- Do-it-yourself installation of corrugated roofing
- Advantages and disadvantages of a profiled metal roof
- Errors in the organization of roof ventilation
- Arrangement of roof ventilation from corrugated board
- The design and purpose of the cornice overhang
- hip roof ventilation
- Causes of roof damage from corrugated board
- Ways to arrange ventilation
- Aerators
- Ventilated cornice
- dormer window
- How to bring a pipe through a roof from corrugated board
- Height of ventilation shafts according to SNiP
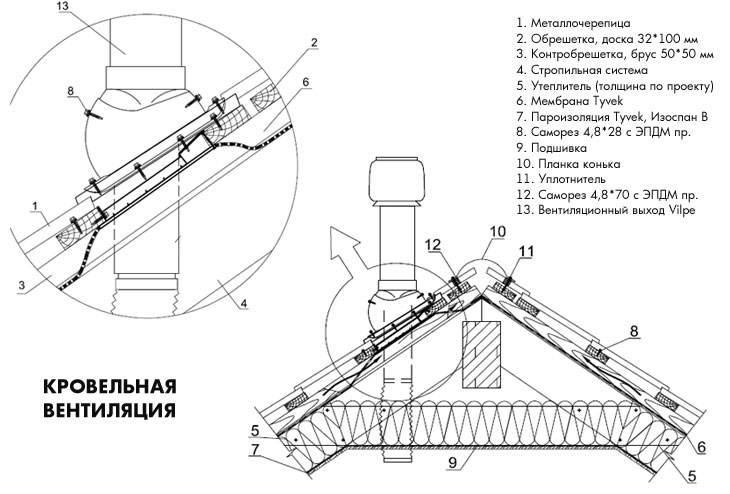
- How to properly install a ridge for corrugated board on the roof?
- Roof aerators
- Installation of aerators on a flat roof
- Video: do-it-yourself installation of an aerator on a two-layer soft roof, part 1
- Video: installation of an aerator on a two-layer soft roof, part 2
- Installation of aerators on metal tiles and corrugated board
Do-it-yourself installation of corrugated roofing
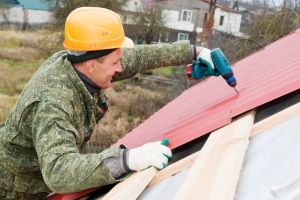 Covering the roof with corrugated board can be done even by a beginner in the construction business, subject to the installation requirements.
First of all, it is important to follow the instructions for the material purchased for the arrangement of the roof. In addition, the choice of high-quality and certified material plays a big role in the quality of the future coating.
In addition, the choice of high-quality and certified material plays a big role in the quality of the future coating.
Mandatory stages of preparing the roof for laying the roofing profiled sheet:
- correct and mandatory laying of the waterproofing layer;
- arrangement of ventilation by imposing rails on the waterproofing layer;
- flooring from boards on both sides of the gutter at a distance of about 60 cm under the valley plank on a crate with an overlap of 20 cm at the valley boards;
- installation of a cornice strip, while the waterproofing layer should be higher.
Routing
Depending on the roof structure, corrugated sheets are laid:
- with a rectangular sloping roof. Installation of corrugated board on the roof is carried out from the lower corners of the roof. Lay several (2-3 pieces) sheets in the first row, securing them with one self-tapping screw. Then they mount the second row - 1-2 sheets of corrugated board. The rows are aligned along the eaves and fixed thoroughly;
- with a triangular shape of the roof or a trapezoidal roof, the sheets of corrugated board are attached to both sides of the guide from the edge of the ridge perpendicular to the cornice strip.
Installation of additional elements
Fastening of corrugated board elements should be carried out in the following order:
- the first sheet is laid in the lower corner of the roof, taking into account the overhang (with a wave depth of up to 10 mm, the length of the overhang should be no more than 100 mm, in other cases, the length of the overhang should not be less than 200 mm);
- the following sheets are laid parallel to the cornice with an overlap of no more than two waves;
- the second row of roofing sheets is laid by applying a transverse overlap (about 20 cm) to the bottom row. Per square meter of corrugated board, from 6 to 8 self-tapping screws are required.
Next, the installation of end and ridge trims is carried out. The installation of the wind bar is carried out from the side of the hinged part to the ridge. The missing length is increased by overlapping the planks, and the excess is cut off.Thus, one of the waves of the sheet is covered with a plank. The bar is attached with self-tapping screws to both the end board and the corrugated sheets. At a low wave height of the sheets, a sealant is placed between the roofing material and the elements of the ridge.
Installing the wind bar
NOTE!
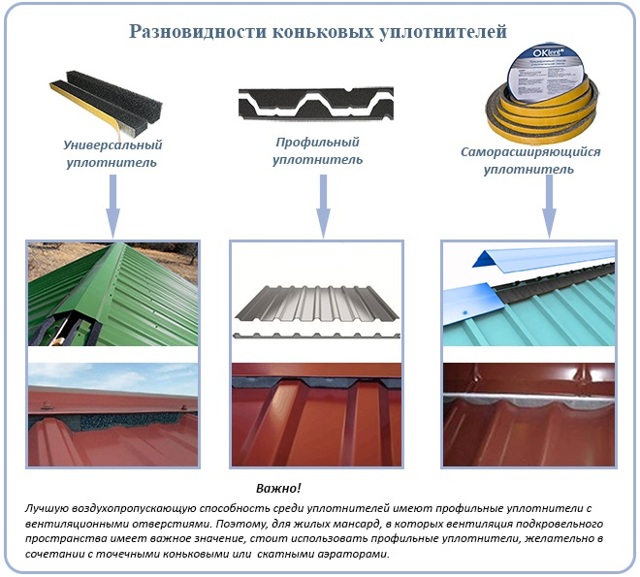
When installing ridge elements, the overlap must be at least 10 cm. The step of the slats must correspond to a length of 30 cm.
With a sloping roof, it is better to lay a longitudinal seal. With a steep steep slope - transverse
The installation of the roof with the wall is carried out using a ridge seal, which is mounted between the butt plate and the upper edge of the roofing profiled sheet. With a sloping roof, it is better to lay a longitudinal seal. With a steep steep slope - transverse.


If you follow the sequence of steps for installing roofing corrugated board, you can independently cover the roof with high quality do-it-yourself corrugated board.
Advantages and disadvantages of a profiled metal roof
Information about the advantages and disadvantages of this roofing material must be familiarized not only in order to make the right choice, but also in order to imagine what can be expected from it during operation.
So, the positive qualities of corrugated board include the following:
- The minimum service life of corrugated roofing, when it is installed in accordance with the requirements of the technology, is 13-15 years, which is consistent with the cost of the material.
- The profiled roofing metal sheet does not have a large mass, which facilitates its transportation, carrying, lifting to a height, flooring, leveling and fixing on the rafter system.
- The neat look of the material can transform any structure, and the variety of colors can give the roof the necessary individuality.
- Qualitatively laid corrugated board perfectly copes with its main task - protecting the house from precipitation and wind. It is waterproof, and the wave profile contributes to excellent drainage of water from the roof. In addition, in some models of corrugated board, the manufacturer provides a capillary groove or a drain channel located along the edges of the sheet and designed for high-quality removal of precipitation and melt water that enters between adjacent sheets of roofing material. This type of corrugated board is especially suitable for roofs with a slight slope.
Even if a small amount of water leaks between the sheets, it will be diverted due to such a drain groove
Decking is an environmentally friendly material, which is important for residential buildings.
Profiled sheets are produced in lengths up to 12 meters, which allows them to be ordered for pitched roofs of almost any length, in order to be installed without horizontal joints.
The disadvantages of corrugated board include the following features:
- The metal has a high thermal conductivity, and therefore, the thermal insulation qualities of such a roof can be safely assessed as "none". In the attic it will be cold in winter and incredible heat from direct sunlight in summer.All this means that in order to achieve a normal temperature balance, it is recommended to use insulating material in combination with a metal coating. This factor will inevitably increase the cost of arranging the roof of the house.
- Metal, especially one that has a small thickness and is used for the manufacture of both corrugated board and metal tiles, at high wind speeds, reaching up to 15 m / s, can resonate and emit ultrasound, which negatively affects the psychological state of a person. Therefore, in areas with frequent windy weather, it is better not to use metal roofing, preferring heavier coatings that do not give such a reaction to the wind.
- Any metal does not have the property of sound insulation, so the sound of raindrops beating on the roof, and even more so - hail, will be clearly heard in the house. But in the event that the roof is insulated, the thermal insulation material will simultaneously serve as an effective barrier against noise penetration into the premises.
Roofing sandwich panel and two sheets of corrugated board with a layer of thermal insulation between them
To avoid the mentioned negative, sometimes special sandwich panels are used for roofing. They consist of two sheets of profiled metal, with a layer of thermal insulation material placed between them. High-density mineral basalt wool, polyurethane foam or expanded polystyrene can be used as insulation. However, such material requires a completely different technological approach during installation, and will not be considered within the framework of this publication.
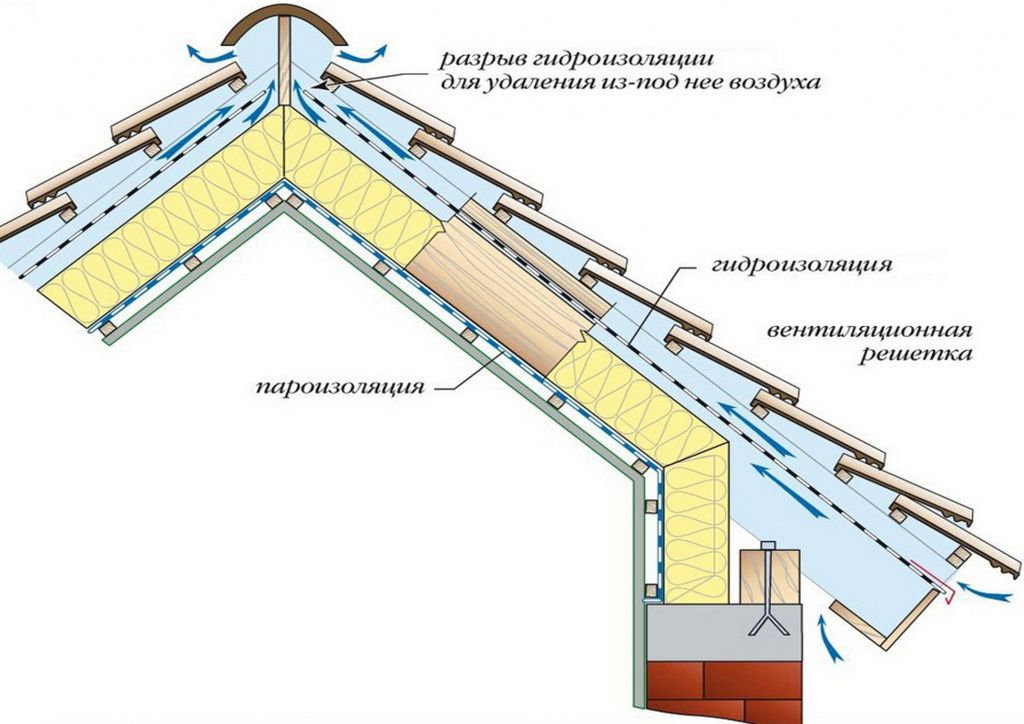
Errors in the organization of roof ventilation
Often, installed roof ventilation does not work or does not work at full capacity, which leads to the formation of condensate and frost from inside the attic.
There are several reasons for this:
- When laying the “roofing cake” layer by layer, no gap is left between its individual components, or it is too small. As a result, the air cannot circulate inside, and the condensate that accumulates there does not disappear.
- When installing the roof, instead of vapor-permeable membranes, completely sealed materials - polyethylene, etc. - were used as waterproofing. As a result, moisture cannot enter the ventilation gaps, remaining inside the insulation.
- Vapor barrier membranes do not fit tightly. Condensation and external dampness penetrate through the joints into the heat-insulating layer.

As a result of such violations of technology, due to the accumulation of moisture, not only the elements of the “roofing pie” are damaged, but also the truss system of the house is also rendered unusable over time.
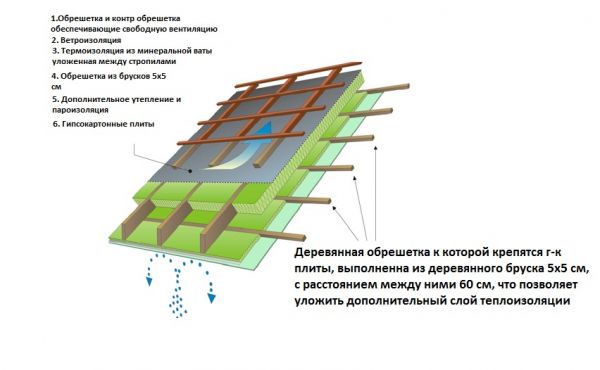
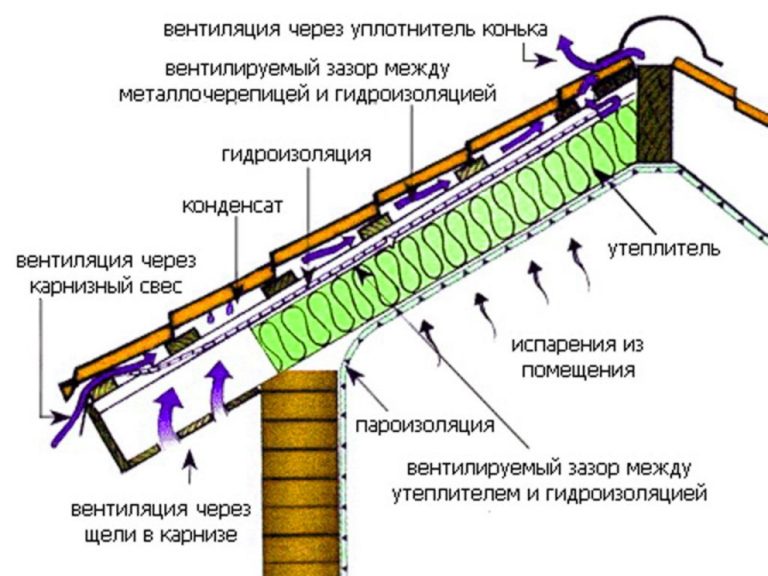
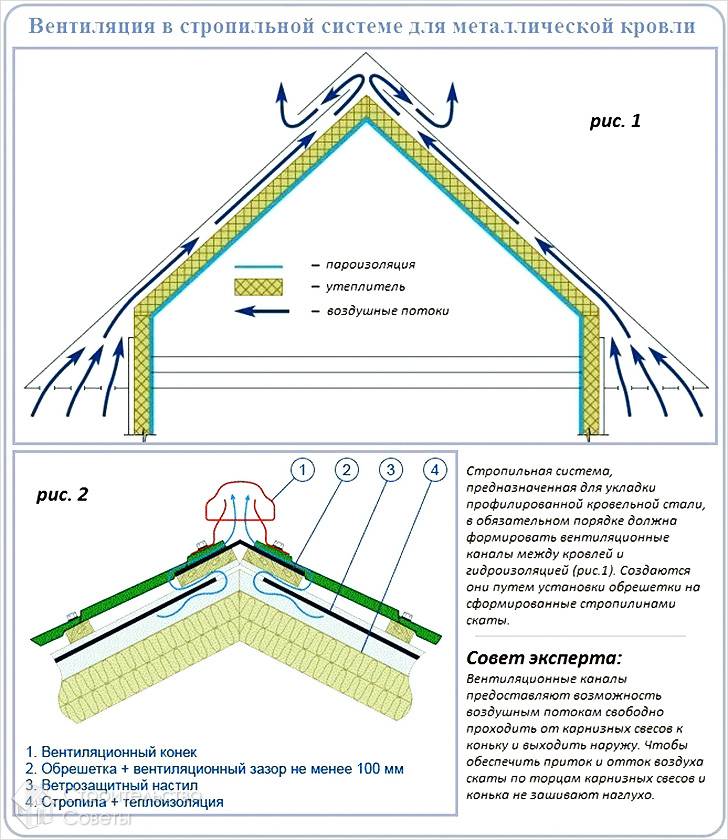
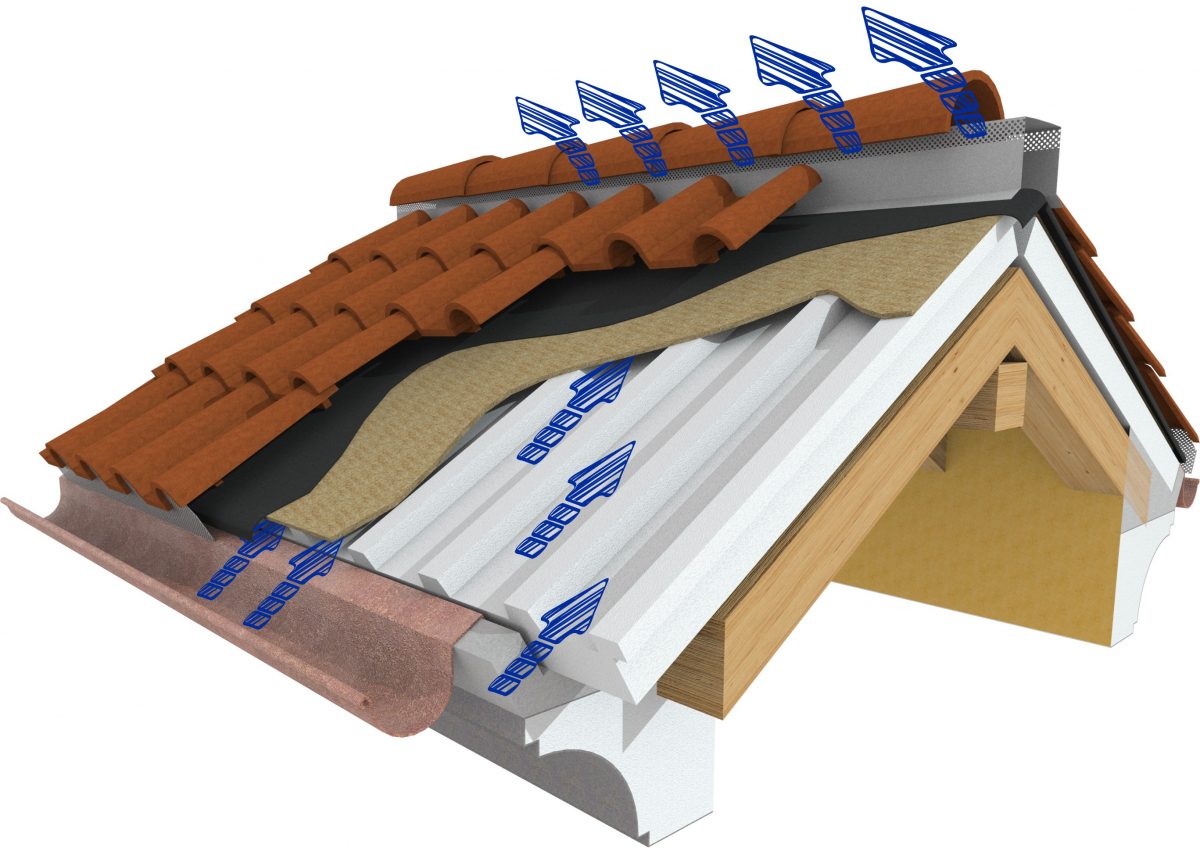
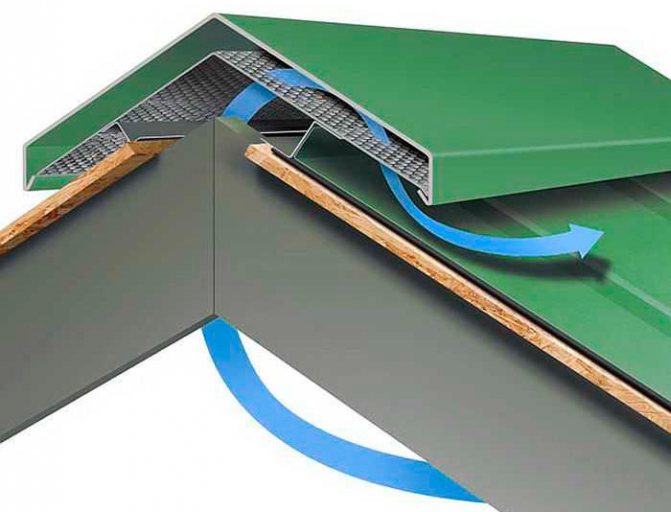
Arrangement of roof ventilation from corrugated board
Metal roofs are very popular among private developers. Lightweight and durable roofing material is most often represented by corrugated board and metal tiles. In addition to many positive qualities, the metal has one drawback - it condenses when the temperature drops. Therefore, without ventilation of the corrugated roof, the roof will simply rot.
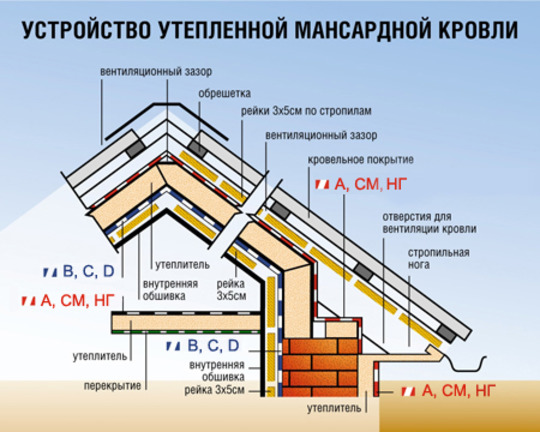
Roofs are covered with corrugated board, the length of the slopes of which is not more than 12 m. The arrangement of under-roof ventilation depends on the layers of the cake. For cold attics, it is enough to lay only a waterproofing layer under the corrugated board. Even an ordinary roofing material is suitable for this. Warm attics provide for laying in a thermal insulation pie.In this case, waterproofing will protect it from above, and vapor barrier from below. The ventilation gap is provided by a counter-lattice made of wooden beams.
Aerators are installed on high sections of the roof. For them, similarly, you will have to cut a hole in the roofing, only on a soft roof it is allowed to glue the aerator with a sealant, and the element is screwed to the corrugated board with self-tapping screws
The ventilation outlet is important to seal well. To do this, use special rubber linings and sealant.
The video shows the installation of a through-hole ventilation unit:


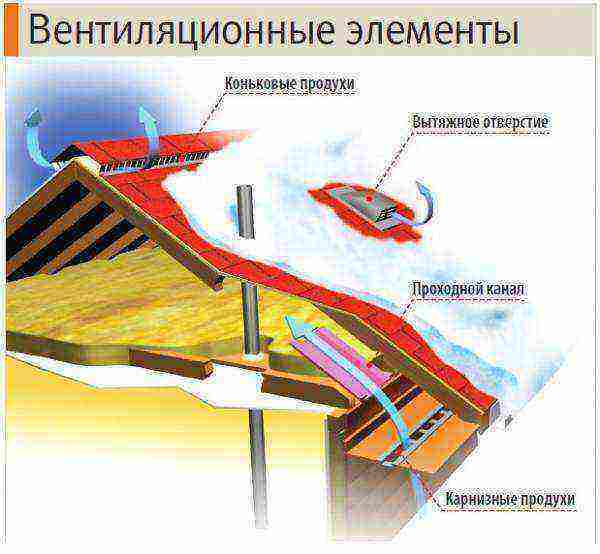
The design and purpose of the cornice overhang
The main function of the structure is to protect against precipitation that flows from the roof. They play a special role. All the liquid flowing from the roof moves along the slope and enters the gutter of the drain or immediately to the ground. In this case, the better the liquid will be removed from the walls, the less they will get wet even with significant winds.
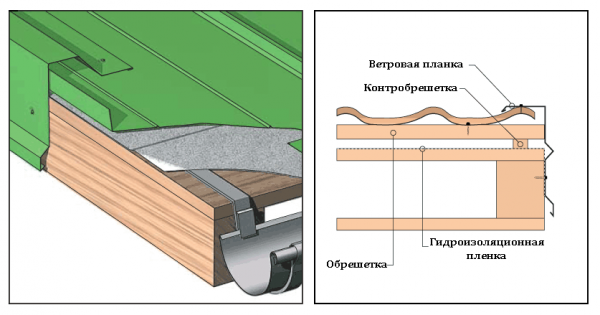
Cornices are formed by the protrusions of the bases of the rafters behind the walls of the structure. According to generally accepted recommendations, it is believed that the optimal distance of the eaves is 50-70 cm. If the roof slopes are steep, then this length is reduced, but in this case the walls may get wet during oblique rain.
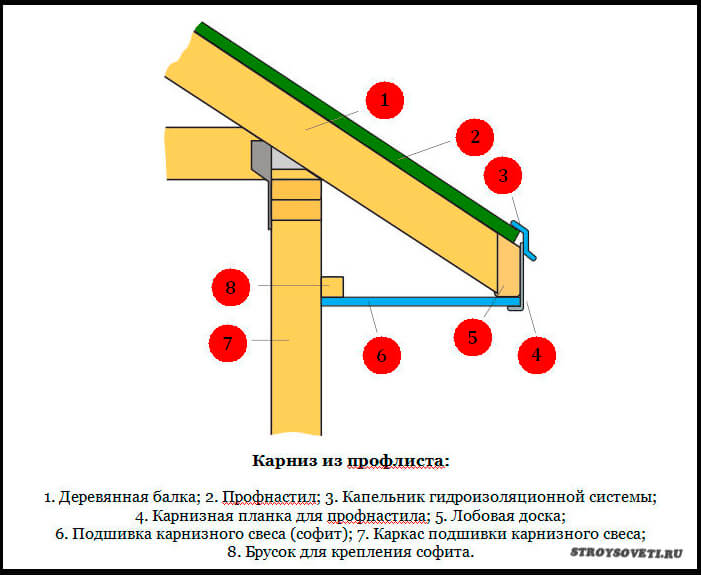
Almost no load is applied to the cornice overhang. Because of this, most often not the rafters themselves are produced, but an additional element - “fillies”. They are pieces of boards attached to the rafters. Moreover, it is allowed to select their cross section smaller than the rafter. The mares are connected with the help of crate bars. On their end side, a frontal board is knocked out. Subsequently, a cornice strip will be fixed to it.Upon completion of the installation of the cornice strips, the construction of the frame part for hemming the roof with corrugated board is considered completed.
Eaves eaves are important elements in the protection of roofing elements. It is they who ensure the safety of parts from the wood of overhangs from the influence of moisture and allows for the removal of emerging moisture into the gutters. A membrane waterproofing must be installed on top of the plank. Otherwise, the condensate formed inside will not enter the drainage system.
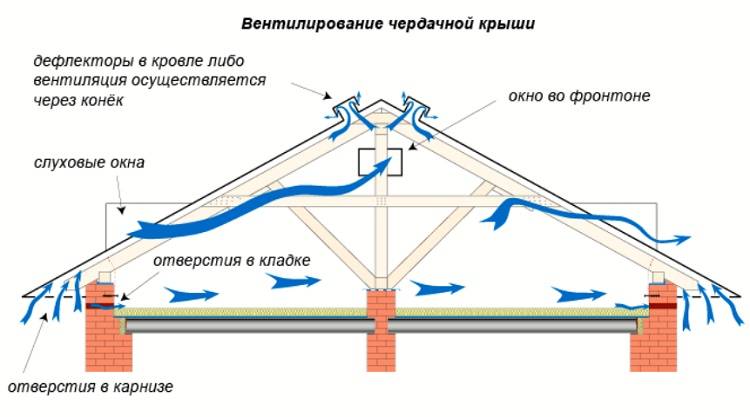
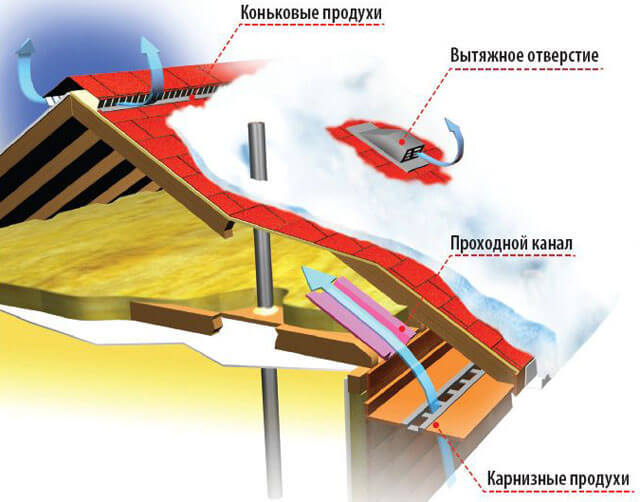
In addition to protective functions from high humidity, cornices are necessary for ventilation of under-roof spaces. Ventilation is necessary both for rooms with attics and for spaces that are not heated.
The air rising from the ground must easily penetrate the eaves and take the resulting moisture and exit at the ridge.

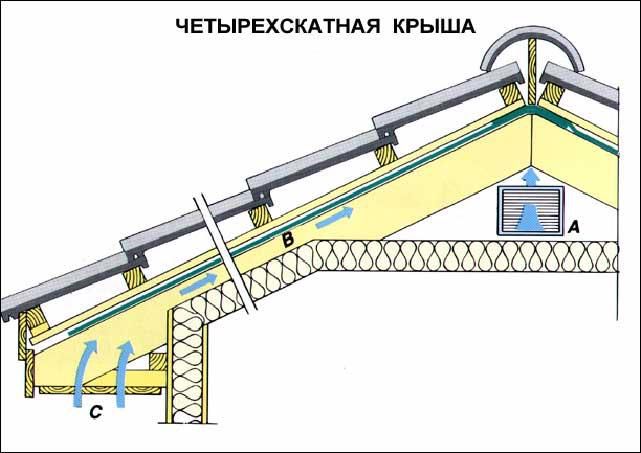
hip roof ventilation
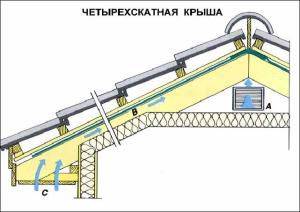 When constructing the ventilation of the roof of the hip structure, they are guided by the principles already outlined above. This is a natural ventilation method, in which air enters the under-roof space from under the eaves and exits near the ridge.
Therefore, special attention should be paid to the wind filing of the cornices. If the cornice is hemmed with wood, gaps are left between the boards
It is more convenient to make a filing from ready-made perforated plastic (soffits). If the filing is already ready, and ventilation is not provided, openings are cut into which gratings are mounted for forced ventilation of the hip roof. The gratings are 5 cm in diameter, they are covered with a fine mesh. Between the gratings, gaps of no more than 0.8 meters are left. On sale there are models of various colors and shapes.
Causes of roof damage from corrugated board
Unlike a folded roof that is simpler in structure, a corrugated roof can be damaged for a number of reasons. After all, its main drawback is a huge number of fasteners!
Usually the owners of houses with a small roof slope suffer from leaks and damp roofs. It is clear that snow lingers more on such a roof, and then melt water. And even a downpour exerts more water pressure than on a more pitched roof. And then what about a flat roof?
The second point is the amount of overlap of the sheets. It is not for nothing that there are official building recommendations for the arrangement of roofs made of this material: a slope in the range of 15-30 ° and an overlap in length from 100 mm to 200 mm, depending on the slope. The width is one wave. But the roofs, the angle of inclination of which is less than 15 °, are mounted with the mandatory use of sealing compounds. And if at least one of these requirements is violated, leaks are guaranteed in the first thaw.
And here's what else happens. Unprofessional builders, accidentally and regularly missing the crate with a puncher (and you only need to fasten the screws to it), the resulting extra holes were simply covered with sealant - with what was at hand. Naturally, already in the first year such "flaws" will flow. A modern ecobit can solve this problem - special patches that need to be cut out and heated with a hair dryer. And then paint over the color of the roof - as easy as shelling pears.
Especially often mechanical cleaning of snow from a profiled sheet damages a roof: a mount flies out, small cracks appear where there is already rust, scratches appear.Scratches themselves are dangerous in that they open access to melt and rain water directly to the metal sheets, now bypassing a special protective coating. In less than two months, ugly rusty streaks will go on the new roof, which will entail even more problems.
So, one of the most common causes of roof leaks is rust. Moreover, for a roof from a profiled sheet, this problem is especially acute - much more acute than with any other type of metal roof.


Why is that? For example, the same seam is less susceptible to corrosion processes due to the fact that it practically does not contain fasteners in the form of self-tapping screws or nails - its joints simply bend. And the snow rolls off of it much easier. But the roofing of corrugated board is 18-20 pieces of self-tapping screws per square meter! It is clear that no matter how tightly you drive them, no matter what rubber nozzles you use, all the same, any holes in the roof are always at increased risk.
Basically, the process of fighting rust looks like this: we clean the corroded places with a metal brush, process them with special tools for better soldering and cover them with waterproof paint. If the damage is already large, we simply change individual sheets, which, fortunately, is not difficult to do on a corrugated roof.
The most common defect in a metal profile roof in terms of leaks is the gap under the ridge. Whatever one may say, profiled sheets do not fit snugly to the ridge, even if a substrate is used. And over time, due to seasonal temperature expansions and contractions, a through hole forms in these places.
Simplest way to deal with this problem - clean with sandpaper, degrease well and apply a patch.
Another problem with metal roofing is low-quality material. The fact is that the modern construction market is simply replete with low-quality profiled sheets that are sold cheaply.
You look closely: they are durable, smooth to the touch, and they are cheaper. Why not cover such a roof? How much does she need, especially since your slope angle is well over 30 °? And why overpay if a person sells “directly from the manufacturer”, without heating up on intermediaries? Yes, such a roof may easily endure heavy rains, but not snow or minor damage.
Oddly enough, quite often the owners of a new corrugated roof forget that a month after the installation of the roof, all the screws in it need to be additionally tightened. And so the construction team did its job, handed over the object - and to another. As a result, during the active rainy season, the first leaks appear in the house. Both embarrassing and detrimental
Pay attention to this!
That is why such defects in the corrugated roof should be corrected as soon as you notice them.
Ways to arrange ventilation
Roof ventilation can be achieved in a variety of ways. The choice of arrangement option depends on the architectural decision of the designer.
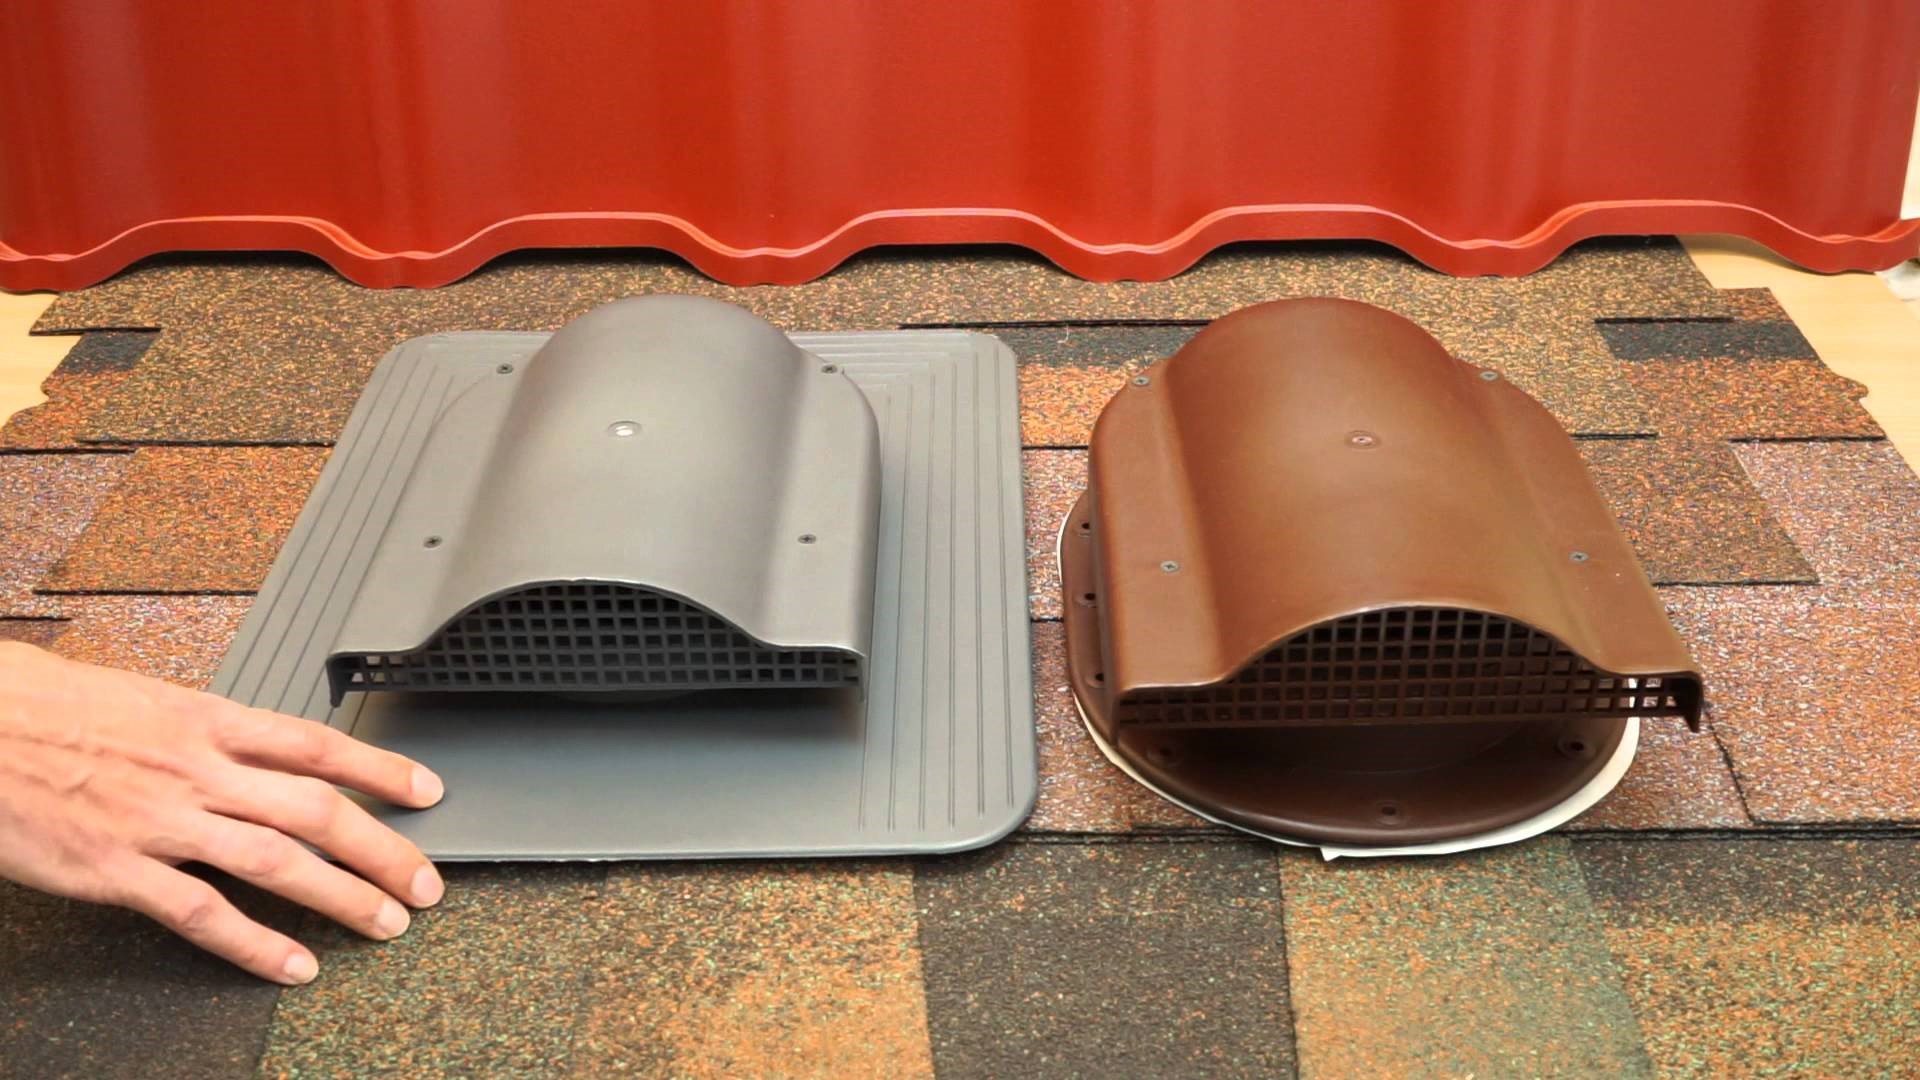
Aerators
Installing roof aerators is the most common option. The aerator is a part of a small piece of pipe with a flat base for installation on the surface and an umbrella that covers the upper opening of the pipe from precipitation. A protective filter is placed inside.

roof with aerators
Aerators can be installed according to various schemes.The location of these devices depends on the type of roof and the degree of humidity in the region. Usually aerators are located near the ridge. You can install them point by point. Experts believe that the most effective is the installation of a continuous gutter of aerators, stretched along the entire edge of the roof. It is advisable to install ventilation of this type simultaneously with the arrangement of the ventilation system of the entire building.
The advantage of aerators is that they do not interfere with the design of the house. In addition, when using them, the roofing should not be airtight, that is, it can be laid without the use of special tape and mounting foam.
Ventilated cornice
The use of a ventilated eaves provides air access to the under-roof space. As a result, the roof is well ventilated, and the entire ventilation scheme of the building works better. The eaves for ventilation of the roof can be equipped in different ways:


-
usage spotlights for filing a roof;
-
installation ventilation grilles;
-
installation over cornice overhangs of special elements with products.

Ventilation system with ventilated eaves
Insulating materials are not laid at the installation sites of the cornice ventilation channels. To protect them from precipitation, elements of the drainage system and snow retainers are used.
dormer window
Ventilation with a dormer window is also a fairly common option. Ventilation of the roof of the house in this way, among other things, improves the aesthetics of the facades
The shape of the windows can be different, and it is important at the design stage to think over such a type of windows that will correspond to the general style of the building.
Dormer windows are roof elements that are quite expensive to build. But they have their own undeniable advantages - high efficiency as a ventilation system and aesthetic appearance.

Mansard roof with dormers
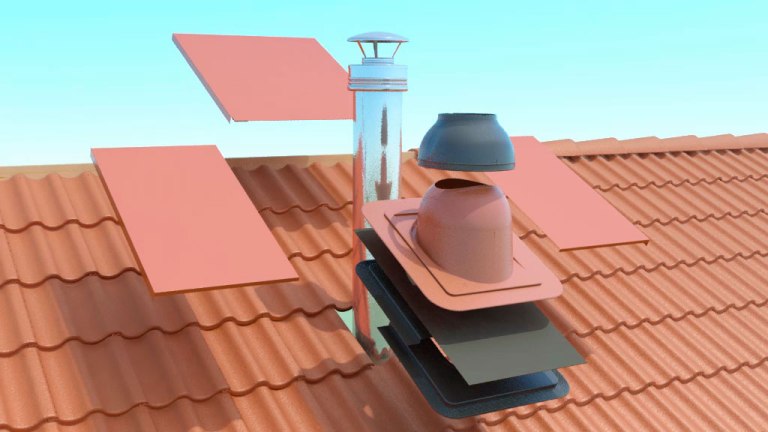
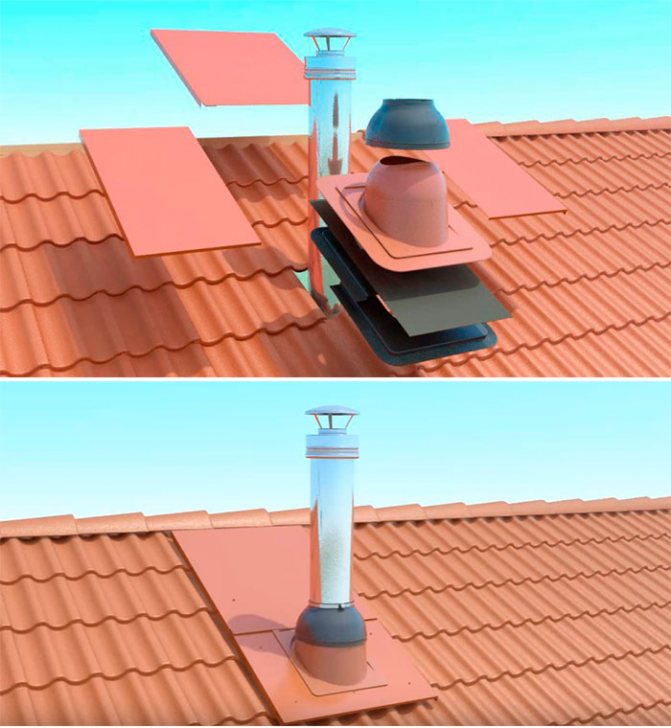
How to bring a pipe through a roof from corrugated board
Any home heating system, with the exception of electric, involves the output of chimneys to the roof to release combustion products into the atmosphere. Consider how to bring the chimney through the corrugated board.
- First you need to make sure that the chimney is located correctly - the exit point should be in the darkened north side, where the sun does not get much.
- The shape of the pipe and the size of its section are chosen, taking into account the climatic conditions of the area, the relief and the temperature of the outlet gases.
- Then they are determined with the height of the pipe according to SNiP.
- They make the pipe themselves, or buy it ready-made and carry out the installation.
Height of ventilation shafts according to SNiP
When calculating the height of ventilation shafts, take into account:
- elevation of the pipe relative to the highest point of the roof and adjacent buildings;
- the total length of the smoke channel;
- head size;
- design height.
Requirements and norms for SNiP:
- for a flat roof, the minimum height is 1 m;
- if the chimney is located at a distance of less than 1.5 m from the ridge, its height should be 0.5 m more than the top point of the roof;
- provided that the chimney is located within 1.5–3 m from the ridge, the pipe head should be located at the level of the roof break;
-
when the chimney is installed at a distance of more than 3 m from the ridge, its upper part must be on a conditional line drawn from the ridge along the slope at an angle of 10o.
How to properly install a ridge for corrugated board on the roof?
The ridge is an indispensable attribute of any pitched roof. This is the name of the joint of any two horizontal or inclined edges of the planes of the pitched roof. The correct execution of this element is very important for the reliability of the entire roof.
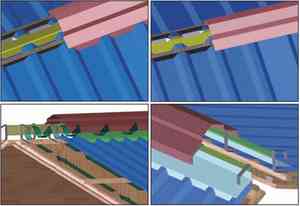
The tightness of the roof slopes is ensured by a tight fit of the sheets of corrugated board to each other. To do this, when laying sheets of corrugated board at vertical and horizontal joints, an overlap is performed. Often, for greater tightness, special capillary grooves are made along the vertical edges of the sheet. At the same time, horizontal joints of profiled sheets with small roof slopes are sealed with a special roofing sealant.
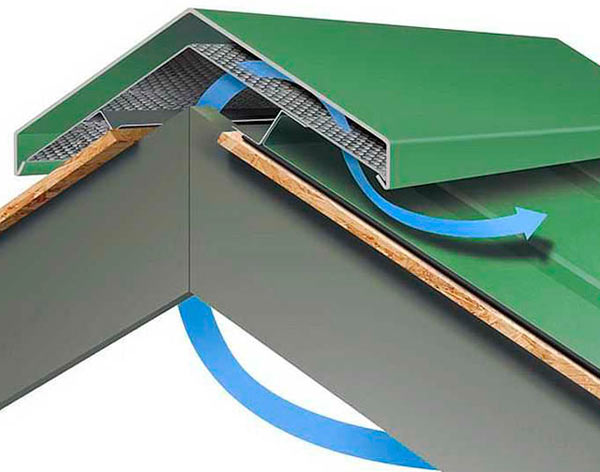


If it is quite simple to prevent moisture from entering the under-roof space on the plane of the slopes, then only a special ridge element for corrugated board can protect the roof from rain splashes at the junction of two inclined surfaces. This article is devoted to what it is and how to install it.
Article title (click to open)
Roof aerators
Ventilation aerators are special devices for ventilating the under-roof space and removing moisture and water vapor to the outside. They are used on flat roofs, preventing swelling of the covering roll material due to temperature changes, and on pitched roofs for effective ventilation and condensate removal.
Vanes (aerators) are produced in different sizes and designs.They are considered the most effective elements of ventilation systems. On a flat roof, they are installed evenly over the entire surface at the joints of the plates. On pitched structures, they are located closer to the ridge (0.6 m from it) or in the places where the valleys pass (on complex roofs).
On pitched roofs, aerators are installed closer to the ridge or in places where the roof is broken.
The material for the manufacture is stainless steel AISI 316 or durable polypropylene, so they can withstand a wide temperature range from -40 to + 90 ° C.
Installation of aerators on a flat roof
With a two-layer coating with rolled materials, aerators are installed in the lower layer:
- A hole is cut through the screed and layers of insulation along the diameter of the aerator tube.
- They fall asleep with gravel and attach the aerator to the hot mastic.
- After cooling, fix with screws.
- The top layer of the roofing is melted in such a way that the aerator is in the place of overlap (15 cm) of the sheets, the junctions are sealed.
Video: do-it-yourself installation of an aerator on a two-layer soft roof, part 1
In a single-layer flooring, aerators are installed on the screed, making a hole to the vapor barrier. The coating is laid on the skirt of the aerator, hot mastic and a patch are applied on top, overlapping the skirt and going onto the coating by about 15 cm. Then, the aerator is fixed with self-tapping screws, the joint is treated with sealant.
Video: installation of an aerator on a two-layer soft roof, part 2
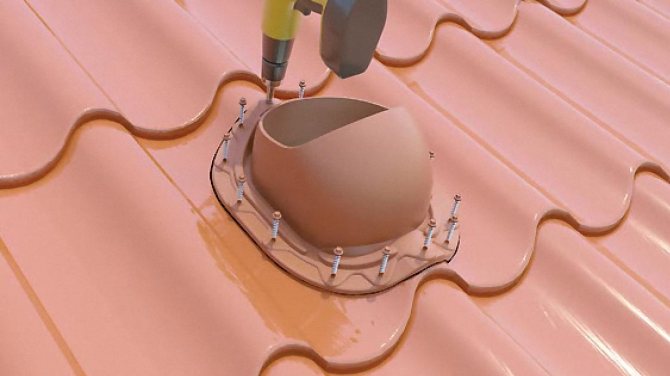
Installation of aerators on metal tiles and corrugated board
The installation of ventilation outlets on roofs made of metal tiles and profiled sheets is the same and is associated with a violation of the roofing, so it must be carried out very carefully so that damaged sheets of covering material do not have to be changed.
- Apply a template (included in the kit) to the installation site, outline and carefully cut a hole along the intended line.
- Strengthen the seal with screws, and apply sealant.
- Install the aerator, fix it with hinges and additional screws.
- From inside the attic, the places where the ventilation pipes pass are puttied with sealant.


