- Dimensions of openings for natural ventilation
- We study the ventilation device in the bathhouse, bastu or other systems, but without ventilation in any way - either we will burn or the bathhouse will rot
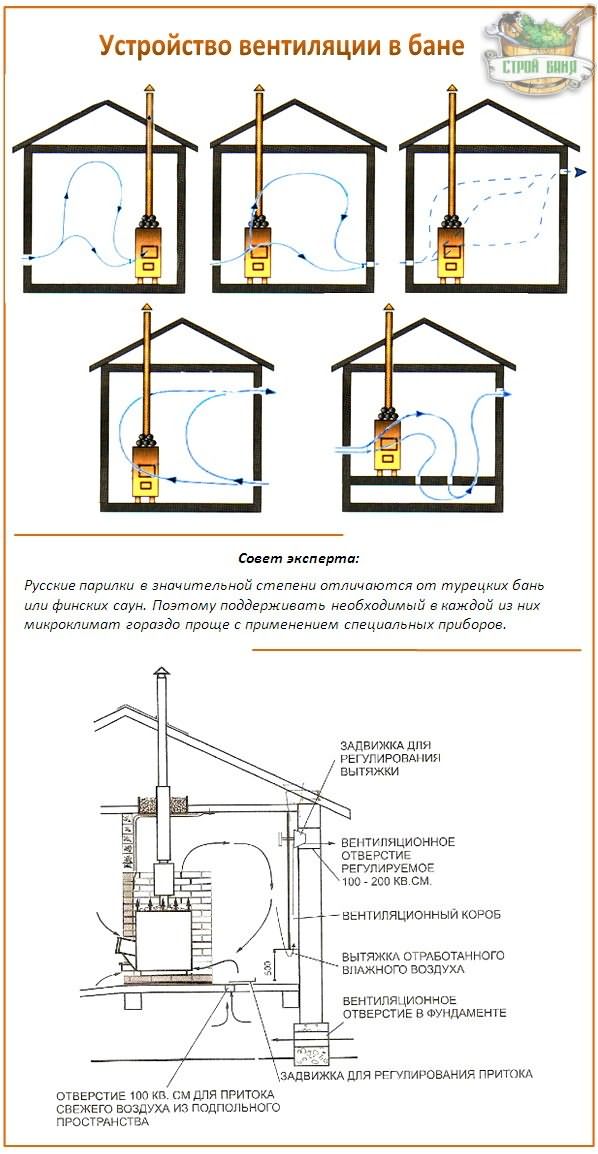
- Bath ventilation device
- Bath ventilation installation guide
- How to make a hole in a log house with a crown
- Additional elements
- How the Russian bath was ventilated
- How to make ventilation with your own hands
- How to choose a ventilation scheme and places for products
- Tools and materials
- Step-by-step ventilation device technology
- Pros and cons of Bastu
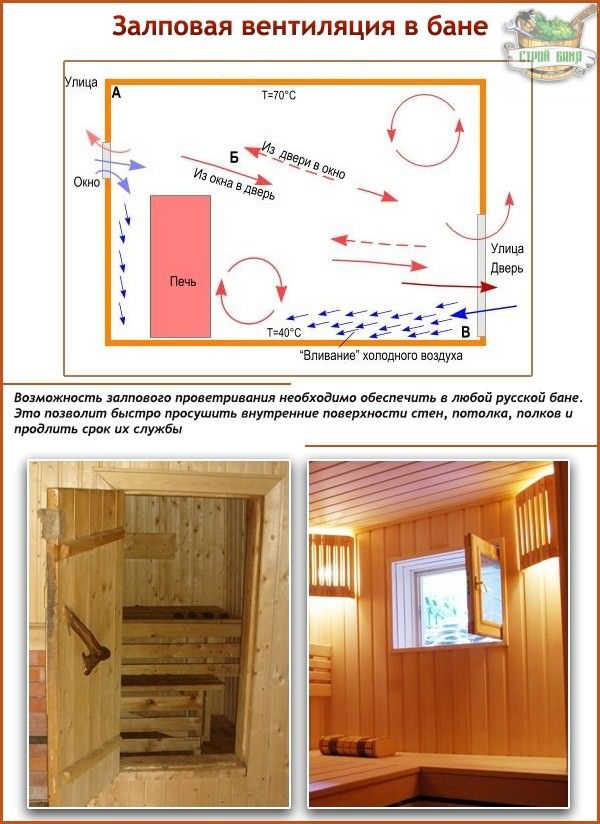
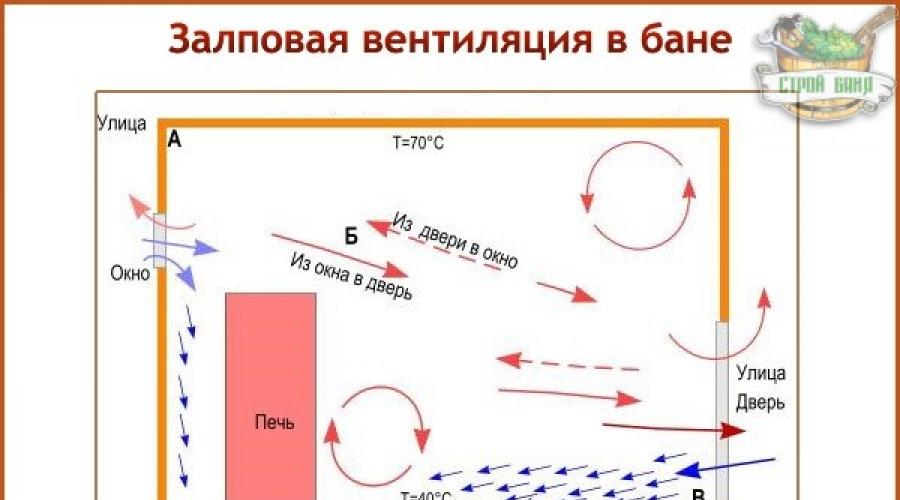
- Ventilation in the bath: scheme
- How to choose?
- How to arrange ventilation in the bath and steam room - calculation of the scheme
- Do you really need ventilation in the bath or can you do without it?
- What is Bastu ventilation?
- Ways to arrange natural ventilation
- Ventilation through the chimney
- Ventilation through vents
Dimensions of openings for natural ventilation
The technology for calculating the dimensions of ventilation openings is indicated in the current regulations. Determining the size of vents for natural ventilation is much more difficult than for forced ventilation - there are too many factors beyond the control of people. The main performance parameter of the ventilation system is the frequency of air changes.For residential premises, the minimum value of the multiplicity is regulated, while taking into account both the temperature in the rooms and the temperature outside. The temperature in residential premises fluctuates within insignificant limits, which simplifies the work of designers.
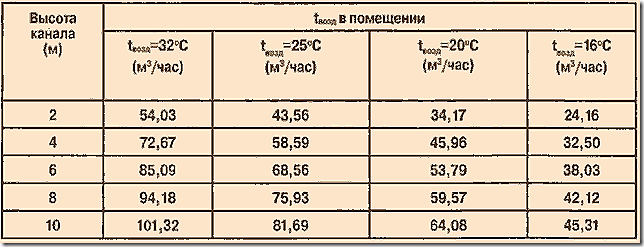
Natural ventilation performance
In pairs, the situation is much more complicated - the temperature and humidity indicators vary over a very wide range. In addition, the rate of arrival / entry of air in different situations may differ significantly. Such preconditions make it virtually impossible to accurately calculate the optimum air exchange rate for natural ventilation.
Can't calculate? And it is not necessary, we recommend using practical experience. And he claims that for most steam rooms it is enough that the area of \u200b\u200bthe products is 200-300 cm2.

Ventilation grill with shutter 280x190 mm
Some bath owners are afraid to suffocate while taking bath procedures due to lack of oxygen. We bring to their attention that one cubic meter of air is enough for one person to breathe for an hour and a half. Calculate the cubic capacity of the steam room and find out how long you can safely steam, the bill goes to tens of hours.
Safe oxygen content for saunas and baths
We study the ventilation device in the bathhouse, bastu or other systems, but without ventilation in any way - either we will burn or the bathhouse will rot
Home page » Ventilation in the bath » We study the ventilation device in the bath, bastu or other systems, but without ventilation in any way - either we will burn or the bath will rot
 Ventilation in the bath is not only comfort, but also an urgent need. It is needed both during and after bath procedures:
In the process, it is important that no one is burned out.The danger of carbon monoxide poisoning is always present - it is the result of incomplete combustion of fuel
Therefore, ventilation is necessary for the safety of people in the bath.
In addition, the air that is inhaled and exhaled becomes “waste”, and it must be removed, replacing it with new, with a greater proportion of oxygen.
You can also regulate the temperature, monitoring the condition of people, with the help of ventilation, especially when you need to do it urgently.
Any stove runs on oxygen (combustion is oxidation), so it needs ventilation. And with a competent device, you can also get fuel economy.
And, finally, drying after, on which the durability of the structure, especially its wooden parts, directly depends. Ventilation can be a good prevention of fungi and decay.
At the same time, bath ventilation is quite complex and diverse in design. Of course, the issue can be reduced to financial investments, but in fact, you just need a good ventilation specialist who will find the best solution in each case. We will consider all the possibilities and features of the ventilation device in the bath.
Bath ventilation device
Components in the bath are selected depending on the type of ventilation:
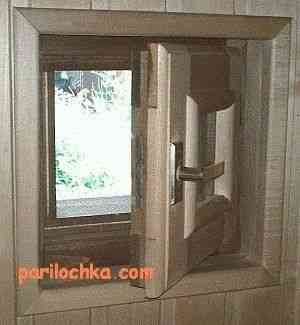
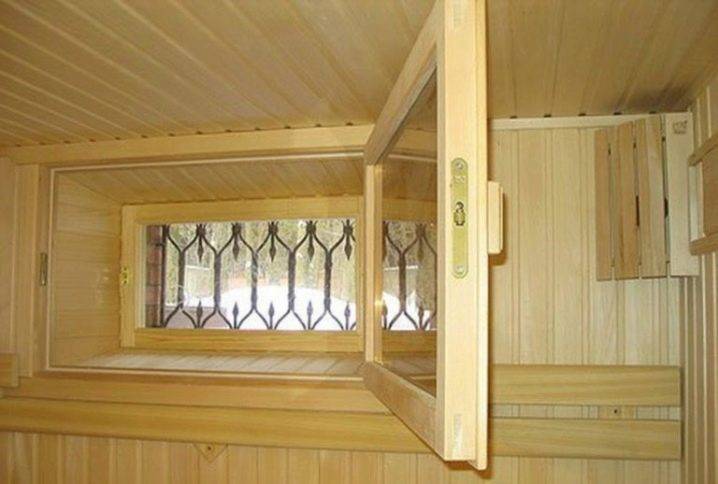
Window.
This is an important element in the bath, not only because of the lighting, but also because after the procedures you can ventilate the steam room with high quality.
But it is important to install it correctly so that there is no depressurization. Otherwise, warm air will not linger for a long time and you will have to raise the temperature more often.
Masters advise installing two windows: one above the shelves (if during the procedure there is too much heat and someone feels bad, then it can be opened to cool the room) and under the shelves (the beds dry out so quickly). The second window should be small and opaque.
It is also important to remember that for safety reasons, windows should open inward. Do not install plastic windows in the steam room, as they can begin to release toxic substances
Only wood can be used.
A well-chosen window will complement the interior of the bath well.
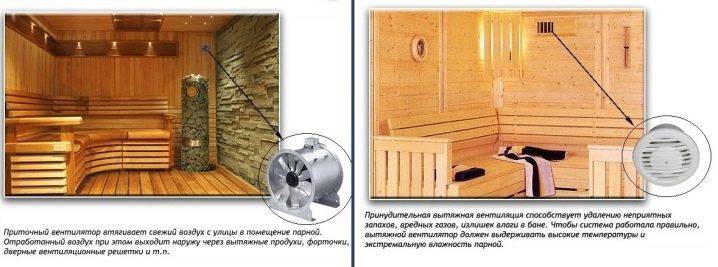
Fan.
To install ventilation, you need to purchase several components: a grill, a valve, a valve, a box, a mosquito net, a thermometer and the fan itself. It is advisable to take the grate from wood, and the mesh from metal.


Thus, they will not let insects or rodents into the room. Corrugated or galvanized pipe can be used as an air duct. Do not use plastic, as it is not suitable for use at high temperatures.
Steam room fan
Bath vent valve.
It must be installed in the supply and exhaust duct. Dimensions and shape are selected depending on the interior. There are two types of valves: forced ventilation and infiltration. Both work on the same principle and differ little in appearance. They are easy to install by shortening them to the thickness of the wall in the steam room. On the outside there are blinds that will not let rain or snow into the ventilation.
On the inside there is a cap and a membrane for better sound insulation and heat retention. There is also a mosquito net inside.
The valve is installed in a load-bearing wall and it is important to ensure that it does not lead to an outdoor toilet or garbage cans.Otherwise, all this smell will be indoors.
The valve must be installed in a load-bearing wall
Vents and air in the bath.
Vents are installed at a distance of 2m. There are three types of vents: round, square and rectangular and are located on the roof.
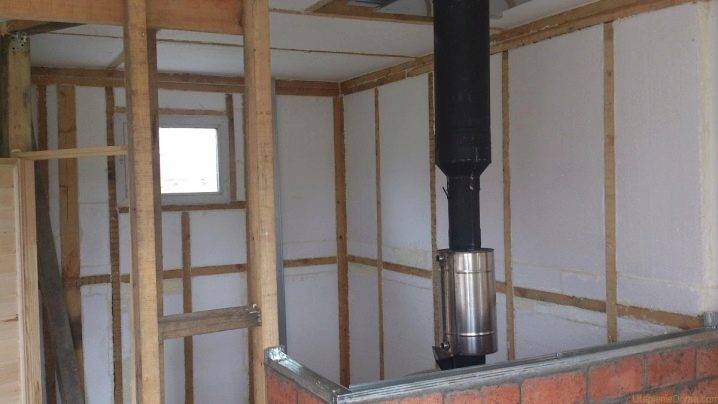
Hood.
If the bath is located along with the house, then the hood is installed so that the air goes in the opposite direction from the dwelling. The hood cannot be installed under the ceiling, as in this case there will be a large draft.
The hood should not be directed towards the house.
In order for the steam room to function properly, it is necessary to install all the components. If there is at least something, then there is a high probability of a fire or that someone in the process will become unwell
It is also important to remember that materials must be selected in accordance with safety regulations.
Windows in the bath must be installed so that they open inward
Bath ventilation installation guide
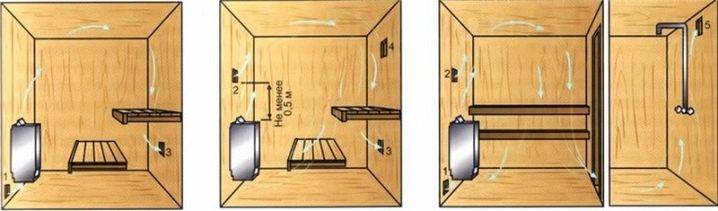
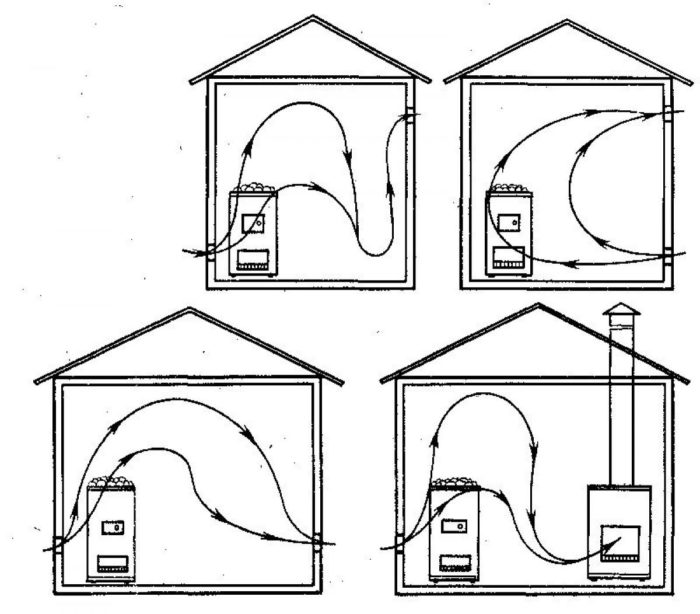
There are several simple ways to organize effective air exchange in the bath. Study each of them and choose the best one for your steam room.
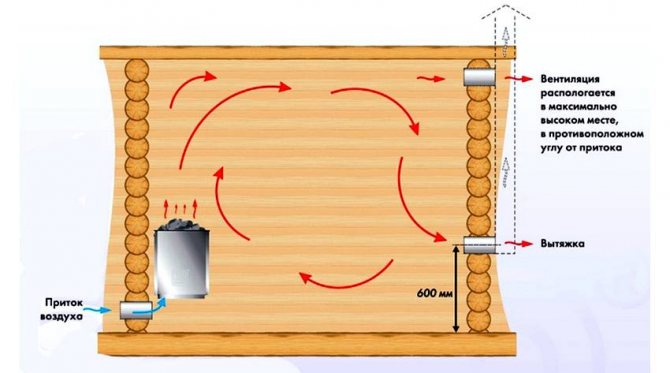
First way. Create an opening for fresh air. It should be behind the stove, about half a meter from the floor. Make a hole for exhaust air from the side opposite to the inlet, at a height of about 30 cm from the floor level. Install a fan in the outlet.
Create an opening for fresh air
However, there is no need to be too zealous either. Try to make holes at the recommended height, assuch values are the most optimal. Openings are recommended to be closed with ventilation grilles.
The second way. With this air exchange, both vents will be on the same wall. Work will be carried out with a wall parallel to the stove. The inlet duct is created at a level of about 30 cm from the floor, the exhaust duct is at the same distance from the ceiling of the bath. The exhaust opening is equipped with a fan. Close open channels with ventilation grilles.

Ventilation
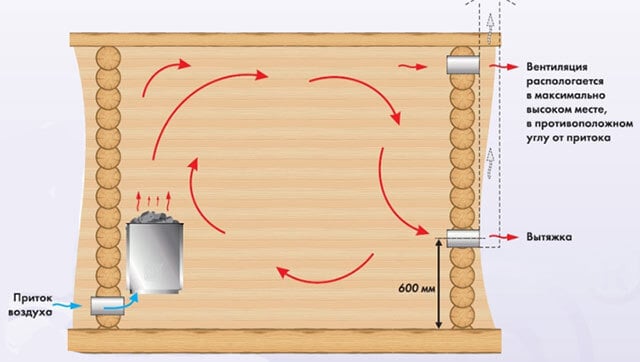
The third way. Make a hole behind the sauna stove for air to enter. Position the intake duct about 20 cm from the floor surface. The exhaust channel is made at approximately the same height, but in the opposite wall. The exhaust opening is equipped with a fan. Close open channels with ventilation grilles.
Fourth way. This air exchange option is great for baths, the flooring of which is laid with slots to drain water. Make an inlet behind the stove unit at a distance of about 30 cm from the floor surface. An exhaust hole is not made in the case of such ventilation - the exhaust air will leave the bath through the cracks in the floor covering, and only after that it will be discharged to the street through a common ventilation pipe.


Ventilated floors in the bath
Fifth way. Such ventilation is ideal for baths with a constantly working furnace unit. Install the inlet channel opposite the stove, stepping back about 30 cm from the floor. The function of the hood will be performed by the oven.
You can also make the holes yourself. Brick walls can be easily passed with a puncher, and log walls with any tool suitable for this, for example, wood drill. It is recommended to put plastic pipes into the finished holes. Don't forget about protective ventilation grilles. In the future, you are unlikely to be happy with uninvited guests in the form of rodents.
Successful work!
How to make a hole in a log house with a crown
If you do not want to make holes for ventilation by hand, you can drill them with a special metal crown. They are sold in stores and are inexpensive. The only problem is that the crown requires a powerful low-speed drill or a hand-held drilling machine, ordinary drills can quickly fail due to a heavy load. Another limitation is that the maximum diameter of crowns is rarely more than 120 mm. But for most baths, small volumes of this size are enough.
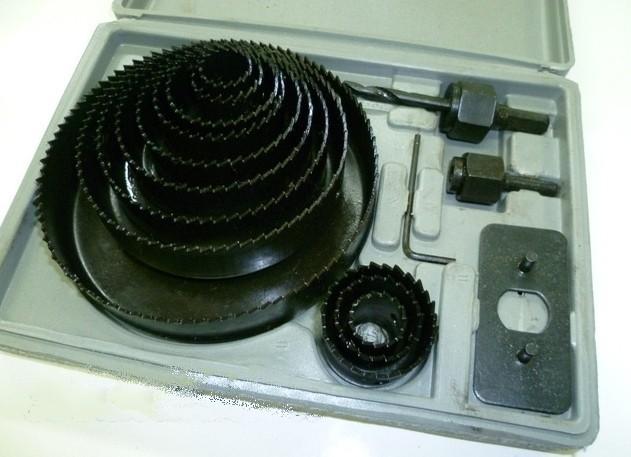
Crowns of various diameters

Hole drill for wood
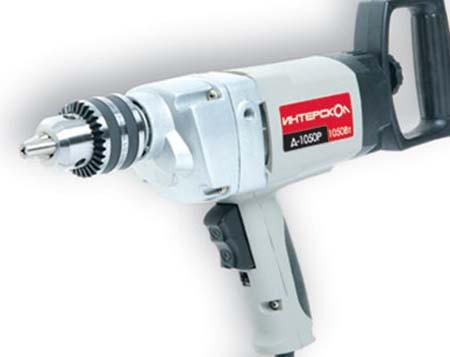
Low speed electric drill
Step 1. Select a drill bit of a suitable diameter and secure it in the chuck. Mark the drilling site.
Step 2. Be sure to lubricate the bit with machine oil to lighten the cutting force. Lubrication should be repeated periodically. Once the bit is about two-thirds deep, stop drilling, remove the bit and re-lubricate its inner and outer surfaces.
Step 3. Mark the center of the hole with any thin drill. Insert a crown into a shallow hole and start drilling the beam.
Step 4. Drill as long as the crown height allows. Closely monitor the operation of the electric tool, do not allow heavy loads. Loads are regulated by the force of pressing the crown to the bar.
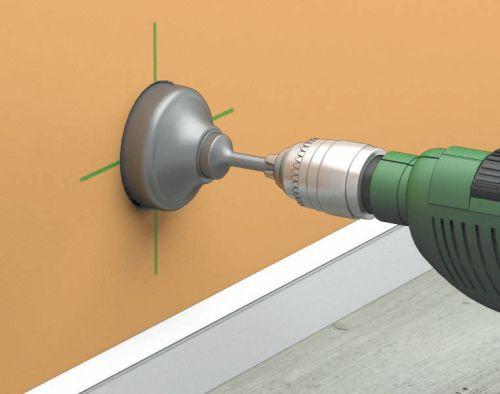
Drilling the wall according to the markup
Step 5. The crown does not work any further - take it out and gradually remove the cut wood with a chisel or chisel.It is removed quickly, start gradually chipping holes in the corners. Don't cut the log across the grain with the chisel, only chip it along the grain, it's much easier to do the job.

Round hole in a log
Repeat the steps until the hole is through. If the timber is so thick that the drill cannot go through it on one side, go to the other. To do this, you need to find the center of the already made hole as accurately as possible. The crown has its own centering drill, but its length may not always be enough to reach the reverse side. You will have to find the center yourself. To do this, install a thin wood drill in the drill, insert it into the existing hole from the center drill of the crown and very carefully make a through hole. The more precisely you drill the center, the easier and faster it will be to work on the other side of the wall.
Additional elements
In addition to these elements used in the installation of the ventilation system in the bath, plastic parts are used that perform protective and regulatory functions. These include various dampers, hatches and gratings.
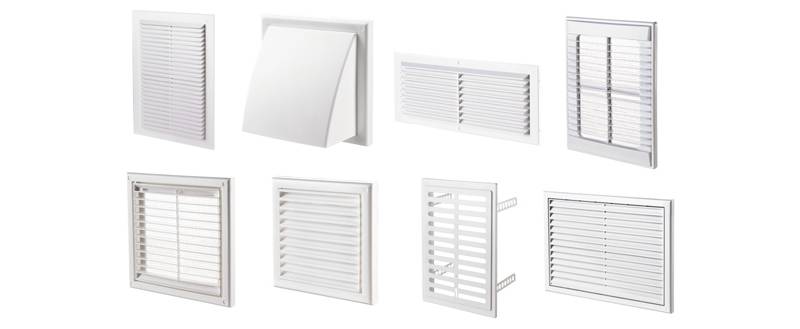 Plastic ventilation grilles
Plastic grills can have different purposes. The following main varieties are distinguished:
- inertial type: for flow separation without pressurization;
- adjustable grilles: allow you to change the volume of incoming air and distribution in one direction while blocking the movement of air in the other;
- unregulated type: distribution or flow restrictions without the possibility of regulation;
- external protective grids: to prevent foreign bodies from entering the channel.
 Extraction grates can be of an adjustable type
Plastic hatches can be installed in powerful, branched systems for access to the ventilation line for revision, cleaning, repair. They can be mounted on the ceiling or walls of the bath. Damper doors are designed to allow access to natural flow. They can be mounted on the natural ventilation vents in the window or door. Standard sizes are 10x10, 15x30 and 25x60 cm.


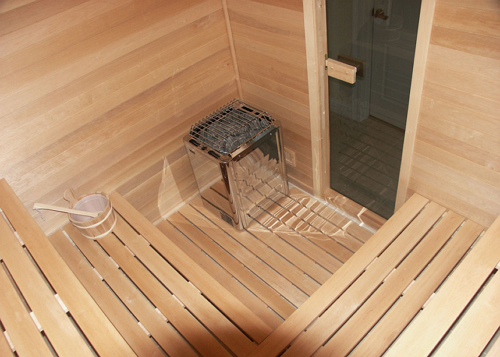
How the Russian bath was ventilated
During the adoption of water procedures, the doors from the steam room to the dressing room were sometimes slightly opened. But these actions were carried out not for ventilation as such, but to lower the temperature and humidity.
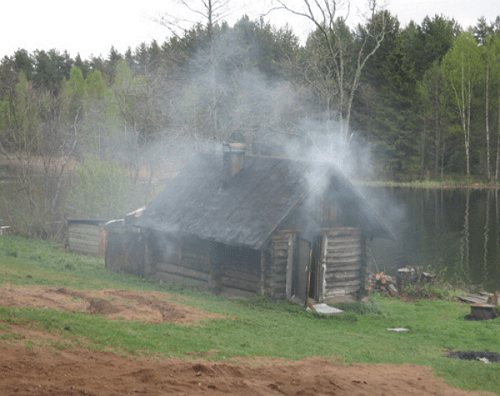
Bath ventilation through an open door
After washing, the steam room door opened completely and the moisture came out right through the roof - there was no ceiling in the dressing room. Of course, such ventilation was ineffective, especially in winter. Frost and ice appeared on the walls, wooden structures almost never dried completely. Only in the summer period it was possible to really dry the wooden structures. As you can see, the operating conditions of wooden structures, even with all the desire, cannot be called favorable. But due to the large thickness and high quality of lumber, the bath served for several decades. Then they took it apart and put in a new one. Or they raised and changed the lower crowns and flooring.
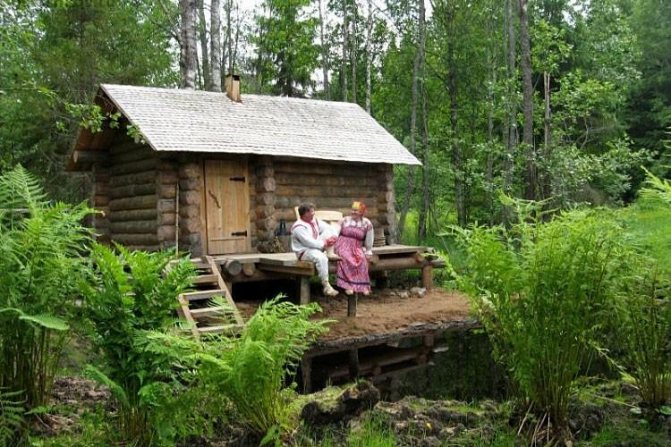
Traditional Russian bath
Why did we talk in such detail about real traditional Russian baths? Only knowing the principles of their functioning, you can make ventilation in such a way as not to lose the main thing - the merits and differences of the folk bath.
We organize ventilation in the Russian bath
How to make ventilation with your own hands
Ventilation in the bath, the scheme and device are thought out at the construction stage. It is more convenient in practical terms and doing it yourself. But even if the site already has a bathhouse without an air exchange system, it will not be difficult for the user to form ventilation by choosing the best option.
Consider a method for arranging products, a phased do-it-yourself work technology.
How to choose a ventilation scheme and places for products
Before you make ventilation in the bath with your own hands, you should take note of the general rules for the formation of products:
- To supply cold air, holes are cut no higher than 20 cm from the floor level. Exit openings are located as far as possible under the ceiling or on the ceiling surface.
- The farther the air is separated, the more efficiently the layers of air are mixed.
The formation of holes for cold air can be done in several zones:
- At the bottom of the door. In this case, there is no need to drill the walls of the bath, the lower crowns of the structure will not get wet. Minus - the doors are most often located opposite the shelves, a cold stream will blow on visitors.
- Under the shelf Reduced risk of cooling users, but there is difficulty accessing the grate.
- Behind the oven. The best option for a bath. A cold jet enters the stove, warms up, disperses throughout the room - this eliminates the risk of drafts. Minus - there is not always a place behind the stove for mounting the grate. In addition, the zones are isolated with sheet iron and insulated, it is necessary to cut through all the layers and carefully seal them.
With an outlet for hot air, everything is simpler - it is cut through as much as possible under the ceiling.Air should be made on the ceiling only if the bath attic is open. Otherwise, the steam will settle on the upper crowns of the log house, soften the tree and have to repair the top of the building.
Tools and materials
The master will need the following set:
- drill;
- a set of drills for a drill;
- crowns for wood;
- bit;
- chisel;
- protective valves and grids;
- sealant;
- metal pipe with a cross section according to the size of the air;
- grille with shutters or adjustable shutters.
Personal protective equipment will come in handy. To drill holes in brick walls, you need a hammer drill.
Step-by-step ventilation device technology
Consider a complex option with finished interior and exterior. Any shape of the products - round, square. The ventilation device in the bath begins with the markup.
The algorithm is this:
Determine the size and shape of the hole. Apply markings indoors.
Prepare a long drill for wood. The length of the drill should be longer than the wall, taking into account the decorative finish.
Drill one hole through the center of the vent circuit. The exit to the outside is the center of the air. Draw around the center the dimensions of the hole with an exact match to the parameters inside the steam room.
Remove trim. Repair supporting structures. Drill through holes with a minimum step along the contour of the vent. Keep the drill perpendicular to the plane.
Use a chisel and chisel to remove the jumpers between the holes. Cut half of the hole on the outside, half on the inside
It is not necessary to carefully level the opening, it is important to make it so that the air duct fits.
As soon as the air ducts are broken, the stage of installation of air ducts is performed. Exhaust and supply ventilation in the bath is equipped with plastic, metal pipes with a length equal to the passage.
Air duct installation:
- wrap the pipe with mineral wool;
- insert an element into the air;
- fix the position with mounting foam;
- foam the waterproofing between the wall and the sheathing;
- fasten the grids.
It remains to check the operation of the network. This is done with a burning log or other source of smoke - send a stream of smoke into the hole and see how the inflow and exhaust work.
Pros and cons of Bastu
- the floor and shelves warm up well, uniform heating of the entire room is ensured;
- constant supply of fresh heated air;
- saving firewood, fuel or electricity after kindling;
- natural air filtration occurs, there are no unpleasant odors;
- no condensation on the windows;
- no additional exhaust devices are required that fail and require maintenance;
- lying on a shelf under a stream of warm fresh air is simply pleasant and healthy.
In addition to positive qualities, bastu ventilation also has disadvantages:
- it is not recommended to give a lot of heat, because the air quickly overheats and dries out, in addition, hot steam quickly settles and burns;
- dependence on weather conditions - in calm weather, ventilation will work poorly, if the wind is too strong, drafts appear;
- filters cannot be installed, as they will melt under the stove.
Ventilation in the bath: scheme
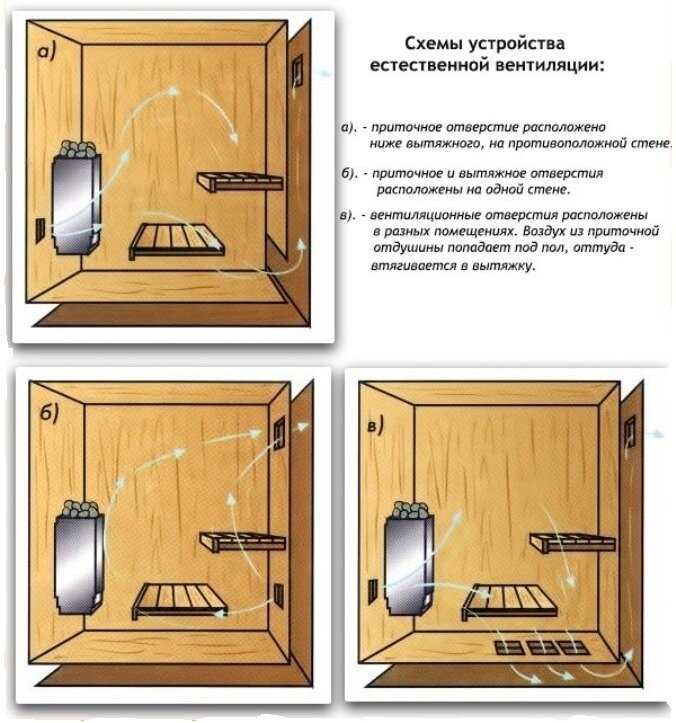
The following ventilation schemes are considered the most successful:
- Supply windows are located at the bottom of the bath wall. Hoods on the opposite side are installed at the top. From the outside, the upper vents are connected by a channel, with a vertically rising air duct.
- Supply windows and hoods are located on opposite walls and at the same height from the floor. Ventilation will only work with a fan.
A bad scheme is the location of the supply and exhaust openings on the same wall. The incoming fresh air sharply cools the legs of a person in the bath and, not having time to completely change the carbon dioxide, quickly exits through the hood.


How to choose?
In a Russian bath, unlike a conventional washing one, it is necessary to provide the following conditions with the help of ventilation:
- temperature in the steam room - from 50 to 60 degrees;
- relative humidity - not lower than 70 and not higher than 90%;
- very fast drying of any wooden surface after washing;
- operational decrease in humidity while excluding drafts and opening doors;
- the same air quality in the steam room, as well as in the relaxation room, regardless of the season;
- preservation of all the traditional properties of the Russian bath.
No ventilation devices will help to escape from carbon monoxide if there is a constant influx of it. You will have to continuously monitor the completeness of the combustion of firewood, and only after the attenuation of all coals, close the chimney. The organization of air flow in a chopped log bath occurs through the crowns of the walls.
This approach, for obvious reasons, is not suitable for a brick building. When the walls are sheathed with boards or clapboard, it will be necessary to use ventilation holes, otherwise the negative effect of dampness will be excessively strong. In most cases, a hole of 200x200 mm will be enough to bring pipes outside. The choice of plastic or metal should be made in accordance with the specific project and operating conditions of the ventilation system.
A bath of foam blocks must be ventilated inside the walls. The layers of waterproofing and cladding are separated by a ventilation gap, for external cladding it is 40-50 mm, and inside the bath - 30-40 mm.A typical design involves the use of battens, which already help hold the wall cladding. In addition to in-wall ventilation, all rooms are equipped with an air intake at the bottom (most often behind stoves) and an outlet (near the ceiling). The advantage of an active air freshening system is that it can be placed anywhere.
How to arrange ventilation in the bath and steam room - calculation of the scheme
We have already said about the standard value: 1 cubic meter of space requires 24 cubic centimeters of bends. When choosing pipes, they often stop at pipeline pipes - they are inexpensive and effective, but we recommend assembling such a system from Ferrum stainless chimneys, they have a long service life and do not deteriorate from constant interaction with moisture. The standard diameter is 10 centimeters. So, the cross-sectional area is 78.5 cm2. One such box is enough for 3.27 m3 of room volume.
We calculate the number of cubic meters. Suppose that the steam room has dimensions of 2 by 2 m2, the ceilings are also 2 m high. We multiply everything, we get 8 m3. We divide this by 3.27=2.45. Round up to three. As a result, you need to organize 3 boxes with a diameter of 10 cm for the entire steam room.
Do you really need ventilation in the bath or can you do without it?
The functions of bath ventilation are complicated by the fact that it should contribute to a fairly rapid removal of moist air from the premises and qualitatively regulate the temperature in the steam room
It is especially important to have a good exhaust system for baths equipped with gas and solid fuel stoves - for maintaining the combustion process in such structures requires an influx of an impressive volume of air. Lack of ventilation for baths will lead to excessive concentration of carbon dioxide, which adversely affects the health of people and which can lead to loss of consciousness
 A comfortable and healthy microclimate in the bath depends on well-executed ventilation.
Inexperienced craftsmen try to carefully isolate the premises, filling up the slightest cracks to increase the speed of heating the steam room and keep the heat longer. However, this is the wrong approach, since ventilation holes must be mandatory. A well-designed ventilation system allows:
- create a healthy microclimate in the bath;
- reduce the concentration of humidity and quickly drain the premises;
- get rid of carbon dioxide;
- quickly warm up the steam room and other bath rooms;
- eliminate stagnant and unpleasant odors;
- get rid of pathogenic fungi and mold;
- keep the interior decoration in its original form.
From the foregoing, it becomes clear how important the device is in the exhaust system bath. Before you make ventilation in the bath, you must first learn about its varieties and basic installation schemes
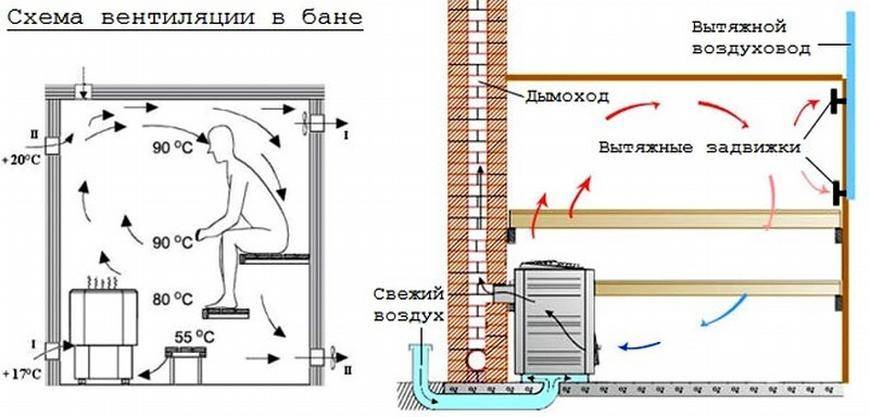
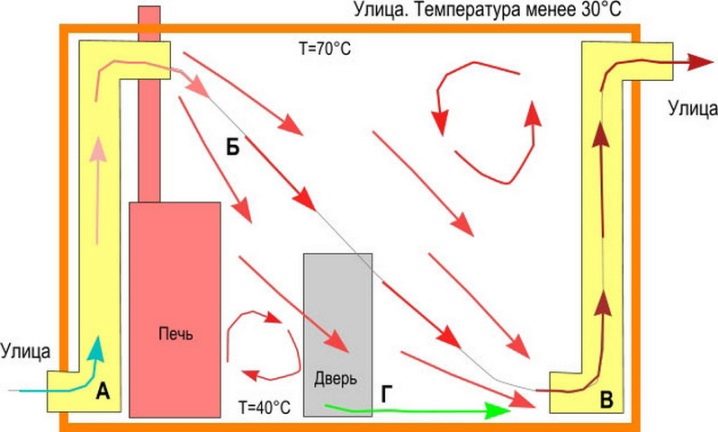
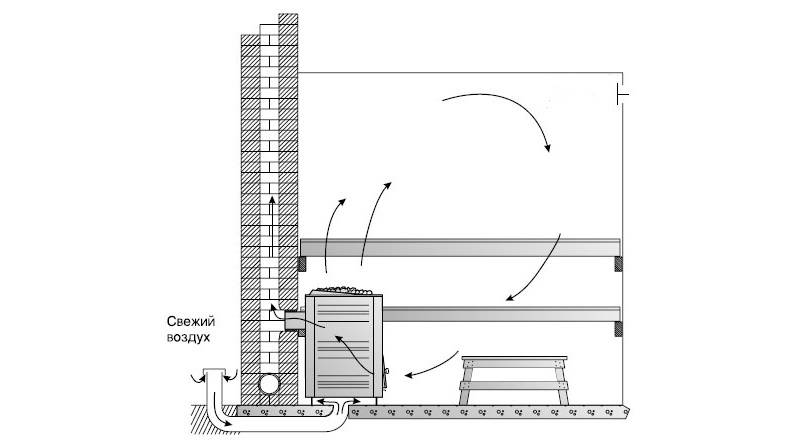
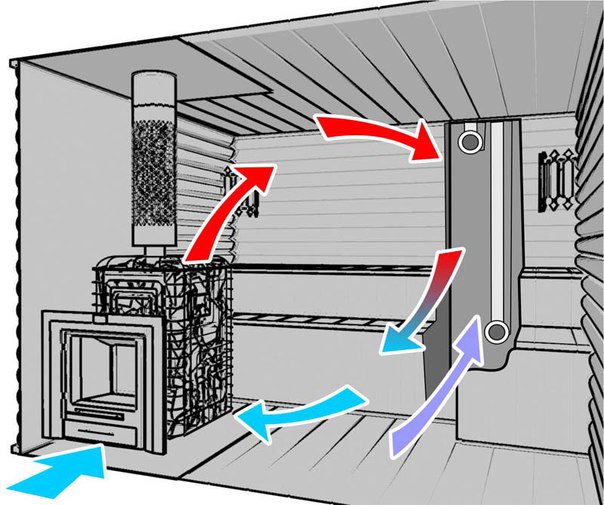
What is Bastu ventilation?
Increasingly, the most efficient solutions are used in the design of ventilation systems. The scheme in the Bastu bath can be attributed to such innovations. Due to the ease of installation and sufficiently high efficiency, this system is becoming increasingly popular among our compatriots.
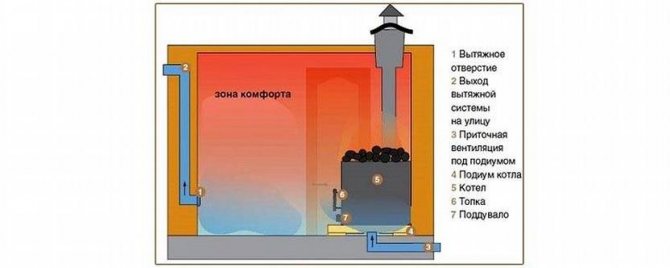
Bast ventilation works as follows:
- The role of the heat pump falls on a red-hot heater, which draws air from the supply duct.
- When cold streams pass through the furnace, they warm up quickly enough and rise to the ceiling.
- Thus, they push an equal volume of near-floor air through the exhaust duct.
At the Bastu ventilation system, the exhaust and supply openings are located at the bottom.
To equip this type of ventilation, two stainless steel pipes are required - the lower one must be installed diagonally from the heater at a level of 20 cm from the floor, and the upper one above the stove. Both entrances must be equipped with gratings with shutters.
But, like all systems with a natural type of ventilation, Bastu only works when it works. oven or when outside strong wind. The main advantage of such a scheme, if it is mounted in Russian baths, is the ease of installation, which is quite easy to do on your own, thanks to which you can save a lot.
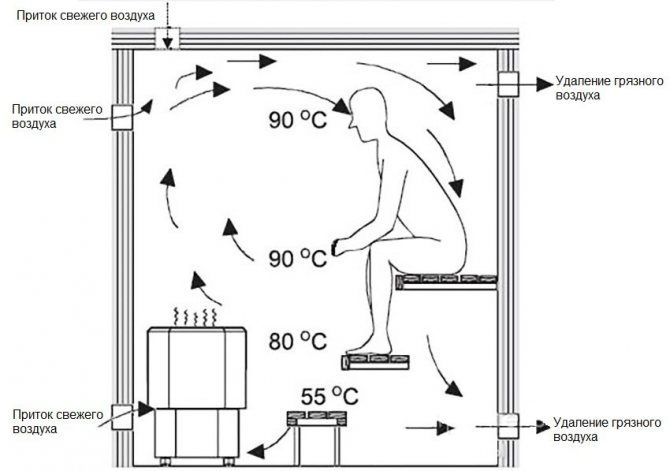
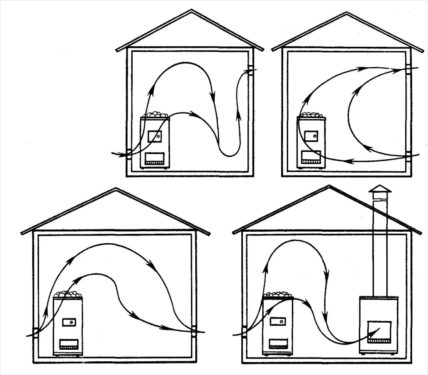
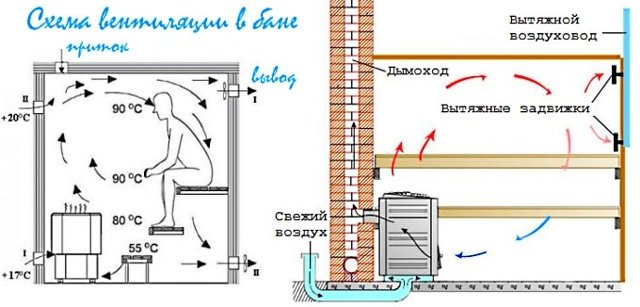
Ways to arrange natural ventilation
Dense and heavy cold air always goes down, and heated is displaced by it and rises up. This is how moving air flows arise in rooms with any heating device. But without an influx of fresh air, it does not renew itself, but simply moves.
If a hole is made in the lower part of the wall, air from the street will flow through it if its temperature there is lower than in the room. And through the hole at the top, it will stretch. This is natural ventilation.


Scheme of the movement of air masses in a heated room
This elementary law of physics is used when they think about how to make ventilation in the bath with their own hands without using any mechanisms.As a rule, natural ventilation without forced air intake is enough for a small bath. Unlike living quarters, where in summer it is as hot as outside, the temperature in the bathhouse is always higher.
But it is necessary to maintain a temperature comfortable for receiving procedures in it, and so that drafts do not form, and there is no sharp difference from heat on the shelf to cold on the floor. To do this, air flows must move along a certain trajectory, which is set by placing supply and exhaust openings in specific places.
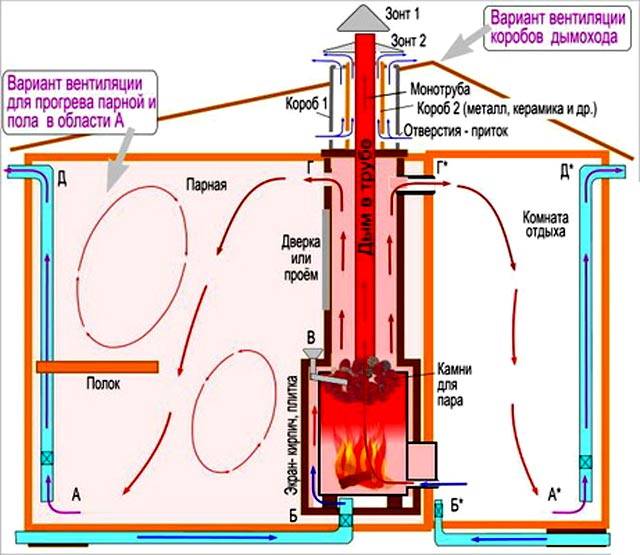
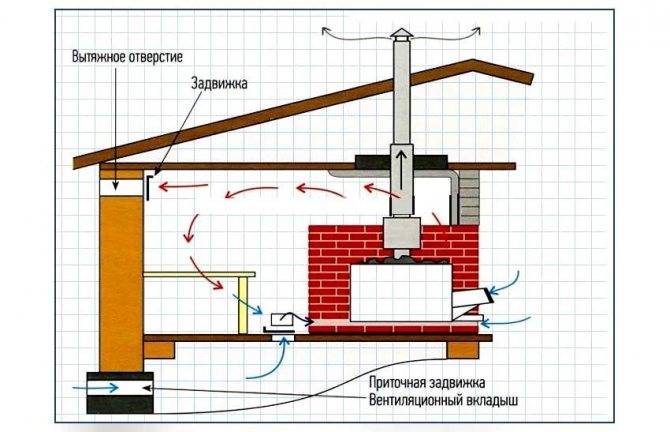
Ventilation through the chimney
The easiest way to solve the problem is how to make ventilation in the steam room if there is a furnace with a blower in it. It will serve to remove the exhaust air through the chimney, in which draft occurs during the combustion of the fuel. But this scheme will work only if there is an influx of air from the outside.
Open door to the steam room
Inflow can be provided in the following ways:
- from time to time slightly open the door to the steam room;
- make a small gap of 1 cm in the door or leave the same gap between the door and the floor;
- if the log cabin of the bath is not sheathed, such a gap can be left between the first crowns below the floor level, provided that the boards are not stacked tightly;
- make a special opening in the wall opposite the stove at a height of 20-30 cm from the floor.
In any of these cases, the cold stream penetrating into the room moves to the heat source and displaces the air already heated by it upwards. When moving, it warms up the entire room, gradually cooling down and falling down. Here it is drawn into the blower and led out through the chimney to the street.
Air movement pattern
This method of how to make ventilation in a steam room is not the most reliable and efficient, since most of the fresh air is immediately drawn into the stove. Therefore, even during the construction of the bath, it is advisable to consider other options with the installation of products in the walls.
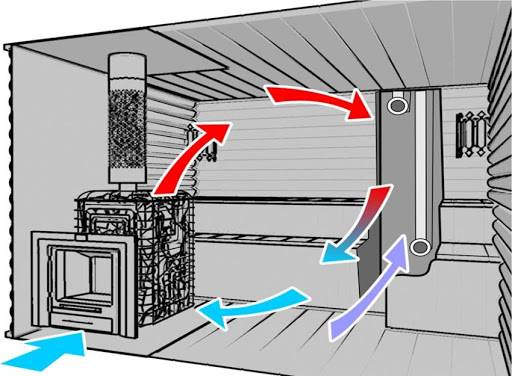
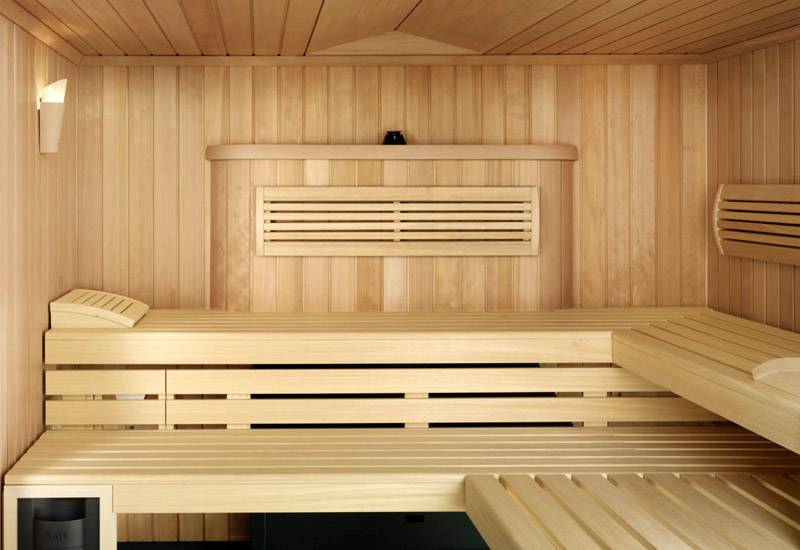
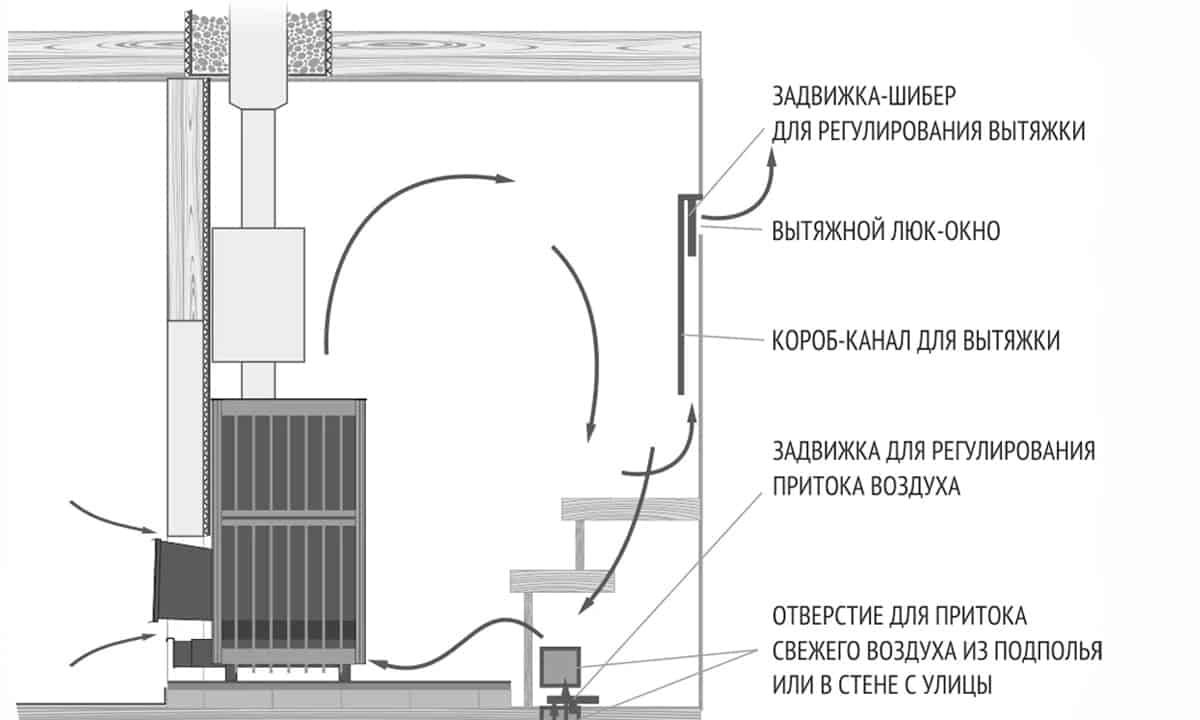
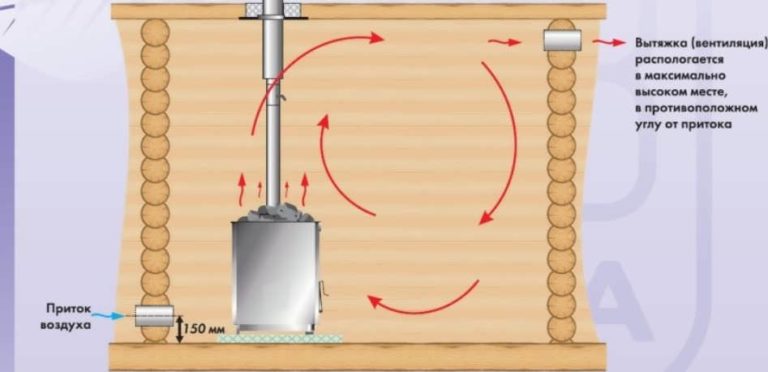
Ventilation through vents
To ensure that air exchange does not depend on the operation of the furnace, special openings are arranged in the walls for the inflow and exhaust of air. It is guaranteed to work under the following conditions:
- the exhaust hole is placed under the ceiling of the bath - where heated air accumulates;
- the inlet should be located low above the floor on the opposite wall, the closer to the stove, the better so that the cold streams drawn in do not hit the legs;
- the optimal vertical distance between the products should be 150-200 cm;
- the cross section of the exhaust hole should be larger.
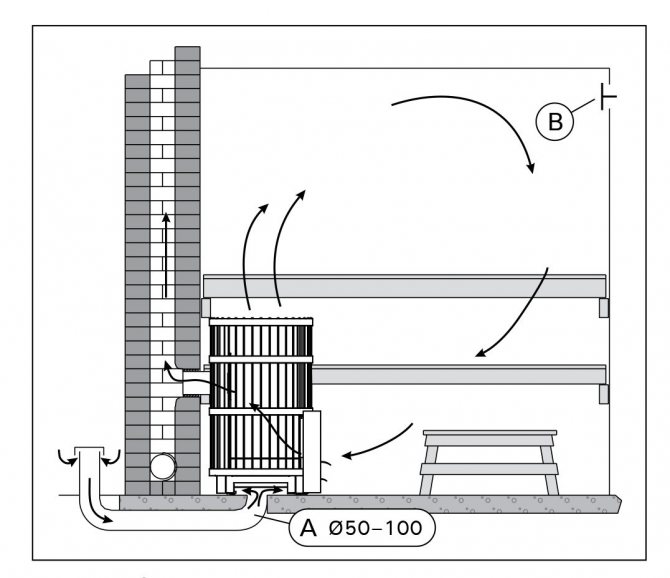
Cold air immediately enters the heating zone
The ideal location of the supply air is behind the furnace. Entering the room, it immediately begins to warm up, displacing the already hot air mass up and towards the hood. Therefore, cold streams and levels with noticeably different temperatures are not formed in the steam room.
If you want to know how to properly ventilate the bath and steam room, consider this scheme at the design stage and before installing the stove
It is also important to make sure to make a difference in height between the ventilation holes. If they are approximately at the same level, this will lead to a draft and a rapid passage of fresh air in a straight line, without circulation in the room.
Natural ventilation extractor
In order to be able to regulate the ventilation or restrict access to the steam room for too frosty air, it is necessary to provide covers or valves for the air.
The advantage of natural ventilation is that it works without the use of devices that require mains power and can break down. Its installation and operation do not require large expenditures.


