- The main disadvantage of an ultrasonic humidifier
- Features and benefits
- How to create an ultrasonic humidifier at home: scheme and work plan
- How to make a humidifier on a battery with your own hands
- Options for homemade humidifiers
- bottle humidifier
- Simple containers
- Expanded clay and stationery bucket to help
- Humidifier from a bottle and a cooler
- Manufacturing technology
- Instructions for making an air purifier
- 3 battery humidifier options with video
- bottle humidifier
- Hanging Humidifier
- The simplest humidifier
- Varieties of homemade devices
- Water containers
- From a plastic bottle
- Battery towel
- From a plastic container
- From expanded clay and buckets
- Ultrasonic Humidifier
- From the fan
- Manufacturing instructions
- From plastic bottles
- From trash cans
- Air humidifier with antibacterial filter
- Decorative humidifier
The main disadvantage of an ultrasonic humidifier
Yes, not everything is perfect. The point is that the first two types of humidifiers evaporation occurs more or less naturally, that is, no matter how pure the water you pour into the tank, only pure water will evaporate.That is, all the salts, lime, iron and other bad impurities that many people usually have on the walls of teapots will remain in the humidifier, it can be washed and it will continue to work. With an ultrasonic humidifier (and sellers often do not mention this), this trick will not work - they only need to be filled with clean water. And when I say “clean”, I don’t mean some kind of “jug”-type filters, into which you pour water from above and it slowly flows by gravity into the lower tank - they do not provide the required degree of purification, although they make the water much more usable. No, for such humidifiers only the purest water is needed, from a filter with a reverse osmosis system. (Well, or buy distilled water, but, IMHO, this is nonsense)
Seriously, if you still don't have such a filter - be sure to get one, and I know that it is not cheap. Forget the humidifier: you have a bigger problem.
Why is it so important to pour clean water into it? The thing is that in such humidifiers there is actually no evaporation of water - it is simply thrown out in a fine mist, and already this mist gradually evaporates, the water from it seems to be absorbed into the air, moisturizing it. And all the impurities are not, they simply settle on the surfaces adjacent to the humidifier, covering them with a whitish coating.
And some of this crap probably remains in the air you breathe (I'm not sure about this, but as an option). Do you need it? Of course not! Therefore, if you have nowhere to get water for an ultrasonic humidifier, make an evaporative one or buy it. Better yet, buy a damn filter! Health is more expensive!
Yes, and deposits from dirty water will be deposited, I think, on the generator itself, which will negatively affect its service life.
Haven't changed your mind yet? Then we continue!
Features and benefits
What threatens dry air in the apartment? Insufficient humidity contributes to the fact that the dust does not settle, but is in the air. Dust contains harmful bacteria, mites and microorganisms, so a person may develop allergies or asthma. The nasal cavity serves as a protective barrier against bacteria that linger on the nasal mucosa and exit naturally. Thus, if the nasal cavity is too dry, it makes it easier for bacteria to enter the body. Sufficient humidity in the room allows you to maintain the correct condition of the nasal mucosa.
To maintain the optimal level of humidity, there is a special humidifier - a small device that has a simple design and is easy to use. In winter, when the heating systems are working, a humidifier is simply necessary in the room. It is able to have a beneficial effect not only on the health of the respiratory system, but also improves the general condition of the body, favorably affects the condition of the skin, gives a feeling of vigor and lightness.
The benefits of a humidifier are for both plants and pets, while the pet will be healthy and active, and houseplants will become strong and strong. Perhaps the only drawback of the humidifier is its price. However, this device can be made independently from readily available materials.
How to create an ultrasonic humidifier at home: scheme and work plan
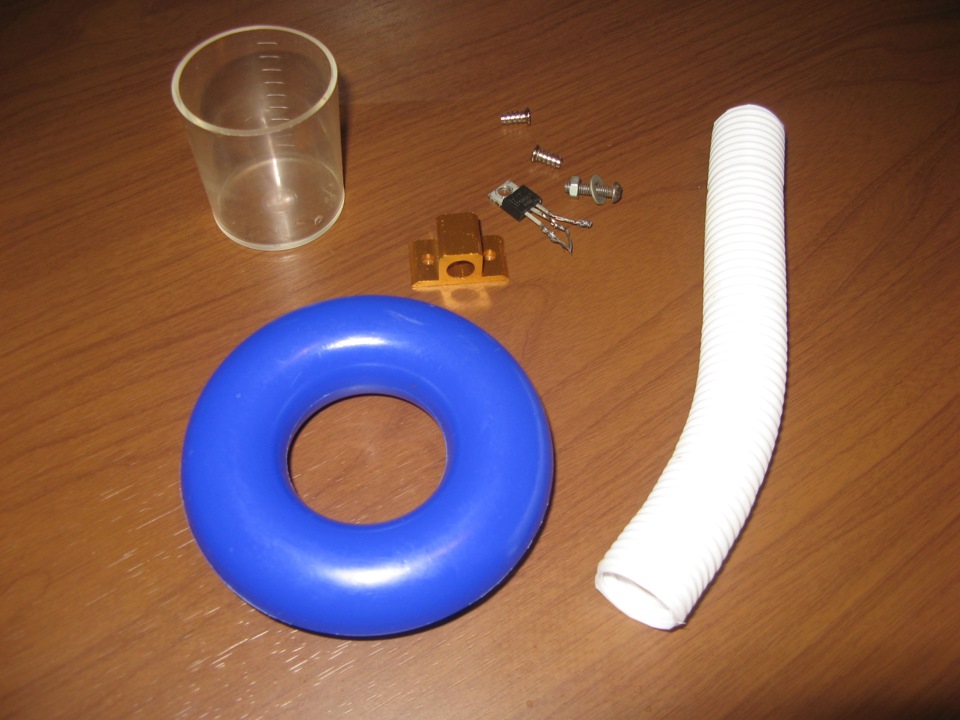
To assemble the structure, you will need:
- ultrasonic transducer;
- computer cooler for the processor;
- plastic bottle with a capacity of 5-10 liters;
- plastic cup;
- a ring from a children's toy-pyramid;
- power supply for 24 V, with a converter from 24 to 12 V;
- plastic corrugated pipe;
- aluminum corner.
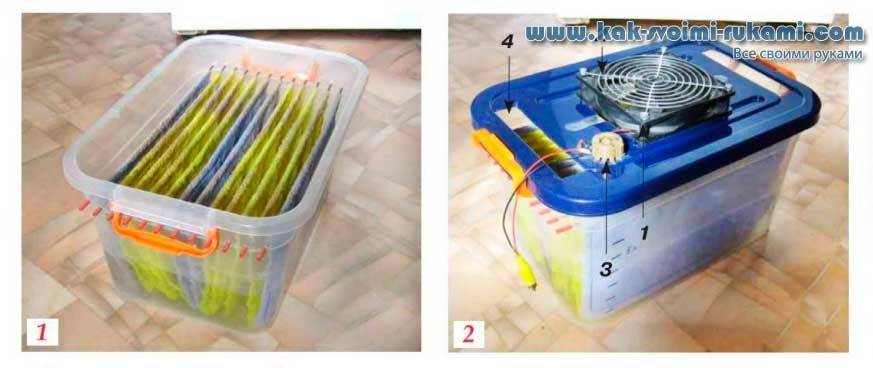
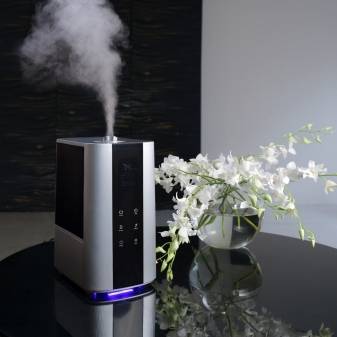
Holes are drilled in the lid of the container with an electric drill for mounting the cooler mount. The steam generator wire, outlet tube and fasteners are inserted into these holes, after which the fan is screwed to the container, and a plastic corrugated pipe is inserted.
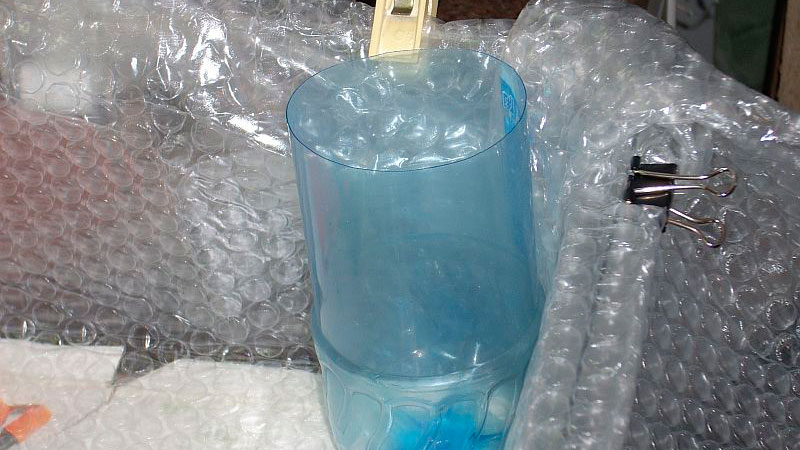
The steam generator must always be on the surface of the water, for which it is placed in a platform made of a plastic cup. The glass is inserted into the ring from the children's pyramid, a hole is drilled in the bottom of the glass, a piece of fabric is attached to the bottom by means of an elastic band. The fabric in this case is needed as a filter. Then the steam generator is inserted into the cup.
The device does not require special care and maintenance, the only thing is that it is necessary to control that there is always water in it.
In general, you can collect a lot of things from plastic bottles. When designing a humidifier, you can go in two ways:
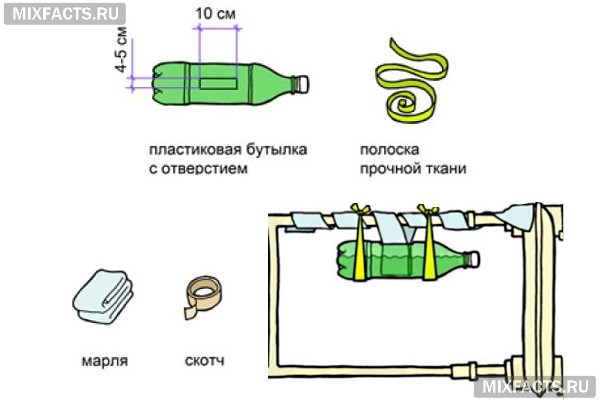
- Make a cut along the side of the bottle along its length, approximately 10X2 cm, in the form of a rectangular window. The structure is suspended under a straight horizontal section of the heating pipe 10–20 centimeters from it. The bottle is filled with water. A strip of gauze about 10 cm wide and 1 meter long is cut out, the end of which falls into the cut-window. The gauze is wrapped around the pipe, and the process has started. The advantages of the method are the simplicity and cheapness of the device, the minus is the low productivity due to the direct evaporation of water without spraying.
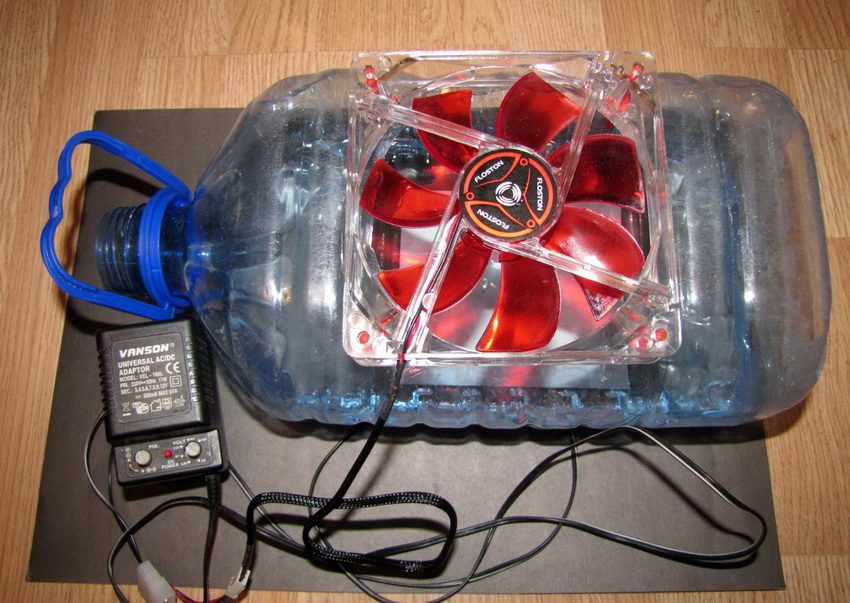
- We cut off the neck of a large plastic bottle with a capacity of 10–20 liters so that a cooler from a computer can be attached to it.We fix the cooler, using an old computer power supply, we supply 12 volts to it. On the sides of the bottle, about 7–10 centimeters from the top, we make holes for air to escape. Pour water just below the level of the holes, using adhesive tape, we attach the cooler to the neck of the bottle. We turn on the power supply unit in the outlet - the device starts to function. Pluses - simplicity and efficiency of the device, minus - not very neat in terms of aesthetics design, the need to disconnect the cooler every time when filling the tank with water.
How to make a humidifier on a battery with your own hands
The first option was described above, you can use a plastic eggplant by hanging it under the heating pipe. The second way is to put a metal pan, a large iron mug, etc. on the battery. with water, of a suitable size, so that it does not fall. The method, of course, is not aesthetic, but simple and practical. The bad thing is that scale forms at the bottom of the container, and it is quite difficult to remove it, so you should take a pan that is not very pitiful.


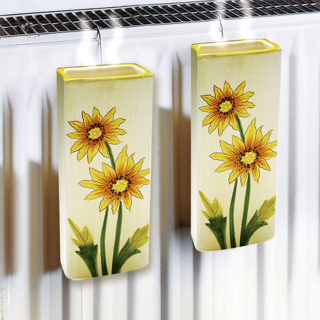
If you want everything to look nice and neat, you can take rectangular-shaped vessels with water and attach them with a rope (or wire hooks, most importantly, securely) on the front side of the battery. It turns out both a humidifier and a decoration for radiators.
Options for homemade humidifiers
The simplest is a wet towel on the radiator. This method was used by our mothers and grandmothers. There are a lot of advantages in such a humidifier - there is no need to use electricity and labor costs. You just need to regularly moisten the towel and hang it back.But this method also has its drawbacks. Firstly, the lack of a lasting effect (often they forget to wet the towel, and it hangs dry for a long time). Secondly, air humidification occurs mostly locally. That is, near the battery.
Tip: you can slightly improve the technique and put a basin of water next to the radiator. Dip one end of the towel into it. The second is located on the battery. The fabric gradually draws water into itself and remains constantly wet. The quality of air humidification is improved.
bottle humidifier
You can make your own humidifier from a plastic bottle. The work is not difficult. To make the device you will need:
- Plastic bottle with a capacity of 1.5-2 liters;
- Wide stationery tape;
- Scissors or stationery knife;
- Gauze - 1 m;
- Any piece of fabric.
Step by step work looks like this:
- In the bottle, on one side, cut a hole about 7x12 cm.
- Now attach handles to the two ends of the fabric bottle. Or replace them with wire hooks without piercing the bottle. Just wrap a large piece of wire around the bottle from the neck and bottom.
- Fix the places where the hooks or fabric touch the bottle with tape.
- Attach the homemade humidifier to the radiator.
- Pour water into it and fold the gauze there, previously twisted into a wide layer. It should fit completely in the container.
- Squeeze one end of the gauze slightly (so that water does not drain) and place it on the battery. Just fill the bottle with water regularly and the humidifier will work properly.
It is desirable to hang such devices in each room.
Interesting: How to make a bird feeder
Simple containers
And you can simplify the task as much as possible and just find small containers with perforated plastic that can be hung on batteries. Fill them with water regularly.
Expanded clay and stationery bucket to help
To make a humidifier you will need:
- Stationery mesh buckets - 4 pcs. (2 bigger and 2 smaller);
- Bucket for 12 l;
- Cooler from the system unit with a section of 14 cm;
- Aquarium pump;
- Plastic clamps;
- Building hair dryer;
- Expanded clay of the middle fraction (or such that it does not crawl into the bucket mesh).
We do the work like this:
First, we connect the buckets of small volume from top to top. That is, they form such a one-piece capsule, as indicated in the photo. You can connect by heating with a building hair dryer or using clamps.
- Now we place the capsule in a bucket of a larger section and cover it with a second large one on top. We get a capsule within a capsule. We also join large buckets.
- At this stage, we cut off the upper part of the larger capsule and pour expanded clay inside. It should fill the space between the two capsules, but should not fall through the grid of the buckets.
- We take a bucket of 12 liters and put an aquarium pump on its bottom. We fill the bucket with water about half or a little less.
- We install a capsule with expanded clay in it. But so that the pump tubes reach its very top (capsules with expanded clay). Through them, the pump will supply water to the upper layers of expanded clay.
- At the very top of the structure, we install the cooler so that it blows into the expanded clay humidifier.
The principle of operation of such an apparatus is that the pump tubes constantly moisten the expanded clay. A fan blows moist air down. He then enters the room through the nets of a makeshift capsule.You just need to turn on the pump and fan.
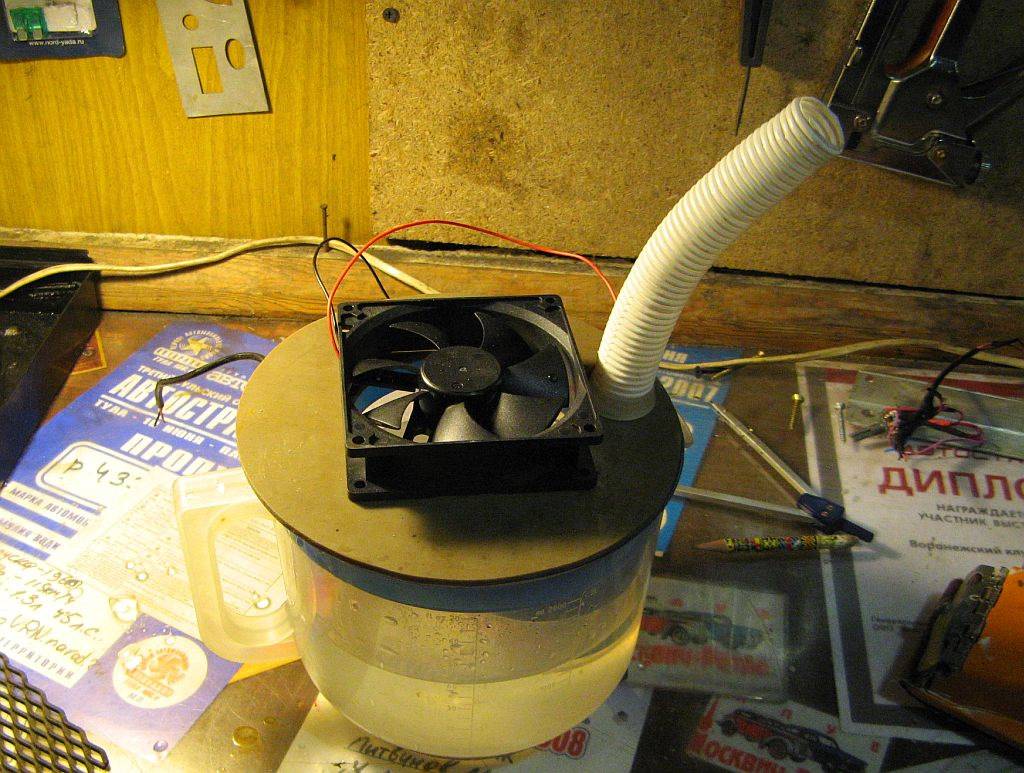


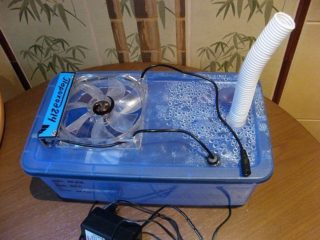
Humidifier from a bottle and a cooler
The cold steam humidifier is in store 1500-3000 thousand rubles. But its price can drop a hundred times right before your eyes. To observe this incredible spectacle, you will need one bottle of water (preferably a ten-liter one), one computer cooler and scotch tape.
Manufacturing technology
- Cut off the top of the bottle with a neck so that a cooler can be installed in the hole formed.
- Attach the fan to the bottle with tape. You can take some thick cardboard, make a slit in it a little smaller than the cooler body and attach it to the bottle with the same adhesive tape - this will be more reliable.
- Plug in the fan.
These simple moisturizing options are sure to come in handy. Even if not in a city apartment, but in the country. Air everywhere and always should be comfortable.
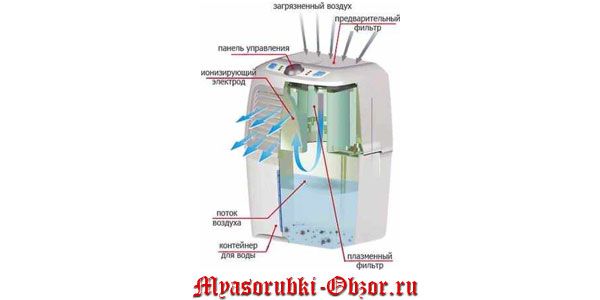
Instructions for making an air purifier
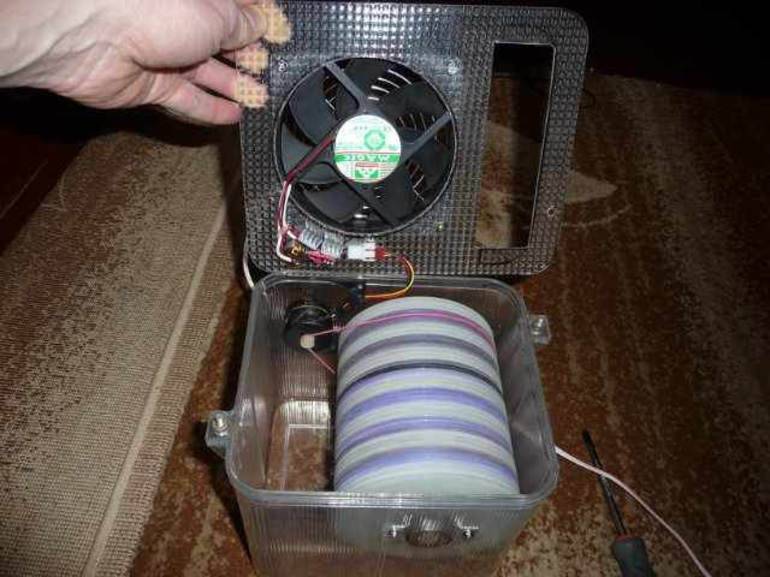
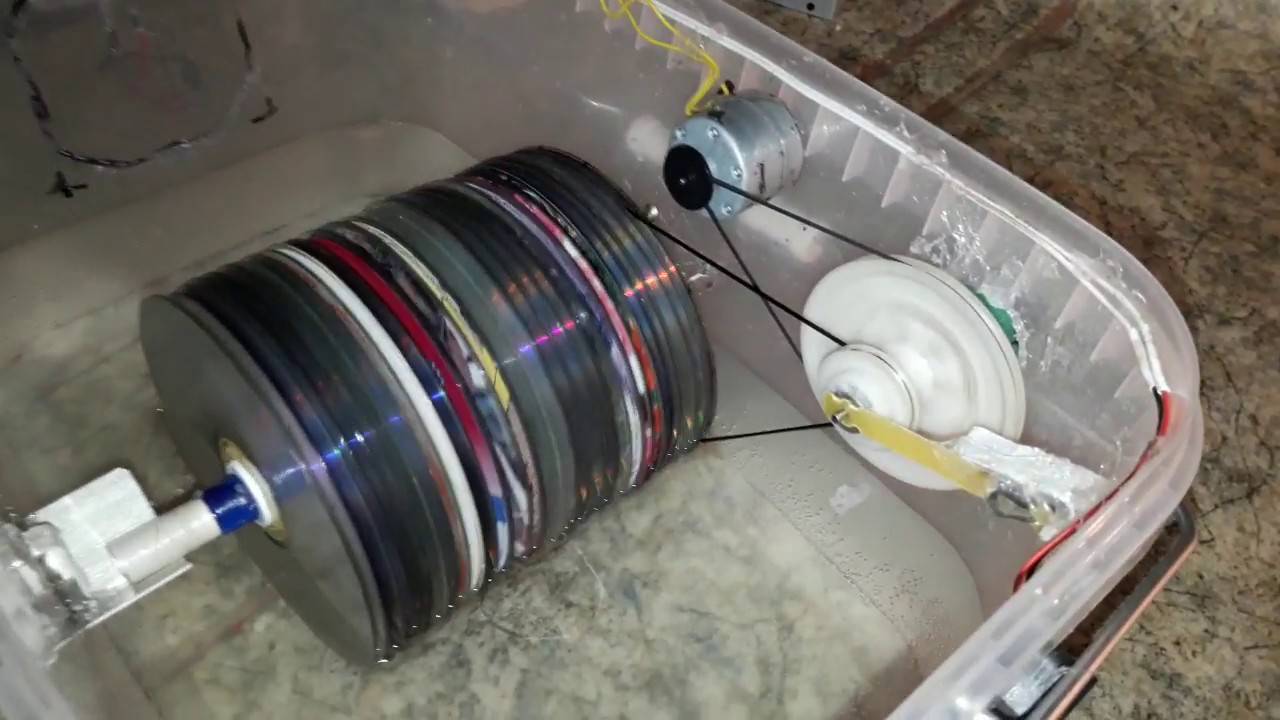
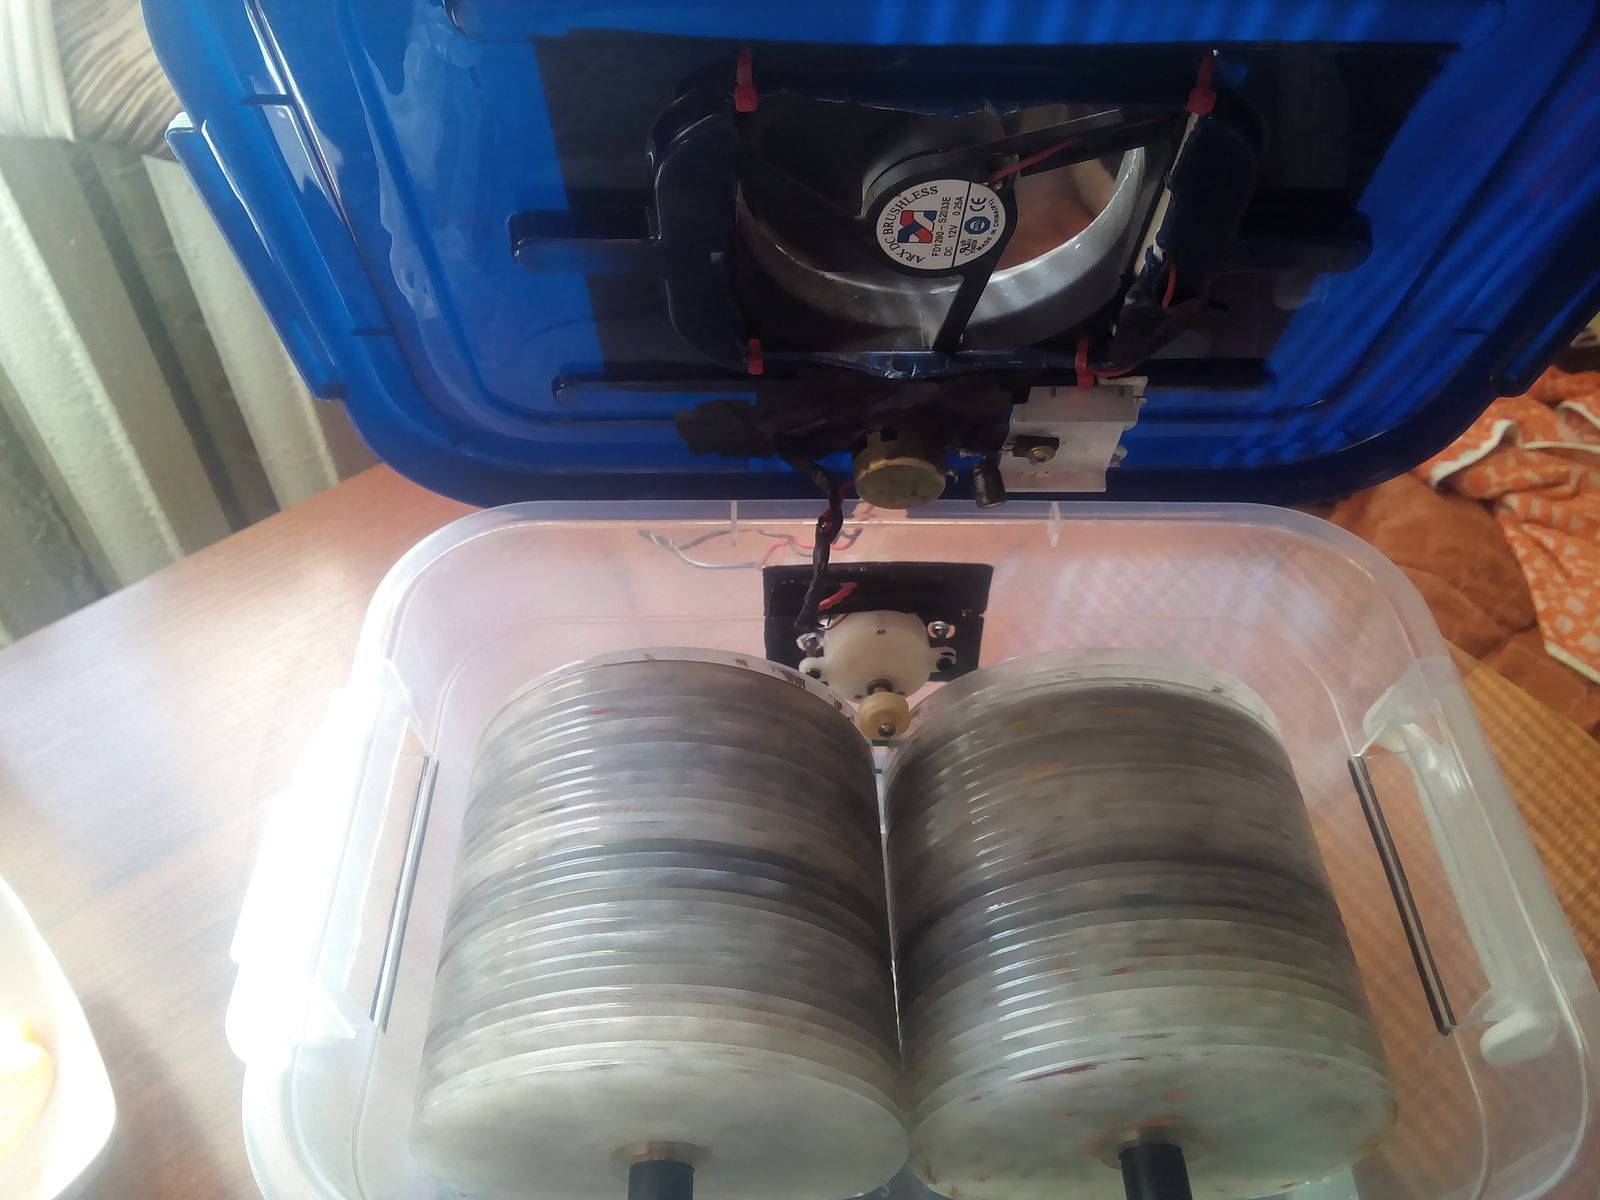
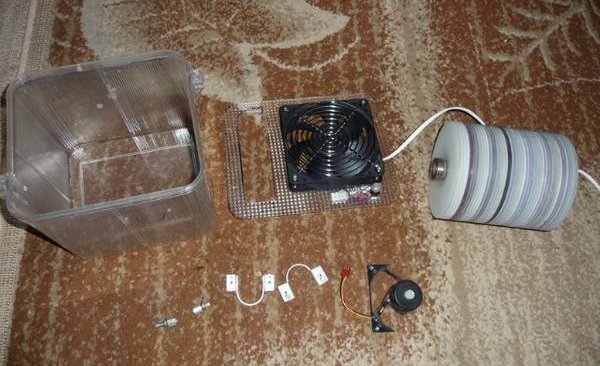
Dust particles and bacteria in the air are not noticeable, and even constant wet cleaning is not able to remove them. Factory-made air washers are very expensive and not everyone can afford. It is possible to make a humidifier-air purifier with your own hands using improvised materials. For example, how you can use old disks:
- the surface of the discs must be sanded, the gloss removed, and plastic pieces soldered to the edges;
- put prepared disks on a tube with a diameter of 15 mm, alternating with plastic washers 3 mm thick;
- in a rectangular shape, install several coolers from the computer to draw in air;
- install a shaft with disks and connect a small toy motor to it;
- install a fan in the lid of the container to extract humidified air;
- fill with water, so that it does not reach the coolers and plug it into the network.
An air purifier assembled in this way at home can be used not only in houses and apartments, but also in other utility rooms.
For poultry entrepreneurs, it is easier to assemble a humidifier for an incubator with their own hands than to buy expensive factory equipment.
Humidity and purity of air in such rooms are very important for a young brood.
3 battery humidifier options with video
bottle humidifier
What you need to make a humidifier:
- Radiator;
- water;
- ropes;
- scotch;
- any plastic bottle;
- scissors or knife;
- piece of gauze.
We take a clean bottle of 1.5-2 liters. In the side of the bottle, you need to make a neat cut, for this it is convenient to use a clerical knife. The dimensions of the hole are approximately 10-12 by 4-7 centimeters. The prepared container must be hung on a horizontally standing pipe so that the hole is strictly on top. Use a rope, such as a piece of braid or a thick fabric ribbon, as an attachment. We attach it to the bottle with adhesive tape.
The main structure is ready. Now we take the gauze and fold it several times so as to get a rectangle 1 meter long and about 10 centimeters wide. Next, we wind one edge of the fabric onto a horizontal heating pipe, the other edge should be immersed in a hole cut in a plastic bottle.
It is advisable to equip the bottle with two pieces of gauze at once in order to get a more powerful air humidifier. Anyone can make such a design with their own hands. The next step is also easy. We fill the bottle. To fill it with water, use another bottle. We can assume that the humidifier has been built, it will soon warm up and start working.
It must be clarified that the structure needs a kind of maintenance. In the opening of the bottle, you need to add water again and again, as it evaporates. To strengthen or weaken the effect of the humidifier, it is enough to change the level of the working part - lower or raise the gauze
It is important that the matter is not in any area lower than the water level. Since it may start dripping
A visual diagram of a homemade battery humidifier is attached to this article.
If you need to stop the humidifier for a while, then simply drain the water, and let the structure remain in place. As soon as the device is needed again, just fill the bottle and the humidifier will work again. A bottled humidifier is practical, safe, easy to use, and a popular option. Try making one for yourself, but be careful not to accidentally spill the water from curious little children or playful pets.
how to make a humidifier from a bottle


Hanging Humidifier
What you need to find to implement the idea:
- suitable fasteners, such as rope, wire or rigid metal fasteners;
- convenient water containers;
- water;
- battery.
A good idea for a humidifier is a hanging flat container.The principle of operation is the same - the water in one or more vases will be heated from the radiator and evaporate into space, filling the air with life-giving particles of moisture. In this case, no fabric is needed, since the working part - a container with water - will adjoin the battery on one side.
So, we select suitable containers. It can be an elongated vase or something similar. This container should have a hole where it is given to pass a rope or a metal bracket. And the other end will cling to the battery. The container should hang so that water does not spill. Add water as needed and the humidifier will do its job well. If you manage to find beautiful flat vases, they will realize another useful function - they will become a decorative element of the interior.

hanging humidifiers on battery
The simplest humidifier
What will be required:
- battery;
- water;
- metal container.
Everyone can build the above structures, but there is an even simpler solution - a quick version of the humidifier. You need to install a metal container with water on the battery and soon it will begin to evaporate, moistening the air.
If you have to use the same container for the entire heating season, then there is a high probability of failure of this dish. The fact is that it forms an indelible plaque from tap water. To avoid this effect, purified water can be used.

container with water on the battery for humidifying the air in the room
Varieties of homemade devices
If it is not possible to purchase a ready-made humidifier for the home, it will not be difficult to make it yourself. Simple options for fixtures made from improvised materials are suitable.Factory and homemade humidifiers work according to one of the principles: heating or ventilation.
Water containers
 To increase humidity, you can hang special containers with water on the battery.
In order to saturate the air with moisture, you can place containers with water everywhere. The method is ineffective if the air is very dry, because the water naturally evaporates for a long time.
From a plastic bottle
In a bottle of 1.5-2 liters on the side, you need to make a hole about 10-15 cm long and 5-7 cm wide. The container is tied to the central heating pipe with the hole up. A long strip is made from a fabric or bandage folded in several layers. Its center is placed in the hole in the bottle, and the container itself is filled with water. The ends of the fabric strip are wound around the pipe in a spiral. The material will be gradually moistened due to the fact that the middle part is immersed in water. The liquid will quickly evaporate, increasing the level of humidity in the room due to the high temperature from the battery.
Battery towel
You need to take a towel. Thin will not work, because it will dry out very quickly. The bigger and thicker the towel, the better. It must be moistened well, squeezed out so that water does not drain, and cover the battery with it from above. If you do this in every room and periodically moisten the fabric, breathing will become noticeably easier.
Some users improve on this method by attaching one end of the towel to the battery at the top and lowering the bottom into a container of water. The fabric does not have to be wetted every time.
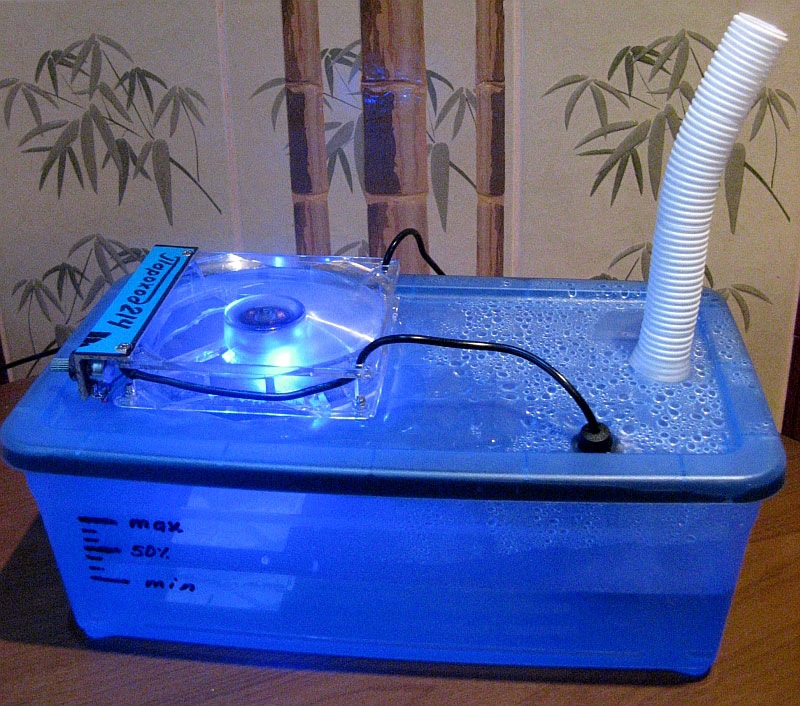
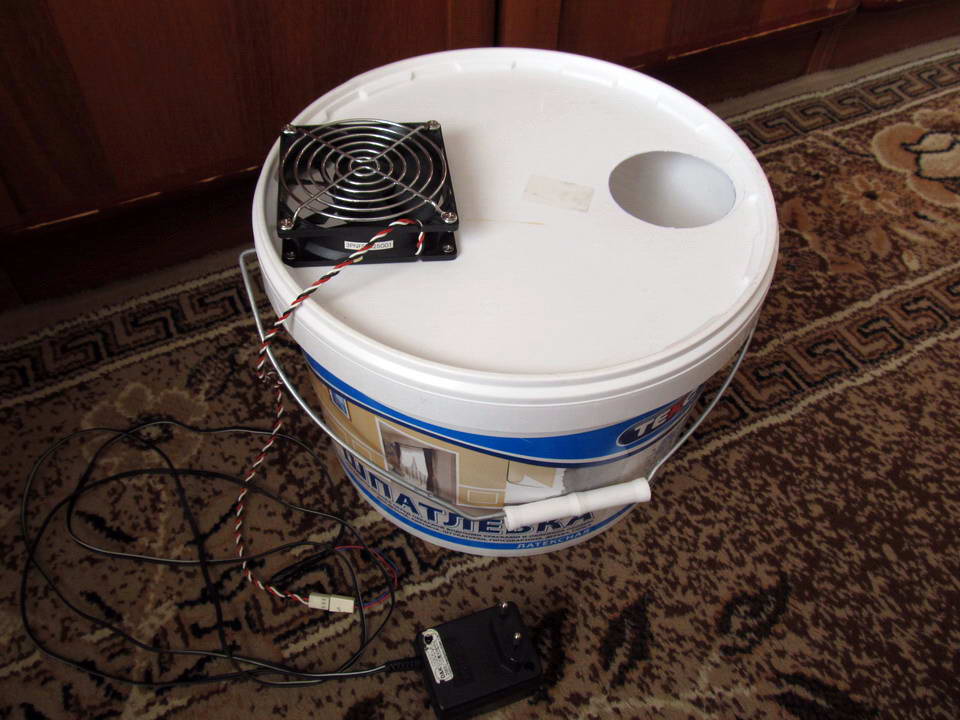
From a plastic container
You can buy a large plastic container with a lid at the store. Preferably on wheels. Additionally you will need:
- fan or cooler;
- power unit;
- soldering iron, knife.
On the sides you need to make small holes with a heated drill or knife, and in the lid - a hole for mounting the fan. The cooler must be securely fastened so that it does not fall into a box filled with water, and connected to the power supply. Wires should be insulated. Then water is poured into the box and the fan is turned on.


From expanded clay and buckets
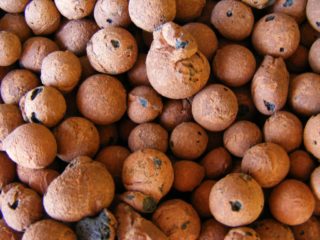 Expanded clay absorbs water well and evaporates it for a long time
The filler in this homemade humidifier is expanded clay, because it absorbs moisture well. To make the device you will need:
- two large plastic waste baskets and two smaller ones;
- 12 liter bucket;
- aquarium pump;
- cooler with a diameter of 140 mm;
- building hair dryer or plastic ties.
Small baskets need to be fused with a hair dryer or fastened with zip ties. Two large baskets are also connected, but small ones fastened together are first placed in them. A hole is cut out in the bottom of the upper basket and expanded clay is poured through it. The pebbles should be large enough not to fall into the holes. Pour water into a bucket and put a pump for the aquarium there. The design of the baskets is placed in a bucket. The tubes from the pump are brought to its upper part so that the water wets the expanded clay. The liquid will drain back into the bucket. It is necessary to install a cooler from above, which will direct the air flow to the expanded clay so that the water evaporates more intensively.
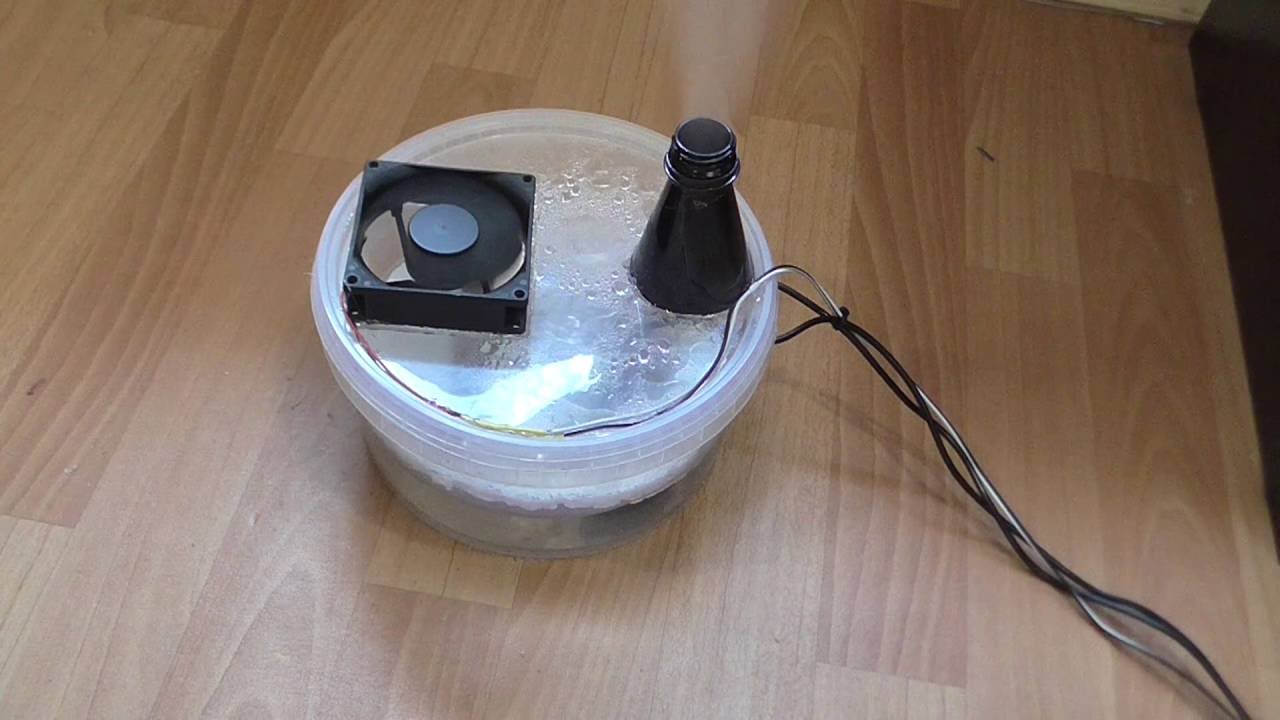
Ultrasonic Humidifier
 Homemade Ultrasonic Humidifier
You can buy a ready-made ultrasonic humidifier at the store or make it yourself.
Would need:
- 12 V power supply;
- ultrasound transducer;
- corrugated pipe 30 cm long;
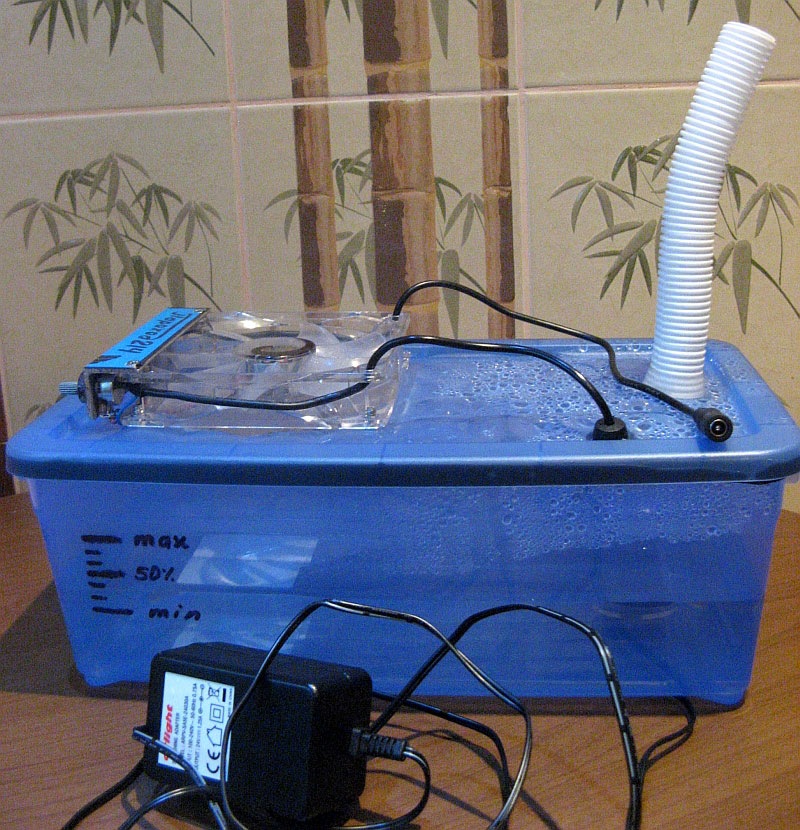
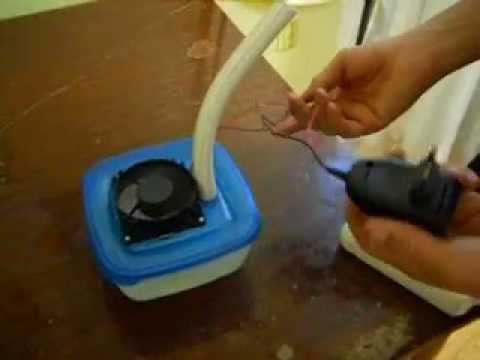
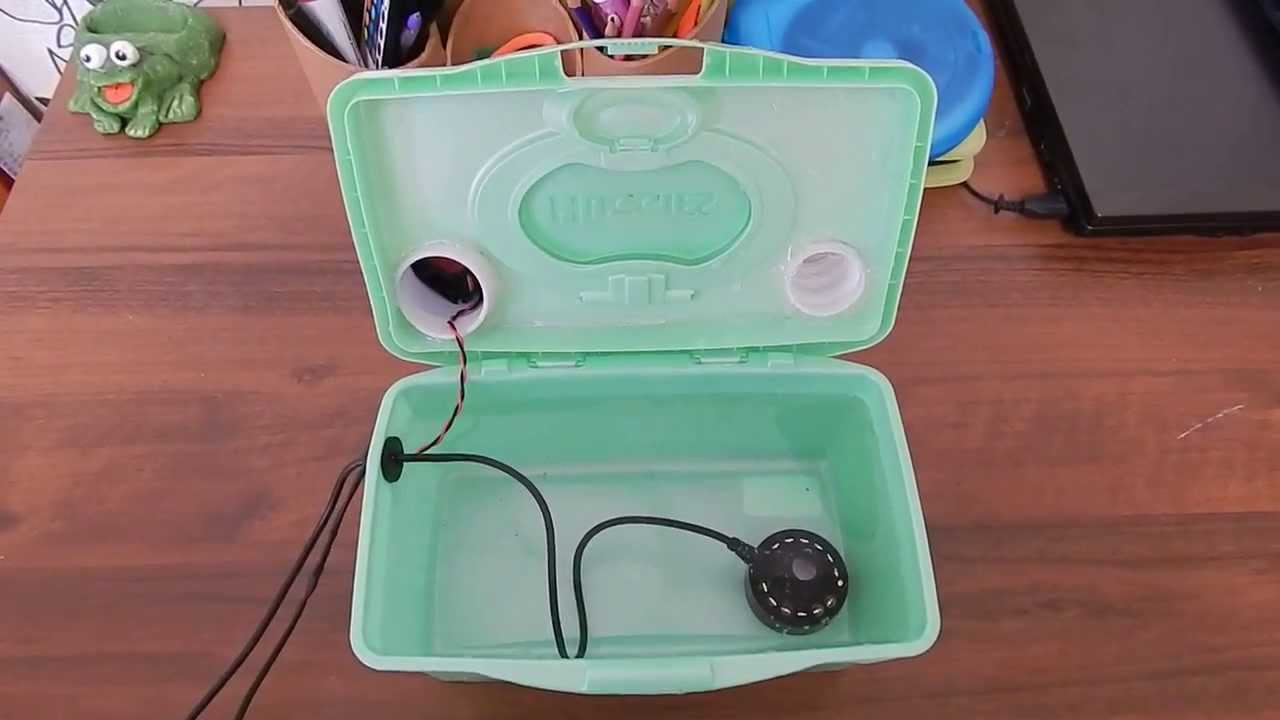
- plastic container with lid;
- hot glue gun and glue sticks.
In the container, you need to make one hole on the side for the wire, and the other in the cover for the pipe along its diameter. A converter is installed at the bottom, a power supply is connected to it, having qualitatively insulated the connection. The hole through which the wire passes is filled with hot glue and the pipe is fixed in the same way. Then you need to fill the container with water and the device can be used. In half an hour, such a device is able to humidify the air in one living room.
From the fan
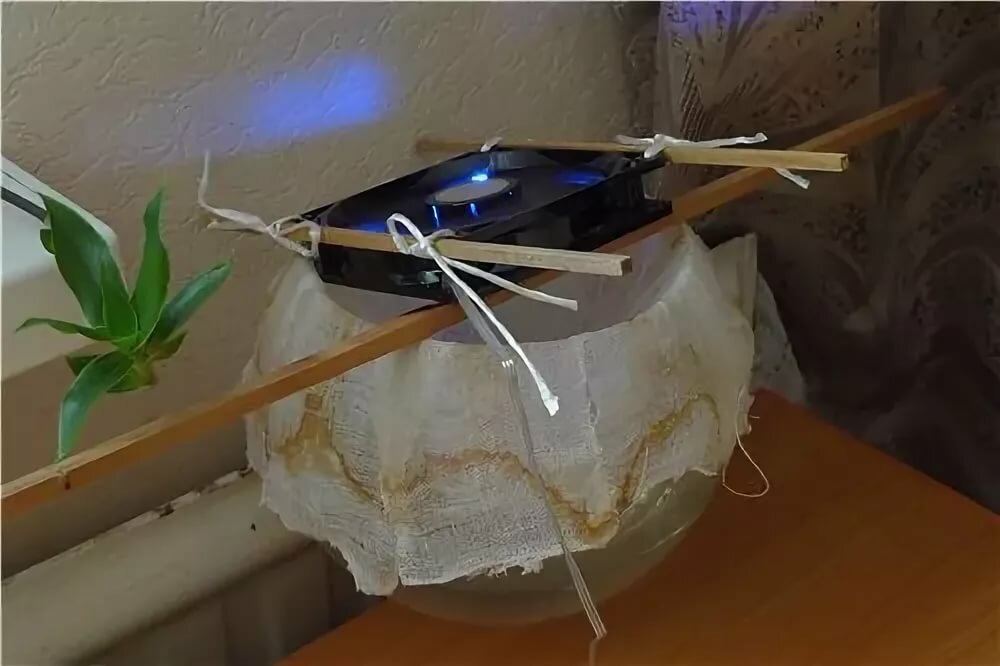
The fan is used in various homemade devices for humidifying the air:
- The easiest way is to hang a wet towel on the fan, on the side where the blown air is directed. Due to the movement of the stream, the water will evaporate quite quickly. Only as it dries, the towel will need to be moistened.
- Under a working fan put any container with water. The air flow will spread the evaporating moisture.
Manufacturing instructions
A simple humidifier is easy to make at home. Making this useful thing with your own hands can be translated into the format of an exciting game with a child, allowing him to learn useful little things, develop and spend time nearby. This device can be made from various materials. It is worth considering the algorithm of actions for assembling various types of humidifier.
From plastic bottles
The simplest options for home-made models are products from plastic bottles. To make the simplest humidifier yourself, you need:
- take one plastic bottle, the volume of which should be about 1.5-2 liters;
- to attach to the battery you will need tape or rope, you also need gauze, at least a meter;
- scissors or a clerical knife will help to make a hole in the bottle.
This method has a number of advantages. This simple appliance does not require electricity, and it does not leave a salt residue. However, it does not require financial investments. To build the corresponding model, you need to do the following steps.
- Make a hole in a plastic bottle, approximately 12-13 cm long and 5-6 wide.
- Then the bottle must be attached to the pipe so that the hole is at the top. For attachment, you can use a rope or cloth tied around the edges of the bottle and tied to the battery. For convenience, you can make small holes in both edges of the bottle in order to thread a rope through them and tie it to a heater. In any case, all this will need to be additionally fixed with adhesive tape, since water will be poured into the container of the bottle, spilling should be avoided.
- The next step is to prepare the gauze. It must be carefully folded 9-10 cm wide. The length of the canvas should be at least a meter in length.
- One edge of the gauze is dipped into the opening of the bottle, the rest of the material is wrapped around the battery.
- In conclusion, you should pour water into the bottle hole and enjoy the work of a home humidifier.
You can complicate the task a little and make the device in a more complicated way. For him, you need a bottle with a capacity of at least 5 liters. If desired, you can take 10-liter bottles. It is also necessary to prepare the cooler removed from the computer and adhesive tape for fastening. The method of manufacturing the product is quite simple. At the same time, finding a cooler from a computer can be the most difficult job.The rest of the work won't take long. To build such a model, you need the following.
Make a hole in a plastic bottle equal to the size of the cooler
It is important to measure everything very well, since the cooler will be placed in this hole. It should hold tight and not fall through.
To make the structure more durable, you can put cardboard between the cooler and the jar, cutting a hole corresponding to the size of the cooler, but this item is not mandatory.
Then all this must be wrapped with tape, pour water into the hole and plug the fan into the outlet.
From trash cans
Making a humidifier out of recycle bins will be more difficult than plastic bottles, but it is also a popular and practical option. For the basis, you should take such materials.


- Two small bins and two larger bins. The filler will be expanded clay, which will need to be washed before being poured into the container.
- You will also need a bucket with a capacity of at least 12 liters.
- Aquarium pump.
- Computer cooler.
- Plastic ties for fixing parts.
First you need to connect 2 small baskets together. This must be done in such a way that the bottom of one of them remains on the floor, and the bottom of the other is directed upwards. In this case, fastenings will be made according to the diameter of the upper rings of the baskets. The resulting part is placed in a larger basket, covered with a second one of the same size on top, and large baskets are connected to each other according to the same principle.
Then you need to make a hole in the upper basket in order to fill the expanded clay inside. So that he does not wake up in a hole in the basket, expanded clay should be medium or large.The resulting device is placed in a bucket, where they put an aquarium pump, the pipes of which should be carried out to the very top.
The final step is to install a computer cooler at the very top of the device, which will act on the wet expanded clay, ensuring that air enters its walls.
Air humidifier with antibacterial filter
For such a device, of course, you will need a filter, in addition, a low-speed fan (12V) and a plastic box.
The moisturizing sponge with antibacterial impregnation is a key part of such a humidifier, it is able to trap large particles, dust and hair. Impregnation does not allow germs to spread.
The assembly process is not particularly difficult. In a plastic container, in the side part, you need to make a cutout for about half the height of the filter, then you need to fix it with a plastic tie or in any other way.
A fan is attached to the lid of the container, for which a hole is prematurely cut out. The last stage is the filling of water, its level should be slightly lower than the height of the side slot. Everything is ready, it remains only to plug it into the outlet.
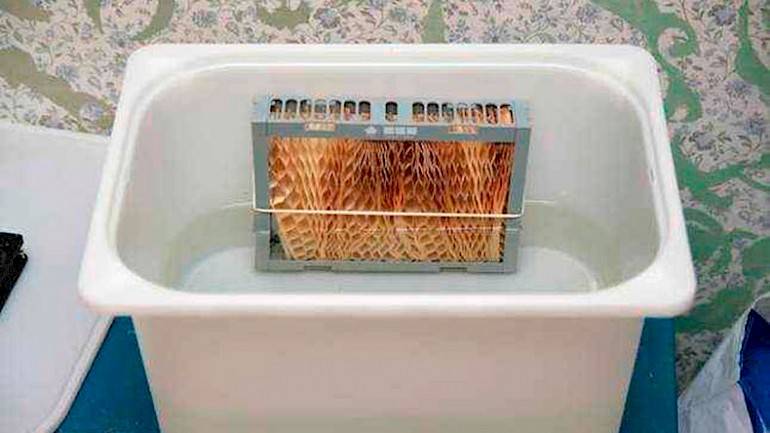
Do not forget that such a filter needs to be changed regularly, such a need can be seen by its color - it darkens, but at least once every three months.
Another version of the humidifier will have a similar design, only instead of a filter there will be gauze, and for the convenience of pouring water in the container lid, you can make a hole of the same diameter as the neck of a watering can.
Its advantage is the absence of the need to purchase a filter. For an additional effect, you can add a few drops of essential oil to the water, while there will be both moisturizing and aromatization.
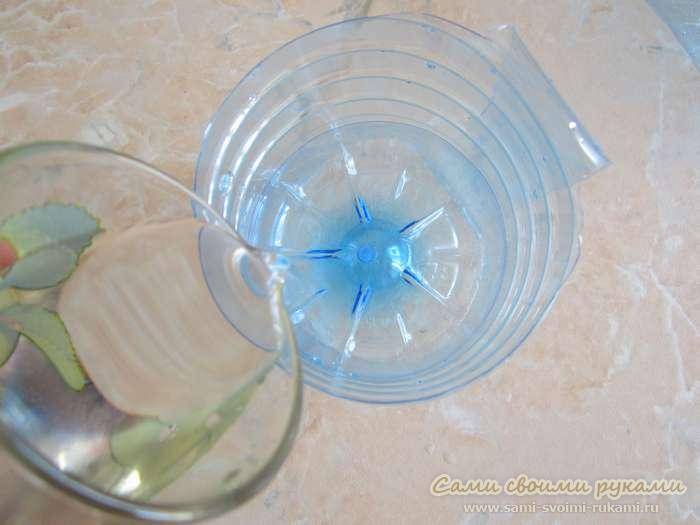
Decorative humidifier
All these designs are not very attractive, if you crave aesthetics in everything, then this humidifier option will suit you.
In order to make it, you need to take a bowl, preferably blue or light blue. Inside it and at the edges, you can stick pebbles with special glue, if there are plastic fish, then they will go too - in general, create a marine entourage, you can throw pebbles on the bottom. Pour the whole thing with water and put it near the battery.


