- Pros and cons of aluminum radiators
- What is required for efficient battery operation?
- Installation of aluminum heating radiators
- Battery connection diagrams
- Connection and commissioning
- №2 Error when calculating the number of sections
- How to place batteries
- The most accurate calculation option
- Heating Radiator Calculator
- What is needed for installation
- Mayevsky crane or automatic air vent
- Shut-off valves
- Related materials and tools
- Disassembly of cast iron radiators
- What threats might arise?
- Power of aluminum heating radiators
- The power of aluminum heating radiators and their other parameters
- Indicators of bimetallic heating radiators
- Comparison of bimetallic and aluminum heating radiators
- The importance of correct calculation
- By area of the room
- By room size
- Use of coefficients
- Small Conclusions
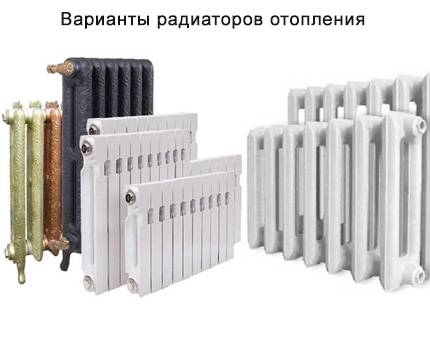
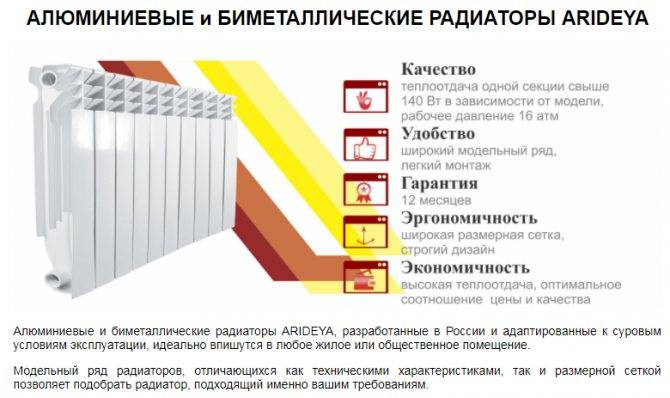
Pros and cons of aluminum radiators
Over the past half century, nothing has changed with respect to aluminum radiators - they are also actively used to equip the heating systems of public institutions and multi-apartment residential buildings. Neat, light and easy to install, devices are also readily purchased for the improvement of private housing.
There are several undoubted advantages of aluminum radiators, and often they “outweigh” the disadvantages (which also exist) and are decisive arguments when choosing.
According to user reviews, aluminum devices harmoniously complement the interior of rooms, and if they stand out from the general picture with their industrial design, they are easily masked by a decorative screen or a box with holes.
But batteries made of relatively soft metal also have their weaknesses, including:
- a characteristic feature of aluminum to enter into chemical reactions with the coolant, resulting in the formation of corrosion, as well as gases;
- air vent valves save from the occurrence of air jams;
- low resistance to high pressure and water hammer, characteristic of central highways;
- sensitivity to incorrect installation - installation errors can disrupt the uniform distribution of the coolant in all sections.
Experienced installers, due to the listed technical characteristics, do not recommend equipping circuits dependent on the central line with aluminum heating radiators.
The system functions in such a way that water hammer, a sharp change in pressure are not excluded. Due to instability, the most unprotected places - joints and connections - can fail.
Aluminum is sensitive to stray currents, which are one of the causes of corrosion. Too acidic or alkaline coolant also causes accidental destruction of the material, resulting in the replacement of the device
In connection with the listed disadvantages, it is better to connect aluminum devices to a more stable cottage heating system.It is protected not only from water hammer, but also from low-quality coolant. If you still choose an aluminum battery for a high-rise building with main heating, it is better to prefer anodized models.
What is required for efficient battery operation?
An efficient heating system can save you money on fuel bills. Therefore, when designing it, decisions should be made carefully. Indeed, sometimes the advice of a neighbor in the country or a friend who recommends such a system as his is not at all suitable.
Sometimes there is no time to deal with these issues. In this case, it is better to turn to professionals who have been working in this field for more than 5 years and have grateful reviews.
Having decided to independently install new batteries or replacement of heating radiators, it should be borne in mind that the following indicators have a direct impact on their effectiveness:
- size and thermal power of heating devices;
- their location in the room;
- connection method.
The choice of heating appliances strikes the imagination of an inexperienced consumer. Among the offers are wall radiators made of various materials, floor and baseboard convectors. All of them have a different shape, size, level of heat transfer, type of connection. These characteristics must be taken into account when installing heating devices in the system.
Among the models of heating devices on the market, it is better to choose, focusing on the material and heat output indicated by the manufacturer
For each room, the number of radiators and their size will be different. It all depends on the size of the room, the level of insulation exterior walls of the building, connection diagrams, thermal power indicated by the manufacturer in the product passport.
Battery locations - under the window, between windows located at a fairly long distance from each other, along a blank wall or in the corner of a room, in the hallway, pantry, bathroom, in the entrances of apartment buildings.
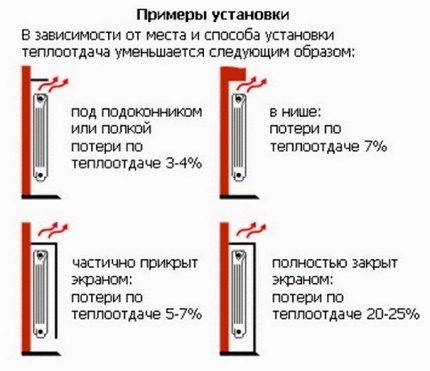
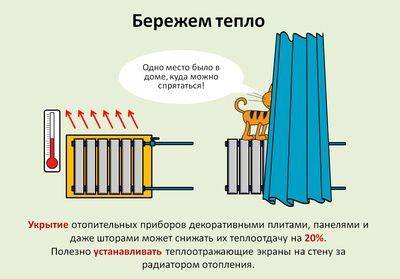
Depending on the place and method of installation of the heater, there will be different heat losses. The most unfortunate option - the radiator is completely closed by the screen
It is recommended to install a heat-reflecting screen between the wall and the heater. It can be made with your own hands, using for this one of the materials that reflect heat - penofol, isospan or another foil analogue.
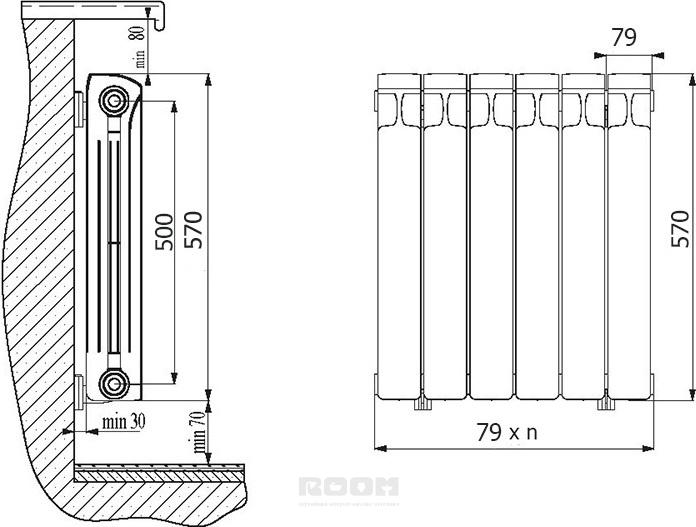
You should also follow these basic rules for installing a battery under a window:
- all radiators in one room are located on the same level;
- convector ribs in a vertical position;
- the center of the heating equipment coincides with the center of the window or is 2 cm to the right (to the left);
- the length of the battery is at least 75% of the length of the window itself;
- the distance to the window sill is at least 5 cm, to the floor - not less than 6 cm. The optimal distance is 10-12 cm.
The level of heat transfer from appliances and heat loss depends on the correct connection of radiators to the heating system in the house.
Having observed the basic norms for the placement of radiators, it is possible to prevent the penetration of cold into the room through the window as much as possible.
It happens that the owner of the dwelling is guided by the advice of a friend, but the result is not at all what was expected. Everything is done like his, but only Batteries don't want to heat up.
This means that the selected connection scheme was not suitable specifically for this house, the area of \u200b\u200bthe premises, the thermal power of the heating devices were not taken into account, or annoying errors were made during installation.
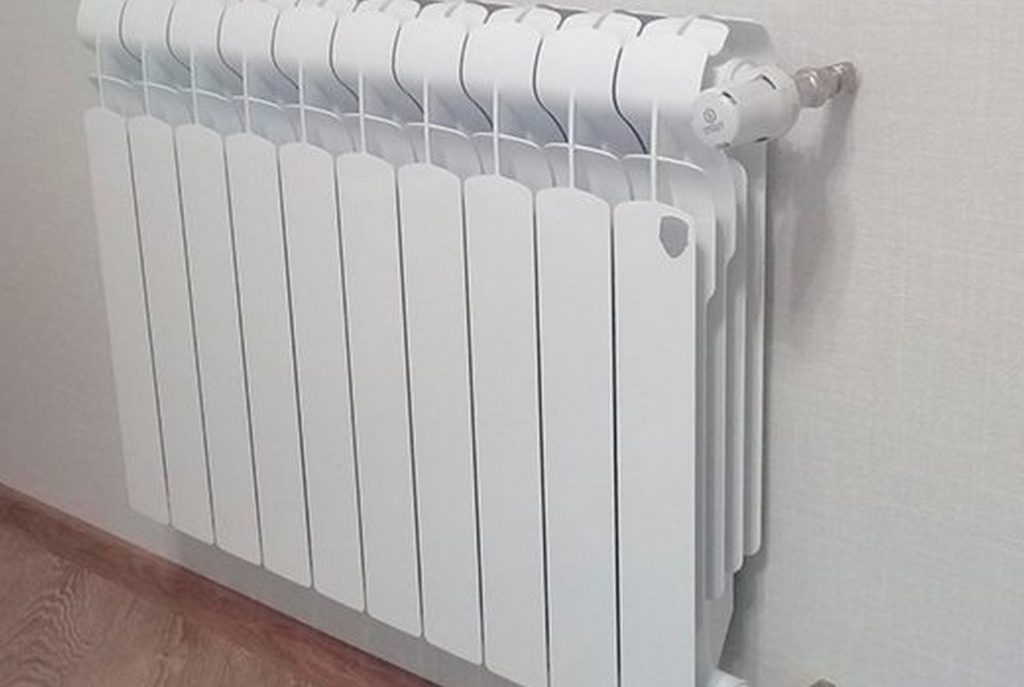
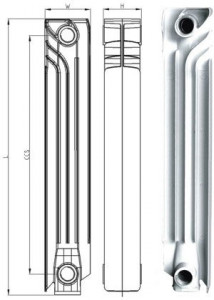
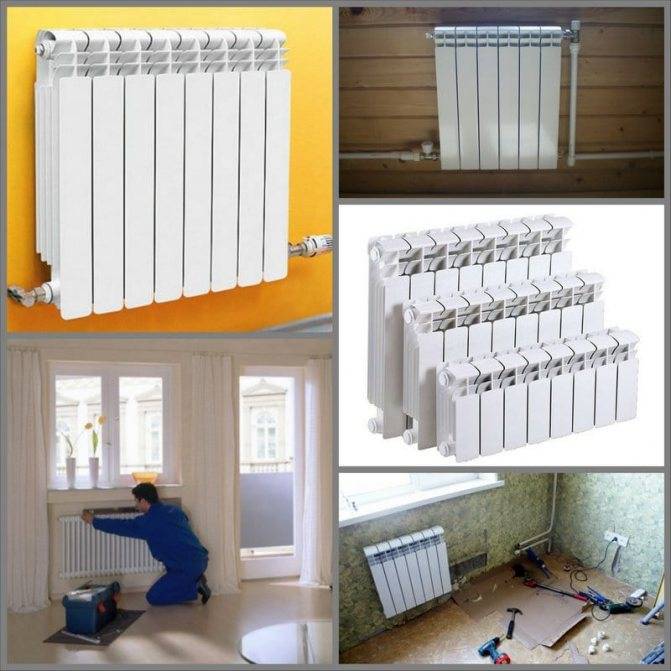
Installation of aluminum heating radiators
Assembling and adjusting the heating system is a responsible matter, it is best handled by professionals. But if you wish, you can install aluminum radiators with your own hands.
First you need to assemble the device:
- Screw in the included plugs and plugs.
- Assemble temperature controllers and attach shut-off valves at the inlet and outlet of the device.
- Check the nipples and fix the air valves.
The scheme of assembly-disassembly of the device is attached to the kit. It is better if the assembly is carried out by a specialist, then there will be a guarantee that all the taps are installed correctly. It is not allowed to clean aluminum with abrasives when installing adapters or building sections - a coolant leak may begin.
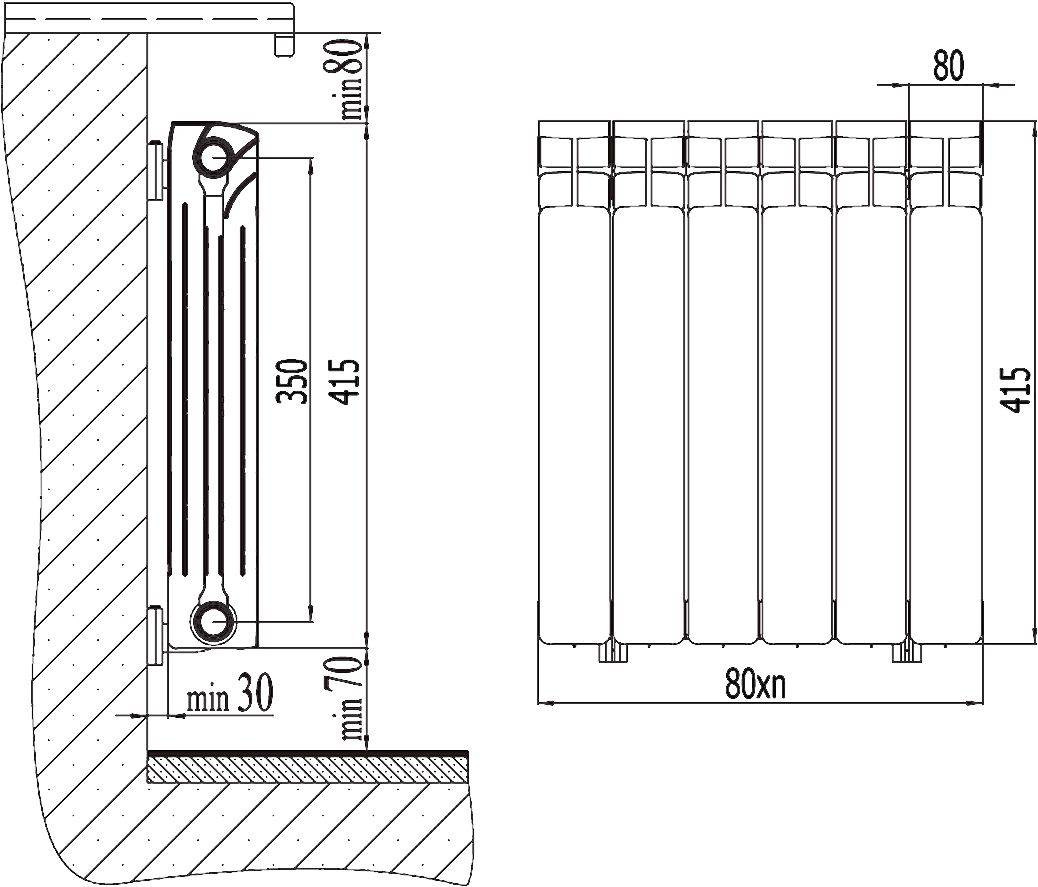
Attention! It is necessary to fasten the air valves so that at the end of the process their outlet heads look up. Having marked the installation location of the battery under the window in accordance with the indicated indents, brackets are attached to the wall
To do this, you need to drill holes with a puncher and insert plastic dowels, and screw the brackets into them. Screwing the fasteners, from time to time it is necessary to hang a radiator on them in order to maintain a distance of 5 cm from the wall
Having marked the place of installation of the battery under the window in accordance with the indicated indents, brackets are attached to the wall. To do this, you need to drill holes with a puncher and insert plastic dowels, and screw the brackets into them. When screwing the fasteners, from time to time it is necessary to hang a radiator on them in order to maintain a distance of 5 cm from the wall.


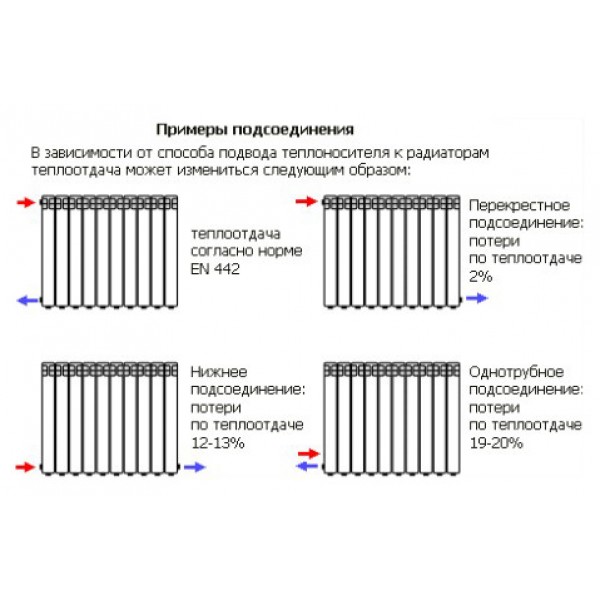
Battery connection diagrams
The device can be connected in several ways:
Diagonal. Experts consider it the most energy efficient.The supply pipe is connected to the upper pipe, and the outlet pipe is connected to the lower pipe, but on the opposite side of the radiator. With such a scheme, the battery gives off the maximum of thermal energy received from hot water into space. The disadvantage of the method is that the pipes running on top do not fit well into the design of the room.
Side. The pipe supplying the coolant is connected to the side fitting (right or left), the return pipe is connected to the parallel lower one. If the pipes are laid in the reverse order, the heat transfer of the device will drop by 50%. Such a scheme for connecting aluminum heating radiators does not work effectively if the sections are of a non-standard size, or their number exceeds 15.
In terms of design, bottom-mounted aluminum radiators win. With such a wiring, the pipes are not visible, they are hidden in the floor or in the wall. Batteries are connected to the system through pipes located at the bottom of the devices. Typically, bottom-connected radiators are mounted on floor brackets. The battery is attached to the wall on one hook, only to maintain balance.
Connection diagrams for aluminum heating radiators
Important! Aluminum batteries have standard pipe parameters, so you don’t need to buy any additional adapters from the radiator to pipes. The device also comes with a Mayevsky crane, designed to bleed air
Connection and commissioning
Before installing aluminum appliances, the autonomous system is washed with water. Alkaline solutions should not be used.
Important! Aluminum is easy to wrinkle and scratch with tools, so it is better to mount the battery in the factory plastic packaging.After connection, the polyethylene can be removed
In an effort to connect aluminum heating radiators at a low cost, some homeowners use deaf, non-separable pipe and radiator mates. But heating a home in the northern hemisphere is not something to save on. It would be wiser to install “Americans” - quick-connect threaded assemblies, when the pipes are joined and disconnected using one union nut.
The procedure for connecting radiators to the heating system:
- Make sure that there is no water in the system or it is blocked at the installation points.
- Hang the radiator and connect it to the pipeline with the help of spurs.
- Seal all threaded connections using plumbing linen. Enough 4-5 turns in the direction of the thread.
- Pressurize the system.
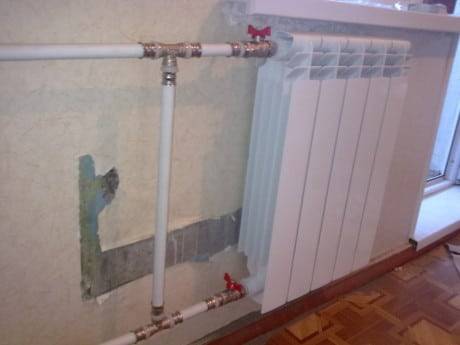
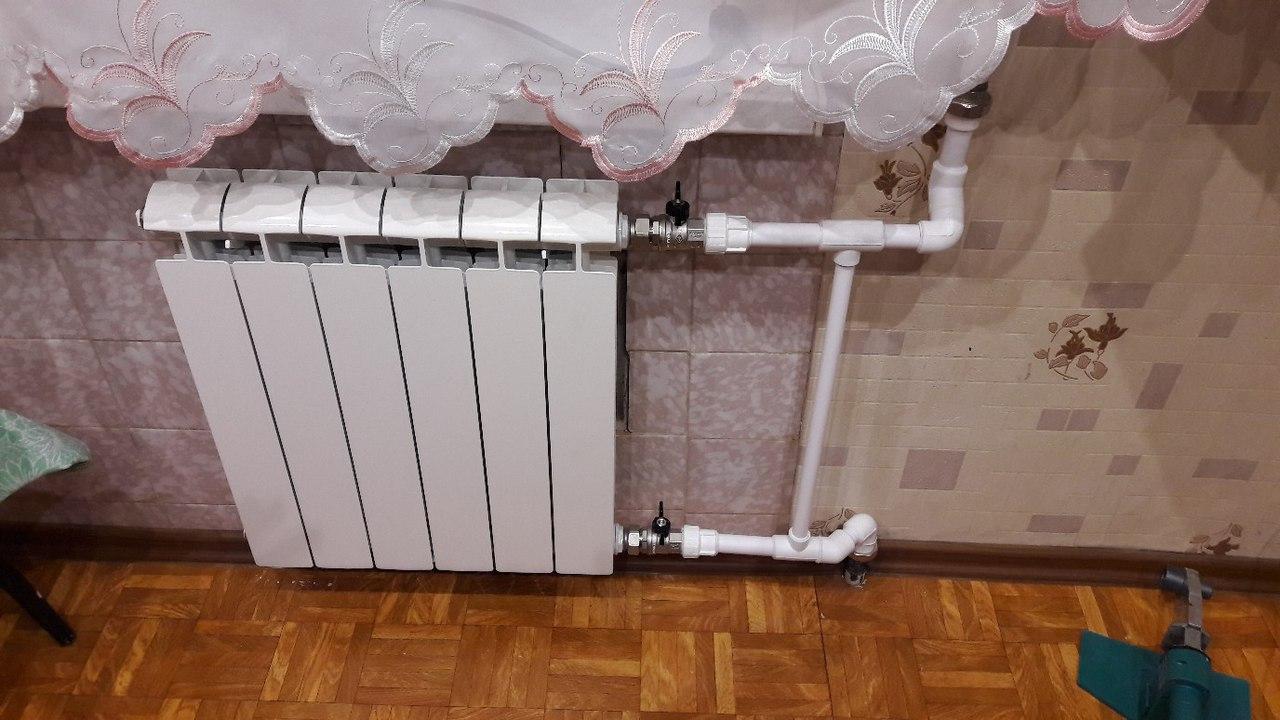
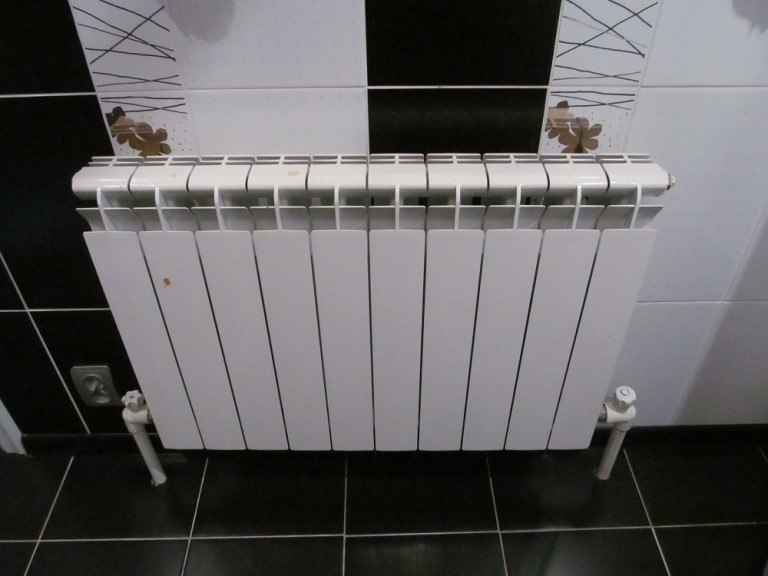
Aluminum battery connected to the heating system
You can install an aluminum heating radiator yourself, but it would be wiser to entrust the matter to specialists who have all the necessary permits to perform such work. The slightest inaccuracy in installation can lead to leaks and inefficient functioning of the heating system.
№2 Error when calculating the number of sections
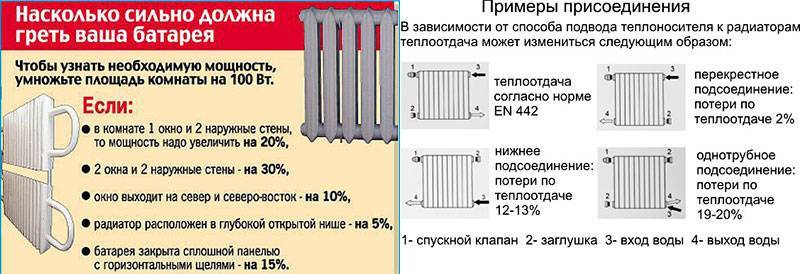
To calculate the length of the battery, most measure the height of the ceilings, the footage of the room and stop there. These values will be enough only for a private house, where you can set a certain temperature of the device.
In the case of centralized heating, when installing a radiator in an apartment, this method of calculating the number of sections is not suitable, because the temperature fluctuates on different days. If you focus on the average figure, then the apartment will not always be warm enough.
Therefore, it is better to take one or two sections more than it turns out according to the calculations. It is no longer possible to make the temperature of the coolant, but it is enough to close the tap to reduce it.
How to place batteries
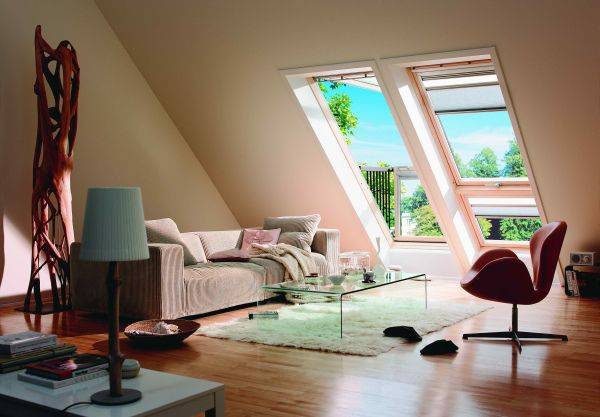
First of all, the recommendations relate to the installation site. Most often, heating devices are placed where heat loss is most significant. And first of all, these are windows. Even with modern energy-saving double-glazed windows, it is in these places that the most heat is lost. What can we say about the old wooden frames.
It is important to correctly place the radiator and not make a mistake in choosing its size: not only power is important
If there is no radiator under the window, then cold air descends along the wall and spreads across the floor. The situation is changed by installing a battery: warm air, rising up, prevents cold air from “draining” onto the floor. It must be remembered that in order for such protection to be effective, the radiator must occupy at least 70% of the width of the window. This norm is spelled out in SNiP. Therefore, when choosing radiators, keep in mind that a small radiator under the window will not provide the proper level of comfort. In this case, there will be zones on the sides where cold air will go down, there will be cold zones on the floor. At the same time, the window can often “sweat”, on the walls in the place where warm and cold air will collide, condensation will fall out, and dampness will appear.


For this reason, do not seek to find a model with the highest heat dissipation. This is justified only for regions with a very harsh climate. But in the north, even of the most powerful sections, there are large radiators. For central Russia, an average heat transfer is required, for the south, low radiators are generally needed (with a small center distance).This is the only way you can fulfill the key rule for installing batteries: block most of the window opening.
The battery installed near the doors will work effectively
In cold climates, it makes sense to arrange a thermal curtain near the front door. This is the second problem area, but it is more typical for private houses. This problem may occur in the apartments of the first floors. Here the rules are simple: you need to put the radiator as close to the door as possible. Choose a place depending on the layout, also taking into account the possibility of piping.
The most accurate calculation option
From the above calculations, we have seen that none of them is perfectly accurate, since even for the same rooms, the results, albeit slightly, are still different.
If you need maximum calculation accuracy, use the following method. It takes into account many factors that can affect the heating efficiency and other significant indicators.
In general, the calculation formula has the following form:
T \u003d 100 W / m 2 * A * B * C * D * E * F * G * S,
- where T is the total amount of heat required to heat the room in question;
- S is the area of the heated room.
The rest of the coefficients need more detailed study. So, coefficient A takes into account the features of the glazing of the room.

Features of the glazing of the room
- 1.27 for rooms whose windows are glazed with just two glasses;
- 1.0 - for rooms with windows equipped with double glazing;
- 0.85 - if the windows have triple glazing.
Coefficient B takes into account the features of the insulation of the walls of the room.

Features of the insulation of the walls of the room
- if the insulation is inefficient. the coefficient is assumed to be 1.27;
- with good insulation (for example, if the walls are laid out in 2 bricks or purposefully insulated with a high-quality heat insulator). a coefficient equal to 1.0 is used;
- with a high level of insulation - 0.85.
The coefficient C indicates the ratio of the total area of window openings and the floor surface in the room.
The ratio of the total area of window openings and the floor surface in the room
The dependency looks like this:
- at a ratio of 50%, the coefficient C is taken as 1.2;
- if the ratio is 40%, use a factor of 1.1;
- at a ratio of 30%, the coefficient value is reduced to 1.0;
- in the case of an even smaller percentage, coefficients of 0.9 (for 20%) and 0.8 (for 10%) are used.
The D coefficient indicates the average temperature in the coldest period of the year.
Heat distribution in the room when using radiators
The dependency looks like this:
- if the temperature is -35 and below, the coefficient is taken equal to 1.5;
- at temperatures up to -25 degrees, a value of 1.3 is used;
- if the temperature does not fall below -20 degrees, the calculation is carried out with a coefficient equal to 1.1;
- residents of regions where the temperature does not fall below -15 should use a coefficient of 0.9;
- if the temperature in winter does not fall below -10, count with a factor of 0.7.
The coefficient E indicates the number of external walls.
Number of external walls
If there is only one external wall, use a factor of 1.1. With two walls, increase it to 1.2; with three - up to 1.3; if there are 4 external walls, use a factor of 1.4.
The F coefficient takes into account the features of the room above. The dependency is:
- if there is an unheated attic space above, the coefficient is assumed to be 1.0;
- if the attic is heated - 0.9;
- if the upstairs neighbor is a heated living room, the coefficient can be reduced to 0.8.
And the last coefficient of the formula - G - takes into account the height of the room.

- in rooms with ceilings 2.5 m high, the calculation is carried out using a coefficient equal to 1.0;
- if the room has a 3-meter ceiling, the coefficient is increased to 1.05;
- with a ceiling height of 3.5 m, count with a factor of 1.1;
- rooms with a 4-meter ceiling are calculated with a coefficient of 1.15;
- when calculating the number of battery sections for heating a room with a height of 4.5 m, increase the coefficient to 1.2.
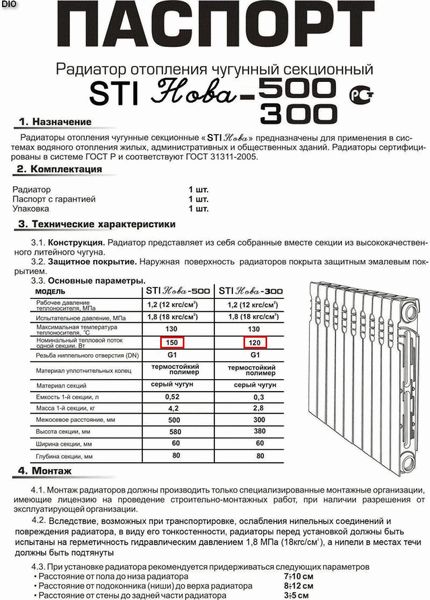
This calculation takes into account almost all existing nuances and allows you to determine the required number of sections of the heating unit with the smallest error. In conclusion, you will only have to divide the calculated indicator by the heat transfer of one section of the battery (check in the attached passport) and, of course, round the found number up to the nearest integer value.


Heating Radiator Calculator
For convenience, all these parameters are included in a special calculator for calculating heating radiators. It is enough to specify all the requested parameters - and clicking on the "CALCULATE" button will immediately give the desired result:
Energy Saving Tips
What is needed for installation
Installation of heating radiators of any type requires devices and consumables. The set of necessary materials is almost the same, but for cast-iron batteries, for example, the plugs are large, and the Mayevsky tap is not installed, but, somewhere at the highest point of the system, an automatic air vent is installed.But the installation of aluminum and bimetallic heating radiators is absolutely the same.
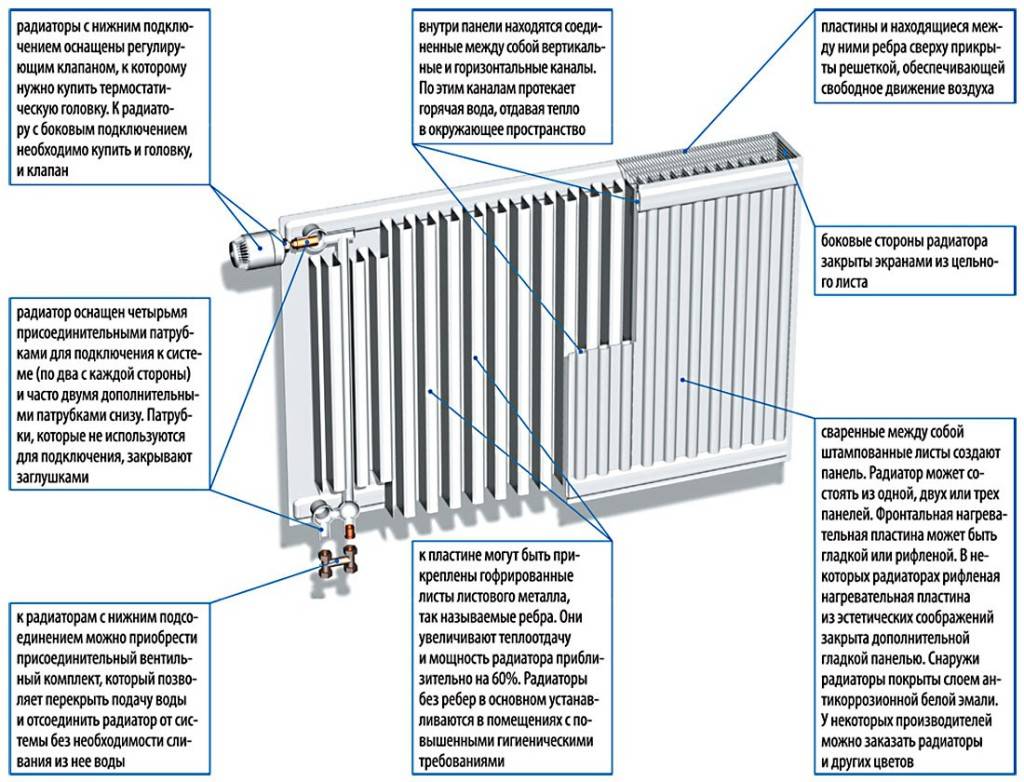
Steel panel ones also have some differences, but only in terms of hanging - brackets are included with them, and on the back panel there are special metal-cast shackles with which the heater clings to the hooks of the brackets.
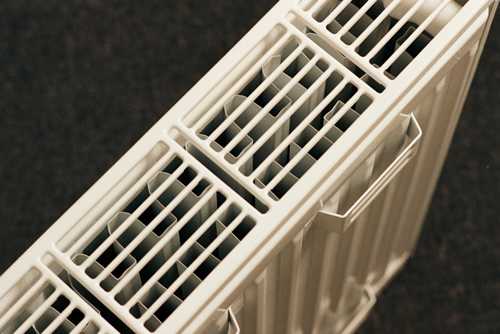
Here for these bows they wind up hooks
Mayevsky crane or automatic air vent
This is a small device for venting air that can accumulate in the radiator. It is placed on a free upper outlet (collector). Must be on every heater when installing aluminum and bimetallic radiators. The size of this device is much smaller than the diameter of the manifold, so another adapter is required, but Mayevsky taps usually come with adapters, you just need to know the diameter of the manifold (connecting dimensions).
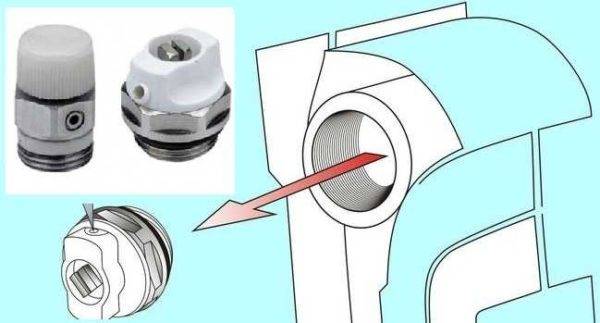
Mayevsky crane and method of its installation
In addition to the Mayevsky tap, there are also automatic air vents. They can also be placed on radiators, but they are slightly larger and for some reason are only available in a brass or nickel-plated case. Not in white enamel. In general, the picture is unattractive and, although they deflate automatically, they are rarely installed.
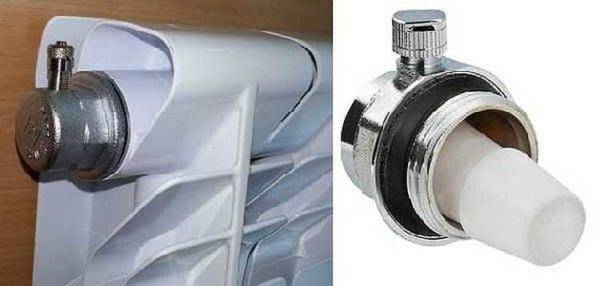
This is what a compact automatic air vent looks like (there are bulkier models)
There are four outlets for the radiator with lateral connection. Two of them are occupied by the supply and return pipelines, on the third they put a Mayevsky crane. The fourth entrance is closed with a plug.It, like most modern batteries, is most often painted with white enamel and does not spoil the appearance at all.
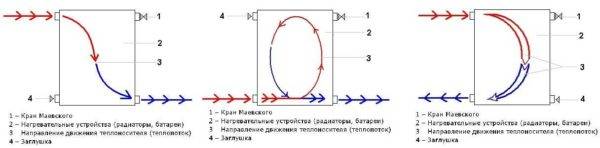
Where to put the plug and the Mayevsky tap with different connection methods
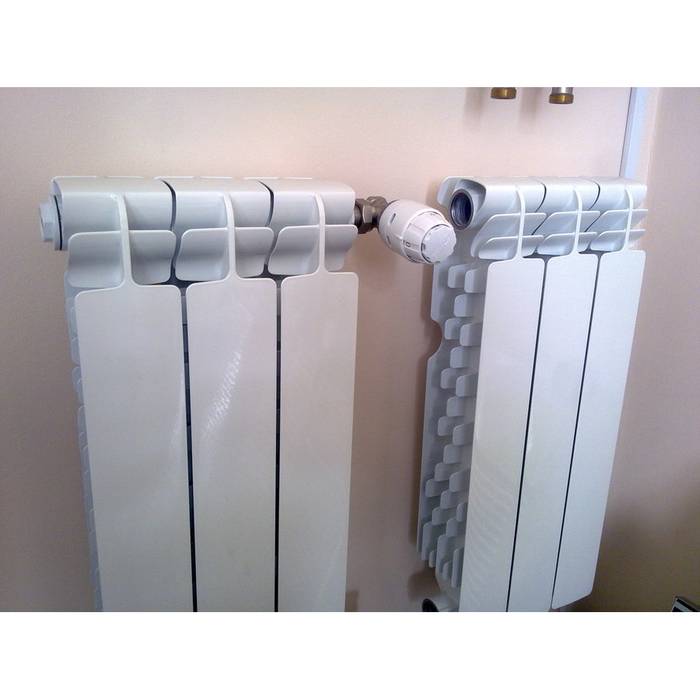
Shut-off valves
You will need two more ball valves or shut-off valves with the ability to adjust. They are placed on each battery at the input and output. If these are ordinary ball valves, they are needed so that, if necessary, you can turn off the radiator and remove it (emergency repair, replacement during the heating season). In this case, even if something happened to the radiator, you will cut it off, and the rest of the system will work. The advantage of this solution is the low price of ball valves, the minus is the impossibility of adjusting heat transfer.
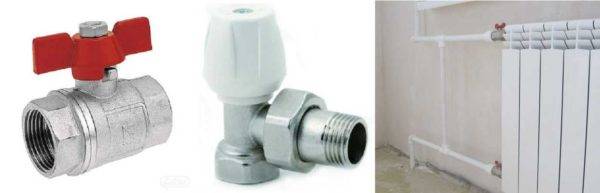
Cranes on the heating radiator
Almost the same tasks, but with the ability to change the intensity of the coolant flow, are performed by shut-off control valves. They are more expensive, but they also allow you to adjust the heat transfer (make it smaller), and they look better outwardly, they are available in straight and angular versions, so the strapping itself is more accurate.
If desired, you can put a thermostat on the coolant supply after the ball valve. This is a relatively small device that allows you to change the heat output of the heater. If the radiator does not heat well, they cannot be installed - it will be even worse, since they can only reduce the flow. There are different temperature controllers for batteries - automatic electronic, but more often they use the simplest one - mechanical.
Related materials and tools
You will also need hooks or brackets to hang on the walls. Their number depends on the size of the batteries:
- if the sections are not more than 8 or the length of the radiator is not more than 1.2 m, two attachment points from above and one from below are sufficient;
- for every next 50 cm or 5-6 sections, add one fastener from above and below.
Takde need a fum tape or linen winding, plumbing paste to seal the joints. You will also need a drill with drills, a level (a level is better, but a regular bubble one is also suitable), a certain number of dowels. You will also need equipment for connecting pipes and fittings, but it depends on the type of pipes. That's all.
Disassembly of cast iron radiators
Dismantling cast-iron radiators sometimes becomes a very time-consuming process, but necessary.
Scheme of disassembling cast-iron heating radiators: a - capturing the threads of sections by nipples by 2-3 threads; b - turning the nipples and joining the sections; c - connection of the third section; g - grouping of two radiators; 1 - section; 2 - nipple; 3 - gasket; 4 - short radiator key; 5 - crowbar; 6 - a long radiator key.
A new or old radiator is placed on a level place. At least on one side, you need to remove the usual futors or deaf ones - plugs. On different sections of radiators, they can be left-handed or right-handed. Usually, cast iron fittings have a right-hand thread, and plugs have a left-hand thread. If there are no disassembly skills, and there is a free section, it is better to find out what kind of thread this is and in which direction the key should be rotated before applying force. If the thread is left-handed, when disassembling cast-iron batteries, turn the key clockwise.


As with unscrewing any nuts, you first need to “break” the futors from their place, i.e. turn them a quarter of a turn on both sides of the battery.Then the futors are unscrewed so that a gap of several millimeters is formed between the sections. If you release the futorki more, the whole structure will begin to bend under its own weight and due to the applied efforts. In this case, the thread may jam. To prevent this from happening, an assistant must stand on the disassembled battery, which will prevent bending with its weight.
Usually, dismantling of old heating radiators is difficult because the fittings and sections are “boiled”. In order to disassemble such a battery, you will have to use an autogen or a blowtorch. The junction is heated in a circular motion. As soon as it is warm enough, the futorki are twisted out. If it was not possible to unscrew the first time, the actions are repeated.
If there is not enough strength to disassemble the battery, you need to increase the length of the key. An ordinary pipe is used, which serves as a lever.
Similarly, built-in nipples for airing cast-iron radiators are unscrewed.
If it was not possible to disassemble the cast-iron battery using the considered methods, it remains to cut it with a grinder or autogenous or smash it in a supine position with a sledgehammer. You need to carefully break or cut one section. After this operation, the adhesion between the sections may loosen, the battery can be disassembled, the remaining sections can be saved.
The use of a “liquid key” or WD liquid does not give an effect, since in old cast-iron batteries the futors were sealed with flax and paint, and liquids would not get on the threads.
What threats might arise?
Let's start with the fact that supplying heat from the outside is much easier and more convenient than from autonomous heating. There is no need to suffer with the installation, configuration of the boiler.Especially when the autumn and winter period begins, when the temperature starts to drop, water will quickly flow through the batteries, which will warm the apartment.
For central heating, there are some disadvantages:
- Water obviously travels a long way before entering the battery, and naturally there will be a large amount of chemical impurities in it. It is they who can cause the formation of rust and corrosion on the pipes.
- Another disadvantage will be that there are also particles of sludge, they will be in the coolant. Just these particles will deform the battery straight from the inside, and in a fairly short time.
- The main disadvantage is that the constant supply of water is not 100%. That is, the pipes may sometimes not be hot, but just barely warm. Sometimes it happens that the supply is so strong that the batteries become too hot, and they simply cannot be touched.
- Another significant disadvantage will be a sharp jump in pressure. In the heating system, this is a common practice. Occurs due to the fact that the locksmith, for example, abruptly stopped the water supply.
If earlier they used valves that made it possible to prevent large jumps, that is, they made the water supply gradual. But now, when steam taps appeared that shut off the water instantly, the valves became unclaimed. It turns out that a water hammer is formed when unnecessary air enters the pipes.
These unexpected jumps can lead to big problems. In general, weak batteries cannot normally withstand such surges, thus they can harm others.
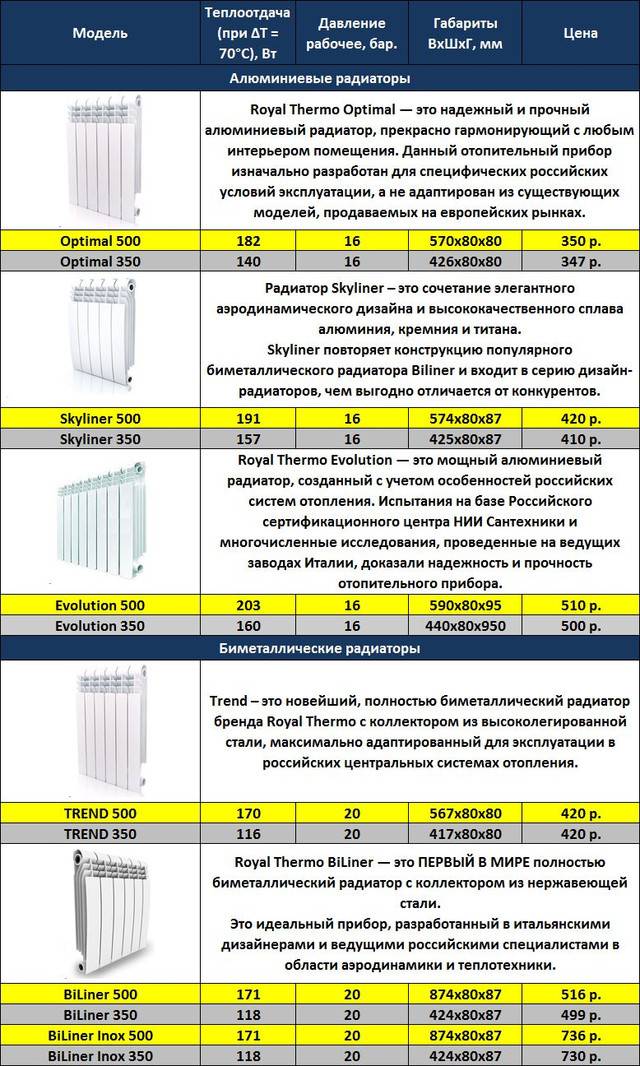
Power of aluminum heating radiators
When choosing a heating radiator, first of all, pay attention to the material from which it is made and its power. The performance and technical characteristics of the battery depend on these factors.
Another important criterion when choosing is the cost of equipment. Let's deal with the indicators of the leaders among heating batteries.
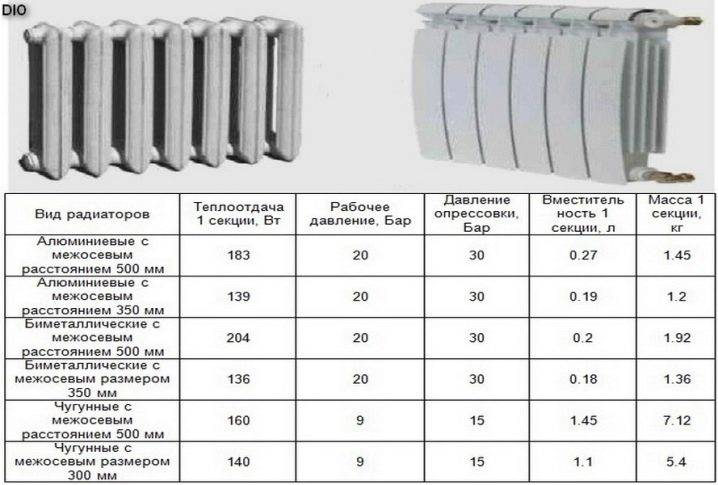
The power of aluminum heating radiators and their other parameters
The power of aluminum heating radiators is greater than that of steel or cast iron counterparts. due to the high heat transfer of this metal. In addition to performance, aluminum radiators have a number of other advantages, due to which they are gaining more and more popularity among similar equipment.
- Lightness - the mass of the radiator simplifies transportation and installation work.
- Attractive look - easily fit into the environment.
- Durability - service life up to 25 years.
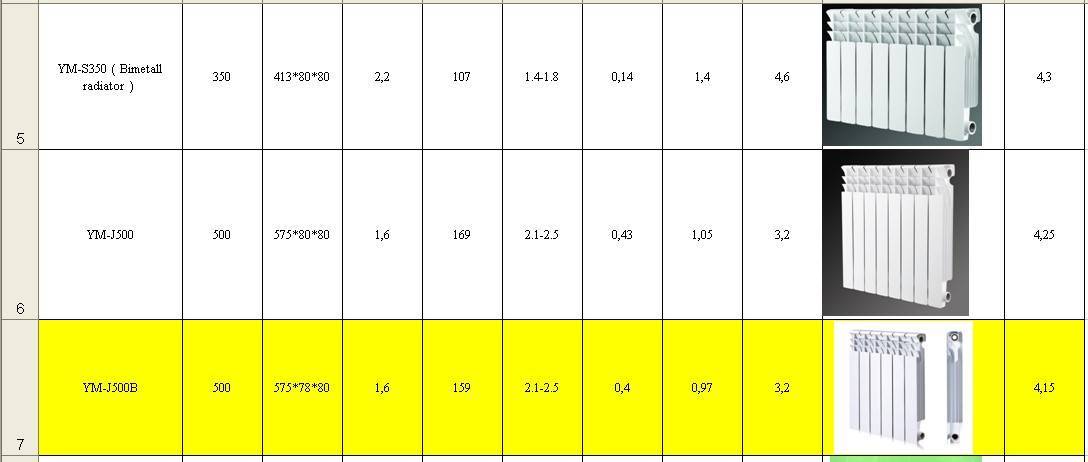
The power of one section of the aluminum radiator is 0.2 kW, which is a solid indicator. For heating an average room up to 15 m2, 7 sections are enough at a standard height or 8 if the ceilings are higher than usual. If cast iron and steel radiators are superior to aluminum, then there is a modern variety with which they have almost equal data.
Indicators of bimetallic heating radiators
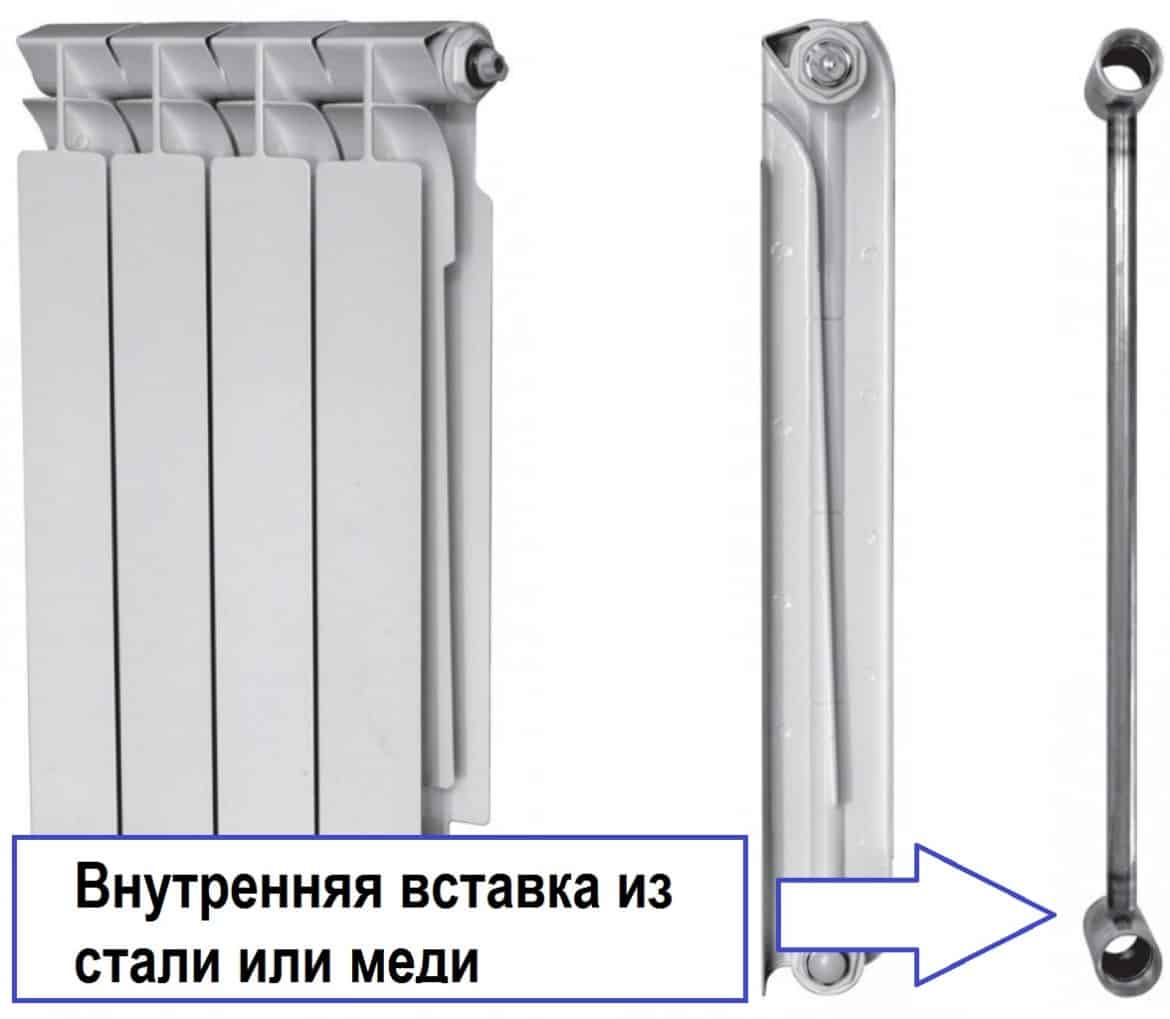
The power of bimetallic heating radiators is comparable to the power of an aluminum battery and is 0.2 kW. This is due to their composition: the aluminum body provides instant heat removal from the steel filling. The combination of two metals made it possible to obtain batteries that have the advantages of aluminum, but without its disadvantages.
- Strength - steel is more resistant to water hammer and can withstand even strong drops up to 24 atmospheres.
- Wear resistance - the batteries are coated on the inside with a special protective compound and become immune to corrosion.
- Durability - the service life of a bimetal is up to 30 years, which exceeds the safety margin of an aluminum battery.
Given the identical power, the number of sections of an aluminum radiator and a bimetallic one, for heating a room with the same area, will be equal.
Comparison of bimetallic and aluminum heating radiators
The power of the aluminum radiator section and the bimetallic one is identical. which gives them the same performance, but there are some differences in characteristics
What to look for when choosing batteries
- Reliability - for an autonomous heating system, in which there is no threat of water hammer, aluminum equipment will be enough, but if it is intended to be used in a centralized heating system, it is better to play it safe and choose bimetal as more resistant. It is guaranteed to withstand even a serious jump and will not leak.
- Cost is one of the most important criteria, which often outweighs any arguments. The cost of aluminum radiators is on average two times lower than the cost of bimetallic radiators with equal characteristics. If we compare the price-quality ratio, aluminum wins, but subject to pressure control in the system.
Both bimetallic and aluminum radiators will meet their characteristics only if they are produced on modern equipment and according to technology. You should not try to save money and purchase a surprisingly cheap model from a little-known manufacturer.Probably its quality, regardless of the material, leaves much to be desired.
Rating: 0 Votes: 0
To ensure optimal performance of the heating system, the number of radiator sections per heated area is calculated. Quite often it turns out that a standard radiator is not enough and sections must be added, otherwise the heating will not be effective. Consider how to properly soy.
In order to obtain the most efficient heating system with high efficiency and minimum energy consumption, it is necessary not only to select the most suitable radiators, but also to perform the correct installation. Given the increased popularity of bimetallic batteries, let's take a closer look at their connection. P.
In this article, we will consider what is better than a radiator or a convector for a reliable and economical option for heating both your apartment and a private house, we will list several reliable and proven manufacturers that you can trust to heat your home. The question of reliable heating rises before many.


A thermal valve for a heating radiator is a very necessary addition, without which your heating system will not work fully. More precisely, it will work, but it will be impossible for you to regulate the temperature of the system and, accordingly, the temperature regime in the room. To.
The importance of correct calculation
From the correct calculation of sections of bimetallic heating batteries depends on how comfortable it will be indoors in winter. This number is influenced by the following factors:
- Temperature. If there are not enough sections, then in winter it will be cold in the room. If there are too many of them, then there will be too hot and dry air.
- Expenses.The more sections you buy, the more expensive it will be to replace the batteries.
Calculating the number of sections of bimetallic batteries is quite difficult. When calculating take into account:
- fans that remove part of the heat from the room;
- exterior walls - it is colder in the corner rooms;
- Are heat packs installed?
- whether there is thermal insulation of the walls;
- what are the minimum winter temperatures in the region of residence;
- whether steam is used for heating, which increases heat transfer;
- whether it is a living room, a corridor or a warehouse;
- what is the ratio of the area of walls and windows.
In this video you will learn how to calculate the actual amount of heat
By area of the room
This is a simplified view calculation of bimetallic radiators heating per square meter. It gives a fairly correct result only for rooms with a height of no more than 3 m. According to plumbing standards, for heating one square meter of a room located in central Russia, a heat output of 100 W is required. With this in mind, the calculation is made as follows:
- determine the area of \u200b\u200bthe room;
- multiply by 100 W - this is the required heating power of the room;
- the product is divided by the heat transfer of one section (it can be recognized by the radiator passport);
- the resulting value is rounded up - this will be the desired number of radiators (for the kitchen, the number is rounded down).
You can calculate the number of sections by the area of \u200b\u200bthe room
This method cannot be considered completely reliable. The calculation has many disadvantages:
- it is suitable only for rooms with low ceilings;
- can only be used in central Russia;
- does not take into account the number of windows in the room, the material of the walls, the degree of insulation and many other factors.
By room size
This method gives a more accurate calculation, since it takes into account all three parameters of the room. It is based on a sanitary heating norm for one cubic meter of space, equal to 41 watts. To calculate the number of sections of a bimetallic radiator, perform the following steps:
- Determine the volume of the room in cubic meters, for which its area is multiplied by the height.
- The volume is multiplied by 41 W and the heating power of the room is obtained.
- The resulting value is divided by the power of one section, which is recognized from the passport. The number is rounded - this will be the required number of sections.
Use of coefficients
Their application allows to take into account many factors. The coefficients are used as follows:
- If the room has an additional window, 100 watts are added to the heating power of the room.
- For cold regions, there is an additional factor by which the heating power is multiplied. For example, for the regions of the Far North it is 1.6.
- If the room has bay windows or large windows, then the heating power is multiplied by 1.1, for a corner room - by 1.3.
- For private houses, the power is multiplied by 1.5.
Correction factors help to more accurately calculate the number of battery sections. If a selected bimetal radiator consists of a certain number of sections, then you need to take the model in which it exceeds the calculated value.
Small Conclusions
You can safely start choosing the right radiator. Someone will need the lightest battery, for someone the appearance is important. But the 2 most important factors are water shock endurance and heat transfer. In fact, they need to be guided in the first place. Everyone chooses a radiator according to their needs, their budget.
If you live in an old style house. Then you can safely leave the cast-iron variants of radiators. But if the house is new, then it is worth installing an aluminum model. Second moment. If old cast-iron batteries are installed, then you can choose only 1 option, either replace it with cast iron, or bimetal.