- How to insulate the roof and other elements
- Why are there problems?
- Do-it-yourself attic insulation options from the inside
- Insulation of the attic from the inside, if the roof is already standing
- Insulation of the attic from the inside, if the roof is metal
- How to insulate a mansard roof for winter living
- How to insulate the attic floor with a gable roof
- How to properly insulate a mansard roof
- Video about the insulation of the attic roof with your own hands
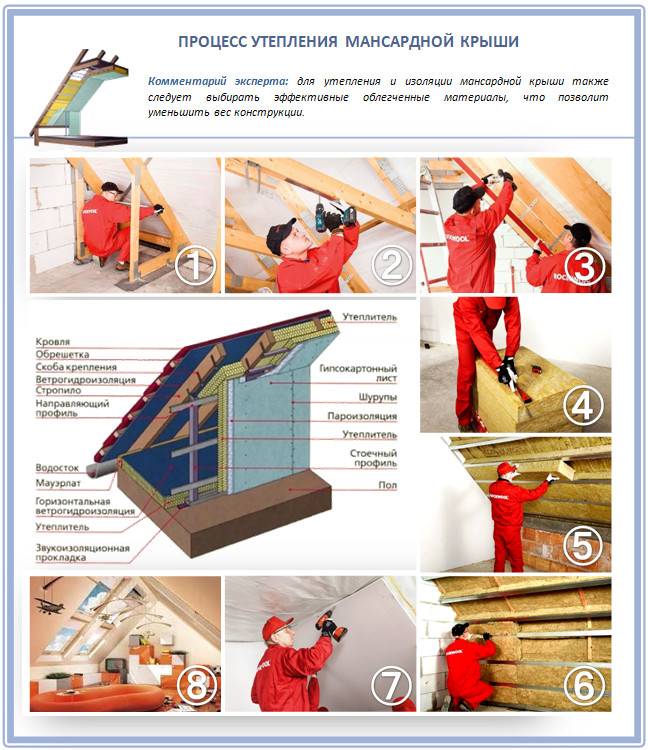
- How to properly insulate a mansard roof on your own: workflow
- We warm the outside of the roof with our own hands
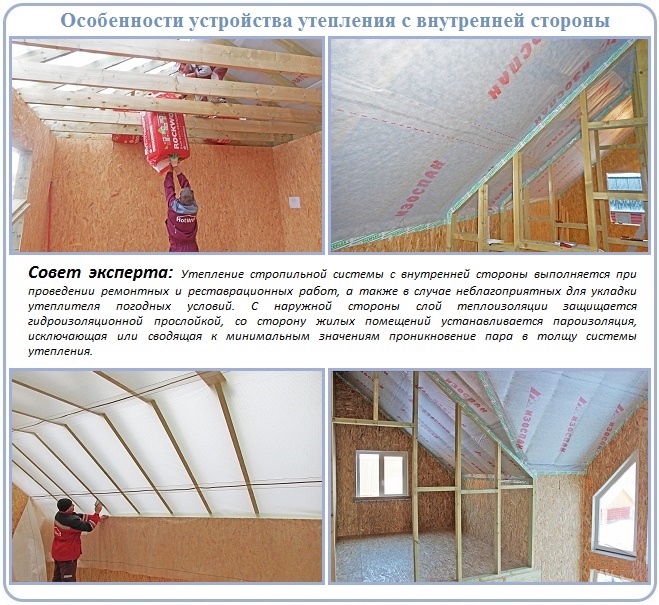
- Warming from the inside
- Preparing the under-roof space for insulation
- Basic Mistakes
- Best Answers
- A set of works on insulation
- Waterproofing works
- Installation of thermal insulation on the roof from the inside
- Vapor barrier installation
- Insulation of the walls and floor of the attic
- External insulation of the attic
- Stages of attic insulation from the inside
- Roof insulation in the attic
- Wall insulation in the attic from the inside
- Floor insulation in the attic
- Advantages and disadvantages of different types of heaters
How to insulate the roof and other elements
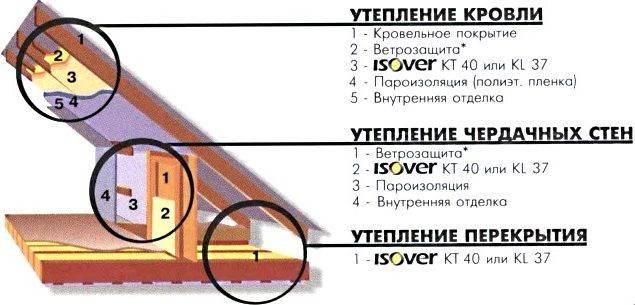
The scheme of how to properly insulate the attic can be different and depends on the type of house.
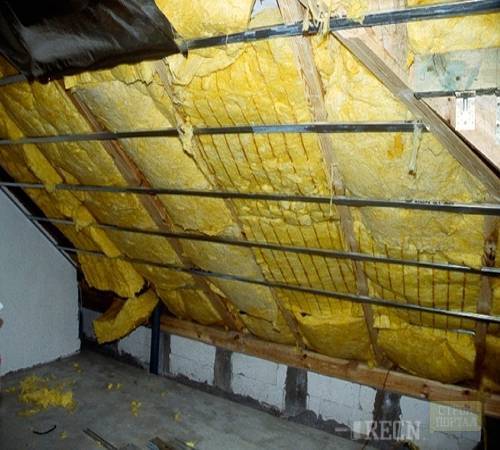
Insulation of the attic roof is the most important stage, because. It is she who occupies most of the room.
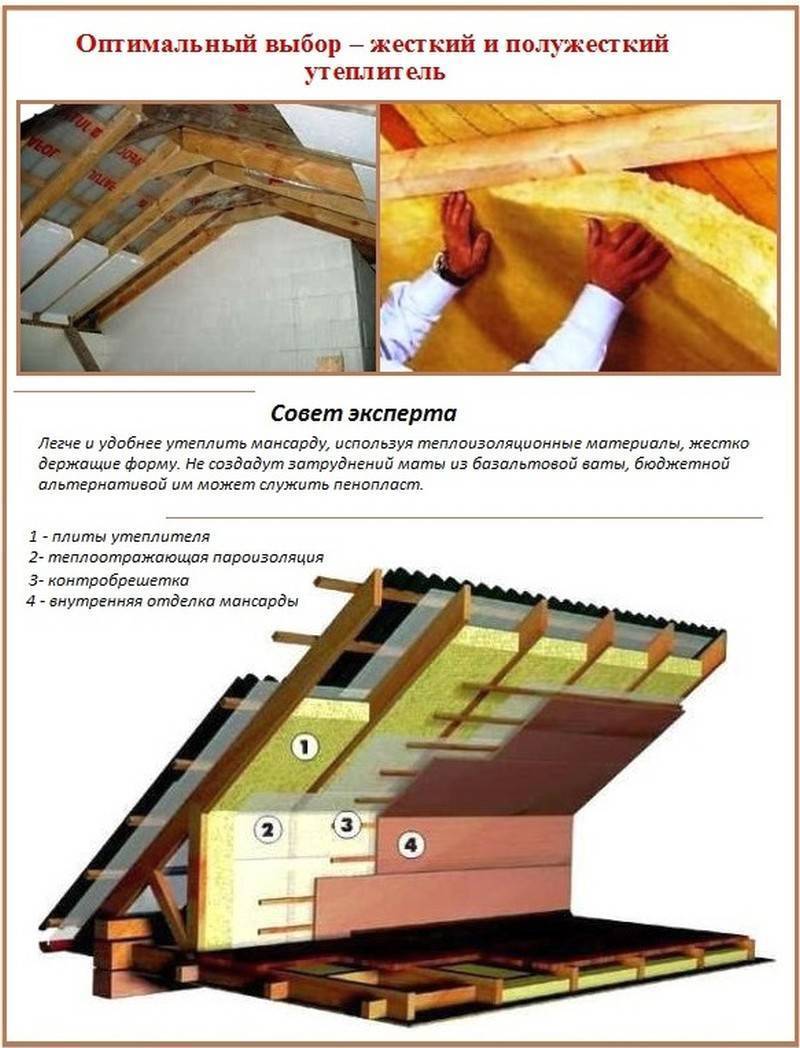
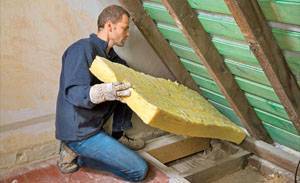
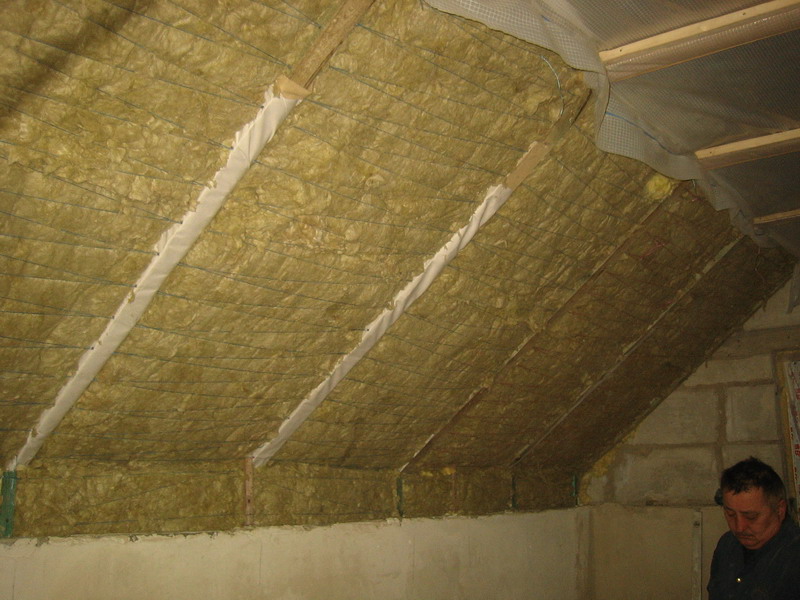
Since the roof is sloping, only those materials that do not change their size and shape over time are suitable as insulation.
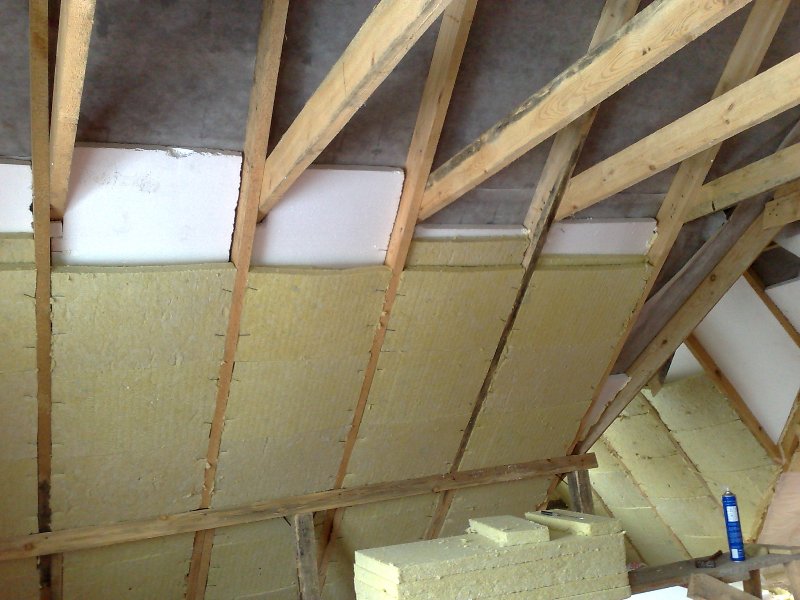
If you have chosen basalt wool for insulation, then it is better to purchase it in tiled form, and not in a continuous sheet, because. in this case, it will be easier to lay it, and the plates can be easily connected to each other during the installation process.
The insulation must lie in a continuous layer, so if there are gaps between the plates, then they must be closed with a strip of material, which should be slightly larger than the required space, because. cotton wool tends to shrink over time.
Details for closing gaps are driven into the space between the slab and the rafters with effort. The laying pattern of this material is available on video and photos - watch them before starting work.
Thermal insulation is also required by complex roof elements - skates, overhangs and valleys.
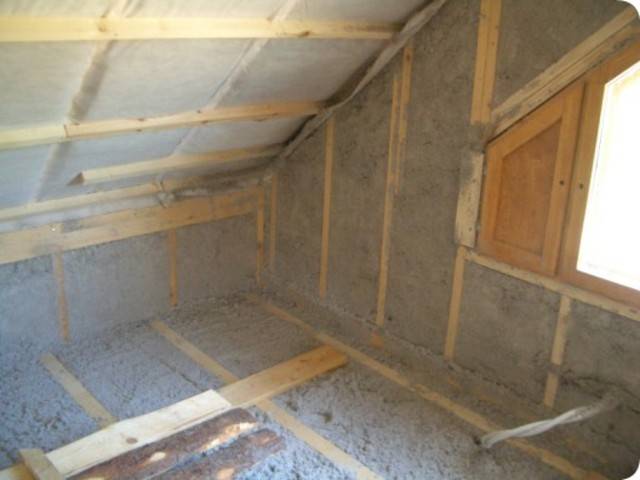
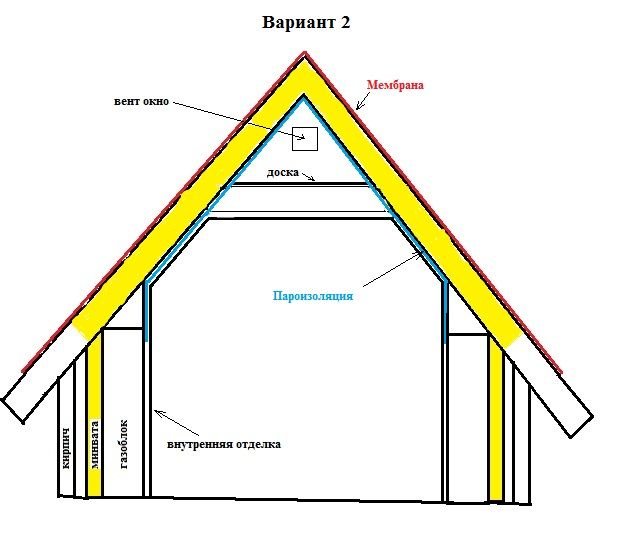
In a private house where the shape of the roof changes, it is important to tightly connect the parts of the insulation so that it does not move away and performs its function, holding warm air. A particularly problematic place in the room is the junction of walls with a roof and window openings. To prevent these places from freezing in winter, the windows of the room are also insulated.
The scheme of window insulation is shown in the photo below.
To prevent these places from freezing in winter, the windows of the room are also insulated. The scheme of window insulation is shown in the photo below.
A particularly problematic place in the room is the junction of walls with a roof and window openings. To prevent these places from freezing in winter, the windows of the room are also insulated. The scheme of window insulation is shown in the photo below.
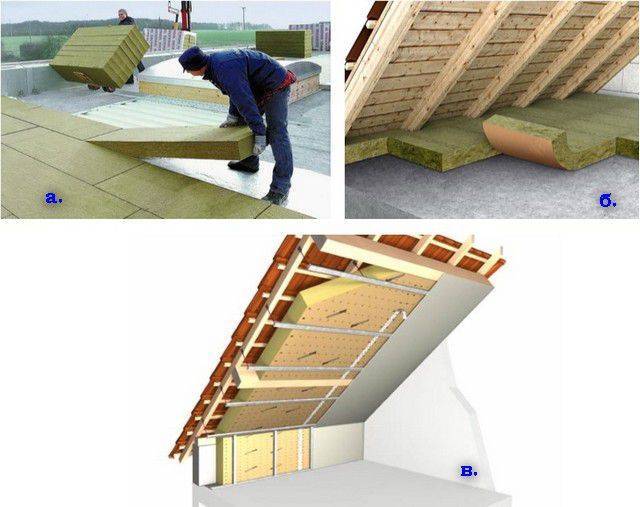
The material for insulating the ceilings of the attic roof depends on their type.
Expanded polystyrene is most suitable for reinforced concrete structures and self-leveling or tiled floors - it is durable and also has good sound insulation, which is very important in this type of room.
For reinforced concrete floors with wooden floors on logs, insulation from the outside with wool with basalt fiber is usually used.
At the same time, ventilation holes must be made in the corners of the attic, and so that the ceiling does not let in unnecessary sounds, sound-absorbing pads are installed on the logs.
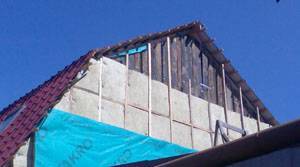
Warming the gables is another important step that should not be missed. The layout of the insulation depends on the type of construction of the house.
If it is erected by means of layered masonry, then the insulation must be laid inside the masonry. At the same time, there is a facing material outside the structure, and a load-bearing wall on the inside.
If the house uses a ventilated facade, then the gable is insulated with basalt fiber slabs. When laying, a space of 4-15 cm should remain between the material and the cladding layer.
To ensure that cold air does not penetrate into the attic from the outside of the gables.
To protect the insulation from moisture, a membrane must be installed on top of it, which will resist wind or rain on it.
Video:
If the facade is plaster, then expanded polystyrene or stone wool slabs are used to insulate the gables. If you use cotton wool, you will have to adjust it to the desired size of the gables.


Whatever type of insulation you choose, it is better to first follow the stages of work on photos and videos, and only then proceed to finish the attic.
If it is impossible to insulate the walls of the gables, then you will have to insulate the walls from the inside. We will talk about this below.
Why are there problems?
There are statistics: up to 30% of attics have to be redone after the first winter. Roofing, interior trim and films are removed, and the insulation is dried. A lot of materials have to be thrown away, and this is another unplanned cost. Even if you hired a professional team of builders, this is still not a guarantee of the well-being of the future attic, especially if the roofing cake is thought out without taking into account the local climate.
Why is this happening? So, in Russia, dampness, cold and round-the-clock negative temperatures are not uncommon. And the lower the ambient temperature, the greater the volume of steam that penetrates through the vapor barrier - all due to an increase in the partial pressure drop. And at the same time, the migration of moisture through the cold membrane slows down significantly, although it does not stop. Bottom line: the situation is even worse than under standard proven conditions. And therefore it is impossible to test the vapor permeability of a roofing pie in European conditions, and at the same time expect the same good result in the Siberian regions.
Here is a simple illustration to help you understand what we are talking about here:
Note that the maximum pressure of water vapor on the roofing pie is in the residential attic. And the point is not even that there is a person in such a room much more often than in an ordinary cold attic - it’s just that the pressure of warm air is additionally added to the vapor pressure. Moreover, these processes are so clear that they can be observed in the form of real leaks!
The fact is that wet insulation loses its properties very quickly. And the more humid the air that gets to it, the faster the thermal insulation decreases.For example, a basalt insulation with a moisture content of only 5% already loses its heat by 20% than a dry one.
For example, just one cubic meter of air space, if its relative humidity is 100%, at a temperature of 20C contains 17.3 grams of water - just in the form of steam. And the lower the temperature, the more difficult it is for air to hold water in a bound state. And when the temperature drops to 16C, there will already be only 13.6 grams of water vapor in the same air, and the rest will settle in the form of water in the heater. We conclude: moisture in the insulation appears due to the condensation of excess water vapor from the air in the process of lowering the temperature. And she needs to actively fight. And this is far from the only problem - now we will deal with all of them.
Do-it-yourself attic insulation options from the inside
Do-it-yourself attic insulation is possible for two reasons. Firstly, it will be possible to reduce the heat loss of the building, which will lead to fuel savings during space heating. The second reason is that air humidity decreases, as a result of which a microclimate is formed that is suitable for humans, but prevents the reproduction of fungus and mold.
The process of warming from the inside is carried out mainly according to the general scheme. But there is also a certain specificity. Often the reason for this is in the mistakes made when laying the roof and other aspects.
Insulation of the attic from the inside, if the roof is already standing

If the roof is already covered with waterproofing, then there are two ways to insulate it from the inside of the attic. The essence of the first: lay the thermal insulation between the rafters, close the vapor barrier, put the crate and mount the cladding.
The essence of the second method:
- on the crossbars and rafter steps, the markings should be stretched with a cord. The distance between the strips must correspond to the width of the selected insulation. Fastening of metal holders is carried out in the form of strips;
- mineral wool is used to fill niches. To avoid its falling out, the holder's limit switches must be bent;
- close the mineral wool with a vapor barrier. Attach the membrane to the holders using special plastic latches;
- cut holes for windows, wiring and other utilities. Glue them with a film, if required, then fill with sealant;
- install a metal profile on plastic latches.
At the final stage, drywall should be fixed or sheathed with any kind of finishing material. But this should be done only after the entire crate is fixed to the latches.
Insulation of the attic from the inside, if the roof is metal

The disadvantage of a metal roof is the formation of strong condensate.
As a material for thermal insulation, it is better to use Penoplex plates, because they are moisture resistant. From the inside, the insulation is laid on top of the rafter steps, and not between them.
You can also use mineral wool. But in this case, the rafters are initially fastened with a waterproofing membrane. Hangers should be installed on each rafter leg and a metal profile should be attached to them.
Under the resulting sublattice, you will need to get a heater and close it with a vapor barrier from above. Next, the final cladding must be fixed to the profile. The resulting ventilation space between the heat-insulating cake and the metal roof will completely eliminate the accumulation of condensate.
How to insulate a mansard roof for winter living

Attic ventilation, even with an insulated roof, is carried out through viewing windows
This is an important rule if the attic is preparing for winter living. Gables, roof and floor should be insulated in such a way as to get a "thermos"
In this case, it is necessary to make sure that the gaps between the roof covering and the heat-insulating cake are observed. Moisture will be removed through the ventilation space. If heat-insulating material was used to insulate the roof, then it will be necessary to equip a forced ventilation system for the attic.
How to insulate the attic floor with a gable roof
On the attic building there are simple and broken roofs. In the latter case, the structure has rafter junctions in which it is necessary to bend the insulation
Therefore, it is important to use flexible material for broken roofs.
Insulating a gable roof of the usual type is much easier. Due to the absence of complex sections with kinks, it is convenient to use rigid plates. In addition, it is still permissible not to create a ceiling, but only to insulate the slopes.


How to properly insulate a mansard roof
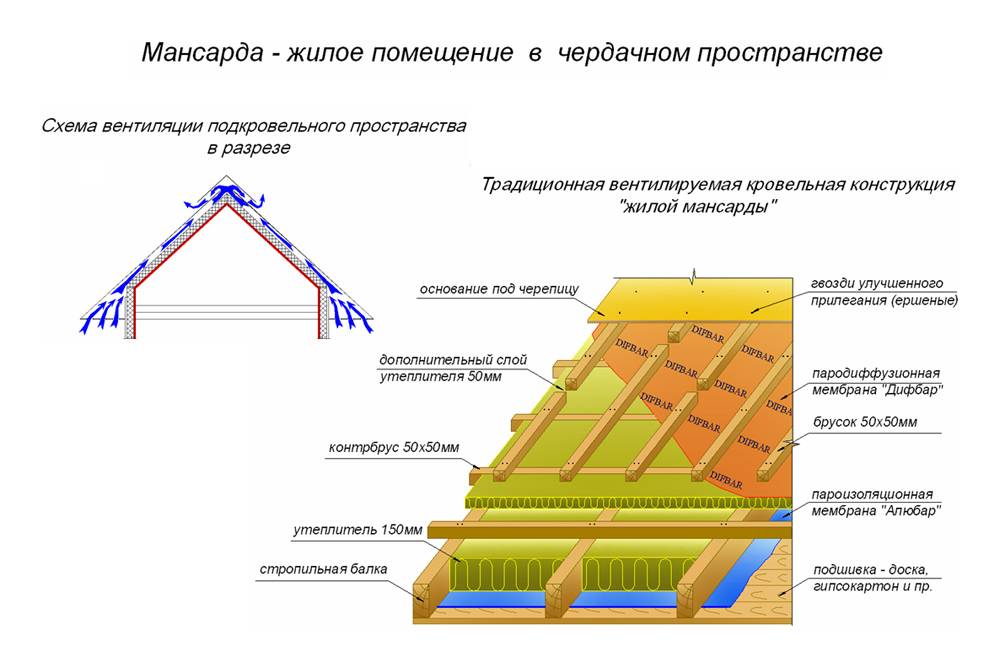
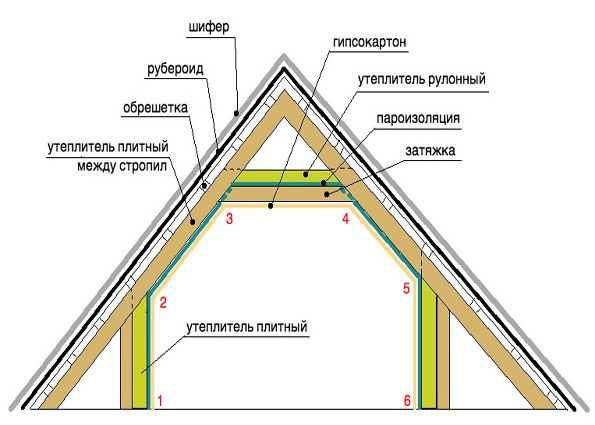
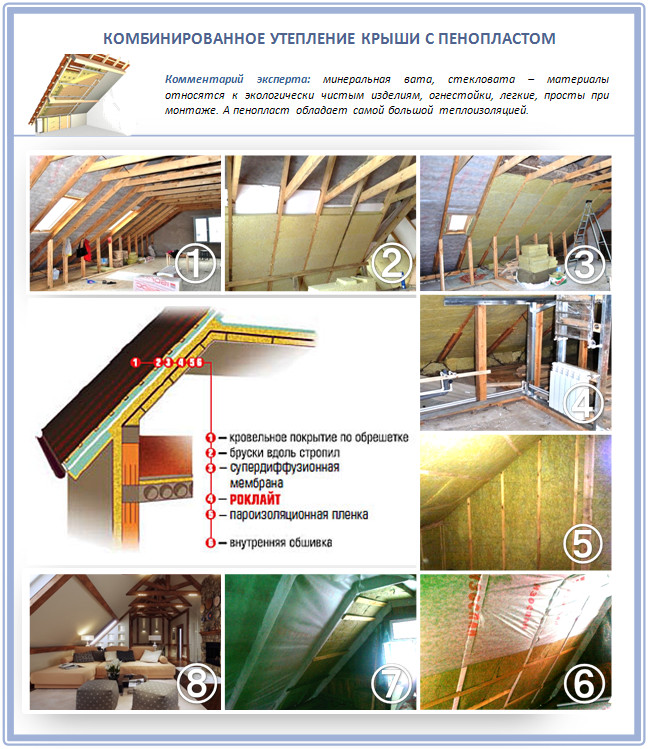
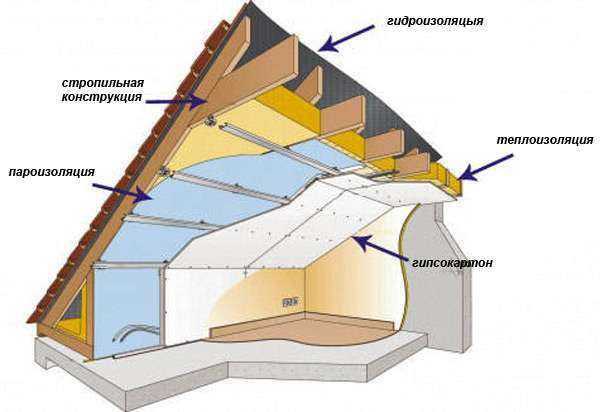
Roof insulation
The thickness of the insulation must provide the required thermal resistance, which is determined by thermal calculation (performed by specialists of the design organization). However, it should be borne in mind that even in the southern regions, the thermal insulation layer above the attic should be powerful enough, since the roof heats up in the sun more than other building envelopes. For the same reason, the use of expanded polystyrene is undesirable: when heated, it releases substances hazardous to health.
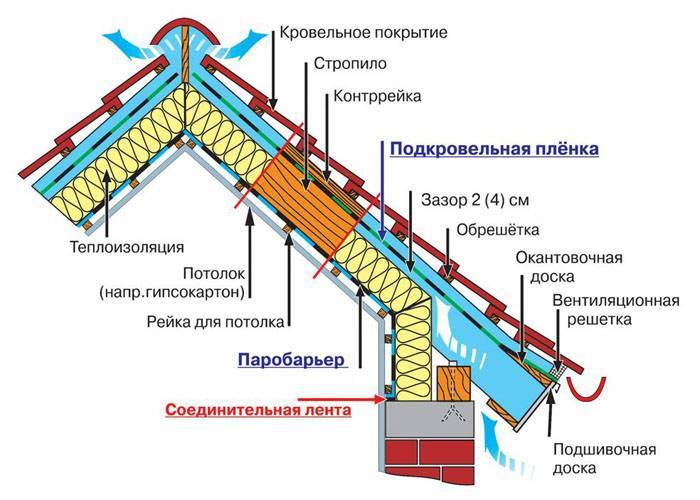
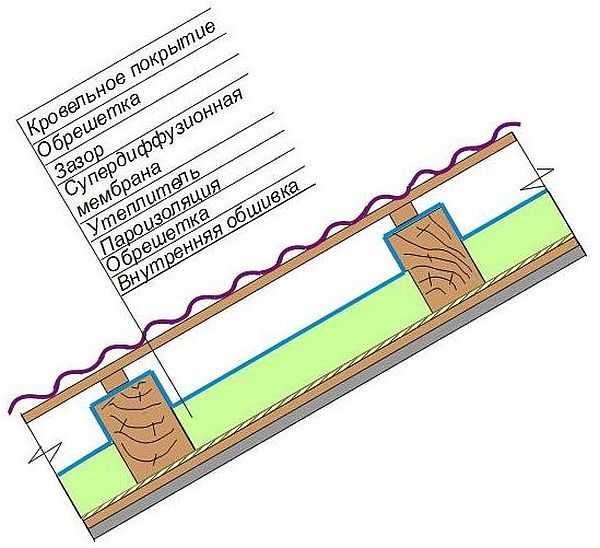
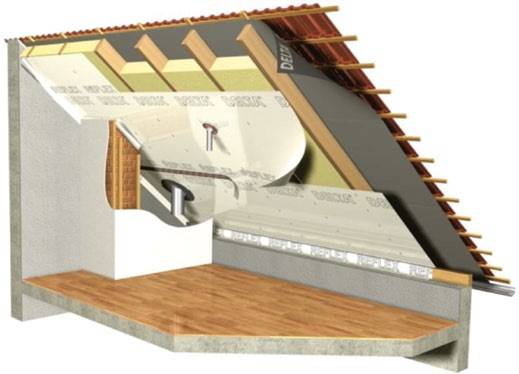
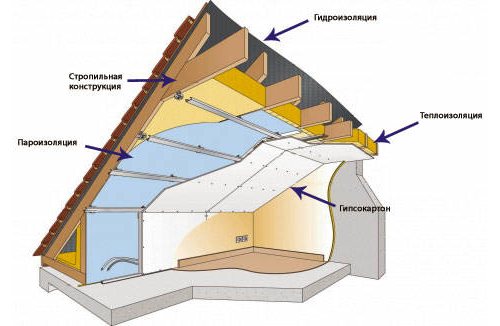
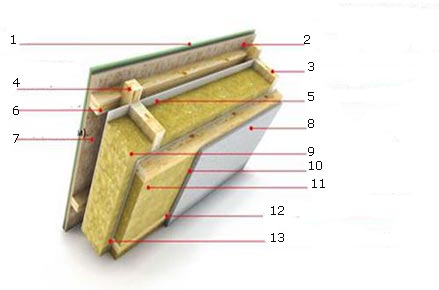
Proper insulation of the mansard roof requires that the insulation be placed in the space between the rafters so that a ventilation gap of 50-100 mm remains between it and the waterproofing film. To do this, before laying, special slats are attached to the rafters. After laying slabs or mats in the inter-rafter space, they, together with the rafters, are covered with another layer of insulation (from below) and only then they are hemmed with a layer of vapor barrier. For more information about insulation, you can look at the mansard roof insulation scheme.
Warming of gables
Video about the insulation of the attic roof with your own hands
Up to 35% of the heat escapes through the roof of the house, so it must be insulated. Watch the video below for professional advice on how to properly insulate your attic.
Important information about attic insulation.
How to properly insulate a mansard roof on your own: workflow
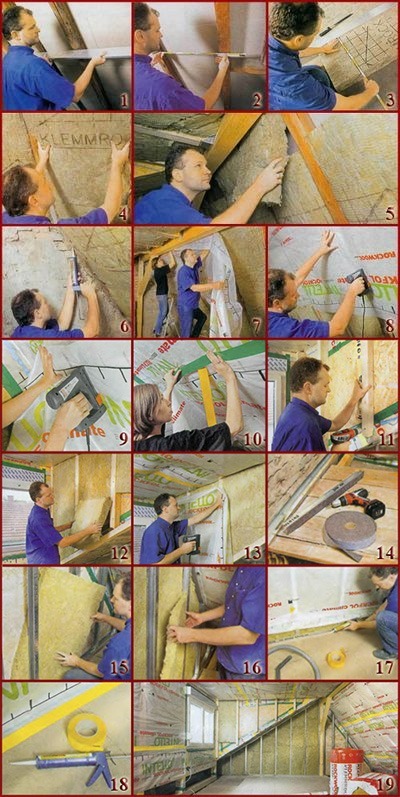
The correctness and sequence of actions in warming are the key to successful work on thermal insulation of the roof. The main rule is the tight contact of the truss elements and the insulation itself. To make the attic roof suitable for winter living, you need to perform the following activities:
- first protect with a waterproof film;
- attach the slats, taking into account the free placement of insulation;
- the last layer should cover the wooden beams so that cold air does not pass through them;
- if there are empty spaces left, they must be blown out with mounting foam;
- you also need to install another layer of vapor barrier material.
If through holes occur during the execution of work, they will need to be closed.
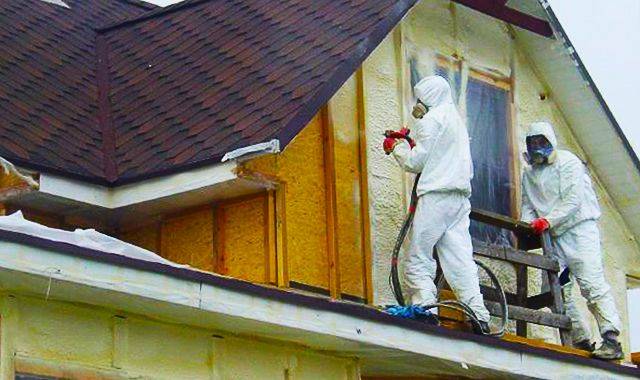
We warm the outside of the roof with our own hands
For insulation from the outside of the roof, you need to use special dense materials like plates. Choose specimens that are moisture resistant. It is advisable to carry out thermal insulation work together with the facade of the whole house. From below it is necessary to nail boards that will not allow the piits to slide down. The board must be equal in width and thickness to the material used.
 Roof insulation work
Note that all wood must be treated with antiseptics, flame retardants, special solutions for outdoor use.
Before starting work on thermal insulation, check whether the ventilation system is made in the space under the roof.
To make the attic warm, and at the same time there were no problems with excessive humidity, you must clearly follow all the instructions. for work. If the roof is at the same time the walls of the attic floor, while it has a broken structure, then the work algorithm is as follows:
- The lower part is the inner lining. It can be drywall or lining.
- Next, the crate is mounted.
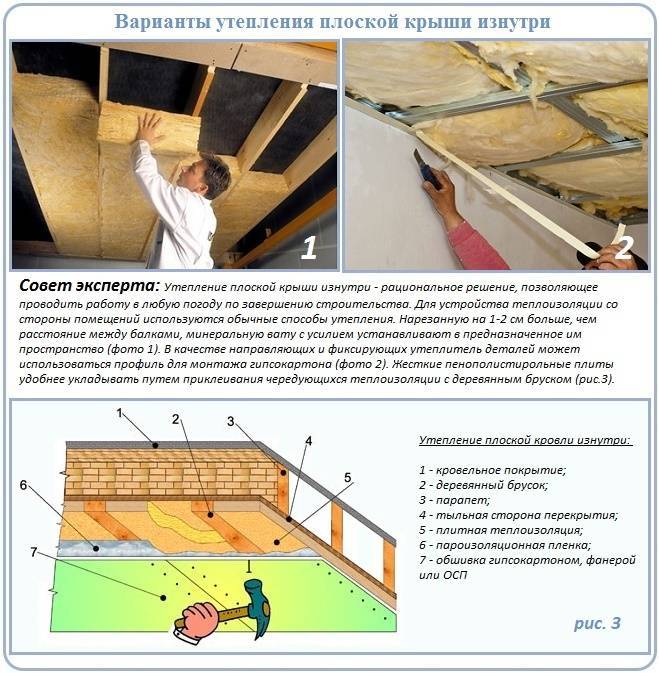
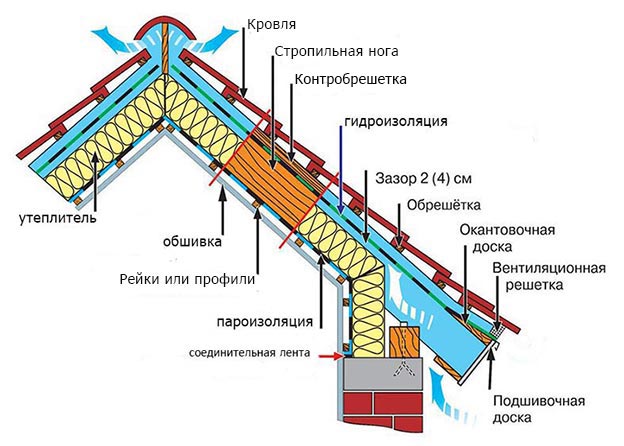
- The vapor barrier is laid first, then the heat-saving material. The thickness of the insulation depends on where you live. For the middle band, 200 mm is enough; for colder regions, this figure should be higher.
- A superdiffuse membrane is placed on top. After it, a gap is left for ventilation.
- The last step is the roofing material.
The plates themselves for insulation must be laid out in a checkerboard pattern. It is necessary to carry out work, starting from the bottom. The film for waterproofing is also spread from below, moving upwards, taking into account an overlap of 10-15 cm. The resulting borders must be glued with adhesive tape.This is necessary to protect against leakage and condensation.
Such a layer cake will allow you to keep warm, creating additional living space.
Warming from the inside
The process of thermal insulation of the attic inside can be divided into two parts:
- Basic. When insulation is carried out during construction. Light insulation is used here, if in the future it will not be used as an attic.
- Additional. When additional laying of insulation is carried out, taking into account the creation of a full-fledged living space.
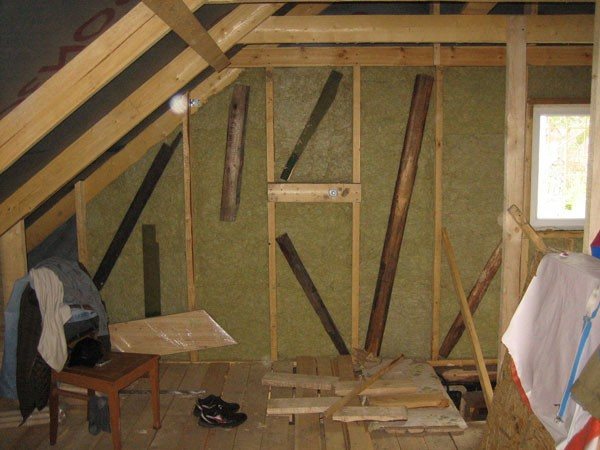
When it becomes necessary to insulate the structure of the mansard roof from the inside, the most common problem in this case is the small thickness of the rafters.
 Attic insulation from the inside
Main article about working with walls.
To fix the problem, you will need to create an additional crate or frame. Further work is carried out in several steps:
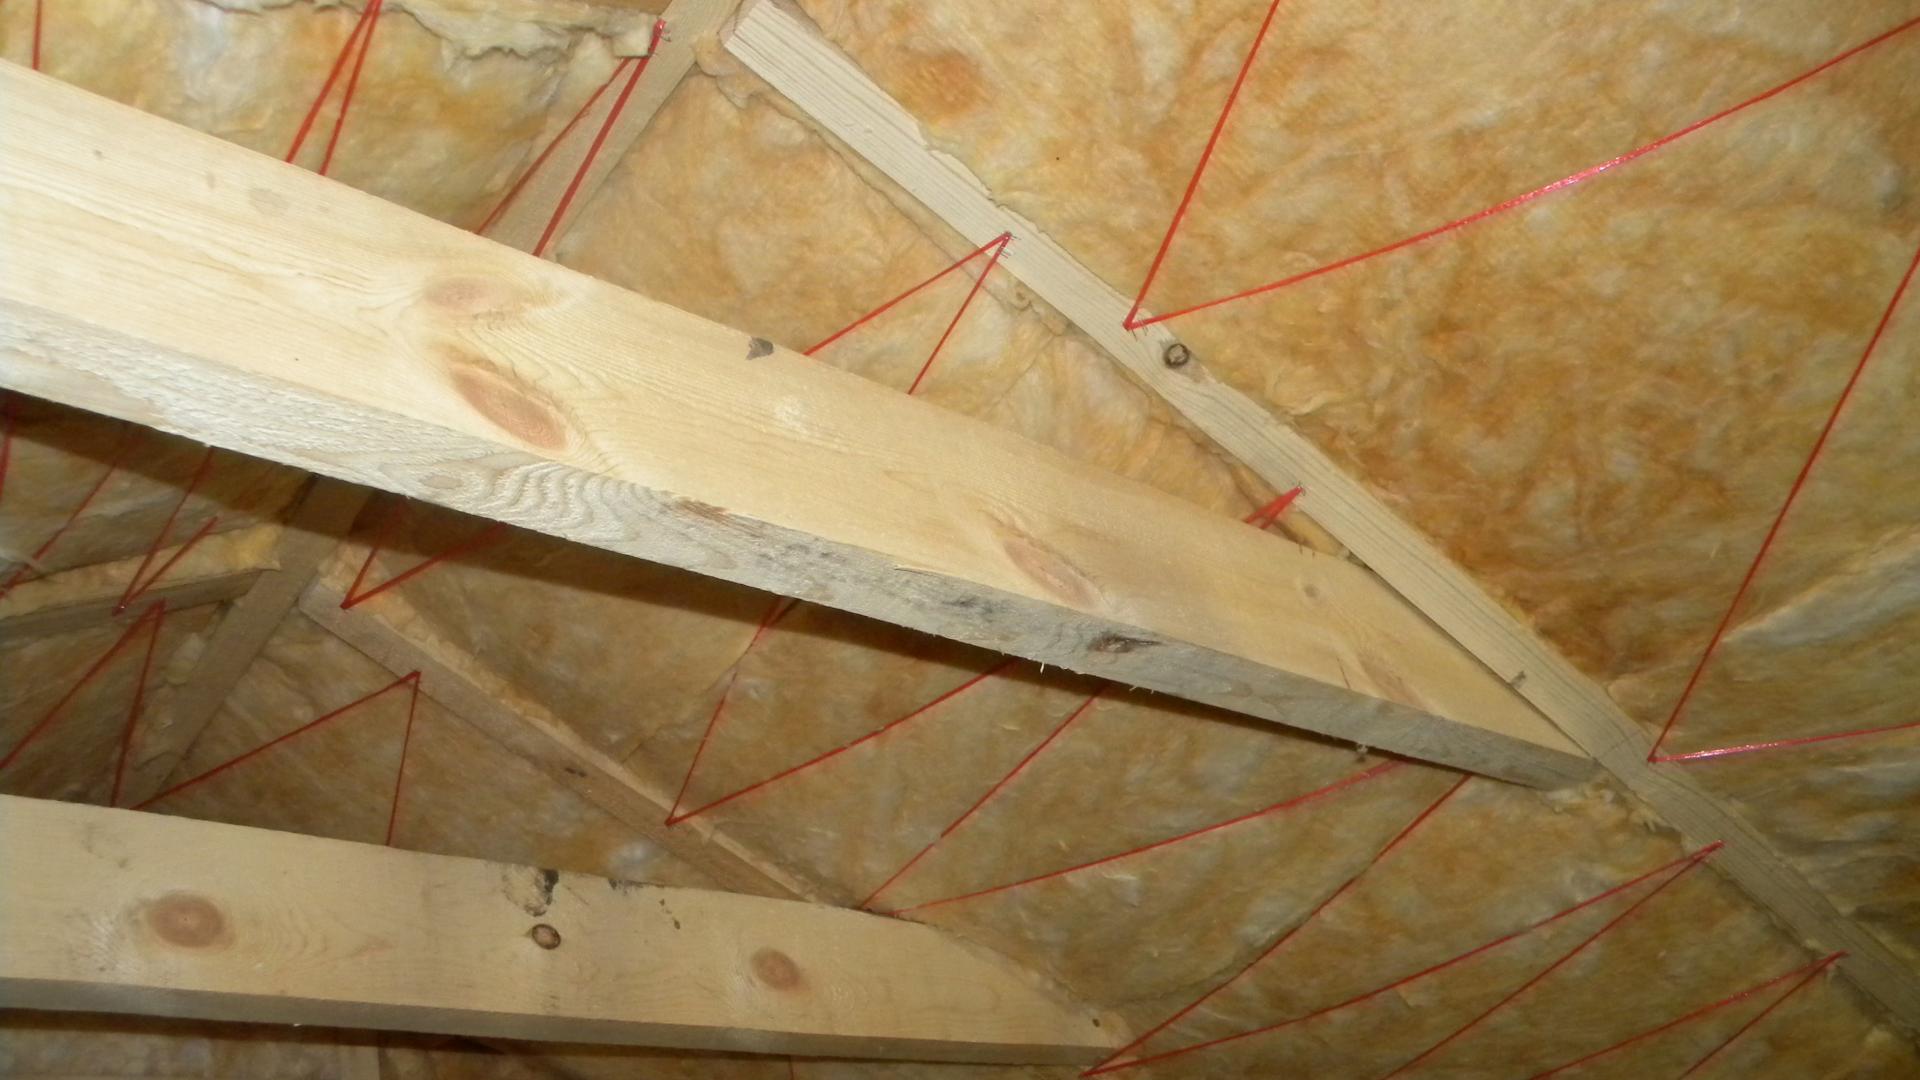
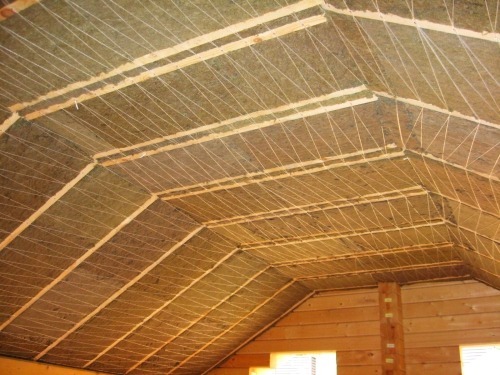
- Creation of battens and counter battens from wooden slats.
- Twine or a thick thread is pulled to the rafters over the entire area of \u200b\u200bthe crate, which will hold the material during operation.
- We build a metal frame, which is mounted to the rafters with brackets.
- We insert insulation over all areas of the roof.
- Metal staples are unclenched, they will additionally hold the material for the duration of the fine finish.
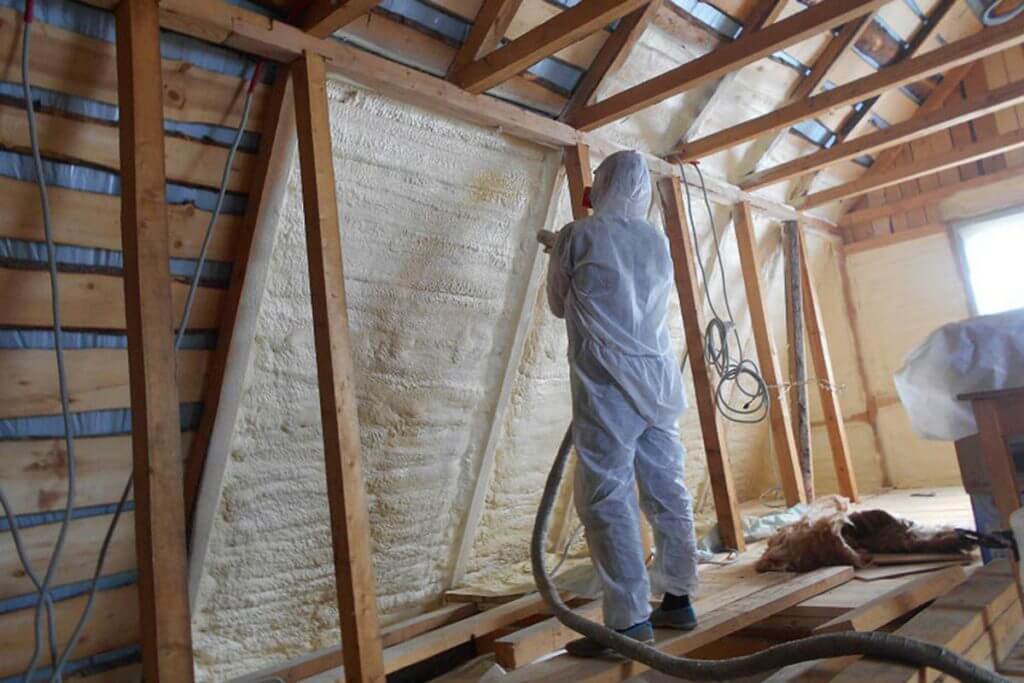
Attic roof insulation is the most popular method for attic spaces. It is desirable to select the material on the basis of mineral wool. Sometimes ecowool or polyurethane foam is used, in which case a vapor barrier is not required.


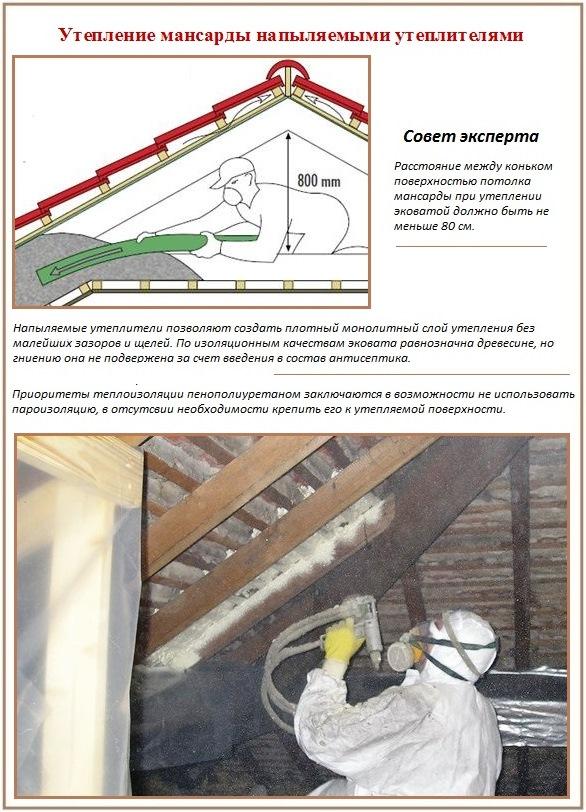
But waterproofing is mandatory, regardless of the insulation material.To do this, special membranes are used that can pass steam without passing moisture. Between the waterproofing material and the roof, a ventilation gap is needed, the thickness of which varies depending on the type of roof. It will release excess steam from the heater up.
Preparing the under-roof space for insulation
You should be aware that, according to GOST standards, the ceiling height in the attic cannot be less than 2.5 meters. But this does not apply to the entire attic area, but only to half of it, that is, on the remaining 50 percent, the height of the room may be slightly less.
What factors affect the heat loss of the attic floor:
- type of the main building material of the house;
- the presence of common communications with other premises of the house;
- features of the geometry of the roof, the number and shape of slopes;
- type of load-bearing materials of the roof;
- placement of the attic relative to the main building (with or without going beyond it).
All these factors must be considered before proceeding with the insulation of the roof from the inside with your own hands. Building rules dictate that the insulation of the house must be carried out from the outside so that the freezing point moves to its outer part. But this rule does not apply to attic floors. Here, the specifics of construction require precisely internal insulation, since roofing material must be placed outside.
The only surface that can be thermally insulated from the outside is the gable of the roof
In terms of preparation for insulation work, you need to carefully study the options for thermal insulation coating and select a high-quality waterproofing film.
This is interesting: Metal fire door: we convey the essence
Basic Mistakes
All the positive aspects of heaters can be nullified by errors in their installation:
- Carrying out work at low temperatures. This leads to insufficient drying of the adhesive and loss of strength of the insulation layer.
- Incorrect choice of material thickness. Insulation of insufficient thickness will not give the desired effect, and too thick a layer will lead to unnecessary material costs.
- Sliding of thermal insulation due to insufficient fastening. This leads to the appearance of unprotected places and intense penetration of cold through them.
- Lack of vapor and waterproofing. In this case, the insulation will get wet, absorbing moisture, and quickly lose its properties.
- Installation of vapor and waterproofing films with sagging. These materials should be fastened with little tension.
- Lack of ventilation. In an unventilated attic, condensation forms on the walls and inside them, spoiling the insulation.
Carrying out work on the thermal insulation of the attic on your own, it is necessary to take all stages responsibly - from project development to fixing the final finish. In this case, a do-it-yourself room will delight the owners with comfort for a long time.
Best Answers
Sergey Parfilov:
Of course it is possible. Just keep an eye on tightness
Vladimir Petrov:
If you want to properly insulate, then do this with 100 mm of cotton wool from the side of the house, then bars from the street, then 50 minutes of cotton wool for wind and moisture protection and siding. Just as you wrote above, do not forget about the ventilation gap from the faces and the ventilation gap from the house after the vapor barrier and the fine upholstery of the house
Roman Shved:
It is possible, only taking into account that the staples from the stapler will be closed with a bar, that is, beacons for siding.
Alexander:
Good thermal insulation will allow you to maintain the appropriate temperature in the attic in the house both in winter and in summer. Roof slopes must be well insulated. Only a thick (20–25 cm) layer of thermal insulation will make it possible to achieve heat transfer resistance R = 5–6.25 (m2·K)/W. It is most convenient to place heat-insulating material between the rafters. But usually the height of the rafters does not exceed 18 cm, so it will not be possible to completely lay the insulation between them. Part of the required thickness of thermal insulation, which does not fit between the rafters, is laid in the second layer, between the bars of the inner crate nailed to the rafters from the side of the attic. If a ceiling is made in the attic of the house, then the insulating material covering part of the attic can be laid in the roof pie at the level of the ceiling.
Alexei:
Well, in principle, we didn’t cover them with bars either, only the joints were wound into a tube so that it wouldn’t blow through
Pavel Kharlamov:
No. Warming is done outside.
A set of works on insulation
High-quality attic insulation involves work from the inside and outside of the house. From the inside, the floor, ceiling and walls are insulated. In this case, vapor barrier layers must be used. The stages of work on the insulation of the attic and roof depend on the characteristics: the thickness of the insulation, raw materials, etc.
Waterproofing works
Before starting all work, the entire surface of the attic is treated with antiseptic compounds and solutions that increase fire resistance. Proper insulation must be ensured by ventilation, which is achieved by leaving ventilation gaps.
If it is a membrane, then it will be enough to leave a gap on only one side.The correct position of the waterproofing film is determined according to the manufacturer's instructions, taking into account the structure of the material and recommendations on how to properly insulate the attic. The film carefully wraps around each rafter and all corners. The places where the film is attached, around nails, etc., are additionally insulated with isobutyl tape.

Roof waterproofing
Installation of thermal insulation on the roof from the inside
A crate is installed across the rafters of the roof of the roof with a height of bars of at least 2 cm, their length depends on the size of the slope and is 1/500 of its part, usually these are bars 5x5 cm in size. The distance between them should be the same. To ensure ventilation, nails are driven into the rafters and a fishing line is pulled between them at a height of 10 cm, which should subsequently hold the insulation. An aluminum profile can be used as a crate.


The insulation is laid between the rafters from the bottom up, cut into pieces over the entire surface. After the installation is completed, the quality of the coating is checked and, if necessary, all the cracks found are sealed.

How to insulate a roof from the inside
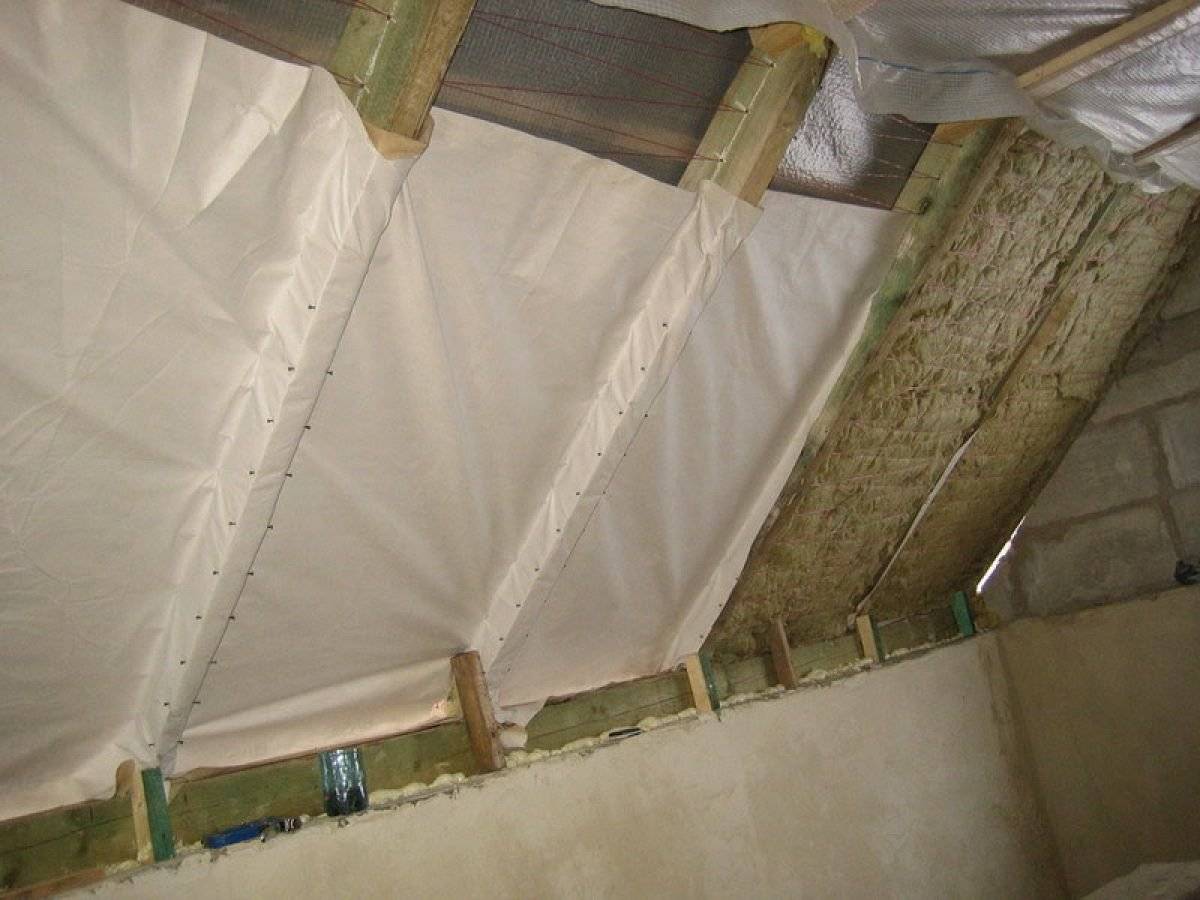
Vapor barrier installation
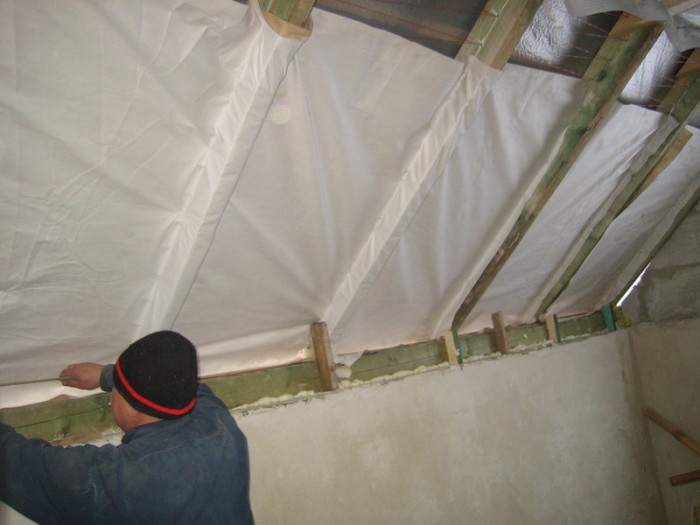
From above, the thickness of the insulation is measured. The material is laid with a vapor barrier film overlapping by 10 cm and fastened with brackets
It is important to leave space for the evaporation of possible moisture and its flow down. The film is not stretched, leaving some sagging
Joints are hermetically sealed with adhesive tape. Next - OSB (wood chip sheet) and facing material.
Ceiling part of the attic, sheathed with vapor barrier
Insulation of the walls and floor of the attic
The walls of the attic are traditionally insulated with plasterboard packing, the spaces between it and the walls are filled with insulation: basalt slab, mineral wool, etc.
The most common way to insulate the attic floor is installation by dry screed. Thus, two goals are achieved: they mount a rough floor covering and insulate the floor. Further, carefully leveled granular material is poured as a waterproofing and placed in 2 layers of gypsum fiber boards.
A simpler insulation is filling the empty gap under the floor with mineral insulation. At present, heating equipment is provided in the attic floor.
Insulation of the attic floor: thermal insulation of the under-roof space, vapor barrier
External insulation of the attic
If the house is made of logs, timber, foam concrete or bricks, then the attic insulation is laid on the outside of the roof. Works here are similar to internal ones. To hold the waterproofing layer, a counter rail is used. Next is a layer of insulation and facing material (siding).
External insulation
In the built house, there is usually already a vapor barrier. If not, then you have to remove the roofing and lay a waterproofing film along the entire length, and at the same time insulate the attic with your own hands.
Stages of attic insulation from the inside
The process of work on the insulation of the attic takes place in several stages, in addition to the choice of material:
The procedure for thinning the attic
- roof insulation;
- Wall insulation;
- Floor insulation.
Roof insulation in the attic
First, it is worth telling what the process of insulating a mansard roof from the inside should consist of. Stages of work:
When insulating the attic, do not forget about steam and waterproofing
- Basic roof covering;
- Waterproofing device;
- Thermal insulation laying;
- Vapor barrier;
- Finishing work.
The initial stage, after the existing main roof covering, is waterproofing, which is laid along the entire height of the supports, from the bottom to the very ridge of the roof. Before starting the laying of the material, all wooden elements of the roof are treated with an antiseptic. In the presence of rotten and moldy parts, it is necessary to replace them. Knowing the coefficient of thermal conductivity, a decision should be made to exclude possible heat losses, whether one layer of insulation will be enough or whether it is still worth laying the second layer. In the place where the insulation is laid to ensure ventilation, when installing this material, a gap is left between it and the roof. If the roof material is undulating (tiles, metal tiles), then the layer is left at least 2.5 cm. And if the roof is made of flat-form material (steel sheets, rolled materials), the space between the insulation and the roof should be doubled.
Thermal insulation is carried out by laying the selected material on top of the waterproofing layer.
The next step is vapor barrier. The material is a special film, which in appearance can be like a regular film, or it can be in the form of a membrane, foil or perforated film. The film is attached to the rafters with a construction stapler.

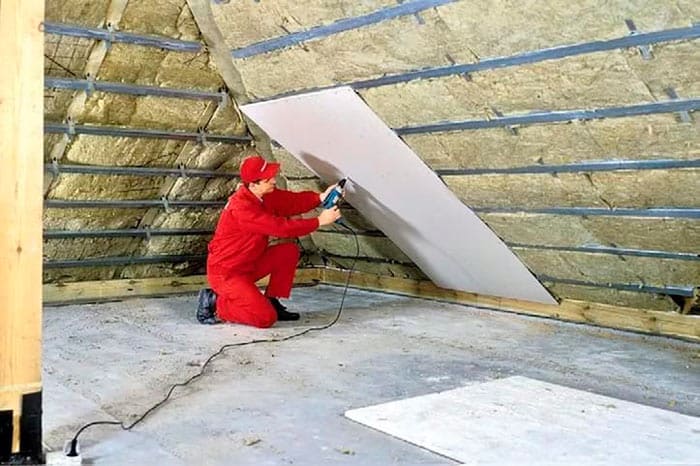

Room decoration. At this stage, the following happens: fixing plastic, drywall, lining, moisture-resistant chipboard, fiberboard or plywood sheets. At the same time, you need to fasten close to the vapor barrier, or you can on a thin type crate from individual rails. Then you can, if necessary and desired, stick wallpaper, varnish or paint.
Wall insulation in the attic from the inside
Insulation of the attic walls is carried out when the roof does not reach part of the floor. So, when insulating walls, several steps should be taken to achieve the final result:
Wood treatment with antiseptic
- Treatment of walls with an antiseptic, removal of dust, dirt;
- Lathing of the roof surface from the inside with the help of beams or raw boards;
- Waterproofing;
- Laying a layer of the selected insulation;
- Vapor barrier layer;
- Wall decoration.
A distinctive feature of wall insulation work is the absence of battens, unlike the roof. The rest of the process takes place according to the same method as the insulation of the attic roof.
After treating the walls with an antiseptic, a vertical frame is arranged on the surface of the walls from a bar or raw board. The beam is attached to the wall with metal corners or dowels.
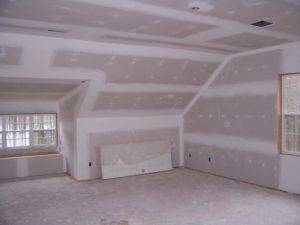
Plasterboard finishing insulated attic
Wall waterproofing means laying material in the frame cells. After that, the first layer is formed from the selected insulation.
The vapor barrier layer is fixed on top of the first layer of insulation. The vapor barrier material is a film, as mentioned above, which should fit snugly, without any sagging.
Wall decoration is carried out using facing materials: OSB boards, drywall, which are mounted on a frame made of a metal profile or wooden bars.
Floor insulation in the attic
Basically, the attic floor is made in the form of a wooden structure. And to create complete and final comfort in the room, the floor must also be insulated. And the floor insulation also takes place in several stages:
- Removing the old floor covering;
- Inspection of logs, detection of damages and defects, elimination of defects;
- Fixing the vapor barrier film;
- Laying the first layer of insulation;
- Laying the second layer of vapor barrier;
- Log sheathing.
The design of the insulated attic floor
The vapor barrier film is mounted along the entire length and width of the insulated surface. The film is attached with a construction stapler. In this case, the film must exactly repeat all the lines of the lag system, closely adjacent to the beams.
The first layer of insulation must be laid between the lags. This is followed by the stage of laying the vapor barrier layer, which will become the second layer. Accordingly, the vapor barrier material is laid on top of the insulation.
And the final stage will be facing the log with the help of front coverings made of OSB boards, or wooden boards.
Advantages and disadvantages of different types of heaters
Types of thermal insulation materials and technologies for their application a lot of. How to choose the most suitable one? Of course, you need to consider all the disadvantages and advantages of materials, compare their characteristics:
Material
Advantages
Flaws
Styrofoam
Safe for human health, does not emit toxic substances during operation.
It is not subject to rotting and decomposition, has an almost unlimited service life.
Resistant to fire, contains flame retardants that promote self-extinguishing.
Does not have a weighting effect on the roof structure.
Has an affordable price.
Fragile material, needs protection from mechanical damage.
Destroyed by exposure to nitro paint.
Doesn't let air through.
Destroyed by rodents.
Penoplex
High thermal and sound insulation properties.
Does not absorb moisture, is not subject to rot and the formation of fungus.
Retains its properties indefinitely.
Fireproof, self-extinguishing.
Has an affordable price.
Safe for humans.
Destroyed by direct contact with sunlight.
Subject to mechanical damage.
mineral wool
Passes water vapor, but does not accumulate vaga
As a result, the roof rafters will always be dry.
It is a breathable material, contributes well to air exchange.
Good sound insulator.
Does not burn and does not emit toxic substances at high temperatures.
It has a long service life - up to 55 years.
Does not attract rodents.
It is available to insulate the roof of the attic from the inside with the help of mineral wool with your own hands without the involvement of hired workers.
Contains toxic formaldehyde compounds in small quantities.
May warp if placed incorrectly.
glass wool
Affordable cost.
Fire safety, high temperature resistance.
Durability - average service life of 35 years.
Durability and light weight.
The ability to absorb water.
It shrinks over time, which has a bad effect on overall thermal insulation.
Necessity of additional precautions during installation.
Basalt wool
Does not burn and does not sustain fire.
Excellent soundproofing characteristics.
Chemical resistance.
Vapor permeability, basalt wool "breathes".
Long service life - up to 70 years.
Mold and rodent resistant.
Inferior in terms of thermal insulation characteristics to foam.
Strongly crumbles during installation, dusty.
Deforms under its own weight.
Ecowool
Increased vapor permeability.
Environmental friendliness, ecowool does not contain toxic substances.
Formation of a seamless coating, filling of gaps.
Long service life - up to 50 years.
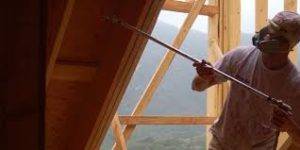
Difficulty in application, you will need a special sprayer.
The impossibility of using frameless insulation.
polyurethane foam
Excellent adhesion to any substrate: concrete, brick, wood.
Can be used for complex curved surfaces.
It has a minimum weight, does not weigh down the roof.
Makes insulated surfaces stronger.
It is a seamless finish.
Decomposes under the influence of ultraviolet radiation, needs additional coating.
Smoldering during a fire.
Penofol
Significant savings in floor space, practically does not take up space.
Excellent thermal insulation and reflectivity.
Safety for human health.
Does not support combustion.
Does not absorb moisture, does not attract rodents.
Good soundproofing.
Ease of installation.
The need to combine with other materials.
Not suitable for decorative coating.
Do not use self-tapping screws and nails during installation - it loses its properties.


