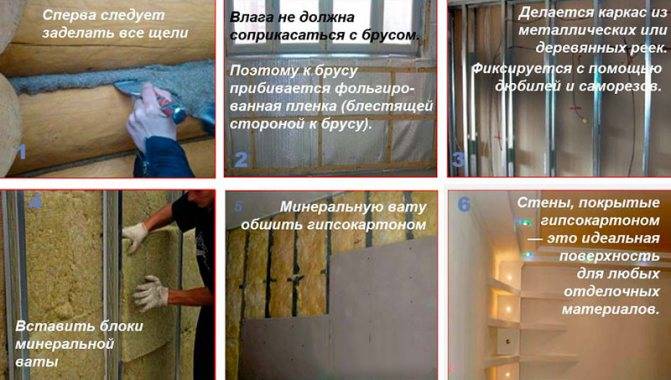
- The general course of the installation of thermal insulation
- Installation subtleties
- External wall insulation with mineral wool for siding
- Wall preparation
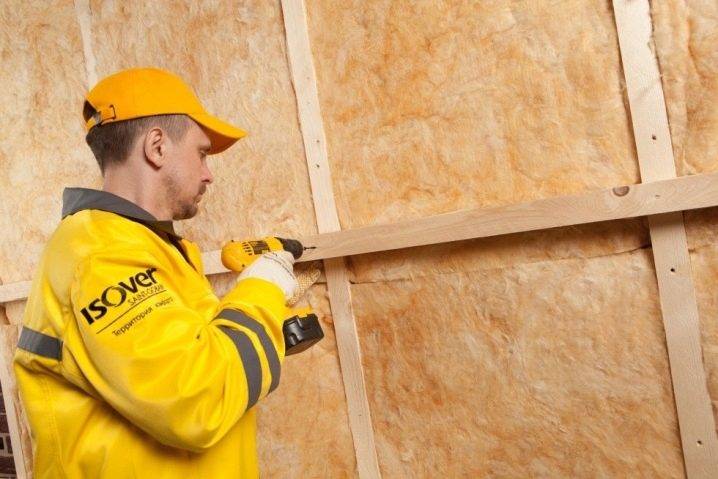
- We lay mineral wool
- Video - Wall insulation with mineral wool
- Installation of waterproofing and vapor barrier
- What is better to use?
- What is the difference between internal and external wall insulation
- Wall with external insulation
- Internal insulation
- Tips of the masters
- Insulation with expanded polystyrene
- Prices for Ceresit glue
- Prices for building levels
- Self-insulation of the walls of the house
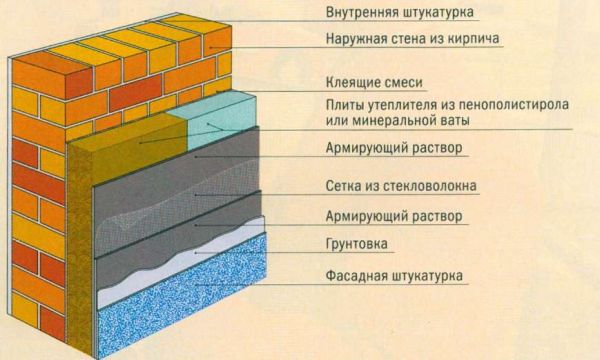
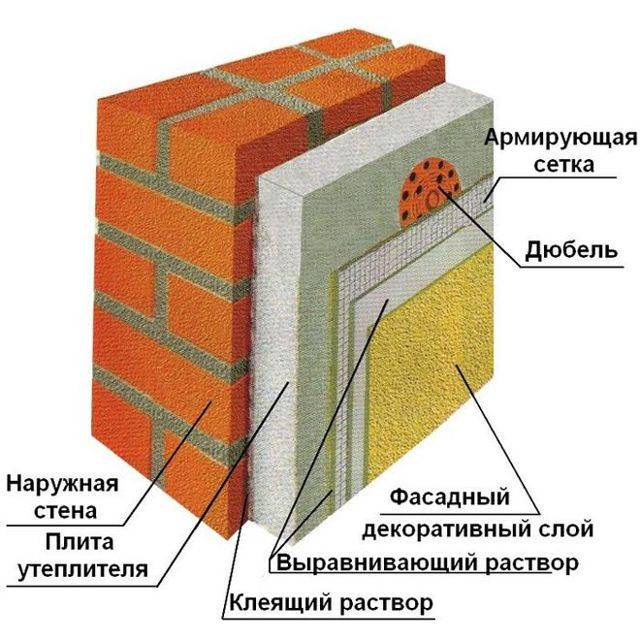
- Installation of insulation under plaster
- Non-ventilated three-layer wall
- Ventilated facade
- How to choose inexpensive wall insulation
- Calculator for calculating the thickness of ceiling insulation in a house with a cold attic
- popular vote
- Sawdust
- Internal or external insulation - what to choose
- Types of thermal insulation materials
- Styrofoam
- Extruded polystyrene foam
- polyurethane foam
- Mineral wool
- Basalt slabs
- Cost of materials
- How are foam blocks and heat-insulating panels used for insulation
- Selection criteria and types of winter heaters
- Possible mistakes
The general course of the installation of thermal insulation
All steps for warming a house from a bar by any of the methods described are always schematically the same and are performed in the following sequence:
- for ventilation of the first layer of insulation, a crate of wooden planks is mounted on the wall;
- a frame is stuffed onto the crate for fixing the insulating material
- installation of a heater;
- installation of additional battens and frame (if double insulation is used);
- laying an additional layer of heat insulator;
- fastening of a diffusion membrane, which will provide hydro and wind protection.
- installation of facade finishes (lining, siding) with an air gap.
In general, the insulation of a house made of timber according to the rules will make it possible to save on heating in the future. Despite the seeming simplicity of the whole process, there are a fairly large number of pitfalls that will definitely come out during installation. As a result, if there is no proper qualification, then it is better to order the work to professionals, because it is much more pleasant to control the construction site than to climb walls on your own.
Installation subtleties
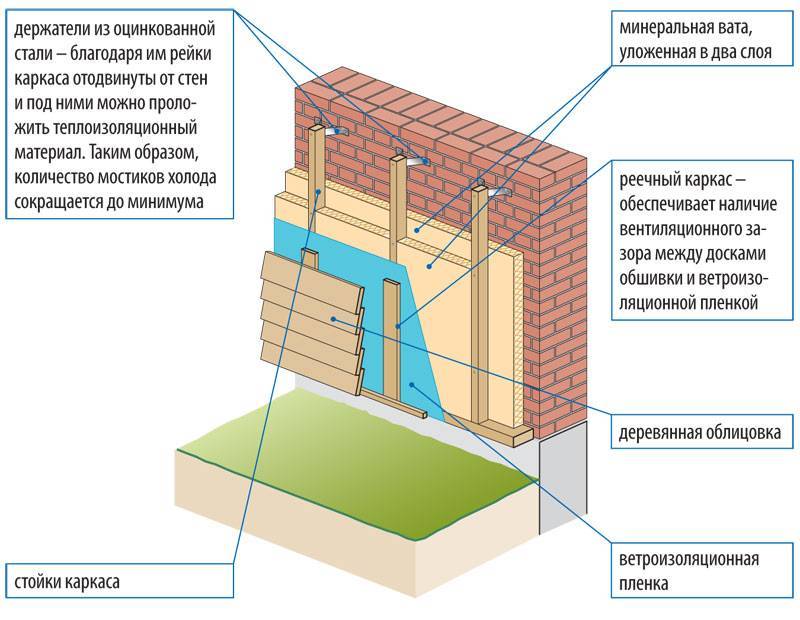
It is possible to insulate private houses with wall defects exceeding 2 cm with your own hands only after leveling the surface with cement solutions. These solutions, after drying, are covered with a primer that stops the destruction. For the installation of a ventilated facade, the base can be leveled using brackets. If mineral wool is used, the insulation can be installed using a wooden rack frame. Anchors will help strengthen the attachment to the walls.
The technology for finishing the overlying layers can be any, as long as it turns out to be convenient. If polymer plates are superimposed on the wall, all layers are shifted horizontally by 1/3 or ½.
It is possible to increase the tightness of the plates by cutting off the corners of the side faces. Screwing dowels into the edges of the joined parts will help reduce the need for fasteners
It is recommended to pay attention not only to the type of insulation, but also to ensuring that its thickness is correctly determined, sometimes, calculation with the help of professionals only saves money
It is necessary to focus on information about the coefficients of thermal resistance assigned to a particular locality. The maximum layer of insulation must be mounted on top of reinforced concrete, because it is this material that has the highest thermal conductivity.
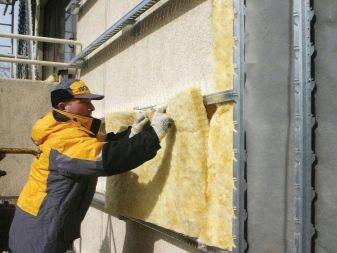
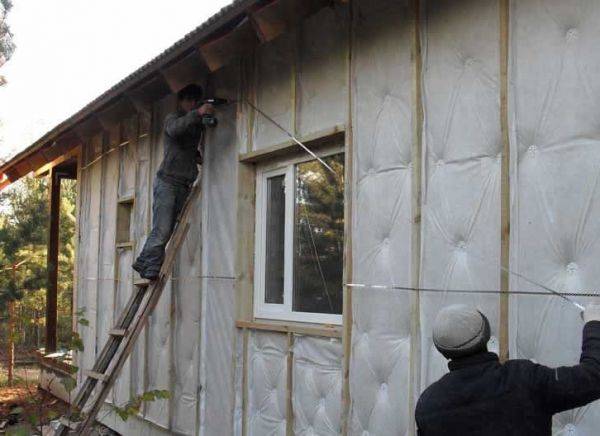
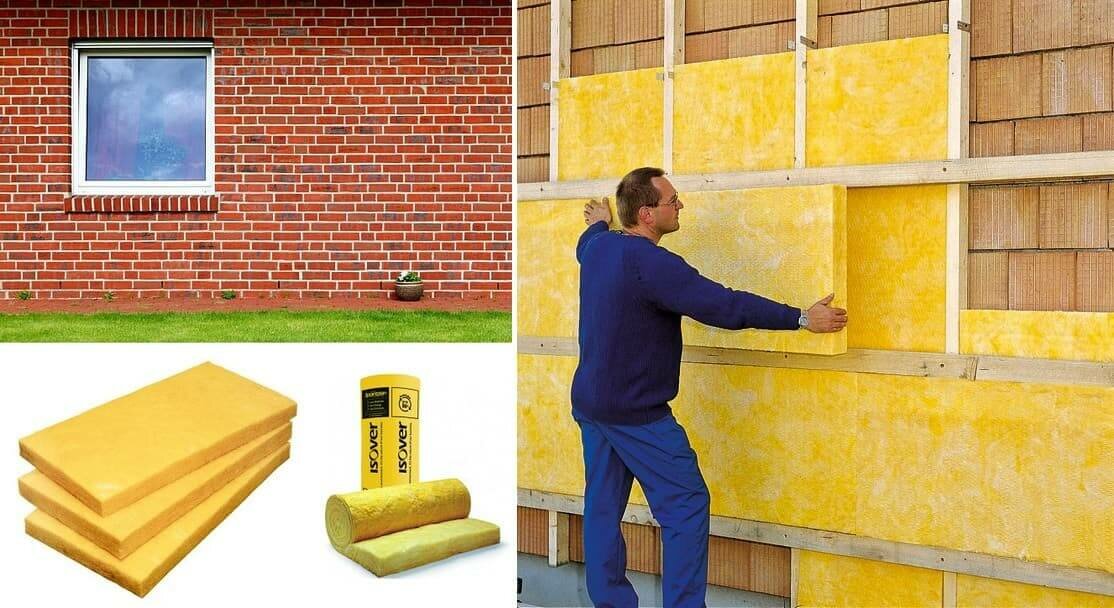
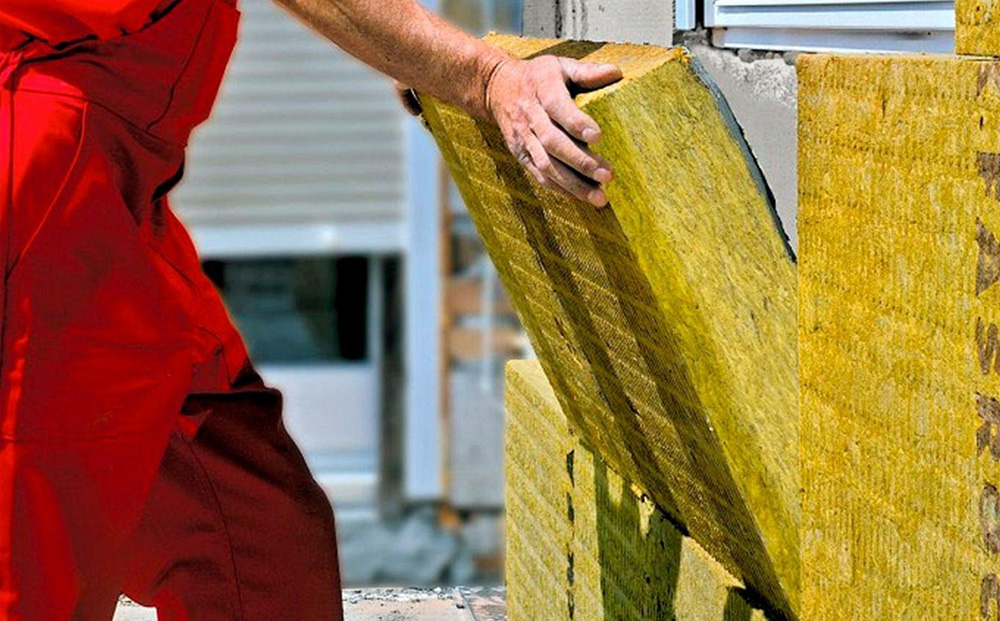
External wall insulation with mineral wool for siding
To effectively insulate the walls with mineral wool, you should prepare the surface for subsequent installation work: clean it of debris, close up gaps, remove gutters and other decorative elements, apply markings, and attach hangers.
Next, mount the elements in order:
- laying mineral wool slabs from the bottom up between the guide posts end-to-end, pushing the material onto the hangers and attaching the dowel-nails;
- close the cracks with pieces of insulation;
- lay a vapor barrier membrane similar to a heater;
- attach racks to suspensions;
- then proceed to the lining.
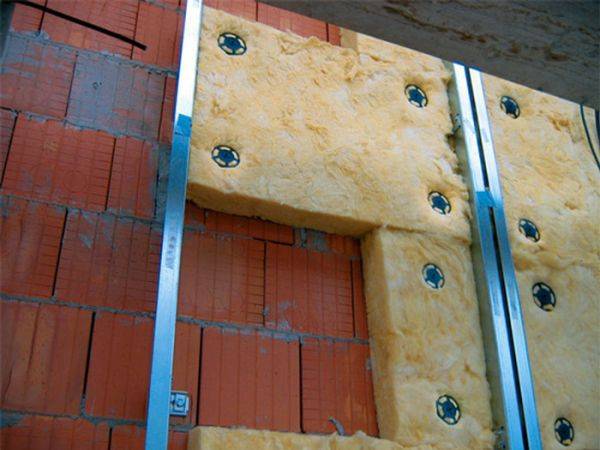
Metal crate
This method is suitable for metal profiles.
If a wooden beam is used, then the mineral wool insulation is somewhat different:
- on the prepared wall, attach the bars with corners at a distance of the width of the mineral wool slab;
- the insulation is placed end-to-end between the racks, fixed with a pair of dowels, the slots are sealed with mounting foam;
- if a second layer of insulation is needed, then counter rails are attached to the racks and mineral wool slabs are laid between them;
- the diffusion membrane is attached to the frame with staples;
- install a counter-lattice, which serves as the basis for fastening siding panels and creates an air gap in the wall cake.
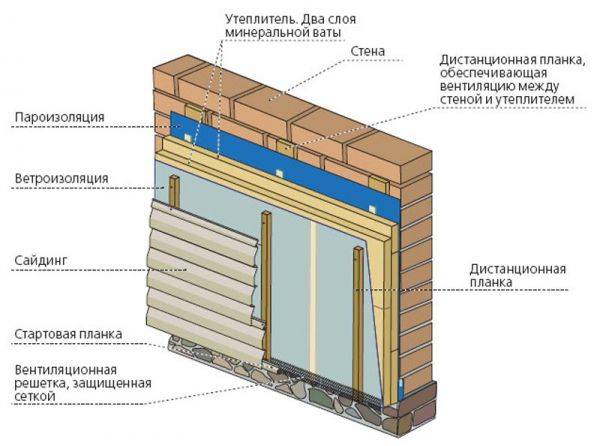
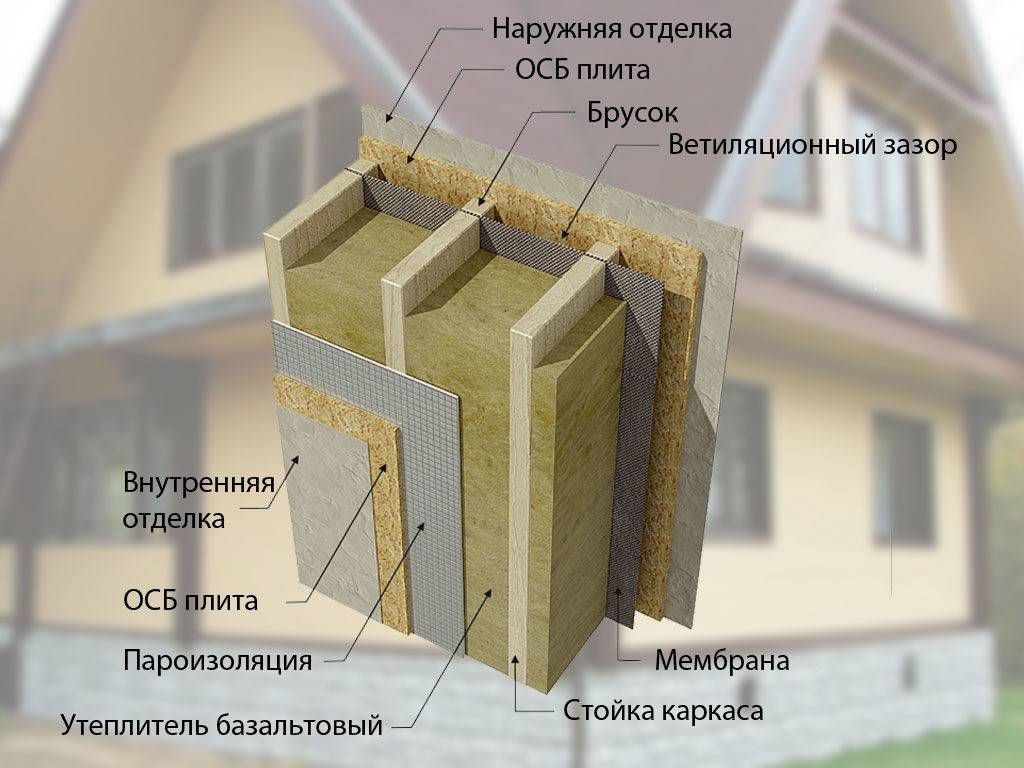
Wall cake for siding
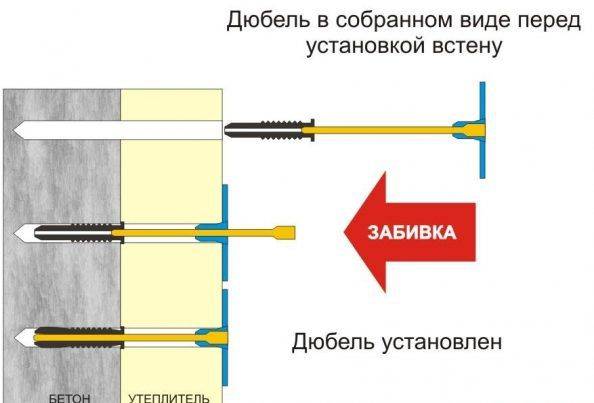
Fastening mineral wool to the wall with dowels
Wall preparation
The formation of batten knots on wood is the simplest and easiest, compared with the processing of walls made of other materials. At the same time, the layout design of the material should take into account the basic properties of wood: its high vapor permeability and the likelihood of fungal infection. The frame can be formed from a wooden bar or an aluminum profile. Special fixing points for heat-shielding material and a crate for front trim should be provided. Roll insulation is attached to the walls of the beam on the slats.
A two-layer thermal insulation coating must be mounted on a double crate (simple or supplemented with brackets). You can get a wooden frame using an electric jigsaw (if you choose the right blade), but it is recommended to cut aluminum structures with metal scissors. You should not try to speed up the process using angle grinders, it damages the anti-corrosion layer, reduces the shelf life of thermal insulation. Screwing screws, bolts and self-tapping screws into wooden walls is best done with a screwdriver with a set of nozzles. The battery version of the device is best suited, because then there will be no always interfering wire.
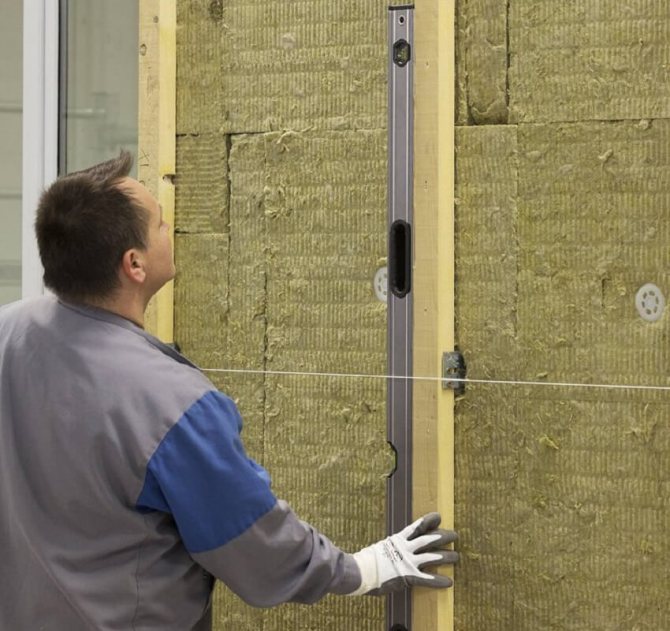
It is advisable to adjust the parts made of wood and drive in dish-shaped dowels with a hammer or a rubber mallet. If you need to mount membrane films, the best solution is to use a stapler with a set of staples. When preparing the crate, each part of it is verified according to the building level: even minor deviations, imperceptible to the eye, often lead to improper operation of the insulation.Of course, even before starting the installation, wooden walls must be impregnated with several layers of an antiseptic composition. The use of a spray gun will help speed up this impregnation.
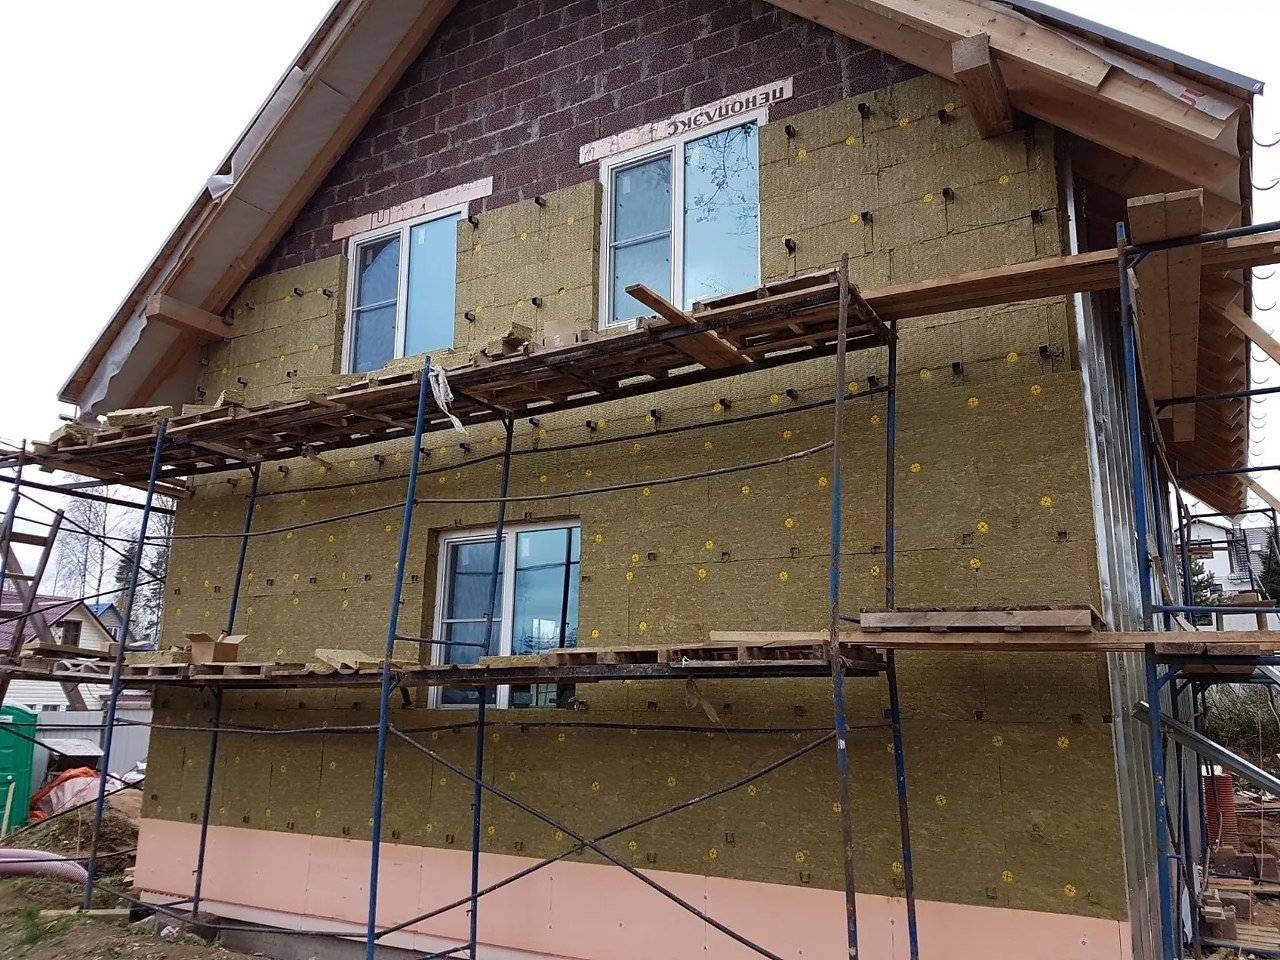
We lay mineral wool
Step 1. In this case, you need to attach steel brackets to the front part of the walls of a wooden house. The length of the bracket will depend on the thickness of the insulating coating. You can fix the brackets with self-tapping screws.
steel bracket
Fastening steel brackets
Step 2 Place a paronite spacer between each bracket and the wall.
Next, you need to lay the paronite gasket
Step 3. Next, you can already fix the insulation. A sheet of mineral wool should simply be put on the previously installed brackets.


Mineral wool fixing
Step 4. In addition, the wool must be fixed with self-tapping screws and wide plastic fasteners, screwing the self-tapping screws into them.
Additional insulation mount
Step 5. Thus, you need to lay the first row of cotton
It is important to fasten the second row on top of the first so as to cover all the joints between the sheets of cotton wool in the first row
Warming with mineral wool
Second row laying
Step 6. When the second layer of mineral wool is laid, you can proceed with the installation of the wind and waterproofing layer. Brackets need to be threaded through the film.
Installation of a layer of wind-waterproofing
Brackets need to be threaded through the film
Step 7. You can also fix the protective film on self-tapping screws and plastic wide fasteners.
Fixing the protective film
Step 8. After finishing the installation of the insulating material, you can proceed to the construction of a ventilated facade, that is, the installation of the frame and the finishing material itself. The guides, by the way, are attached to the same brackets.
Arrangement of a ventilated facade
The result of the work done
Video - Wall insulation with mineral wool
Warming a house is a profitable investment in saving the budget and the own comfort of the people living in it. So saving on thermal insulation is not worth it. In addition, as we can see, there is nothing complicated in installing the insulation layer directly.
And it is important to remember that, if possible, it is necessary to insulate the house from the outside, in accordance with the rules and regulations.
Installation of waterproofing and vapor barrier
When installing waterproofing outside the wall of a wooden house, it can be done:
- by applying a special solution to the walls;
- with the help of additional materials (waterproofing polyurethane foam).
If the wall is brick, then you can use special solutions or resort to an adhesive form of waterproofing: roofing material. Glue it vertically, overlapping, removing the formed air bubbles and gluing the joints with mastic.
When using decorative facing materials, special plaster waterproofing is used.
Waterproofing mineral wool
When installing a vapor barrier from the outside, films should be used that protect the surface of the wall from the outside and allow moisture to pass from the side of the walls.
Installation of vapor barrier films is reduced to the rules:
- they should be laid between the insulation layer and the wall;
- provide a gap for ventilation between layers;
- overlap the film, glue the joints, fasten the film with brackets.
IMPORTANT!
If the vapor barrier is installed on a round beam, then there is no need to install a ventilation gap. In the case of square boards, such a need is mandatory ..Next, lay the remaining layers of the structure
Now let's talk about ways to insulate walls with your own hands
Next, lay the remaining layers of the structure. Now let's talk about ways to insulate walls with your own hands.


What is better to use?
Choosing the right material for an experienced craftsman is quite simple, but it will not be easy for beginners to decide. You can focus on ready-made recommendations, for example, depending on the materials with which the house will be lined.
Table. The choice of insulation depending on the material from which the wall cladding will be made.
wall/facade type
Recommendations
Brick facing
In the presence of such a facing material, it is important to ensure the presence of a small layer of air, otherwise the wall materials will get wet. Here it is recommended to make a wall structure consisting of three layers.
ventilated
Finishing is done on the crate
It is easiest to insulate with mineral wool - ideal for hinged facades.
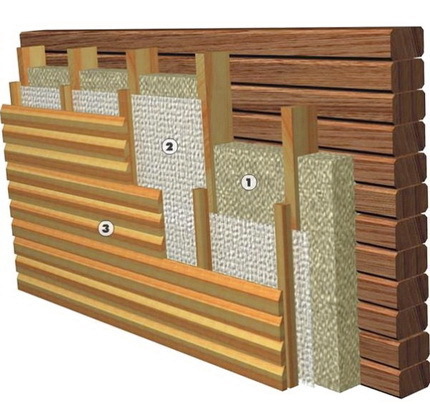
wooden house
Such buildings are insulated only with mineral wool, the technology of the so-called hinged facade mounting method is used.
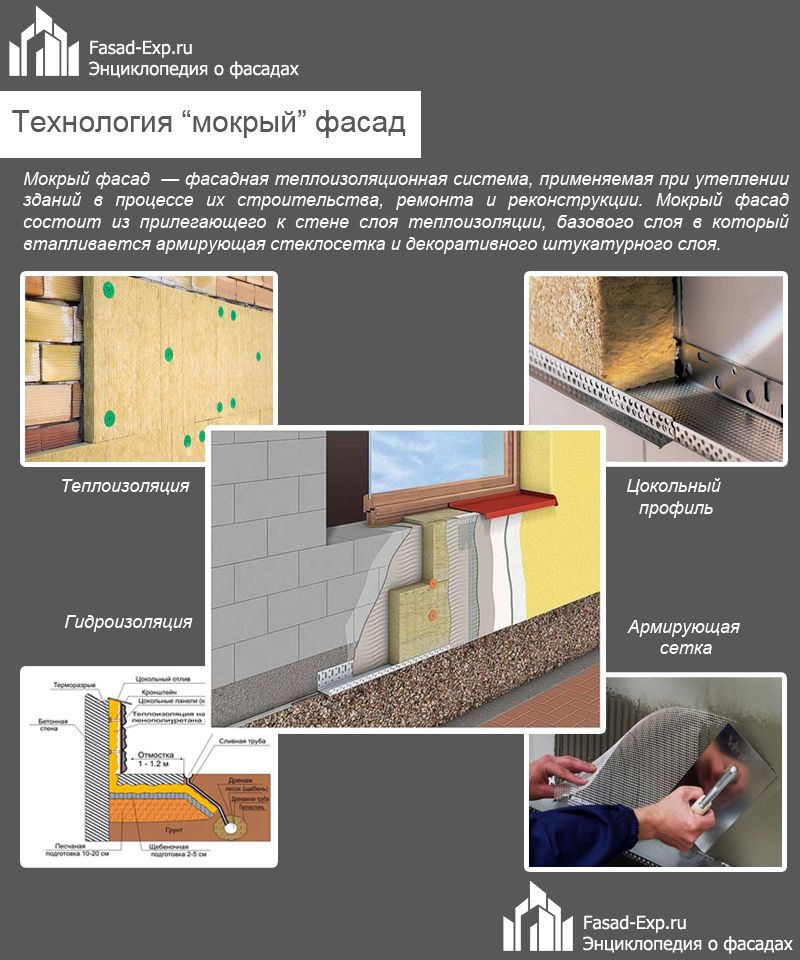
Wet
Usually insulation is made with mineral wool, but sometimes polystyrene foam is used, but it is important to leave a gap for air.
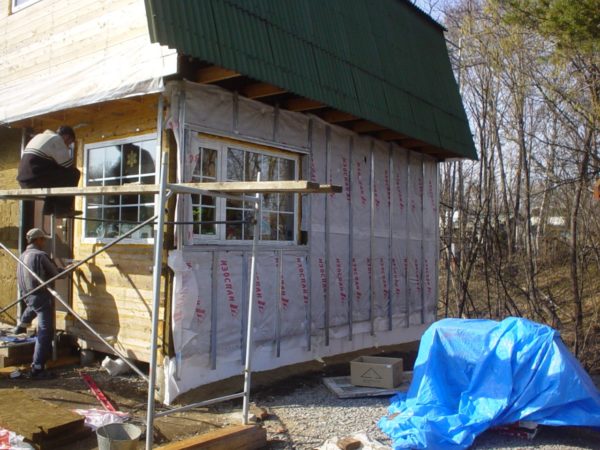 Insulation of the facade of a wooden house
The regulatory document will answer the question about the number of layers of thermal insulation. You can insulate a house from the street in two or three layers. In the latter version, paneling or plastering does not go for a separate layer, so in a three-layer wall a third layer of structural material must be laid.
What is the difference between internal and external wall insulation
Wall with external insulation
This application technique is considered the most effective, because the house retains heat, while the internal area does not change in any way.
An important advantage is the increased ability of external walls to retain heat. Walls that are insulated from the outside cool down much more slowly than walls that are insulated from the inside.
Undoubted advantages:
- Minimum heat loss;
- Inside the insulation, as a rule, there is a dew point. In rare cases, it can accumulate at the outer edge of the wall;
- The wall will never be wet;
- Stepa around the entire perimeter maintains a certain temperature, there are no jumps;
- The coating reliably protects the wall from seasonal and daily temperature fluctuations, it is not affected by precipitation, which is considered the main cause of its destruction.
External insulation
Internal insulation
This method is considered the simplest, but in terms of functionality it is significantly inferior to the previous one.
This manifests itself in:
- Heat loss up to 10 percent.
- Dew point. It is located in the space between the inner wall and the insulation or in the insulation itself, which will undoubtedly lead to the fact that condensate will begin to accumulate and dampness will appear in the room;
- Walls are not able to store and accumulate heat.
IMPORTANT!
At the stage of performing thermal insulation indoors, it is more rational to use a vapor barrier film over a thermal insulation ball to prevent steam from entering the insulation.
The place where the thermal insulation will adjoin the structure must be hermetically glued with foil adhesive tape. In this case, it is desirable to make an overlap of several centimeters.
Internal insulation
Tips of the masters
- End freezing of panel slabs in an apartment building can be a serious problem.Some also carry out internal wall insulation using the drywall installation method. To do this, a frame is installed, between the elements of which insulation plates are placed, for example, mineral wool. GKL is installed on top, which is then covered with a decorative layer.
- When insulating a panel house from the outside with foam, according to experts, material should be purchased only from trusted manufacturers. The company must have a license to manufacture. This is due to the fact that the production technology is very simple, it attracts not very conscientious entrepreneurs. The market today is filled with not so high-quality goods.
- When insulating a panel house with foam plastic and then finishing it with plaster, the cladding procedure should be performed in one go. Otherwise, you may encounter the fact that the joints may be visible to the eye.
- If you decide to insulate with foam, you should make sure that condensation does not form between the thermal insulation and the wall. It may appear due to the fact that the adhesive was applied in separate lumps and not distributed. This allows air pockets to form, which are subsequently filled with moisture coming from the premises of the apartment.
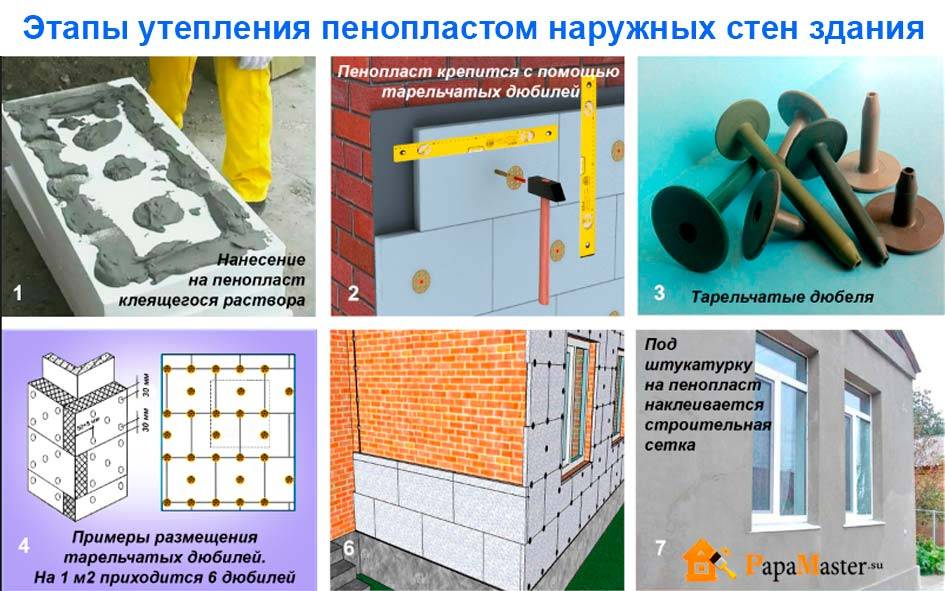
Insulation with expanded polystyrene
Step 1. The first step is to do the preparatory work. That is, the walls must be cleaned of dirt and debris.
First you need to clean the walls
Step 2. Next, you need to apply a deep-penetrating primer, which will increase the level of adhesion of other materials, as well as save the walls from dusting. It must be applied over the entire surface of the walls with a brush or roller.
Primer application
Step 3. After that, you need to mount the starting bar.It is fixed above the basement of the building with dowels, having previously carefully aligned, focusing on the building level. The starting bar will allow you to properly glue the polystyrene foam.
Installation of the starting bar
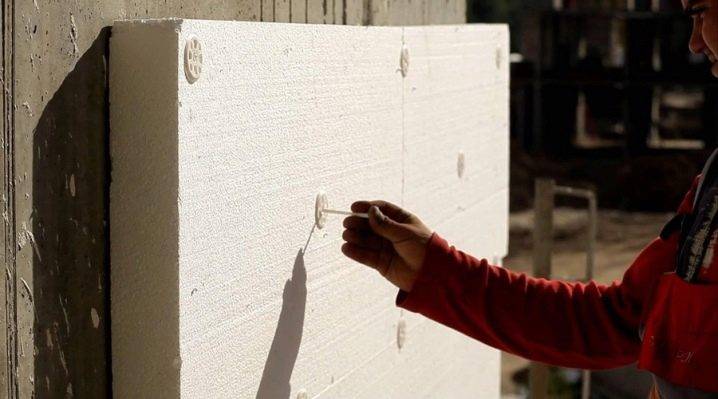
Step 4. Next, you can start gluing insulation panels
It is important to use specialized formulations. The adhesive solution must be prepared immediately before use strictly according to the instructions.
Preparation of the adhesive solution
Prices for Ceresit glue
Glue Ceresit
Step 5. The adhesive solution must be applied to the expanded polystyrene plate using the “side-flat cake” method - a strip of glue is applied around the perimeter of the plate, and then 3-5 glue cakes must be placed in the middle. In this case, the adhesive will cover about 40% of the board surface.


Applying glue to insulation
Step 6. Next, the panel with glue must be placed on the starting profile and then attached to the wall, pressing it firmly.
The plate is attached to the wall
Step 7. Whether the panel is evenly glued can be determined using the building level. You need to check the evenness of the panel in three planes - on the sides and on top.
Checking the evenness of the slab
Prices for building levels
Building levels
Step 8 Now you can glue the rest of the panels in the first row. By the way, in subsequent rows, the panels are glued in a checkerboard pattern.
Panel bonding process
Step 9 After installing the boards, wait 12 hours for the adhesive to set, and then fill the wide gaps between the boards with mounting foam.
Filling gaps between tiles
Step 10 After drying, excess foam must be cut off with a sharp knife, and the panel joints must be sanded.
Removing excess foam
Joint grinding
Step 11
When installing polystyrene foam in the area of window and door openings, it is important not to forget to reinforce the corners of the insulation with strips of reinforcing mesh. This will strengthen them
The mesh should be laid at an angle of 40-45 degrees. Such a measure will allow in the future to avoid cracking the walls in these places.
Installation of expanded polystyrene in the area of window openings
Strengthening the corners
Step 12. At the corners of the house, the panels still need to be laid in a checkerboard pattern, joining the sections from different sides of the house (shown in the image). Here, by the way, you also need to use a mesh for reinforcement.
At the corners of the panel are stacked in a checkerboard pattern
The use of reinforcing mesh
Self-insulation of the walls of the house
Wall insulation technology will vary depending on the insulators used. Extruded polystyrene foam, polystyrene foam and similar board insulation can be attached to the walls of the house with glue and sealant. Mounting the crate, performing additional hydro and vapor barrier in this case is not required. All that remains to be done is to plaster the insulation, clad the facade of the house with siding, block house or other similar materials.
When using mineral wool for insulation, it is necessary to perform additional waterproofing of the walls. A crate is made of lumber, a heater is laid inside, a vapor barrier membrane is fixed on top, after which a counter-lattice is mounted, to which a decorative facade material will be attached.The use of stone and mineral wool leads to a significant increase in the cost of work, so many homeowners choose more affordable and easy-to-use slab insulation.
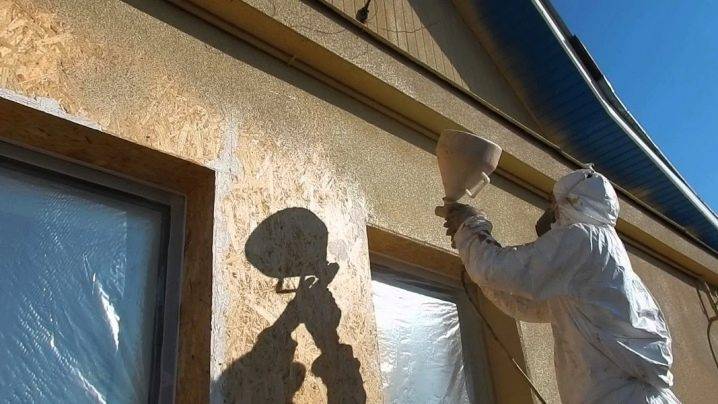
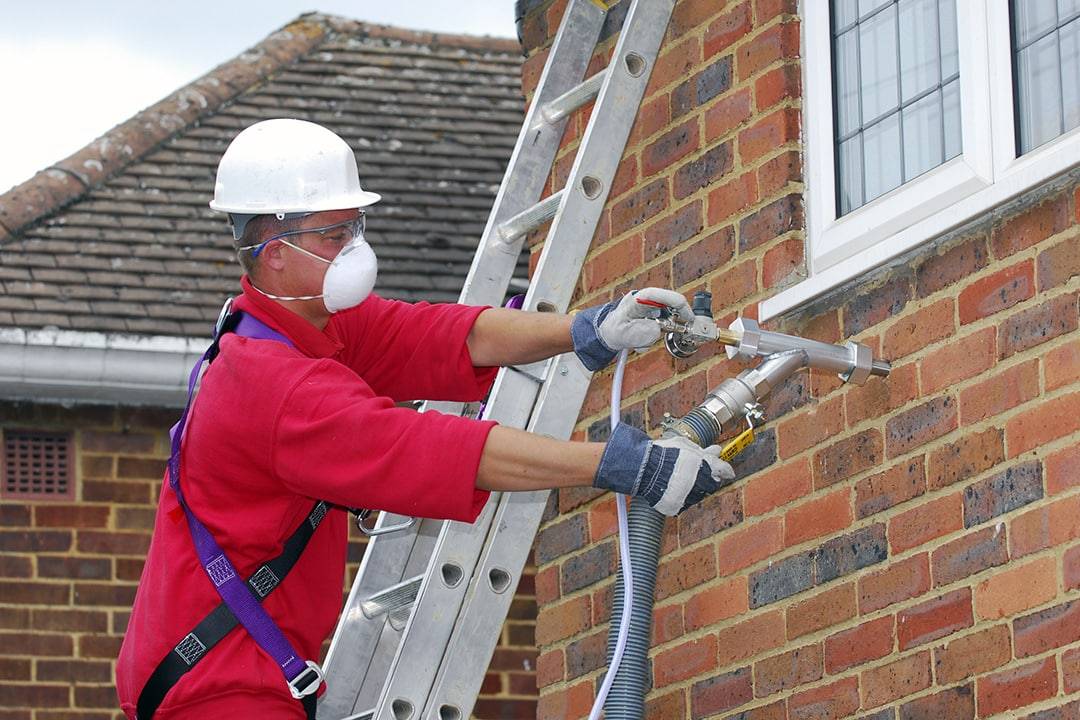
Liquid thermal insulation and polyurethane foam are applied using special compressors and spraying equipment. Accordingly, if you do this work yourself, you will need to purchase or rent the appropriate equipment.
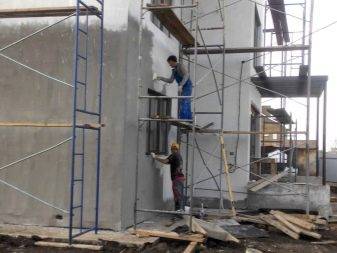
Installation of insulation under plaster
When installing heat-insulating material under plaster, basalt slabs, polystyrene foam, foam plastic and mineral wool are used. The insulation can be fixed on the walls with an adhesive solution and is additionally reinforced with a reinforcing fiberglass mesh. Basalt slabs and foam sheets can be additionally fastened with fungal dowels. As a finish, plaster or various facing materials can be used.
The advantage of this technology is its simplicity, which allows the homeowner to do all the work himself, even if he does not have any experience in construction work. The cost of warming the house is significantly reduced, and the building itself acquires an attractive and neat appearance. The homeowner can use various heat insulators, and subsequently the walls can be lined with decorative panels, upholstered with a block house, or decorative plaster can be used.
Non-ventilated three-layer wall
This method of insulation can be used with brick buildings and houses made of gas silicate blocks. A non-ventilated wall is formed due to facade decoration, insulation and high-quality waterproofing.This technology involves the use of various thermal insulators, including blown thermal insulation materials for walls.
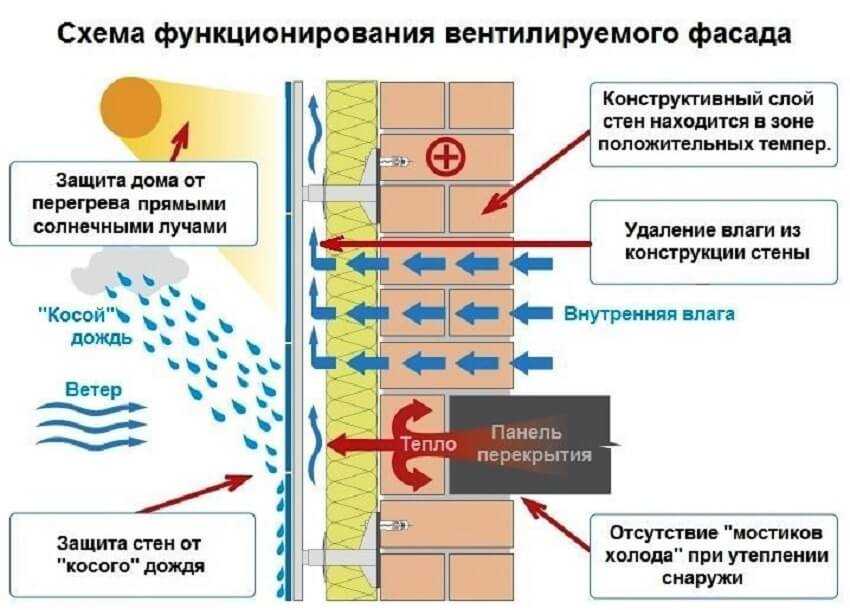
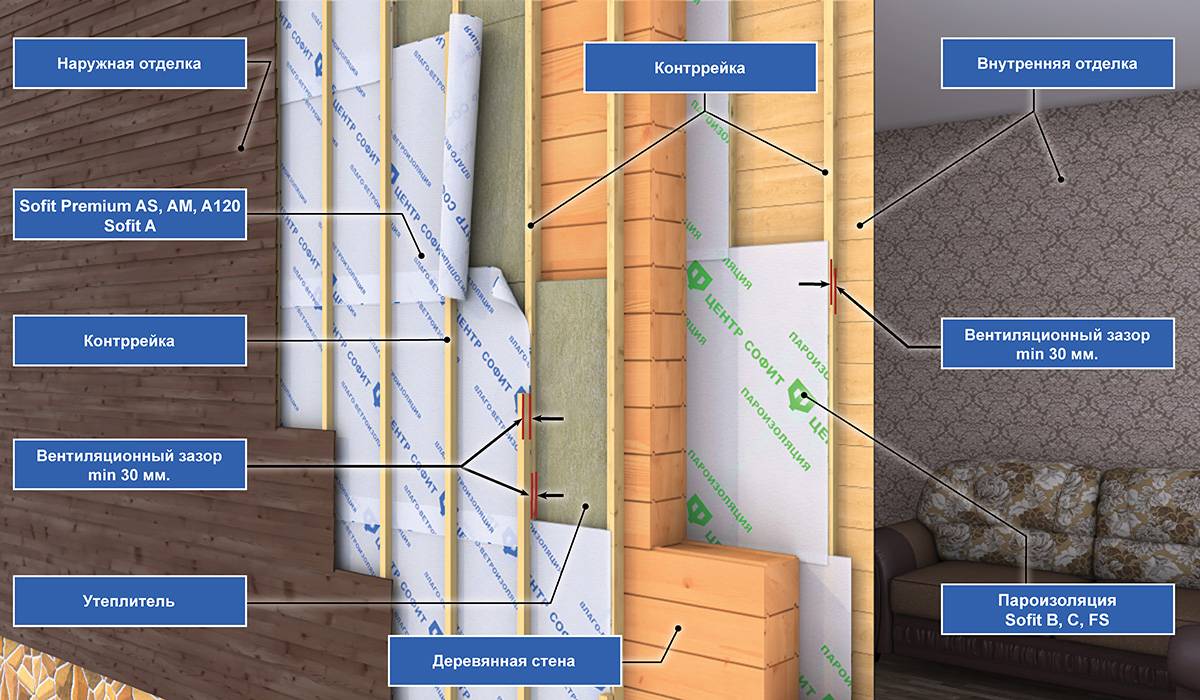
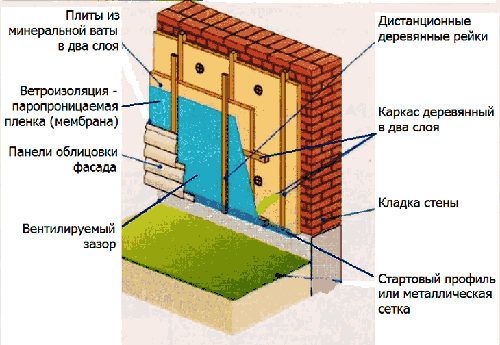
Ventilated facade
This insulation technology, due to its simplicity, efficiency and versatility, has become widespread on the market today. You can use such insulation with wooden, brick and block buildings. Insulation for a ventilated spa will include the following layers.
- Waterproofing.
- Heat insulator.
- Wind protection.
- Decorative facade cladding.
Installation of insulation using the technology of a ventilated facade allows you to minimize heat loss through the use of high-quality heat insulators and the presence of wind protection. Waterproofing protects the walls of the house from moisture, which prolongs the life of the erected building. The use of this insulation technology is suitable for most wall materials and types of buildings, including when used as a decorative siding material.


Having performed high-quality insulation of the walls of a private house, it will be possible to guarantee the comfort of living in a private house, and will allow the homeowner to save on utility bills in the winter season. A well-chosen heat insulator will keep the heat in the house, while such material will be reliable, durable and environmentally friendly.
How to choose inexpensive wall insulation
When choosing the optimal material, it is necessary to pay attention to many nuances. It makes sense to consider the most common materials in order to understand their features, advantages and disadvantages in the form of a table.
Table. Comparative characteristics of popular materials
| insulation | Advantages | Flaws |
|---|---|---|
| Basalt wool | low thermal conductivity; easy to cut to the desired size; excellent vapor permeability; does not burn; light weight; thickness from 50 mm to 200 mm; optimal density. | may lose shape over time; absorbs water well; during work, it is required to use personal protective equipment; high price. |
| Styrofoam | good compressive strength; thermal conductivity is low; poor water absorption; retains its shape for a long time; thickness from 20 mm to 50 mm. | it is required to cut quite accurately; can not be used for the roof; highly combustible materials; high price; susceptible to rodent damage. |
| Styrofoam | low price; not afraid of water; perfectly retains its shape; environmentally friendly material; rodents are not interested; thickness from 20 mm to 50 mm; light weight. | combustible material; must be accurately cut; may crumble during operation; thermal conductivity is low; low density. |
| glass wool | low price; perfectly compacted; does not burn; environmentally friendly material; thickness from 50 mm to 200 mm; light weight. | when working, personal protective equipment is required; hygroscopicity; loses shape over time relatively low chemical resistance. |
| Polyester fiber insulation | retains its shape and does not absorb water; low thermal conductivity; not used in the production of phenol; hypoallergenic material; light weight. | combustibility; high price. |
When choosing a material, the following parameters should also be considered:
- thermal conductivity - the lower the indicator, the less heat loss will be;
- vapor permeability or the ability to pass moisture;
- shrinkage - over time, materials lose their shape, so this parameter is critical;
- mass and density;
- water absorption or hygroscopicity;
- Operating temperature range;
- combustibility;
- thickness;
- the form of the material - rolled or in the form of a sheet or plate;
- environmental friendliness;
- chemical resistance.
Calculator for calculating the thickness of ceiling insulation in a house with a cold attic
Before buying, it is highly recommended to ask for a certificate from the fire department. This will check if the material meets the safety requirements. If this certificate is missing, then you should refuse to purchase.
popular vote
What insulation would you choose or recommend?
Sawdust
Save the voting results so you don't forget!
You must vote to see the results
Internal or external insulation - what to choose
Insulating walls from the inside or outside is an individual decision. A less popular way of warming is from the inside. With this method, the area of \u200b\u200bthe room is significantly reduced.
This shortcoming of the method plays an important role in deciding the method of thermal insulation in favor of external insulation work. In addition, there is a high probability of moisture inside the wall, especially in regions with high humidity.
Insulation of walls from the outside is carried out much more often
This method requires more costs, but the internal area for living in the house is preserved, which is important especially in houses, the area of \u200b\u200bwhich is already insignificant.
Wall insulation methods
Types of thermal insulation materials
The building materials market has a huge assortment. So, before you go shopping, you should consult with experts or study the issue yourself.
When choosing a material for insulation, pay attention to:
- thermal insulation properties;
- vapor permeability;
- strength (resistance to external damage);
- water-repellent properties;
- combustibility;
- price;
- compatibility with the base material on which the insulation will be laid.
Based on these characteristics, consider the most common heat insulators.
Styrofoam
It is considered the cheapest material, thanks to which it became the leader in sales. In addition, it is lightweight, therefore it does not overload the main structure.
In direct contact with water, it does not get wet and practically does not absorb moisture, which is an undoubted advantage. And, of course, it retains heat well.
Styrofoam does not have high strength, even with maximum density values, the material easily breaks and crumbles.
Birds fell in love with him (for reasons not yet clear) and if the foam remains unprotected for a long time, the birds use small balls for their own purposes or even build nests right in the stove.
The heat insulator does not pass steam well, which leads to the accumulation of moisture in the premises. To whom, it is categorically not suitable for houses built of wood, which are afraid of high humidity.
Styrofoam can be considered a hazardous material in relation to fire. It ignites, burns with the release of acrid, black smoke.
Extruded polystyrene foam
This material is also called penoplex, by the name of the trademark, which was the first to start producing extruded polystyrene foam.
The heat insulator is an improved relative of foam. The polymer is loaded into an extruder, where the mass is sintered under pressure and at high temperatures.


Thanks to this, penoplex differs:
- Improved indicators of the strength of the material - breaking off a small piece is much more difficult.
- Higher rates of thermal insulation with smaller values of thickness.
- Long service life.
But at the same time, extruded polystyrene foam is more expensive, does not pass vapor well and is also a combustible material.
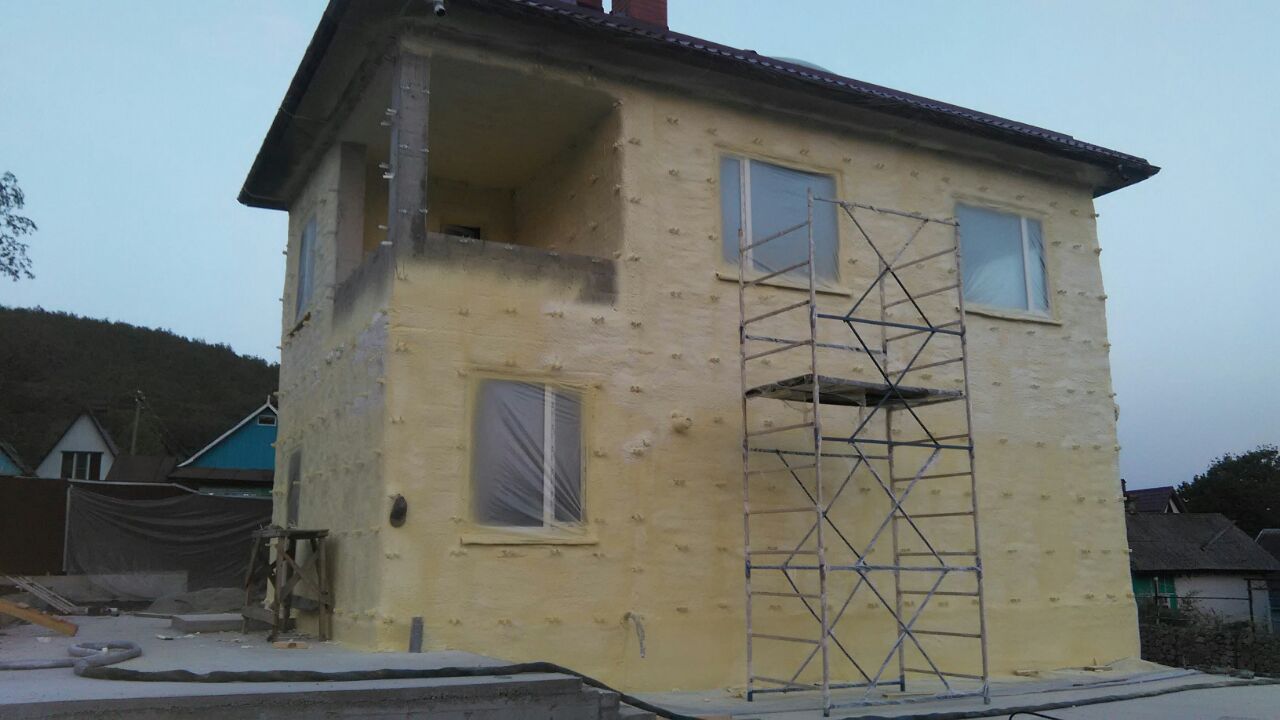
polyurethane foam
The most modern thermal insulator. It is applied in the form of foam on the base, which hardens over time and creates a monolithic shield. Polyurethane foam perfectly protects against:
- heat loss;
- penetration of moisture from the external environment;
- fire (does not burn);
- development of fungi, mold or insects.
Polyurethane foam is quickly applied, but without special installation and work skills, it will not work to insulate a private house on your own. In addition, the material is completely vapor-tight, quickly loses its properties under the influence of ultraviolet radiation and is expensive.
Mineral wool
The material is not new, it has been known for a long time and is now used to insulate various buildings. The main disadvantages of this heat insulator are:
- Hygroscopicity - mineral wool absorbs moisture and loses its properties to retain heat. Therefore, if you use this material, take care of waterproofing.
- Low strength indicators. If you plan to finish the exterior in the form of decorative bark beetle plaster, then you will have to buy plates with the highest fiber density possible.
- The material shrinks if not fixed properly to the substrate.
- The cost is higher than that of foam.
- When working with the material, protective clothing must be worn.
As you can see, the shortcomings are not so critical if you know how to deal with them. But there are some positives too:
- steam capacity - you don’t have to worry about additional ventilation or the presence of moisture in the premises;
- versatility of use - suitable for any base, even the most whimsical;
- fire safety - mineral wool self-extinguishing insulation;
- ecological purity of the material;
- used as soundproofing
- rodents avoid contact with the heat insulator.
Basalt slabs
Basalt insulation is one of the types of mineral wool. Therefore, it has all the positive and negative qualities that mineral wool has.
The only difference is brittle fibers, which, when they enter the organs of the respiratory system, can cause allergic reactions. Because basalt wool is often used for insulation of pipelines or industrial premises.
In private construction, a heat insulator can also be used. The main thing is not to forget about hydro and wind barriers that will help minimize the ingress of material fibers into the air.
Cost of materials
If you are already fed up with end freezing, it's time to start work on insulation. But first you need to take an interest in the price of the material. For example, Rockwool mineral wool will cost 495 rubles. for packing. The parameters of each sheet will be 50 x 600 x 800 mm. The material is presented in slabs, and its density is D35. There are 12 sheets in the package. Knowing the area of \u200b\u200beach of them, you can calculate how much will be needed to carry out the work.
Styrofoam prices are slightly lower compared to polystyrene foam.So, you can buy extruded polystyrene foam "TechnoNIKOL" for 1174 rubles. for one package. The length, width and thickness of the material are 1180 x 580 x 50 mm. The sheets are interconnected by an H-shaped profile, which eliminates cold bridges and reduces installation time. The package contains 8 sheets per 5, 475 m2.
How are foam blocks and heat-insulating panels used for insulation
The foam block is produced in the form of facing slabs, which are laid according to the principle of brickwork in order to exclude the appearance of cold bridges. The foam block is glued directly to the load-bearing wall, and the adhesive mixture acts as an additional waterproofing layer.
For better adhesion, dowels-umbrellas are additionally used. Foam and gas blocks are characterized by low weight, which facilitates their installation. Due to the fact that during the manufacture of the concrete mixture foams, the material is able to freeze through and lose strength. Therefore, it is best to use with a finish that does not allow moisture to pass through. It is not recommended to perform facade insulation under plaster with a foam block.
Decorative panels are a set consisting of insulation and a decorative layer. The basis of the panels is foam (foam), and the decorative layer is plaster or brickwork. Mounted with a special adhesive solution. The main advantage is the speed and ease of installation.
Fiber cement facade panels for the exterior of the house (read more)
In this case, it is not necessary to additionally insulate the facade with plaster, because the decorative layer is applied in advance at the factory. The panels look attractive and retain heat well.The only drawback is the peeling of sheets from the surface, especially if you use the wrong glue. If you use dowel umbrellas for better grip, then the appearance of the facade will deteriorate. The cost of the panels is about 3000 rubles/m2, excluding installation.
 Decorative panels consist of a heater and a decorative layer.
Selection criteria and types of winter heaters
For a long time, expanded clay concrete and foam concrete served as the main materials for facade insulation in winter. Then they began to use glass wool, and only with the development of building technologies did many other materials appear that perfectly cope with thermal insulation. Each material has its own characteristic advantages that determine their choice.
- Mineral wool. Great for facade insulation. It has many advantages: fibrous structure, high vapor permeability, incombustibility, and besides, it is inexpensive. The facade insulated with mineral wool is able to “breathe”, which prevents the formation of fungus and mold. The material is suitable for all types of structures. Basically, mineral wool is used in "dry" processes.
- Styrofoam. It belongs to the most budgetary materials for facade insulation. It is lightweight, breathable and easy to work with. Along with the advantages, the material has a number of disadvantages. Under the influence of sunlight, it ages, so it needs to be covered with primer, paint or cladding. Due to the fact that the foam does not allow air to pass through, it cannot be used for thermal insulation of wooden houses.
- Thermal panels. The material performs two functions at once: lining and thermal insulation. Design and content may vary.Minplates, foam plastic, cellulose, etc. can act as an insulating layer, and decorative plaster, metal, metal-plastic can act as a lining. The design can be assembled in the form of puzzles and conventional fasteners for self-tapping screws.
- Thermal paint. Initially, the material was intended for use in the space industry, but over time it became in demand in construction. It's all about filling the paint. It contains microscopic glass spheres, inside of which there is a rarefied space. The binding elements are latex, acrylic, silicone or a mixture of them. A layer of paint of 1 mm is enough to provide protection against a mineral insulation of 2.5 cm.
- Isolon (foamed polyethylene). It is produced in soft rolls with a thickness of several millimeters. Often used in "dry" processes. Acts as a supplement to the main insulation of the facade with foam plastic in winter. Foamed polyethylene can be mounted anywhere on the frame: on the wall or under the skin. Isolon is vapor-tight and should not be used in the same construction with mineral wool.

Mineral wool
When choosing a material for facade insulation, they pay attention to the type of building, the region of residence, the properties of the insulation and their financial capabilities. But it is best to consult with specialists who will determine exactly which thermal insulation option is suitable in a particular case.
Possible mistakes
 High-quality insulation of external and internal concrete walls requires a professional approach, as the process is multi-stage and requires careful implementation of each stage.
Most mistakes are made when performing internal insulation, since the brand of insulation and its thickness are chosen incorrectly.
Therefore, the wall will be completely cut off from the heat of the heating system and will freeze, absorbing moisture.
The insulation pie from the inside must be carefully calculated by specialists with the determination of the actual heat loss through the wall. After that, a heat insulator with a low level of moisture absorption and vapor permeability is selected.
Despite the fact that concrete is considered the most practical and reliable building material, it has a significant drawback - the highest heat transfer coefficient, which leads to the rapid removal of heat energy from a warm room to the environment.
Therefore, everyone knows that concrete houses are the coldest. In Soviet times, this problem was solved by increasing the specific heat supply rates on such houses, that is, they simply overheated.


