- Step 3: Insulate the balcony
- Mold and mildew treatment
- Waterproofing
- Insulation works
- No. 5. Foam glass
- What is dew point?
- Infrared film for heating
- Types of infrared films
- Strong Benefits of IR Film
- Where to begin? Inspection and repair of balcony slabs
- Glazing of the loggia
- Artificial insulation of plastic windows
- Do you need underfloor heating on the balcony?
- How much to buy penoplex
- floor construction
- timber fastening
- Insulation laying
- Level alignment
- Create a floor surface
- The main stages of warming
- Stage 1 - careful preparation of the loggia
- Stage 2 - installation of foam and penofol on the ceiling
- Stage 3 - fastening polystyrene foam to the walls
- The choice of frame design and insulation
- What frame do you prefer?
- How to choose a heater for a balcony
- Construction of underfloor heating for balconies and loggias
- Conclusions on the use of penoplex
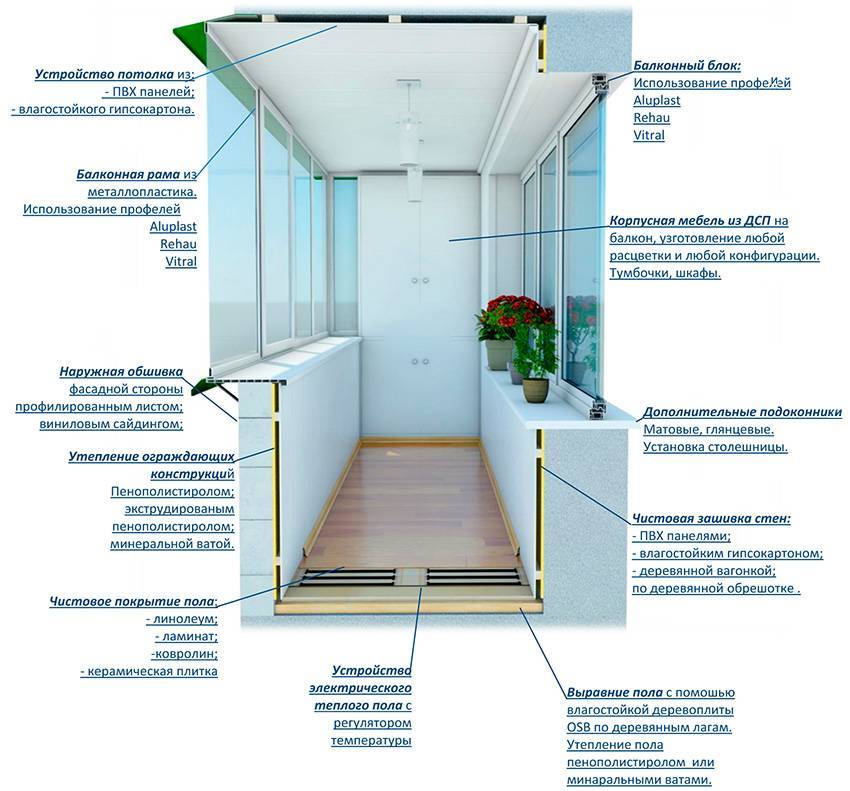
Step 3: Insulate the balcony
Mold and mildew treatment
In order for your balcony to stand for a long time and have an ideal appearance, this is a necessary measure to avoid unpleasant consequences and quick repairs if mold or fungus suddenly settles under insulating materials. In addition, the formation of mold and fungus is very dangerous for the health of apartment residents. They cause allergic reactions, respiratory problems, and other more serious illnesses.
Waterproofing
Secondly, make waterproofing.
Today, there are many materials that can be applied at this stage. We advise you not to save on this and make waterproofing with truly high-quality materials. After all, it depends on how long the repair you made will last.
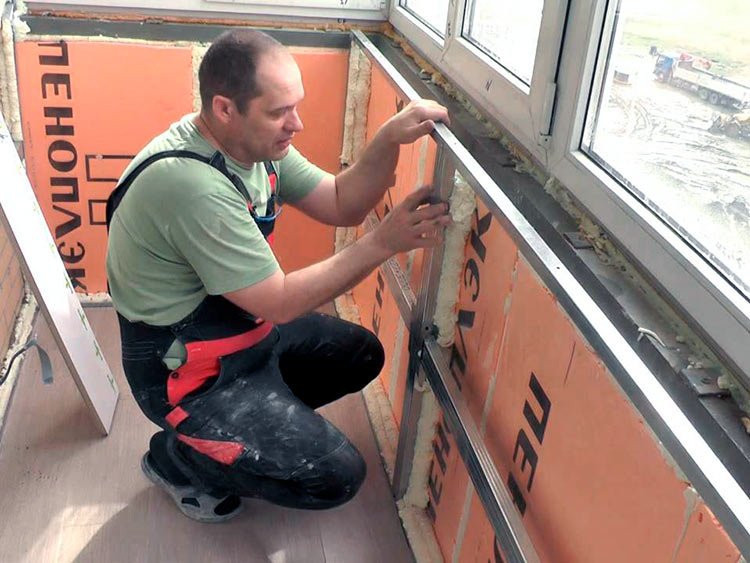
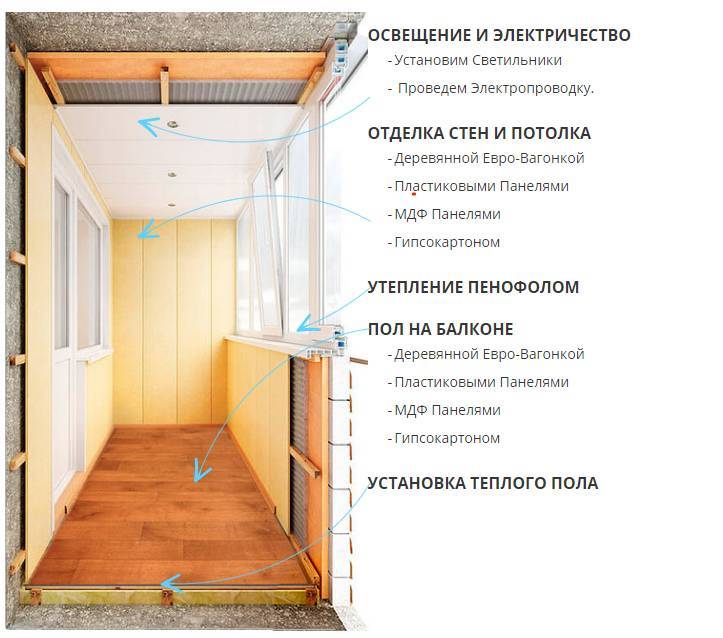
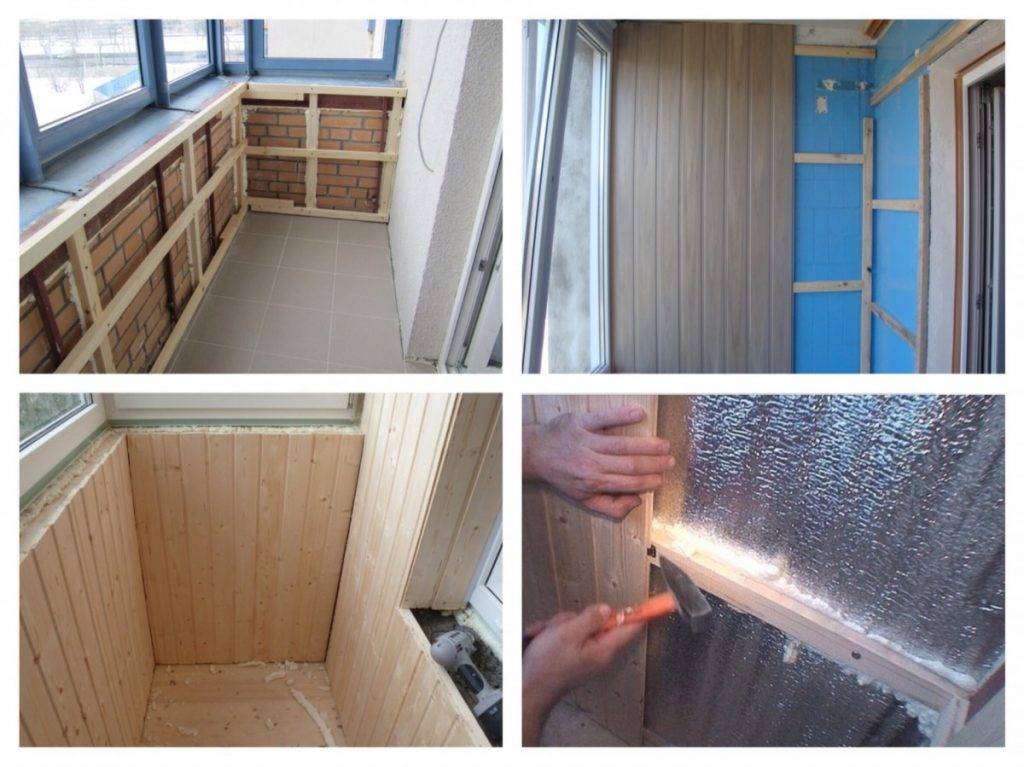
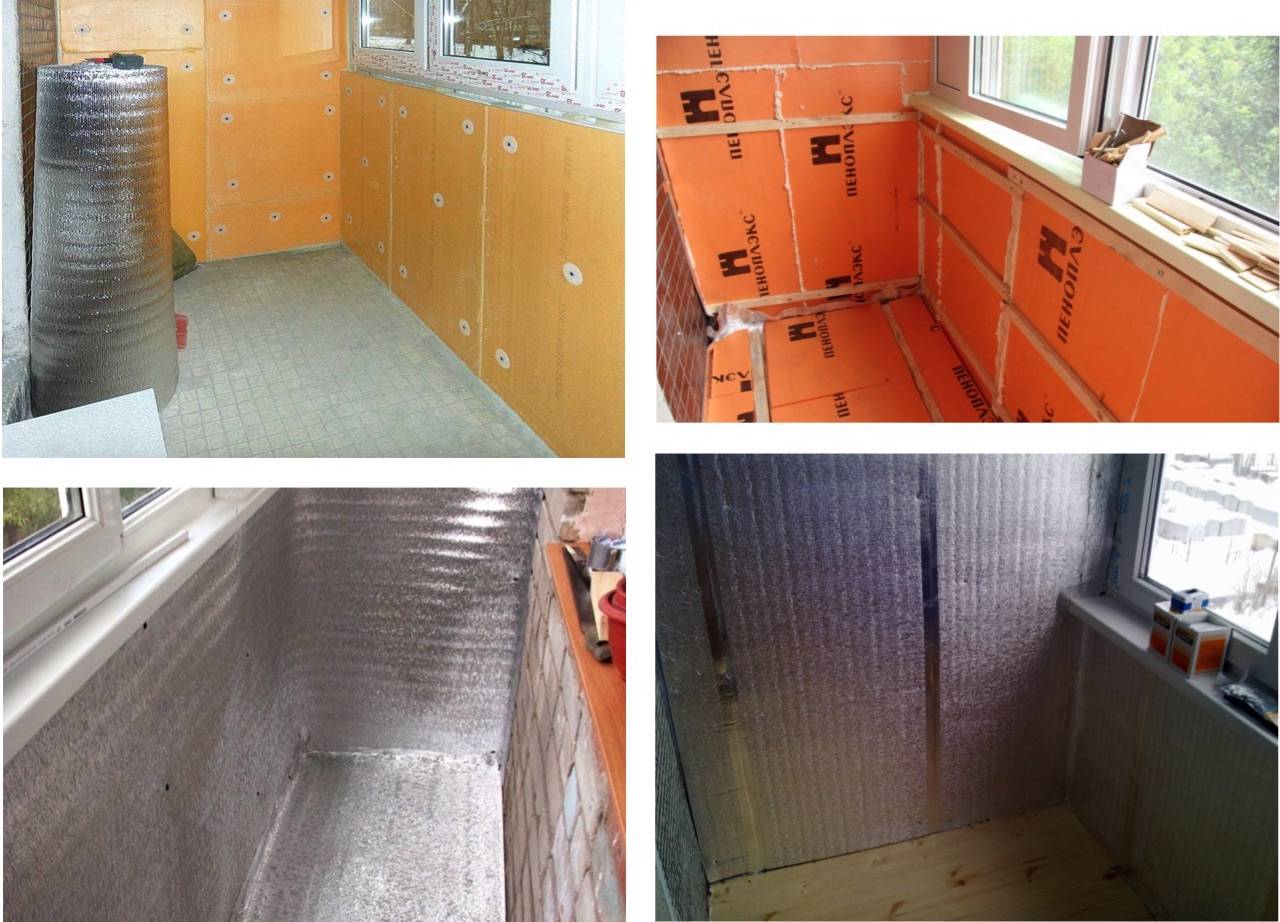
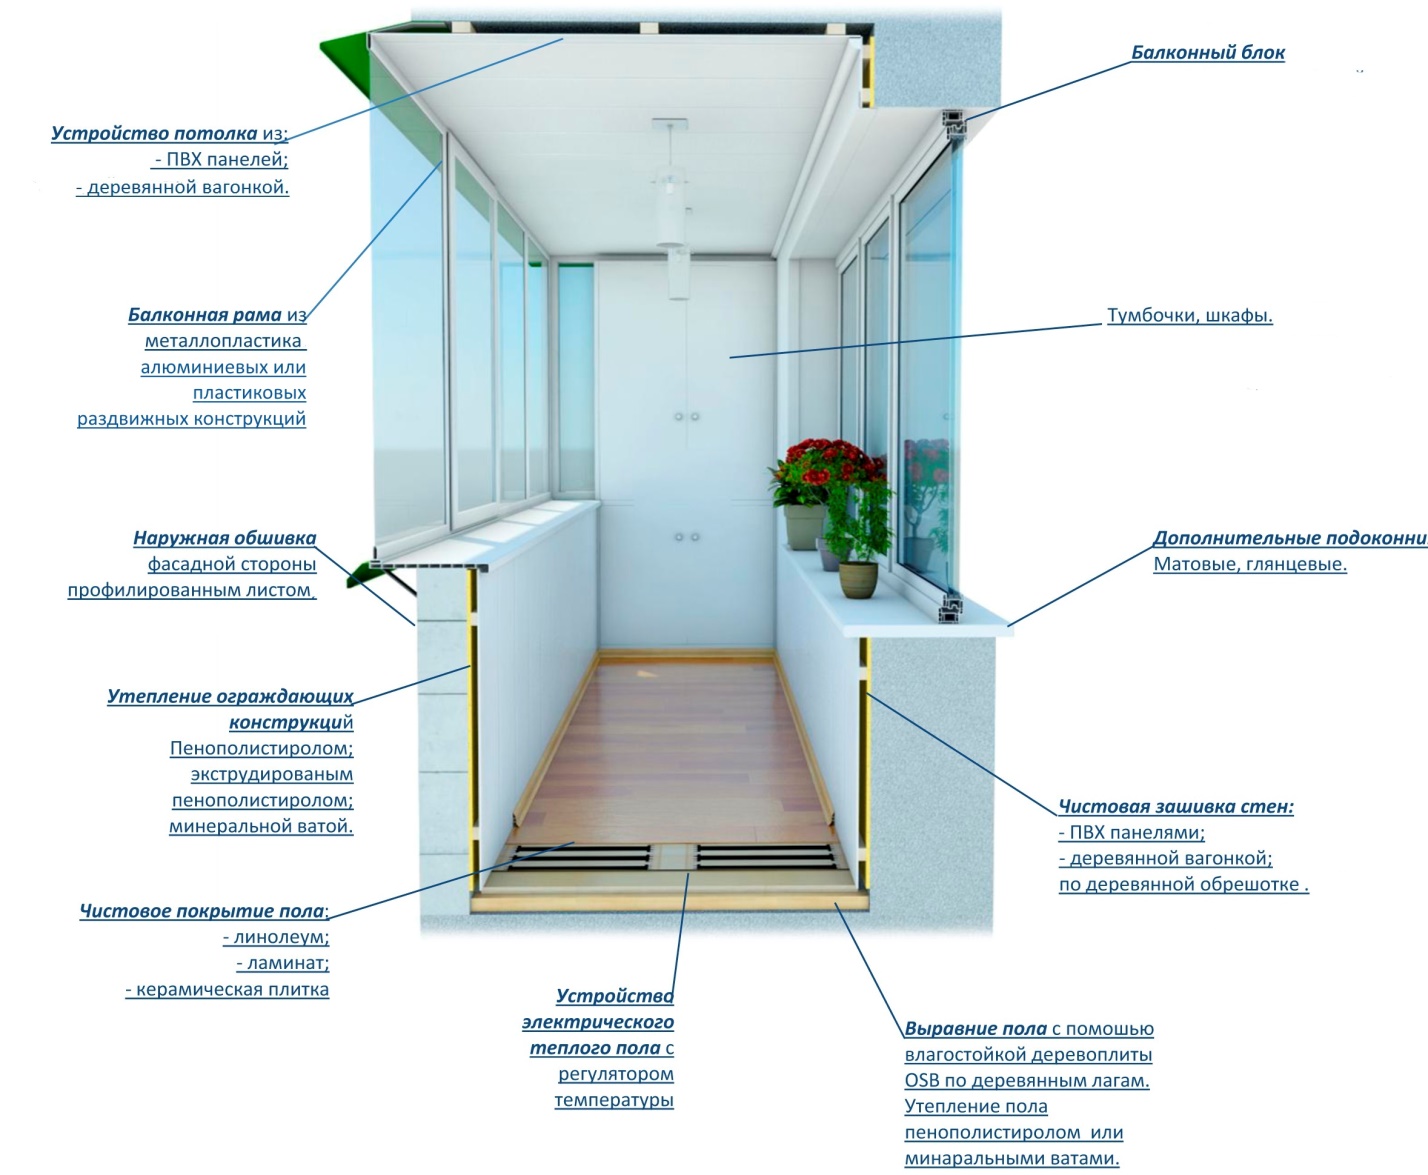
Insulation works
Now we proceed to the insulation of the balcony itself. We insulate the walls and ceiling on the balcony. Depending on the chosen insulation, here you can do without fastening the crate and glue the insulation on the adhesive solution. This will help save usable space and time spent on repairs.
When using wooden logs and battens, it is important to treat them in advance with special compounds against decay and fire. If possible, it is better to use a galvanized metal profile. After the insulation is laid, you should think about whether you need additional heating devices.
It can be a radiator, an air conditioner or a “warm floor” system. If such a system is still needed, then the next stage of work on insulating the balcony with your own hands will be the installation of a thermal system (radiator, underfloor heating)
After the insulation is laid, you should think about whether you need additional heating devices. It can be a radiator, an air conditioner or a “warm floor” system. If such a system is still needed, then the next stage of work on insulating the balcony with your own hands will be the installation of a thermal system (radiator, underfloor heating).
Now all the preparatory work is done and you can start decorating. There are no limits to fantasy here. You can make decorative plaster, sheathe the walls with panels or stick wallpaper, having previously plastered the walls.All this can be done on a warm balcony, provided that you have provided for this at the initial stage of work, since each type of finish requires its own surface preparation.
Having warmed the balcony with your own hands, you will receive additional living space, which will not only expand the square meters of your apartment, but also make it more comfortable and attractive. A balcony insulated with your own hands will undoubtedly serve as a source of pride for the owners of the apartment.
No. 5. Foam glass
For loggias and balconies, the number of possible heaters is greatly reduced due to specific conditions. You have to refuse, for example, from ecowool, but foam glass can be used. In its composition, the material is ordinary silicate glass, but the production method allows you to add unique properties. Glass waste is crushed into powder, melted, and due to the action of a gas-forming agent in the form of coke or coal, the mass increases tenfold and acquires a porous structure. Not only is this material much lighter than glass, but it also has a host of other advantages:
- good heat and sound insulation properties. A 10 cm thick slab reduces the noise level by 56 dB;
- durability. The material can retain all its basic properties for 100 years;
- well tolerates cold and heat, temperature changes, does not change geometric dimensions;
- does not burn, because it is based on glass, which melts at a temperature of 1000 0 C, and does not ignite;
- strength;
- the material is not afraid of water, but passes air.
Due to its high cost, foam glass is not often used for insulating residential buildings and, especially, loggias and balconies. In terms of performance, this is an ideal heater.
What is dew point?
Before you insulate the balcony from the outside, you need to take into account such a physical quantity as the dew point. This is the temperature at which condensation begins to form.
Dew point when insulating a balcony from the outside
In order to subtract a point, you need to know what atmospheric pressure, relative humidity and temperature are. Knowing the dew point, you can find out at what temperature condensation is most likely to appear on the windows or elsewhere. If the structure is insulated from the outside, the calculation point will be outside, that is, the condensate will settle on the outside of the balcony, due to which the humidity inside the structure will not increase.
To choose a sufficiently reliable insulation, you need to know the approximate dew point in the most severe frost that happens in your locality. If this factor is not taken into account and internal insulation is made, at which the insulation will freeze, after that the walls will become wet. Because of this, fungus and mold will appear on them over time. If the balcony is insulated from the outside, the cold first meets the insulation, then the wall, so condensation will not appear between it and the wall material.
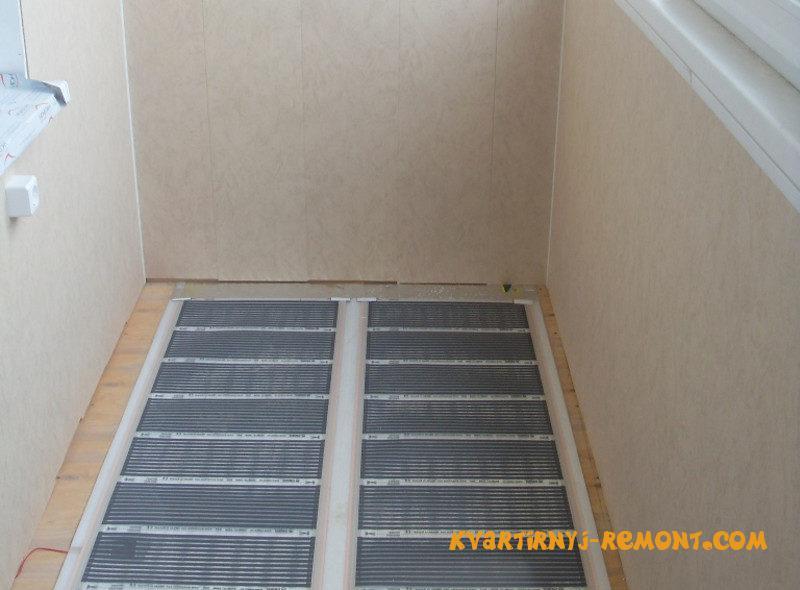
Infrared film for heating
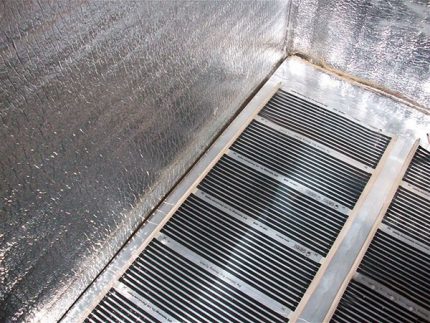
The principle of operation of the IR film is based on the generation of long-wave infrared rays. The device itself looks like a canvas coated on both sides with a polyester film. It is flexible, making it easy to mount on any part of the floor.
Implementation does not require pouring a cement screed or an adhesive base, the film can be easily installed and dismantled.
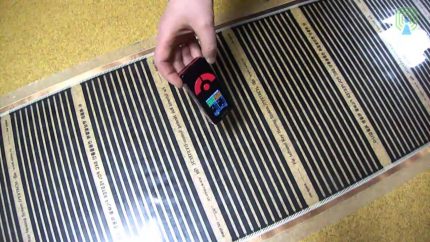
The layers of the film are made up of carbon fiber and copper bars, thanks to which 100% heat dissipation is achieved.IR film functions effectively at low temperatures, is widely used for installation in the loggia floor
The film is a kind of emitter of infrared rays, which a person interprets as heat. Its maximum heating temperature is 50°C.


Any IR film consists of:
- a heating carbon element, which is a converter of electricity into heat;
- bimetallic tires, with the help of which energy is supplied to the heating elements;
- a two-layer polymer film that performs the functions of protection against mechanical damage.
The device is powered by an electrical network of 220-230 V.
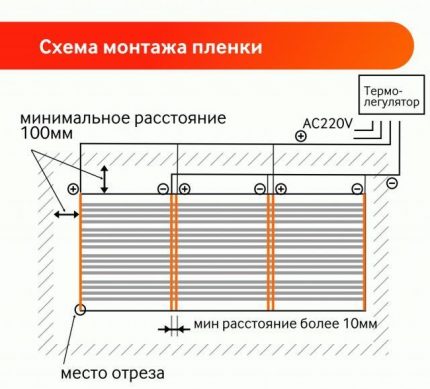 You can fix the film to the floor using a stapler, adhesive base or any other method, depending on the type of coating that will be installed (+)
The current passing through the components of the system is converted into thermal energy, it is transferred to the environment, which then heats the air mass around it.
Types of infrared films
There is a wide variety of IR films that differ in specific technical parameters and appearance. Two main types can be distinguished - low- and high-temperature models. Films also differ in terms of power, maximum heating temperature, thickness, width, and areas of application.
Installation of a continuous carbon film used as the main heating system of an equipped loggia is quite simple:
When choosing a film, the key parameter is the temperature of its heating. So, if it exceeds + 27 ° C, then the laminated coating should be discarded, since it is irreversibly deformed when exposed to high temperatures.
Therefore, high-temperature modifications should be laid under ceramic tiles.
If the floor covering will be a parquet board, laminated flooring, carpet, etc., then you need to install a low-temperature system that heats up to + 27 ° C. For coating in the form of tiles, expanded clay, you can install high-temperature modifications that generate + 45- + 50 ° С
In the loggia, you can install a warm IR film both on the floor, and on the walls and ceiling. Additionally, the panels are mounted on both walls under the windows, opposite the windows. This method of heating is called the PLEN heating system.
When choosing an IR film, it is important to focus on the area of its application.
Strong Benefits of IR Film
Experts identify a number of advantages of IR film.
The main advantages include:
- environmental safety - radiation is considered beneficial to health;
- preservation of the qualitative composition of the air - during the operation of the device, it is not the air that is heated, but the interior items, therefore, oxygen does not evaporate, the composition of the air does not change;
- lack of electromagnetic radiation;
- Easy to install, wide range of customization options.
The IR film is durable, practically does not fail and does not require repair.
Infrared film systems serve well in open areas. They are actively used in the arrangement of balconies and loggias. A significant advantage of infrared floors is that this is the only option that allows you to effectively heat rooms without glazing.
The process of installing an IR system on the balcony floor will be presented by the following gallery:
If you plan to choose IR film for the balcony, then we suggest that you familiarize yourself with the information on the installation and connection of such a warm floor:
- Infrared carbon warm floor: the principle of operation and laying rules
- How to make an infrared warm floor with your own hands: installation and connection of the film floor
Where to begin? Inspection and repair of balcony slabs

Balcony slab needs restoration
The condition of balcony slabs is not always satisfactory - over time, they can partially collapse. Therefore, before proceeding with the insulation of the balcony, you should check how strong and reliable its base is.


Minor and medium repairs are allowed to be carried out independently. If significant cracks appear, or even more so if reinforcement is exposed, fragments of the slab collapse or move away from the wall, specialists should be called.
Remember that major or emergency repairs should only be carried out by qualified installers from the management company. If the reinforcement is severely corroded, it may be necessary to reinforce it with steel beams. In case of severe destruction, the balcony slab can be completely cut off.
To repair damaged concrete sections:
- All unnecessary is removed from the balcony, and all debris is completely removed, as well as the remnants of loose concrete
- If the reinforcement is exposed, it is cleaned of rust. A reinforcing mesh is laid on top. So that it does not rust over time, it must be completely drowned in concrete. To do this, it is necessary to leave a gap between it and the plate.
- Formwork is placed along the perimeter of the balcony slab
- After pouring the concrete solution, the screed is ironed - sprinkled with dry cement, then rubbed into the dry mortar
- To protect against moisture from below, the balcony slab is primed and then plastered. On the sides, a galvanized steel outflow is mounted

Filling the floor screed on the balcony
After the reconstruction of the slab, it is desirable to waterproof it. For these purposes, roll materials or bitumen are used. Modern waterproofing materials include penetrating impregnation of the Penotron type. It is better to apply it in 2 layers.
Repair may also require a balcony railing. New structural elements in the form of shaped pipes are attached to the anchor or by welding.
Veranda attached to the house - expanding the living space: projects, tips on how to create your own hands (200 original photo ideas)
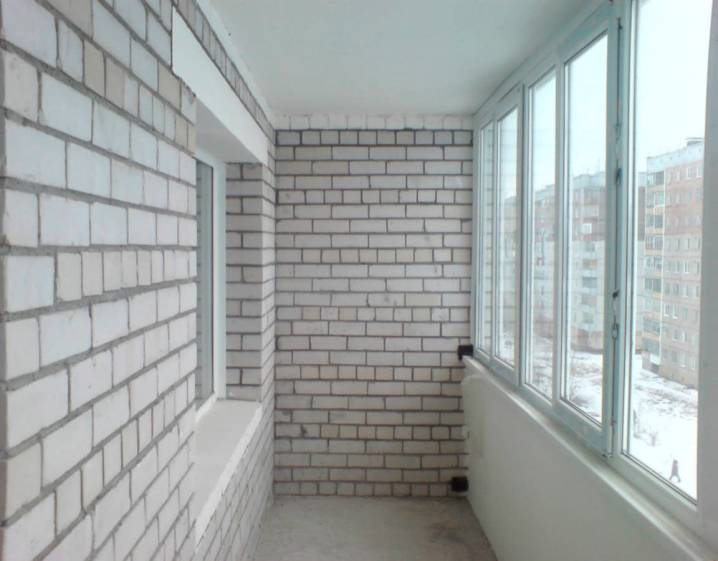
Glazing of the loggia
Glazing is a necessary step in the processing of a balcony. This will keep warm, protect the room from wind, snow and rain and turn the loggia into a separate room. This procedure requires more effort than insulation itself, and for its implementation it is recommended to contact professionals. However, more experienced and self-confident repairmen are able to do this on their own.
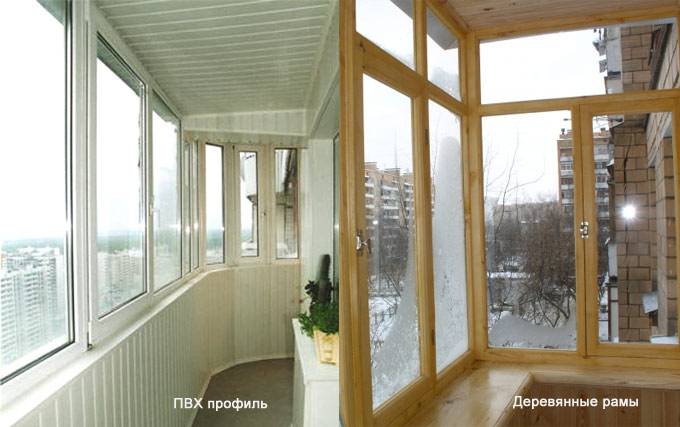
There are several ways to glaze a balcony:
With wooden frames. The advantage of this method is the high quality of the materials used, strength, long service life and excellent external characteristics. Wooden frames suppress street noise well, retain heat
Only sliding structures should be treated with caution. They are made in such a way that water can penetrate into them and freeze at a negative temperature.
Frameless glazing
Guarantees protection from atmospheric precipitation, adverse weather conditions. The design has a minimum of elements, each of which is of high quality and durability. When using this method, the frames are not visible, because the windows look solid, and more light enters.The disadvantages of the method include the high cost and the impossibility of full insulation of the loggia, due to which the loggia can be blown through with strong gusts of wind.
With the help of metal-plastic structures. The method is widespread due to good performance characteristics and relatively low cost. The system will maintain the temperature inside the room, provide reliable air circulation. Plastic structures are more functional than wooden or other frames, so the balcony can be ventilated even in the cold season.
The systems have a long service life. A balcony glazed in this way will last at least 40 years. There are drainage holes in the design, minimizing the risk of frames freezing. In addition, plastic is easier to care for - it does not require painting, it is easy to wash and clean.
Aluminum glazing. One of the cheapest options. The design is lightweight, the load on the balcony floors is minimal. At the same time, the materials are strong, durable and resistant to external mechanical stress. They are easy to care for, they are not afraid of moisture and high temperatures. Installation of the structure is carried out in a short time, people without experience will be able to produce it.

Artificial insulation of plastic windows
Something that is not talked about so often, and that requires care for the people. If you only insulate the walls, then you will not get the maximum effect. Hoping that metal-plastic windows will reliably retain heat, you may stumble upon the problem of loose closure or wear of the seal. Now I will tell you how you can keep winter frosts from getting into your family nest.
We all know the traditional ways of sealing windows using cotton wool, newspapers or special adhesive tape. To do this with double-glazed windows is a complete perversion. It will be much more efficient to use one of the following methods:
- replace the seals, which, quite possibly, have worn out. You can get them at any hardware store, as they are used not only for windows, but also for other types of work. They are easy to install, as they have a self-adhesive tape that clings perfectly to a plastic surface,
- stick a heat reflective film. Someone thinks that this is crazy nonsense, but believe that progress does not stand still, and ordinary toning will insulate your home,
- adjust lock. It is very likely that a gap may form between the frame and the window. The reason for this is the incorrect setting of the lock. Watch a video on how to do this below:
Do not forget. Before you start working on windows, wash them. You will be more pleasant, and shame will not cover your face.
It won't cost you much to artificially insulate windows, so you can arm yourself with this knowledge and go into battle against the cold seasons.
Do you need underfloor heating on the balcony?
Underfloor heating is a popular solution today. They are installed in offices and living rooms. They are economical and practical. But is it possible to make such heating on the balcony? Yes, this would be the best option. The fact is that the radiator, if installed on the balcony, will only warm the air, but the floor will remain cold. A warm floor warms up the entire room. But only specialists can install it.It is better not to engage in installation on your own, since there are a lot of subtleties that you can not take into account without work experience.


To better understand this issue, read the article: installation of electric underfloor heating.
How much to buy penoplex
Standard sizes of penoplex: width 60 cm, length 120 cm. To find out the area of one sheet, you need to multiply these values \u200b\u200b(0.6 m X 1.2 m \u003d 0.72 m2). Therefore, the area of one sheet of penoplex is 0.72 m2.
Now the area of \u200b\u200bthe walls that will be covered with insulation is measured, and the result is divided by 0.72. The resulting number is the number of sheets to be purchased. If, when dividing, the number turned out with a remainder (and this always happens), you need to buy material with a margin.
An example of the calculation of insulation. Wall area 12.5 m2. We divide this indicator by the quadrature of one sheet and find out how much to buy foam plastic: 12.5: 0.72 = 17.36. So, you should buy not 17, but 18 sheets of insulation. The principle of calculating the amount of material is the same for insulation from the outside and from the inside of the balcony.
If the insulation will be mounted in two layers, it is natural that you need to buy twice as much material.
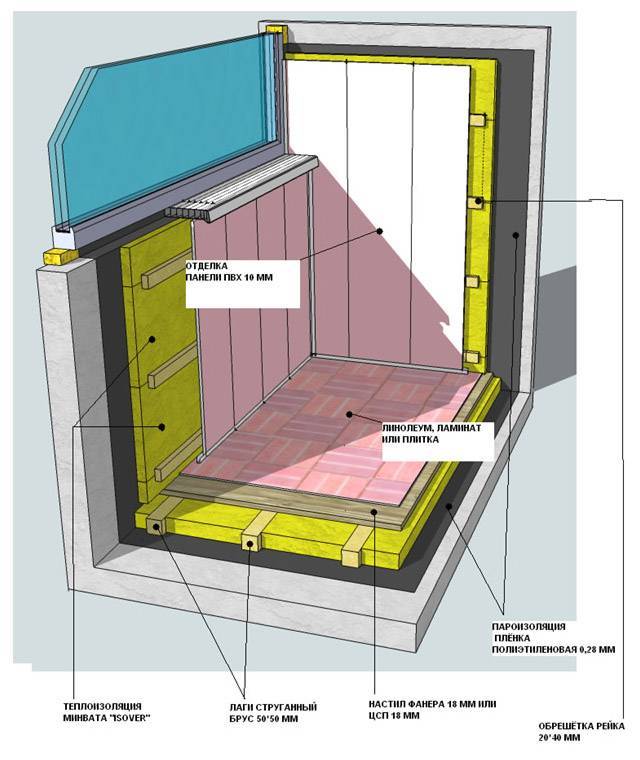
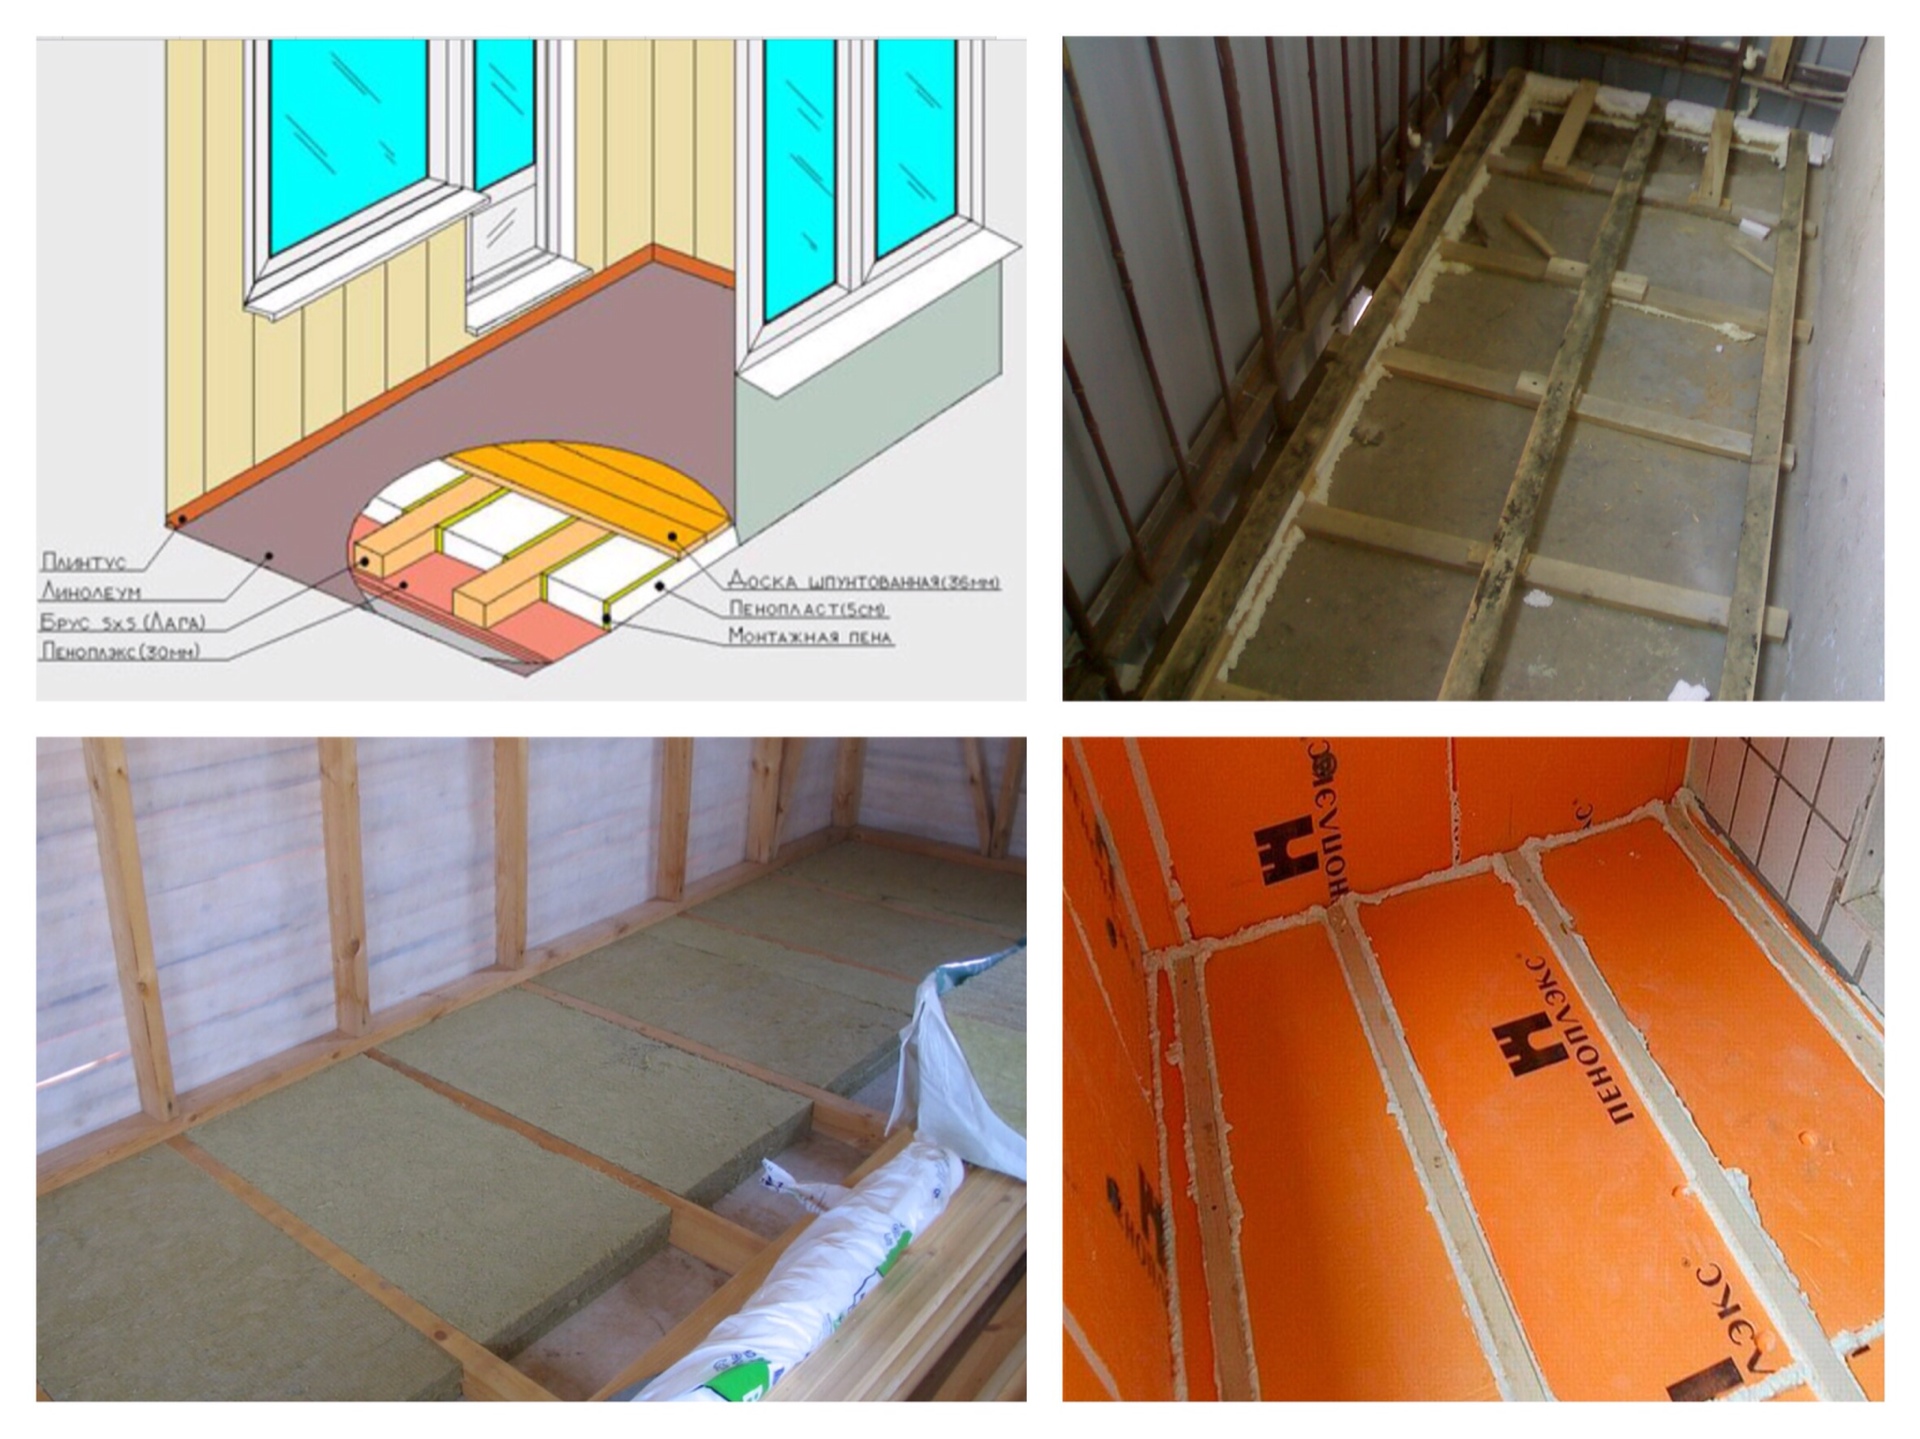
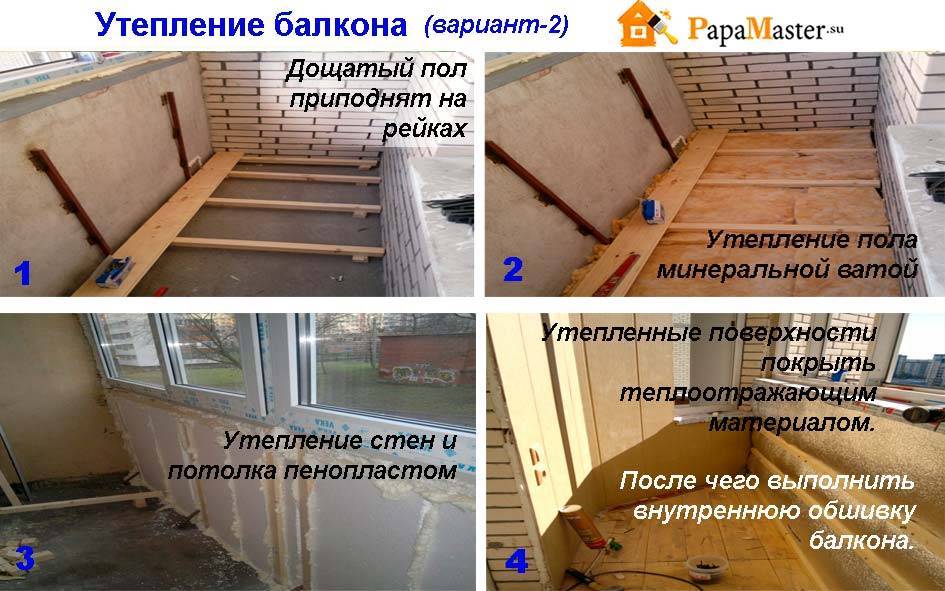
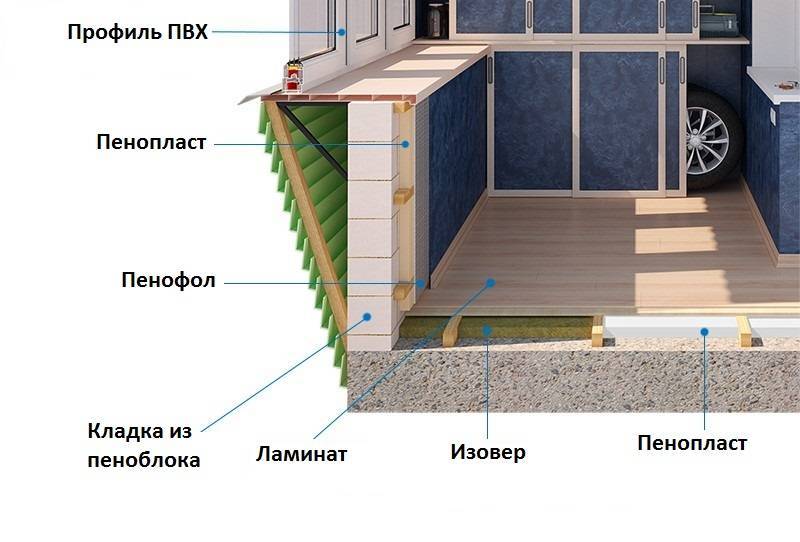
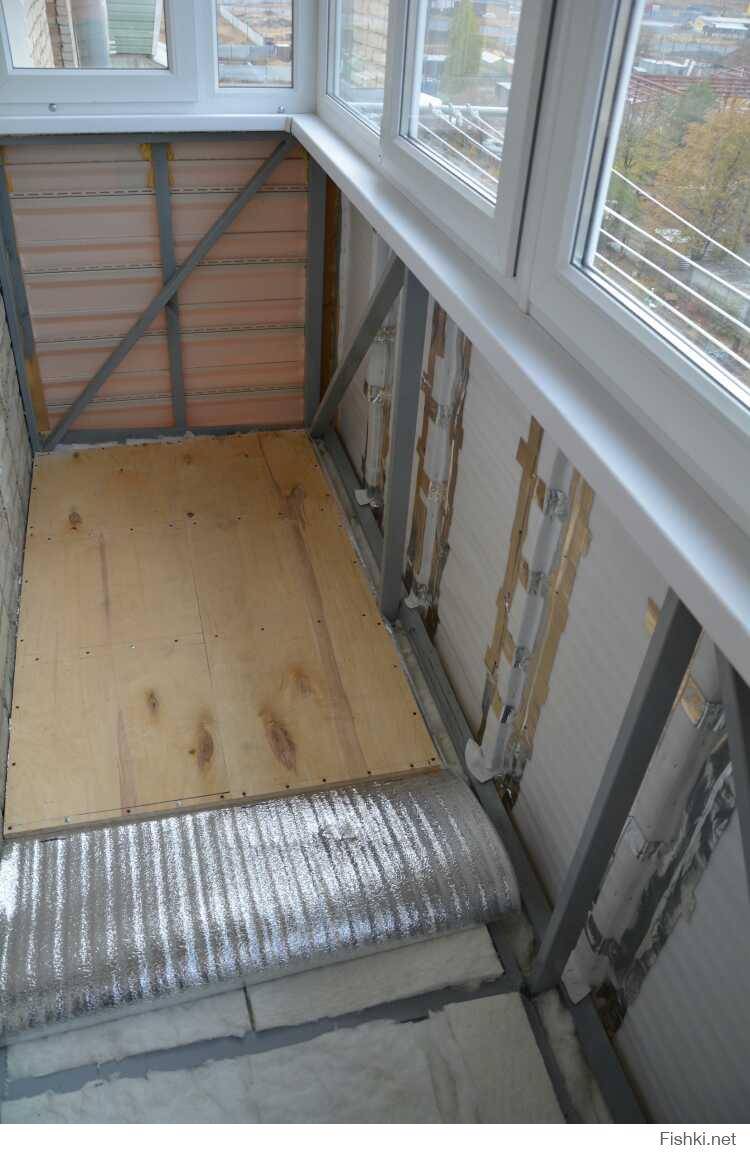
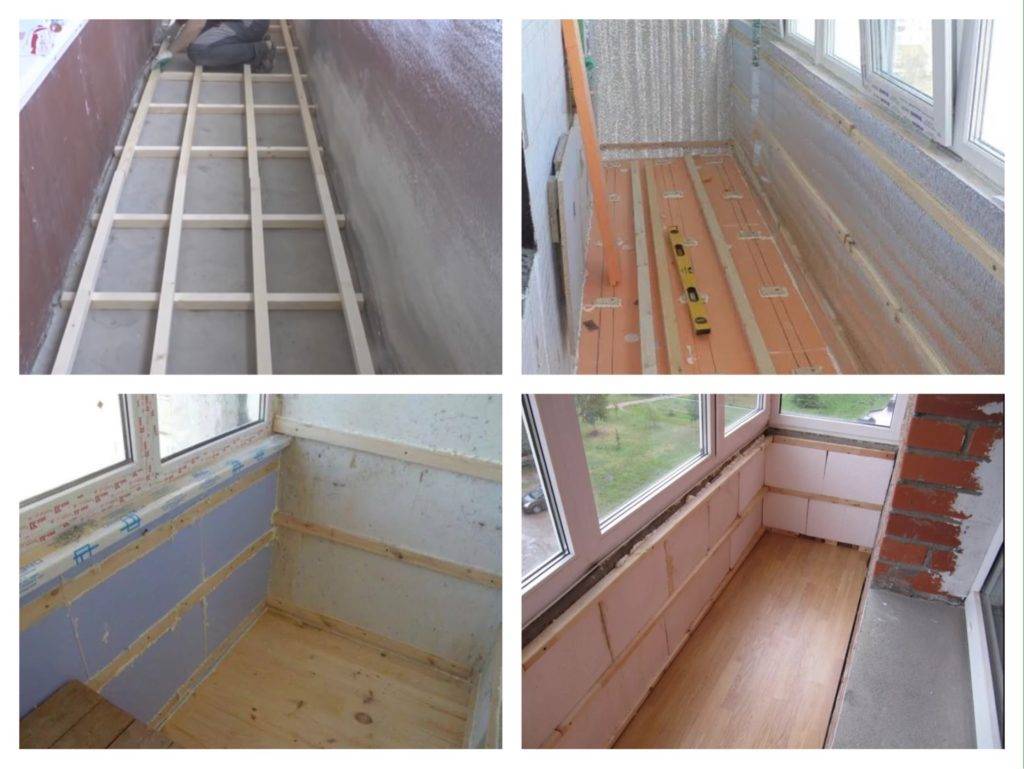
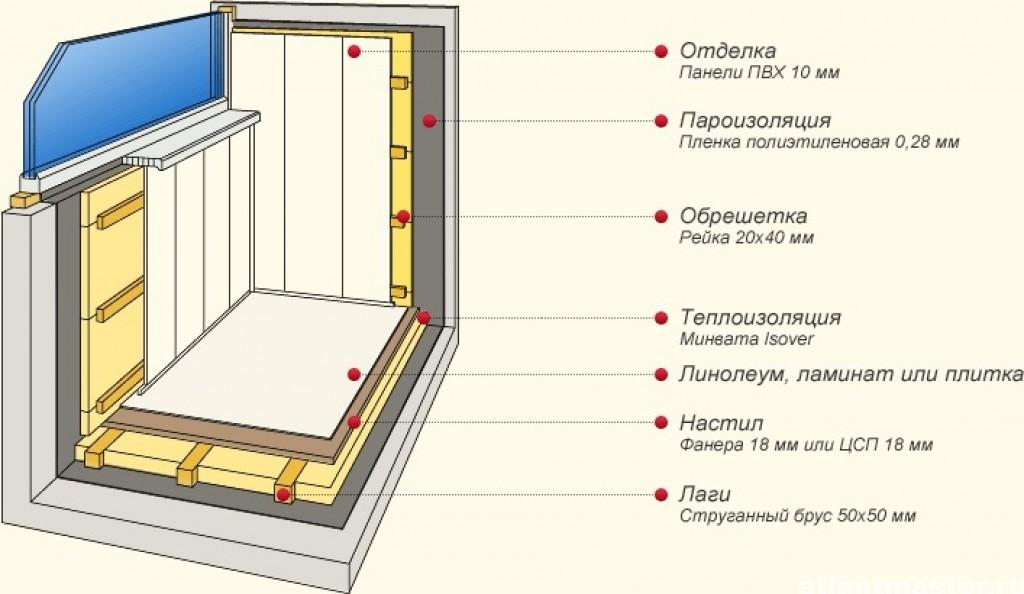
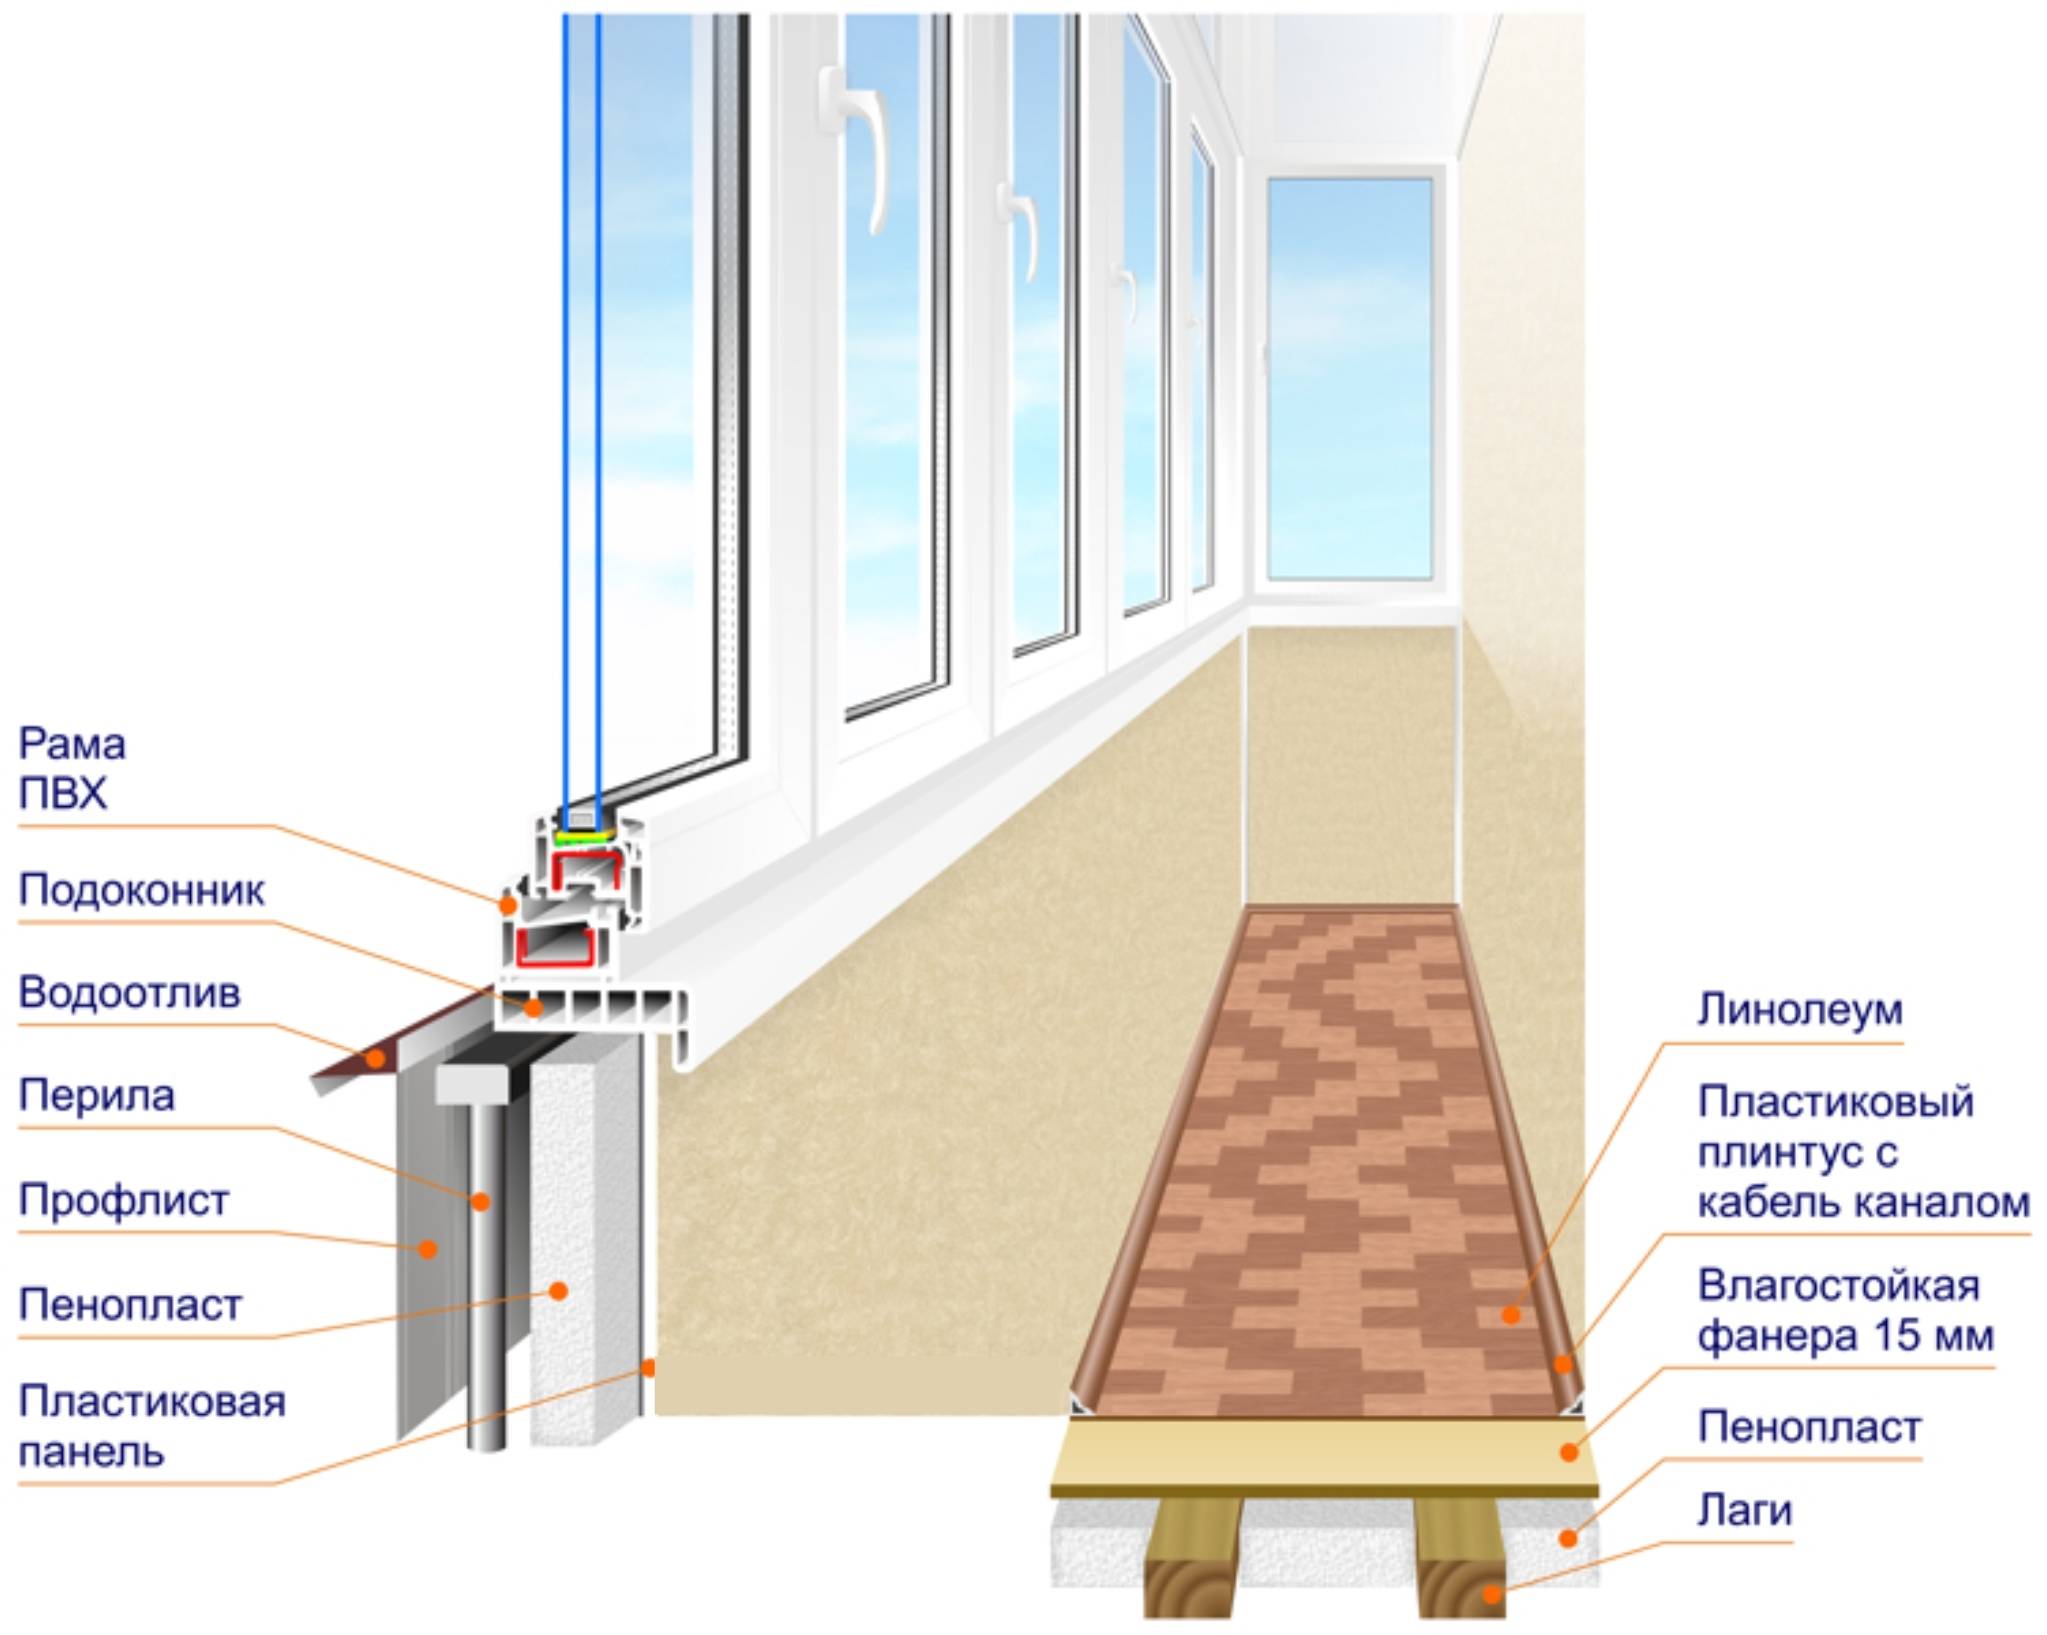
floor construction
The insulation cover should be built at a level close to the floor of the adjacent room. More often it is made equal or slightly lower. If it is necessary to raise the balcony floor relative to the general floor in the apartment, it is better to provide a small recess-pocket at the door to prevent moisture from penetrating into the room.
For work you will need tools and materials
- Roulette.
- Jigsaw or wood saw.
- Wooden beam of the desired section (about half the height of the lift) or logs of the appropriate thickness.
- Insulation.
- Material for the floor surface: board, sheets of thick plywood, chipboard (with a thickness of 16-18 mm, you can lay it directly on the logs).
- A balloon of building foam.
10 mm sheets are stacked on a pre-created "grid" of boards or low-quality coating. Usually thin chipboard or plywood serves only as a means of leveling the surface.
The work is carried out in several stages.
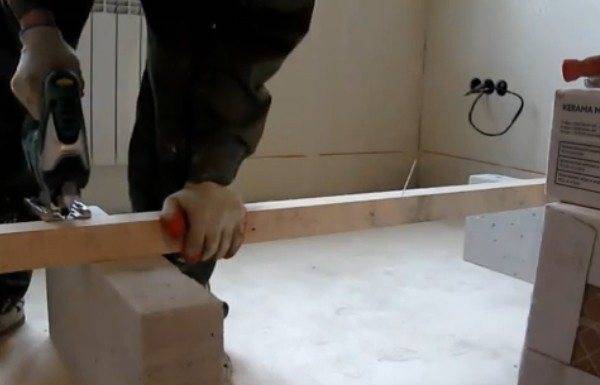
timber cutting
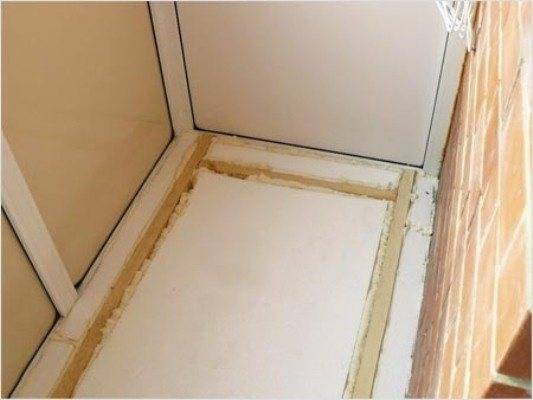
A timber of the required size is cut for laying across the balcony. The gap to the walls should be about 5 cm.
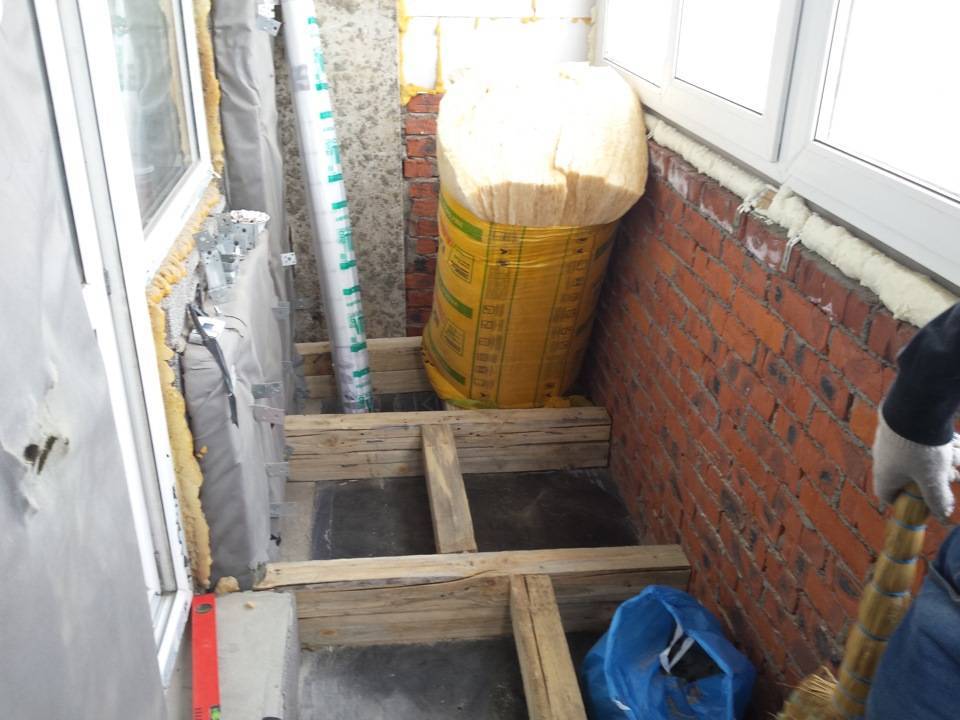
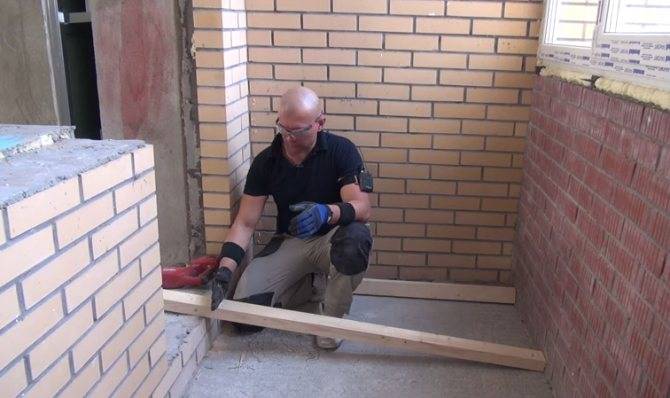
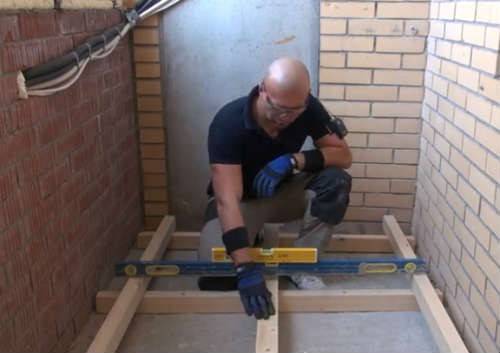
timber fastening
timber fastening
timber fastening
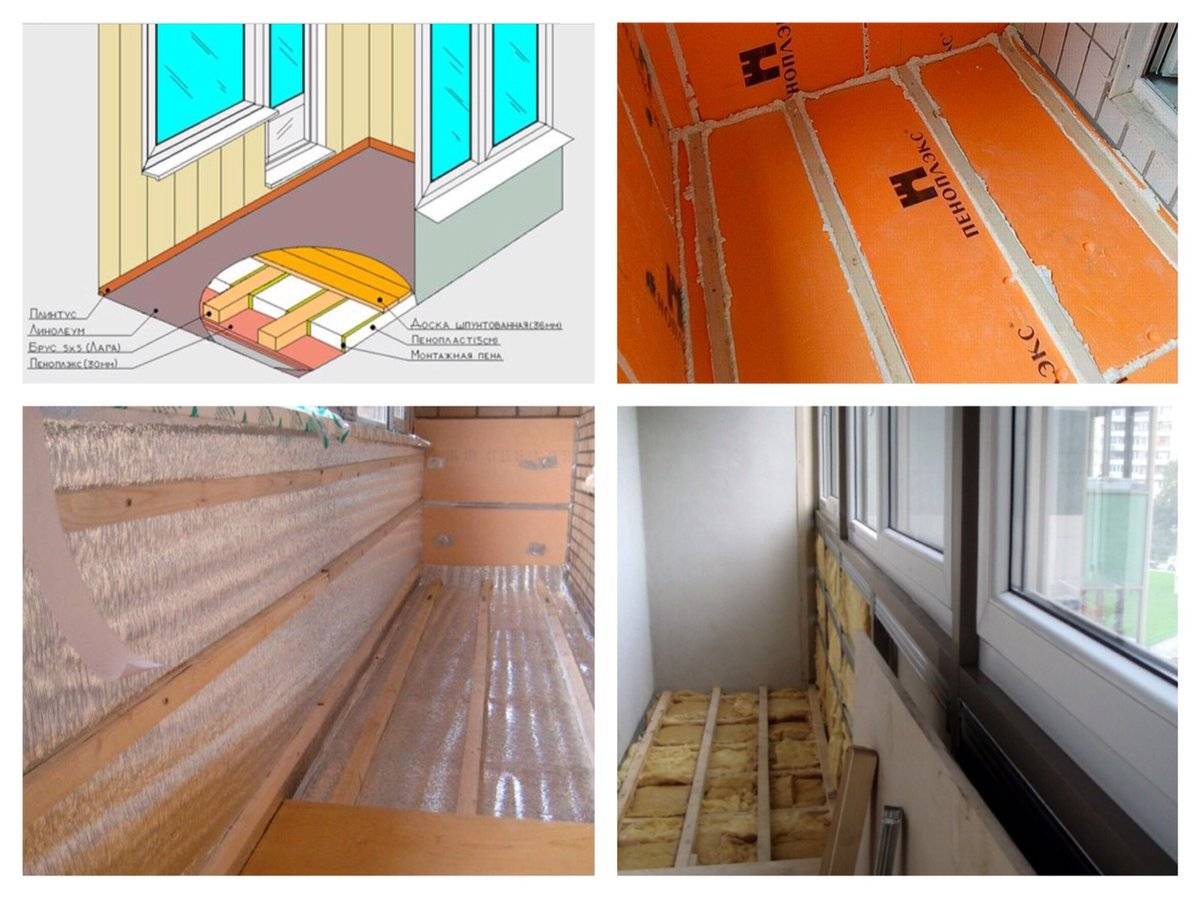
The cut parts are stacked at a distance of half a meter. They need to be attached to the surface of the balcony slab. The most convenient way to do this is with the help of "new settlers" - self-tapping screws with a plastic plug that is inserted into the concrete. To avoid splitting, the distance from the edge of the beam to the first self-tapping screw is left 7-10 cm. At this stage, you can almost not monitor the final level of the floor - this task will be performed by subsequent work.
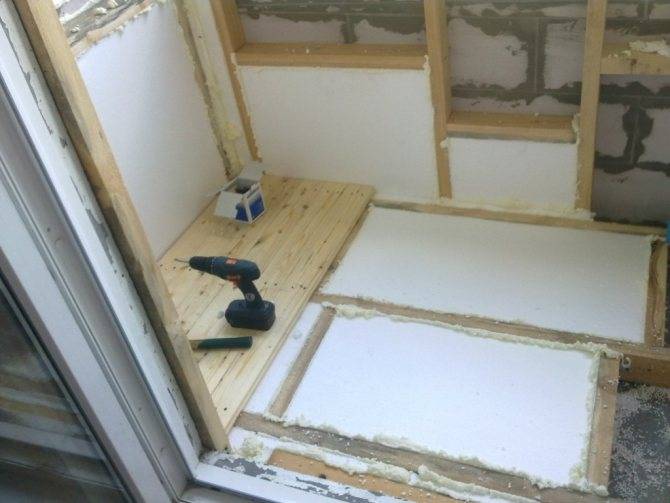
Insulation laying
Insulation laying
When foam or foam plastic is used, the material is cut into the necessary pieces to fill the gaps between the timber. Another recommendation: the level of insulation should be flush with or slightly below the surface of the timber. The gaps should be minimal. Wherever necessary, gaps are foamed. When using mineral wool, the insulation is tightly laid in the free space.
Penofol fits easier. A long strip is cut off in size 40 cm larger than the length of the balcony. It is simply laid on top, so that there is approximately 200 mm of “extra” insulation around the perimeter. If it is necessary to connect the pieces, the laying is done with an overlap with sizing with aluminum tape.
Level alignment
The level for laying the surface is finally leveled and an air gap is created for thermal protection. For this, bars are cut for longitudinal laying. In size - the length of the balcony minus 5 cm. The blanks are stacked, while the final level is carefully controlled. Linings are used on the basis of transverse bars.
Create a floor surface
Create a floor surface
Boards or other material are sewn on - chipboard, plywood, etc.
As a result, a flat surface is formed on the balcony, which has complex properties. It combines insulation, an air layer to dampen heat transfer and prevent moisture condensation phenomena. On such a coating, ceramic tiles, linoleum or laminate can be laid.
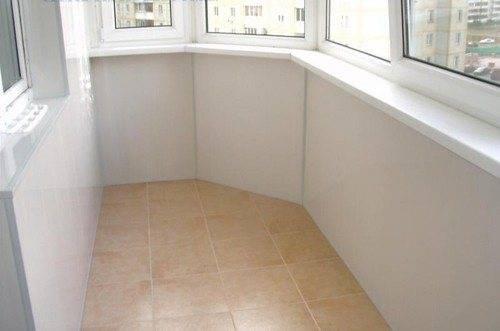
Floor on the balcony
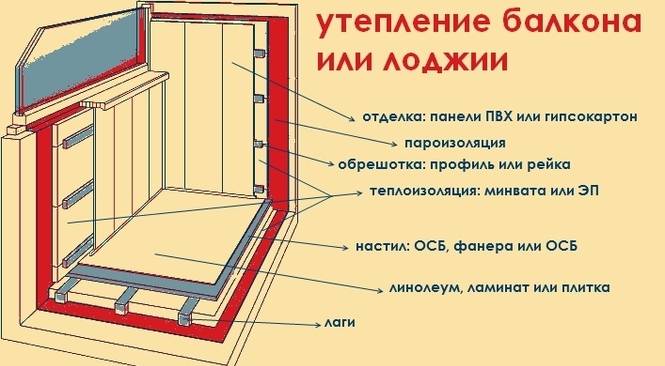
The main stages of warming
Do-it-yourself insulation of walls and floors on the loggia requires compliance with the technology. Construction work should be carried out in strict order, otherwise the heat-insulating properties of the installed insulation are lost. If you have any doubts about the performance of the work, you can watch a video on the Internet with instructions for insulating the walls of the loggia from the inside with your own hands. Youtube and construction forums describe in detail nuances of installation of various thermal insulation materials.


Step-by-step instructions for high-quality insulation of the loggia with your own hands involves the implementation of several main steps.
Stage 1 - careful preparation of the loggia
The surface itself should be carefully treated: eliminate all cracks and holes and voids, remove the crumbling layer of plaster and screed, clean the seams between the panels. To do this, you can use a cement-sand mixture.
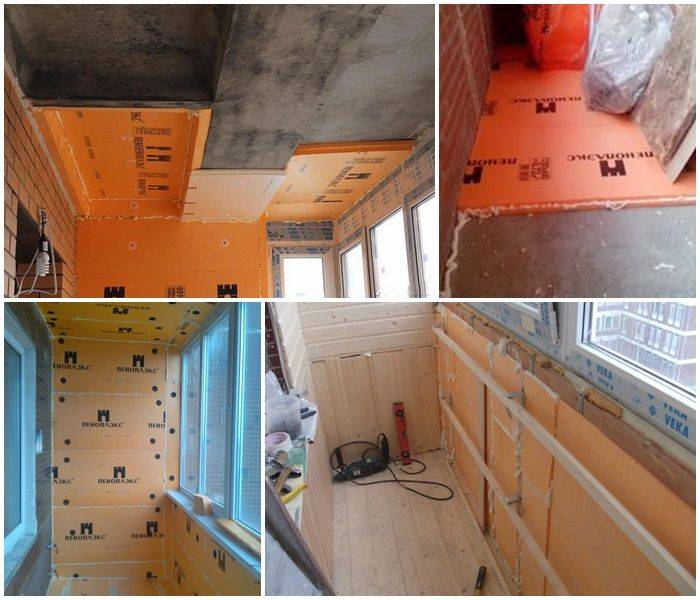
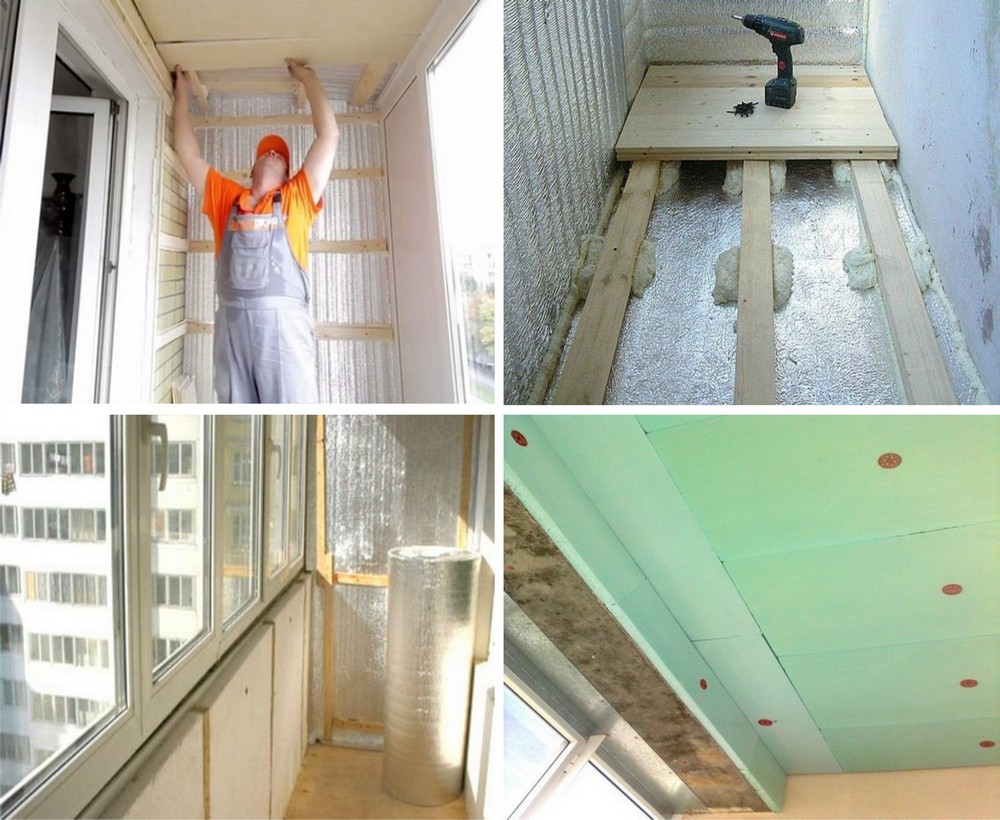
Stage 2 - installation of foam and penofol on the ceiling
Next, you can begin the installation of foam or penofol on the ceiling. Ceiling insulation can be carried out wet or frame method.
Frame thermal insulation requires the installation of wooden slats with a thickness equal to the thickness of the insulation. It is placed in the received cells. In the case of using a layer of mineral wool, a vapor barrier layer will be required. The use of penofol allows you to keep warm air inside the loggia. On top of the heat-insulating layer, it is necessary to finish the ceiling.
The second method involves gluing a rigid insulation on a previously leveled surface. Glue is applied to the surface of the ceiling and to the plates themselves. For reliability, this layer is fixed with dowels with large caps. The joints of the sheets are foamed. Penofol can also be used for this method.
There is another way to finish - insulation by installing a false ceiling.
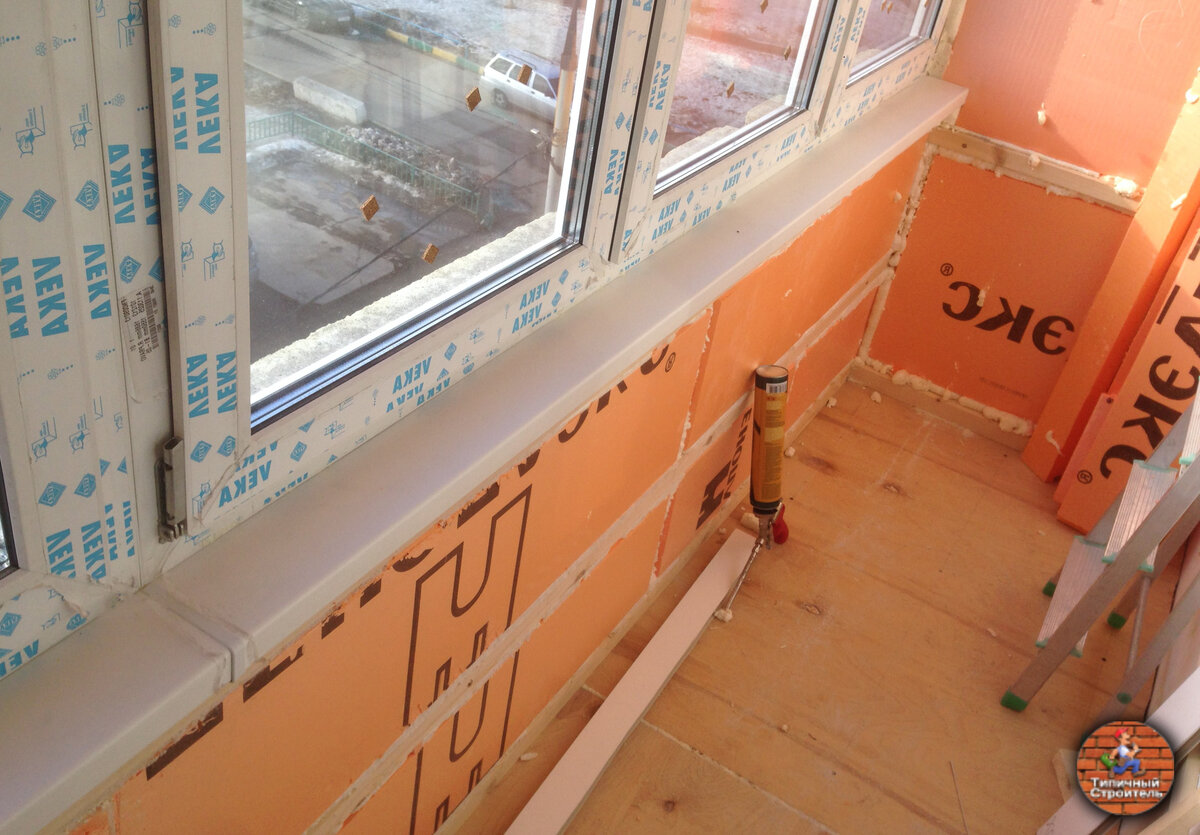
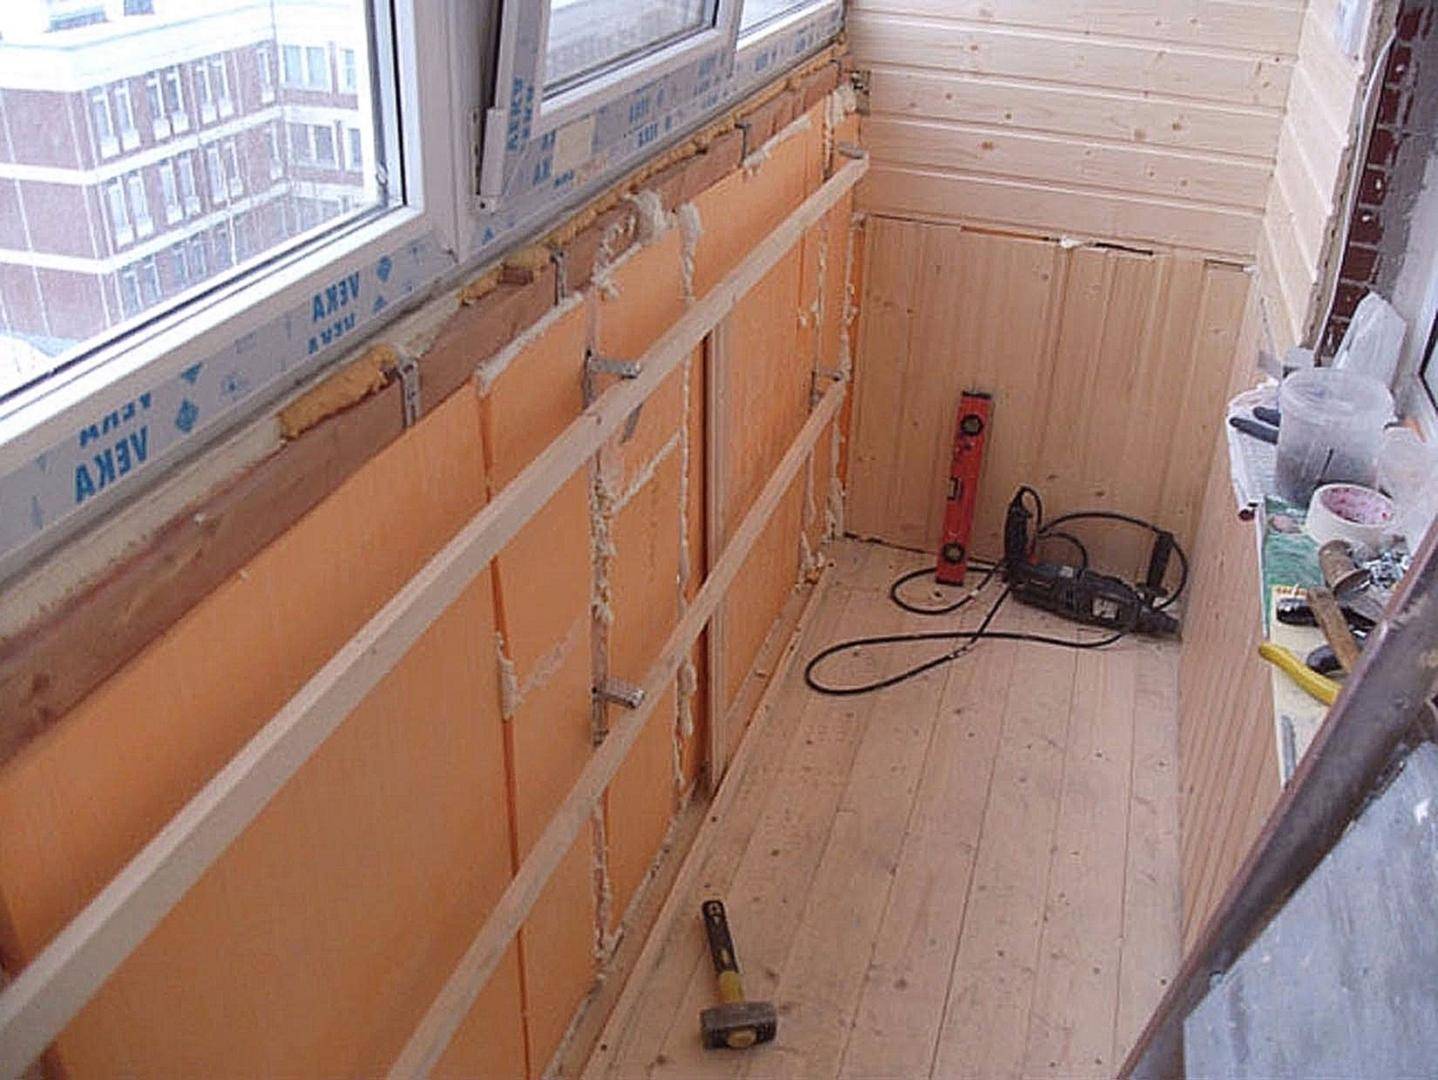
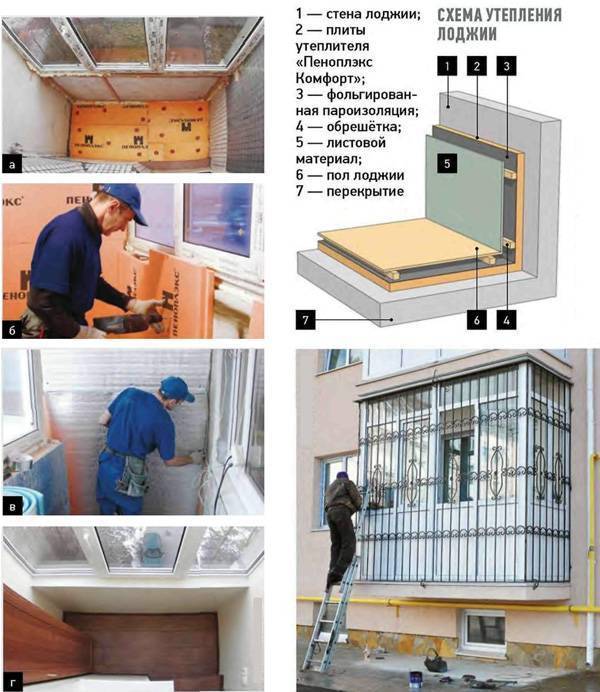
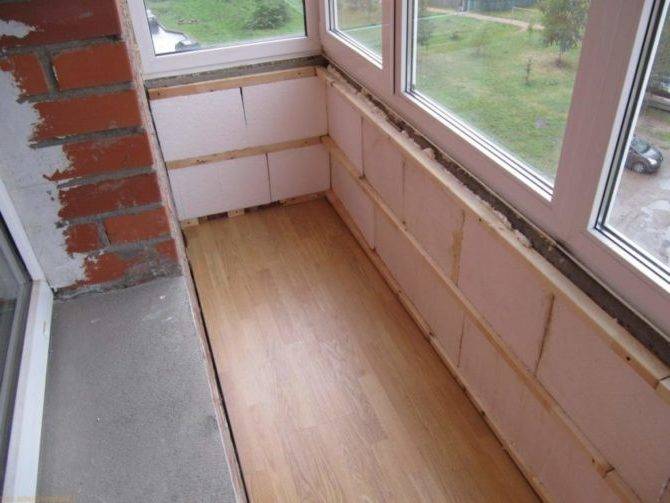
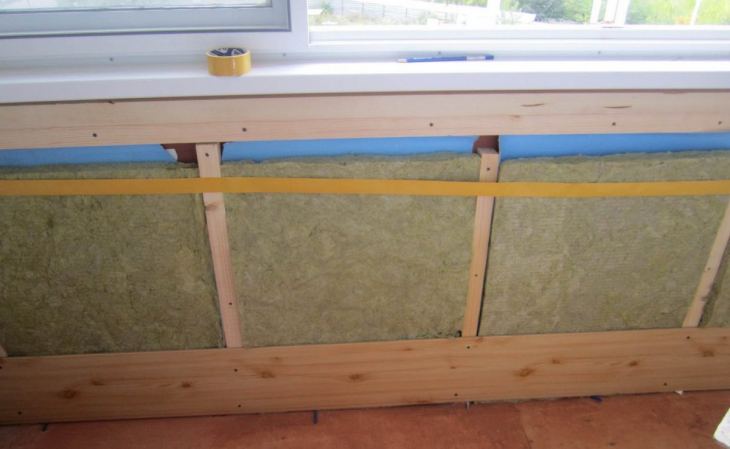
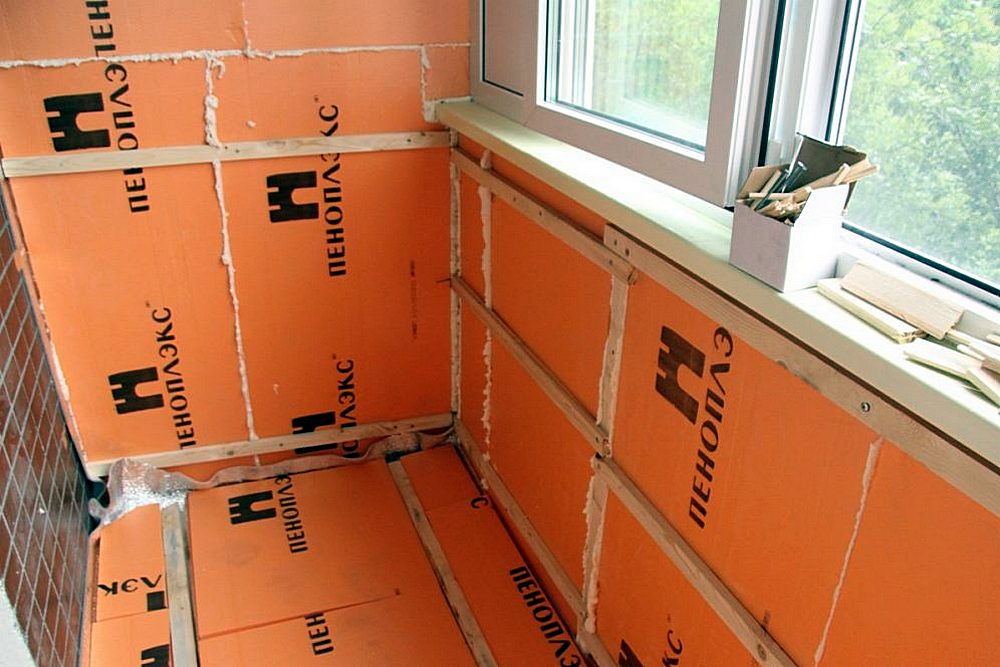
Stage 3 - fastening polystyrene foam to the walls
Warming of external and internal walls on the loggia begins with the installation of the frame. Insulation is placed in the cells, on top of which a vapor barrier film is fixed.
The wall between the loggia and the room is insulated in one layer. For a street wall, you will need a thick layer of heat insulator.
The procedure for insulating the outer wall is as follows:
- surfaces are prepared: cracks and chips are eliminated;
- if necessary, the structure itself is strengthened;
- a frame is installed on the outer walls;
- the heater is fixed. For this purpose, lighter materials are used so as not to increase the total load on the structure;
- surfaces are sheathed with finishing materials or painted.
It is better to entrust high-altitude work to professionals with special training.
As a layer of thermal insulation for the loggia, modern materials are increasingly used: technonicol and technoplex. These are innovative systems that provide high-quality results, while being easy to install and do not require the purchase of additional materials. They are used for interior walls.
Deciding how best to insulate the floor should be based on the financial capabilities and purpose of the room. Penofol can be used to insulate the floor of the loggia. It is laid with the reflective side up. Logs are mounted on top of the heat-insulating layer, into which sheets of polystyrene or polystyrene are then laid. All seams are carefully sealed with polyurethane foam. Next, the rough floor is laid.
An electric floor will provide heat all year round. It can be a cable system or heating mats connected to the mains. They are laid on top of the insulation layer and filled with cement mortar. Any floor covering is laid on top of the screed: tile, linoleum or laminate.
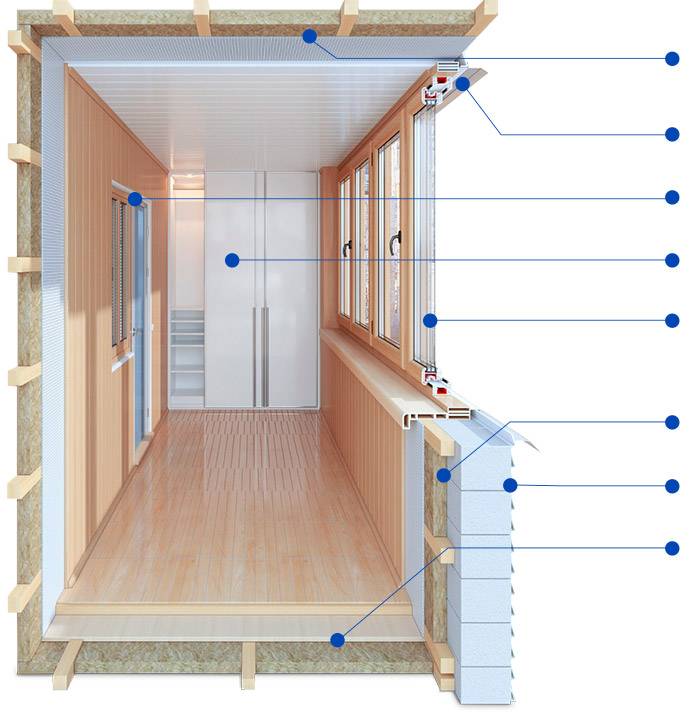
The choice of frame design and insulation
The owner of the apartment should know that the insulation of the balcony in Khrushchev begins with high-quality glazing. The structures are divided into cold or warm frames. If the task is to reduce drafts and natural humidity from precipitation, cold glazing of the balcony is chosen.
For a warm design, a PVC profile frame is chosen. It keeps warm air in and keeps cold air out. Having carried out work on the insulation of the ceiling, walls and floor on the balcony, they get the desired effect - it will be warm enough inside.Without additional thermal insulation, the air temperature on the loggia will differ little from the street temperature. Concrete does not work well as a heat insulator.
Expanded clay backfill is quite suitable for thermal insulation of the floor. For finishing of internal surfaces use lining, MDF, plastic. Sheathing the balcony will protect the insulation from moist air and add completeness and attractiveness to the room.
What frame do you prefer?
The design of glazing for a balcony can be of three types:
Of the listed types, in terms of resistance to heat transfer, a metal-plastic frame is preferable. From an environmental point of view, a wooden structure is better.
How to choose a heater for a balcony
Thermal insulation material must be:
- safe and environmentally friendly for humans;
- with high thermal conductivity;
- moisture resistant;
- durable in service life;
- with an active flame, do not emit acrid smoke;
- without condensate.
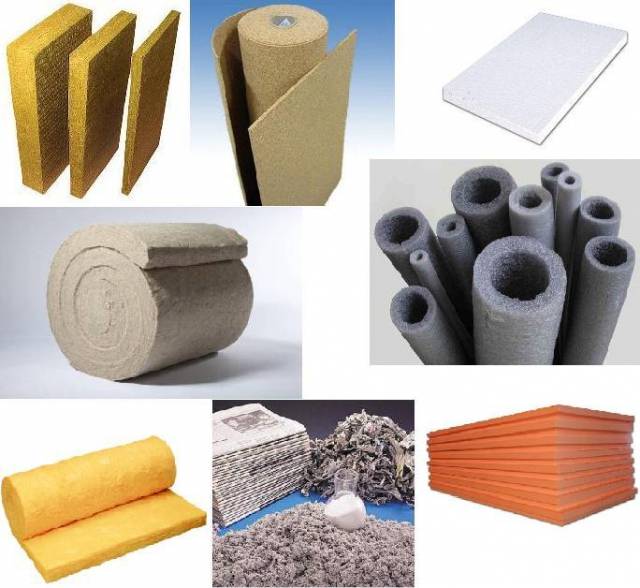
What thermal insulation do professionals recommend? Popular and popular heaters are:
- Penofol. Reflective ultraviolet insulation consists of several layers of polyethylene, aluminum foil. Advantages - light weight, easy installation, low price. Excellent protection against moisture, condensation, radiation. Penofol is sold in rolls.
- Styrofoam. Low-cost, environmentally friendly and safe material for installation. Non-toxic, odor neutral, perfectly retains noise and heat. The insulation is resistant to water and steam.
- Styrodur (expanded polystyrene). Durable, resistant to moisture, keeps heat well. Available in green leaf form.
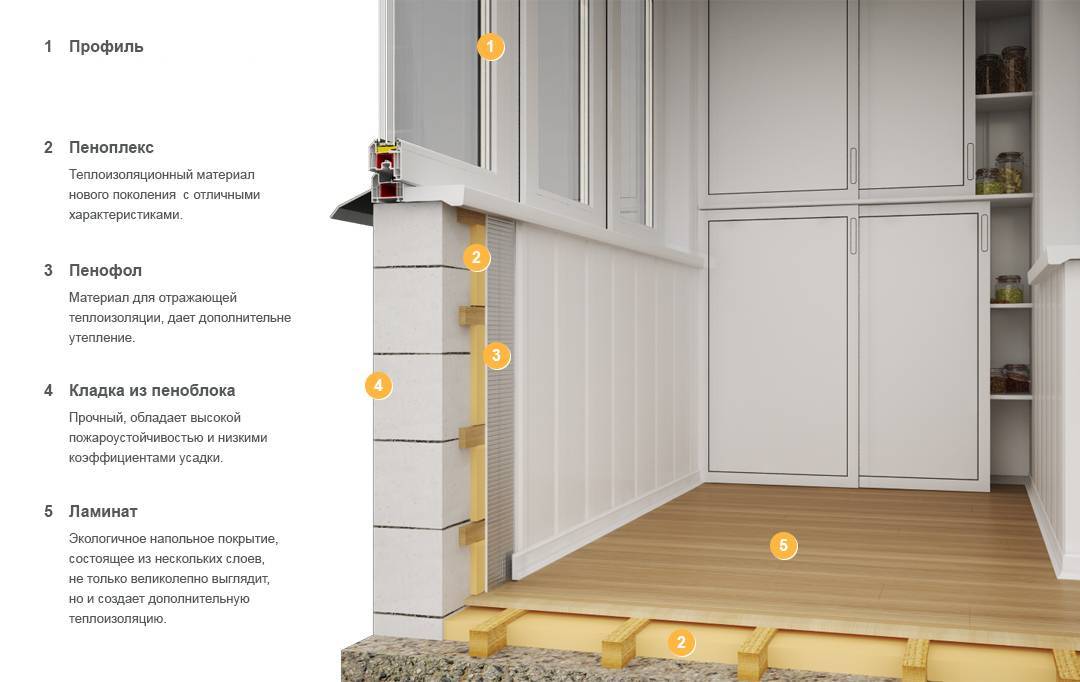
- Penoplex. This is a foamed type of polystyrene, which has moisture resistance and minimal thermal conductivity.Often used as a heater for outdoor work, they sheathe large surface areas. Read more in the article "Insulation of the loggia with penoplex".
- Polyurethane foam. The leader among heat-insulating materials. Has high rates of fire resistance, is safe for people around. Apply by spraying or pouring. The design of the crate is not needed for it. When sprayed, it quickly seizes and dries, sealing all bumps and cracks. When applied, protection is needed, work in a respirator.
- Mineral wool (izover). Trade enterprises offer sheets or rolls of insulation. It is of high quality, used more often for work on floor insulation.
To figure out how to insulate balcony in a panel housewhat material to purchase for thermal insulation, take into account the nuances of the room. If we are talking about a loggia, it makes no sense to use moisture-resistant materials. All work is carried out inside, after the completion of the glazing. The thickness of the insulating material must be optimal so as not to greatly reduce the usable area after the insulation of the balcony.


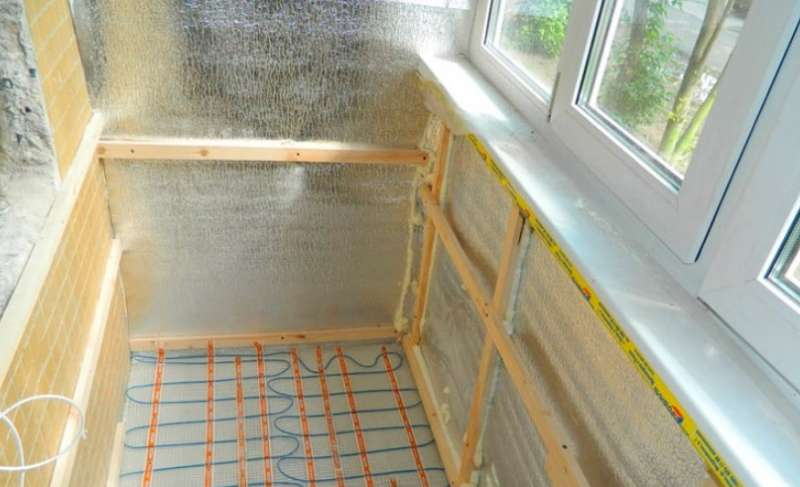
Construction of underfloor heating for balconies and loggias
The source of heat for a warm floor can be an infrared film or a specialized cable.

Choosing the latter, you need to consider:
- the power of the heating cable should not exceed 200 W/m2;
- before proceeding with laying out the cable, the floor is insulated with penoplex or penofol and poured with a 4–5 cm layer of screed;
- the cable is positioned so that it occupies 70% of the area. For convenience, the wire is laid along the mounting tape, which is rolled out on the floor;
- the installation of the temperature sensor and wiring is carried out inside the corrugated pipe, and the contacts are connected to the thermostat.
Before pouring the screed, the joints of the walls and flooring are pasted over with a damper tape. After waiting for the screed to dry, the repairman checks the performance of the system, armed with a special device. If the electrical characteristics of the warm floor correspond to the norm, then you can proceed to the final stage - the laying of the external coating.
Warming a balcony with panoramic windows is a complicated procedure. It is better to entrust it to an experienced specialist.
Conclusions on the use of penoplex
As you can see, do-it-yourself insulation of a balcony with penoplex is a completely feasible process. The purpose of balcony insulation is to create an acceptable microclimate on the balcony, to make it a full-fledged living room. Our task is to achieve the optimal temperature on the balcony, if not room temperature, then at least above zero, and dryness. In many houses older than 10 years, if the finishing of concrete slabs has not been updated, moisture can already enter the premises. Therefore, the insulation of the balcony has a very positive effect on the condition of housing.
If the balcony will only be used for storing essentials, you can insulate it in one layer. But if the loggia will be used as a living room, you can insulate the walls in two layers of foam.


