- The better to insulate the loggia from the inside
- Insulation without vapor barrier
- Foam insulation
- The choice of glazing methods
- Do-it-yourself plastering of a balcony (loggia)
- External insulation of the loggia
- Step four - working with insulation
- Panoramic loggia insulation methods
- Balcony decoration
- Frameless glazing
- What materials to use?
- How to insulate a balcony with your own hands?
- Balcony insulation from the outside
- Choosing materials for insulation.
- Finishing the loggia and balcony after insulation
- What is the best thermal insulator to use?
The better to insulate the loggia from the inside
From the point of view of an ordinary owner of an apartment located in a brick or panel house, the task of thermal insulation should be solved taking into account the following requirements:
- it is desirable that the temperature on the balcony and in the adjoining room be the same and comfortable in the winter season;
- the space of the apartment should be maximized due to the loggia; for this, part of the wall is sometimes dismantled along with the window;
- the cost of the work and the purchase of insulation materials should be acceptable;
- it is necessary that the internal design of the loggia after insulation and finishing turn out to be aesthetic, but not costly.
In accordance with the above requirements, it is necessary to choose a durable, thin enough and at the same time effective insulation for the loggia, affordable. There is only one way to save money on work - to do it yourself. Then, by elimination, we refuse such options as insulation with polyurethane foam or polyethylene foam materials. The first is too expensive, and the second is inefficient.
It turns out that for the insulation of the loggias inside, which is done by one's own hands, the following choice of suitable heaters remains:
- foamed polystyrene (polystyrene) in plates;
- polystyrene foam extruded in slabs (penoplex);
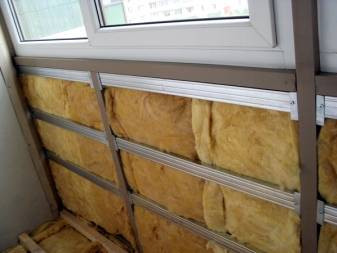
- mineral wool, which is made on the basis of basalt and fiberglass.
Styrofoam with a density of 25 kg / m3 is the best option for insulation in terms of cost, and therefore the most popular. A little more expensive will be a more durable polystyrene laid on the floors - 35 kg / m3 of specific gravity. In addition to the fact that the material is cheap, it has one of the best thermal conductivity values - 0.043 W/m2 °C. Better than it is only extruded polystyrene foam, which has a thermal conductivity of 0.037 W / m2 ° C, while for mineral wool this indicator at a density of 80 kg / m3 is 0.06 W / m2 ° C, and for glass wool it is 0.044 W / m2 ° C.
Insulation without vapor barrier
The main scourge of a newly insulated room is condensate. Temperature fluctuations between the cold concrete panels and the warm air of the heated room will inevitably lead to the appearance of condensate in the form of moisture. And where there is condensate, there are unpleasant consequences - mold and fungus, which are very difficult to remove.They can be eliminated if you first put a vapor barrier on the path of condensate (finish the walls on the balcony or in the loggia with plastic wrap or foil). This is especially true if you plan to insulate the walls with mineral wool. There are modern materials in which heaters are combined with vapor barrier. This is, for example, foam, on which a film or glassine has been previously applied. Another option is a material such as foil foam.
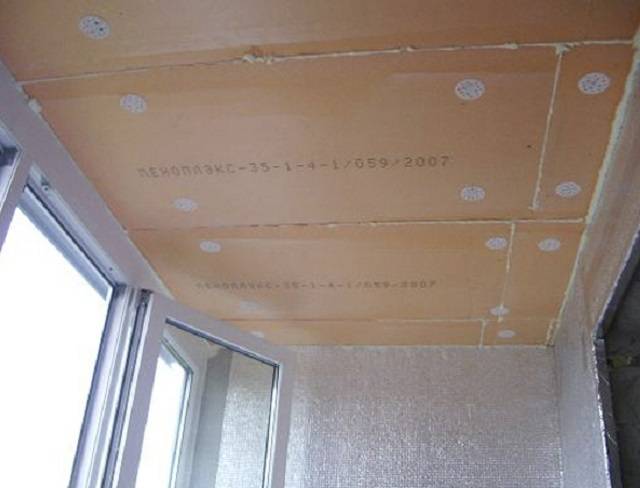
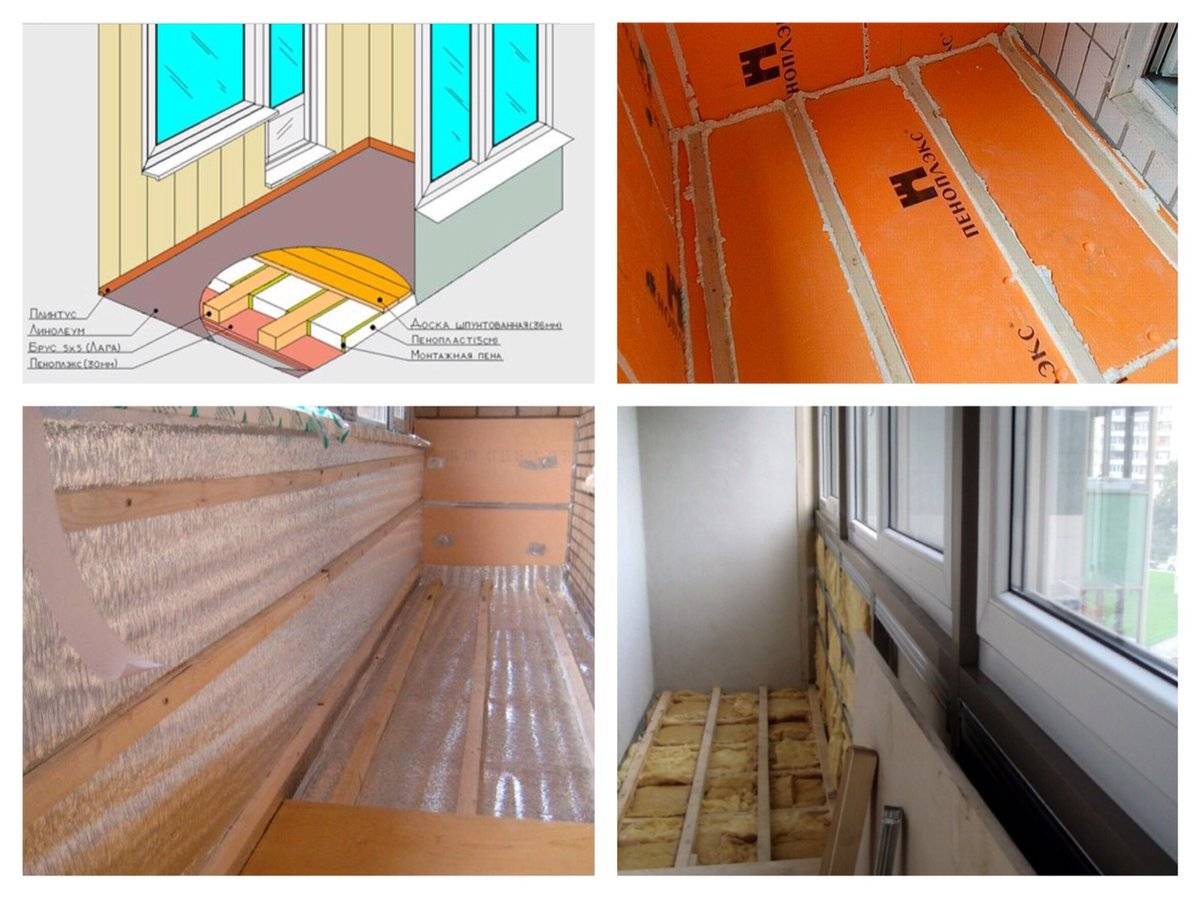
Foam insulation
Penoplex, or extruded polystyrene foam, is a heat-insulating material belonging to a new generation of heaters. It is, in fact, an improved foam that has increased strength characteristics, is less prone to fire and is more stable. This causes the growing popularity of this material used for mounting the ceiling of balconies or loggias.
Advantages of penoplex:
- low vapor permeability, which prevents the material from absorbing moisture;
- low thermal conductivity;
- ability to withstand heavy loads;
- ease of installation;
- long service life;
- good combination of price and quality.
The disadvantages of penoplex are:
- sufficiently high fire hazard;
- susceptibility to rodent attacks;
- the cost is higher than that of foam.
The insulation of the ceiling of the loggia / balcony with extruded polystyrene foam is carried out similarly to the insulation with foam plastic - the difference is that when mounting the foam plastic under the putty, you need not five, but only two fungus-dowels located along the edges of the panel.
Due to the density, which can range from 35 kg / m3 to 45 kg / m3, foam plastic is characterized by better thermal insulation, which makes it possible to use panels with a thickness of 20 mm or more.So, having clear advantages over polystyrene, extruded polystyrene foam has the only drawback - high cost.
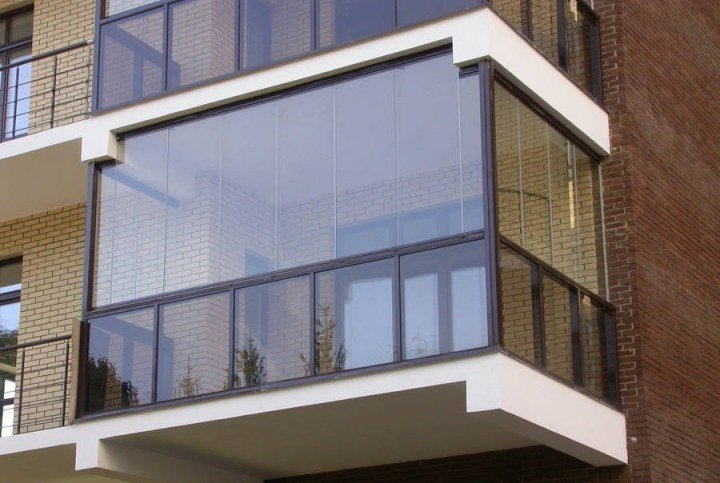
The choice of glazing methods

Double-glazed window construction
If your balcony has conventional 1-chamber double-glazed windows, they should be replaced. Otherwise, you will waste a significant part of the energy resources spent on heating the room. A warm balcony requires 2- or 3-chamber double-glazed windows. In the conditions of the Far North, they can be 5-chamber.
Balcony glazing is more difficult than the usual installation of double-glazed windows in windows. In this case, the installation of additional components is required. Therefore, be sure to invite proven masters of high qualification.
It is undesirable to use wooden double-glazed windows for glazing. Due to the accumulated condensate, over time they will begin to rot. Plus, the weight of such structures saturated with water will be significant. If for some reason you decide to focus on wooden products, do not forget to regularly treat them with an antiseptic and paint them.
The use of the latest technologies - glazing using I- or K-glasses - will help reduce heat loss by 30%. The first option - I-glass with a multilayer coating, which includes a small percentage of silver - can reflect up to 90% of the outgoing heat. Since such surfaces can be easily scratched, they are installed with a coating inside the room.
Non-ferrous metal oxide is applied to K-glass, due to which heat is reflected from the batteries into the room. Such a coating is less afraid of damage. Although the prices for both glass options are the same, the degree of heat reflection in K-glasses is less and amounts to 30%.

Energy-saving double-glazed window
A low-quality profile may turn yellow over time, so pay special attention to certificates of its quality. Choose profile systems from trusted manufacturers
If you want double-glazed windows to last longer, do not save on fittings either.
A more economical way of sealing windows is ordinary polyurethane foam. But it will be better if all the cracks are sealed with a sealant that has water-repellent properties. You should not refuse to install flashings - they not only look decorative, but also protect the room from drafts.


You can order blinds for balcony windows or cover them with a special opaque film. It will protect the premises from prying eyes.
Making a greenhouse with your own hands from a profile pipe and polycarbonate: a complete description of the process, drawings with dimensions, watering and heating (Photo & Video)
Do-it-yourself plastering of a balcony (loggia)
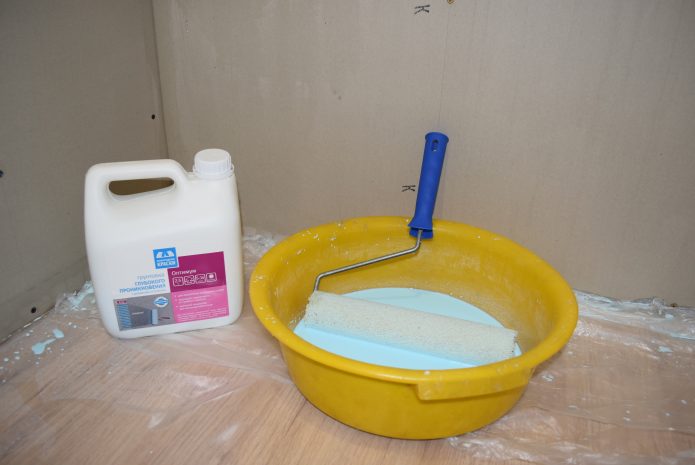
After the balcony was completely sheathed with drywall sheets, including the ceiling, we had to plaster the walls. You can’t glue wallpaper on bare drywall, because its top layer consists of paper and can come off when wet. Additional surface treatment of sheets includes a primer and putty.
At this stage of work, our master left us, since he was only engaged in insulation, and the work of a plasterer as a painter was not part of his duties. We were faced with a choice - either to find a new employee, or to pick up a spatula ourselves. A significant role in the choice was played by the amount that the plasterers asked for - professionals for processing our small area.
So, to plaster a balcony sheathed with sheets of drywall, I needed:
- gypsum plaster "Volma layer"
- deep penetration drywall primer
- serpyanka tape for joints
- putty knife
- container for diluting plaster
- drill with nozzle mixer for mixing the solution
- oilcloth to protect the surface from dirt (floor and brick wall)
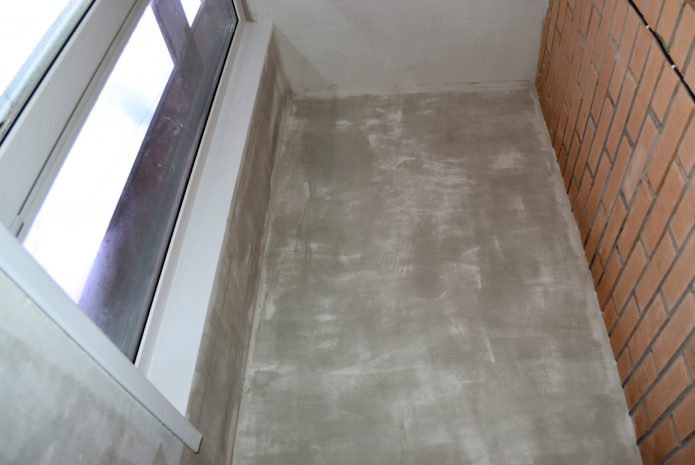
1. First, I went over the walls with a primer to improve the adhesion to the top coat. Waited 40 minutes for it to dry completely.
2. I sealed all the joints on drywall with tape - serpyanka
It forms a strong bond with the binder mixture, which is especially important at seams and corners.
3. Prepare the solution. I first diluted everything according to the instructions, and then mixed the plaster with water by eye. For the second time, you already know exactly what consistency the solution should be. I applied two coats of plaster. It took me four hours to get to work. I concluded that you can cope and learn how to work with a spatula even if you are a beginner. What happened to me you can judge from the photo. The color of the "Volma layer" plaster after drying becomes not white, but gray, so the ceiling had to be whitewashed with water-based paint.
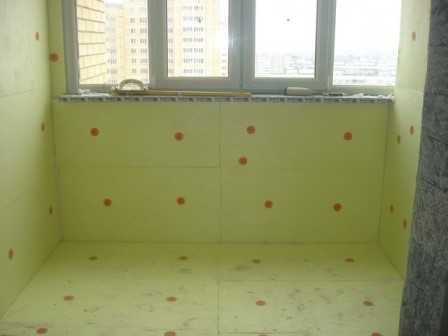
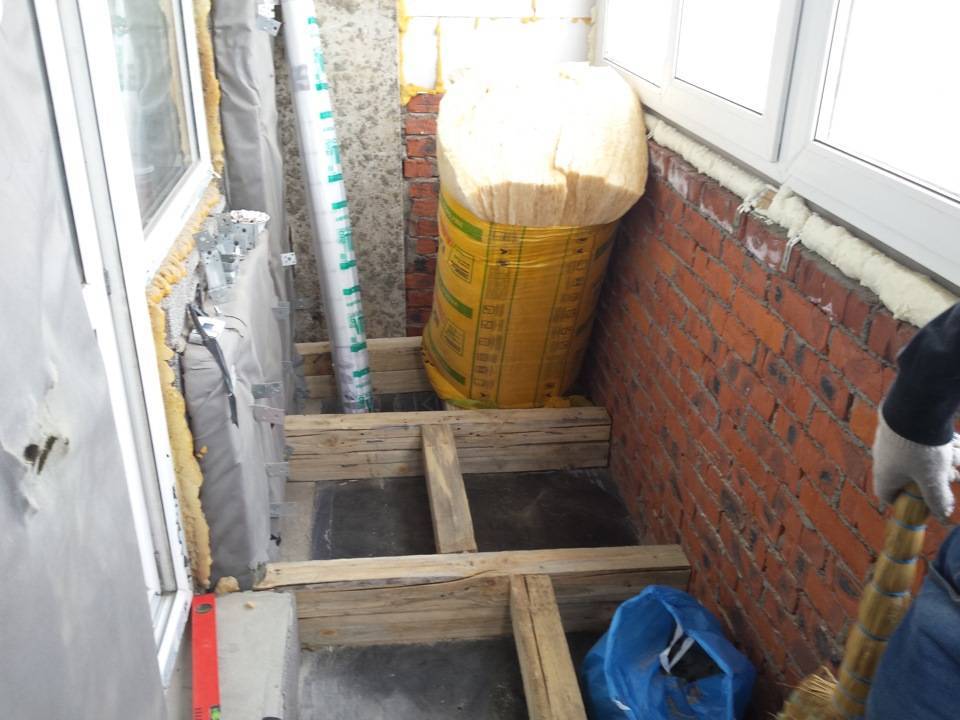
External insulation of the loggia
Loggias and balconies of various types can be used as full-fledged living quarters only if they are properly insulated. Usually, work on the external insulation of loggias is carried out by industrial climbers, simultaneously with the installation of thermal insulation of all walls of an apartment or building. In the case of self-reconstruction, it is necessary to use an aerial platform or stairs, except for those situations where the balcony or loggia is on the ground floor.
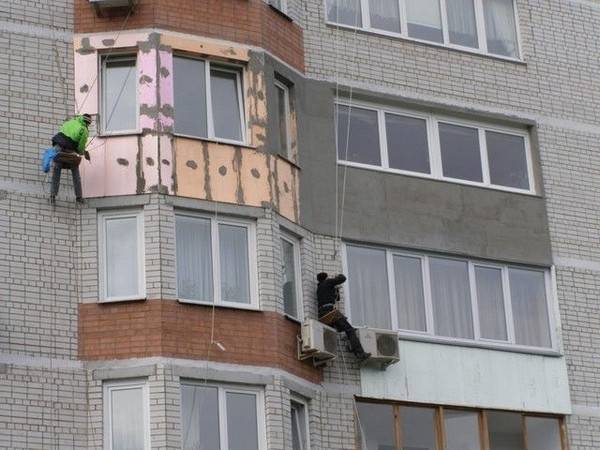
It happens like this:
- Foam or polystyrene sheets are glued to the primed parapet, which, for better fixation, are attached to the wall with dowels.
- A layer of glue is applied to the surface of the insulation, a reinforcing mesh is applied to it, which is embedded in the adhesive composition with a spatula.
- After that, you need to wait for the glue to harden, and apply another layer of it. Then you can start plastering work.

Due to certain difficulties of this type of insulation, a more popular and easy-to-implement option for how best to insulate a loggia is its thermal insulation from the inside.
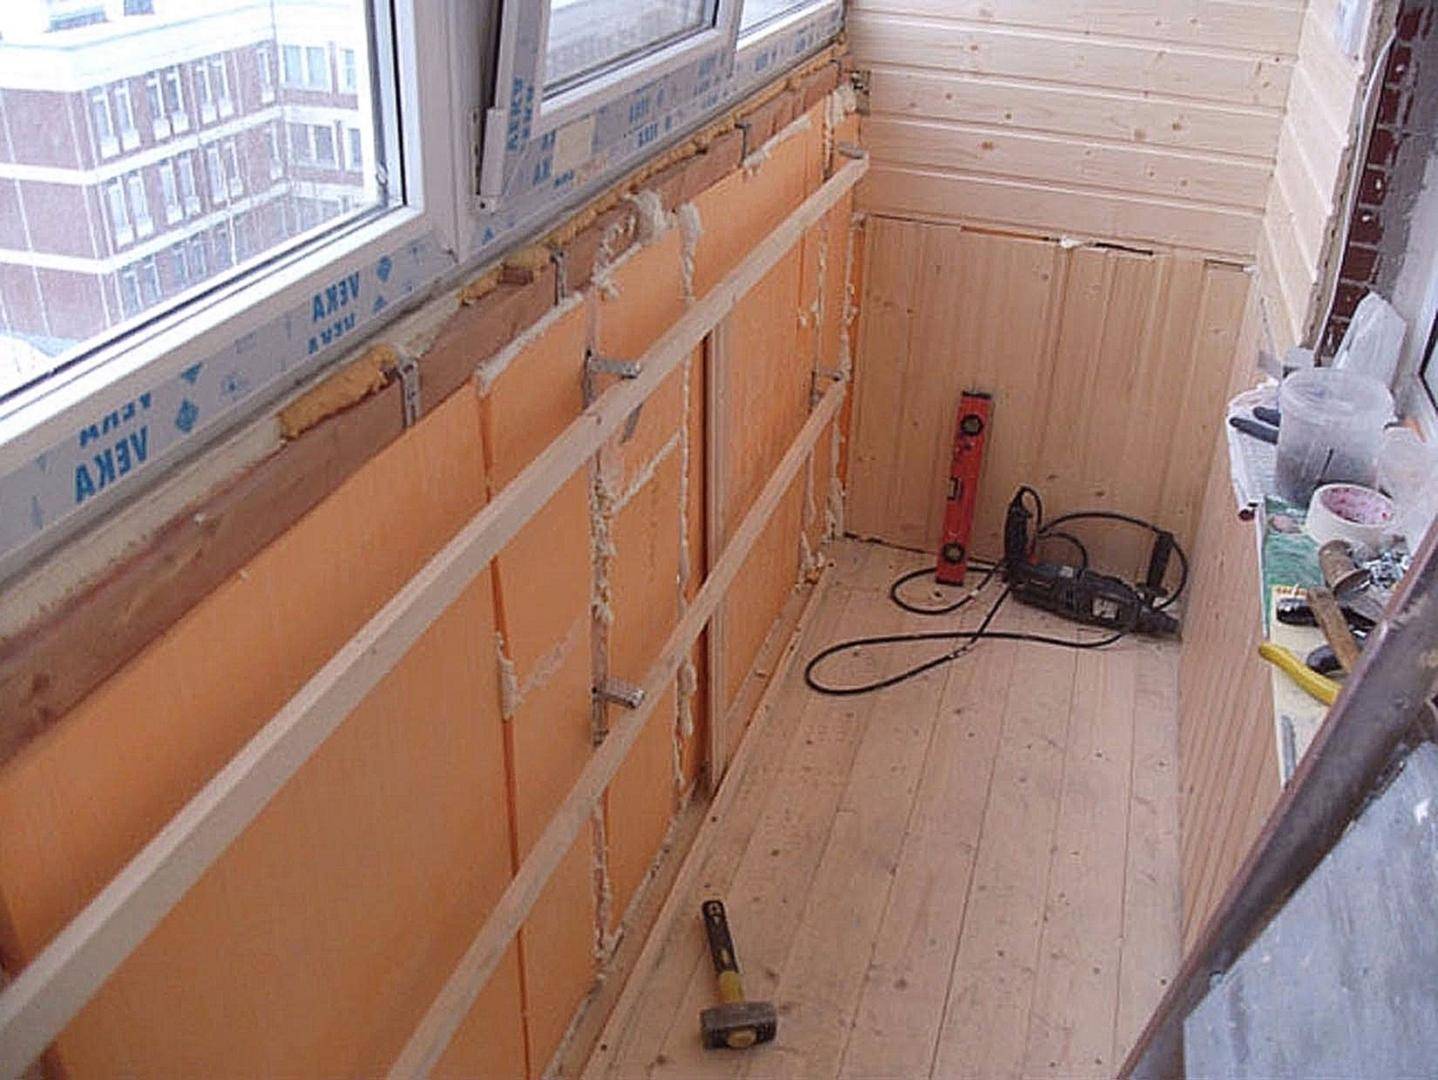
Step four - working with insulation
Having finished with the main structural work, having ended up with a closed space, go directly to the insulation of the balcony space from the inside. A reasonable question arises at this stage. Than from the inside, what materials to give preference to? Good insulation is always good, but when using foam or mineral wool, you risk losing precious inches of interior space.
Calculate how much you need material for insulation, we decide on the choice of insulation. The insulating material must have high thermal insulation parameters and technological parameters:
- low flammability;
- hygroscopicity;
- high manufacturability;
- a light weight;
- durability;
- affordable cost.
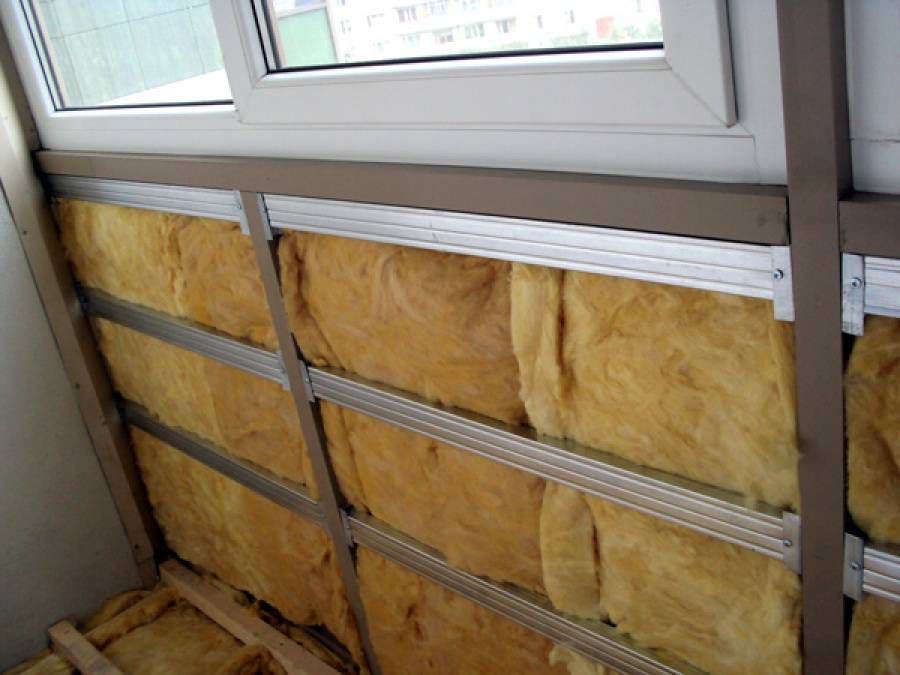
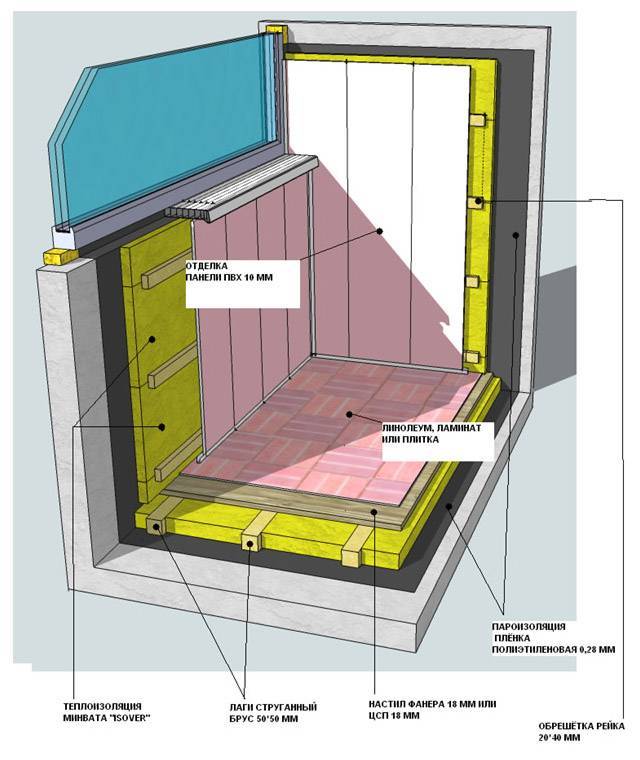
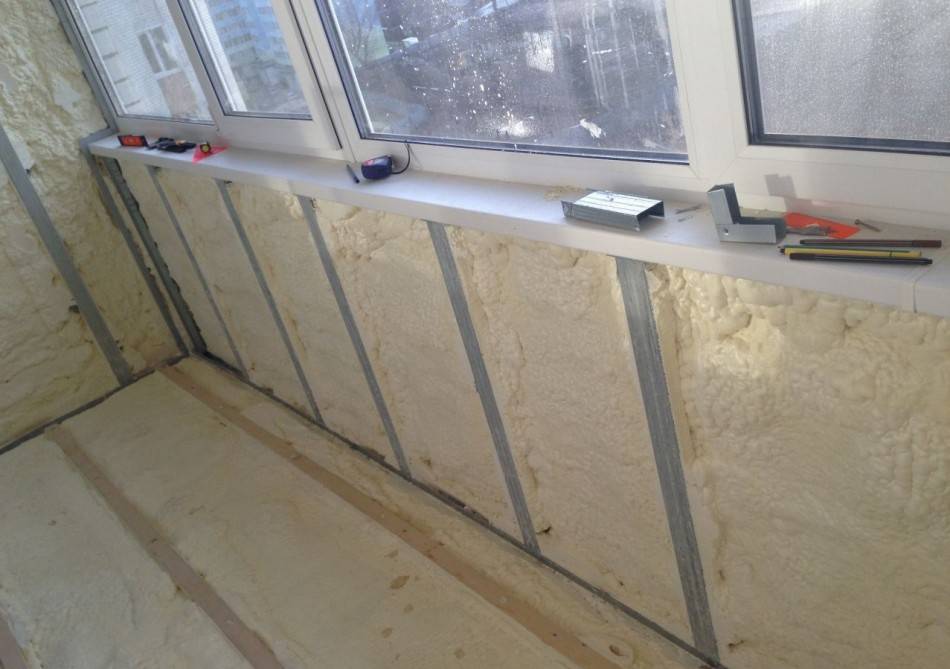
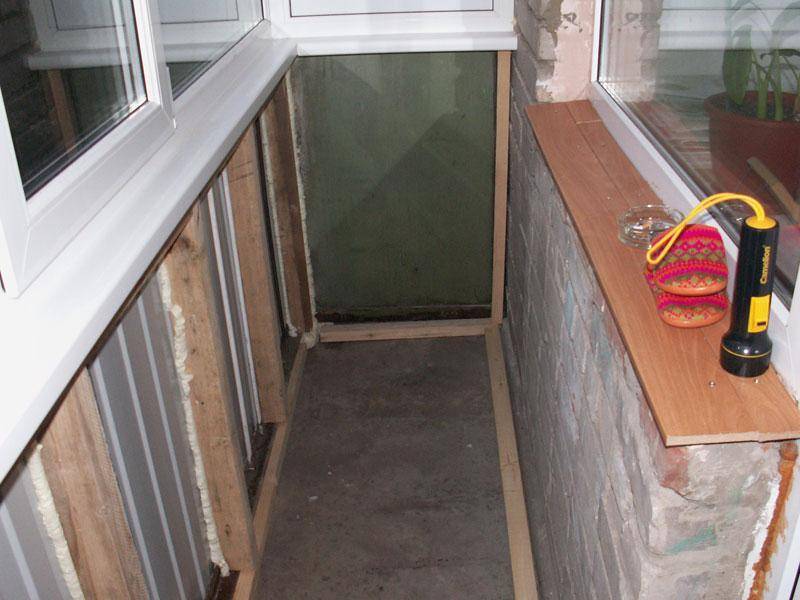
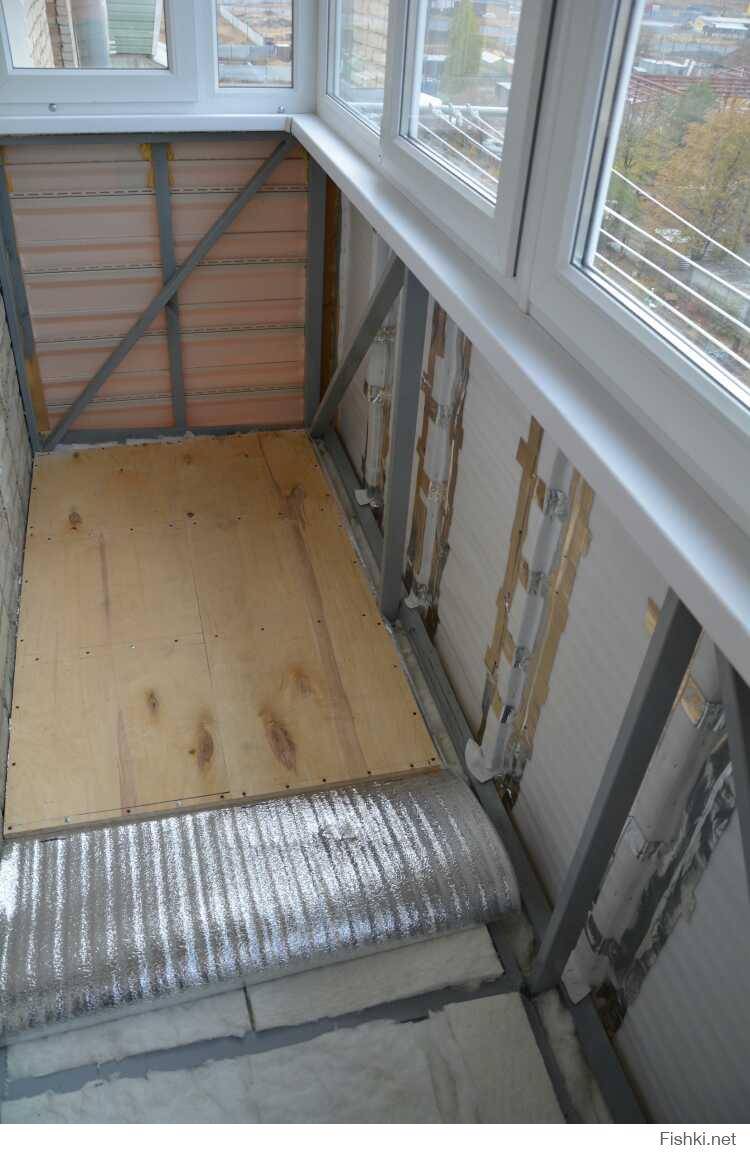
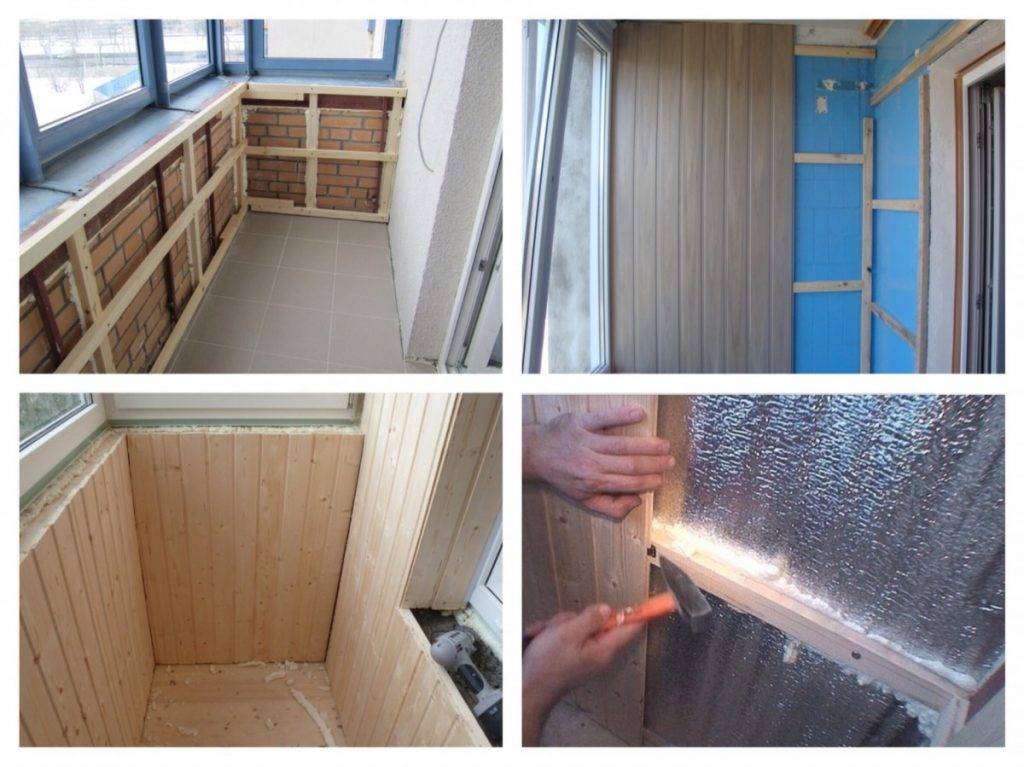
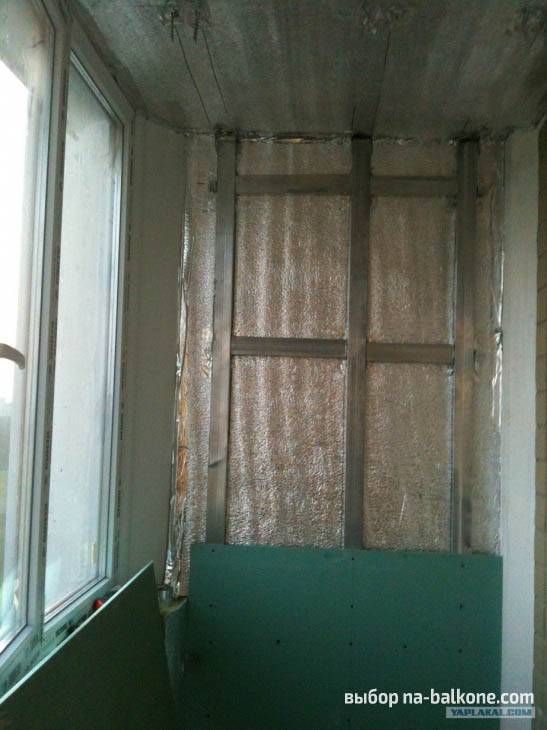
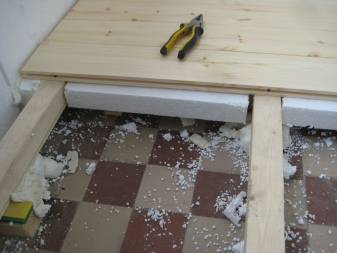
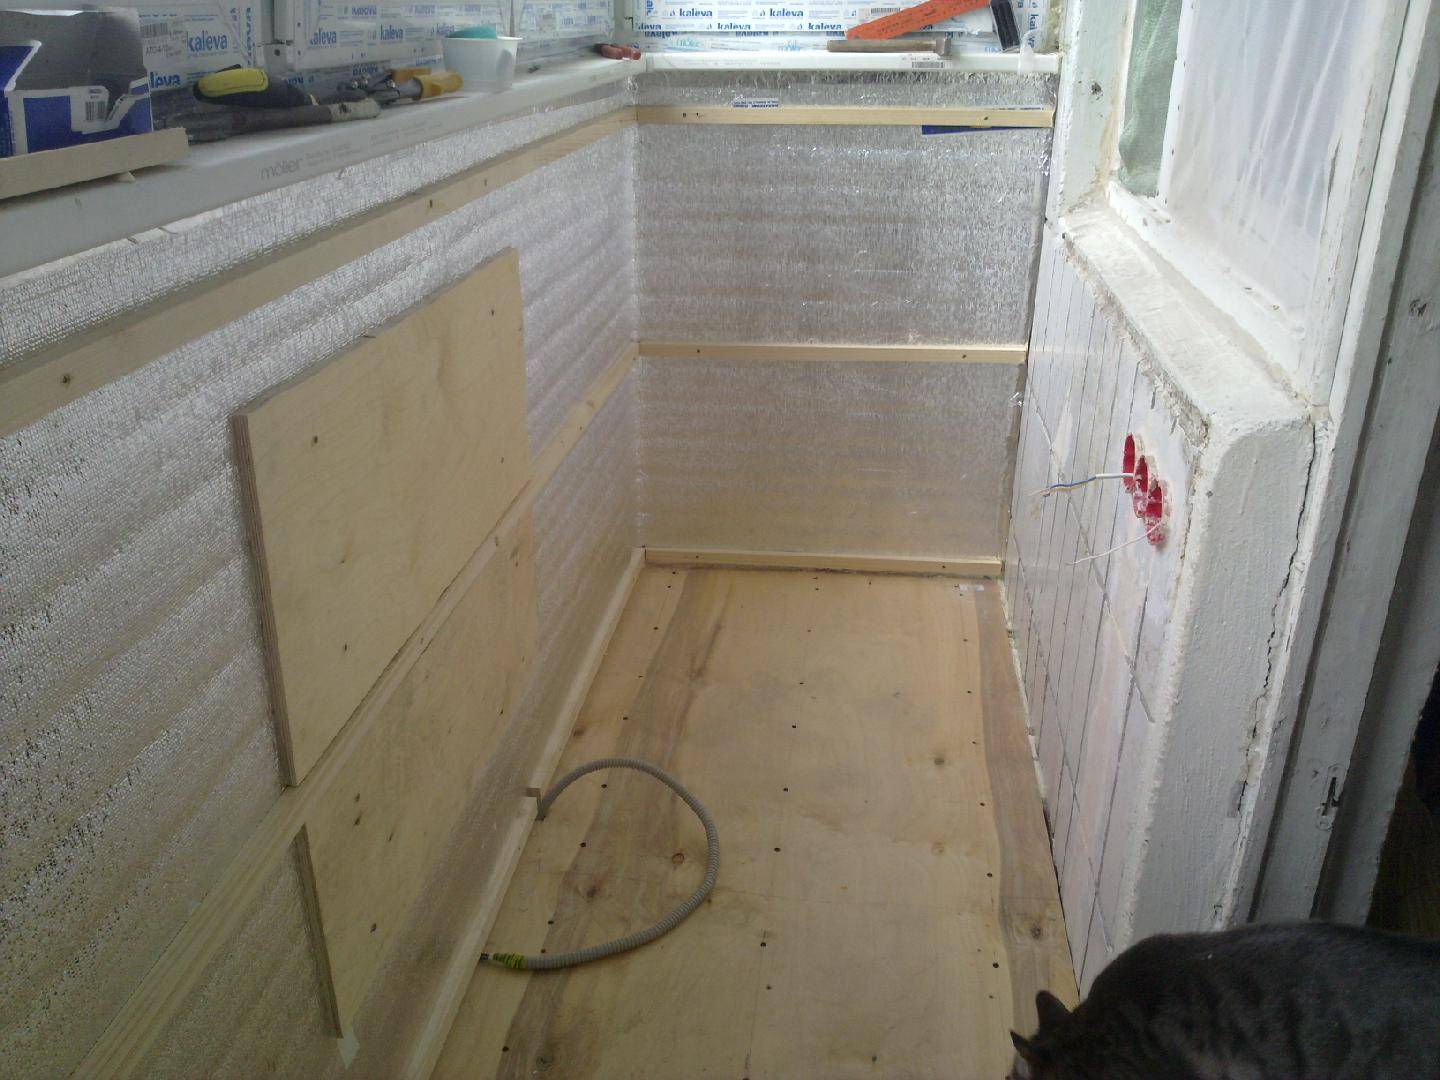
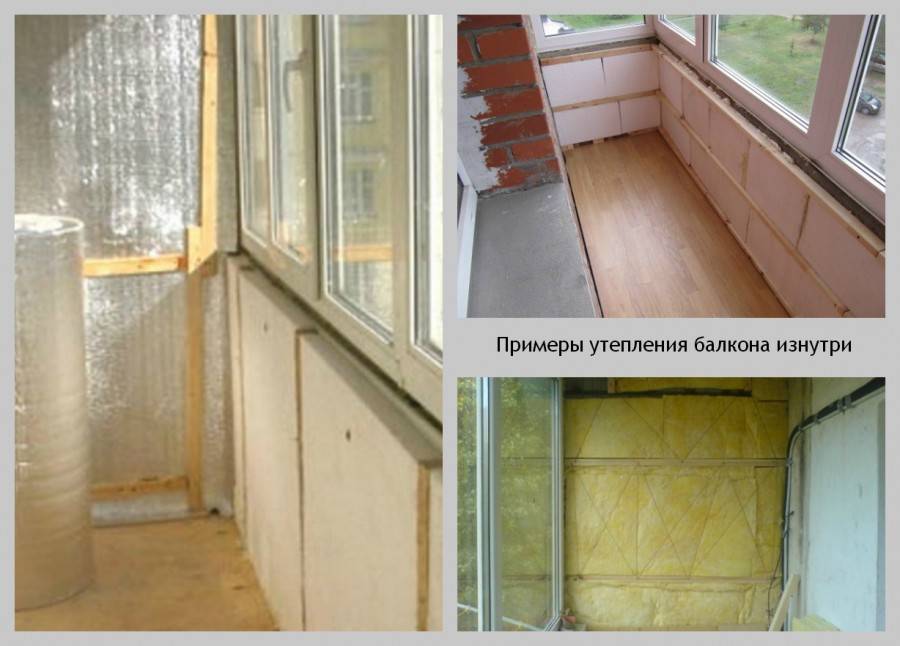
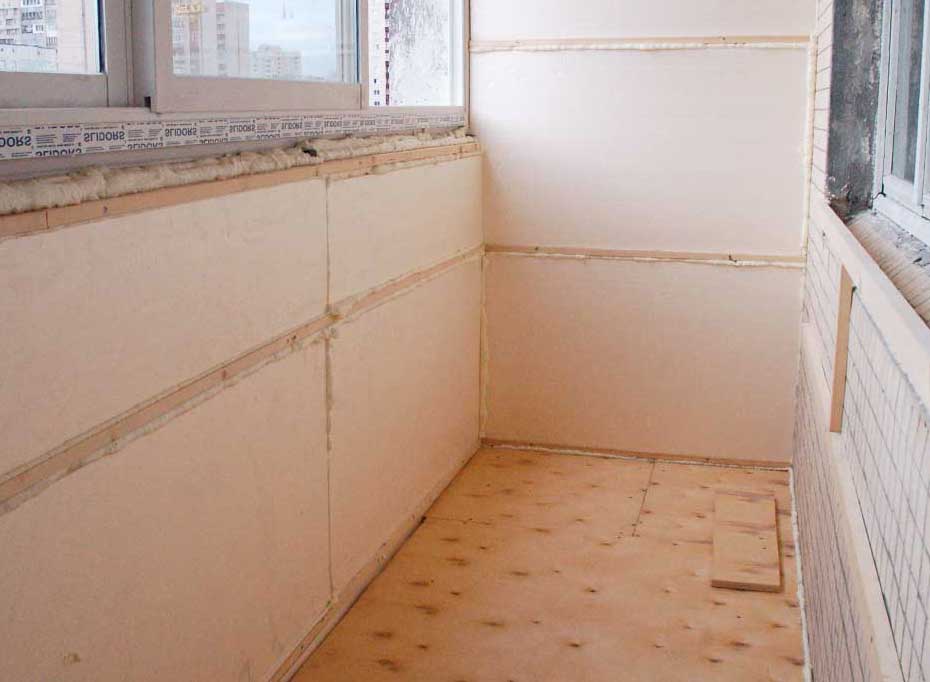
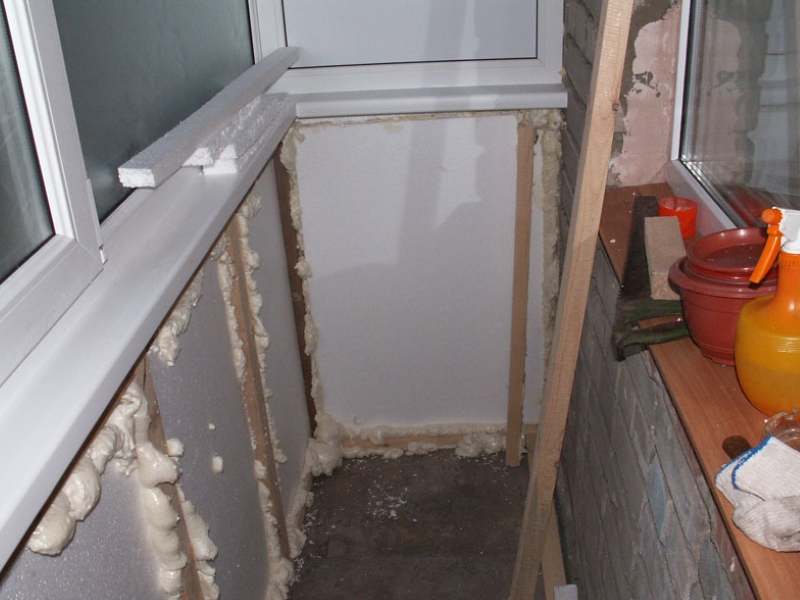
Today, foam is massively used for insulation, but we have already said. Sheets 5-10 mm thick will eat up your precious insulated square meters. Styrofoam is the cheapest option for insulation. With limited finances, you will have to be content with this material.It should be remembered that the foam is a fairly thick material, its durability and fragility is highly questionable. The best way to make the insulation of the balcony as efficient and productive as possible is to use mineral wool and foil isolon. In the latter version, porous polyethylene is used for manufacturing, which is based on a metal film. The listed materials have the necessary technological properties that will tell you the answer to the question of how to properly insulate the loggia from the inside. Actions are carried out according to the same principle. All internal panels in the loggia are covered with insulating material, which is easily masked from above by decorative and finishing elements. It is quite easy to insulate a loggia in a panel house if you include it in the common room space.


Extruded polystyrene foam has similar properties. Low thermal conductivity, lightness and strength provide this material with the necessary technological advantages in comparison with other insulating materials.
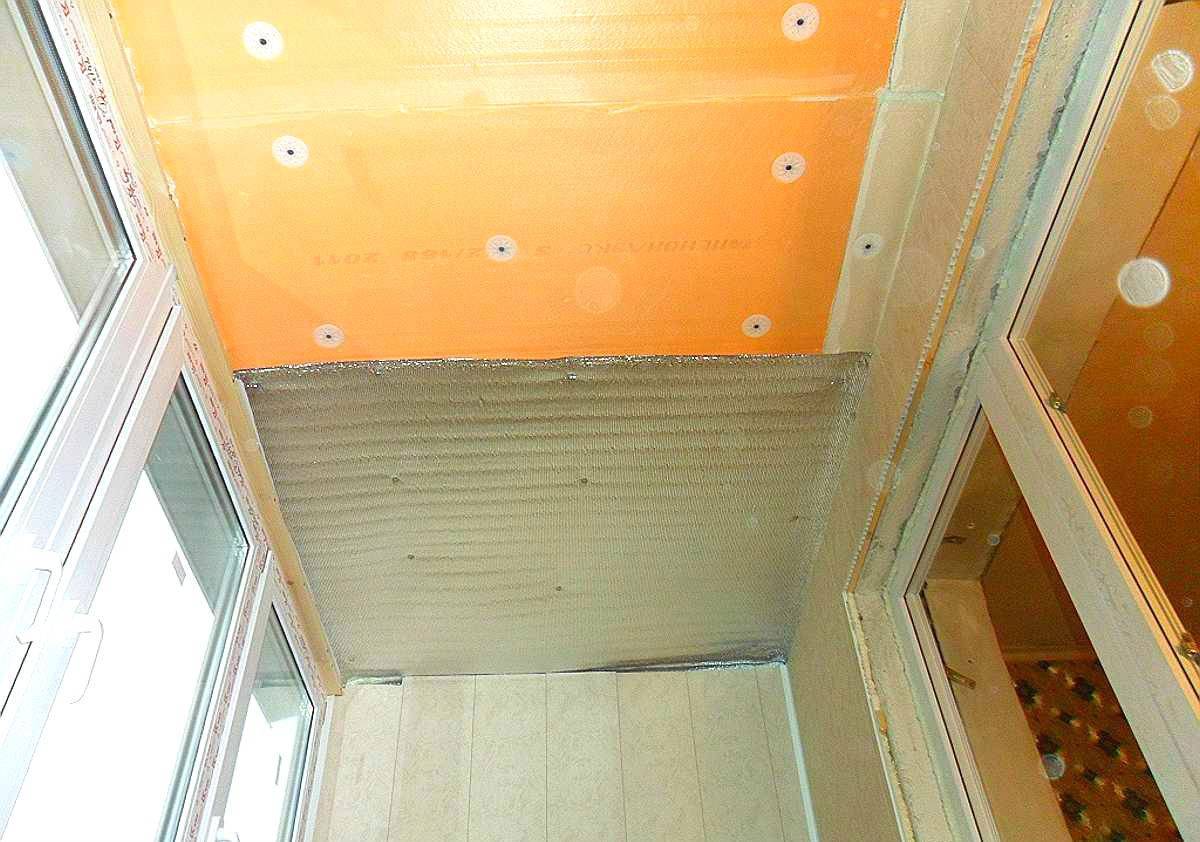
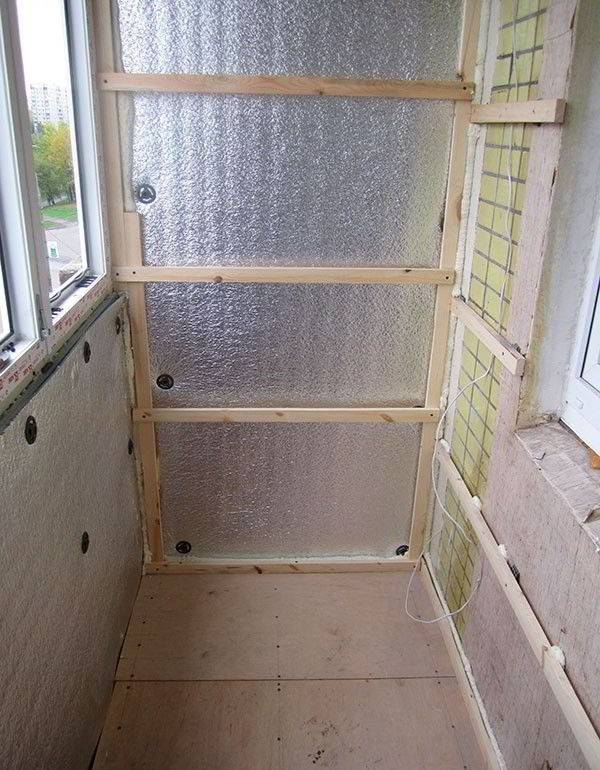
The diagram shows a view of the fastening of the insulation from the inside:
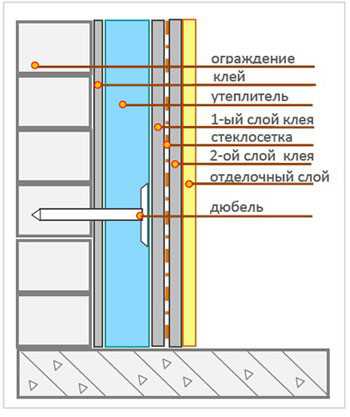
The insulation is fastened with dowels or with mounting glue. The choice of mounting method is up to you. In the case of glue, the situation is much simpler. The fixing area and the insulation itself are smeared with adhesive composition. By tightly connecting both surfaces, we get the finished panel. The gaps between the pieces or sheets of insulation are filled with mounting foam.
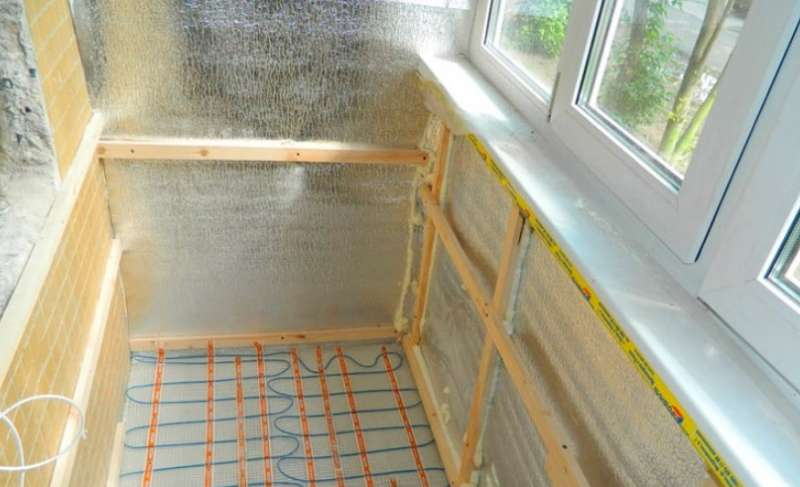
Panoramic loggia insulation methods
Insulation of a panoramic loggia is slightly different from standard work
In a panoramic room, it is very important that the windows are installed correctly and with high quality, and the requirements for windows are also very high.You should familiarize yourself with two options for solving the problem of insulation:
- Installation of a warm floor. This method will make it possible not only to make the flooring warm, but also to heat the entire area with the help of heat.
- If the panoramic loggia is connected to the room, then repairs should be immediately provided for in the room. Thanks to the overhaul, it will be possible to produce not only insulation, but also to make a general design. Then the balcony can be insulated using the standard method and an additional heating system can be installed in it. In addition, it can be heated from the heat emanating from the room itself.
The insulation of the panoramic loggia needs to be approached more carefully due to increased heat loss through window blocks
In general, the insulation of a panoramic loggia should begin with the removal of all cracks that can create a draft.
It will not be superfluous to install radiators and underfloor heating
In order to create comfort and warmth, the owner of the apartment will have to spend not only a certain amount of money, but also make considerable efforts, as well as time. Warming do-it-yourself loggias according to our step-by-step photo instructions, it is carried out for a period of 3 days to 1 week. Warming according to the instructions presented in the article, you can get a sufficient level of comfort, regardless of what the weather is like outside.
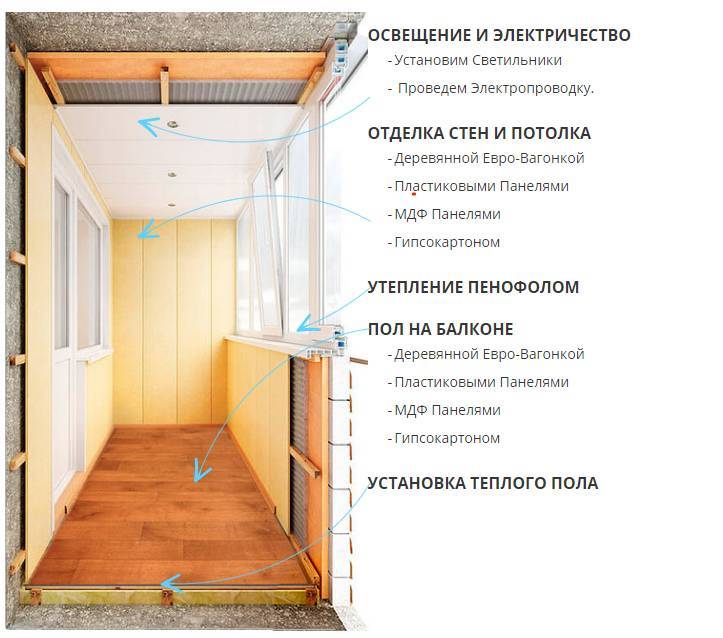
Balcony decoration
Purposes of creating interior decoration:
- External masking of the heat insulator;
- Organization of a favorable internal environment in the room.
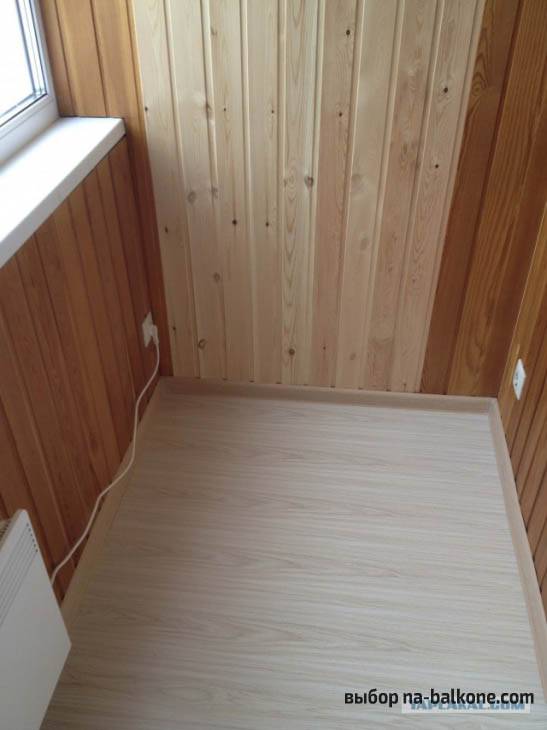
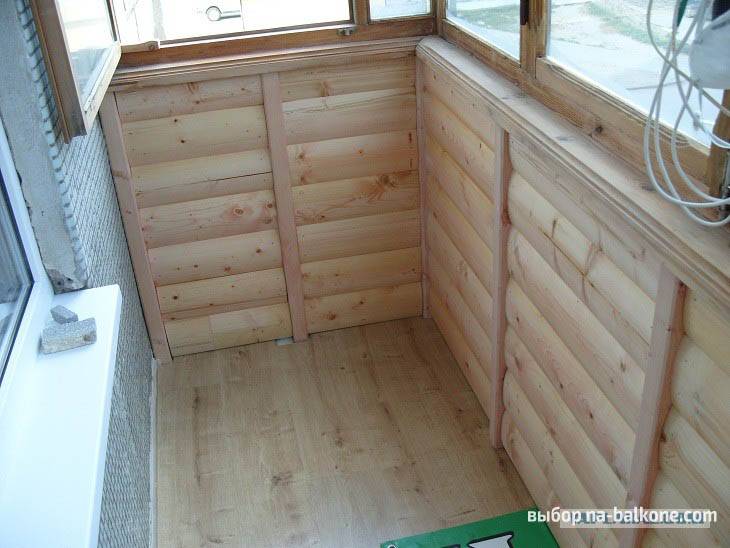
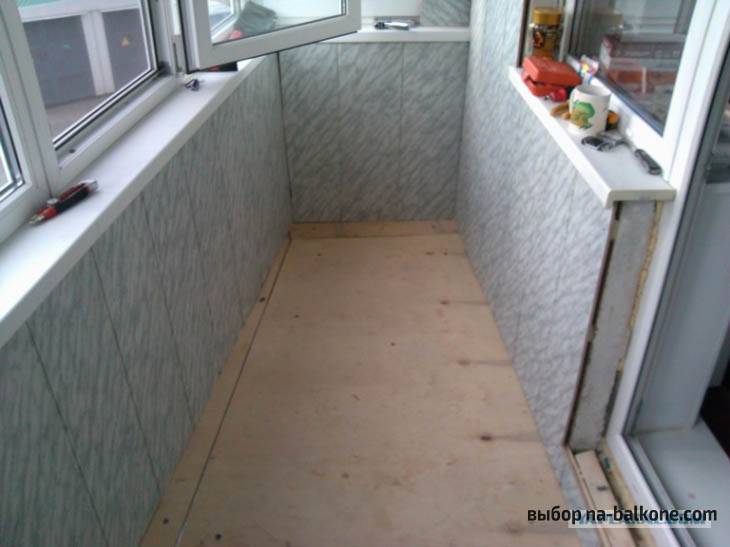
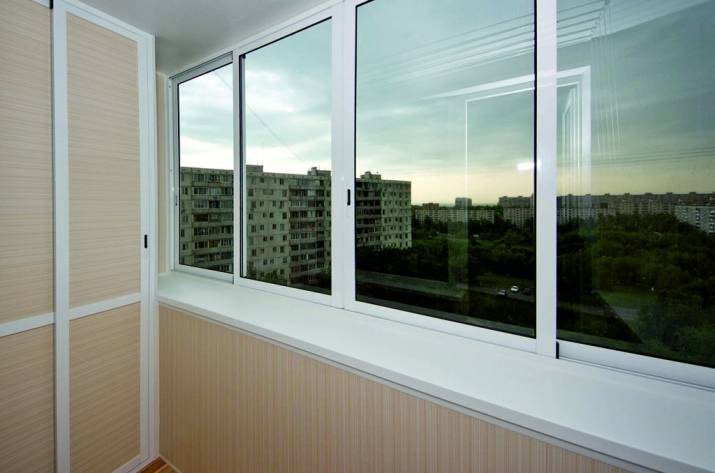
To create an interior balcony, you can choose from various finishes. Plaster, plastic panels, MDF, lining, plywood, plasterboard sheets and even a block house are perfect for the finishing layer.
The lining panels are environmentally friendly and reliable. One of the main advantages of the finishing material is rigidity. The lining is fixed on a wooden frame crate.
The walls of the loggia are lined with clapboard, the flooring is laminate.
Facing the balcony with a block house.
The plastic panels have grooves for connecting elements. The plastic version of the lining has less rigidity and strength than wood.


Installation of GKLV sheets on metal profiles. Plasterboard slabs can be decorated with wallpaper, painted, or lined with decorative plaster.
Wall decoration with wallpaper over GKLV sheets.
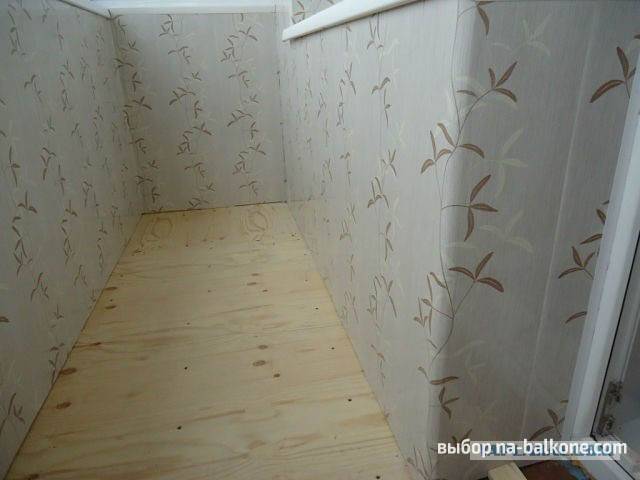
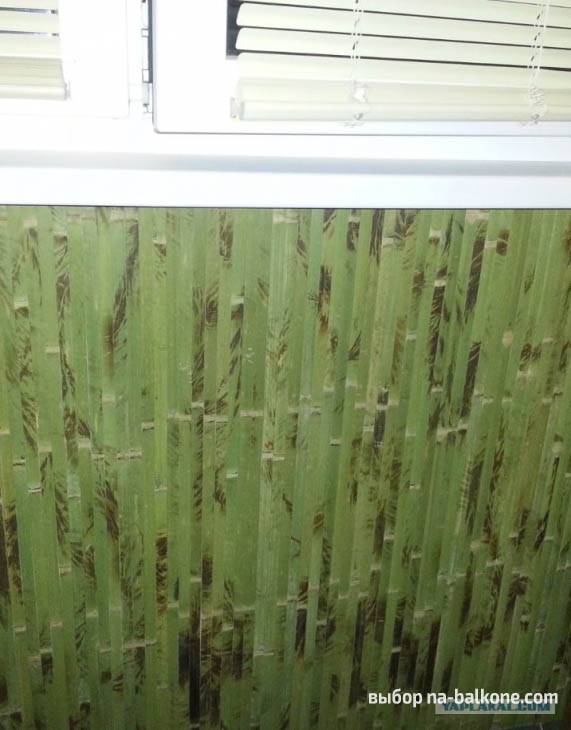
Bamboo wallpaper. The basis for finishing - drywall.
Frameless glazing
Frameless glazing seems both beautiful and modern, besides it takes up a minimum of space. But. This is single glazing, which in winter will turn the loggia into a branch of the refrigerator, and frost will penetrate into the gaps between the frames. Therefore, this option should be discarded immediately. Double glazing only. Plastic windows with double-glazed windows and hinged sashes will be the right solution. In addition, they do not take up much space, they are easy to clean, and you can install mosquito nets in them. But if you still don’t have a soul for plastic windows, you can look at new technologies: these are lift-and-slide windows with thermal insulation.
What materials to use?
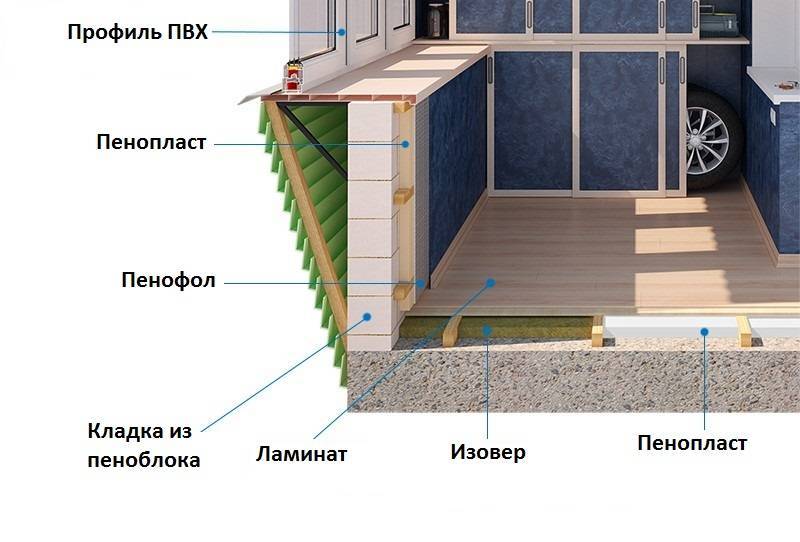
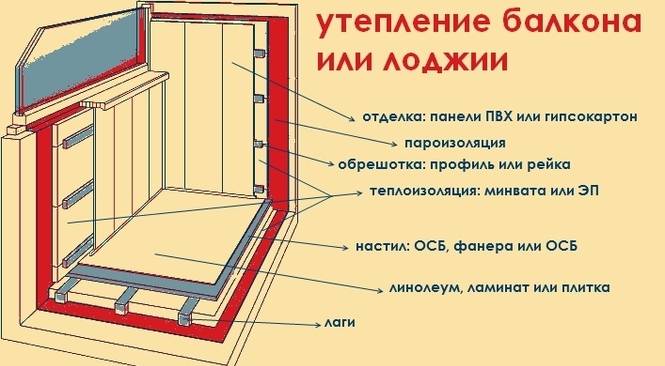
The decoration of balconies during their insulation should be carried out using such materials in order to withstand temperature extremes and the possible penetration and accumulation of moisture for a long time. The resistance of these materials to fading due to sunlight (when they enter through the glass of a balcony window) is important.
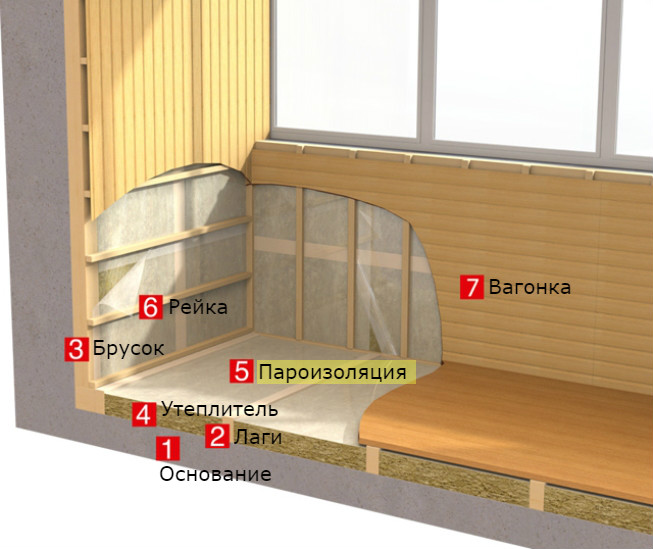
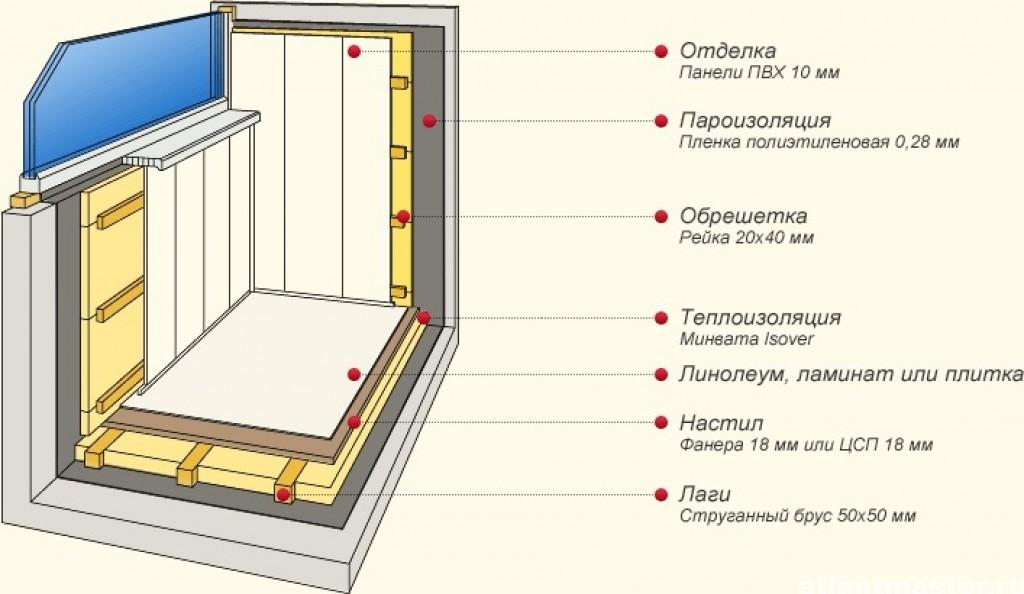
Here is an approximate list of parts on a well-insulated balcony:
- wind-moisture protective membrane;
- sexual lag;
- floor insulation;
- heat-protective membrane;
- tongue and groove for the floor;
- laminate on the floor;
- finishing panel;
- drainage;
- window frame and installation profile;
- vapor barrier membrane.
In order to insulate the balcony with high quality for many years, you need to choose heaters that are best suited for a particular category. The safety of heat on the balcony and the price depend on the technological properties, heat protection. You can choose a heat-insulating material from a number of:
- extruded polystyrene foam, foaming polystyrene;
- Styrofoam;
- penoplex;
- foil polyethylene foam (penofol and ecofol);
- fiberglass;
- mineral wool.
7photos
Materials made of synthetic resins with fillers are considered the best for thermal insulation of rooms of different profiles and levels. Like all other insulating materials, they must meet certain requirements:
- low thermal conductivity;
- resistance to bacteria;
- high hydrophobicity;
- soundproofing;
- ease of machining.
The best materials that meet these requirements are extruded polystyrene foam and expandable polystyrene in the form of plates that are easy to install. The thickness of the insulating material depends on the climatic conditions, the area of the balcony, the selected floor option. It is appropriate to recall that the installation of all parts for thermal insulation is carried out after the installation of the frame and bases for windows.

How to insulate a balcony with your own hands?
How to properly insulate a balcony from the outside on your own? In fact, the answer to this question is quite simple - you need to follow the instructions:
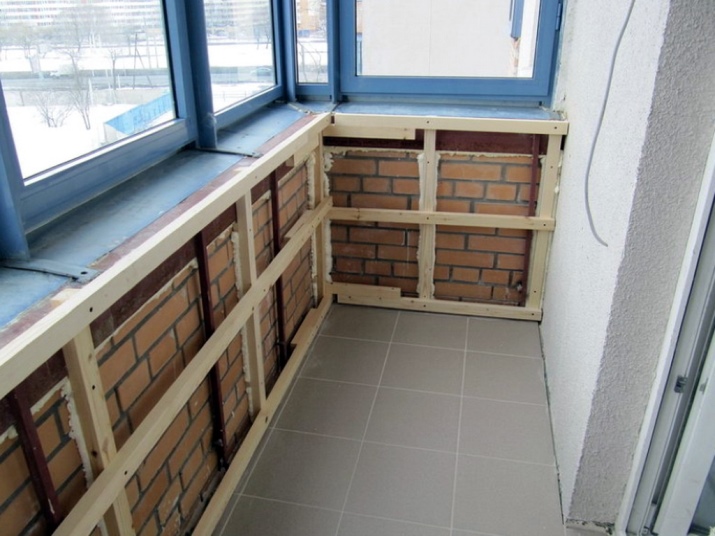
- First you need to mount the guide profiles.Wooden bars can be used instead, but the profile is lighter and easier to mount.
- After that, the material is mounted on the walls. The panels are cut in advance, they can be sawn with a hacksaw.
- The easiest way is to mount foam or similar hard sheet materials. You can do this with glue, but since it is usually quite difficult to knead, it is better to use ready-made liquid nails that do not have to be mixed with water. Such material seizes instantly, but it will cost more.
- You need to start gluing the panels from the bottom corner of the balcony structure. Make sure that it fits snugly against the bar or profile: the smaller the gap, the better. The material must be aligned with the facade.
- After that, the sheets are laid from below, then - above; so gradually glue all the external insulation of the balcony.
- When working with foam, keep in mind that it can crumble. In a strong gust of wind, the sheet may break. If you fix it on special plastic dowels, you should not fasten it close to the edges.
- Under the plastic fasteners, you need to drill holes in the timber. Do not do this close to the frame, otherwise there is a risk of damaging it or compromising the tightness of the structure.
- Facade panels are fixed in places where they touch the wooden beam. If the structure is not the most even, and the insulation cannot be applied tightly, it will be necessary to pave the joints with construction foam.
- After the insulation is fixed in its place, you can do the exterior decoration of the balcony. To do this, you can use, for example, siding or profiled sheet. It is quite easy to fix them either with self-tapping screws or using special fasteners.It is much more difficult to prime the surface if no other finish can be made.
- If you want to plaster the balcony, then you first need to install a fiberglass mesh, it is attached with a special adhesive. The mesh is needed so that the solution sets better and does not crumble.
- Insulation of the balcony from the street allows further plastering, but work can only be carried out in dry weather. Rain can damage wet plaster. The work itself is carried out in several stages, since it is required to apply several layers of plaster, and each subsequent one can be applied only after the previous one dries.
- The last layer should be leveled so that the balcony looks even. That is why it is worth putting beacons in advance, which will hide the flaws of the facade, if any.
When deciding how to insulate a balcony from the outside, it is not necessary to choose the most expensive materials, but you should pay attention to their quality and ease of installation and characteristics. In most cases, the work can be done independently without the involvement of installers and the use of sophisticated equipment. The key to a warm balcony is an insulated ceiling and a warm floor.
The key to a warm balcony is an insulated ceiling and a warm floor.
In addition, we recommend watching a video that will show in detail the intricacies of the work.


Balcony insulation from the outside
External insulation is considered the most correct option, as it prevents the appearance of internal condensation and preserves the free space of the balcony. But the catch is that it is almost impossible to complete it without the involvement of specialists.
External insulation technology:
The wet method implies fastening the insulation directly to the wall with the help of an adhesive mixture with its further plastering. For readability, the material is also attached with special dowels.
The dry method consists in mounting a frame of metal profiles, and insulation is laid between them. All of this is finished off.
The first method is mainly used, as it is cheaper and faster to perform.
Summing up, we can say that the insulation of the balcony can be done in two ways, interior and exterior. Due to the fact that exterior decoration requires the involvement of specialists, the technology of internal insulation is mainly used. There are many materials for these purposes, the choice of which depends on the preferences of the owner and his financial capabilities. Guided by step-by-step instructions, everyone can do the work, most importantly, draw up an action plan and consistently implement it.
Choosing materials for insulation.
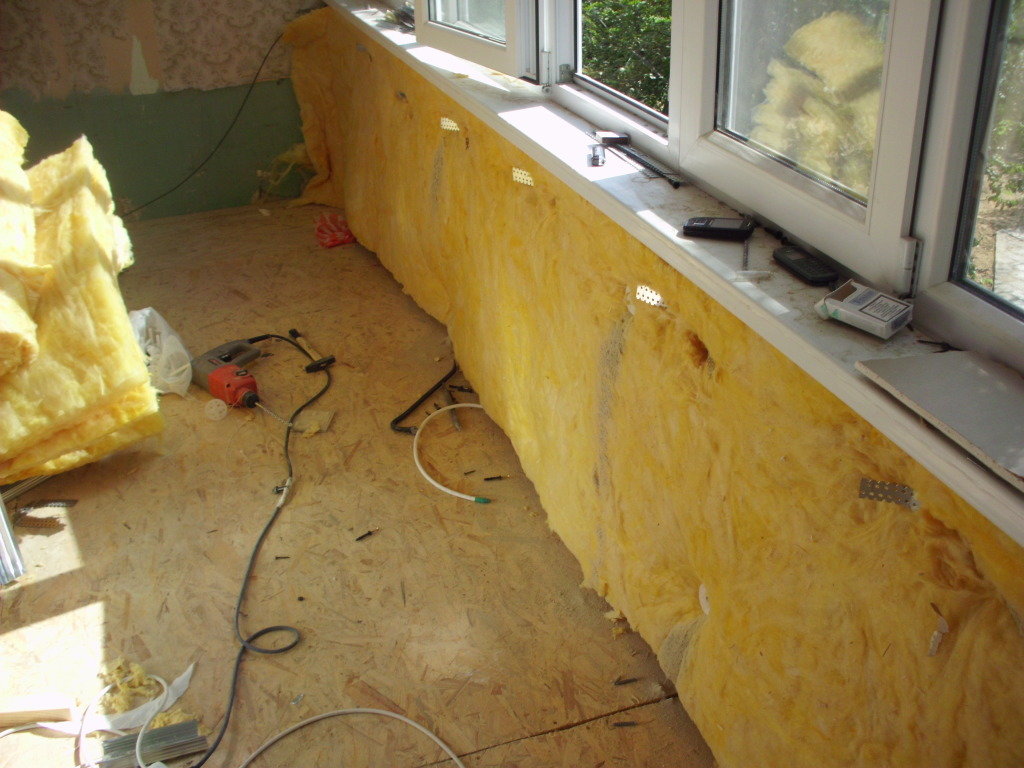
Mineral wool is an old inexpensive and proven material.
There are several types of mineral wool
Of these, attention should be paid to
fire-resistant basalt wool. Its melting point is 1000C
Among
disadvantages of mineral wool is a short service life and high
breathability. Shrinks over time, which leads to blowing in places
junction of cotton wool with elements of the crate. Its air conductivity is 1. Then
there is it completely passes warm air to the street.
Also, mineral wool is very demanding for installation.Improper installation without the use of special vapor barrier films can lead to wetting and a sharp loss of thermal insulation properties.
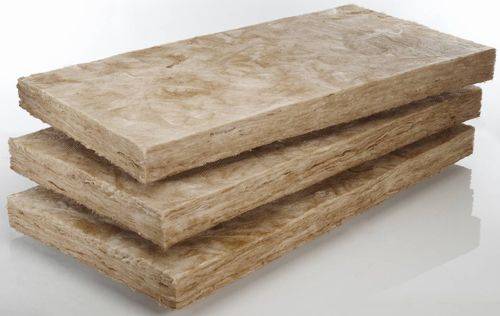 Mineral wool.
Styrofoam is also a rather “old” and cheap material. Polyfoam has a rather low coefficient of thermal conductivity, a long service life, is environmentally friendly and easy to install. But despite its positive aspects, it has poor resistance to chemicals based on alcohols and petroleum products and burns quite well. Birds and various insects also like to arrange their nests in it. To insulate a balcony or loggia, you need to choose a foam with a density of at least 25 kg / m3.
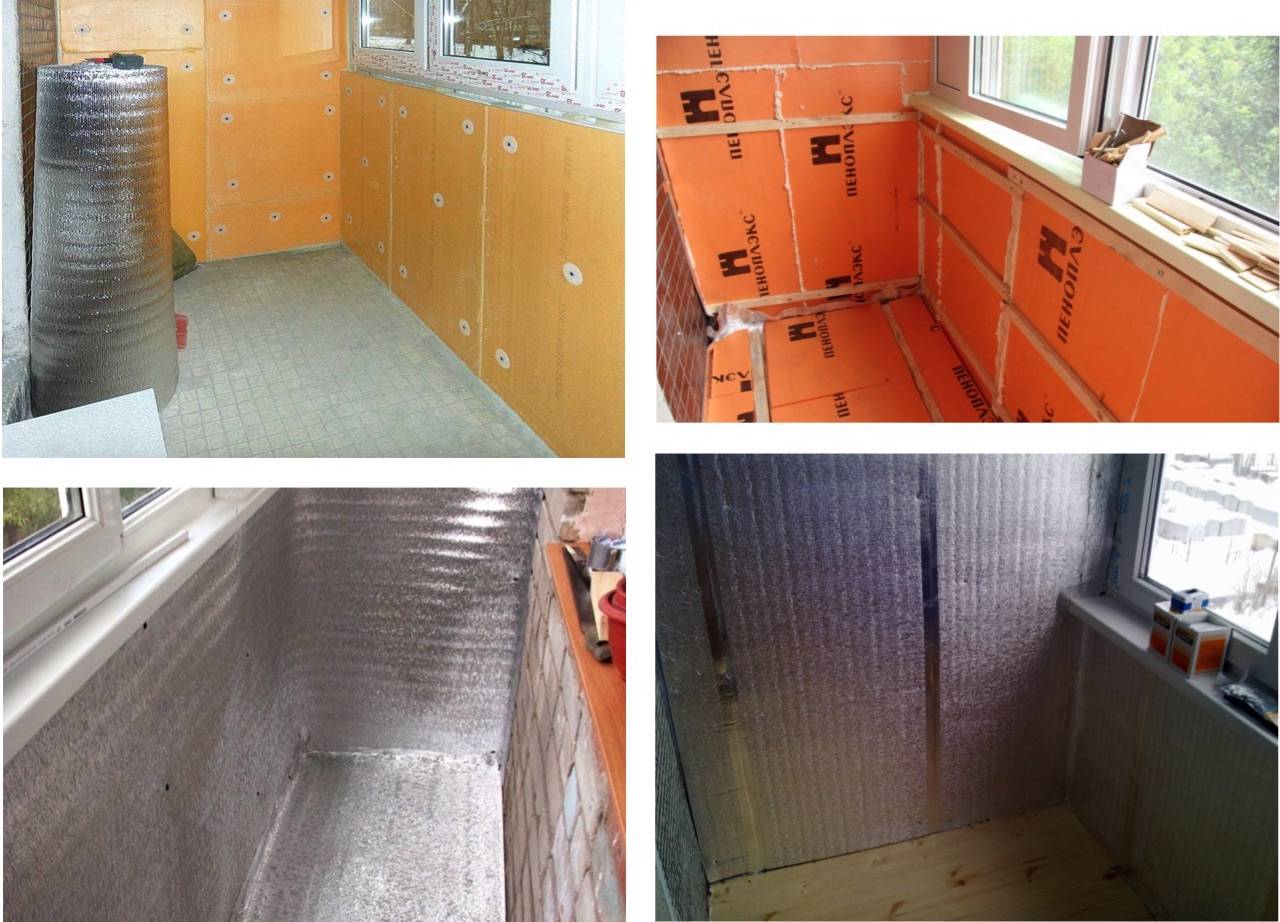
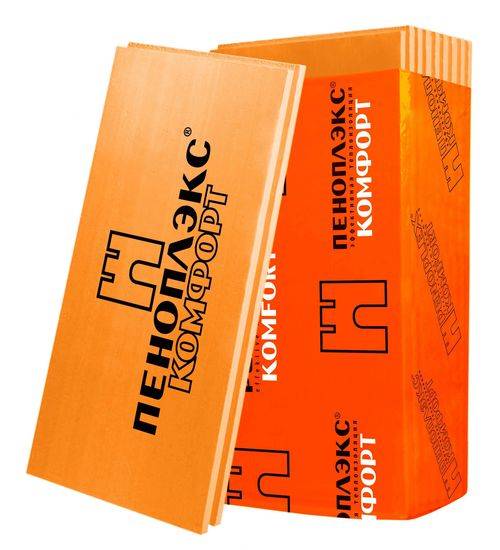
Extruded polystyrene foam (Penoplex) is a modern material with high density and low heat transfer coefficient. It has high vapor barrier characteristics, low water absorption. There are several types of this material. Penoplex "comfort" is suitable for warming the balcony. This material is an improved version of foam. It is eco-friendly and more durable than Styrofoam. This material withstands pressure of 20 t/m2. The service life of foam plastic is 50 years, it is easily cut with an ordinary clerical knife, birds and insects are not interested in them, and, unlike mineral heaters, it does not lose its properties when wet. The disadvantage of this material is its flammability, although it is slightly lower than that of polystyrene.
 Extruded polystyrene foam (foam)
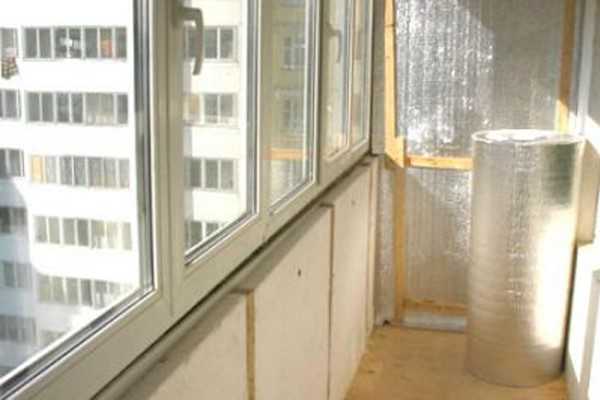
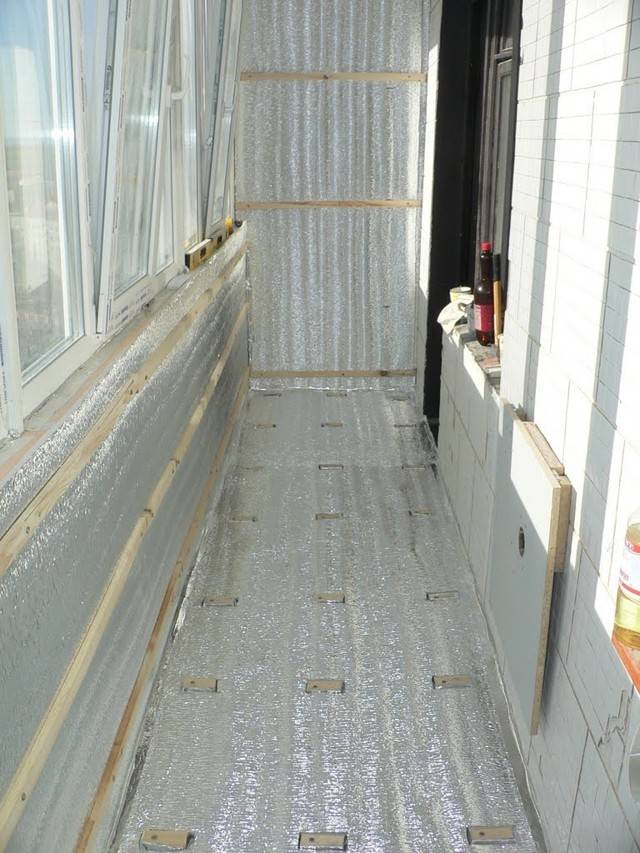
Penofol (foamed polyethylene with a foil layer) the main advantage of this material is its ability to reflect heat in the infrared range and low vapor permeability.This material is completely environmentally friendly, does not lose its properties when wet. Penofol is produced in rolls and mats. There are three varieties of this material, with a one-sided reflective layer, with a double-sided reflection and with one adhesive side.
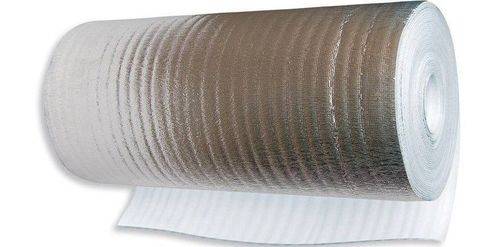 Penofol in a roll.
Sprayed polyurethane foam. This insulation is sold in cylinders, as well as polyurethane foam. It has a low coefficient of thermal conductivity and provides seamless thermal protection, it is quite convenient to install. The disadvantage of this material is only its high price.
We recommend reading:
Do-it-yourself soundproofing of the apartment.
Seamless heaters have a great advantage, as they do not have joints and cracks with the structural elements of the house. When they are applied to an insulated wall, they swell more than 100 times, fill all the voids and cracks and thereby eliminate the problem of cold bridges.


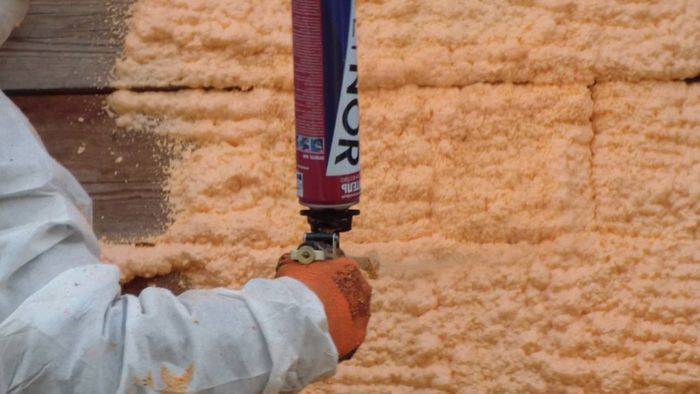 Sprayed polyurethane foam.
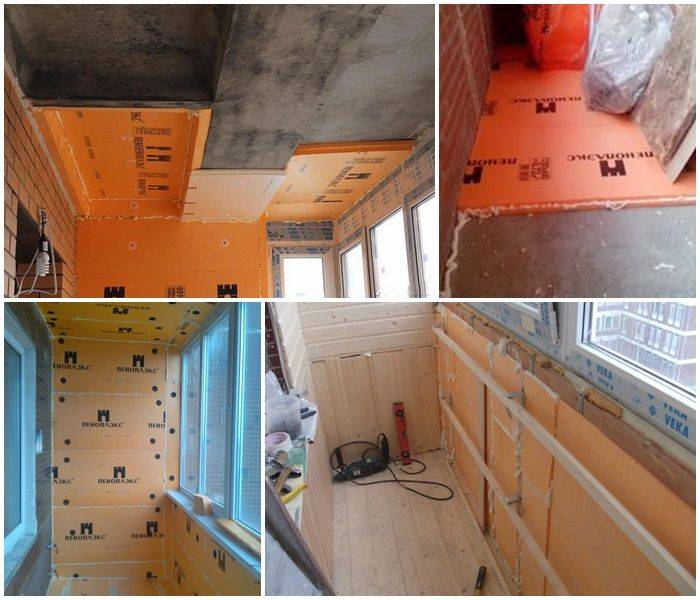
Finishing the loggia and balcony after insulation
When all construction work is completed, the finishing phase begins. Finishing materials are mounted on the frame over the heat-insulating layer.
The frame is mounted in such a way that there are voids between the bars - they are needed as a ventilating component, moreover, this is an additional layer of air.

You can not make an additional frame for finishing, if you use a metal profile immediately under the insulation: brackets are made from it, protruding from the layer by 30-40 mm.

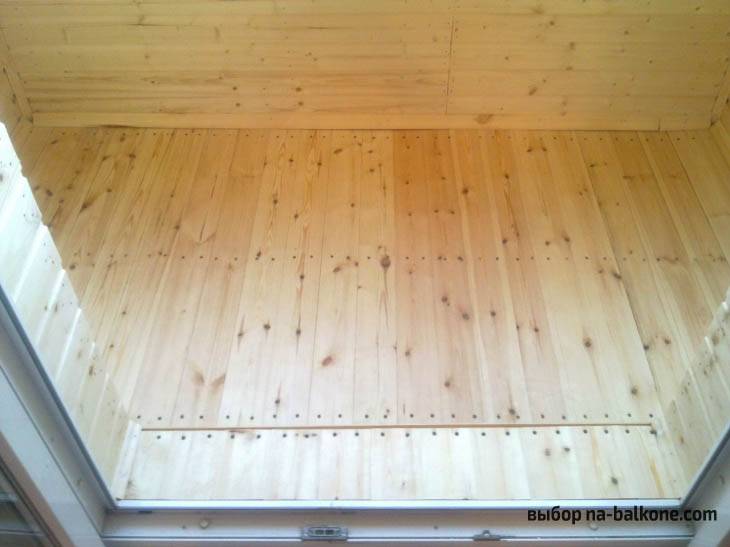
The floor is tiled, laminate or wooden boards are laid. The ceiling is covered with slats, PVC plates, finished with decorative plaster.
What is the best thermal insulator to use?

Types of heaters
To finish the balcony, you can use both rolled and tiled materials that provide reliable thermal insulation:
- polystyrene: an inexpensive tile material with sufficiently high thermal insulation properties has two significant drawbacks; the first - a large thickness of the sheets, when using it, the already small area of \u200b\u200bthe balcony will be significantly reduced; the second disadvantage is high fire hazard; to ignite it, a lit cigarette accidentally thrown from the top floor is sufficient; therefore, for cladding a balcony, purchase class G2 material that does not support self-combustion
- polystyrene foam (extruded polystyrene foam): in composition, this material is similar to polystyrene, but due to a special production method with equal thermal insulation properties, it has a smaller thickness, greater mechanical strength; however, the cost of penoplex is higher; since the material has a low water absorption coefficient, in order to avoid condensation, the balcony will need to be regularly ventilated; about how to insulate the balcony with penoplex from the inside, we will tell a little lower
- "Penofol": foamed polyethylene, protected on both sides with aluminum foil, which simultaneously serves as wind and moisture protection; a significant plus is the minimum thickness, for insulation it is enough to use a material several millimeters thick; Izolon, Penolon, Teplofol, Energofol have similar composition and properties; disadvantage - high price
- mineral wool (glass, slag or basalt wool): the undoubted advantage of all these materials is high heat-insulating properties; some experts believe that the increased moisture permeability of the material in the case of balcony insulation is only a plus - absorbing excess moisture well, the material will protect the room from condensation on windows and walls; however, over time, mold can form in mineral wool, so it must be reliably protected from moisture penetration from both sides with the help of hydro and vapor barrier
It is undesirable to use heat-insulating materials having a significant mass (for example, brick) for insulating balconies. After all, the bearing capacity of the balcony slab is limited. With excessive load, such a design simply may not withstand the additional weight.
The use of expanded clay for floor screed is also not recommended. Its main disadvantage is the ability to absorb moisture. As a result, its mass increases significantly.

Perennial flowers (TOP 50 species): garden catalog for giving with photos and names | Video + Reviews


