- Installation of a heated structure on a light rack base
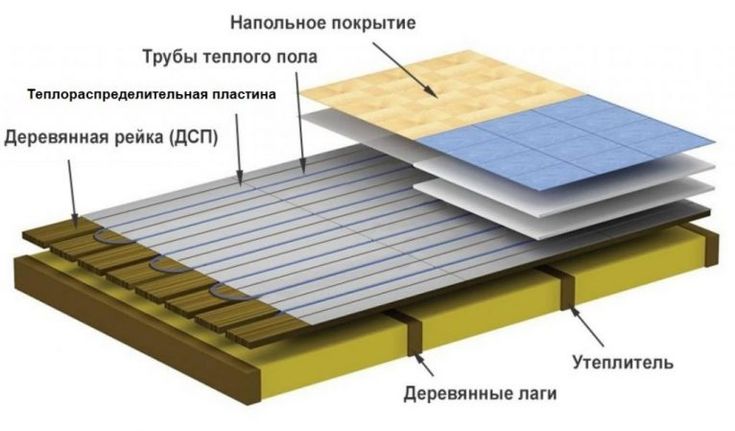
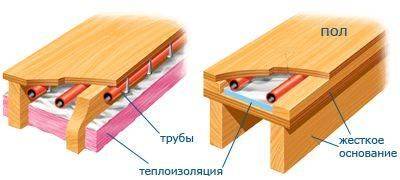
- Underfloor heating with water heating on wooden floor
- A few tips for safe operation
- Installation of film heating on wooden floors
- Necessary materials and tools
- Mounting technology
- Video: How to make film heating on a wooden base
- Key features when laying the system
- We evaluate the foundation
- pre-insulated floor
- Laying the floor board
- Pipe laying technology
- Connection to the heating system
- Laying method
- Is it possible to save on materials
- Underfloor heating on wood floor
- The device of the floor heating system
- Requirements for the base under the structure
- Insulation layer device
- Pipe fixing option
- Pipe for the movement of the coolant
- Construction of the base for finishing
- Underfloor heating on wooden logs: the first installation option
- Water floor heating schemes
- Foundation preparation
- Features of laying a heating floor under a wooden coating
- Do you have accurate measurements at home?
- Pros and cons
- The technology of laying a warm electric floor on a wooden floor
- First method (with concrete screed)
- The second way (without concrete screed)
- Other Floor Installation Instructions
Installation of a heated structure on a light rack base
If you are laying the system on an old wooden floor, you need to carefully inspect the floor before starting work. It is better to raise the floorboards, check the condition of the lag, if necessary, restore or replace worn and damaged structural elements. Sometimes wooden beams should be nailed to the beams on the floor and additional insulation should be laid.
The next step is laying the insulation.
 The process of laying thermal insulation
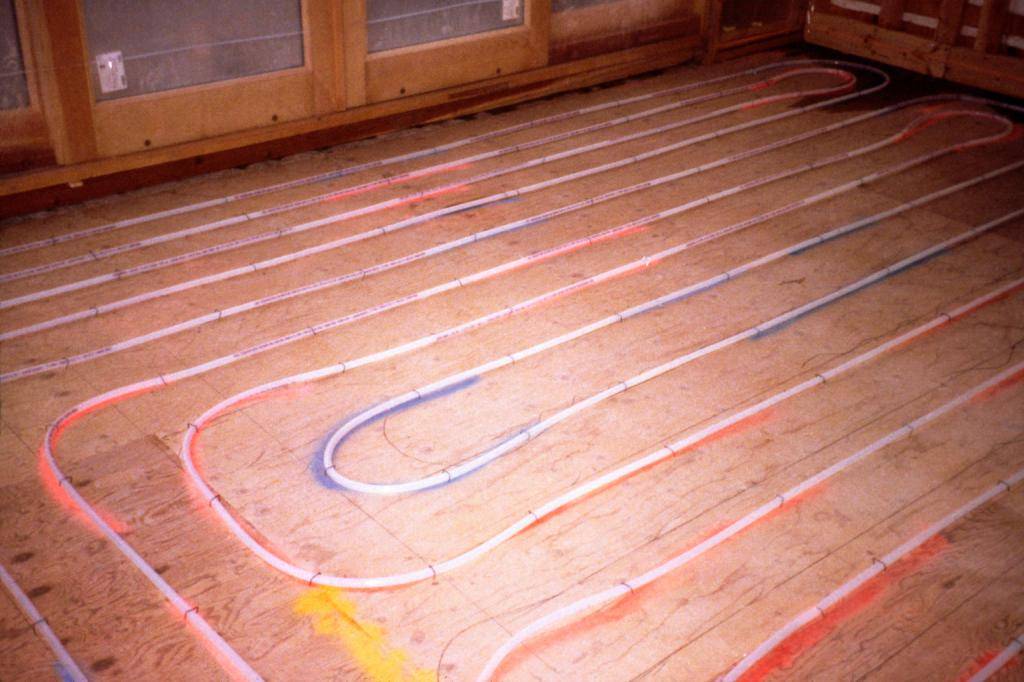
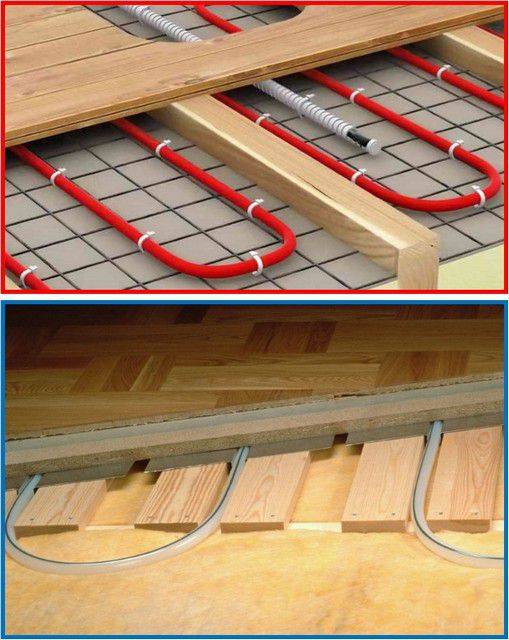
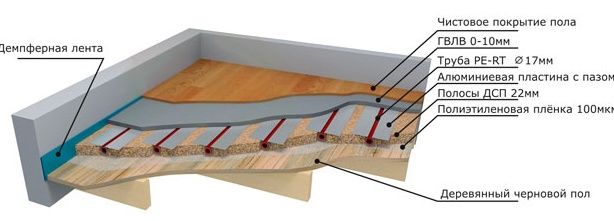
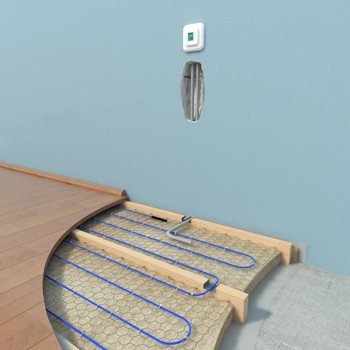
For this, polyethylene is suitable, which is laid out with an overlap. A damper tape with a width of 5 centimeters is attached to the wall along the perimeter of the floor covering. For installation of a warm floor with a water circuit, it is convenient to use the “snake” pipe laying method.
On a pre-drawn plan-scheme of the room, we mark out the pipe connection area and the equipment attachment points for adjusting the system, you also need to draw the position of the guides with the necessary clearances. Usually it is 150 - 300 millimeters. It is better to use corrugated pipes with a diameter of 16 millimeters. Rails are made to measure.
Next, laying the warm floor along the logs. Lay out guides. Between them you need to leave channels for the pipeline.
 The method of laying pipes "snake"
Then we fix the guides to the subfloor with self-tapping screws. The corners of the slats in the pipe bends should be rounded off. A foil with a thickness of at least 50 microns is placed in the prepared grooves. Slightly pressing and smoothly bending around the recess, we fix it. At several points, you can attach the material to the rails with a stapler.
We lay the pipes in the formed channels. Metal plates are also used for fastening to the subfloor. After that, they connect to the heating circuit and pressurize the heating system.After checking the normal functioning of the water floor, you can immediately proceed to the finishing of the tiles or lay the substrate, if necessary. Of the materials for the substrate, it is recommended to use DSP boards that do not contain formaldehyde.
A wooden warm floor on a water circuit can be completely installed with your own hands. However, it is not necessary to spend a lot of money. Today it is possible to successfully cope with this task using a special stage-by-stage technology of lath or modular laying.
Underfloor heating with water heating on wooden floor
The warm electric floor system, despite all its advantages, has a serious drawback - it consumes a large amount of electricity and therefore has not become in demand in the private residential sector. Most often, water heating systems are installed in country cottages.
For structures that operate using a heated coolant, before laying a warm floor on a wooden floor, it is necessary to purchase a boiler, collector, pumping equipment, water flow control fittings and control devices.
Laying a water floor can be carried out in two ways, one of which is simpler, and the second is more complicated, since many components are required for its implementation.
In any case, regardless of the option chosen, you will need:
- heating pipes, the installation step of which is 30 centimeters;
- thermal insulation materials - for example, mineral wool;
- hard black base.
If a more complex installation process is chosen, a metal mesh will be required to fasten the structural elements, polyethylene pipes under high pressure of a heat transfer fluid, a temperature sensor located in the corrugation, aluminum foil, a mechanical or automatic type temperature controller.
To save heat, heat-reflecting screens are used that can direct the flow of warm air upwards and warm the space of the room.
A few tips for safe operation
When planning the installation of a warm floor, do not forget that neither electrical cables nor water pipes can be laid under heavy pieces of furniture. Also, do not install a warm floor in close proximity to a wood-burning, gas fireplace, stove and other heating devices.


For rooms for various purposes, you can program different temperature conditions, for example, in the bathroom and living rooms it will be comfortable at 22-24 ° C, and 20 ° C is enough in the kitchen and corridor
Practical nuances:
After the repair is completed, you should leave the heating system turned on, and maintain the same temperature regime for 3-5 days
This precaution will heat the entire floor pie evenly and thoroughly and ensure reliable operation of the system.
At the beginning of the heating season, you need to properly prepare the floor heating system for operation. To do this, increase the degree of heating by 5-7 units every day until the temperature reaches the required value.
This approach will avoid a sharp jump in temperature, which can damage the laminate and other materials. Similarly, heating is turned off for a warm period.
Do not forget that the film infrared floor does not tolerate moisture well.Therefore, it is not recommended to install it in rooms with a humidity level above 70%, and after wet cleaning, wipe the laminate dry.
The optimum temperature for underfloor heating is considered to be in the range of 20-30 degrees.
Lastly, do not cover a heated laminate floor with carpets or other furnishings that interfere with efficient heat distribution.
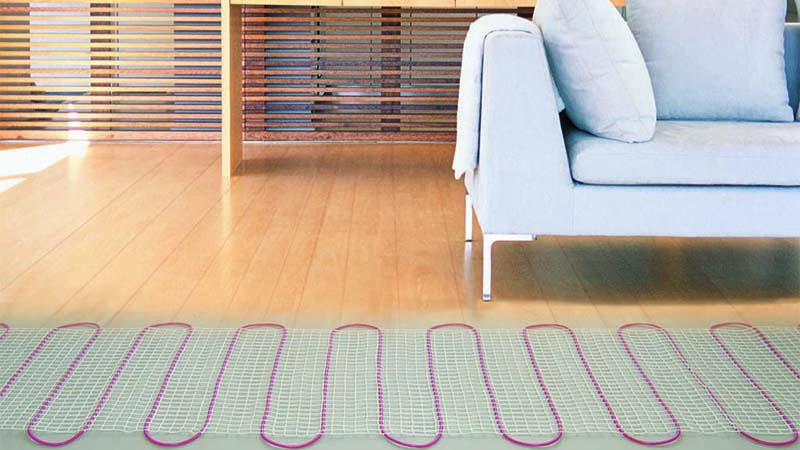
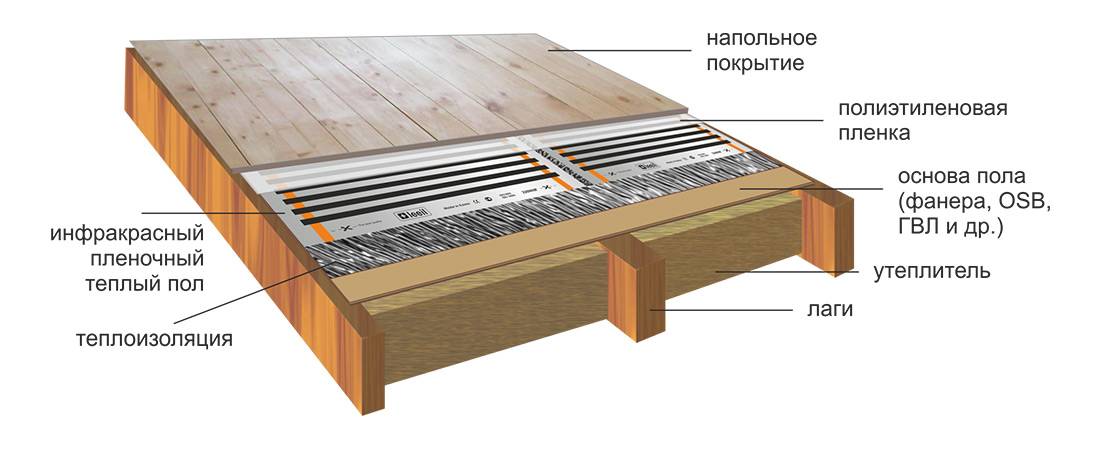
Installation of film heating on wooden floors
When preparing the base for the installation of the film system, it is not necessary to dismantle the old coating. It is necessary only in case of significant physical wear.
Necessary materials and tools
When installing an infrared underfloor heating, you will need the following tools and materials:
- Heating film.
- Polyethylene film.
- Heat insulating underlay.
- Thermostat and temperature sensor.
- Wire (section - from 2.5 sq. mm).
- Tools: scissors, knife (can be stationery), indicator screwdriver, tape measure, pliers.
Mounting technology
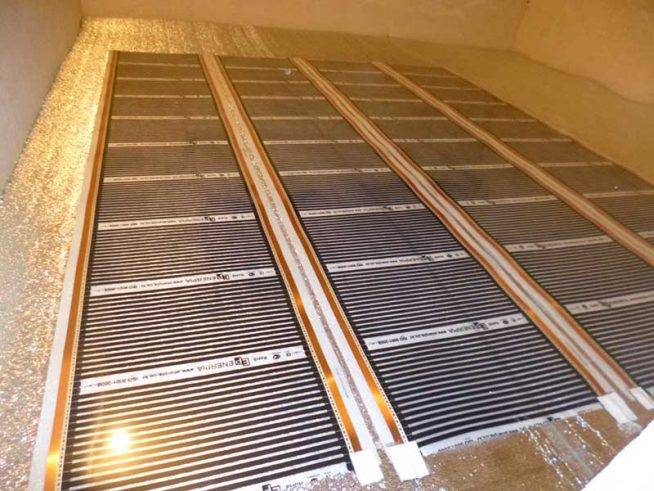 Sheets of infrared film should be placed evenly on the floor, but in no case should they overlap
Independent installation and connection of the infrared floor is carried out according to the following algorithm:
- Cleaning the floor from dust and other contaminants. Work takes place on a dry, cleaned surface.
- With a wet draft layer, the thermal film is waterproofed. For this, a polyethylene film up to 50 microns thick is used.
- A film made of polypropylene or metallized lavsan is used as a heat reflector (aluminum foil cannot be used for these purposes). First you need to cut the material.If the underfloor heating is installed in a large room, you need to ensure that the length of the film is no more than 10 meters.
- The material is laid at a distance of 25–30 cm from each wall. The thermal film is laid out on the floor with copper tires down. It is forbidden to step on the film, drop tools. It is also not allowed to overlap two sheets on top of each other. Before laying, you should mark out the room, determine where heavy furniture and equipment will stand, and avoid these places. Otherwise, due to constant pressure, the thermal film will deteriorate.
To connect the system to the electrical network, it is better to invite a competent electrician. If there is a desire to do it yourself, then the work should be organized as follows:
- Strip the wire (8–10 mm) and insert the end into the terminal.
- The contact is established on a sheet of film. Connection points and cut lines are insulated with vinyl mastic tape.
- After connecting all the sheets, the resistance is measured at the ends of the wires connected to the thermostat.
- Next, the load is calculated. To do this, use the formula W \u003d V2 / R, where V is the voltage in the network, R is the resistance. The final figure should be about 20-25% lower than the one indicated on the thermostat. After that, you can connect the device.
- Thermal film strips are connected to the thermostat in parallel. To avoid possible damage to the wiring, individual sections are hidden under thermal insulation.
- Then the temperature sensor is placed. The device is included with the thermostat.The installation location depends on what material is planned to be used as a finishing coating: if it is soft, then the sensor is installed in a place with a minimum load.
- Connecting the thermostat to the network and testing the system for contact overheating, sparking, and so on.
After completion of all work on the installation of the film floor, the finish coating is laid. If it is planned to use ceramic or porcelain stoneware tiles, a mounting grid is preliminarily laid out on the floor and fixed in places where there is no thermal film. After laying the adhesive solution, with which the tiles are mounted, must dry. This will take about a month. It is not recommended to turn on the warm floor until this moment.
Video: How to make film heating on a wooden base
The ideal microclimate in the room is achieved with the help of heating devices. To obtain the optimum room temperature, you must follow selection and installation rules underfloor heating on a wooden basethat allow any homeowner to easily install the selected system.
Key features when laying the system
If this is your first time encountering such work, then you need to familiarize yourself with the most significant moments of the technology. Alas, the basis of any practical undertakings is theory.
Therefore, before making a wooden floor warm, take into account some details.
We evaluate the foundation
The boards of the wooden base should be as close to each other as possible - if there are gaps, then they must be eliminated with the help of a heat-insulating material. However, if it can be seen with the naked eye that the wooden floor has physically exhausted itself, then it is better to dismantle it.When is it really necessary? In the following cases:
- The floors do not have insulation - the wind “walks” under the boards.
- The logs on which the boards are fixed are very rarely located relative to each other. A warm floor on wooden logs suggests their location at a distance of 60 cm.
- The board of an old wooden floor needs to be processed on a planer - the exact thickness must be observed. This is necessary if the top coating will be made of laminate. The fact is that its manufacturers recommend laying the material on the basis of unevenness, which will not exceed 2 mm. And since the use of a substrate is not provided for in such a floor configuration, the surface of the base must be leveled to the maximum.
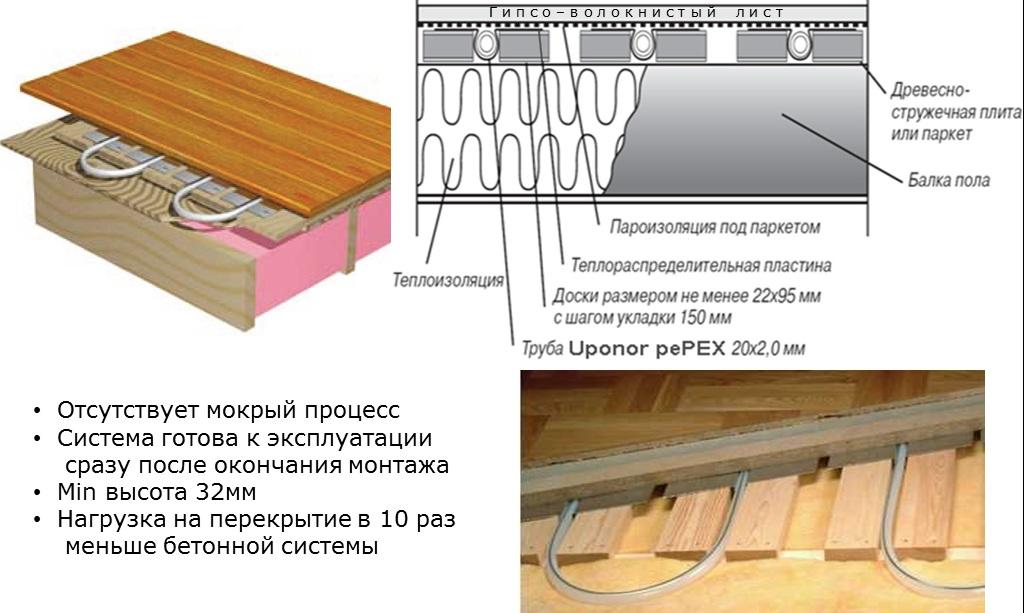
pre-insulated floor
After the distance between the lags is brought to 60 cm, it is necessary to start the installation of the raised floor. To do this, plywood or a used board or something else suitable for laying insulation on it is nailed to the bottom of the lags. Then, a 100 mm thick insulation is laid between the lag, however, it is first protected from below, and then from above, with a vapor and hydroprotective film.
Water warm wooden floor must be laid on thermal insulation
Slab mineral wool with a density of 35-40 kg / m3 will perfectly cope with the function of a heater. Today, the supply of this material on the market is extremely wide, so there are plenty to choose from.


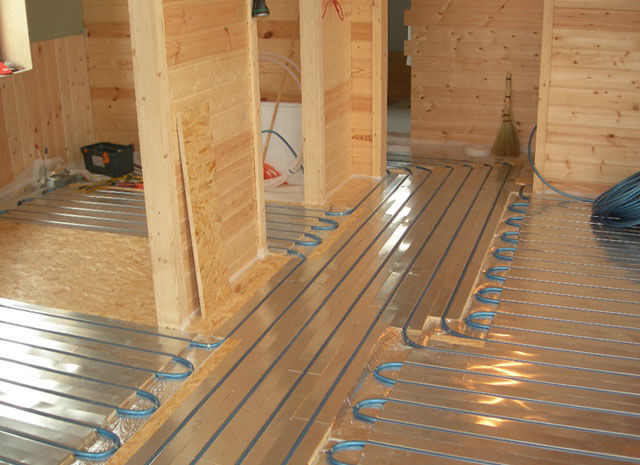
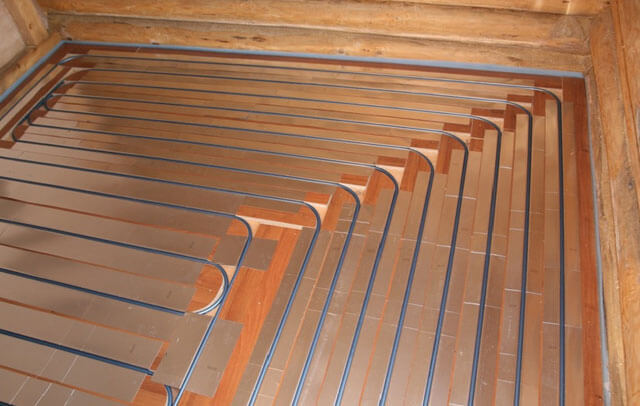
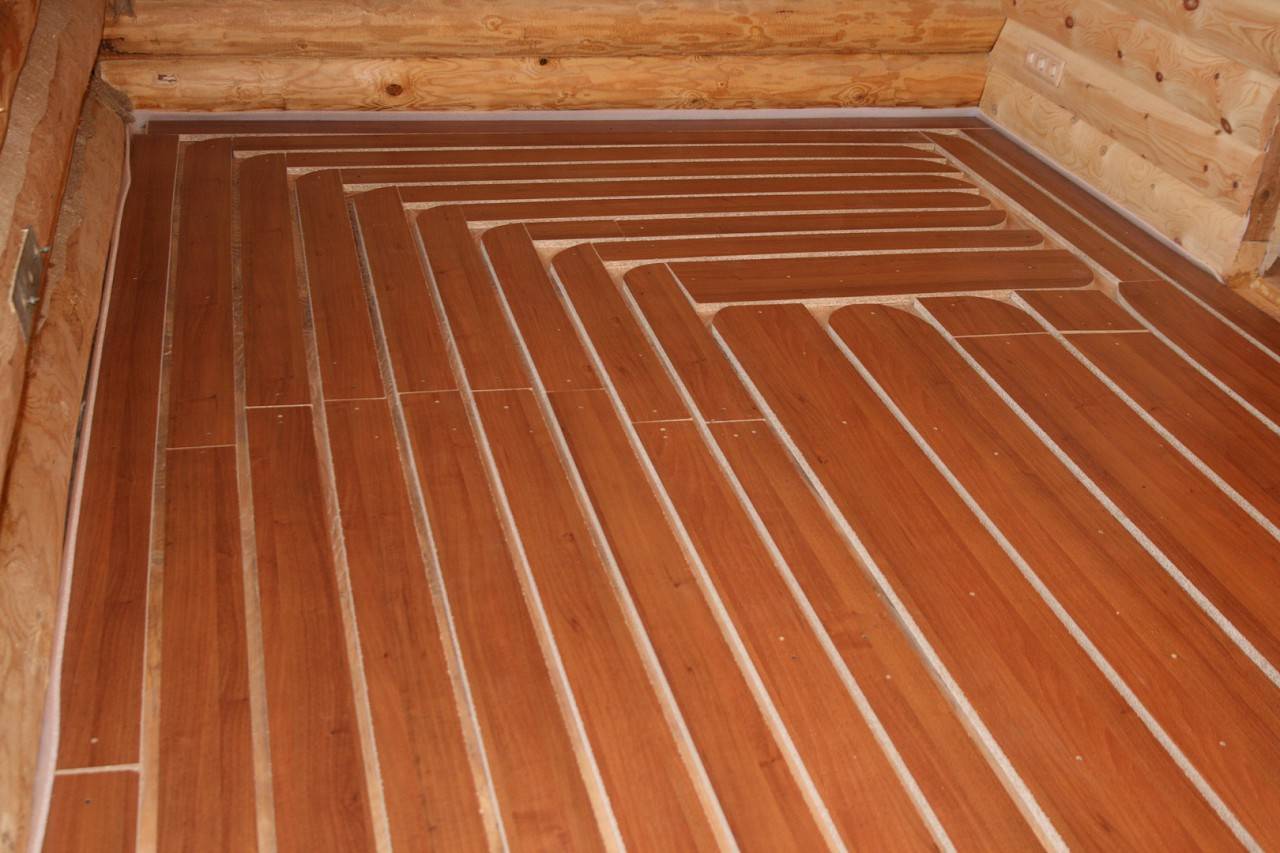
Laying the floor board
This process is carried out taking into account one circumstance - a groove measuring 20x20 mm should form between the boards. But along the edges of the boards at the ends, it is necessary to make round grooves designed for turning pipes.In principle, everything - the preparatory stage, which implies the wooden system of a water-heated floor, is completed, completed. If everything is done rationally, then all these events will take 10-12 hours.
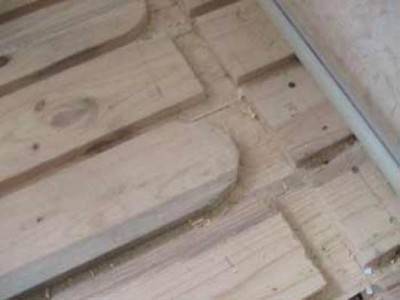
We are preparing grooves for laying the pipes of the underfloor heating system on a wooden floor
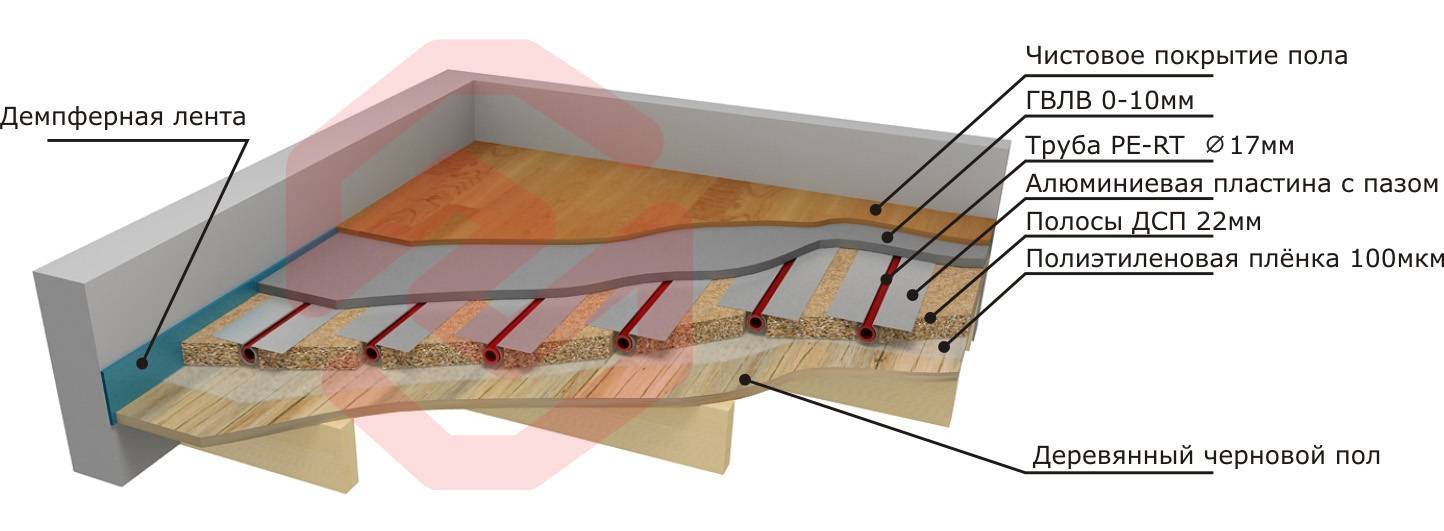
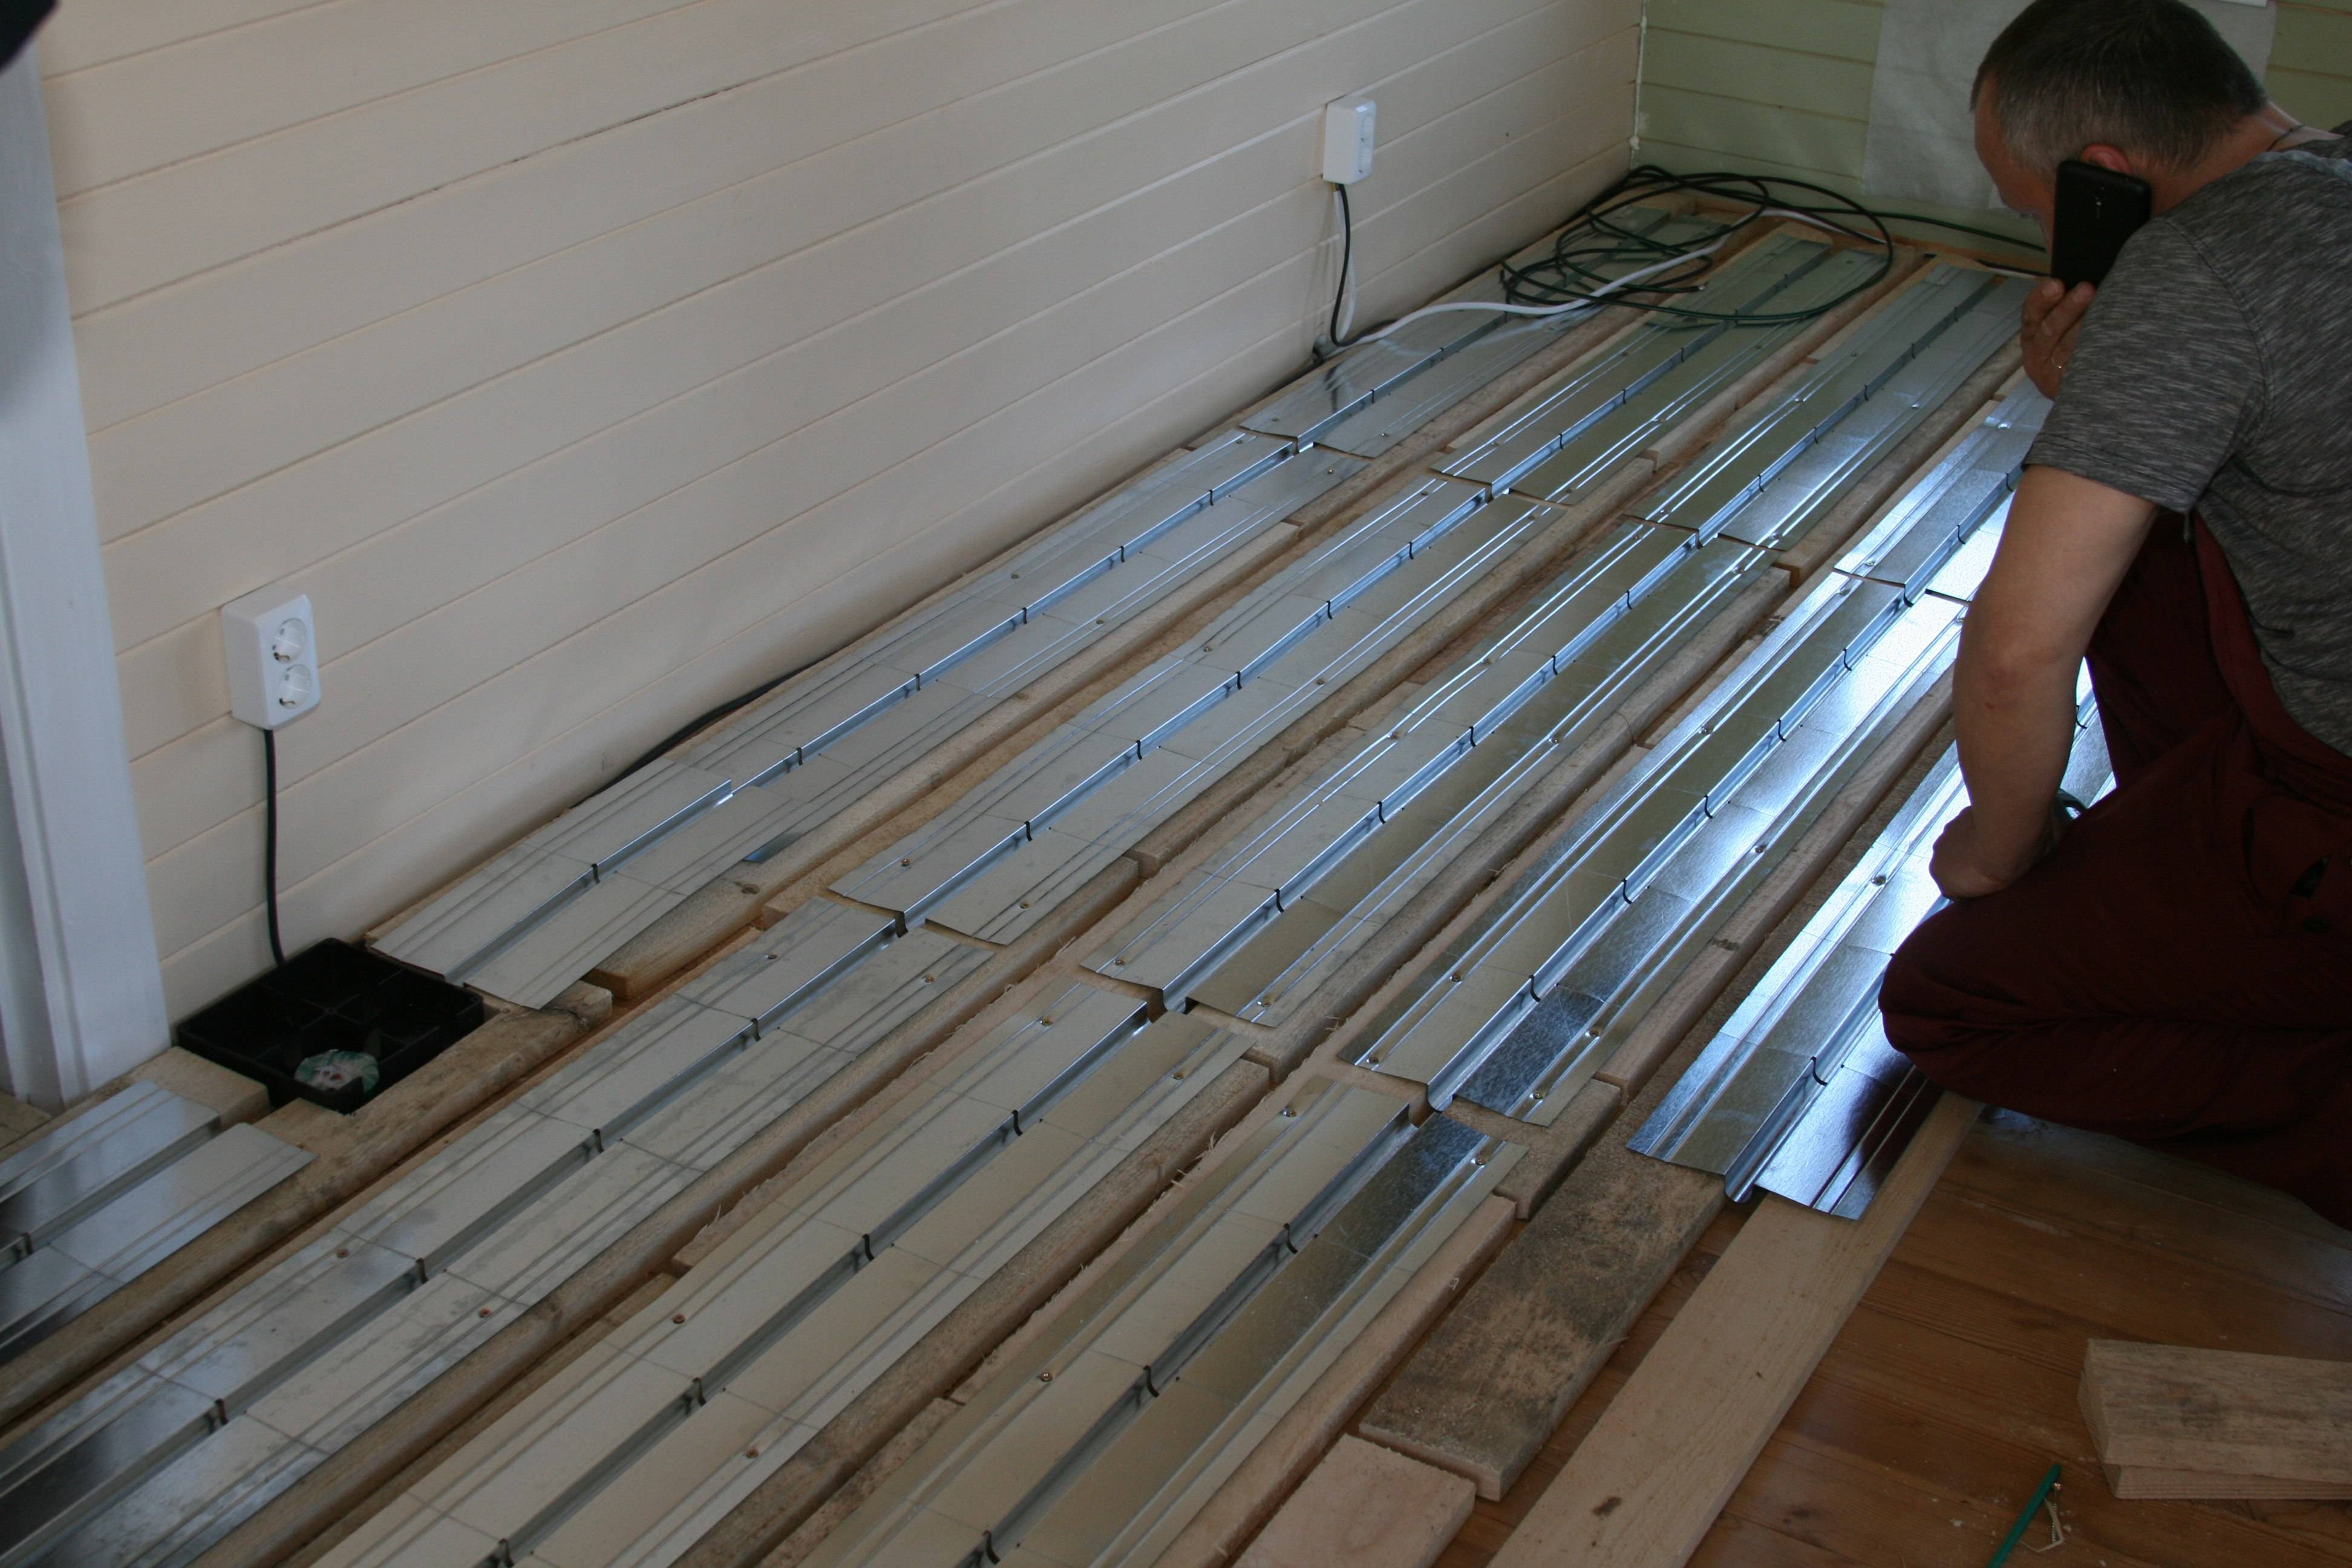
Pipe laying technology
Over the longitudinal grooves, rolls of rolled foil are rolled out, and on top of it, directly into the grooves, metal-plastic pipe with a diameter 16 mm. Then the pipe must be wrapped with foil, the edges of which are stapled to the board.
To prevent the pipe with foil from popping out of the grooves, it must be attached with small metal plates to the floor. The location of the plates in relation to the grooves is transverse. Thus, the pipe is laid over the entire floor area.
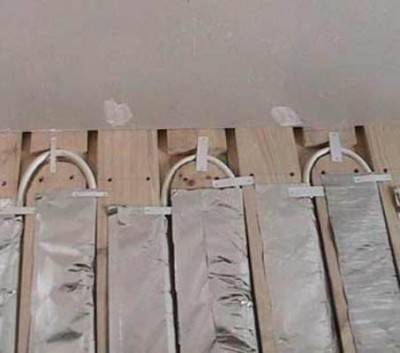
Foil and plates serve to fix the pipe when laying a wooden water-heated floor system
Connection to the heating system
The last most responsible and important step is to connect the system to a common heating system. In this case, you can stop at the simplest, which is called "no problems", the way to perform this operation - manual regulation. Underfloor heating on wooden beams can be connected by any other method: using mixing units, using a collector system, etc. Basically, underfloor heating control systems there are quite a few.
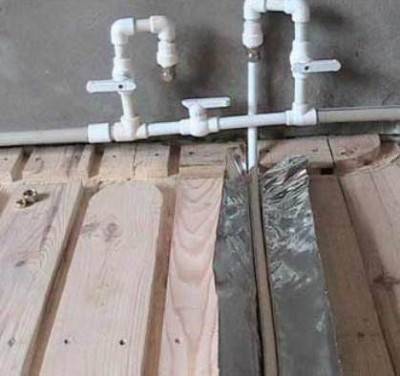
Connection to the heating system of a water-heated wooden floor
After completing the connection, of course, it is necessary to pay attention to pressure testing the system for leaks or damage to the pipeline. This procedure cannot be skipped in any way in order to avoid unpleasant surprises in the future in the form of swollen flooring.
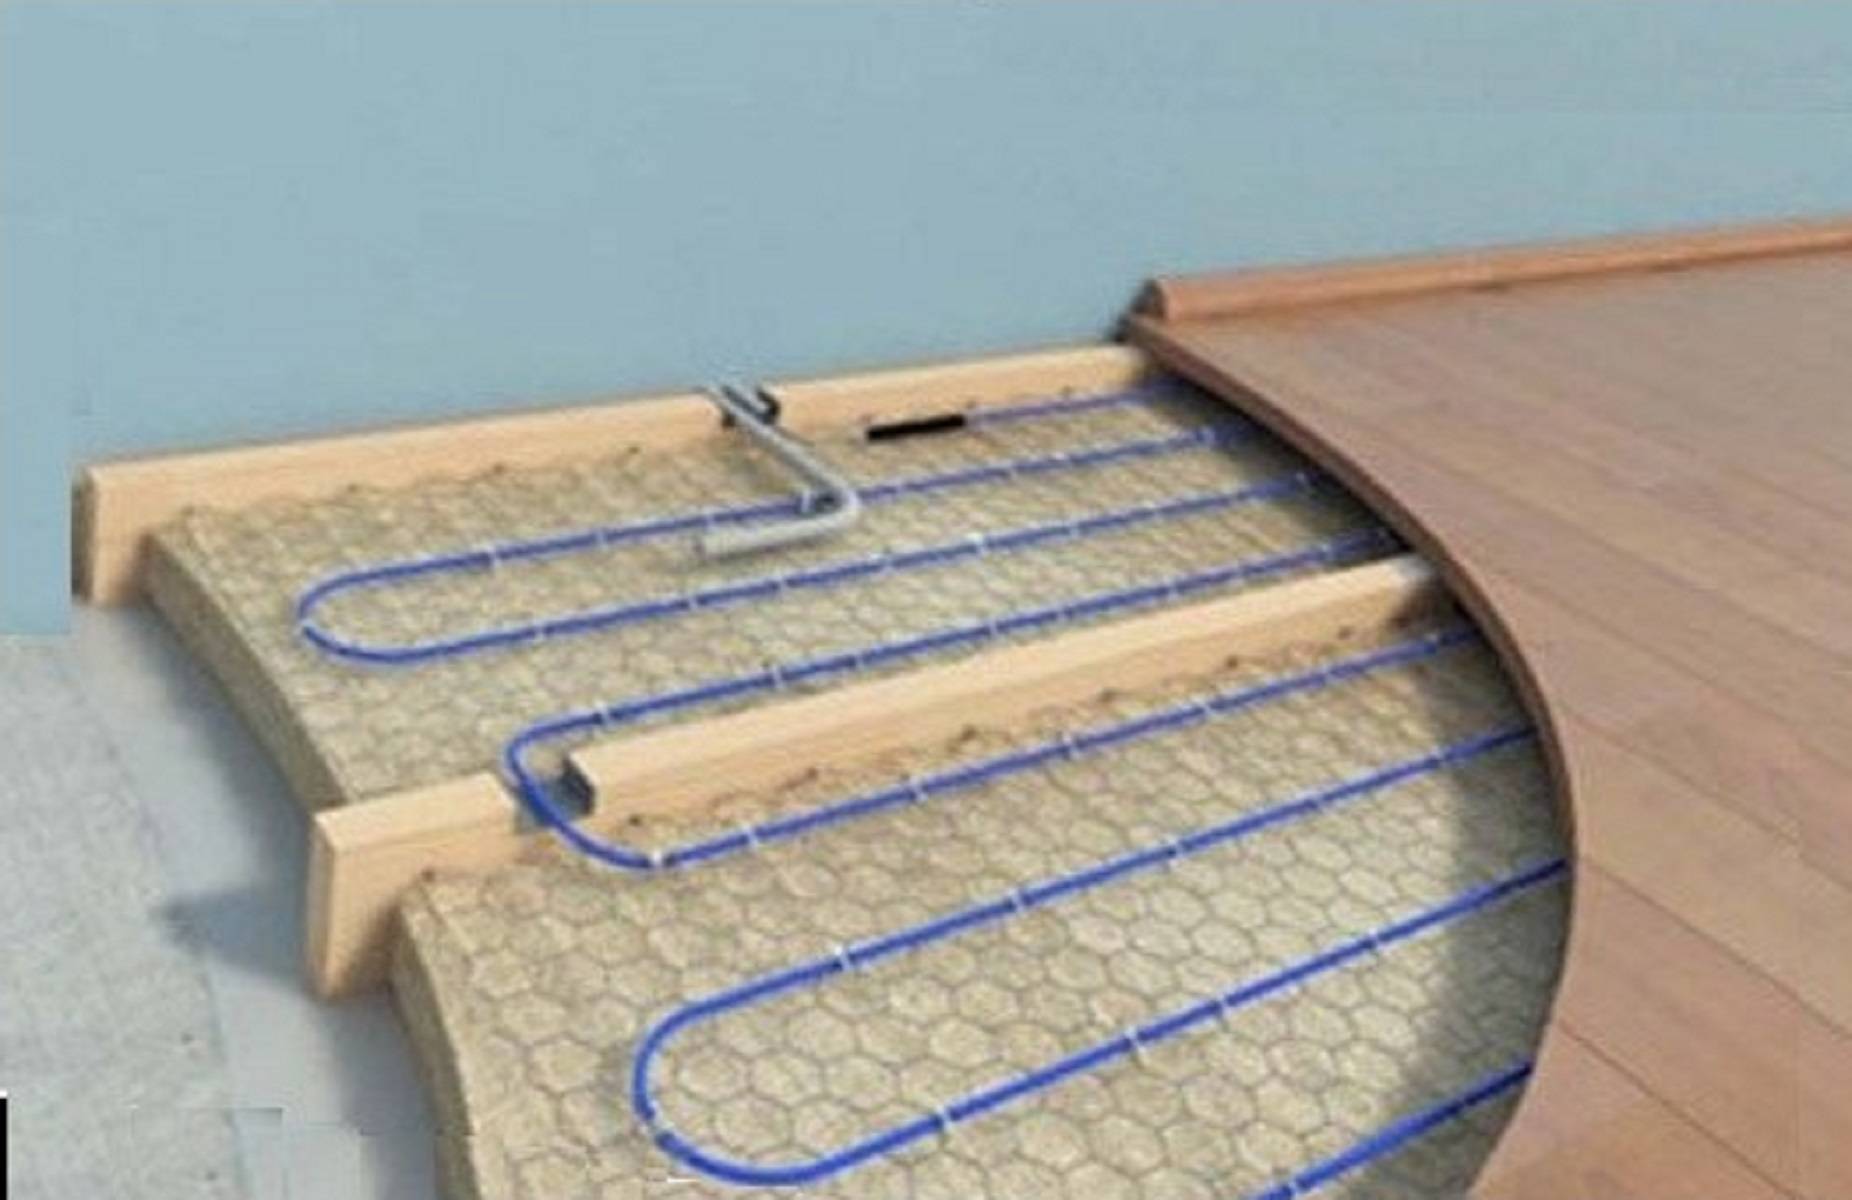
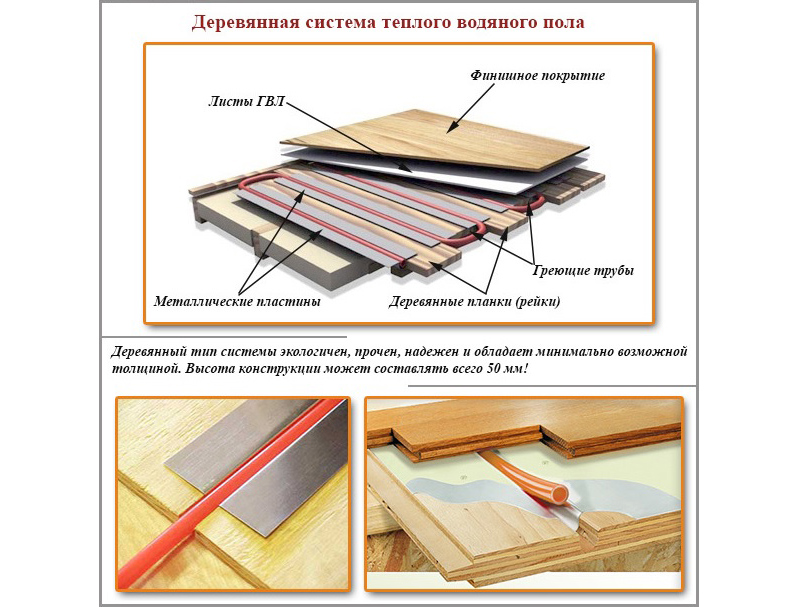
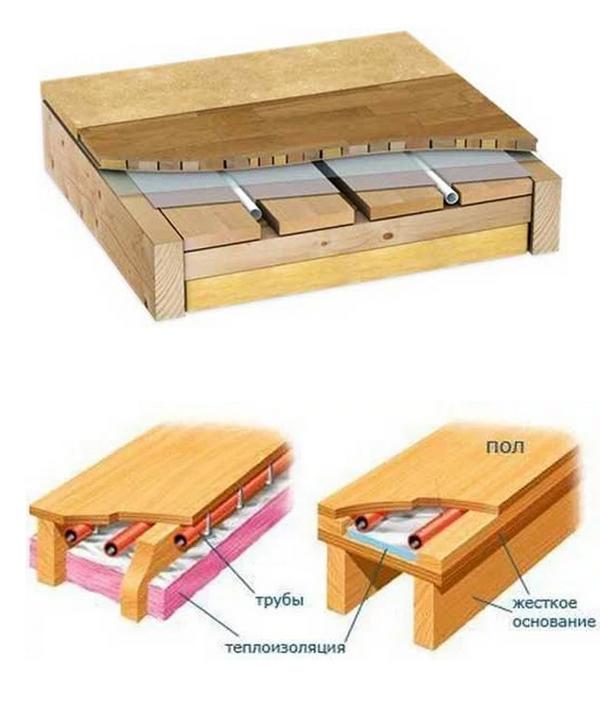
Laying method
There is a common technology that you need to master if you are interested in the question of how to make a warm floor in a wooden house. The water-heated floor system for wooden floors is mounted by the flooring method.
Pipes with a coolant circulating through them are not laid in a concrete screed, but on logs or a rough base of boards in specially equipped channels.
Installation of a water floor heating system
In order for heat to be accumulated and distributed properly in the channels, special plates with longitudinal recesses for the heating circuit pipeline are strengthened.
Metal plates not only perform the function of heat transfer, but also make the structure more rigid, which eliminates the need for a substrate.
If you do the installation yourself, you can not buy expensive plates, but use 200 micron thick foil instead. Sometimes, when finishing the floor with tiles or laying linoleum, the presence of a substrate is desirable. To do this, you will need to purchase GVL sheets or cement-bonded particle boards with the smallest insulation values.
Is it possible to save on materials
Since screedless underfloor heating accessories cost a lot of money, many craftsmen have found ways to do without them:
- Lay the heating branches inside the ceiling, directly on the insulation. Then Ω-shaped products are not used.
- Make cutouts in the boards yourself, and instead of plates along the length of the grooves, roll out aluminum foil used for baking.
- To manufacture steel heat spreaders independently on metalworking equipment.
- You can also make a wooden system for laying pipes in grooves yourself, for example, from chipboard sheets.
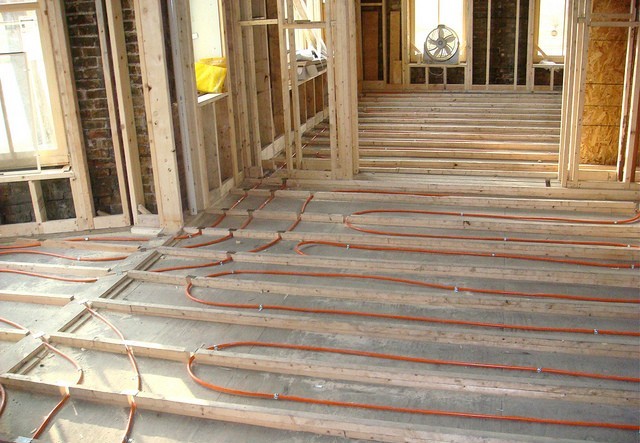
Pipe wiring inside the ceilings is practiced to this day
When laying pipes inside a wooden structure, they have poor contact with the finish coating and heat the air around them more than the room. In order for such heating to have an effect, the pipes must be laid at a distance of 10 cm from each other, and the temperature of the coolant must be raised to the maximum. Then the idea loses its meaning, it is easier to install radiators.


Thin aluminum foil serves as a poor heat flow distributor due to its thickness of hundredths of a millimeter. In addition, it crumbles over time from gradual oxidation, so using foil is pointless.
Craftsmen make their own grooves for pipelines and roll rolls of aluminum foil into them
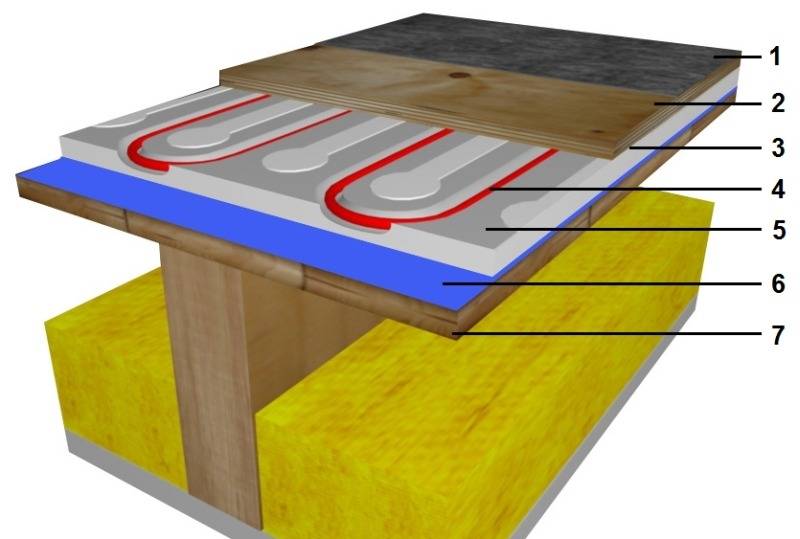
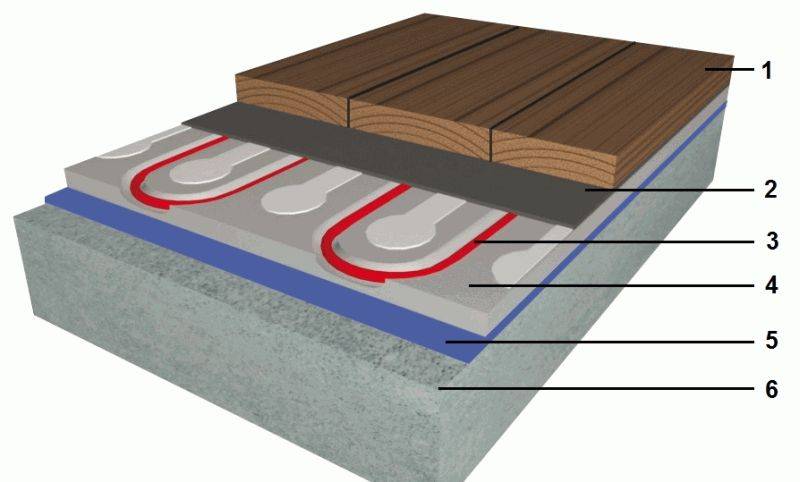
Underfloor heating on wood floor
Underfloor heating on wood floor
The main advantage of underfloor heating on a wooden floor is the absence of a “wet” process, i.e. clamping devices. The function of the base is performed by the boards of the existing flooring. No gaps between boards are allowed. There are certainly gaps in the old floor, so it is necessary to lay heat-insulating material in them. If the homeowner has doubts about the quality and durability of the existing flooring, then it is better not to take risks and dismantle the old one and install a new one.
The device of the floor heating system
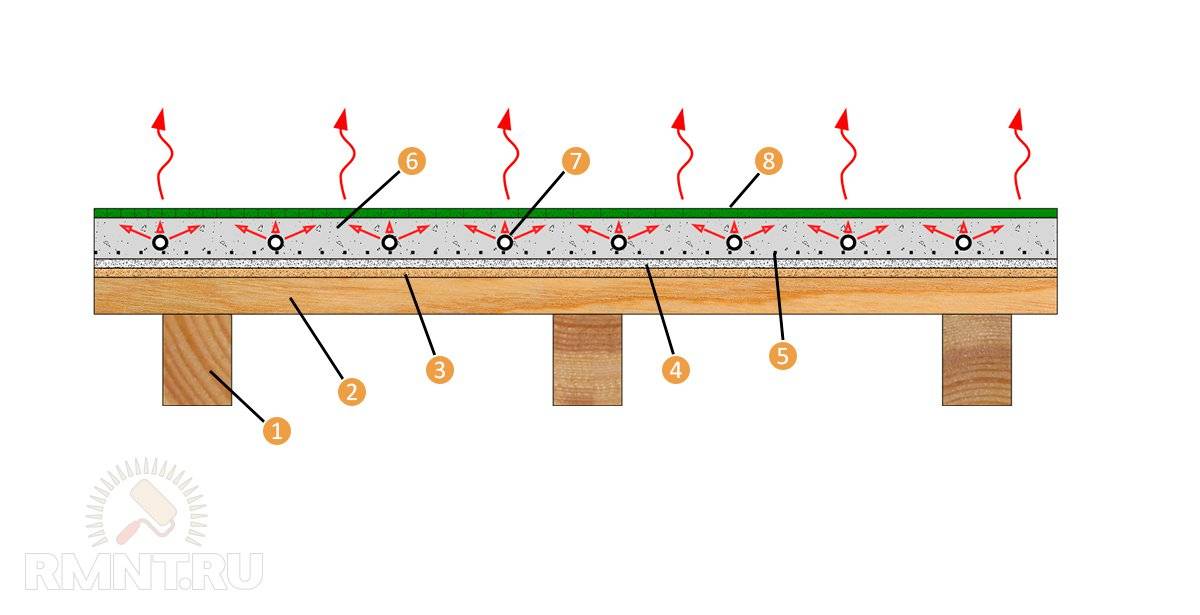
When laying the flooring system, a kind of multi-layer cake is obtained, we will consider each of its layers in more detail.
Requirements for the base under the structure
The first layer of the cake is a properly prepared base. It can be any overlap that is pre-aligned. SNiPs regulate the absence of significant elevation changes, protrusions and roughness. The wooden floor should be flat, without protruding boards.
Each plank should be well fixed and should not sag. The maximum allowable limit of deviation from the horizontal is 2 mm, distributed over 2 m of area in any of the existing directions.
Insulation layer device
An insulating layer is required to prevent heat leakage. The material for its implementation is selected individually, based on the operating conditions. It must be moisture resistant, refractory compatible with other building materials.
It is desirable that sound insulation be additionally provided. If possible, the thinnest, but most effective material is selected.
Pipe fixing option
The actual flooring under the pipes is laid on the insulation. There are many options here. These can be polystyrene mats with special lugs for pipes. Such mats are produced with single and duplicated insulation.
In the latter case, the insulating layer may be superfluous. As a flooring, sheets of lumber with sawn grooves for pipes can be used. They are also produced industrially. There are also home-made floorings from slats, bars, etc.
Pipe for the movement of the coolant
Next, a heat pipe is laid in the prepared fasteners and grooves. For the most snug fit and creating a thermal screen, the parts are placed inside a special aluminum profile.
If there is none, you can make similar elements from galvanization or wrap each part with thick foil. It is optimal to lay an additional layer of foil on top of the installed pipes.
Construction of the base for finishing
A base must be laid on top of the pipes under the floor covering. It is selected depending on which topcoat will be laid.
If it is planned to install tiles, ceramic or PVC, as well as linoleum or carpet, moisture-resistant drywall is laid on the metal elements of wooden flooring. If polystyrene mats were used to equip the flooring, GVL is laid in two layers.

The deck structure is usually covered with a base under the finish coat. It is selected depending on the material that is preferred as a coating. Under the laminate, for example, a moisture-absorbing substrate is laid, under the tile - moisture-resistant drywall or chipboard
Under the laminate on a wooden flooring, drywall is not laid. Instead, polyethylene foam or a cardboard backing that absorbs excess moisture is placed on aluminum plates.
Instead of GVL, moisture-resistant grades of chipboard or plywood can be used. A good solution is glass-magnesium sheets, which also conduct heat well, which is absolutely not superfluous when arranging a heating floor.
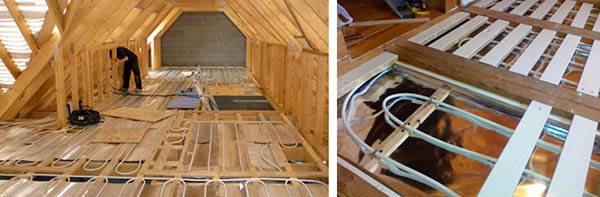
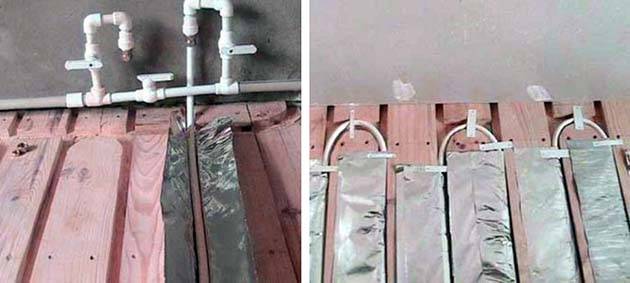
Underfloor heating on wooden logs: the first installation option
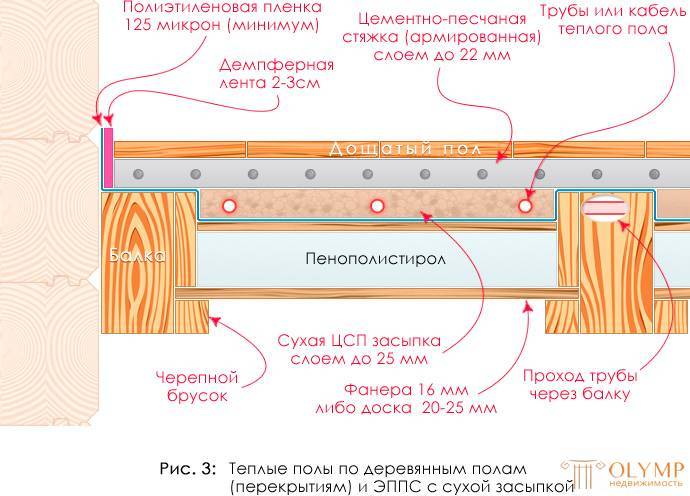
There was a wooden floor. Logs were placed on it from a board 50x150 mm with an interval
60 cm. Put between the lags insulation - mineral wool - 100 mm thick. Insulation - underfloor heating pipes.


In the logs, cuts were made for the passage of the pipe.Possible gaps between the lags and the insulation were foamed (although with the correct distance between the lags, it is not necessary to foam; if the insulation is mineral wool, then the distance between the lags should be 1.5-2 cm less than the width of the mineral wool sheet). Plywood was placed on top of the logs, on which there was already some kind of finishing material.
The weakness of the shown device: there is an air gap between the pipe and plywood, which does not need to be: it worsens the thermal conductivity of the floor.
Water floor heating schemes
This is a very important point - schemes. The fact is that the coolant moving through the pipes gives off its heat, gradually cooling down. So, when you exit the system, it will be almost cold. It turns out that one half of the floor heats up according to the norm, while the other remains cool. That is, there is an uneven distribution of the coolant along the laid heating circuit. If the room is small, for example, an attached balcony, bathroom or toilet, then this will not be very noticeable. What if it's a large living room?
That is why different schemes are used for laying underfloor heating. For small rooms, a snake is the simplest scheme. For large ones - a spiral, or a double snake, in which both the coolant supply and its return are laid along one circuit.
Foundation preparation
A warm floor on wooden logs has a great and main advantage - the absence of “wet” work, in particular, a screed device. In this case, the boards are the base. At the same time, certain requirements are imposed on them:
- The thickness of the flooring from beech, oak should not exceed 24 mm, from pine or larch - 22 mm;
- If a new flooring is being made, then the boards should first be laid out on a heated floor for several days.This is necessary so that they do not subsequently deform.
Before proceeding with the laying of cable or pipes, it is necessary to prepare the base. There are two options here:
- On existing subfloors. Slots and gaps between the boards are sealed in the old surface, thermal insulation is laid (polystyrene, mineral wool);
- From scratch. Logs treated with antiseptics and fire and bioprotection are located 60 cm apart. Slots, mold, rot on the boards are unacceptable.
As you can see, laying underfloor heating in any case requires a rough foundation. The next step is to insulate. The heat-insulating material fits tightly between the lags, which eliminates the appearance of cold bridges.
After the rough base is prepared, you can start laying underfloor heating.
Features of laying a heating floor under a wooden coating
The main problem when laying a thermal system under wood flooring is the possibility of the structure drying out under the influence of high temperatures.
To avoid this, it is recommended
- Before applying this or that flooring, it is necessary to make sure that it is permissible to lay it on a heated floor, this is usually indicated on the packaging or in the instructions.
- The power of the system should not exceed 80 W per m2, while the total power should be evenly distributed over the surface of the entire floor.
- Before laying the finish coat, it is necessary to test the system for at least two weeks, and only after that do the installation of a decorative floor covering.
- Two days before laying the floor, you need to reduce the heating to 18 degrees.
- After installation work, they do not immediately give the maximum temperature, it is necessary to gradually raise the degrees during the week.
- During the operation of the heating structure, it is necessary to adhere to the humidity regime of 40-60%. Higher rates lead to rapid drying of the wood.
Electric underfloor heating is a technically complex structure, and those who decide to do the work with their own hands need to thoroughly study the technology of work, be well versed in electrics, and know the nuances of installing heating systems in a wooden house. It is very difficult to master all this on your own, and ignorance of the rules and lack of skills can lead to serious consequences. Therefore, it is not recommended to mount the electrical structure yourself.
The company "Master Srubov" employs experienced and competent specialists who are always ready to help make warm floors in your home. Our employees have considerable experience and high qualifications, and also have the necessary permits to perform electrical work. Turning to us, you protect yourself and your loved ones.
To contact us, go to the "Contacts" section, where you will find all our coordinates.
Calculate the cost of painting and insulating your home right now
Do you have accurate measurements at home?
I measured myself There is a project for the house Measurers came I want to call a measurer
By clicking on the button, you consent to the processing of personal data
What determines the cost of finishing a wooden house
How to insert wooden windows into a log house yourself
Step-by-step instructions: how to insulate a bath from the inside
Methods for installing window slopes and materials for their manufacture
Pros and cons
The advantage of warm floor systems over radiators has long been proven. Here are just a few of the major differences:
- such systems optimally distribute heat. The comfort temperature zones coincide with the living space (from the floor surface to a height of 1.7 m). In the case of radiators, the air under the ceiling is mainly heated;
- in comparison with batteries, the floor warms up the room more efficiently;
- radiators are more conducive to the movement of dust, the warm floor;
- floor systems look more advantageous compared to radiator systems;
- they do not dry out the air and provide the room with the necessary level of humidity.
Like any other heating system, a warm floor in a wooden house has disadvantages. Depending on the type of system, the following disadvantages are distinguished:
- with the installation of a floor system, the cost of electrical energy increases significantly, however, in the absence of the owners of the house, the floor temperature can be lowered, and in this situation, on the contrary, you can save a pretty penny; electrical networks in old houses are not designed for high loads;
- with the use of a heated system, the level of electromagnetic radiation becomes higher. There is an opinion that it negatively affects the human body, but this fact has not yet been proven;
- if the electric floor is the only source of heating in the house, then there is a risk of freezing during a power outage;
- the device of a warm water floor in a wooden house is quite laborious.
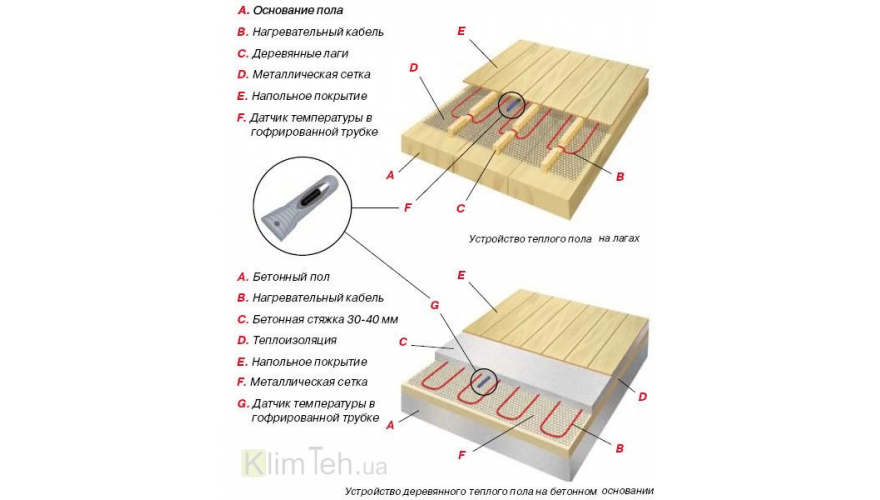
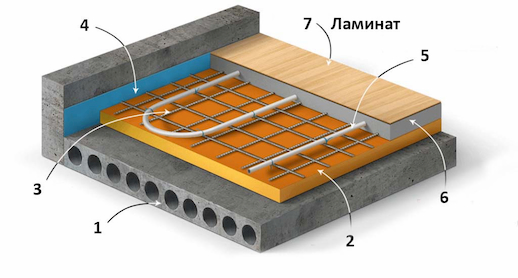
The technology of laying a warm electric floor on a wooden floor
First method (with concrete screed)
Initially, the existing wooden floor should be brought to the “monolithic state”. The wooden floor should not “walk”, the floor boards should not stagger.If necessary, the wooden floor must be sorted out.


The floor is then waterproofed. A rolled waterproofing material or 200 micron polyethylene is laid on the wooden floor. A rolled heat-insulating material, such as Tizol, is laid on top of the waterproofing. This is a roll insulation with a foil side. The insulation is laid with foil on top. The thermal electric cable is laid on top of the thermal insulation. The cable is attached to special holders, with loops with a pre-calculated (in the store) step. The screed is poured over the laid heat cable. Before pouring the screed, a temperature controller (on the wall) and a temperature sensor are installed between the loops of the laid cable.
The second way (without concrete screed)
If you want to make a warm floor in a wooden house, then a wooden floor heating system is used. The essence of the technology is as follows.
being prepared base for laying a new wooden gender. Lags of the future floor are mounted. A rolled heat insulator (at least 3 cm) with a foil side (foil up) is laid under the logs. A mounting grid is laid over the foil for fixing the heat cable. The thermal electric cable is laid in loops. The loops are marked on the logs and cuts are made in the logs for the cable loops. The heating electric cable is laid in the cuts made and attached to the grid with clamps.
A thermostat is installed on the wall, and a temperature sensor is placed between the lags. After connecting and checking the underfloor heating, the floor finish is laid. The distance from the cable to the finish coat should be 3-5 cm.
Currently, a special laminate is on sale, equipped with a cable for arranging a warm floor.However, its cost is significant: about 50 euros per 1 m2.
Other Floor Installation Instructions
- Instructions for installing a semi-dry floor screed with fiberglass (fiber)
- Instructions for applying a polymer self-leveling floor
- Laminate installation instructions
- How to prepare the base for the screed
- How to make a cement-sand screed
- How to make a screed
- How to arrange cement-polymer floors
- Installation of electric warm on a wooden floor
- Do-it-yourself floors in the bath


