- Stages of installation and connection
- How to choose the required power of a warm floor
- Important installation questions
- Electric underfloor heating in a screed: step-by-step installation instructions
- Film underfloor heating in a frame house. Common User Mistakes
- Electric underfloor heating in a screed: how much cable is required
- How to calculate underfloor heating
- Do-it-yourself installation of a warm floor system - expert advice
- Step 1: Substrate Preparation and Thermal Insulation
- Step 2: We carry out the installation of pipes
- Step 3: We start the system and fill the screed with our own hands
- Step 4: Finishing the water floor
- Connection of films among themselves at an infrared heat-insulated floor
- Management of electric underfloor heating in a country house
- Preliminary preparation of the floor surface for the installation of heating cables
- Types of warm floors
- The main advantages of underfloor heating:
- Warm floors are divided into 2 types:
Stages of installation and connection
To imagine how to connect an infrared warm floor, the installation process can be divided into several stages:
- underfloor heating drawing
- leveling the rough base, laying out the hydro and thermal insulation layers;
- preparation of a place for mounting the thermostat;
- laying infrared film and connecting heating elements;
- initial testing;
- installation of a temperature sensor;
- thermostat connection
- system performance testing;
- laying polyethylene (additionally and hard coating for carpet or linoleum)
- finishing coating.
The scheme for connecting the infrared floor is not complicated, it is enough to carefully study the instructions and get acquainted with the secrets of experienced craftsmen.
How to choose the required power of a warm floor
Choosing a set of underfloor heating
Before calculating the power, you need to know whether the room will be heated only with the help of the ETP or whether it will complement the main heating system, creating additional comfort. Each ETP manufacturer in the technical data sheet of his product indicates what power should be selected in each case.
For most premises, a value of 120-140 W/m2 is selected as a comfortable ETP based on a heating wire or a heating mat. If the ETP is made on the basis of an infrared film, then the comfortable value is 150 W/m2.
Electricity consumption of film underfloor heating
If the room will be heated only by the ETP, then the value of 160-180 W / m2 is selected for the heating wire or mat, and for the infrared film, the power should be 220 W / m2.
If you are using a heating mat or infrared film, then the capacity per square meter is known in advance and you just need to choose the appropriate option. In the case of using a heating cable, the power will depend on the distance between its turns. You need to know in advance the area and shape of the heating surface, after which you will determine the required distance from the tables in the technical data sheet or instructions. Usually it is 10-30 cm, depending on the power of the cable.
Heating cable power calculation table
| room | Power, W/m2 |
|---|---|
| corridor, kitchen | 90-140 |
| WC, bathroom | 170-190 |
| Balconies, loggias | up to 200 |
| Living spaces | Up to 130 |
It is important to take into account the maximum possible load on the building's electrical network, as well as to use switching equipment designed for the appropriate load current.
Important installation questions
The film is laid under most finishing coatings: parquet, laminate, tile (we said about additional conditions above). The only remark: if the material is soft, like linoleum or carpet, a protective layer of plywood or fiberboard is additionally laid on top. This is necessary so as not to accidentally damage the heating elements with careless strong mechanical impact. Under materials that have high thermal insulation (for example, cork), it is undesirable to lay the film
Another significant feature of the thermal film is that it cannot be laid in a screed, like other models of heating floors.
Under materials that have high thermal insulation (for example, cork), it is undesirable to lay the film. Another significant feature of the thermal film is that it cannot be laid in a screed, like other models of heating floors.


The emission of IR bands is close to the emission spectrum of solar rays. The waves emitted by them are in an absolutely safe range, therefore underfloor heating film installation can be carried out in any type of room. It is used to heat children's rooms, bedrooms, rooms where the sick and the elderly live.
Instagram mirklimatavoronezh
Instagram proclimat_perm
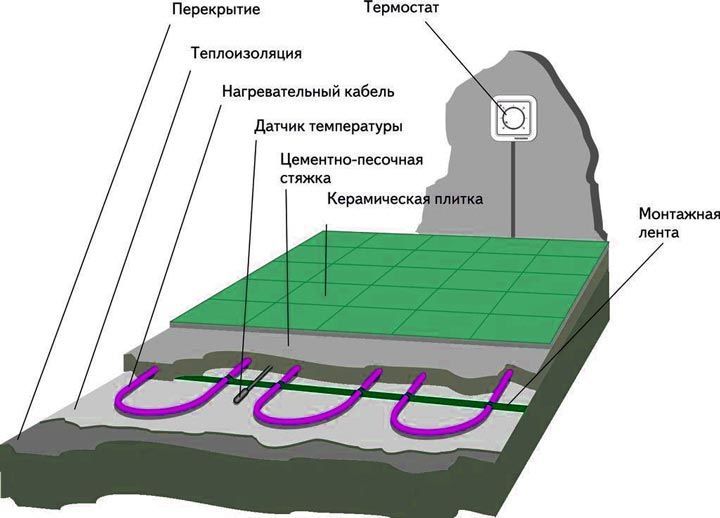
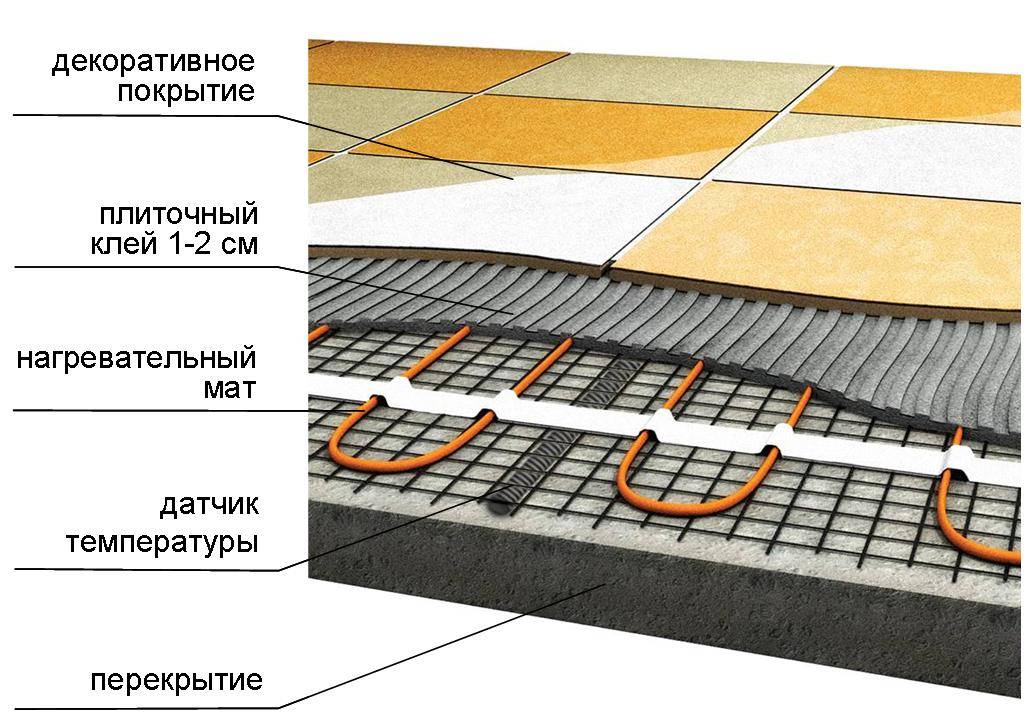
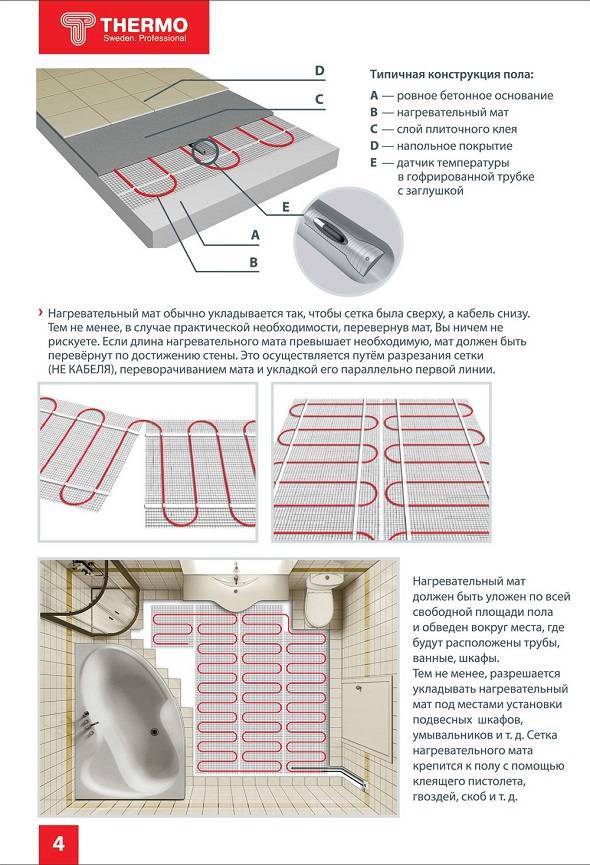
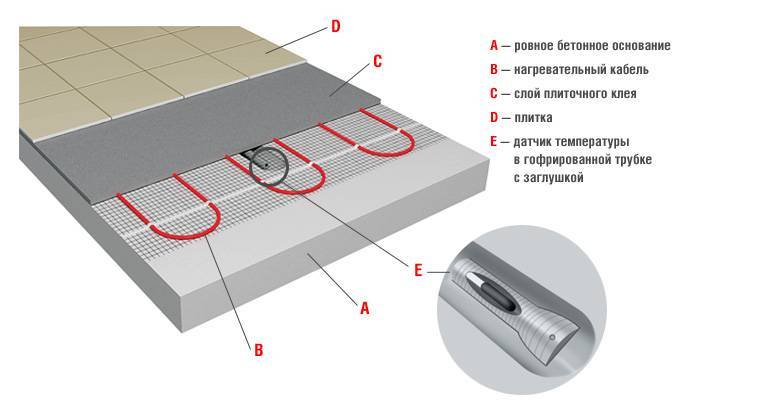
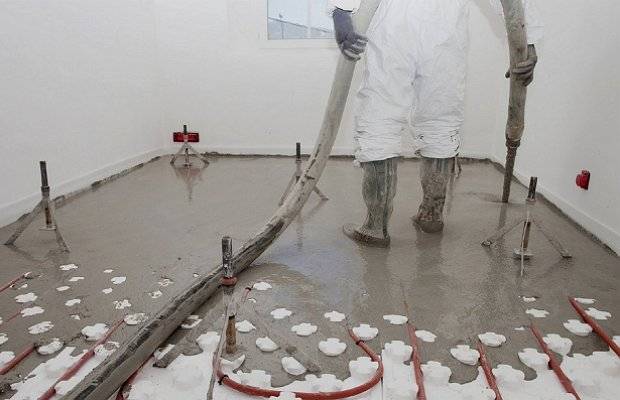
Electric underfloor heating in a screed: step-by-step installation instructions
The electrical system is mounted in layers.First, an electric cable is laid on the floor, then a waterproofing layer using a coating composition or roll material. The concrete screed will expand when heated, so the tape material (damper) is laid last around the perimeter premises. Step-by-step steps for laying a cable underfloor heating under a tile:
- We cut out the socket for mounting the socket in the selected area. Why do we make a hole with a special crown with a distance of 300 mm from the floor. The nest should not cover nearby large household appliances and furniture. Typically, the thermostat is mounted near the light switch.
- We cut the strobe for laying the corrugated tube and mounting wires with a rectangular section of 20 × 20 mm, starting from the finished socket and down to the floor level.
- We fix 3 clamps in the strobe in order to collect the tube and wires into one solid bundle.
- We clean the surface of the rough base from debris, dust to create good adhesion with the future screed after pouring with a solution.
- We lay rolled foil insulation directly with the foil side out over the entire floor area for additional thermal insulation and reflection of heat flow.
- We lay sheets of insulation and adjacent strips tightly butt to each other.
- We glue the resulting seam with metallic tape.
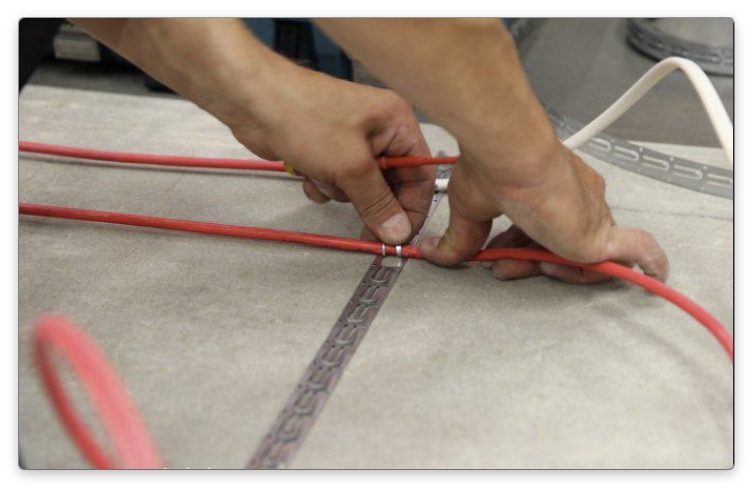
- We lay out the mounting tapes on the floor. We fix it on self-tapping screws, but maintaining a distance between adjacent parallel tapes of 500-1000 mm. If a waterproofing layer is located near the surface of the base of the floor, it is not recommended to screw in self-tapping screws or drill holes for dowels.It is better to cover the floor with a fiberglass reinforcing mesh, which will serve as additional reinforcement for the screed and convenience when unfolding and tying cables.
- We accept the layout of the cable according to the diagram. We fix the couplings. The first fixation is with a mounting film, preventing the tightness from intersecting with the rest of the cable. The cold end of the cable should reach the thermostat. Moreover, it can be placed along the wall, laying between the wall and the foil insulation.
- We lay according to the drawings and the calculated pitch of the cable loop so that the bent antennae or special fasteners on the mounting strips provide reliable fixation.
- We fix the cable in the area of the end sleeve.
- We introduce a temperature sensor with a signal wire into the corrugated tube. The head of the temperature sensor must reach the end of the corrugation of the tube.
- We close the openings of the tube with a cap to prevent the concrete solution from getting inside during subsequent work.
- We install approximately in the middle a tube with a temperature sensor between the turns of the heating cable, fix it.
- We lay a vertical strobe, starting from the corner between the floor and the wall. The distance of the sensor from the wall should be approximately 500 mm.
- We put the mounting cold end of the cable into the gate. There you can place the wires for power supply.
- We close the strobe with a putty mixture or a cement-sand mortar.
- We check the conductivity of the circuit and the resistance levels of the laid cable, which must fully comply with the passport data.
- We connect the mounting conductors of the heating cable to the terminals, according to the thermostat diagram. Further - to the 220V network. The main thing is to tin the cleaned ends of the insulation cable before switching.
- We check the system in operation and before, before cutting through the windows (50x200 mm) between the turns of the cable in the foil insulation.
- To ensure contact of the future screed with the base, we glue the joints of the floor and walls with an elastic damper tape around the entire perimeter of the room.
- We install a system of profile metal beacons.
- We fill the top of the laid cable with concrete mortar. We distribute and level, avoiding the formation of air cavities that can reduce the effectiveness of a warm floor or lead to overheating of the cable.
- We are waiting for the screed to harden and gain strength, holding for about 7 days, moistening with water after 3-4 days and covering with plastic wrap.
- After about a week, you can start priming the surface and laying ceramic tiles.

Film underfloor heating in a frame house. Common User Mistakes
Infrared warm floor in a private frame-type house is an indispensable system. Such heating will allow you to save many times if you approach the installation process and further operation competently, professionally. Few imagine how the installation process and maintenance of heating should ideally go.
It is worth considering typical mistakes in order to know how to avoid them:
- Selection of a heating element over the entire area. It is necessary to carry out calculations taking into account those places where the film will not be installed. Otherwise, you can stay in a cold house;
- Connecting the cable to the network if the screed or adhesive solution has not dried. Is fraught with lethal consequences;
- You can not walk in hard shoes on the film floor. There is a risk of damaging it;
- Do not leave "air pockets" around the warm part of the system.An error is allowed in the case of mounting the infrared floor in tile adhesive.
When installing the structure in a wooden house, you should be extremely careful, and the heating will work properly.
Helpful1Useless
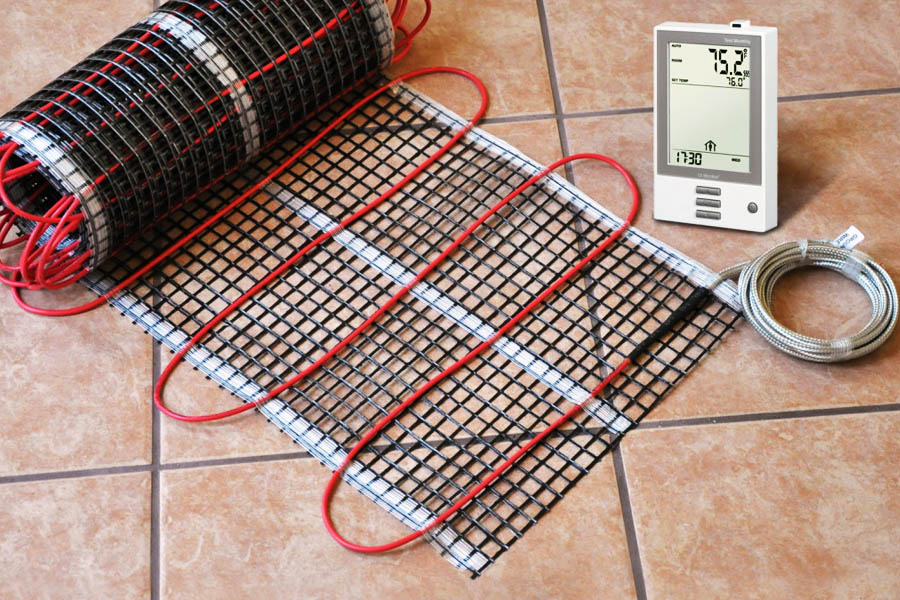
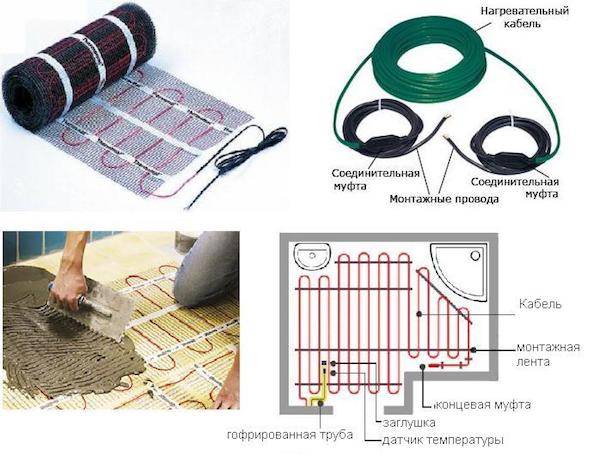
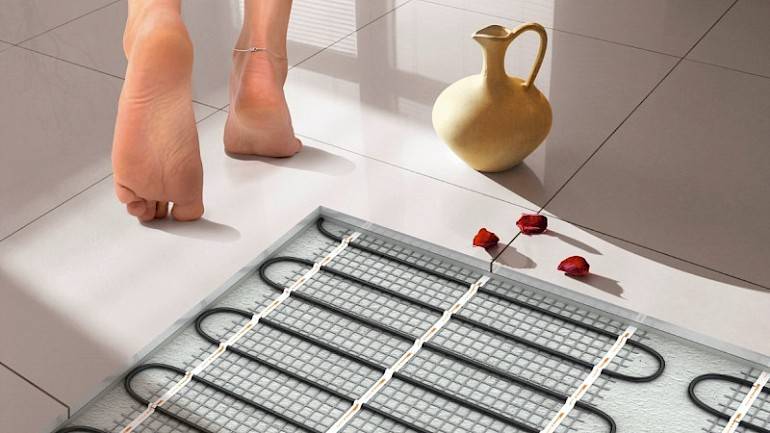
Electric underfloor heating in a screed: how much cable is required
The main parameters of the cable, thanks to which it is possible to calculate the required amount, are the length and the pitch between adjacent loops. These are two values that are calculated based on the S laying area. Other quantities:
- Qs is the amount of thermal energy for heating;
- Qkb - specific thermal power per 1 m of cable length (specific thermal power should be indicated in the technical documentation).
S is calculated after measuring, calculating and summing the areas of the sections where the cable will be laid. The required cable length is calculated by the formula: L = S × Qs / Qkb. After calculating the length, you can determine the distance between the parallel loops and the cable laying step - N \u003d 100 × S / L. where S is the area, L is the length of the cable.
By the way! When calculating the required amount of cable, it is important to understand that it cannot be laid under stationary pieces of furniture. You also need to leave indents from furniture and walls by 50 cm, and from heating appliances (convector, heating risers, radiators) by 100 cm
If the rough base of the floor is cold and the heating system is installed as the main one, then the cable should ideally cover 70-75% of the total area of \u200b\u200bthe room. On sale, the cable is released in standard lengths with already installed couplings (connecting and trailer). So, it is enough to choose the optimal cable length of one or another model range.If the room is too large, the estimated length may be higher. You can also divide the base of the floor in half and for each part make your own cable calculations, taking into account the area of \u200b\u200bthe room, equipping each circuit with its own thermostat during installation.


Reference! Before carrying out the installation of a cable underfloor heating under the tile, it is recommended to make the necessary accurate calculations. First, draw a cable layout diagram, then on a scale and on the basis of laying.
How to calculate underfloor heating
A pre-calculated warm floor and its installation technology make it possible to determine in advance the most optimal pipe laying scheme and calculate the amount of materials needed. For this purpose, a detailed diagram is drawn up, which shows the exact location of all elements.
In this case, the following rules and specifications should be taken into account:
- Places for installation of furniture, plumbing and other heavy objects are determined in advance, after which an installation diagram is drawn up. Pipe laying in these areas is not allowed.
- A circuit consisting of pipes with a diameter of 16 mm must have a length of no more than 100 m, and with a diameter of 20 mm - no more than 120 m. Otherwise, the pressure in the system will be insufficient. Consequently, the area of one circuit averages up to 15 m2.
- Several separate circuits installed in one place should not differ significantly in length. As a rule, they are used in rooms with large areas.
- The distance between the pipes is kept within 15 cm. Such an interval assumes high-quality thermal insulation. With frequent frosts in winter, when the air temperature drops below minus 20 degrees, the laying step is reduced to 10 cm.The distance between the pipes in this case can only be reduced near the outer walls. In the northern regions, additional installation of conventional batteries will be required.
- When calculating, it should be taken into account that the consumption of pipes with an installation step of 15 cm will be about 7 m per 1 m2 of the room, and with a step of 10 cm - 10 meters per 1 square.
The flow density of the coolant depends on its average temperature. The calculation of this value is carried out by dividing the sum of heat losses in a given room (W) by the area with laid pipes (minus the distance from the walls). The average temperature indicator is calculated through its value at the inlet and outlet of the circuit. The difference between them is approximately 5-10C. The heating of the coolant itself should not be higher than 55 degrees.
The total length of the circuit is calculated as follows: the active heating area (m2) must be divided by the laying step size (m). The dimensions of the bends and the distance between the contour and the collector are added to the obtained value. General initial data allow only preliminary calculation of warm floors. More precise adjustments are made on the finished system, where thermostats and a mixing unit are used.
Do-it-yourself installation of a warm floor system - expert advice
To install the system in a private house as successfully as possible, carefully study our instructions.
Installation work consists of several stages and it is very important to follow all the recommendations of experts so that you do not have to start all over again
Water floor installation
Step 1: Substrate Preparation and Thermal Insulation
This will reduce the risk of emergencies in the system.Remove the old coating and, if necessary, make a concrete screed. Be sure to check the result of the work done with the building level. Old private houses are usually famous for "walking" ceilings. In this case, one cannot do without reinforcing mesh application to strengthen the base. Thanks to this, you will avoid various troubles, for example, the formation of cracks.


After that, divide the room into sectors - each of them will contain a separate circuit. Now let's move on to insulation. There are many suitable materials, but a fairly practical option is the use of expanded polystyrene sheets. And to exclude further deformation or expansion during temperature changes, use a damper tape (welted). It is laid at the junction of the floor and walls, as well as at the junctions between sectors around the entire perimeter of the room. Next you need to do the following:
- We lay and form a layer of thermal insulation;
- We put a layer of waterproofing;
- We fix the reinforcing mesh;
- Installing pipes.
Expanded polystyrene plates are adjusted to each other as close as possible. We put waterproofing on top, which can be a dense plastic film. We close the joints between the film with tape. The reinforcing mesh also needs to be fixed in order to eliminate the risk of its shift.
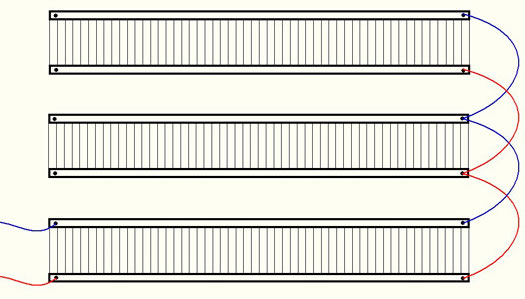
Step 2: We carry out the installation of pipes
Next, you need to fix the pipes on the reinforcing mesh. To do this, you can use special clamps or flexible wire. Be careful not to overtighten while attaching. pipe clamps - during the movement of the coolant, the pipe may move slightly, and tightened clamps will leave traces.You need to start laying from the point (“comb”) that connects the water supply system and the circuit. We fix the extreme end of the pipe on the supply manifold and begin to gradually mount the pipe on the frame, setting the desired radius using a special spring, putting it on the pipe. Thanks to this, you can avoid strong bending of products and their deformation.
We connect the end and the beginning of the contour on the comb, and then draw the next one from the same point. Continue to work until the entire surface is filled. Connect the last part of the pipe to the return manifold. In this case, the number of circuits must exactly match the number of outlets at the collector, so think over the number of circuits in advance. After connecting the heating circuits on the comb, the equipment should be “embedded” into the water supply system.
Step 3: We start the system and fill the screed with our own hands
We have installed the system. However, before pouring the top coat and starting the heating, carry out preliminary hydraulic tests. You can do this with your own hands, without involving specialists: pour water into the pipes under pressure of 0.7 MPa. It is also necessary to inspect the pipes for damage, deformed sections and troubleshoot before pouring the screed and installing the floor covering.
If the testing of the system was successful and you did not notice any failures or any damage, you can start pouring the screed. To do this, set the water pressure to about 3 bar and ensure that the room has a constant room temperature. By pouring the screed, we provide another heat-distributing layer. Having prepared a solution of cement and sand grade M-300 and pour the solution.
Step 4: Finishing the water floor
The last step is laying the finish coat. This is done only after the concrete screed has completely cured. You also need to remember that not all types of coverage are suitable for a warm water floor. It is best, of course, to lay ceramic tiles. But if you want to put parquet or other flooring, check that the packaging is marked "for underfloor heating."
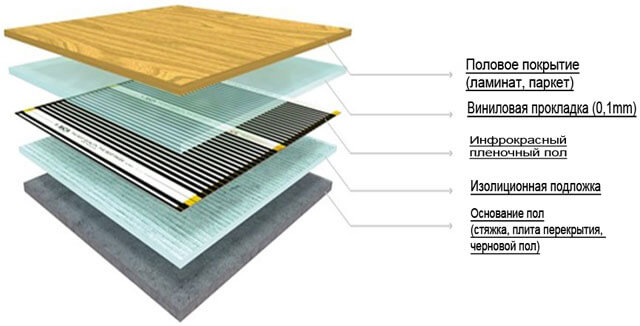
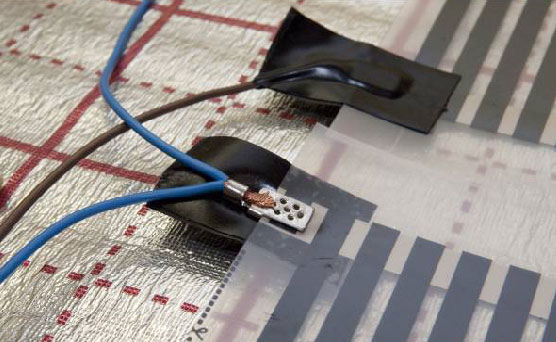
Connection of films among themselves at an infrared heat-insulated floor
Laying an infrared film floor is a painstaking process, but does not require special skills.
The design of the infrared floor heating includes a film heater, which is produced in rolls and has an average thickness of up to 2 mm. Inside the film, between the copper strands, there are strips of carbon, which are heated by the electric current passing through them. On mats, manufacturers apply dotted lines indicating the cut line. Cutting must be done taking into account the furniture in the room: a warm floor is not laid under it.
The strips of film are placed on the floor so that they do not touch each other. Some manufacturers recommend laying mats with an overlap, maintaining a distance between adjacent tires of no more than 1 cm. They are fixed with double-sided tape, which must be removed after installation work.
Operating procedure:
- Laying the substrate around the perimeter of the room - the use of metals in its reflective surface should be excluded;
- Distribution of mats, taking into account the geometry of the room, indented from the walls at a distance of 5-7 cm;
- Installation of power supply fasteners - these are special clips in the form of plates connected at an angle.One plate is inserted into the cavity under the lamination and superimposed on the copper core. The second, with the help of pliers, compresses it from the other side;
- Connecting wires - it is recommended to use two-color. The connection scheme is parallel, that is, the wires are located on one side. It is obligatory to check their tight fastening in the contact clamps and isolation with liquid rubber, which is included in the kit;
- Performing waterproofing of current-carrying parts, to which the terminal with wires will not be connected;
- Setting the thermostat sensor under the heating elements;
- Thermostat connection;
- Test connection of a warm floor with checking each element for heating.
Management of electric underfloor heating in a country house
The system can be zoned, or it can be laid throughout the room. Sometimes there is no need to heat the entire room or you want to heat a certain corner (for example, a workplace) in order to save money. And the constant functioning in one mode will not play into the hands of the equipment. In addition, control is necessary if the whole family leaves home for several days.


The device of electric underfloor heating in a wooden house provides for the installation of temperature sensors and control equipment. These devices will allow you to maintain the desired temperature in the room. Advanced variations will allow you to monitor the operation of the system in automatic mode. So, you can set parameters to warm up the house before coming home from work.
The system is connected to a 220 V network. Cables from the heating element and temperature sensor are connected to the regulator.
Controllers monitor overheating.So, they can work on an emergency power off if a dangerous situation arises. Modern models allow you to connect equipment to a PC, record temperature trends with up to 4 curves. All results can be immediately printed for greater convenience when studying.
Preliminary preparation of the floor surface for the installation of heating cables
The device of an electric warm floor is made on a previously prepared surface. All cracks must be repaired and primed. Such work will allow the heat emanating from electrical cables to be directed into the room itself, as a result, floor slabs will not be heated.
- These works require the manufacture of a new floor screed. It is possible not to carry out such work, but then the heating will go to the neighboring ceiling. The heat will begin to dissipate, it will simply be lost in this mass of concrete.
- The screed, made for the future electric underfloor heating, is like a pie, which has a variety of materials in its composition. At the first stage, the existing floor slabs are covered with waterproofing, for which a polyethylene film is used. Then a thick foam is laid, a metal mesh is placed in the second layer. At the third stage, the laid layers are poured with concrete, the thickness of which exceeds 50 mm.
Types of warm floors
Before you make warm do-it-yourself floor, you need to figure out what types of heating systems are and which ones are more suitable for a particular home.
The main advantages of underfloor heating:
- uniform heating of the room;
- comfort;
- complete autonomy.
The heat generated by these floors is effectively used for space heating.How to choose underfloor heating for your home? There are different types of underfloor heating, so you can only determine which one is better by knowing all their pros and cons. Some of them are heated with hot water (water), while others are heated with electricity (electric). The latter are divided into 3 types:
- rod;
- cable type;
- film.
All floors have their own advantages and disadvantages. So the advantages of water heated floors include:
- lack of air conversion, creating a more comfortable atmosphere in the house;
- relatively low heater temperature;
- lack of damp corners, which prevents the formation of fungus;
- normal humidity in the room;
- ease of cleaning;
- self-regulation of heat transfer when the temperature changes;
- efficiency, allowing to reduce heating costs by 20-30%;
- lack of heating radiators;
- long service life (up to 50 years).
The disadvantages of water floors can only be attributed to the fact that they cannot be used in an apartment building from a central heating system and permission from the housing and communal services services is required for their installation in such buildings.
The advantages of an electric underfloor heating include the same properties as a water floor, but besides this, they still have the possibility of repairing local faults and installation without special equipment and permits.
Warm floor do it yourself
Many people think about whether laminate flooring is suitable for underfloor heating? What materials are used for floor coverings? The disadvantages of such heating systems include:
- Restriction in choosing the type of flooring. This means that its heat transfer coefficient should not exceed 0.15 W/m2K.For a decorative coating of such a floor, tiles, self-leveling floors, granite, marble, linoleum, laminate, carpet, which have a permissive marking, are suitable. Thus, a warm floor under a carpet or under a carpet can be mounted only in compliance with the above requirements.
- The need to raise the floor by 6–10 cm.
- The inertia of heating for 3-5 hours.
- The use of furniture made of natural wood, since products made of MDF, chipboard, plastic, with constant heating, can release substances harmful to humans.
- Quite high financial costs for electricity when installing electric floors.
Taking into account all the above advantages and disadvantages of underfloor heating, it is preferable to install them in small rooms: in the bathroom, corridor, toilet, kitchen, bedroom, on an insulated balcony. Most often, masters lay a warm floor under the tile. This is due to the good heat-conducting characteristics of ceramics. Water floors are more suitable for round-the-clock space heating.
Warm floors are divided into 2 types:
- Comfortable, slightly warming screed, guaranteeing a pleasant feeling when walking. Along with them, other heating systems are also used.
- Heating, when, in addition to creating comfortable conditions, they are full-fledged heating.
For apartments in multi-storey buildings, it is better to use electric underfloor heating, and in private houses - water. A warm water floor rarely gives a specific power of more than 100 W / m2, so this heating should be used in well-insulated buildings.
It is better to entrust the calculation of a water heated floor or an electrical system to specialists, since not everyone will be able to calculate all the necessary indicators in accordance with sanitary standards. Calculate how much a warm floor costs, everyone can independently, using an online calculator.