- What are the types of RCDs and differential automata according to the type of current leakage?
- RCD connection diagram
- The principle of installation of an RCD in a two-wire electrical network
- Video: RCD installation diagram
- RCD connection diagram in a three-wire (three-phase) electrical circuit
- How to connect an RCD without grounding?
- Where to install?
- The process of installing automation in an electrical panel: step by step instructions
- VDT connection diagrams
- RCD adapter
- Wiring diagrams for sockets with RCD
- Single grounded outlet
- Socket connection system through difavtomat
- Single-level system of several sockets
- Non-Recommended No-Ground Circuit
- RCD connection diagrams in a single-phase network
- Connection procedure
- Choice of protection by characteristics
- RCD Installation Instructions
- How to independently connect the RCD?
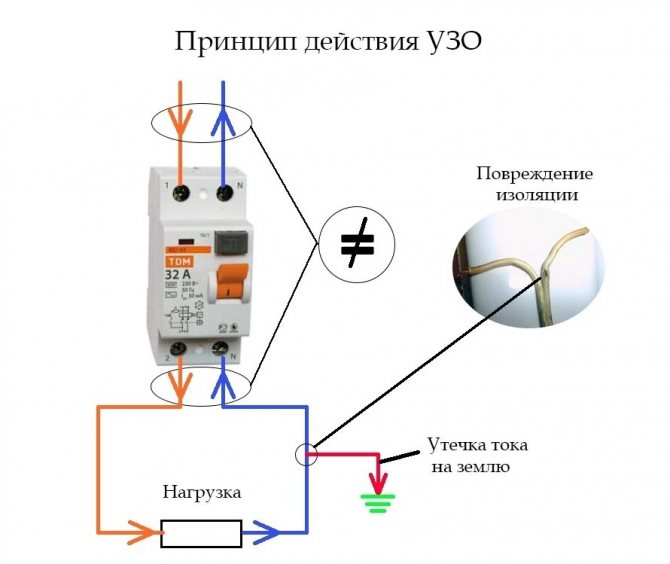
- What is a security connection device
- Possible design options
- RCD installation methods
- Conclusions and useful video on the topic
What are the types of RCDs and differential automata according to the type of current leakage?
In electrical circuits, various types of currents are used, therefore, protective devices are usually divided into classes:
- AC type. This is a common class of devices that have a budget cost, so they are often used in apartments and country houses.They are calculated for the leakage of alternating current, on which most household appliances operate.
- Type A. Allows you to recognize the leakage of both AC and DC. In recent years, manufacturers have begun to produce devices adapted specifically for such RCDs. Switching power supplies are used here to adjust the power. Since these are more reliable devices, they cost a little more than the previous ones.
- Type B. These RCDs also react to the leakage of any current. At the same time, they are often used only at production facilities, in public places. Installing them in an apartment does not make sense.
 The marking by which the class is determined is located on the body of the device
RCD connection diagram
The principle of installation of an RCD in a two-wire electrical network
In the premises of the old layout, two-wire wiring (phase / zero) is used. There is no ground conductor in this circuit. The absence of a ground conductor cannot affect the effective operation of the RCD. A two-pole RCD installed indoors with this type of wiring will work correctly.
The difference between the installation of an RCD with and without grounding is only in the principle of disconnecting the device. In a grounded circuit, the device will operate at the moment a leakage current appears in the network, and in a circuit without grounding, at the moment a person touches the device case, which is under the influence of a current leakage.
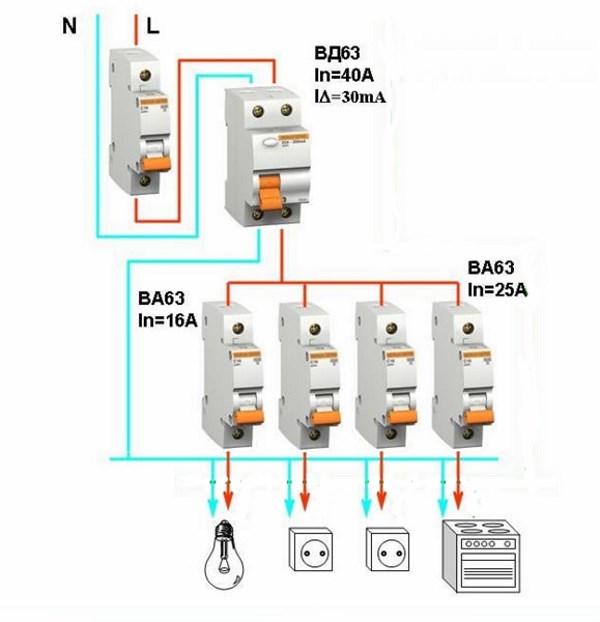
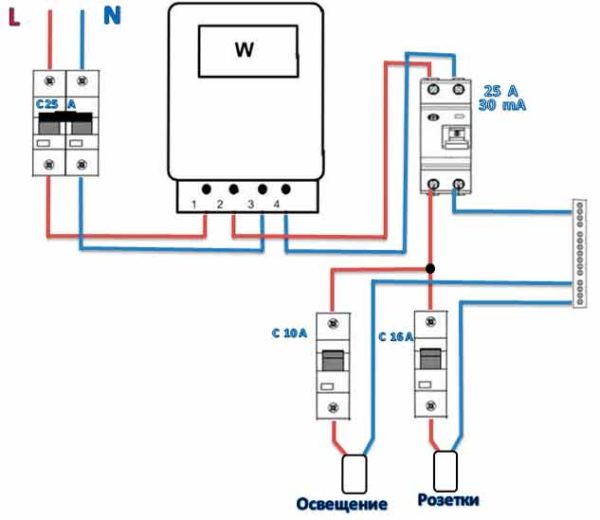
An example of installing an RCD in an apartment with a single-phase two-wire electrical network (diagram):
Option for an apartment with two-wire wiring
The specified scheme is also suitable for one group of consumers. For example, for kitchen electrical equipment and lighting.In this case, an RCD is installed after the introductory circuit breaker, which protects the circuit section and electrical appliances located after it.
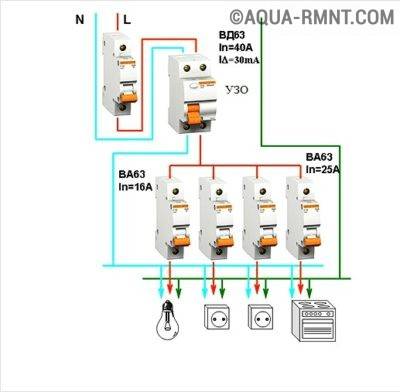
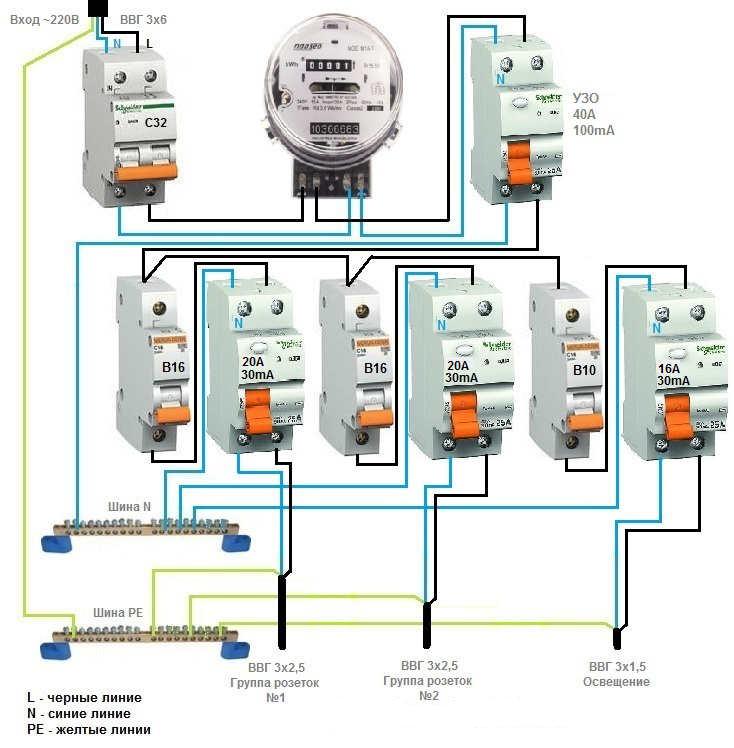
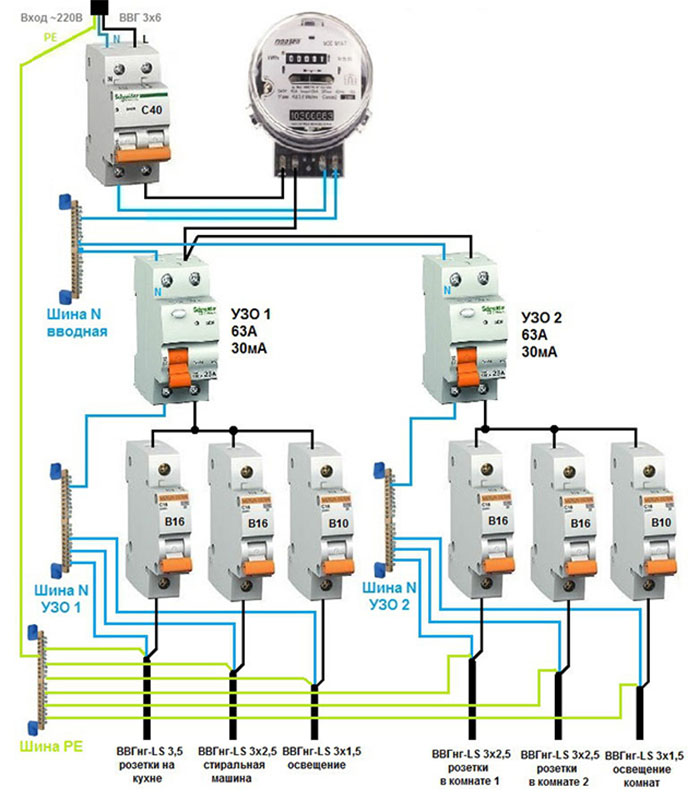
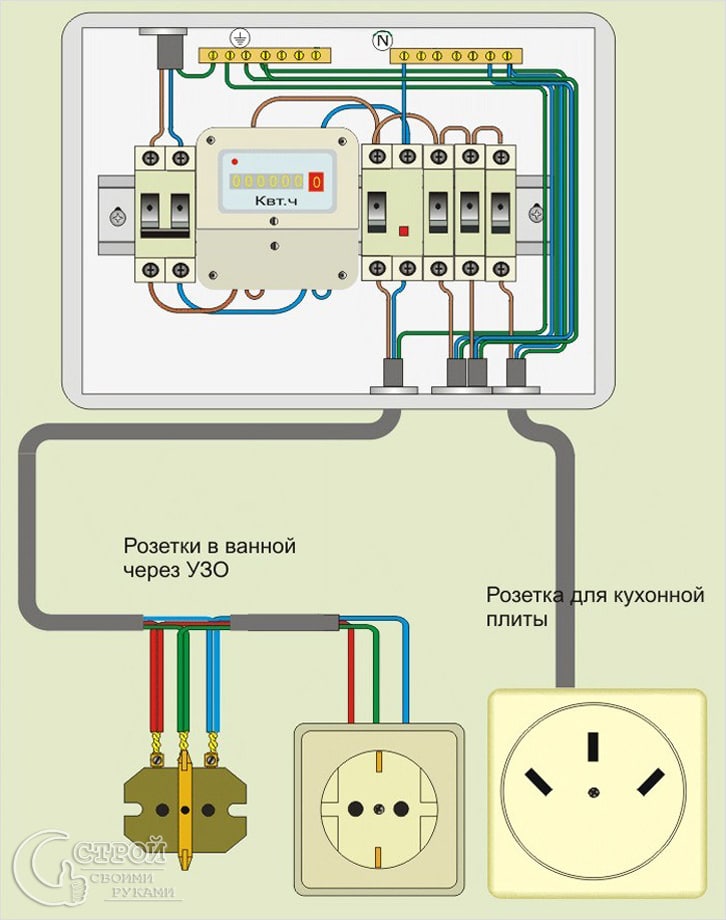
For a two-wire electrical network of a multi-room apartment, it is preferable to install an introductory RCD after the introductory circuit breaker, and from the introductory RCD, branch the wiring to all necessary consumer groups, taking into account their power and installation location. At the same time, an RCD is installed for each consumer group with a lower differential current setting than that of the input RCD. Each group RCD is equipped with a circuit breaker without fail, this is necessary to protect against short circuit current and overload of the electrical network and the RCD itself.
An example of an electrical wiring diagram for a multi-room dwelling, which is protected by residual current devices, is shown in the figure:
Multi-room option
Another advantage of installing an introductory RCD is its fire-fighting purpose. Such a device controls the presence of the maximum possible leakage current in all sections of the electrical circuit.
The cost of installing such a multi-level protection system is higher than that of a system with a single RCD. The undoubted advantage of a multi-level system is the autonomy of each protected section of the circuit.
For an objective understanding of the process of correctly connecting an RCD in a two-wire electrical circuit, a video is shown.
Video: RCD installation diagram
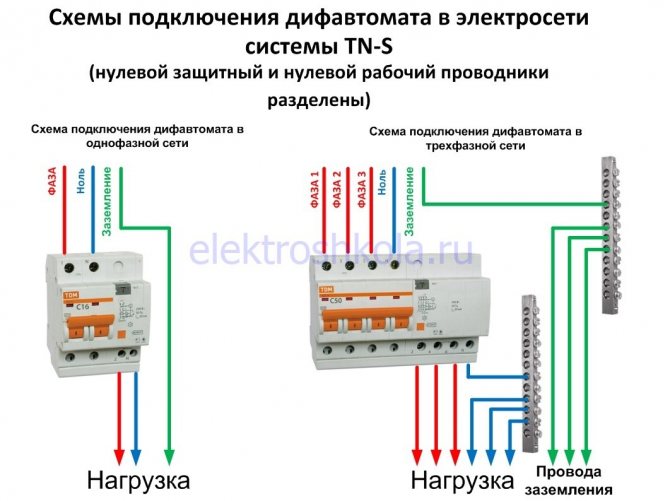
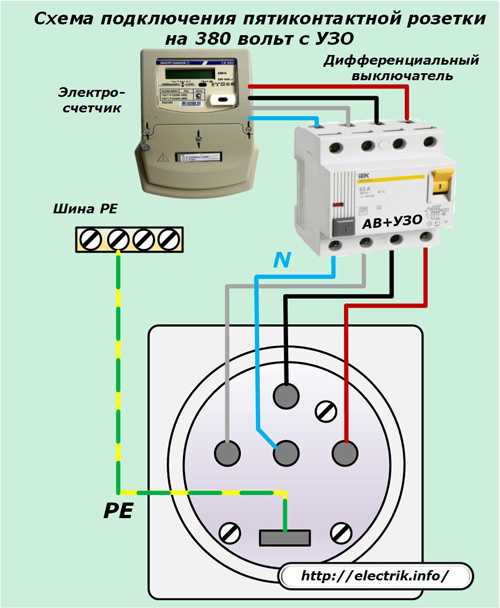
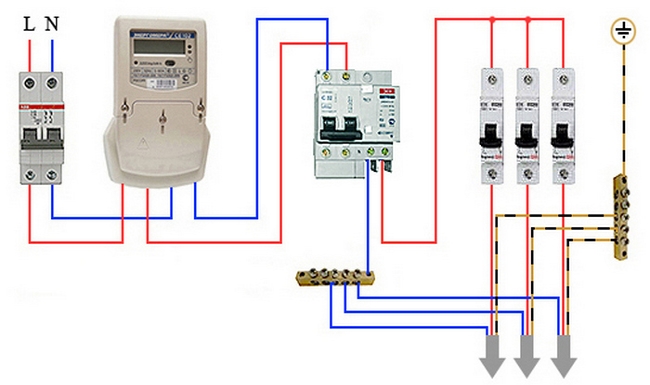
RCD connection diagram in a three-wire (three-phase) electrical circuit
This scheme is the most common. It uses a four-pole RCD, and the principle itself is preserved, as in a two-phase circuit using a two-pole RCD.
Incoming four wires, three of which are phase (A, B, C) and zero (neutral) are connected to the input terminals of the RCD, according to the terminal marking applied to the device (L1, L2, L3, N).
Wiring diagram
The location of the neutral terminal may differ on RCDs from different manufacturers.
It is important to observe the correct connection at the input and output of the device, the correct operation of the RCD depends on this. Otherwise, the order of connecting the phases does not affect the operation of the RCD.
Connection in a three-phase network
For an objective understanding of the RCD connection diagram in a three-phase circuit, a diagram is given - an example.
Multi-level protection
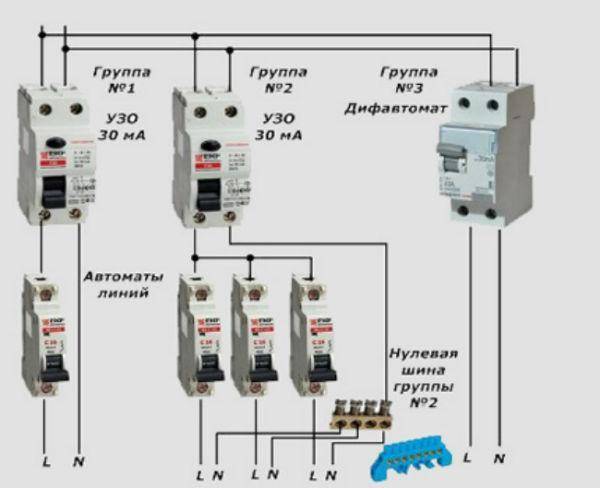
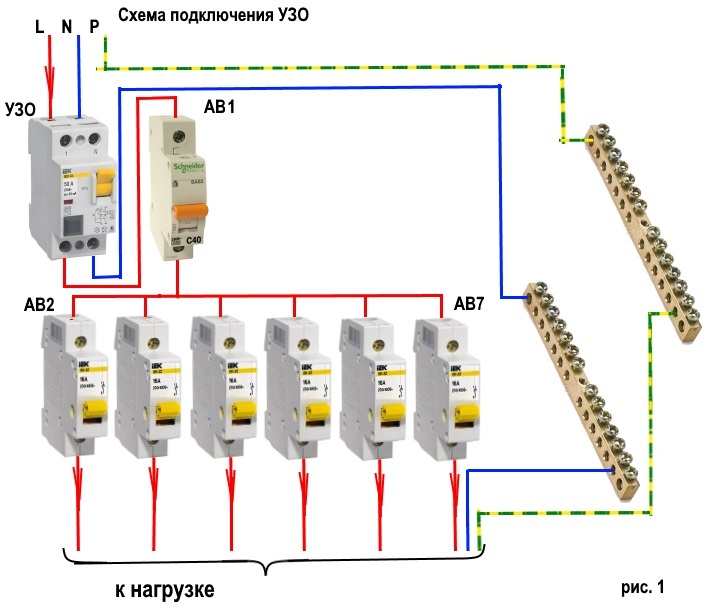
It can be seen from the diagram that the branched electrical circuit after the introductory four-pole RCD is made like a two-wire RCD connection circuit. As in the previous example, each section of the circuit is protected by an RCD from leakage currents, and by an automatic switch from short-circuit currents and from overload in the network. In this case, single-pole circuit breakers are used. Only the phase wire is connected through them. The neutral wire goes to the RCD terminal, bypassing the circuit breaker. It is not necessary to connect neutral conductors to a common node after exits from the RCD, this will lead to false alarms of the devices.


The input RCD in this case has a working current rating of 32 A, and the RCD in some sections has ratings of 10 - 12 A and differential current settings of 10 - 30 mA.
How to connect an RCD without grounding?
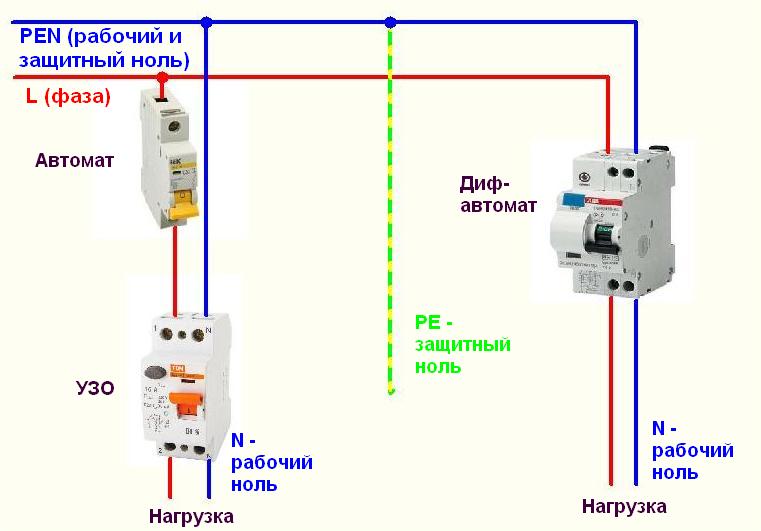
When there is no protective grounding in the apartment, then it is possible to connect the RCD to a two-wire network without degrading its protective parameters.Although it is forbidden to install a common RCD in the TN-C system in the PUE ( ground and neutral are connected) due to a decrease in the probability of its operation by hundredths of a percent. As practice has shown, the RCD does a good job of its task even without protective grounding.
RCD connection diagram without grounding
However, the choice is yours, for me it is better to put an RCD without grounding than to be left without protection, or install a protective ground loop. The RCD protection circuit quickly trips when current passes through the body of a person, a possible short circuit (in this case, a circuit breaker or differential circuit breaker must be installed) and when current leaks through the old wiring insulation.
Where to install?
As a rule, a protective device is installed in an electrical panel, which is located on the landing or in the apartment of residents. It contains many devices that are responsible for metering and distributing electricity up to a thousand watts. Therefore, in the same shield with the RCD there are automatic machines, an electric meter, clamping blocks and other devices.
If you already have a shield installed, then installing the RCD will be easy. To do this, you need only a minimal set of tools, which includes pliers, wire cutters, screwdrivers and a marker.
The process of installing automation in an electrical panel: step by step instructions
Consider the option of assembling an electrical panel for a one-room apartment, a knife switch, a protective multifunctional device will be used here, then an RCD group will be installed (type “A” for a washing machine and dishwasher, because such a device is recommended by the equipment manufacturer).After the protective device, all groups of automatic switches will go (for air conditioning, refrigerator, washing machine, dishwasher, stove, as well as for lighting). In addition, impulse relays will be used here, they are needed to control lighting fixtures. A special module for electrical wiring will still be installed in the shield, which resembles a junction box.
Step 1: first, you need to place all the automation on the DIN rail, in the way we will connect it.
This is how the devices will be located in the shield
In the panel, first there is a knife switch, then an UZM, four RCDs, a group of circuit breakers of 16 A, 20 A, 32 A. Next, there are 5 pulse relays, 3 lighting groups of 10 A each and a module for connecting wiring.
Step 2: Next, we need a two-pole comb (in order to power the RCD). If the comb is longer than the number of RCDs (in our case, four), then it should be shortened using a special machine.
We cut the comb to the desired size, and then set the limiters along the edges
Step 3: Now for all RCDs, power should be combined by installing a comb. Moreover, the screws of the first RCD should not be tightened. Next, you need to take cable segments of 10 square millimeters, remove the insulation from the ends, crimp with tips, and then connect the knife switch to the UZM, and the UZM to the first UZO.
This is what the connections will look like
Step 4: next, you need to supply power to the circuit breaker, and, accordingly, to the RCD with RCD. This can be done using a power cable that has a plug on one end and two crimped wires with lugs on the other.And first you need to insert the crimped wires into the switch, and only then make a connection to the network.
Next, it remains to connect the plug, then set the approximate range on the USM and press the "Test" button. So, it will turn out to check the performance of the device.
Here you can see that the RCD is functioning, now it is necessary to check each RCD (if connected correctly, it should turn off)
Step 5: now you need to turn off the power and continue the assembly - you should power the group of circuit breakers on the center rail with the comb. Here we will have 3 groups (the first is the hob / oven, the second is the dishwasher and washing machine, the third is the sockets).
We install the comb on the machines and transfer the rails to the shield
Step 6: Next you need to move on to zero tires. Four RCDs are installed here, but only two neutral tires are required, because they are not required for 2 groups. The reason for this is the presence of holes in the machines not only from above, but also from below, so we will connect the load to each of them, respectively, and the bus is not required here.
In this case, a cable of 6 square millimeters is required, which must be measured in place, stripped, clamped the ends and connected to the RCD with its groups.
By the same principle, it is necessary to power the devices with phase cables
Step 7: since we have already connected the automation, it remains to power the impulse relays. Connect them together with a cable of 1.5 square millimeters. In addition, the phase of the machine should be connected to the junction box.
This is what the shield will look like when assembled.
Next, you need to take a marker to put down the labels of the groups for which this or that equipment is intended.This is done in order not to get confused in case of further repairs.
Safety precautions when working with RCD and machine
VDT connection diagrams
Power (electricity) can be supplied to both the lower and upper contacts of the RCD - this statement applies to all leading manufacturers of electromechanical RCDs.
Example from the manual for RCD ABB F200
I divide the RCD connection schemes into 2 types:
-
- This is a standard connection diagram, one RCD one machine. Remember that the RCD is selected with a rated current one step higher than the machine? If we have a machine on a 25A cable line, then the RCD should be selected at 40A. Below is an example of an RCD connection diagram for an electric stove (hob).
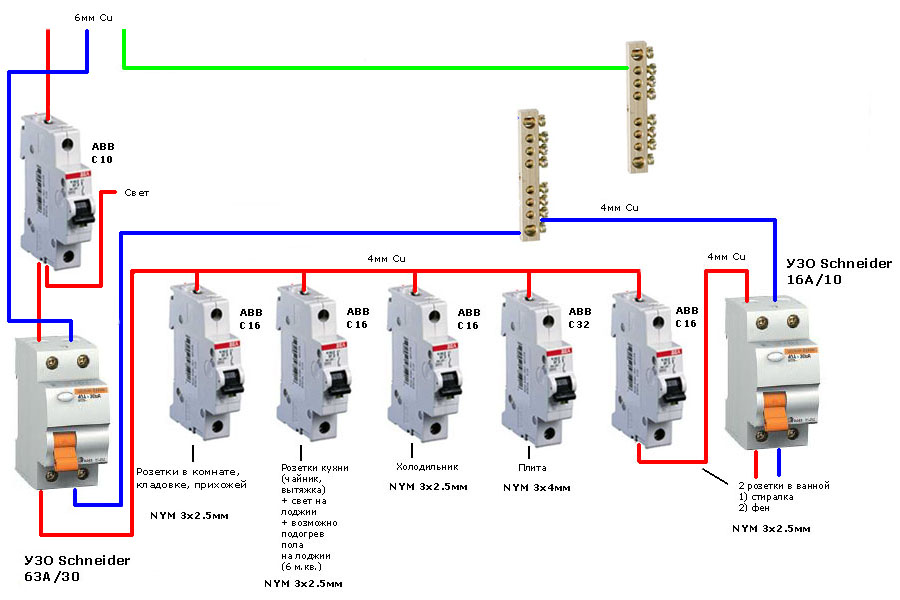
But, if we have an apartment or a private house, where there are 20-30 cable lines, then the shield according to the first connection scheme will be huge, and its cost will come out like a budget foreign car)). Therefore, manufacturers are allowed to install one RCD per group of machines. Those. one RCD for several machines


But here it is important to observe the following rule, the sum of the rated currents of the machines should not exceed the rated current of the RCD. If we have an RCD for three machines, for example, a machine 6 A (lighting) + 16 A (sockets in the room) + 16 A (air conditioning) = 38 A
In this case, we can choose an RCD for 40 A. But you should not “hang” more than 5 machines on the RCD, because. any line has natural leakage currents (cable connections, contact resistances of circuit breakers, sockets, etc.) as a result, you will get the amount of leakages that exceeds the tripping current of the RCD, and it will periodically work for you for no apparent reason.Or if you install an automaton with a lower rated current in front of the RCD, then you can “hook” automata to the RCD without thinking about their rated currents, but, of course, remember that more than 5 automata should not be connected to the RCD, because. the sum of natural leakage currents in cables and devices will be high and close to the RCD setting. Which will lead to false positives. It can be seen from this diagram that the sum of the rated currents of the outgoing automata is 16 + 16 + 16 \u003d 48 A, and the RCD is 40A, but in front of the RCD we have a 25A machine and in this case the RCD is protected from overcurrents. This scheme is borrowed from an article where I changed machines and RCDs in an apartment panel.
Wiring diagram of a three-phase electric motor
Actually, there is nothing complicated about this, for the correct operation of a three-phase RCD, we connect the neutral conductor to the zero terminal of the RCD from the supply side, and from the motor side it remains empty.
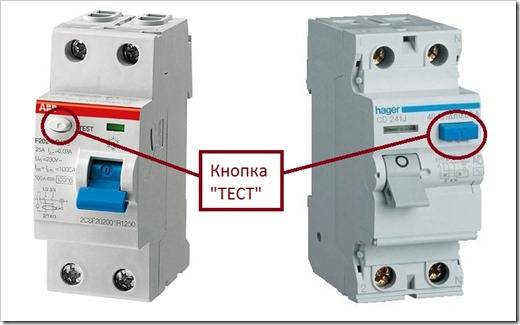
The RCD should be checked at least once a month. This is done quite simply, just press the “TEST” button, which is on any RCD.
The RCD must turn off, this should be done with the load removed, when TVs, computers, a washing machine, etc. are turned off, so as not to once again “pull” sensitive equipment.
I like ABB RCDs, which, like the ABB S200 series circuit breakers, have an indication of the on (red) or off (green) position.
Also, like the ABB S200 circuit breakers, there are two contacts on each pole at the top and bottom.
Thank you for your attention
if (w.opera == "") {
d.addEventListener("DOMContentLoaded", f, false);
} else { f(); }
})(window, document, "_top100q");
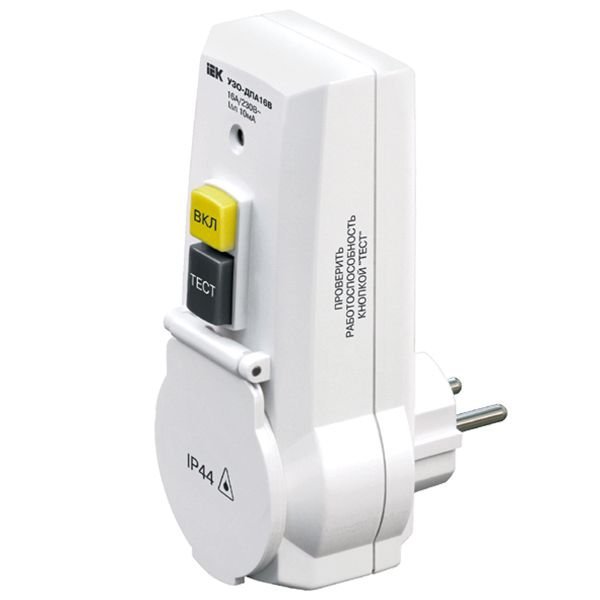
RCD adapter
You can also use a safety shutdown adapter to protect your bathroom appliances. The advantage of this method is that it will no longer be necessary to intervene in the design of the electrical wiring. You can connect this device to any connector that is present in the room.
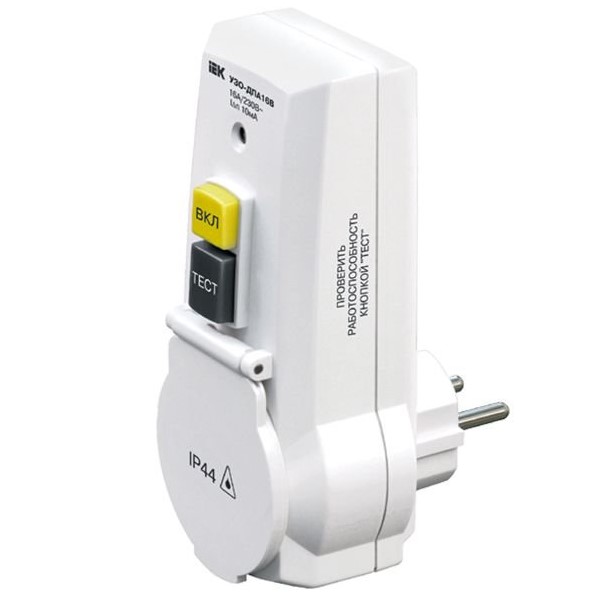
Residual Current Adapter
Most adapter models can have a low degree of protection against moisture and dust, and this is a drawback. Although in specialized stores you can find an adapter with a built-in RCD that has IP44 protection. This degree of protection allows the device to be used in a bathroom.
Wiring diagrams for sockets with RCD
Ways to connect sockets with a built-in RCD may be different. They depend on the number of connected devices, the location of the wires and the presence of a ground bus.
It is important to connect the outlets in the house in such a way as to ensure maximum safety for residents and comply with all electrical regulations.
Single grounded outlet
The simplest scheme for embedding an RCD socket into a home electrical network includes only one device. Not only the phase and zero are suitable for it, but also the ground wire. Such a scheme allows for double protection of a person.
The single socket circuit is the simplest and cheapest. If necessary, any household appliances can be connected to it through an extension cord.
Grounding serves as a passive way to protect a person from electric shock when in contact with a energized household appliance. In this case, the main flow of electrons goes into the ground, but the person is still endangered.A protective shutdown device eliminates almost all health risks in the above situation.


The main advantage of a grounded circuit is the ability for the current to flow seamlessly into the ground, which will lead to an instantaneous operation of the RCD. In the absence of such a leak, the conductor will be a person who comes into contact with the energized surface. This may result in a sensitive electric shock.
Socket connection system through difavtomat
The two-level system of RCD and difavtomat is optimal in terms of convenience. A common differential machine provides additional protection for the entire apartment not only from leakage current, but also from network overloads and short circuits. This scheme is recommended for use in residential premises with highly branched wiring.
It is advisable to install an additional RCD in the form of a socket in case of frequent power outages when a general-apartment difavtomat is triggered due to one household device
When the electrical mechanism of the outlet is triggered, it will be turned off without de-energizing the entire apartment, while the rest of the rooms will remain under backup protection.
A difavtomat may have the same threshold current as an outlet with an RCD, or maybe more (100 mA). With its same value, both devices connected in series can be knocked out simultaneously. The advantages of connecting the outlet to ground remain the same as in the previous circuit without a difavtomat.
Single-level system of several sockets
When several sockets with RCDs are connected to the network, the principle of their operation does not change.Each device ensures the safety of the use of household appliances connected to it.
Sockets with RCDs, of course, increase the safety of using household appliances, but from a financial point of view, such a scheme is impractical
Such a circuit is mounted quite simply and does not require the installation of a common difavtomat or RCD. The advantages of grounding connections remain the same as in the previous considered options.
The differences in the principles of operation of the RCD and the differential machine are given in the article, the contents of which we recommend that you familiarize yourself with.
The only disadvantage of a system of several outlets is their cost, because you will have to pay a considerable price for each device. An alternative to this option is to install one RCD for the entire room.
Non-Recommended No-Ground Circuit
The schematic diagram for connecting sockets with RCDs in the absence of grounding is almost the same as the two-level and single-level options proposed above. The difference is only in the absence of a wire, which ensures the removal of current from the housing of the household appliance if its electrical insulation is damaged.
The connection diagram of a socket with an RCD without grounding can be used both in the presence of a common difavtomat and in its absence
In fact, the vast majority of houses and high-rise buildings were not equipped with grounding until 2000, so this connection scheme is the most common. However, there is a hidden danger in it - the absence of contact between the housing of the household appliance and the "ground".
This fact is not only a problem for human health, but also has a negative impact on the performance of microcircuits in household appliances.Therefore, the presence of a ground bus in home wiring is extremely necessary and desirable.
RCD connection diagrams in a single-phase network
The industry produces residual current devices designed to operate in a single-phase or three-phase network. Single-phase devices have 2 poles, three-phase - 4. Unlike circuit breakers, neutral conductors must be connected to disconnecting devices in addition to phase wires. The terminals to which the zero conductors are connected are designated by the Latin letter N.
To protect people from electric shock, RCDs are most often used that respond to leakage currents of 30 mA. In damp rooms, basements, children's rooms, devices set to 10 mA are used. Disconnecting devices designed to prevent fires have a trip threshold of 100 mA or more.
In addition to the trip threshold, the protective device is characterized by a rated switching capacity. This term refers to the maximum current that the breaking device can withstand indefinitely.
Watch this video on YouTube
An important condition for the reliable functioning of protection against leakage currents is the grounding of metal cases of electrical apparatus. TN grounding can be done with a separate wire or through the grounding contact of the mains socket.
In practice, two methods are used to include residual current devices in an electrical circuit:
- RCD connection diagram with individual protection;
- group consumer protection scheme.
The first switching method is most often used to protect powerful consumers of electricity.It can be applied to electric stoves, washing machines, air conditioners, electric heating boilers or water heaters.
Individual protection provides for the simultaneous connection of the RCD and the machine, the circuit is a serial connection of two protective devices. They can be placed in a separate box in the immediate vicinity of the electrical receiver. The choice of the disconnecting device is carried out according to the rated and differential current. It will be better if the rated breaking capacity of the protective device is one step higher than the rating of the circuit breaker.
With group protection, a group of automata supplying different loads is connected to the RCD. In this case, the switches are connected to the output of the leakage current protection device. Connecting an RCD in a group circuit reduces costs and saves space in switchboards.
In a single-phase network, the connection of one RCD for several consumers requires the calculation of the rated current of the protective device. Its load capacity must be equal to or greater than the sum of the ratings of the connected circuit breakers. The choice of the differential protection threshold is determined by its purpose and the hazard category of the premises. The protective device can be connected in the switchboard in the stairwell or in the switchboard inside the apartment.
The scheme for connecting RCDs and machines in an apartment, individual or group, must comply with the requirements of the PUE (Electrical Installation Rules). The rules unequivocally prescribe the grounding of electrical installations protected by RCDs. Failure to comply with this condition is a gross violation and may lead to negative consequences.
Connection procedure
First of all, you should take care of observing all the required safety measures when performing this type of work.
Turn off the power supply at the installation site, provide the process with a serviceable tool.
Then you have to follow a number of rules when performing electrical work:
Installation is carried out strictly according to a previously prepared scheme.
The device is mounted inside the electrical panel next to the machines.
The device fixed in the shield is connected to other components through conductors with a cross section of at least 2.5 mm (copper)


It is important to use the connection diagrams printed on the body of the protective device.
After completing the installation and wiring of conductors, check the correctness of the connections and apply power to the site.
Check the operation of the device by activating the "Test" button. As a rule, a correctly selected device successfully passes the test mode
As a rule, a correctly selected device successfully passes the test mode.
If this did not happen, the device did not work, which means that the calculations were performed incorrectly or there are any defects in the device circuit. Then the RCD should be replaced.
Choice of protection by characteristics
Choosing an RCD for leakage current:
- 30mA for introductory RCD (for the whole house);
- 30mA for protection of socket groups;
- 10mA for a children's room, individual consumers (if installed separately on a washing machine, refrigerator), for a bathroom or rooms with high humidity.
Devices with a leakage current of 50 mA or more are not used to protect against human injury (the body will not withstand even 50 mA), but as fire protection.
Tripping characteristic (marked on each device):
- AC - devices that respond only to a sinusoidal (alternating) leakage current. Such RCDs are cheap, but less effective.The proof is that in European countries devices for protection with AC class are not used.
- A - reacting to AC and DC leakage in devices with electronic converters. Universal look. Install for networks that power computers, washing machines and dishwashers, as the first type may not be effective for them. They cost a little more than AC.
One high-quality RCD is better than several low-quality ones - we have already talked about this above
Therefore, we recommend focusing on such manufacturers as:
- ABB - F200 series (type AC) and FH200 (type A), rated current 16-125 A, sensitivity 10, 30, 100, 300, 500mA, cable cross section up to 35 mm2.
- Eaton (Moeller) - PF4, PF6, PF7 and PFDM series (up to 63 A, maximum leakage current for fire protection 300mA, for protection against human injury 30mA).
- ETI - EFI6-2 series (up to 63 A, for protection against damage up to 30mA).
- Hager about 10 series (CDA CDS, FA, CD, etc.) with and without self-clamping terminals, one, two, three and four poles and the same number of contacts.
All presented models of RCDs are on sale in the online store of electrical engineering.
We thank the electrical company Axiom-Plus for their help in preparing the material.
Further on the video you can find out how to properly connect the RCD.
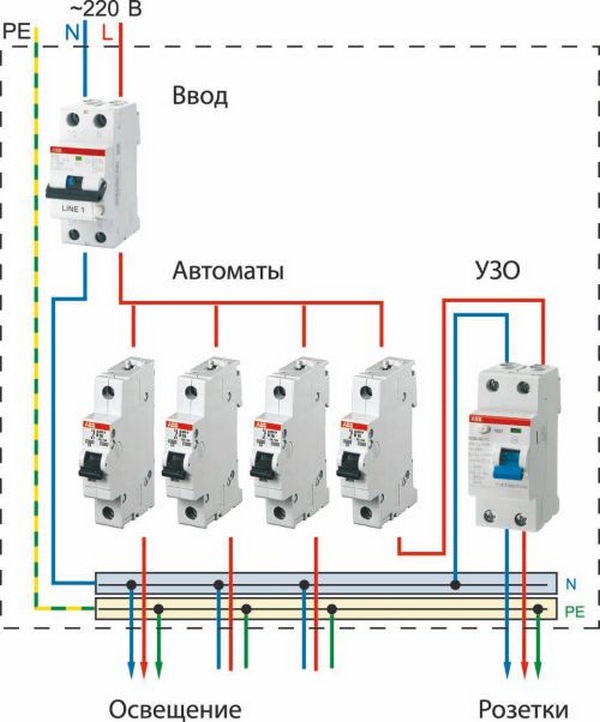
RCD Installation Instructions
First you need to choose a place to mount the device. 2 options are used: a shield or a cabinet. The first resembles a metal box without a lid, fixed at a height convenient for maintenance.
The cabinet is equipped with a door that can be locked.Some types of cabinets have openings so that you can take meter readings without opening the door on purpose and turn off the devices.
Protective devices are fixed on mounting DIN rails arranged horizontally. The modular design of automata, difavtomatov and RCD allows you to place several pieces on one rail
The neutral wire is always connected to the left terminals at the input and output, and the phase wire is connected to the right terminals. One of the options:
- input terminal N (upper left) - from the input machine;
- output N (lower left) - to a separate zero bus;
- input terminal L (upper right) - from the input machine;
- exit L (lower right) - to group machines.
By the time the protective device is installed, circuit breakers may already be installed on the switchboard. To arrange the arrangement of devices and wires, you may have to rearrange the devices in a certain order.
We present an example of installing an introductory RCD in an electrical cabinet, where there is already a meter, an introductory machine and several circuit breakers for individual circuits - lighting, socket, etc.
Never connect an RCD at the input - it always follows the general input circuit breaker. If a counter is used the residual current device moves to the third position from the entrance.
Description of the connection process:
- we install the device on a DIN rail to the right of the machine - just attach it and press with a little effort until it clicks;
- we stretch the cut and stripped wires from the machine and the zero bus, insert them into the upper terminals according to the diagram, tighten the fixing screws;
- in the same way, insert the wires into the lower terminals and tighten the screws;
- we test - first we turn on the general machine, then the RCD, press the "Test" button; when pressed, the device should turn off.
To make sure the connection is correct, leakage current is sometimes staged. They take two working wires - "phase" and "ground", at the same time they bring the electric lamps to the base. There is a leak, and the device should work immediately.
How to independently connect the RCD?
The lethal current for humans is 0.1A. The last step is to check the RCD itself, which is carried out by pressing the test button.
A breakdown of this device occurs when the value of a single-phase electric current of operating parameters is exceeded. They will have the same rated operating voltage - V or V.
In home wiring, it is practiced to use a device with a mA cutoff current. It will provide protection against voltage overloads and short circuits, while the RCD will monitor the absence of current leakage, thus obtaining a combined protection.
This can protect against electric shock and save health or life. Decide on the diagram whether you will have a residual current device on a separate line or after the meter.
Unforgivable Movie Mistakes You Probably Never Noticed There are probably very few people who don't like watching movies. The lethal current for humans is 0.1A. It is advisable to carry out a check using the button at least once a month. The video shows how this is done in practice.
What is a security connection device
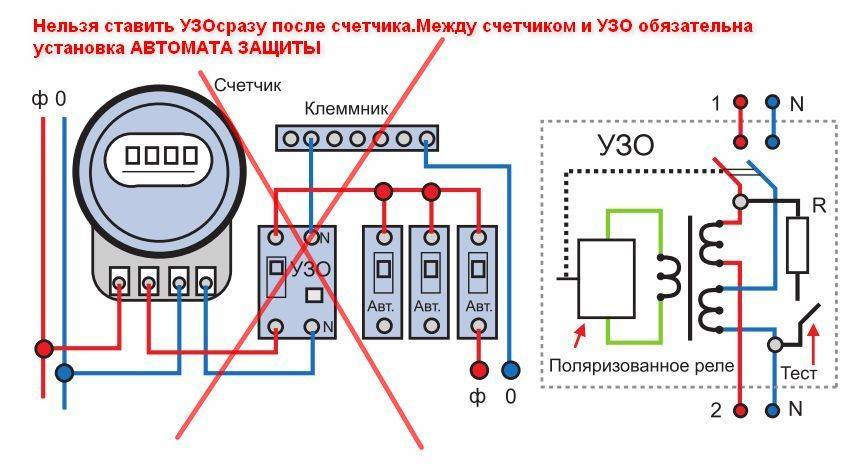
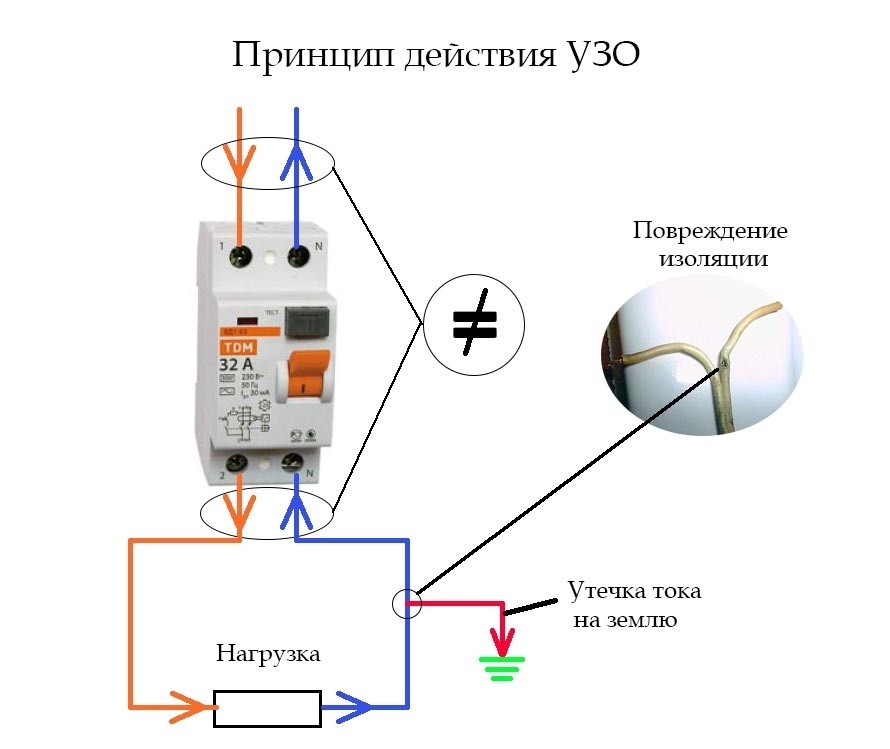
The disadvantage of the scheme is the difficulty in finding the damage site.Residual current device from the inside The principle of operation of the RCD is that if there is a current leakage in the wiring, its value along the conductors of the phase and zero will be different.
The second value will be the differential current, upon reaching which, the protection will operate. A negative point in the functionality of this device is the reaction directly to the manifestation of leakage current, regardless of the source of occurrence. This will also lead to malfunctions. So that high currents at the time of the accident do not have a negative impact on the residual current device, it must be connected to the circuit together with the machine. How to look younger: the best haircuts for those over 30, 40, 50, 60 Girls in their 20s don't worry about the shape and length of their hair.
Such a scheme is not dangerous, but the RCD will not function with it, since its principle of operation will be violated. After the counter, connect the RCD. A grounding bar must be installed.
Three-phase RCD working principle. How a three-phase RCD works


Possible design options
In a combination of a socket and an RCD, both devices are equivalent. It is difficult to determine the main role of any of them. Therefore, outwardly, they can be a socket with an RCD or an RCD with a socket.
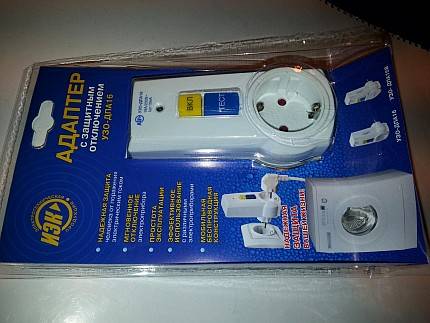
The protective adapter is attractive for its low price and ease of use. It can always be moved to another room to connect the desired device
The design of these devices can be as follows:
- module built into the socket;
- monoblock adapter inserted into a simple socket;
- module mounted on a DIN rail.
In fact, these devices are two independent devices connected within the same design.Their functionality is the same, so the main selection criterion is the convenience of a particular model in a particular situation.
RCD installation methods
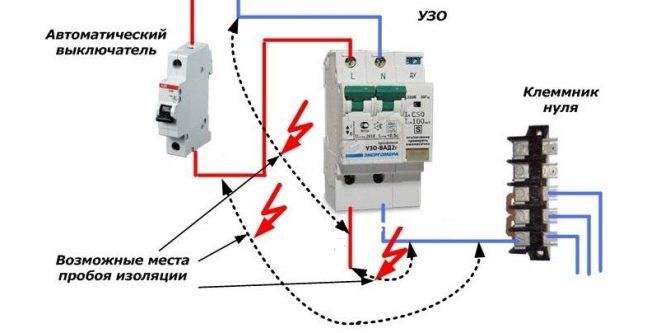
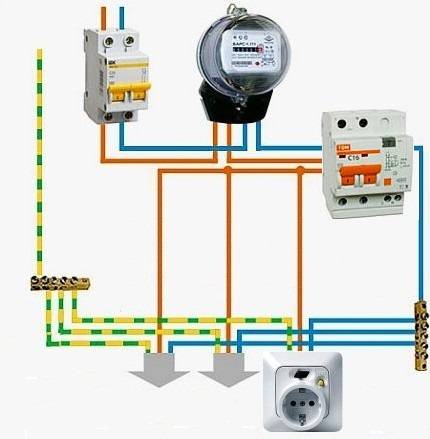
There are two ways to install the device. The first option involves the installation of a common RCD in the wiring diagram, immediately behind the meter and the machine. With one general RCD for apartment or house, it is very difficult to find a place for current leakage through wire insulation. Such a violation of insulation must be sought throughout the apartment or cottage.
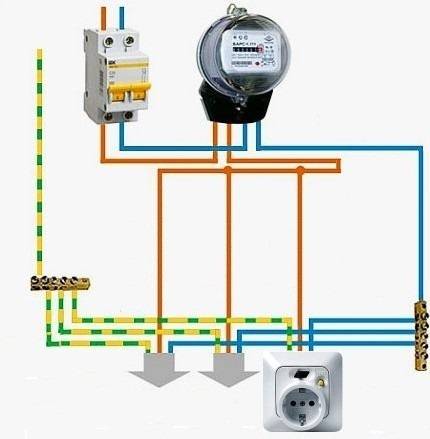
A variant of the wiring diagram with a common RCD and protective earth in a single-phase network
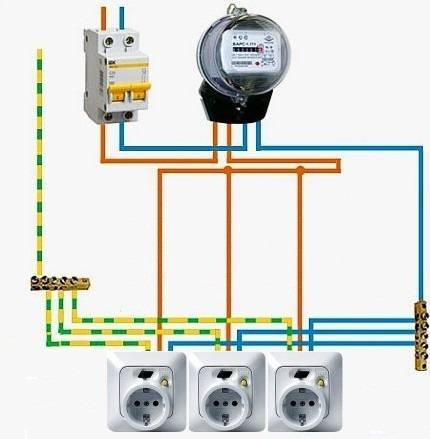
In this case, the RCD will de-energize the entire apartment. In another option, several RCDs are installed, separately for each direction of the electrical wiring, in the living room, kitchen, bedroom and nursery. Such a scheme of separate electrical wiring in the rooms is assembled in the electrical panel in the hallway.
Several RCDs are installed in the same electrical panel. This option is of course expensive, but it has some advantages. Firstly, when the RCD is triggered, the network will be turned off in only one direction, and in the other part of the apartment, the network voltage will remain. In one room it will be easier to look for damage to electrical wiring.
Variant of the wiring diagram with a separate RCD for sockets and protective earth in a single-phase network
In a children's room, a separately connected RCD device will protect children from touching a dangerous outlet faster than in the general RCD option. For the children's room option, an RCD is installed with a trip current of less than 10 mA. In the bathroom, or in the kitchen, where the washing machine is located, you need to install an RCD with a large trip current value (300mA - 500mA), because an RCD with a trip current of 10 mA will constantly turn off the kitchen.
RCDs are selected according to the optimal current for all loads in amperes. The response time of the RCD - a high-quality device - is up to 0.1 seconds, during which time no electric shock is felt. The protection device must be checked for operability by pressing the RCD test button once a month and after each emergency operation.
Conclusions and useful video on the topic
The video tells about the nuances and shows the details of connecting a protective device in the operating conditions of electrical wiring made according to the TN-C system.
Intelligible explanations of the author about the operation of the RCD in such conditions and practical demonstrations:
At the end of the review material of possible circuit configurations with RCDs, it is necessary to note the relevance of using these devices. The introduction of residual current cut-off devices is a significant increase in the level of safety when using electrical networks. The main thing is to choose and correctly connect devices.
If you have experience connecting RCDs to single-phase networks without grounding, please share it with our readers
Tell us what points you need to pay attention to, maybe you know some subtleties of connection that we did not mention in our material? Leave your comments and ask questions in the block under the article


