- Making a gas burner from improvised materials in stages
- How to make a nozzle and a handle
- How to improve flame control
- How to choose the right cabinet for gas cylinders
- Product Placement and Appearance Tips
- Connection module and filter
- Use of torches for hard soldering and brass soldering
- Gas valve troubleshooting guide
- Connecting equipment
- Choosing a location for the balloon
- The process of connecting to a gas stove
- Accession to the cylinder
- Leak test
- Existing connection types
- System Connection Standards
- Basic storage requirements
- At home
- At the enterprise
- At construction sites
- What is a propane reducer?
- Required pressure and volume
- How does a cylinder reducer work?
- 1 Direct reducer
- Membrane
- 2 Reverse gear
- Meaning?
- Related video
- Screwing on the new shut-off valve
Making a gas burner from improvised materials in stages
List of materials and tools:
• drill;
• Bulgarian;
• a hammer;
• sandpaper;
• blanks made of brass for the splitter nozzle;
• thin brass tube with a diameter of 15 mm;
• wooden blocks;
• vise;
• silicone sealant or FUM-tape;
• hoses for connection;
• valve for adjustment.
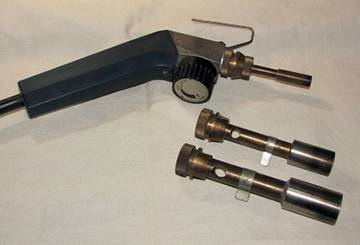
How to make a nozzle and a handle
First of all, we take a brass tube and attach a handle to it - for example, from an old burner, or from a wooden block, having processed it before that. In the bar, we drill a hole for a brass tube with the appropriate diameter. Putting the tube into the timber, we fix it with silicone or epoxy.
Next, we proceed to a more time-consuming and lengthy stage of work - the manufacture of the nozzle. The hole size should preferably be 0.1 mm.
With a drill, you can make a slightly larger hole, and then adjust the edges to 0.1 mm. The hole must have the correct shape so that the flame is even.
After that, we fix the workpiece in a vise, take a hammer and carefully, in a vertical plane with a “branch” to the middle of the workpiece, strike the future nozzle. We evenly scroll the product to form an ideal hole.
Then we take sandpaper with fine grit and skin the nozzle head. To connect to the tube, a thread is applied to the back of the product, and the elements can also be simply soldered - but in the future the repair of parts will be more difficult.
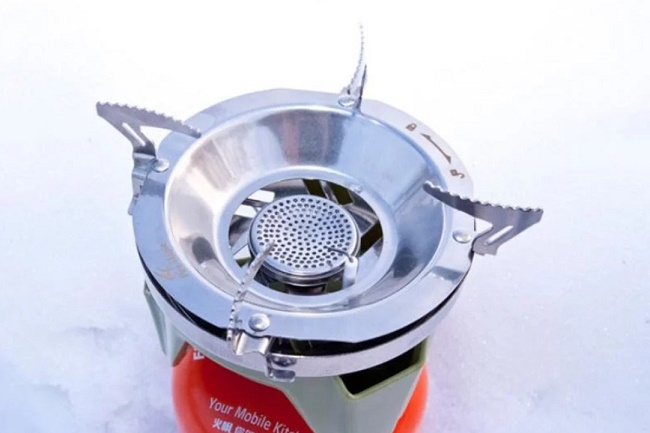
Now we attach the device to the gas cylinder and set it on fire - the do-it-yourself burner is ready to go. However, here you can see that to adjust the gas flow, you can only open and close the valve of the gas cylinder, and in this way it is very difficult to obtain the desired flame. What we can do?
How to improve flame control
For the normal operation of our home-made unit, we will install a divider and a crane on it. It is better to mount the faucet near the handle, at a distance of about 2–4 cm, but it can also be mounted on the inlet pipe. As an option, take a burner tap from an old autogen or another similar tap that is threaded.To seal the connection, we take the FUM tape.
The divider is installed on a pipe with a nozzle, it is made of brass, diameter 15 mm. The best option is a cylindrical part, where there is a hole for a tube with a nozzle. If it doesn't exist, do this:
1. We take a brass pipe with a diameter of 35 mm and cut off a piece of 100–150 mm.2. We take a marker, step back from the end and mark 3-5 points, with an equal distance between them.3. We drill holes of 8–10 mm in the pipe, take a grinder and make cuts to them evenly.4. We bend everything to the center and weld it to the burner pipe.
How to choose the right cabinet for gas cylinders

The box is made with some design features that perform important functions:
- gas does not heat up under the sun;
- protects against unauthorized entry;
- in the event of an explosion, the steel on the side walls will stop the fragments;
- prolongs the service life of the cylinder, protecting it from adverse weather conditions, corrosion;
- carries explosive material away from the place of residence.
In exchange for these important advantages, the cabinet will require little maintenance: lubrication of the hinges on the door, periodic painting in the original color, since the maintainability of the product is at a height that allows it to be used for many years.
The design provides for the presence of one or more doors with a key lock. The criteria for choosing one or another option depend on the number of cylinders that you intend to use.


It is important to pay attention to the presence of vents, this detail is an important part of the product for the safe storage of cylinders, as a rule, they are located on the top or bottom, preventing gas accumulation in the event of a leak.Another point that affects the functionality is that you are offered a one-piece cabinet or a prefabricated one, one or another option affects the convenience when transporting the product to the place of operation. Dimensional boxes, basically, have a collapsible design
Dimensional boxes, basically, have a collapsible design
Another point that affects the functionality is that you are offered a one-piece cabinet or a prefabricated one, one or another option affects the convenience when transporting the product to the place of operation. Overall boxes, basically, have a collapsible design.
For the production of cabinets, steel sheets up to 1.5 mm thick are used. A large thickness can unnecessarily increase the weight of the box. Powder paint is applied over the metal, it protects from exposure to elevated temperatures and humidity.
It is important to mention what colors the cabinets come in, as they are often the same color as the cylinders, oxygen is blue, helium is brown, and so on. Hazard warning signs posted in a conspicuous place
Check if the product has stiffeners that fix the structure.
Before purchasing equipment, determine the size of the cylinder that will be used. Purchase a box according to its dimensions. The normal height of the product is 1 - 1.5 m. Plan the location of the reducer, pressure stabilizing device, if installed, additional space will be required. The bottom area is usually 43 * 40 cm, 43 * 80 cm, depending on the number of cylinders.
Product Placement and Appearance Tips

The equipment should be located on the north side of the building, in the shade, no closer than 5 m from the entrance to the house. Such planning is a guarantee of safer operation.It is advisable to make a small foundation, which will be slightly larger than the size of the bottom. The gas tank is secured with a clamp that will prevent it from tipping over.
The door must be reliable, not creak, have a smooth ride
Particular attention should be paid to the fastening of the hinges. The cabinet has large dimensions, can ruin the design, do not fit into the yard
In this case, repainting it in an acceptable color for giving will help.
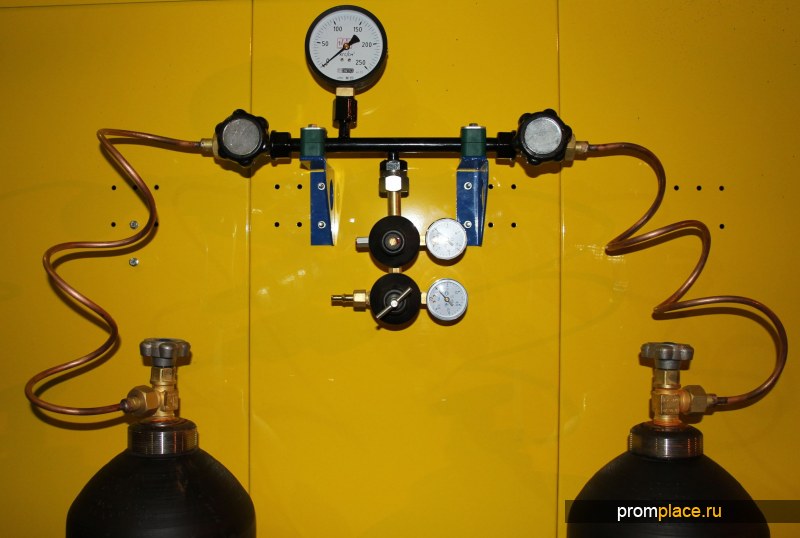
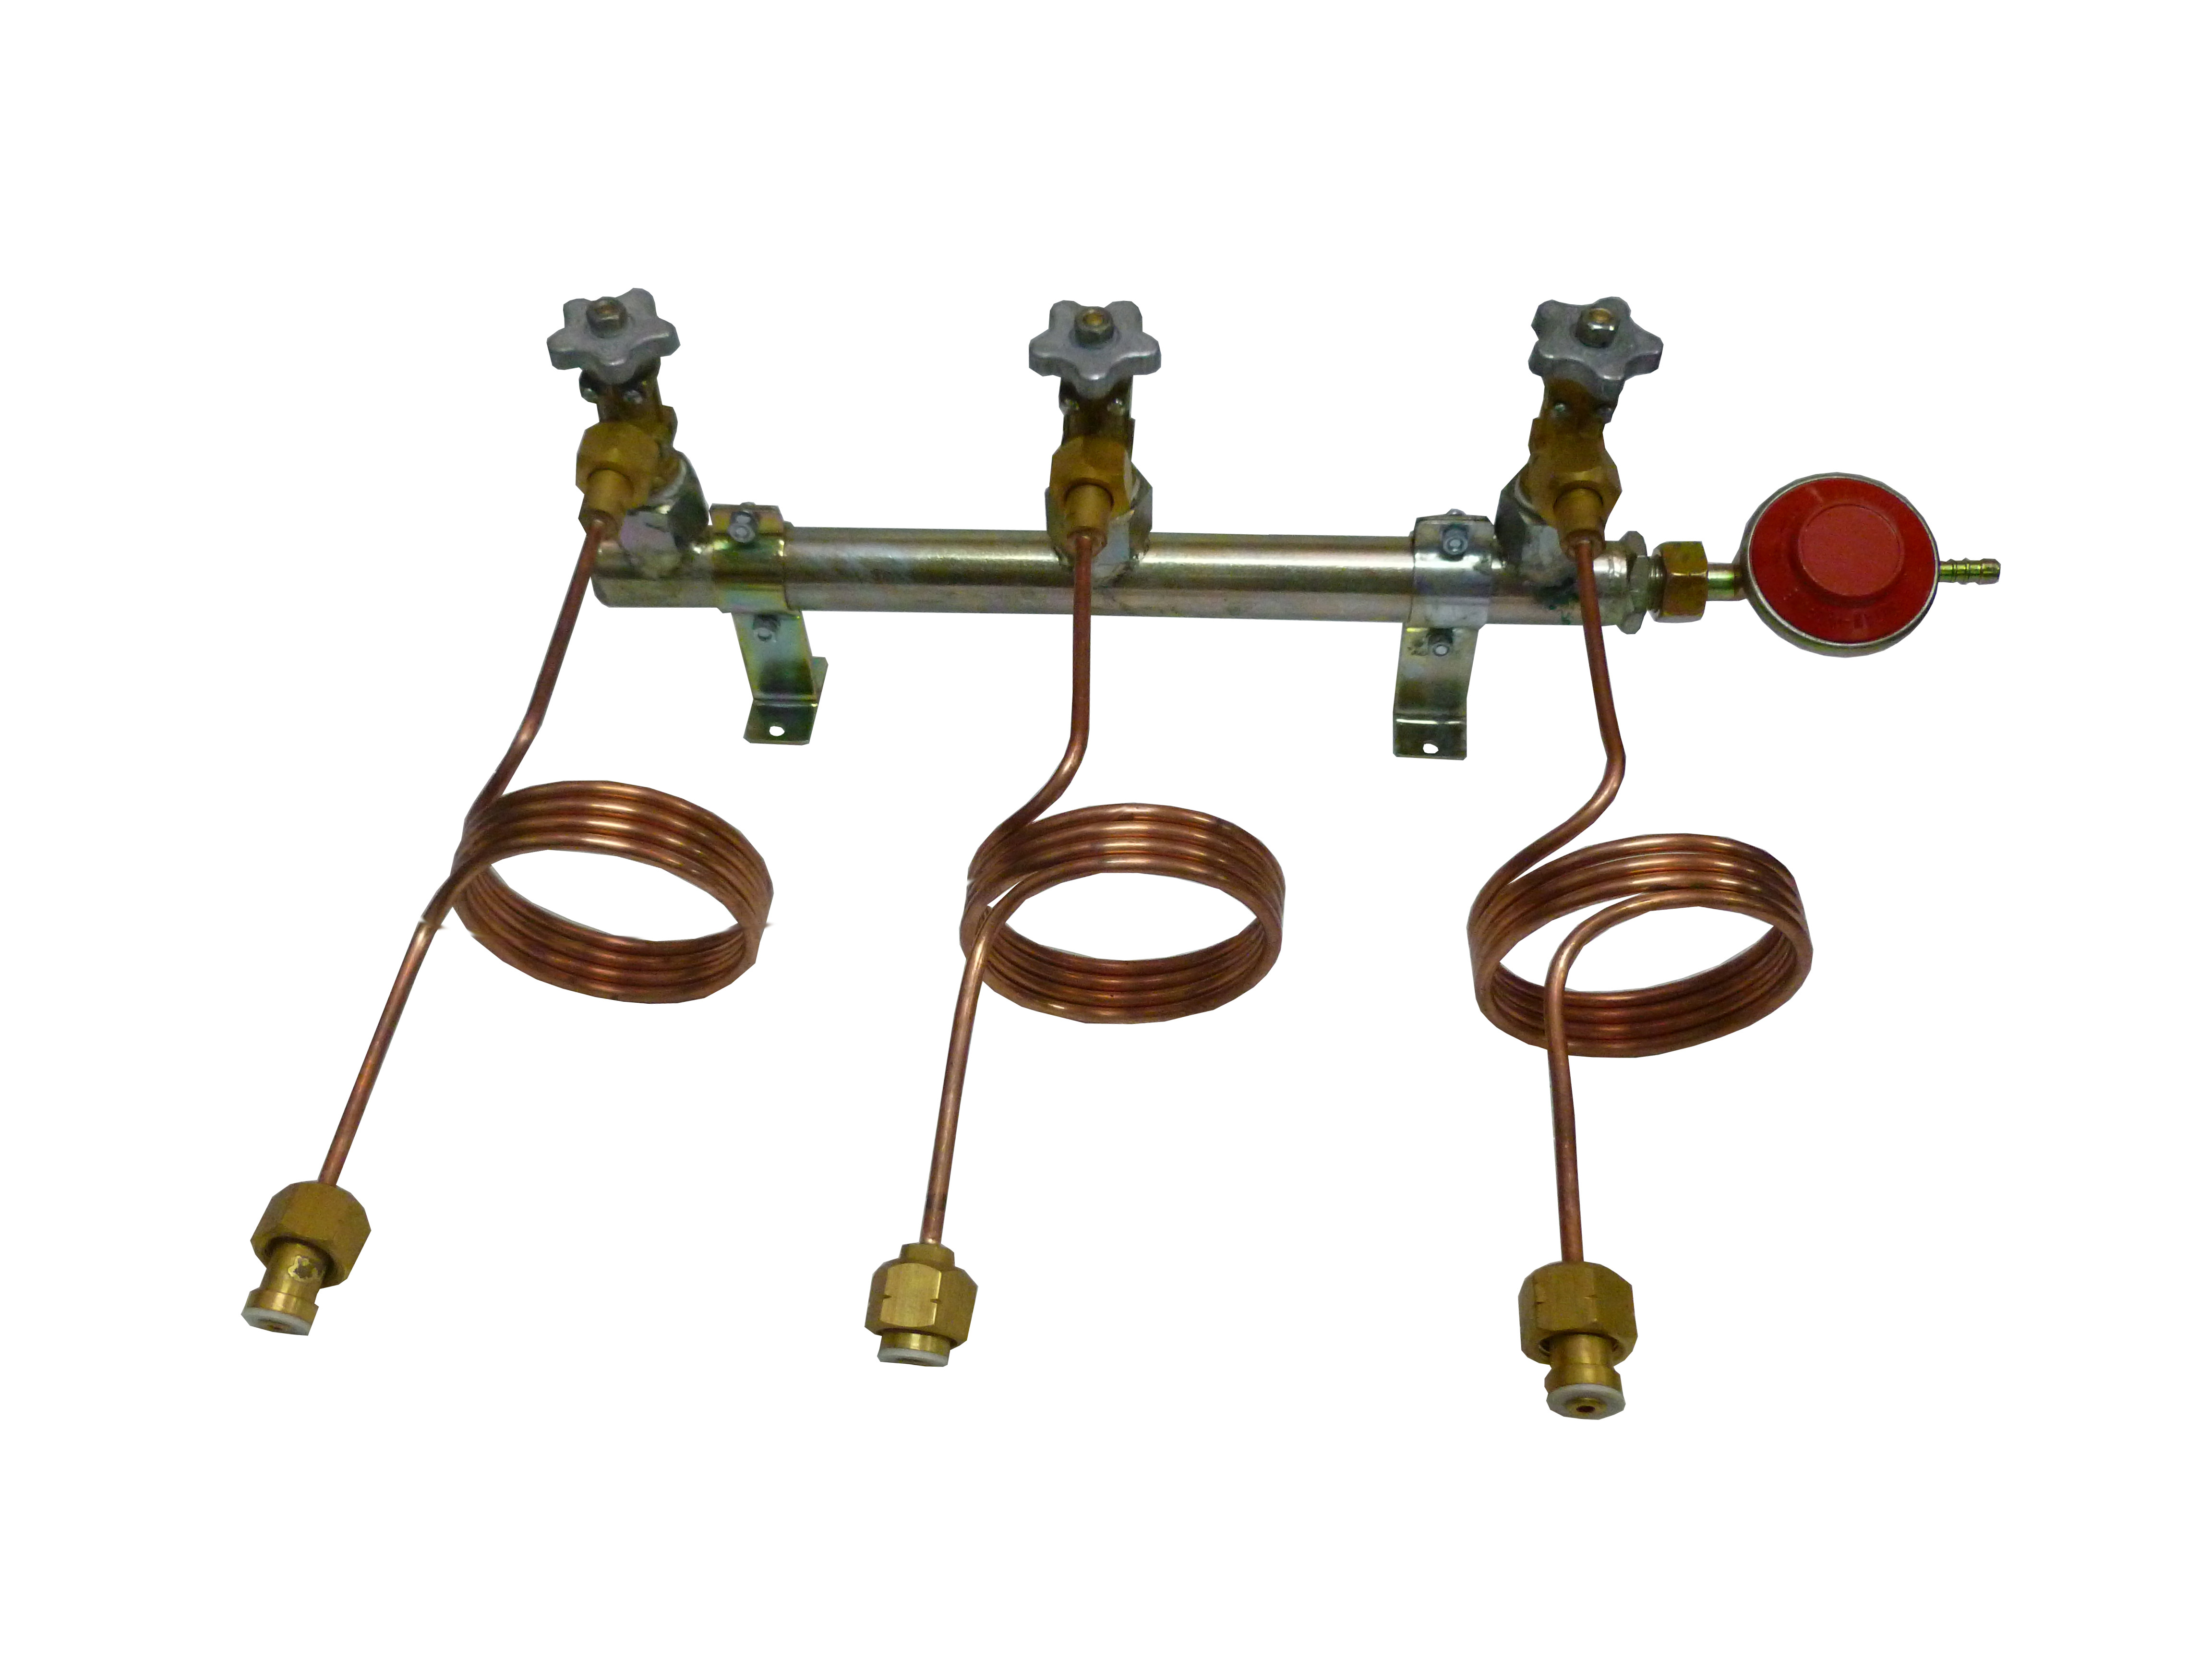
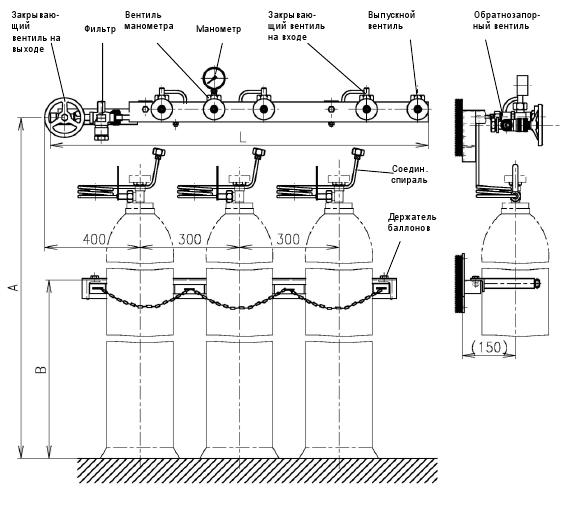
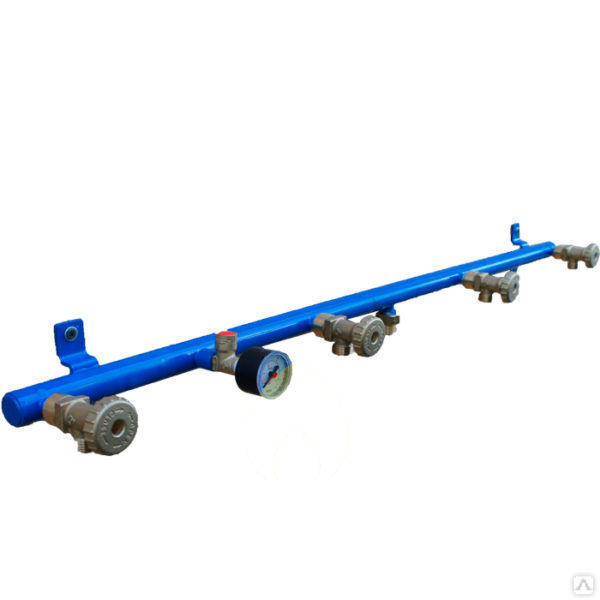
Connection module and filter
The first element includes two devices: a valve with which you can stop the fuel supply, and an insert that dampens vibration. It is needed so that the vibrations generated by the burner during operation do not spread to the gas pipeline pipes.
The gas train also allows for additional purification of gas in the process of its consumption. For this task, after the connecting module, a filtration section is installed in it, in which mechanical additives are retained. If there was no filter, the particles could prevent the shut-off valve from closing tightly.
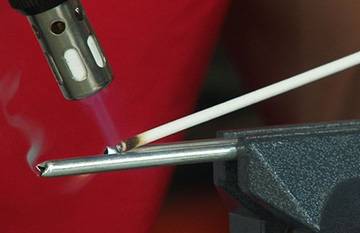
Use of torches for hard soldering and brass soldering
Soldering allows you to perform an integral hermetic connection of two metal parts by a kind of "gluing" them with some kind of molten material - solder. The latter must show high adhesion with respect to the joined metals, that is, be very “sticky”, and have sufficient strength after solidification.
The melting temperature of the solder must be higher than the operating temperature at which the soldered product is operated; and at the same time lower than the melting point of the base material.
Obviously, for the convenience of work, its torch must maintain a stable shape and temperature.
The advantage of this tool lies in the ability to process areas with a large area - such a task will not be possible for an electric soldering iron.
At the same time, a simple low-power burner can be made with your own hands without much hassle.
With the help of a homemade burner, you can do a lot of useful things. Its capabilities will be quite enough for soldering copper and brass vessels that are part of radiators, intercoolers and heat exchangers, as well as for soldering using hard solders.


In addition, only with the help of this tool it is possible to disassemble the radiator in order to replace its core, as well as replace the honeycombs in it.
Such a burner will also come in handy during body repairs, in which a high temperature is not only not needed, but also highly undesirable, as it can cause warping of this part of the car.
A slight heating will also be needed if it is necessary to dismantle a part that has been fitted with an interference fit, that is, a pressed one.
It can be a bearing cage or some kind of bushing.
Gas valve troubleshooting guide
A modern gas cylinder complies with GOST 949-72 and is a durable all-welded element made of carbon or alloy steel. According to the standard, the thickness of the cylinder walls cannot be less than 2 millimeters.In order for the gas inside to press equally on the upper and lower parts, they are made concave and convex.
The cylinders themselves, depending on the substance in them and its quantity, can have different sizes, shapes and colors. But one thing remains unchanged - any gas cylinder must have passport data assigned at the factory. In the upper part there is a neck, equipped with a thread, into which the valve is inserted.
- Valve malfunction - the flywheel does not turn or there are other problems;
- Corrosion, dents or other damage on the cylinder body and valve part;
- Examination date is overdue;
- Feel the gas in the air;
- Crooked or damaged cylinder shoe;
- There is no plug on the fitting.
The balloon itself is one-piece, and something can hardly break there. Therefore, the main number of faults concerns gas valves.
Procedure:
- Repair is carried out in a well-ventilated area;
- We open the shut-off assembly to allow the remaining gas to come out;
- To unscrew the valve manually or with a gas wrench, it is necessary to warm up this element. In this case, there is no danger, since only gas vapors are in the cylinder, and not their mixture with air, which is explosive in the first place. The only thing to watch out for is moderate heating of the structure, since overheating can increase the pressure in the cylinder. The meaning of warming up is that the metal expands and it becomes possible to unscrew the valve even manually, or with a slight lever effort in the form of the same gas key;
- After removing the element, the conical fitting is sealed - a sealant is applied to it, or a fluoroplastic tape;
- A new valve is mounted, after which the fact and time of repair are recorded in the cylinder passport. Installation is carried out with a special torque wrench, which makes it possible to correctly dose the forces and not to break the thread. The maximum pressure allowed in this case is 480 Nm for steel valves, and 250 for brass valves;
- Having removed the valve from the cylinder, it is necessary to drain the condensate from it, if we are talking about propane-butane, which is widely used by us. This procedure is practically not performed by anyone, despite the fact that it is highly desirable. However, it is necessary to drain away from residential buildings, since this condensate has an extremely unpleasant odor.
Requirements for production processes and technical characteristics of gas cylinders are regulated by rather old GOSTs 949-73 and 15860-84.
The maximum working pressure in the devices ranges from 1.6 MPa to 19.6 MPa, and the wall thickness can vary from 1.5 to 8.9 mm.
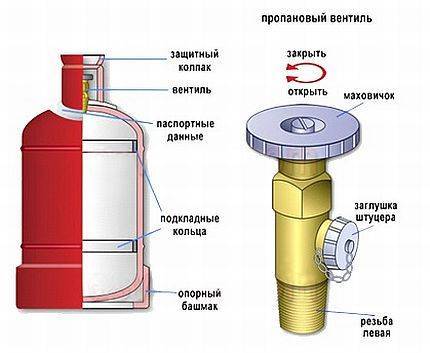
protective cap on gas bottles can be screwed onto a special thread of the neck, completely closing the valve, or be welded to the body and only protect the valve from accidental external shocks
A standard gas cylinder assembly consists of the following items:
- The body of the balloon.
- Valve with stop valves.
- Closing valve cap.
- Backing rings for fixing and transportation.
- Base shoe.
The information stamped on the cylinder is used by service centers when refueling and re-examining the equipment, so it should not be heavily painted over with paint
The bottom of the cylinders has the shape of a hemisphere for uniform distribution of internal pressure.For better stability of the body, a shoe is welded on the outside, on the lower edges of which there are often holes for attaching the cylinder to horizontal surfaces.
The types of gas cylinders and the features of their marking will be introduced in the article, which we recommend viewing and reading.
- it is forbidden to use faulty gas cylinders;
- it is forbidden to store cylinders in places of permanent residence of people;
- the valve must not be opened very quickly: the head electrified by the gas jet can cause an explosion;
- periodically check the serviceability and tightness of the valve;
- it is forbidden to use or stay at the same workplace two propane-butane cylinders at the same time.
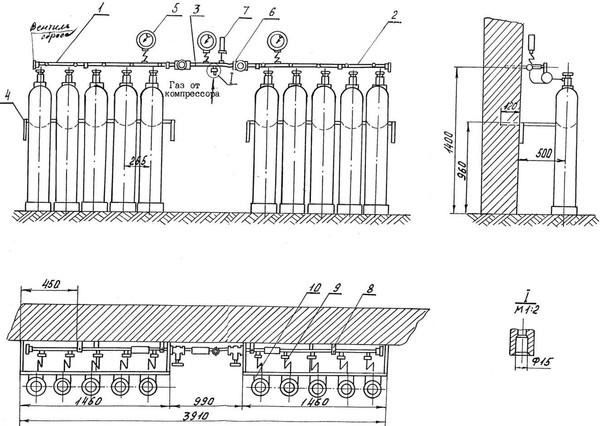
Connecting equipment
Connecting a gas hob to the balloon is carried out in several stages:
- balloon installation;
- connection to the stove;
- connection to the cylinder;
- examination.
Choosing a location for the balloon
The gas cylinder can be located:
- outdoors in a special metal box;
- at home, directly in the kitchen or in a separate room.
Outdoor installation improves safety when using gas. However, it should be taken into account that:
- the cylinder can only be placed on a flat and dry surface (pallet, slats, and so on);
- when the temperature drops to 0°C, the pressure in the system may decrease.
To use the gas cylinder in cold weather, it is recommended to insulate the equipment. For insulation, you can use any material that allows you to keep warm or a specialized self-regulating cable.
The location of the gas cylinder near the house
When placing a gas cylinder with your own hands inside the house, the following rules must be considered:
- the distance from it to the tile should be no more than 1 m;
- it is forbidden to install inside the house if there are more than 2 floors;
- it is impossible to have a cylinder in the basement;
- distance to heating equipment - more than 1 m.
The process of connecting to a gas stove
Next, you need to connect the hose to the gas stove. The connection diagram is as follows:
- a hose is connected to the outlet pipe of the stove. A rubber gasket is installed at the junction. In the absence of a gasket, sealing the joint with a sealant is required;
- the hose is secured with a clamp.
Connecting a hose to a gas stove
If the size of the hose and the outlet of the tile do not match, then different adapters are used. Installation of adapters must be carried out with a sealing compound.


Accession to the cylinder
The next step is to connect the hose to the gas cylinder.
If the cylinder is located on the street, then the outlet through the wall is carried out using a special metal sleeve.
Gas hose outlet
Next, the reducer is connected to the cylinder and the hose is connected using a mounting clamp, as well as the installation of additional equipment. All connections must be sealed.
Connecting the plate to the cylinder
Leak test
Before putting the system into operation, it is necessary to check its tightness according to the following scheme:
- soap solution is prepared;
- with a sponge (rag), the solution is applied to the joints;
- if soap bubbles appear within a few seconds, then the tightness of the connection is broken.
Violation of the tightness of the connection
How to connect the stove to the gas cylinder, see the video.
After completing all the work, you can turn on the gas stove and check the pressure in the system. If the gas burns in a bluish or slightly greenish color, then the pressure is normal. When other colors are formed, the pressure is adjusted by the reducer.
Existing connection types
Gas-fired household stoves can be connected to both main and bottled fuel. Depending on the gas source on the equipment, nozzles are simply changed and adjusted. Thus, the possibility of connecting to a gas cylinder is provided in any stove.
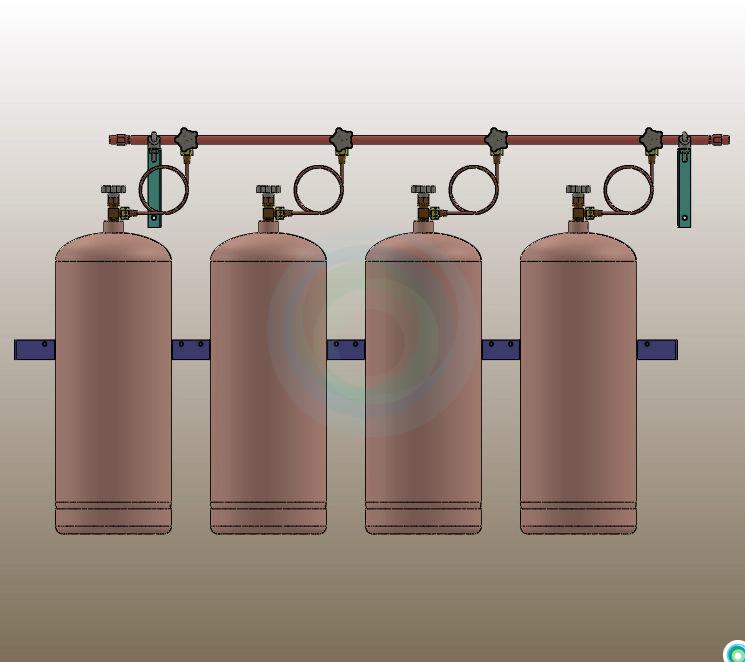
There can be several types of connecting a gas cylinder to a hob or stove.
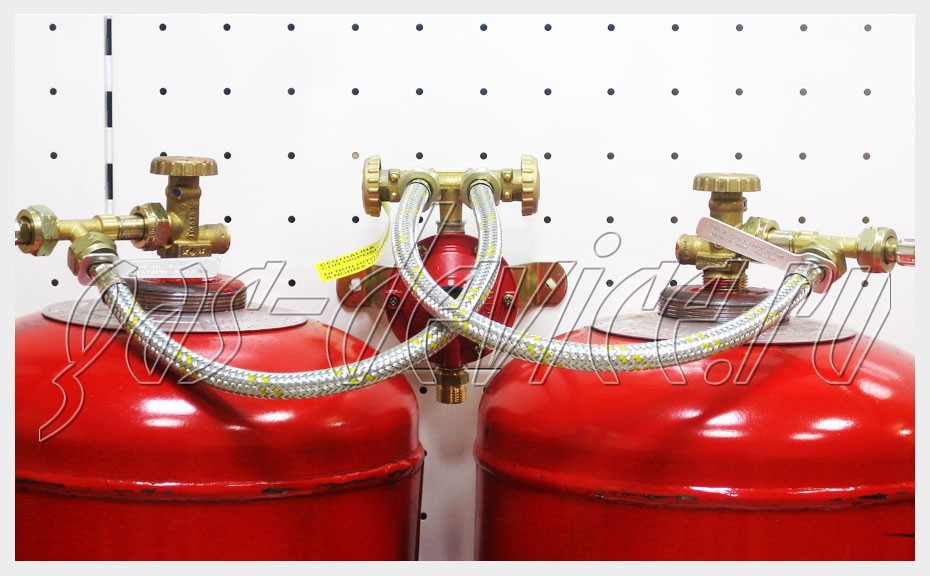
- Standard connection - one plate is connected to one cylinder.
- Several cylinders are connected to one consumer at once, which is more convenient. In this case, at the end of the mixture in one tank, the user can quickly switch to another and not be left without fuel.
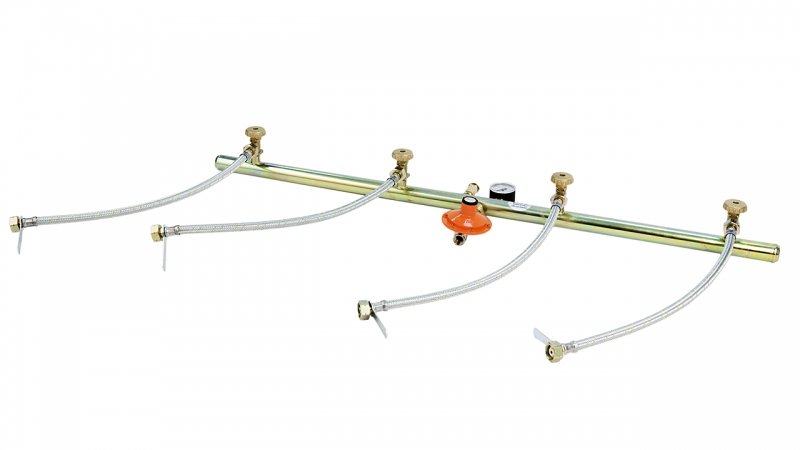
- Another way is to connect two gas stoves to one cylinder (more is possible). There are no significant differences from the usual connection here. Additionally, you will need to purchase a divider for several hoses, each of which is connected to a separate fuel consumer.
System Connection Standards
There are widespread devices that support two standards for connecting a reducer to a gas cylinder:
- GOST - common in the CIS countries, used on steel cylinders of local production.
- GLK European standard, mainly used on composite cylinders.
Connecting the reducer to the gas bottle
By connecting the working pipe:
- Threaded connection.
- Nipples for 6.3 or 9 mm.
- Universal nipple.
- GLK.
Some gas reducers, for example, RGDS, are factory equipped with a 9 mm nipple pressed into the body.
Gearboxes with working pressure regulation are supplied with a threaded half-inch outlet, in which, as an option, a universal nipple can also be fixed with a union nut.
It is safer to use devices that match the standard. Each adapter is an additional connection that increases the risk of gas leakage.
Basic storage requirements
Cylinders with liquefied gas are widely used in everyday life, as well as in the industrial and construction industries. When storing an explosive substance in various places, basic safety requirements must be observed that will prevent the occurrence of accidents, both at home and at work.
At home
For the storage of liquefied gas in domestic conditions, one-piece welded metal cylinders are used. Their capacity is usually 50 liters, but there are small vessels with a volume of 5.27 liters.


In everyday life, cylinders filled with butane, propane and their mixture are used. They must be stored only in compliance with the following established safety standards:
- It is not allowed to save gas cylinders in apartments, including loggias and balconies, and residential buildings. It is also forbidden to leave containers with combustible filling for storage on landings, in attics and basements.
- The liquefied gas tank must be kept on a fireproof surface. To avoid accidental dropping of the cylinder, it is recommended to place it in an upright position.
- The gas container must be kept in places protected from direct sunlight. It is not allowed to leave cylinders near open flames, heating appliances, open electrical wiring.
- Tanks filled with liquefied gas must be stored in non-residential outbuildings constructed from non-combustible materials. The distance from the entrance to the building or its basement, basement premises is more than 5 meters.
In places where gas cylinders are stored, a sign warning about the placement of a hazardous substance must be placed in plain sight.
At the enterprise
In industrial areas, cylinders with liquefaction and technical gas can be used. The tank capacity can be up to 50 or over 100 liters. Storage of cylinders at the enterprise must be carried out in accordance with the requirements presented:
- It is allowed to save containers with gas in special premises designated for these purposes or simply in the open air. In any case, the tank must be completely protected from the rays of the sun and precipitation.
- Places for storing gas cylinders should be located at a distance of 100 meters from public buildings and not less than 50 meters from residential buildings. Also, a distance of more than 20 meters should be observed between warehouses.
- It is allowed to store cylinders with only one type of gas in one storage room. It is quite dangerous to place containers with a liquefied mixture and oxygen together.
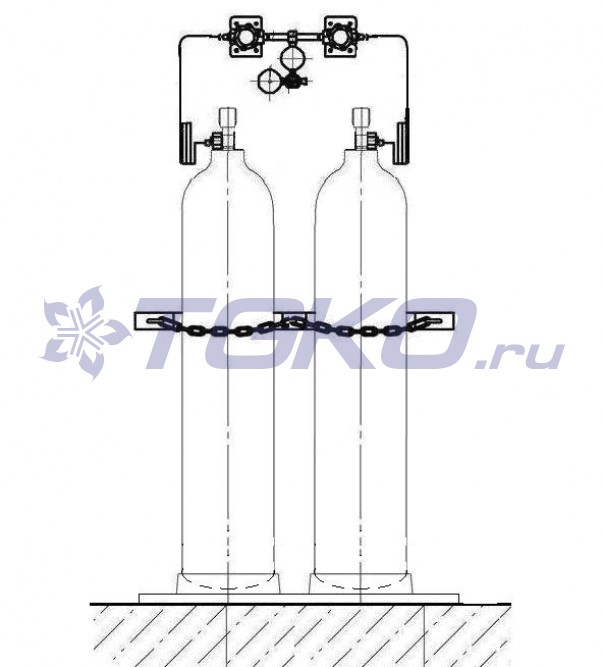
- Cylinders filled with gas with shoes installed are stored in an upright position. In order to prevent accidental movement of containers, they must be installed in special support nests or protected by barrier structures, which must be made only from refractory materials.
- All heating devices, including radiators and heating units, must be located more than 1 meter from gas cylinders. The distance from heat sources with open fire is over 5 meters.
- In warehouses in which cylinders with a combustible substance are stored, there must be high-quality artificial ventilation.
Storage of gas cylinders at the enterprise
In the premises for storing gas containers, there must be an instruction and information warning about the danger of the stored substance. All posters and signs must be displayed in plain sight.
At construction sites
During the construction of buildings, hot work is often required using gas cylinders. The rules for storing combustible mixtures at the construction site coincide with the safety requirements at enterprises and at home. But there are some additions that relate to the construction industry:
- If there are no special storage facilities, then cylinders can be stored in semi-closed or open places without access to sunlight and at an appropriate distance from heating devices. It is allowed to place containers with gases in special cabinets made of non-combustible material on a fire-resistant surface.
- When storing cylinders, sunlight should be excluded from them, and the fuel container should not come into contact with various building materials, especially those impregnated with fatty substances.
- Tanks with other substances must not be stored together with cylinders filled with liquefied gas, and joint storage of full and empty tanks is also prohibited.
Store gas cylinders at construction sites away from sunlight
Be sure to install signs with the words “Explosive”, “Do not smoke”, “Caution! Gas"
What is a propane reducer?
The device of all propane reducers is very similar. All of them have:
- Sealed housing made of aluminium, brass or plastic.
- Entrance branch pipe for connection to a cylinder.
- Outlet branch pipe for connection with the consumer.
- Chambers of high and low pressure.
- Flexible membrane.
- Valve and stem.
- return spring.
- working spring.
In professional gas reducers, a pressure gauge, an adjusting screw or a flywheel, a threaded connection of the inlet pipe are added to the design. The gearbox housing has a cylindrical shape, which is due to the use of a round membrane that sags inside the working pressure chamber. The inlet and outlet pipes protrude from the housing.
Required pressure and volume
The key characteristics of a gas reducer are inlet pressure, operating pressure and flow rate, or the maximum volume of gas passing through the device per hour.
The inlet pressure is determined by the standard pressure in the cylinders and is usually 20 MPa.
Gearbox Specifications
The working pressure for domestic unregulated gas reducers is set at 0.3 MPa ± 5%
For adjustable semi-professional and professional adapters, the working pressure is set by the user in the range of 0-0.4 MPa, and for some high-performance models - up to 1.6 MPa
The amount consumed must exceed the amount consumed by the device (or group of devices) per hour.
How does a cylinder reducer work?
1 Direct reducer
The usual simple gas pressure reducing apparatus consists of two chambers with an area of high and low pressure separated by a rubber membrane. In addition, the “reducer” is equipped with an inlet and outlet fitting. Modern devices are designed so that the bellows liner is screwed directly into the gearbox. Increasingly, you can find a gas reducer with a third fitting designed for mounting the monomer.
After gas is supplied through the hose and then through the fitting, it enters the chamber. The generated gas pressure tends to open the valve. On the reverse side, a locking spring presses on the valve, returning it back to a special seat, commonly called a “saddle”. Returning to its place, the valve prevents the uncontrolled flow of high-pressure gas from the cylinder.
Membrane
The second operating force inside the reducer is a rubber membrane that separates the device into a high and low pressure area. The membrane acts as an “assistant” to high pressure and, in turn, tends to lift the valve from the seat, opening the passage. Thus, the membrane is between two opposing forces. One surface is pressed by a pressure spring (do not confuse with a valve return spring), which wants to open the valve, on the other hand, the gas that has already passed into the low pressure zone presses on it.
The pressure spring has a manual adjustment of the pressing force on the valve.We advise you to buy a gas reducer with a seat for a pressure gauge, so it will be easier for you to adjust the spring pressure to the desired output pressure.
As the gas exits the reducer to the source of consumption, the pressure in the chamber of the working space decreases, allowing the pressure spring to straighten. She then begins to push the valve out of the seat, again allowing the device to be filled with gas. Accordingly, the pressure creeps up, pressing on the membrane, reducing the size of the pressure spring. The valve moves back into the seat narrowing the gap, reducing the gas filling of the reducer. The process is then repeated until the pressure equalizes to the set value.


It should be recognized that direct-type gas cylinder reducers, due to their complex design, are not in high demand, reverse-type reducers are much more widespread, by the way, they are considered devices with a high degree of safety.
2 Reverse gear
The operation of the device consists in the opposite action described above. Liquefied blue fuel is fed into a chamber where high pressure is created. Bottled gas builds up and prevents the valve from opening. To ensure the flow of gas into the household appliance, it is required to turn the regulator in the direction of the right-hand thread.
On the reverse side of the regulator knob is a long screw, which, by twisting, presses on the pressure spring. By contracting, it begins to bend the elastic membrane to the upper position. Thus, the transfer disk, through the rod, exerts pressure on the return spring.The valve starts to move, begins to open slightly, increasing the gap. Blue fuel rushes into the slot and fills the working chamber at low pressure.
In the working chamber, in the gas hose and in the cylinder, the pressure begins to increase. Under the action of pressure, the membrane is straightened, and a constantly compressing spring assists it in this. As a result of mechanical interactions, the transfer disc is lowered, weakening the return spring, which tends to return the valve to its seat. By closing the gap, naturally, the flow of gas from the cylinder into the working chamber is limited. Further, with a decrease in pressure in the bellows liner, the reverse process starts.
In a word, as a result of checks and balances, the swing can be balanced and the gas reducer automatically maintains a balanced pressure, without sudden jumps and drops.
Meaning?
The installation of two cylinders is quite rare, since it will be much easier and probably cheaper to install one large tank than two smaller ones. However, there are exceptions.
- Firstly, two cylinders can be arranged more conveniently than one large one, not all cars have such an opportunity.
- Secondly, two cylinders can be installed in different places of the body, thus saving useful space in the trunk. For example, one cylinder is under the bottom of the body, and the second is in the trunk. This way you get a large range, while saving space in the trunk.
- Thirdly, for owners of cars with a large engine capacity, as well as owners of various minibuses and buses, the installation of two large cylinders allows you to get a large power reserve, no need for frequent refueling, etc.
In general, there are plenty of reasons, so let's move on to the second point - implementation.
Related video
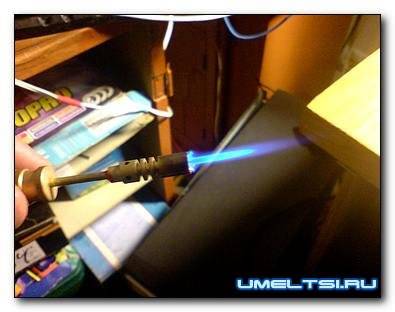
In this article, we will look at how a do-it-yourself gas torch for soldering is made. This device is often in demand both in the private sector and for commercial purposes - for individual technical creativity and various construction tasks. In particular, with the help of gas burners soldering, plumbing and blacksmithing, roofing, jewelry work is carried out, and for other purposes a flame is obtained, the temperature of which exceeds 1500 ° C.
In plumbing, using a gas burner, you can heat a metal billet so that in the end it turns out to be sufficiently hardened. When carrying out welding work with some metals, the places of future seams must be warmed up.
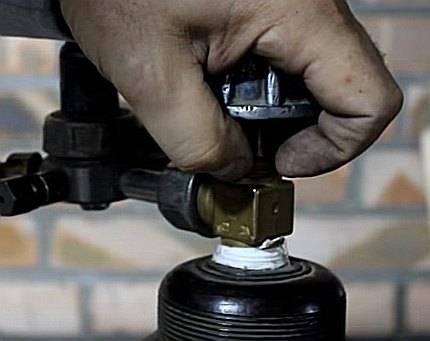
Screwing on the new shut-off valve
Before tightening the valve, all connected parts must be degreased to prevent clogging of the locking mechanism. To do this, you can use a cloth with ordinary detergent or moistened with white spirit. After that, rinse the surfaces with plain water and allow them to dry.
A new valve is never bolted to the cylinder with bare threads. It is imperative to use a sealant: a special thread lubricant or a fluoroplastic fum tape. They are applied to the lower fitting and only after that the valve is tightened.
No additional gaskets are intended to be used between the valve and the cylinder body, a seal and adequate clamping force will suffice
The thickness of the gas fum tape is more than the plumbing one and is 0.1 - 0.25 mm, and its reel should be yellow. The tape is wound with tension in 3-4 layers.It is better to twist it once more at break than to make the seal loose.
Clamp the valve preferably with a torque wrench. Steel valves are screwed with a maximum force of 480 Nm, and brass - 250 Nm. After clamping the valve, you can proceed to the next steps to test the tightness of the resulting connection.