- Priorities for buying prefabricated structures and custom-made showers
- Features of a shower without a tray
- Schemes for arranging showers without a pallet
- How to remove water from the shower floor without a tray?
- Cabin materials
- How to arrange a drain in the shower
- Pallet design options
- Choice of size and shape
- Plum formation
- Choice of shower cabin
- "Homemade" shower
- Drainage device
- Making a booth from scratch, step by step instructions
- Preparation of the necessary materials and tools
- Marking and preparation of the base
- Waterproofing the installation area
- Pipe laying and foundation construction
- Surface leveling
- Frame assembly and ceramic tiling
- Laying finish tiles
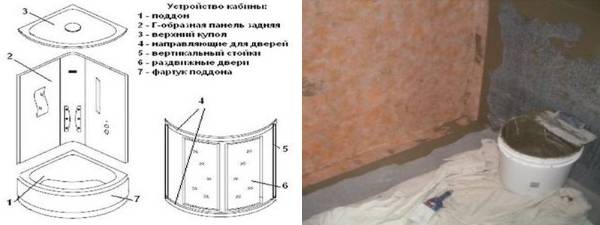
- Shower cabin design
- DIY shower cabin examples
Priorities for buying prefabricated structures and custom-made showers
Manufacturers offer a large selection of shower enclosures without a pallet. They can be bought in the distribution network, where you can see the goods, visually evaluate the dimensions, shades, combinations of parts of the structure and accessories. This is an acceptable option. Its advantage is that sellers often offer installation as well. There is no risk of not noticing a marriage or taking an incomplete set. During installation, the installers will solve the problems.
Glass shower enclosures can be customized
With all the variety of choices, sometimes it is not possible to buy a ready-made shower cabin. Most of the problems are related to size. In such cases, you can purchase a custom-made shower enclosure. For non-standard bathroom conditions, this is the only way out. The order can be made through the store or directly from the manufacturer. These are additional costs, but individual measurements will be kept to the millimeter.
Features of a shower without a tray
The key difference between structures of this type is the absence of a tank bowl with sides.
One of the main features is the high requirements for evenness of the cladding surface. At the slightest elevation difference, water will accumulate in the bathing area, which can lead to leakage or the appearance of an unpleasant odor.
Schemes for arranging showers without a pallet
How to make a shower without a tile tray? The cabin can be "hidden" in the niche in the room. If this is not provided for by the plan of the room, it is constructed using the installation of partitions or piers.
The compact design makes it possible to position the shower along the walls of the room.
The bathing area can be fenced off from splashing water with doors, walls and ceiling made of glass or plastic.
When installing a cab enclosure that completely covers it from all sides, it is necessary to install an additional ventilation system.
How to remove water from the shower floor without a tray?
Depending on the material of manufacture of the drain system, there are:
- plastic - the most commonly used in the installation of showers, due to the simplicity and convenience of the installation process. The material is light weight, not subject to corrosion and can withstand significant loads. The disadvantage is the low resistance to high-temperature drains;
- stainless steel - suitable for use in rooms with high sanitary and hygienic requirements (public catering establishments, including school and preschool institutions, swimming pools);
- cast iron - installed in the premises of industrial enterprises. Such systems are durable, have good throughput and can withstand a wide range of temperatures. Due to the significant weight of the products, installation is associated with high labor costs.

According to the location and type of reception, ladders can be:
- point - water is drained along an inclined plane into a funnel connected to a sewer pipe. The drain system is mounted in the center of the shower room, in the wall area or in the corner;
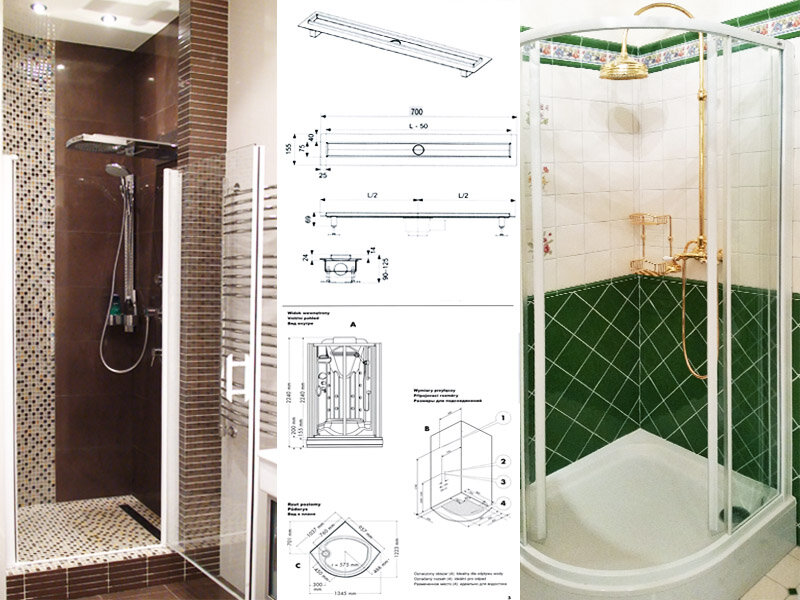
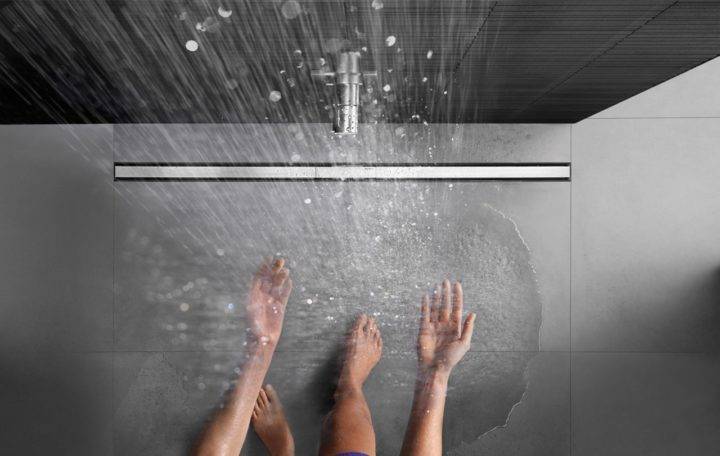
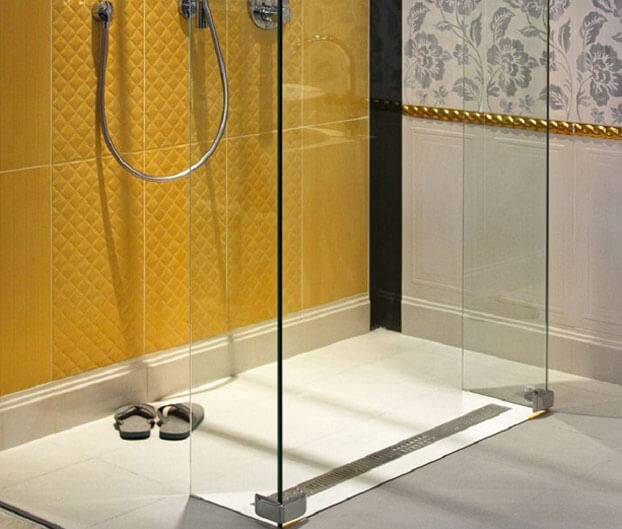
- linear - a long gutter with a rigid grate, located near the cabin wall, and connected through a pipe with a sewer drain. This type of drain has a high receiving capacity, so it is most often used in large showers;
- wall-mounted - point or linear type, additionally equipped with a water receiver built into the wall.
Wet shutter drains are similar to a siphon device - an S-shaped channel is built between the funnel and the drain fitting.
Dry shutter drains:
- membrane - the system opens with water pressure on the membrane, after the liquid leaves the spring returns the shutter to its original position;
- float - when the drains pass, the shutter is located at the top, after swimming it sinks to the bottom, blocking the passage.
Difficulties in installing tile showers without a pallet:
the design of the shower room should be located above the plane of the existing sewer pipes, which requires the re-equipment of the entire sewage system or raising the floor level to the height required for installation;
for the normal functioning of the cabin without a pallet, it is important to be careful during operation and regularly clean the walls of the drain hole from dust particles and other deposits. In the absence of proper care, the patency of the canals may deteriorate.

It is undesirable to install a shower room in a newly built house, if the building shrinks, the ladder walled up under the lining and waterproofing can be deformed and become unusable.
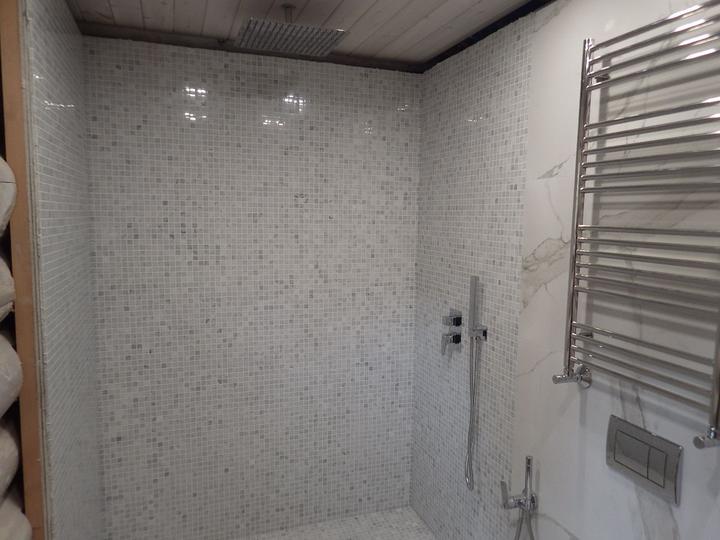
Cabin materials
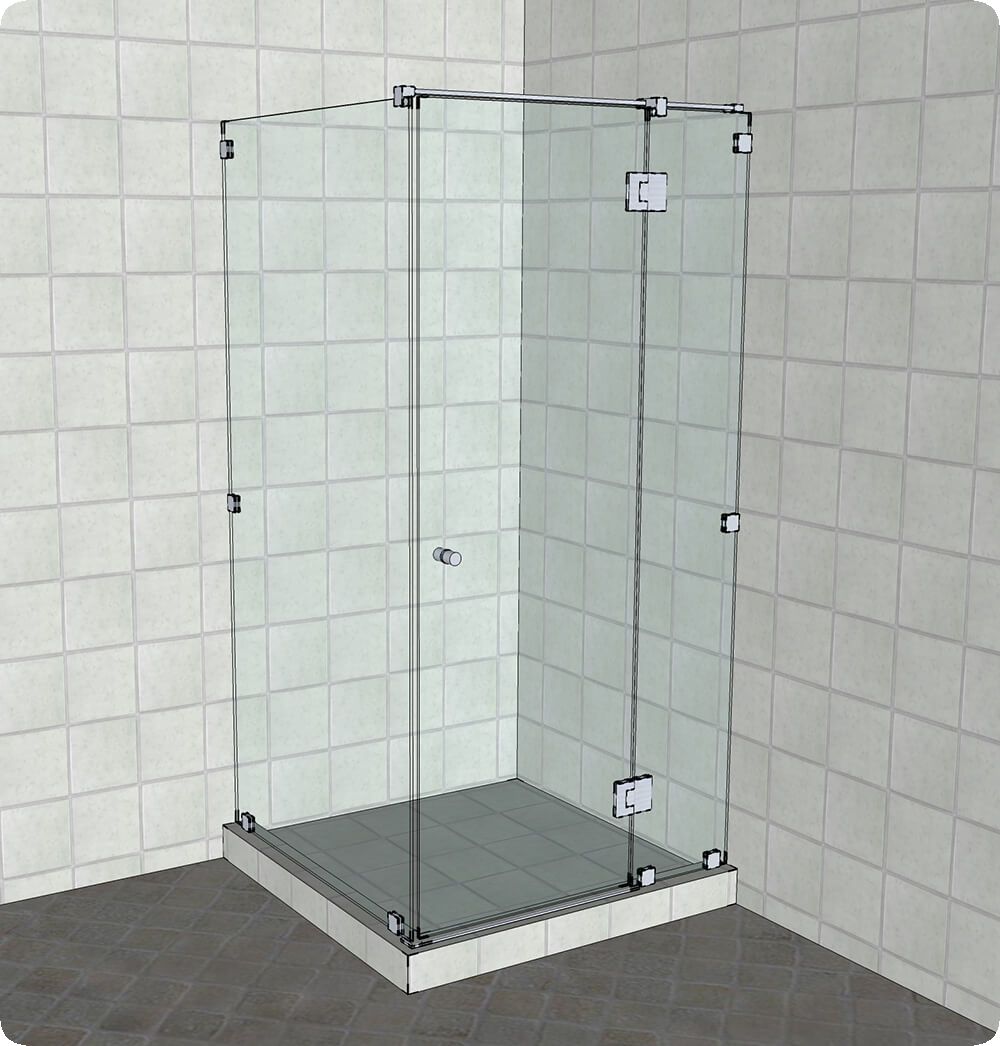
Enclosing doors are most often made of thick glass (regular or organic), cast polycarbonate, and plastic. The material is wear-resistant and easy to maintain, it can be used to make a bathroom zoning, fencing off a corner or a wall area.
The most practical in operation will be the use of frosted, tinted or embossed glass surface: the remnants of soapy water and salt will be hardly noticeable.
For small bathrooms or combined bathrooms, a shower cabin made of tiles without a pallet and without rigid fences is relevant: elastic PVC or silicone sliding curtains can be used to protect against water on the floor. Such products serve for a long time, are distinguished by a low price, which allows them to be replaced if necessary.
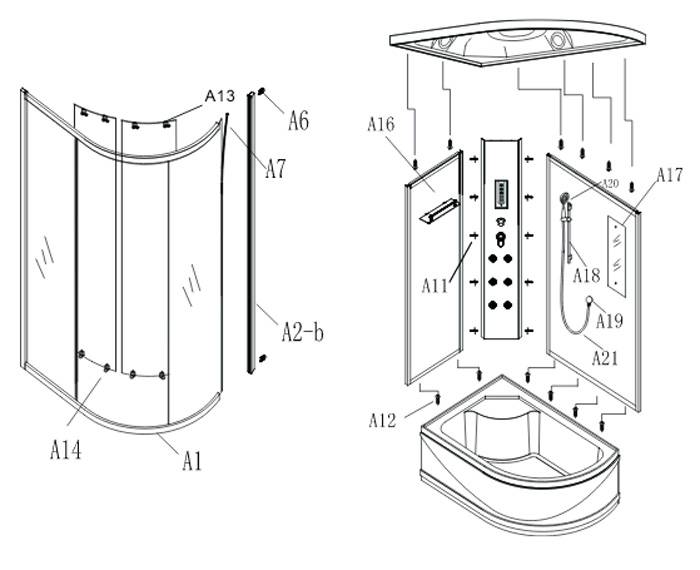


For decorative design of the floor section of the cabin, it is advisable to use mosaic tiles: this will minimize slipping during water procedures. Also suitable are ceramic products of the usual format with a textured front surface and a base made of polished wood (walnut, oak) covered with moisture-resistant varnish.
How to arrange a drain in the shower
From the outside, there isn't much difference.
Despite some external similarity between the showers, there are some differences, which are mainly related to the presence of functional elements, as well as interior decoration. Therefore, there are a sufficient number of design options and choosing the most suitable one is not a problem.
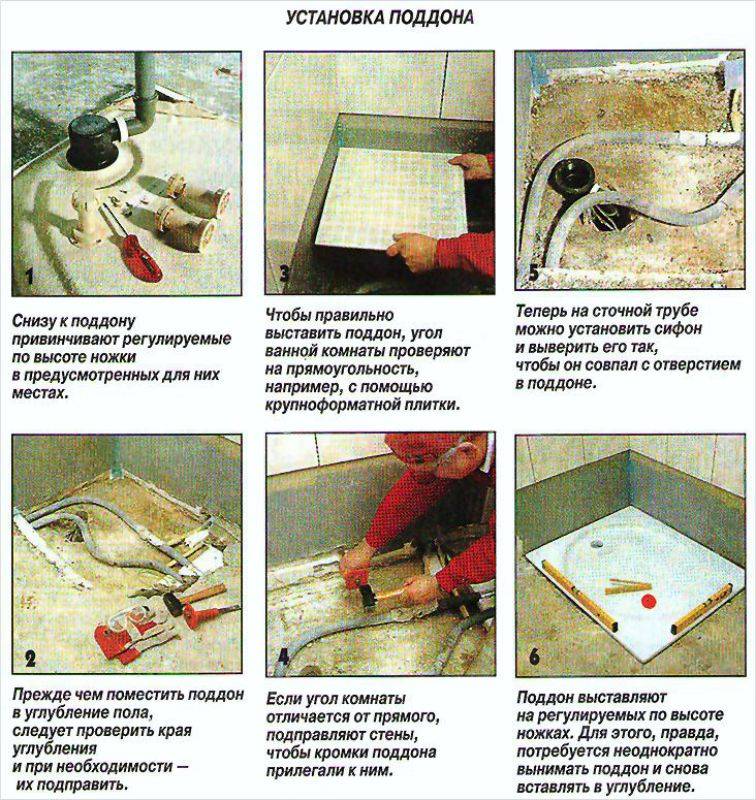
Pallet design options
Finished pallet
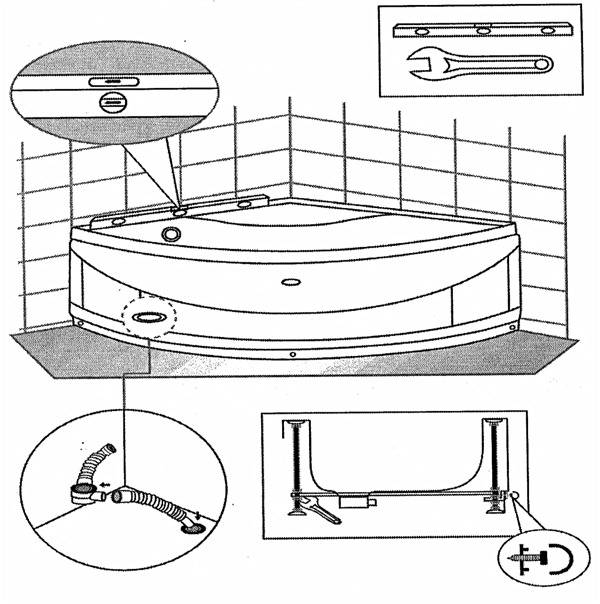
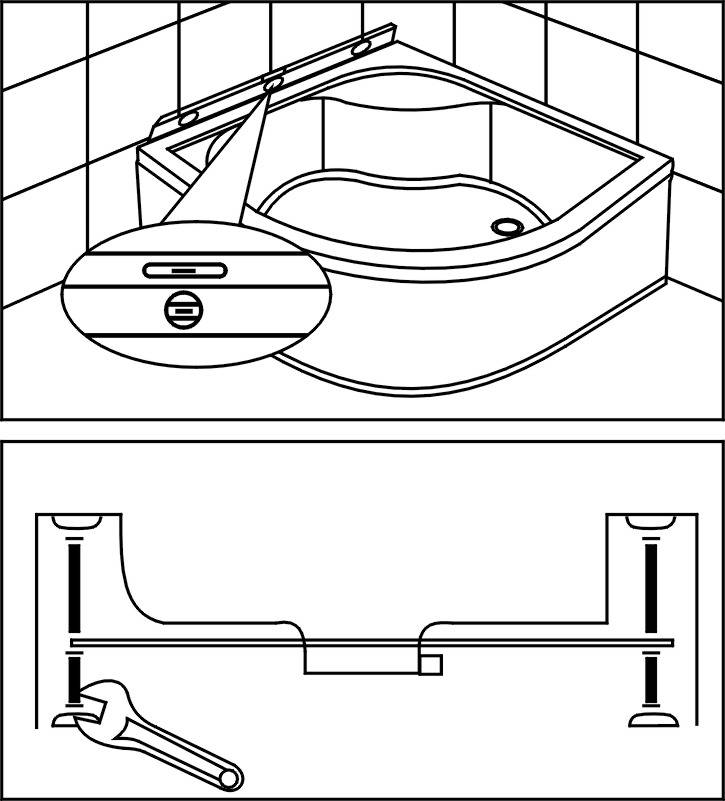
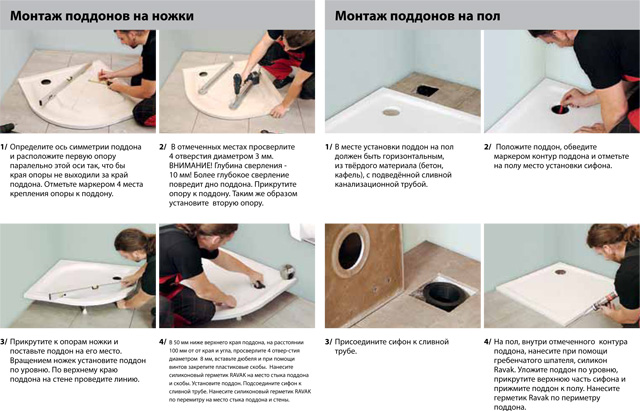
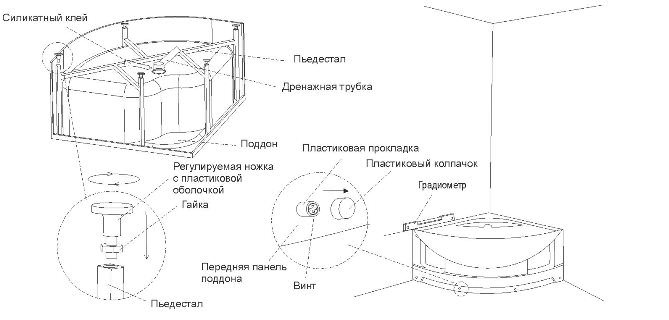
The easiest and most reliable option is to install a ready-made factory pallet. The finished tray can be made of acrylic or enameled metal (like a metal bath). If we talk about the characteristics of such pallets, then the acrylic pallet is quite light and non-slip, but turns yellow over time, and the metal (enamelled) pallet is very slippery when wet and you will have to put a non-slip mat on it. In addition, such a pallet feels quite cold when compared with an acrylic pallet.
In the case when the option with a ready-made pallet, which differs in standard dimensions, is not suitable, it is not difficult to build a pallet from brick or concrete. After that, it will have to be cultivated with tiles. The solution is not bad, but it will require professional skills, and it will also take a lot of time. If this is an apartment building, then you will have to take care of reliable waterproofing, otherwise there may be problems with neighbors who live on the floor below. This does not mean at all that in a private house you can do without waterproofing. Sooner or later, but the lack of waterproofing will make itself felt, and from a not very good side.
Brick pallet
You can use another option.It consists in the fact that a pallet of suitable sizes is made of metal using welding technology. After that, the metal is coated with anti-corrosion compounds. Such a pallet is installed on bricks and, if necessary, it is also lined with sides
The most important thing is not to forget about the drain. From the inside, such a “trough” is cultivated with tiles in the form of a mosaic by gluing
As a rule, one of the presented options is selected, although there is another option when the booth is made without a visible pallet. In this case, it is enough to lay out the tiles so that the water flows towards the drain.
Choice of size and shape
Naturally, size does matter, because:
- 70x70 cm is an insufficient size and more may be suitable for children.
- 80x80 cm is also an insufficient size, but the booth is more spacious.
- 90x90 cm - this size may be enough for ordinary people of medium size.
- 100x100 cm and more are comfortable sizes for citizens of any weight category.
The level of comfort starts with dimensions of 1 meter, but if this size is not available, then the best option is at least 90 centimeters. It should be noted that a square booth is not the best option and a rectangle should always be preferred. It is more practical even if the cabin is only 80 centimeters wide. In this case, the length of the booth must be at least 1 meter.
Plum formation
Ladder installation
As a rule, in such cases, the drain is formed using a ladder, although a siphon option is also possible. The fact is that the ladder is a special drain device. In other words, the ladder can be built into the floor, and it will serve for a long time.
As a rule, the siphon is installed where there is a visible pallet, for example, factory-made. At the same time, it is necessary to provide for the possibility of replacing it, otherwise problems will arise sooner or later. Just taking it and sealing it forever is a bad idea, and in this case it is better not to mess with the siphon.
It is necessary to make an inspection hatch
In any case, the organization of the drain must be such that at any time it is possible to clean the drain with a cable. For greater efficiency and practicality of the system, the pipes are laid so that the pipe joint angles are no more than 30 degrees.
It is equally important to take care of effective slopes that would not allow water to stagnate. In this case, the value of the slopes should not be less than 4 percent.
In other words, on one meter of pipe, the slope should be about 4 centimeters. Some recommend making the floor slope the same, although here the norms are completely different and for safety, a slope of more than 1.5 percent is not recommended.
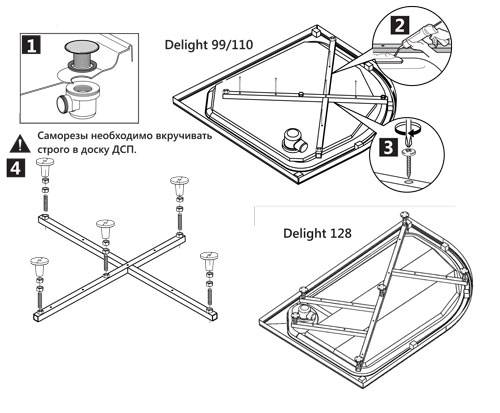
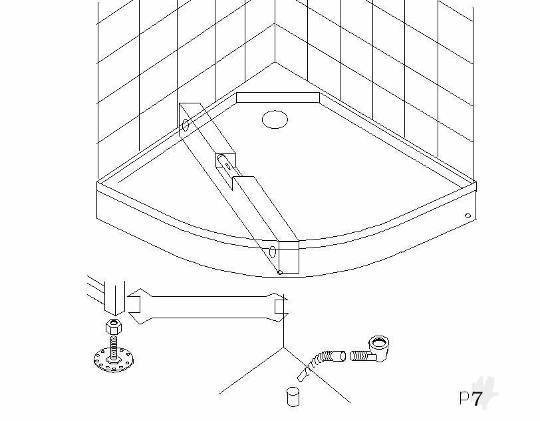
Day 1. We install the ladder. Building a shower tray We fill the floor of the pallet.
Watch this video on YouTube


Choice of shower cabin
When choosing the right model, each buyer is based on their desires and budget.
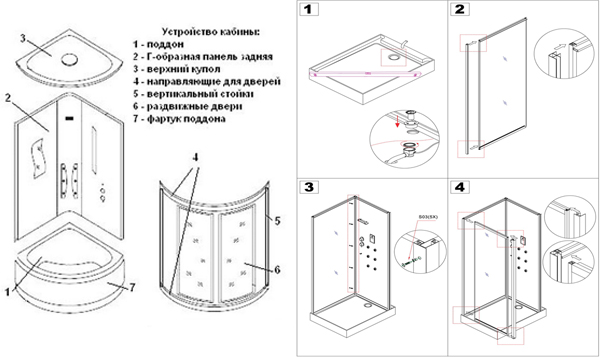
Options and appearance are also an important detail. Shower cabins are usually divided into three types:
Shower cabins are usually divided into three types:
- Simple corners. This is the simplest and cheapest option that you can find in the store. Most often, the models do not have a roof, and bathroom walls are used instead of side walls. Installation of this design is as simple as possible, you can use the corner only for taking a shower.
- Simple cabins. The option is more expensive, already has its own walls.Often models have nozzles with a water pressure control function. You can take not only a shower, but also use the hydromassage.
- Multifunctional boxes or booths. The most equipped models. Optionally, there may be: steam generation, radio, illumination of the tropical rain function, creation of bath conditions and so on. The number of additional options will directly affect the complexity of installing the booth.
In addition to functionality, division can be made depending on the materials used. For the pallet, plastic, steel, acrylic or cast iron are used.

Stone pallet
For doors - glass, plastic. The type of door opening also has a division into:
- swing;
- bivalve;
- folding;
- sliding.
The main factor in choosing the dimensions of the shower enclosure is the available space in the bathroom.
"Homemade" shower
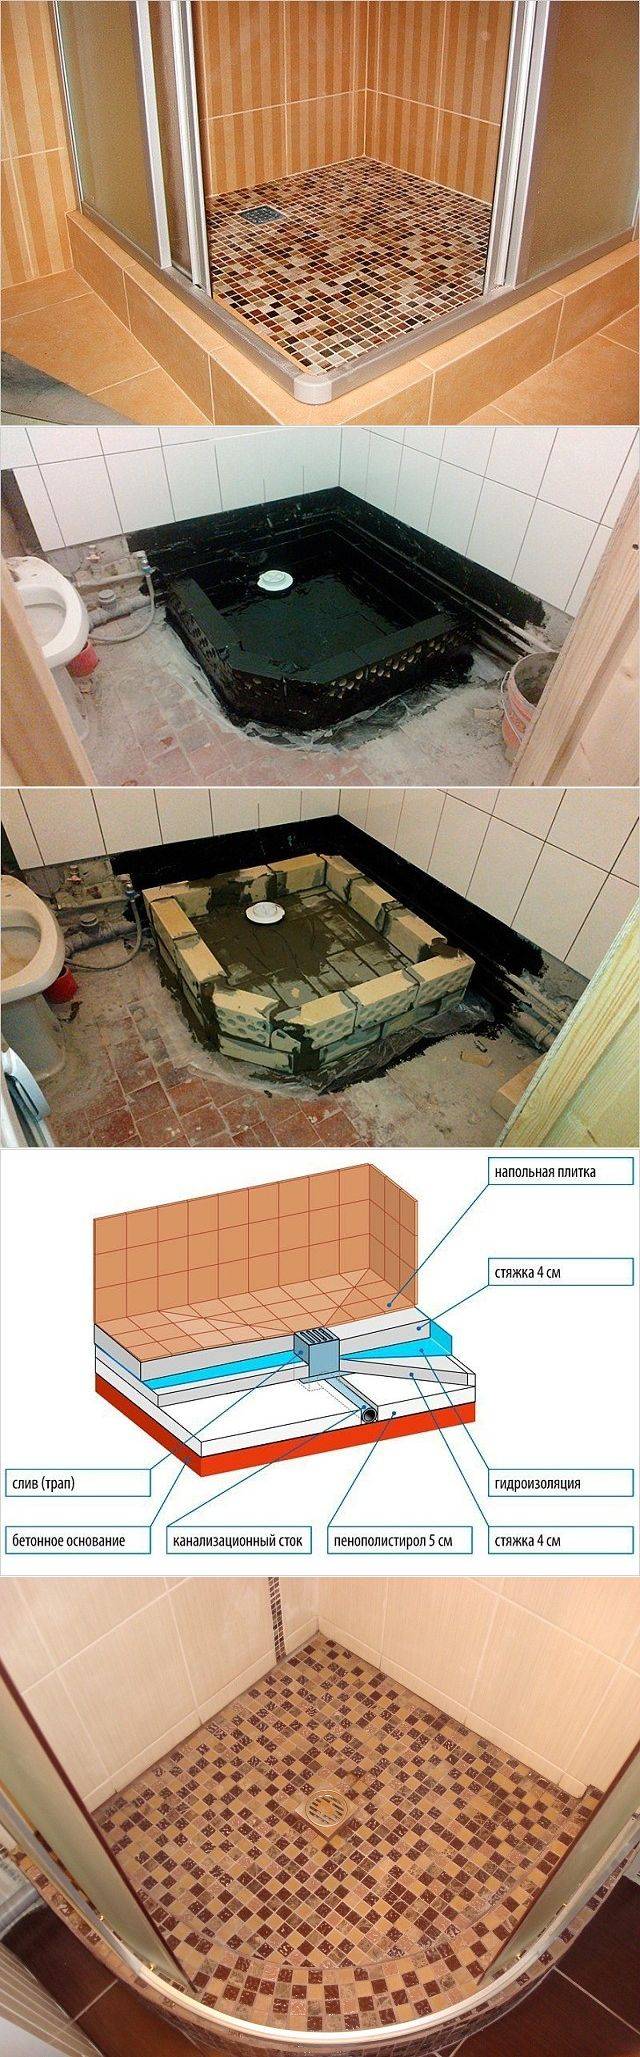
The main part of any shower is the shower tray. It can be both factory made acrylic, steel or cast ironand is made of concrete and tiles.
A homemade pallet is usually a section of the floor with slopes to devices for draining water hidden in the floor, bounded by sides and tiled. In trendy interiors, the entire surface of the bathroom floor is used as a pallet, configured in a certain way to allow water to drain into the sewer (this option requires serious preparatory work and reliable waterproofing of the entire room).
Consider the simplest version of the pallet - a cement screed with sides.
At the stage of preparatory work, the first task is to draw up at least a simple drawing indicating the dimensions of the future pallet to facilitate further work. The place for its placement depends mainly on the location of the water and sewer pipes. If these communications are not in the right place, you need to mount them before you start work on creating a pallet.
“The most important thing to build on is understanding at what level a sewer ladder can be installed,” explains Aleksey Klimovich, a specialist in plumbing work and equipment. - If we are talking about a private house, then the sewer pipes are hidden quite deep there, which allows you to install a ladder below the level of the existing floor. You can completely do without a pallet and sides - there will be enough slope of the tile. To implement this, you will need a drain with a good drainability (that is, so that it can take more liters per minute than it will pour out of the mixer during this time).
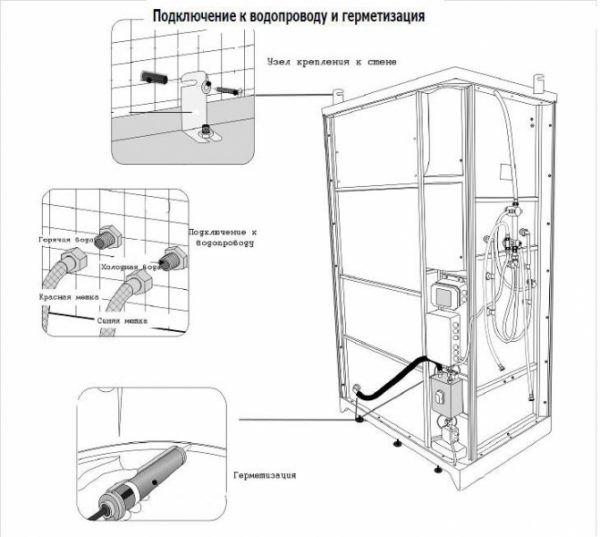
The specialist says that if the water pipes have not yet been divorced, then it is worth considering their hidden installation.
“This is a modern solution, when only the faucet lever and the watering can are visible on the wall in the shower room. The latter can be installed in the ceiling.
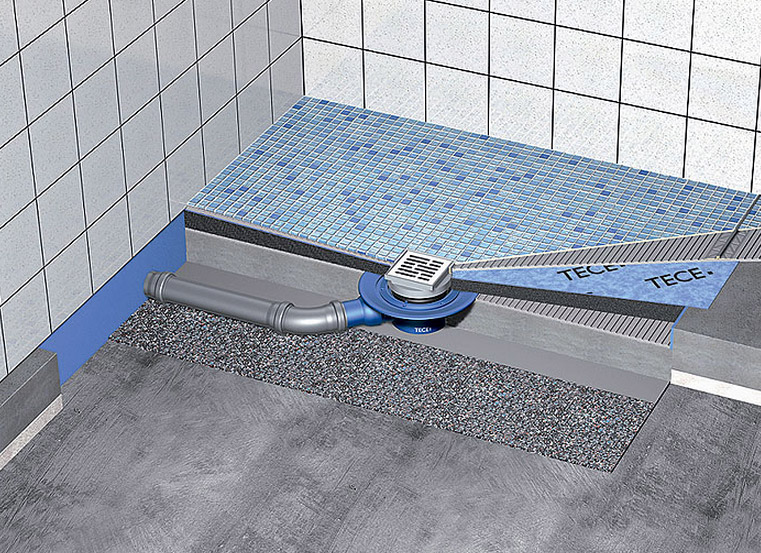
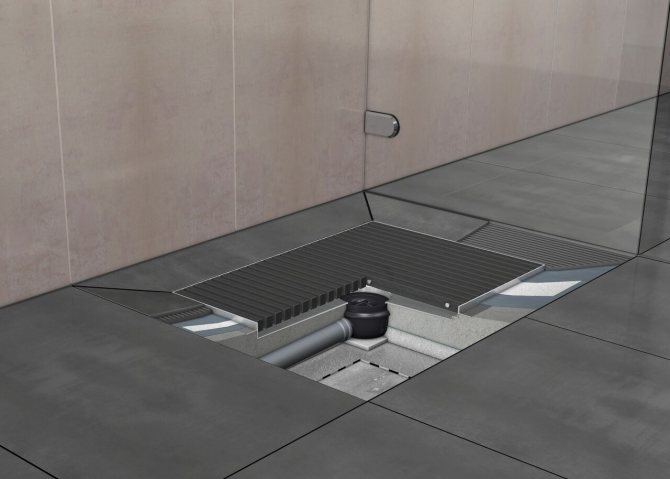
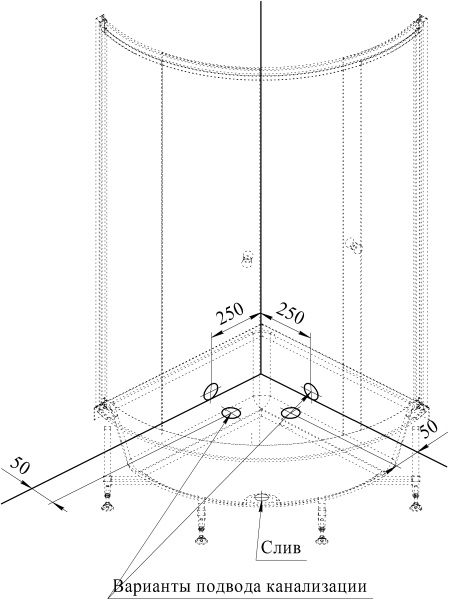
Drainage device
Before you make a shower corner of such a plan, you need to think through everything to the smallest detail. The floor in the bathroom lies in the same plane with the bottom cover of the shower cabin, and therefore the issue of drainage is quite acute.
At the moment, 2 types of possible water drainage devices under the shower of such a plan have been invented: with the help of a channel and a ladder. They perform the same functions, but are arranged in completely different ways.
For reference!
In the case of choosing a floor drainage system, the sole itself acts as a pallet.
In order to prevent water from spreading around the entire perimeter of the bathroom, it is necessary to design the coating at a slight slope.
It is important to take into account the fact that the ladder network is of small size, and accordingly the floor must be sloped from all edges to the center of the grate. This point should be taken into account at the stage of laying the cladding. In the event that a mosaic acts as a finishing material, it will have to be adjusted using specially designed nippers
In the event that a mosaic acts as a finishing material, it will have to be adjusted using specially designed nippers
This point should be taken into account at the stage of laying the cladding. In the event that a mosaic acts as a finishing material, it will have to be adjusted using specially designed nippers.


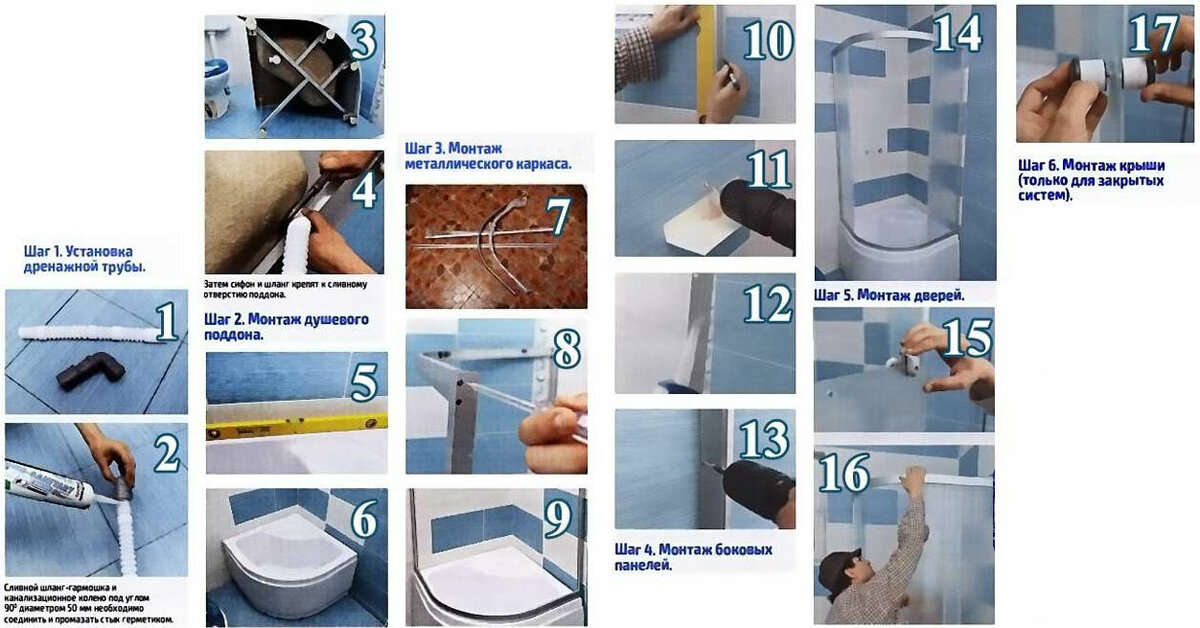
Making a booth from scratch, step by step instructions
Preparation of the necessary materials and tools
- ruler, tape measure, pencil;
- laser level, marking cord;
- cement-sand mortar, expanded clay, mixing container;
- waterproofing (liquid formulations and roll materials);
- sheet extruded polystyrene foam (at least 5 cm thick);
- tile adhesive, grout;
- drain system (ladder), pipes;
- facing material.

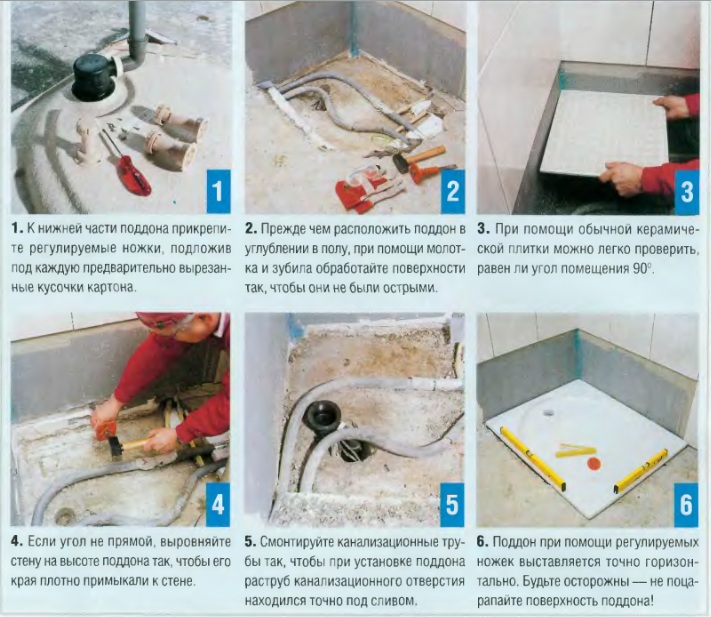
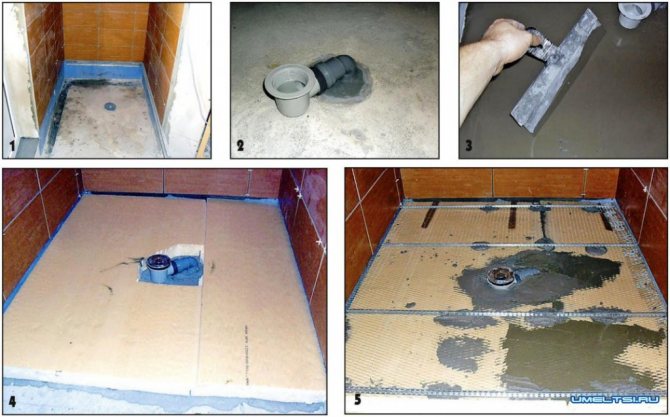
Marking and preparation of the base
Before installing the shower room, consider installing a ladder: with raising the level of the entire bathroom floor area or only in the bathing area (in this case, the cabin will have a small step):
- clean the surface of debris and dirt, if necessary, dismantle the old lining;
- use a tape measure to determine the location of the future location of the drain.If the ladder is installed in the center, the floor must be made with a slope on all sides along the perimeter of the cabin; if the drain is near the wall, the plane should have a greater height on the opposite side;
- mark the zero level on the wall;
- adjust the laser level so that the beam is located in the center of the hole in the sewer pipe;
- set the ladder so that the inlet pipe is above the beam, while taking into account the height and thickness of the upper platform of the glass;
- on the wall (1 cm above the beam), mark the level of the drain hole with a pencil;
- to indicate the slope of the surface, make marks on the walls 2-3 cm above the beam, transfer them around the entire perimeter;
- With a marking cord, beat off the lines according to the marked marks.

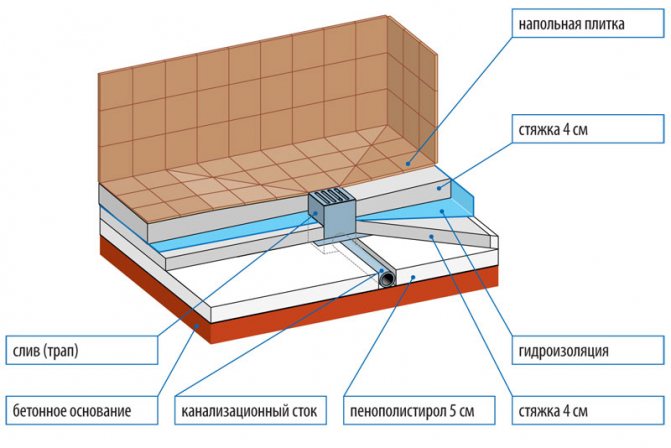
Waterproofing the installation area
A second insulating layer must be made on top of the dried rough screed: lay sheets of fiberglass or roofing felt in several layers, placing the edges with the call to the walls. Bend in the corners and fix with glue.
Pipe laying and foundation construction
- install the elements of the ladder, check the quality of the assembly by pouring water. To avoid clogging with particles of debris, seal the grate with tape;
- make a formwork out of moisture-resistant drywall or oriented strand board;
- fix the structure on the floor;
- install the drain system on the base, aligning the position of the outlet pipe with the sewer pipe and observing the slope in its direction (by 1-2 ⁰);
- fill the remaining sections of the floor after the installation of the ladder with polystyrene foam;
- prepare the cement-sand mortar for work, pour the screed, its drying time will be at least 2-3 days.
Another option for carrying out work is possible: install the drain system in a specially designed formwork, fill the rest of the area with a solution of cement, sand and expanded clay, taken in a ratio of 1:1:2 (add water in a minimum amount). On a frozen screed, make a layer of waterproofing and lay polystyrene foam.

If it is impossible to adjust the position of the ladder, heat the plastic pipes with a building hair dryer, then slowly and smoothly give them the desired direction and hold it until the material cools.
Surface leveling
In the process of pouring, control the horizontal plane according to the marks on the walls and the observance of the required slope: with a trowel, draw lines from each corner of the ladder to the corners of the shower area, removing the thickness of the mortar in the desired areas. You can use a rule or a rail for this purpose. Correct minor irregularities with a construction grater.
After the screed has dried, dismantle the formwork.
Frame assembly and ceramic tiling
In the case of arranging a shower room with a frame of enclosing walls:
- make markings for attaching parts to the walls;
- fix profiles and guides;
- make installation of partitions with seals;
- fix the door frame and install the fittings depending on the type of opening mechanism.
If cinder block, brick, plasterboard partitions or walls are used as a protective barrier, decorate the surface with ceramic tiles after laying the floor: the bottom row of vertically arranged elements will “cover” the horizontal coating.

Lay with a notched trowel and a tile adhesive with high adhesion and resistance to moisture.
Treat seams and joints with moisture-resistant silicone sealant.
Laying finish tiles
Lay ceramic cladding, starting from the ladder and moving towards the perimeter. Tiles in areas along the walls must be cut and joined corners.
For the do-it-yourself coating installation process, use a waterproof tile mortar.
Shower cabin design
Of the most important parameters of modern design, first of all, it is worth noting ergonomics, visual lightness and maximum “unloading” of space. In pursuit of these goals, designers have developed relatively compact and quite stylish shower cabins without a pallet. Such products are simply installed on the bathroom floor, and as a result, the shower becomes a harmonious addition to the overall interior.
Shower enclosures that do not have a tray are equally suitable for both small spaces and spacious bathrooms. The absence of a pallet allows you to reduce the cost of floor space to a minimum, and an extensive range makes it possible to choose the best option for the implementation of any design solution.
The lightness of the shower cabin is determined by the materials of its manufacture, which are most often represented by transparent or organic frosted glass, on which no water stains remain after taking a shower. However, depending on the interior, you can choose another material - plastic panels, glass blocks, block walls, etc. If you want to make an original design, you can purchase a floor shower with double glass, inside which LEDs or lights are installed.

To create a stylish design, you need to choose the right materials. If necessary, you can even use the services of designers - it will be much easier to create a really interesting project. When designing a bathroom, you need to take into account the features of the entire room so that each element performs its function.


DIY shower cabin examples
Where to start work on creating your own shower cabin? Yes, it is probably better to study the experience of those people who have already passed this stage and are now enjoying the fruits of their own efforts.
If we talk about a shower cabin in a private house, then it can be placed anywhere. Or rather, where does she go?
If you pay attention to the photographs, then on them the booth is comfortably located in the space between the wall and the stove, in an ordinary kitchen. This creation of engineering thought does not have a steel pallet, it is replaced by a tile, which was laid out at a slight angle to the gutter. Cabin floor raised above kitchen floor
In this case, this is a necessary measure so as not to dismantle the floor to install a drainage funnel. So that water from the cabin does not get into the kitchen, it was separated by a threshold with two degrees
The floor in the cab is raised above the floor in the kitchen. In this case, this is a necessary measure so as not to dismantle the floor to install a drainage funnel. So that water from the cabin does not get into the kitchen, it was separated by a threshold with two degrees.
The craftsman needed brick, tile, and damp-resistant drywall to create his booth. Plastic seamless panels are installed on the ceiling. Even the kitchen stove looks harmoniously combined with a shower cabin, as they are finished together in the same style.
Water is supplied by a pumping station from a well.There is a compact size water heater. All this made it possible to obtain a small shower cabin with cold and hot water.
A shower stall will look very good and unusual if you assemble it yourself from glass blocks. This material is no less durable than brick, but at the same time it looks very decorative. You can learn how to lay glass blocks very quickly, and you can make the most unusual forms from it. If you look at the photo, you can see how stylish the glass block looks paired with natural stone tiles.
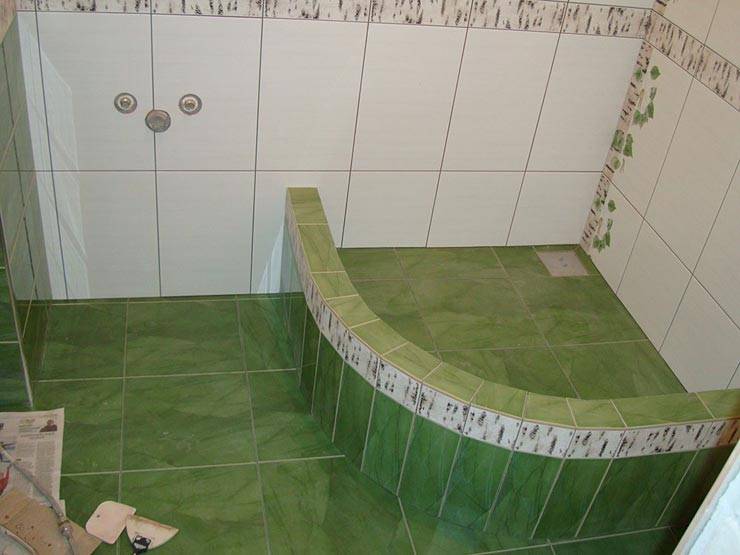
On the floor of the cabin there is a concrete screed, on top of which there are porcelain tiles. The walls are also ceramic tiles.
Not everyone likes the option of replacing a transparent screen with a film curtain, but in this case it looks very good.
Mosaic cladding and waterproof fabric suspended from a chrome-plated bow. The whole composition looks like a work of a real designer.
When choosing material to create your soul, you should pay attention to cellular polycarbonate. It is quite durable, not afraid of water and looks beautiful. On its basis, you will get nice transparent cabin walls and a door.
On its basis, nice transparent cabin walls and a door will turn out.
The edging for it is made on the basis of aluminum or plastic. The door itself can be hinged, but you can also put a sliding door. This is easy to do if you fix the wheels from the cabinet on the underside of the polycarbonate and insert them into the guide.
Due to its flexibility, polycarbonate allows you to create a wide variety of shapes.
No less popular for creating showers and plexiglass.It is not as strong as polycarbonate, so it will have to be framed with stainless steel corners.


On the basis of glass, simple and airy home-made structures are obtained.
It is easy to combine with tiles.
Quite a good option for facing - plastic lining. It can be easily and quickly connected into a single panel that is not afraid of moisture. It sticks to absolutely any surface.
The walls can be made on the basis of a homogeneous material, or they can be assembled from different ones.
Turning on the fantasy, and from durable plastic, you can create a cozy corner of relaxation. As if in an oasis, you can not only bathe here, but also relax under the jets of warm water and meditate.
Quite easily and quickly, you can make a cabin frame out of drywall, then finish it with moisture-proof material and tile it. The design will be inexpensive and easy to install.


