
- Installation and repair
- Installation of a wired bell
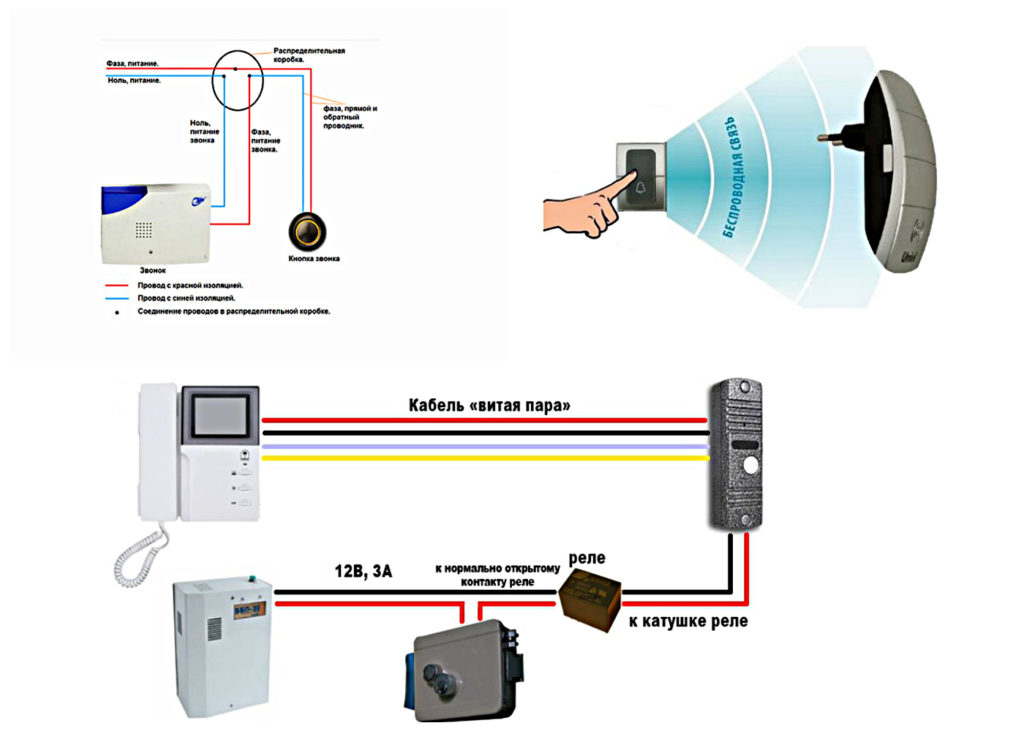
- Connecting a wireless call
- Setting up a video call
- Design and types of electric calls
- How to connect a call button
- Wired and wireless
- Which is better, wired or wireless calls?
- Connecting to the network and checking the functionality
- Do-it-yourself mechanical door lock
- How to connect a bell in an apartment: wired, wireless
- What tools will be needed to carry out the work
- Installing the speaker
- Button setting
- Connecting the electrical wire to the button
- Masking and fixing wiring
- Connecting the main bell unit
- Connecting the doorbell yourself
- Types of doorbells depending on food
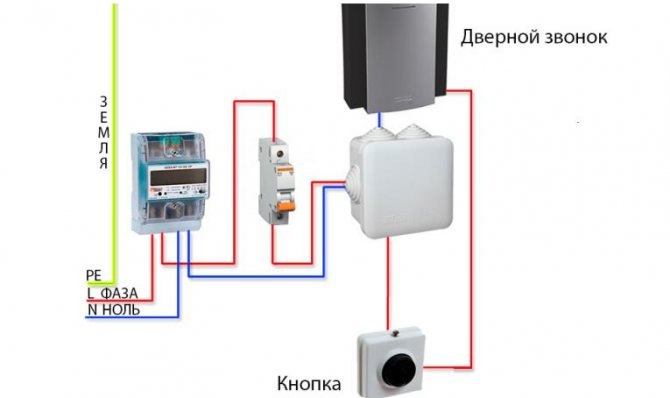
- Schemes for connecting a doorbell to 220 volts (apartment house)
- How to connect an electric bell and its button in an apartment or house
- How to connect a call
- How to connect a call button
- Overview of popular wireless doorbells
- LUAZON LZDV-12-1 BLACK
- Cacazi
- IN HOME ZBN-6
- Rexant GS-215
- ERA C91-2
- Wireless models
Installation and repair
Installing a wired bell is more difficult than connecting a device on radio waves. As for the video call, it can be either wired or wireless.
Installation of a wired bell
To install this type of doorbell, follow these steps:
- choose a convenient place to install the block and button;
- de-energize (turn off) the electricity supply in the apartment;
- drill a hole from the hallway to the entrance;
- run a cable to connect both parts of the device;
- install the main unit and the button in the places provided for them;
- connect a zero cable to the internal device;
- connect the phase from the button to the switchboards;
- restore the power supply and test the operation of the bell by pressing the button.
Connecting a wireless call
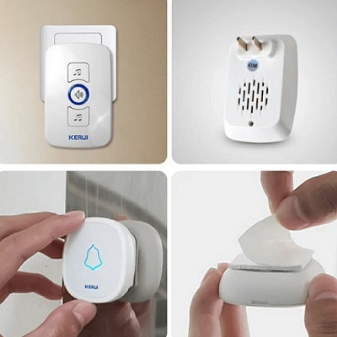
Even a teenager can install a wireless bell, since for these purposes you do not have to drill walls and connect electrical wires. Actions are performed in the following order.
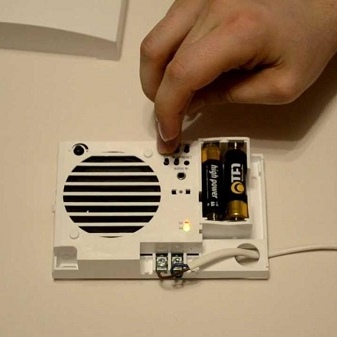
- Provide the button and receiver with batteries.
- Install a button on the outer wall of the apartment at the front door. It can be fixed with double-sided tape, but for reliability it is better to use screws.
- Place the indoor unit (speaker) in one of the rooms, preferably in a place where the bell will be heard throughout the apartment. It can be connected to the mains if necessary.
- Next, you should choose the melody you like and check the operation of the call.
Despite the ease of connection, the instructions are still worth reading, if only to know the remote capabilities of the model. Placing the receiver and transmitter too close together can cause interference.
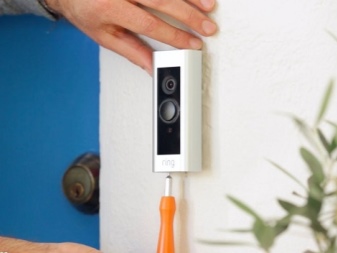
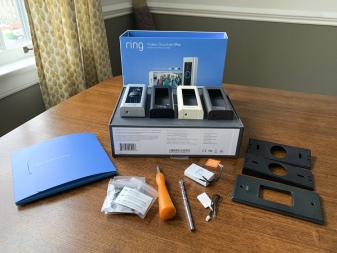
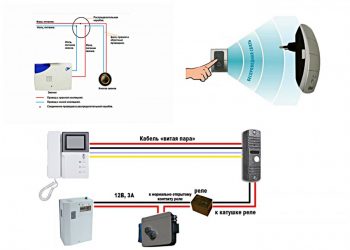
Setting up a video call
You can always use the services of a specialist to set up a video call, but for those who decide to do it on their own, we will consider the workflow step by step.
- If the video call device provides batteries, they must be installed in advance. If they are not available, you will need an outlet at the front door.
- It is necessary to choose a place and make markings where the monitor and call panel will be located.
- The intercom can be placed on a shelf or mounted on a wall. If a wall is selected, a bar is mounted on it with dowels and screws, and the device is hung on the bar.
- If this is a wireless model, the display can be installed in any convenient place, but the height must be comfortable. An electronic bell will require the preparation of a hole for the cable.
- The outdoor unit "sits" on the screws.
- At the last stage, the device should be connected to electricity and check the operation of the video call.
- It remains to adjust the equipment and shoot a test video. All settings are made in accordance with the instructions provided.
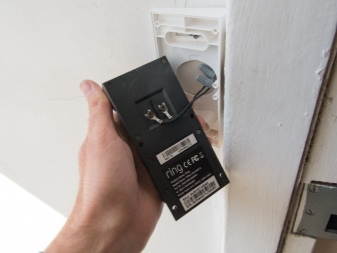
If during operation it is necessary to repair the device or replacement of used parts is necessary, it is better to entrust the work to specialists. They will change outdated electronics, be able to connect the cable and start adjusting the updated smart technology.
For information on how to connect a doorbell in an apartment, see the following video.
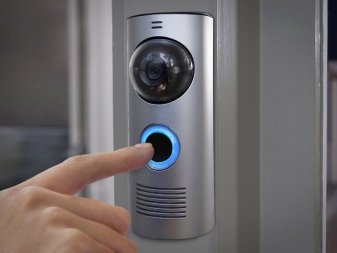
Design and types of electric calls
According to the principle of operation and design features, electrical models can be divided into 2 large categories: electromechanical and electronic. They are united by the principle of operation - the sound is heard when the button is pressed. At this point, the contacts close and voltage is applied.
The sound in electromechanical bells is heard due to the operation of the electromagnetic coil and the interaction of the percussion mechanism with the electric plate. Such models do not have adjustments, and the quality and volume of sound depend on the material and dimensions of the plate, hammer and bowl.
Construction of an electromechanical bell.The traditional monotonous sound is heard at the moment when the hammer begins to strike the bowl. Thanks to the device of the bowl, the sound is booming and loud
Electronic products differ in internal stuffing. Instead of interacting metal parts, electronics and a loudspeaker are located inside the box. The advantage is that you can adjust the sound volume, and for some models, select a melody.
Electronic models, in turn, are divided into 2 groups:
Wired, in which all parts are connected by wires. Pros: clear design, easy installation, reliability. Cons: depend on the supply of electricity, require drilling and wall chasing.
Wireless, giving signals by radio waves. They run on batteries or accumulators, less often - from the mains. Pros: do not depend on the mains connection, the button is protected from dust and moisture, easy installation. Cons: limited distance between blocks, regular replacement of batteries.
There are also video calls with a camera, but their design, installation method and principle of operation should be discussed separately. We will focus on current electronic models, which are present in large numbers on the domestic market.
How to connect a call button
- For connecting wires, it is necessary to disassemble the button and fix it to the wall with 2 self-tapping screws or a dowel-nail. Then strip the wires and connect them to two pins. The order of joining can be any.
- To the wireless button we insert the batteries and stick it on double-sided tape, but it is better to fasten it to the wall.
A doorbell is a familiar device that we use every day without even noticing it. But this is until you need to install a new one or replace the old one.This is where the difficulties begin: how to connect the bell, which wires to use, where to get power from and where to supply it ... There is nothing difficult to connect, but you need to know the diagrams.


Before you connect the call, you need to deal with its device. The amount of work depends on this, and their type of these works can also be different. At the place of installation, electric bells are residential and street. The difference is that the button in the second version has a sealed housing, with a high level of protection against dust and moisture. It is these models that are needed when installed on the street.
Not every doorbell is a simple device
Wired and wireless
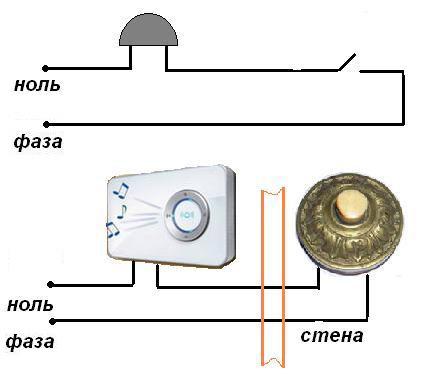
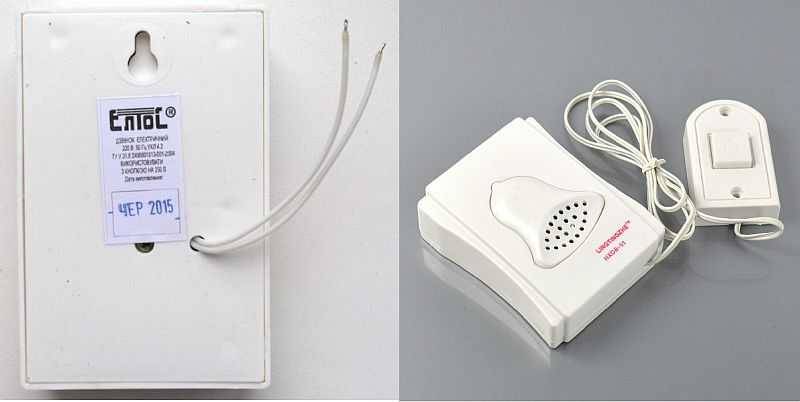
Any doorbell consists of two parts: a button and an indoor unit, which houses an electro-mechanical bell or a board and a speaker. According to the method of execution, there are wired and wireless electric bells. The wired blocks are interconnected by wires (hence the name). When the bell key is pressed, power is supplied to the indoor unit, which emits a beep.
The work of wireless is based on the transmission of radio signals. The receiver is in the indoor unit, the transmitter is in the button. Signals can be of two types: analog and digital. Analog wireless calls are cheap, but not very reliable: the signal is subject to distortion, which often causes false positives. There are also reverse situations - there are no sounds, because the signal is “lost” or has become too weak. Another nuisance with wireless analog calls is overlapping range with neighbors.Then it turns out that the buttons of the adjacent bells cause a signal on all receivers. Called the neighbors - you got a signal. And vice versa. How to fix? Change the frequency of signals. This is done by soldering the jumpers on both blocks.

Wireless calls - easy to install, but may have operational issues
Digital wireless calls are more reliable, but also more expensive. The digital signal is less susceptible to interference. Most companies develop their own waveform, so that the radius overlap does not cause problems. In addition, some models have the ability to change the regular frequency.
Which is better, wired or wireless calls?
The advantage of wireless is the ease of installation. No wires and problems associated with their laying. Minus - cheap models are unstable (especially in winter, when the batteries freeze), and reliable ones are expensive.
With wired fuss during installation is much more. But this is a “set and forget” option. Problems can only arise if the wiring is damaged.
Connecting to the network and checking the functionality
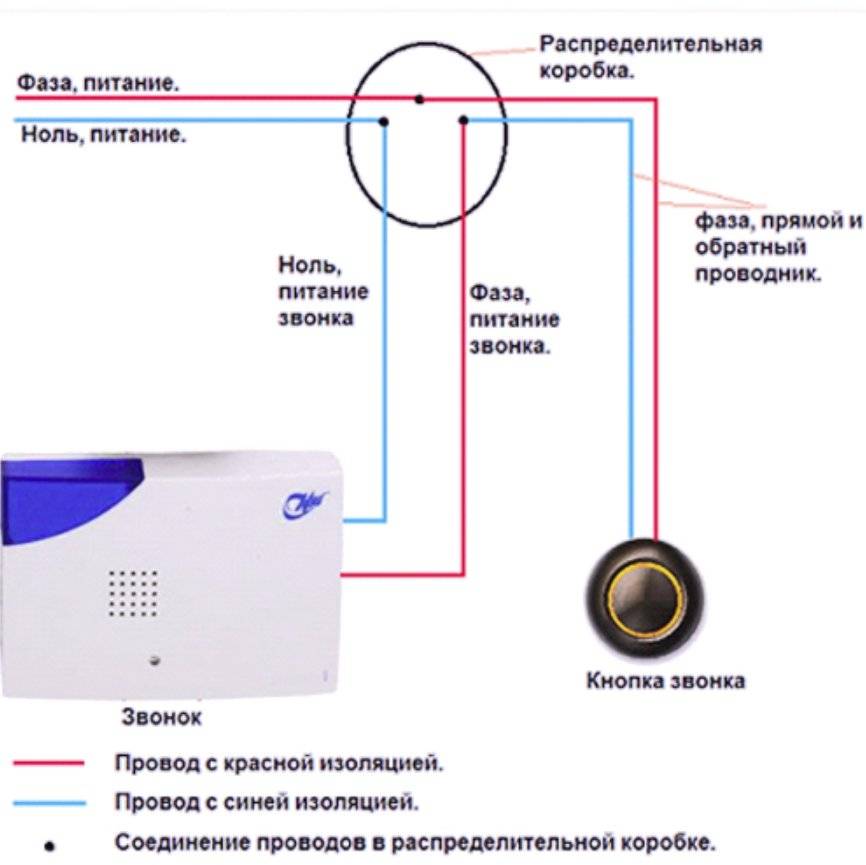
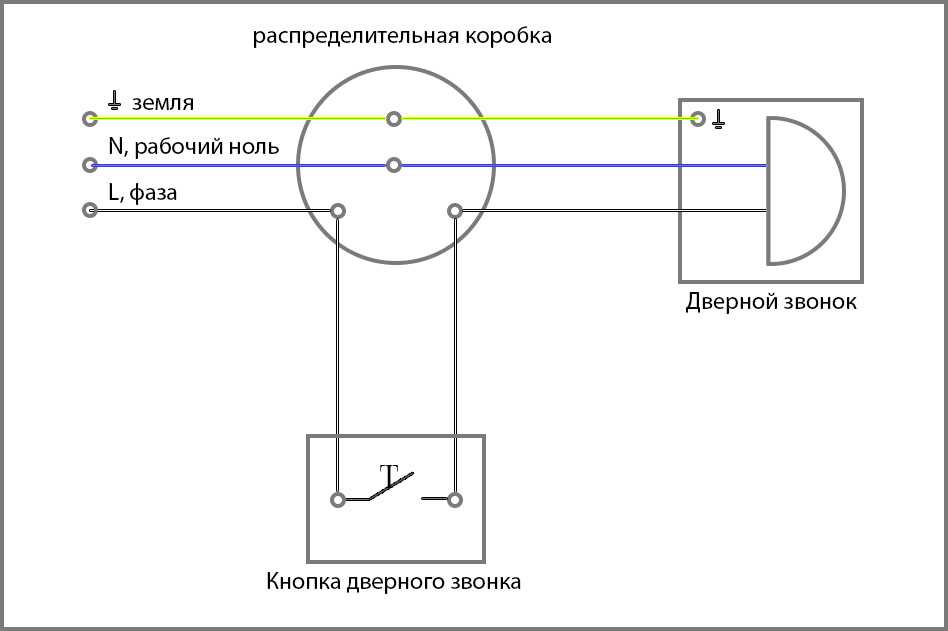
After completing the installation work, it is necessary to connect to the power supply network. First, on the input shield, the power supply to the apartment is turned off using circuit breakers. Then connect the neutral wire and phase to the corresponding supply wires in the junction box. A connection error may cause damage to the main unit, so you need to use the phase indicator before connecting the doorbell. If everything is done correctly, then after turning on the power, the circuit should work. If the bell does not work, then it is necessary for the tester to ring the wiring and fix the breakdown.
Do-it-yourself mechanical door lock
Popular among amateur mechanical doorbells is a device where the sound comes from a small bell when a suspended tongue strikes its dome. In addition to it, for making your own hands you will need:
- a long metal chain (can be soldered from several segments);
- wooden board;
- steel perforated tape, for example, 0.5×12×800 mm in size;
- insulating tape;
- fasteners (self-tapping screws, nails);
- paint for coloring the board;
- soldering iron;
- set of locksmith tools.
A mechanical bell is made in the following order.
- The plank is painted in a color corresponding to the interior design of the apartment.
- A spring is made from perforated tape, both surfaces of which are covered with electrical tape;
- The spring is made in the form of a twisted spiral.
- One end of the spring is made in the form of a suspension for a bell, and the other is a rolled surface for basing the fastening axis, which is a nail.
- An eyelet is installed on the board through which the chain is passed.
- To add design elements to the bell, an engraved plate made in a special way is attached, and a decorated plug is inserted in the center.
- One of the ends of the chain is attached to the spring, and the board with the bell itself is installed using self-tapping screws on the wall.
How to connect a bell in an apartment: wired, wireless
Usually the bell is connected to a 220 V network. In this case, operations similar to connecting lighting devices are performed. Before installation, you should determine the location of the devices. Also, do not perform work with the shield turned on. There are two types of doorbells - wireless and wired.
Wireless ones are easier to install, but they are less reliable and trouble-free, and they also require a replacement battery or accumulator. Wired options can last for decades without maintenance, typically run on 220V AC, but are more difficult to install.
Consider how to connect a doorbell in all possible ways.
What tools will be needed to carry out the work
To set up a call, you will need:
- The bell itself (internal and external units);
- Dowels with screws, for installation;
- Transformer.
- Button.
- The wire is special for low voltage connections.
- Screwdrivers, ordinary pliers, long-nosed pliers, side cutters, level, set of drills.
- Drill driver, stripper for stripping conductors.
- Insulating tape, tape measure, plastic clamps.
If a bell has not been installed in the house before, then you need to choose a suitable place to install it. Usually a call consists of two elements - a button and the call itself (speaker).


Your bell should have a diagram indicating in which position it should be fixed.
Installing the speaker
This is the first step towards connecting the call in the apartment. The speaker usually has technological holes for mounting and for the input of the electrical wire. First you need to place it on the wall and drill a hole for the conductors. Use a level to keep it even. After the hole is ready, you need to insert a wire into it and stretch it to the place where the button will be installed.
Button setting
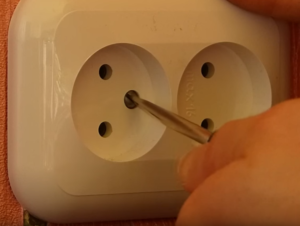
It is necessary to drill a hole for the conductor in the wall at the location of the button. After that, you need to thread the cable into the hole so that it sticks out 15 cm from the outside. Strip the cable with a stripper or other available tools.Bare no more than 2 cm.
Tip: The recommended mounting height for the button is 1.5 meters. It is considered the most versatile and comfortable.
Cable stripper
Connecting the electrical wire to the button
Move both stripped conductors apart. Insert the ends into special clips that are located on the back of the button. Beforehand, the wires are bent so that they wrap around the base of the clamp.
Then the clip is pulled tightly with a screwdriver. Thus, the electrical wire will hold securely and will not fall out during operation. After both wires are fixed, you can mount the button to the wall using a drill, screws and dowels.
It is advisable to set it according to the level.
Masking and fixing wiring
The wire must be fastened with plastic clamps. The clamps wrap around the cable and are attached to the wall with a drill and screws. Then the wiring can be masked using skirting boards or all kinds of decorative inserts.
Connecting the main bell unit
To the main unit there is a cable consisting of two wires - feeding and transmitting a signal when someone calls. It is recommended to mark the electrical wires with different colors (if they are of the same color), for example, paint them with a marker.
Main unit, inside view
The conductor from the button must be folded in half and inserted through a hole in the wall, then threaded through the hole in the main unit, brought out and left with about 25 cm of margin.
It should be noted: one end of the wire folded in half goes to the button, and the second will be connected to the power supply. Therefore, its length should be calculated.
After that, you can attach the main unit to the wall with a drill.Thus, we get an open box of the main unit attached to the wall, with a double-folded cable sticking out of it. Both ends of the cable go into the hole and are behind the wall.
Now, inside the main unit, we separate both wires of this cable from each other and cut one of them (it is desirable that it be white and the other wire black). As a result, you will get two ends of the electrical wire, which must be distributed to the clamps inside the main bell unit.
Connecting the doorbell yourself
In our life there are many multifaceted situations and cases. One of such relevant and at the same time simple cases is the problem of how to connect a bell at the front door of an apartment (house). To put it bluntly, the task of connecting a doorbell is simple and can be solved independently, without the involvement of specialists.
Types of doorbells depending on food
In principle, as we have already said, the main difference between calls is the supply voltage. So there are calls with a voltage of 220 volts and powered by batteries. The advantages of the first are that for their work it is not required to redo the electrical wiring in the apartment.


In most cases, apartments already have a standard bell connection scheme built into the wall (the first scheme in the paragraph “Doorbell Connection Diagrams”). The disadvantage of such calls is the dependence on electricity of 220 volts and a dangerous current, sometimes more than 100 mA.
But wireless calls, perhaps, can be distinguished into a separate group. Their main convenience is the absence of any wiring diagrams and wiring when connecting. The pros and cons of wireless calls are similar to battery-powered calls.They are mobile, do not require any connection scheme at all, and therefore are independent of 220 V. However, they are the most “gluttonous”. This is where you can change the batteries.
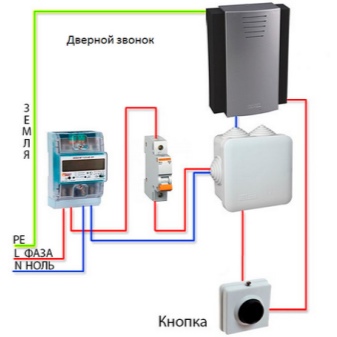
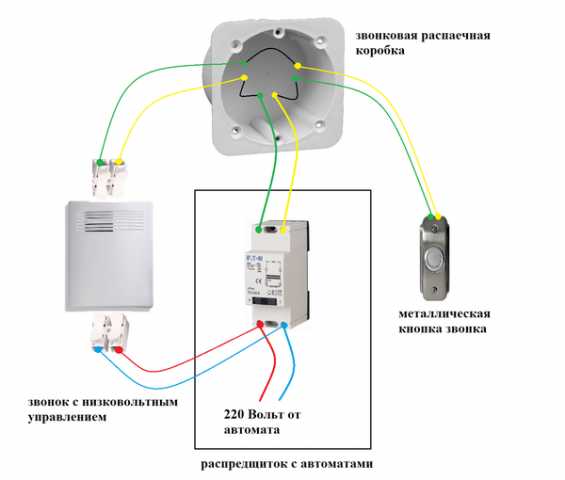
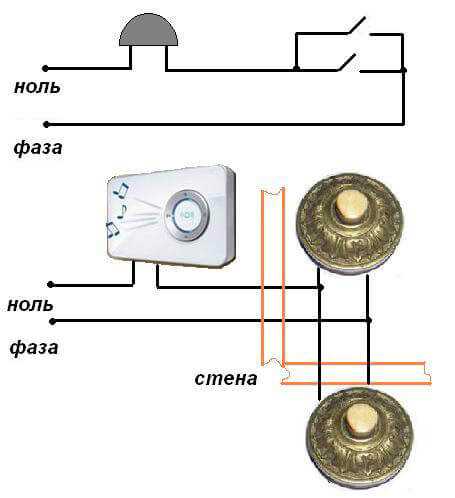
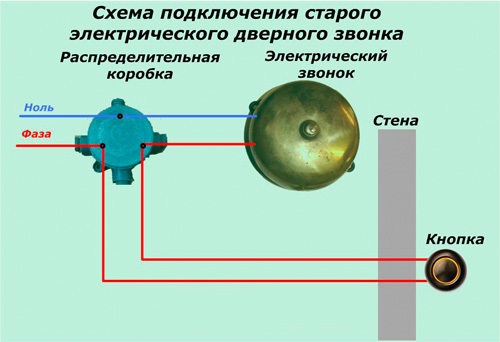
Schemes for connecting a doorbell to 220 volts (apartment house)
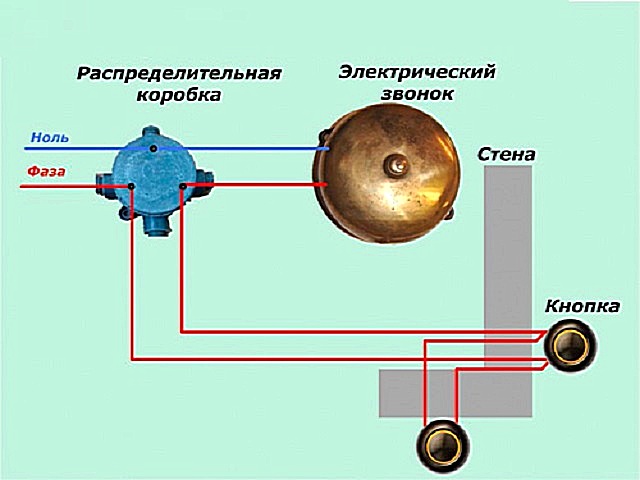
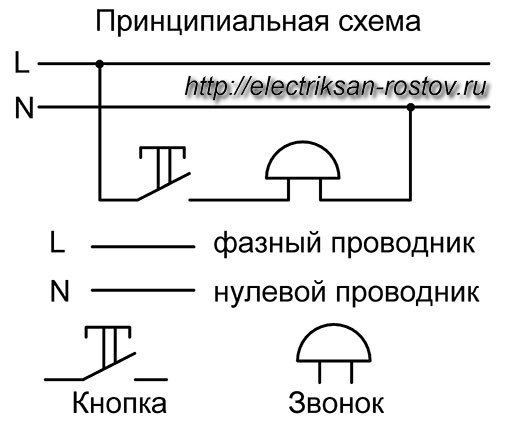
In most apartments, the simplest bell connection scheme is implemented, this is a closed circuit with a series-connected current source (electricity input to the apartment), a button and a bell. So, when the button is closed, the electrical circuit is closed. Then current begins to flow in the circuit, including through the bell itself, which means it starts signaling that the button is pressed.
 In most apartments, the simplest bell connection scheme is implemented - a closed circuit with a series-connected current source
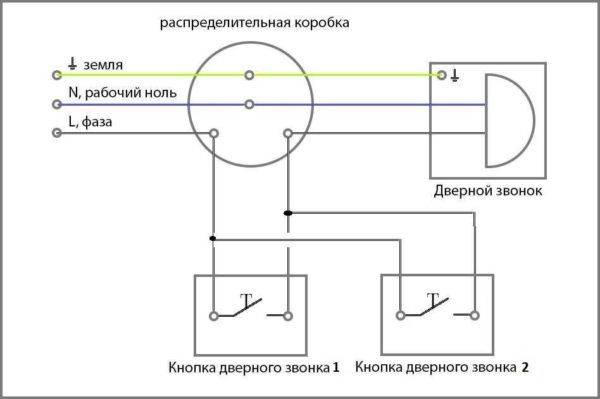
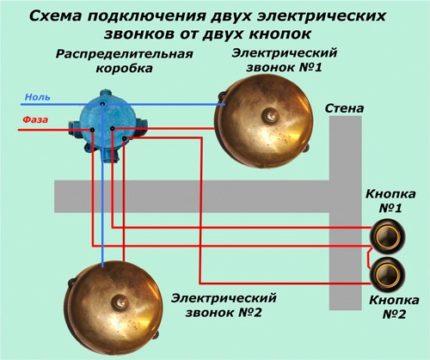
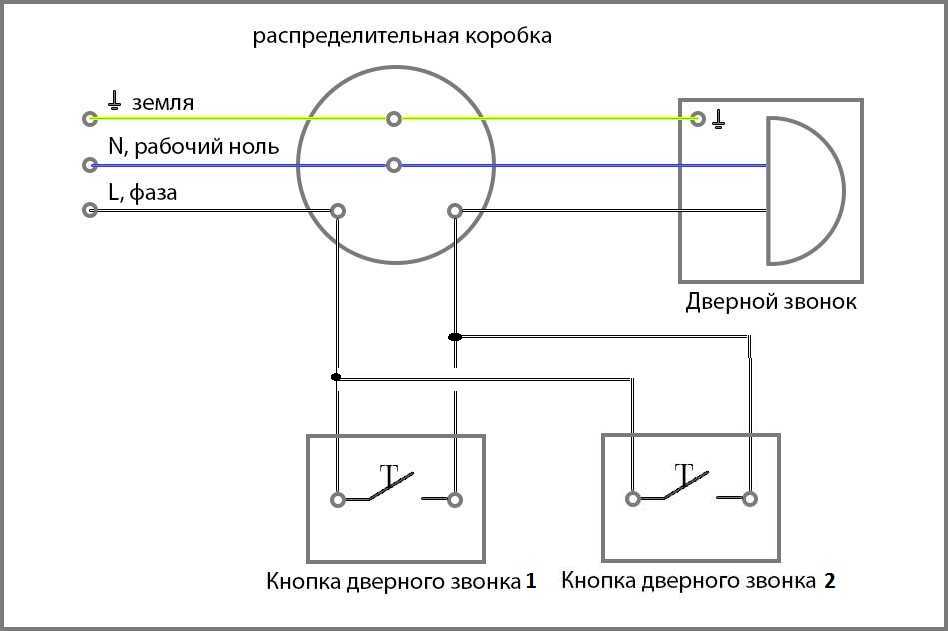
There are cases when there is a need to connect two buttons to one call. For example, in the cut-off for neighbors, if they suddenly decide to visit you, and the second button is on the landing. In this case, the circuit is slightly more complicated by connecting a button to a button in parallel. In fact, it doesn’t matter which of the buttons is pressed, but if at least one of them is pressed, the circuit will close and everything will end the same as in the first case. The call will work.
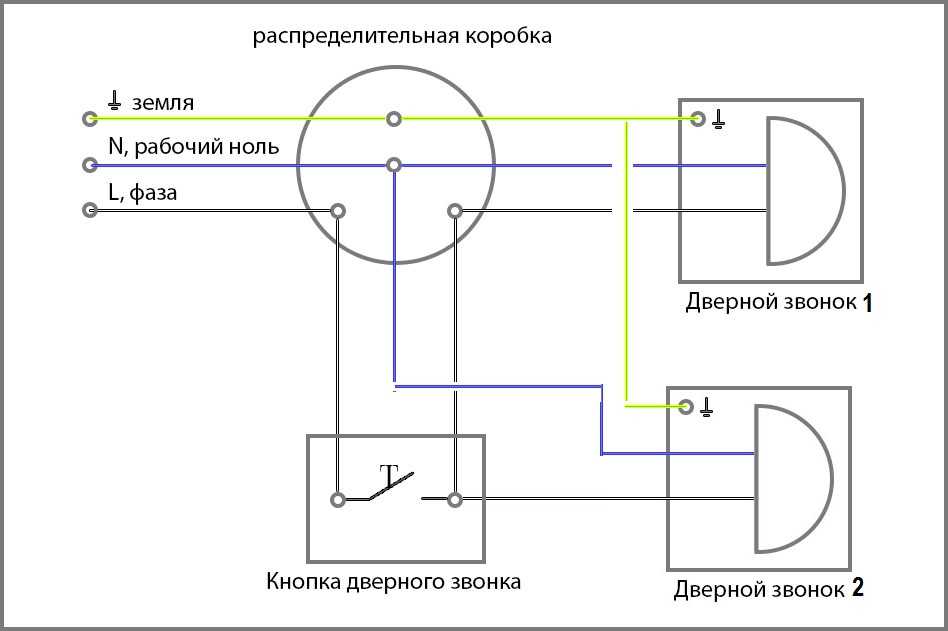
The third option is when you need to connect two calls. In this case, depending on the situation, it is necessary that a specific call work. In this case, the simplest option would be the usual parallel connection of calls relative to each other. In fact, there will be one supply line to the switching device (button or switch), and then it will diverge into two lines, for each of the doorbells.
Buttons are not closed or filled with moisture.In the first case, the call will not work, but in the second, it will constantly beep. Sometimes at half volume, due to high water resistance. Connecting a doorbell is not difficult and even easy. This means that it is not only possible to connect it, but in some cases you even need to do it yourself.
How to connect an electric bell and its button in an apartment or house
A modern electric bell consists of the body itself, installed inside a house or apartment, and a button, mounted near the entrance doors.
Modern models of electric bells for houses and apartments are of two types of connection:
- Wired, which are connected to home electrical wiring. In addition to the installation site of the button and the bell, it is necessary to stretch a two-wire cable.
- Wireless with a range of up to 100 meters, which are quick and easy to install. A radio signal is transmitted from the button to the bell, therefore no wires are required for connection. But you need to install batteries in both the button itself and the bell. Most models of wireless models can also be operated from a 220 Volt mains.
For practical reasons, it is better to use a wired bell for an apartment - set it and forget it. But for a private house, when the button is installed at a distance near the gate or gate, it is better to use a bell with a radio button.
It is often better to use the wireless option in apartments, for example, if the cable to the button is interrupted or broken, or it must be installed near the common doors with a lock in front of the entrance to the landing.
How to connect a call
All modern bells are usually equipped with a light indicator of operation and a separate power button on the body. Be sure to turn it on after the installation and connection work is completed.
Electric bell connection options:
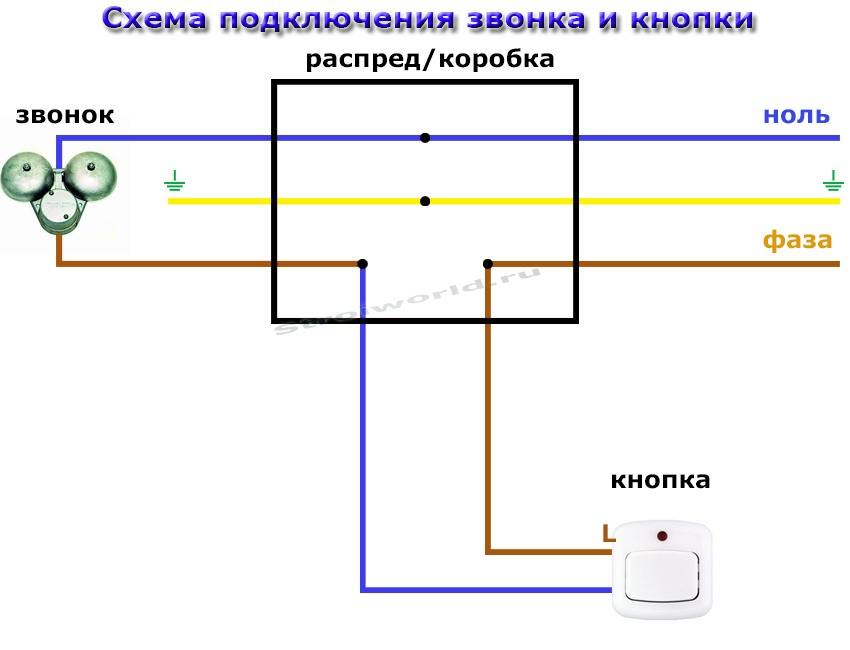
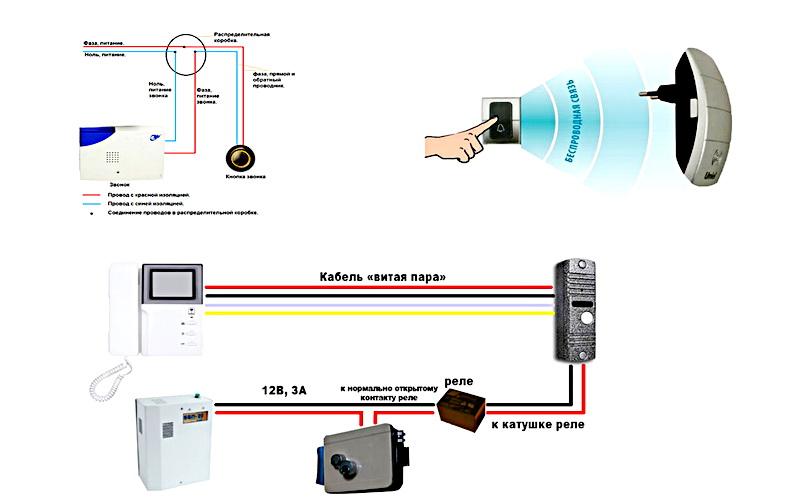
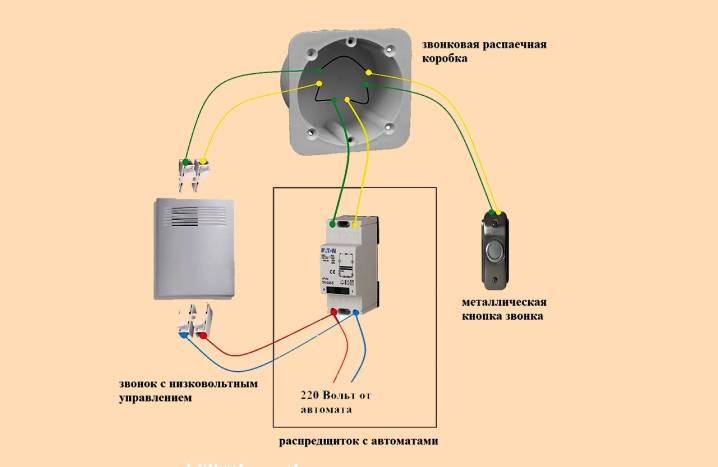
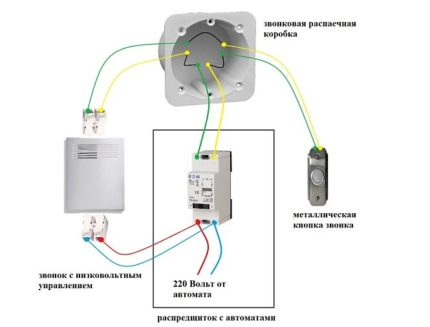
- A wired bell and button is the most common option. From the wiring, zero is connected directly to the bell itself, and the phase is connected through a button, when pressed, the circuit closes and a signal is triggered or a melody plays. In practice, this is done as follows, two 2-core cables are brought into the electrical wiring junction box and connected. One cable goes to the button - one of its wires is connected from the phase twist in the box, and the second one is connected to the wire of the second cable going to the bell. The remaining wire to the bell is connected to zero twist in the box.
- Connecting a wired bell with two buttons. If necessary, you can connect 2 or more buttons for one call. All of them are connected in parallel to each other. Practically, this is done by adding one button to the connection twists in the box, similarly to the second.
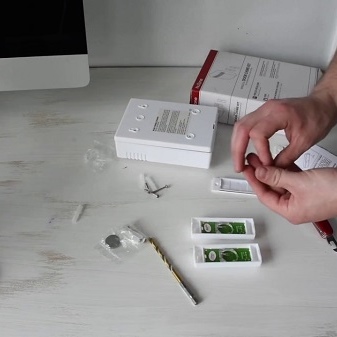
- Connection of a wireless call on batteries. It is necessary to disassemble the case or open the battery compartment cover and insert the batteries in the correct polarity. That's all left to flip the switch. Very fast and no wiring required.
- Connecting a wireless bell from the mains. We connect directly without breaks the phase and zero from the junction box to the bell contacts under 220 volts. There are options with a plug - just insert such a device into an electrical outlet.
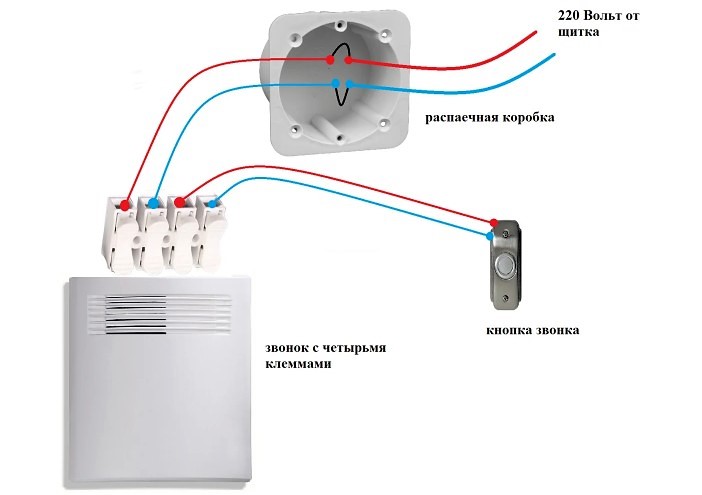
- Connecting a wired bell with 4 contacts. Rare variant.One pair is for connecting the power supply, and the second is for two wires from the button. I do not recommend buying these models.
How to connect a call button
- To connect the wires, you need to disassemble the button and fix it to the wall with 2 self-tapping screws or a dowel-nail. Then strip the wires and connect them to two pins. The order of joining can be any.
- We insert batteries into the wireless button and stick it on double-sided tape, but it is better to fasten it to the wall.
I recommend for a house or apartment, if there are wires for a bell and a button, install wired options. If not, or broken off, then wireless.
Overview of popular wireless doorbells
I will describe several common models, between which I chose myself. I give them as an example: you will find much more on the Internet. Each of them has pros and some disadvantages. Weigh your own needs, and feel free to choose among popular models.
LUAZON LZDV-12-1 BLACK
This model has a large range, so it is suitable for large houses. Electric wireless doorbells such as the Luazon LZDV-12-1 Black do not require a battery to be installed in the speaker. You only need one LR23A button cell battery.
pros
- Range 150 m;
- 32 melodies, volume control;
- In addition to the sound signal - light indication;
- Stylish design (black);
- Easy installation;
- Power supply of the receiver from the mains;
- Good feedback;
Minuses
- Material - plastic (not suitable for the street);
- Power supply of the speaker from the mains;
- Power supply of the door button from the battery;
Price:
About 600 rubles
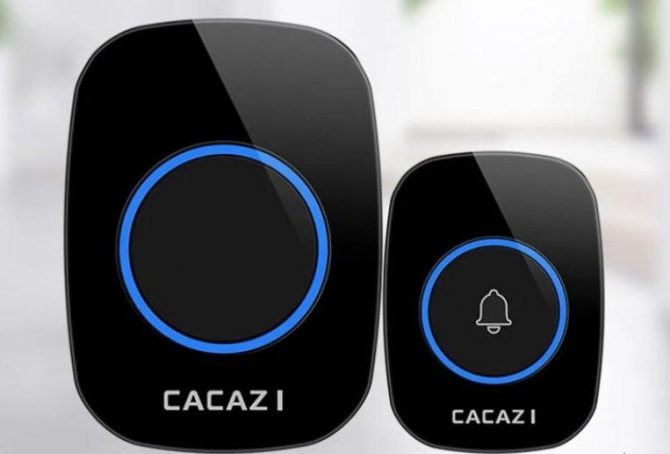
Cacazi
This model is different in that it does not require batteries at all.The receiver is connected to the mains, and a miniature "power plant" is mounted in the door button. It fires every time you click on it, generating a signal. In addition, it is almost a full-fledged long-range wireless radio call for the outdoors, if you do not take into account the poor protection against moisture.


pros
- No batteries needed;
- 120 meters signal transmission radius;
- 38 melodies;
- Volume control, up to mute;
- Light indicator;
- Operating temperature from -40 to +60 °С;
Minuses
- Poor protection against moisture ingress;
- Power supply of the receiver from the mains;
Price:
About 700 rubles
IN HOME ZBN-6
Its distinctive feature is 2 receivers. This allows you to hear the sound anywhere in the apartment or house. Extended range provides good signal coverage.
pros
- 2 separate speakers;
- Range 120 meters;
- Speaker powered by 3 AAA batteries;
- Door button powered by 1 12V23A battery;
- 32 melodies.;
Minuses
- No volume control;
- Battery powered;
Price:
About 800 rubles
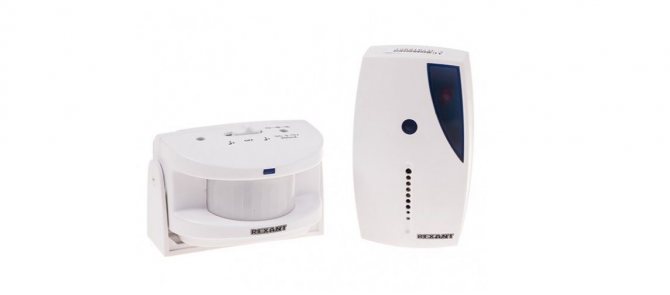
Rexant GS-215
Rexant GS-215 is a wireless bell with a motion sensor, although it can work without it. The sensor is remote, it works when someone enters the room. Thus, such a gadget can automatically signal the arrival of guests or, in the case of an office or store, customers.
pros
- Motion sensor, detection angle 110 degrees;
- Possibility to turn off the sensor notification;
- Powered by 3 AAA batteries;
- Volume up to 90 dB;
- 12 melodies;
- Operating temperature from -10 to +50 °С;
Minuses
- Battery powered;
- Not suitable for the street;
Price:
About 800-900 rubles
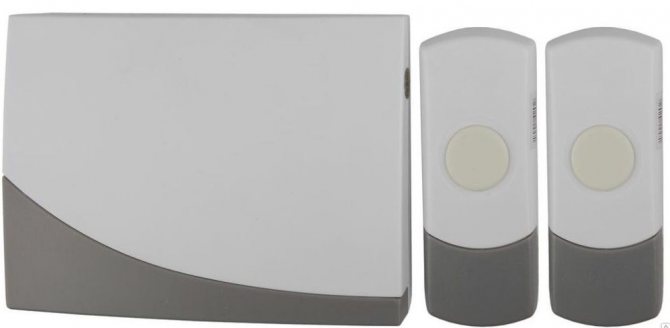
ERA C91-2
This device with two buttons can also be used as a waterproof waterproof outdoor bell for summer cottages.The degree of protection and operating temperatures allow the buttons to withstand outdoor conditions, although they are better placed under a canopy or canopy. It also plays different melodies, depending on which button is pressed.
pros
- 2 buttons;
- Moisture protection (from drops);
- Up to 100 meters of action;
- Batteries in buttons and receiver;
Minuses
- Batteries;
- Material - plastic;
- Only 2 melodies.;
Price:
About 1000 rubles
Wireless models
Wireless analogs can be powered from an outlet or from batteries. The first is inconvenient in that it does not work when the power supply is turned off, the second in that it requires regular replacement of batteries. Their advantage: they do not require connection.


Let the doorbell not be the calling card of the house, like the front door. But he leaves some idea of his owners. Typically, doorbells are selected by a melody that turns on when a button is pressed.
More sophisticated buyers pay attention to the technical characteristics of such a device. A wireless doorbell is a great way to show your guests your status and taste.


