- How to make a hood in the kitchen
- Tool
- Clapperboard
- Cupboard
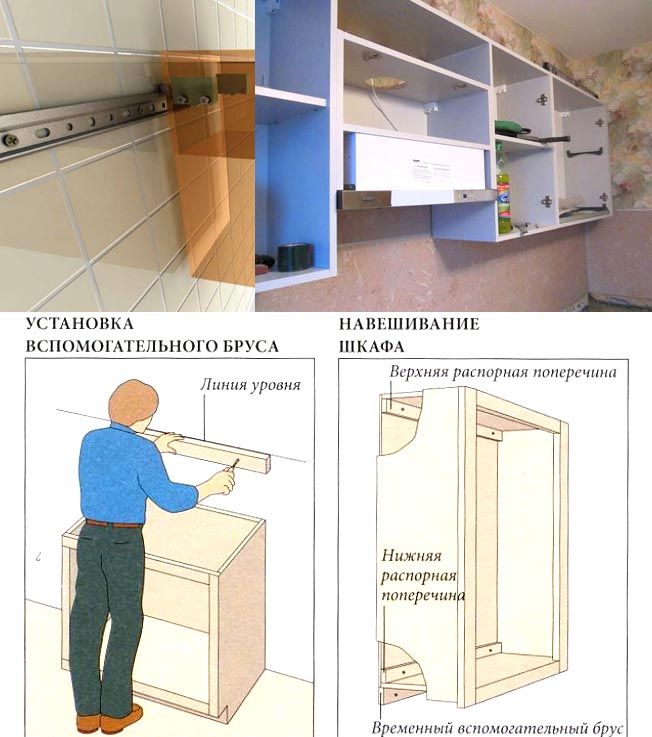
- Corrugation installation
- Firecracker installation
- Hood installation
- If there is no cabinet and the socket is large
- Wiring features
- Drilling work
- The installation process of the hood
- Anti-return mechanism
- Duct connection
- Wall mount without cabinet
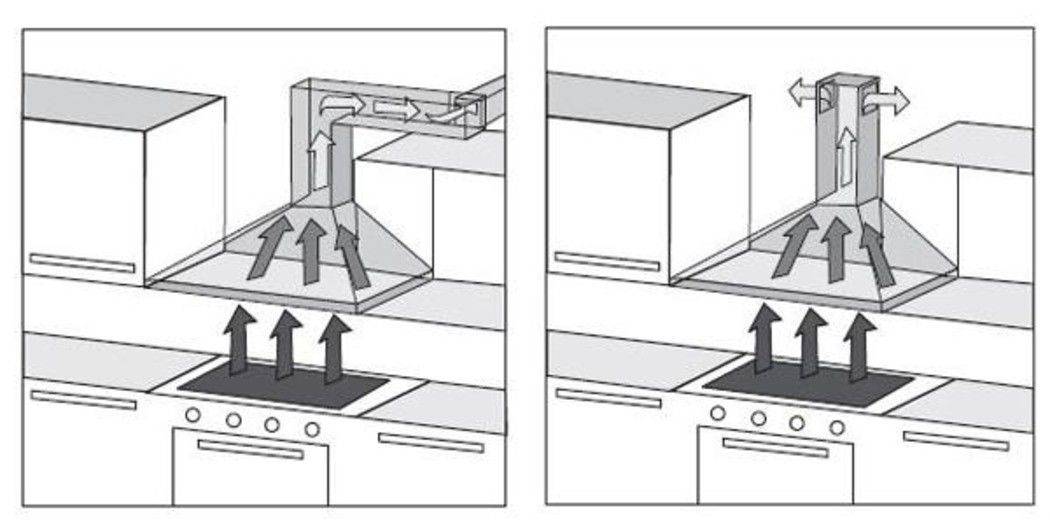
- Functions of exhaust devices in the kitchen, their difference from ventilation
- The installation process of the hood
- Anti-return mechanism
- Duct connection
- Wall mount without cabinet
- Why is everyone betting, but we can't?
- Rules for operating the hood
- Types of built-in hoods according to the method of air purification
- Flow hood
- Circulation hood
- Making a hood in the kitchen with your own hands
- Active View Hood
- Passive hood
- Production of drywall hoods
- Plywood production
- Step-by-step installation of a dome hood
- Examples
- Where is the best place to install an outlet?
- Where and how to bring the air duct
- How to get outside
- So that the hood does not interfere with natural ventilation in the kitchen
How to make a hood in the kitchen
Tool
For the extraction device, you will need to buy or rent a jigsaw with a clean cut saw. The rest of the instruments are ordinary household ones.
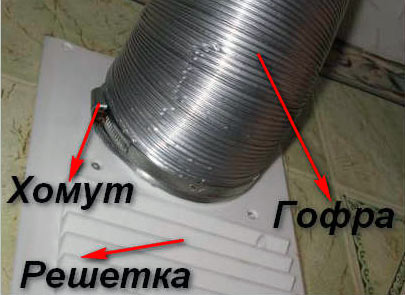
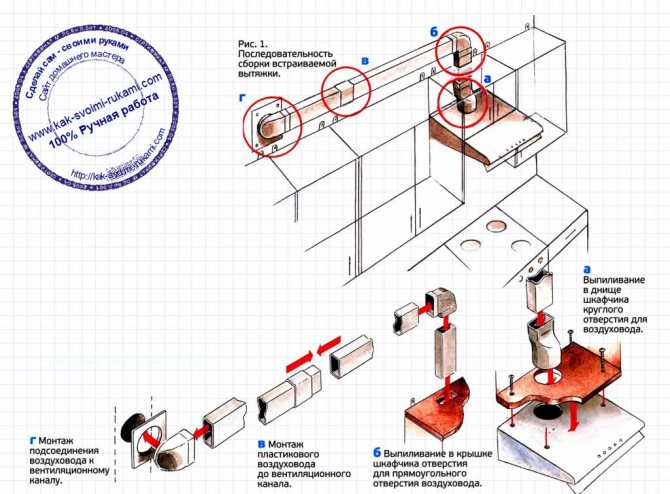
Clapperboard
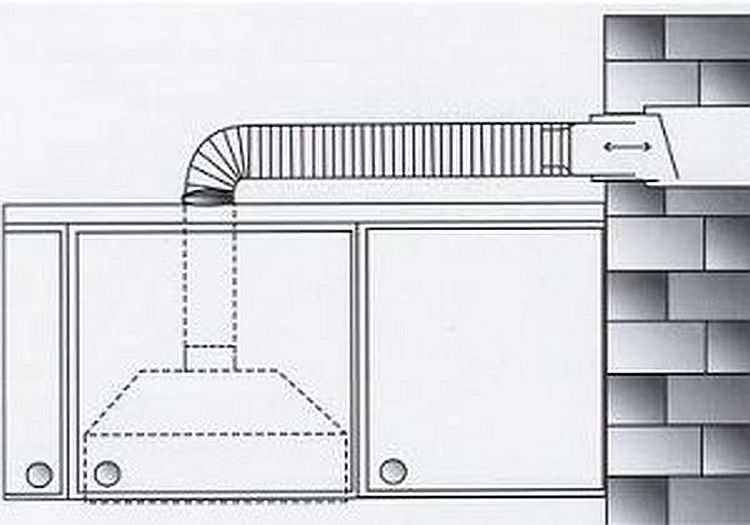
Installation of the hood in the kitchen begins with the manufacture of a clapperboard box.Material - thin aluminum, tin or galvanized. For convenience, the cracker should lie on the cabinet above the stove. In the future, the cracker will be planted in the ventilation window on mounting foam, and glued to the cabinet with mounting glue or silicone; this will eliminate resonance.
But first we only try on the clapperboard, and on the top board of the cabinet we mark the hole corresponding to its bottom window. This can be done with a pencil right from the inside of the cracker, removing the damper for a while. We also outline the sides of the cracker - this is necessary for accurate final installation.
Cupboard
Next, we free the cabinet, remove it, and in the bottom board we cut out with a jigsaw a recess according to the size of the lower frame of the hood. For cutting, beforehand, inside the contour of the hole, we drill an auxiliary hole with a diameter of 8-12 mm, insert a jigsaw file into it and cut it out along the contour. If you are not a very skilled craftsman, do not be discouraged by flaws: with the installation method described, they will not be visible.
Next, remove the shelves of the cabinet and cut out round holes for the air duct in them in the same way. Micron accuracy is not required: the flexible corrugation will still go where it is needed.
The next stage: in the top board of the cabinet, we cut out a square hole for the cracker window, with an allowance of 3-5 mm to the sides. A certain amount of accuracy is already required here: if the corrugation “leaves” too much from the cracker window, you will have to “smear” a lot with silicone. True, it will still not be visible from below.
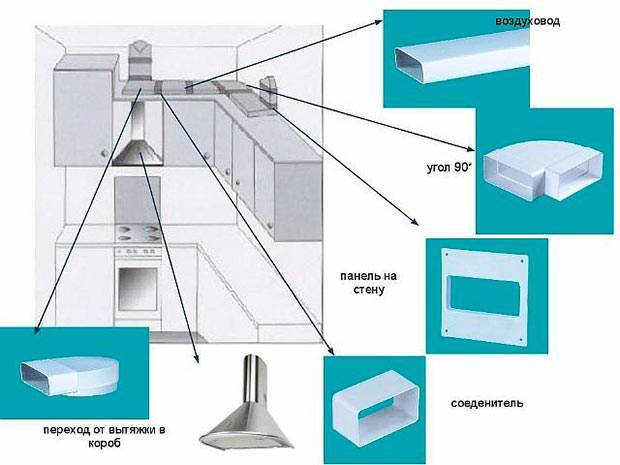
Typical kitchen hood layout
Corrugation installation
We put the cabinet “on the back”, we put a piece of corrugation of the desired length into the round holes.We form its upper end with our hands into a square (or into a rectangle, if, due to the configuration of the ventilation window, the damper and its window had to be made oblong), we push it into the upper hole. We cut the corners by 1.5 - 2 cm with scissors and bend them outward.
Firecracker installation
We hang the cabinet with corrugation in place. On the bent strips of corrugation at the top, and on the tree in the corners between them, we apply a “sausage” of silicone without gaps. Tilt the box with the clapperboard up, insert it into the ventilation window, lower it onto the cabinet board exactly between the marks. If too much silicone is squeezed out on the sides, immediately remove the drips with a cloth moistened with table vinegar.
After about half an hour (construction silicone seizes rather quickly), we blow out the gap between the edges of the cracker box and the edge of the ventilation window with foam. It is better to do this with a foam gun: it has a long nozzle and gives a thin stream.
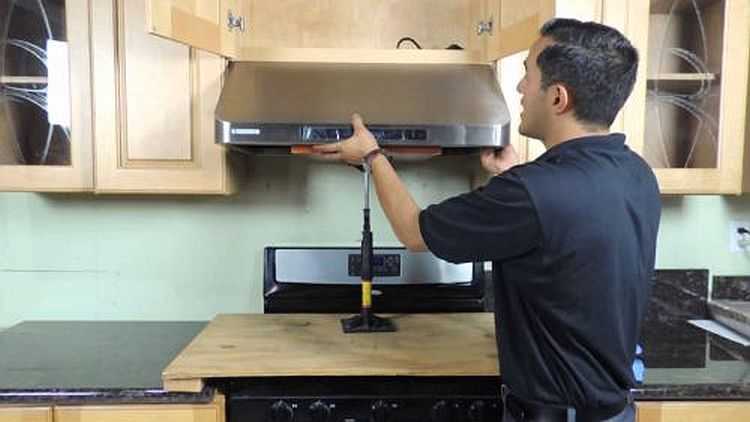
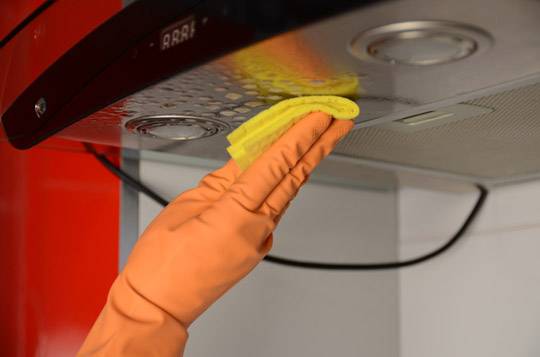
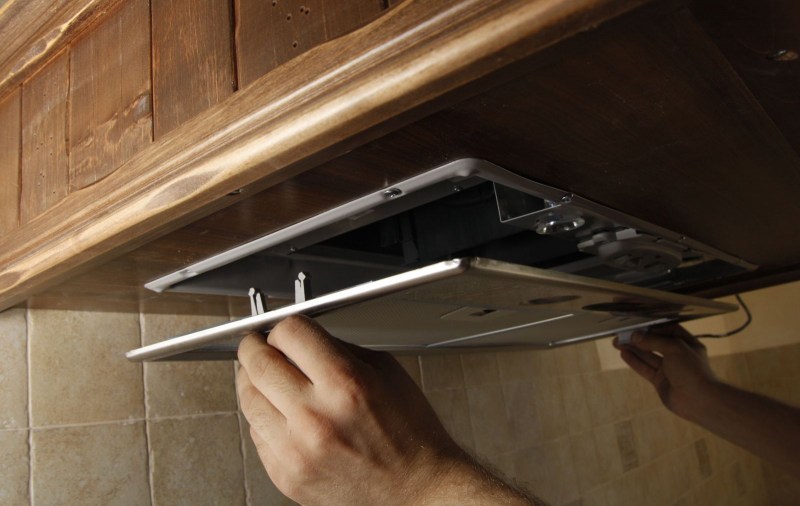
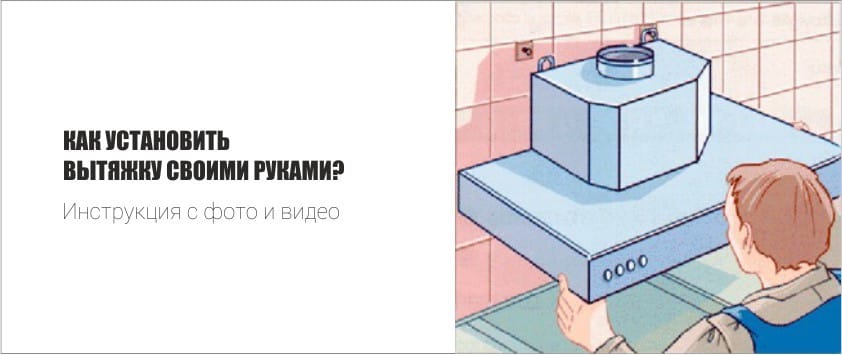
Hood installation
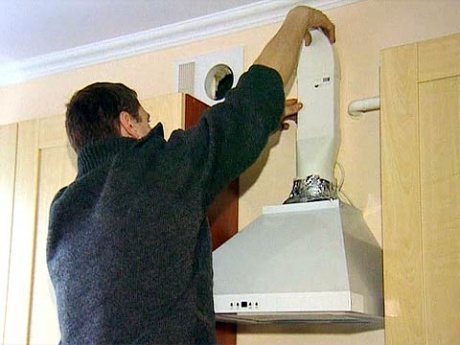
We insert the hood from below into the cutout of the cabinet. You don’t need to put on the corrugation right away: the exhaust pipe will simply press it up. We attach the hood with self-tapping screws to the cabinet through the mounting holes. We put a corrugation on the exhaust pipe and fix it with a clamp or simply wrapping it with soft wire. It is not necessary to seal: this will make it difficult to disassemble for cleaning, and in the place where the pipe passes into the corrugation, according to the laws of aerodynamics, the pressure will always be less than atmospheric pressure. In addition, the protrusions of the corrugation, crushed under a clamp or wire, by themselves will already give a fairly tight connection.
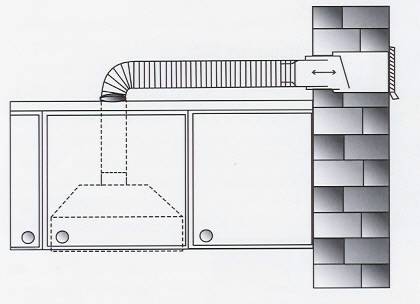
If there is no cabinet and the socket is large
Not everyone hangs a closet over the stove, for fear of fire. And the hood works better if its bell is the size of the plate.In this case, a U-shaped frame from a corner of 20-25 mm is attached to the wall under the socket on five self-tapping screws in dowels. If the wall is sheathed - also on 5 collet studs with a diameter of 4-6 mm.
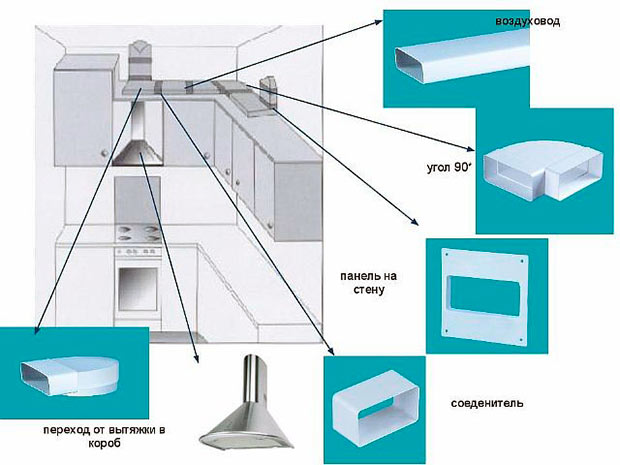
At the same time, the air duct is hidden in a PVC box of the appropriate size; it is then pasted over with a self-adhesive film of the desired color and pattern. It is unrealistic to make a strobe in the wall for a pipe with a diameter of more than 100 mm with modern wall thicknesses, and a clapperboard fits on the upper cut of the box no worse than on a cabinet.
Wiring features
Wiring for the installed equipment is planned and laid in advance.
Depending on the method of connecting the hood to the electrical network and the complex design of the kitchen, the solution to the issue may be as follows:
- The standard electrical cord of the hood is quite short. Therefore, when connecting with a plug to a socket, the latter must be provided and installed in advance. Wiring or an extension cord with a socket can be neatly laid behind furniture or closed with a PVC box.
- Connection through an automatic machine (permanent) is made in a phase break.
- Ground is always connected first.
The second and third paragraphs are mandatory.
Drilling work
Using a perforator, holes should be made in previously marked places. You should also make holes for attaching the grille. To perform work on fixing the hood, you will need a drill with a diameter of 8 mm. The finished hole is “nailed in” with a 50-mm dowel, into which 50 mm self-tapping screws are screwed. To fasten the grille, a drill with a smaller diameter is used, and, accordingly, smaller fasteners: 6 mm will be just right. After installing the fasteners, the grating itself is fixed.As a rule, the ventilation grille is fixed with four self-tapping screws.
The installation process of the hood
Of course, the installation of a kitchen hood with your own hands depends on its type and location of the ventilation shaft. First, we will consider installation using the example of a built-in device in a cabinet.
Anti-return mechanism
The anti-return valve will not allow air to return back to the kitchen
- If you decide to do everything in good faith, then start by making a cracker box. The body can be made of aluminum, galvanized sheet or tin according to the scheme that was given above. Or, in order not to suffer, just buy an anti-return valve that opens like a butterfly. It is placed in front of the ventilation shaft.
- For convenience, install the case on a wall cabinet above the stove. Then fix it more tightly by sealing all the cracks with mounting foam and gluing it to the cabinet to avoid resonance.
- At first, just try on the cracker body and make markings on the cabinet for the hole. After that, you can remove the cabinet from the wall and cut a hole for the frame in the bottom wall with a jigsaw. To do this, drill a hole inside the marking area with a large drill, and then insert a jigsaw blade into it and start cutting the shape you need in the cabinet.
- Next, in the same way, make holes in the inner shelves (if any) for the air duct. In the upper wall, you need to make a square hole with a margin of 3-5 mm for a cracker.
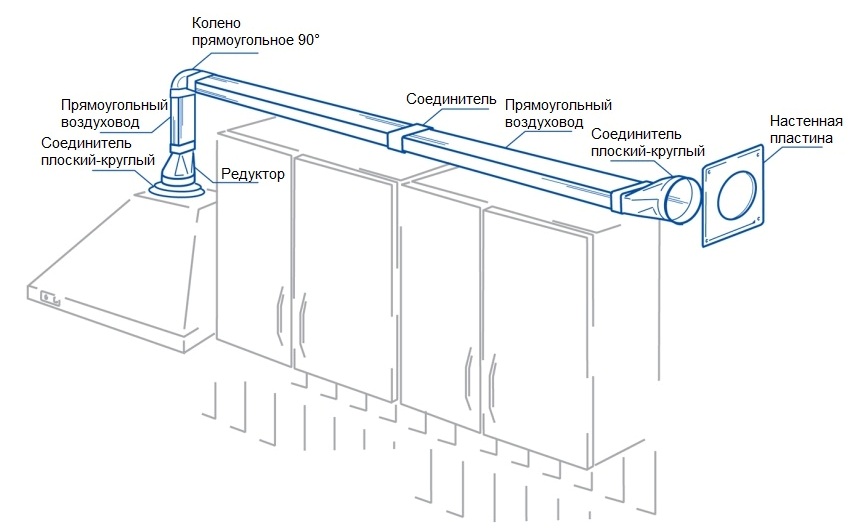
Duct connection
-
- The next step is to connect the duct. Insert the corrugation into the holes made, and in the upper wall of the cabinet, give it the desired square shape. Trim the corrugation with a small margin, cut the corners and bend them outward.
- Now the cabinet with corrugation can be hung on the wall.Be sure to seal all duct joints with silicone sealant so that power is not lost.
- Fasten the homemade box to the cabinet so that it connects the corrugation to the ventilation shaft. We also glue it on silicone, and close up large gaps with foam.
- After that, you can fix the hood in the cabinet. Screw it on self-tapping screws, or on dowels - if the mount is intended for the wall.
- Securely fasten the corrugation to the hood and secure with a clamp. In this place, it is not necessary to coat the joint with sealant.
- If you connect the hood directly, then simply connect the duct to the ventilation shaft. To make it convenient to dock them, use a special grill with a round hole, which is shown in the photo.
 Fastening the corrugation to the ventilation
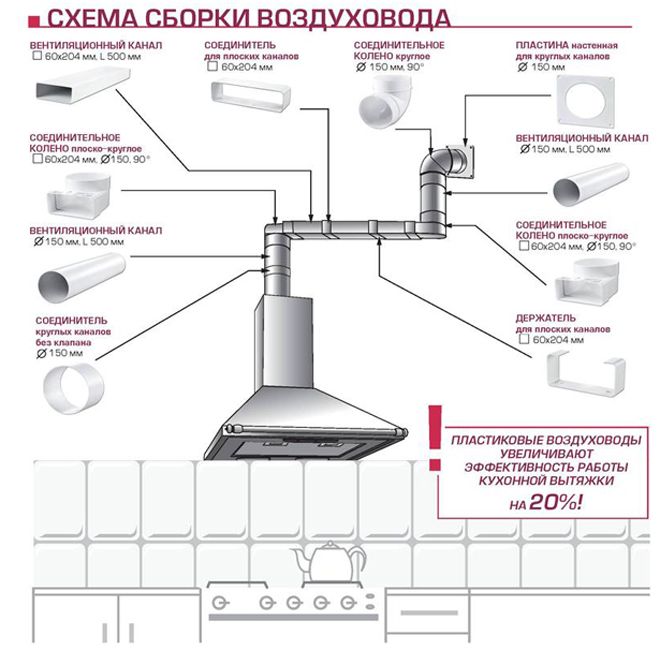
 Accessories for plastic air duct
Wall mount without cabinet
-
- Not everyone has wall cabinets above the stove, fearing their quick damage from steam and high humidity. Moreover, wall cabinets are usually narrow, which does not allow mounting wide hoods inside. If there is no built-in mount, then for this a U-shaped frame is attached to the wall from the corners on the dowels. This mount acts as a support for the body.
- And how to install a kitchen hood, if it cannot be fixed to the wall with ordinary dowels? Such problems often arise for owners of gas stoves when the pipe interferes with normal fastening.
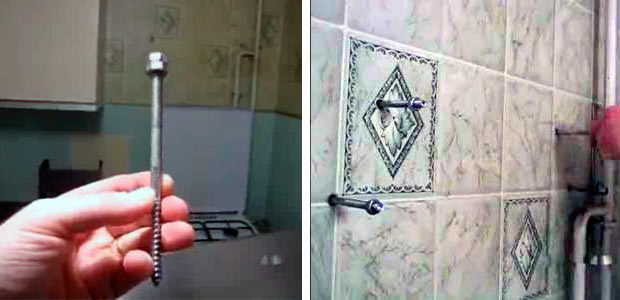
- In this case, you can buy long plumbing stud screws, which, on the one hand, look like a self-tapping screw, and on the other, have a thread with a nut.You simply screw them into the wall like dowels, and attach the hood body to them at the required distance from the wall.
 Hood mount next to the gas pipe
Installing the hood in the kitchen - video instruction:


- And in the end, it remains only to connect the hood to the network, through a socket, or by permanently connecting it through a fuse. Do not forget to connect the grounding first, it will remove possible voltage from the case when the fans are running.
- If everything works, you can put on a decorative cap and enjoy the fresh air while cooking!
Functions of exhaust devices in the kitchen, their difference from ventilation
The importance and necessity of using the equipment in question is confirmed by the tasks that it solves:
- From the area adjacent to the stove, polluted air with particles of combustion products, fumes, smoke and odors is removed.
- In place of the discharged air with pollution, an influx of comfortable - clean air, which has lower humidity and temperature, is provided.
- Thanks to the work of the hood, conditions are not created for the undesirable appearance and reproduction of harmful microorganisms.
- Significant or complete removal of air contaminated with grease, soot and dirt helps to maintain a presentable appearance of kitchen furniture, interior items, household appliances for a long time, increases their durability.
- Favorable comfortable conditions are created not only for those working in the kitchen, but also for family members and guests of your house located in neighboring rooms and premises.
The air outlet provided by exhaust systems cannot be replaced by classical ventilation. The latter only creates conditions for air exchange in some limited space.The removal of air saturated with combustion products and vapors is not carried out. This problem is solved by the installed hood. Connecting with special pipes to the ventilation shaft, it ensures the removal of polluted air to the outside.
The installation process of the hood
Of course, the installation of a kitchen hood with your own hands depends on its type and location of the ventilation shaft. First, we will consider installation using the example of a built-in device in a cabinet.
Anti-return mechanism
- The anti-return valve will not allow air to return back to the kitchen
- If you decide to do everything in good faith, then start by making a cracker box. The body can be made of aluminum, galvanized sheet or tin according to the scheme that was given above. Or, in order not to suffer, just buy an anti-return valve that opens like a butterfly. It is placed in front of the ventilation shaft.
- For convenience, install the case on a wall cabinet above the stove. Then fix it more tightly by sealing all the cracks with mounting foam and gluing it to the cabinet to avoid resonance.
- At first, just try on the cracker body and make markings on the cabinet for the hole. After that, you can remove the cabinet from the wall and cut a hole for the frame in the bottom wall with a jigsaw. To do this, drill a hole inside the marking area with a large drill, and then insert a jigsaw blade into it and start cutting the shape you need in the cabinet.
- Next, in the same way, make holes in the inner shelves (if any) for the air duct. In the upper wall, you need to make a square hole with a margin of 3-5 mm for a cracker.
Duct connection
- The next step is to connect the duct.Insert the corrugation into the holes made, and in the upper wall of the cabinet, give it the desired square shape. Trim the corrugation with a small margin, cut the corners and bend them outward.
- Now the cabinet with corrugation can be hung on the wall. Be sure to seal all duct joints with silicone sealant so that power is not lost.
- Fasten the homemade box to the cabinet so that it connects the corrugation to the ventilation shaft. We also glue it on silicone, and close up large gaps with foam.
- After that, you can fix the hood in the cabinet. Screw it on self-tapping screws, or on dowels - if the mount is intended for the wall.
- Securely fasten the corrugation to the hood and secure with a clamp. In this place, it is not necessary to coat the joint with sealant.
- If you connect the hood directly, then simply connect the duct to the ventilation shaft. To make it convenient to dock them, use a special grill with a round hole, which is shown in the photo. Attaching the corrugation to the ventilation
- When using PVC air ducts, the installation is similar: we simply connect the pipes with the component corners and carry them out to ventilation.
Wall mount without cabinet
- Not everyone has wall cabinets above the stove, fearing their quick damage from steam and high humidity. Moreover, wall cabinets are usually narrow, which does not allow mounting wide hoods inside. If there is no built-in mount, then for this a U-shaped frame is attached to the wall from the corners on the dowels. This mount acts as a support for the body.
- And how to install a kitchen hood, if it cannot be fixed to the wall with ordinary dowels? Such problems often arise for owners of gas stoves when the pipe interferes with normal fastening.
- In this case, you can buy long plumbing stud screws, which, on the one hand, look like a self-tapping screw, and on the other, have a thread with a nut. You simply screw them into the wall like dowels, and attach the hood body to them at the required distance from the wall.

Installing the hood in the kitchen - video instruction:
And in the end, it remains only to connect the hood to the network, through a socket, or by permanently connecting it through a fuse. Do not forget to connect the grounding first, it will remove possible voltage from the case when the fans are running.
If everything works, you can put on a decorative cap and enjoy the fresh air while cooking!
Why is everyone betting, but we can't?
In old houses, the issue with the hood was never raised, so everyone installed the device and connected it to the ventilation shaft to get rid of the smells of cooking. Also, the absence of installation problems is explained by the fact that individual channels for air exchange were used in the aging housing stock. Each apartment had its own shaft, to which none of the neighbors can connect.
In modern houses, especially in multi-storey new buildings, a common ventilation shaft is used to speed up construction and standardize air exchange. The design provides branches for each apartment and one common air outlet. If the mine is massive, there are several channels in it, isolated from each other. This is required to separate the ventilation of the bathroom, toilet, kitchen, etc.
It is important to understand that the laws are intended exclusively for apartments where gas stoves are used.The fact is that the presence of an exhaust hood impairs the operation of natural ventilation and gas can accumulate in the apartment
Without an influx of fresh air, the room becomes a reservoir for a hazardous substance, and when a critical concentration is reached, the situation becomes explosive. The options “keep the window open” or “the room is constantly ventilated” do not alleviate the situation, because you cannot constantly control the ventilation of the apartment. Air exchange must be natural and correct!
If all the neighbors put up a hood, do not follow their example. For non-compliance with the rules, the owner of the apartment will be fined, and he will also be forced to dismantle the device. Do not follow stupid examples, because this is not about breaking the rules, but about the safety of life.
Rules for operating the hood
In order for the air cleaner to serve flawlessly for many years, it is important to comply with the requirements for safe operation. Consider these important rules: Hood installation
The required distance from the surface of the stove is at least 70 cm. This measure can prevent damage to the device from exposure to high temperatures when used with gas and electric stoves
Hood installation. The required distance from the surface of the stove is at least 70 cm. This measure can prevent damage to the device from exposure to high temperatures when used with gas and electric stoves.
The presence of draft in the ventilation. We check this parameter before starting the installation of the device. If the air is not moving well, it is better to clean the shaft.


Air duct installation.Too long and straight air duct increases the noise level of the device and significantly reduces its performance.
Varieties of air ducts
Power regulator. Available on almost all modern devices. It is not recommended to use the maximum power immediately after switching on. It is worth starting operation with a minimum air flow rate, gradually increasing it. This creates ideal conditions for smooth operation of the motor, which is less damaged by starting currents.
Surface care. It is recommended to use mild detergents in combination with water. Do not wash the appliance with a lot of detergent solution. For safety reasons, experts advise to carry out wet cleaning by disconnecting the hood from the mains.
 Grease stains are removed with a soft sponge or cloth, without the use of abrasive
Connecting to the power supply
For a safe connection, it is important to create conditions under which the cable of the device does not overheat from a working stove. Timely regular replacement of filters
Or their cleansing. On average, replacement is required 1 time in 3-6 months. More rare is not recommended due to the heavy load on the motor.
Timely regular replacement of filters. Or their cleansing. On average, replacement is required 1 time in 3-6 months. More rare is not recommended due to the heavy load on the motor.
 Grease filters need to be washed in case of visual pollution.
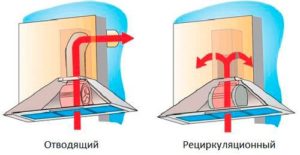
Types of built-in hoods according to the method of air purification
Built-in, and the rest, too, hoods may differ in the way they clean the air from combustion products and steam. In particular, there are two types.
Flow hood
Flow hood - it is connected by ventilation pipes to a chimney or channel leading through the walls to the street. Inside them are installed blowers that draw in air, moving it through the system forcibly. Polluted air is discharged outside the premises along the specified path. It is replaced with fresh, which means that in the room, for the effective operation of the device, a high-quality ventilation system must be provided.
Duct hood
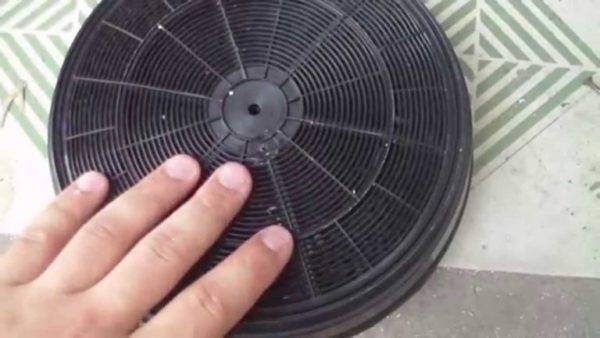
Grease traps are installed in front of the fans at the inlet to the device - metal meshes that clog over time and require cleaning or replacement with new parts.
Why are grease traps necessary?
Such devices are very effective under all installation conditions. They ventilate the room, constantly pulling fresh air into it.
Circulation hood
Recirculation hoods - outwardly, these devices will not differ from their flow counterpart, but they work on a different principle. Such devices do not need to be connected to the ventilation system. Their task is to drive polluted air through a system of filters located inside their housing. The grease trap is installed first at the inlet. Next come fans with electric motors, and then everything else. The air returns to the room and circulates in it again. That is why this type received the appropriate name.
Circulation hood
The convenience of using such a hood is one thing - it is its compactness and the absence of the need to stretch pipes through the entire kitchen. There are more disadvantages.Firstly, filters filled with absorbent substances (mostly activated carbon) wear out over time and need to be replaced, so those who wanted to purchase such equipment, get ready for additional expenses. Secondly, a single run through the filters cannot completely clean the air. Thirdly, the system does not create a pressure drop, which means that fresh air will flow into the room worse.
Design island hood
Making a hood in the kitchen with your own hands
There is nothing shameful in assembling this device yourself. After all, all modern manufacturers once started with piece copies. If standard models do not fit your kitchen or you want something unique, then putting together your own design is not at all difficult.
Active View Hood
You will need:
- Any non-combustible material for the box (tin, thick foil, drywall);
- Aluminum or metal profile for the frame;
- Fan and motor to it;
- check valve;
- Corrugated pipe (if the vent in the house does not match the location of the box);
- Fasteners and tools.
- We mark the dimensions and shape of the future structure and its location on the wall.
- From the profile we assemble the frame of the lower part, the sides and the frame of the upper part.
- We put the finished “skeleton” against the wall and see if it looks good, if it doesn’t interfere, if it fits into the overall concept of the interior. At this stage, it is easy to make any changes to the structures, which will be more difficult to do with the finished frame.
- If all the edits are taken into account, you can proceed to sheathing the frame with non-combustible material. The result is a ventilation duct - the basis of the future hood.
- The most crucial moment is the installation of the fan. Several options are possible here. It is better to install a large unit on spacers inside the socket of the ventilation duct. It should not stand close to the narrow part, so as not to block the air flow. A small fan can be placed inside the pipe.
- We place the finished box on the wall. If necessary, we connect the top of the frame with the ventilation in the house using corrugations. Do not forget about the reverse action valve, otherwise all the smells from the neighbors will stretch out of the hood.
- We check the performance of the device.
- We proceed to the design and decoration of the outer box.
As you can see, it is not at all difficult to assemble an active type hood yourself. For this, any material at hand and the remains of the repair are suitable.


Passive hood
For assembly you will need:
- Filters-grease traps from an old hood.
- Frame profiles.
- Shell material.
- Small exhaust fan.
- Fasteners.
The body is assembled in the same way as in the previous model, except for the following:
- It is not required to make a hole to connect the socket to the ventilation in the house;
- You will need slots in the upper part of the box for the exit of purified air;
- The fan is placed between two layers of filters - fat at the inlet and carbon at the outlet.
Otherwise, the design of the passive action device follows a similar pattern.
Production of drywall hoods
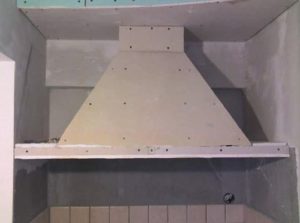
- Does not burn or melt at high temperatures;
- Easy to use, allows you to cut fragments of any shape;
- Easy to install - fastened to any base and does not give a large load on the frame;
- It is decorated and painted, pasted over and plastered, opening up complete freedom of action for the designer.
A drywall box can be turned into a chimney lined with artificial stone, and into a strict cube in a minimalist style, and into a painted romantic element of Provence.
Plywood production
A plywood box in the kitchen is also appropriate. This material is inexpensive, safe for human health and is easily cut and mounted on the frame. But you should pay attention to fire safety.
IMPORTANT! The plywood hood should be as high as possible from the stove, and it should be pasted over inside with metal or foil. Refractory impregnations will also be useful
It is also worth considering the special boominess of this material. So that cooking is not accompanied by the sounds of a fighter taking off, the inner surface of the box should be sheathed with sound-absorbing material. Non-combustible mineral wool is ideal for this.
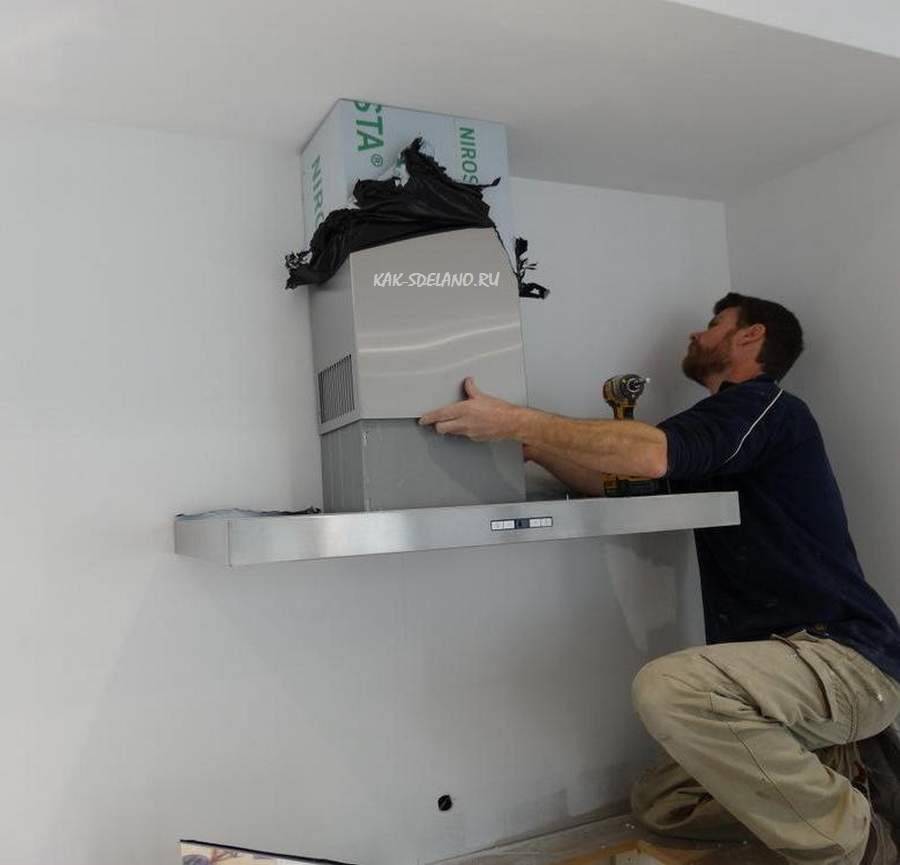
Step-by-step installation of a dome hood
Before installing the chimney hood, you need to precisely orient the position of the stove relative to the outlet of the ventilation duct. Usually the plate is installed exactly along the axis of the ventilation hatch. After that, proceed to the installation of equipment.

- We draw an axial vertical line on the wall from the center of the hob up to the channel opening, using a pencil, level, tape measure or ruler.
- We mark the height of the lower edge of the dome, and draw a horizontal line.
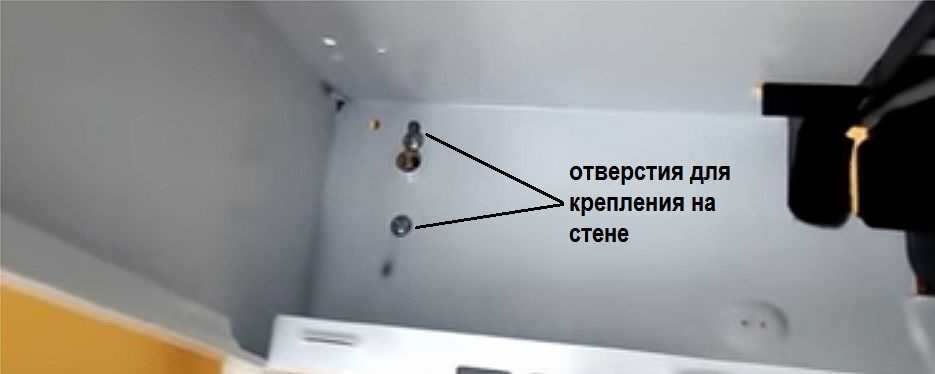
- On the dome, we measure the distance from the mounting holes to the bottom edge of the hood. We transfer the marking of the attachment points to the wall.
- We drill nests for dowels with a perforator. We insert polymer elements into them.
- To install the dome, you will need a stepladder and additional working hands.Leaning the back of the hood, we combine the mounting holes with the dowel sockets, and hammer the screws into them.
- On the wall we make a mark of the lower edge of the duct.
- Cut off the excess pipe. In no case should you do this with a hacksaw. The saw teeth will leave torn edges and damage the enamel. Trim with an angle grinder, jigsaw or circular saw.
- A mounting frame is usually supplied with the hood. The channel hole is either expanded with a perforator, or narrowed with cement mortar to fit the size of the frame.
- It is necessary to fix the frame in the channel with dowels, sealant or glue.
- We insert the air duct into the hood, and fix its upper end in the frame.
- All connections are treated with sealant.
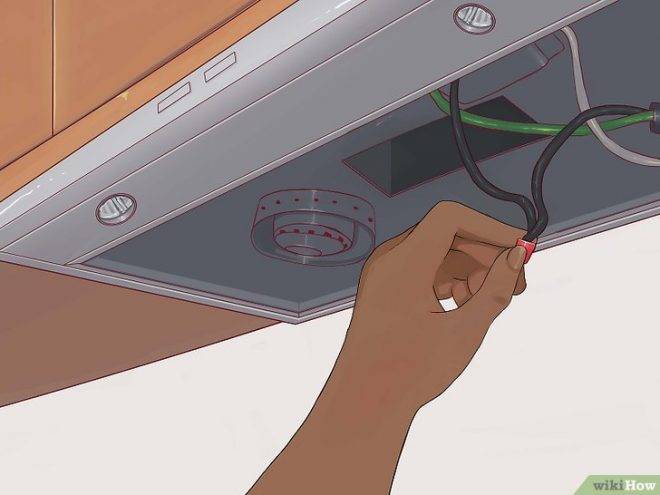
- Before installing the air duct, you need to install a power point. We recommend that you do this in two ways:
- along the axis of the pipe above the dome with a crown, we drill a seat for the box and install it on the cement mortar. We punch a strobe to the box with a puncher, into which we put the electrical wire. With the electricity meter turned off, we connect the power cable of the hood to the network cable through the block. We close the strobe with putty. We close the box with a lid. Restoring the wall finish
- in the second case, we try to secretly lead the wire behind the dome body into the adjacent wall cabinet. We fix the socket on the bottom shelf or on the side wall. We attach a plug to the end of the hood cable. We connect the socket to the network wire, which runs from the box behind the walls of the cabinets.
Examples
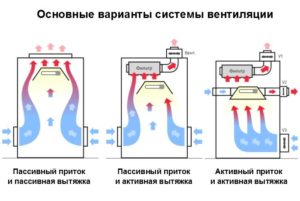
Schematic diagram for installation in country houses and in the country - ventilation with natural air circulation.It is suitable for brick and wooden buildings, as well as structures made of expanded clay concrete. As a rule, the design of just such a scheme prevails in the construction of apartment buildings. If you have purchased an apartment in Khrushchev, then be guided by the fact that there will be natural ventilation.
Natural air exchange is based on the phenomenon of the pressure difference of the air column. The ventilation system is easy to install and operate, does not depend on the availability of electricity, does not require the installation of expensive equipment. However, the system is affected by weather conditions, in particular wind, and temperature, since natural circulation requires that the temperature inside the room is higher than outside. Otherwise, air movement stops.
In the age of developing technology, many use forced ventilation. It can be partially automated, when the equipment is used only to force air into the building, or, conversely, to remove fumes to the outside, or fully mechanized, which involves the use of fans at both stages.
Since the ventilation shaft in the kitchen usually has a larger diameter, all flows rush to it. In windy weather, this powerful channel can “overturn” the smaller one in the bathroom, forming a reverse draft, that is, a cold wind will begin to blow from the toilet. In this case, a competent installation of forced ventilation is necessary.
A ventilation system is also required on a glazed balcony or landscaped loggia. There are several options for its arrangement. First of all, it is natural due to the opening of windows, but during the cold period it is not always convenient.Some window manufacturing companies build ventilation holes in them, with the help of which micro-ventilation is carried out. More often, the owners install a hood, which ensures the removal of condensate.
The supply and exhaust circuit is necessary for ventilation in a room without windows, for example, a pantry. In particular, for security reasons, many technical premises require to be equipped with a forced system (garages, boiler rooms, boiler rooms, warehouses).


The ventilation complex in the case of a mixed scheme is a system of pipes, some of which draw in air from the outside, others take the exhaust air outside the building. The inflow is provided by a convector, which additionally heats, filters and disinfects the flow from the street with ultraviolet light. In order to prevent the forced air from expelling heat from the room during the cold period, a special heat exchanger was developed - a heat exchanger, which is designed to use the temperature of the outgoing stream to heat the incoming one.
Where is the best place to install an outlet?
Surely, most readers will not have a question - how to connect the hood to electricity? However, even before the installation of the exhaust device, you need to prepare a new outlet for it.
IMPORTANT! Hoods go on sale, for the most part with three-wire wires, so the socket must match.
 It is forbidden to install sockets near the stove and near the sink, so the best option would be to install an outlet for the hood above the wall cabinets, at a height of about two meters.
Move the outlet to the right or left of the center of the hood.If you choose another, more open place, then the outlet can be decorated with a special box. Do not hide the outlet behind hanging cabinets or bulky appliances!
For various reasons, power surges are possible in the house, which can damage or burn out the hood motor. To prevent such a breakdown, be sure to ground the outlet under the hood.
Summing up, we note that the hood in the apartment is certainly a useful thing. It will greatly facilitate the life of the hostess. You can install the exhaust device yourself, but if you do not have certain skills, it is better to choose a flat hood.
Any defects during installation: they were not installed strictly horizontally, the joints and holes were not sealed tightly enough, the corrugation material was chosen too thin, and other little things can affect the operation of the hood or even negate the benefit of its installation. Therefore, follow the instructions in the instructions.
We offer you to watch a video on how the kitchen hood is connected to the ventilation:
Where and how to bring the air duct
Most often, the duct from the hood in the kitchen is connected to the vent through which natural ventilation (due to draft) goes. This is wrong, since in this case most of the grille is closed by an air duct, and air exchange through the remaining available holes will be clearly insufficient.
A significant part of the ventilation grill is closed and the ventilation in the apartment will be insufficient
Correctly connect the air duct to a separate ventilation duct. In this case, the same grate is installed on the hole as in the photo above.
If there is no separate ventilation duct, but there is an outer wall nearby, you can bring the pipe outside by placing a grill on the outside.These are two ways to have normal ventilation and ensure the normal operation of the hood.
How to get outside
To install the hood and bring the duct into the wall, you need to make a hole in it. And this is the only difficulty. Further, an air duct is inserted into this hole, sealed with a solution. Outside, the hole is closed with a grate - so that debris does not get in, birds and small animals do not settle.
One example of installing a hood in a kitchen with air outlet through the wall
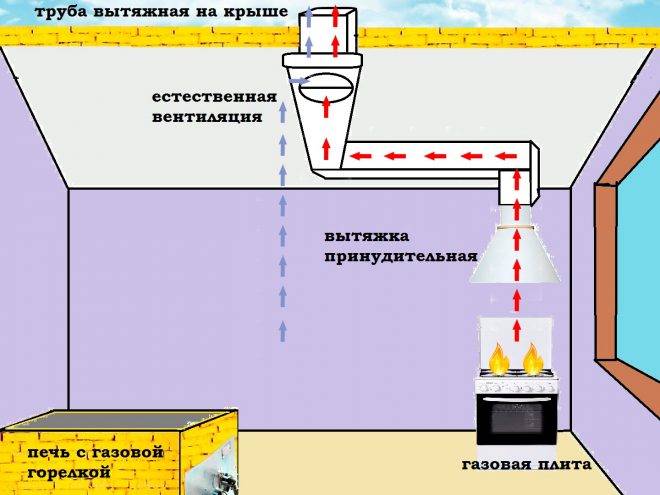
To prevent air from the street from blowing into the room, a check valve is installed (in the figure above it is indicated by an oblique line). By the way, it is also desirable to install it when connecting the air duct to the ventilation system - so that odors from the pipes do not enter the room.


It looks like a non-return or anti-return damper for air ducts
The non-return or anti-return air valve is a lightweight plastic or metal plate. It is movably attached in two places to the pipe - at the top and bottom, the petals are supported by a slight spring. While the hood is not working, the valve blocks the access of air from outside. When the hood is turned on, the air flow bends the plate forward, squeezing the spring. As soon as the hood is turned off, the plate returns to its place with the help of springs. If you install a hood without this valve, it may be too cold in the kitchen in winter - outside air will enter the room without any problems.
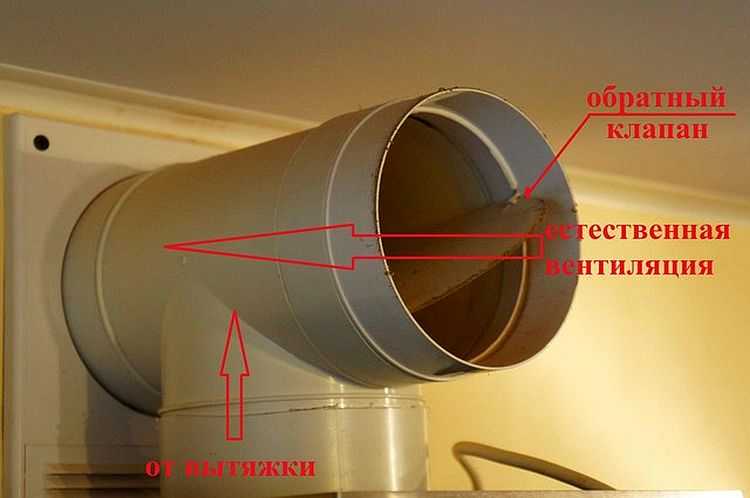
So that the hood does not interfere with natural ventilation in the kitchen
With the help of a tee and a non-return valve, by the way, you can install the hood so that it does not interfere with the natural ventilation in the kitchen. You will need a special ventilation grill for connecting hoods, a check valve and a tee.A tee is attached to the ventilation grill, an air duct from the hood is connected to its lower inlet, and a check valve is placed on the free outlet, only so that the petals are locked when air passes from the pipe (in the photo below).
Anti-return valve for normal natural ventilation in the kitchen
How does such a system work? When the hood is turned off, the check valve petals are bent, air from the kitchen enters the ventilation duct through the grill and the open outlet of the tee. When the hood is turned on, the air flow from it unfolds the valve plate, and the air goes into the ventilation system. When the hood is turned off, the springs again open access to air through the tee.
Outwardly, such a system does not look very attractive and it will have to be somehow masked. But this is the only way to connect the hood to the only existing ventilation outlet and not reduce air exchange.


