- How to properly position the brackets?
- How to fix the gutter to the roof: ways
- Installation of brackets under the drain
- General provisions
- Gutter heating options
- The main mistakes in installing roof gutters
- Mounting
- brackets
- gutters
- Pipes
- Peculiarities
- Features of installing a water drainage system
- In what situations the drain is attached only to the frontal board
- Helpful Hints
- Description of the elements of the drainage system
How to properly position the brackets?
At this stage, you will have a completely expected question: how are the gutters attached to the roof itself? Hooks for them are mounted to the frontal board, windshield, to the cornice overhang or directly to the rafter legs.
The mount is installed on the rafter legs when there is no frontal board as such, in principle, or it is important to leave it untouched for the sake of a certain aesthetic effect. But, if the roof is already ready, then the only rational option is to attach the fasteners to the frontal board:
Sometimes fasteners for the drainage system have to be installed directly to the roof sheathing. For this purpose, special elongated clamps are used, which are fixed at two points. Brackets are attached to the rafters (through the crate) only pre-bent.
Often, home craftsmen try to save money and put the brackets too far apart, although the distance between the fasteners should not exceed 60 meters. If this rule is violated, over time, the gutters are deformed and gradually damaged under the pressure of the weight of water, ice and snow.
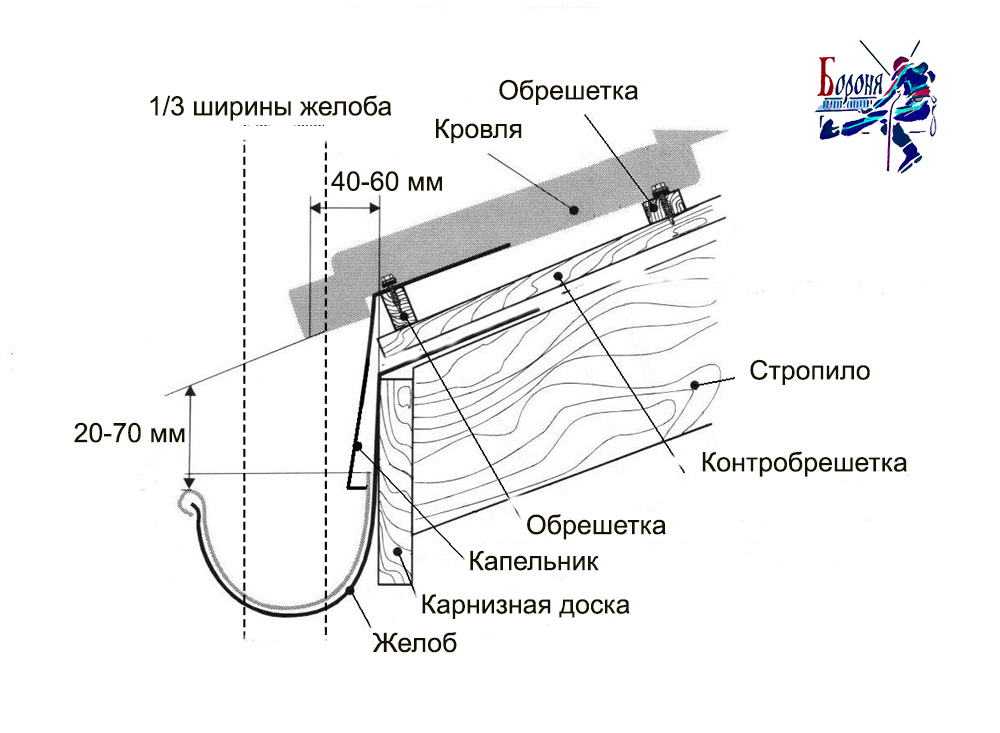
It is also important to be careful with the location of the brackets so that they are not too low or too high relative to the edge of the roof. If the hooks are located lower than necessary, the rainwater from them will not get into the gutter, it will splash and there will be drips on the facade
Sometimes such an installation error even leads to breakage and breakage of the fastener itself. And rightly so, if the gutter protrudes slightly beyond the edge, at least half of its width. If the drain is installed too high, then the mechanical pressure on it and its fastenings will be many times greater than the norm, and the drainage system itself will have to withstand a load of falling snow.
At the end of the installation of the fastener, it is important to correctly install and align each hook:
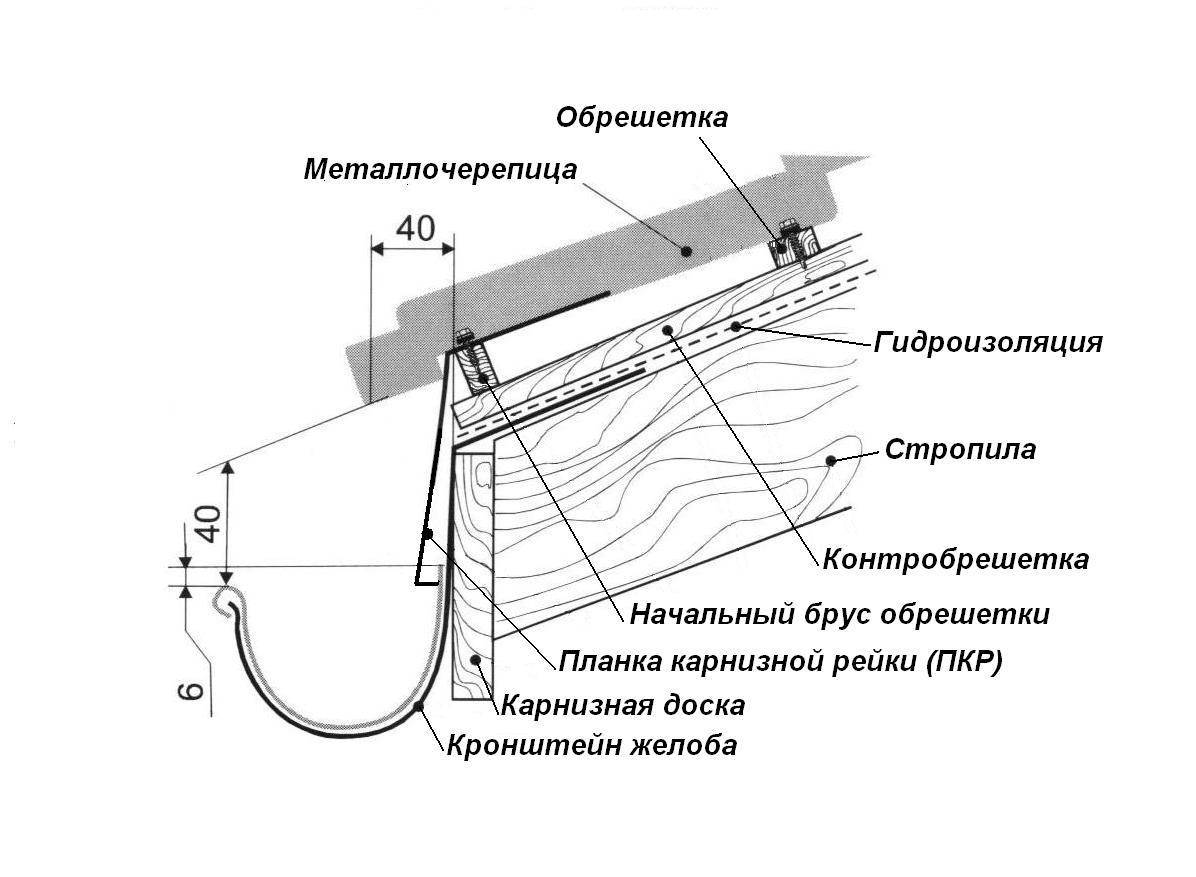
Also keep in mind that when installing metal tiles, an anti-condensation film with an allowance is also used:
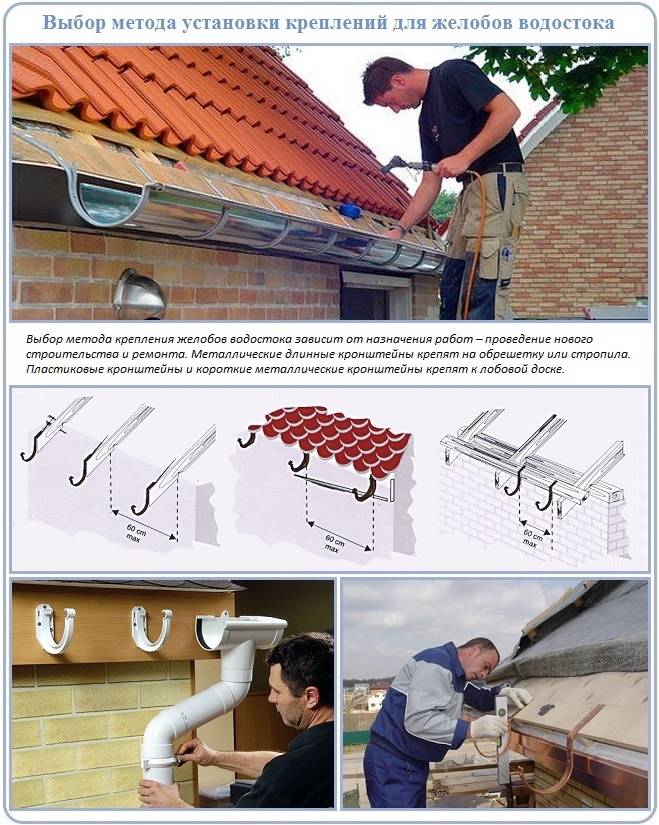
How to fix the gutter to the roof: ways
For fixing gutters to the house, several main methods have been developed:
- Fastening to the frontal (wind board);
- Fastening to the crate;
- Attachment to rafters.
The most reliable fastening option is that the gutter hooks are attached under the roof to the top of the rafters before the batten and finish are installed. The hooks are additionally pressed by the crate. This method is applicable only during the construction process and if the step between the rafters does not exceed 0.6 m.
It is somewhat easier to do the installation with your own hands on the roof according to the finished crate. The hooks are not additionally pressed, but this is the only difference from the first method (unless the batten boards are very thin). This option has the advantage that it allows you to hang a drain with a large distance between the rafters.
Holders can be attached to the frontal board only if the reliability of the board itself and its attachment to the roof elements allows.
The covered roof makes it impossible to choose among the most convenient options. How to fix the drain on a completely finished roof, under corrugated board or other coating, will be discussed below. Depending on the design, you can consider the following mounting methods:
- To the side surface of the rafters (with the same criteria for the distance between them);
- To the front board;
- To the wall of the building.
Mounting on the side surface of the rafters should be done with long hooks, since nails or screws will take the bending load and may loosen or break off over time. For mounting on the side surface of the rafters, special hooks with a mounting plane curved by 90 ° are used.
Note! To ensure the reliability of fastening and avoid damage to the rafters, they must be made of timber with a cross section of at least 120x50 mm. If the diameter of the rafters on the roof is smaller, then this method is not recommended. For installation of a drain on a windboard, it does not matter whether the roof is covered or not
The main requirement is the reliability of the base, that is, the wind board. Its thickness should be at least 20-25 mm
For installation of a drain on a windboard, it does not matter whether the roof is covered or not.The main requirement is the reliability of the base, that is, the wind board. Its thickness should be at least 20-25 mm.


The gutter can be fastened to the roof using several hook options:
- Ordinary hooks with a long mounting platform;
- Hooks with a supporting surface;
- Hooks with adjustable mounting surface for installation on inclined boards;
- Using a special guide profile and a specially shaped hook.
The use of a profile greatly simplifies the installation of the drain, especially in terms of maintaining the required slope and alignment of all fasteners. Of the minuses - a rather high cost.
It is possible to fasten the brackets to the crate, if it is possible to dismantle or move the lower row of the roof covering. It is most simple to do this on a tiled roof and from a metal tile or profiled sheet, and it is almost impossible to do it on a roof covered with classic slate.
For fastening to the wall, special steel pins of the required length are used. Hooks are attached to the pins, and on them, in turn, gutters.
Reliable roofing - metal tiles, polycarbonate and other hard and durable materials allow you to fasten the elements of gutters to the roof directly to the roofing with special clamps.
Important! With all the obviousness and convenience, it is impossible to fasten the drain to the end surfaces of the rafters, since the fasteners will pass along the wood fibers, and the reliability of holding the fasteners to be fixed will be extremely low
Installation of brackets under the drain
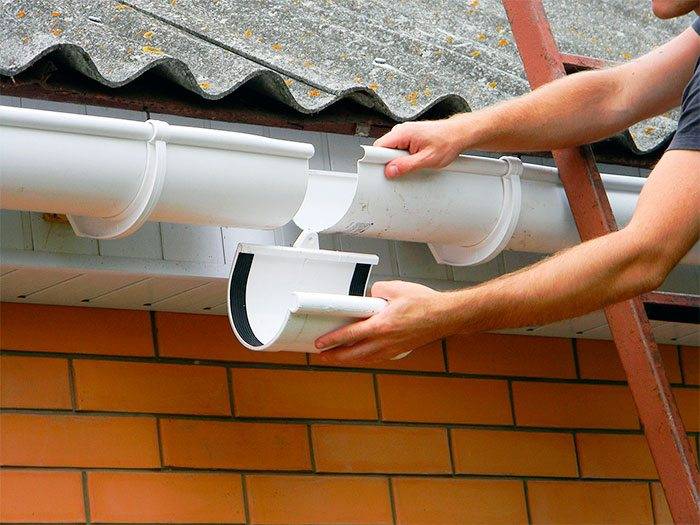
The brackets must be inserted into the gutters and the structures must be attached to the roof with nails or self-tapping screws. The length of the distance of the brackets from each other is not more than 50 cm.If you use the type of brackets that hold the gutters from the outside using the girth method, then you need to start installing such brackets by attaching them to the facade or roof. In this case, it is necessary to install the gutters only after the brackets are completely installed.
The open ends of the gutters must be closed with plugs that can be fastened with rivets or self-tapping screws. In order to connect the gutters at the corners, you need to use corner elements.
To fix the drain pipe in the gutter, you need to cut a hole in it. To do this, you need to have previously taken, accurate measurements of the diameter of the pipe. The downpipe adapter must also be fixed in the gutter.
General provisions
1. Ensuring the slope of the gutter
Option with a frontal board, fastening on a plastic bracket
The brackets are located at the level of the cord, which is stretched between the end bracket and the funnel. The difference in height between the end points of the cord should provide a slope of up to three millimeters per linear meter.
Option without a frontal board, fastening on a metal bracket
The option will be used for a roof with a small step of the crate. The difference in height is provided by the bending of the bracket in the calculated place. The distance from the end of the supporting part of the bracket to the place of bending decreases as the intermediate bracket moves away from the end bracket.
Option without a frontal board, fastening with an extension and a plastic bracket
The option is used for roofs with a large pitch of the crate. The fold lines of all extensions are located at the same distance. Moving the plastic bracket along the extension provides a slope.The fold point should be no closer than ten millimeters from the fixing point of the clamping plate of the bracket, or no closer than ten millimeters from the end of the slot in the extension.
2. Ensuring the optimal position of the elements relative to the roof
3. Ensuring stability from deformations under vertical load
- The distance between the gutter brackets must not exceed 600 mm.
- The funnel is fixed at two points, or on two brackets / extensions
- The gutter connector is fixed at one point or on one bracket/extension.
- The end of the corner element is located no more than 150 mm from the nearest bracket.
- The distance from the plug to the nearest bracket must not exceed 250 mm.
4. Providing compensation for thermal linear expansions
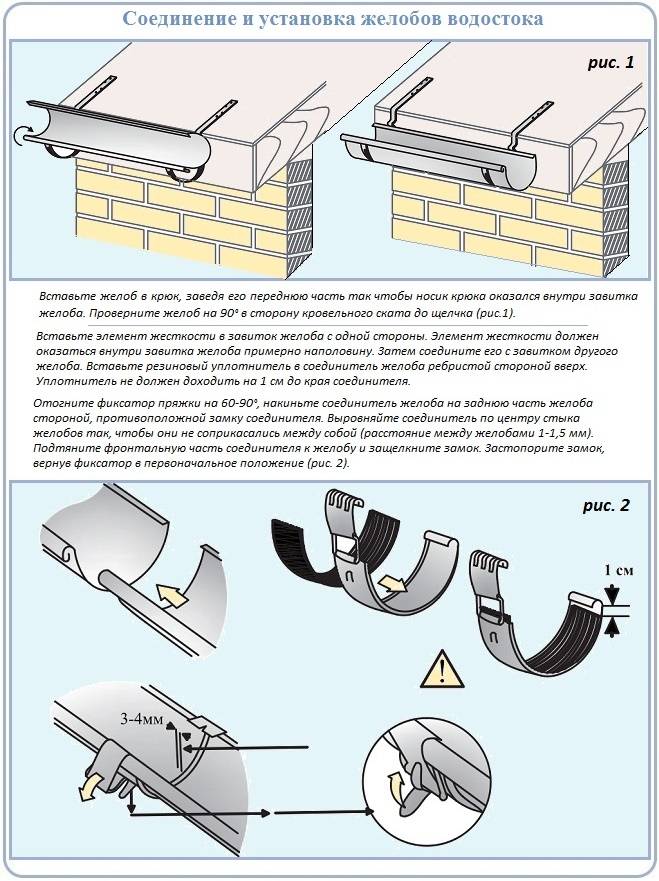
- The gutter is mounted into the mating elements up to the line marked "Insert until now". For ease of installation, point micro-stops are formed along the edges of the line, before contact with which you need to insert the gutter.
- The distance from the end surface of the plug to the structural elements of the house should not be less than 30 mm.
5. Ensuring the sealing of the system
- Before starting installation, the mating surfaces should be cleaned of dirt, and also make sure that the rubber sealing gaskets are present and that they are securely installed in the sockets. Gaskets should reach the ends of the sockets.
- All plugs must be installed. The ends of the gutters protrude beyond the side cut of the roof by 50 mm -100 mm.
Comparison of performance of chutes under load
Gutter heating options
The absence of an anti-icing system leads to the formation of leaks in waste structures, the destruction of the facade and the foundation of the building.But the main danger lies in the hanging ice, which, when falling, can threaten the health and life of people.


To eliminate icing and possible damage to gutters, as well as to prevent leakage of roofing material, a reliable heating system is installed.
The modern anti-icing system maintains the internal heating temperature of the structural elements of the gutters and the roof above 0. It has a fairly simple and effective device, consisting of heating resistive and self-regulating cables.
- The cable is resistive. Standard heating element, which consists of a metal conductive core and thermal insulation. It has constant resistance, constant heating temperature and standard power.
- The cable is self-regulating. An element for heating roofs and drainage systems is a heating matrix for temperature control, thermal insulation (internal and external) and braid.
Heating of drains can be: external - the cable is installed in the lower part of the roof slope, internal - the cable is installed inside the gutter and pipe.
The main mistakes in installing roof gutters
Proper installation of the system guarantees not only high efficiency, but also the durability of the operation of drainage systems. Metal products can be deformed from excessive loads caused by gross violations of the installation technology, while plastic ones crack and require complete replacement.
What mistakes are often made by inexperienced roofers?
Incorrect gutter slope. To ensure normal water flow, it is recommended to make a slope of 3–5 mm per linear meter.If the slope is greater, then at the end of the slope the gutter is too far away from the edge of the roofing and water does not enter it. If the slope is insufficient or the mounting line of the brackets is not straight, then stagnant areas are formed. Dust and dirt quickly accumulate in them, then mosses grow, completely blocking the gap of the gutter. As a result, the drainage system stops working, the gutter needs to be cleaned. It is difficult and time-consuming to do this, and it is not always possible to correct the mistake made. Sometimes it is necessary to undermine the installed roof, which always has negative consequences in the future. The slope of the gutters
Not enough brackets. All structures are designed for the maximum possible bending load, taking into account these data, manufacturers recommend the optimal distance between fixation points. For plastic structures, the brackets should be at a distance of no more than 50 cm; for metal structures, this parameter increases to 60 cm
You never need to save on the number of brackets, the cost of several elements is incomparably lower than the cost of eliminating negative consequences. It is important to fix the optimal number of brackets to prevent deformation of the gutters
Incorrect connection of couplings. Due to the violation of technology, leaks appear in these places.
Rubber elements or adhesive joints are used as seals. During installation, maximum efforts should be made to ensure complete tightness and high reliability of all connections. Additional brackets must be installed on both sides of the coupling element.
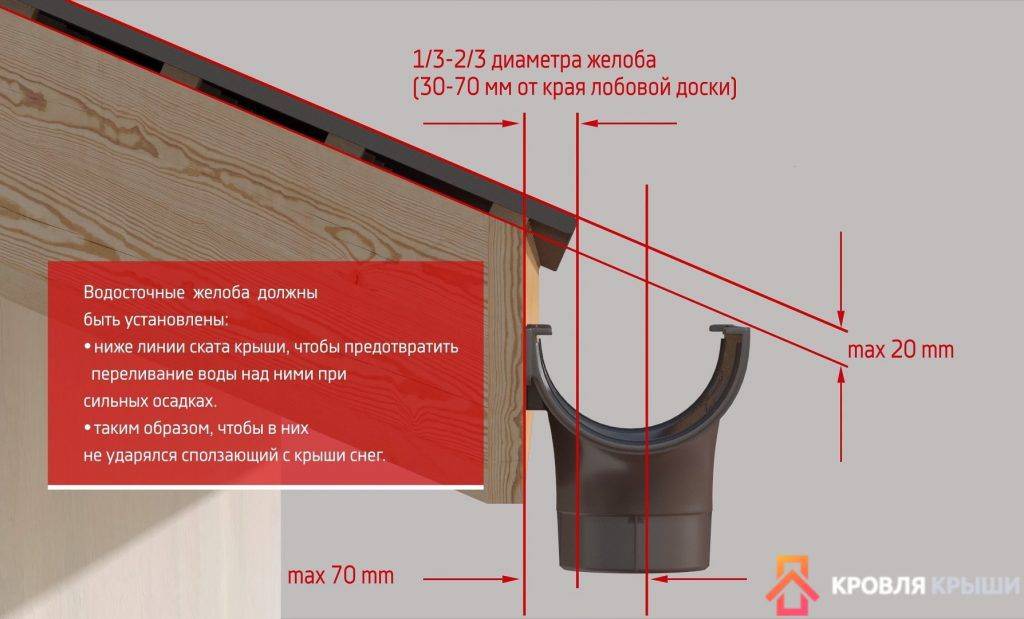
Violation of the recommended spatial position of the gutter. If we continue the plane of the roof, then it should pass over the rear edge of the gutter at a distance of approximately 20–25 mm. Why exactly these parameters? Only they simultaneously provide a safe sharp snowfall from the roof and full reception of all rainwater. Reducing the gap will cause snow or ice to damage the integrity of the gutter, and increasing it will cause water not to enter the gutter, but to the ground. Another dimension must be strictly observed - the vertical projection of the edge of the roofing should be located as close as possible to the center of the gutter. The permissible deviation cannot exceed 1/3 of its width. Failure to comply with this parameter also causes rainwater to drain past the drainage system. Spatial position of the gutter
Each type of system has its own minor structural differences, but they only affect the installation technology, and the principles are common to all.
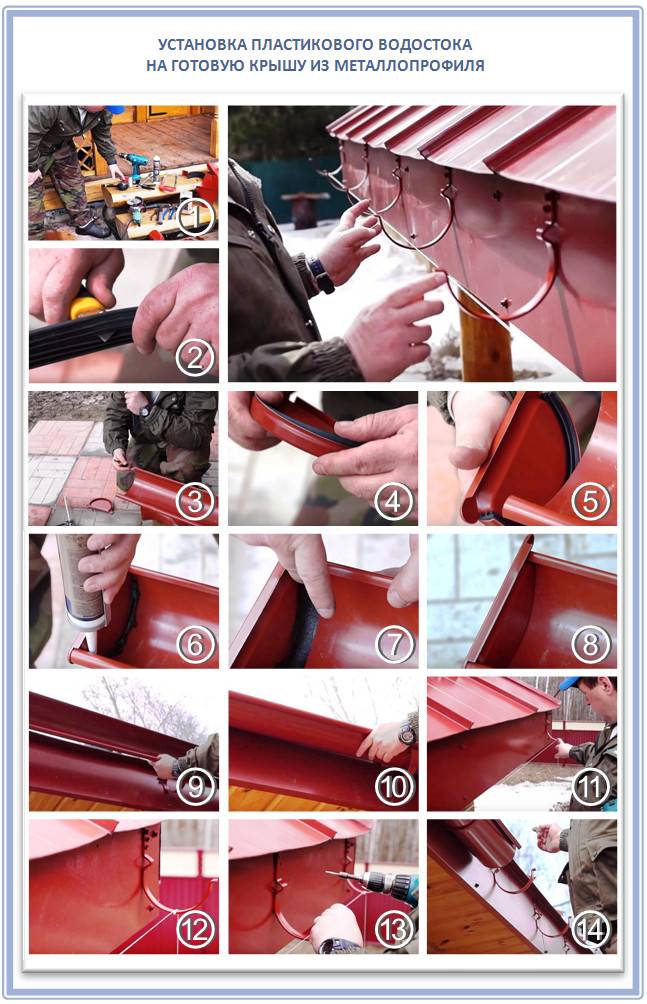
Mounting
Installation of a drainage system requires compliance with the standards and recommendations from the manufacturer:
- Work is carried out at a temperature of more than 6 degrees in order to avoid further damage to the drainage system.
- The gutters are placed at an angle to the storm water inlet at the rate of 3 mm per 1 m, and long slopes are divided into several sections by installing additional funnels.
-
The gap between the funnels should not be more than 23 meters.
brackets
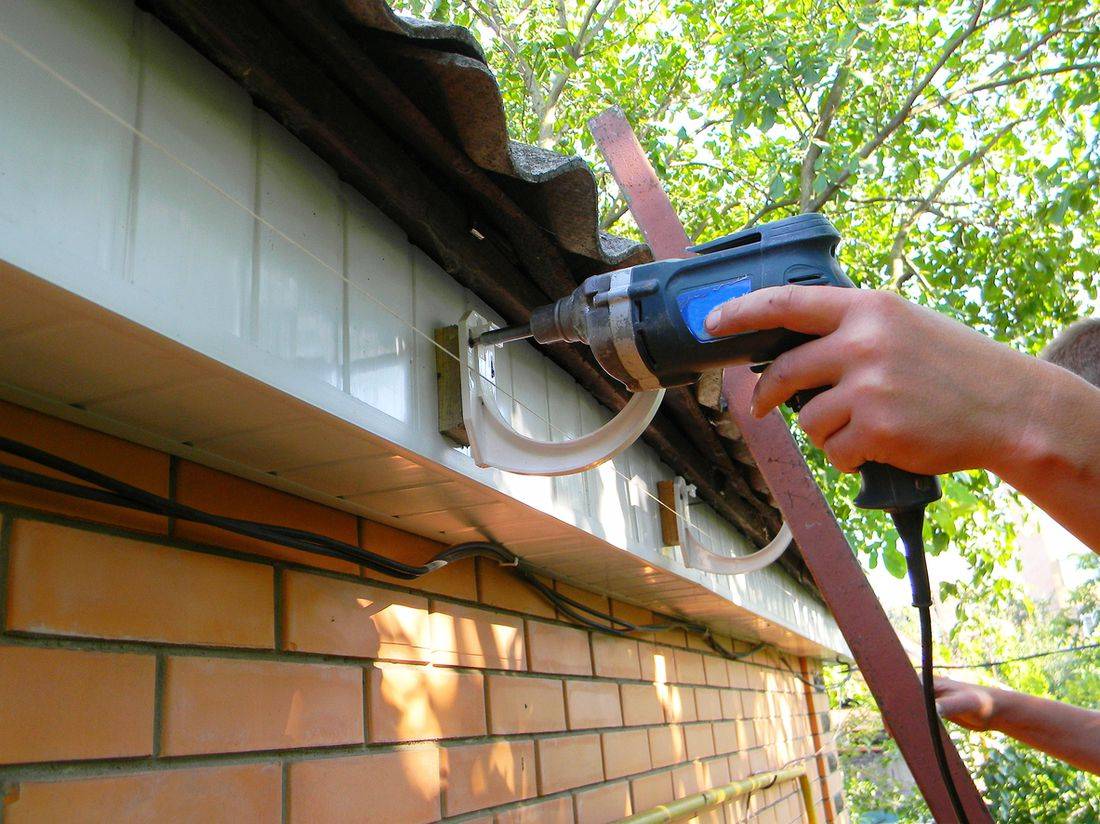
Hooks are installed on the frontal board with a step of 500 or a crate with a step of 600 - 900 mm.
Additional hooks are installed at the joints of the gutters, as well as at the beginning and end of the gutter.
Given the length of the slope, I calculate the offset of the extreme hooks relative to each other, if the length is 20m, then the offset is 6 cm.
Recheck the offset with a laser or water level, the roof slope is not always level.
First, the extreme brackets are attached at the very top and bottom, and a fishing line or cord is pulled between them, funnels, connecting elements and corners are fixed, after which the remaining mounts are placed in increments of 500mm to 900mm, depending on the mounting option and the drainage system.
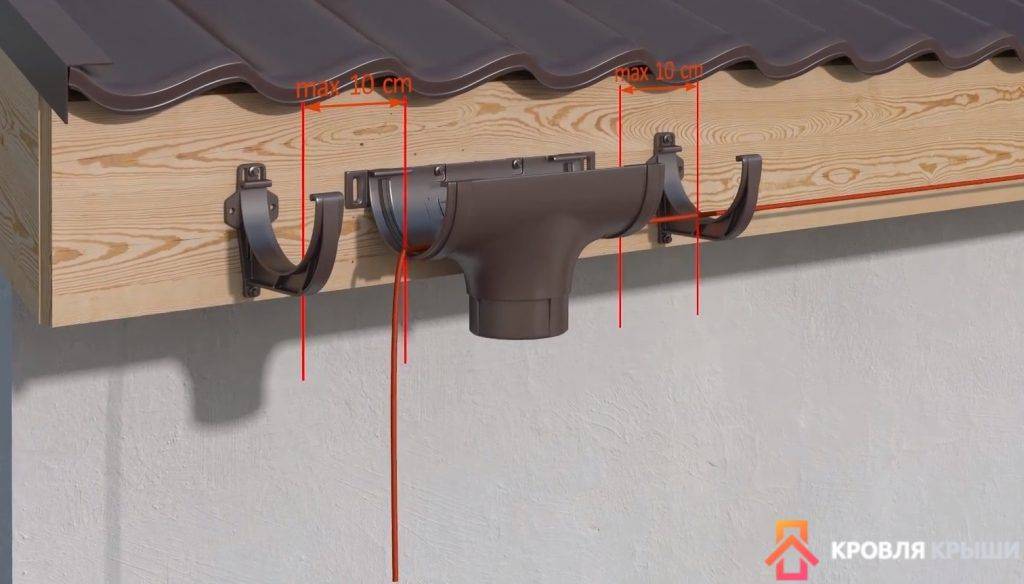
Pay attention to the installation locations of the two brackets:
- funnel location;
- gutter connector;
- corner.
Gutter holders on the right and left sides of the storm water system are located at a distance of no more than 5 cm.
gutters
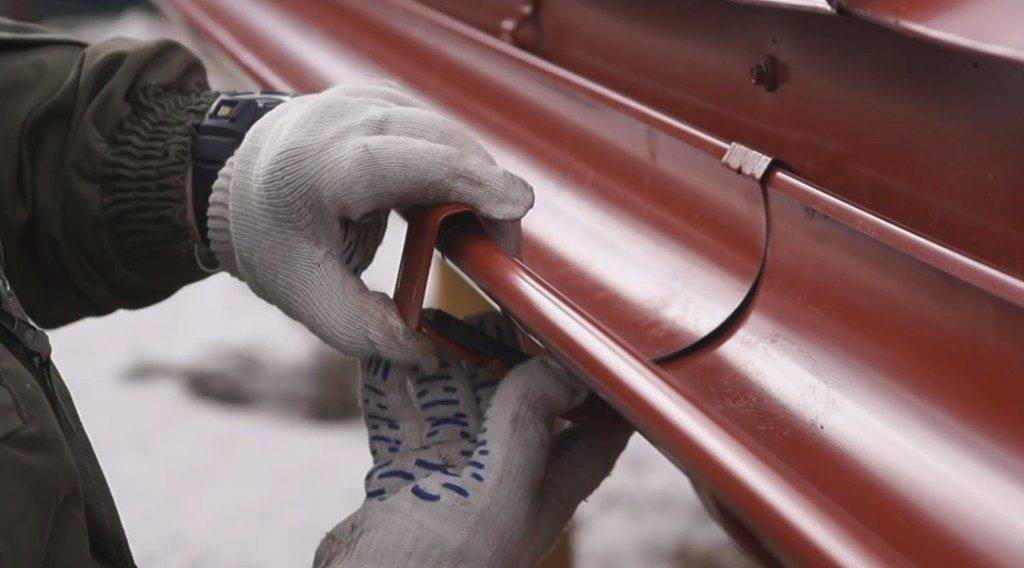
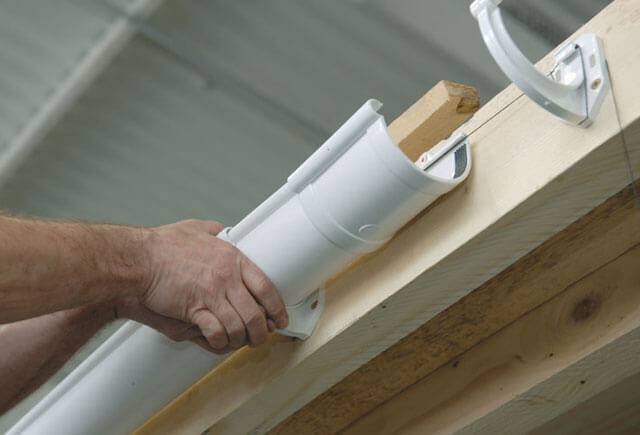
After fitting (taking into account the notches on the connecting elements and funnels), we saw off the required length with a hacksaw for metal, we mount the gutters on the brackets, fixing them with latches.
Pipes
Pipes are fastened with clamps at a distance of 2 m from each other, for objects with a height of up to 10 m, at a distance of at least 5 cm from the wall.

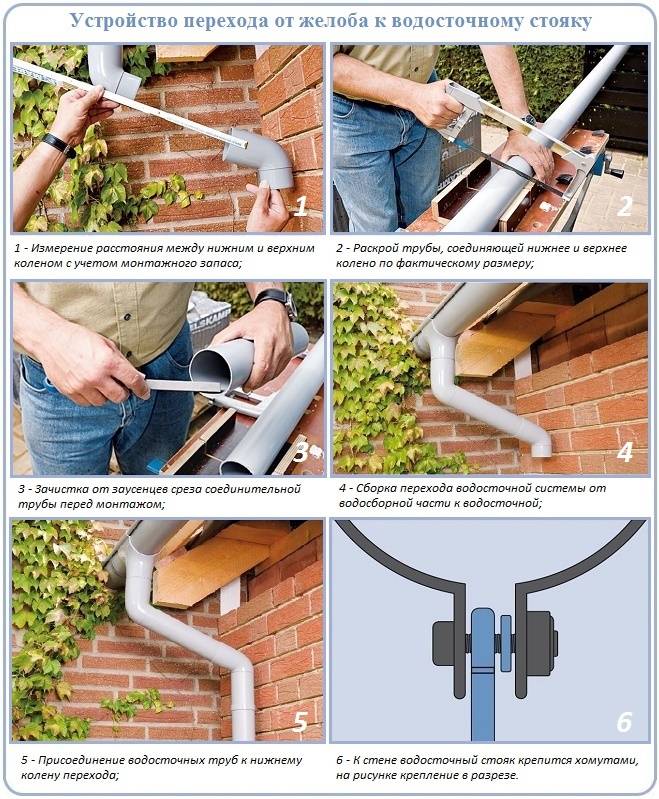
After connecting the knee to the funnel socket, it is turned to the wall, the second knee is inserted, screwed to the wall using the top bracket, then the line is pulled to the bottom clamp, after which the remaining brackets are marked and mounted.
Peculiarities
It is impossible to carry out installation in frost. Otherwise, the pipes will crack during the cutting or fastening process. In addition, some types of pipes cannot be left packed in the sun.
It is important to be aware of debris and leaves in the gutter that clog the gutter system. To eliminate such a situation, it is necessary to install a system of a grid-leaf trap. Also, to protect pipes from icing and their deformation, it is necessary to install a system with cable anti-icing, having previously calculated the power in the heating cable
Also, to protect pipes from icing and their deformation, it is necessary to install a system with cable anti-icing, having previously calculated the power in the heating cable.
To combat the problem of overflowing water in the gutters, select a system based on the manufacturer's recommendations.
Errors when installing roof gutters
Often problems arise after drainage installation. Their appearance is associated with many factors, in particular:
- With the wrong selection of pipe diameters and the number of funnels or improper design of the drainage system.
- Gutter. It is placed in a horizontal position without a slope, then water accumulates in it and does not allow the system to drain it, playing its main role.
- No anti-icing system. Stagnation of water as a result of heavy rainfall in some regions leads to the formation of large pieces of ice in the drains. Therefore, the life of the system is no more than 2 years. The copper type of drain is the least exposed to icing, but it is expensive.
- Distance from the gutter to the roof. The roof hangs over the gutter or it has a slope to the wall. As a result, during heavy precipitation, water overflows from the system.
- Fixing the pipe to the surface of the house. As a result, walls and foundations get wet.
Features of installing a water drainage system
The gutter is fixed to the building and the roof using special brackets. As a rule, the rule is accepted, according to which the gutter is fastened every meter
When calculating downpipes, take into account the fact that every 10 meters of the gutters must be equipped with one downpipe with a diameter of 100 mm. It is very useful to know the area of \u200b\u200bthe roof, and even better its projection.This is due to the fact that a roof with an area of 100 m 2 at a slope of 30 ° will receive more precipitation than the same roof with a slope of 45 °
It has long been established by specialists in the construction industry that every 100 m 2 of the roof projection must be equipped with one downpipe with a diameter of 100 mm
This is due to the fact that a roof with an area of 100 m 2 with a slope of 30 ° will receive more precipitation than the same roof with a slope of 45 °. It has long been established by specialists in the construction industry that every 100 m 2 of a roof projection must be equipped with one downpipe with a diameter of 100 mm.
Downpipes are also fastened with clamps, only of a slightly different type than for gutters. Very often, buildings and structures have a complex roof structure that requires additional installation of downpipes. In this regard, when calculating the drainage system, experts take into account the presence of gables, ledges, bay windows and other architectural features.
Especially often the question arises of how to fix the galvanized drain to the building. This can be done very simply with the help of special galvanized clamps and brackets available on the market. One of the design features of galvanized systems is the presence of a protective polymer layer under the paint. When this polymer coating is deformed, corrosion will spread very quickly throughout the damaged area. In this regard, during the operation and installation of galvanized elements, it is prohibited to use sharp objects and tools, as well as to carry out excessive bends and other operations that are dangerous for the polymer coating.
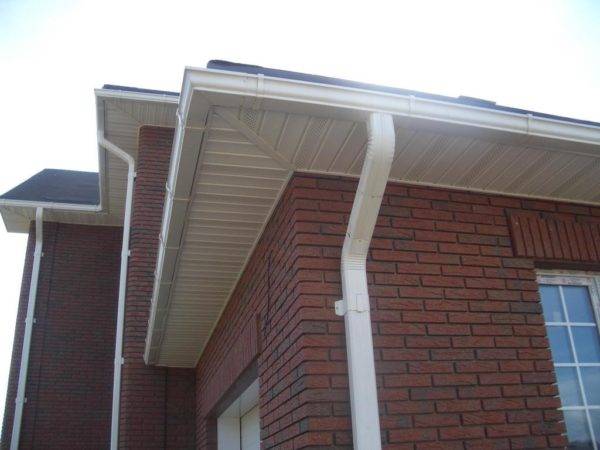
When choosing the color and texture of the drain, special attention should be paid to the color of the roof and facade of the building. The drainage system should harmoniously fit into the design of the building and not spoil the facade with its appearance. Otherwise, the drain should be hidden from the back of the house, which will be the best solution if it is impossible to choose the right color
When using soft tiles, experts recommend installing a plastic gutter system. This is due to the presence of a layer of mineral chips with abrasive properties. With large flows of water, it is washed into the drain, scratching the surface of the gutter, funnel and pipes, and this, accordingly, can lead to damage to the polymer coating and the development of corrosion.
Otherwise, the drain should be hidden from the back of the house, which will be the best solution if it is impossible to choose the right color. When using soft tiles, experts recommend installing a plastic gutter system. This is due to the presence of a layer of mineral chips with abrasive properties. With large flows of water, it is washed into the drain, scratching the surface of the gutter, funnel and pipes, and this, accordingly, can lead to damage to the polymer coating and the development of corrosion.


In what situations the drain is attached only to the frontal board
Mounting the hooks of the drainage system only on the frontal board is possible in cases where ventilation of the under-roof space is carried out using special holes in the filing of overhangs - the so-called. "perforated soffits". This is the simplest and most inexpensive type of ventilation, but its efficiency leaves much to be desired.
For a more complete flow of air, a gap under the crate is used.This implies a lower location of the frontal board and fixing the brackets exclusively on the crate. The disadvantage of this method is the risk of board collapse under snow load. The decision on the appropriateness of one or another approach to the installation of gutters is made by the owner of the house.
Another reason for installing drain hooks on the frontal board is to carry out the installation of drainage structures after the completion of the main construction work. A common situation when an unfinished house with expensive roofing is purchased: in order not to start a laborious procedure for dismantling it, it is easier to attach the gutters to the frontal board. The same algorithm of actions is selected when replacing the drainage system.
The third reason why the brackets can only be installed on the surface of the frontal board is the use of an anti-condensation waterproofing film. As the installation rules say, it must necessarily go to the overhang of the cornice, which implies the possibility of installing gutters exclusively on the frontal board.
Helpful Hints
Little tricks will allow you to organize the drainage of rainwater and melted snow more efficiently.
- The location of the vertical riser in buildings with a wall length of more than 15 m is more appropriate in the center. This will allow you to make a slope from the corner of the house to the middle.
- Special paint with protective properties in cylinders will extend the life of the metal in places of damage and chips of the protective coating.
- The use of nets installed around the perimeter of the trays or in the funnel will prevent clogging of the drain.
- It is necessary to organize the waste of water from the house using a storm system or a water collection tank.
- For areas with aggressive climatic conditions, it is important to use anti-icing devices.
Such subtleties will prevent the need to replace the drain earlier than the deadlines declared by the manufacturers.
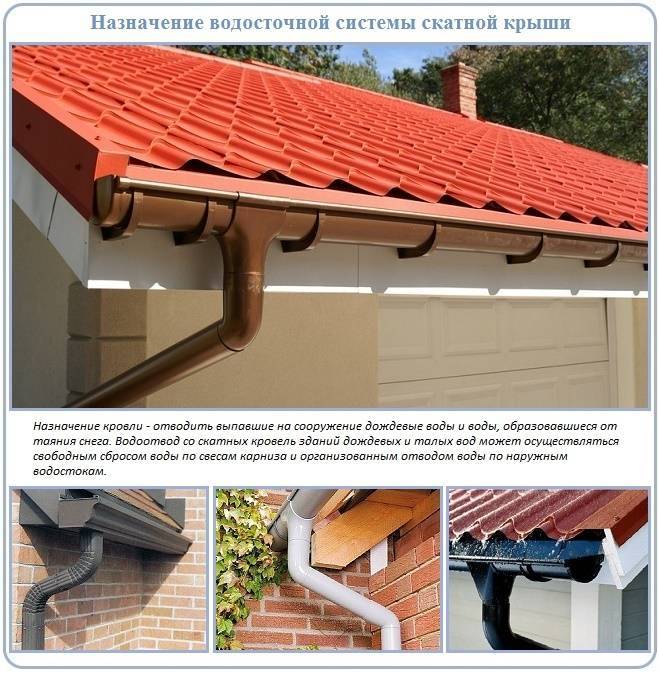
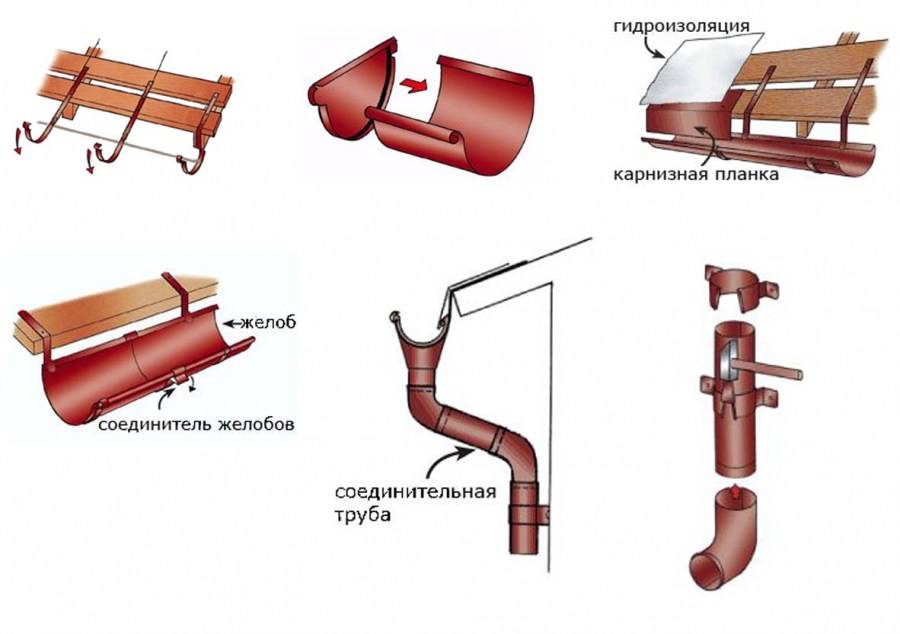
Description of the elements of the drainage system

Before describing the installation process on the roof, you should find out what the drainage system generally consists of.
Gutters and pipes. They are necessary for the collection, removal of precipitation. Gutters are installed at the edge of the eaves so that water from the roof gets on them. They are mounted with a slight slope so that the liquid does not linger, but moves towards the pipes. Alpha profile produces these parts with a length of 3 m or 4 m. The pipe diameter is 8 or 10 cm.
Water funnels. This part, which connects the chute to the pipe, directs the liquid down. There are two types:
- internal funnels;
- external funnels.
The difference between them is that the installation of the former is more difficult - they are installed directly into the roofs (if they are sloping or straight). If the roof is pitched under a fairly steep slope, gutters with external funnels are mounted along its perimeter, which remove precipitation.
Attention. Pitched roofs are accepted in Russia, therefore systems with external funnels are used in the field of private housing construction
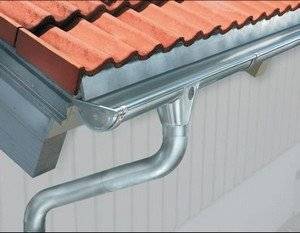
knees
They are used to connect funnels and pipes, they are designed to ensure high-quality drainage, because they are made at an angle of 45 degrees. There are also parts with an angle of 72 degrees
knees. They are used to connect funnels and pipes, they are designed to ensure high-quality drainage, because they are made at an angle of 45 degrees. There are also parts with an angle of 72 degrees.
At the edges of the roof, where the direction changes, corner gutters are used, most often with a right angle.
Protective grilles and plugs.The former protect pipes and gutters from getting large debris into them, which can create an obstacle to removing precipitation from the roof, the latter are attached from the edges of the gutters to isolate the system.
At the bottom of the pipe, for more convenient removal of liquid, drain outlets are mounted - being at an angle, they drain water from the roof away from the foundation.
Brackets, clamps, couplings for attaching parts to the roof and walls of the house.


