- Planning and drainage schemes
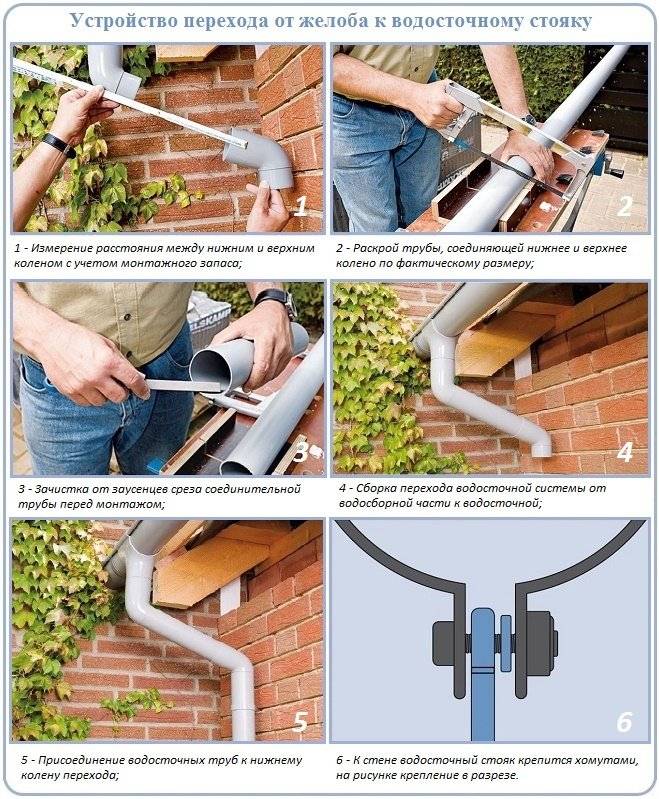
- Gutter Assembly Rules and Sequence
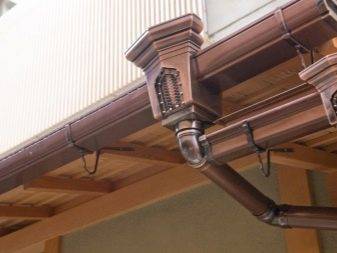
- Pipe installation
- How to fix the gutter yourself?
- Installation steps
- Stage 1: installation of fasteners for gutters
- Stage 2: installation of funnels
- Stage 3: installation of the gutter
- Stage 4: installation of plugs
- Stage 5: joining the gutters
- Stage 6: knee installation
- Stage 7: installation of downpipes
- Stage 8: Clamps
- Stage 9: drain
- Installation of internal drainage system. Step-by-step instruction
- How to fix modern plastic gutters?
- Basic rules and subtleties of installation
- Installation instructions for the drainage system
- Tips
- How to choose the right drainage system
- Heating cable in the drainage system
- Varieties of modern drainage systems according to the material of manufacture
- Generalization on the topic
- Drainage from the roof for water - drainage device from pitched roofs
- 1. Draining water from the roof
- 2. Place (node) adjoining the roof to the wall
- 3. Plumb roof
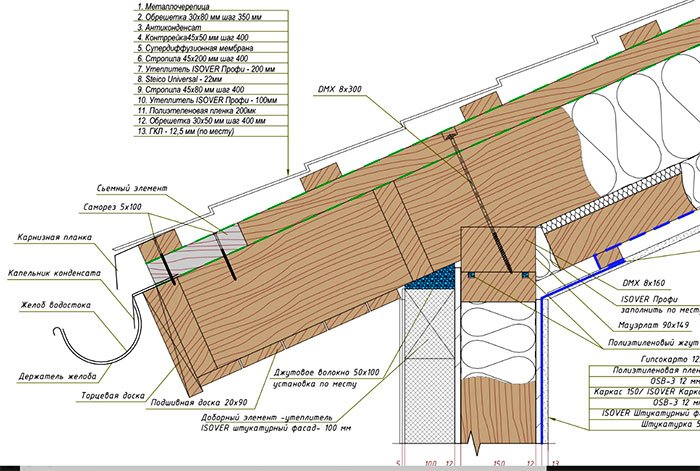
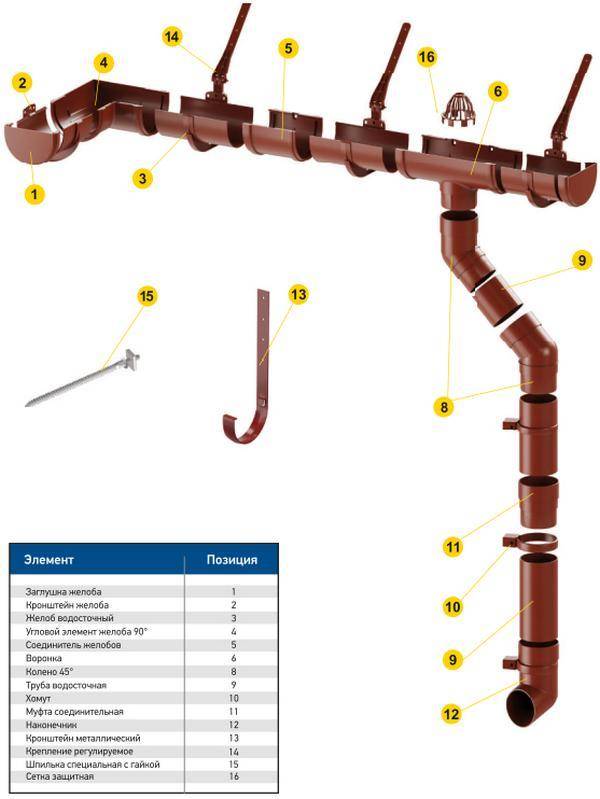
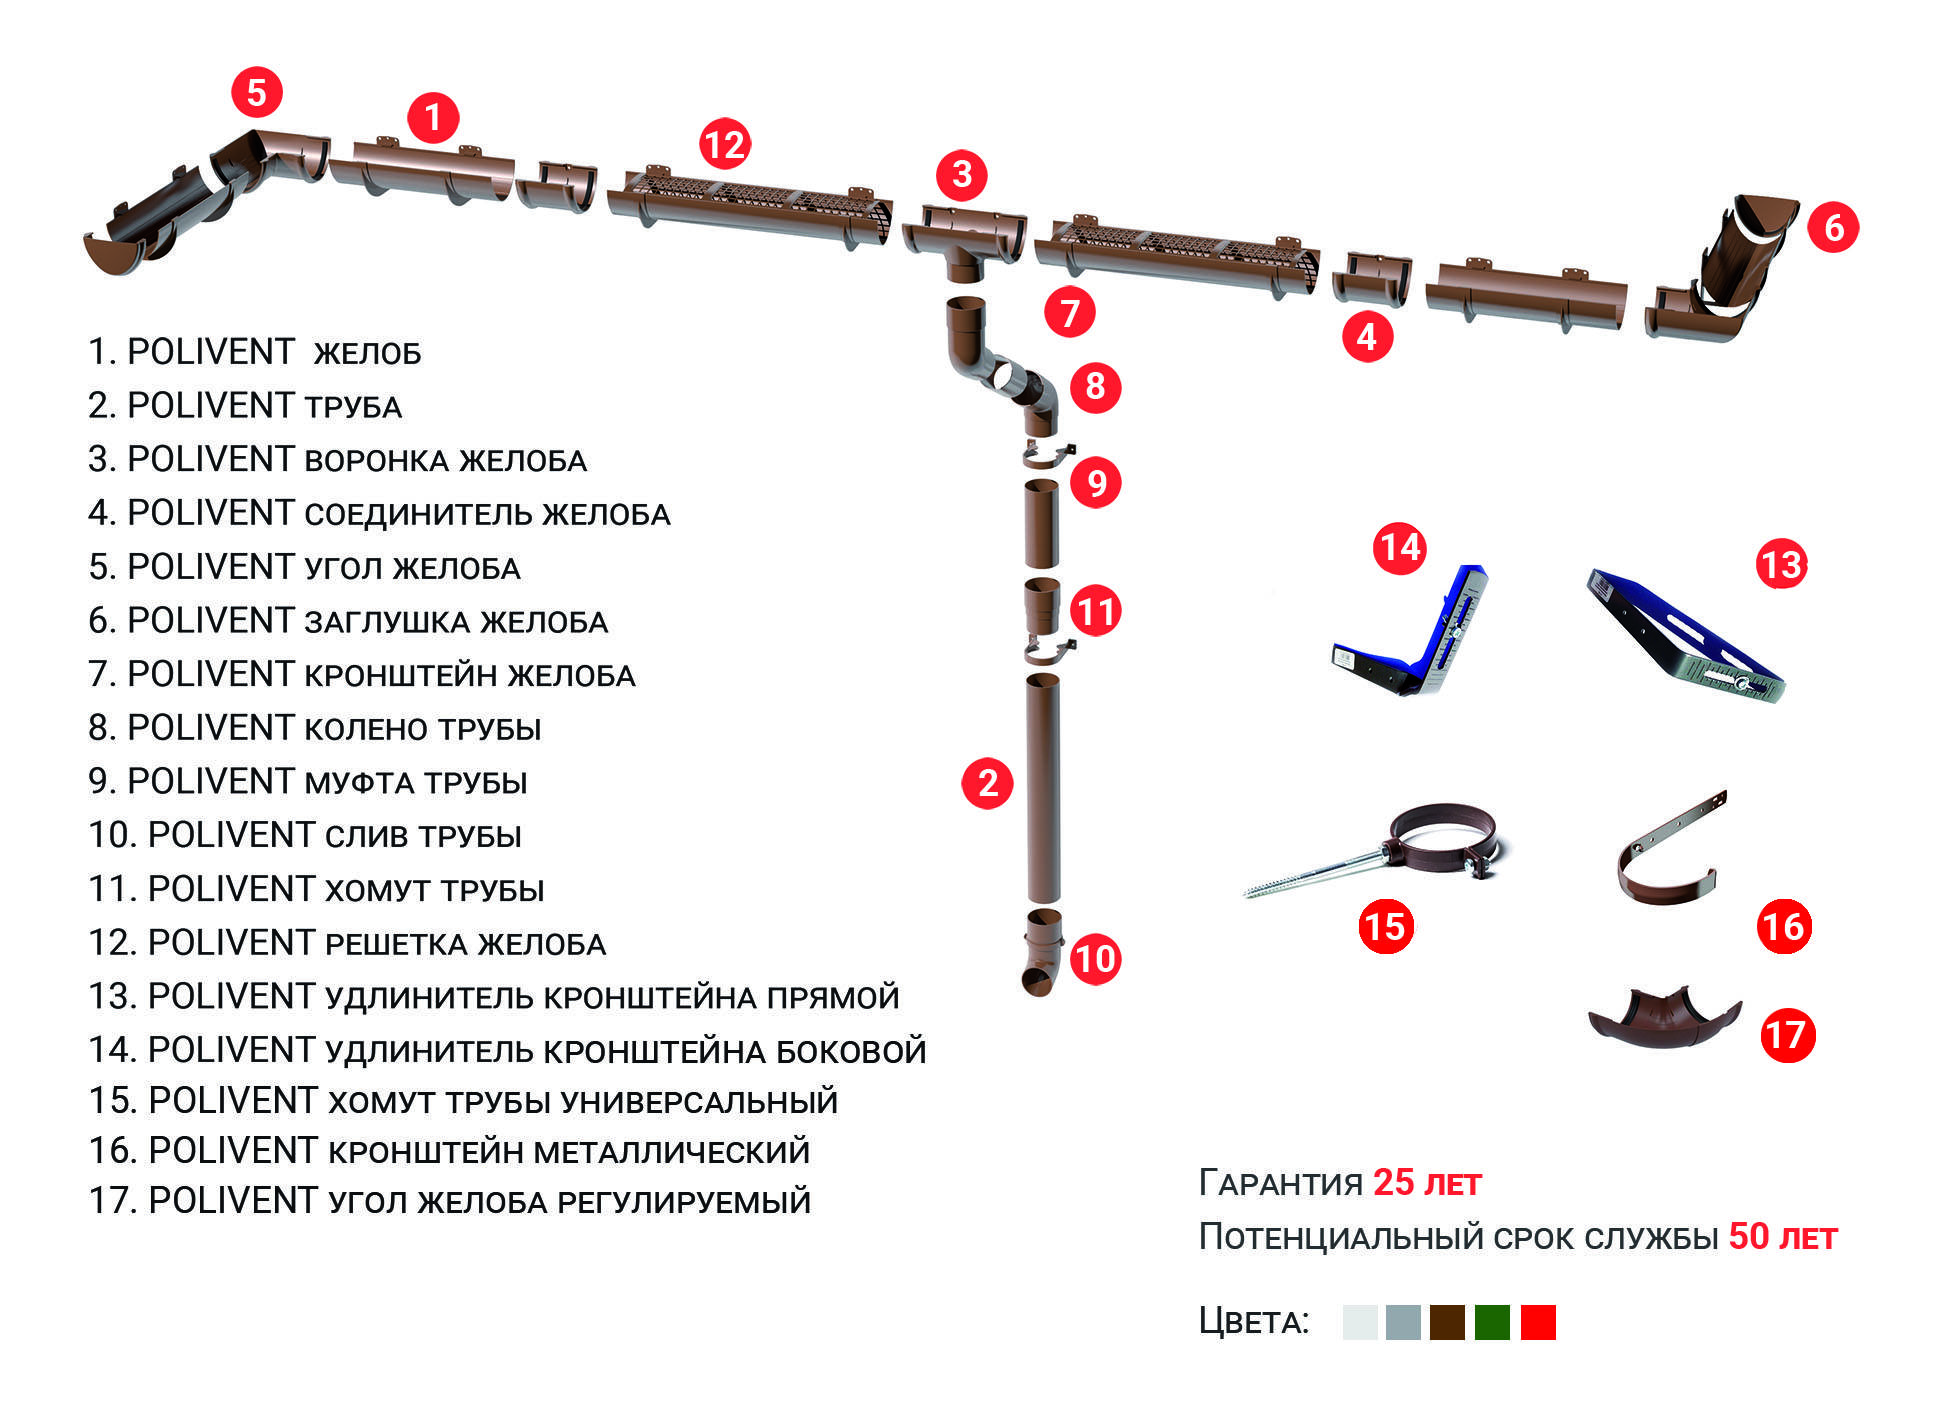
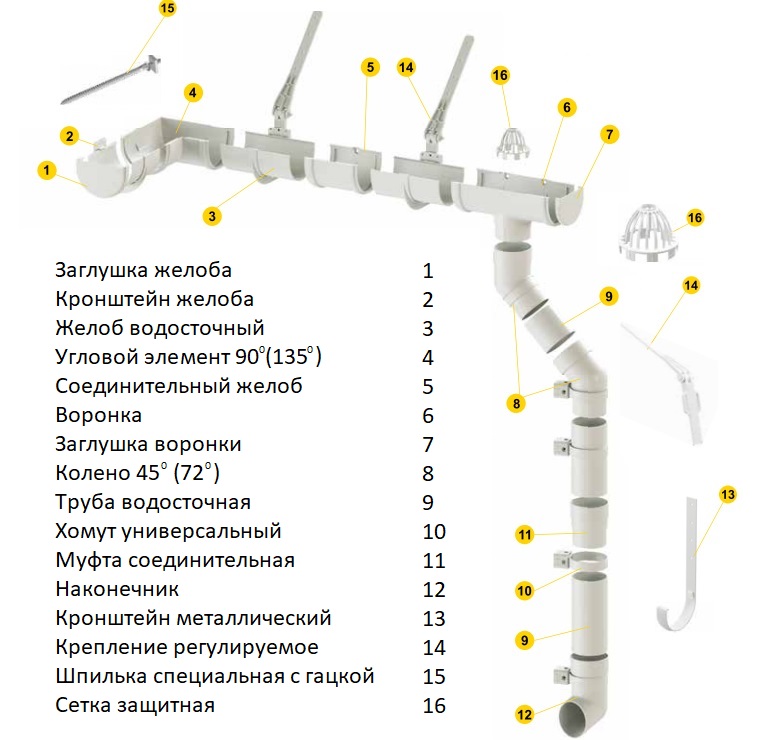
- 4. Components of the drainage system
- Composition of drainage systems
- Installation of the curly part and drain pipes
- How to calculate drainage elements
Planning and drainage schemes
In order to deal with the installation of a spillway system step by step, it is important to consider the following points when planning:
- Calculate the area of the roof, both the total and the section of each slope.
- Schematically depict the future installation, indicating the fixation points of the funnels, the diameter of the gutters and the number of required elements.
- Masters recommend buying all products from one manufacturer in order to eliminate the discrepancy between the dimensions of the parts.
- Properly select the material of the system. Although aluminum and steel pipes will cost more, they will last longer than plastic ones.
- When calculating, take into account the norms of technical documentation, SNiP.
The number of risers is determined by the length of the facade of the house. It is generally accepted that one riser is enough for every 12 m. With a higher figure, it will be necessary to mount two risers and plus a compensating funnel. The last element is used, and when there are other buildings next to the building, or it is planned to install a closed drainage system around the perimeter of the roof.
It is important to correctly calculate the number of long, short brackets in the form of hooks. If the roof is only covered with material, then long hooks are fixed to the crate
Short ones can also be used after the roofing, fixing them to the frontal board.
When choosing a place for installing risers, it is necessary to take into account the general appearance of the building so that the pipes do not spoil the aesthetics of the building. Therefore, drains are often mounted in the corners.
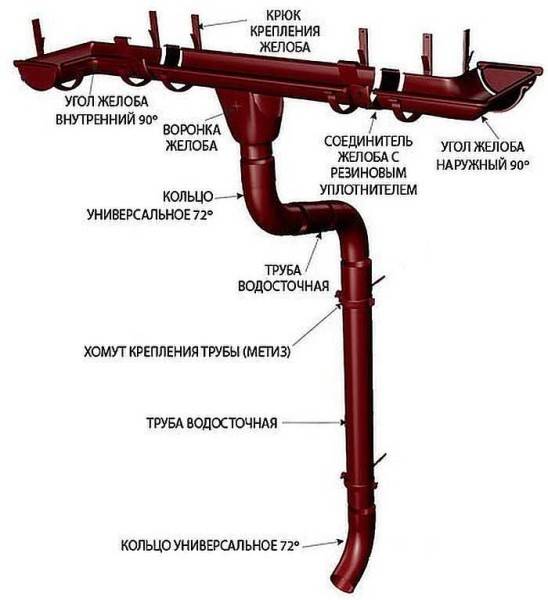
Gutter Assembly Rules and Sequence
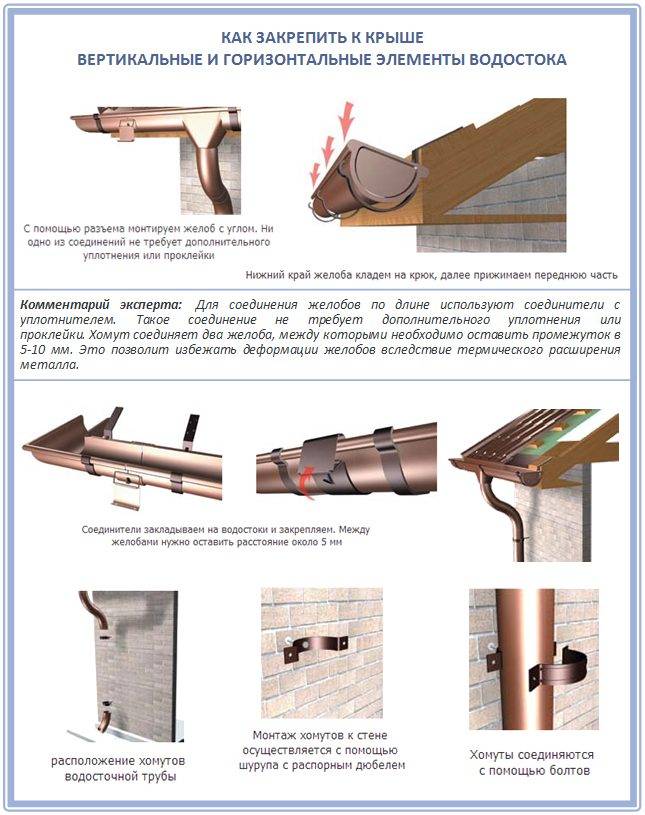
The main task of the work foreman is to fasten the gutters of the gutter system at a small angle equal to 3-7 °, since the gutter is a gravity flow system. Therefore, on one side of the slope, the bracket is installed closer to the roof eaves, and on the opposite side of the slope, lower to form a slope. Then, a thread is pulled between the two fasteners, along which other brackets are installed in increments of 50-60 cm.
It remains only to lay and fasten the gutters to the fasteners. The main thing is that the laying is carried out with an overlap of the edges of the trays, this is when the edge of the upper tray is laid over the edge of the lower gutter. In this way, the problems of leaks at the joints are solved. To reduce the possibility of leaks, the joints are treated with silicone sealant.
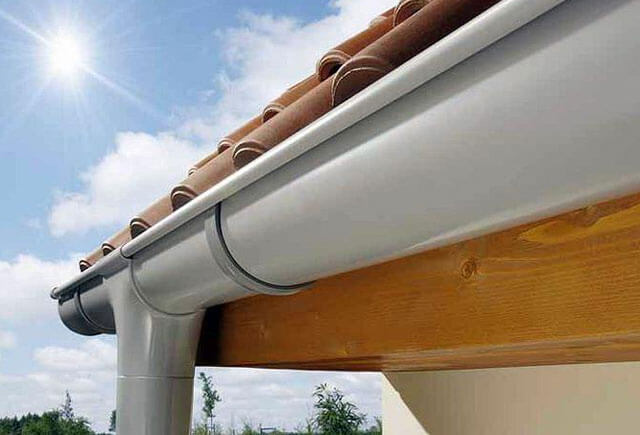
Installation of gutters
Pipe installation
The second stage of the installation of gutters is the installation of vertical pipes. There are strict standards that determine the installation location of pipe elements. This is the distance between them, equal to 12 m. For example, if the length of the front part of the building is 12, then one pipe structure is mounted on its surface. If the length is greater than this value, but less than 24 m, then two risers are installed.
The pipes are fastened to the walls of the house with clamps in increments of 1.8 m. If the height of the house exceeds 10 m, then the installation step is reduced to 1.5 m. The clamps themselves are fastened to self-tapping screws through plastic dowels. The main requirement is a strict vertical installation. Therefore, at the installation site, first determine the vertical along the wall using a plumb line. Then, measuring the installation step, make notes in which holes are drilled for the dowels.
Installation of a pipe riser
The assembly of pipes, the length of which is standard - 3 m, is carried out by the socket connection method. This is when one side of the pipe has a larger diameter than the opposite. That is, the pipes are inserted one into the other. In this case, a large diameter pipe is installed upwards. For one hundred percent sealing of the joint, they are treated with silicone sealant.
Between themselves pipes and trays are connected by funnels. A drain is mounted at the bottom of the pipe riser - this is a branch at an angle of 45 °.Here it is necessary to take into account that the lower edge of the drain should be at a distance of 25 cm from the surface of the soil or blind area.
An important point is the installation of a drain (riser) at the roof eaves, where bends are used. Because the overhang of the roofing material is located at a distance of 30-50 cm from the wall surface. This means that in order to connect the funnel to the pipe riser, two bends at 45 ° are needed. If the roof overhang is large, then a piece of pipe is mounted at an angle between the branches.
Connection of a funnel and a pipe riser with two branches
How to fix the gutter yourself?
When installing any gutter system, it is extremely important to take into account the thermal movement of the gutter and its structural elements, which, depending on the material of manufacture, work differently in tension and contraction. According to the rules, the only movable element of this kind should be a hinged complaint, which is mounted without additional gluing - only on a latch
Moreover, modern manufacturers take care of this by making a special, so-called expansion mark inside the gutter, which helps to assemble in accordance with the air temperature that exists at the time of installation.
According to the rules, the only movable element of this kind should be a hinged complaint, which is mounted without additional gluing - only on a latch. Moreover, modern manufacturers take care of this by making a special, so-called expansion mark inside the gutter, which helps to assemble in accordance with the air temperature that exists at the time of installation.
Here's how to properly mount the gutter directly to the eaves:
Installation steps
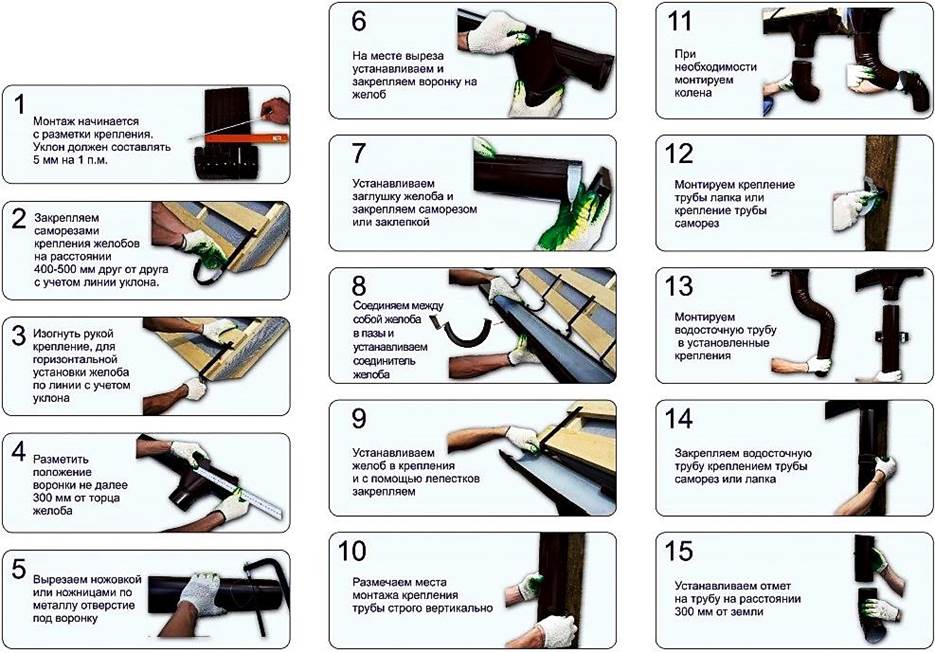
Stage 1: installation of fasteners for gutters
The market offers many solutions in terms of fasteners that can be used to install gutters. At the same time, the installation of these components of the drainage system is carried out both on the wall and directly on the roof. At the same time, the following condition must be observed: the gutters must be installed in such a way that there is a slope of about 5 cm per 10 meters of the length of this product in the direction of the downpipe. This position ensures free flow of water without overflowing over the edges of the gutter. If the length of the house exceeds 20 meters, it is necessary to arrange 2 slopes for the full drainage of water, starting from the middle of the building.


Reliable fastening of the gutters is provided by brackets installed in half a meter increments. At the same time, it is worth taking care that this parameter is observed regardless of the distance between the rafters, for example, you can use the crate for mounting these fasteners.
Stage 2: installation of funnels
Typically, funnels are installed where the drain pipes are. But under certain conditions, these elements of the drainage system find their application in terms of connecting gutters. If so, then you should install from them. With regard to the standard installation of water inlets, it should begin with the fact that you first need to make a corresponding hole in the gutter, using, for example, a hacksaw. Then the edges of such a hole should be cleaned and after that you can proceed to direct installation using the appropriate clamps if the funnel is metal. If this product is made of plastic, then its installation is carried out using glue.
Stage 3: installation of the gutter
Installation of gutters is carried out in accordance with a simple instruction:
- lay the gutter on the brackets with the outer groove down;
- fasten the gutter due to the presence of special clamps.
Stage 4: installation of plugs
The most effective plugs are equipped with rubber seals, which are located on the lower arc of this product. If you don’t have this type of plugs at hand, then you should follow some conditions for installing standard plugs:
- use a seal, which must be laid in the plug with the ribbed side up;
- to connect the plug with the gutter.
Stage 5: joining the gutters
To connect the gutters, it is necessary to use connectors specially designed for this purpose, equipped with seals. In practice, the two gutters to be connected need to be placed at a small distance from each other, and then the connector is correctly installed between them and the installation is completed by securing the docking point with a lock.
Stage 6: knee installation
The installation process of the elbow involves its installation on a funnel in the direction of the outlet to the wall in order to ensure a closer location of the drainpipe to the building. In the next step, another elbow is added to the installed knee, providing a downward direction.
Stage 7: installation of downpipes
The pipe is installed in the elbow with further fixing of the connection with a clamp. To increase the length of the drain, an additional pipe is threaded into the already installed one.
Stage 8: Clamps
Depending on the material of the supporting elements (brick, wood), various types of clamps are used.Mostly, the clamps in their structure are 2 arcs that are put on the pipe and fixed by means of bolts.
Stage 9: drain
A drain, resembling a knee, is designed to drain water from the base of the building. Usually it is mounted so that from the blind area to the edge of the drain is from 30 to 40 cm.
The drainage system must be durable - this is the main requirement. Also, the installation of the gutter system must be done correctly so that it can cope with any flow of water. After the installation of gutters is completed, it is necessary to flush the system to remove chips, which can damage plastic elements.
Installation of internal drainage system. Step-by-step instruction
Pipes are mounted in a communication channel in order to gain access to it if necessary. After the calculations have been made, the installation is carried out in several stages.
- Marking for fasteners and making holes for them.
- Determination of the point where the riser will exit to the floor.
- Determination of the place of installation of water intake funnels.
- Mounting brackets. If you buy a complete gutter system, then all fasteners are already included in the package.
- Installation of a pipe that diverts water from the riser to the storm sewer. Another option is to simply take it outside the house.
- Sealing the exit point.
- Riser installation.
- Installation of revision holes at a height of 1 m from the floor.
- Sealing of riser joints.
- Mounting the funnel and sealing the seams.
- Closing the slopes of the funnel with roofing material.
- Mounting the grid on the surface of the funnel to prevent small debris from entering the system.
After installation, you need to check the efficiency of the system.
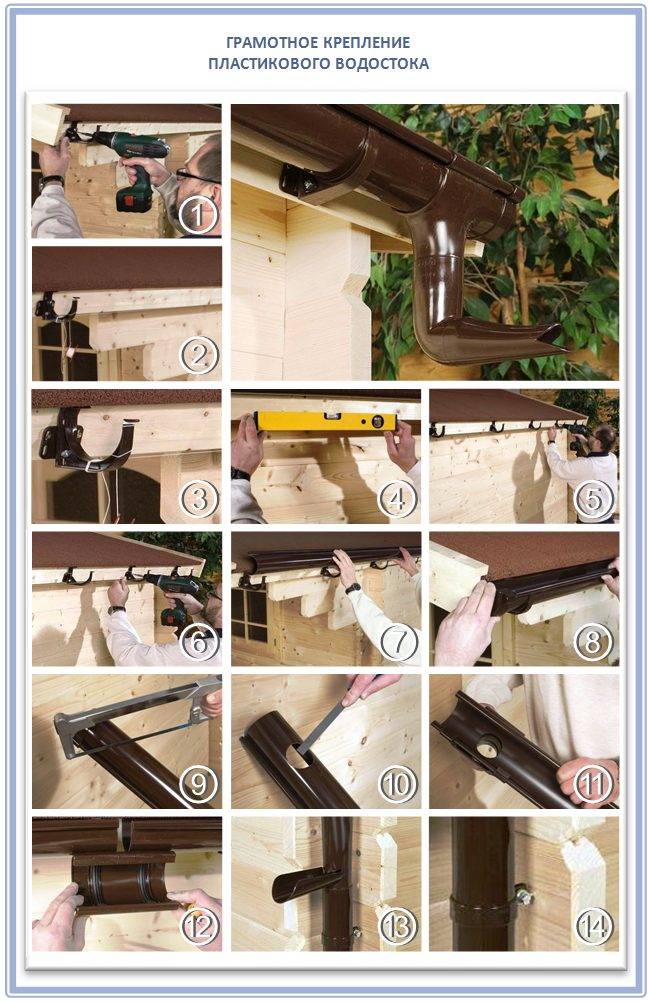
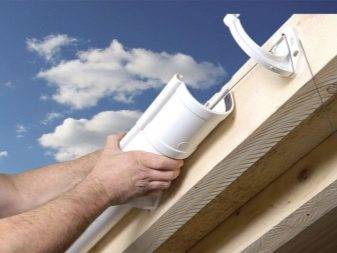
How to fix modern plastic gutters?
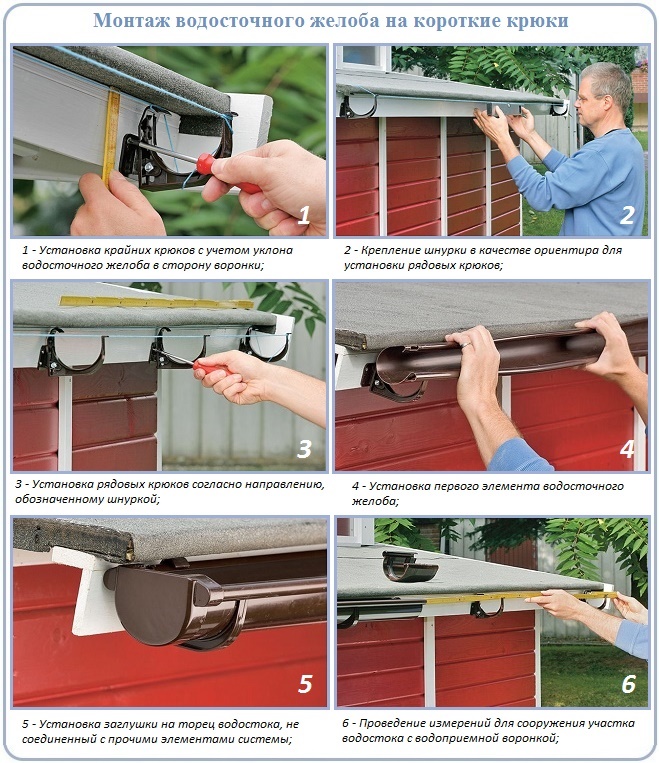
In total, you will need the following tools for installing a plastic drain: a cord, a hacksaw or a grinder, a screwdriver or a screwdriver, a puncher, a pencil, a tape measure, a ladder, a hook bender or a vice.
Let's look at an example of how to properly install a plastic gutter system. In total, it will be enough for you to spend about a day for this lesson. The main thing is to correctly calculate the slope of the gutter towards the funnel, so that the water flows easily and the melted ice quickly falls down. According to building codes, it is desirable to make 1 cm of slope for each linear meter. Then follow these instructions:
- Step 1. So, we mark the hooks: lay them on a flat surface close to each other.
- Step 2. Now on the hook where the gutter will be mounted, make notches as many centimeters as necessary to create a slope, and mark this place with a pencil.
- Step 3 Attach a ruler and draw a line from the first mark to the last. The line will not turn out to be horizontal, as you understand, and it is along this line that you will mount the brackets.
- Step 4. Next, if you have metal hooks, then you will need a special hook bender, if not, then a small vise. They should be clamped along the line and bent towards you.
At this stage, we install all the hooks, while checking the bend angle. Please note that the angle of bend for all hooks should be the same, and only the place of bend along the line is different. So, step by step:
So, step by step:
Step 1. Take the hook with the smallest bend and screw it to the eaves. You should get the highest side of the complaint attachment and the lowest.
Step 2. Make sure the edge of the roof is exactly in the middle of the hook.


This is important so that the snow moving down in winter does not damage the gutter and rainwater falls exactly into the funnel.
Step 3. Now pull the lacing or strong thread between the first and last hook, and attach all the remaining hooks clearly along this line.
The distance between the hooks should be between 50 cm and 65 cm.
Step 4. Now we take the gutters and mount them
Please note that modern drainage systems have special strips along the edges of the complaints that simply snap into place, and a well-thought-out rubber gasket protects them from leaks. It is usually black and hard to miss.
Step 5
Now install the gutter cap. It should be placed first on the inside of the hook and pressed on its outside.
It is important that the mounted gutter is perpendicular to the ground:
We continue with the installation of the drain:
Step 1. In the next step, measure the distance from the funnel to the gutter connector, and at the same time keep in mind that during the installation process it will go into the funnel and connector up to 7 centimeters.
Step 2 Install the funnel so that it is 20-30 cm from the edge of the roof.
STEP 3. Cut off another piece of complaint. It is most convenient to cut a plastic gutter with a regular hacksaw with a fine tooth, or with a grinder with a thin circle for metal.
Step 4. Now we take the funnel in our hands
Please note that it has special sides - these are the limiters to which you need to insert the gutter.
Step 5. We mount the funnel and gutters.
Step 6
Now we move on to the installation of the knees. The knees must be installed on the drain hole of the funnel and turned towards the wall.
Step 7. After that, we take the second knee, and measure the distance between them. The second knee must be secured with a clamp.
Step 8The next step is to measure the distance to the knee of the drain. It will be convenient to fix the clamp into the wall using self-tapping screws with a 30 mm press washer or a dowel if you have a brick house.
The following step-by-step photo illustration will help you consider the process in more detail:
Basic rules and subtleties of installation

There are a number of nuances that it is desirable to observe when installing drainage systems in a private house.
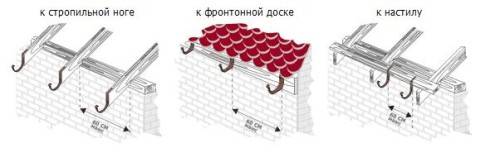
- The method of fastening the bracket is on the windboard, on the edge of the coating, under the roof. For each of the cases, there is a model of fasteners - on a long or short leg. If the roof is not yet covered, they take an elongated version, and a standard one for a finished one.
- When choosing gutters, the area of \u200b\u200bthe roof is also taken into account - the width of the gutter depends on this. Less than 50 m2 - 100 mm; up to 100 m2 - 125 mm; above 100 m2 - 150-200 mm. You should not install small drains on a spacious roof, they will not cope with the task assigned to them.
- Fasteners are placed in increments of 60 centimeters, near the funnels you need two brackets on each side. The required number of clamps is calculated in advance.
- All gutters are installed with a slope. For each meter, a bevel of 3.5 mm is given towards the drain, which is located in the lowest place of the entire structure - this is the center or edge of the facade.
The remaining nuances depend on the chosen drain. Often, the assembly system is indicated in the descriptions and instructions for models if they are purchased as a kit. If necessary, you can contact the sellers of the store for clarification. But do not forget that there are no difficulties in assembling modern elements.
Installation instructions for the drainage system
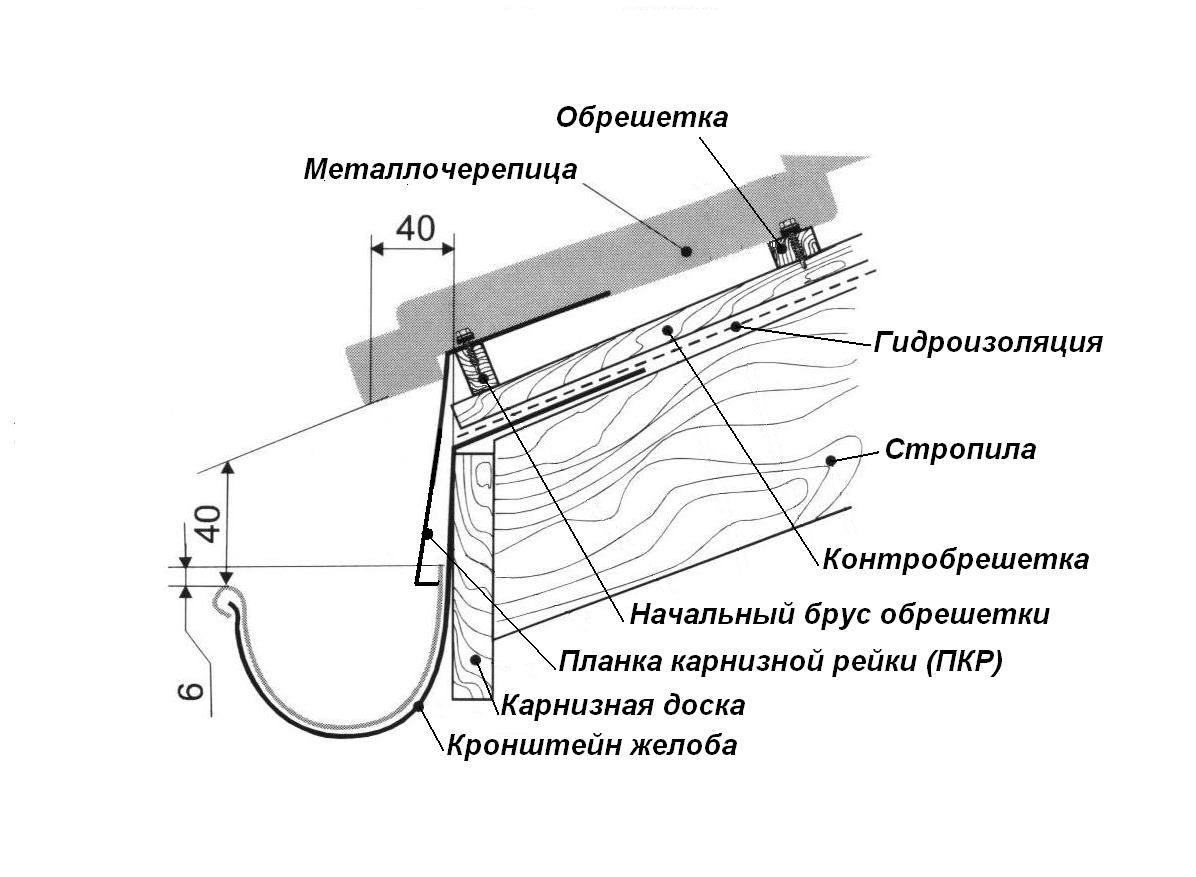
- Installation of the drainage system begins with the installation of hooks. Basically, they come in three types: short, adjustable and long.They can be attached to the bottom board of the batten, to the rafter or on top of the rafter. For each of the cases, different types of hooks are used.
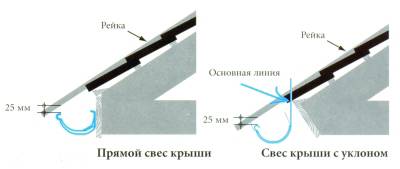
- Calculate the angle of inclination of the hooks. The recommended slope must be 2-3 mm/m. Hooks are placed side by side, numbered and mark the fold line. Further, using a tool for bending the hooks, they are bent according to the markup.
- The installation of the first gutter hook is carried out in such a way that the distance between the imaginary extension of the roof and the outer side of the gutter is 20 - 25 mm.
- Hooks are mounted at a distance of 0.8 - 0.9 meters with an angle of inclination of 2-3 mm / m relative to the horizon. The installation starts from the edge of the eaves from where the slope relative to the horizon will go. The first and last hooks should be at a distance of 100 - 150 mm from the edge of the roof edge.
If the installation of hooks does not take place on the frontal board, but on the rafter or on the last bar of the batten, then grooves are made to align the surfaces of the hooks with the surface of the rafter or batten.
- If it is necessary to make a hole in the gutter for the funnel, then mark the desired place with a pencil and cut a hole with a hacksaw. With the help of pliers, the funnel is given the necessary shape, and the burrs are removed. The place where the metal is cut is treated with a special paint to prevent corrosion.
The funnel is first attached to the outer bend of the gutter, and the fixing clamps are clamped from the inside. Next, the plug is installed on the end of the gutter using a rubber hammer or manual pressing. The assembled structure is installed on the hooks by pressing on each hook.
If possible, elements such as: funnel, end caps and corners should be installed before the final installation of the gutter on the roof.!
- The connection of the gutters occurs with the help of connecting locks. To do this, a gap of 2-3 mm is left between the ends of the parts to be joined. Sealant is applied to the rubber gasket in the form of three lines: one is applied in the center, the rest on the sides. The back of the lock is attached to the inner sides of the gutters. Next, the lock is pressed towards the outside to ensure a snug fit of the gasket to the gutters. Snap the lock and fix it by bending the clamping terminals. Residues of sealant must be removed.
- When installing internal or external corner elements, between the ends to be joined, it is also necessary to make a gap of 2-3 mm and connect using clamping locks, as indicated in the instructions above.
- Installation of drains takes place in previously designated places. For fastening pipes to the walls, clamps are used, which are fixed with dowels. The distance between the clamps should not exceed two meters. The pipe must be at least 40 mm from the wall. Pipe cutting must be done with a hacksaw.
If it is necessary to connect two elbows, then measure the distance between the ends of the pipes. 100 mm is added to the obtained value (in this case, “a”) for the connecting pipe to enter the ends of the elbows (50 mm for each elbow).
The drain finish elbow is fixed to the pipe with rivets. The distance from the edge of the drain pipe to the ground must not exceed 300 mm. This completes the plumbing installation.
We bring to your attention a video that will help you understand all the nuances of installation.
This manual describes the main stages of installing a gutter with your own hands.In each specific case, it is necessary to ask the supplier for instructions, since each manufacturer has slightly different installation of gutters.
Tips
- The heavier the material of the pipes, the smaller the distance between the hooks should be. All auxiliary parts (hooks, funnels and plugs) must be installed before the installation of the main gutter line.
- Copper is considered the most durable material for drainage systems. Copper pipes do not react in any way to atmospheric phenomena. The service life of copper parts can be more than one century. However, such a system is expensive. It will not pay for itself if it is installed on a modest house or a simple industrial building.
- Methods for connecting elements are selected depending on the material used in the construction. For example, for plastic, the cold welding method, using clamps, using rubber seals, will be relevant.

- In areas with cold weather conditions, heating of the gutter system can be installed. This pleasure is not cheap, but it effectively prevents icing, and hence the collapse of the entire system.
- It is not necessary to cut metal gutters with an angle grinder, especially if these are elements with a polymer coating. The best tool for cutting gutters is a hacksaw.
- Do not forget about the need for periodic cleaning of the system. Open gutters are easily clogged with fallen leaves, and small debris and dirt get into the pipes. The debris that has fallen into the drain will have to be removed manually. A good pressure of water, for example from a hose, will help in cleaning. There are specialists who will perform this work for a monetary reward.
- It is better to mount the gutter with all connections and plugs on the ground. To lift the system under the roof, you will need an assistant. If a person works alone, then it is better to assemble the system upstairs, under the roof, but this is not very convenient.
- The optimal adhesive for joining PVC pipes is a two-component, based on a polymer compound (the second component is tetrahydrofuran). It is a heat-resistant composition that is resistant to chemical aggressive substances. Hardening of substances is observed for 4 minutes. Glue is sold in containers weighing from 0.125 to 1 kg. The mechanical strength and safety margin of such an adhesive composition are very high.
- For metal, clamps and seals can be used. If you are unable to install the system, then it is better to call professional installers for installation. The work will be done efficiently and quickly.
For information on how to install gutters, their subtleties and secrets, see the video below.
How to choose the right drainage system
Just go to the store and buy a gutter system without deciding on its parameters, it's wasted money. There are certain standards regarding the size of the roof, or rather, the area of \u200b\u200bthe slope from which water will be collected in the drainage system. And the larger the area, the larger the trays and pipes should be in terms of their diameter. Therefore, before proceeding to the installation of a gutter system, it is necessary to accurately select it in size in accordance with the area of the roof slope.


- If the roof slope area does not exceed 50 m², then gutters with a width of 100 mm and pipes with a diameter of 75 mm are installed in the gutter system.
- The area is within 50-100 m², gutters are used - 125 mm, pipes 87-100 mm.
- The slope area is more than 100 m², gutters 150-200 mm, pipes 120-150 mm.
Installation of the drainage system is shown in the video:
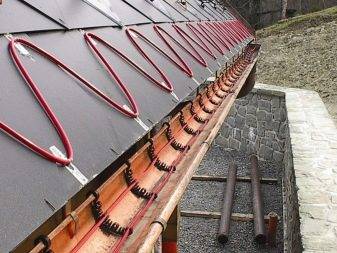
Heating cable in the drainage system
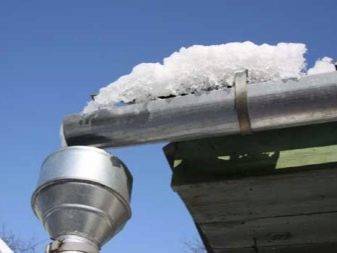
Ice and snow inside the drainage system create a blockage (plugs), which prevents the melted water from draining. As a result, it overflows over the edges of the trays, forming icicles. How dangerous they are, everyone knows. In addition, a large amount of ice and snow inside the trays is a high probability of the collapse of the entire structure or the deformation of its elements. To prevent this from happening, a heating cable is installed in the drain. It is a conductor of electric current that releases heat energy.
Heating cable inside the gutter of the gutter system
The installation of the heating cable is carried out after the installation of the roof drain. It is simply laid inside the gutters (along) and lowered inside the pipe risers. In trays, it is fixed with special clamps made of either stainless steel, or galvanized steel, or plastic.
In addition to the cable itself, the kit comes with a power supply and a thermostat. The first one supplies the current of the required voltage and strength, the second regulates the temperature of the cable depending on the weather conditions. For example, if the temperature outside is within -5C, then the cable does not heat up much. If the temperature drops lower, then the current strength inside the conductor increases, which increases heat transfer. This is what the thermostat controls.
It must be added that the thermostat itself does not determine the temperature. To do this, sensors are added to the system: either temperature or humidity.
Most often, the heating cable is installed not only inside the trays and pipes. They cover part of the roof, or rather the overhang area.Here the conductor is laid with a snake and fixed to the roofing material with special clamps. You can see this clearly in the photo below. At the same time, it should be noted that the heating cable both inside the drain and on the overhang is a single system with one power supply and a thermostat.
Heating cable on roof eaves
How the drainage system works is shown in the video:
Varieties of modern drainage systems according to the material of manufacture
Traditionally, gutter systems were made of galvanized steel. And today this material has not left the market. They simply began to cover the galvanized drain with paint, thereby adjusting it to the color of the roofing material, creating a single design design for the house. Plus, it became possible to extend the service life due to an additional protective layer.
Today, manufacturers offer galvanized gutters, polymer coating. In this case, the polymer coating is applied both from the outside of the galvanized sheet and from the inside. This is better protection and a huge variety of colors, not limited by anything.
Gutter made of plastic
Plastic gutters are the most popular today. They are made from polyvinyl chloride (PVC). But this material is not used in its pure form, because by itself it becomes brittle at low temperatures. Additives are added to it, which increase the strength of the polymer, so PVC gutters are not afraid of temperature extremes and sunlight. And the biggest plus is that plastic is the cheapest material.
The modern market today offers gutter systems made of copper or stainless steel.
Copper drain
Generalization on the topic
Installing roof gutters is a serious process. The main task of the manufacturer of works is to correctly select its elements in accordance with the area of the roof slope, correctly set the angle of inclination of the gutters and correctly fasten the structural elements.
Drainage from the roof for water - drainage device from pitched roofs
Roofs on houses of old construction have a simple gable
roof structure. But, modern houses are equipped with more complex rafters.
systems. There are more slopes, they are adjacent to each other at different angles. it
requires a proper roof drain.
Therefore, we will consider step by step each of the elements.
1. Draining water from the roof
This point is important because water can get inside the house before reaching the drain. There are three areas of increased risk on the roof, as a result of which the roof of the house is leaking (and ways to fix the leak on the roof).
The junction of two slopes with the formation of an internal corner. If a private house has a roof, such as in the photo, then installation of a valley or a groove on the roof is necessary.
There are two types of valley:
Single overlap (lower valley).
Nuance. The choice of overlap is influenced by the material of the roof and the angle of inclination of the roof slope. With a high wave height of the roofing material (slate, metal tiles) and with a slope angle of more than 30 °, a single overlap is used. If the material is flat (bituminous tiles) and the angle is smaller - double overlap.
Double overlap (lower and upper valley).
Nuance. The design of the lower valley is very simple, so it
usually do it by hand. It's just a sheet of metal folded in half. But for
in order for it to perform its functions, you need to know how to install it correctly
lower valley. Competent installation is as follows: the bottom valley is attached
using clamps (the use of self-tapping screws is not allowed).


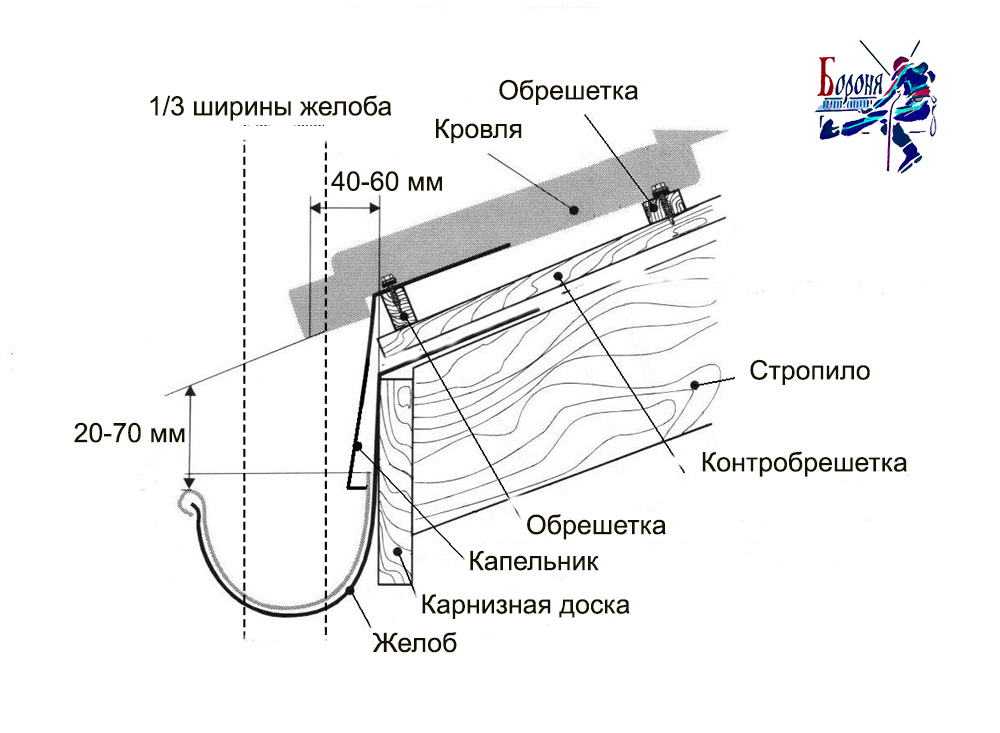
2. Place (node) adjoining the roof to the wall
In this case, a special junction bar is used
for the roof. Installation of the strip is carried out in the corner between the house and the roof.
The specifics of choosing a strip for adjoining
The photo shows three types of straps.
But only the bar "c" will ensure the tightness of the joint, due to
a small edge that winds up in a gash on the wall. Plank "a" does not have
rolling in general. At the bar "b" the lower rolling is external. This is the place with
which the bar will begin to rust.
Nuance. For a tight connection in a brick, you need to make
washed down and bring one edge of the bar there. The second lies freely on the roof.
3. Plumb roof
According to the rules for installing a drainage system, roofing material
should end in the middle of the gutter. Then water won't get out of it.
on the walls of the house.
However, this is not always possible. This may be due to
features of the roofing material (for example, the length of the metal tile is always
multiple of 350 mm, and the usual multiple of 1 pc.) or with a miscalculation during design
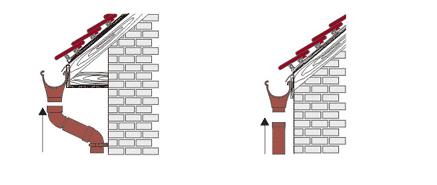
rafter system. In this case, an additional eaves bar is mounted.
The second component of the system for draining water from the roof is a gutter
system.
Let's get acquainted with its main elements and see how
make your own drainage system.
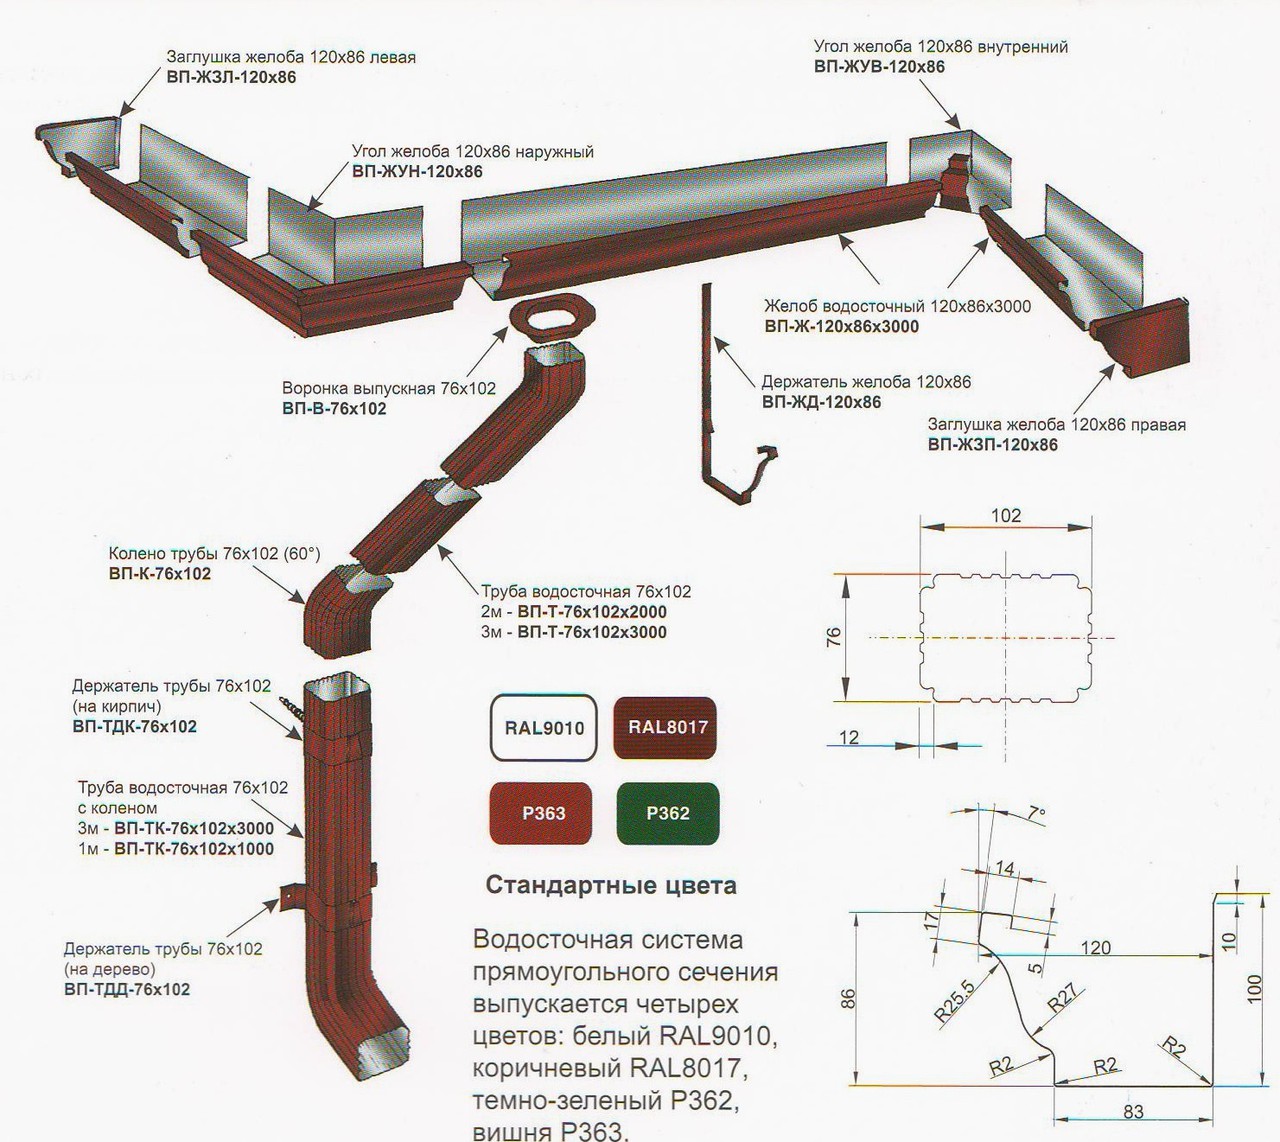
4. Components of the drainage system
Before proceeding with the manufacture of the ebb, you need to figure out what elements (components) are needed:
gutter.Serves for receiving water from slopes. Its diameter depends on the area of the slope;
funnel or drainpipe. Connects the gutter and pipe;
pipe. Discharges water into the drainage system or away from the foundation;
corners and turns. They allow you to bypass the house, protruding elements or install a pipe at the right distance from the wall;
plugs. Used in places where a funnel is not provided.
Advice. Plugs are installed in the highest place.
fasteners. For gutter and pipe.
Visually, the elements of the drainage system are shown in the diagram.
Composition of drainage systems
Gutters are located under the roof overhang. They are mounted on special brackets that hold the system. Since the storm drain is located around the entire perimeter of the roof, there are corners - internal and external. All these elements must be connected tightly, for this there are gutter connectors with rubber seals. These elements are often considered redundant. Then the gutters are overlapped with an overlap of at least 30 cm, connected with self-tapping screws.
What elements does the drain consist of?
To drain water, holes are made in the gutter into which funnels are inserted. Downspouts are attached to the funnels. If the roof overhang is large, the pipe is required to be curved. To do this, there are maple or universal rings (some manufacturers have). The downpipe is attached to the wall of the house using special clamps that have the same color as the entire system.
From all these elements, a system of the required configuration is assembled. If you decide to buy ready-made elements, and then assemble the gutter with your own hands, the best solution is to have a house plan with dimensions on hand.According to it, you will quickly determine the composition of the system and calculate the required number of elements.
Installation of the curly part and drain pipes
The laying of the drain provides for the installation of pipes from top to bottom, while the elbow, coupling and drain are installed with a socket to the top.
Features of fastening downpipes
Installation is done like this:
- A part of a straight pipe of at least 60 mm is inserted into the knee-knee connection (depending on the distance between the frontal board and the wall).
- Next, the necessary curly part is assembled, into which the upper end of the pipe is inserted.
- The system is attached to the wall using clamps, the distance between which is up to 1.8 m. Only one clamp is fixing, the second is a guide. In some systems, the manufacturer recommends the use of clamps - expansion joints. The clamp is attached under the connector.
- The pipe is set strictly vertically using a plumb line.
- A drain elbow is installed on the lower end of the pipe fixed with clamps (the lower edge is at a distance of 25-30 cm from the blind area).
- If there is a drainage system or a storm water inlet, then the lower end of the pipe goes there. The pipes are connected using a coupling (connector).
- Each subsequent pipe is inserted into the connector installed on the previous one.
- A clamp is attached under each connection.
Installation of a funnel-roof pipe connection with and without a ledge
- Depending on the design features of the installation site, an elbow of the desired shape or a coupling is attached to the funnel. In the case of a roof protrusion beyond the facade, two elbows and a pipe segment are used. If the roof is without a ledge, then a coupling is used.
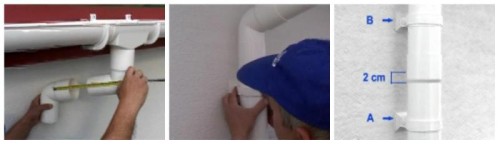
Installation of roof drains is carried out taking into account the compensation of thermal expansion.For this function, manufacturers use compensation gaps. So on pipe connectors in some systems there are assembly lines. The edge of the pipe is set along these lines, depending on the air temperature at the time of installation. Silicone-treated seals allow smooth sliding of the elements during expansion. When using a pipe connector, leave an air gap of at least 0.6-2 cm.


Pro tip:
It is not recommended to assemble the drainage system at temperatures below -5.
This completes the installation of the drainage system. It is necessary to revise all installed elements. If the configuration of the drainage system is fully consistent with the project, calculated and installed according to the manufacturer's recommendations, then all the water that enters the roof will only leave through the pipes, without splashing or overflowing over the edges of the gutters.
At the end of each season, it is advisable to inspect and flush the system (using a hose with water). When clearing emerging congestion (leaves, debris), do not use sharp metal objects.
How to calculate drainage elements
The determination of the required number of elements required for the construction of a drainage system takes place taking into account the characteristics of each specific case. Increasingly, in the construction of private houses, they are trying to use original structures, which leaves a certain imprint on the calculation of roofing and drainage systems. However, certain calculation templates greatly facilitate the performance of calculations.
There is a very simple scheme for calculating the drain of a gable roof, where the length of the slopes does not exceed 12 m:

To calculate the drainage scheme of a house with an attic, the same method is used.The same applies to equipping multi-tiered pitched roofs with drains, where each slope is calculated separately. To determine the number of elements and fasteners for a half-hip and hip roof, you will have to face additional difficulties. In this case, you will need to purchase at least four corner pieces and two compensator connectors. Compensating and connectors function on the same principle as linear elements. However, in this case, such compensators must be installed in each closed circuit.
At the same stage, it is necessary to determine the diameter of the future structure. Gutter accessories are produced in a number of standard sizes, in order to avoid overflowing during the removal of atmospheric precipitation. According to the technical recommendations, each m2 of the roof should be equipped with downpipes with a cross section of 1.5 cm square. This coefficient is averaged for the central regions of our country. To accurately select the standard size of the drainage system, you first need to determine what area of \u200b\u200bthe roof can be served by one funnel. Since private houses rarely have a slope area of more than 80 m2, most often pipes with a cross section of 100 mm are used to install gutters, with the possibility of adjusting this parameter in one direction or another.


