- We mount air ducts in the floor - for objects with a large glazing area
- Installation of a ventilation and cooling system in a cottage with an area of 2400 sq. meters
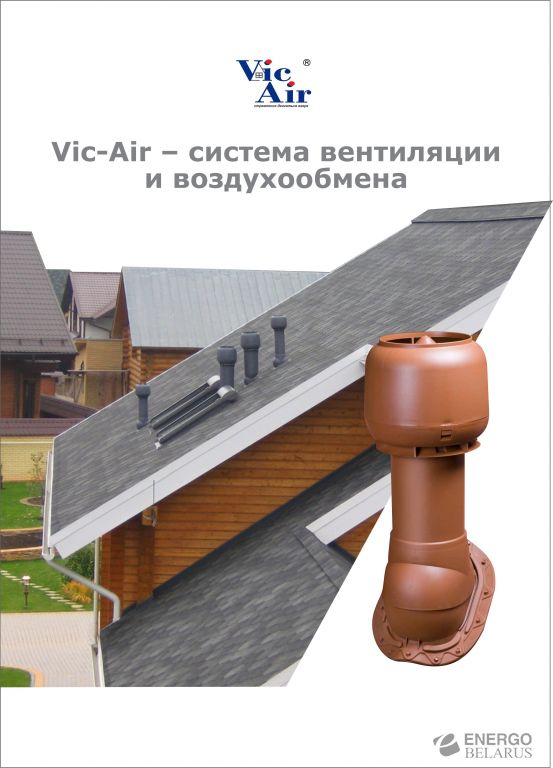
- Ventilation pipe passage assembly
- 2 Air purification in a brick house
- Stages of installation of the ventilation passage assembly
- The purpose of the lattice for the window sill
- Technical task
- What you need to install a ventilation outlet on the roof
- We carry out installation of ventilation grilles and diffusers
- Water heaters with a fan: characteristics and manufacturers
- Heating heaters with a fan: design and operation features
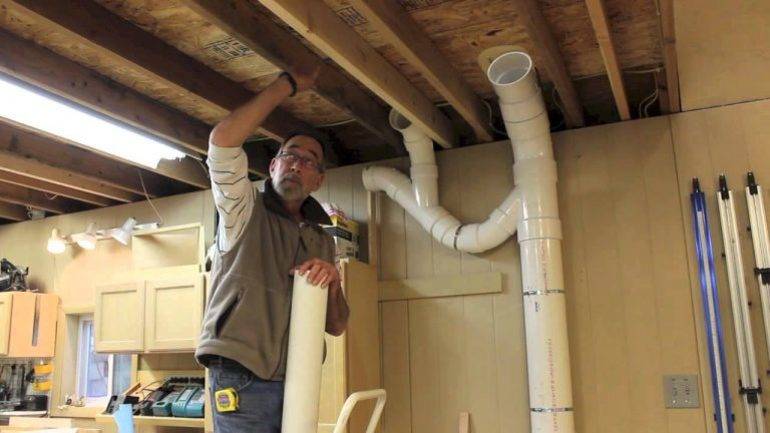
- We install supply and exhaust ducts
- Arrangement in a brick house
- Stages of installation work
- Installation Features
- Consequences of installation errors
- 7 Step by step installation instructions
- Features of the withdrawal of pipes for ventilation on the roof
- Conclusions and useful video on the topic
We mount air ducts in the floor - for objects with a large glazing area
Air ducts of the ventilation system can be built into the floor. This solution is used in cottages, houses, restaurants and offices with a large area of facade glazing. Air ducts are designed and installed in the floor and lead to floor convectors located under large glass windows.
-
Among our unique solutions is the ventilation system for a "glass" cottage with an area of 680 square meters. meters.
- Using a similar technology developed for "glass" objects, we created ventilation systems for an office and a restaurant with an area of 1100 sq. meters each.
Engineering systems in a "glass" cottage with an area of 680 sq. meters
A complex of engineering systems in an office area of 1100 sq. meters
Engineering systems in the restaurant "Mario" with an area of 1100 sq. meters
Installation of a ventilation and cooling system in a cottage with an area of 2400 sq. meters
This private country cottage with a total area of 2400 sq. meters consists of several buildings, for the ventilation of each of which the design and installation of separate ventilation units were carried out.
Three Swegon ventilation units were installed in the attic of the cottage: two Swegon Gold ventilation units and one Swegon Basic.
Photo of the 1st Swegon Gold ventilation unit and air ducts of the ventilation system
Photo of the housing of the Swegon Gold energy-saving ventilation unit
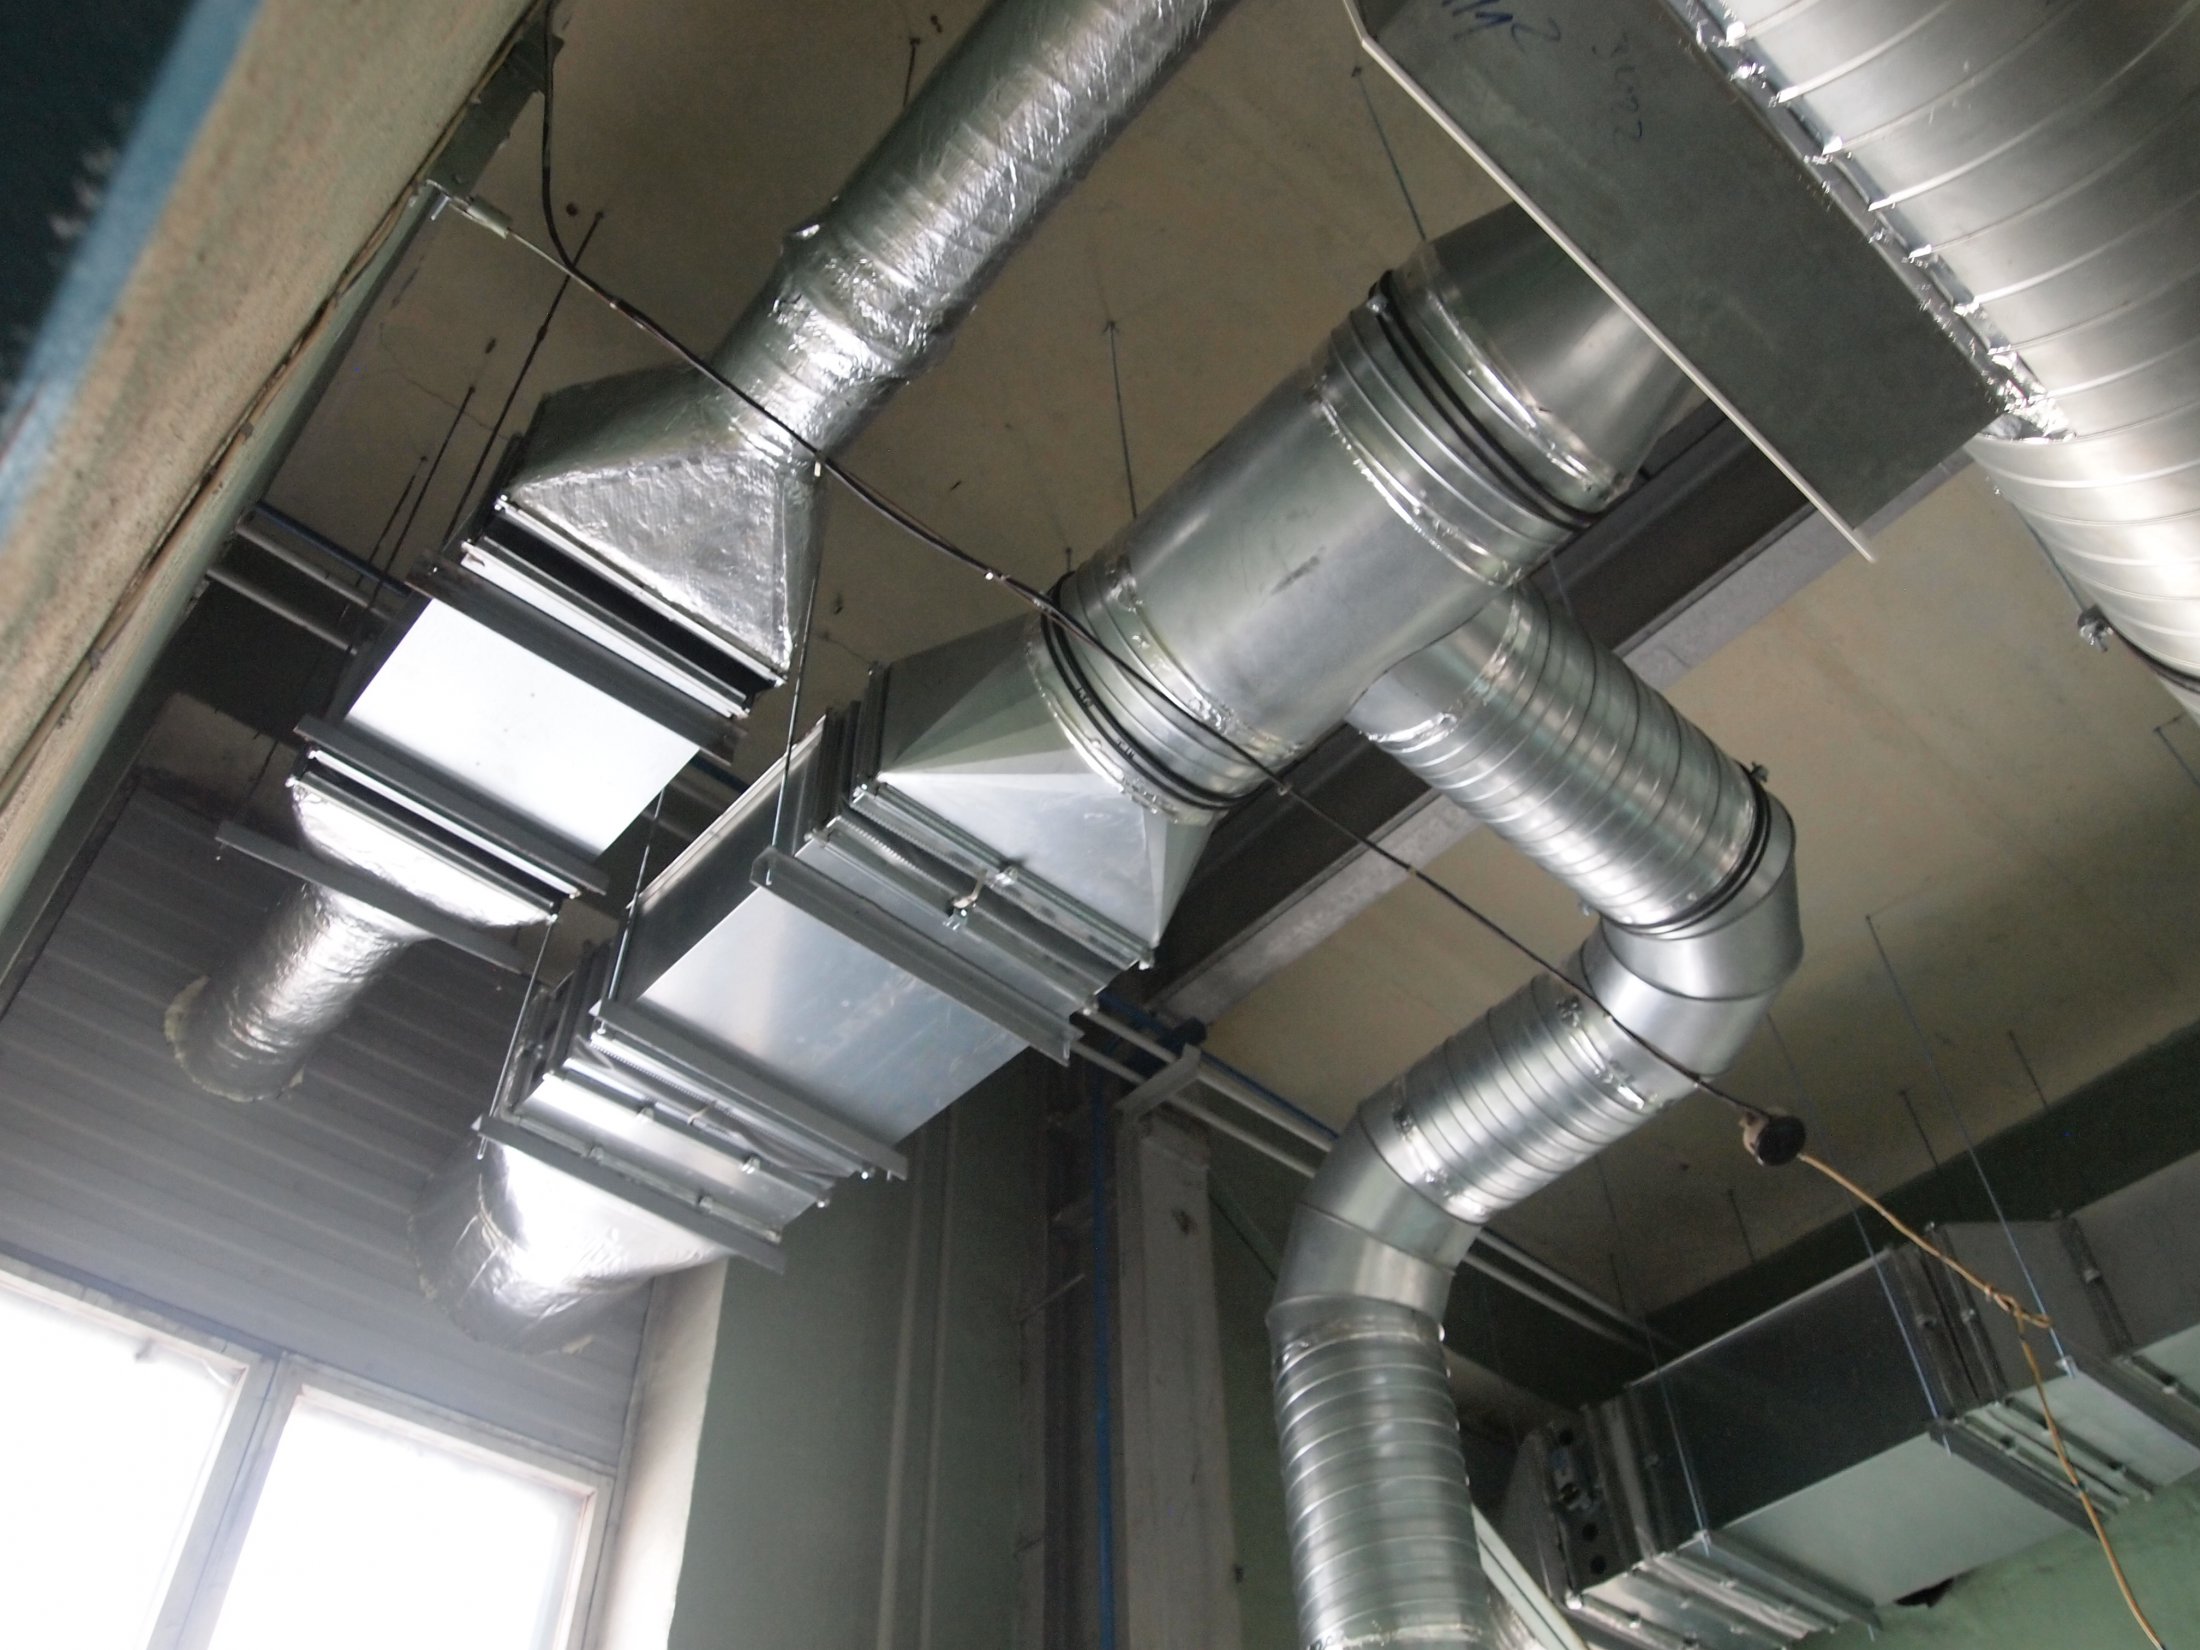
Photo of the ducts of the cottage ventilation system installed in the attic
Photo of the 2nd Swegon Gold unit, air flow valves and cooler heat exchanger
Photo of installed Carel steam humidifier
Photo of the refrigeration machine (Cooler) and air ducts of the ventilation system
Photo of Swegon Basic ventilation unit for swimming pool ventilation
Photo of the piping of the Swegon Basic battery heat exchanger
Photo of air flow valves on Swegon Basic air handling unit
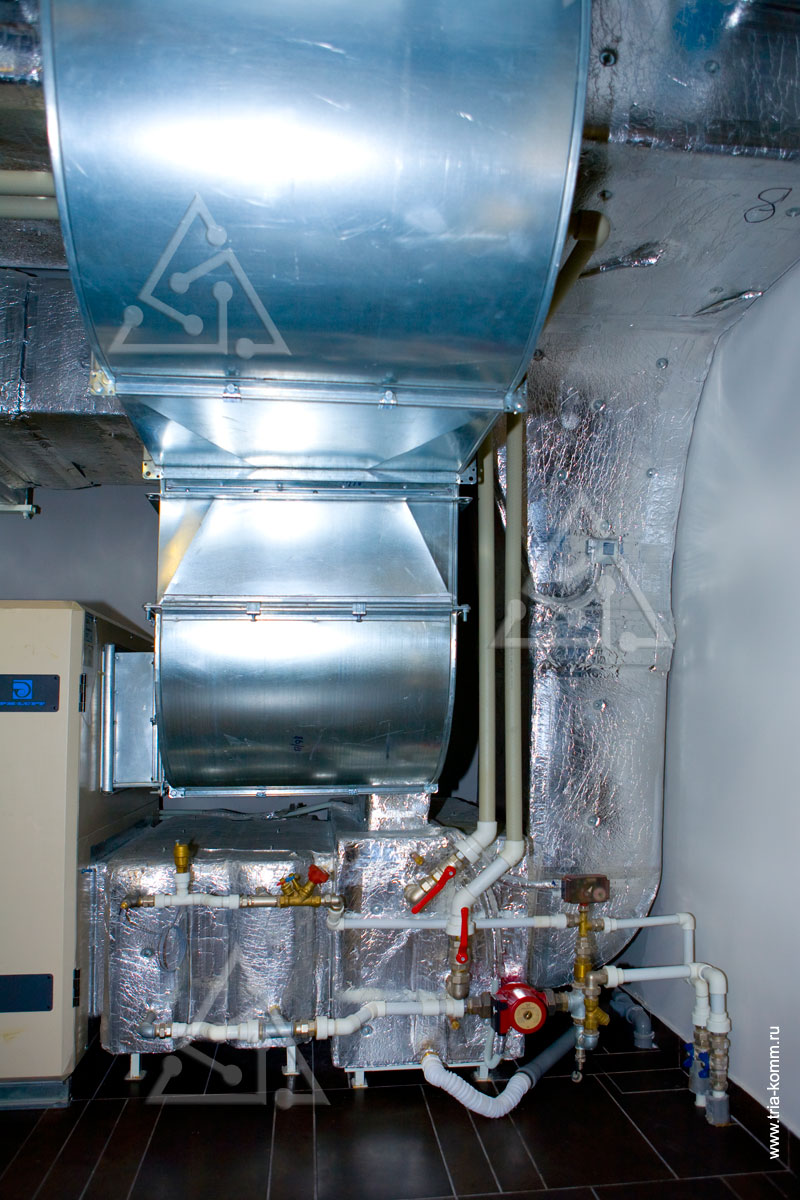
Photo of the piping of the Swegon Gold ventilation water heater and air ducts
Air ducts are tightly linked to the pipes of the sewerage and drainage system
Photo of mounted air ducts of the ventilation system in the attic of the cottage
Another example of the installation of air ducts in the attic of a cottage
Installed duct fans, silencers and air ducts
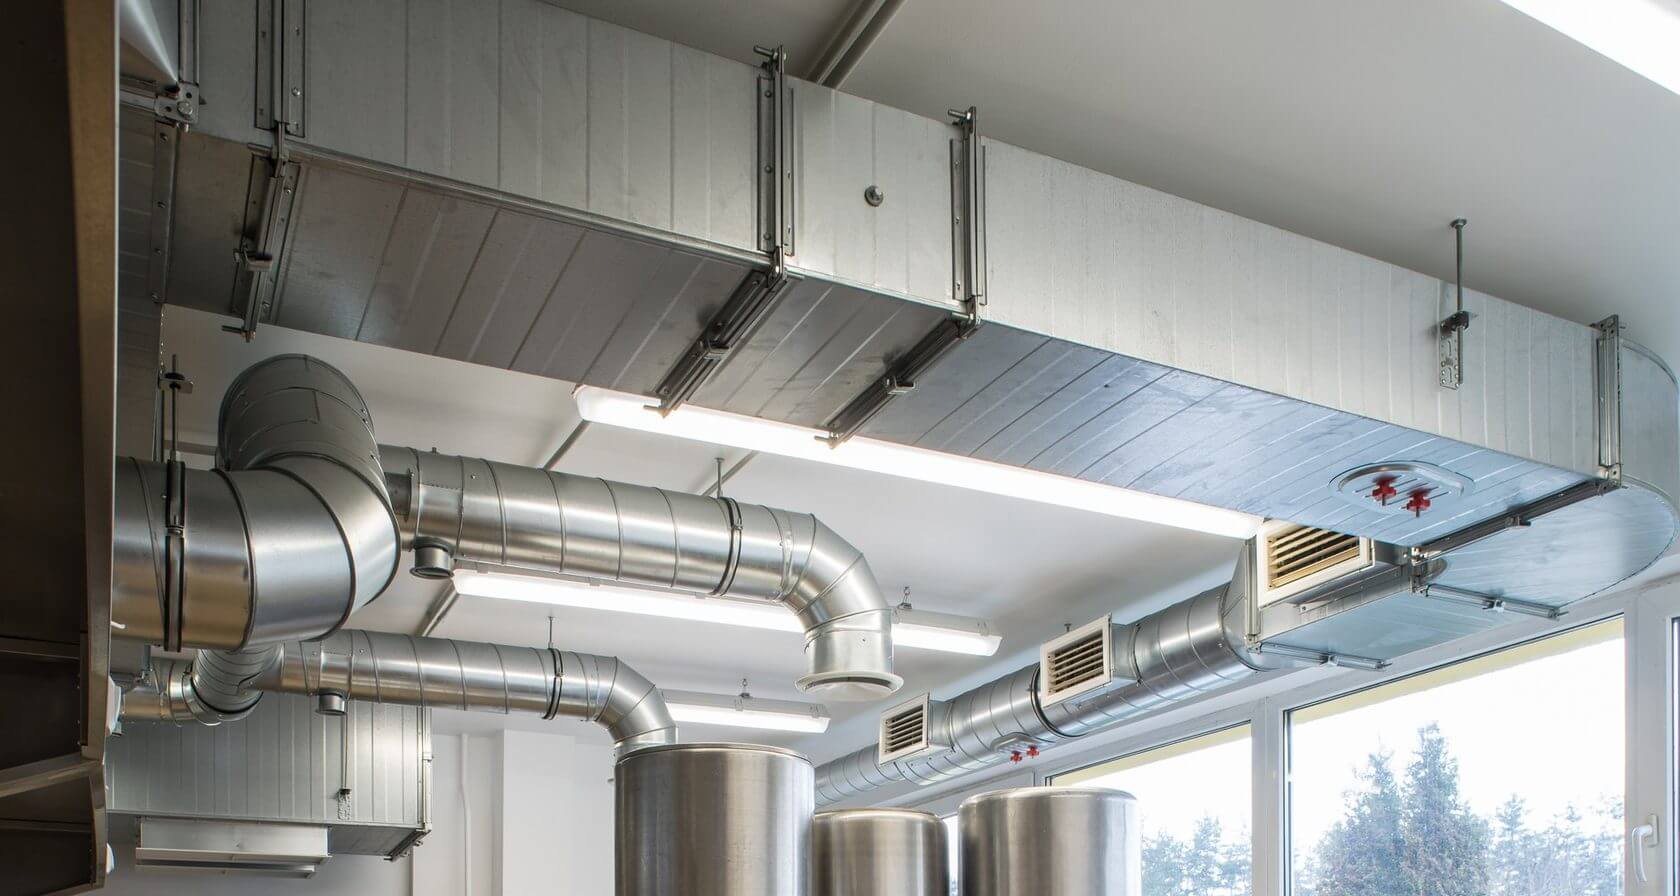
Photo of mounted air ducts of the ventilation system on the ceiling
Photo of supply and exhaust air ducts for the supply and exhaust ventilation system
Another example of the completed installation of supply and exhaust air ducts
Photo of installed air ducts in the subceiling space
Photo of air ducts on the ceiling of the pool
Another example of supply and exhaust air ducts of the cottage ventilation system
Photo of the air ducts of the pool ventilation system
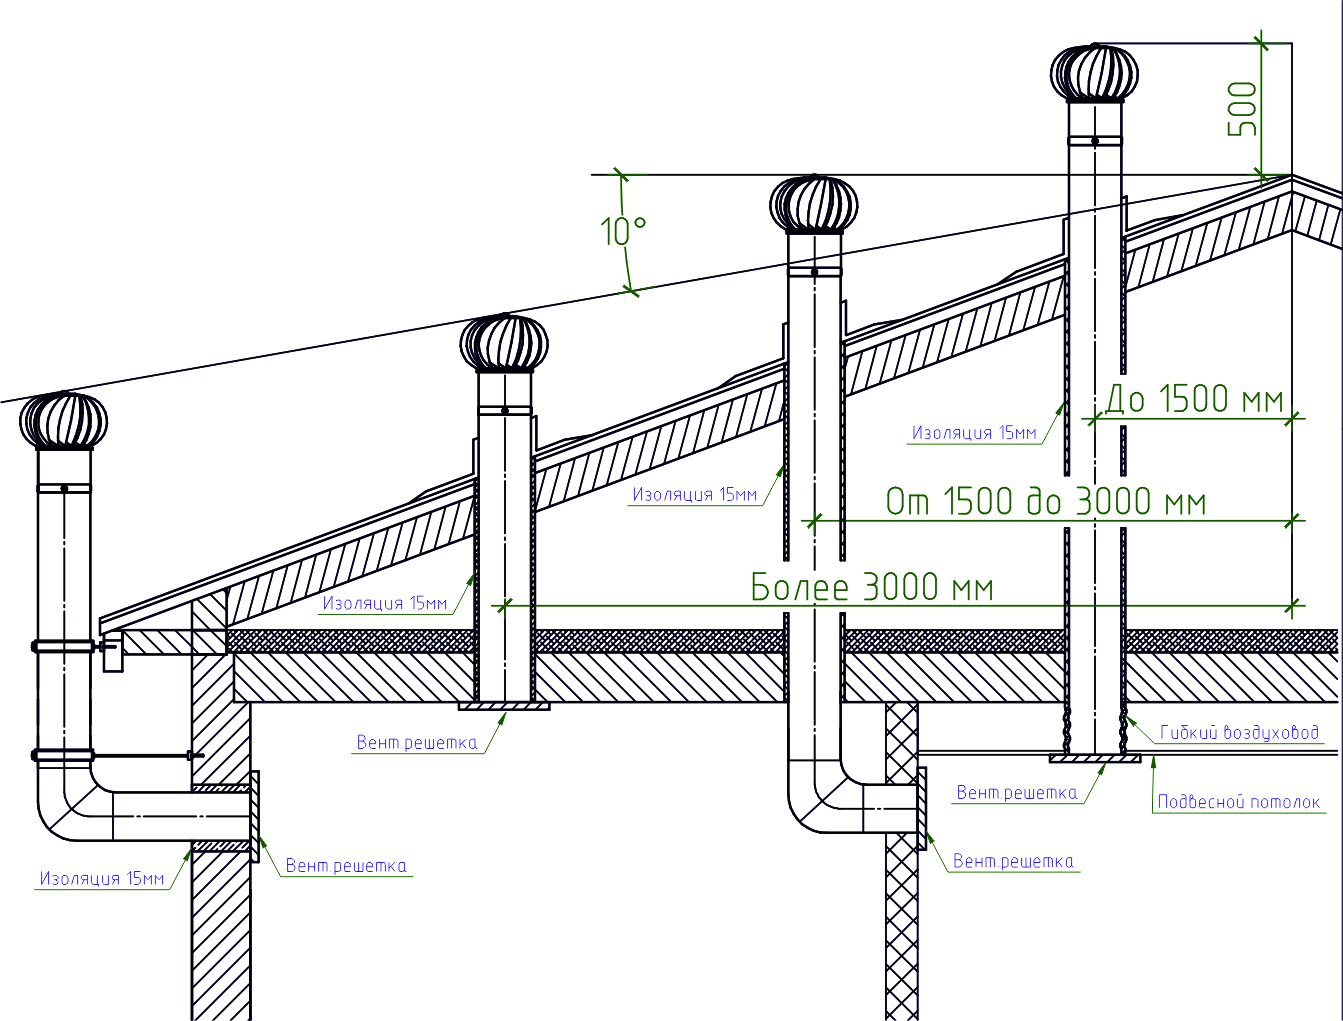
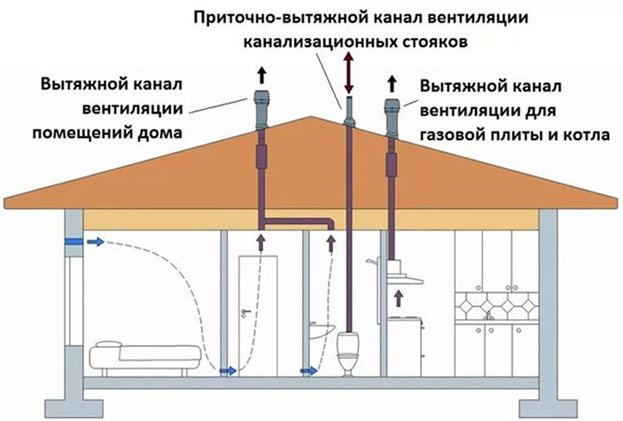
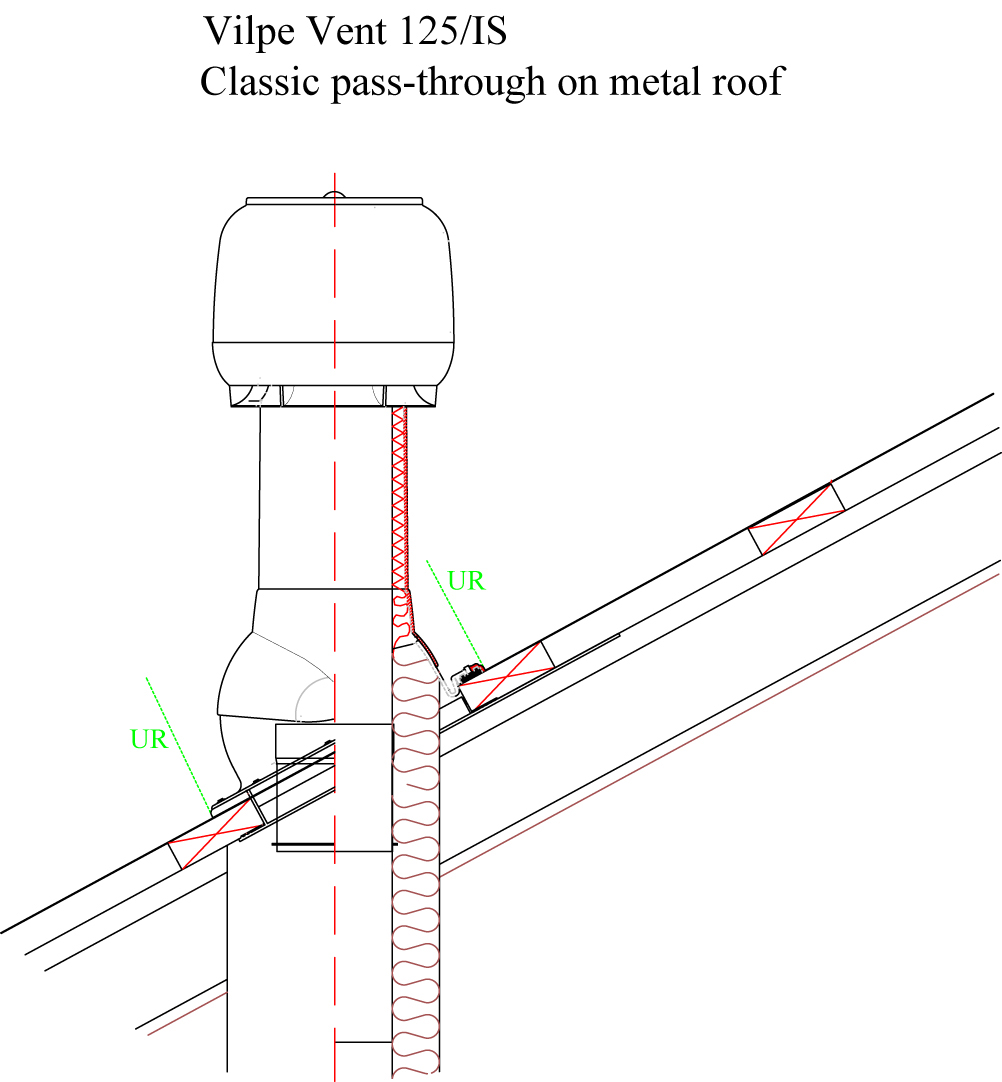
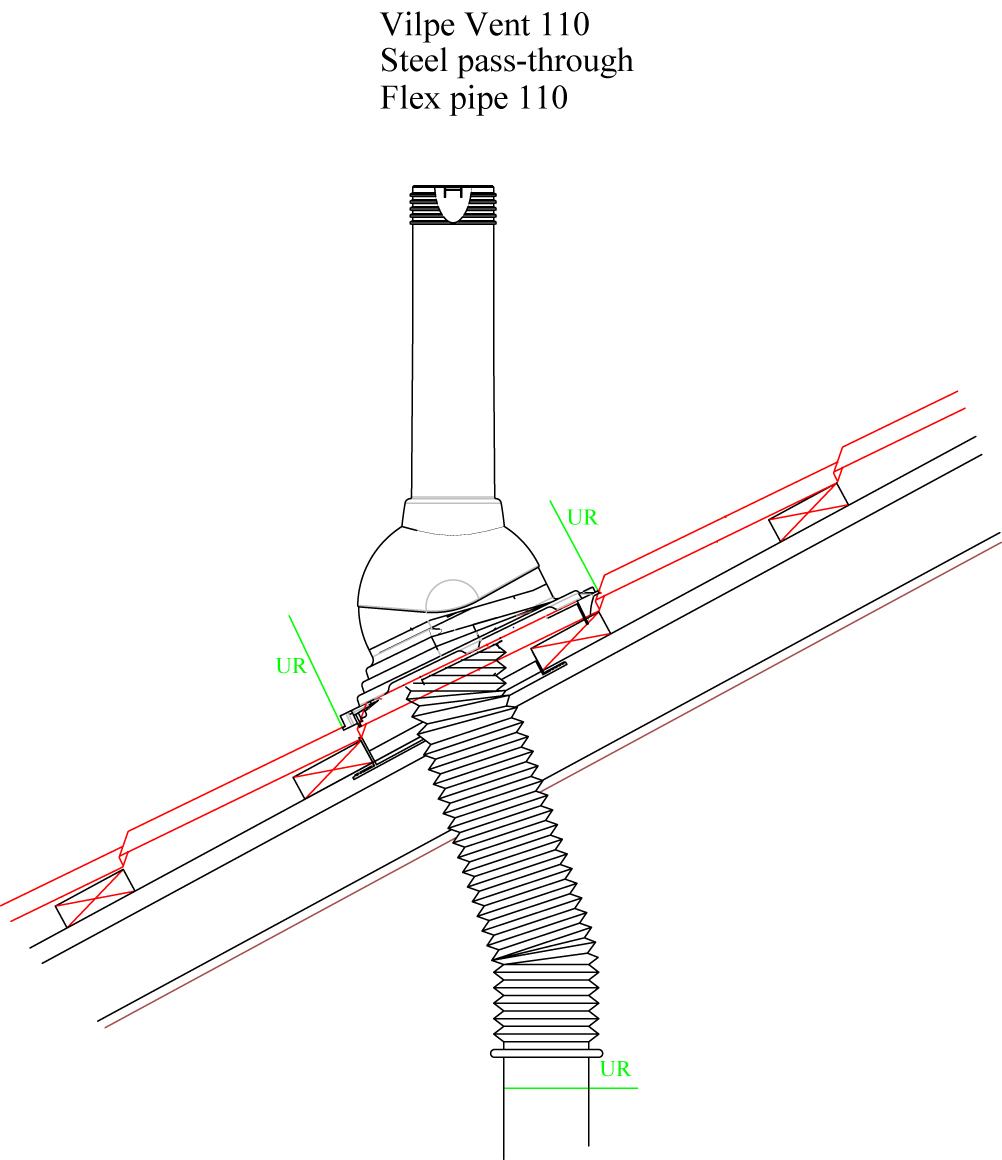
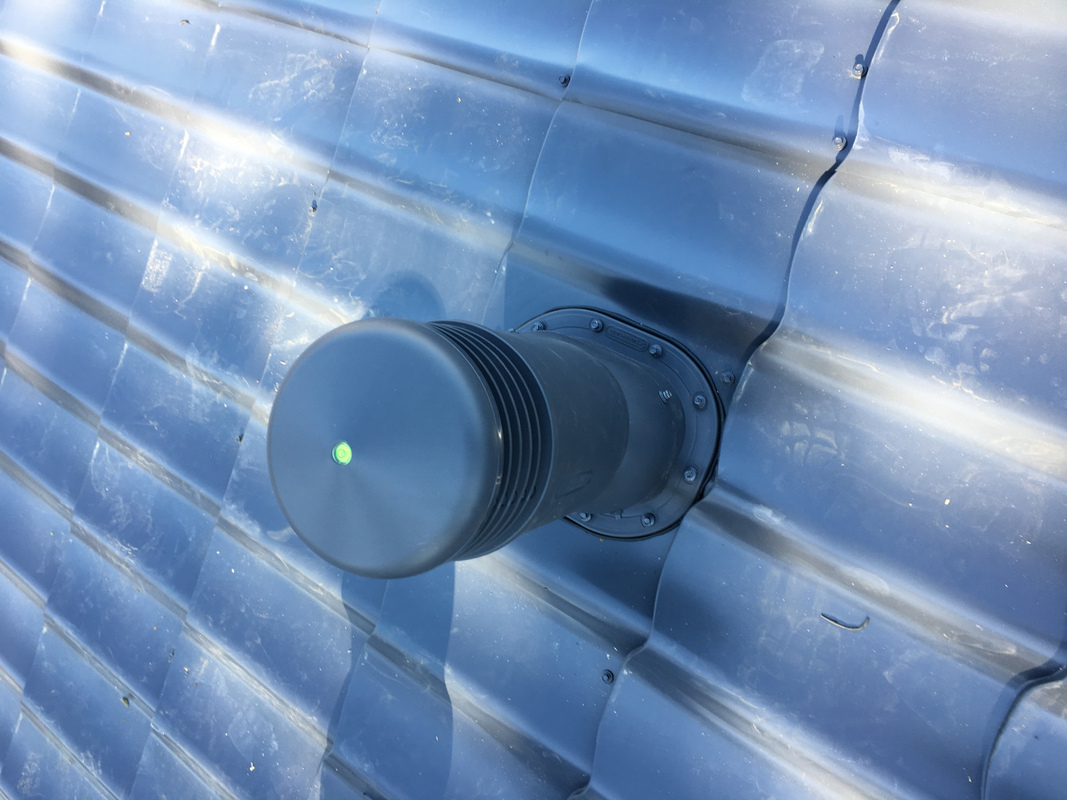
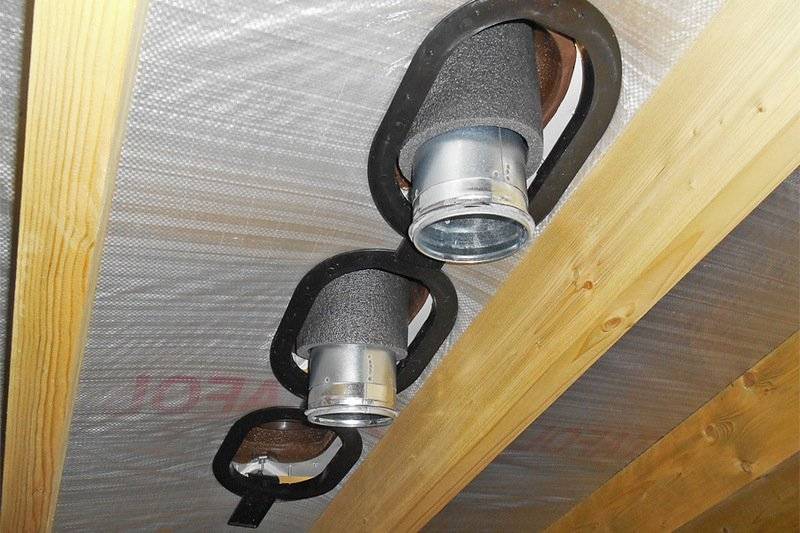
Ventilation pipe passage assembly
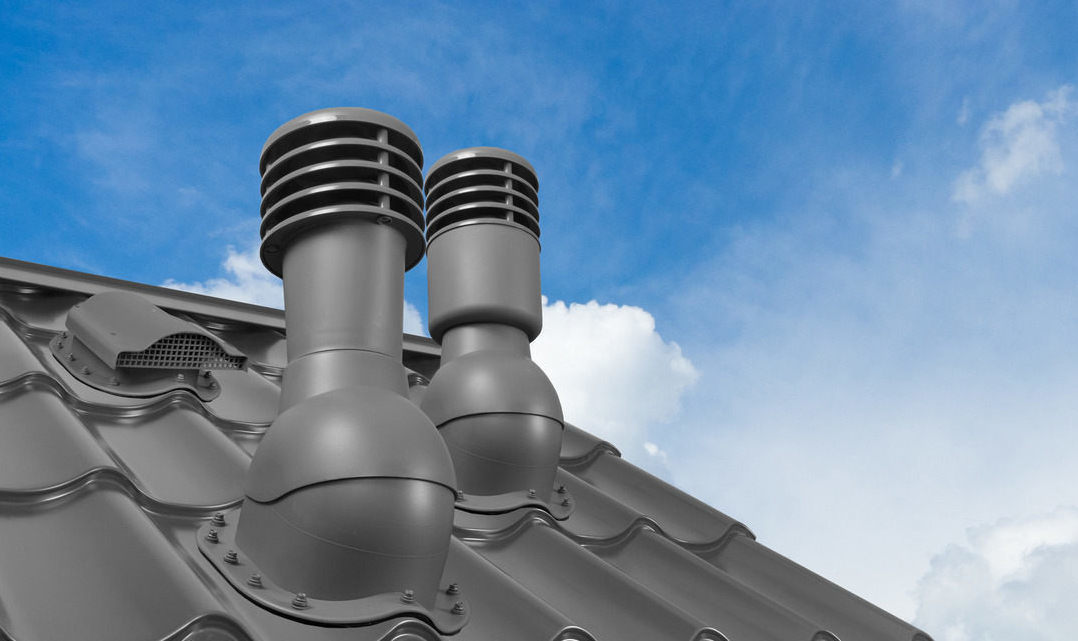
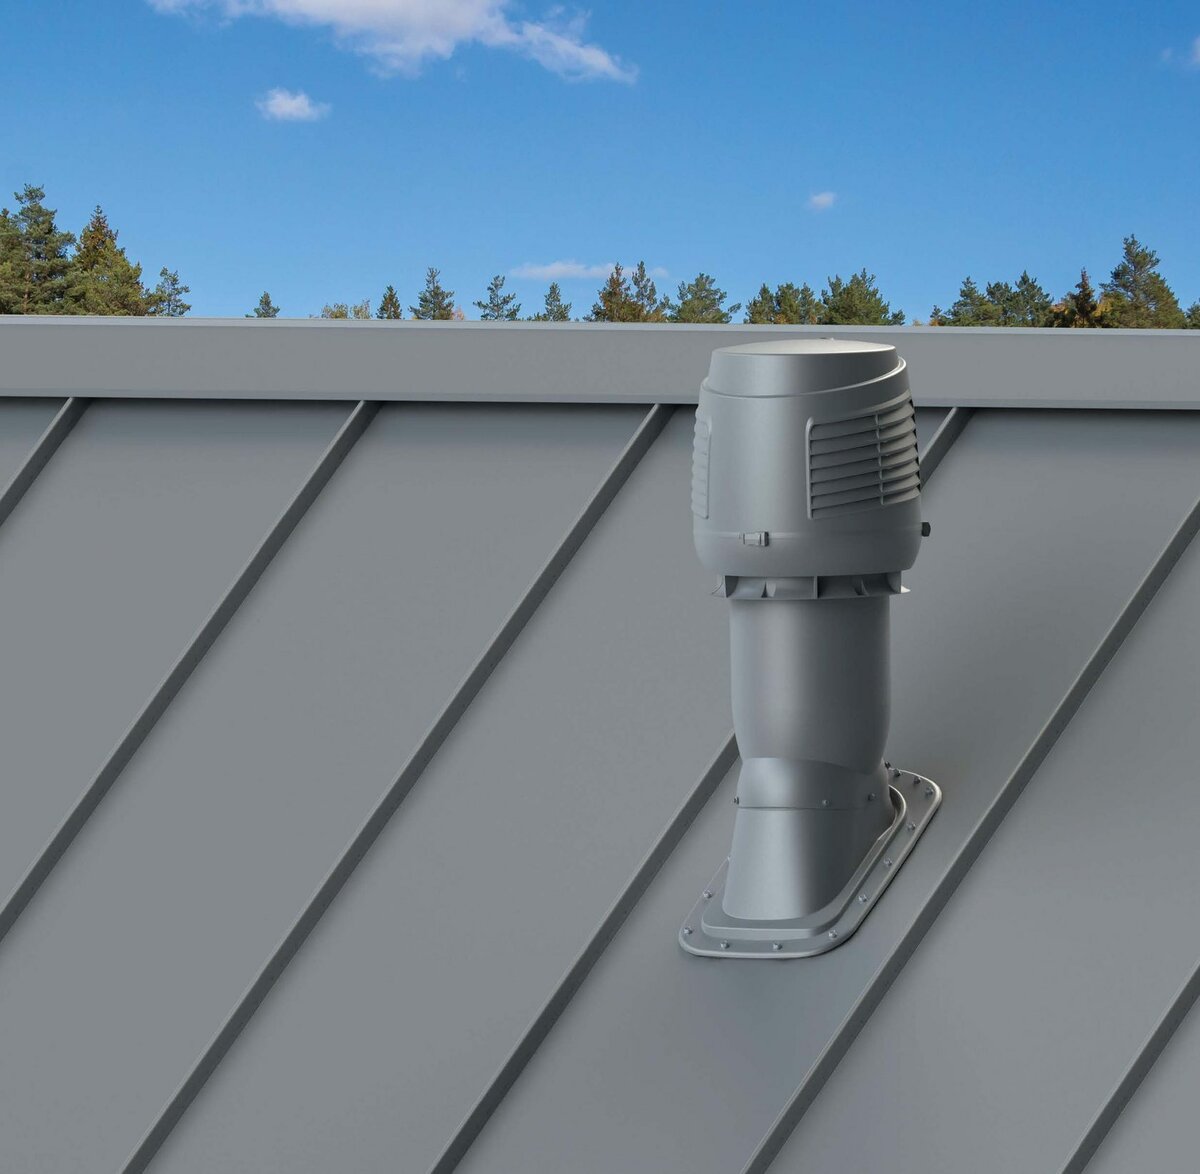
A roof vent is a pipe made of metal or plastic that fits into a hole in the roof. The pipe is fixed in a metal cup. After its installation, the hole is sealed and insulated from the outside and from the inside. From below, an air duct is joined to the node, and a deflector is installed from above.
It is more convenient to use a ready-made factory fitting for mounting the ventilation pipe passage. Manufacturers of ventilation systems offer many models that differ in design, shape and color. For each type of roof, their own types of ventilation pipes have been developed.
Galvanized steel pipes wrapped in a layer of polypropylene are in the greatest demand. In the lower part of such a product there is a seal, and on top there is a cap with a deflector.
It is impossible to combine the outlets of the air ducts into one, otherwise, in the event of adverse weather conditions, as a result of reverse draft, unpleasant odors will spread throughout the house
Installation features of the ventilation pipe passage assembly depend on a number of factors:
- from the type of roof - complex or flat, single or gable;
- from roofing material - metal or ceramic tiles, corrugated board, soft tiles, etc.;
- from the corner of the pitched roof.
The sealing and insulation of the roof at the installation site of the passage element must be carefully performed. If this is not done, moisture will enter the thermal insulation layer of the roofing pie and the room through the junction of the pipe with the coating, which will cause the destruction of structures.
The junction of the ventilation pipe with the roof must be carefully sealed. Sealing is done by applying a water-repellent material to the passage and applying silicone sealant under the ventilation outlet flange
What are the main requirements for the passage node:
- pipe outlets must be strictly vertical so that the air does not encounter obstacles when moving up;
- for each air duct - from the kitchen hood, from the sewer riser, from the bathrooms there must be a separate exit to the roof;
- the best option is that the exhaust outlets pass close to the ridge edge of the roof, but so that the run is not disturbed and the entire rafter system based on it is not weakened;
- the selected fittings must ensure the unhindered movement of air masses and tightness.
The main element of the passage assembly is the outlet - a fitting: a branch pipe with a flexible metal base, made in the form of a flange. It is pressed against the roofing, giving relief to the roof on which it is mounted. During the installation process, the geometry of the roofing materials used is achieved and the node is impeccably sealed.
On sale you can find different types of shaped products that facilitate and speed up the installation of a ventilation outlet to the roof. Can be purchased separately - outlet for exhaust, separately - for sewerage, etc.
Roof penetration: proper installation will ensure complete tightness of the roofing pie
There are several types of pass-through elements:
- Valveless / with valve. Valveless models are great for arranging ventilation outlets in a private house. Valves are more suitable for industrial buildings.
- With insulation / without insulation. In cold regions, it is better to choose a ventilation outlet with thermal insulation. Moreover, insulation is necessary if the pipe is placed close to the eaves. In regions with warm winters, the option without insulation will suffice.
- With manual and auto control. The choice depends on the budget of the design. Products with a cable for adjusting air circulation are very popular with owners of private houses.
For a ventilation penetration device, you cannot buy a similar part for a chimney, since they implement fire protection that is unnecessary for ventilation outlets.
2 Air purification in a brick house
Channels are provided along with the construction of walls, the thickness of which must be more than 380 mm. If the building has already been built, then hinged vertical and horizontal boxes are used. Depending on the design of the house, 1-3 channels are provided. Characteristic features of ventilation in a building with brick walls:


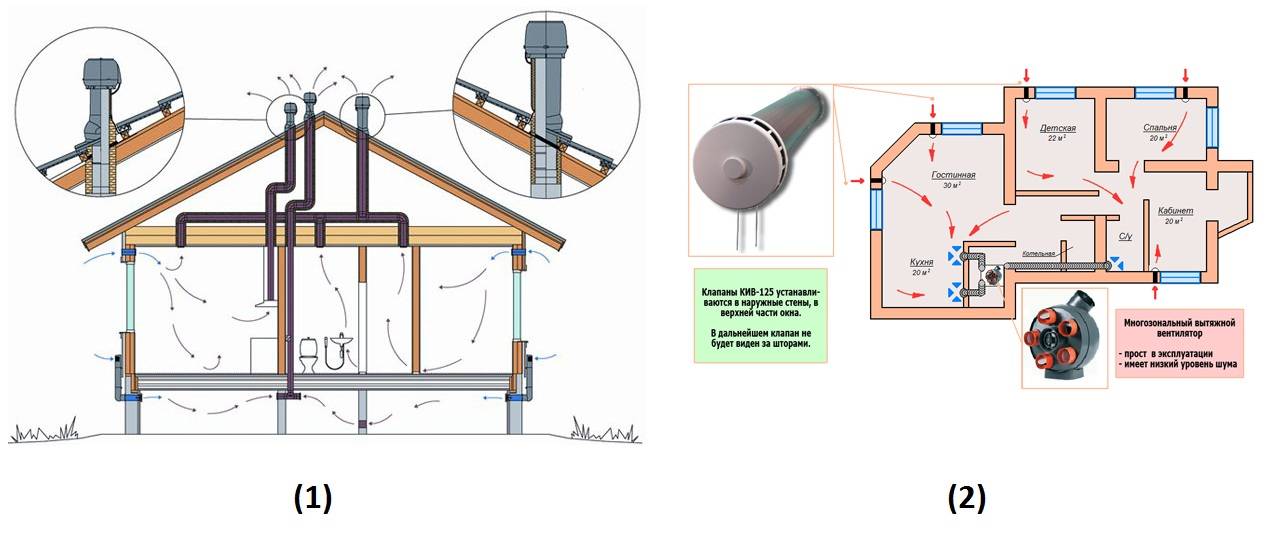


- the cross section of the passage is 130x130 mm;
- the inlet from the room is made under the ceiling;
- the conclusion to the roof is made using a vertical pipe, which rises 0.5 m above the roof;
- the thickness of the channel walls in the masonry is made at least 2.5 bricks for slow cooling of the flow;
- a vertical pipe is placed in the center of the building;
- to increase air permeability, overflow passages (holes) are made in the door leafs or an open slot is left at the bottom.
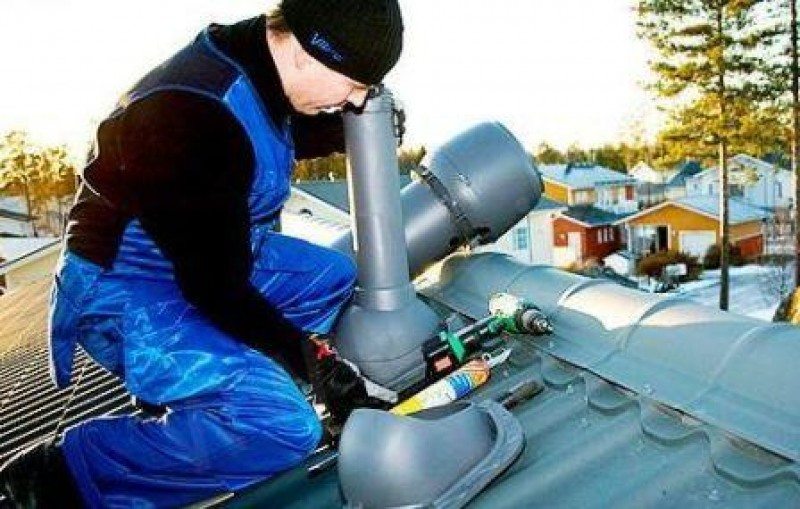
Stages of installation of the ventilation passage assembly
To simplify the task of arranging a ventilation outlet to the roof with your own hands, you should resort to using a ready-made structural solution for the passage unit, for the installation of which you will need to follow the following sequence of actions:
- determine the installation site, based on the structural features of the roof and the requirements of the regulations;
-
apply marks that will indicate the subsequent location of the pipes of the ventilation system, and cut holes of a given diameter along them.
- similarly prepare exits in the insulating layer and waterproofing;
- using a template, mark the position of the passage assembly, drill holes for subsequent fastening with self-tapping screws;
- the working section of the roof will be cleaned of all types of pollution;
- apply a layer of silicone or other sealant to the lower part of the sealing gasket and fix the gasket in place of the future ventilation outlet;
- place the passage element on the gasket and fix it tightly with fasteners;
- place the ventilation pipe in the passage assembly, checking its verticality with the help of a level, and finally fix it with screws.
To complete the installation of the ventilation pipe, it is necessary to check the fit of the passage element to the roof.It should be pressed in such a way as to remove excess sealant from the joint. It is also necessary to seal the junction of the duct with the roofing pie. from the attic.
The purpose of the lattice for the window sill
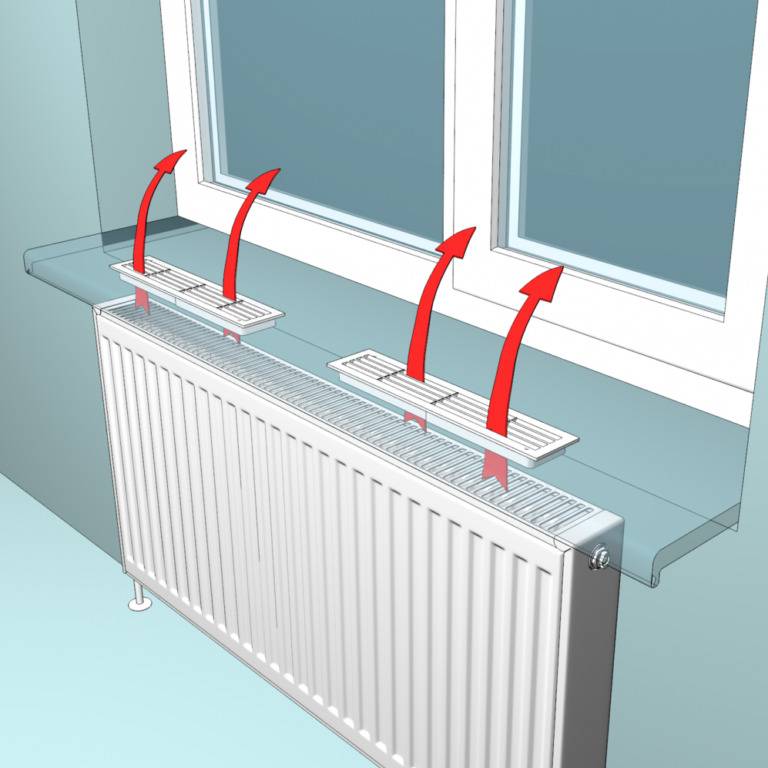
The ventilation grille prevents fogging of the plastic window. This situation occurs when the level of humidity in the living room increases.
The product successfully fights fogging of windows in a room or kitchen. The principle of operation of such equipment is based on the natural circulation of air heated by a battery in a closed room.
Warm air from the heating radiator under the windowsill goes up and at the same time enters the ventilation grill. At the same time, the temperature difference under the window sill and above it is insignificant, and as a result, the windows in the room do not fog up.
Before you put this product in your apartment, you need to figure out why the windows fog up. This happens both in the kitchen and in living areas.
This happens for the following reasons:
- high humidity in the kitchen or in the room;
- the apartment has hermetic plastic windows, and there are no holes in the window frames for the penetration of street air into the room or they are made of thin profiles;
- there are no or poorly functioning batteries in the living room;
- air circulates poorly in the house - the natural ventilation of the plastic window sill is broken in the rooms;
- a window sill that is too wide creates an obstacle for mixing cold and warm air. Thus, cold air accumulates above the window sill, and warm air currents remain under it.
In addition, the appearance of the window sill deteriorates from high humidity.Old wooden window frames that used to be installed in houses had several gaps and small cracks.
Through these openings, outdoor air freely entered the rooms and went outside through the ventilation ducts. In this case, the natural circulation of air masses was not disturbed.
Until the early 2000s, before people massively replaced old wooden windows with new ones made of plastic, condensation on windows did not appear so often.

And the apartment was not stuffy due to the penetration of fresh air masses into the room through several window slots.
Now, due to the fact that PVC windows are completely sealed, it becomes very stuffy in the living room. There are two ways to solve this problem:
- equip the window with a supply valve;
- install a window sill with a ventilation grill made of plastic or other material in the house.
- Ideally, these 2 ways to solve the problem should be combined, because if a ventilation grill is installed in the windowsill, it prevents the windows from fogging up, but not the stuffiness in the room.
Thus, in order to prevent the appearance of high humidity and stuffiness in the apartment, residents must follow these recommendations:
- when replacing or installing new window frames, it is necessary to carefully make slopes and firmly seal all cracks;
- you need to constantly ventilate your home, because the influx of fresh air reduces the humidity in the apartment;
- it is necessary to clean the ventilation ducts from debris in a timely manner;
- in case of condensation on the windows, it is necessary to install a small ventilation grill in the windowsill.
Technical task
At the ventilation design stage, the first thing to do is to draw up a technical task, setting out the requirements for the volumes and functions of air exchange in each part of the room. Depending on the purpose of the room, the parameters of the exhaust system may vary.


To successfully and correctly implement the installation, you need to follow these principles:
- Living rooms, gyms or living rooms. These rooms need an uninterrupted supply of fresh air, because people are constantly in them. The optimal volume is determined by the number of people living or present. There may also be requirements for the microclimate, namely the temperature and humidity of the incoming flows.
- Bathroom, laundry and lavatory. Natural ventilation must be present here, which will remove the exhaust air during the operation of mechanical systems.
- Kitchen. This part of the room is considered technical and is characterized by a constant increase in humidity. In addition, gas and food odors accumulate in the kitchen, so they need to be quickly and efficiently removed outside. For such purposes, a multifunctional forced hood is used.
- Corridor and hallway. The task of the hood in such a part of the house is the free movement of air masses and balanced air exchange.
- Pantry. The room is equipped with natural exhaust.
- Boiler or furnace. These rooms require regular removal of combustion products through natural ventilation, that is, through a pipe.
Also, autonomous ventilation systems should be present in work areas such as garages and workshops. The power and operating parameters of the equipment are determined by the area and purpose of the room.
What you need to install a ventilation outlet on the roof
To perform installation work on the ventilation pipe above the roof, you must have all the necessary tools. It is recommended to prepare them in advance so that no unforeseen circumstances arise during installation.

Pipe installation is carried out using the simplest tools
The list of materials and tools that will be needed when installing the ventilation pipe:
- scissors for cutting metal;
- insulation;
- Screwdriver Set;
- marker (for marking);
- special sealant;
- self-tapping screws;
- sealing elements;
- passage node;
- work gloves.
- drill or perforator;
- level;
- electric or manual jigsaw.
We carry out installation of ventilation grilles and diffusers
As a final distribution device, we use various ventilation grilles or diffusers, the specific location and type of which are selected when agreeing on a design project. Air distributors are used with devices that change the direction of the air jet, as well as with a device for regulating the air flow. In some cases, low-velocity air distributors are used to supply a large amount of supply air at a low speed, which is especially relevant when installing ventilation in swimming pools. This allows you to create the most comfortable ventilation systems, eliminating the occurrence of drafts.
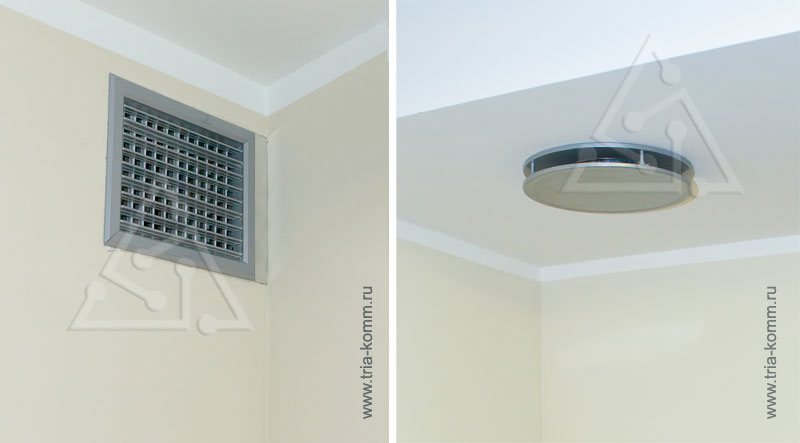
Completed installation of ventilation grilles and diffusers
Water heaters with a fan: characteristics and manufacturers
A water heater with a fan is one of the most economical and efficient devices used to heat air in hangars, warehouses, gyms, trade, exhibition and concert halls, car services, workshops. It is also used to heat greenhouses, farms and other spacious facilities with a large area.
Such units are also available in different versions depending on the intended placement. That is, there can be wall or ceiling heaters that can be easily installed in any room.
The main advantages of water heating heaters are their energy efficiency and performance, which is manifested in the ability to both increase and cool the temperature in the room. At the same time, fan heaters are generally low-cost, as they consume little electricity and allow saving on heating.

Electric fan heater with Flowair control panel
Both foreign and domestic brands specialize in the production of such heaters, including Teplomash, Greers, Flowair and Volcano. A hot water heating coil with a fan is an excellent solution in most cases for heating large objects.
KSK heaters are considered popular in the domestic market. Devices of this brand are compact and economical. The units are widely used in industry, as they do an excellent job of quickly heating the air in rooms with a large area, while using a minimum of electricity. Devices are also used as a heat exchanger. They are a component in various units, heating, air conditioning and ventilation systems. The heat carrier in the KSK heater is hot water with a temperature index of over 190°C.
Heating heaters with a fan: design and operation features
Heating heaters with a fan are available in six standard sizes. These are very popular means of heating, therefore they have a wide range of models from many manufacturers. There are two-row and three-row models. The power of the heater from 10 to 60 kW allows you to choose equipment for rooms with different areas.

The power of heaters varies between 10-60 kW
Such heaters are also called fan heaters or duychiks, they are compact and lightweight. They are mounted on the ceiling or wall using special brackets.


For the purpose of wear resistance, the body of the unit is made of polypropylene or galvanized steel, and enameled on top. Polypropylene is characterized by a high degree of resistance to mechanical damage and resistance to various gases and vapors. Therefore, the body can withstand high temperatures, resistant to corrosion damage of a different nature.
For the production of the heat exchanger, copper tubes are used, and for the fins, aluminum plates are used. They are mounted on the rear panel of the device, which greatly simplifies the installation of the device and improves its design.
The device is equipped with a silent axial fan with blades made of special profile and bearings of the highest class, which do not require lubrication. Such a device gives high performance with low power consumption. In addition, the air flow is adjustable within the operating range. The heating medium is water from the central heating system.
Units are produced in ceiling and wall versions.Due to the lightness of the mounting console, the unit can be rotated 180 degrees during operation.

Ceiling fan heater
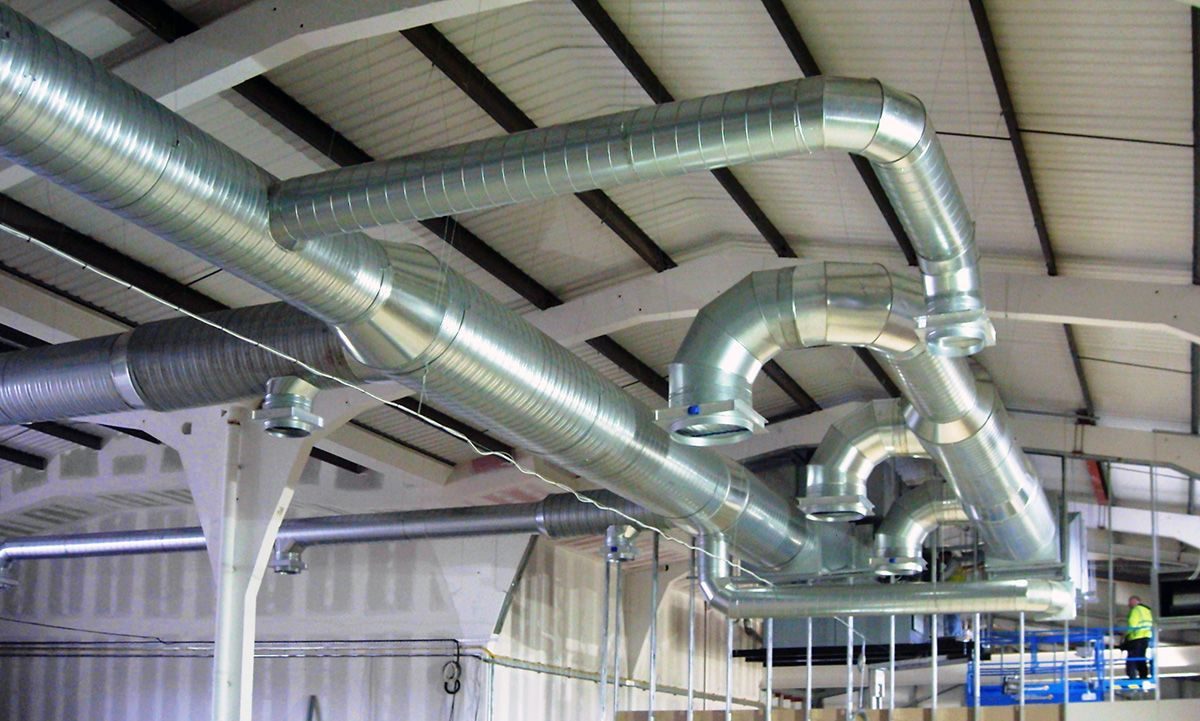
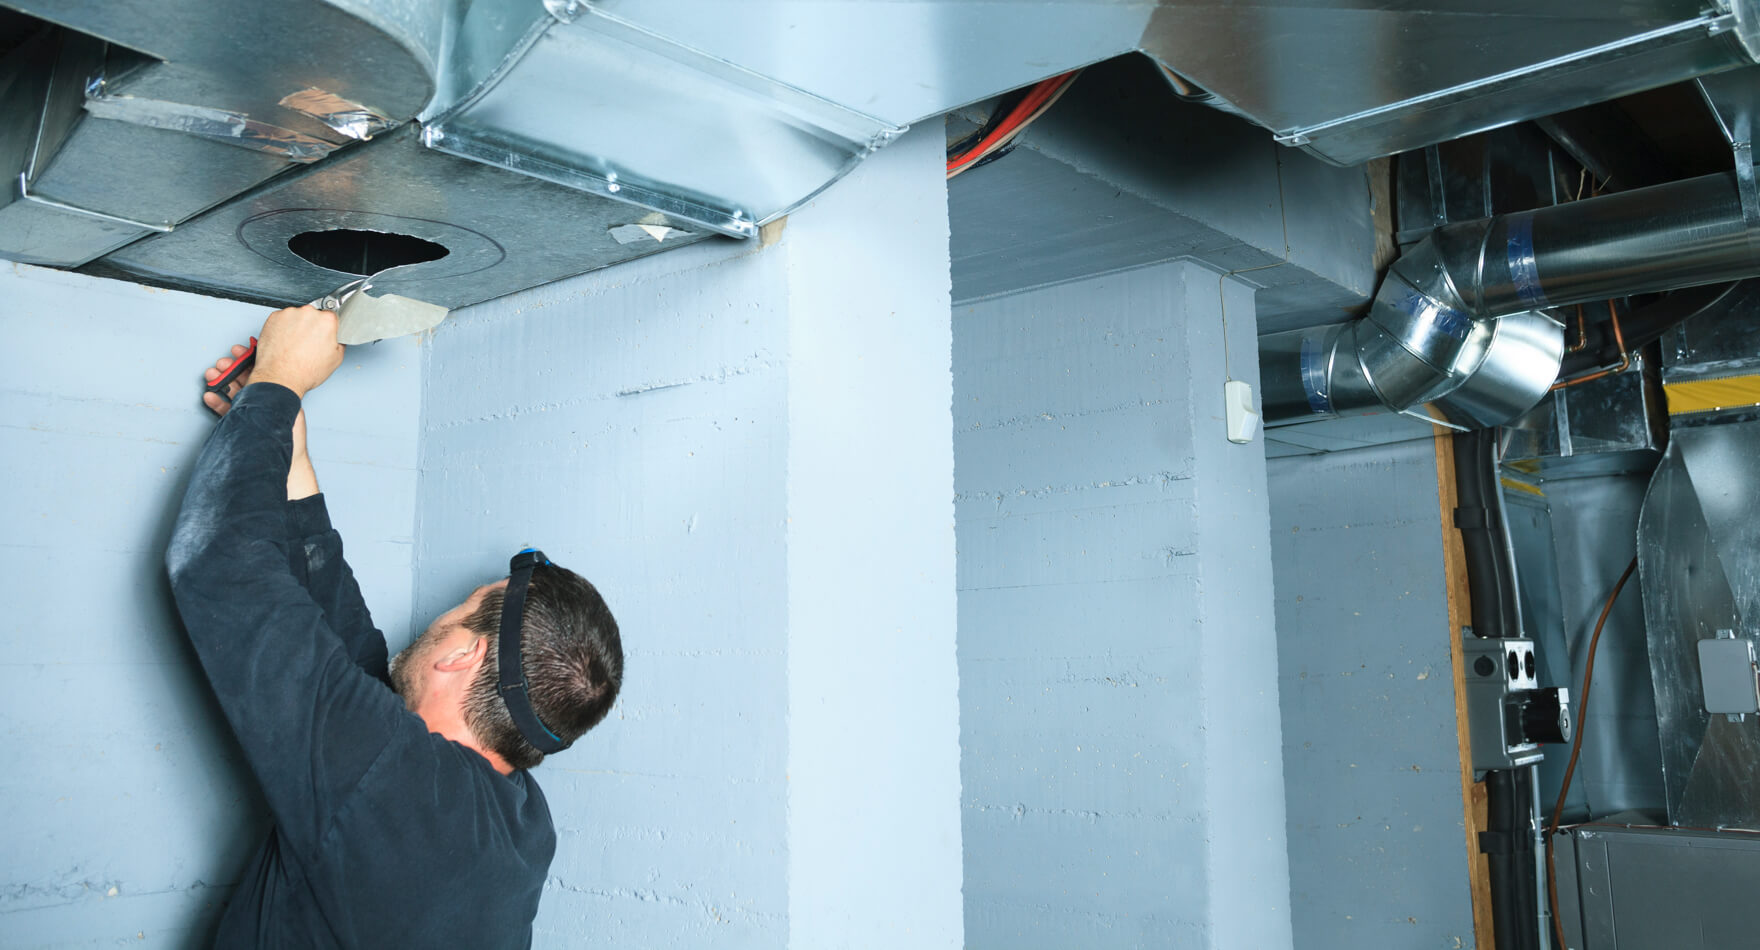
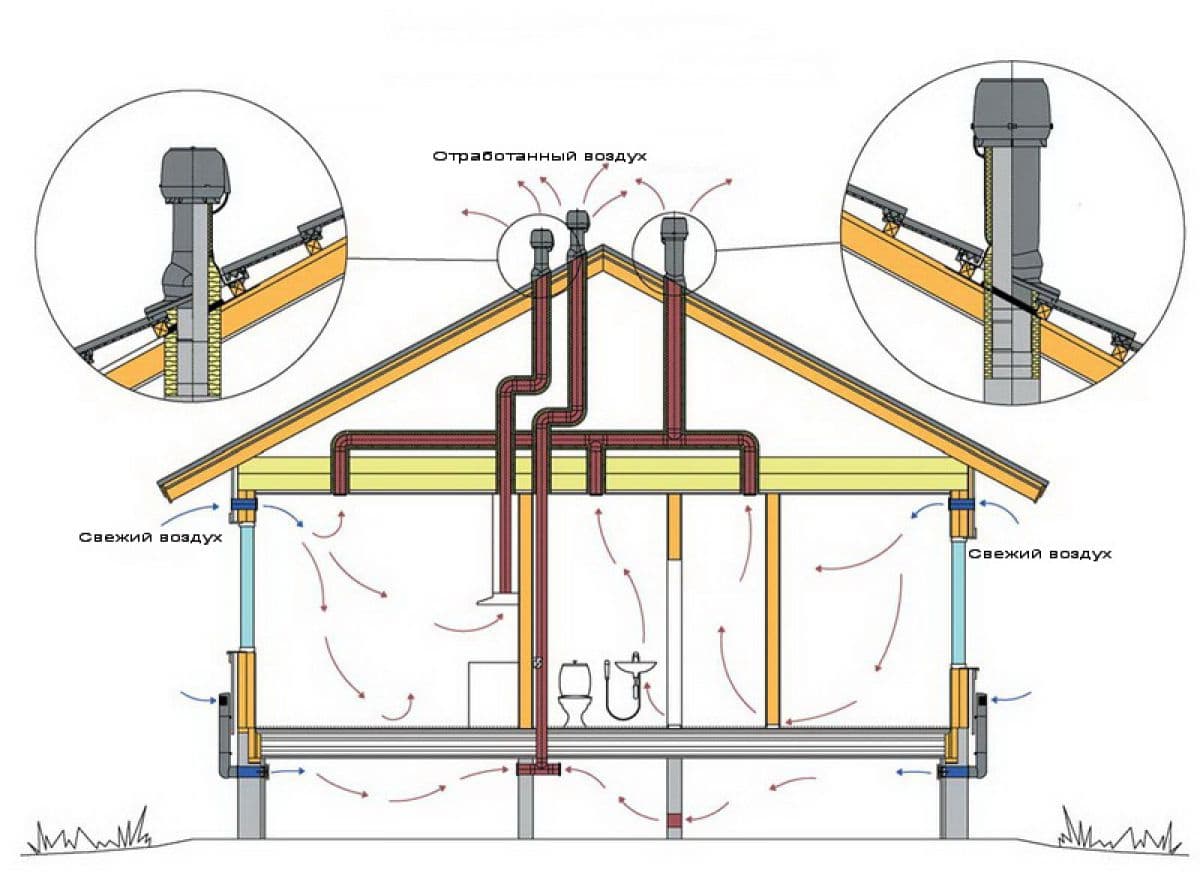
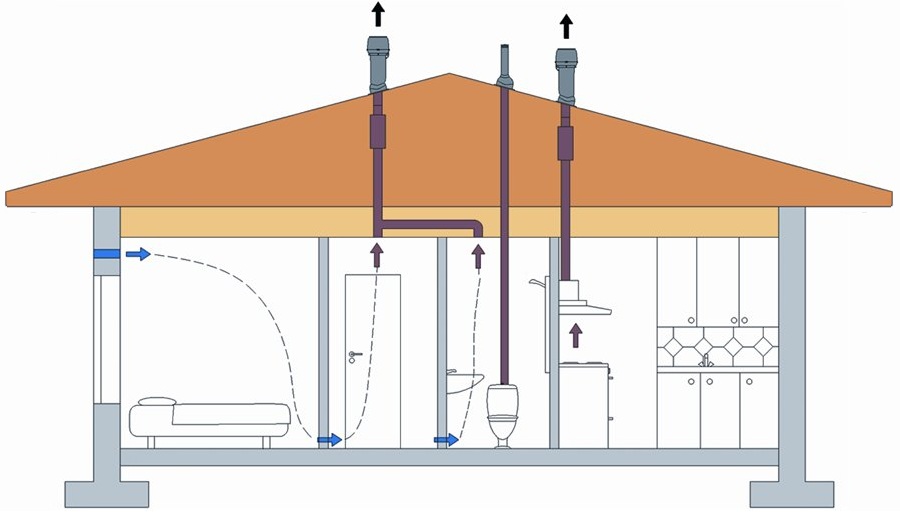
We install supply and exhaust ducts
Air ducts are laid in hidden ducts, avoiding, if possible, chasing load-bearing walls. The supply air is distributed throughout the premises by means of an extensive system of air ducts laid behind the suspended ceiling, in technical boxes or decorative elements. Air ducts are made, as a rule, from sheet metal, and all supply air ducts, in the case of using ventilation equipment with a cooling module, are still protected by external thermal insulation (this measure serves to eliminate the possibility of condensation on the walls of the air ducts). The final air ducts suitable for the air terminal adapters are laid with flexible hoses if possible. Exhaust air ducts are also made of galvanized sheet steel without thermal insulation (if no central air conditioning system is provided) and laid hidden.
Supply and exhaust air ducts
Arrangement in a brick house
Most modern houses are equipped with combined supply and exhaust systems, as they are more efficient than conventional types. The exhaust channels are fixed in the main walls with a minimum thickness of 38 cm. From 1 to 3 such channels can be present in one room, and when choosing a suitable model, the architectural design of the building is taken into account.
When arranging a hood in a private brick house, you must adhere to the following recommendations:
- The optimal parameters of the ventilation channel are 13 x 13 cm.It is better to build such a space during the laying of the wall structure.
- The inlet from the room to the channel is located under the ceiling.
- To bring the hood to the roof, it is necessary to equip a pipe with a height of at least 50 cm above the ridge. If you do not follow this rule, traction may deteriorate.
- The optimal thickness of the channel walls is 2.5 bricks. If they are thinner, the duct system will cool down, which will prevent the natural exhaust air from being expelled to the outside, but will lead to the pulling of cold masses from the street.
When performing installation work in a brick house, you can additionally buy a wall fan and fix it at the base of the air duct. Bearing-type models are characterized by maximum strength, but during operation they create a lot of noise. Sleeve devices operate almost silently, but their cost is much higher.
It is quite difficult to implement the installation of ventilation in a private house or apartment. But with the observance of simple rules, such a task becomes solvable.
Stages of installation work
Before bringing the ventilation pipes to the roof, it is necessary to complete the installation of the ventilation system wiring inside the building. The duct itself must be securely fixed. The list of tools depends on the material of the roof of the house. For comfortable work, you will need the following basic list of tools and materials:
- chisel;
- electric drill;
- building level;
- jigsaw (highly desirable - electric);
- Screwdriver Set;
- insulating material;
- scissors for metal or "grinder";
- marker;
- hardware for fixing;
- sealant;
- rags;
- passage node;
- individual protection means.
When performing independent installation of ventilation outlets to the roof, you should use the assembled passage assembly, thereby greatly simplifying your work. The sequence of actions is as follows:
- Markup. Using a marker, make marks according to the template (depending on the section and size of the ventilation outlet pipe to the roof) in the place where the ventilation shaft will exit.
- Creating a slot. It is necessary to cut a hole in the roof using a tool for processing a certain roofing material (usually this is a “grinder”).
- Removal of the top layer of the roof.
- Drilling holes for fastening the outlet segment of the ventilation shaft.
- Marking for mounting the passage assembly.
- Creation of grooves in which self-tapping screws will be placed in accordance with the previously carried out markings.
- Installation of the pass-through node.
- Its fixation with self-tapping screws.
- Installing the ventilation pipe, fixing it with the appropriate hardware.
- Insulation of all cracks and openings.
Installation Features
During the planning and installation of the ventilation system, it is first necessary to check the calculations for compliance with the technical rules. It is highly recommended to entrust the design to specialized specialists who understand all the features and technical nuances of the building.


There is a difference between the temperature readings at the inlet and outlet of the ventilation duct. Inside the channel, there is an increase in thrust due to the difference in temperature inside and outside the room. This is the main reason why ventilation tends to work at higher productivity in winter than in summer.
Even at the design stage, you need to think about the thermal insulation of the channels that pass under the roof. This is required so that air draft does not decrease over time. This solution effectively affects the protection of the exhaust channels from the accumulation of moisture. If the ventilation pipe is located along the chimney, it is necessary to take care of its heating (the quality of operation of the ventilation system as a whole changes positively). On the other hand, there is also a downside here. In such channels, the draft is different, therefore, if the calculations are incorrect, you may encounter a violation of the ventilation.
Properly designed ventilation output contributes to effective air conditioning indoors. Self-installation does not cause difficulties, subject to preliminary familiarization with the features of the work.
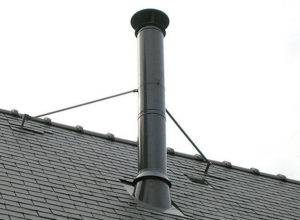 Fixing the top of the ventilation riser
Consequences of installation errors
Proper installation of the ventilation pipe on the roof is the key to the full operation of the entire system. If the recommended installation standards are not met, the following negative consequences will occur:
- weakening of traction;
- the presence of unpleasant odors in residential premises;
- accumulation of moisture in rooms;
- condensate inside the system;
- lack of oxygen;
- the appearance of a fungus on the surface of the walls;
- deposition of soot on facing materials installed in the kitchen;
- an increase in the intensity of the occurrence of diseases in all residents;
- freezing of certain structural elements of the building.
The correct installation is the main factor that determines the usefulness of air exchange and the comfort of living.
7 Step by step installation instructions
The procedure for installing a ventilation duct on a roof structure is not too complicated. It can be easily performed by anyone, but for this you need to be guided by the following instructions:
- 1. First of all, you should deal with the installation location of the pass-through unit on the roof.
- 2. On the upper wave of the metal tile, it is necessary to draw the contours of the future hole, applying the template that comes with the element itself.
- 3. After that, cut a hole on top with a chisel and scissors for metal, and also make several holes in the lower layers of the roofing cake.
- 4. Following the template, you need to drill several holes for the screws.
- 5. Then it remains to clean the roof surface from moisture and dust residues.
- 6. Apply a layer of sealant to the bottom of the gasket.
- 7. Then it is necessary to lay the gasket in the right place and fix the passage element in it. After making sure of the reliability and correct location of the structure, you can proceed to fixing. For this, screws are used.
- 8. At the end, it is necessary to ensure the tightness of the ventilation outlet to the roof from the attic.
Based on the foregoing, there are practically no difficulties in installing a ventilation duct on the roof. If you draw up the right project in advance, make calculations and study the installation instructions, the future ventilation system will work in the best possible way. At the same time, the operational life of the roof, which has gone through a lot of changes due to the appearance of a new node, will not be reduced in any way. But for this you need to responsibly treat the upcoming work and follow the basic installation rules.
Features of the withdrawal of pipes for ventilation on the roof
The main task of the ventilation system is to create and maintain an optimal microclimate in the house. The air in ventilated rooms must necessarily comply with sanitary and hygienic standards. The air should not be too humid, polluted with dust and dangerous substances.
Installation of the ventilation structure is quite easy, however, before installation, the creation of a project is a mandatory item. It should include a plan that takes into account exactly which elements will be used during installation and where they will be placed.
The installation of ventilation parts must comply with building codes and regulations (SNiP) and be carried out taking into account all safety points. In addition, the correct location of the ventilation pipes allows you to get the most productive ventilation. A very important point is the location of the ventilation pipe on the roof. Its output is carried out from the main equipment or from the wall. The number of components may vary. It depends on the specific case and on the plan of the future design.
The conclusion of the ventilation pipe through the roof is performed for:
- the flow of oxygen into the house;
- installation of the fan part of the sewer riser;
- air circulation in the attic.
The choice of a place for a pipe when installed on a roof must be carried out in such a way that nothing interferes with the removal of polluted air. The height and diameter of such products is determined taking into account their operational features.
The height and diameter of the pipe depends on the type of ventilation, the volume of the room and other factors.
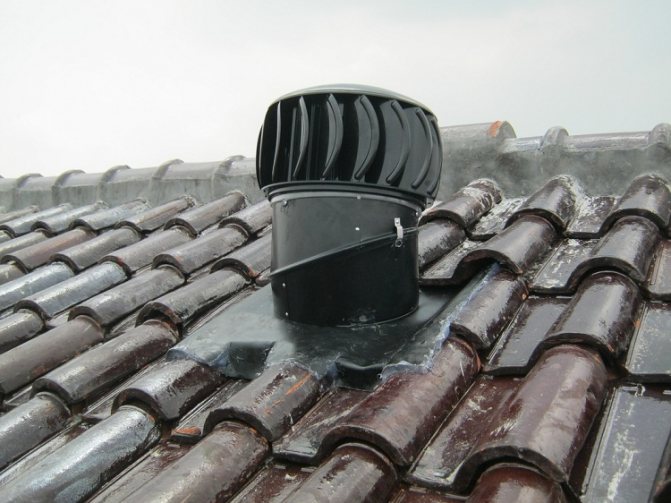
For a pitched roof type, the right solution would be to install a ventilation structure near the ridge.Such placement does not require additional fixation of the duct.


Conclusions and useful video on the topic
The video tells and demonstrates the features of the design and installation of PVV in a private house:
Another illustrative example of a ready-made ventilation solution for a private 1-storey wooden house:
p> Summarizing the above information, we note that supply and exhaust ventilation is easy to design, available for purchase and installation system.
Ventilation in conjunction with the heating system allows you to organize the balance of fresh and warm air in the room.
Have you been doing ventilation in your country house? Or do you know the secrets of designing and installing a ventilation system in an apartment? Please share your experience - leave your comments on this article.


