- Guidelines for choosing the right bath
- Checking and sealing the joint
- Mixer selection
- What criteria to choose
- Leading plumbing manufacturers
- Advantages over mounting on legs - which method is better?
- How to install an acrylic bathtub with legs
- Fabrication for steel bath podium
- Making a metal frame
- Making a podium from foam blocks
- Making a podium from a wooden beam
- Types of preparatory work
- Bath piping: how the system works
- Installation on bricks
- Insert into a niche
- Structural alignment
- Screen types
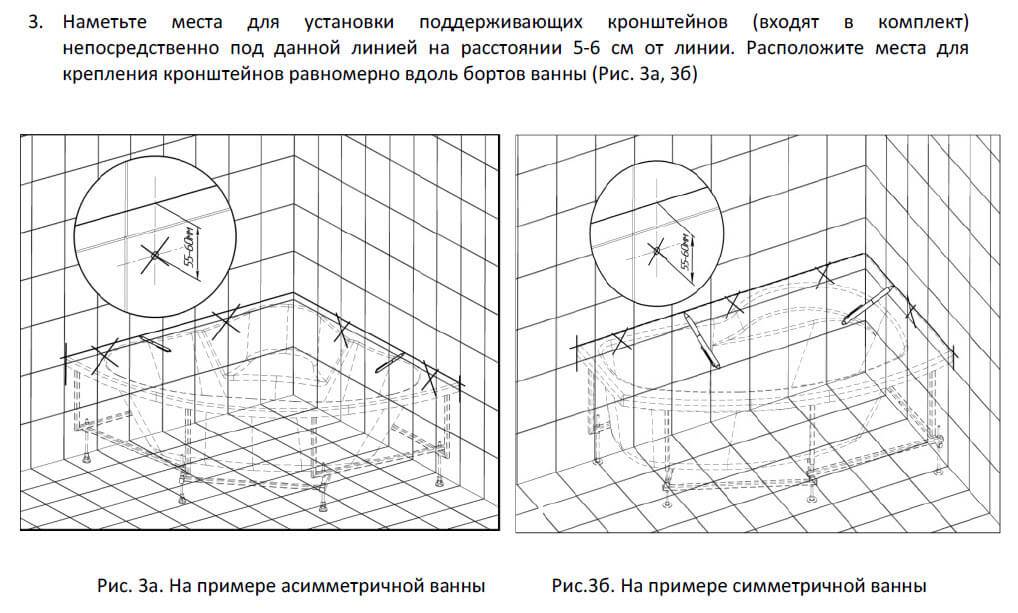
Guidelines for choosing the right bath
Modern industry offers us bathtubs of various shapes and colors, made from various materials. Due to the variety of models, the homeowner always faces the problem of choice.
If the shape of the container and its coloring excite us more from an aesthetic point of view, then important operational characteristics of the product depend on the material of manufacture: its practicality, appearance and durability.
In addition to the material, dimensions and configuration of the bowl, the choice of bath is influenced by the size of the hygienic room, the height of the sides that is convenient for all members of the family, the presence of additional devices and functions.
In the production of bath bowls are used:
Steel.Steel plumbing attracts with an affordable price, an abundant assortment. Due to the lightness, the installation can be handled without the involvement of assistants. The disadvantages include high heat transfer, the ability to deform, bend under the weight of large people, "noise" when water is drawn into the bowl.
Cast iron. Expensive, reliable, durable. Does not make noise when filling with water, perfectly maintains the temperature in the container. Due to the impressive weight, the installation of a cast-iron bath cannot be carried out alone.
Plumbing is quite fragile, with careless handling, you can split the bowl or damage the enamel.
Acrylic. Easy and inexpensive option, which is easier and more logical to replace than to repair
It does not sound when water is filled, it retains heat, but it does not last long enough and does not please with stability. With the installation without difficulty, you can handle it yourself.
If there are people with impressive weight in the family, it is advisable to install sanitary containers made of steel and acrylic on brick pedestals or additional supports built from it.
These measures will provide stability and stabilize the position of the bottom. For owners with a less solid build, instead of capital brick fixtures, it is enough to install an additional frame made of a bar or a steel profile.
A frame made of a wooden block or a metal profile will provide an opportunity to tile a kind of bathtub wall or arrange niches for storing hygiene items under the plumbing (+)
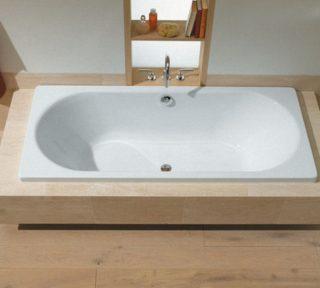
The shapes of the baths are also pleasing with variety. In addition to the rectangular structures familiar to our eyes, there are oval and square ones. For small bathrooms, corner models are increasingly being used.And in addition to products in which it is more convenient to take a bath while lying down, those that are specially designed for procedures in the “sitting” position are also in demand.
Checking and sealing the joint
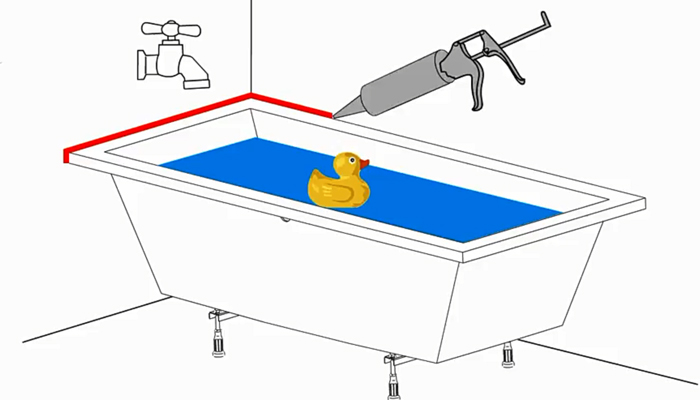
Do-it-yourself bath installation ends with checking the functioning of the system. To do this, turn on the water supply, open the taps and observe the operation of the drain. All connections must be tight, and water must quickly enter the drain, leaving the tank on its own. If everything works, then before using the device, it remains only to seal the joint between the bathroom and the wall. This is done as follows:
- The edge of the bathtub is washed, cleaned of dirt and dust, and then degreased with alcohol or an acidic detergent.
- If the gap is larger than 1 cm, it is filled with moisture resistant cement and left to dry for 12-48 hours.
-
If the gap width is 1 cm or less, it can be sealed with silicone sealant with antibacterial additives.
- After the sealant or cement has dried, a plastic border is glued with moisture-resistant liquid nails to prevent moisture from flowing into the joint.
-
I cut the corner into segments of the required length at an angle of 45 degrees with the help of a must and a hacksaw.
- Protective plugs are put on the edges of the corner.
When installing steel models, it is possible to process the bottom or walls from the outside with mounting foam or paste over with vibroisol to reduce the resonating ability and thermal conductivity of the material.
Mixer selection
The shower faucet should not have a long spout for water collection, because. it will interfere with taking hygiene procedures.
What criteria to choose
To choose the right shower faucet, consider the following:
- Design.Depending on the design of the bathroom, choose the appearance of the equipment. There are models in the style of Provence, avant-garde, classic, etc., so finding the right one is easy.
- Material. Silumin products are cheap and light, but fragile, so they do not last long. Brass faucets are the most reliable, they are heavy and resistant to corrosion. Bronze devices look beautiful, last a long time, but are expensive. Ceramic and glass-ceramic products have an unusual design, are not afraid of hard water, but react poorly to sudden changes in temperature. Some parts of mixers are made of stainless steel and plastic.
- Protective covering. Metal products are nickel-plated or chrome-plated. The first option is cheaper, but contact with it can develop allergic reactions. Chrome-plated coating is hypoallergenic, durable and beautiful.
- Structural features. In valve models for cold and hot water separate taps. Faucets are inexpensive, but it is inconvenient to control the temperature; seals must be changed frequently in taps. In single-lever devices, it is easier to control the flow of water; a ball valve or a removable cartridge is used for this. Thermostatic devices allow you to adjust the pressure and temperature of the water, regardless of the pressure in the line. Sensor mixers have electronic settings and control.
- Fastening. Depending on the model, the faucets can be mounted on the wall or built into it, cut into the side of the bathtub. For self-installation, wall-mounted devices are better suited.

When choosing a mixer, design and material are taken into account.
Leading plumbing manufacturers
Among the most popular manufacturers of plumbing, the following should be highlighted:
- Grohe is a German company, its products are of high quality and reliable, the guarantee for trouble-free operation of mixers is up to 10 years;
- Hansgrohe is a German manufacturer, its products are mainly designed for small bathrooms;
- Jacob Delafon is a French brand, its models are distinguished by their unusual design, high quality, warranty up to 5 years;
- Oras is a Finnish company that produces modern faucets with an optimal price-quality ratio;
- Roca - the products of the Spanish brand are distinguished by their unusual appearance, high reliability and long service life, but their price is appropriate;
- Vidima - This Bulgarian manufacturer produces simple and reliable plumbing fixtures that are available to any average family.
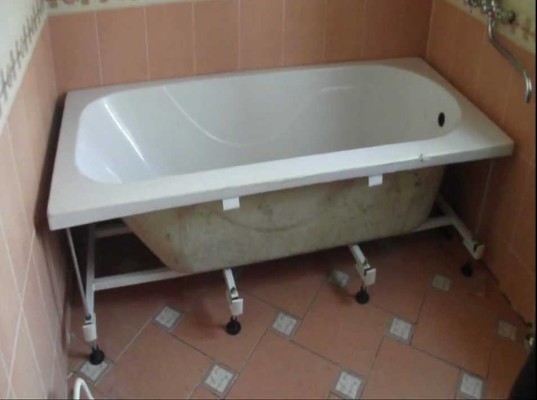
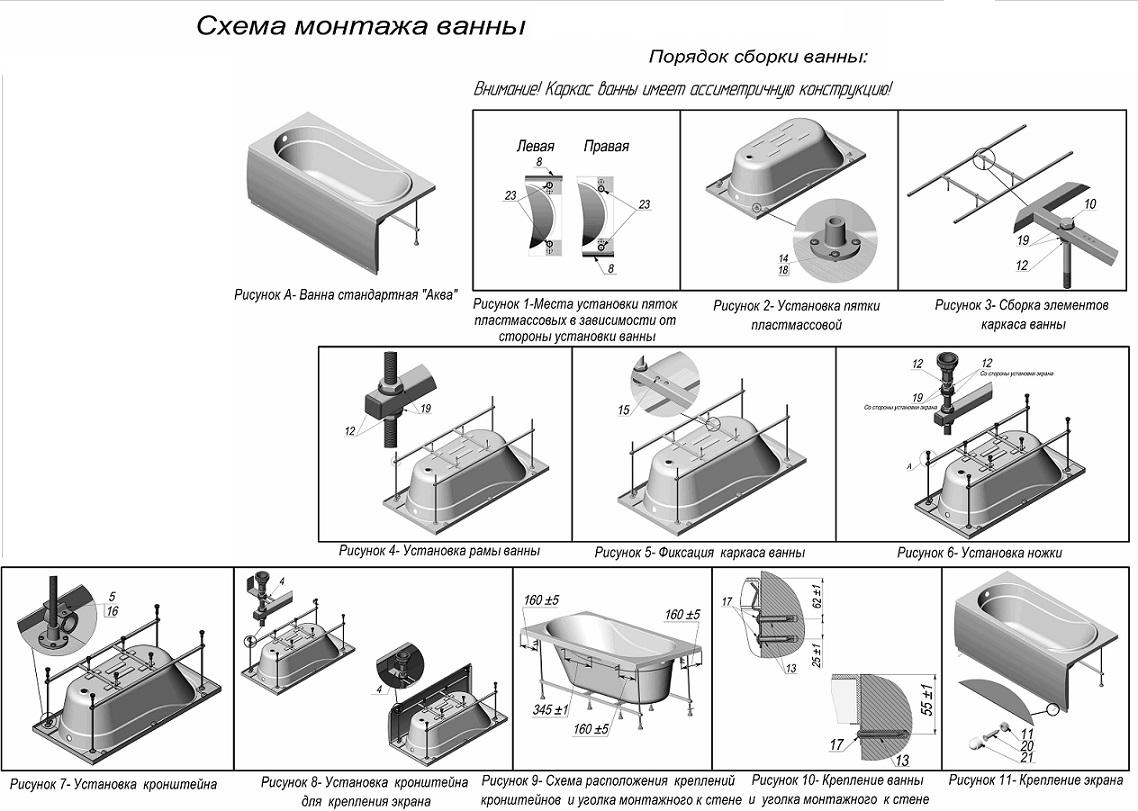
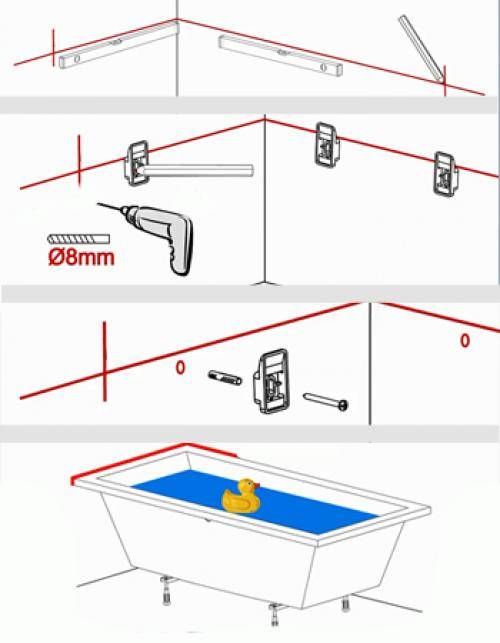
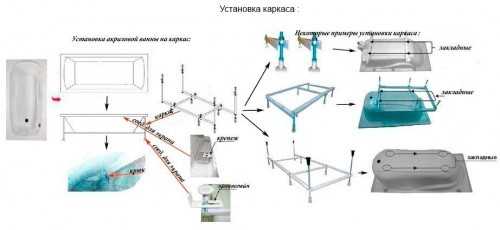
Advantages over mounting on legs - which method is better?
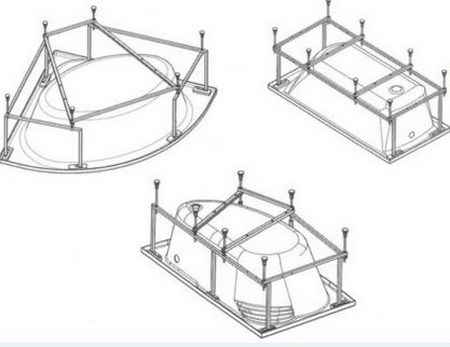
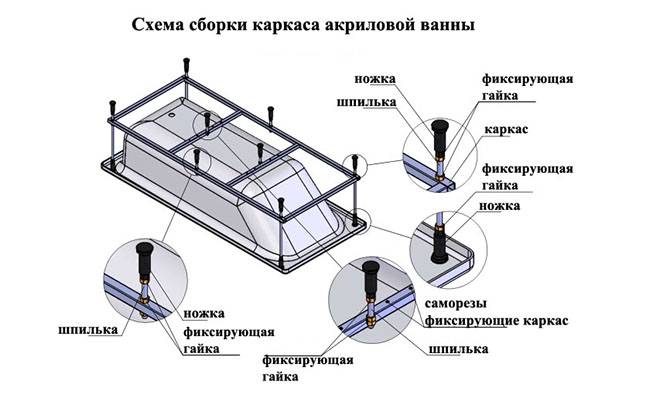
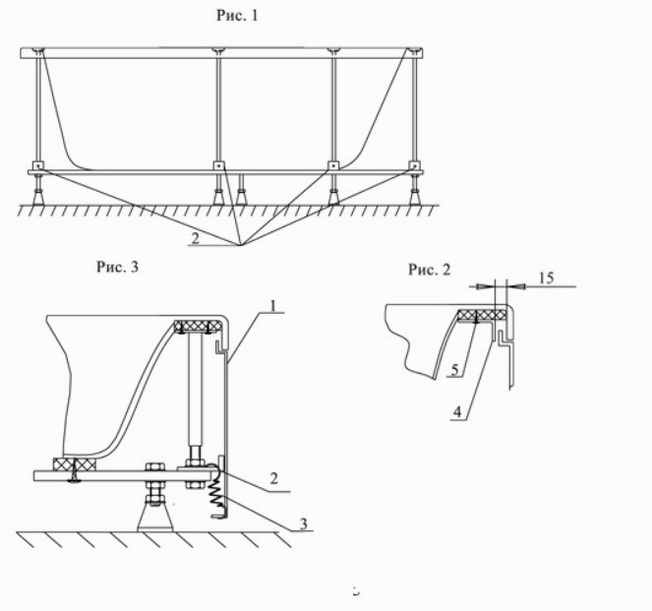
To begin with, all manufacturers of this product recommend using specialized frames in the form of a frame during installation, on which acrylic bathtubs are installed.
Such a design 100% evenly distributes the load on the bowl, exerted by water and the weight of a person, prevents breakage and deflection of the body. At the moment, all manufacturers produce serial frames designed for certain models - there are no universal ones.
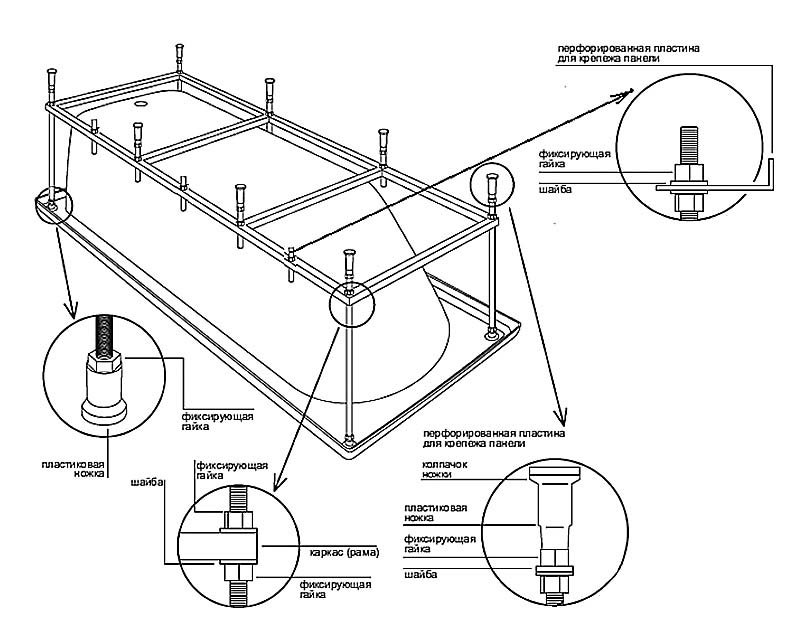
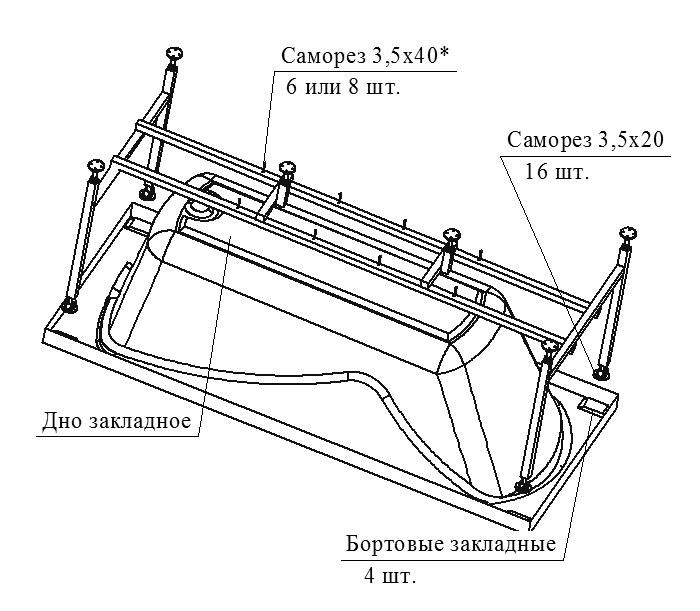
What is a framework? The frame-frame itself is a construction of a square profiled pipe, which is coated with a special powder composition, which prevents its corrosion in a humid room.
The skeleton consists of special stiffening ribs, supports for each corner of the bath and legs that can be adjusted by twisting.Despite the fact that high-strength fibers are used in the production of acrylic bathtubs, it is impossible to install the structure securely without a rigid frame.
As you can see, the advantages of the frame are obvious.
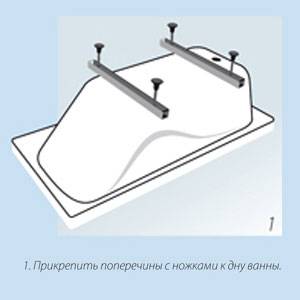
As for the legs, only their low cost is considered their main advantage. The design is flimsy and unreliable - two crossbars are attached to the bottom of the bath on different sides, and then the legs are screwed to them. It is not difficult to assemble and install an acrylic bath on legs, but you should understand that if the bottom of the bowl is thin, you will have to mount a brick frame under it. Otherwise, the weight of an adult will be able to bend it.


As you can see, there are much more disadvantages, besides this, no one will give you a guarantee that such a design cannot simply roll over if the wall mount is unreliable.
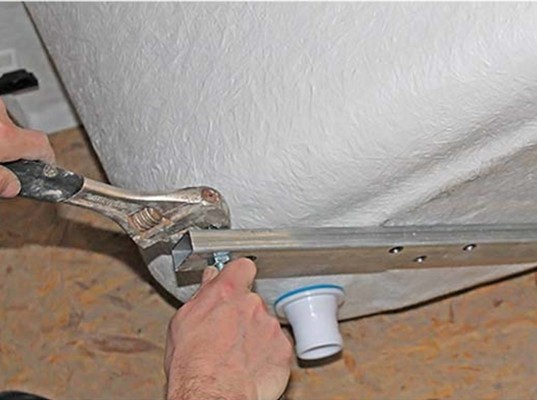
How to install an acrylic bathtub with legs
Stage 1. We fix the beam to the bottom and fasten the legs.
Stage 2. We bring and install the bath in place
Stage 3. We adjust the height. With the adjusting bolts screwed in, the drain will be located at a height of no more than 5-10 cm from the floor level. It is necessary to select the height so that the drain level is 2-3 cm higher than the sewer level. If the desired difference cannot be made, the substrates should be made of a material that does not absorb moisture.
Attention! If the free space under the bath is not planned to be used, the gap between the bottom and the floor can be filled with mounting foam. Such a decision will increase its stability and remove the question of increasing the height. However, it will not be possible to quickly clean the siphon or eliminate the leak in this case.
However, it will not be possible to quickly clean the siphon or eliminate the leak in this case.
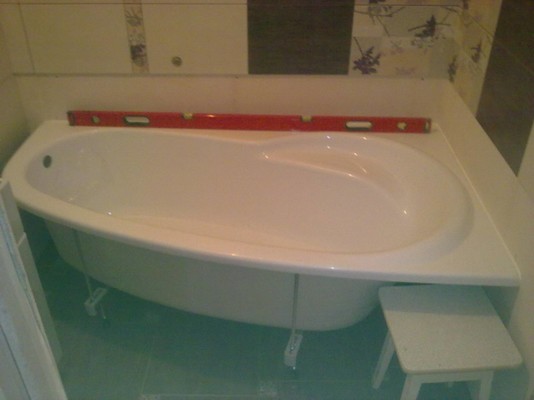
Stage 4.Using the building level, we carry out adjustment in the longitudinal and transverse directions. Any bathtub has a bottom slope, so it must be installed strictly horizontally in all directions. After that, it is necessary to tighten the lock nut on the adjusting screws of the legs.
Stage 5 Installing a sewer. The entire drain goes on sale in a disassembled state, so the first thing to start with is to assemble it.
All parts of the system are connected to each other. At the end of one part there is a cone-shaped gasket that enters the inner diameter of the other part and is pressed with a nut. Thanks to this connection, the entire drain system is sealed, and any leaks are eliminated by tightening the nuts.
An important part of the drain is the water seal. The water seal has a U-shape. Thanks to this, after draining, water always remains in it, which prevents the release of unpleasant odors from the sewer. We install the drain part.
Next, we assemble the overflow separately and install it. Next, we connect the drain and overflow to each other. Once again, check that all nuts are securely tightened.
Attention! All plastic nuts are hand-tightened without the use of tools. This is enough to assemble a sealed system
Fabrication for steel bath podium
Mounting a bathtub on a podium is an excellent installation method that provides protection against tipping over, which can lead to such troubles as damage to the interior, injury to residents and possible flooding of neighbors from below.
The podium can be made from different materials, more on that later in the article.
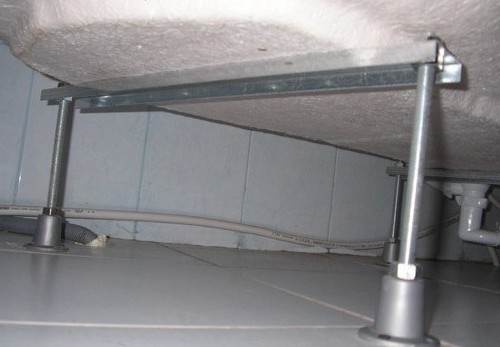
Making a metal frame
The metal frame is made of galvanized profile.If you have the skill to use a welding machine and a room where you can use it, the frame can be made with your own hands.


The finished frame is placed as close as possible to the wall and after that a font is placed in it. As well as the podium, the frame should be masked in any convenient way.
If possible, the frame should be additionally fixed to the wall in order to avoid its displacement.
Making a podium from foam blocks
This method is similar to making a brick podium. However, you should know that the brick is not afraid of water, but the foam block is unstable to moisture, so it must be treated with a water-repellent agent before installation.
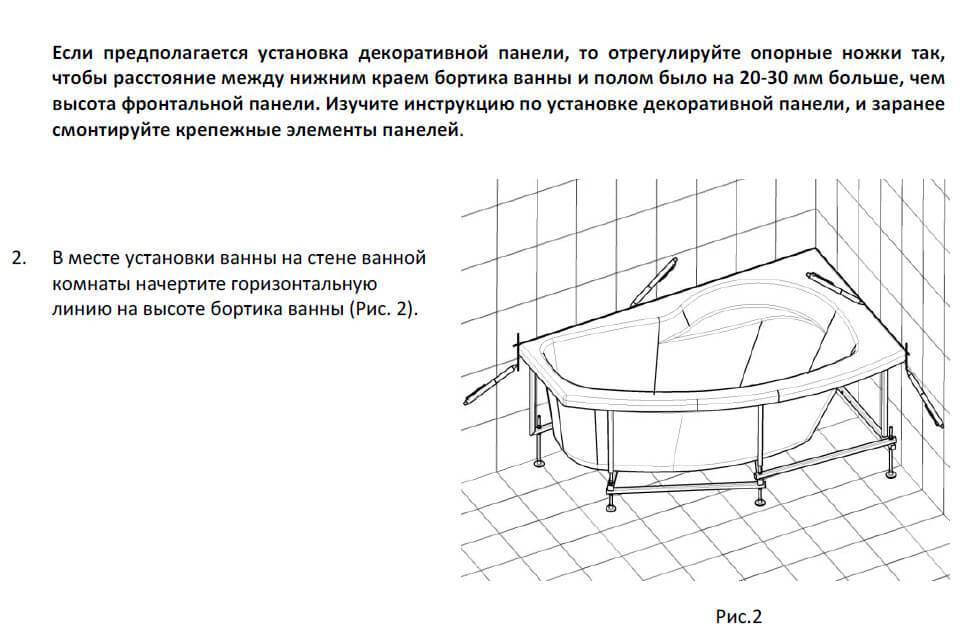
First you need to determine the height of the bath and carry out installation only after the necessary calculations. The calculation is simple to make - you need to understand what height will be convenient for all residents when using the bathroom.
The subsequent actions are extremely simple - a rectangular frame is formed from the foam blocks, inside which a bowl is subsequently inserted and, after fixing, the structure is lined.
Making a podium from a wooden beam
The beam, as well as the foam block, is covered with a moisture-proof agent. In addition, it is treated with an antiseptic composition to prevent the development of fungus.
Similarly to the method of using foam blocks, a rectangular frame is made from a bar. It is necessary to fix it only on stainless steel screws.
Types of preparatory work
- Completion of all construction works in the premises and supply of engineering networks.
- Debris removal and site preparation.During the execution of work, nothing should interfere, the floor should be clean, to prevent scratches, the surface is covered with cardboard or a thick cloth.
- Preparation of tools and materials. To seal the gaps, you will need a special sealant for bathrooms (it inhibits the reproduction of microorganisms and has improved performance), a set of locksmith tools, an electric drill, tape measure, level, pencil or felt-tip pen.
Bathroom Sealant
Before installing the bath, carefully check its condition and the completeness of additional fixing elements. Remember that the manufacturer's warranty only covers factory defects. Damage resulting from improper installation will have to be repaired at your own expense. Remove the protective film from the front surfaces only after the completion of all installation work.
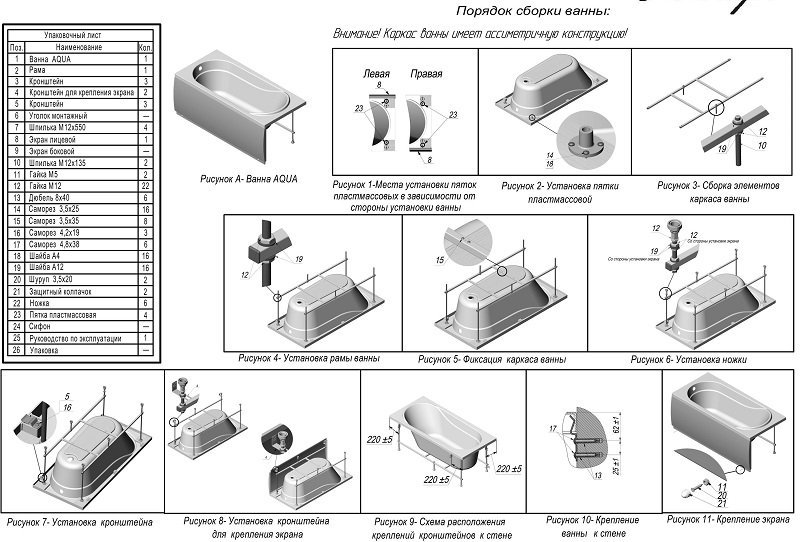
Acrylic bathtub in a package
Installation kit (may differ for different bathtub models)
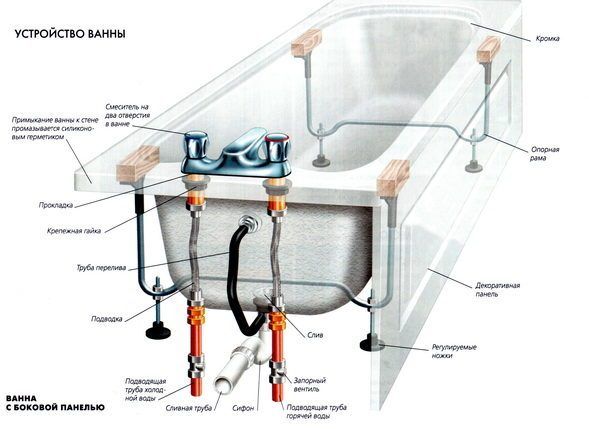
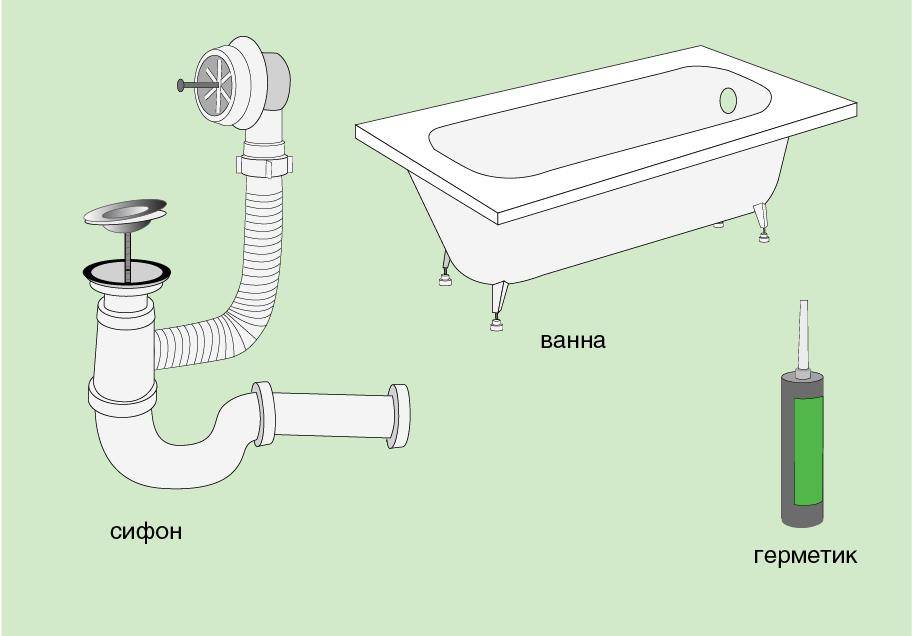
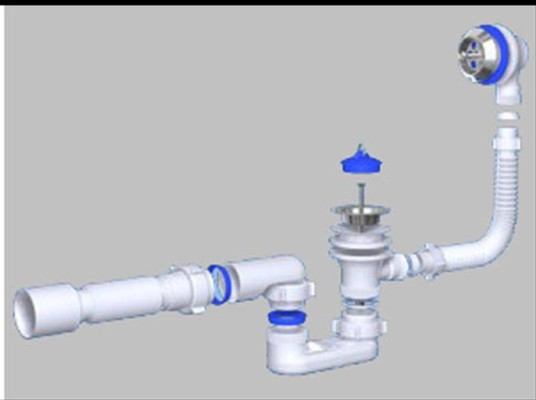
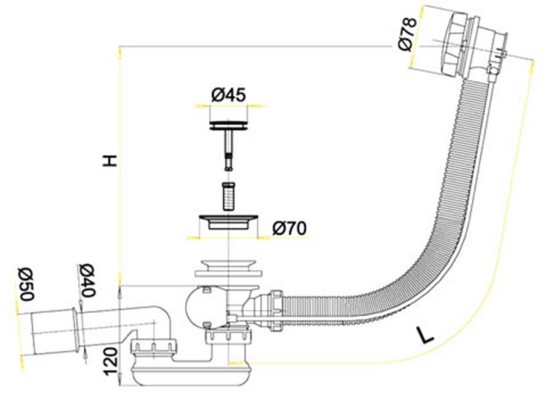
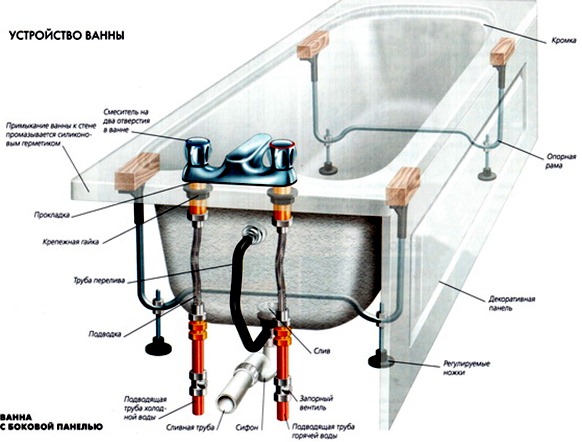
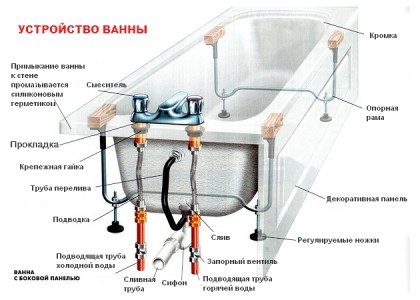
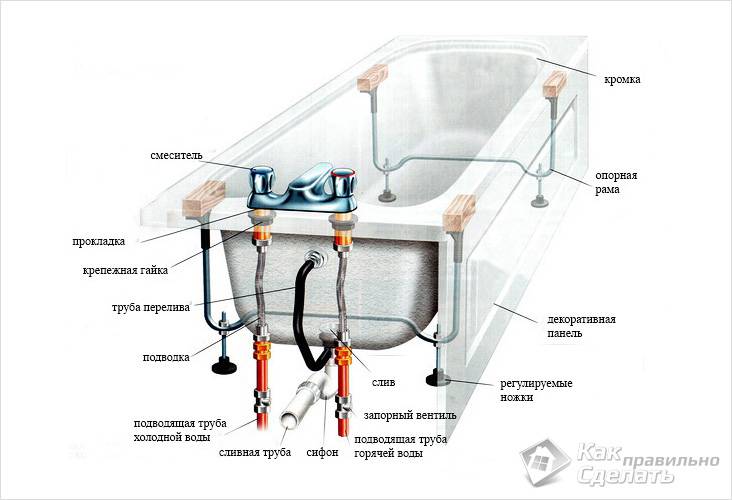
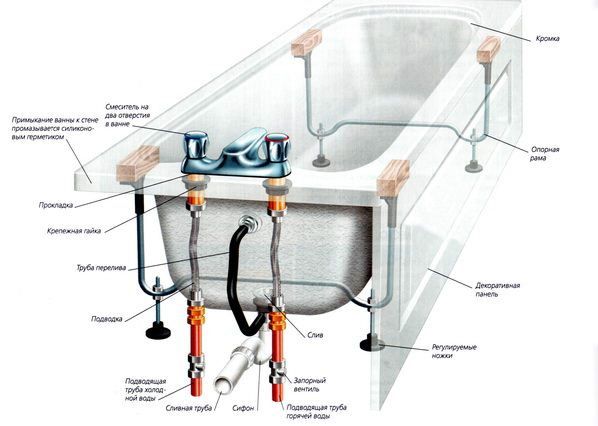
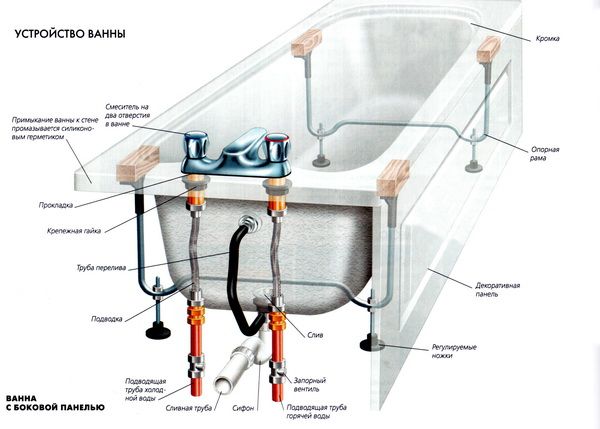
Bath piping: how the system works
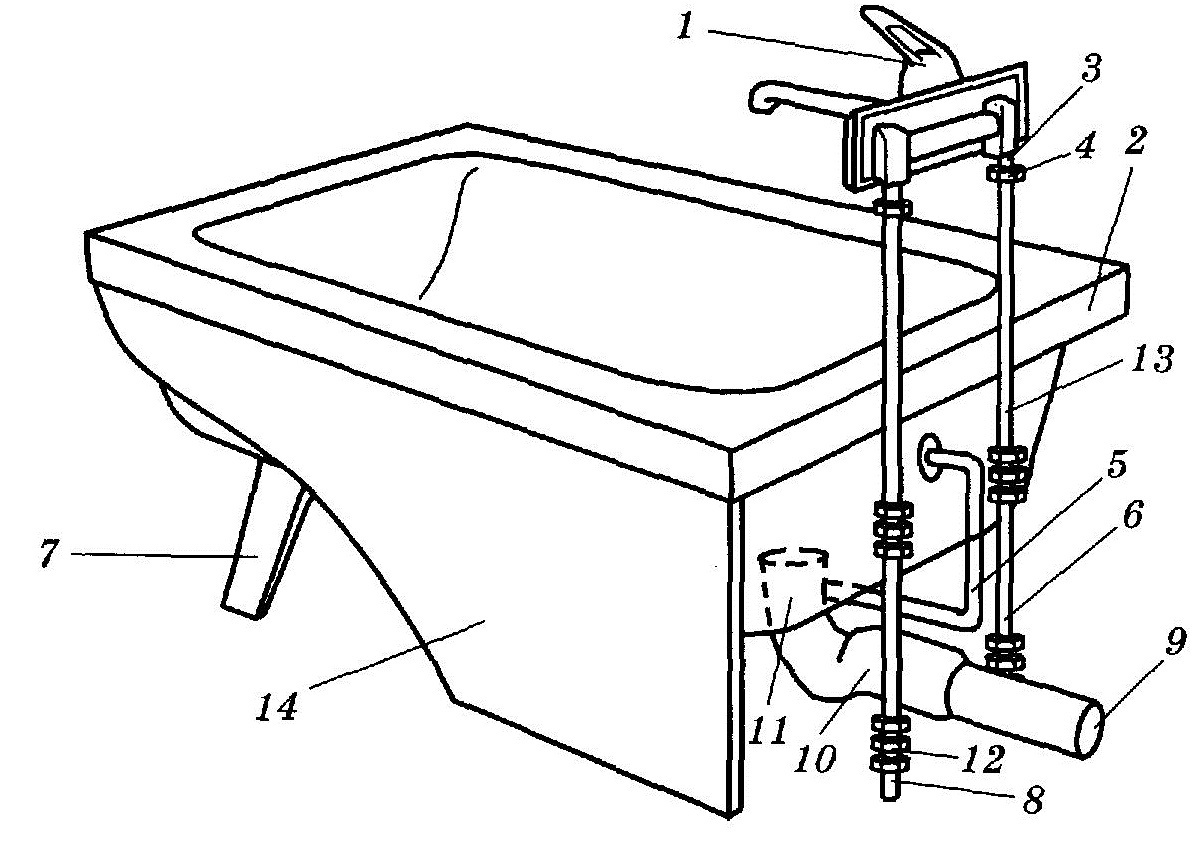
The Soviet-style piping was a structure consisting of an overflow connected to a siphon and several branch pipes. Models of a modern sample are made in the form of a single system.
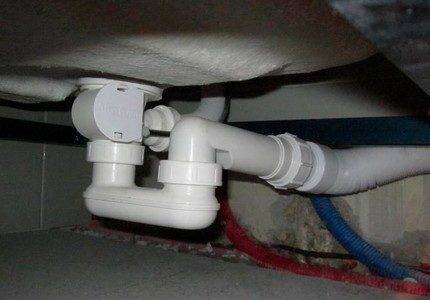 Modern models are complex systems, the use of which makes it possible to simplify the process of installation and management of water drainage during operation
The bathroom piping device is not much different from the drain system for the same sink, the main element of which is the siphon.
- drain serves to remove the main volume of waste water;
- the overflow prevents the tank from overflowing, preventing the bathroom from flooding.
A drain hole located at the bottom of the tank drains water into a wide pipe.The overflow hole, located at a distance of 5 cm from the top side, comes into operation when there is too much water in the bathroom.
But, the pipe connected to the overflow is usually thin. And therefore, only under the condition of a properly functioning overflow, you can protect yourself from overflowing the tank and flooding the bathroom.
Installation on bricks
First of all, you should stock up on the necessary tools and materials for installation. This includes bricks (20 or more), cement and mortar sand, spatula, tile adhesive, brush, trowel, spirit level, ceramic tile and screen. Then you need to choose a convenient place for the location of the bathroom, preferably in the place of the old one, so as not to bother with the conclusions of communications. The next step is to prepare the material. In most cases, bricks are installed across the bathroom, with pillars of 2-3 pieces high.


Here it is important to know the shape of the bottom of the bathroom, because it can be different: oval, rectangular or beveled - the future shape of the masonry depends on it. In order to designate it, half a brick is added to the outer columns (in the event that the bottom has a rounded shape)
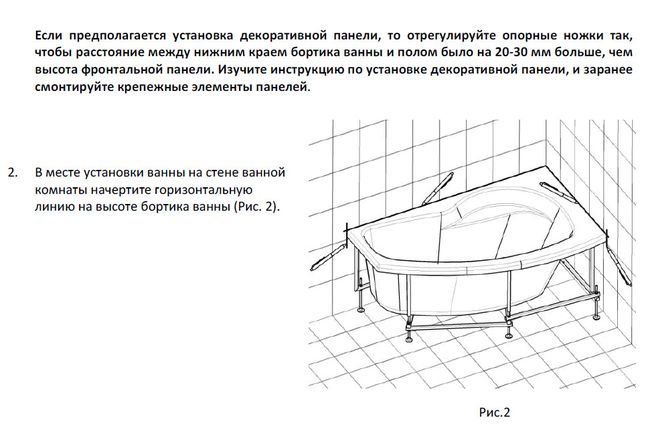
The total height of the structure together with the bathtub should not exceed 0.7 m; at a greater distance from the floor, the use of the bowl becomes inconvenient.
Bathtub on a brick basis.
Also, the height must be optimal for the normal functioning of the siphon. The number of rows should be calculated depending on the length of the bowl. The optimal distance between the columns is 50 cm.
Having drawn up a rough plan, you need to proceed to the preparation of the solution. The ratio of cement and sand should be 1:4 respectively + water.Then, in the designated places, brickwork is carried out. In order for the mortar to dry well and adhere to the bricks to the desired degree, you need to wait at least a day.
After we install a siphon with overflow on the bathroom. Here you need to put the bowl on its side, and rubber gaskets are installed on the corresponding hole: this is necessary for sufficient sealing of the drain. A prerequisite for the normal operation of the siphon is the placement of its outlet pipe slightly above the sewer pipe with a drain.
Bathtub mounted on brick pillars.
After a day, you can install the tank itself. For the most durable and efficient installation, professionals recommend lubricating its edges with tile adhesive, the places where it will connect to the wall surface and the wall itself too. With this simple action, you will firmly connect the bowl to the wall, as well as create additional waterproofing. After that, use the level to trace the horizontalness of the tank and put the bath on the supports. If the bathtub is metal, do not forget to stick Guerlain (plastic roll material) on the bottom support points on the brick posts. For a cast iron bath, additional processing will be superfluous, since its very weight ensures a snug fit. As mentioned above, for a normal drain, you need a slight advantage on one side.
After the installation is completed, you need to connect the sewer hose to the drain hole using a corrugated plastic pipe. The angle of its inclination should be equal to 45 degrees. To check the quality of installation, you need to fill the bath with water and see how it flows out - if there are no obstacles, then the bath is installed correctly.
The screen under the bath will not only help hide the brick supports, but will also be a stylish addition to the interior.
There is another version of this installation method, it is called "embedded installation". It consists in creating a support, which is a wall closed around the perimeter, on top of which a bath is laid. A flat cushion of bricks is installed under the bottom, and sometimes the empty space formed by the masonry is covered with sand, but in this case it becomes difficult to access the drain siphon.
In any case, the installation must be completed with a decorative finish of the external space. A plastic screen or ceramic tile can be used for it. The latter can be called especially successful, especially if the color of the tile is in harmony with the exterior of the bathroom.
Insert into a niche
 Bathtub mounted in a niche
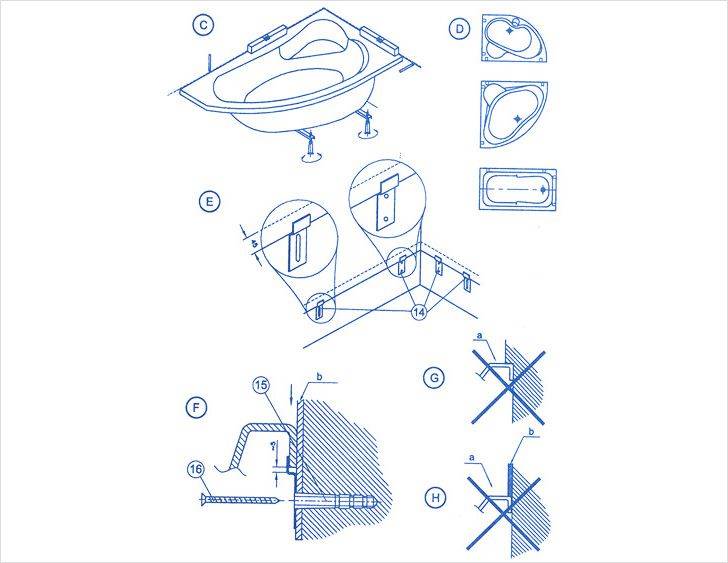
To strengthen the bath, mounted on legs, you can additionally cut it into a niche. Insertion is made only along the long side or one short and long sides. For preparatory work, you will need a tape measure, marker, level. A strobe can be made with a strobe cutter, drill, puncher, grinder. They are done manually with a hammer and chisel, but cutting grooves in concrete with a hand tool will not work.
The order of work is as follows:
- First, the bowl is placed on the legs. Adjust to a comfortable mounting height. You can do this not in the bathroom, so that you do not have to take out the plumbing later.
- Measure the distance from the floor to the lower edge of the side and lay this distance at the installation site, from the floor, along one or two walls. Draw a line.The length of the strobe along the short wall should be equal to the width of the bathtub; it can be made with a small margin for ease of installation.
- Measure the height of the side and lay this distance from the first line up. This is the minimum width of the strobe. To make it more convenient to install, you can expand the gate up by 1-2 cm. The depth should be at least the difference between the length of the bath and the distance between the walls, if the length of the plumbing exceeds the width of the room.
- Having made a strobe, they bring in a bath.
- Install it at an angle to the installation site. On the one hand, they put something so that the board, which will not be inserted into the groove, rises higher, or use the help of a second person.
- The second side is lifted and inserted into the side gate.
- The bath is pushed into the strobe along the long wall.
- Install the legs.
Using this technique, you can install a bath if it is several centimeters larger than the opening.
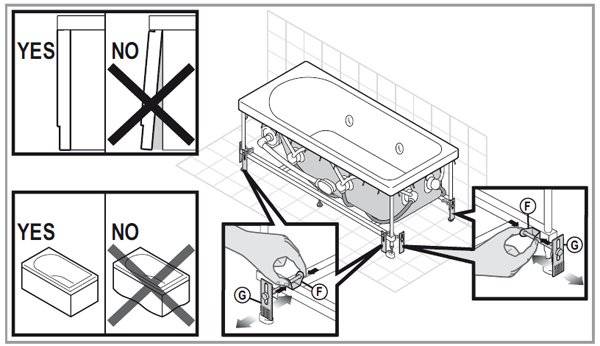
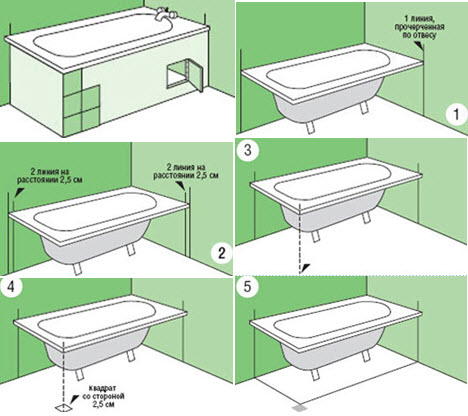
Structural alignment
Usually, the manufacturer attaches legs to steel bathtubs. For proper installation, they must be adjusted in height.
It is worth remembering a simple rule. In case of uneven installation, always raise the lowered part, and never level by lowering the raised part.


It is worth remembering that it is better to install acrylic and steel baths with your own hands on the frame. In this case, they will stand securely and will be able to serve for a long time.
Bath alignment is usually done either diagonally or along the sides. Both options help to properly install the bath. You can use any of them.
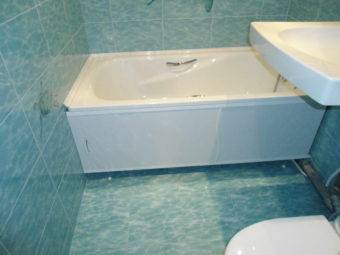
Screen types
The screen consists of a solid frame and a panel attached to it. The frame is made of aluminum or steel, in budget models - from a solid polymer. The range of these products is very wide, especially in terms of decorative design. There are monophonic models, with photo printing, various textures and shapes.
Bath screen (MDF)
By design, the screens are:
- sliding;
- removable;
- deaf stationary;
- with hinged and hinged doors;
- with shelves;
- with technological hatch.
Screen under the bath with four hinged doors for convenient storage of cleaning products and detergents
Decorated screen can fit well into the overall design
The screen canvas can be either solid or lattice. The second option improves air exchange, which eliminates the appearance of mold and unpleasant odors from under the bath.
Bathtub screen
Most of the factory models are equipped with adjustable legs, and the gap formed between the floor and the bottom edge of the screen allows you to comfortably stand close to the bath. The standard length of products is 1.5-1.7 m, height - from 50 to 60 cm, but other sizes are also very widely represented.
Screens can be of different sizes
For the manufacture of screens, materials with increased water resistance are used - plastic, organic glass, MDF and moisture-resistant drywall. Each type of screen has certain pros and cons that affect the choice of model.
| Screen view according to the material of manufacture | pros | Minuses |
|---|---|---|
 Plastic | Affordable price, a huge variety of textures and colors, ease of installation. The plastic screen is easily cleaned of soap deposits and other contaminants, does not deform, and retains an attractive appearance for a long time. | Low mechanical strength, poor resistance to chemicals and abrasives |
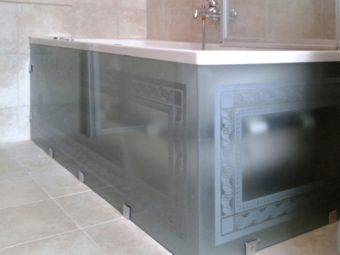 Glass | Plexiglas screen always looks very unusual and impressive. There are options in matte and mirror versions, with a corrugated surface, painting and other decor. The material is strong, durable, highly resistant to abrasion and detergents | Large weight, high cost, more complex installation compared to plastic screens |
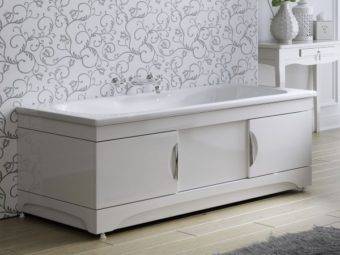 From MDF | Relatively low price, large selection of colors, easy installation. Such screens are easily cleaned from dirt, do not require special care, and are suitable for any interior. | Limited sizes, short service life, prone to warping |
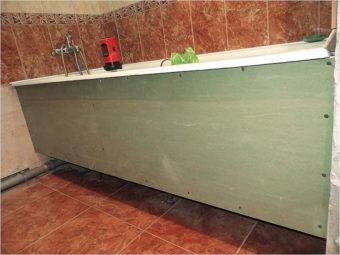 From drywall | The most popular option for homemade screens. Drywall can be easily adjusted to any size and shape of plumbing, is lightweight, has a long service life | The installation process takes longer, the screen requires mandatory decoration with decorative materials |
bath screen
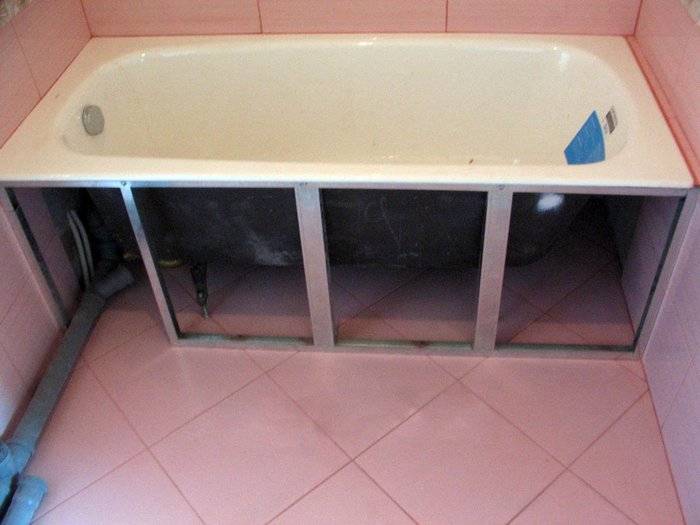
Installing most screens requires the construction of a frame around the perimeter of the bath. The frame is usually assembled from aluminum profiles, less often from wooden bars.


Metal profile frame
wooden frame
For lightweight plastic screens, such a frame is not needed, since the product is attached to the side of the bath. Sometimes the space under the bathroom is covered with brickwork, which is faced with tiles or mosaics. It is recommended to make an emergency hatch in the masonry in case of repair of communications, so that you do not have to break everything. Such a screen looks good and is highly reliable, but it requires more time and effort to install, excludes the possibility of rational use of free space under the bathroom.
Block screen. Right escape hatch


