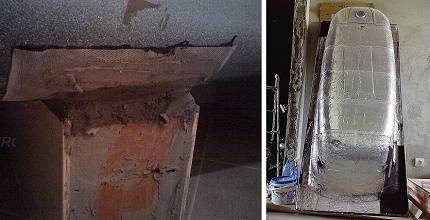
- How to install an acrylic bathtub with legs
- Installing an acrylic bath on bricks
- Preparing the premises for the upcoming installation
- When should walls be painted?
- How to properly prepare the floor?
- Installing an acrylic bath on bricks
- Installing a bathtub on bricks
- Installing a bathtub on a solid brick substrate
- Installing an acrylic bathtub on brick supports
- Installing a bathtub on acrylic bricks
- laying bricks
- Bath installation
- Closing cracks and gaps
- Installation technology
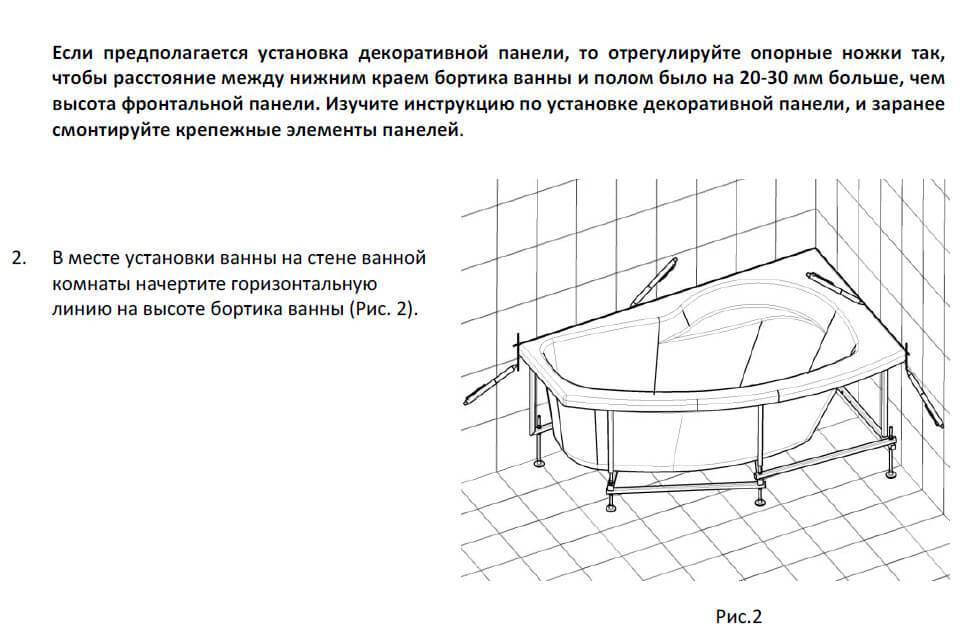
- Installation of a corner acrylic bath
- Masonry options
- Do-it-yourself shower cabin construction
- Supply of communications
- Waterproofing
- Pallet construction
- Frame manufacturing
- Sewer connection
- Benefits of choosing a steel bath
How to install an acrylic bathtub with legs
Most well-known bathtub manufacturers supplement their products with special fasteners and installation parts. Supports are included with models manufactured by Jika (Jika), Roca (Roca), Riho and others.
How to properly install an acrylic bathtub on legs yourself:
-
On the bottom of the acrylic bathtubs, which are mounted on legs, there are characteristic protrusions for connections. To attach the legs, the bathtub must be turned over and the supports that come with the kit are attached to these protrusions;
- To give rigidity to the structure, the legs are also interconnected.To do this, they are tightened with nuts and fixed with studs;
-
After that, the drain is processed (a siphon is connected to it). The water outlet does not need to be touched until the bathtub is installed on the floor. When all the preparatory work is completed, you can proceed with the installation of the bath;
-
The legs are installed on the floor, using the level, the evenness of the installation is checked. If any corner is too high, then, as mentioned above, all other corners are raised. This is done very simply: the bath is turned over and some of the legs are adjusted to the desired level;
- For strength, we recommend slightly knocking out the plastic supports with a hammer with a rubber working surface.
With acrylic and glass baths, you need to work very carefully. Plastic is susceptible to deformation under impact loads
When the installation process is over, proceed to install the faucet, washing machine and other consumers.
Video: complete video installation instructions for the bath
Installing an acrylic bath on bricks
We note right away that this method is rarely used to install plastic bathtubs. For acrylic plumbing, not only perfect evenness is important, but also the complete absence of shock or other loads that contribute to deformation. Brick supports are quite difficult to install with your own hands so that they evenly distribute pressure over the entire plane of the bath.
Step-by-step instructions on how to install an acrylic bath on bricks:
-
The height to which the bath will be installed is determined based on the dimensions of the bathroom and the dimensions of the liner. The optimal height is considered to be 3 bricks;
-
For laying, a classic chess pattern is used.For its implementation, the floor is leveled, the first row of bricks (2 pieces) with cement mortar is laid on it. On top of them, 2 more pieces are installed, but in the opposite direction. So up to the height you need;
- If for the installation of a sliding frame system it is possible not to make accurate measurements of the bath, then they are required for bricks. In addition, you need to calculate the location of the supports in such a way that there are no sagging points. For example, 4 brick supports at each corner and two in the central part;
-
While the solution hardens, you can start connecting the sewerage system. If this is not a hydromassage model, then all work is performed according to the standard scheme. From the sewer there is an adapter and a siphon with overflow, and pipes for installing a mixer depart from the water outlet.
After laying the bricks, you need to wait for the mortar to harden and only after that install an acrylic bath on them. Of course, the appearance of brick supports leaves much to be desired, so a variety of options can be used for their decor. These are tiles, decorative panels, a screen (as for a frame), etc.
Preparing the premises for the upcoming installation
If you have already made a choice in favor of a particular model, a number of preparatory work should be performed before installation begins. In addition, you should choose a place in advance, decide how you will install the bath: you plan to do the work with your own hands, invite workers or invite friends.
After drawing up a kind of plan for the upcoming actions, it is necessary to assess the condition of the premises, if a need for repair is found, carry it out.
When should walls be painted?
It is best to install a bathtub before facing the walls during the overhaul of the premises.This sequence of work will achieve the best practical and aesthetic results.
Installation of tiles after installing the bath allows you to most effectively close up all the gaps and cracks so that moisture does not accumulate in them, which creates an ideal environment for the development of bacteria and mold.
If you were not going to renovate the bathroom, but only wanted to replace the bath itself, you need to choose a model that will be slightly higher than the previous one. At least 1.5 cm.
Note that the tile under the edge of the old bathroom differs in color from the general canvas: it has not been fading. In addition, it may have a contaminated surface that cannot be washed off. So it's better to hide it.
It takes a lot of effort to seal all the seams in the tile adjacent to the bathtub rim, but the result is worth it: your bathroom should be a place of strength, not infection
How to properly prepare the floor?
The floor in the bathroom should not only be perfectly flat, but also durable.
This is especially important if we have to work with a cast iron product that has a fair amount of weight even without water.
If we lay floor tiles under the bathtub with our own hands, then it should be laid using the indentation method to prevent the formation of voids under it. Otherwise, the tile may crack during the operation of the bath.


Any bathtub filled with water creates a significant load on the floor surface. For its uniform distribution, wooden logs can be used. Practice has shown that larch is optimally suited for this purpose.
Wood is prepared by treatment with antibacterial and antiseptic solutions.Then the logs are impregnated with PVA putty or drying oil.
Logs not only redistribute the load, but also successfully solve the issue of increasing the height of the product. Sometimes we need to raise the bathtub in order to be able to install a siphon with a deep knee. Such siphons will not allow sewer waste to penetrate in the opposite direction. If the bath is slightly raised, for example, less hair will accumulate in the siphon.
Before installing and connecting the bath, the walls and floor in the room must be repaired, if necessary, strengthened
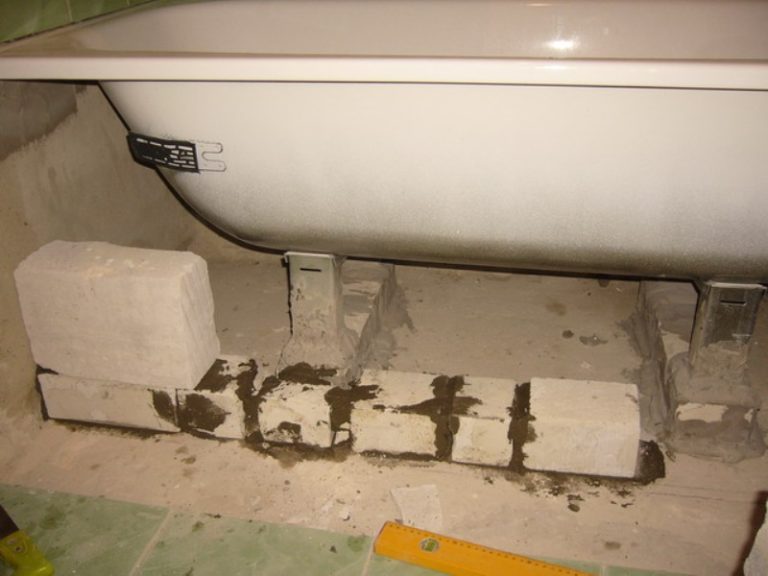
Installing an acrylic bath on bricks
This method is less fast, but more reliable. When the bathtub is not equipped with legs and a metal frame, it is possible to build a brick stand on your own.
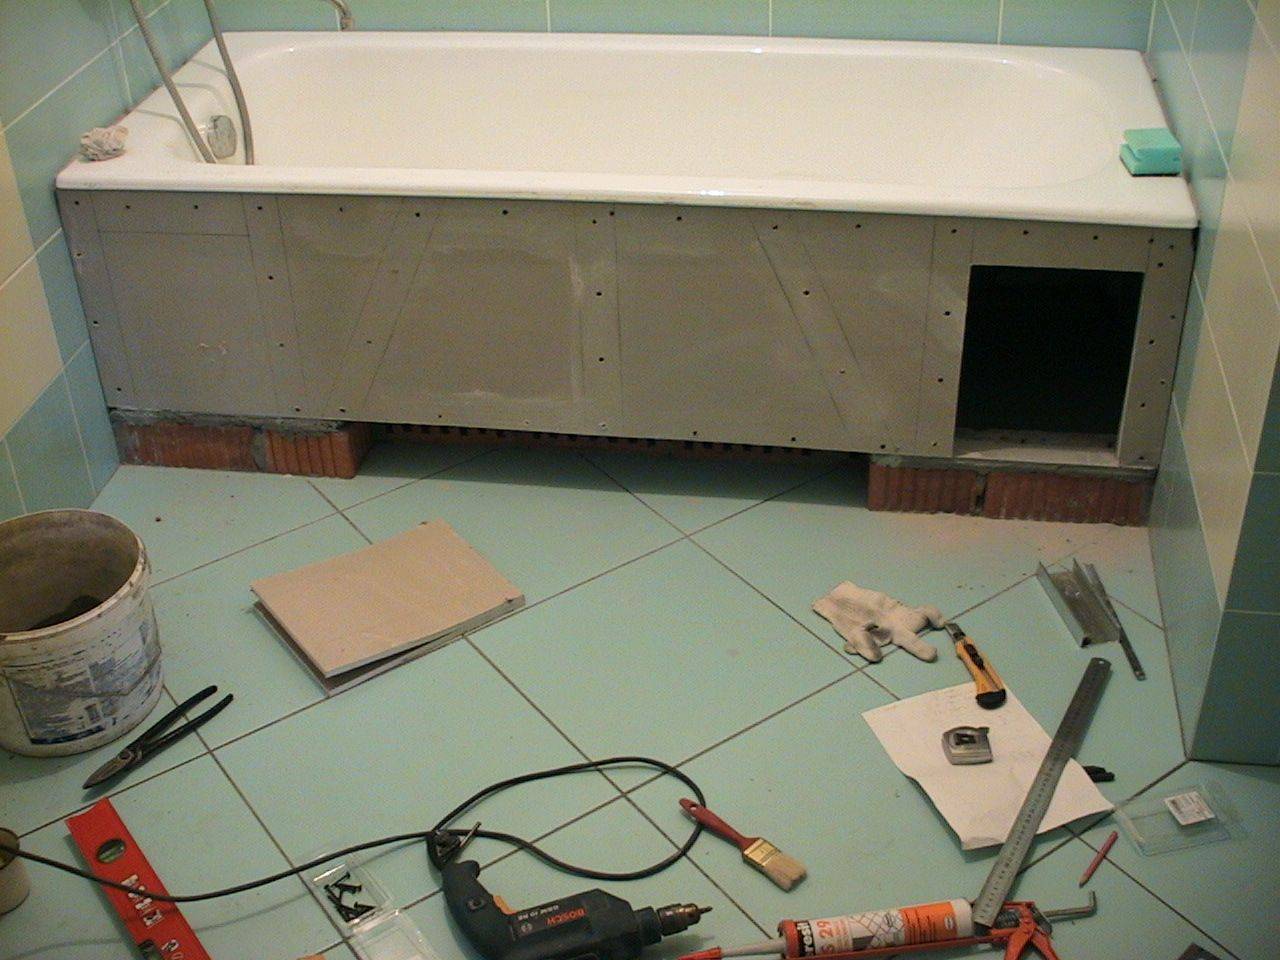
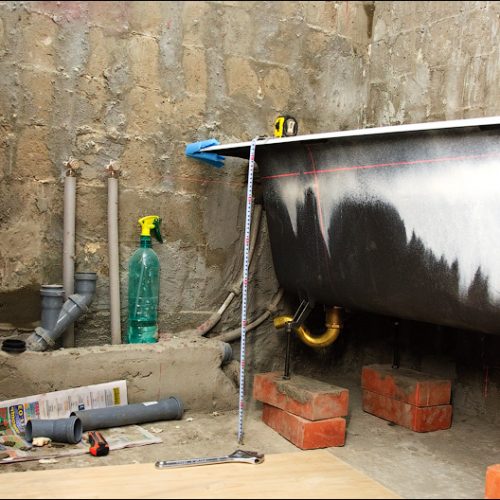
Work begins with measurements of the room where the bath will be installed. This will give an idea of how it will be located, where to mount the drain, where to connect the water supply. After making all the calculations, the bath is brought into the room and the base is marked - the place of the brickwork. It is better to make it wide, reaching the bend of the bottom of the bath. This design gives more stability. Next, the solution is mixed.
The process of building a brick frame. After the construction of the outer wall, you need to let the concrete dry, and then you can install the bath itself
The foundation is built from bricks. It will take no more than 40-50 bricks. It should not interfere with the siphon. Access to it must be made free. We leave a gap of 1 cm between the bottom of the bathroom and the brick pillow. Cement is laid out on the brick pedestal. Everything is level.After all measurements, a frame with an inspection window is laid out from the brick. After setting the solution, the bath is installed in the resulting niche. The space between the sides and the masonry is foamed from above. In order for the foam to dry properly, water is supplied to the bath and held there until it hardens completely.
Acrylic bath is attached to the walls with hooks. Side mounting the bathroom to the wall is one of the most important steps. Or make a groove in the wall with a wall chaser and embed the edges of the bathroom there. For this, cement with PVA glue is used. They do not play the role of sealing, but serve as a fastener. After such manipulations, the bath must be filled with water. All gaps formed are smeared with a solution. After it has completely solidified, the water is drained
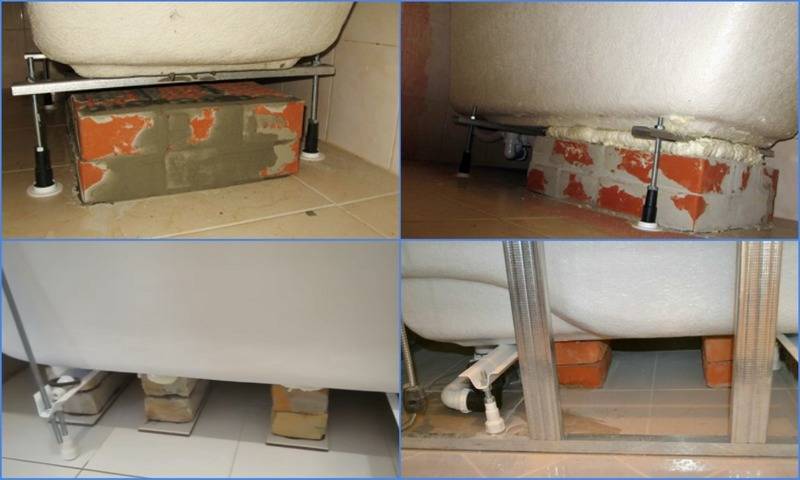
There is another way to self-install an acrylic bath. It combines the two previous ones and provides special reliability. First, the legs included in the kit are mounted on the bath, and after that it is fixed additionally with brickwork. In this case, the installation will be much easier than on bricks. In order not to damage the acrylic surface, the protective film is not removed from it during installation.
After completing the above steps, the connection of the bath and its installation can be considered complete.
You can buy a high-quality excellent acrylic bathtub here, in the same store you can pick up various accessories and hydromassage for an acrylic bathtub.
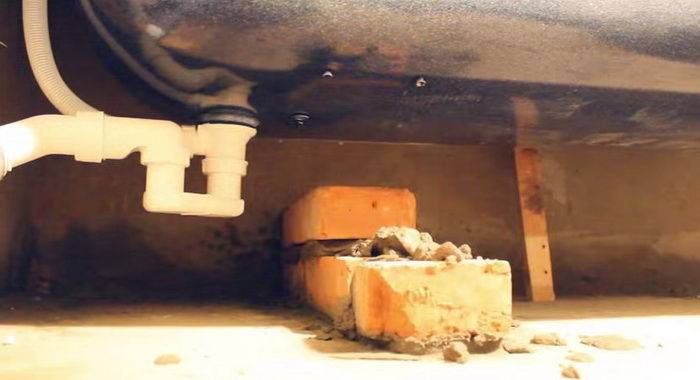
Installing a bathtub on bricks
No factory frame? No problem! We can install an acrylic bath on bricks. This option is even more reliable than the method of installing the bath on a factory-made frame.
The support may be solid or columnar.
Installing a bathtub on a solid brick substrate
An example of installing an acrylic bathroom on a brick
First step. We temporarily install the bath in the place of its future installation and project a drain hole onto the base. This will give us the opportunity to leave a gap in the substrate for connecting the drain.
Second step. We lay out the bricks on the area of \u200b\u200bthe entire supporting part of the container. We select the height so that the sides of the bath rise above the floor by no more than 600 mm. At the same time, we take into account that we will still have a 2-3 cm pillow made of polyurethane foam.


Bricks are laid on a traditional cement mortar.
Third step. We assemble a plywood frame around the perimeter of the brickwork. The height of such sheets should exceed the masonry by the thickness of the foam substrate. Don't forget to leave the drain hole unfilled.
Fourth step. We evenly foam the surface of the substrate with polyurethane foam, without going beyond the boundaries of the frame. We immediately apply pre-prepared sheet plywood to the foam. We use moisture resistant sheets 10 mm thick.
We foam the bottomInstalling the bathtub on a brick
Fifth step. We tightly seal the drain of the acrylic bath. At the same stage, we prepare about a liter of water and wooden supports to regulate the installation level of the tank.
Sixth step. Pour the previously prepared water into the container and set the bath on the substrate at the building level.
Seventh step. While the polyurethane foam has not hardened, we adjust the evenness of the installation of the bath with the help of props. As a result, the water in the tank should be evenly distributed around the drain, and the level should show “0”.
Eighth step. Having set the bathtub according to the level, pour water into it by about half the volume.Under the weight of the water, the foam will not be able to lift the container, and the bath itself will take the required slope.
Ninth step. Let the foam dry and remove the bath. If the edges of the container should be recessed into the wall, we first outline the contour of the edge on the surface, and then we make a recess in the wall for the edge of the bath. A perforator will help us with this. If the arrangement of the groove is not provided (this is not recommended if the walls are made of blocks, drywall or other light material), at the level of the lower cut, we simply fix the timber impregnated with an antiseptic, or a steel corner. We will additionally strengthen the supporting bar at the end with stops.
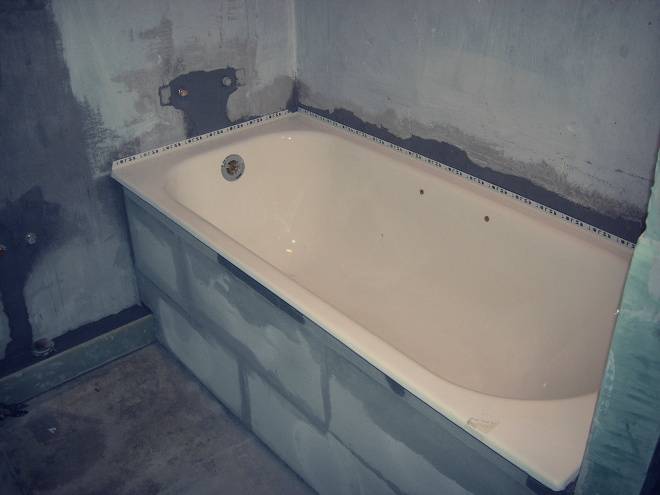
Tenth step. We return our container to its place and connect it to the sewer. We blow out the gaps between the container and the bricks with foam. We install a decorative screen and skirting boards.
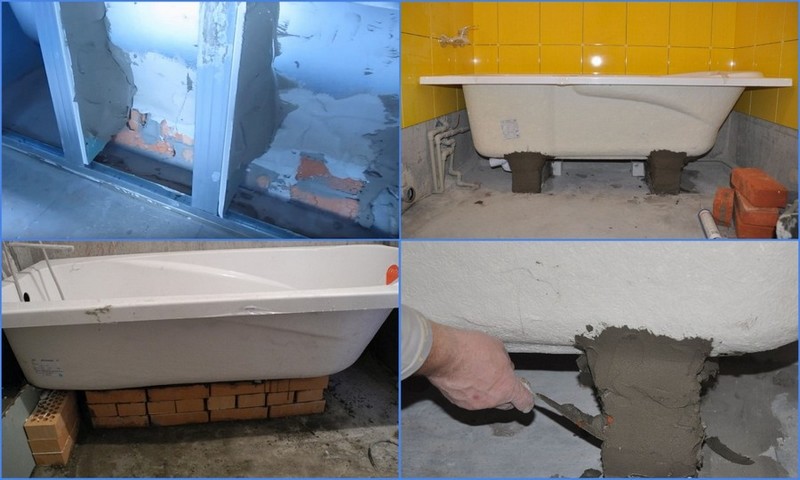
Example of a brick-mounted bathtub with mosaic finish
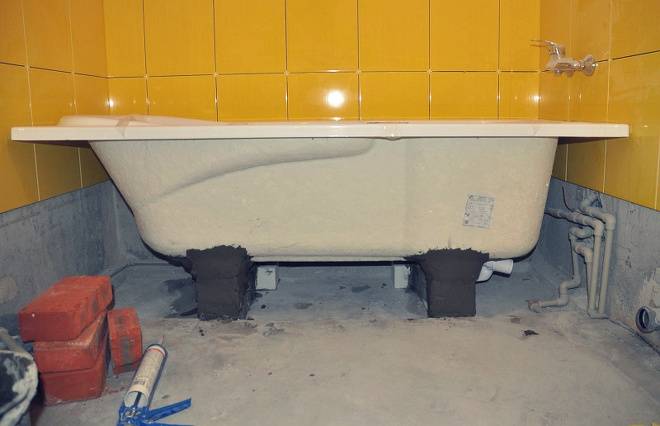
Installing an acrylic bathtub on brick supports
Installing an acrylic bathtub on brick supports
First step. We bring the container into the bathroom.
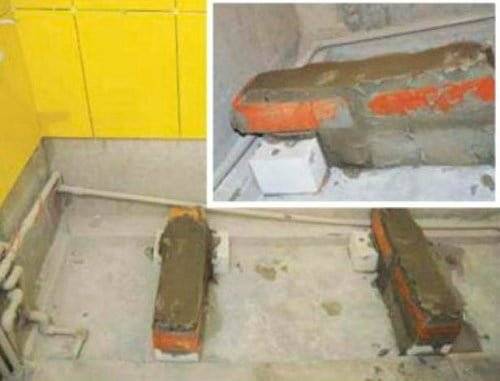
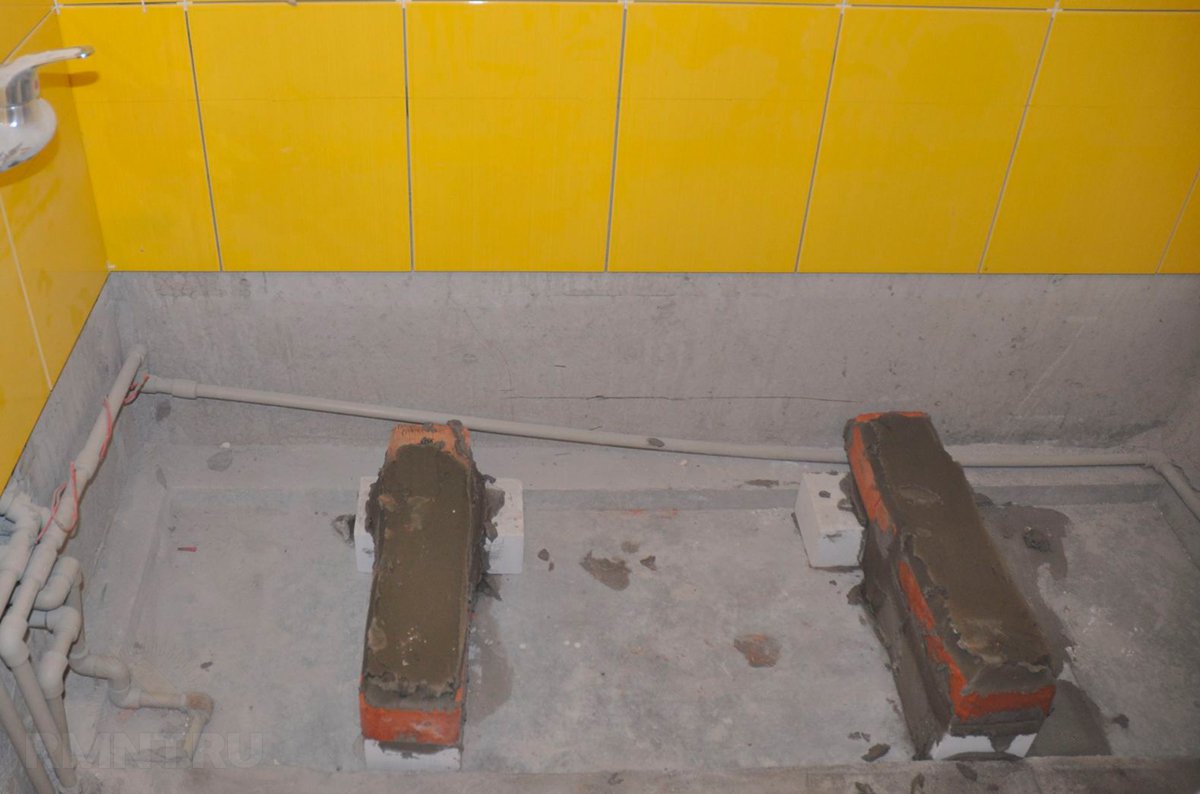
Second step. We carry out the marking of the base at the installation site of the brick supports. The most correct option is to erect pillars closer to the edges of the curve of the acrylic bath. If the container is long, an additional support can be erected in the middle.
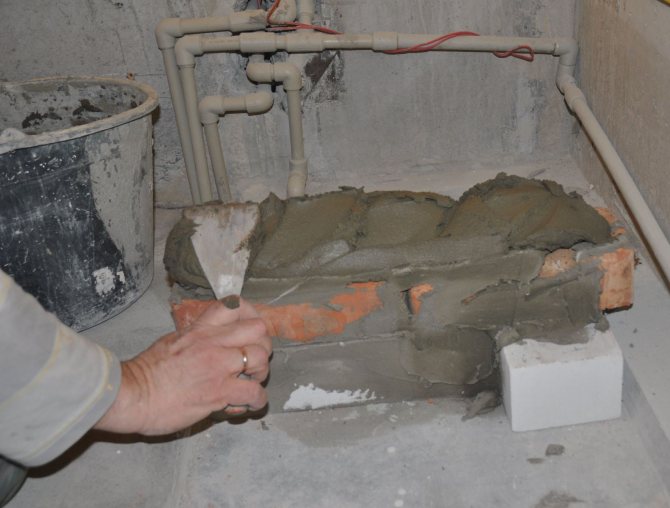
Third step. Having outlined the places for laying the supports, we proceed to the preparation of the cement mortar. We don’t cook too much - we have to lay out no more than 20 bricks, so we don’t need extra expenses.
Fourth step. Let's start laying. We lay out the support for the back of the bath to a height of 190 mm, we raise the column for the front edge of the tank to 170 mm. The height of the middle support, if needed, is selected according to the situation, depending on the design of the installed bath.The difference in the height of the pillars will provide conditions for the effective flow of water from the tank.
laying bricks laying bricks
Fifth step. We give the masonry about a day to dry and install the bath. We set the container slowly, moving it tightly against the walls. We fill the gaps between the bricks and the bathroom with sealant.


If desired, you can additionally fix the bath to the wall using dowels and a metal profile. Such a mount is used quite rarely, but still occurs.
After making sure that the installation of the bathtub is correct, stable and even, we connect the sewage system, install the mixer, mount the decorative screen and lay the plinth on the bathtub.
Installing a bathtub on acrylic bricks
Such an activity as installing an acrylic bath on bricks involves the use of a completely standard set of materials and tools. They are a hammer, self-tapping screws, bricks, cement mortar, rags, tape sealant, metal profile and mounting foam for s / t devices. Once everything you need is purchased and prepared, you can get to work.
laying bricks
Directly on the floor in the place where the bath will stand, you should start laying brickwork in the form of low supports. In doing so, several important factors should be taken into account:
- the distance from the floor to the edge of the bath should be no more than 60 cm;
- the slope towards the drain of the bath should be about 2 centimeters;
- the distance between the supports should be about 50-60 cm.
The dimensions of the brick supports should be calculated based on the dimensions of the bath itself.In view of the fact that they can be quite diverse, it is impossible to give any universal advice on this matter.
Bath installation
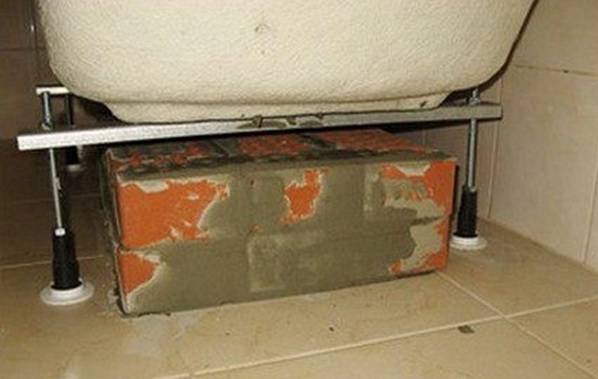
Installing an acrylic bath on bricks with your own hands is quite simple. This is primarily due to the fact that its weight is not very large. There are two possible mounting types:
- Installation directly on the bricks themselves without the use of legs.
- Combined installation, which involves the use of not only bricks as a support, but also the legs that come with the kit.
In the second case, you must first install the bath along with the legs, and then measure all the distances that these elements occupy. With this in mind, it is worth equipping the brickwork itself in addition.
Acrylic bathtubs don't use foam as a sound deadening agent, as they don't make too loud noises when filled with water.
It is worth remembering that in no case should you install a bath on a brickwork that has not yet dried.
It is also important to consider that between the building material and the container itself there must be either a cement pad or a mounting foam
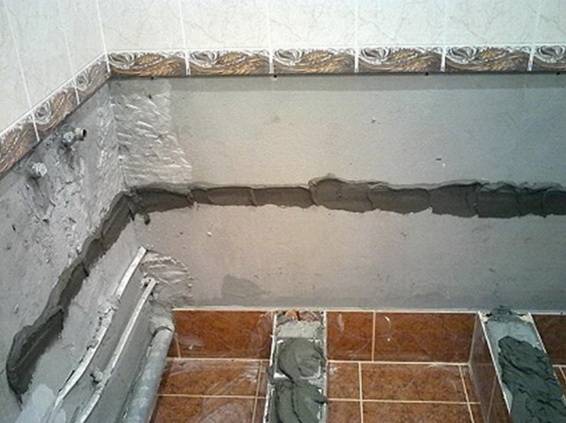
Closing cracks and gaps
Do-it-yourself installation also involves the use of foam and tile adhesive. These materials should be used in those places where there are any gaps or gaps between the bathroom and other elements of the interior of the room.
The joints between the tile and the container should be sealed with tape sealant. It is best if it is white. In the absence of such material, it is worth using building silicone. This will completely cover even the smallest gaps.The advantage of using such a material is that it is transparent.
Installation technology
You can easily install a plumbing fixture made of cast iron, steel or acrylic with your own hands. Before installing the bath on bricks, you need to level and tile the floor, but it is better to wait with the wall decoration. To work, you will need a brick, a moisture-resistant mortar, mounting foam and a building level. The installation technology on a brick base is as follows:
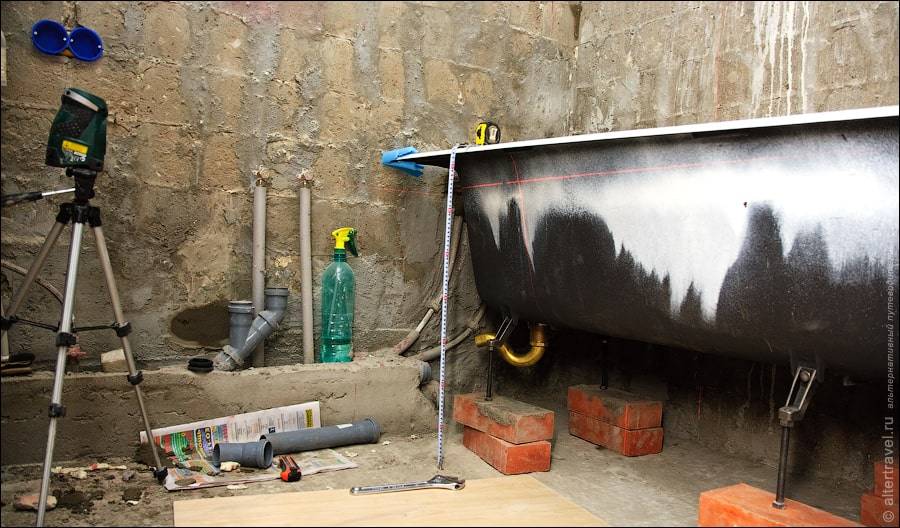
- The bath is brought into the bathroom and carefully laid on its side at a distance of 70-100 cm from the wall to provide access to the place of work.
- The bathtub is connected to the sewer system using a siphon and overflow. If you do not connect the washing container at this moment, then it will be problematic to do this.
-
The bottom of the washing container is measured with a tape measure, and then the height, length and width of the brick base that will be required for installation is determined. Please note that it should not exceed 60-65 cm, as this is unsafe.
- The bath is turned over, moving close to the wall, and then the correct location of the supports under the bottom of the tank is marked.
- Prepare a cement mortar by combining 1 part of cement with 4 parts of sand and water. Experienced craftsmen recommend replacing half of the volume of cement with tile adhesive so that the mixture is more plastic in work and durable after hardening.
- With the help of bricks and cement mortar, a bath bed is formed, exactly repeating the shape of the bottom. During work, the correctness of the masonry is checked by the building level.
- With the help of cement, the masonry surfaces are molded into the shape of the bottom of the bathroom, ensuring maximum adhesion.The layer of cement in this case should be no more than 3 cm in the central part of the bed.
-
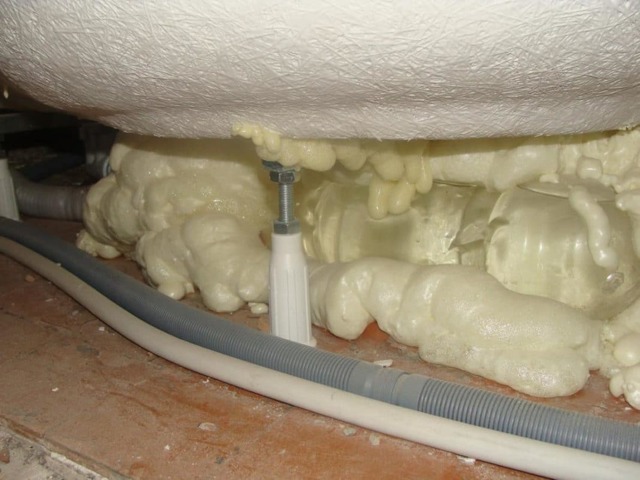
The brick base is poured with a uniform layer of mounting foam to ensure a secure fixation of the bowl, to prevent swaying and deformation of the walls.
- After the foam is applied, the bath is turned over and stopped on a brick base, filled with water to provide a weight bearing. Under the weight of water, the foam expands and hardens evenly, without distortion.
Installation of a corner acrylic bath
An ideal solution for apartments in which every corner counts would be a corner acrylic bath. Its installation is carried out by analogy with a rectangular one. The most reliable for such a model is the combined installation method: the part adjacent to the walls is attached with hooks, and the rest is placed on legs.
Installation of a corner bath video instruction
At the same time, before installation, it is necessary to carefully prepare the surfaces and level the walls, since these models are made at a standard angle of 90 degrees, which must be verified using the building level. You can learn more about all the stages of work, how to properly install a corner acrylic bathtub with your own hands, in the video lesson.
As a rule, it comes with a frame that serves as a decorative element of the interior, with a door for storing detergents and other useful things in the bathroom.
Masonry options
Bath tubs are different. This is determined by the specifics of the room, the characteristics of the bath, production needs, the capabilities and imagination of a person. The following types are popular:


- Two supports in the form of small walls.Usually they are made with a concavity at the top in the shape of the vessel.
- A solid pedestal that serves as a support for the foundation.
- Brick walls along the edges of the tank. This view is often used during the installation of a corner acrylic structure.
There are no very big differences in the technology of creating these masonry. The differences are only in the amount of material and the amount of labor. Although there is still debris during the dismantling of the bathroom, cleaning and preparation are considered mandatory procedures.
If it is planned to install a brick base, but an old bathtub is placed, dismantling is performed first. Work must be done in special clothing and protective equipment. This job is dirty. Before dismantling, communications are turned off: water taps are shut off. Still need to take out supplies and accessories.
Furniture is removed from the room, plumbing and sanitary ware are dismantled. The room is cleared of everything that will interfere. Often, when dismantling a bath, a major overhaul is carried out, so they remove tiles, tiles, remove paint and other facing materials. Everything is done quickly. These works allow you to carry out high-quality repairs.
Do-it-yourself shower cabin construction
Self-production of a shower cabin is a complex process that includes several stages. First you need to accurately determine the location of the future hydrobox, its dimensions, and the materials used. A drawing of the structure with detailed dimensions is drawn up. If there is an old finish on the walls, it is removed. If necessary, the old screed is dismantled and a new one is poured.
Supply of communications
Water pipes and sewerage are carried out in a hidden way.In modern houses, polypropylene pipes are used for this, which are placed in strobes. At the same time, they need to be cut so wide that, in addition to the pipe itself, a layer of thermal insulation also fits in the strobe. As it is usually used either ecowool or special sleeves. Don't forget to install stopcocks. They are mounted outside the cabin.
After the system is laid and its performance is checked, the strobes are plastered. At the ends of the pipes, threaded flanges are installed for the subsequent installation of the union nuts of the mixer.
Waterproofing
Without properly made waterproofing, subject to a homemade pallet, you will quickly flood your neighbors from below. Modern compositions for protection against water are divided into the following types:
- Penetrating - used for monolithic concrete surfaces;
- Rolled - self-adhesive options are most often used for the home;
- Coating - compositions based on polymer-cement substance or bitumen.
Before organizing a sealed layer, the old finish should be removed. If preference is given to roll materials, they are overlapped. The junction of the wall and floor is carefully glued with a special tape.
Pallet construction
The sequence of actions in this case depends entirely on whether the finished product is used or it is decided to build a pallet from scratch. The first option is much easier. The finished structure is installed as follows:
- The base is carefully leveled, for which a rough screed is made;
- Sewer pipes are laid, a drain siphon is installed;
- The product itself is installed;
- A decorative screen is attached to the latches, usually it comes with a pallet in the kit.
The pallet is usually built of brick.At the same time, water-resistant additives, for example, liquid glass, must be added to the cement mortar. If the glazing will be installed on a metal frame, mortgages are mounted for it. A rough screed is poured inside, on top of which waterproofing is applied. A ladder and sewer pipes are laid in the right place
In this case, it is important to observe the slope. A layer of thermal insulation is placed on top, usually a 50 mm foam sheet is used for this, on top of it there is another layer of waterproofing and a screed reinforced with a metal reinforcing mesh with 100 by 100 mm cells
The screed must be poured with a slope towards the drain point. After it is completely dry, waterproofing is laid, only after that it is possible to finish the structure with tiles.
Frame manufacturing
The frame of the shower cabin can be made of aluminum profile or wood, but the latter must be treated with an antiseptic composition. The first profile is laid on the edge of the base, it must be exactly in a horizontal plane, a level is used to check. The counterpart is installed on the ceiling. For reinforcement, vertical rails and horizontal rails are mounted.


Drywall sheets are fixed on the frame, which are pasted over with reinforcing tape along the joint. The plaster is applied on top. After drying, a waterproofing layer is mounted. Ceramic tiles can be laid on top of it. It should be laid on a waterproof adhesive composition. Instead of tiles, special latex paint or ready-made plastic panels can be used.
Sewer connection
The method of connecting the drainage system depends on the type of the pallet.If a finished product is used, a siphon is connected to its drain hole, a corrugation is connected. The second end of the latter is connected to the sewer outlet.
If the pallet is homemade, a ladder is installed in it, which is mounted even in the subfloor. The performance of the product must be at least 30 liters per minute, otherwise the water simply will not have time to drain. The square ladder is mounted in the center of the cabin, the slope from the walls is at least 3 degrees. The slotted ladder is installed next to the wall.
A well-made shower enclosure will last for many years. If necessary, the finished pallet can always be replaced, this procedure will not take much time and will not require large-scale repair work.
Benefits of choosing a steel bath
When the choice falls on a steel bath, this is due to its advantages over other models made from other materials. The installation of a steel bath is carried out taking into account some of the nuances in the work. The steel model has more positive sides than negative ones. Many of the minuses are eliminated when mounting the bowl.
- The enameled coating of the steel font is "baked". There is a fusion of steel and coating, which gives the enamel strength. Enamel is easy to clean and retains its original luster.
- The appearance of the coating remains snow-white after several years of operation.
- Steel is a plastic material. From it bowls of different configurations, different sizes are made.
- Transportation and installation of the model is facilitated by the low weight of the structure.
- A person without professional plumbing skills can install a steel bowl.
- Steel bowls are in demand due to their affordability.
- Installation of a steel bath is carried out in several ways.


