- Room preparation
- Preparing the premises for the upcoming installation
- When should walls be painted?
- How to properly prepare the floor?
- Sealing the junction of the bath and the wall
- Installation process
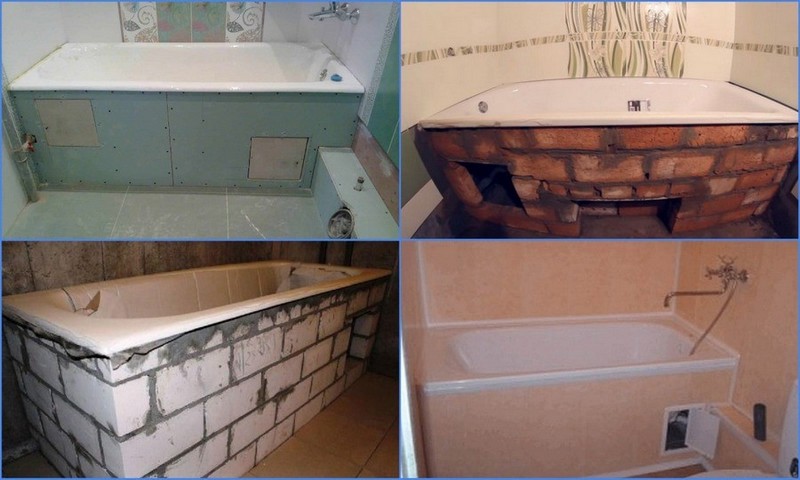
- Installation technology of a cast-iron bathtub on brick supports
- Brick supports for acrylic bath
- Necessary equipment
- Laying brick supports
- Installing an acrylic bath
- Sealing gaps
- Installing a bathtub on bricks
- Installing a bathtub on a solid brick substrate
- Installing an acrylic bathtub on brick supports
- Strong position of the steel bowl
- Subtleties and details of the process
- Installation of corner acrylic bathtubs
- The procedure for mounting an acrylic bathtub on legs
- Marking and assembly of the frame
- We put the legs
- Installing a bathtub on acrylic bricks
- laying bricks
- Bath installation
- Closing cracks and gaps
- Brick supports for steel bath
- Tools and consumables
- Support legs
- Foam processing
- Eliminate gaps
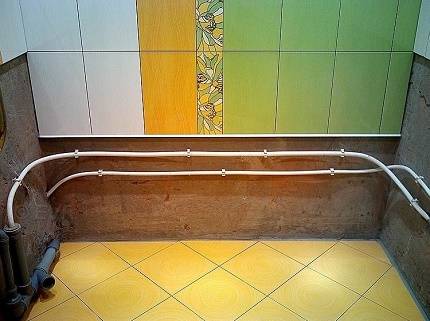
- Plumbing finishing
Room preparation
Before starting work, make sure that the water supply is turned off. Next, you can begin to dismantle the old bath. After that, break out the drain and clean the socket of the drain pipes.
Then insert the corrugation into it, grease the joints with sealant. Take the trash out of the room. If you decide to simply change the old bathtub for a new one, then this preparation will end.
If it is planned to repair the premises with a change in the installation location of the plumbing fixture, then complex work will have to be done.
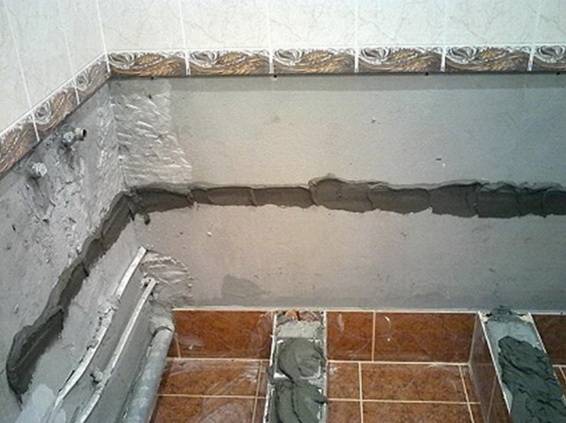
First of all, you need to take care of the drain hole. The sewer drain pipe must not protrude more than 10 cm from the floor level. Consider in advance how the connection will occur.
 The pipe should be at a slope of 1:30 (1 cm high per 30 cm of pipe) towards the riser. That is, if you plan to install the bathtub so that the drain hole of the product is at some distance from the sewer pipe, then you need to calculate the slope.
It turns out that the greater the distance, the higher the bath should be installed. The optimal height of the bath is no more than 70 cm. For this reason, it may be necessary to raise the floor in the room.
Then you need to level the base at the installation site of the bath frame. This is an important point because the horizontal position will ensure easy installation and distribution of loads during operation.
Walls and corners in the room should also be even. Otherwise, there may be gaps between the bathroom and the wall, into which water will penetrate. Angles, for the same reasons, must be strictly 90°.
Now you can proceed to the final finishing of the walls and floor. Most often, tiles are used for this.
Please note: you can not rest the tiles on the sides of the acrylic bath. That is, if you plan to veneer only the place above the bath, and leave the wall under it in a draft version, then first decide on the location of the sides by installing the bath
And lay the tiles on a temporary profile.
Preparing the premises for the upcoming installation
If you have already made a choice in favor of a particular model, a number of preparatory work should be performed before installation begins. In addition, you should choose a place in advance, decide how you will install the bath: you plan to do the work with your own hands, invite workers or invite friends.
After drawing up a kind of plan for the upcoming actions, it is necessary to assess the condition of the premises, if a need for repair is found, carry it out.
When should walls be painted?
It is best to install a bathtub before facing the walls during the overhaul of the premises. This sequence of work will achieve the best practical and aesthetic results.
Installation of tiles after installing the bath allows you to most effectively close up all the gaps and cracks so that moisture does not accumulate in them, which creates an ideal environment for the development of bacteria and mold.
If you were not going to renovate the bathroom, but only wanted to replace the bath itself, you need to choose a model that will be slightly higher than the previous one. At least 1.5 cm.
Note that the tile under the edge of the old bathroom differs in color from the general canvas: it has not been fading. In addition, it may have a contaminated surface that cannot be washed off. So it's better to hide it.

It takes a lot of effort to seal all the seams in the tile adjacent to the bathtub rim, but the result is worth it: your bathroom should be a place of strength, not infection
How to properly prepare the floor?
The floor in the bathroom should not only be perfectly flat, but also durable.
This is especially important if we have to work with a cast iron product that has a fair amount of weight even without water.
If we lay floor tiles under the bathtub with our own hands, then it should be laid using the indentation method to prevent the formation of voids under it. Otherwise, the tile may crack during the operation of the bath.
Any bathtub filled with water creates a significant load on the floor surface. For its uniform distribution, wooden logs can be used. Practice has shown that larch is optimally suited for this purpose.
Wood is prepared by treatment with antibacterial and antiseptic solutions. Then the logs are impregnated with PVA putty or drying oil.
Logs not only redistribute the load, but also successfully solve the issue of increasing the height of the product. Sometimes we need to raise the bathtub in order to be able to install a siphon with a deep knee. Such siphons will not allow sewer waste to penetrate in the opposite direction. If the bath is slightly raised, for example, less hair will accumulate in the siphon.
Before installing and connecting the bath, the walls and floor in the room must be repaired, if necessary, strengthened
Sealing the junction of the bath and the wall
No matter how tightly you put the bathtub against the wall, the gap still remains. With acrylics, the problem is complicated by the fact that their sides in the middle bend a little inward. Therefore, simply sealing the gap with silicone will not work. Additional funds are needed.


The easiest way to fix the tape is that it is sold in rolls. One is enough for sealing from three sides. Shelf width 20 mm and 30 mm. The tape is rolled out along the edge of the bath, fixed to the silicone.
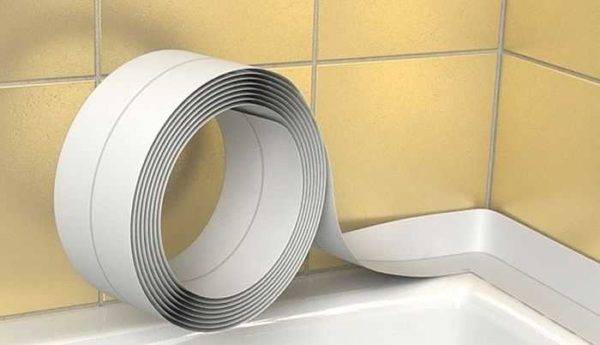
You can seal the joint between the acrylic bathtub and the wall with a special tape
There are also various corners for the bath.They are made of plastic, and the edges are rubberized so that the joint is tighter and the seams between the tiles do not flow. The profiles and shape of the corners are different. There are those that are mounted on top of the tile, there are those that run under it. And they can be of different shapes and colors.
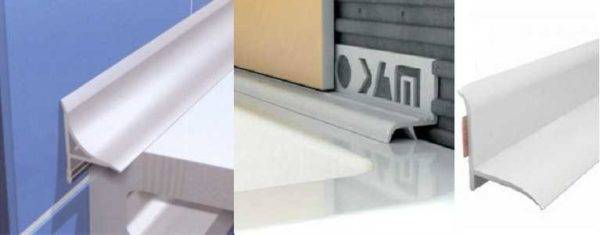
Some types of corners for the junction of the bath and the wall
Regardless of the shape, they are installed in the same way: in the corners, the lower parts are cut at an angle of 45 °. The quality of the joint is checked. Then the surface of the wall, side and corner is degreased (preferably with alcohol), silicone is applied, on which the corner is installed. Everything is left for the time required for the polymerization of the sealant (indicated on the tube). After that, you can use the bathroom.
In the case of acrylic bathtubs, there is one caveat: before applying the sealant, they are filled with water, and in this state the composition is left to polymerize. Otherwise, when water is collected and the load on the sides increases, microcracks will appear on it, into which water will flow.
A few words about which sealant is better to use when sealing the junction of the bath and the wall. The best option is a sealant for aquariums. It is no less durable than plumbing, but it has some additives, thanks to which it does not get moldy, does not change color and does not bloom.
Installation process
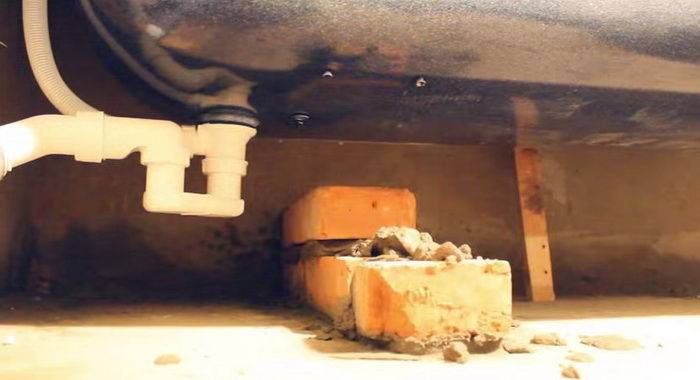
The step-by-step instruction includes several stages: preparatory and the installation itself. To work, you need 15 full-bodied red bricks. They are resistant to mechanical stress and high humidity. Durable top layer does not promote the development of microorganisms. Rubber pads will be required to protect the steel structure. When waterproofing seams, tape sealant is preferred.
To prevent water from spilling between the wall and the side, the bath is installed close to the walls of the room.
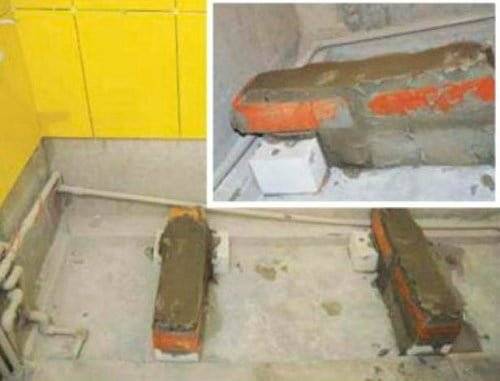
Use cement M-400. A solution is prepared in a ratio of 1 to 4. Work begins with the first row, checking the level, then two subsequent layers are laid. To obtain a recess of the desired configuration, use the halves of the building material. The design is left for a day to dry.
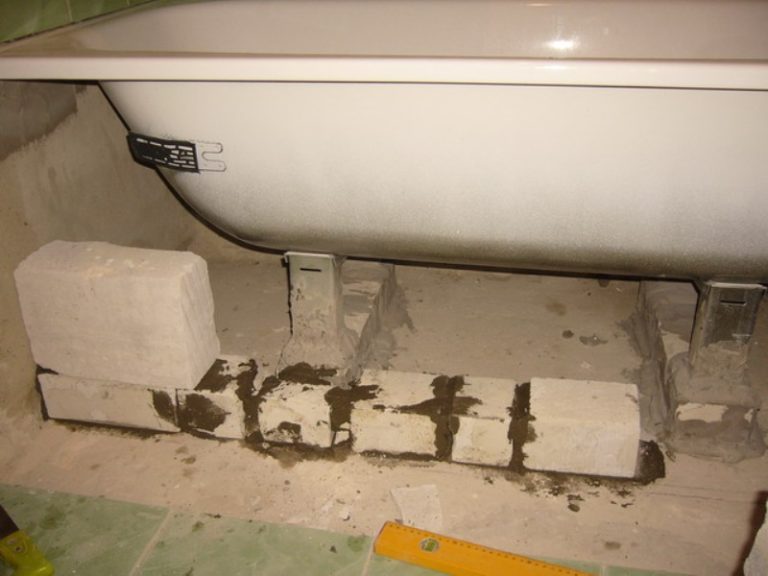
During this time, a bath is prepared by mounting a drain and a siphon using a sealant. The bowl is installed on the base, not forgetting about the protective gaskets and level gauge. After checking the stability with slight rocking, pieces of bricks are placed to securely fix the structure against the wall. Sometimes acrylic bowls are additionally attached to the wall with dowels or self-tapping screws. The more anchor points, the more stable the bath will stand.
Installation technology of a cast-iron bathtub on brick supports
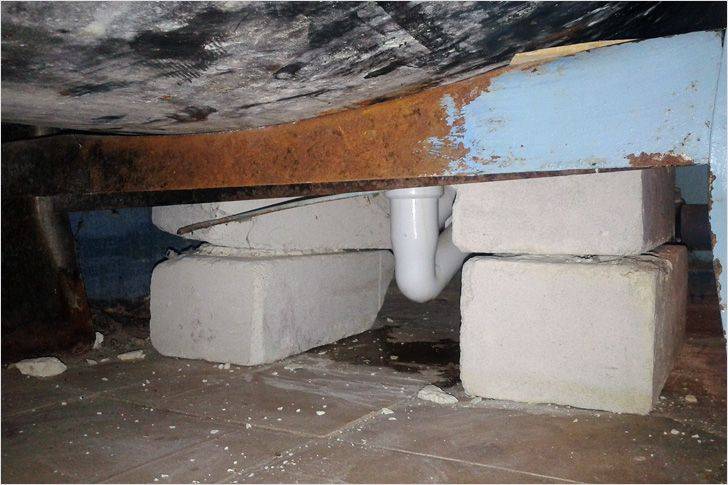
The main reason for the loosening of the legs of the cast-iron bathtub is the large weight of the product. It is often extremely difficult to correct the current situation, since in order to fasten the supports, it is necessary to move and turn the device over, which is almost impossible to do. If prompt action is not taken troubleshooting, the design can be so skewed that the water begins to leave a puddle in the bowl or even stops draining into the sewer.
Such troubles most often happen with cast-iron bathtubs. In order to avoid them, you should install the device on brick supports immediately after purchasing the product, which, unlike the legs, do not deform, do not change the height and slope.
Consider the sequence of work.
- Carry out the preparation of bricks in the right amount. As a rule, at least 20 pieces are required to install a standard device.
The number of racks, and hence the consumption of bricks, depends on the length of the bath.
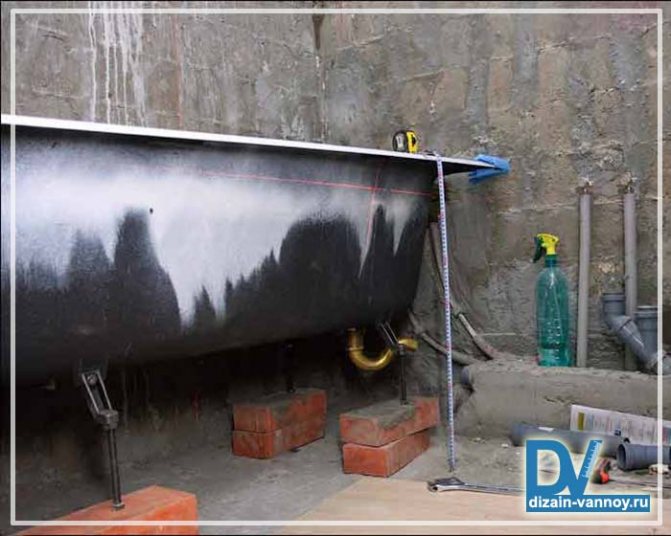
In the process of laying supports, it is necessary to pay attention to the height of the structure
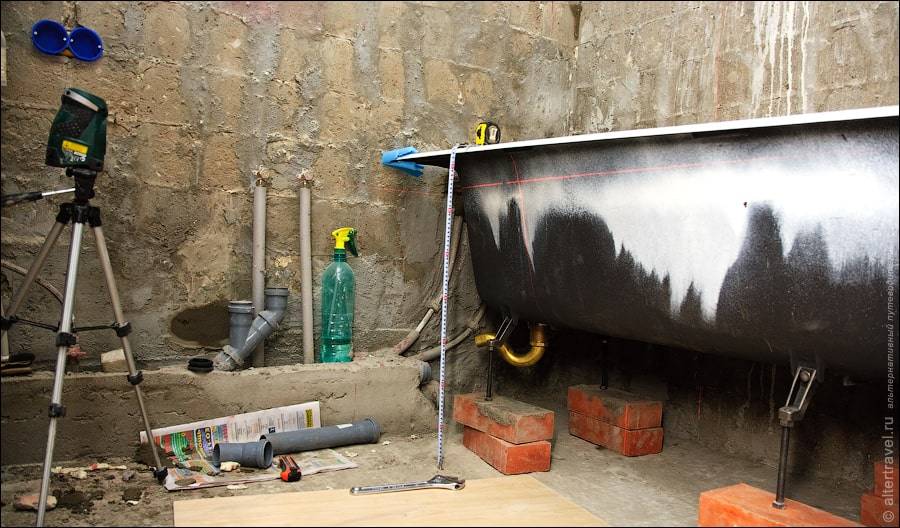
It is important that the upper edge of the appliance on masonry does not exceed 0.7m.
The outlet of the bathtub must match the height of the front support and correspond to the mark 17cm, and the rear - 19cm.

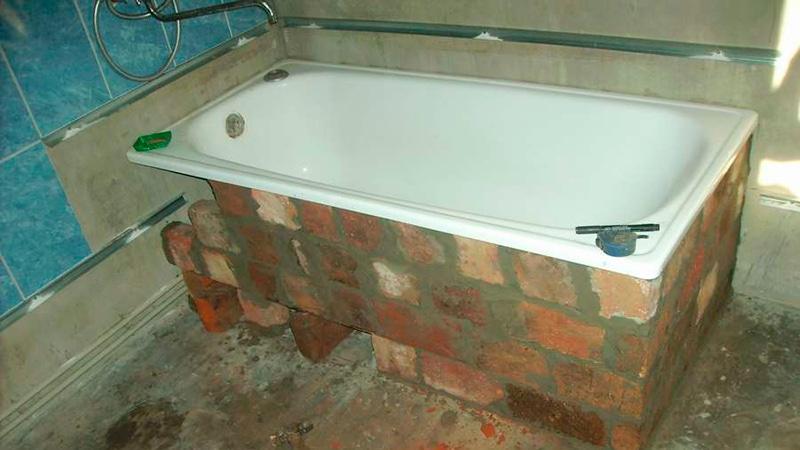
A foundation is built from bricks and the solution is allowed to "grab"
- Create brick scaffolds that have a rectangular configuration. Along the edges of the support, it is necessary to lay half of the bricks, which will give additional stability to the device installed in the brick bed.
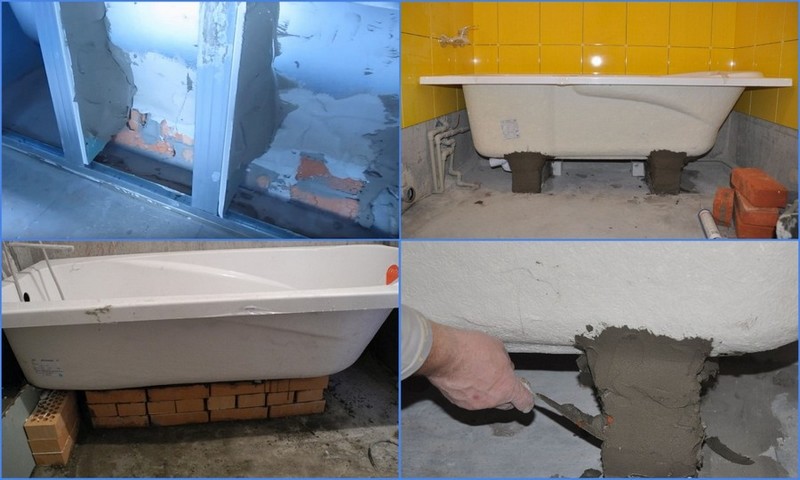
- Make a cement-sand mortar, which includes one part of cement, four parts of sand. After that, lay out the support on the masonry mortar. Using waterproof tile adhesive, seal the joints between the bathroom and the wall.
- Dry the supports. This procedure will improve adhesion with the cement mortar. Next, they proceed to install the cast-iron appliance on the scaffold, followed by checking the horizontal position of the bath. For this purpose, the building level is used.

The formed base is covered with a fresh layer of cement.
If the installation of the device on brick supports is done correctly, the water will quickly go into the sewer pipes without lingering in the bowl. For greater structural strength, the joints of the bricks, as well as the bottom of the bath, should be thoroughly smeared with mortar.


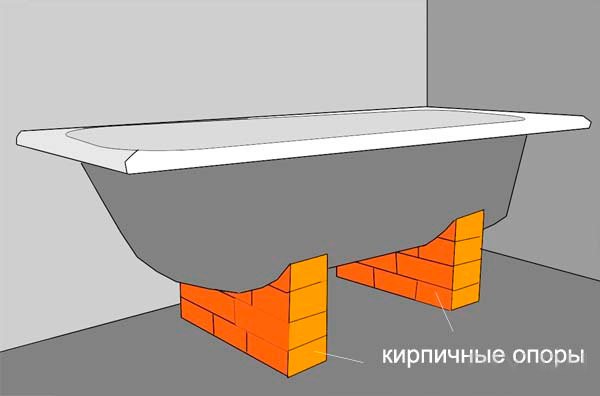
Brick supports for acrylic bath
Installation of supports for an acrylic bath is no different from installing racks for structures made of other materials. Complex structures are not necessary for such products. The traditional version looks like a flat pillow with pillars.
Necessary equipment
In order for the installation work to be completed without any difficulties, you need to prepare bricks, sand, cement and a tank for preparing the mixture, sealant, metal profile, trowel and level, as well as personal protective equipment. Supports can be made from red or white brick.
To work, you need a red or white brick.
Laying brick supports
First you need to lay out the first row of bricks, adjusting the position of the elements until the cement mixture hardens. Then the 2nd and 3rd layers are laid (if they are not needed, you can get by with 1 side by side).
Upon completion of work on the verge of supports from 2 ends, it is necessary to put half a brick in order to form a recess.
Installing an acrylic bath
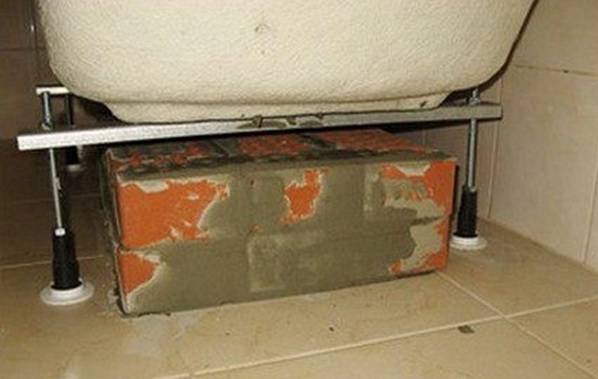
Before installation acrylic bathtub need to install gaskets. The support is mounted in half a brick, using a cement mixture for fastening. Between the racks, you need to keep a gap of 1-2 cm and seal it with mounting foam for a good fit of the bottom of the brick support.
The evenness of the placement is estimated by the level. On the wall from all sides it is worth providing pencil marks around the perimeter of the sides. Solidification of the solution takes 10-12 hours.
If you plan to install a bathtub with a corner configuration, then first of all it is worth evaluating the angle in which it will be installed. The optimal indicator is 90 °.
Sealing gaps
To avoid water entering the voids, they must be sealed with foam. Separate areas should be treated with sealant.
Installing a bathtub on bricks
No factory frame? No problem! We can install an acrylic bath on bricks. This option is even more reliable than the method of installing the bath on a factory-made frame.
The support may be solid or columnar.
Installing a bathtub on a solid brick substrate
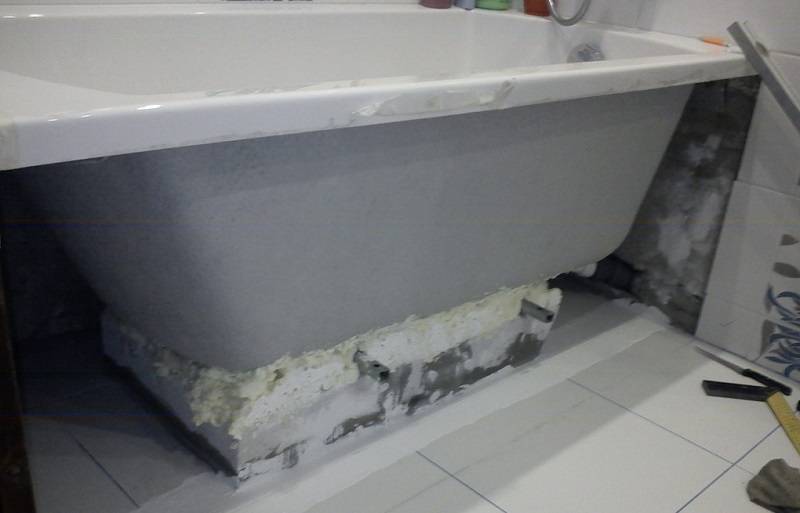
An example of installing an acrylic bathroom on a brick
First step. We temporarily install the bath in the place of its future installation and project a drain hole onto the base. This will give us the opportunity to leave a gap in the substrate for connecting the drain.
Second step. We lay out the bricks on the area of \u200b\u200bthe entire supporting part of the container. We select the height so that the sides of the bath rise above the floor by no more than 600 mm. At the same time, we take into account that we will still have a 2-3 cm pillow made of polyurethane foam.
Bricks are laid on a traditional cement mortar.
Third step. We assemble a plywood frame around the perimeter of the brickwork. The height of such sheets should exceed the masonry by the thickness of the foam substrate. Don't forget to leave the drain hole unfilled.
Fourth step. We evenly foam the surface of the substrate with polyurethane foam, without going beyond the boundaries of the frame. We immediately apply pre-prepared sheet plywood to the foam. We use moisture resistant sheets 10 mm thick.
We foam the bottomInstalling the bathtub on a brick
Fifth step. We tightly seal the drain of the acrylic bath. At the same stage, we prepare about a liter of water and wooden supports to regulate the installation level of the tank.
Sixth step. Pour the previously prepared water into the container and set the bath on the substrate at the building level.
Seventh step. While the polyurethane foam has not hardened, we adjust the evenness of the installation of the bath with the help of props.As a result, the water in the tank should be evenly distributed around the drain, and the level should show “0”.
Eighth step. Having set the bathtub according to the level, pour water into it by about half the volume. Under the weight of the water, the foam will not be able to lift the container, and the bath itself will take the required slope.
Ninth step. Let the foam dry and remove the bath. If the edges of the container should be recessed into the wall, we first outline the contour of the edge on the surface, and then we make a recess in the wall for the edge of the bath. A perforator will help us with this. If the arrangement of the groove is not provided (this is not recommended if the walls are made of blocks, drywall or other light material), at the level of the lower cut, we simply fix the timber impregnated with an antiseptic, or a steel corner. We will additionally strengthen the supporting bar at the end with stops.
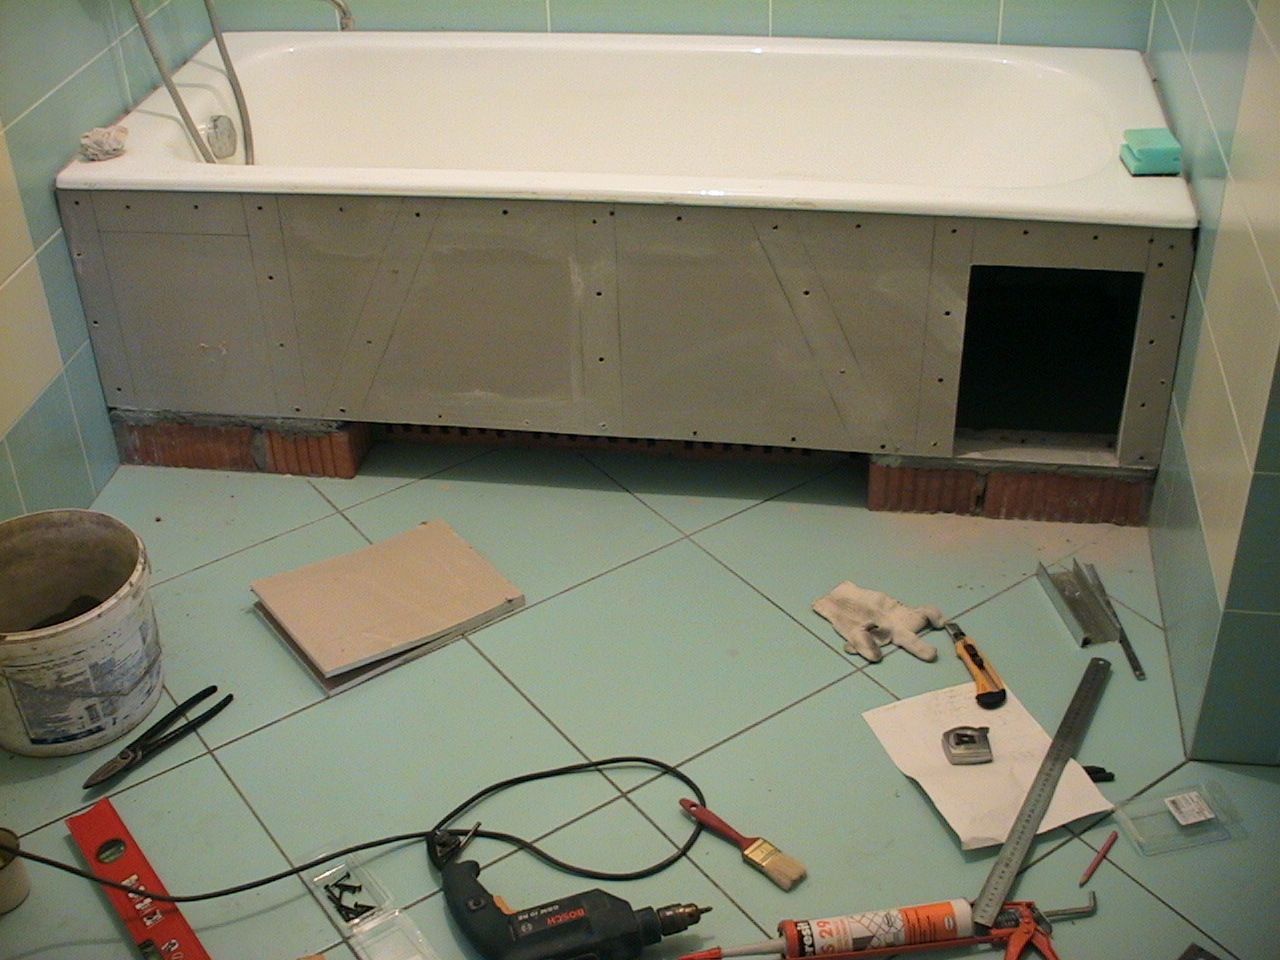
Tenth step. We return our container to its place and connect it to the sewer. We blow out the gaps between the container and the bricks with foam. We install a decorative screen and skirting boards.
Example of a brick-mounted bathtub with mosaic finish
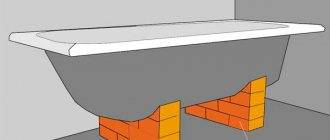
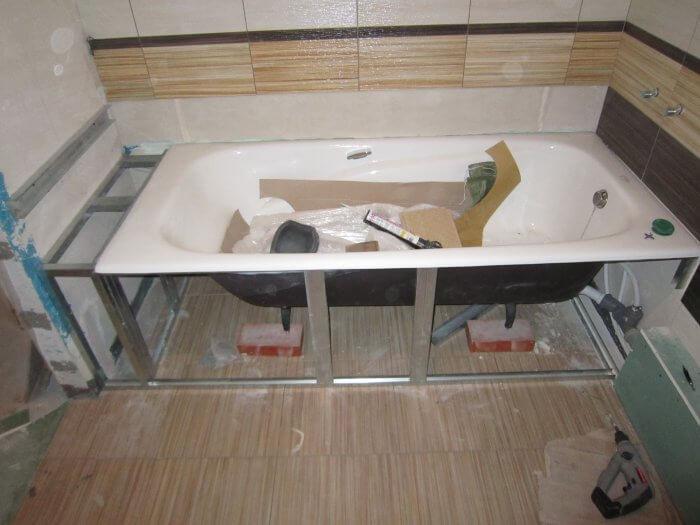
Installing an acrylic bathtub on brick supports
Installing an acrylic bathtub on brick supports
First step. We bring the container into the bathroom.
Second step. We carry out the marking of the base at the installation site of the brick supports. The most correct option is to erect pillars closer to the edges of the curve of the acrylic bath. If the container is long, an additional support can be erected in the middle.


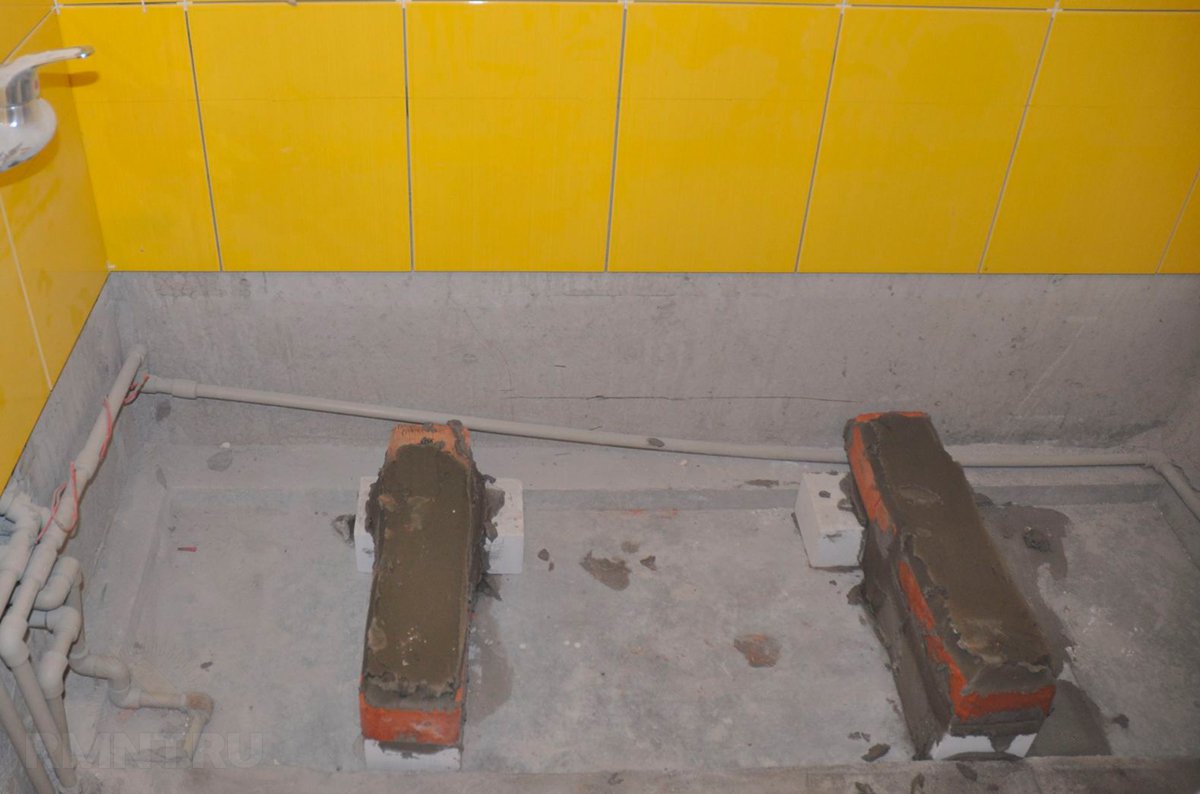
Third step. Having outlined the places for laying the supports, we proceed to the preparation of the cement mortar.We don’t cook too much - we have to lay out no more than 20 bricks, so we don’t need extra expenses.
Fourth step. Let's start laying. We lay out the support for the back of the bath to a height of 190 mm, we raise the column for the front edge of the tank to 170 mm. The height of the middle support, if needed, is selected according to the situation, depending on the design of the installed bath. The difference in the height of the pillars will provide conditions for the effective flow of water from the tank.
laying bricks laying bricks
Fifth step. We give the masonry about a day to dry and install the bath. We set the container slowly, moving it tightly against the walls. We fill the gaps between the bricks and the bathroom with sealant.
If desired, you can additionally fix the bath to the wall using dowels and a metal profile. Such a mount is used quite rarely, but still occurs.
After making sure that the installation of the bathtub is correct, stable and even, we connect the sewage system, install the mixer, mount the decorative screen and lay the plinth on the bathtub.
Strong position of the steel bowl
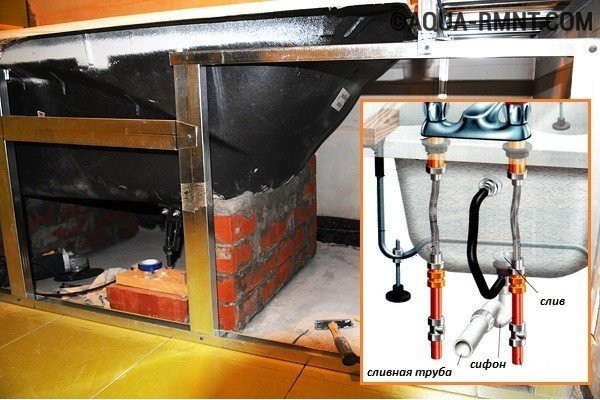
The installation of an iron bath takes place in a similar way. For work, in addition to the above materials and tools, you will also need:
- roll materials "Guerlain" and "Guerlain D";
- rubber pads.
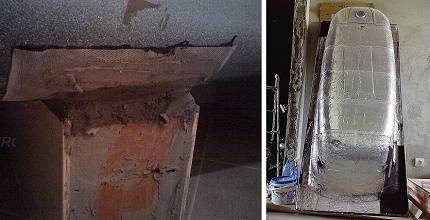
Bricks and mortar are prepared in the same way as in the case of installing a cast iron tank. The difference lies in the preparation of the iron bath itself for installation. Since the steel tank has thin walls and a bottom, in those places that will be installed on brick supports, it will be necessary to stick a layer of Guerlain D roll material. This cushioning material is made on the basis of synthetic rubber with a layer of fabric applied to it.The advantage of Guerlain is that, thanks to this base, it will help the iron bath to keep its shape, because steel can change its size under the influence of temperatures. Another roll material is a sound insulator. If you paste over the entire surface of the tank from the outside with it, the noise emitted by water when pouring it into an iron bath will not be so audible. For this purpose, it is better to use "Guerlain", dubbed with foil.
After gluing the entire outer surface of the bowl or its individual places with gasket material, the bathroom wall, the sides and the side of the tank adjacent to the wall are coated with tile adhesive. Then the bath is installed on brick columns. Installation is done by level. Rubber grommets help level the tub. As in the case of a cast iron tank, the outer edge of the bowl can be 4-5 mm higher than that adjacent to the wall. When the installation of the bath is completed, it is possible to fill the entire space between the brick columns with sand-cement mortar. And the final touch, as in the case of a cast-iron bath, is the installation of a screen or laying ceramic tilescovering bricks.
Subtleties and details of the process
The scheme of fixing the upper edge of the bath.
The described process is simple, but you need to know some of its features:
The top of the bath should not be higher than 60 cm from the floor surface.
Pay special attention to the angle and direction of the slope at which the object will be placed. This is necessary in order to correctly calculate the placement of sewer pipes.
Mistakes in this matter will lead to problems with draining water. Usually the difference between the height of the sides is 2 cm.
When forming a pedestal, it is necessary to take into account not only the size and configuration of the bath, but also the material from which it is made. Most problems are created by cast iron and metal products. They are heavy, which creates a load on a brick base.
You should not install the bath immediately after you have completed the construction of the brick support. First, everything must be dried.
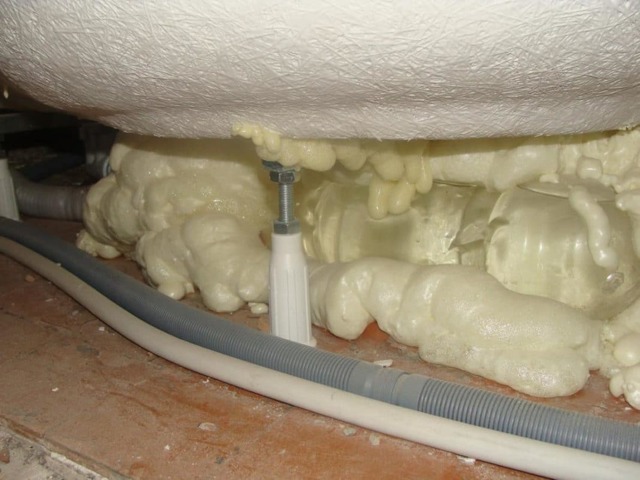
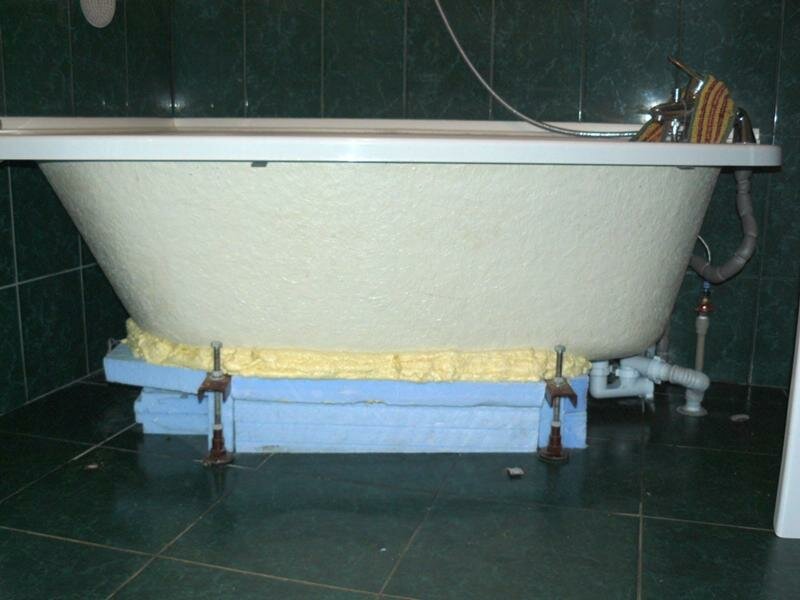
Sometimes construction foam covers not only the brick base, but also the outer surface of the bath. This is done for better soundproofing. It is not necessary to cover the entire acrylic bathtub with foam, because it absorbs sound well by itself.
You can adjust the angle of inclination using pieces of bricks and cement mortar. If you are working with an acrylic bath, you need to make sure that the sharp corners of the brick fragments do not pierce it.
Despite the simplicity, this case has a lot of nuances. But you can manage everything if you follow the tips for installing a bathtub.
Installation of corner acrylic bathtubs
If the area of the bathroom allows, some consumers choose to install a corner acrylic bath, as it allows you to fully enjoy hygiene procedures. Such a product must be firmly attached to the wall.
It is important to level the place where two adjoining walls meet. The angle between them must be right .. They begin the installation of a corner acrylic bath with their own hands by bringing the font into the bathroom and screwing the legs included in the kit to it
There are different opinions regarding the need to tilt the product. If you want to provide a slope, a certain angle is created by adjusting the clamps on the legs.
Do-it-yourself installation of a corner acrylic bath begins with the fact that the font is brought into the bathroom and the legs that are included in the kit are screwed to it. There are different opinions regarding the need to tilt the product. If you want to provide a slope, a certain angle is created by adjusting the clamps on the legs.
The process of how to install a corner acrylic bathtub is simple - the main thing is to know certain nuances and the technical side of installation. To get a reliable result, it is fixed on the wall at 4 points - in three places it is fixed along the long side and in one - along the one that is shorter.
When installing a corner bath, it is pushed close to the wall and adjusted in strict accordance with the level. When necessary, steel spacers are placed under the legs of the container.
If preference is given to a corner plumbing product, it is important:
- before assembling a corner bath, determine the dimensions of the container;
- purchase a waterproof sealant that treats the seams and all joints, it can be replaced with mounting foam so that not a single gap remains;
- when installing the drain, use a corrugated pipe that easily takes the desired position and provides a bend in a certain direction.

Sometimes, in order to ensure safe use, corner baths are equipped with special handrails that help to easily enter and exit them. This set will complement the mat laid on the floor, always with a rubber base.


If you follow the recommendations and rules of manufacturers on how to assemble a corner acrylic bath, you can purchase a product of the right size and proceed with the installation activities.
The procedure for mounting an acrylic bathtub on legs
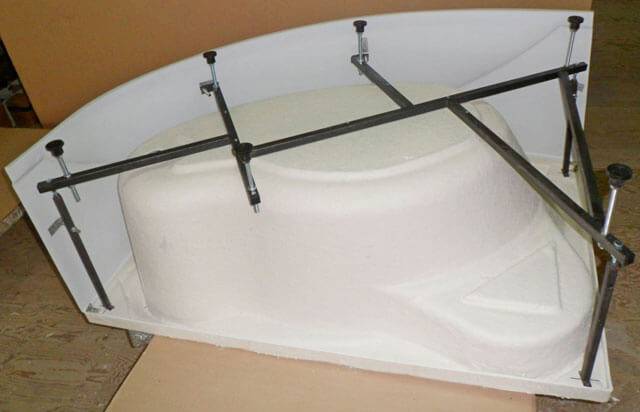
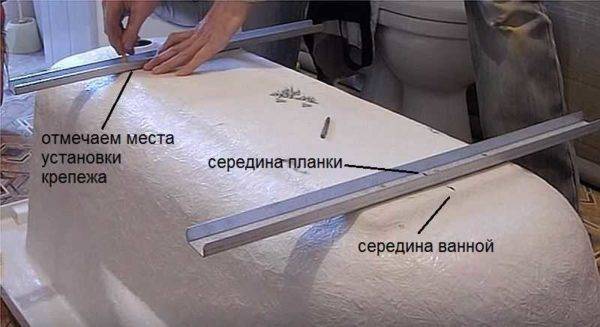
Assembling an acrylic bathtub with legs is much easier and faster - the design is elementary. The set includes two planks, four legs with pins, fixing an acrylic bath to the wall, a number of nuts and self-tapping screws.
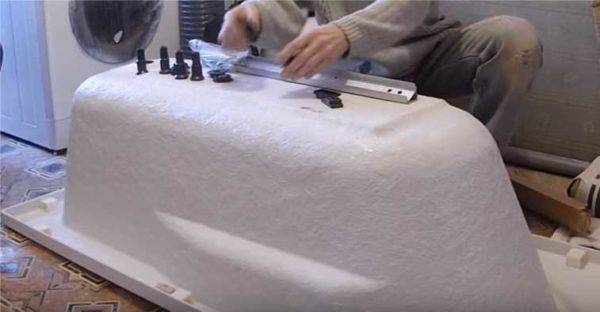
Marking and assembly of the frame
In an acrylic bathtub with legs, the frame is two planks that are attached to the bottom. These bars come with adjustable legs. The task is to screw the planks evenly, install the legs and level the entire structure. Not too difficult.
Complete set of acrylic bathtub with legs
Find the middle of the mounting strips and the bottom of the bath, put marks. Aligning the marks of the middle, two mounting strips lay a non-inverted bathtub, stepping back a little from the edge of the reinforcing plate (3-4 cm), install the strips. With a pencil or marker, mark the installation locations of the fasteners (there are holes in the planks).
Place mounting brackets
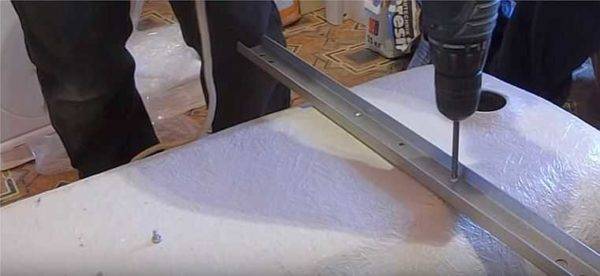
According to the marks, holes are drilled to a depth of about 1 cm (you can stick colored tape on the drill to make it easier to control the depth). The drill diameter is selected 1-2 mm less than the diameter of the self-tapping screws (indicated in the instructions or can be measured). After installing the strips and aligning the holes, we fasten them to the self-tapping screws (included).
Do-it-yourself installation of an acrylic bathtub on legs: fasten the planks
We put the legs
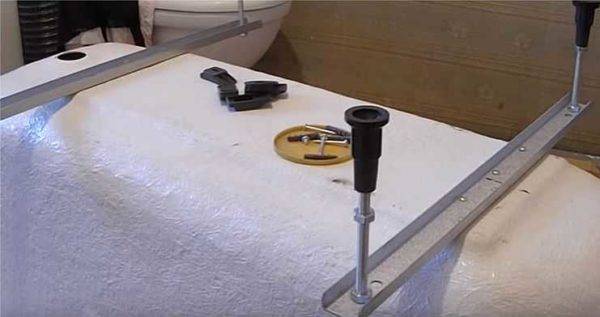
The next step is to install the legs. They are assembled in the same way as in the previous version: one lock nut is screwed on, the rod is inserted into the hole on the mounted bar, fixed with another nut. An additional nut is needed on the legs on the screen mounting side (pictured).
We put the legs
Next, turn the bath over, expose it in a horizontal plane, twisting the legs. The position is controlled by the building level. Then you need to install a mount on the walls, with the help of which the board is fixed to the walls.
The bath, set in terms of level and height, is put in place, we note where the sides end. We take the mounting plate, apply it to the mark so that its upper edge is 3-4 mm lower, mark the hole for the fasteners. The number of fasteners is different - one or two dowels, as well as the number of fixing plates on the wall (one or two on the wall, depending on the dimensions). We drill holes, insert plastic plugs from dowels, put clamps, fasten.
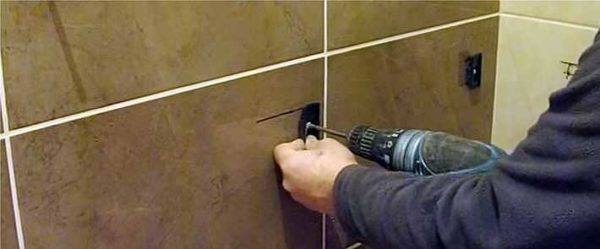
Fixing the acrylic bathtub to the wall
Now you can install an acrylic bath - we raise it so that the sides are higher than the plates installed on the wall. We lower, pressing the sides against the wall, they cling to the fixing plates. Installation of an acrylic bathtub on legs is completed. Next - connect the drain and you can use it.
Installation of an acrylic bathtub on legs is completed
The assembly of such an acrylic bath takes a little time. But the construction is very flimsy. Not every adult feels confident. The bottom bends, the legs slide on the tile. Pleasure is below average.
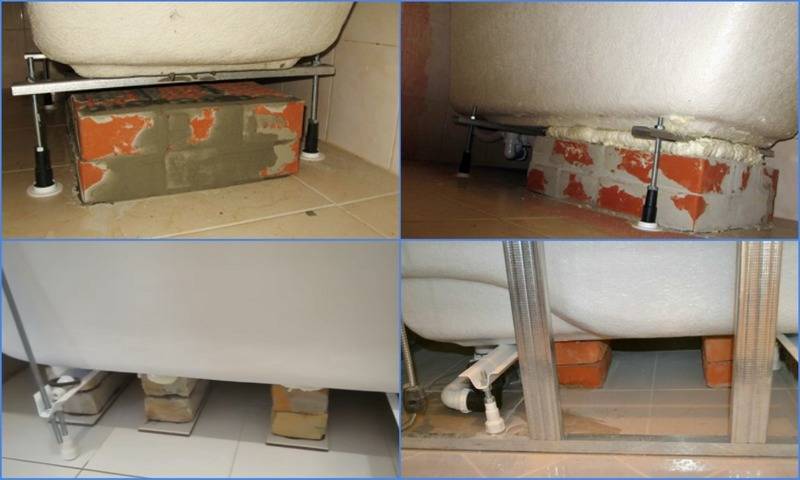
There is also a combined installation option. This is when put on legs and bricks is shown in the next video. After assembly, two bricks are laid on the mortar, a significant layer of mortar is laid on top (it must be kneaded with low plasticity, adding a minimum of water). When you put the bath in place, part of the solution is squeezed out, it is carefully picked up, the edges of the remaining part are corrected.The bath is loaded (it can be filled with water) and left for several days - so that the solution grabs.
Installing a bathtub on acrylic bricks
Such an activity as installing an acrylic bath on bricks involves the use of a completely standard set of materials and tools. They are a hammer, self-tapping screws, bricks, cement mortar, rags, tape sealant, metal profile and mounting foam for s / t devices. Once everything you need is purchased and prepared, you can get to work.
laying bricks
Directly on the floor in the place where the bath will stand, you should start laying brickwork in the form of low supports. In doing so, several important factors should be taken into account:
- the distance from the floor to the edge of the bath should be no more than 60 cm;
- the slope towards the drain of the bath should be about 2 centimeters;
- the distance between the supports should be about 50-60 cm.
The dimensions of the brick supports should be calculated based on the dimensions of the bath itself. In view of the fact that they can be quite diverse, it is impossible to give any universal advice on this matter.


Bath installation
Installing an acrylic bath on bricks with your own hands is quite simple. This is primarily due to the fact that its weight is not very large. There are two possible mounting types:
- Installation directly on the bricks themselves without the use of legs.
- Combined installation, which involves the use of not only bricks as a support, but also the legs that come with the kit.
In the second case, you must first install the bath along with the legs, and then measure all the distances that these elements occupy. With this in mind, it is worth equipping the brickwork itself in addition.
Acrylic bathtubs don't use foam as a sound deadening agent, as they don't make too loud noises when filled with water.
It is worth remembering that in no case should you install a bath on a brickwork that has not yet dried.
It is also important to consider that between the building material and the container itself there must be either a cement pad or a mounting foam
Closing cracks and gaps
Do-it-yourself installation also involves the use of foam and tile adhesive. These materials should be used in those places where there are any gaps or gaps between the bathroom and other elements of the interior of the room.
The joints between the tile and the container should be sealed with tape sealant. It is best if it is white. In the absence of such material, it is worth using building silicone. This will completely cover even the smallest gaps. The advantage of using such a material is that it is transparent.
Brick supports for steel bath
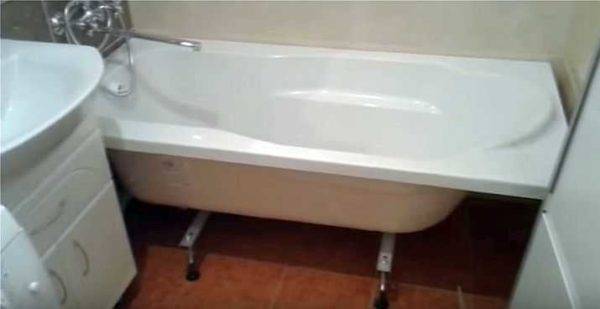
Steel baths weigh less than cast iron, but because of this feature, they are inferior to the second option in terms of stability. Therefore, many models are already sold with support legs.
Installation is done in 2 ways:
- With brick supports without legs and auxiliary accessories.
- Combined method. When performing the installation, both bricks and legs are used.
Additional racks can be made using the arrangement of the wall. If the steel equipment is located against one wall, a partition wall must be provided. If the structure is adjacent to 3 walls, you can get by with brick supports.
Tools and consumables
For the arrangement of supports used:
- Bricks.
- Concrete mortar grade not lower than M400.
- Metallic profile.
- Water repellent finishes.
- Roll guerlain.
- Glue mix.
The disadvantage of such baths is the likelihood of noise generation when filling with water. To eliminate the negative effect, it is better to process the product from the outside with mounting foam. The consumption of funds for a 65-liter bowl is 1.5-2 bottles.
Support legs
In some cases, you need to raise the bowl above the usual level. This is due to planned repairs in the presence of a water-heated floor, if mistakes were made with the choice of the drain placement area, or if there is a desire to adjust the height of the equipment.
They are installed in specially designated holes and fixed with the help of connecting parts.
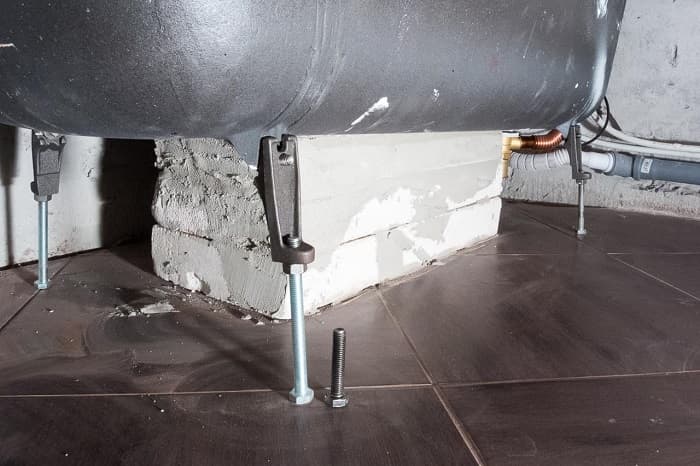
By supplementing the complete legs with brick supports, you can achieve excellent stability of the cast-iron bath.
If you have chosen the location of the bath, you need to measure the height of the area between the bottom and the floor, as well as the width of the legs.
The distance between the supports is selected taking into account the distance between the legs. The shape of the racks must correspond to the dimensions of the bottom, because there are various modifications on the market:
- Beveled and oval.
- Triangular.
- Rectangular.
Laying bricks under a steel bath is carried out according to the same principles as under an accessory made of cast iron.
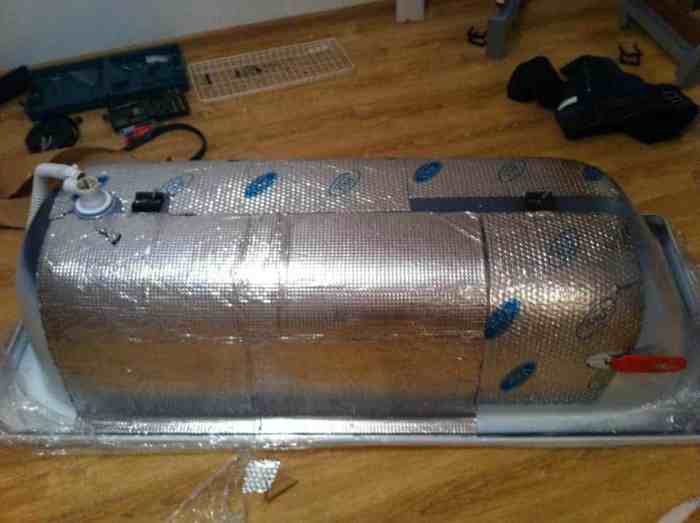
Foam processing
For the convenience of the procedure, it is worth placing the product with the bottom of the bowl up. Before this, the surface must be wiped with a sponge or a damp cloth. Mounting foam is distributed evenly around the perimeter of the bowl with a gradual opening of individual sections.
If a special gun is used for work, then this will reduce the consumption of the working mixture, because.the tool allows you to adjust the intensity of the output of the material and the degree of its expansion.
Eliminate gaps
After completing the installation of the bath and connecting the siphon equipment, drain and other equipment, you can proceed to the next step - eliminating gaps. Sealing gaps and improving the adhesion of the edges are carried out using a rolled guerlain. The fabric layer present in the material is a compensator between the hull and the cement mixture.
It is recommended to glue the areas of contact between the bathtub and brick supports with a rolled guerlain.
To remove air zones between surfaces and improve adhesion, one layer of tile adhesive is used. Small gaps are treated with liquid cement.
To improve adhesion between the bottom of the product and the frozen masonry, it is better to use mounting foam. The joints between the components of the structure are treated with a transparent sealant. When the material dries, it will be almost invisible.
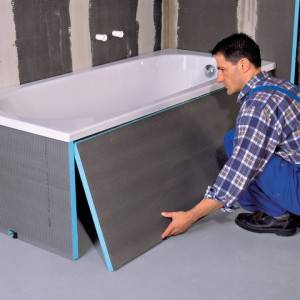
Plumbing finishing
The finished structure can be finished with tiles, drywall or other finishing materials. The main requirement is that the lining must be moisture resistant and not be afraid of temperature changes. The best option is to put a protective screen with decorative features.


