- Varieties of toilet bowls
- Hanging bidet installation
- Installation installation
- Attaching the bidet to the installation
- Connection
- Method No1. Dowel fixing
- Connecting the toilet to the sewer
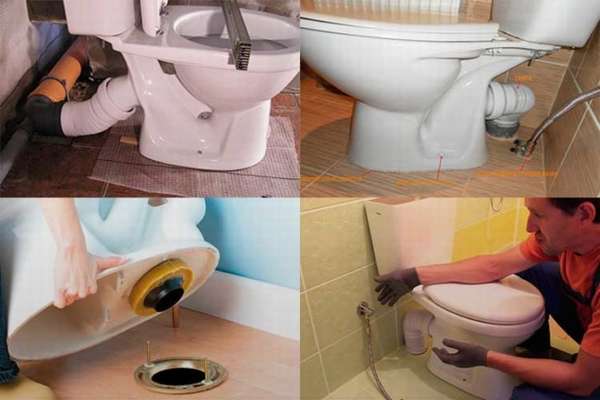
- How to properly install a toilet on a smooth floor
- Preparatory stage of work
- Choosing a new toilet
- Toilet preparation
- Mounting
- Vertical
- Horizontal
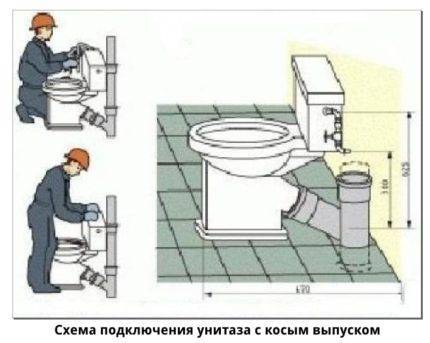
- oblique
- Removing an old toilet
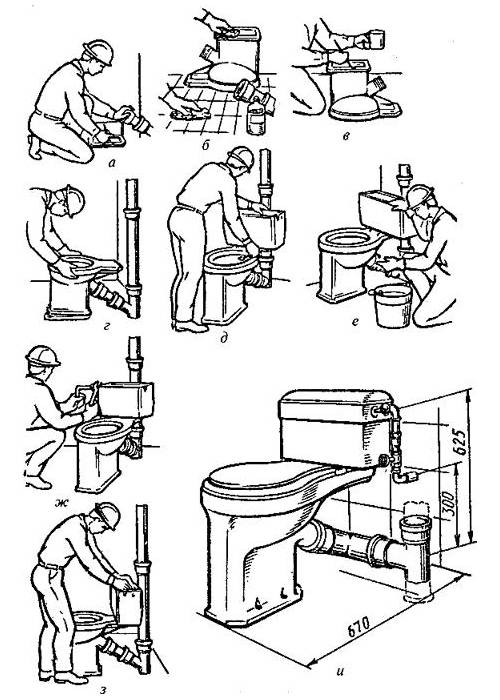
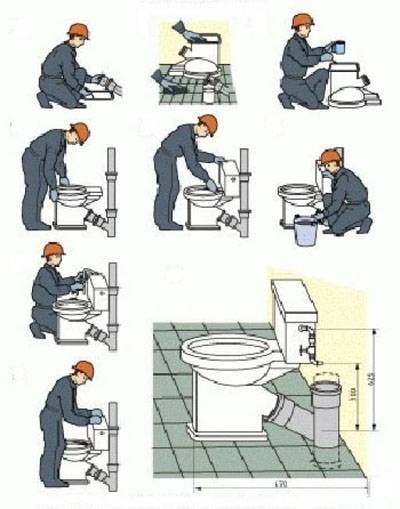
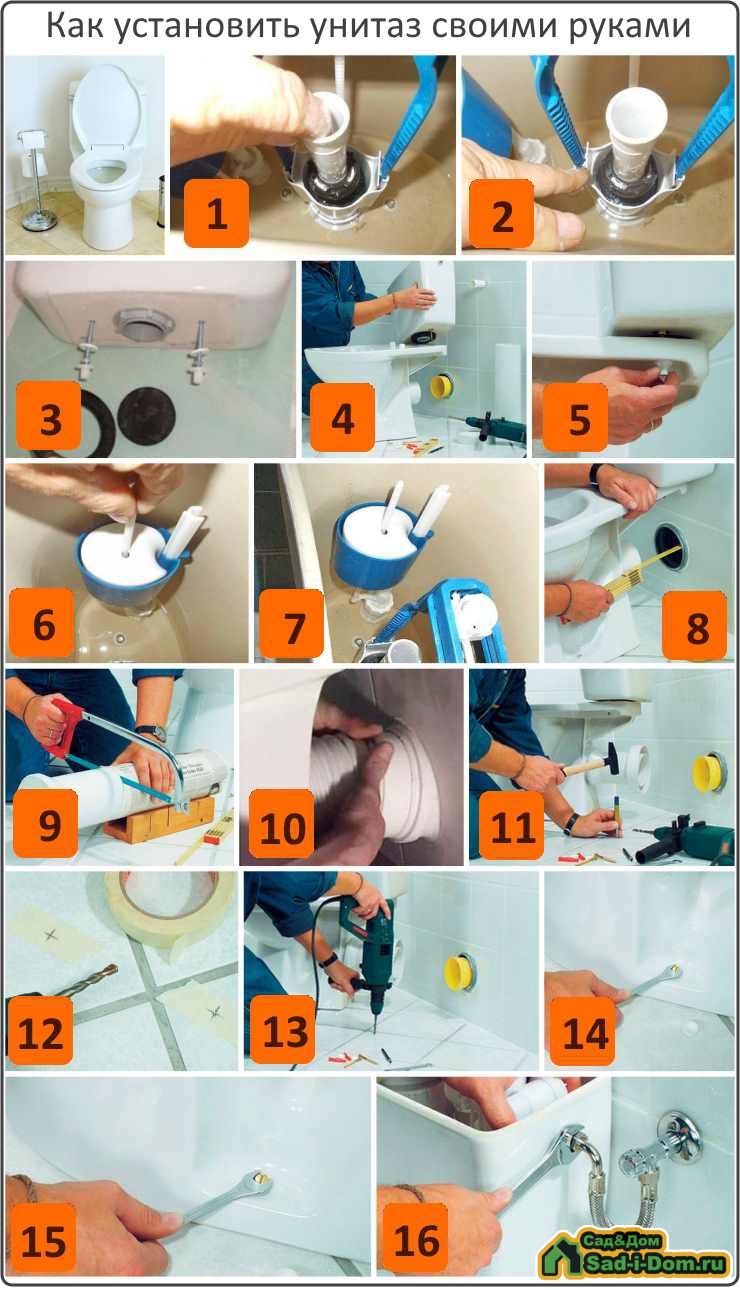
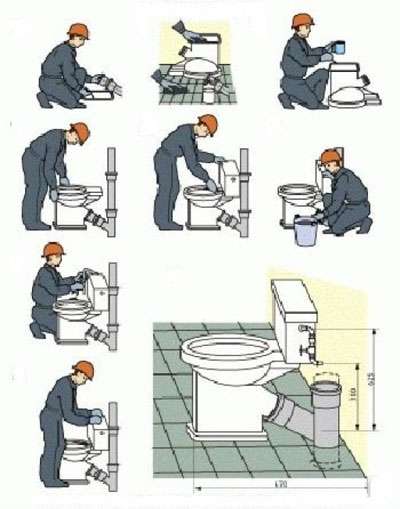
- Self-installation of plumbing "step by step"
- We fix on the floor: 3 types of fasteners
- Fixing the toilet to the wall
Varieties of toilet bowls
Features of installing a barrel and a toilet bowl depend on the type of plumbing equipment. All toilets can be divided into several types:
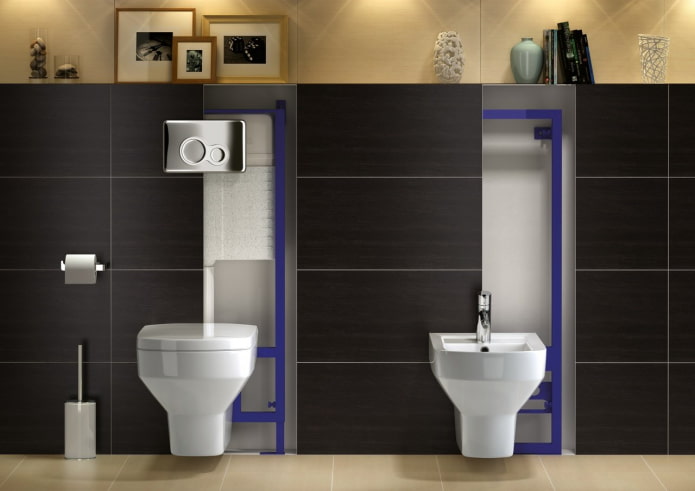
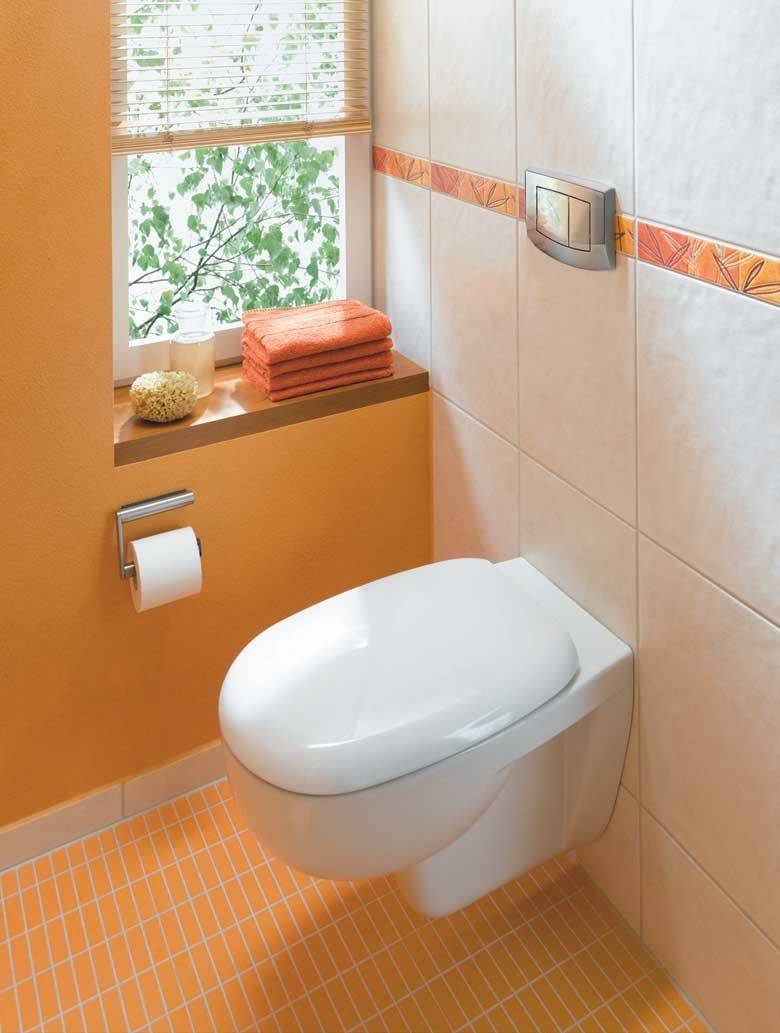
Mounted. The equipment is fixed to the wall, not to the floor. A special design is being built - an installation that imitates a wall and hides a barrel behind it. An aesthetic, but costly solution that requires the skills of a repairman.
Attached. They are installed on the floor, but the communications and the barrel are hidden behind the wall. The option is not practical due to the complexity of installation and maintenance.

Intrafloor. The toilet bowl is mounted directly to the floor. In residential buildings and apartments, this option is not used. Such toilets are relevant for public toilets.

Floor. The most common type, easy to install and maintain.

Hanging bidet installation
Installation of a hanging bidet consists in the systematic passage of the following steps:
- installation installation;
- fixing a plumbing device;
- connection to sewerage and water supply.
Installation installation
The installation of the bidet installation is carried out according to the following scheme:
- a recess is made in the wall for mounting the installation. The dimensions of the recess should be slightly larger than the overall dimensions of the device;
- water pipes and a sewer inlet are connected to the place of the proposed attachment of the bidet;
- going to be installed. Detailed assembly instructions are attached to each device, so this stage, as a rule, does not cause problems;
- markings are made on the floor and back wall for mounting the device;
- holes for mounting bolts are prepared;
- the installation is fixed;
- open space can be sewn up with drywall or other selected materials.
Assembling and fixing the installation for mounting a hanging bidet
When installing the installation, it is important to strictly observe the geometry of the device and the parallelism of the main elements of the floor surface
Attaching the bidet to the installation
How to install a bidet on installation? To do this, a number of steps are followed:
- studs are inserted into special holes to fix the bidet. For strength, metal studs are attached to the back wall of the bathroom;
Bolts for fixing the bidet to the installation
- a special gasket is installed on the installation to protect the sanitary ware. If the gasket is not supplied with the installation, then it can be replaced with a regular silicone sealant. The sealing composition is applied to the attachment area of the plumbing device and the time is waited until it dries completely;
Installing a gasket to protect the plumbing fixture
- the bidet is fixed on studs with bolts.
The installation of the bidet with the installation is completed. It remains to connect the plumbing device to the water supply and sewerage.
Connection
Connecting a bidet: instructions must be supplied with the plumbing fixture. In most cases, the connection is made in the following way:
- a built-in mixer is installed in the place where the water pipes are connected;
- flexible hoses connect the device to the bidet pipes of the central water supply.
When connecting flexible hoses, it is important to take care of maximum tightness. In some situations, regular gaskets installed at the ends of the eyeliner are not enough
To seal the threaded connection, it is recommended to use flax or FUM tape.
Water supply to bidet
The plumbing device is connected to the sewer through a siphon. This device is a must:
- the siphon is connected to the drain hole of the bidet. Between the plumbing fixture and the siphon, rubber rings are required to seal the drain;
- the corrugated pipe from the siphon is inserted into the sewer inlet, which was previously connected to the installation. This connection method is considered the most optimal and allows repairs to be made in a short time, even if any element needs to be replaced.
Connecting a bidet drain to a sewer pipe
Thus, knowing the simplest instructions and having the necessary set of tools, you can install and connect a bidet of any type with your own hands.
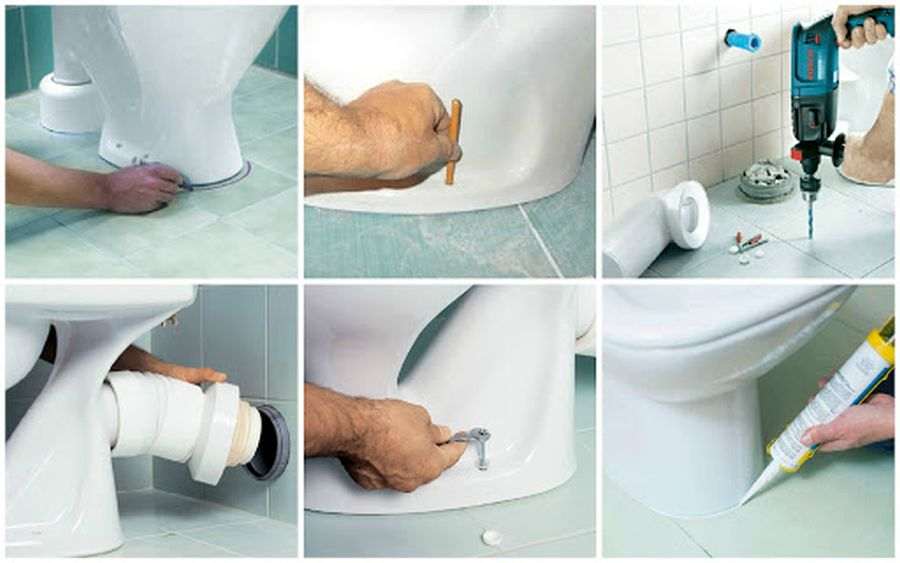
Method No1. Dowel fixing
The use of dowels and bolts is a fairly popular way to fix the toilet bowl.The method is simple and practical, but not without drawbacks. First of all, the tile will have to be drilled


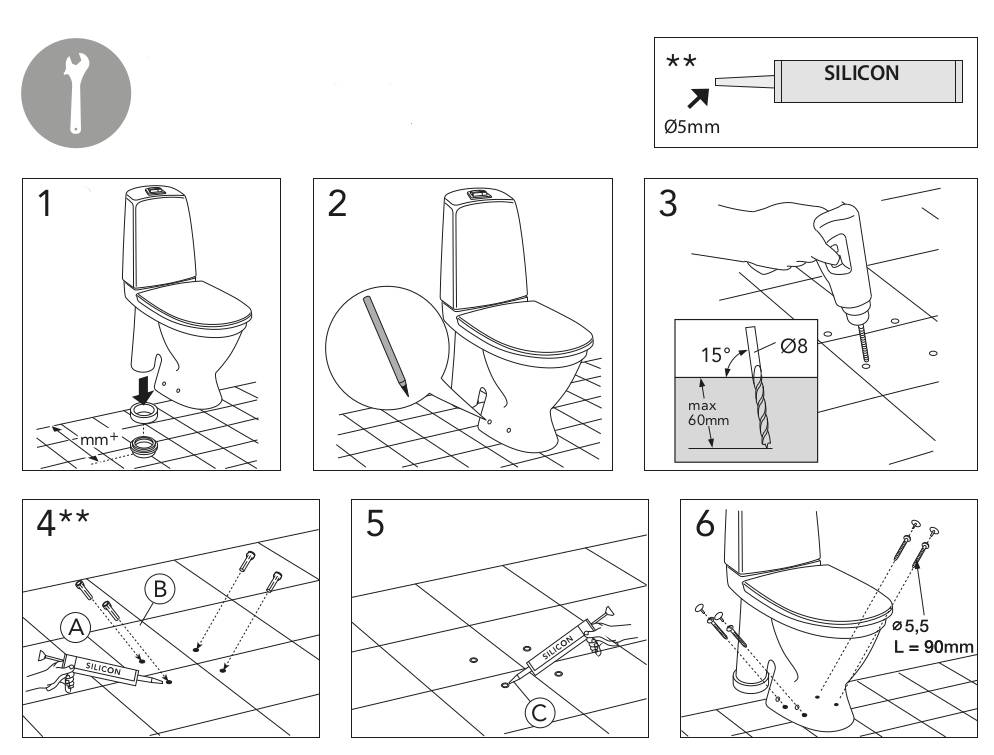
This must be done carefully and carefully, because the slightest mistake can ruin the flooring. In addition, the use of dowels is designed more for light products, and therefore it is better to use the adhesive method to fix a heavy model.
How to fix the toilet with dowels
To fix on the dowels, prepare everything you need:
- roulette;
- ammonia;
- pencil or marker to mark up;
- a napkin or rag (preferably microfiber);
- electric drill;
- drill to it (exclusively for concrete).
Fixture for toilet bowl
Less often, you may need a small piece of linoleum, sealant with a glue gun. Well, everything you need is at hand, so we can proceed directly to the workflow.
Step 1. First, the toilet is tried on, pre-installed where it will stand. The convenience of its use, the ability to connect to the water supply and sewer systems are evaluated. You can also shake the bowl - this will help determine the evenness of the floor under the toilet.
Pre-installation of the toilet
Step 2. Next, the installation location of the device is determined more accurately, which requires a tape measure. Holes for future fasteners are marked.
Future holes in the floor are marked
Step 3. The product is removed, large cross marks are already made at the marked points.
Putting cross marks
Step 4. Holes are drilled in the tile with an electric drill
It is important to work extremely carefully so as not to damage the tile, and also that the tool runs at low speeds.
The tile is drilled at low speeds Photo of the drilling process The drill needs to be moistened from time to time in cold water
Step 5. Next, the holes are drilled already in the concrete. The speed of the electric drill should be higher, or, alternatively, a rotary hammer can be used instead (it is better suited for this).
Concrete is being drilled Dirt and dust after drilling will be enough
Step 6. The tile is cleaned of dirt and dust (and after drilling this “good” will be enough). Then the surface is degreased with ammonia.
Cleaned tile
Step 7. Now you need to insert dowels into the holes that were made earlier.
Dowels are inserted into the holes
Step 8. The bolts are checked to see if they fit into the dowels normally. You can replace the fasteners with others if the ones included in the kit are of dubious quality.
Bolts included in the kit should fit properly.
Step 9. The toilet is installed. The holes in the tile must match those in the support.
Step 10. If there are no problems, the bolts are inserted into the dowels, while the washers - made of rubber or plastic - should not be forgotten
The bolts are tightened, but carefully, otherwise there will be a risk of damaging the bowl. After that, the hats are hidden with special plastic overlays.
Everything, the toilet bowl is successfully fixed to the floor with dowels!
At the end, the bolts just need to be tightened.
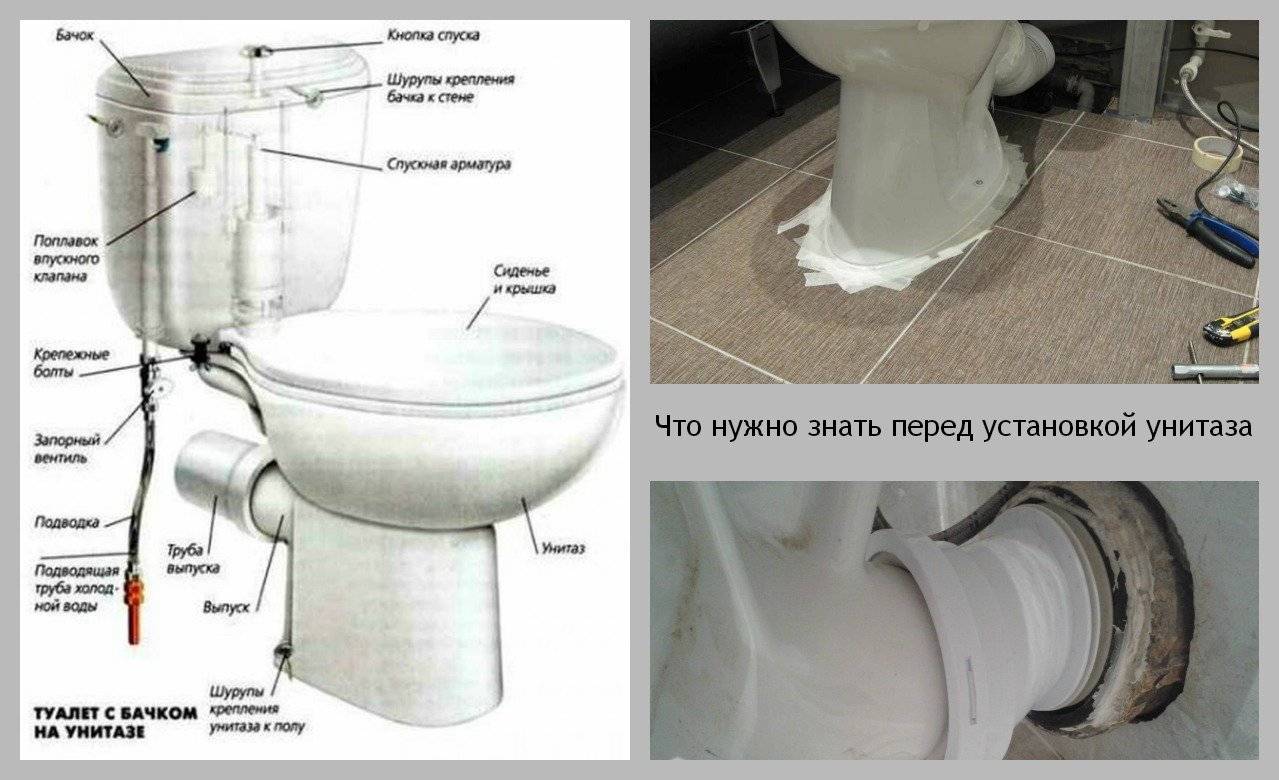
Connecting the toilet to the sewer
The main types of fittings for connecting toilets to the sewer are rubber cuffs, special corrugated pipes with a rigid part, various connecting pipes and bends:
Cuff for connecting toilet bowls - a rubber product, at one end clasping the toilet outlet pipe, and at the other end placed in a 110 mm sewer funnel.The release of toilet bowls is not always coaxial with the sockets of the sewer pipes, and this is taken into account: the cuff can be taken both straight and eccentric (with a shift of the axes by 10-40 mm). The cuff is not considered the best method of connection, since it is not only elastic, but also soft, and often wrinkled in the sockets, which leads to a violation of the tightness of the connection.


Corrugated pipes for toilet connections have rigid parts with rubber rings to connect to the toilet outlet pipe and smooth pipes 110 to fit the outlet into a standard sewer funnel. The middle is made of a corrugated pipe, compressible, stretchable and able to take on almost any configuration. But with all the convenience and simplicity of such a connection: corrugation in plumbing is a sign of “lazy and bad taste”, since nothing collects dirt like such products. Clogged corrugated pipes are not uncommon, and they wear out faster, and leaks in the toilet connections are an extremely unpleasant situation. Professional plumbers do not advise corrugated connections "for a long time". For a temporary scheme, this is cheap and practical, but for a comfortable bathroom with good plumbing and interior, it is completely unacceptable.
Straight connecting pipe for a toilet bowl - designed for standard connection 110. One end of the pipe is equipped with a cuff for hermetic connection to the outlet-pipe of the toilet bowl, and the other side is an ordinary smooth pipe with a chamfer for a standard pipe socket. Pipe lengths - 15; 25; 40 cm. connection with a pipe is the most practical and option and is carried out if possible.But it is only suitable for a toilet with a straight or inclined outlet.
For straight and inclined outlets of toilet bowls, eccentric connecting pipes are suitable (they have an axial offset). By design, these products do not differ from straight pipes, but the axis of the coupling connected to the outlet and the pipe itself is shifted by about 1.5 cm. The lengths are 15.5 cm and 25.5 cm. moreover, if the socket comes out of the floor of the bathroom, a special connecting pipe is designed at an angle of 90 degrees, with a standard length of 23 cm. A similar pipe, only bent at an angle of 45 degrees and 13.5 cm long, is suitable for connecting to the toilet sewer socket with a direct outlet. Connecting outlets 22.5 degrees are similar in design, have lengths of 15 and 36 cm, are used for toilet bowls with straight and inclined outlets.
The fitting for connecting the toilet to the sewer is not the element on which it makes sense to save, and it is much more practical to purchase this fitting from a trusted manufacturer, with a quality guarantee. Even toilet pipes are produced by reputable companies in elite colors of beige, cameo or snow white, and the visible part of the sewer inlet will not spoil even the most sophisticated toilet interiors.
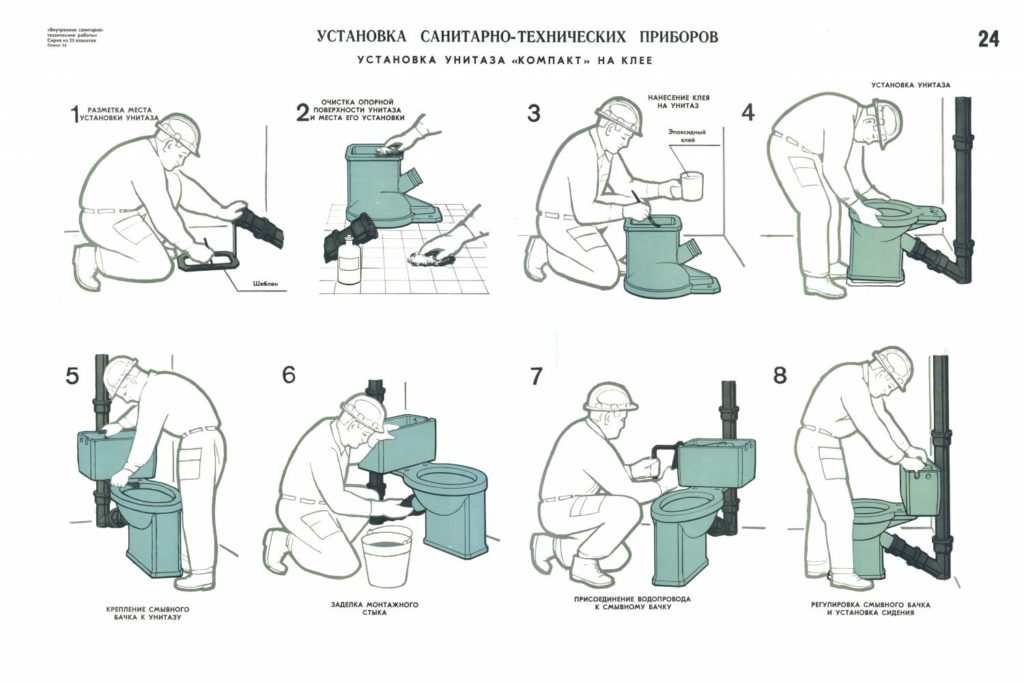
How to properly install a toilet on a smooth floor
If you plan to mount the device in a place where there was nothing before and the tiled floor is not broken, the process is not difficult. The sequence of work is as follows:
we determine the position of the toilet depending on the type of outlet and the position of the sewer. It is also necessary to take into account the size of the tank, the way it is attached to the wall (or toilet bowl), the convenience of the user's location;
cut off a piece of pipe or corrugation to connect the toilet to the sewer;
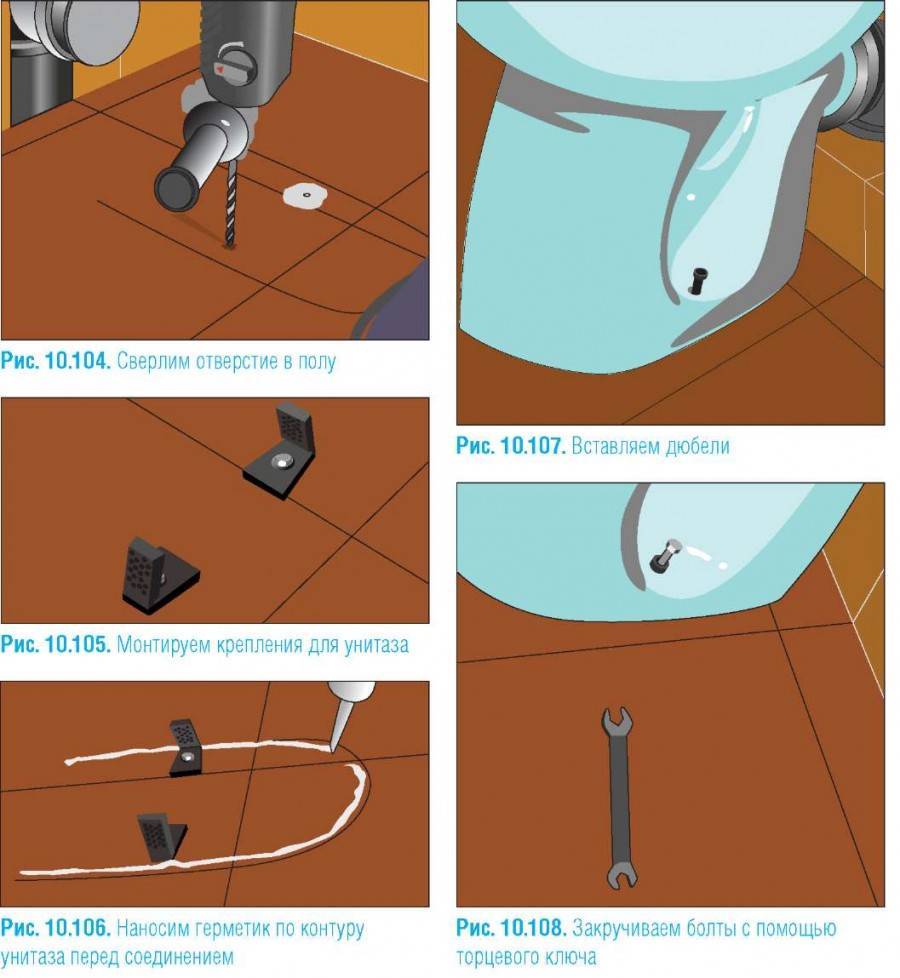
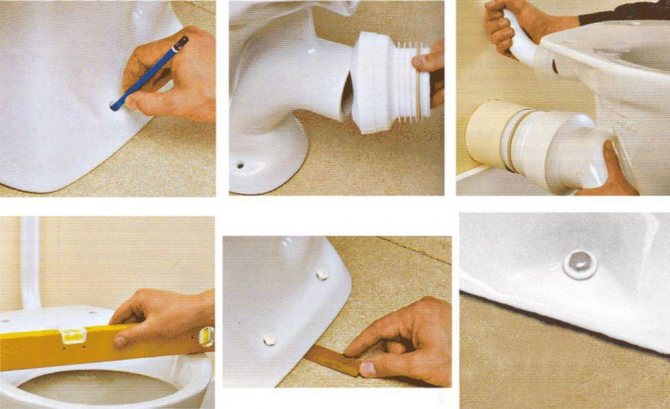
we mark on the tiled floor the contour of the sole of the product and the places for installing the screws (it is convenient to do this with a water-soluble marker). The most accurate marking is obtained when installing a plumbing device at the location of the future location. A heavy product should be carried carefully, avoiding chips and microcracks from impacts;
For wall-mounted toilet bowls (without a sole), it is necessary to outline the contour of the product, the position of the side holes and the place for the internal inserts on which the product is “put on”. Accordingly, the holes for the fasteners are drilled in accordance with the locations of the mounting holes on the inserts.
Before marking, it makes sense to attach the inserts (the so-called internal brackets) to the toilet bowl and mark the holes in them in the assembled form.
we outline the drilling locations for the toilet bowl mounts. The easiest way to do this is with a core;
drill holes for fasteners. To prevent the tile from cracking, it is necessary to seal the drilling site with masking tape and clearly mark the center of the future hole. Use a drill that is suitable for this type of tile. It is necessary to drill the tile to the upper boundary of the cement screed, after reaching it, the drill is changed to a suitable one for working with concrete;
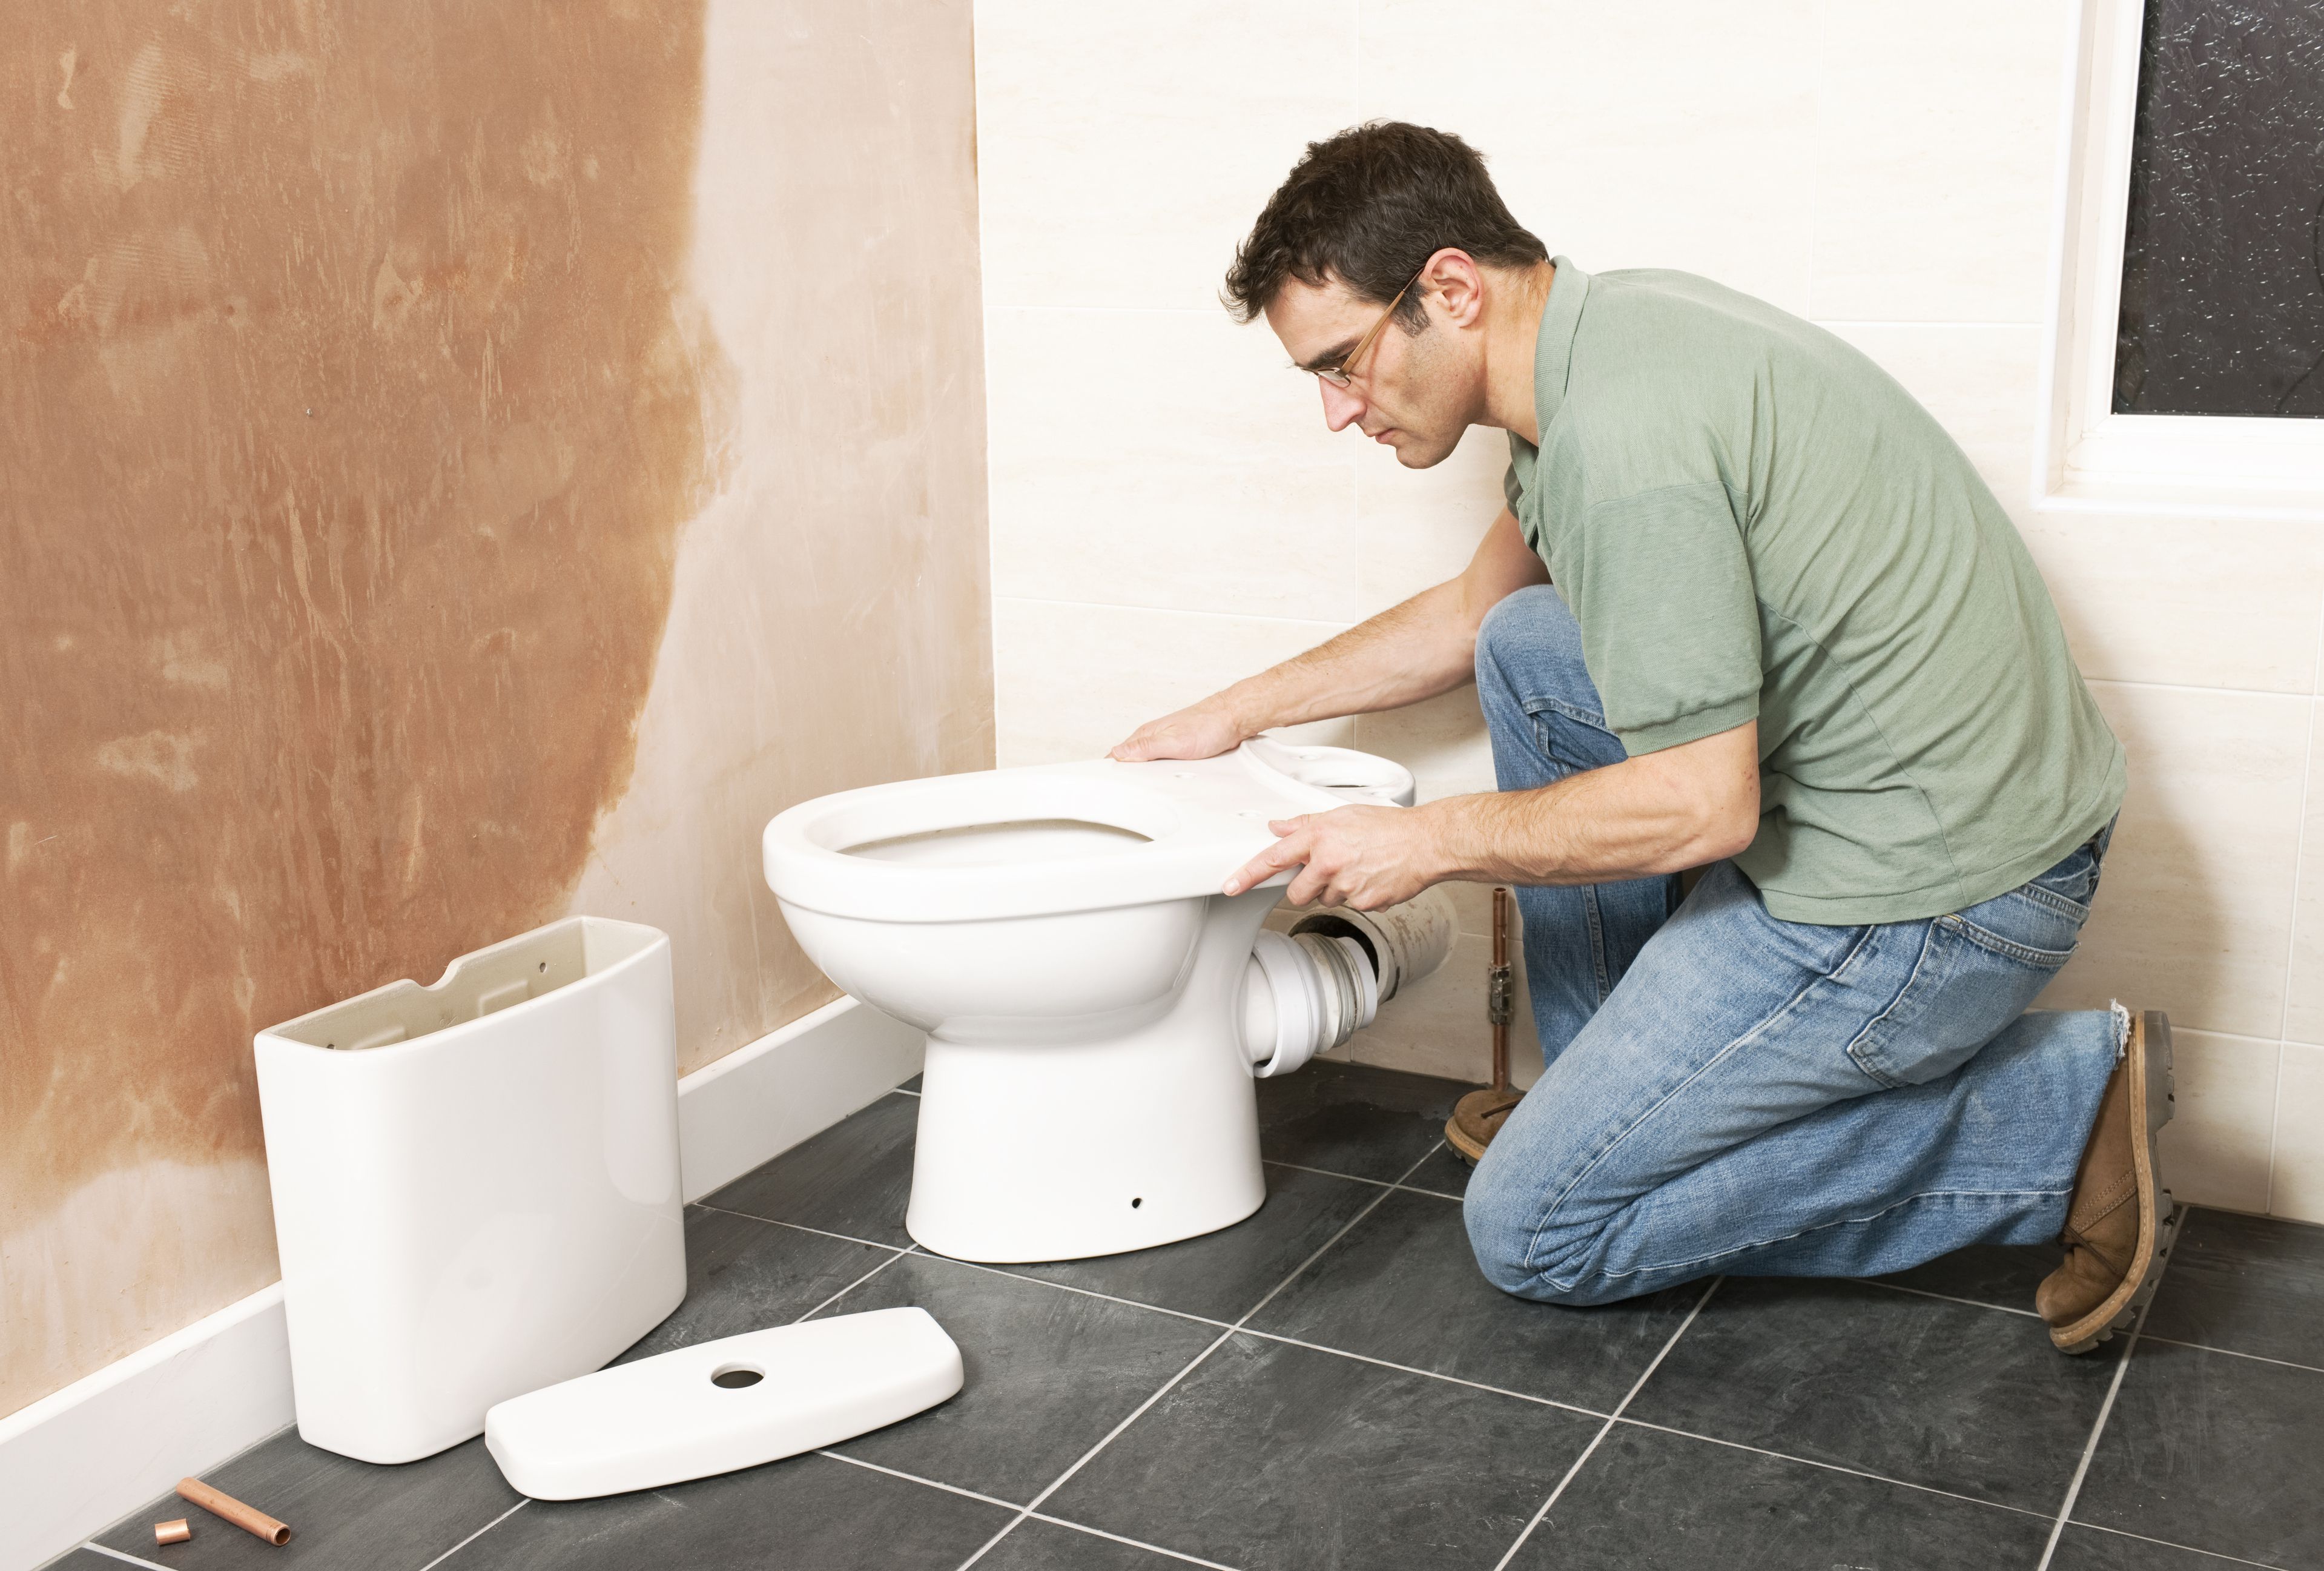
put the toilet in place, immediately connecting it to the sewer
Tighten the bolts carefully, using the fasteners included in the installation kit (always with gaskets!) Or selecting them in accordance with the manufacturer's recommendations. The most dense and high quality will be the connection in which the sealant is used.
They apply a contour along the sole of the toilet, distributing a thin layer so that the substance does not go beyond the boundaries of the contour. It is better to retreat inward by 2 ... 3 mm. The sealant that has come out after installation must be removed immediately, as it quickly hardens and spoils the appearance of the tile;
install the tank on the toilet or wall (depending on the model) and connect the cold water supply hose;
after checking the operability of the device, the installation can be considered completed.
Preparatory stage of work
At the first stage, installing a toilet in a private house involves turning off the cold water supply. If there is no individual supply of water to the toilet, the main valve must be turned on. After these manipulations, work on the installation of plumbing begins. Before removing the old toilet, you need to turn off all other household appliances in the bathroom, such as a boiler or a washing machine.
Dismantling is carried out in a certain sequence. The remaining water is poured out of the tank, the supply hose is disconnected.

In this case, it is better to replace the flexible design with a new product later. Water supply, made of metal, requires more work. So, it is necessary to cut off part of the pipe, and then screw the flexible hose to the threaded connection.
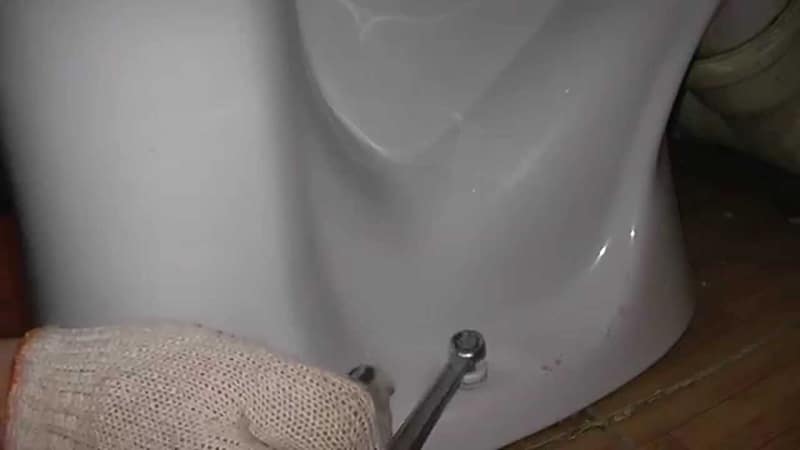
The next step involves detaching the toilet bowl fasteners, with which the product is fixed to the floor surface. Usually these parts look like bolts that need to be unscrewed.
Sometimes the toilet bowl is reinforced on the floor with cement. In this case, the hardened solution is broken from below, at the junction with the floor surface. After disconnecting the plumbing device, it must be tilted and the remaining liquid poured out of the bowl. After that, the bell is removed.It can be corrugated, made of cast iron or plastic. In the first case, dismantling is not difficult.
Plastic or cast iron elements must be disassembled to the ground. This is necessary to install a corrugated drain. Such a part can be mounted immediately by fixing it in the socket.

At the same time, the drain corrugation at the junction with the sewer is covered with a sealant. The bell is pre-cleaned and a sealing compound is added. The corrugation must be tightly fixed in the socket and close the entrance with a strong cloth. This is necessary so that there is no bad smell from the sewer.
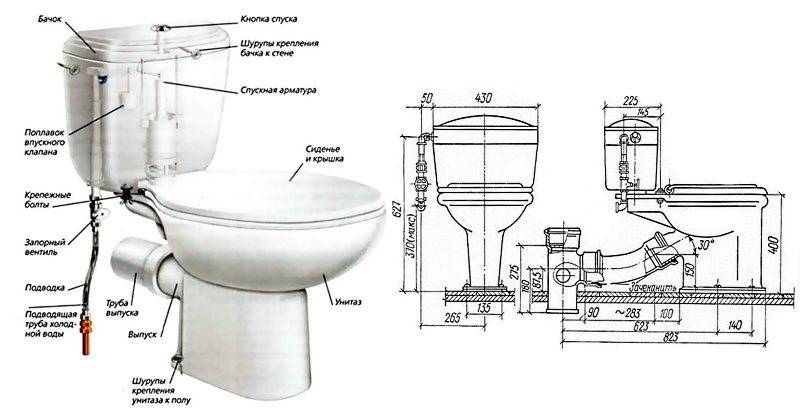
Choosing a new toilet
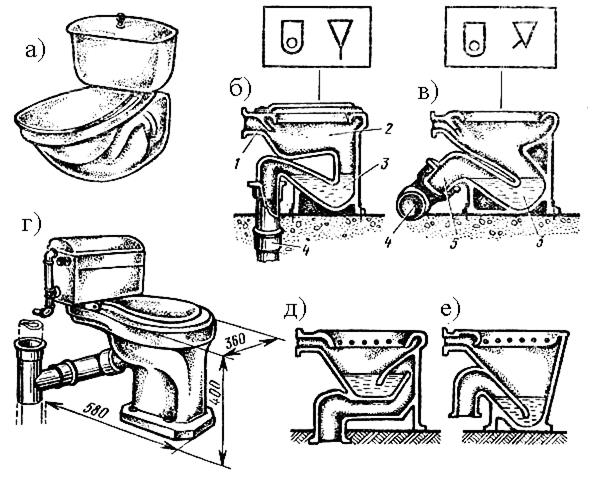
According to their design, floor toilet bowls are divided into several types, differing in the shape of their main nodes.
So, there are the following models according to the shape of the outlet drain:
- horizontal
- oblique (at an angle of 45 degrees)
- vertical
The shape of the bowl distinguish:
- poppet
- visor
- funnel-shaped
The flush tank can be combined with the base of the toilet or mounted separately on the wall, raising it to a sufficient height, and sometimes to the ceiling.
Fixing toilets to the floor are also different. Basically, there are options with two and four direct attachment points, in addition, structures may come across in which special corners are attached to the floor, and the toilet itself is already attached to them.


The way the tank is connected affects the cladding work in the toilet. After all, if a wall mounting method is chosen, then you will need to prepare a place and anchors for installation.
Before you change the toilet, you should take into account the dimensions of the toilet so that the design after installation does not interfere with closing the door and installing the rest of the equipment, if all this is done in a combined bathroom.
Toilet preparation
Self-installation of the toilet, not such a difficult task. The whole process can be done without the involvement of plumbers. Considering the work they charge from 1500 rubles for installation the simplest toilet, in addition to saving, you will gain invaluable experience.
Room preparation consists of:
- Cleaning old plumbing;
- Alignment of the seat;
- Determination of parameters for a new toilet bowl;
Turn off the water supply to the toilet bowl and disconnect the water supply.
Removal of the old toilet bowl is carried out depending on the attachment. In some cases, they can be planted in cement, and then it must be chipped away. If the fixation was on a bolted connection, then the bolts are unscrewed, the toilet bowl is slightly loosened and gently lifted with an inclination back. This must be done to drain the remaining water in the siphon. Now you can pull the toilet pipe out of the sewer pipe.
In old houses, the connection between the toilet and the sewer was sealed with cement mortar. If this is your case, then you have to work with a hammer and break the drain pipe. Its fragments may be inside the sewer pipe. They must be removed! The hole in the sewer pipe is closed with a plastic bag.
Depending on how the old toilet was fixed, the seat is being prepared.
Sometimes, toilet bowls were coated with cement mortar, and tiles were laid, forming a new surface. In this case, you will have to fill in the recess to level it under one level.The easiest way to do this is with a quick-setting self-levelling screed. It is found in small packaging, 2-5 kg each. For work, a two-kilogram package will suffice.
All debris is removed from the excavation, swept, then primed. Dry screed is diluted according to the instructions on the package. The finished mixture is poured in such a way that its level coincides with the level of the main surface.
After a day, the screed gains the declared strength, and it must be primed.
If the toilet was installed on top of an integral coating, but in this case, a mud rim may clearly appear. No matter how well and carefully cleaning is carried out, microscopic dust particles are always deposited in such places. They eat into the surface of the tile, and it can be very difficult to remove them.
A solvent with a very weak surface tension film will help to cope with this task. This is a necessary condition for the penetration of liquid into the smallest pores of the glaze. They will not harm the tile itself. We recommend trying:
- WD40;
- Acetone;
- Xylene.
One of these solvents will help to cope with the task.
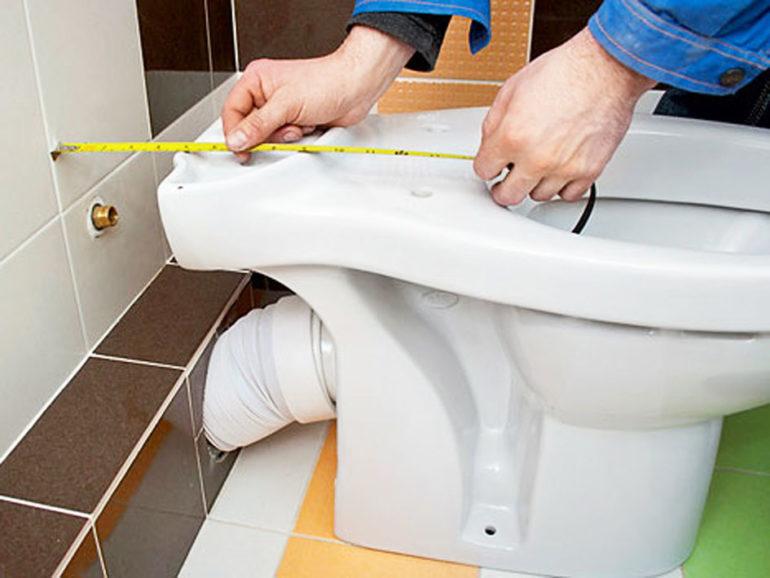
To determine the parameters of a new toilet bowl, it is necessary to measure:
- the height of the inlet to the sewer pipe;
- eyeliner length;
- dimensions of free space behind the toilet.
Write down the results on a piece of paper so as not to make a mistake when choosing. TIP: take a picture with a mobile phone camera of a general view of the prepared toilet. It might come in handy at the store.
Mounting
So, the dismantling can be considered completed, and therefore it's time to move on to another stage. Understanding how to properly install a toilet is actually not difficult.You just need to understand what type of release you are dealing with. As you remember, it can be vertical, horizontal and oblique.
It is about how to install a toilet bowl with your own hands with all three variations of the release that we will now tell.
Vertical
Diagram of how to connect the toilet to the sewer and fix it to the floor
- First, remove all debris from the sewer socket, make it relatively clean.
- Place the cuff into the socket using silicone sealant.
- Insert the release into the cuff, but do not use the sealant yet, place it in the required place, make markings for the holes.
- Now installing a toilet bowl with your own hands provides for the need to make the necessary holes with a power tool.
- Please note that installation on a tile has its own characteristics. You need to drill a layer of tiles first with a special drill. Moreover, its diameter should slightly exceed the diameter of the drill, suitable for fastening.
- Apply sealant to the outlet, insert into the cuff and fix with screws.
- The problem of floor damage is quite relevant. Therefore, the installation of the toilet on the tile must be carried out carefully. Try to tighten the screws evenly so that the plumbing does not warp.
- It is necessary to tighten not until it stops, but until the product stops hanging out, staggering.
- For better fastening, grease all cracks with a solution of cement and clay.
- Now you can connect the toilet to the sewer, and you probably know about these subtleties from our previous materials. One way or another, but connecting the toilet is quite simple.


Horizontal
We have already figured out how to install a toilet bowl with our own hands with a vertical release, and therefore we move on to a direct one, that is, a horizontal one.
- If the sewer system is configured specifically for the use of direct release, then the installation process will be similar to the previous method.
- If the toilet is not suitable, then the connection of the toilet to the sewer will be carried out using a corrugation and an eccentric cuff. They are mounted on a sealant, and it is not recommended to stretch the corrugation too much, otherwise there is a risk of collecting fecal deposits in areas that have sagged.
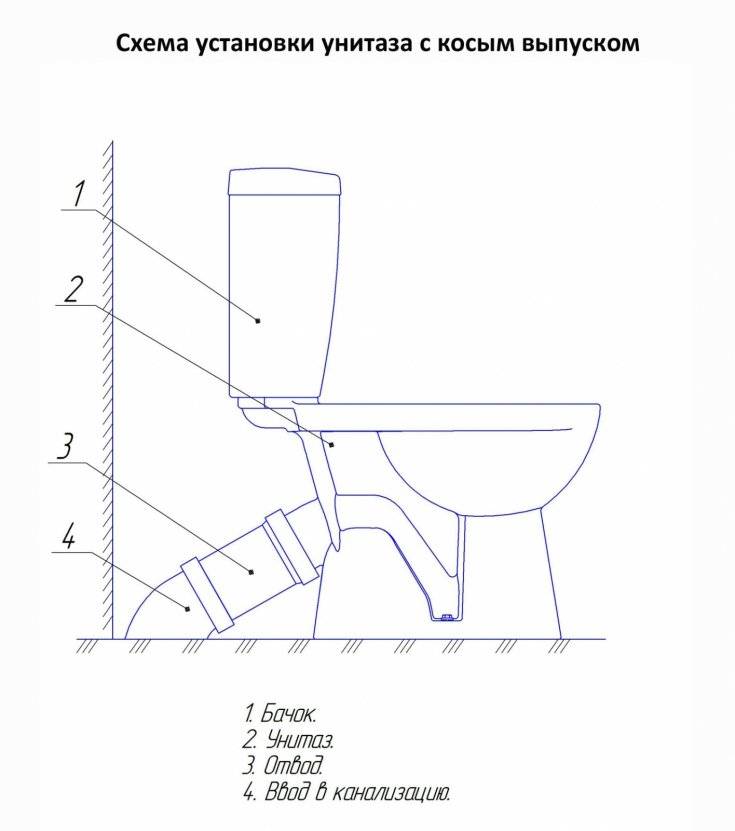
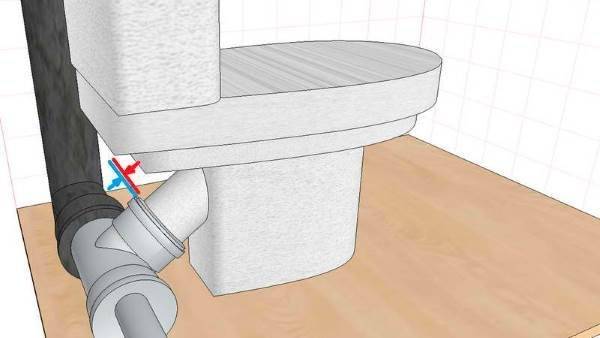
oblique
Instructions for installing a toilet with an oblique outlet
Under certain circumstances, the outlet from the sanitary ware may be located lower or higher relative to the socket. There are two ways out of this situation.
- You can use a corrugation or a sewer-weaving element with a socket made of plastic. Cut off the desired size, put it between the bell and the toilet, and ordinary sealant will help to strengthen such a connection.
- Or arm yourself with a special pipe in the shape of the letter S, and move the toilet bowl a little to the side - about 15 centimeters. As a rule, the size of the room allows this to be done. If this option does not suit you, and replacing the toilet is clearly not an option here, since you just bought a new one, you can make a kind of brick pedestal, thereby raising the product to the desired level in order to connect it to the socket.
Further connection of the toilet will be the final stage of work for you. You can start the system, check its reliability, the presence of leaks and some other problems.
Keep in mind that installing a toilet bowl with your own hands is not as difficult as it might seem. In fact, it is even more difficult to dismantle the toilet bowl in some cases, or to implement the installation of a tank on the toilet bowl.But you will complete many of these tasks based on useful recommendations on our portal.
Don't be afraid to do the hard work yourself. Even the usual instructions for installing a toilet bowl, which is attached to each plumbing product, will greatly simplify the task.
Of course, in some cases, it is extremely difficult to repair a toilet bowl yourself, there is not enough time, experience, certain knowledge, or just a tool. Then turning to specialists will not be shameful at all. Still, not everyone wants to deal with sewage, even if he knows how the toilet is replaced in just an hour.
Removing an old toilet
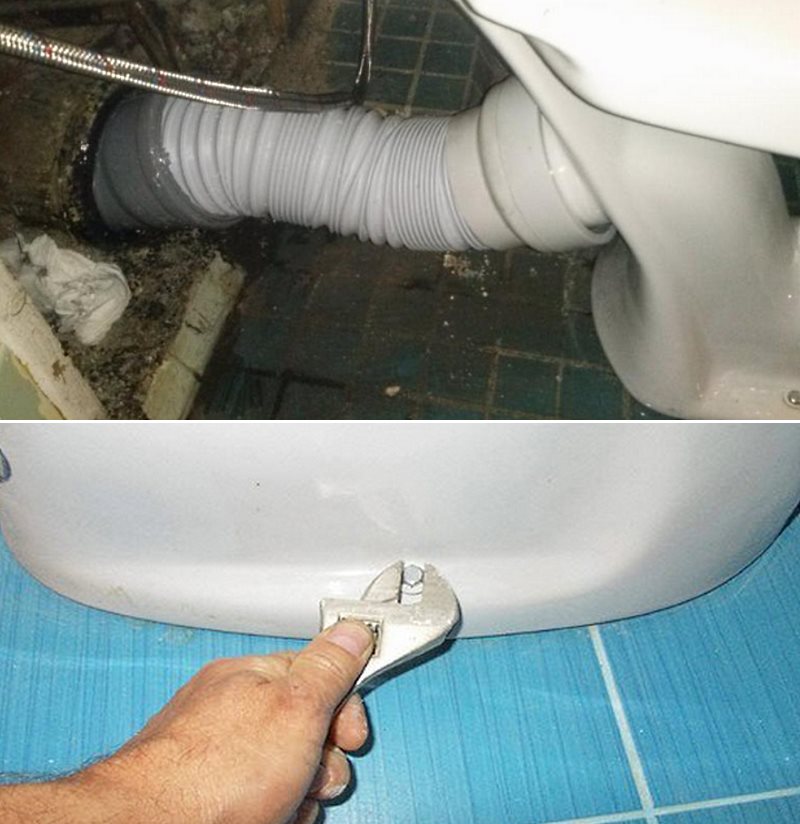
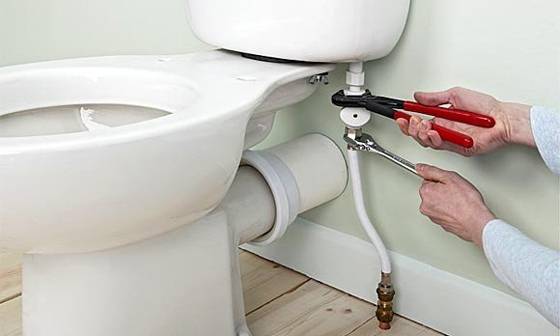
- Turn off the water supply to the drain tank. Drain all the water from it and unscrew the hose that goes to it. After that, you can unscrew the fasteners of the tank. Most likely, the bolts on which it is attached are rusted or stuck with deposits. In order to break them, you will need to hold the head of the bolt on one side with a screwdriver or open-end wrench, and on the other hand, unscrew the nut with an adjustable wrench. You can use WD-40 spray lubricant or some kerosene to soak the bolt. Then he will more easily succumb to efforts.
- After removing the tank, the fasteners of the toilet bowl are unscrewed. It can be nuts screwed onto an anchor or dowel.
- The next step is to disconnect the drain from the sewer pipe. In the houses of the old building, the drain was fixed with a cement coating. For work you will need a chisel and a hammer. Carefully prick the cement with a chisel, placing it across the coating in two places.Then you can shake the toilet with force until the drain turns and loosens. After that, without disconnecting the toilet, tilt it in order to drain all the remaining water from it.
- When the dismantling of the toilet bowl is completed, the hole in the sewer pipe is closed with a cloth plug or a wooden plug. It should be remembered that the gases from the sewer are not only poisonous and smell unpleasant, but also flammable.
You can not stand on ceremony with the dismantling of the toilet, because it is unlikely to be reused. In this case, to facilitate work with chipping off the cement coating, it is better to beat off most of the toilet bowl with a sledgehammer. In order to make it easier to scroll and loosen the drain after that, make a transverse hole in the pipe and insert a metal rod or wooden stick as a lever.
If cast-iron drain pipes are laid in the apartment, it is best to change them all to plastic at the same time. The use of PVC pipes for sewerage greatly facilitates the process of operation and initial wiring, as well as connecting all drain points.
Self-installation of plumbing "step by step"
The toilet bowl for normal operation needs a flat, lined or specially prepared surface of the walls and floor.
First, we connect the drain of the toilet bowl with the help of a corrugation to the outlet of the sewer pipe-riser. You can also use a hard tube. The best option is if the toilet drain enters the riser without extension corrugations, etc. To seal the drain, we use a ring with a rubber border
It is important to consider that rubber does not tolerate cement and similar coatings on its surface. But the sealant is quite suitable.
To enter water, you need a flexible long enough hose connecting the tap that supplies liquid from the water supply to the tank of your plumbing
Pay attention to both inlet diameters to match the hose with two matching fittings
Obviously, there is no way to screw a 3/4” thread onto a 1/8” pipe.
If the drain is securely connected, you can begin to fix the plumbing.
We fix on the floor: 3 types of fasteners
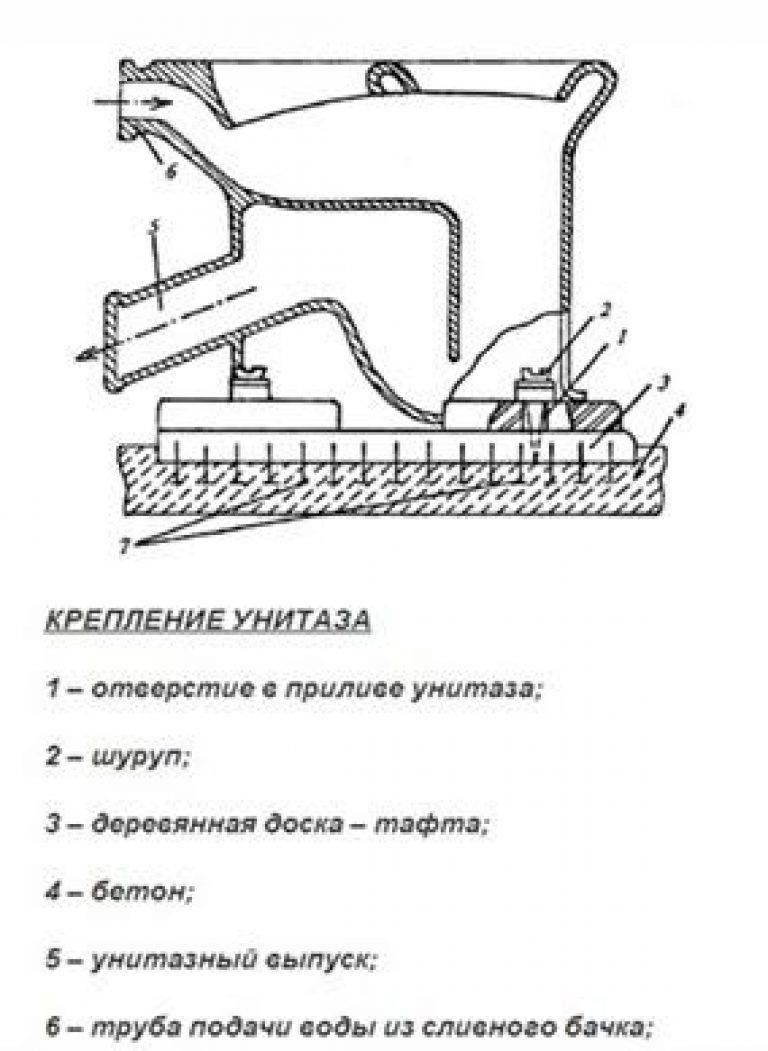
- The first option for floor installation is anchors embedded in the screed. During the pouring of the floor, long anchors are fixed at the place where the toilet bowl and its fasteners will be located. After the screed dries and the floor is finished, a toilet bowl is attached to the anchor. This is the most difficult method of fastening, since it is difficult to install the anchors so evenly that the toilet stands on them without problems. It often happens that inexperienced builders choose too short anchors, on which it is then impossible to screw nuts. The anchor embedded in the floor must be at least 7 cm above the finish surface in order to screw the toilet to it. Gaskets are required under all nuts so that the surface of the toilet does not crack.
-
The second option for securely fixing the toilet bowl on the surface during the overhaul of the toilet is installation on a wooden base. The main thing is that the board strictly matches the size of the base of the toilet bowl. When pouring the floor, the board is prepared by hammering nails into it. Then it is laid in the solution with nails down. After the screed has dried and the room has been finished, the toilet bowl, previously planted on a layer of epoxy resin, is screwed to the board using ordinary screws. Under them, rubber or polymer gaskets are also needed.
-
Fastening to the floor when anchors and board are not provided.To install plumbing on a finished surface, say, on a tile, it is convenient to use dowels. The toilet is placed in the place where it needs to be installed. Attachment points are marked on the floor. Then they need to be drilled deep enough, but without hitting the waterproofing layer in the screed. Before installing the toilet, you need to increase the reliability of the installation with epoxy / sealant. It would be nice to pour a drop of sealant into the holes drilled for the screws. On an epoxy pillow, the toilet will stand like a glove. Screw caps are also needed.
You can fix the toilet with a wall tank without screws, for one resin. True, with this method of fastening, it is first necessary to clean the surface of the tile so that the glue holds better.
When using "epoxy" it is important to allow freshly installed plumbing to dry properly and gain a foothold on the floor surface
Fixing the toilet to the wall
How to install the installation
Wall hung toilets are being used more and more. Their installation is not much more complicated than usual (by the way, you can read about installing a toilet bowl with your own hands on our website). A wall-mounted toilet, as its name implies, will not have contact with the floor surface. It is suspended using a metal frame, which is attached to the load-bearing wall itself. The cistern and pipes of the toilet in this case are behind a false plasterboard wall. If the mounted plumbing has an open tank, then it will be possible to fix it on the wall itself, but then the sewer pipe should be inside the wall. The same anchors embedded in the wall or in the supporting frame will hold the structure.
Installing a toilet on a pedestal
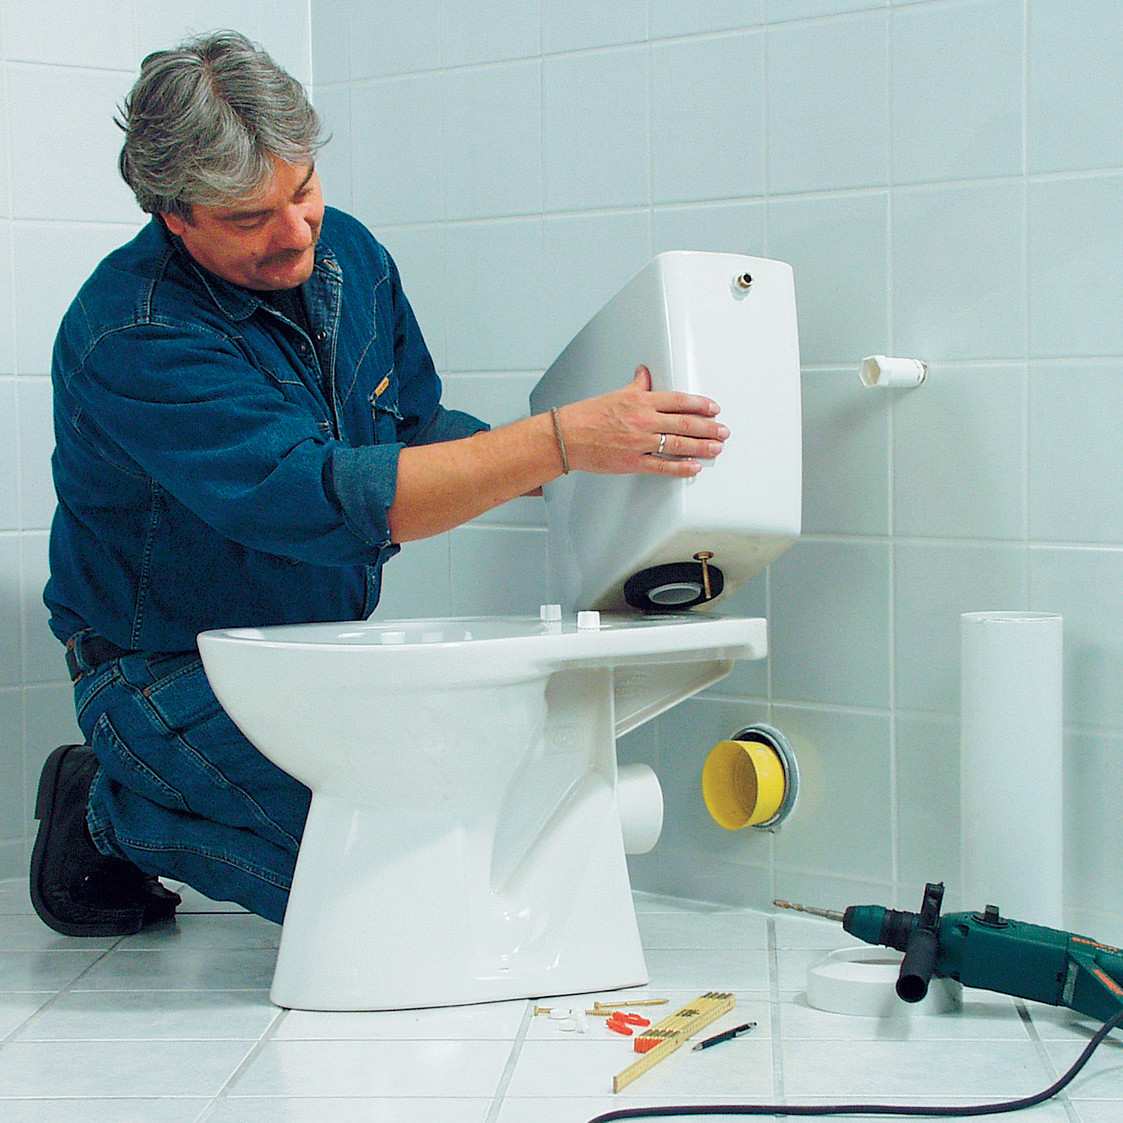
After fixing the toilet bowl on the wall or on the floor, it remains only to assemble the toilet bowl.A tank is placed on the base, already securely fixed, or a pipe is connected to it from a tank hung on the wall.


Installing a toilet on a pedestal
It remains only to check if the toilet is working, and if there are any leaks. We turn on cold water, wait until the tank is filled, adjusting the filling level. We set up the locking mechanism according to the instructions. Rinse and see if it flows from the drain.
The last step is to screw the toilet seat. But here you, for sure, can already handle it yourself.