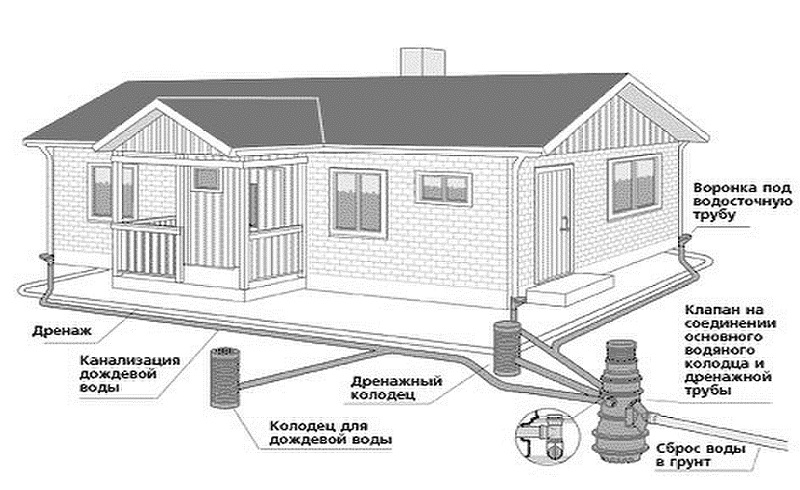
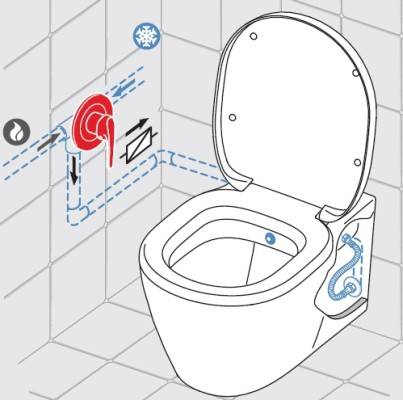
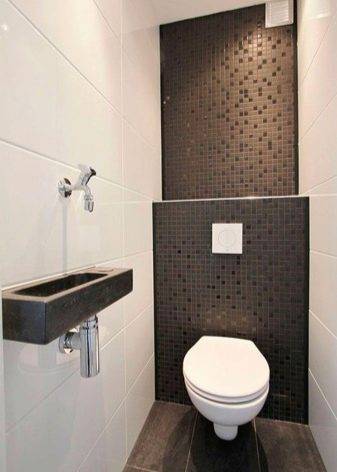
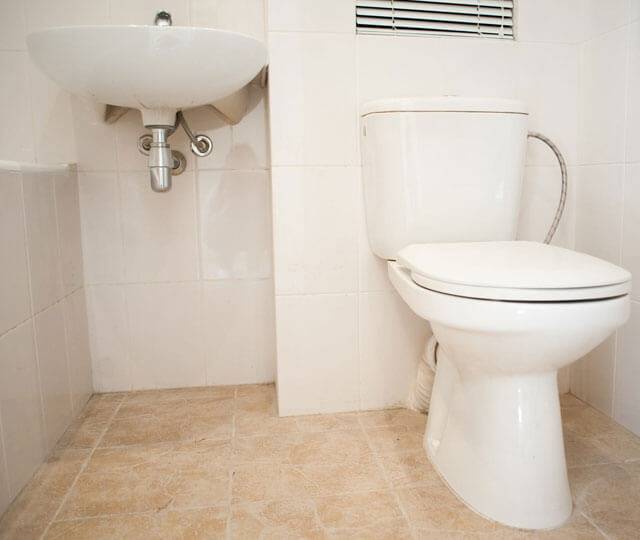
- The device of the sanitary unit
- Floor bidet connection technology
- Equipment preparation
- Mixer installation
- Sewer connection
- Assembly of the structure
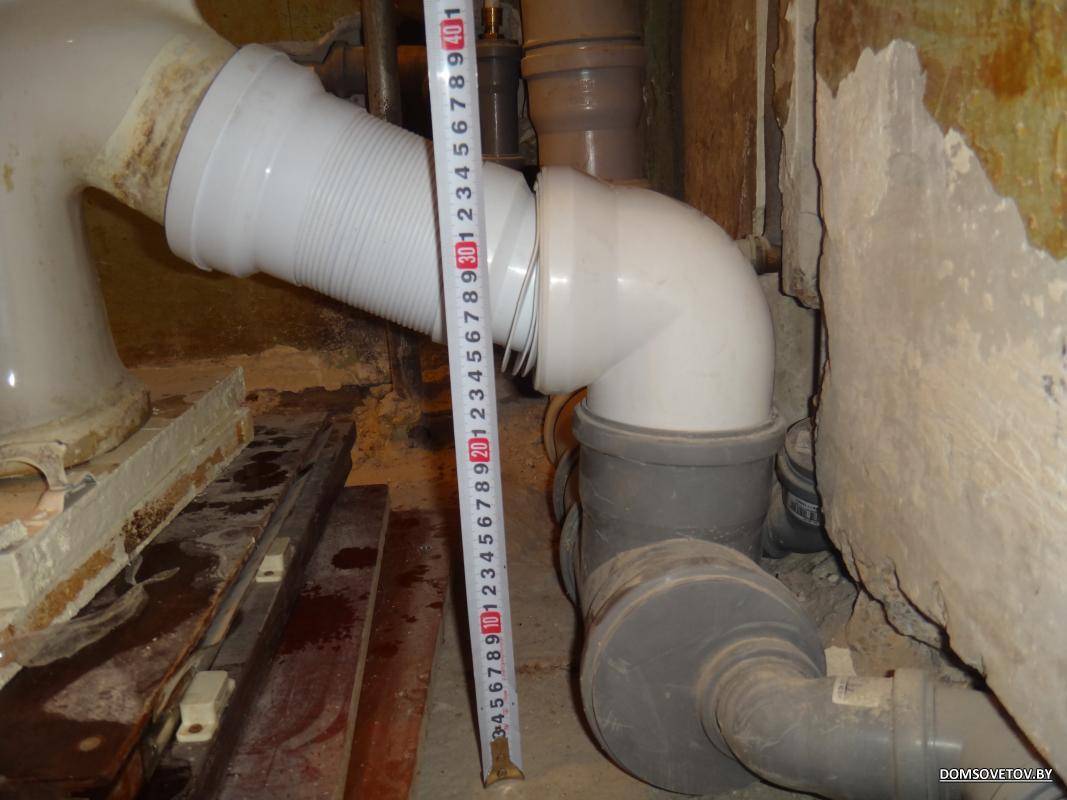
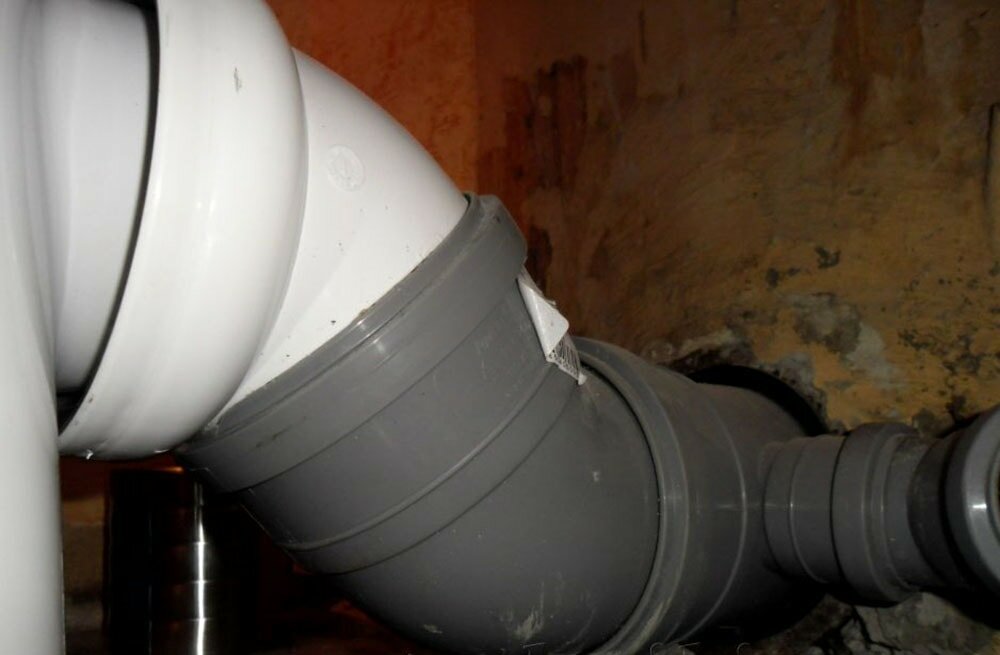
- Ways to connect the toilet to the sewer
- Direct connection
- Corrugated connection
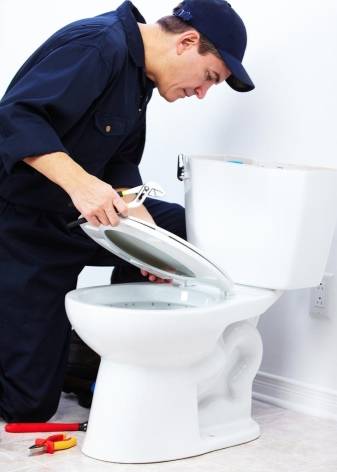
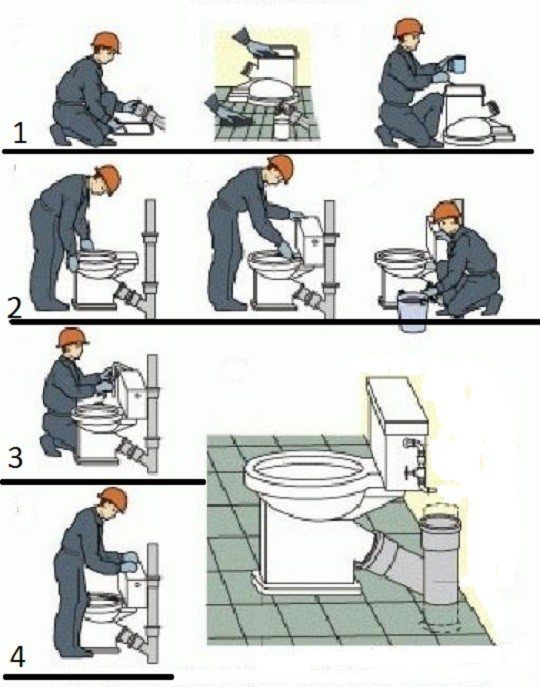
- Mounting
- Tools
- Preparatory work
- Installation
- Connecting sewerage and water supply
- Finishing
- Tank replacement
- The nuances of choosing a new plumbing fixture
- Mounting
- Vertical
- Horizontal
- oblique
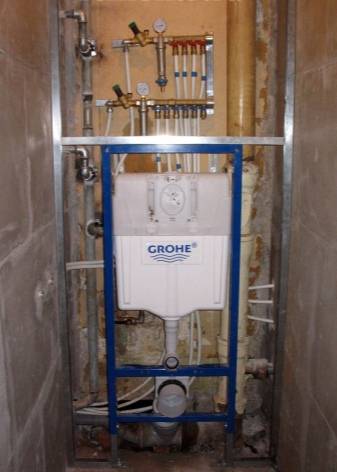
- Types of installations for the toilet
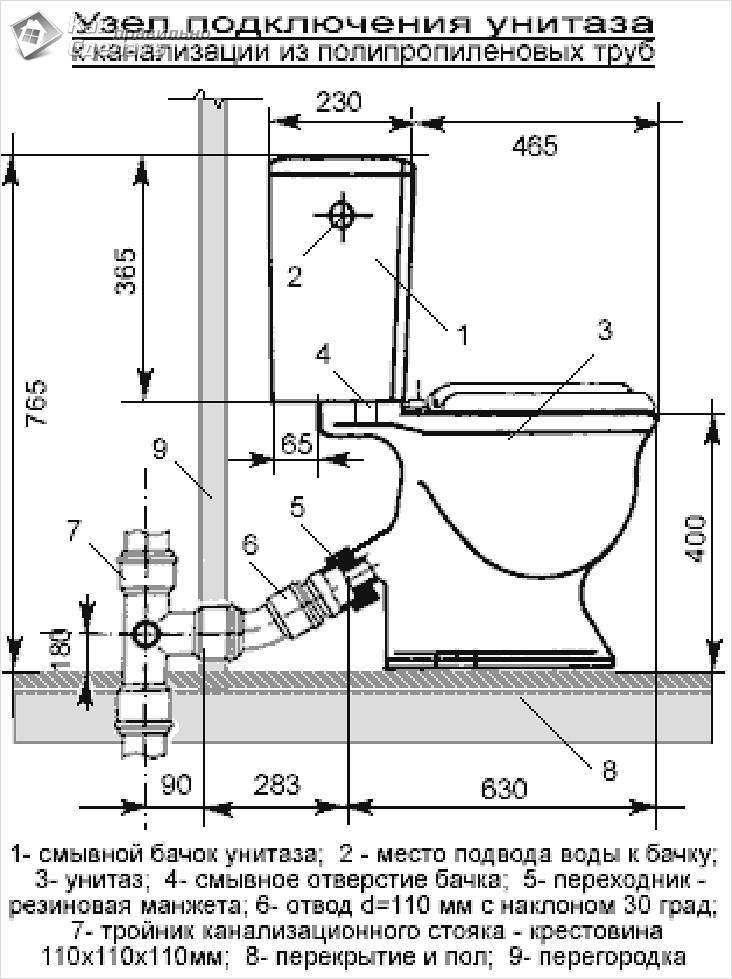
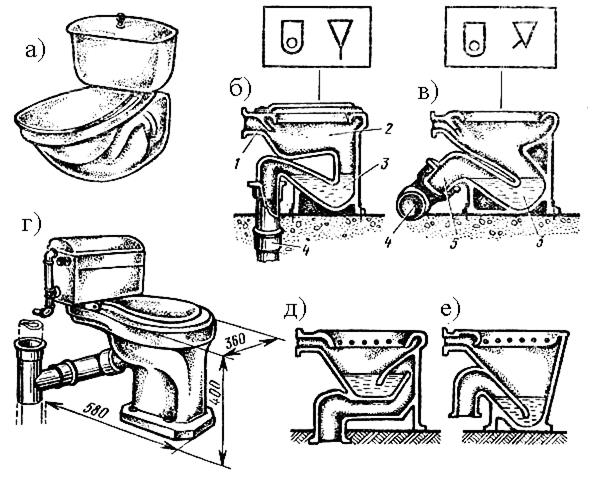
The device of the sanitary unit
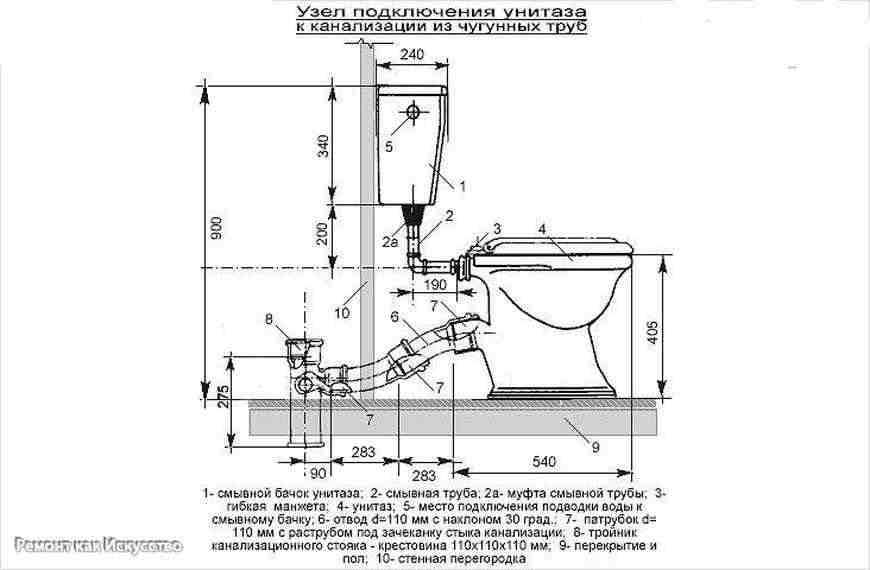
 Connection node
The sanitary unit consists of:
- toilet bowl,
- platforms for installing a drain tank,
- toilet siphon,
- siphon holes,
- release of the toilet bowl (ceramic branch from its body),
- toilet outlet pipe.
This list includes a connecting "elbow", a sewer riser and connection elements.
The installation method of the node is based on the nature of the drainage into the sewer pipe. Considering the features of the equipment, taking into account the standards for the installation of sewer systems of Western and Chinese manufacturers, more often the choice falls on horizontal and vertical outlets.Domestic manufacturers have increasingly begun to resort to the same schemes for arranging a bathroom, along with the still available oblique outlet for connecting to a vertical common riser, which leads to the need to look for a rare obsolete model of a bathroom and its elements when repairing such a toilet bowl.
Floor bidet connection technology
Connecting a bidet to the sewer is a task of medium complexity. But, strictly adhering to the installation technology, even a novice master who knows only the basic skills of repair work can perform it.
When choosing a place to place a bidet, take into account the availability of free access to pipes
The floor bidet is installed in the immediate vicinity of the toilet. The distance between the devices must be at least 70 cm.
Equipment preparation
The first thing to do before connecting the bidet to the sewer is to read the instructions attached to it and check the presence of all the components of the structure.
The bowl of the standard model is equipped with three holes: the top one is for installing a mixer, on the side inner board - for overflow, at the bottom - for direct draining into the sewer pipe. The drain valve is independent of the device configuration. It is fully automatic.
To connect a bidet to the sewer you will need:
- puncher with a set of drills;
- wrenches and wrenches;
- Screwdriver Set;
- mounting tape;
- waterproofing tow;
- silicone sealant;
- marker or pencil.
The connection diagram of the bidet to the sewer, attached to the instructions for the device, must be kept at hand at all stages of installation.
Mixer installation
In most models, the faucet is not included with the bidet.It should be purchased in advance at the points of sale of sanitary equipment.
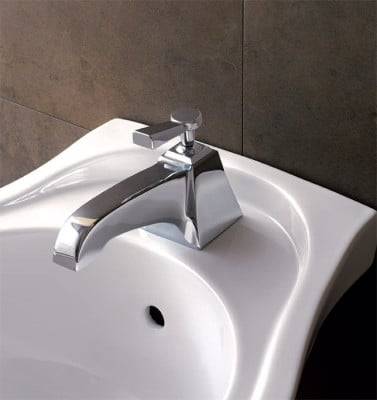
Installation of an external faucet involves fixing the device on the outside of the bidet through a special hole
The installation technology is in many ways similar to the installation procedure for a sink faucet.
The procedure is performed in several stages:
- Flexible hoses are fixed in the threaded sockets of the mixer.
- The mixer is installed on the outside of the bowl, tightening the nut from below.
- In place of the siphon, a drain valve is attached.
- Connect hot and cold water pipes.
- All mating elements are compressed.
When connecting models with internal filling bowls to the sewerage system, it should be taken into account that cold water must be supplied to the spout directly from the storage tank located on the back side. The hot water supply pipe must also be supplied independently.
Sewer connection
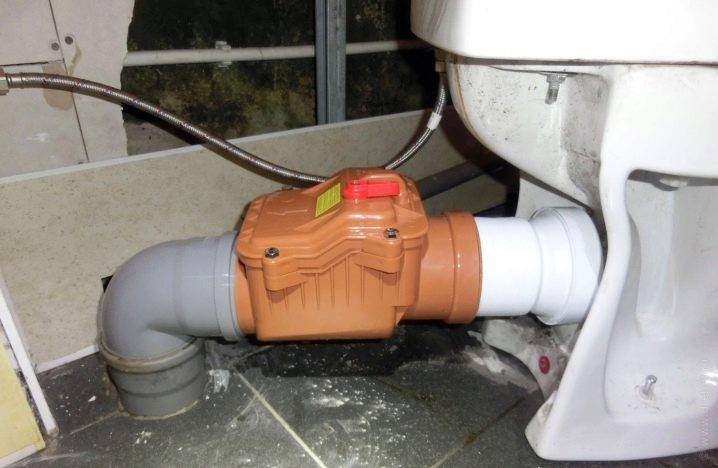
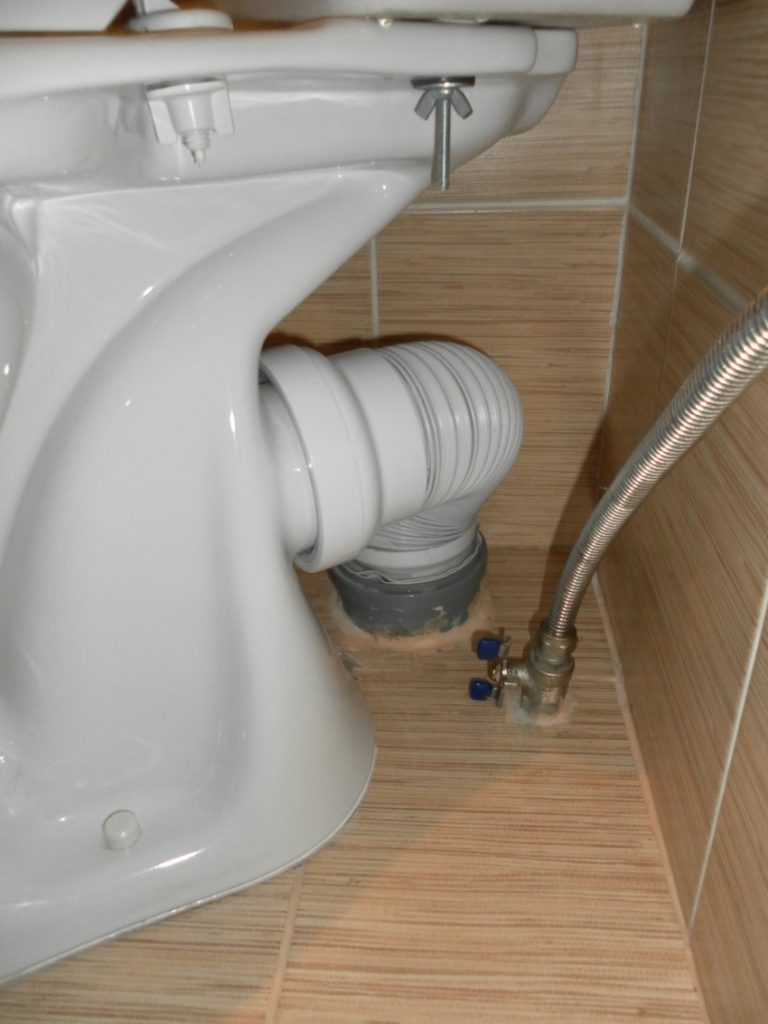
To connect the bidet to the sewer, masters recommend using rigid hoses. But, to simplify the task, a corrugated pipe can also be brought to the sewer. The layout of sewer pipes is best done in such a way that the attachment points of the hoses are located directly behind the plumbing.


It is impossible to connect to the system without installing a siphon
Bidet siphons differ from their counterparts designed to connect sinks and showers with an extended drain pipe and a smoother bend of the elbow. This solution allows you to create a water seal of a larger volume, ensuring uninterrupted operation of the system.
On sale there are also models equipped with several water seals. They are often used for hidden installation.If you need open installation, you can use siphons of both tubular and bottle type.
The technology for installing an open siphon includes the following steps:
- A drain grate is inserted into the drain hole, baited with a nut.
- On the reverse side of the neck, the receiving part of the siphon is installed, fixing the structure with mounting nuts.
- A siphon outlet is mounted to the overflow hole.
- The outlet end of the siphon, a corrugated pipe, is inserted deeper into the socket of the sewer system.
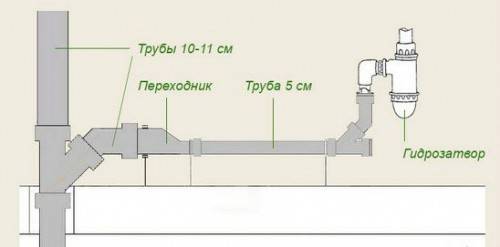
The diameter of the sewer outlet must be at least 100 mm
To connect equipment with upward water supply, it is better to invite specialists. Sanitaryware with internal filling of the bowl has a more complex configuration. Without knowing the intricacies of installation, it will be difficult for you to connect the bidet to the sewer without making mistakes.
Assembly of the structure
Having completed all the stages of connecting the bidet to the sewer, it remains only to fix the plumbing.

The floor bidet is mounted to the floor, fixing it with special fasteners for the toilet
Sequencing:
- Install the device in the intended place, outlining the contour of the sole with a pencil.
- Holes are drilled according to the marks made with a puncher.
- Plugs are inserted into the holes, then the bidet is inserted at a given mark and the fixing screws are tightened, not forgetting to place rubber gaskets under them.
The installation and connection process is described in detail in the video:
Having installed the structure, check the correctness of the connections and start the system. To make a test run, open the valves and observe: if the water pressure is good and there are no leaks, the work is done correctly.
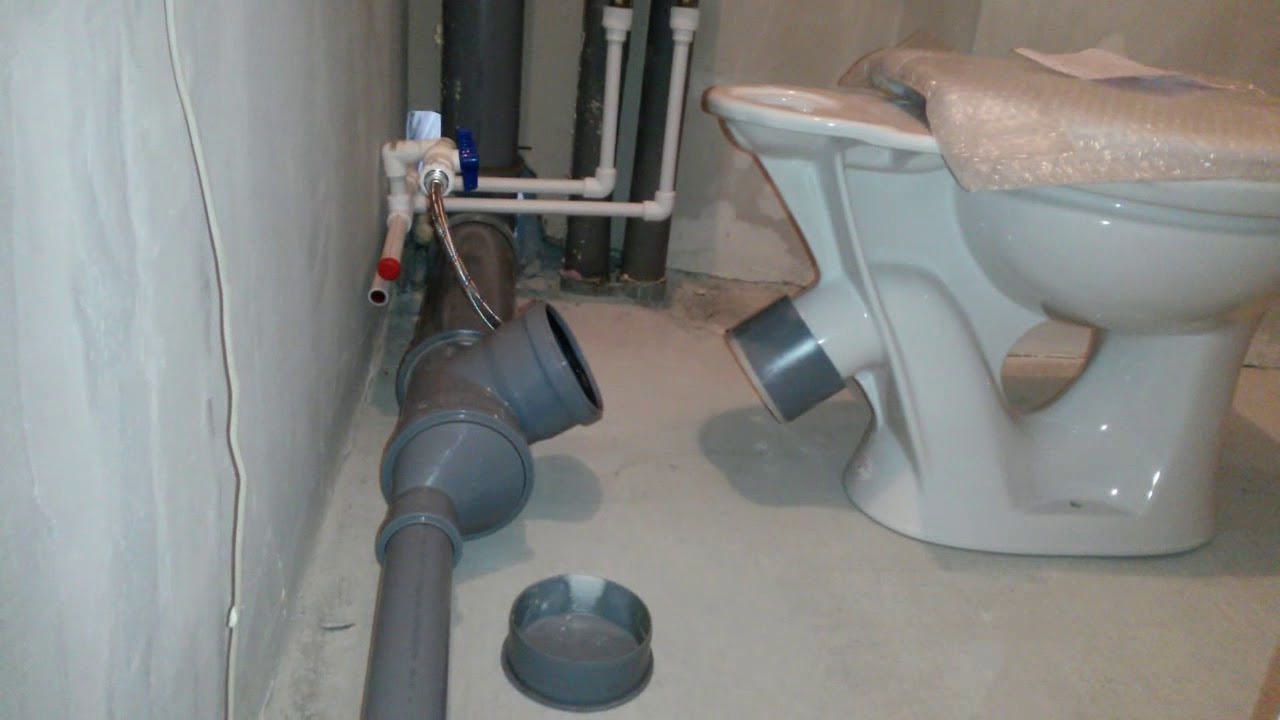
Ways to connect the toilet to the sewer
The toilet is connected to the sewer pipe in one of two ways. Even in a private house, it will be possible to easily cope with the work if you first make the best choice before the options. What options are described by professionals?
- Direct connection;
- Corrugated connection.
Connecting the toilet to the sewer is possible in both ways. Each of them has its own characteristics that make you take the work you do seriously. Mistakes are the main problem for beginners, but most often they appear solely due to oversight.
Direct connection
Having clarified the question of how to connect the toilet to the sewer, you will first be able to get acquainted with the direct connection. It has been used for several decades, so all the details of the process are well understood. Only without professional skills to cope with such a task is not always possible. The reason for this is improper preparation, as well as ignorance of several important points.
When connecting the toilet to the riser, you must first select the correct position. To do this, it is enough to estimate the location of the socket in advance so as not to miss and ensure a rigid connection. An experienced master can easily cope with this task, immediately assessing the situation.


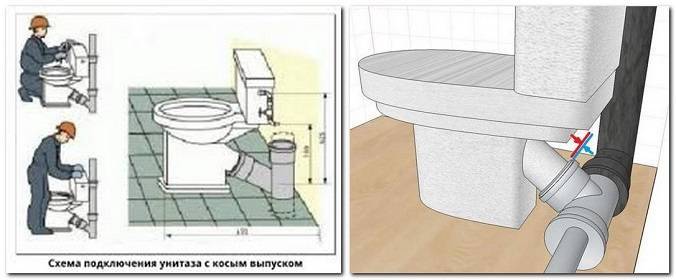


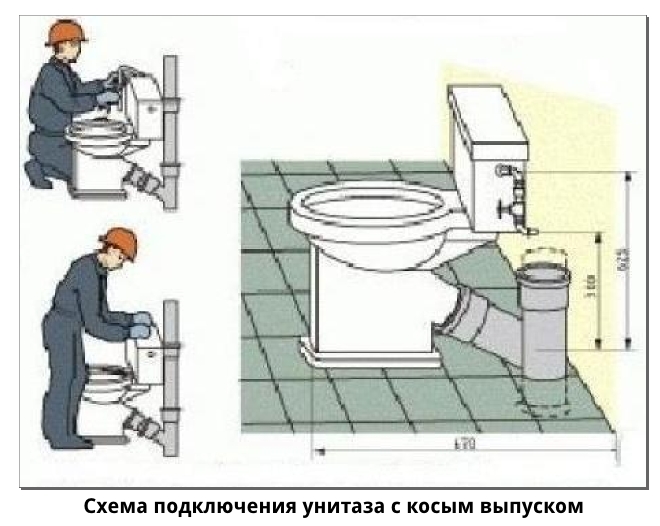
In the absence of the necessary knowledge, a scheme for connecting the toilet to any sewer will be required. The knot remains the main problem to be faced. A rigid connection requires care, as there will be no margin for movement. Otherwise, the installation is completely consistent with the standard, without requiring additional actions.
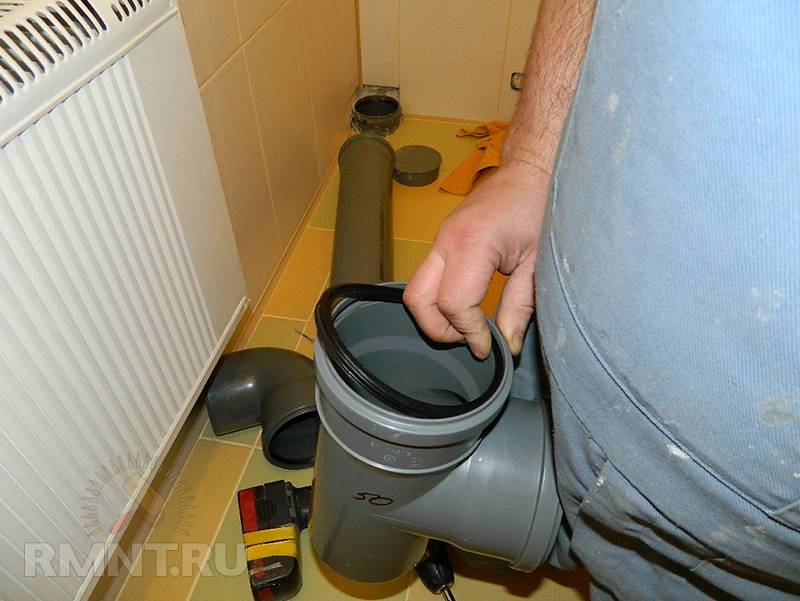
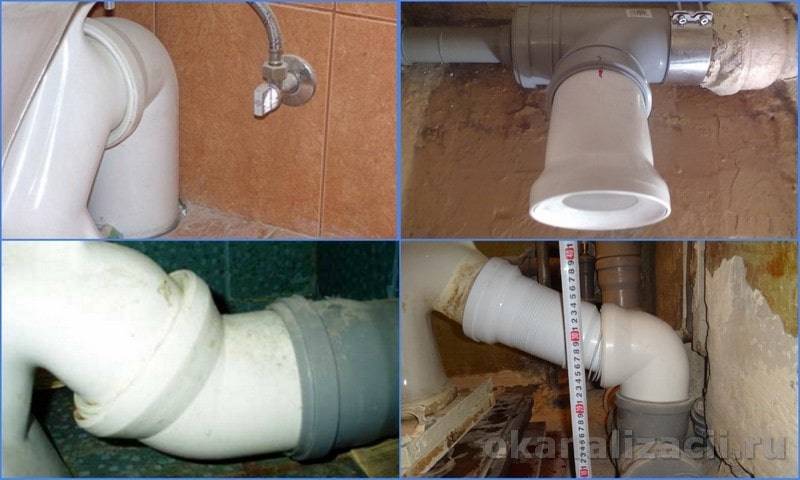
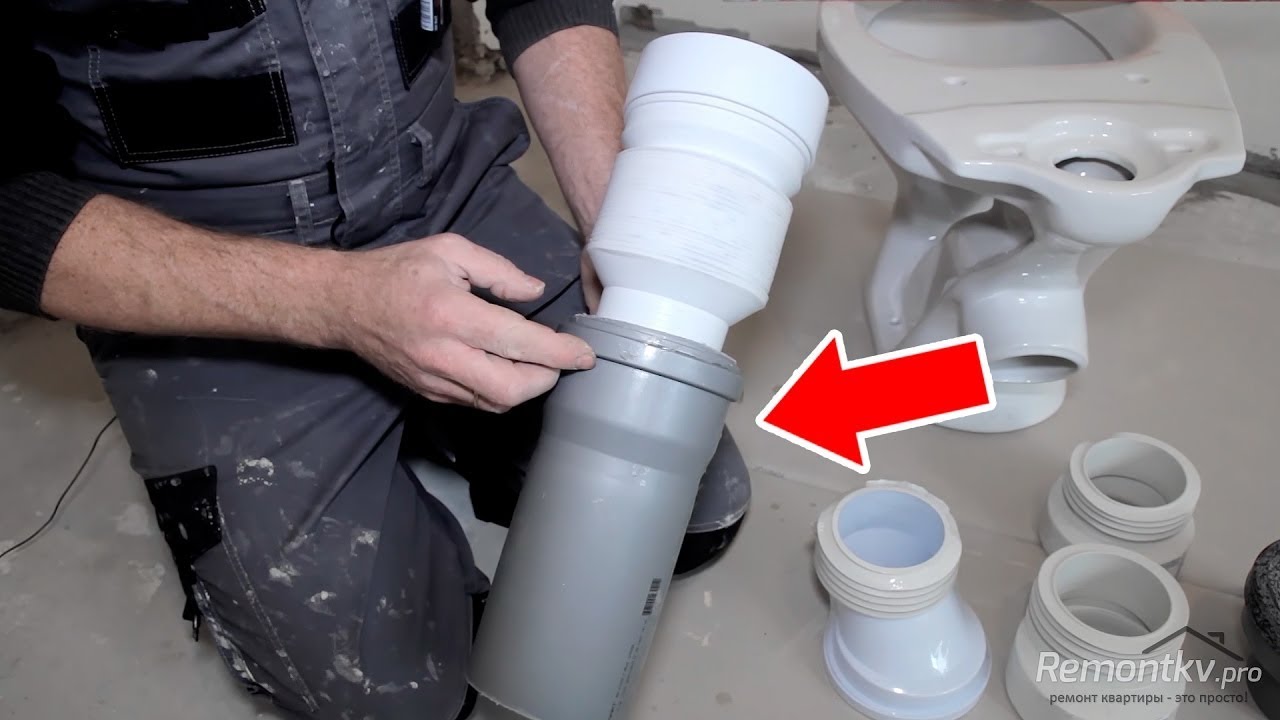
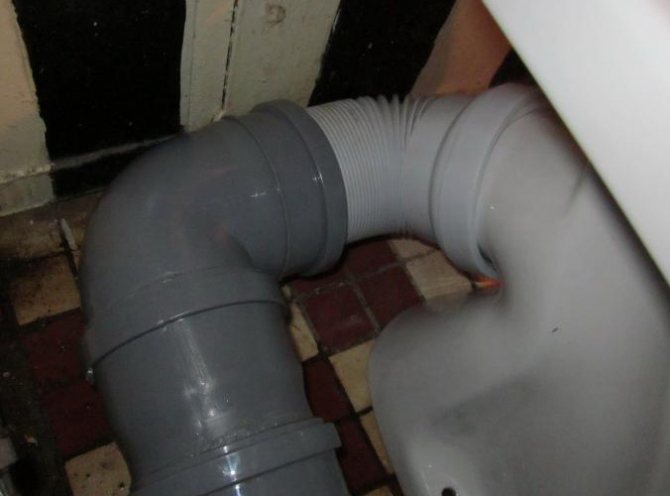
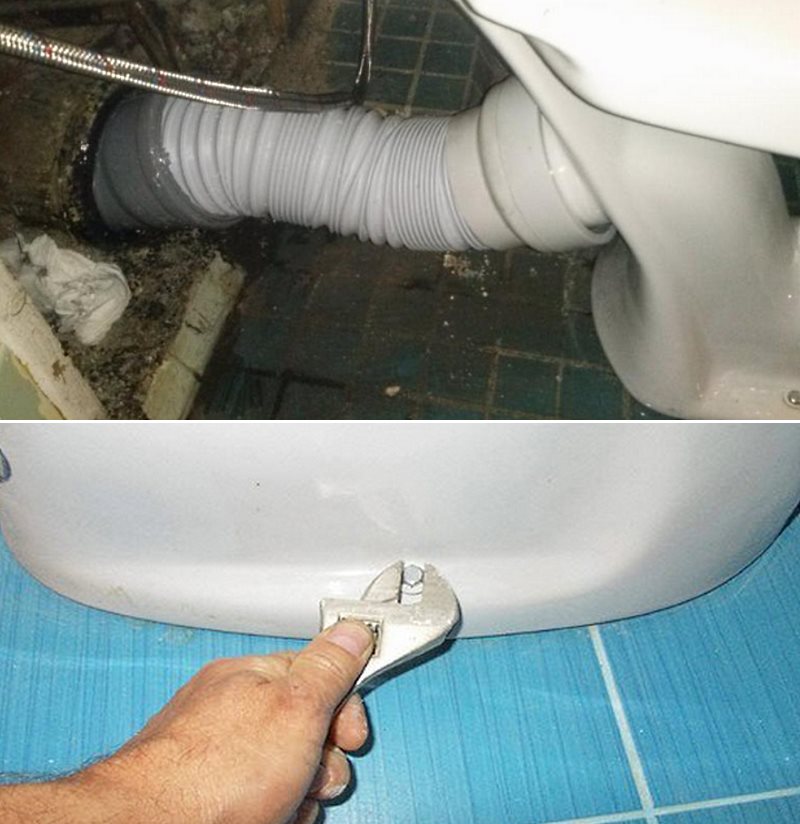
Corrugated connection
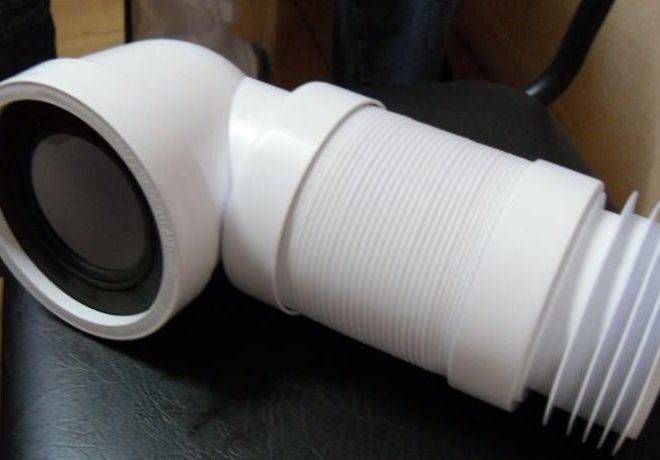
Sewerage is laid with plastic pipes, and then all points are connected to them. Moreover, a drain with a diameter of 110 mm has been prepared for the toilet bowl. This is a standard used in engineering systems since the Soviet era. Masters take a ready-made flexible connection, which gives a free drain.
Corrugation is a separate topic for conversation. If you need to know how to connect the toilet to the sewer, you will have to get to know it. Professionals have long resorted to such means, which guarantee cleanliness and unlimited accommodation.
Mounting
Many owners believe that it is very difficult to install the installation, and they cannot cope with such work on their own. Actually it is not. Consider step by step how to properly mount such a system with your own hands.
Tools
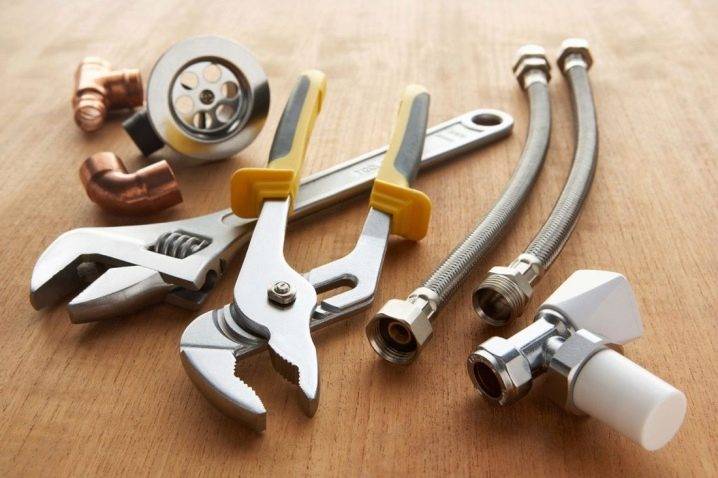
To install a floor or pendant installation yourself, you will need the following tools:
- laser or bubble level (choose a tool that will be more convenient for you to work with);
- a special construction pencil or marker for marking;
- perforator;
- drill for concrete;
- roulette;
- open-end wrenches (overhead).
Preparatory work
Installations assume the presence of a separate niche in the room, in which the frame will be located. It should be borne in mind that the walls in the room must be quite reliable and strong.
The niche in the room should have the following parameters:
- 1000mm high;
- 600 mm wide;
- 150-200 mm deep.
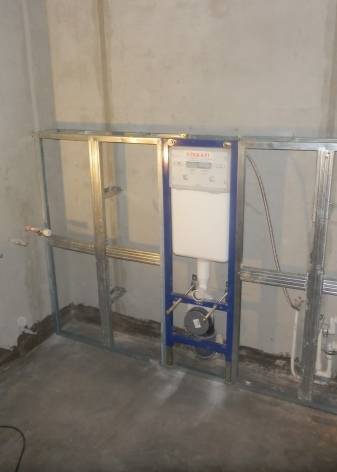
There are cases when the requirements for depth are quite difficult to fulfill. Then the niche should be made as deep as possible. At the same time, its disadvantage should be sheathed (closed) with drywall and covered with a finishing material.
Installation
After preparing the niche, you can proceed to the installation of the installation.
- First you need to fix the metal frames to the wall. As a rule, in these structures there are initially holes with which the frames are attached to the dowels.
- There should be two attachment points - to the wall and to the floor.
- Further, sewer and water pipes must be brought to the installation site.
- Be sure to check that the frame is level. Nowhere there should be distortions and significant deviations from the level.
- Horizontal adjustment should be made using wall mounts.
- At this stage, the height level of the hanging toilet is also set. First of all, this parameter will depend on the growth of households. Most often, the height of the toilet in this case is 0.4 m. The height of the bowl can be adjusted at your discretion in the future.
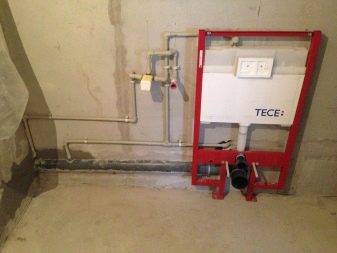
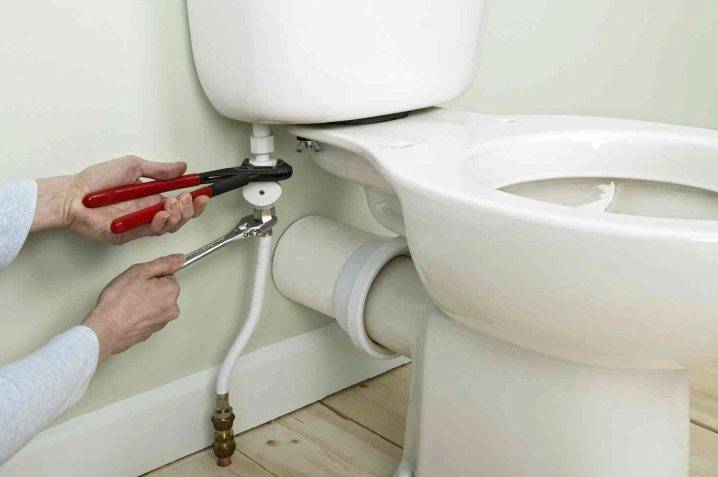
Connecting sewerage and water supply
After fixing the toilet, you need to bring water to the tank. To do this, you can use a flexible or rigid system. Most specialists use a hard approach, because it is more reliable, durable and durable. Of course, it is permissible to install flexible hoses, but if they get damaged or deformed, then they can not be easily reached and quickly removed. During the installation of the liner, the tank valve, like the drain, must be closed.
After connecting all the necessary elements, you need to check the reliability and quality of the fasteners. To do this, open the water in the tap and fill the tank. If you notice a leak, then it must be fixed. In this case, water may remain in the tank.


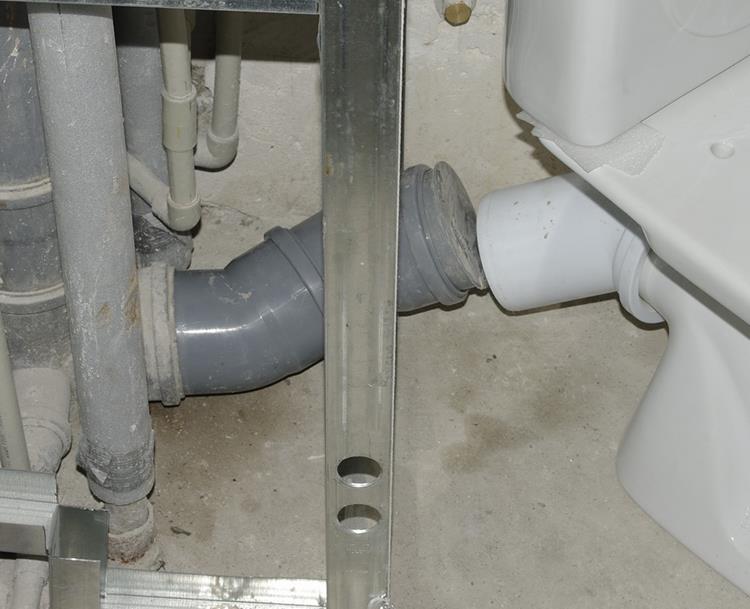


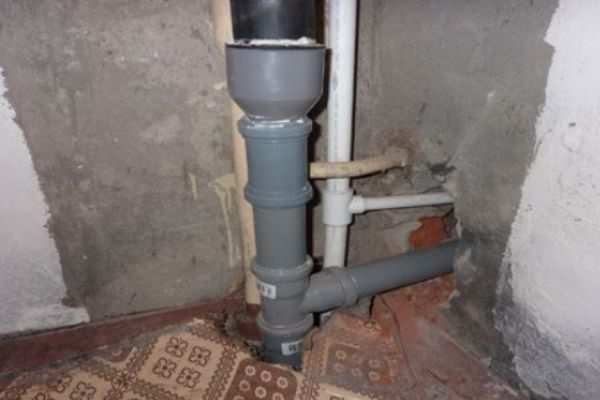
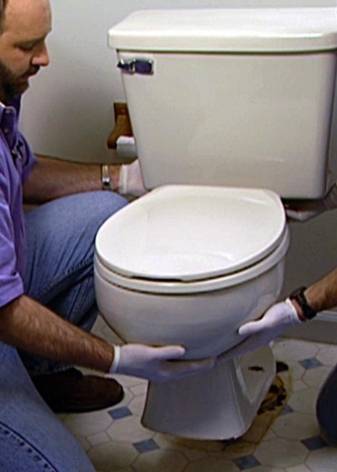
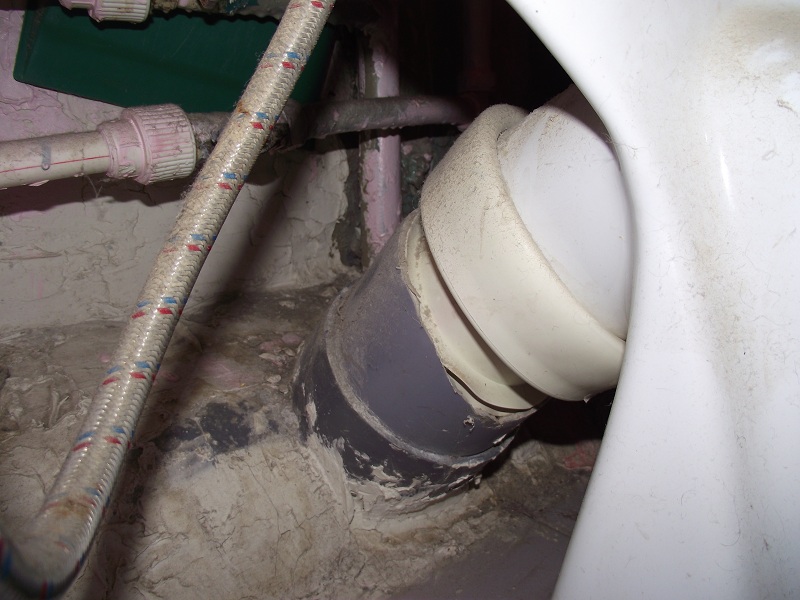
Next, you need to connect the toilet to the sewer.To do this, the drain hole of the plumbing fixture must be inserted into the outlet of the sewer pipe using a suitable corrugation. There are also models that can be assembled without using it.
After completing all work, you should make sure that the installed system is sufficiently tight. To do this, you need to temporarily screw the bowl to the frame. After that, it will need to be removed again. You can mount this part only at the end of all installation work.
Please note that the sewer pipe wiring must be connected before the installation itself begins. Its diameter should be 100 mm (norm). It must be laid with a special slope.
Finishing
After installing all the components, it is necessary to close the structures with a plasterboard sheet. Functional elements must be sewn up with similar sheets / panels. For the bathroom, you should buy only moisture-resistant drywall, which is more durable and wear-resistant than simple material.
To make the finish more reliable, it is recommended to screw it to a metal frame assembled from a profile, as well as to a toilet frame.

Sheathing can be done in two ways:
- over the entire plane of the overlap;
- only along the plane where the installation is located.
The second way of finishing involves the formation of a small shelf located directly above the bowl. It can be used to place the items needed by the owners. After that, the closed barrier must be finished with tiles or PVC panels - it all depends on how the rest of the partitions in the room are decorated.
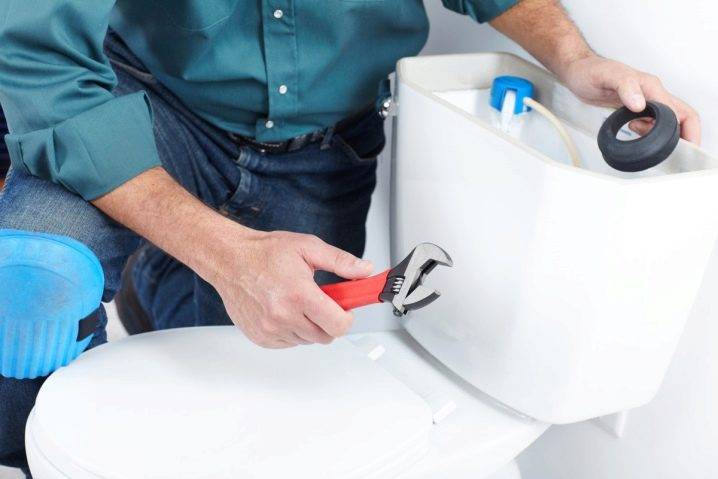
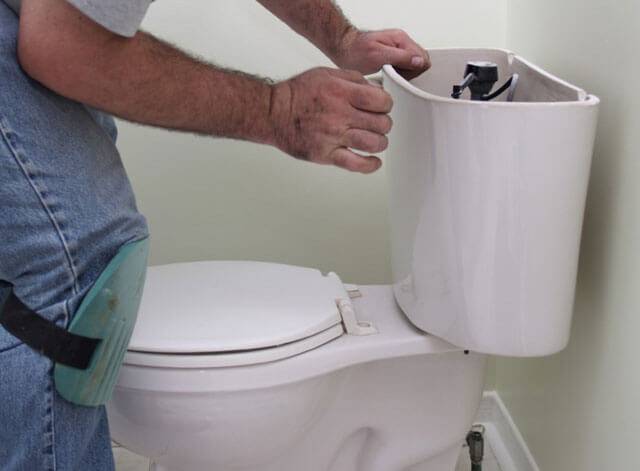
Tank replacement
toilet cistern installation
Do-it-yourself toilet cistern replacement is the last step in the process of replacing a toilet bowl.If we are talking about a barrel that is attached to the toilet shelf, then the pipe must be connected to the neck with a rubber cuff. This will be enough to ensure a strong and tight connection. At the same time, one third of the rubber cuff is put on the pipe, and the remaining two thirds are turned inside out. Then this part must be pulled over the previous one. Here it turns out that the end of the pipe is released. Then the pipe and neck are combined with each other. The inverted part of the rubber cuff is pulled over the neck. Thus, we can say that the tank is perfectly fixed. No additional action is required. A rubber cuff is enough to ensure a tight connection. At the same time, it is worth checking the density of the cuff nozzle so that unpleasant events do not occur with neighbors from below.
attaching the toilet cistern to the toilet
Sometimes a situation arises when the tank is mounted at a short distance from the toilet on the wall. In this case, one rubber cuff is not enough. It will take a little more effort and skill. In this case, a pipe is screwed to the barrel, and its opposite end is lubricated with red lead and wrapped with tow. The neck of the toilet bowl and the pipe itself are connected by means of a cuff. It is fixed on the pipe with a thin wire. Now you can power the flush tank and adjust the water level in it.
Thus, the work on replacing the toilet bowl can be considered completed. As you can see, all actions do not require any special preparation. The work may well be done by hand.Of course, if we are talking about a toilet that is installed on the floor. Otherwise, it is difficult to do without the help of a plumbing specialist. By the way, even before starting work on replacing the floor toilet, you should consult with a professional. It will help you understand all the intricacies of the work. For those who are well versed in the work associated with the installation of plumbing, this manual will definitely help. It is also suitable for those who have never tried to do such work on their own before. Here is a detailed instruction describing all the main stages of work, as well as a video showing clearly how the toilet is replaced with your own hands. Many will definitely benefit from this guide. In addition to the work related to the installation of the barrel and the toilet itself, it contains information on how to correctly dismantle the old unit so that there are no further problems in operation. The video will help even those who decide to save money and not call specialists, although they are dealing with this type of work for the first time. Everything is shown clearly and will be understandable to absolutely everyone.
The nuances of choosing a new plumbing fixture
Before carrying out repairs in the bathroom, you should carefully prepare for it. It is especially necessary to think about how to change the toilet bowl in the apartment with your own hands when the residents continue to use the toilet.
In this case, plumbing should be changed as quickly as possible, but without the proper organization of repair work, this becomes impossible. First of all, they make a choice of a suitable model, prepare all the tools and building materials, and then proceed to implement their plan.
The most important thing, before you install and dismantle the toilet, is to purchase a new plumbing fixture. Depending on the model chosen, a set of tools and materials is prepared for replacement.


Toilets are of two types:
- floor;
- suspended.
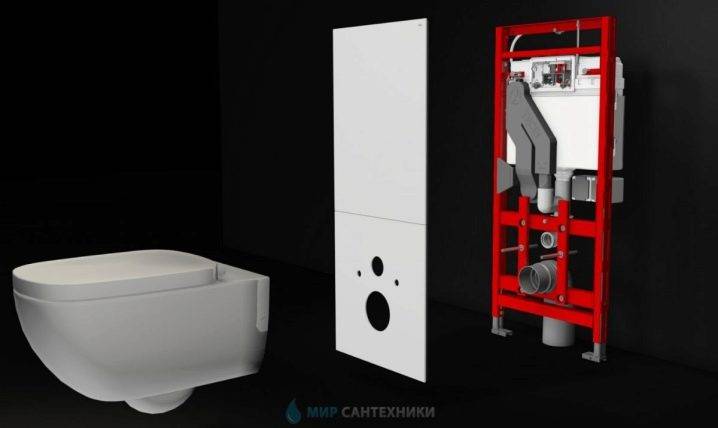
Floor models are more popular and their choice is huge. They are of the "compact", "monoblock" type, with a separate tank and bowl, as well as with a flush system of a hidden design.
A monoblock is a product that combines a water tank and a bowl into a single system. In the toilet - a compact, these two parts are sold as a set and connected during installation - this is the most popular option presented on the domestic market for sanitary products.
A retro model, during the installation of which the tank must be placed under the ceiling and connected to the bowl with a pipeline, has become less and less common in recent years. In them, in order to flush, you should pull the rope or chain with a handle. Such plumbing looks appropriate in a bathroom decorated in the appropriate style.
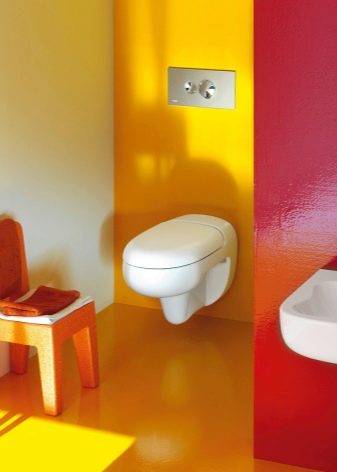
The modern solution is the arrangement of a hidden drain system. Before replacing an old toilet bowl with a new one of this type, it is necessary to consider the construction of a false wall, behind which a drain tank with an installation system will be hidden. Externally, hidden models look very neat, since only the drain button will be located on the wall, and engineering communications will remain hidden.
The bowl of the hanging toilet bowl is not placed on the floor. It is hung on anchor bolts built into the wall. As a result, there is free space under the bowl and it can be used to good use.This design is also advantageous from a hygienic point of view. It is not difficult to wash the floor under it, but a dirty coating often collects around the floor product.
Another important point that should be considered before replacing the toilet with your own hands is the direction of release from the bowl, which can be of three types:
- at an angle;
- direct;
- vertical.
As for devices with a vertical drain, they are usually used in the homes of America and China. Its convenience lies in the fact that the toilet bowl can be located anywhere in the bathroom, and communications are laid in the interfloor overlap. We also implement this arrangement option in domestic sewer systems, but only in private households.
Mounting
So, the dismantling can be considered completed, and therefore it's time to move on to another stage. Understanding how to properly install a toilet is actually not difficult. You just need to understand what type of release you are dealing with. As you remember, it can be vertical, horizontal and oblique.
It is about how to install a toilet bowl with your own hands with all three variations of the release that we will now tell.
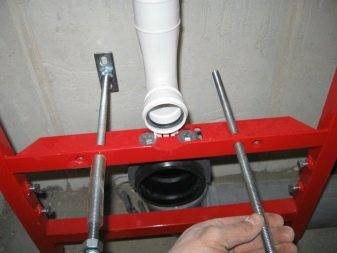
Vertical
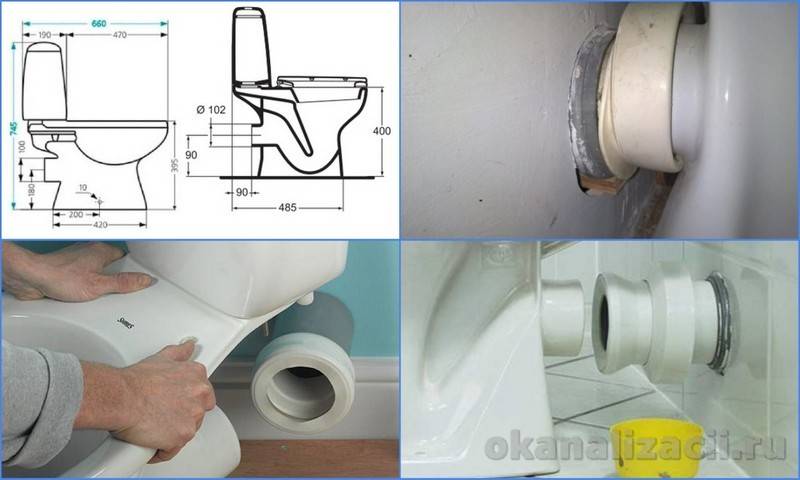
Diagram of how to connect the toilet to the sewer and fix it to the floor
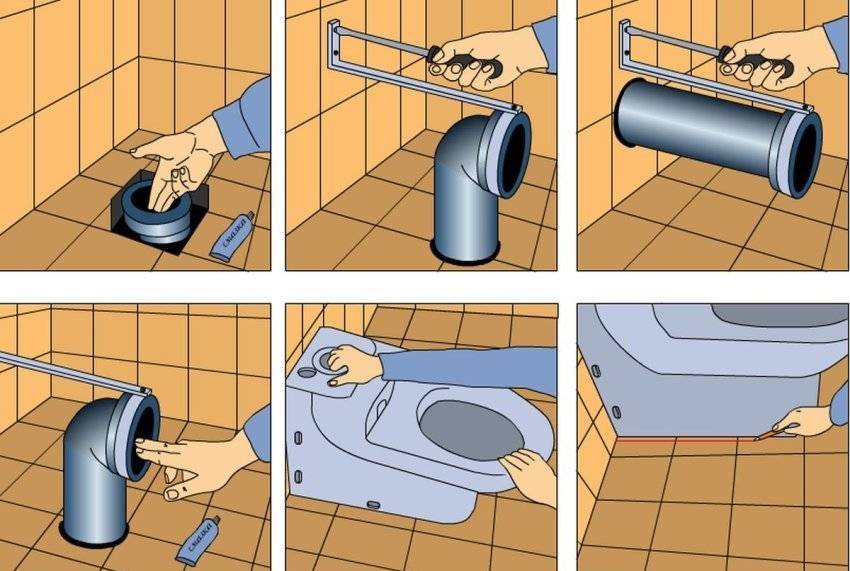
- First, remove all debris from the sewer socket, make it relatively clean.
- Place the cuff into the socket using silicone sealant.
- Insert the release into the cuff, but do not use the sealant yet, place it in the required place, make markings for the holes.
- Now installing a toilet bowl with your own hands provides for the need to make the necessary holes with a power tool.
- Please note that installation on a tile has its own characteristics.You need to drill a layer of tiles first with a special drill. Moreover, its diameter should slightly exceed the diameter of the drill, suitable for fastening.
- Apply sealant to the outlet, insert into the cuff and fix with screws.
- The problem of floor damage is quite relevant. Therefore, the installation of the toilet on the tile must be carried out carefully. Try to tighten the screws evenly so that the plumbing does not warp.
- It is necessary to tighten not until it stops, but until the product stops hanging out, staggering.
- For better fastening, grease all cracks with a solution of cement and clay.
- Now you can connect the toilet to the sewer, and you probably know about these subtleties from our previous materials. One way or another, but connecting the toilet is quite simple.
Horizontal
We have already figured out how to install a toilet bowl with our own hands with a vertical release, and therefore we move on to a direct one, that is, a horizontal one.
- If the sewer system is configured specifically for the use of direct release, then the installation process will be similar to the previous method.
- If the toilet is not suitable, then the connection of the toilet to the sewer will be carried out using a corrugation and an eccentric cuff. They are mounted on a sealant, and it is not recommended to stretch the corrugation too much, otherwise there is a risk of collecting fecal deposits in areas that have sagged.
oblique
Installation instructions oblique outlet toilet
Under certain circumstances, the outlet from the sanitary ware may be located lower or higher relative to the socket. There are two ways out of this situation.


- You can use a corrugation or a sewer-weaving element with a socket made of plastic. Cut off the desired size, put it between the bell and the toilet, and ordinary sealant will help to strengthen such a connection.
- Or arm yourself with a special pipe in the shape of the letter S, and move the toilet bowl a little to the side - about 15 centimeters. As a rule, the size of the room allows this to be done. If this option does not suit you, and replacing the toilet is clearly not an option here, since you just bought a new one, you can make a kind of brick pedestal, thereby raising the product to the desired level in order to connect it to the socket.
Further connection of the toilet will be the final stage of work for you. You can start the system, check its reliability, the presence of leaks and some other problems.
Keep in mind that installing a toilet bowl with your own hands is not as difficult as it might seem. In fact, it is even more difficult to dismantle the toilet bowl in some cases, or to implement the installation of a tank on the toilet bowl. But you will complete many of these tasks based on useful recommendations on our portal.
Don't be afraid to do the hard work yourself. Even the usual instructions for installing a toilet bowl, which is attached to each plumbing product, will greatly simplify the task.
Of course, in some cases, it is extremely difficult to repair a toilet bowl yourself, there is not enough time, experience, certain knowledge, or just a tool. Then turning to specialists will not be shameful at all. Still, not everyone wants to deal with sewage, even if he knows how the toilet is replaced in just an hour.
Types of installations for the toilet
Today there are 2 types of installations, having their own design features.
Block structures
mounted only on the main walls and consist of a plastic tank with fittings. A set of fasteners is additionally attached to the toilet bowl. This type of installation for toilets is installed in a pre-prepared niche and is completely hidden in the wall. The main advantage of this design is accessibility, but if there are no main walls in the bathroom, then installation is impossible.
After buying a toilet, many decide to install it themselves. The procedure is very simple and does not require special skills. Increasingly, people are buying in order to save space, there is an additional design - installation, it provides fastening of the toilet to the wall. In such cases, installing a toilet installation with your own hands can raise a number of questions. To provide a complete picture of the work process itself, there is a special toilet installation instruction that will help in gaining all the necessary knowledge.
Let us consider in more detail the entire sequence of work that must be carried out when installing the installation of a wall-mounted toilet bowl.
Before starting work, you need to check the availability of all the tools that may be needed in the process. This is a tape measure, pencil or marker, a hammer drill with concrete drills, a building level, cap and open-end wrenches.
Now you should unpack the box with fasteners, see if everything is in stock. Manufacturers try to complete their products as much as possible so that a person does not have to buy additional fasteners.Therefore, it is enough to compare the equipment available with the one indicated in the instructions. Let's start the workflow.
The first step is to start applying the markup, which will indicate the place of attachment. Consideration should be given to the location of sewer drains to ensure the installation procedure is as simple as possible. Typically, the installation system should be located at a distance of 14 mm from the wall.
Now it is necessary to mark the attachment points of the drain tank, usually it is located at a height equal to 1 meter from the floor level.
It is also necessary to mark on the wall and floor the points of attachment of the installation elements.
After marking, it is necessary to make holes in the wall, floor, where the installation fasteners will be located, using a perforator, insert dowels into the holes.
Regardless of the type and features of the installation, it will require horizontal and vertical fastening.
Mounting anchors must be installed in the holes with installed dowels, with their help the installation will be attached to a vertical plane.
When installing, it is important to follow the sequence so that in the future there is no need to adjust the vertical level.
Now you can install the installation design itself, attach it to the levels.
It is very important to install the chassis in a level position relative to the vertical and horizontal levels.
Only after the installation is installed correctly, it is possible to tighten all fasteners and bolts, firmly fixing the structure.
Now comes the stage at which the sewer is connected to the installation, it is fixed.
The design was initially equipped with special plastic clamps, which will greatly facilitate the work and speed up the execution.
After all work is completed, you need to once again make sure that the installation is secure, that the bolts are properly tightened, and that the design complies with the levels. At this stage of control, one should be extremely careful, any inaccuracy or poor fixation of the structure in the future can lead to breakage.