- Examination
- The procedure for connecting the automatic machine
- Delivery and installation of the device
- Installation and connection of the washing machine
- Mounting options for different conditions
- Installing a car in a private house
- Installation of appliances in the kitchen and in the hallway
- Placement on laminate or wooden floor
- Embedded machine installation features
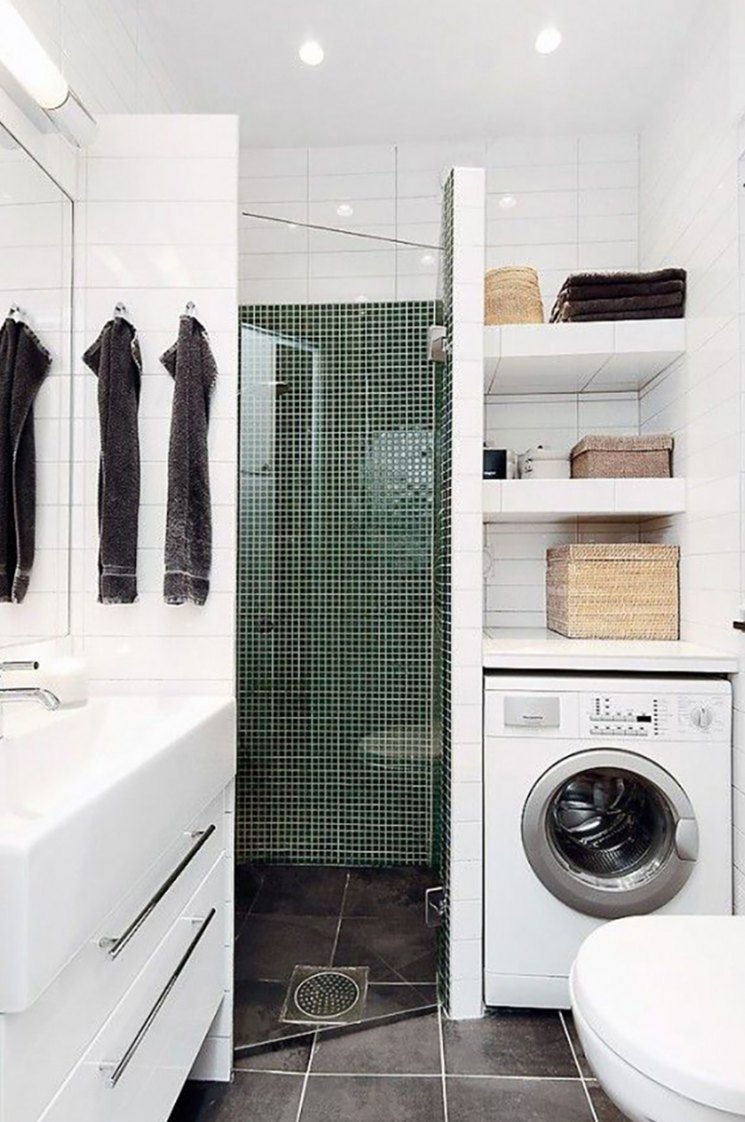
- Installing the machine over the toilet
- Connecting the washing machine to the sewer system
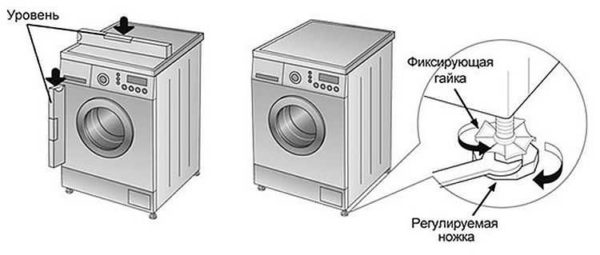
- The last step is setting the level.
- Tips of the masters
- Features of installation in various conditions
- Embedded machine installation
- We place the device over the toilet
- Placement on laminate, wooden floor or tile
- Machine connection
- To the sewer
- To the water supply
- How to connect the washing machine to the water supply?
- Washing machine installation
- Trial run
- From a designer's point of view
- 1. Hidden behind a facade
- 2. Switch in the cabinet
- 3. Taste and color
- Initial actions
- Pipe insert
- Connect anywhere
Examination
All the adjustment steps have been completed, which means it's time for the first start-up. Run the machine without laundry at the highest possible temperature. This will allow not only to check the correct installation, but also to clean the device from the inside of dirt and oil from the factory.
During the debut cycle, check all the joints: is it dripping at the junctions of the pipes, are there any leaks in the sewer hose, is the case shocking, how loud is the unit, is it jumping around the room?
If you find any shortcoming of the above, it is better to interrupt the work and immediately begin to eliminate it.
If you do not know how to get rid of shortcomings, then stop being a hero and call the master. The quality of washing, service life and, of course, safety depend on the correct connection.
The procedure for connecting the automatic machine
To start the operation of the washing device, it is necessary to choose the optimal place for its placement. Then prepare the washer for connection work.
After that, it remains to correctly perform the following steps:
- align the device, giving it the optimal position;
- connect to the water supply for the intake of water needed for washing;
- connect to the sewerage system to drain water during the implementation of a given program (washing, soaking, rinsing, spinning);
- connect to the mains to ensure the supply of electric current that drives the motor of the unit.
Next, we will go through all of the above steps in detail.
Delivery and installation of the device
The paid washing machine is delivered to the address by the seller
When she is already with the owner, you need to carefully examine your purchase, paying attention to the following points:
- Make sure the packaging is intact. If there are damages on it, then this may indicate that the purchase was damaged during transportation at one stage or another.
- Remove the packaging, check the condition of the purchase, visually determine the presence of defects.
- Check the completeness of the equipment, comparing the list in the passport with their physical presence.
Deficiencies found may serve as a reason for refusing to accept the goods, which must be recorded on the delivery note provided by the supplier. If it is decided to accept the purchase, despite some minor defects, this should also be noted on the invoice, as their presence may indicate more serious hidden defects.
When unpacking the machine, try to remove the packaging undamaged. Subsequently, if a return is required, damage to the packaging may be a reason for refusing a replacement. The packaging must be kept during the warranty period of the equipment.
Move the machine to the installation site. Remove the transport screws on the back of the unit.
Their purpose is to fix the drum during transportation. Bolts should be removed and stored for the life of the equipment. They are reinstalled if the unit needs to be transported.
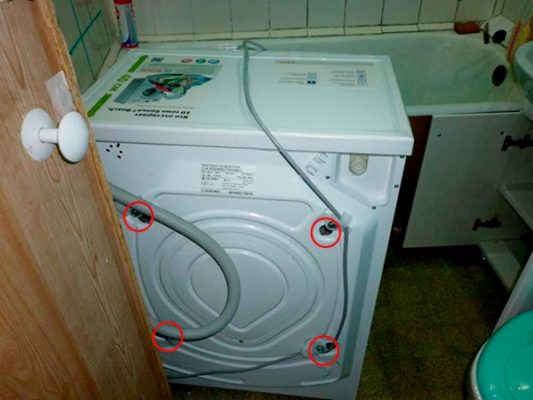
Attention! Switching on the washing machine without removing the transport bolts may render it unusable. Next you need:
Next you need:
- Install the unit in the place of permanent use.
- Set the machine in a horizontal plane. To control use the building level. Adjust the position with adjustable feet.
- Connect the unit to the water supply using the supplied hoses. The connection must be made through a water filter.
- For connection to the sewer system, a corrugated hose from the delivery set is used.
If there is no special pipe for connection at the entrance to the system, you will have to purchase a siphon with an angled outlet.The connection can be installed under the sink or on the bathtub drain.
Electrical connection. This can only be done through a specially installed socket with grounding.
Determining the cross section and brand of wires
The power consumption of this type of equipment can be 1.8 - 2.6 kW. Power for the outlet must be arranged with a three-core copper cable with a cross section of about three squares (ground, phase, zero). The choice of such a wire will allow the simultaneous inclusion of other appliances, such as an electric razor or a hair dryer, into the outlet. For such wiring, you will need a switch - an automatic machine for a rated current of 16 amperes. The brand of wire is selected in accordance with the operating conditions, for such premises as a bathroom it is better to choose a three-core wire in double insulation.
Grounding device
The bathroom is most often the standard installation site for the washing machine, so they are produced according to protection class 1. This implies the mandatory presence of grounding. For his device, the PEN conductor is separated.
Socket selection
Obviously, the bathroom will require a connection device with a high degree of protection against moisture. But they come in different designs. Therefore, it is better to select an outlet after purchasing a car.
Attention! Do not use extension cords, adapters or tees in the bathroom. At high loads, sparking or shorting of wires is possible
Residual current device
After the protection device, whether it be a circuit breaker or a fuse, the RCD is selected with a rating one step higher than their rated current.
In socket networks there are often overloads of up to 30%.The operation time of the machine can reach one hour and all this time the current flows through the circuit in excess of the nominal value for the network. Therefore, for a circuit with a 16-amp RCD, you need to use a nominal value of 25 amperes.


What should not be allowed
Do not connect the body of the machine to the pipes of the water supply system.
It is forbidden to make a jumper between the ground contact and zero, this leads to false tripping of the RCD.
Installation and connection of the washing machine
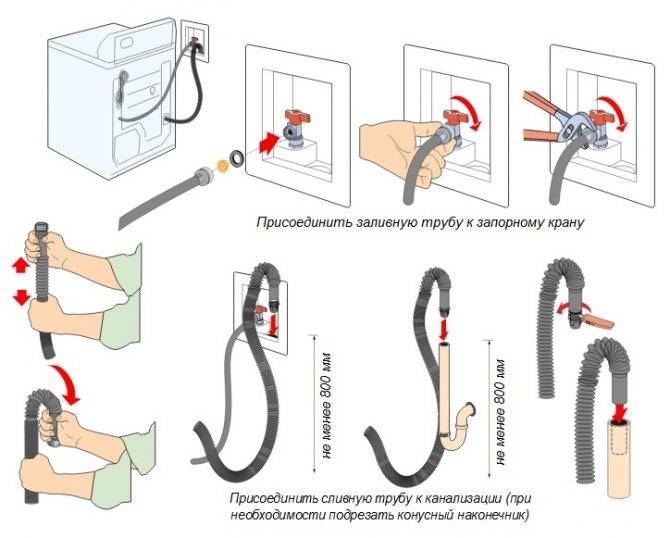
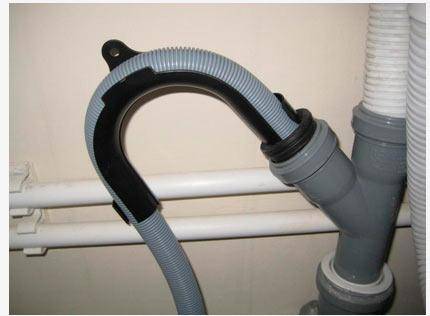
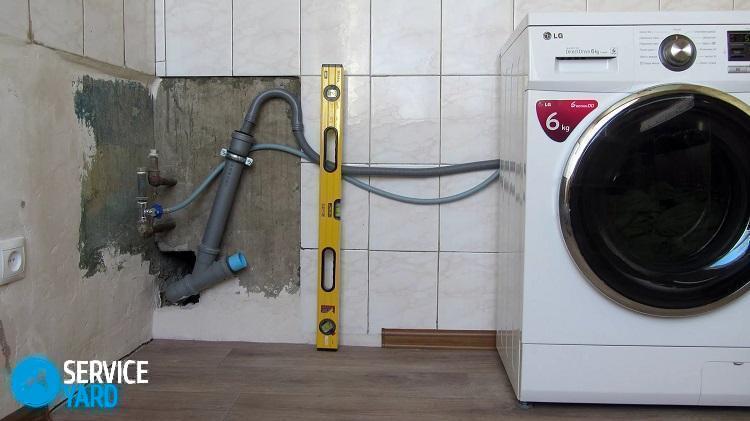
After removing the machine from the factory packaging and removing the bolts for transportation, we proceed to the direct installation. The water drain hose should be connected to the sewer in any way convenient for you.
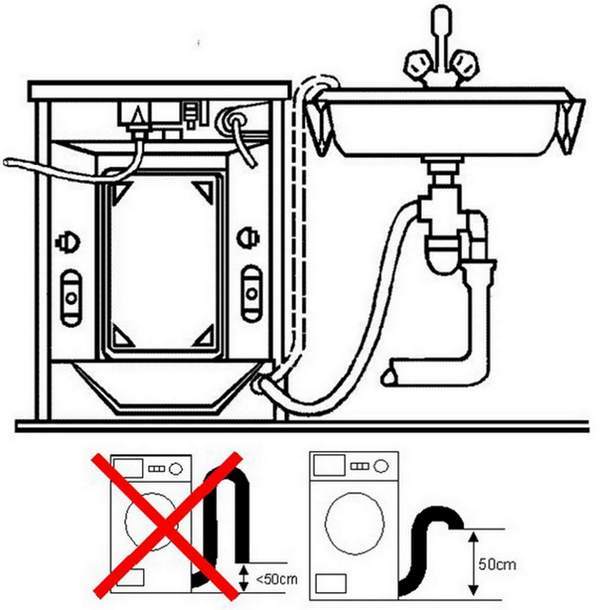
Care should be taken to comply with the requirement to bend 60 centimeters of the hose from the floor, since this requirement will preserve the natural water seal.
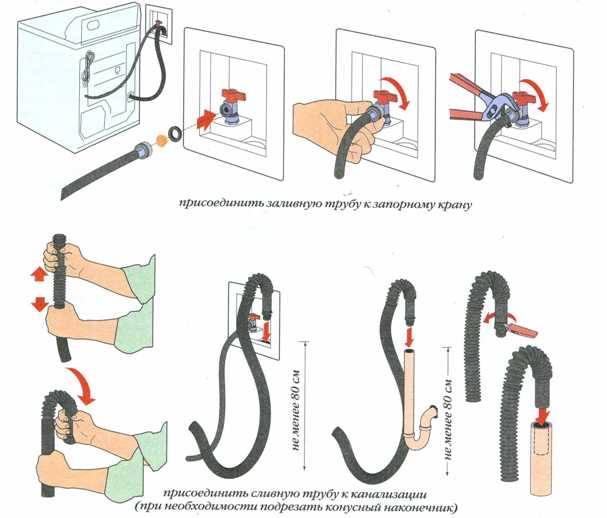
To connect the water, you need to use a special hose that the machine is equipped with. We connect part of the hose with a bent end to the washing machine, the other side is connected to the water supply system.

Mounting options for different conditions
Before installation, you need to consider in what conditions and mode the machine will operate. Based on this, measures are taken to eliminate problems in operation in the future.
Installing a car in a private house
The scheme of electrical cables and piping must be considered at the stage of construction or repair.
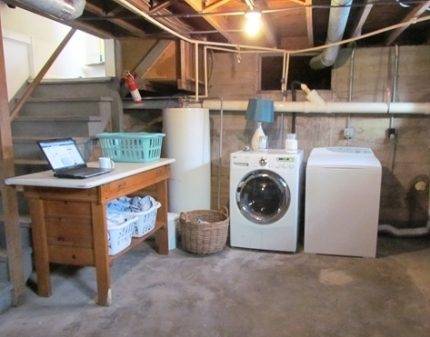
If the washing machine is located in the basement, its connection will be 1.20-1.50 meters below the sewer level. The problem is solved by installing conventional pumping equipment
The dry basement of a private house is the best place to install washing and drying equipment.Residents of the house in this case do not feel noise, smells and dampness.
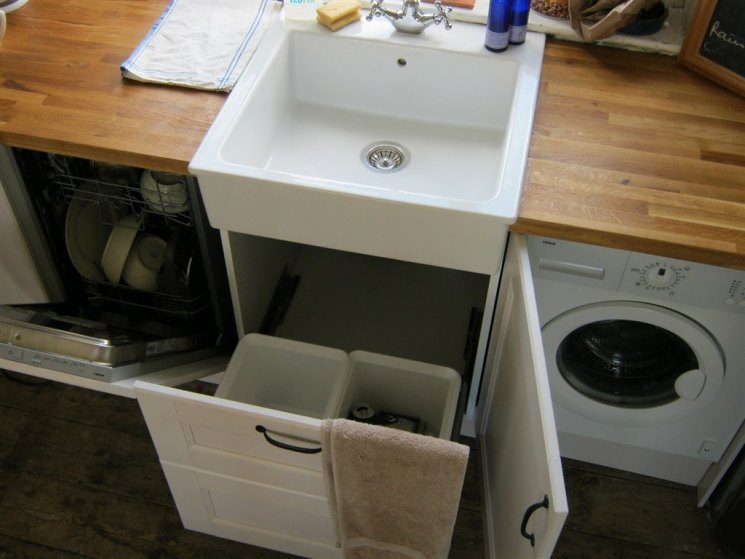
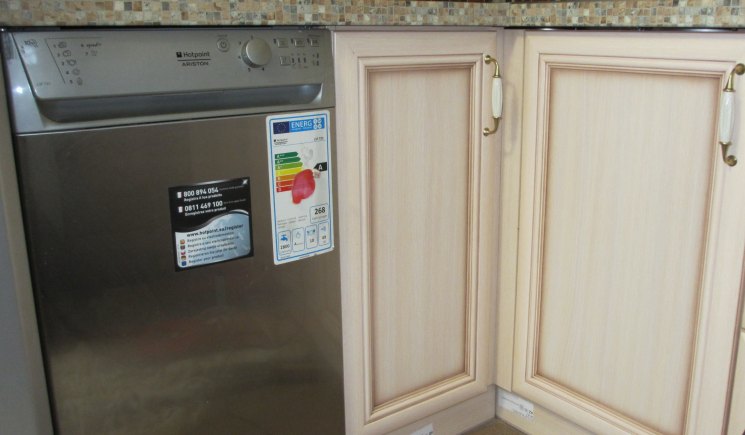
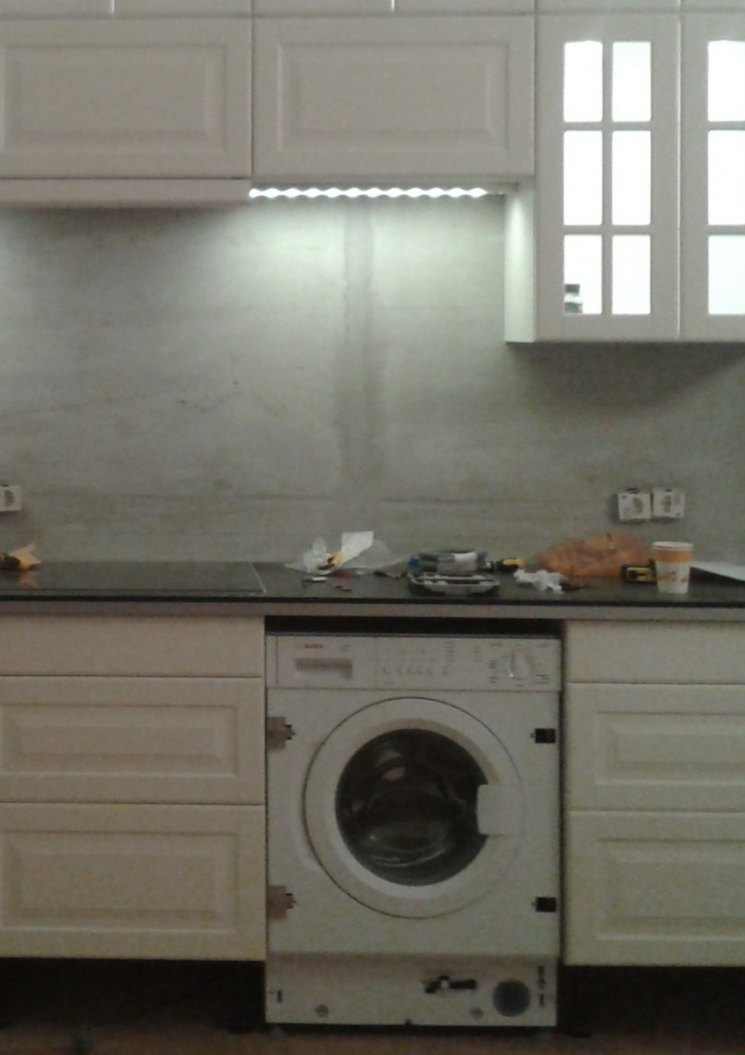
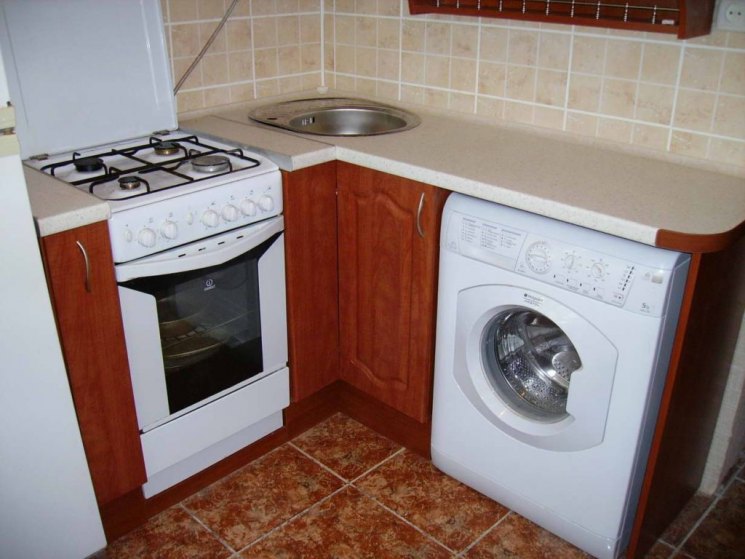
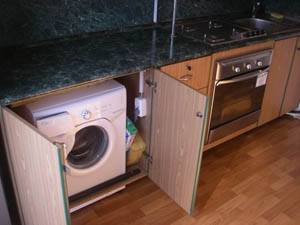
Installation of appliances in the kitchen and in the hallway
Washing does not go well with cooking and eating. However, very often the machine is installed in the kitchen, as its design fits perfectly into the interior.
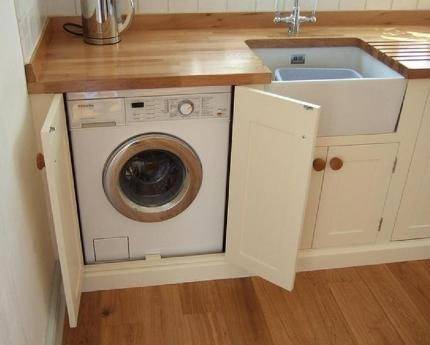
In the kitchen, the machine can be placed anywhere in it. The most convenient option is to install under the countertop or in a cabinet where it can be hidden behind the doors.
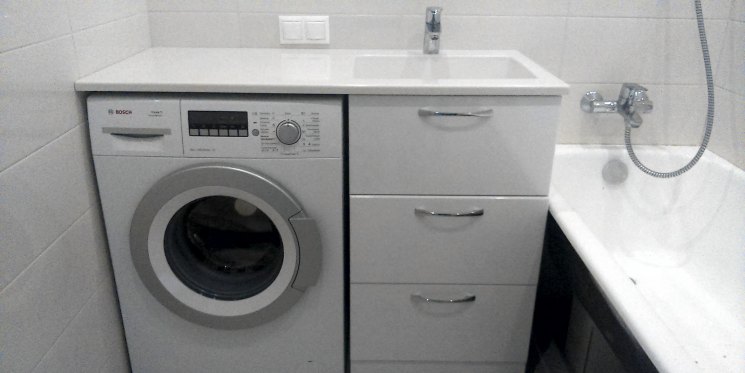
When installed in a corridor or in a hallway, it is better to place the machine near the wall behind which the bathroom is located. This will simplify the connection of the unit to the water supply and sewerage.
You can rarely see her in the hallway. It is difficult to find a place for such an installation and it will be necessary to solve the issues of laying communications in the floor or walls. You will also need to hide the machine behind a curtain, place it in a built-in closet or under a worktop.
Placement on laminate or wooden floor
The ideal surface for a washing machine is hard and rigid concrete. The wooden floor enhances the vibrations that destroy the surrounding objects and the unit itself.
Anti-vibration mats are made of various materials, they are diverse in structure, but serve the same purpose - to protect the unit from vibrations and prevent its breakdown.
The floor can be strengthened in several ways:
- concreting a small foundation;
- arrangement of a solid podium on steel pipes;
- using an anti-vibration mat.
These methods will help reduce unpleasant vibrations, but they cannot be compared with a concrete screed.
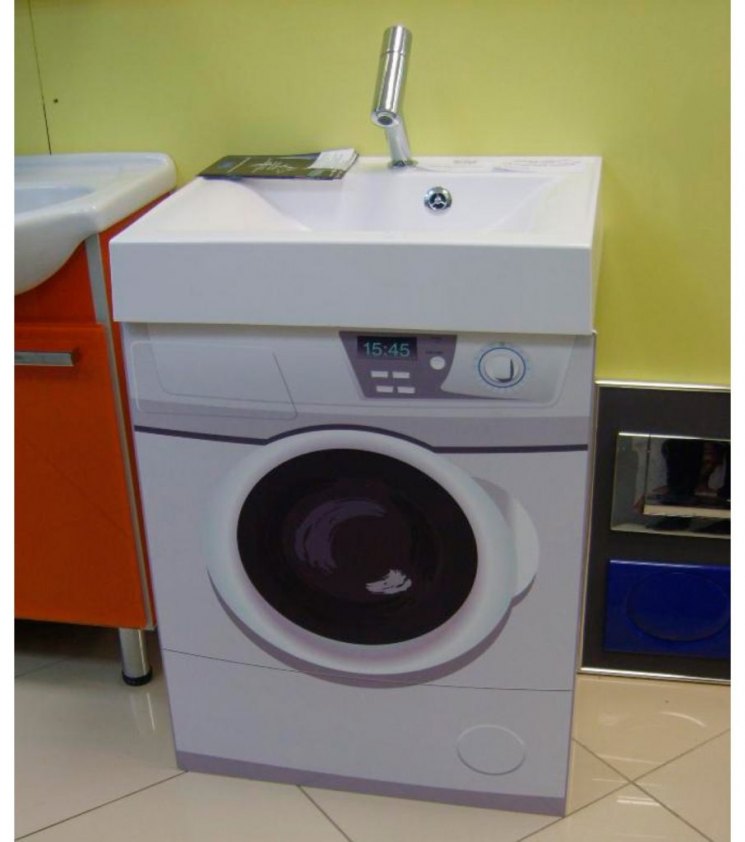
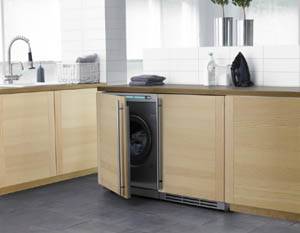
Embedded machine installation features
The built-in model is an ideal option that will fit into any interior.Hoses and wires are hidden behind the cabinet, and its front door is identical to the headset.
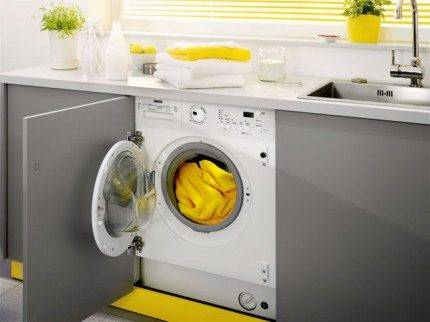
In built-in machines, only a front-loading option is provided. In this case, it is necessary not only to install the machine, but also to provide space for opening the hatch
This type of equipment is more expensive than usual, so many are interested in whether and how it is possible to install or integrate the machine into a cabinet.
The task is solved, it is performed in several ways:
- by installing under the countertop;
- placing a compact model in a finished cabinet;
- installation in a specially made locker, with or without a door.
To prevent vibration from adjacent cabinets, the base must be solid.
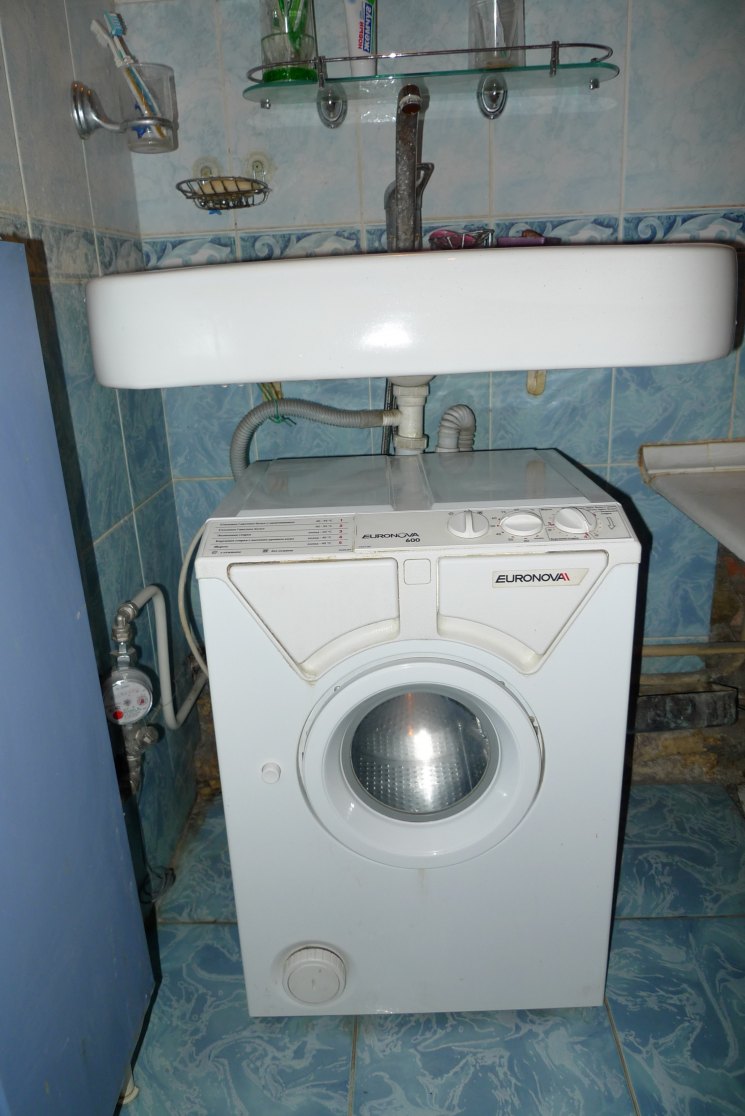
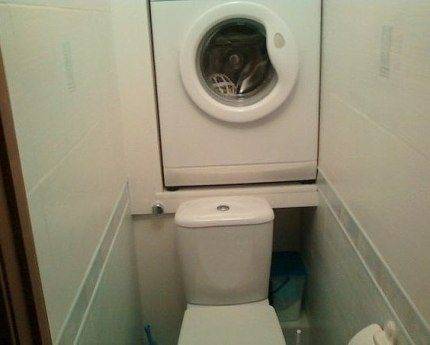
Installing the machine over the toilet
For owners of small toilets, the idea of installing a washer above the toilet may seem strange. But there are enthusiasts who can solve even such a difficult task.
The design for installing the washer should be as thoughtful and reliable as possible. European manufacturers produce powerful fasteners, but their cost is very high.
When planning the installation, pay attention to the following points:
- If the quality of the walls is in doubt, a steel structure is made, resting on the floor.
- A hanging shelf is made of a durable metal profile.
- The shelf is equipped with a safety edge so that the machine does not slip from it under the influence of vibration.
- The sliding shelf will not allow the linen taken out of the machine to fall into the toilet.
- The mounting height is made such that the toilet drain digger remains in the access area.
- It is more convenient to place the machine not above the toilet, but behind it.
- It is more expedient to choose a model with a shallow depth.
In order for the unit to stay on weight and not fall on its head at the most inopportune moment, it is necessary to adhere to safety precautions.
It should be remembered that if repairs are needed, the heavy machine will have to be lowered to the floor and then returned to its place.
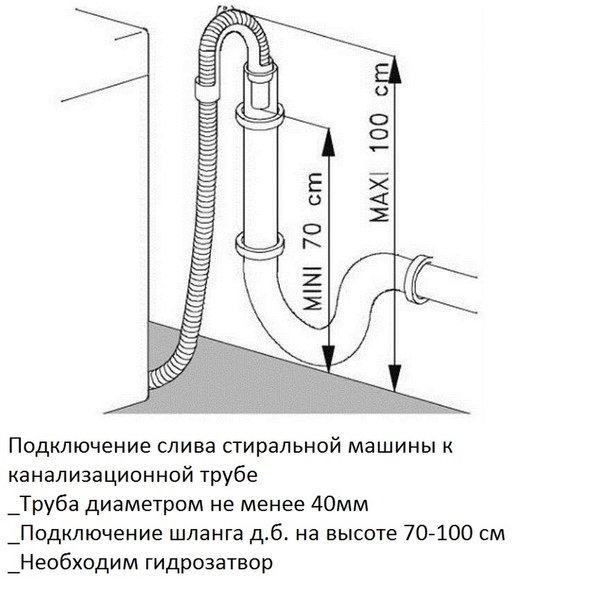
Connecting the washing machine to the sewer system
It only at first glance may seem that connecting the machine to the sewer is a simple process. In fact, this is not the case, therefore, when carrying out this installation, it is necessary to strictly follow all the recommendations of the specialists indicated in the instructions. To plug drain for washing cars into the sewer in two ways.


The first way is a temporary scheme.
For its implementation, it is necessary first of all to connect the drain hose to the outlet pipe. Then fix the drain hose on the side of the bathtub, toilet bowl or sink. The choice will depend on where it is most convenient for you to fix the hose.
We connect the drain hose of the washing machine here.
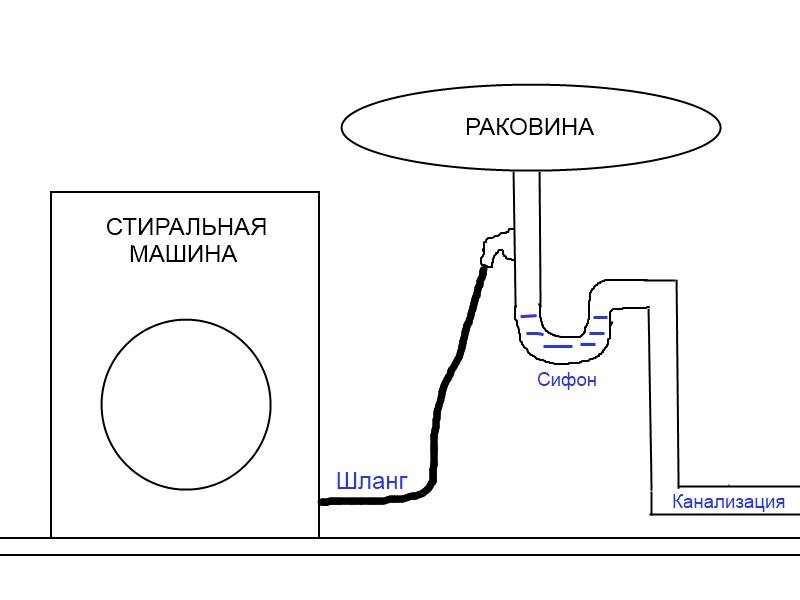
A simple diagram for connecting a washing machine drain to a sink
The second way is a fixed connection.
In this case, everything is much more complicated, so when making an independent connection, you must consider the basic rules:
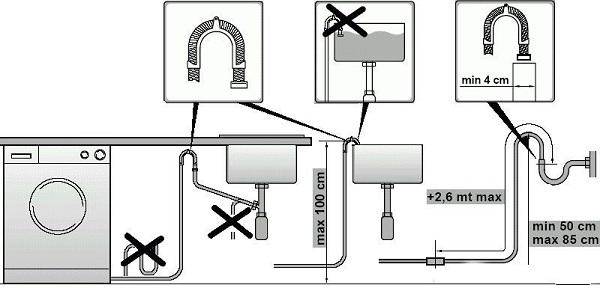
- the length of the drain hose may vary, but its maximum dimensions must remain within the allowable range. Consider the fact that the longer the hose is, the greater the load will be on the pump, which can lead to its failure much earlier;
- drain connection implies the presence of sewer siphons with a check valve. This design prevents the entry of unpleasant odors from the sewer into the interior of the equipment.
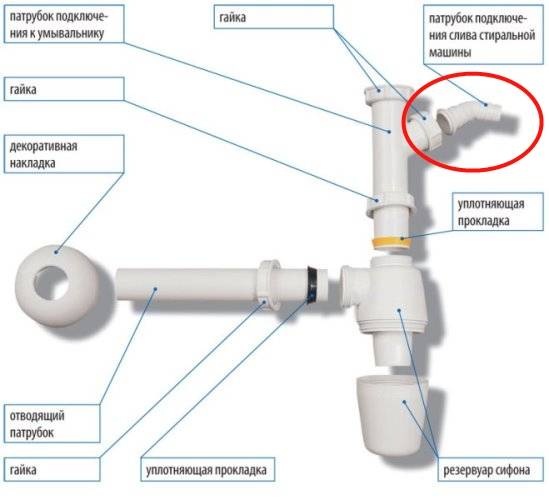
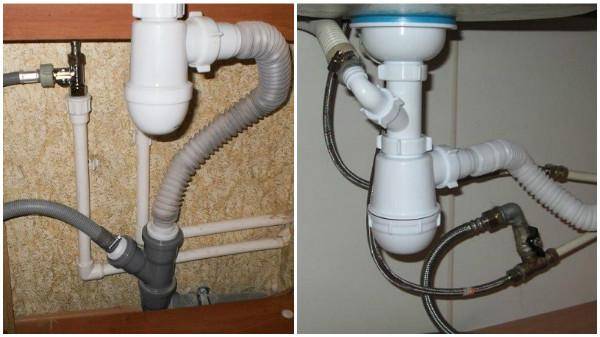
Connecting a washing machine to a siphon
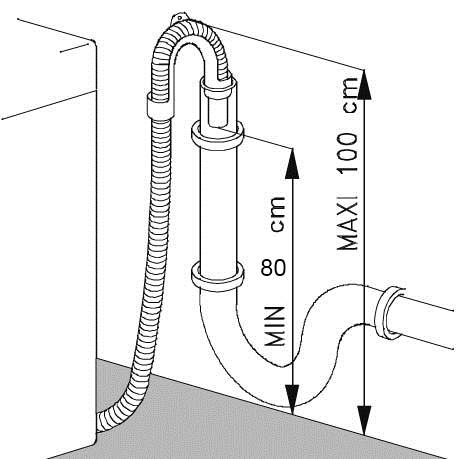
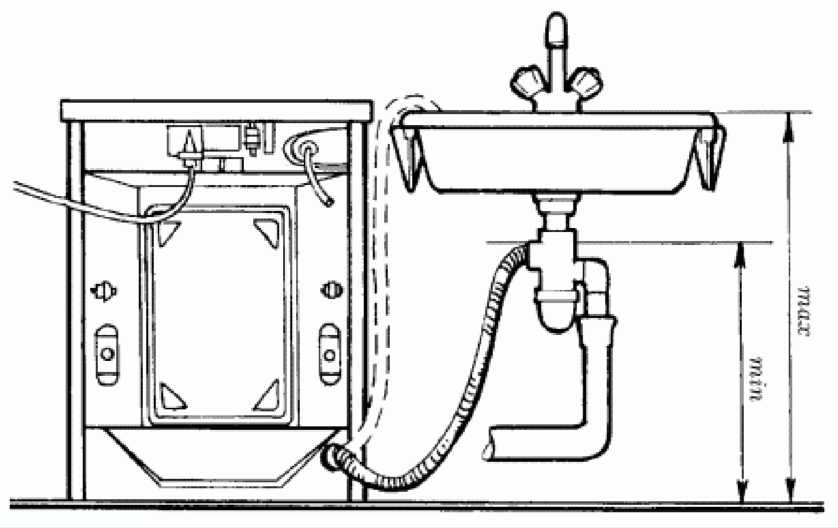
The drain hose is connected from two sides: on the one hand, to the back of the machine, while the height should be somewhere around 80 cm (but not less), on the other hand, to the sewerage system in the bathroom or in the kitchen using a special siphon.

How to connect a drain pipe to a sewer
The height of the gap deserves special attention, it must necessarily be greater than the level of water rise.
If the gap is placed too low, then there is a high probability of flooding an apartment or house.
Thus, we learned how to connect the drain of the washing machine to the sewer. Additionally, you can watch this video:
The last step is setting the level.
Connecting the washing machine to the water supply and sewerage is not all. It is necessary for her to provide normal conditions for work. In order for the washing machine not to jump during the spin cycle, it must be set strictly vertically. The position of the body is adjusted by means of adjustable legs. They take the building level, lay it on the lid, change the height of the legs, ensuring that the bubble in the level is strictly in the center.
Check by laying the level parallel to the front, then shift to the back wall. Then the procedure is repeated, but the level is applied to the side walls of the case - on one side, then on the other side. After the bubble is strictly in the center in all positions, we can assume that the washing machine is level.
Checking the correct alignment of the washing machine
If there is no level, you can try to set the machine by placing a glass with a rim on it, into which water is poured. The water level is on the rim.Change the position until the water is exactly on the rim. This method is less accurate, but better than nothing.
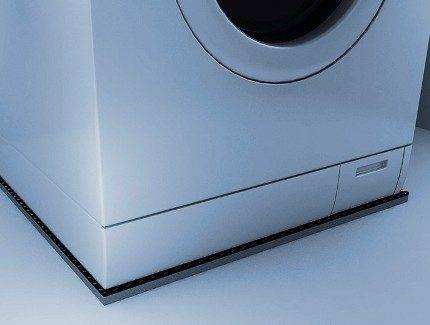
There is one more thing. Most often, washing machines are on a tiled floor, and it is slippery and hard. Therefore, even a perfectly set machine sometimes “jumps” - the vibration cannot be extinguished during spinning on a hard floor. To cope with the situation, you can put a rubber mat under the machine. It serves as an excellent shock absorber.
Tips of the masters
It is worth listening to the recommendations of the masters regarding the process of safe use of the washing machine:
- After washing, you need to leave the hatch ajar to let out excess moisture, turn off the water supply, disconnect the device from the electrical outlet.
- It is necessary to use only detergents (powders, gels) for washing that are of high quality.
- Use special compositions that prevent scale deposits on the internal components of the device.
- Make sure that the load level of the laundry does not exceed the allowable rate according to the instructions.
If you follow these simple rules, your washing machine will last longer.
Do-it-yourself installation of a washing machine only seems complicated. The owner can handle it himself. The main thing is to take into account the features of the device and the room where it is installed, to have the necessary stock of knowledge and tools.
But regardless of the brand (Ariston or Malyutka), any washing machine can break down. On our website you will find detailed instructions for self-repair and installation of such units as a pump, drum, pump, tank, drain, pressure switch, bearings.
Features of installation in various conditions
There are several features of the installation of washers, with which it is better to familiarize yourself.
Embedded machine installation
Installation of a built-in washing machine in a special niche is carried out in several stages:
- Installation in a kitchen set. First, the appliances are built into the kitchen set in which it will stand. When performing this step, you need to be very careful and make sure that the device is installed level.
- Plumbing connection. Built-in models are connected only to cold water. In this case, the hose for fluid intake is installed at an angle of 40-45 degrees.
- Connection to the sewer. To connect the outlet to the sewer system, a special pipe is used, which is connected to the outlet pipe.
- Connection to electricity. At this stage, the machine is connected to a separate outlet.
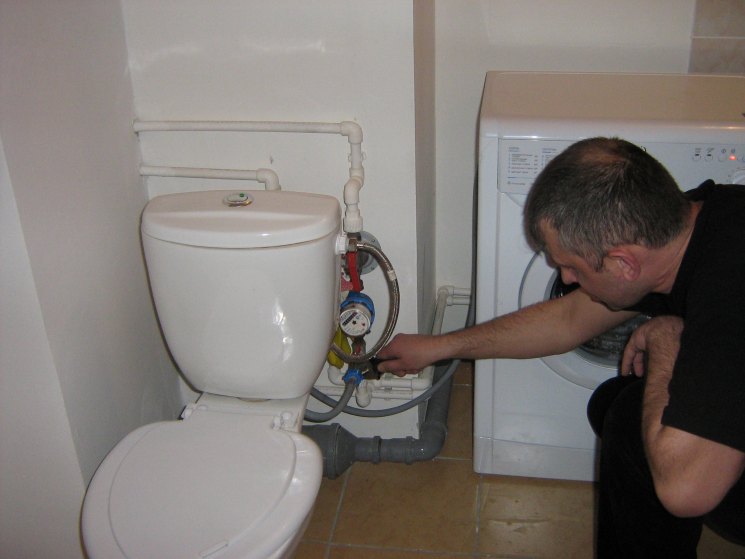
We place the device over the toilet
There are quite unusual options for placing washers. For example, some install them over the toilet.
In this case, the machine is connected to the water supply and sewerage in the same way as always. The main feature is the placement of equipment, as it will be located above the toilet. Before installation, a special niche is constructed in which the machine will be located. It is created from durable wood that can withstand a load of several tens of kilograms. Experts advise strengthening the niche with strong iron corners connected to the shelf and wall.
Placement on laminate, wooden floor or tile
It is not always possible to place the machine on a solid floor surface and you have to put it on a tile or wooden floor. In this case, experts advise to independently make a concrete screed, which will serve as the basis for the technique.
Creating a screed consists of several stages:
- Markup. First, a marker marks the place where the machine will be placed.
- Removal of old coating. After marking inside the marked area, the old coating is removed.
- Formwork construction. The formwork structure is made of wooden boards.
- Strengthening the formwork. To make the surface stronger, the formwork is reinforced with a metal frame.
- Pouring concrete. The created structure is completely filled with concrete mix.
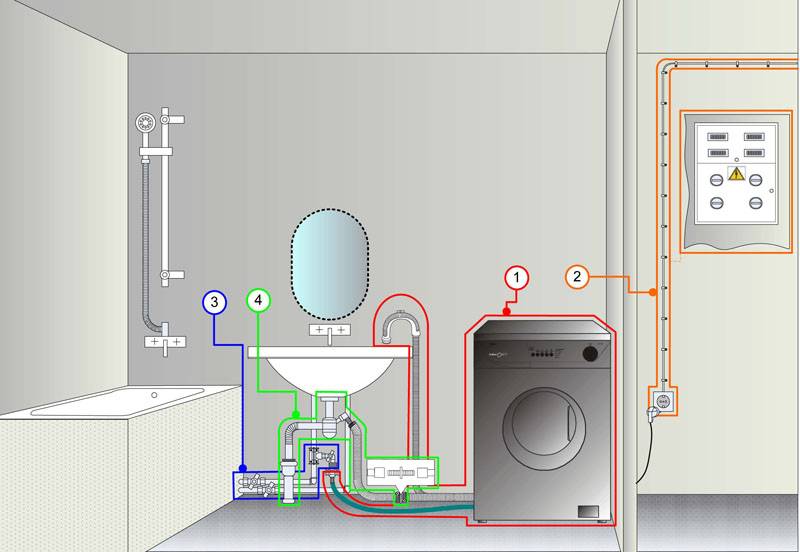
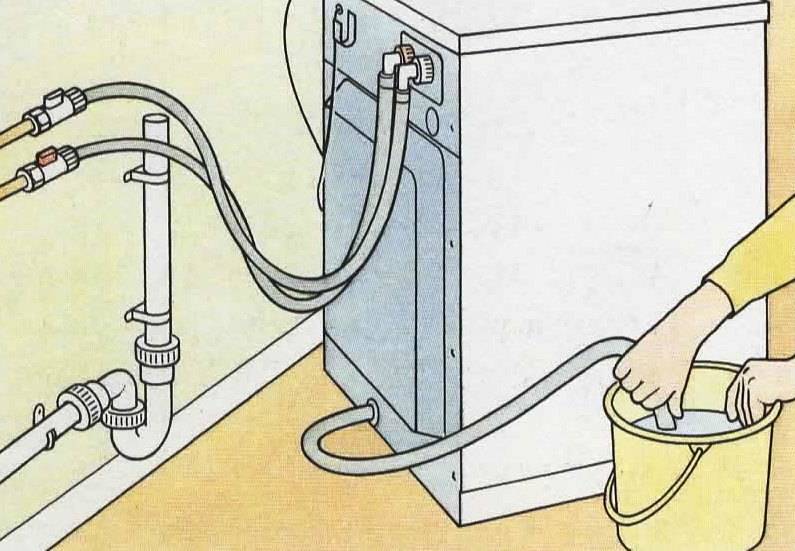
Machine connection
Connecting a washing machine with your own hands is not difficult for those who are versed in technology, deftly manage various tools and have minimal knowledge of how to handle pipes, adapters and plumbing. If all this is unfamiliar to you, then it is better to contact the specialists, having previously found out how much it costs to call the master at home.


The diagram for connecting the washing machine to communications is shown in the photo, we will consider each action in more detail.
To the sewer
At first glance, it is not difficult to organize the draining of water from a car into a sewer drain, but in practice it all depends on the features of the connection, which is carried out by two main methods:
- Temporary connection when the drain hose is lowered into the bathroom or toilet (when combined).
- Stationary - a tie-in into the sewer is carried out, and here users often face certain difficulties.
Connecting the washing machine to the sewer is subject to the following requirements:
- the length of the drain hose should not be too large, as this will increase the load on the drain pump, and it may fail prematurely;
- when you connect the drain to the siphon, you exclude the ingress of unpleasant odors into the machine from the sewer, which is an indisputable plus.
The drain hose is connected to the siphon of the washbasin or sewer, as shown in the photo. As a result, the connection will be quite tight.
To the water supply
The home master needs to know how to connect the washing machine to the plumbing communications without building up the inlet hose with fittings from the manufacturer. If the machine is located at a distance of more than three meters from the water pipe, then the best option is to make a separate connection using a metal-plastic pipe to ensure that there are no leaks in the most inconvenient place.
If everything you need is at a distance of the length of the inlet hose, then connecting the washing machine yourself will not be difficult in one of the ways (see photo).
Consider the connection diagram through a separate valve (end valve). To do this, you need a mortise clamp with a guide sleeve and a rubber gasket, or a tee.
Procedure:
- The clamp is carefully screwed into the water pipe with the sleeve outward.
- The pipe is drilled with a drill and connected to a clamp or a piece of pipe (the end valve is then installed on the latter).
- At the end of the pipe, a thread is made identical to the thread on the clamp.
- The external thread is closed with a sealant or FUM tape.
- Next, the end valve is screwed onto the outer pipe with force, and the hose of the washing machine is connected to its second end.
- The end of the hose is connected to the machine.
- At the final stage, everything is checked for leaks.
When connecting, you must fulfill the basic and rather important requirements:
- Do not lay the hose in places where there is a risk of possible mechanical damage.
- In no case should the slightest stretch be allowed, because deformation may occur due to vibration of the machine at maximum speed. The hose must lie completely free.
- All connections must be reliable and ensure 100% tightness.
- Before entering the washing machine, you can install a filter to protect all systems from small particles and rust, this will only benefit the unit and extend its service life.
If you follow these requirements, then the floor in the room will be constantly dry while pouring water into the household appliance. That's all the tricks on how to independently organize the connection of the washing machine to the water supply and sewerage.
How to connect the washing machine to the water supply?
As for connecting the washing machine to cold water, below will be presented step-by-step instructions with which you can connect yourself:
Scheme of connecting the inlet hose of the washing machine through a tee to the water supply
- First you need to choose a place to connect. Of course, the best place will be the area where the connection of the metal-plastic pipe with the flexible hose of the mixer is marked. In principle, it is also possible to connect to a shower tap;
- then unscrew the flexible hose;
- then we wind the fumlent on the thread of the tee and, directly, install the tee itself;
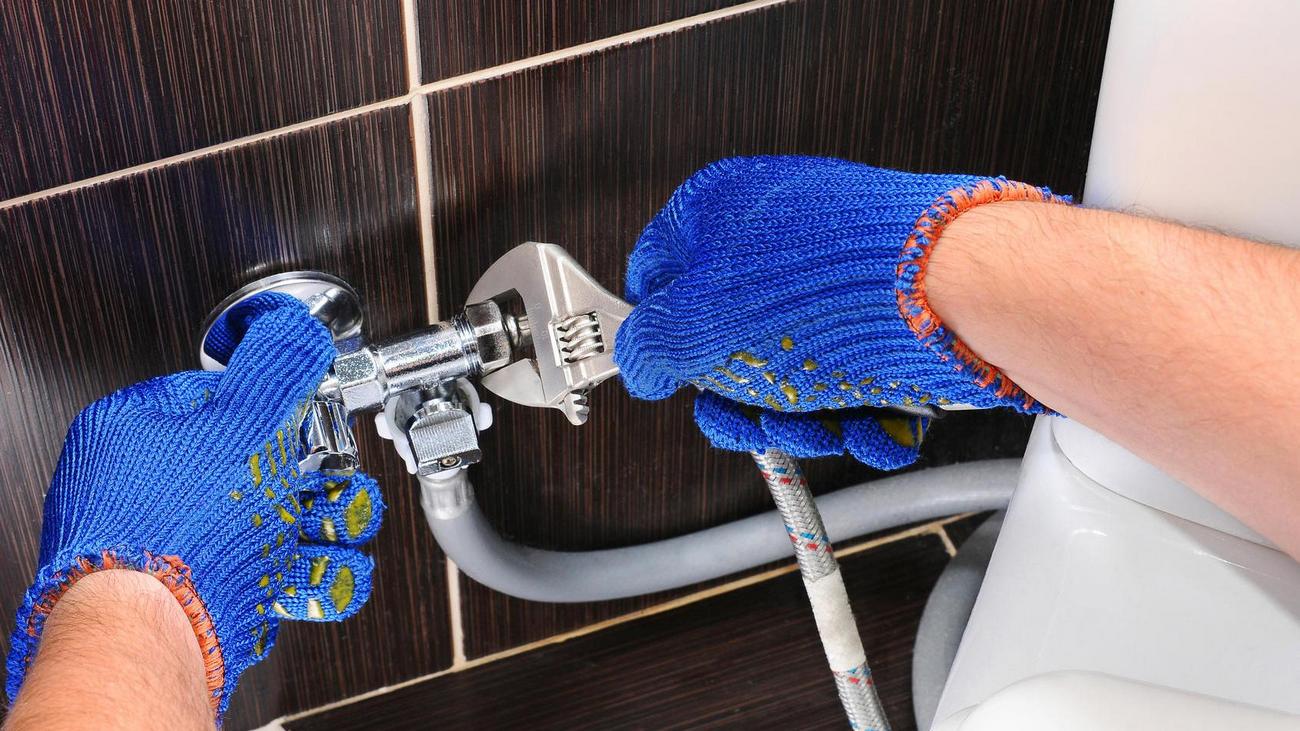
- also, a fumlent is wound on the remaining two threads and flexible hoses from a washing machine and a washbasin faucet are connected;
- Finally, you need to tighten all threaded connections with a wrench.
Connecting the washing machine to the plumbing system
It is worth noting that it is imperative to check the presence of o-rings at both ends of the inlet hose, since it is they who prevent the flow of water at the joints.
Another option for connecting the washing machine hose to the water supply
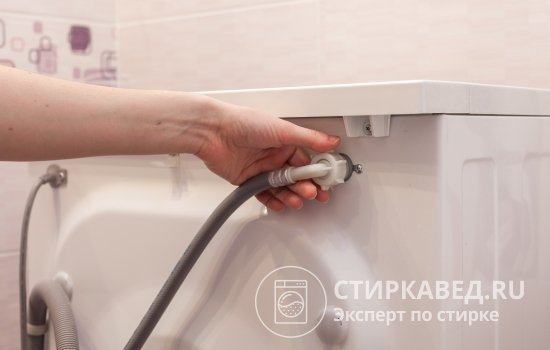
There is another option for connecting the machine to the water supply, by connecting the inlet (inlet) hose to the drain tap in the bathroom or sink.
If you decide to use this method, then you will need a longer inlet hose. One end of the hose in this case is screwed to the tap after the gander is disconnected. People who choose to connect this system claim that the process itself takes a little over a minute.
At the same time, they are completely sure that they avoid water leaks during the downtime of the machine, because the connection of the supply hose was not carried out permanently.
Special attention deserves the moment that today many modern automatic units are equipped with a special system that blocks the water supply to the disconnected machine.
Such equipment is equipped with an inlet hose, which has a block of electromagnetic valves at the end. These valves are connected by wires to the machine, which, in fact, carry out control.
If desired, you can buy a special inlet hose with automatic leakage protection
The whole system is inside a flexible casing. That is, when the machine is turned off, the valve automatically shuts off the flow of water into the device.
This is very convenient and reliable, because, for example, when the light is turned off, you will be sure that when the machine is turned off, it will not continue to pump cold water into itself from the water supply.
As you can see, connecting the washing machine to the sewer and water supply is quite feasible on your own. The main thing is to follow the established rules and follow the instructions that come with the equipment.
A properly connected washing machine will serve you for a long time and faithfully.
If suddenly you doubt something or are not sure about the correctness of your actions, then you can always seek help from specialists. Of course, a specialist will cope with the installation of the device much better and faster, but he will have to pay for this.


The equipment will work smoothly and for a long time only if all the necessary installation measures are carried out as expected and in accordance with the standards.
It is worth saying that if you purchased a dishwasher, then its installation is carried out according to the same principle. All installation activities are identical to those when installing a washing machine.
Naturally, in this case, it is also necessary to first read the instructions for the equipment, which must necessarily go to it when selling.
Washing machine installation
Before starting the installation, the washing machine is released from the packaging, inspected to check the integrity, and the locking bolts are removed. They are installed by the manufacturer at the factory and are intended to fix the drum during transportation. But you can’t leave them in the car after installation, as this leads to a breakdown of the chassis. The bolts are twisted with an open-end wrench and removed from the housing along with plastic bushings, and the plugs included in the kit are inserted into the holes.
On a new machine, you need to unscrew the transport screws and remove the plugs
Transport bolts hold the entire drum suspension in a fixed state, so as not to damage it during transportation
Stub
Now you can start installation.
Step 1. The washing machine is placed in the chosen place, the level is placed on the top cover, the height is adjusted with the help of the legs. The machine should stand level, without distortions, not too close to the wall. On the sides, there should also be at least small gaps between the walls of the machine and furniture or plumbing.
The machine needs to be level
Machine legs
Step 2. After making sure that the placement is correct, the machine is pushed forward a little to facilitate access to communications.
Step 3. Connect to the water supply. They take a water supply hose, insert a filter on one side (usually it comes with a kit), screw it to the fitting on the rear wall of the machine, and the other end to the tap on the water pipe, after inserting the gasket.
The filter can be installed in the form of a mesh in the hose, or in the body of the washing machine
Filling hose
One end of the hose is screwed to the machine
Inlet hose connection
Step 4 Connect the drain hose next: insert its end into the drain hole and tighten the nut tightly. The length of this hose must not exceed 4 m in order to ensure the normal drainage of used water.
Drain hose connection
If it is necessary to extend the hose with water supply, we use a second hose and an adapter coupling
Step 5. Both hoses are filled into the corresponding recesses on the back of the machine to prevent kinks.After that, the washing machine is installed in a permanent place and the location is again checked by level. Now it remains only to connect the washing machine to the outlet and check its operation in test mode.
Plug in the machine
Trial run
Trial run
First you need to take the passport of the device and put it in front of you in order to check the data during the verification process. A test run is carried out without loading laundry, with only water and a small amount of powder. So, they turn on the water supply to the tank of the machine, while recording the filling time to the specified mark. Immediately after this, all connections are inspected, and if a leak is detected, the water is drained and the problematic connection is sealed again. If no leaks are visible, you can turn on the machine.


The water should heat up to the desired temperature within 5-7 minutes, so note the time and check with the device's passport. While the water is heating, listen carefully: the device should work almost silently, and any rustles, creaks, knocks indicate a malfunction. If there are no extraneous sounds, check the operation of other functions, including the drain. After turning off the machine, once again inspect the hoses, connections, floor around the body. Everything must be dry and clean. Ladder in the bathroom read on the site.
From a designer's point of view
One of the minuses that can cross out all the pluses at once is the unaesthetic washing machine in the kitchen. But there are several ways to successfully fit the unit into the design of the kitchen, and you can choose the one that suits you best in terms of labor costs, money and results.
1. Hidden behind a facade
Like most modern appliances, washing machines can be built-in models.
This means that the machine has a flat front panel, close to which you can attach the facade and make the unit indistinguishable from other cabinets in the kitchen.
This option allows you not to think about the appearance of the machine, but you will have to pay a little more: built-in appliances are usually more expensive. The second nuance is design: this installation option must be planned at the kitchen design stage. It will be very difficult and expensive to remake an already finished headset.
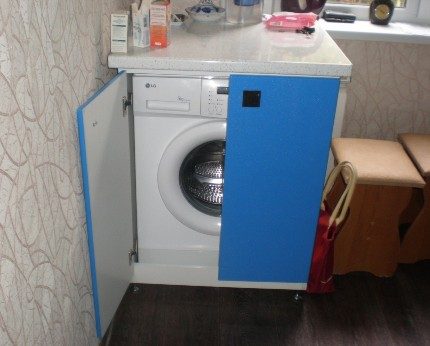
2. Switch in the cabinet
It can even be a free-standing box (for example, in a niche), made in the style of the rest of the kitchen.
This option differs from the built-in washing machine for the kitchen in the inconvenience of access: if the front panel of the built-in machine is flat, then the front panel of the ordinary one is more streamlined, and it will have to be placed deeper in the closet. But this method is more economical (can be used for any machine, even a budget one) and can be applied to a finished kitchen.
3. Taste and color
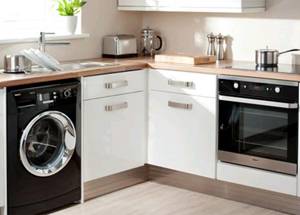
For example, a hi-tech design using a silver color will suit a Metallic typewriter.
And in combination with the same refrigerator and stove, it will create a harmonious ensemble.
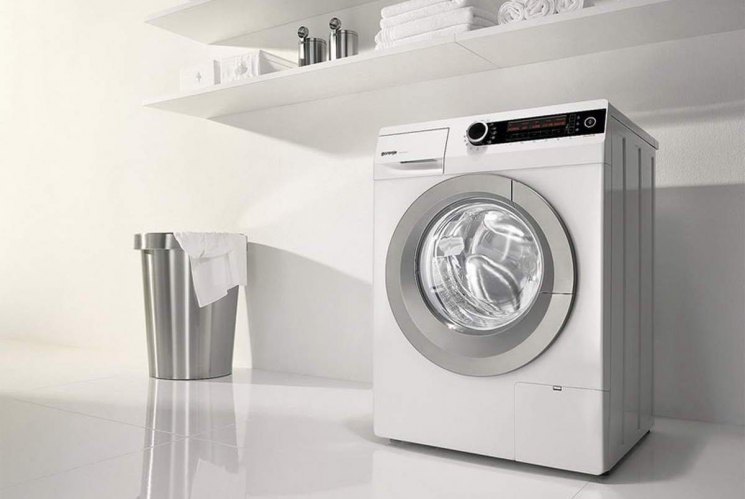
For a kitchen in a modern style and in bright colors, white household appliances are suitable.
When planning a place for a washing machine, it is better to install it away from the stove: the proximity to a hot oven is undesirable for any equipment.
When choosing a model of a washing machine for the kitchen, consider the width of the countertop and the dimensions of the model.
The standard width of the countertop is 600 mm, but there should be room for hoses behind the unit - that is, the machine should be no more than 550 mm. in depth. When installing "in a cabinet" you need to choose an even narrower model (450-500 mm).
Initial actions
When the courier brings the washing machine, you need to carefully inspect its body again. Often it is during transportation that equipment is damaged. Therefore, you can sign the acceptance certificate of the device only after making sure that the equipment was delivered in integrity and safety.
After releasing the courier, let the typewriter “settle” at room temperature for several hours. During this time, it is advisable to study the user manual. The instructions for the washer provide all the necessary information: the rules for connecting, managing and caring for equipment.
The fasteners are located on the back panel. They are necessary to secure the tank so that the tank does not “dangle” during transportation and does not damage the body and internal elements of the washer. Starting the automatic machine with the shipping bolts in place can cause serious damage to the equipment. Such damage will be considered non-warranty.
You will need an appropriately sized wrench or pliers to remove the shipping screws. Having dismantled the bolts, it is necessary to close the resulting holes with special plugs that come with the machine.
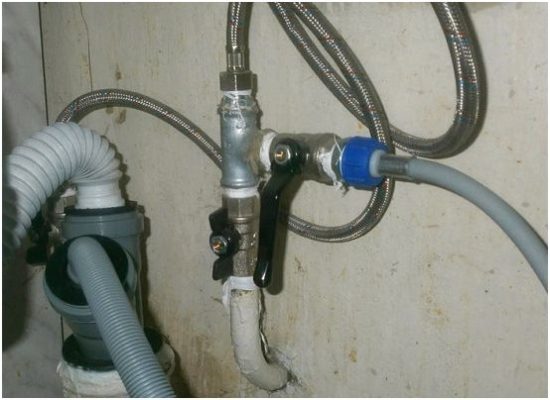
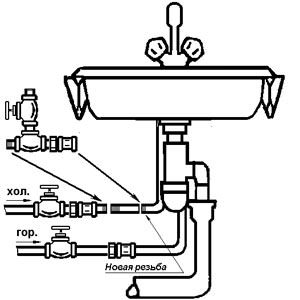
Pipe insert
To attach equipment to polypropylene or metal-plastic pipes, they are cut. A metal tee is installed in this place. From it, branches of communication are made to the washing machine. The hose of the device is connected to the sewer outlet to the siphon, which is equipped with a side telescopic nozzle. An exhaust hose is put on a branch with the proper diameter.
First, cut the pipe, measure the dimensions of the tee, cut off a piece of the pipeline. It must match the adapter. Attach the connecting ring with a nut.The calibrator expands the ends of the pipe at the junction with the tee. A pipe is put on the fitting fitting, sealing rings are pushed from both ends. Tighten nuts well.
The shut-off valve to the adapter is advised to be screwed up to the tie-in. Then the elastic metal-plastic pipe will not be damaged. After the tee is connected, flexible hoses for water are attached to the screwed tap.
If there is a plastic pipeline in the house, you will need a special tool for soldering pipe fasteners with adapters and fittings. A tee is installed on the cold water pipe. A hose is connected to it through a shut-off valve, which supplies water to the apparatus.
Connect anywhere
Sometimes it is more convenient to connect the washing machine somewhere in a straight pipe. In order to connect, you need a coupling saddle. This is such an adapter in the form of a clamp from a clip with a threaded outlet. When buying it in a store, you need to look so that the diameter of the fitting and the size of the pipe match. The adapter, firmly fixed on the required fragment, will block the water. Then a hole is drilled through the nozzle of the nurse. A ball valve is screwed onto the outlet of the coupling. It is used to connect the hose that supplies the washing machine with water.


