- Components of a set of equipment
- Selecting a channel list
- How does satellite TV work?
- Installation of a satellite dish Telekarta
- Pre-positioning satellite dish Telekarta
- Telecard setup
- The principle of operation of the antenna
- Satellite Antenna Tuning
- Satellite dish: installation and configuration (video)
- Functioning of a satellite dish
- Setting up MTS television equipment
- HD set-top box
- CAM module
- Interactive set-top box
- Information required for installation
- Antenna location
- satellite dish mount
- TOP-5 reliable satellite TV providers in Russia
- Setting up a satellite dish
- Making finer adjustments
- Setting the side convectors
- How to set up a satellite tuner
- Scheme of the location of the converters (heads).
- Assembling the antenna, connecting the cable to the converter and switch.
- Diseqc-switch.
- Receiver setup.
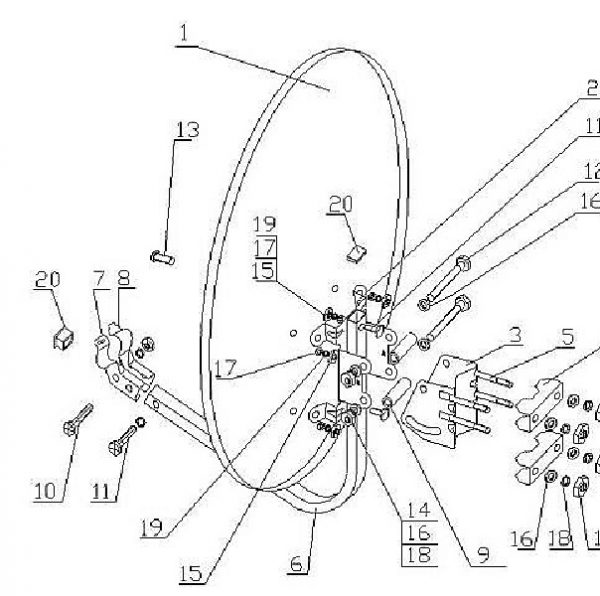
Components of a set of equipment
The kit for mounting this type of television includes the following six parts:
satellite dish
This device consists of an antenna and a mirror, and will receive a signal from a satellite. Depending on the terrain and the presence of interference, a diagonal is determined, which varies from 60 cm to 1.20 m.
converter
The device converts the received signal and sends it to the tuner. To connect several tuners, a different number of inputs is provided.
DiSEq (disek)
The product is intended for fastening several converters.
- connection cable
- bracket for mounting the device on the wall
- DVB receiver
The receiver must be properly configured in order for it to receive and transmit the signal. For free channels, inexpensive devices are suitable. Additional services require a tuner with special card receivers.
Selecting a channel list
First of all, you need to decide which channels you would like to watch on your TV. You can view the lists of channels broadcasting in Russian and Ukrainian on our website on the page "Lists of channels without a subscription fee". This page lists only channels that broadcast in the public domain, or open using Biss keys that are supported by any modern receiver. If you are not satisfied with the above lists of channels without a subscription fee, you can familiarize yourself with the lists of paid channels from Ukrainian providers XTRA TV or Viasat, where the conditions for viewing them are available.
How does satellite TV work?
In the direction of the southeast, south and southwest above the equator, at the same place relative to the Earth, there are satellites that receive a signal from a broadcasting broadcasting center.
The received signal, the satellites broadcast to the Earth, covering large areas like a beam of an electric searchlight. In this case, the signal level itself decreases from the center to its edges.
It should be noted that the signal does not pass through natural and artificial barriers such as walls, buildings, trees, etc.This factor should be taken into account when choosing a place to install the antenna.
The satellite signal is focused on the convector by means of an antenna. After primary processing, it is transmitted to the receiver via an antenna cable. The receiver is converted into a television channel with subsequent transmission to the TV.
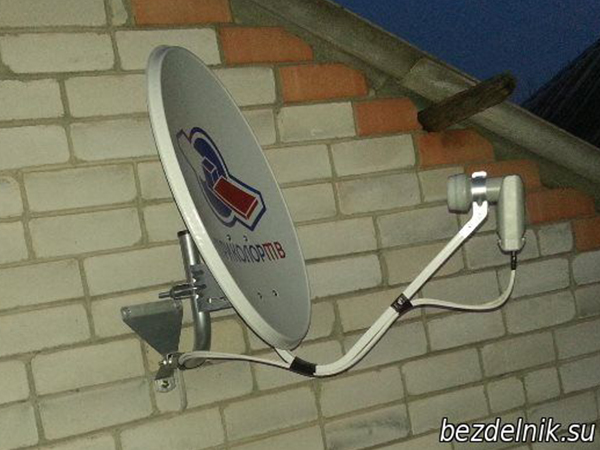
Installation of a satellite dish Telekarta
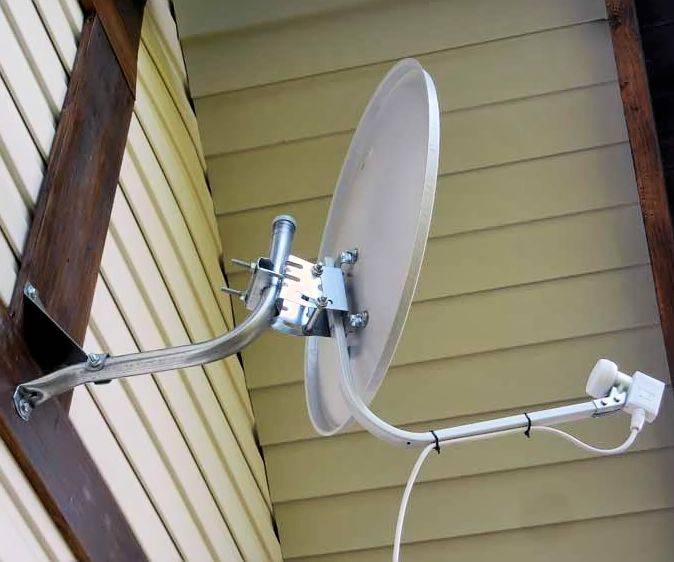
The Internet is full of instructions and recommendations for installing satellite dishes. There is only one rule here: the antenna must be fixed securely on a stationary surface. Therefore, we have no illusions and take up the perforator
For mounting on the wall of a panel house, I used universal dowels ZUM 12x71 complete with self-tapping screws for them with a hexagonal head (bolt) turnkey 13 75 mm long.
The pipe section on which the antenna is attached must be strictly vertical. Therefore, when mounting the bracket, it is not a sin to use the “level”. But if it is not there, then a simple plumb line with a weight will do, unless, of course, there is no wind.
Telekarta on its website posted the best instructions for installing and configuring satellite dishes. Therefore, to whom in my story there are not enough pictures, download the instructions here. In it, we look at how to cut the antenna cable and fix the F-type connectors at the ends.
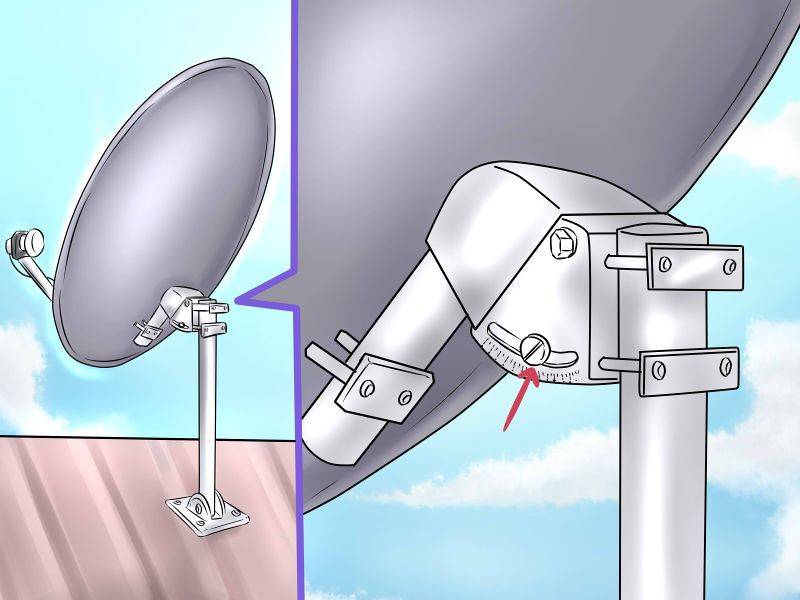
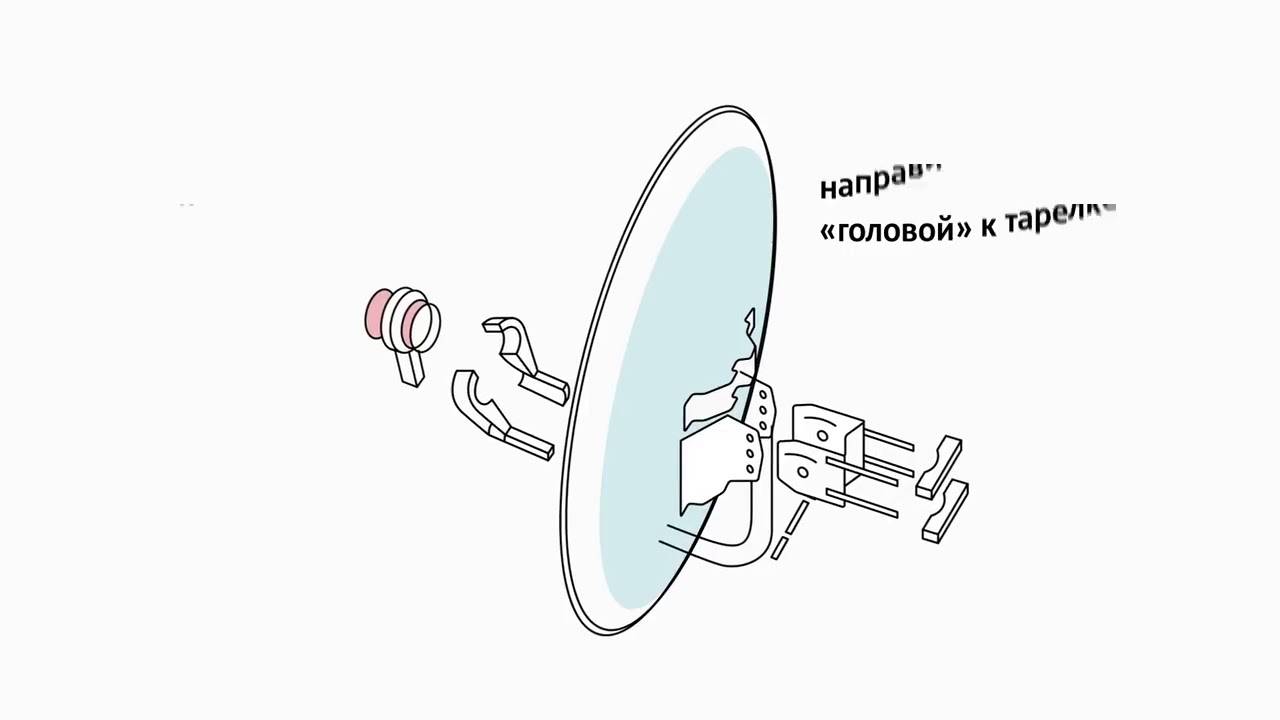
After fixing the bracket, you can start assembling the plate. Connect the cable and do not forget to rotate the converter around its axis according to the data indicated above. Determining the direction of rotation is very simple. By default, the antenna cable exits the converter vertically down. We need to turn the bottom of the converter towards the South. In my case it is about 30°.
Why does this procedure need to be performed "on the ground"? The fact is that after the plate is already mounted, you simply may not have enough arm length to reach the converter.
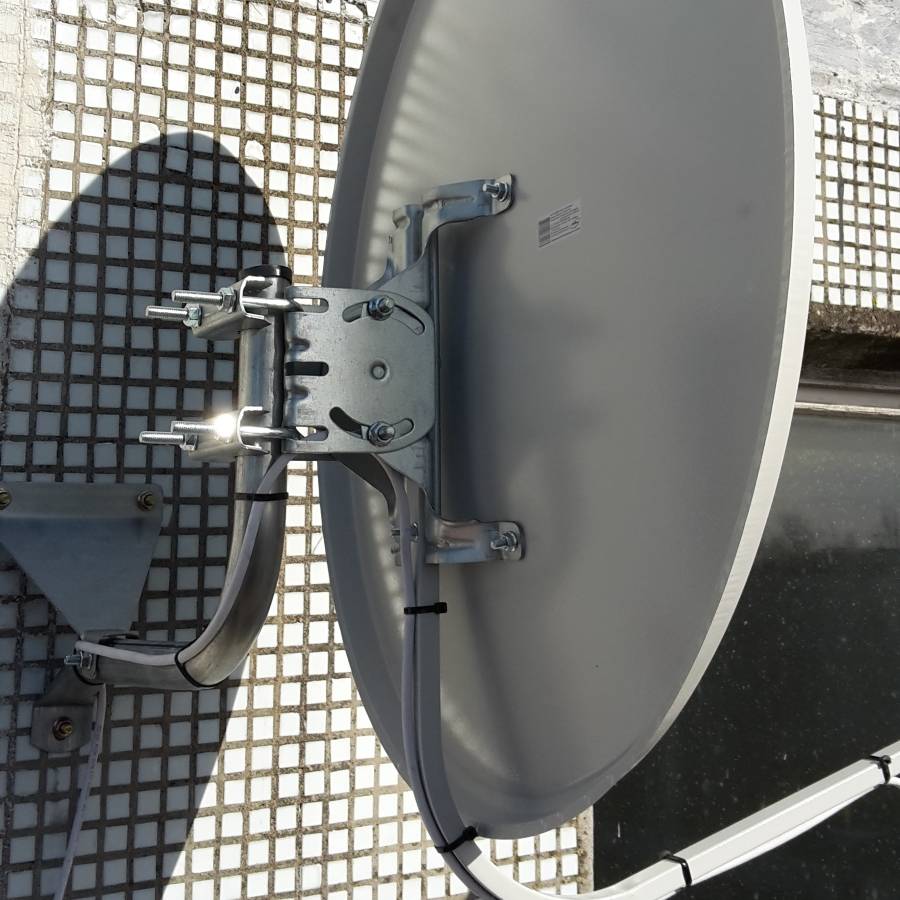
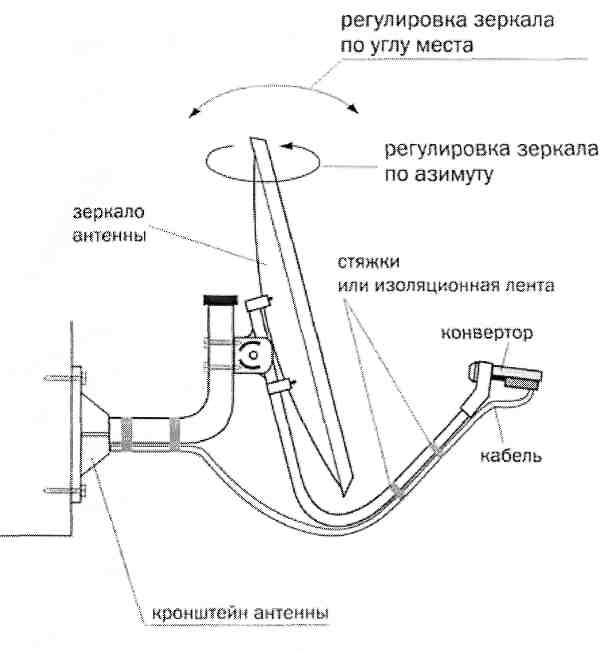
Then we mount the plate on the bracket, fix it, but do not tighten the nuts so that it can be moved in the horizontal and vertical plane.
Pre-positioning satellite dish Telekarta
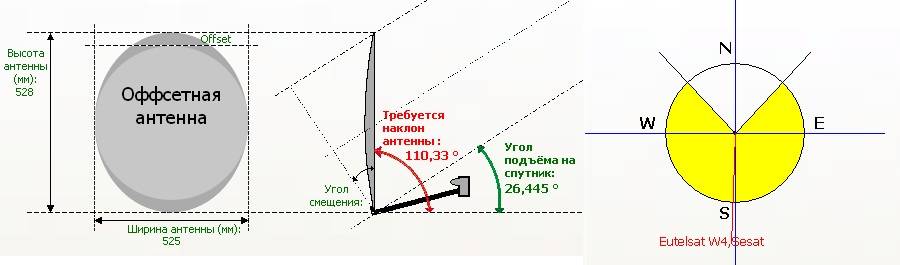
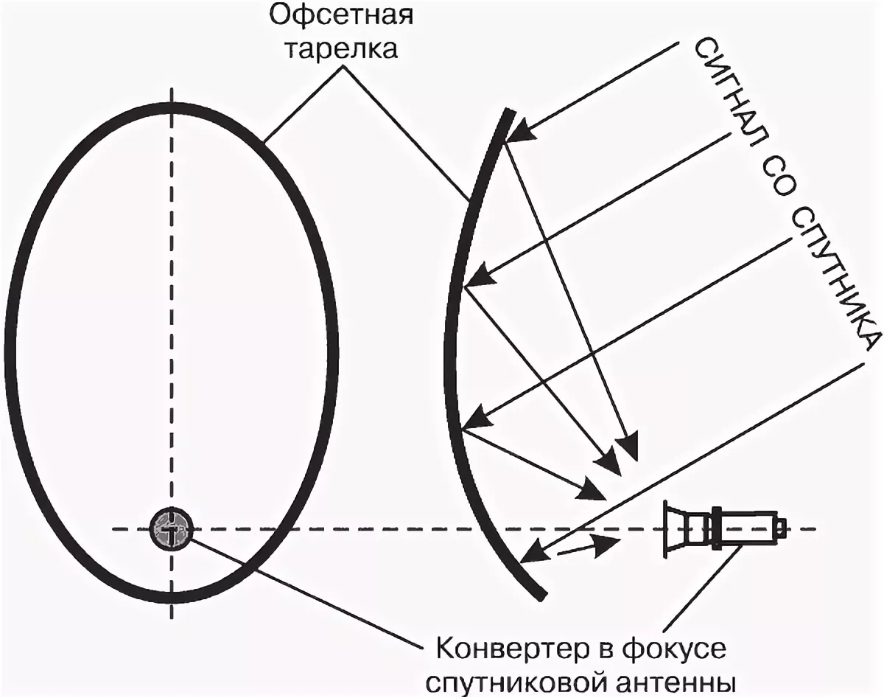
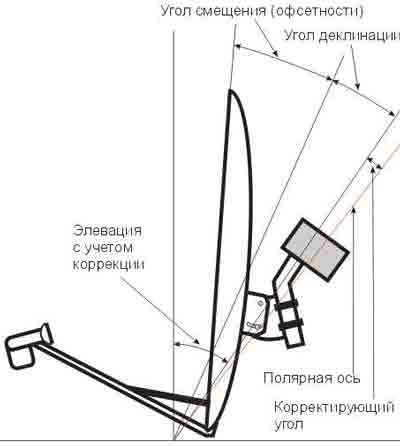
Now is the time to remember the height of the satellite above the horizon. In Volgograd, the elevation angle is 22.1°. And since our plate is offset, it is located almost vertically, that is, it “looks” straight ahead, and not at the sky. To be more precise, the vertical angle of the plate is -1°, that is, visually it looks at the ground! But don't be afraid of this. Just look at the picture of how the offset plate works and everything will fall into place.
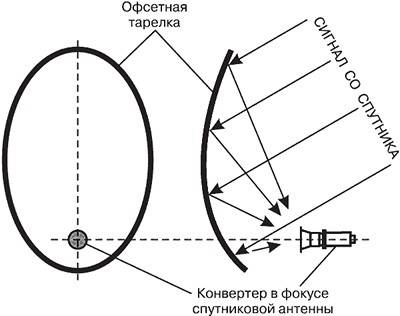
This arrangement has a plus, precipitation in the form of snow and rain does not accumulate in the antenna. Therefore, we orient the antenna mirror so that it looks a little into the ground. And then, according to earthly landmarks, we direct towards the satellite.
This completes the pre-configuration and you can start connecting the wires.


Telecard setup
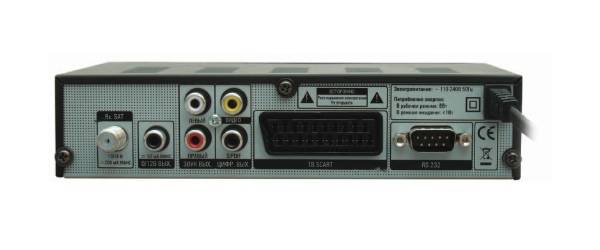
Connect all wires with the equipment turned off. That is, the satellite receiver and TV must be disconnected from the network. You can connect the Telecard receiver to the TV through "tulips" or SCART.
Turn on the TV and receiver. We switch the TV to display a signal from an external source, usually "AV". And you will most likely see the following:
This picture says that the Globo X90 TV and satellite receiver are working, but the antenna is not tuned to the satellite.
Since we do not have any measuring instruments, we will use the capabilities of the receiver itself.Why press the MENU button on the remote control. And select the antenna settings item.
When dish not tuned to satellite, or at least not set up perfectly. Then the signal strength readings are about 45%, and the quality value is only 5%.
Naturally, at this moment you will not see any TV shows. Our task is to tune the antenna so that the power readings are at least 90%, and the quality is more than 70%.
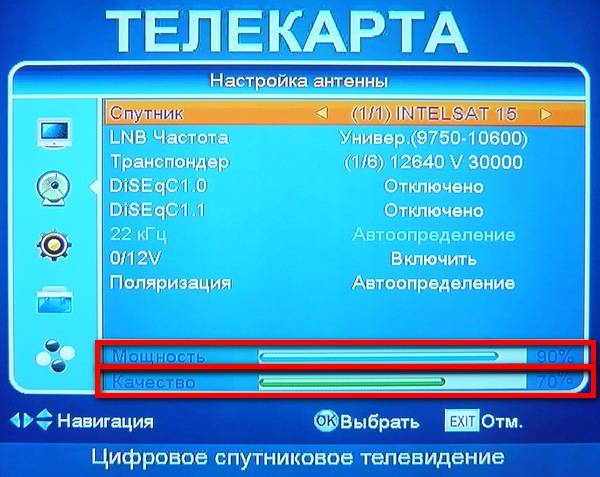
I will say right away that you will get a stable image with a quality value of 50% or more. But still, one should strive for higher values. In order not to depend on the vagaries of nature, during rain, snow, etc.
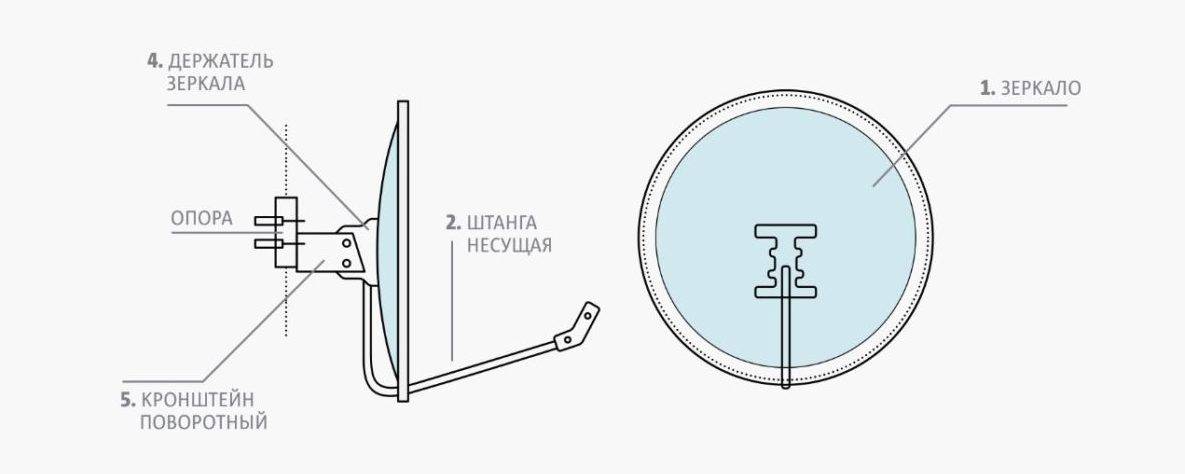
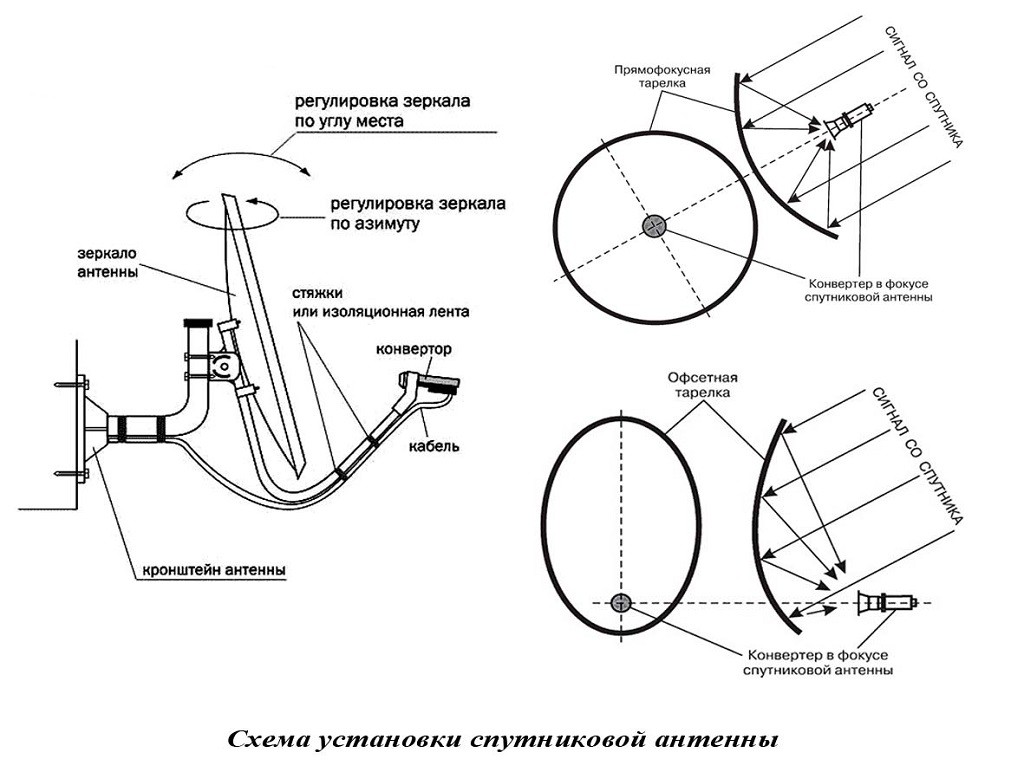
The principle of operation of the antenna
The satellite dish collects the received signal at one point and amplifies it. The size of the mirror directly depends on the range of the orbital position of the spacecraft. The parabolic shape of the mirror reflects the received signal to the antenna, which is installed in the center of the structure. A horn irradiator with automatic adjustment is fixed on the dish coordinator. This element is an amplifier of reflected signals. The front converter heads pick up the radio waves from the focal point and pass them on to the down-converter. The horn converts electromagnetic signals and radio waves into electrical vibrations. In this case, their spectrum is tuned. Further, the signal moves along the chain converter - receiver - TV.
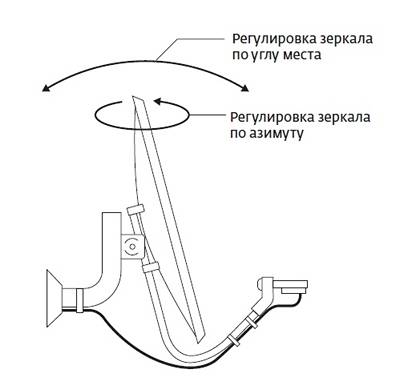
Satellite Antenna Tuning
Having detailed background information, it will not be difficult to set up a satellite dish on your own. Today there is an application for mobile phones and tablets called SatFinder.In it, you can select a satellite TV provider or find a specific broadcaster by its name. The application gives the following data.
- Direction to the satellite on the map, allowing you to choose the right side of the house for mounting the antenna.
- Horizontal azimuth. This parameter describes how many degrees the dish should be rotated relative to the north-south direction. Today, every phone has a software compass, which makes it easy to check the correct installation.
- Vertical tilt deflector. You need to be extremely careful with this setting. Some antenna manufacturers make a converter-deflector system. Products of others require adjustment of the angle of inclination.
With all the setup data in hand, the user must mount, secure, rotate and tilt the antenna. After that, fine positioning can be done. To do this, an info channel is selected on the TV (how to call depends on the model of the tuner and TV). Then, gradually turning and changing the inclination of the antenna, you should achieve the maximum indicators in the lower corner of the screen.
Satellite dish: installation and configuration (video)
Setting up a satellite dish yourself
.
Nowadays, satellite technology has come to almost everyone in the house. And many people think that setting up a satellite dish is a difficult process. In fact, this is not so, and if you understand everything, then everything is very simple.
Today we’ll talk about self-assembly, installation and configuration of a satellite dish, or, in other words, -0 dishes.
Setting up a satellite dish for dummies
Today, the most affordable set for satellite TV can be purchased for $50-80. So it's time to switch to digital technologies in television broadcasting.
The kit includes:
- The receiver (tuner, receiver) is the most expensive piece of equipment. It should be chosen carefully, since the channel is broadcast in mpeg 2 and mpeg4 (better) formats.
- Antenna (mirror) - 0.7 -1.2 m. Designed to form a receiving beam into focus, where the signal itself is received.
— Converter (head). One or several, three mostly in our area. One per satellite. Universal with linear polarization.


- Multifeeds (converter mounts). 2 pieces
- Disek - switch between converters. Since the tuner can simultaneously receive a signal from only one converter, it is definitely needed when receiving two or more satellites.
- Coaxial (television) cable with a resistance of 75 ohms. It is desirable to take with a margin of 3-5 meters.
- F connectors (plugs for connections). For three satellites 8 pieces.
- Bracket for mounting and dowel or anchor under it.
Before moving on to satellite channel settings
. You need to set up a satellite dish.
Functioning of a satellite dish
A signal comes to the mirror, which is a component of this equipment. It is reflected from the mirror and enters the converter - a device that converts the signal. Then the signal goes to the receiver and, as a result, to the TV.
Satellite dishes are divided into the following types:
- offset device. It is installed in the direction below the satellite, and not in a straight line. This is because the signal reflected from the base of the antenna enters the converter at an angle. Satellite dishes of this type have a vertical arrangement relative to the surface.
- Direct-focus satellite dishes have a converter that covers a small part of the mirror.This will not be noticeable if the device has a maximum diagonal.
Correct Antenna Location
Setting up MTS television equipment
The next step is to set up the television. The process differs depending on the equipment used.
HD set-top box
To set up an HD set-top box, you need:
- Turn off the power, install a smart card in a special slot, plug the device into the network.
- Turn on the receiver and TV.
- On the TV, select the desired connector (HDMI or AV) to see the image from the set-top box.
- Depending on the set-top box model, the user will immediately start searching for channels or see a setup wizard. In it, he will select the menu language, picture size, set the parameters of the satellite, transponder and LNB. After making these changes, he will be able to tune the channels on the TV.
- After the search for TV channels is finished, the TV will start broadcasting the first channel found.
The next step is to activate the hardware.
CAM module
To set up a TV with a CAM module, you need:
- Disconnect the TV from the network, connect the antenna cable.
- Install the TV module in the CL slot of the TV, put a smart card into the module.
- Turn on the TV in the network, start.
- Open settings, go to search for satellite DVB-S2 channels.
- Select the desired satellite or add a new one with the options below.
- Search for channels.
When adding a new satellite, use the parameters:
- Satellite - ABS-2;
- Modulation - DVB-S2, 8PSK;
- Home transponder frequency - 11920 MHz;
- Symbol rate - 45000 Msymbol/sec;
- Polarization LNB - vertical;
- Local oscillator frequency LNB - 10600 MHz;
- Power LNB - included;
- Tone 22 KHz - active.
After completing the channel search, activate the equipment.
Interactive set-top box
To set up an interactive set-top box, you need to insert a SIM card into a special slot, and then start the technique. At the first start, the analysis and initialization of the 3G signal is performed. This is a long process, you need to wait for it to finish.
Next, the subscriber will be asked to activate the equipment using one of the available methods. Regardless of the option chosen, the subscriber will have access to a demonstration TV viewing for 10 days.
Next, the user needs to create a profile. In it, you can set an age limit and create a password to access channels.
The subscriber can set up and connect satellite TV from MTS on his own if he does not want to pay extra money for the installation of equipment. The guide above will help him with this. Upon completion of the setup, you will need to activate the equipment. After activation, the user will have 10 days of test viewing, during which the operator will have to receive the original contract.
Site author
Natalia
Technical specialist, user support on mobile communications.
Write to the author
I will try to help each user in solving his problems, the most common ones you will find on the site. You can read about me here Natalya Timofeeva.
Information required for installation
When purchasing a set of equipment, you need to select an operator. Up to 30 Russian-language channels are broadcast by a satellite named Yamal 201. Operators work with it: NTV - plus, Tricolor - TV, Raduga - TV


To receive them, it is important to know and set the frequency. Spacecraft are invisible from Earth, but each of them has its own exact coordinates
The numbers present in the name of the spacecraft indicate the longitude: 5W, 9W, 16E, 85E, 90E.
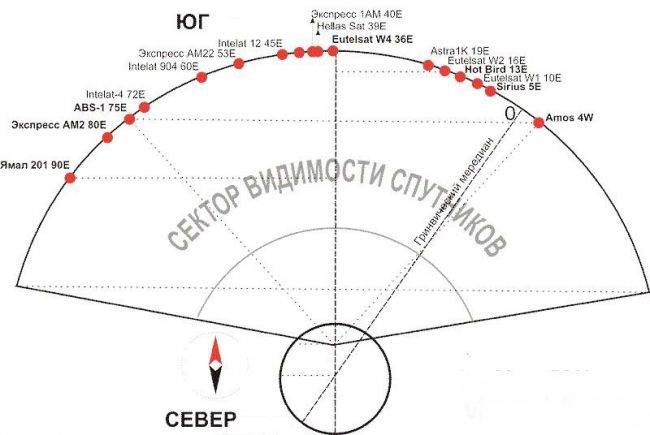 Satellite Visibility Sector
Before installing and setting up do-it-yourself antenna, you need to determine which side is south. This is easy to find out with the help of a regular compass, which is in every smartphone. But how do you know what angle to set up a satellite dish? You need to find out from the seller the azimuth corresponding to the installation site, or look on the Internet. For example, it will be 205 degrees. To "take" the azimuth, set the compass so that the zero mark of the scale is at the bottom, the arrow points to the north. While holding the compass motionless, mark 205 degrees on a scale and visually note this direction on any motionless object: it is a tree, a pillar, a building.
 Finding the azimuth when setting the dish
Antenna location
The installation of satellite dishes independently and the installation of the mounting of the receiving device are carried out on the south side of the building in a convenient place. The height does not matter, the main thing is that it is convenient to maintain, and there are no obstacles between the installation point and the sun: roofs, high-voltage power lines, and more. You can even install on the site, right on the ground. The main thing is that there is more room to turn the signal receiver.
Attention! Installing a bowl on the roof is justified only when there is no other place to get rid of interfering structures and objects. But there is a lot of inconvenience in the maintenance and adjustment of the device associated with lifting to a height
 Incident and reflection of waves on the reflector bowl, depending on the angle of the device
satellite dish mount
To fix the satellite dish yourself and at the same time spend less effort and money, it is better to buy a mounting bracket separately from the device. The one included in the package may not fit. The selected mounting option must meet the requirements:
- withstand the load of the device with large diameters of the plate;
- allow the mechanism to rotate along the vertical and horizontal axes;
- wall support devices or vertical supports should not have their own movement around the axis.
Fastening to the wall of the building is carried out with wedged anchor bolts or self-tapping screws, with a diameter of at least 10 mm, excluding home-made wooden seals. Both those and others are selected with a place for turnkey rotation, and not for a screwdriver.
All holes that are available on the mounting platform must be used. Installation on wooden surfaces is undesirable due to unreliability. When using standard brackets included in the kit, it is advisable to use additional extensions.
Important! The stability of the signal and the safety of operation depend on the reliability of the fastening of the entire structure. If the receiving device falls, passers-by may be injured, the antenna itself may be damaged and it will not be possible to restore it
An economical mounting option is inappropriate here.
TOP-5 reliable satellite TV providers in Russia
In addition to the purchase and installation of equipment, there is one more important detail - the choice of a satellite TV operator. Today, there are quite a lot of companies providing such services in the country.
This raises the question: “Which operator is better to connect to?”.Consider proven and popular providers in Russia.
-
NTV plus. The first domestic operator to start broadcasting in the satellite television format. To date, viewers have access to 200 channels, 30 of which are broadcast in HD. Satellite location: 36o east longitude.
-
Rainbow TV. A package of Russian and international TV channels designed for a wide audience. The broadcasting network includes sports, children's, music and film channels. Satellite location: 75o east longitude.
-
TV MTS. A new service from a well-known mobile operator. After connection, 130 TV channels are available, of which 30 are in high-definition format. The receiver has an intuitive interface and takes TV broadcasting to a whole new level.
In particular, viewers can watch live broadcasts and pause the image, rewind, watch video on demand.
-
Telecard. Today, it is the most affordable satellite television operator operating in all regions of the country. There are two types of connection equipment: SD and HD, which imply different tariff plans that differ in the broadcasting grid and broadcast quality.
-
-
Tricolor TV. It is currently the largest provider in the Russian region. The key advantages of purchasing equipment are the absence of a monthly fee, a confident signal level regardless of external factors. The broadcasting network includes 38 TV channels, connection of a paid package is available.


In addition, you can pay attention to the operators "Platform DV", "Continent", "Platform HD".Providers offers a wide range of thematic and educational channels in high quality images
In conclusion, we offer you to watch an sensible video that will help you cope with the task yourself:
Setting up a satellite dish
 You need to make sure that the antenna is installed correctly and is oriented to the south.
Making settings on Sirius. Setting up satellite dishes independently begins with setting the frequency 11766 and the speed 27500 on the receiver. We select the polarization "H".
We observe two bands on the receiver:
- red - displays the connection of the dish and the satellite signal;
- yellow - shows the level of the received signal.
If the antenna is connected correctly, then the signal level reaches 40%. In this case, the signal quality is zero.
We approach the climactic question of how to independently set up a satellite dish. Set the initial position of the antenna all the way to the left and up.
Then carefully turn from left to right and control the level of signal quality. In its absence, lower the plate 2-3 mm down and repeat the procedure in the opposite direction - from right to left until it stops. We carry out this algorithm of work until a yellow bar appears.
We control the tilt of the plate according to specially printed numbers on its fasteners.
At this stage, it is difficult to independently orient the dish at a height and at the same time control the appearance of a signal on the receiver. Therefore, it is necessary to connect an assistant to the work.
With the indicator of the yellow band within 21%, we fix the position.
Making finer adjustments
Having slightly lowered the antenna, we make a slight turn to the left. If the signal quality has deteriorated, we return to the starting position. We make a turn to the right, as well as up and down.
When the signal reaches 40%, we proceed to setting up the convector. We rotate first clockwise and then counterclockwise and achieve an improvement in the signal up to 65-70%.
Setting the side convectors
 When the main plate is set up, the side convectors are much easier to set up.
We make settings on Amos. On the receiver, set the frequency to 10722, the speed to 27500 and the polarization "H".
For Hotbird, the frequency is 11034, the rate is 27500, and the polarization is "V".
The setup procedure follows the example of Sirius.
By bending the side brackets from the upper left corner to the right and gradually lowering by 2-3 mm, we achieve the appearance of a signal.
To improve the signal quality, we rotate the converters around its axis. First rotate clockwise and then counterclockwise.
So we figured out how to set up a satellite dish yourself. With some experience and a work plan, this is not difficult to do.


After the final tuning of the antenna, carefully fix the cable and turn on the SCAN function on the tuner. The tuner will automatically scan the available TV channels for viewing and display a list of them.
After that, you can start watching TV shows.
How to set up a satellite tuner
Setting up a satellite dish is finished on its own, now you need to figure out how to set up satellite dish tuner. To do this, use the "Settings Wizard" option, following its menu, step by step, the necessary options are selected from the list of proposed ones. Navigating through the menu windows is done from the remote control using the joystick. The choice is confirmed by pressing the OK button. The procedure is divided into stages:
- choice of language and time zone;
- select settings for connecting to a TV;
- cymbal parameter settings;
- automatic channel search.
A message is displayed on the TV screen about the completion of the settings, and the TV receiver automatically switches to the TV show mode.
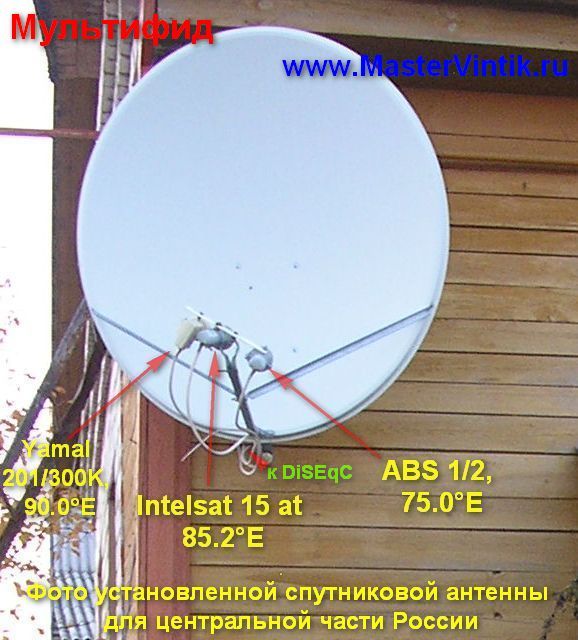
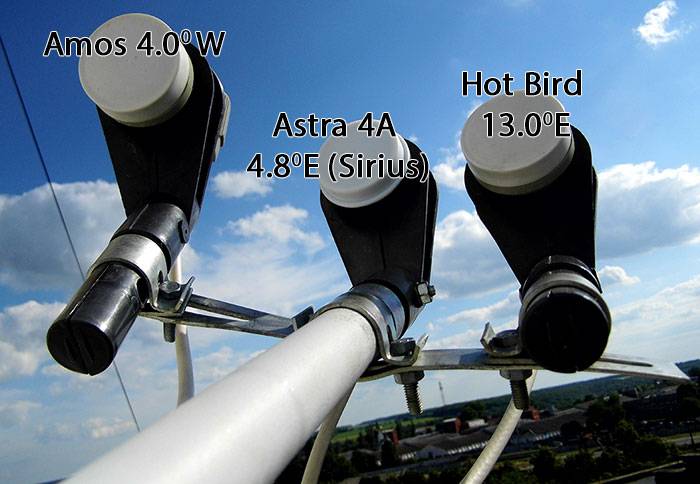
Scheme of the location of the converters (heads).
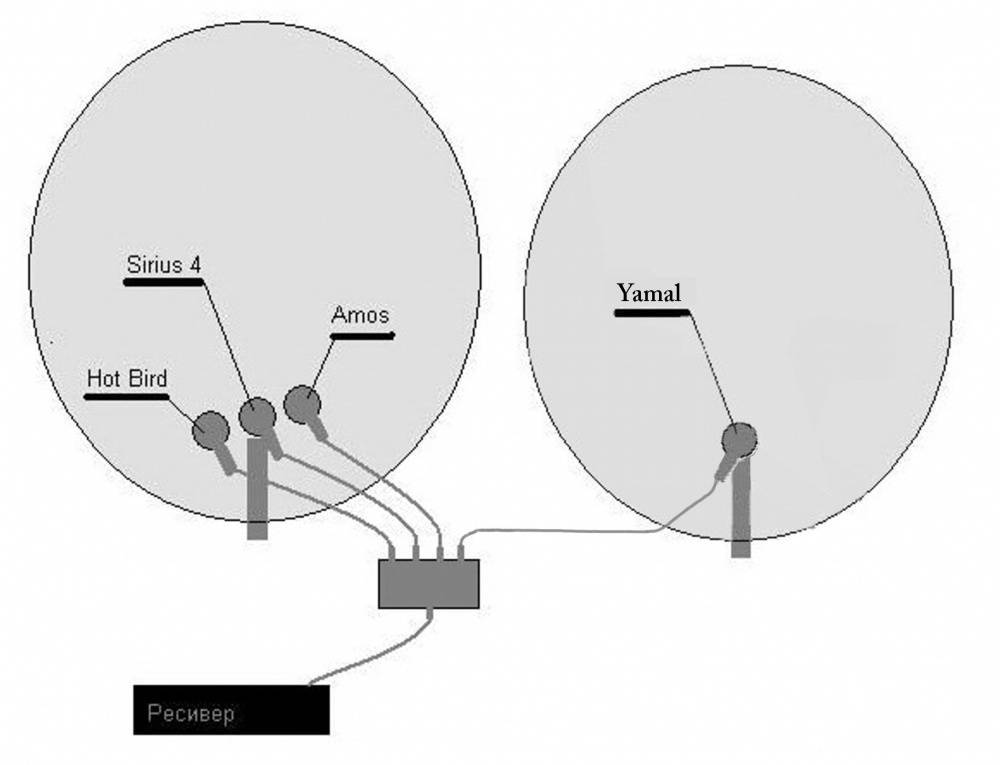
As you can see, the central head of the antenna is directed to the Astra 4A satellite (formerly Sirius), it is attached directly to the antenna.
Assembling the antenna, connecting the cable to the converter and switch.
CABLE CONNECTION MUST BE MADE WITH THE RECEIVER OFF. Shorting the cable may damage the receiver.
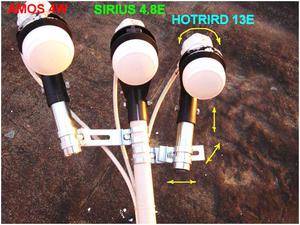
We attach two heads with the help of multifeeds in an approximate position (as in the picture).
We fasten the head that will receive Amos to the left of the central head (when viewed from the back of the antenna) at a distance of about 7 cm and a little higher, then to the right the head that will receive Hot Bird will be about 3 centimeters from the central head and a little lower.
Diseqc-switch.
We connect the cables from the heads to the diseqc switch. We write down which switch port (ports are numbered), each satellite corresponds. For example, we will connect a converter that receives a signal from the Amos satellite to the first port, Sirius - to the third, Hot Bird - to the fourth.
amos 1/4sirius 3/4hot bird 4/4
Next, connect one end of the cable to DiSEqC to the “Reseiver” (out, RW) port, and the other to the “LNB IN” tuner jack. Connect the receiver to the TV and turn on the receiver.
Receiver setup.
Now we need to configure the receiver according to our configuration. Since we could use a different number of heads and switches in the receiver settings, this data is not pre-set.We need to indicate that we are using one switch with four inputs, or rather, we need to indicate which switch inputs the heads are connected to.
We go into the menu - press "MENU" on the remote control. Depending on the model of the receiver, there may not be fundamental differences in the menu structure. We recommend using an already tuned satellite receiver. We go to the "MENU" - "SETUP", select the satellites in turn and set the parameter "DiSEqC


