- Extra Freon charge
- The second stage of the installation of a split system
- Choosing a place for the indoor unit
- Block to the left of the outer wall
- On the wall to the right of the outside
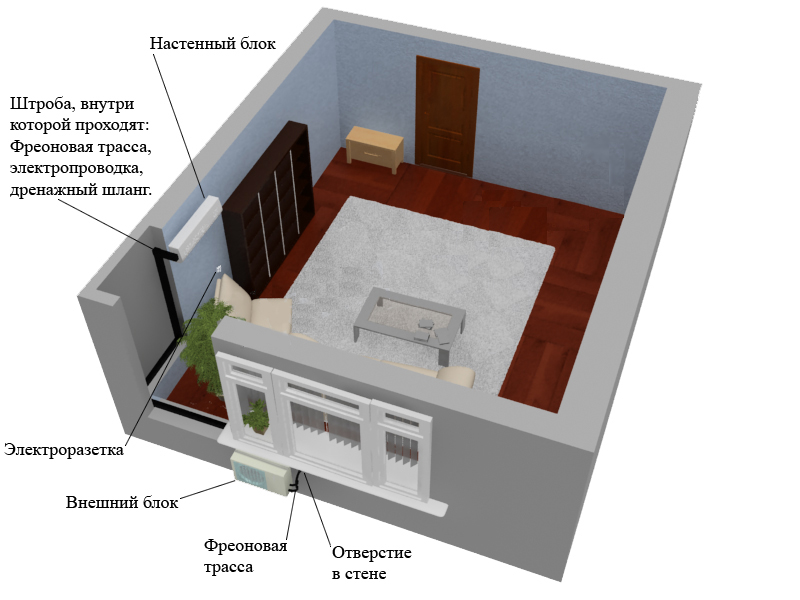
- Laying the track in the box and mounting the brackets
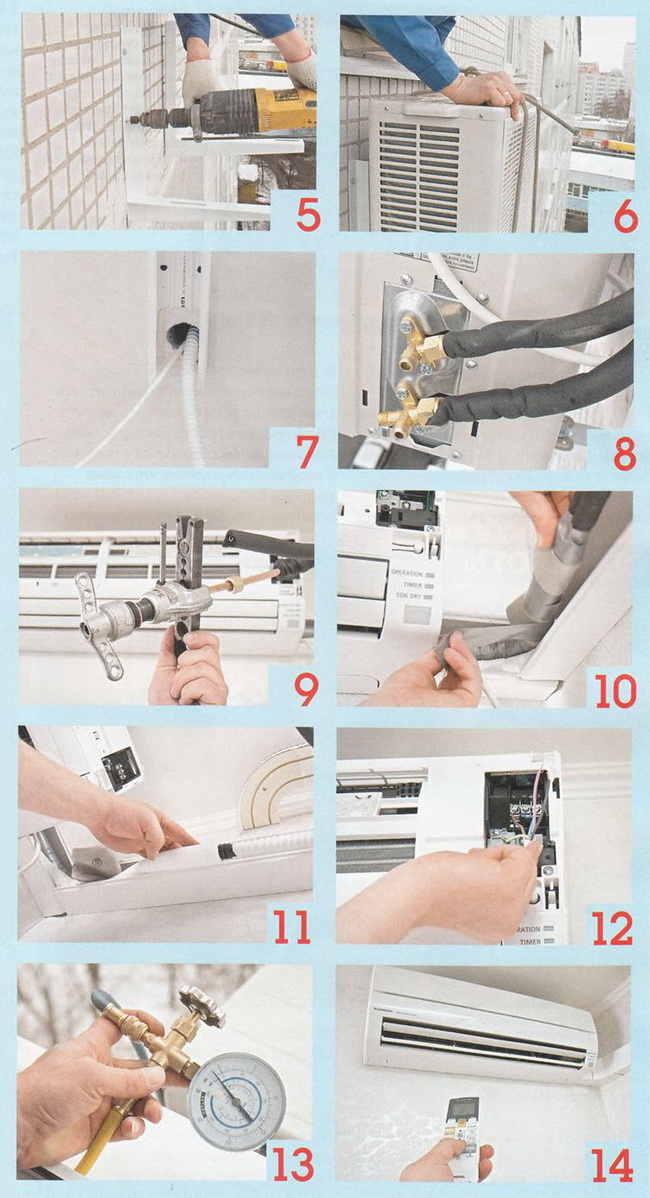
- How to install an air conditioner: installation of outdoor and indoor units
- The second stage of installing an air conditioner with your own hands: connecting blocks
- How to connect an air conditioner: connecting copper pipes
- Some general information
- Connecting freon pipes
- Cable channel installation
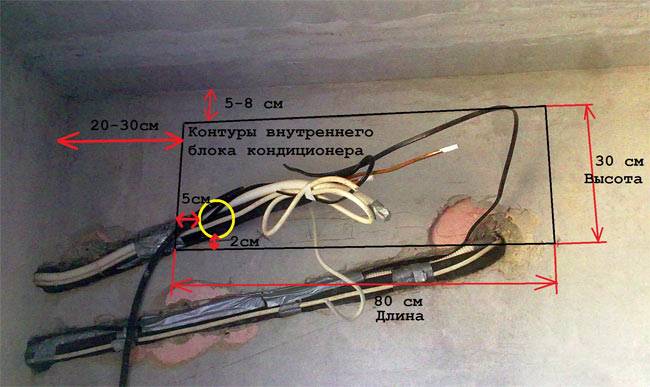
- Installation of the indoor unit of the split system:
- Marking
- Drilling holes in the wall
- Fixing the indoor unit
- Some general information
- Expendable materials
- Using a vacuum pump
- The principle of operation and the device of the air conditioner
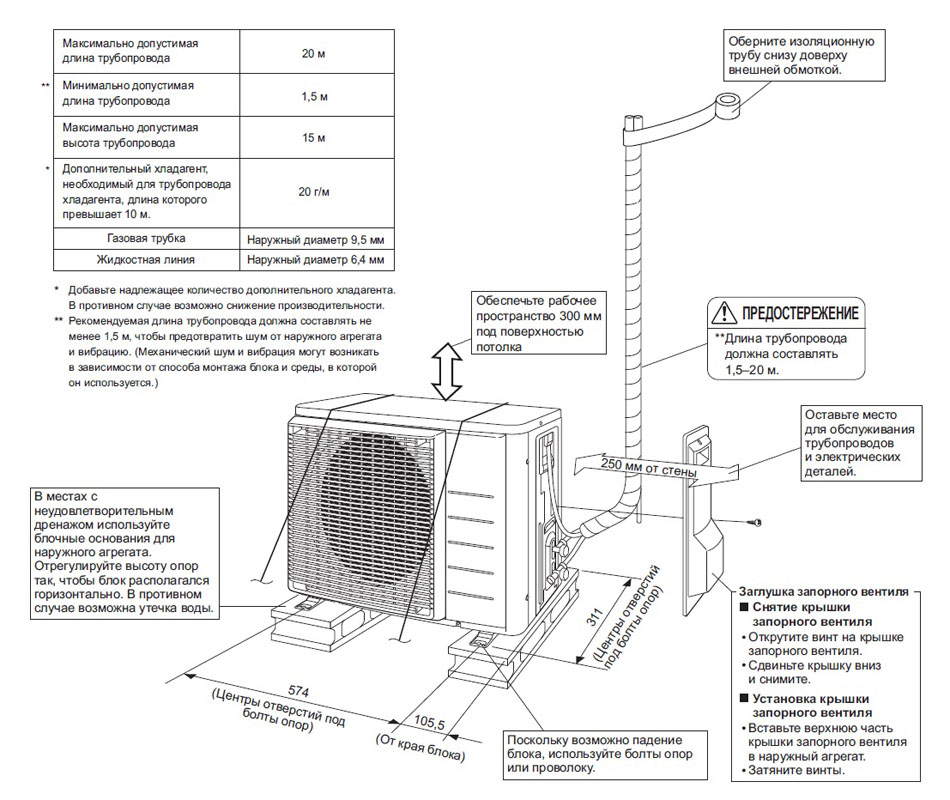
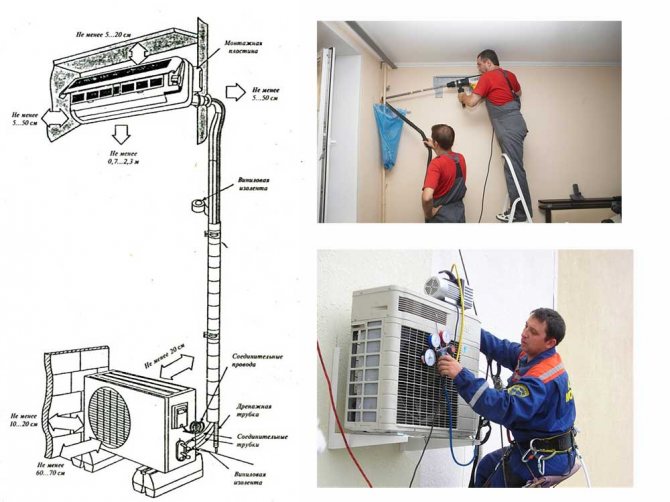
- Determining the distance between blocks
Extra Freon charge
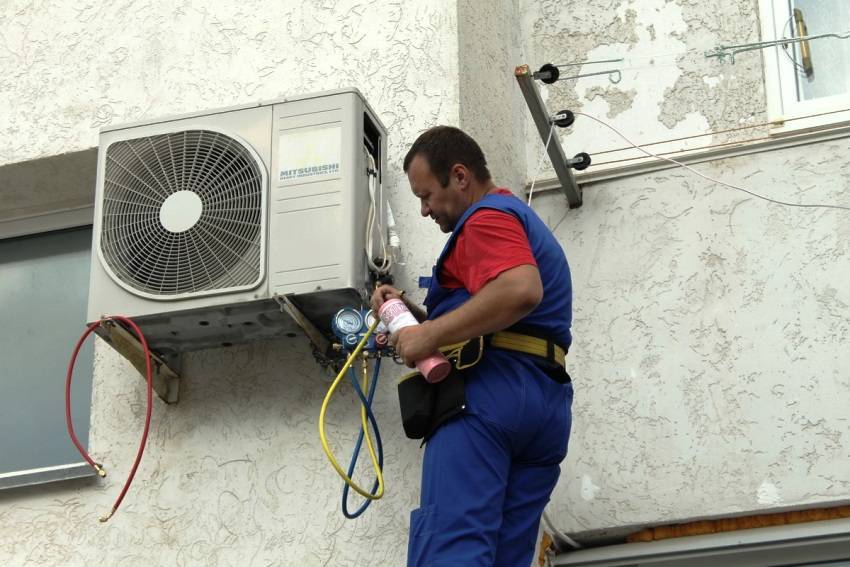
The maximum length of the connecting hoses through which freon moves must not exceed 7 meters. But in the case when another installation of the system is impossible for one reason or another, it is necessary to increase the length of the route for the refrigerant. In this case, a mandatory refueling of freon into the system will be required.
When all the work has been completed and, if necessary, additional charging of freon into the system has been made, the next step will be the need to make a trial run of the installation.
It is advisable to take care of your own safety before this action. Pressing the forced start button will start the system. Sometimes the system beeps twice when turned on. This indicates that you can control the device using the remote control. In order to check its operation, you should also alternately press the buttons on the remote control.
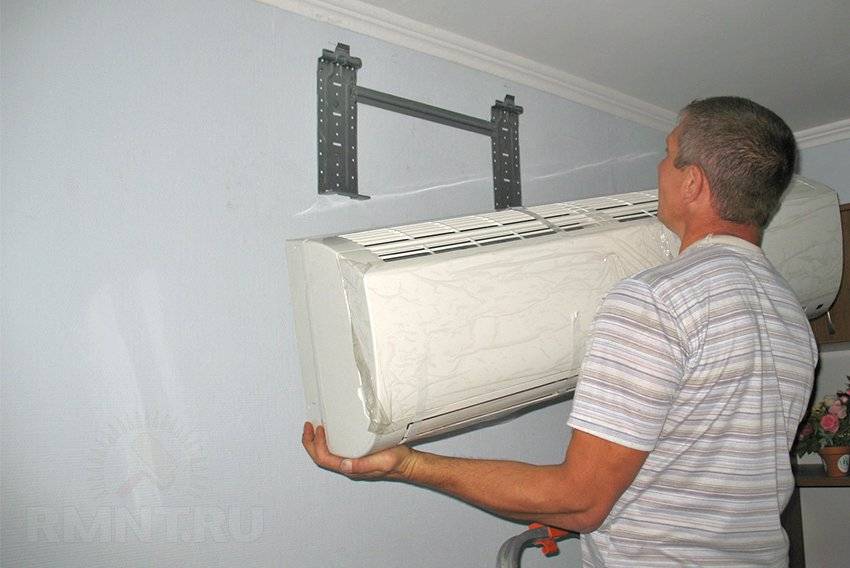
The second stage of the installation of a split system
Correctly installing the indoor unit is very important, since the quality of the entire system directly depends on it. The best option is to fix the device on the wall with self-tapping screws, if the walls are finished with gypsum plaster, then you should definitely insert plastic spacers into it, since such material is quite loose and the self-tapping screws will quickly loosen from vibration
If the wall is made of brick, then wooden or plastic “caps” are inserted into the holes drilled for self-tapping screws, and then a plate for the block is fastened with self-tapping screws. Be sure to check with the help of the building level evenness of the fastening of the plate.
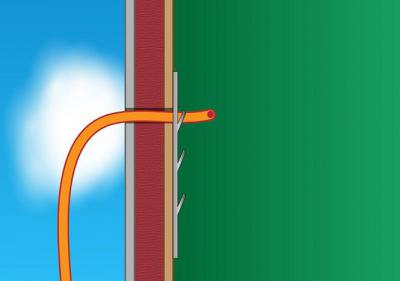
The next step is to use a perforator to drill a through hole in the wall for the cold pipe. Be sure to ensure a slope of at least 15 degrees. It should be out, not in.
Next, you need to connect the copper pipes to the indoor device of the air conditioner, as well as the drain pipe to the special hose on the device.The electrical cable can now be connected to the indoor equipment. For split systems, the cooling capacity of which is not more than 4 kW, you should use a cable with a cross section of at least 1.5 mm (5-core).
Choosing a place for the indoor unit
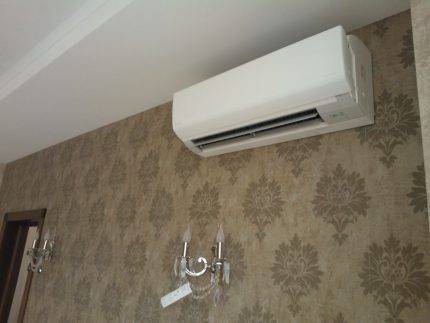
Let's start with the simplest: choosing a placement in terms of usability. The indoor unit must be placed so that the cooled air is distributed throughout the room, but does not fall directly on the bed, desk, armchair. In principle, it is possible to redirect the flow using movable shutters, but it is much better to think about it from the very beginning.
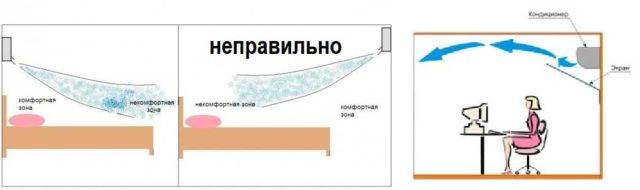
Options for the location of the indoor unit of the split system
The most correct decision in this case is to place the air conditioner above the head of the bed, above or to the side of the table. In this case, the flow of cold air will “flow around” the place of rest or work, which is much more comfortable and less hazardous to health.
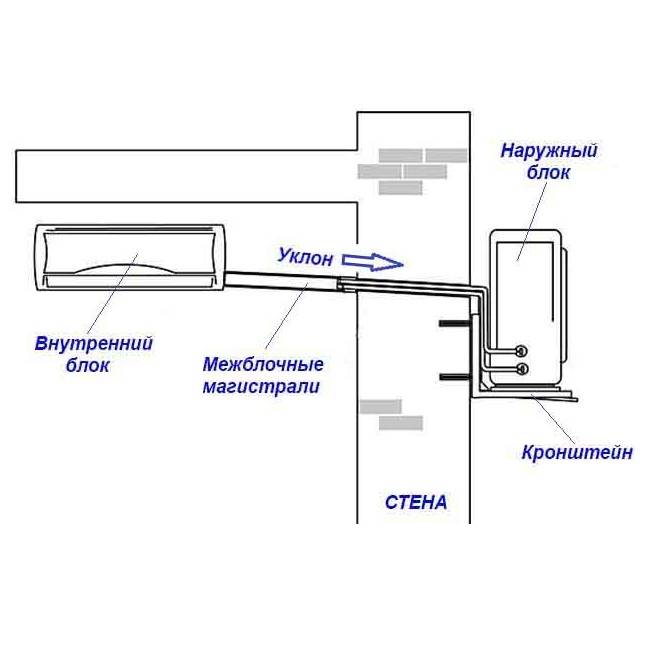
In addition, there are technical points that must be foreseen before the installation of the air conditioner with your own hands is started. The indoor unit is connected to the outdoor unit using a copper pipe route and a control cable. The outlets for connecting the track are on the right (if you look at the block from the front), but they can be bent so that they are on the left or bottom. These outlets are copper tubes 30 cm long.
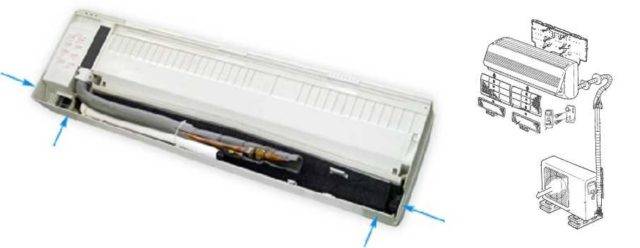
Outputs from the outdoor unit of the split system (rear view)
A route is connected to them (by soldering or flaring), and the junction must be accessible for maintenance. Therefore, this section of the route is not hidden into the wall (into the strobe), but is covered with a decorative box.At the same time, the track can be positioned in different ways - depending on which wall the indoor unit is hung on and where the outdoor unit is located in relation to it.
Block to the left of the outer wall
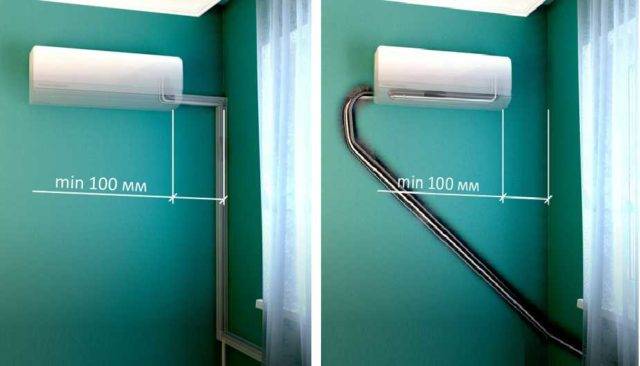
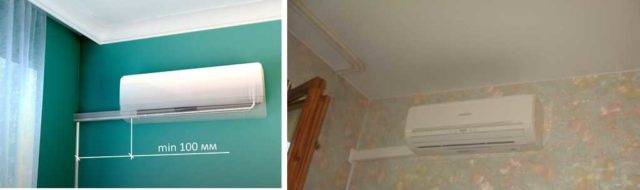
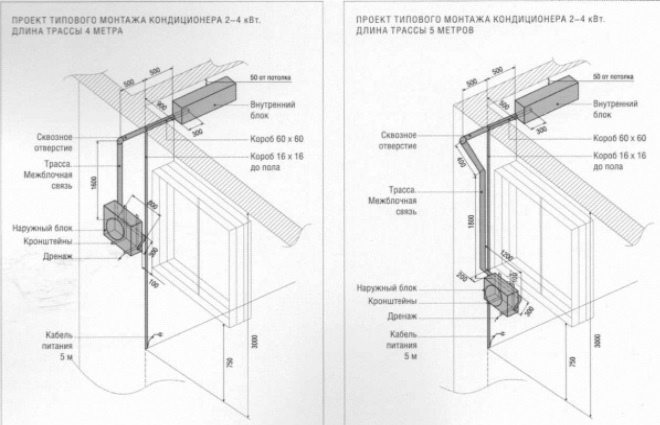
If the indoor unit is located to the left of the outer wall, and the tracks go straight, the minimum distance from the wall to the unit is 500 mm (1 picture in the photo). It can be reduced to 100 mm if the route is wrapped onto an adjacent wall, but its total length should not be less than 500 mm. If this is not possible, you can bring out the bends on the left and lay the pipes in the gate (figure on the right). In this case, this is possible, since the junction of the leads and the trace is obtained under the housing cover, so that it is accessible for repair and maintenance.
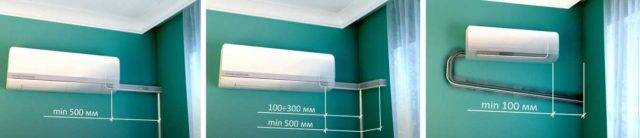
Options for laying the refrigerant route if the indoor unit of the air conditioner is located to the left of the outer wall
If cables, pipes, etc. cannot be pulled along the outer walls of the building. (in order not to spoil the appearance), you will have to lay the entire track indoors. A less expensive option is to hold it in the corner, closing it with special boxes. This arrangement is convenient, since then you can close the box with curtains.
Do-it-yourself air conditioning installation: if the track must be held indoors
The second option is more labor-intensive (it is more difficult to make a strobe), but from the aesthetic side it is more advantageous - this is to transfer the output to the left side panel and put everything into the recess made.
On the wall to the right of the outside
This option can be called typical - this is a standard solution when choosing such a location. most often, the route in the box is led directly into the wall, but if necessary, it can be lowered in the corner (also closed with a box).


Installation example of the indoor unit of the air conditioner on the right side of the outer wall
If necessary, you can put it in a strobe (the junction is in the body). If the route cannot be carried out outside the building, it can be laid in a strobe indoors. The track may look like the last two photos in the previous chapter.
Laying the track in the box and mounting the brackets
At this stage, you yourself choose the sequence of actions. You can first hang the block on the panel, and only then start laying the track in the box. You can, and vice versa, lay the track, then attach the block. The main requirement is not to bend the copper tubes. If this happens, the compressor will soon break down.
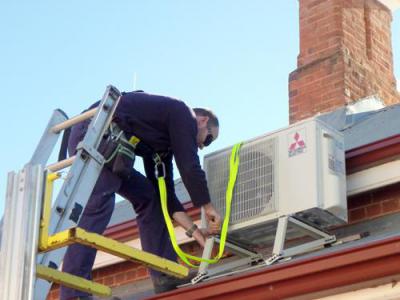
Next, you need to get insurance and go outside, since the next stage is performed there. Whether it is the installation of a multi-split system or the most common one, it is necessary to fix the brackets on the wall. They should be located in the same horizontal plane, so use the building level. It is advisable that two people do the work, since the outdoor unit has an impressive weight. After fixing the brackets, the external unit is put on them and additionally fixed with bolts.
How to install an air conditioner: installation of outdoor and indoor units
First you need to determine the places where the blocks, the track and other elements of climatic equipment will be placed. To do this, you need to walk along the entire route with a device designed to detect wiring and apply preliminary markings.
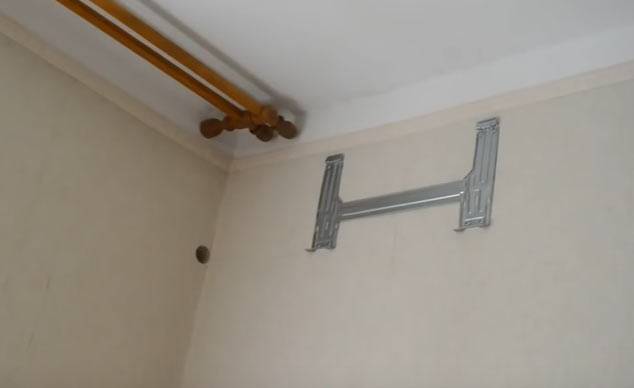
After that, a plate is attached to the wall for fixing the indoor unit. This element is placed strictly in a horizontal position, therefore, in the process of work, it is imperative to use the building level.

The choice of brackets for mounting outdoor units must be approached very responsibly.
How to install the indoor unit:
The plate is applied to the wall, leveled and the places where the fasteners will be placed are marked.
The plate is removed and holes are made at the marked points with a drill.
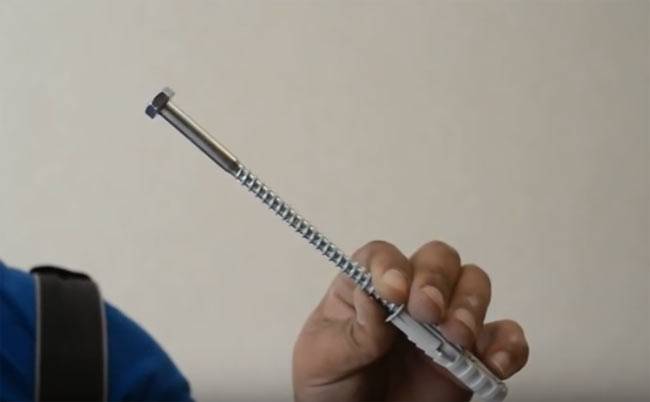
Fasteners are installed. In wooden houses, you can use self-tapping screws; for concrete and brick buildings, it is better to take dowels.
The plate is put in place and securely fixed
Particular attention should be paid to the latches that hold the unit to the bottom.
It remains only to check the horizontalness of the plate and fix the evaporator on it.
Then you should install the air conditioner with your own hands from the outside. To do this, taking into account the standards, markings are applied, in accordance with it, metal corners or brackets are installed. Stainless steel anchor bolts 10x1 cm in size can be used as fasteners. The choice of brackets must be approached very responsibly. These elements must not only withstand outdoor unit weightbut also to cope with wind and snow loads.
After making sure that the brackets are installed evenly, the outdoor unit is fixed to them with the help of bolts. The compressor to the installation area must be lowered very carefully, having previously tied it with ropes. In the place where communications will pass through the wall, a through hole of the required size is made with a puncher.

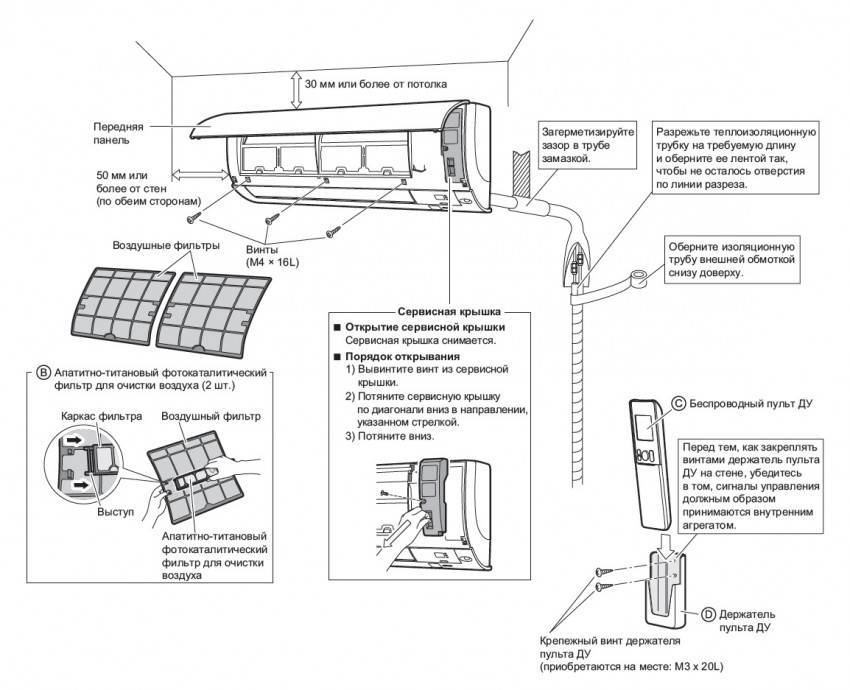
Do not install the air conditioner close to the ceiling or side walls
The second stage of installing an air conditioner with your own hands: connecting blocks
To connect the outdoor and indoor units, a cable and copper pipes of two diameters are used.The dimensions of the connecting elements are usually indicated in the instructions that come with the split system. The length is calculated taking into account the placement of blocks. Add 30 cm to the value obtained.
Copper tube processing:
- a cut of the required length is made from the bay;
- the edges are straightened, and all burrs are eliminated;
- plugs and plugs are installed at the ends;
- thermal insulation is put on.
After that, the pipes must be brought out through the hole in the wall and bent in the right places using a pipe bender. Crimp lugs are installed on the cable on both sides, after which it is inserted into the hole and connected in accordance with the instructions.
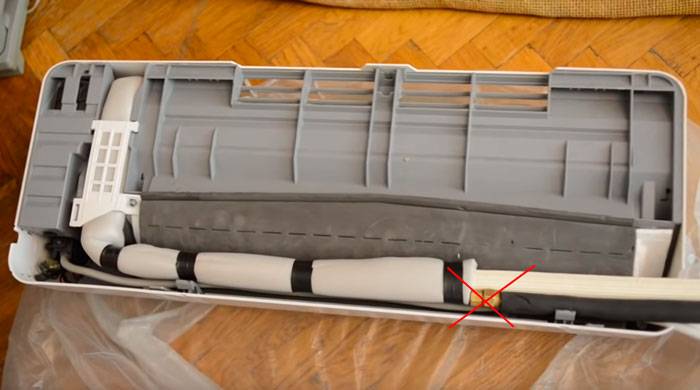
When installing a split system, the drainage tube is connected to the indoor unit with your own hands (a special outlet is provided for this) and brought out at a distance of about 80 cm from the wall. To prevent sagging, it should be fixed at every meter. Before laying communications in a plastic box, they should be tied into a bundle using metallized tape or ties.

The outdoor unit is installed first, and then the system is installed indoors
How to connect an air conditioner: connecting copper pipes
First, the pipes are connected to the indoor unit. On its side wall there are two ports with fittings of different diameters. From them you need to twist the nuts. As a result of this, a hiss will appear, indicating that nitrogen, which was pumped in by the manufacturer, is coming out of the block. It is necessary to protect internal parts from oxidative processes.


Next, remove the plugs from the tubes and once again check their edges for defects. The surface must be even. After that, union nuts can be put on the pipes.
Then the edges of the tubes should be flared. When performing this procedure, you need to hold the product with the hole down so that dust and small chips do not get inside. The tube is clamped in the holder so that 2 mm remains outside. Then the roller is installed, the screw is tightened. This is done until the cylinder stops lowering. As a result, a "skirt" is formed on the product.
The tube is connected to the outlet of the indoor unit with a flared edge. A union nut is used as a connecting element, which is tightened with a wrench. There is no need to use sealing materials. The tubes are connected to the outdoor unit in the same way.

Copper pipes are connected to the indoor unit of the air conditioner
Some general information
Our main goal is to install the air conditioner without damaging it. But, in addition, it is necessary to properly install both the indoor and outdoor units. Otherwise, the performance will be much lower, if the device will function at all.
To get started, you will need a special tool: a puncher and a vacuum pump, a manometric pump, a building level. As for consumables, the installation of a split system is carried out with a standard kit, which should be included in the kit. This is a heater, a drainage hose, dowels, brackets, etc. If this is not there, then you need to buy it, and only after that start installing the air conditioner.
Connecting freon pipes
We pass to the stage of connection of communications.
Connect the flared pipes to the indoor unit of the air conditioner using adjustable wrenches.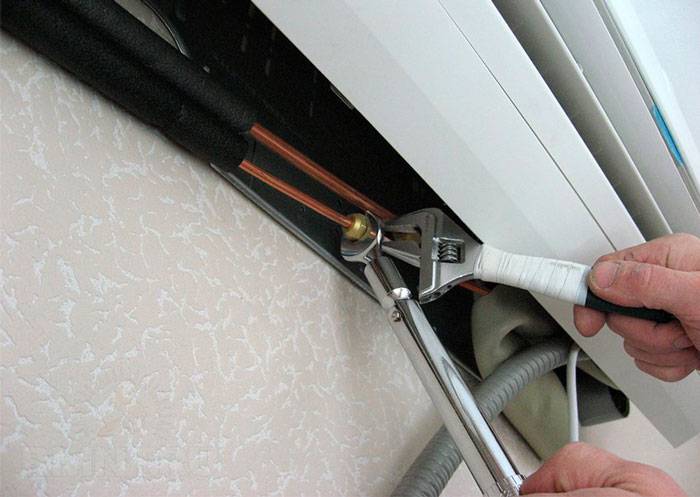
If you are rich with a torque wrench, then it is better to use it.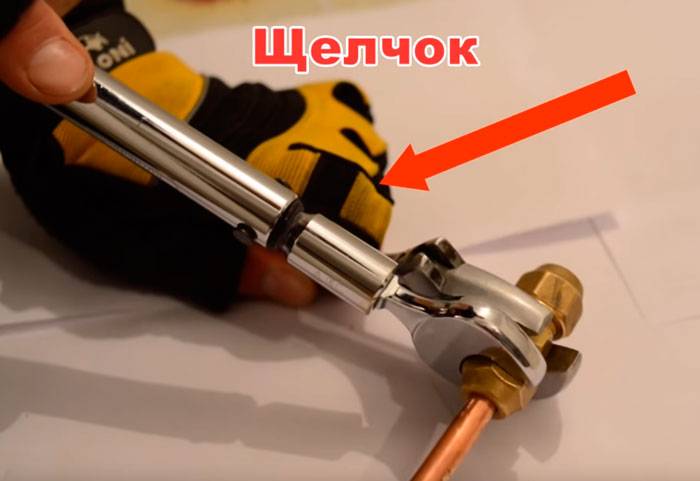
Here are the recommended tightening torques for freon tubes of various diameters:
1/4 - 16-20Nm
3/8 - 35-45Nm
1/2 - 45-55Nm
Next, take the interconnect cable and twist it all together with the freon line using reinforced tape or vinyl tape.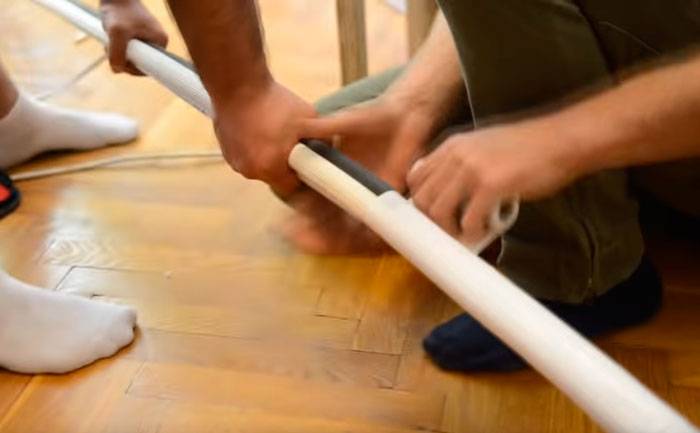
Do not forget to stretch the insulation of the required diameter on the copper pipes.
To prevent dirt from accidentally getting inside the tube, wrap its ends with electrical tape.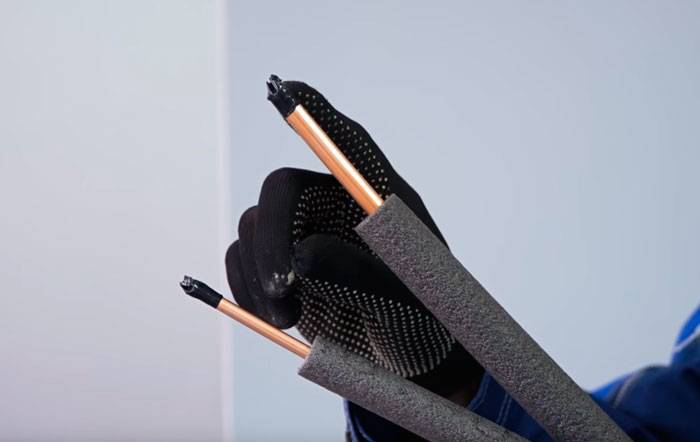
Mistake #8
In no case should the thermal insulation of the pipes be left unprotected.
Otherwise, from the side of the street under the influence of UV rays, within a few seasons it all turns into dust.
If your thermoflex is light-resistant and not afraid of the sun, then think about birds. Ravens are very good at pecking and pulling such material into their nests.

Mistake #9
Also, do not leave any area indoors without insulation. Especially the connection points.
 Condensation will gradually form here and eventually a neat trickle of water will appear on your wallpaper.
The line itself, wrapped with tape inside the room, is hidden in a plastic box.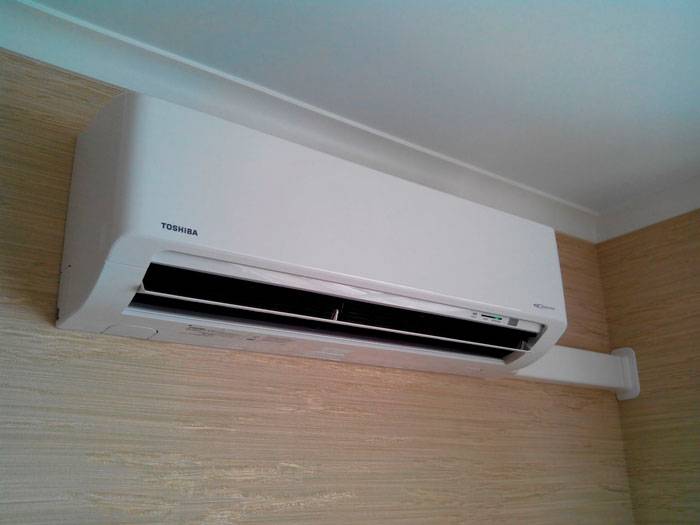
However, if you have a short section and old wallpaper remains, then instead of using a box, you can paste over the highway with them. You get an almost imperceptible picture.


Next, pass the line through the through hole to the outside.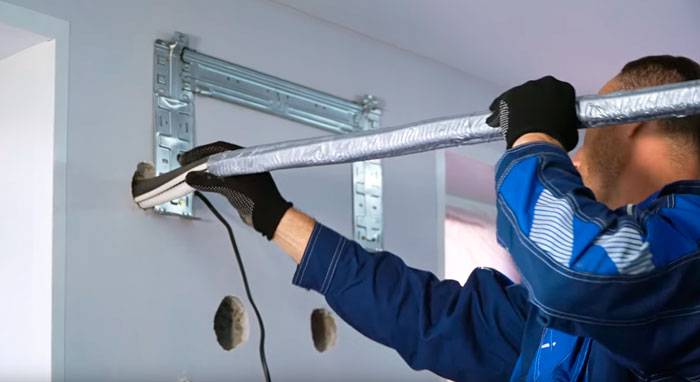
Cable channel installation
Cable laying must be carried out with at least a slight slope. This is done to prevent condensation. Be sure to take this into account when installing.First you need to drill a hole with a minimum diameter of 55 millimeters. Do not forget about the slope, which will prevent the appearance of an air lock in the drain hose. After the through hole is made, we stretch the box, cut the ends, and we customize the whole thing.
The next step is to cut the route
It is extremely important to understand here that the use of a conventional hacksaw is simply unacceptable. This is due to the fact that small chips, dirt, etc. will remain in the copper tube.
n. garbage. If all this gets into the compressor, it will soon fail. Therefore, use special pipe cutters, which today can be found in any specialty store or rented from a neighbor. Despite the fact that the climatic equipment is different, the installation of air conditioners is approximately the same. Split systems are currently a large number, but the principle of operation is the same, and installation is carried out according to general rules.
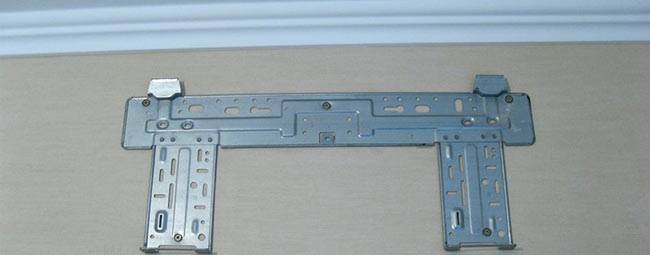
Installation of the indoor unit of the split system:
The indoor unit of the air conditioner is installed on an appropriate perforated mounting (fixation) plate designed to hold the equipment in a secure static position. The manufacturing company is obliged to provide the appropriate fixing plate along with the conditioning device itself.
Marking
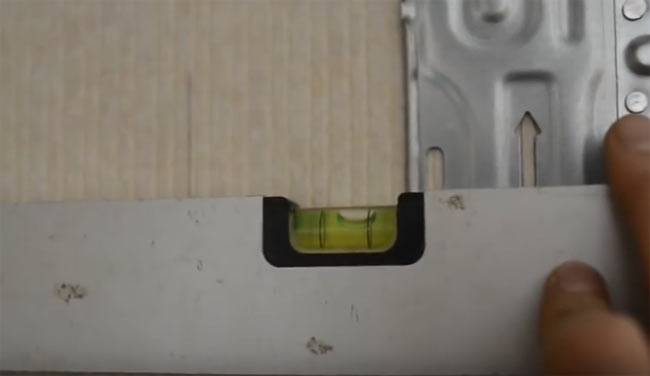
For the stable operation of the air conditioner, it is important to fix the plate exactly as required by the initial engineering calculation. Therefore, in order to independently determine a strict horizontal, it is necessary to use the building level
If the calculation is carried out incorrectly, and the indoor unit is installed incorrectly, then the condensate accumulated in it will not go out into the pipe, but will flow straight to the floor, so you should take the procedure for attaching the indoor unit to the mounting plate very seriously, and it is advisable to practice before this.
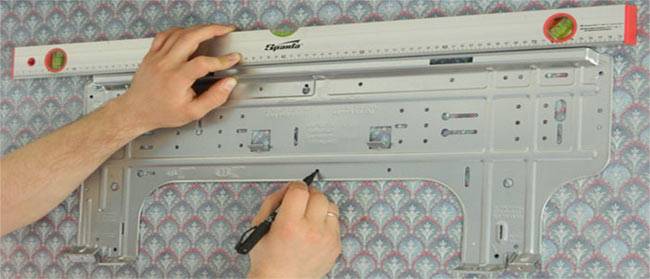
Press the mounting plate against the wall and measure from it the distance you need (in accordance with the minimums indicated above) to the ceiling and walls, and use a felt-tip pen to mark the places where the holes should be drilled.

Drilling holes in the wall
After you place all the appropriate markup for the holes, you will need to implement it accordingly. Marked places must be drilled with a perforator. In this case, the minimum diameter of the drilled hole should be 5 centimeters, because. this is the minimum open hole into which the main line can freely pass.

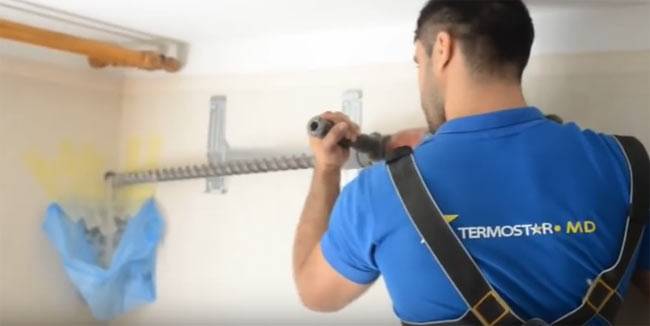
This method also works great when you need to run a line through a concrete wall. When drilling, you should carefully monitor what is happening on the street so that fragments of brick or concrete chips that crumble when drilling the last few centimeters of the wall do not fall on citizens passing by your house.


Fixing the indoor unit
Finally, when almost everything is ready, dowels must be pushed into the drilled holes. Well try on the indoor unit on the mounting plate and screw in each of the dowels the self-tapping screws of suitable diameter, thus fixing the plate with their help, and then simply install the indoor unit itself on top, thus strengthening it firmly and thoroughly.
Some general information
Our main goal is to install the air conditioner without damaging it. But, in addition, it is necessary to properly install both the indoor and outdoor units. Otherwise, the performance will be much lower, if the device will function at all.
To get started, you will need a special tool: a puncher and a vacuum pump, a manometric pump, a building level. As for consumables, the installation of a split system is carried out with a standard kit, which should be included in the kit. This is a heater, a drainage hose, dowels, brackets, etc. If this is not there, then you need to buy it, and only after that start installing the air conditioner.
Expendable materials
To connect and install the indoor and outdoor units of a split system, the following is required:

Cable. Basically, you need a cable with 4 cores and a cross section of 2.5 mm2, its length should correspond to the length of the route, but it is recommended to take it with a margin.
Seamless copper pipes for air conditioning systems. The diameter of the pipes, large and small, is indicated in the manual, you need to buy segments equal to the length of the route and an additional 20 or 30 cm.

Rubber insulation. Manufacturers produce black and gray insulation in 2 m segments, you will need a length corresponding to the length of the track.


Brackets as fasteners. They should correspond in size to the dimensions of the device, a good option is when the bearing capacity exceeds the mass by 5 times, thanks to this, snow and wind loads are compensated.Ordinary fasteners are not a suitable option; buy brackets in specialized company stores that sell components for air conditioners.

Anchors, dowels or bolts depending on the type of mounting plate with brackets.

Plastic box 60 x 80 cm. With this device, it is easy to hide communications from the eyes.

Before proceeding directly with the installation work, study in detail the installation diagram of the air conditioner.
Using a vacuum pump
Here we need the pump itself, a high-pressure hose, a pair of pressure gauges (high and low pressures). We connect the hose from the pump to the main inlet, while not turning the valves of the control valves, we start the installation. The equipment must be operated for about fifteen minutes until all excess mixtures are removed from the system.


At the end of the procedure, you can turn off the pump, but it should not be separated for 10-15 minutes. During this time, follow the reaction of the pressure gauges: with the system completely sealed and at normal pressure, the indicators are normal, the arrows are motionless; the arrows have moved - you need to check the equipment for possible leaks. As a rule, the problem lies at the connecting junction of copper pipes. In this situation, tighten the connection more tightly and look at the indicators again.
Provided that everything is normal, without disconnecting the vacuum pump hose, completely unwind the bottom valve. The presence of any sounds indicates that the system is filled with freon. Next, quickly disconnect the hose from the pump. Since ice freon can splash out of it, work must be done with gloves. Then fully open the top valve.The system that is filled with freon is under pressure, due to which, when the pump is disconnected, the refueling port is locked.
It is worth saying that such a procedure as vacuuming is carried out only in our country and some neighboring countries. The reason, of course, is still a mystery. That's all. On this, this instruction for self-assembly splitThe system has come to an end. We hope our article was helpful to you.
The principle of operation and the device of the air conditioner
Before you start installing the air conditioner, you need to familiarize yourself with its device and understand the principle of operation.
The device of the air conditioning system is quite simple - structurally it consists of the following components and elements:
- a compressor that is installed outside the building;
- condensing heat exchanger located in the outdoor unit;
- an evaporative unit that is installed indoors (depending on models, there may be several units);
- pressure regulator;
- tubing system.
The system itself is a closed loop. Inside the circuit, the main element that serves to cool the air is the refrigerant.
As a rule, freon is used as a refrigerant. Being in a gaseous state, under pressure supplied by the compressor fan, it passes into a condensing heat exchanger, where, when combined with external air, it turns into a liquid and, already in liquid form, enters the evaporator unit through a pressure regulator.
 Initially, ammonia was used as a refrigerant in air conditioners. However, due to the fact that ammonia is extremely toxic, it was later replaced with safer freon.
Due to the action of the pressure regulator, the boiling point of freon decreases. Getting into a special chamber located in the evaporator unit, freon expands and “boils”, while intensively absorbing heat and giving off cold. As a result of this process, condensate is released, which settles inside the evaporator chamber onto a radiator, through which the liquid is discharged into a special reservoir. Condensate is discharged from the air conditioning system through a pipe.
Absorbing heat, freon again passes from a liquid state to a gaseous state and under pressure through a system of pipes is discharged back to the compressor unit, closing the circle of the working process.
 The noise level during the operation of the air conditioner is calculated in accordance with the standards prescribed in SN 2.2.4-2.1.8.562-96. It should not exceed 40 dB during the day and 30 dB at night. The appearance of a hiss, hum or rumble indicates a malfunction in the operation of the air conditioner.
Thus, the closed cycle of the refrigerant depends on the careful connection of all elements and the exclusion of depressurization at the joints and connections of the system.
We talked in more detail about the device and the principle of operation of household air conditioning equipment in this material.
Also, to ensure the normal functioning of the air conditioner, it is worth choosing the right place for its installation. If the installation specifications are not observed, the wear of the system parts and the likelihood of malfunctions increase. Installation features will be discussed later in the article.
Determining the distance between blocks
Often the choice of equipment location is regulated by the minimum and maximum distance between its parts. These indicators are mainly indicated by the manufacturer and depend on model range and characteristics split systems.
Sometimes firms do not indicate the minimum length of the circuit between two units, so installation can be done arbitrarily.
The minimum distance between Daikin split system blocks is 1.5-2.5 m, Panasonic - up to 3 m. However, if the blocks are located a meter apart, the length of the route should be at least 5 m (its excess is rolled into a ring and hidden behind the block)
It is a little easier to deal with the maximum possible distance between the two units. The standard indicator is 5 m. It is also possible to increase the length of the route, but in this case it is necessary to count on additional costs due to the need to refuel with freon.


