- The process of dismantling the old mixer
- Mounting a new model
- Installation of a mixer without eccentrics
- Model Features
- Device price
- The main steps for installing a bathroom faucet
- Other installation methods
- Varieties of devices
- Peculiarities
- Is it worth taking on the job yourself?
- Faucet height above bath
- Faucet installation on the wall
- Selection of a mortise mixer model
- How to install a faucet on a new wall
- Standard spacing for water outlets
- Thread standards
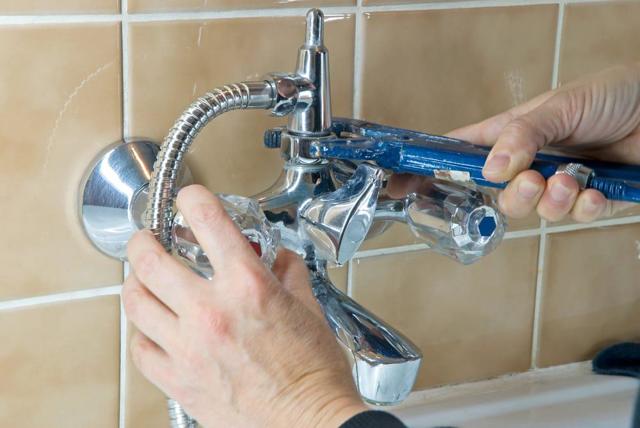
- Removing the old faucet
The process of dismantling the old mixer
Having decided on a specific model, selecting and purchasing the desired sample, you can start. The installation of the mixer is carried out after its careful assembly, and not vice versa. But, before starting the process, you must first dismantle the old device, if any.
Replacing a faucet in the bathroom begins with shutting off the water supply. Then slowly and gradually perform the following steps:
drain the remaining water with an adjustable wrench;
carefully, trying not to damage the thread of the stationary connecting part (fitting), which is joined to the water supply, twist the mixer from the wall;
the threads are cleaned from the remnants of the winding.
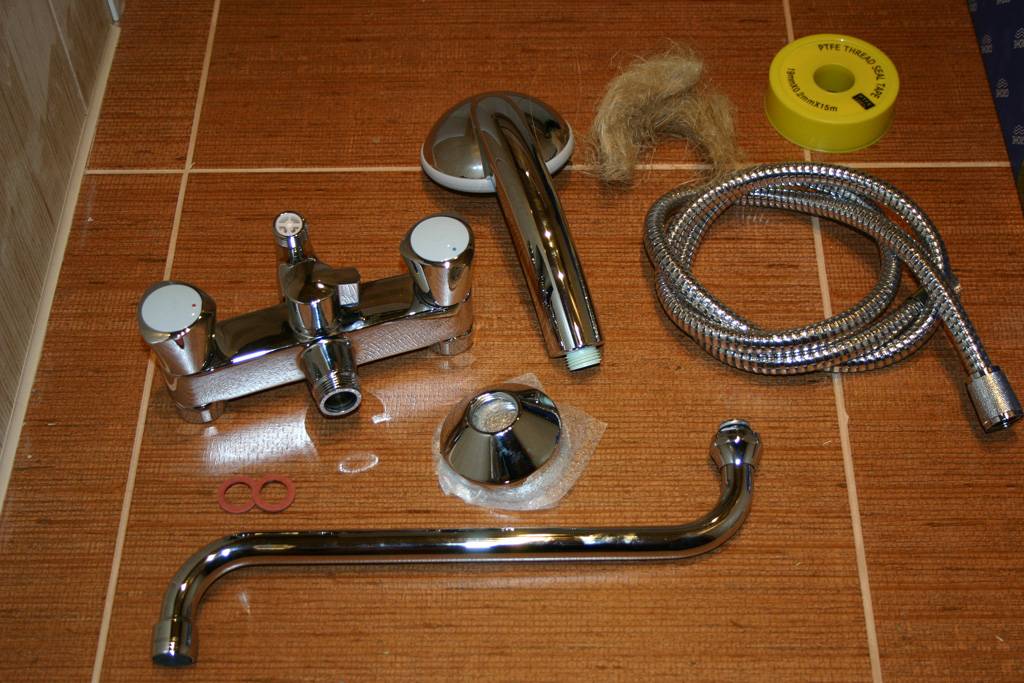
Next, they proceed to install a new version and first of all check the presence of all the individual parts of the device, comparing it with the attached list in the instructions:
- main block;
- shower hose;
- watering cans;
- gander;
- gaskets;
- eccentrics;
- decorative plafonds.
Then the direct installation begins, instructions for which are attached to the product.
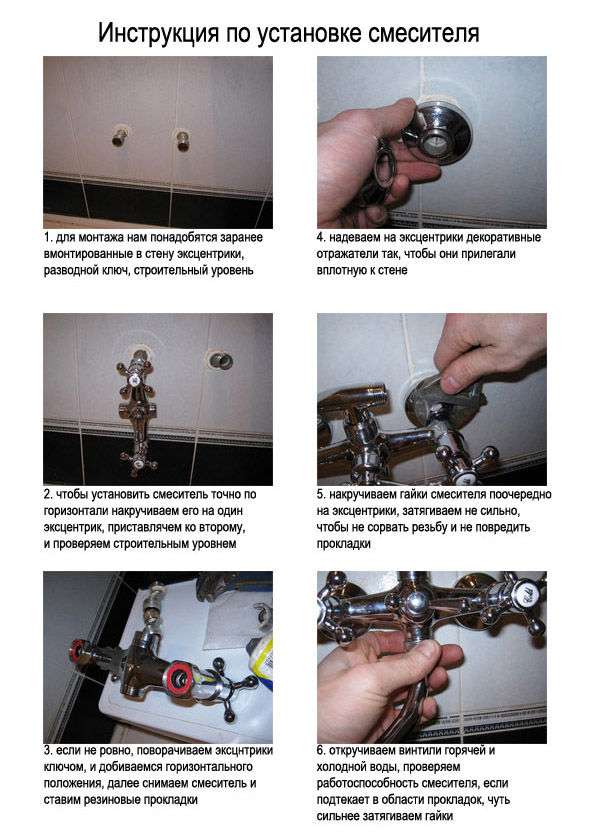
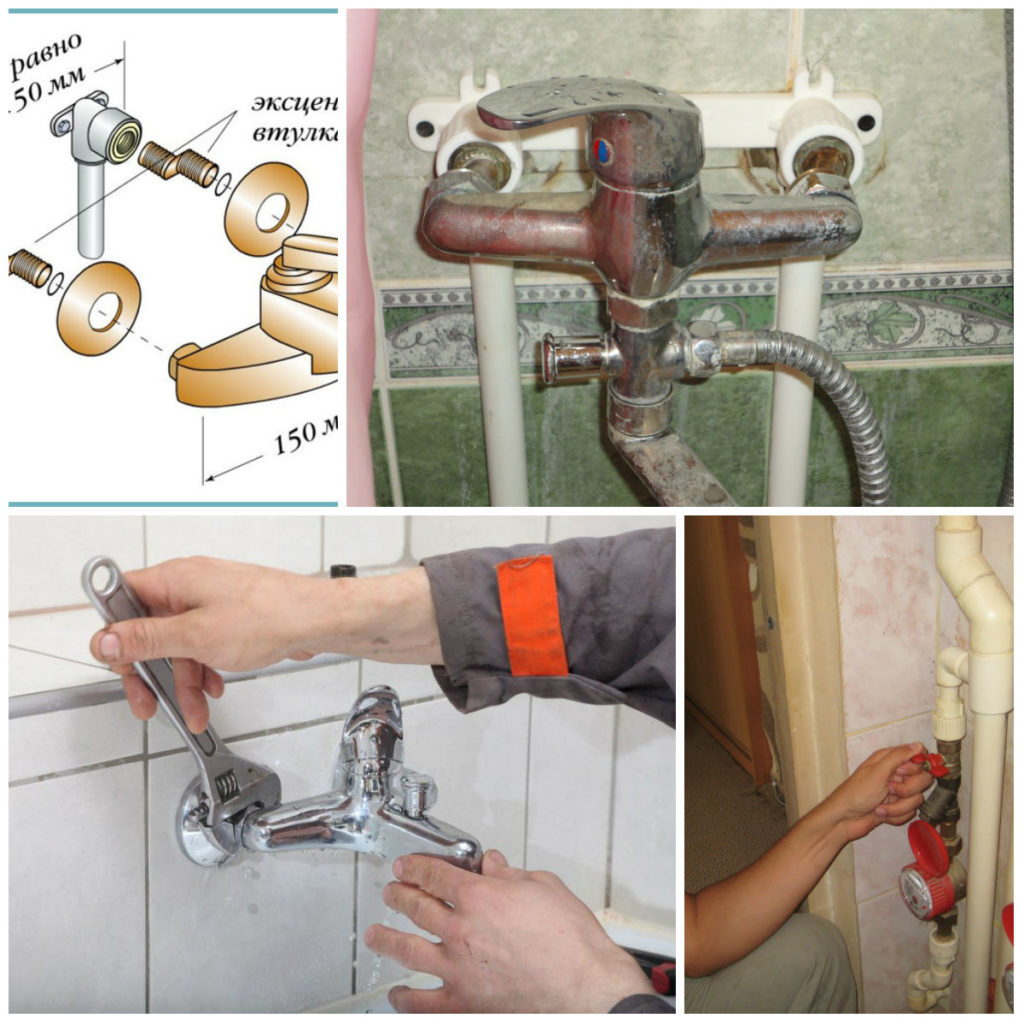
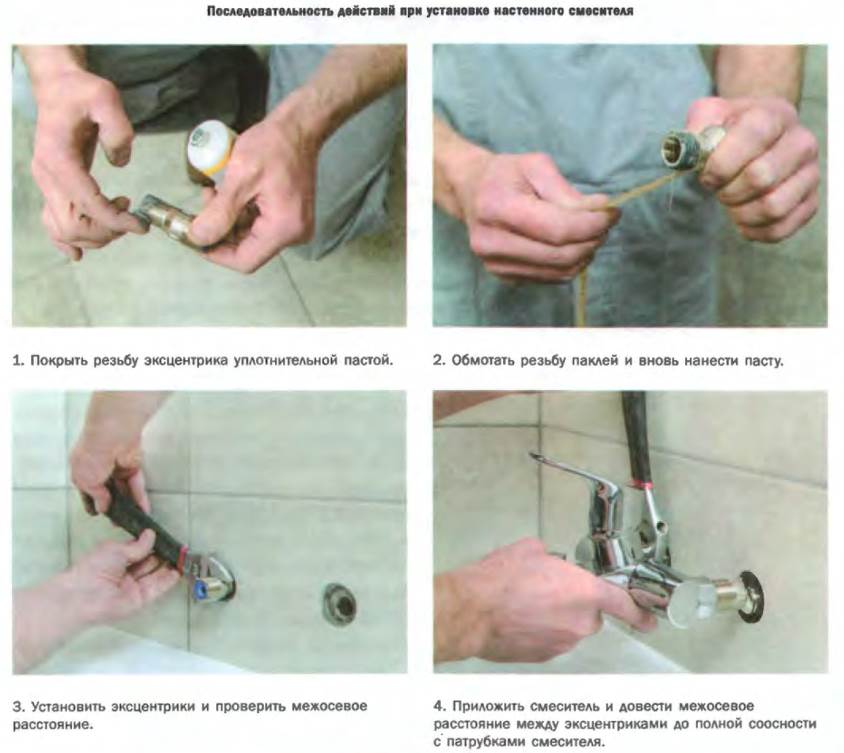
- The mixer is attached with eccentrics. First, the winding is performed, which can be used as a special FUM tape (fluoroplastic sealing material) or the usual tow (preferably with paste).
- The wrapped eccentrics are screwed to the water pipe fittings that are in the wall. So that the distance required for a particular mixer can be adjusted, eccentrics are used. They are shifting. This quality becomes especially important when the distance between the inputs is not the standard 150 mm.
- To check the location of the eccentrics and arrange their horizontal level, construction tools are used.
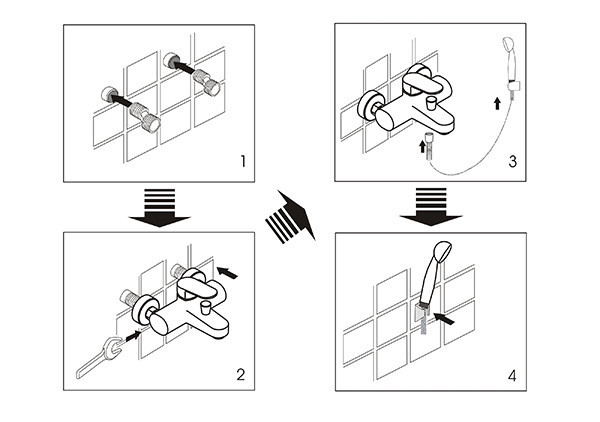
 Installing a bathroom faucet on the wall
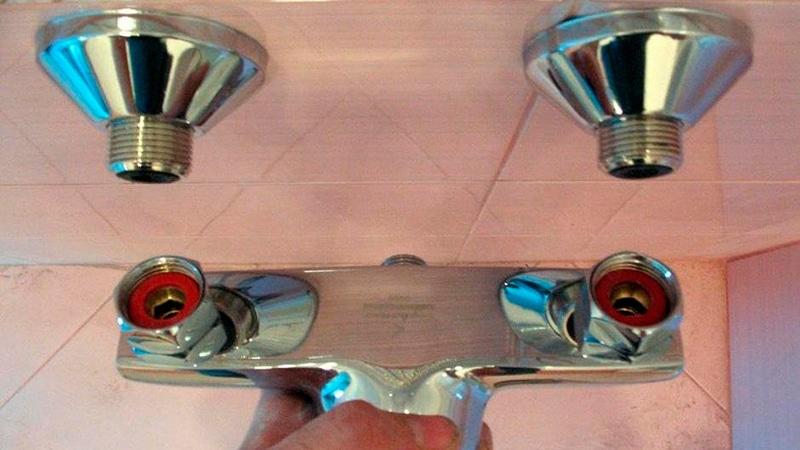
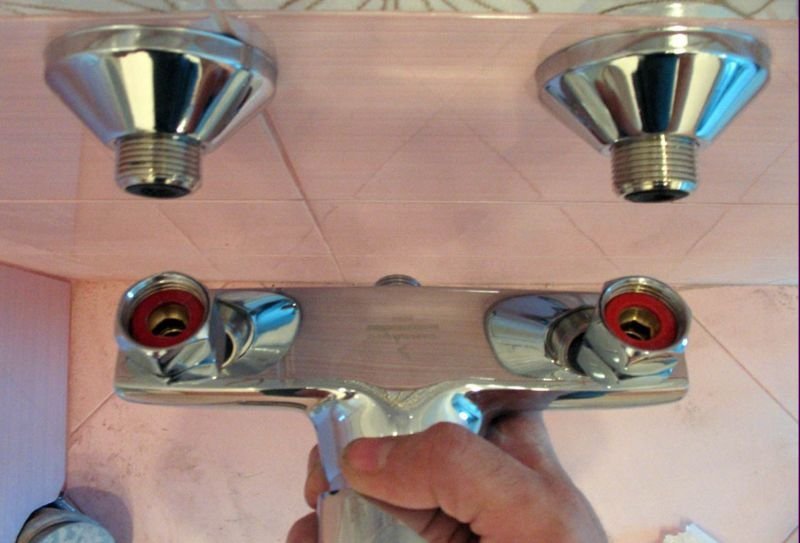
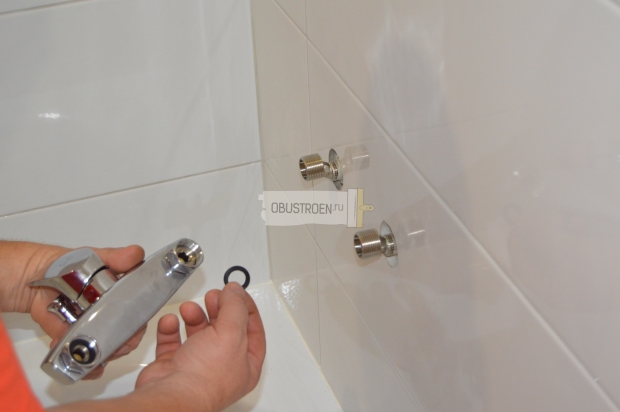
- Then they carefully try on the main unit: if the initial installation is done correctly, both sides are screwed on with ease.
- Having estimated the main unit, it is removed and decorative shades are screwed on. With the right manipulations, they will adjoin the finishing coating without gaps.
- The line behind the block itself: no additional winding is required for it, the gaskets that the nuts are equipped with will be enough.
- It is advisable to tighten the nuts a little with a wrench.
- Turn on the water supply to the main lines to check the performance.If drops appear at the joints or, moreover, a leak occurs, the nuts are lightly tightened and the system is checked again.
Mounting a new model
Before you install the mixer in the bathroom in the sink, the device is assembled. At the initial stage, a flexible hose is screwed into the mixer
Particular care is shown when working with rubber cuffs. They are located on the fittings of the eyeliner.
Before screwing them in, it is recommended to immerse them in water.
At the bottom, the mixer is fixed with studs-fasteners. A rubber seal is installed in the form of a ring.
- In the sink, hoses with hot and cold water supply are threaded into the hole. After that, the crane is installed in its place.
- The clamping nut under the sink or under the washbasin fixes the position of the faucet. A rubber gasket is placed between the washer and the sink to prevent leakage. After that, the clamping nut is screwed onto the stud. The mixer takes a more stable position.
- The faucet nuts are tightened neatly. After they are fully tightened, the faucet is fixed on the sink.
1 - fixing pin; 2 - with a red streak, a hot water supply hose; 3 - with blue veins a hose with a cold water supply.
The installation of the new device ends with the connection of flexible hoses to the pipes for supplying cold and hot water. The nuts of the inlet hoses are screwed onto the threaded connection of the pipes of the plumbing system. The nuts have rubber seals. Therefore, their twisting is carried out without the use of force so that they are not damaged.
The threaded connection is covered with FUM tape. This seals all connections. After connecting the flexible hose, a check is made for the correct performance of the work and the absence of leaks in all places where the connection was made.The water supply in the riser opens and the mixer lever is moved to the “open” position. The absence of leakage confirms the correct installation of the faucet on the sink.
If the tightness of the connections is not broken during the use of the crane, then it will last more than one year.
Installation of a mixer without eccentrics
Just want to warn that this is the wrong decision. However, under certain circumstances
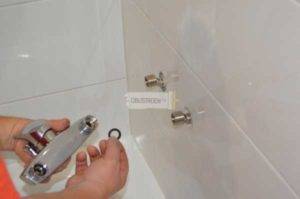
this could be the way out. For example, when the threaded terminals protrude strongly from the wall
Important note:
the distances between the outlets from the wall and between the union nuts of the mixer must match. After all, the standard
in 150 mm
may differ with errors - in fact, eccentric transitions were invented for this.
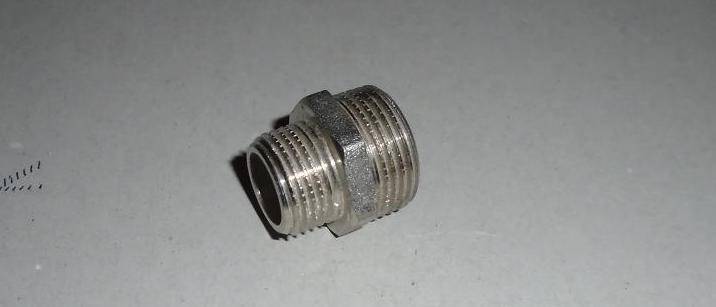
To change from a half-inch thread to a ¾-inch thread, an appropriate nipple is used, which is much
shorter than normal eccentrics. Actually, thanks to the adapter nipple, it becomes possible to install without
eccentrics.


An even more radical solution is the initial installation of water sockets with an external ¾ thread. With such
the implementation does not need nipples or eccentrics, the mixer is screwed directly onto the leads. However
in the future, problems with the installation of a new crane are quite likely when the axes of the outputs do not match. Solution
this is purely amateur.
Based on the above, installation directly on water sockets with an external ¾ thread is amateur
and "kolkhoz". Why reinvent the wheel when these things have long been thought out by engineers?
End.
Rate this post:
- Currently 3.86
Rating: 3.9 (14 votes)
Model Features
Manufacturers, trying to attract buyers to their side, release new models of plumbing, modernize old ones.This is how acrylic bathtubs appeared, which every day are increasingly replacing cast iron fonts and enameled models. The advantages of acrylic are judged by its strength, light weight, long service life.
Many years ago, a faucet was installed in the bathroom. The mortise faucet on the side of the bathtub began to conquer its buyer quite recently.
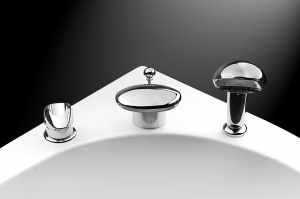
The standard model was attached to the wall surface. This method of installation required a lot of skill and time. Inserting the faucet into the bathroom is carried out on its edged board. All plumbing connections associated with the operation of the mixer are attached to the outside of the bowl. They are hidden from visual view. In this case, the regulating elements of the mixer are located above the side of the font. Installed in this way, the device looks compact, stylish.
Despite the fact that the mortise mixer is produced relatively recently, many modifications have already been developed. All of them are produced with a number of properties common to all of them:
- The main task is to fill the font with water quickly, with a uniform flow, without splashing drops of water in all directions. If there is an adapter, then the flow of water is directed to the shower head.
- Installing a faucet on the side of the bath sets the tone for interior design. The model has been a stylish and original solution for many years, which provokes the search for other unusual plumbing products. So the interior changes dramatically.
Device price
Acrylic bath faucets with mortise mounting in the plumbing market have a run-up in price. Many factors affect the cost of a model.For example, a cascade mixer, which has 3 holes for fixing on the base, costs 6.5 thousand rubles. It is with 4 holes - it costs 14.750 thousand rubles.
The usual design, installed on the side of the bath, costs 3.0-8.0 thousand rubles. The price depends on the material, the design of the model, the operating mechanism. So, a device with a ceramic cartridge is more expensive than the rest. But it also has a longer lifespan. The run-up in price allows you to choose a mortise model according to your financial capabilities.
The main steps for installing a bathroom faucet
To mount a bath faucet, regardless of the installation method, it is necessary to carefully consider the entire process and prepare for work. As in any other business, haste here can only hurt.
For installation, the master will need the following materials and tools:
- the bath faucet itself;
- adjustable wrench up to 17 mm;
- gas key No. 1;
- pliers;
- linen tow.
The tool may be your own, however, if in the future it is not planned to do plumbing work, you can take it from friends - nevertheless, the cost of high-quality keys may even exceed the price of the faucet itself.
The gas wrench is used to work with those elements of the mixer that do not have a front cover and, therefore, do not require careful handling - that is, with eccentrics. But the nuts already on the tap itself should be carefully tightened with an adjustable wrench so as not to damage the enamel.
So how do you install a faucet in your bathroom without risking flooding yourself and your neighbors? To do this, you need to do a few simple manipulations:
Shut off the water supply.
For this, a special valve is provided in the plumbing system of any house or apartment.In old dwellings, there is often no cover on it, then to turn off the water supply, the rotary mechanism should be clamped with pliers. If the state of communications leaves much to be desired, it is more rational to invite a plumber and not to carry out an independent installation. After the procedure, be sure to check the faucet for leaks.


Dismantle the old crane and eccentrics.
First you need to remove the valve itself by unscrewing the nuts. Then comes the turn of the eccentrics - if the mixer was flush-mounted, it is quite difficult to unscrew them with a key. This should be done counterclockwise. If the condition of the old eccentrics allows, they can be left in place - this will significantly reduce the installation time of the valve.
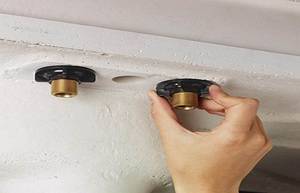
If the old eccentrics are no longer suitable for use, new ones should be installed.
The mixer comes with two pieces. They have 2 threads on opposite sides, marked with ½ and ¾ diameter marks. Smaller diameter side required for water connection
The passed pipe has a polypropylene adapter, into which the eccentric must be carefully screwed clockwise (tow should be wound on the thread beforehand). Its correct position in the end - bending the top
Assemble mixer.
Many inexperienced self-taught masters are wondering how to assemble a bathroom faucet, and is it difficult. In fact, the process takes no more than 5-7 minutes. The mixer must be assembled using an adjustable wrench. All parts of the product are easily connected to each other and fixed with nuts - including the shower head - however, it is better to screw it on after installing the faucet.
Adjust the eccentrics to level the crane horizontally.
To do this, we slightly wind the assembled mixer onto one of them in order to simply estimate its future position. Then, using the key, we adjust both eccentrics so that the crane eventually takes a horizontal position. When you can find the right position, you need to twist it and attach decorative cups to the eccentrics.
Install mixer.
It should be screwed on using insulating gaskets.
This must be done carefully - it is enough to screw the mixer with your hands as far as possible, and then half a turn with a key. Otherwise, you can overtighten the nuts, which is fraught with thread stripping or damage to the gaskets.
Both will certainly lead to leaks.
After that, we can assume that the installation of the purchased faucet in the bathroom with your own hands has come to an end. It remains only to resume the water supply and try to use it for the first time. The above method is applicable when connecting mixers in any way - on the wall, in a special box or on the bath body.
Installing a faucet in the bathroom is a responsible task, having coped with it, you can save a lot on the services of paid specialists. Meanwhile, connecting any faucet in the bathroom requires some experience with plumbing. If there is none, and there is no way to use the advice of a knowledgeable person when working, it is better to refuse
A properly installed faucet will serve faithfully for many years and will 100% perform its functions to ensure the supply of water to the bathroom.


- Acrylic bath weight
- The best cast iron baths, rating
- The best manufacturers of acrylic bathtubs
- Properties, characteristics and varieties of acrylic bathtubs
Other installation methods
Placing a faucet and a shower head on the side of the bathroom opens up a wide range of design possibilities.
The faucet can be built into the wall or mounted on the side of the bathroom. It is believed that in this way the internal space in the room is optimized, increased comfort during operation is provided, and additional design opportunities appear. Consider the installation process in more detail.
To place the equipment on the side, the tools already described must be supplemented with a drill with a milling nozzle of a suitable size, as well as flexible hoses for supplying water. It must be borne in mind that drilling holes on your own is possible only in products made of acrylic or other composite materials. Such manipulations with baths made of cast iron or steel are only permissible in the factory. Self-activity in this matter will lead to enamel chips and the subsequent appearance of corrosion in damaged areas.
Proper installation of the faucet on the side of an acrylic bathtub should include the following steps:
- Determining a place suitable for placing all structural elements, and applying auxiliary markings.
- Drilling holes with an electric drill and cutter.
- Installation of the mixer using gaskets and fixing nuts included in the kit.
- Providing water supply to the mixer using flexible hoses.
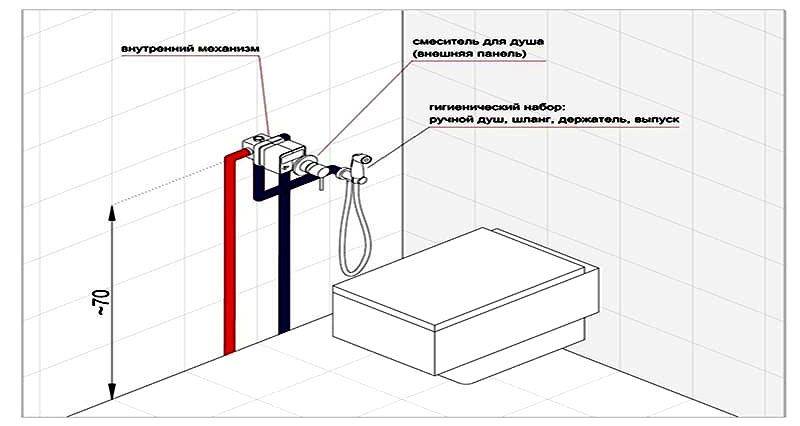
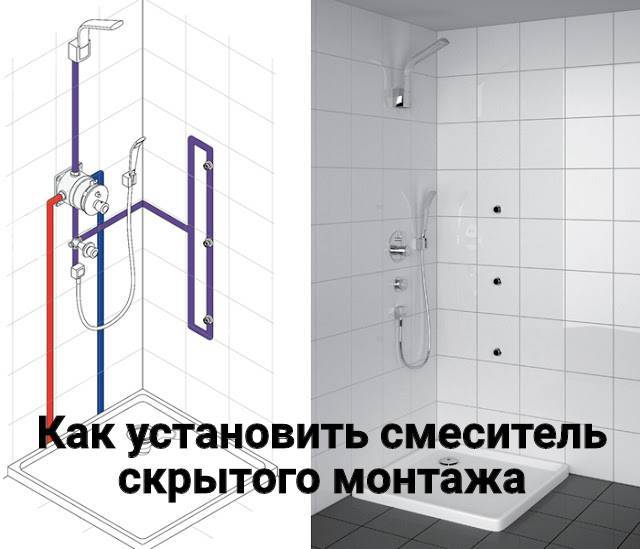
As for the mixer built into the wall, it looks like a small panel with a tap and control levers. The layout of its location is dictated by considerations of comfort and practicality, as well as the place of the most optimal laying of strobes for pipes.Their arrangement should be made taking into account the placement of outlet pipes and other elements of the water supply system. If, when determining the material for wall cladding, the choice fell on drywall, then the issue with strobes disappears by itself.
To fix the main unit in the wall, it is necessary to make a small niche with a puncher and a special crown for working on concrete. Its diameter will be 12-15 cm, and the depth - from 8.5 to 11 cm. Then strobes are laid to bring water to the main unit and the shower head. The connection of the mixer to the pipeline is carried out in a stationary way, since any detachable connections will introduce an element of unreliability into the system. The main unit and pipes are immured into the wall, after which the installation of external parts of the structure is carried out.
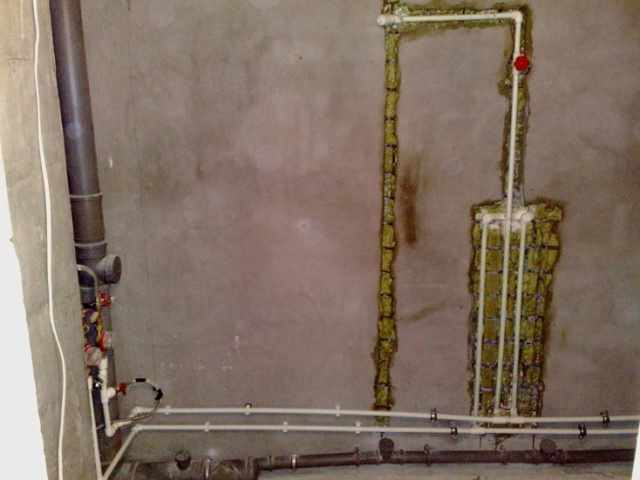
When making repairs from scratch, we lay strobes under pipes made of polypropylene (or copper)
Summing up, it should be noted that the scrupulous step-by-step implementation of all actions will ensure long and reliable operation of the equipment. And the question of how much it costs to install a mixer will never arise again!
Varieties of devices
- Single lever type. Adjusting the water temperature is provided by turning one lever in one direction or another. Instead of the usual valves, it contains a ball element with channels for cold and hot water. By turning the knob, you can partially or completely block the desired channel, or both at once.
- Double valve type. It contains 2 valves, with the help of which the flow of cold and hot water supplied to the mixing chamber is regulated in turn.The simplest variety is valves with rubber gaskets. The modern version is “half-turn” valves, in which there are no rubber gaskets, and the water supply is regulated by a ceramic disc with holes. In the first case, simplicity of design and lower cost are noted, however, there is a need for frequent replacement of gaskets. In the second case, an increased service life is noted.
- Mixer-thermostat. It contains containers in which water with a certain temperature accumulates. The main advantage is that there is no need to constantly adjust the water.
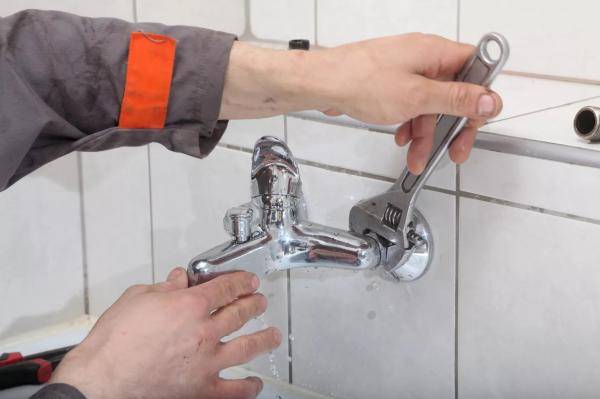
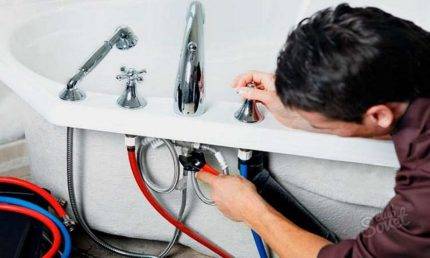
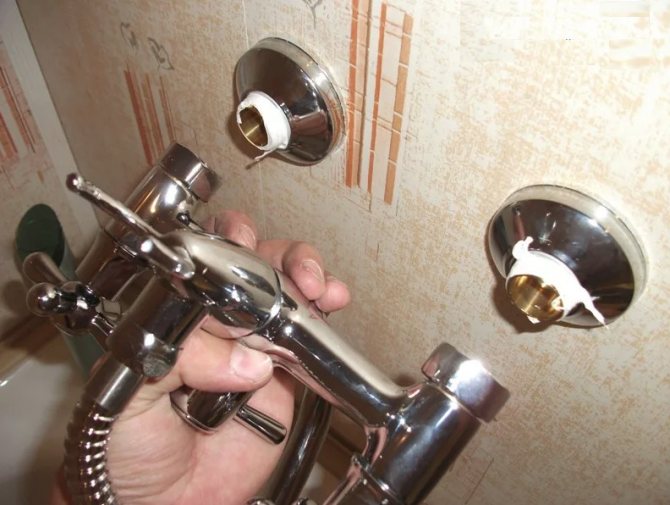
Photo 2. The process of fixing and adjusting a single-lever faucet mounted on the wall above the bath.
Peculiarities
Nowadays, the mixer performs not only the function of supplying water, but also is an element of decor. It should harmoniously fit into the interior of the bathroom, be compact and beautiful.
Modern plumbing manufacturers provide us with a huge selection in different price categories, but still it is worth taking into account some useful tips from experts.
Installing one faucet for bath, sink and shower is impractical, it will quickly become unusable. Check the package very carefully: it must have a manual flexible adjustment and a holder for fixing. Spouts are very often not provided in many models of mixers, and this is a small, but minus.
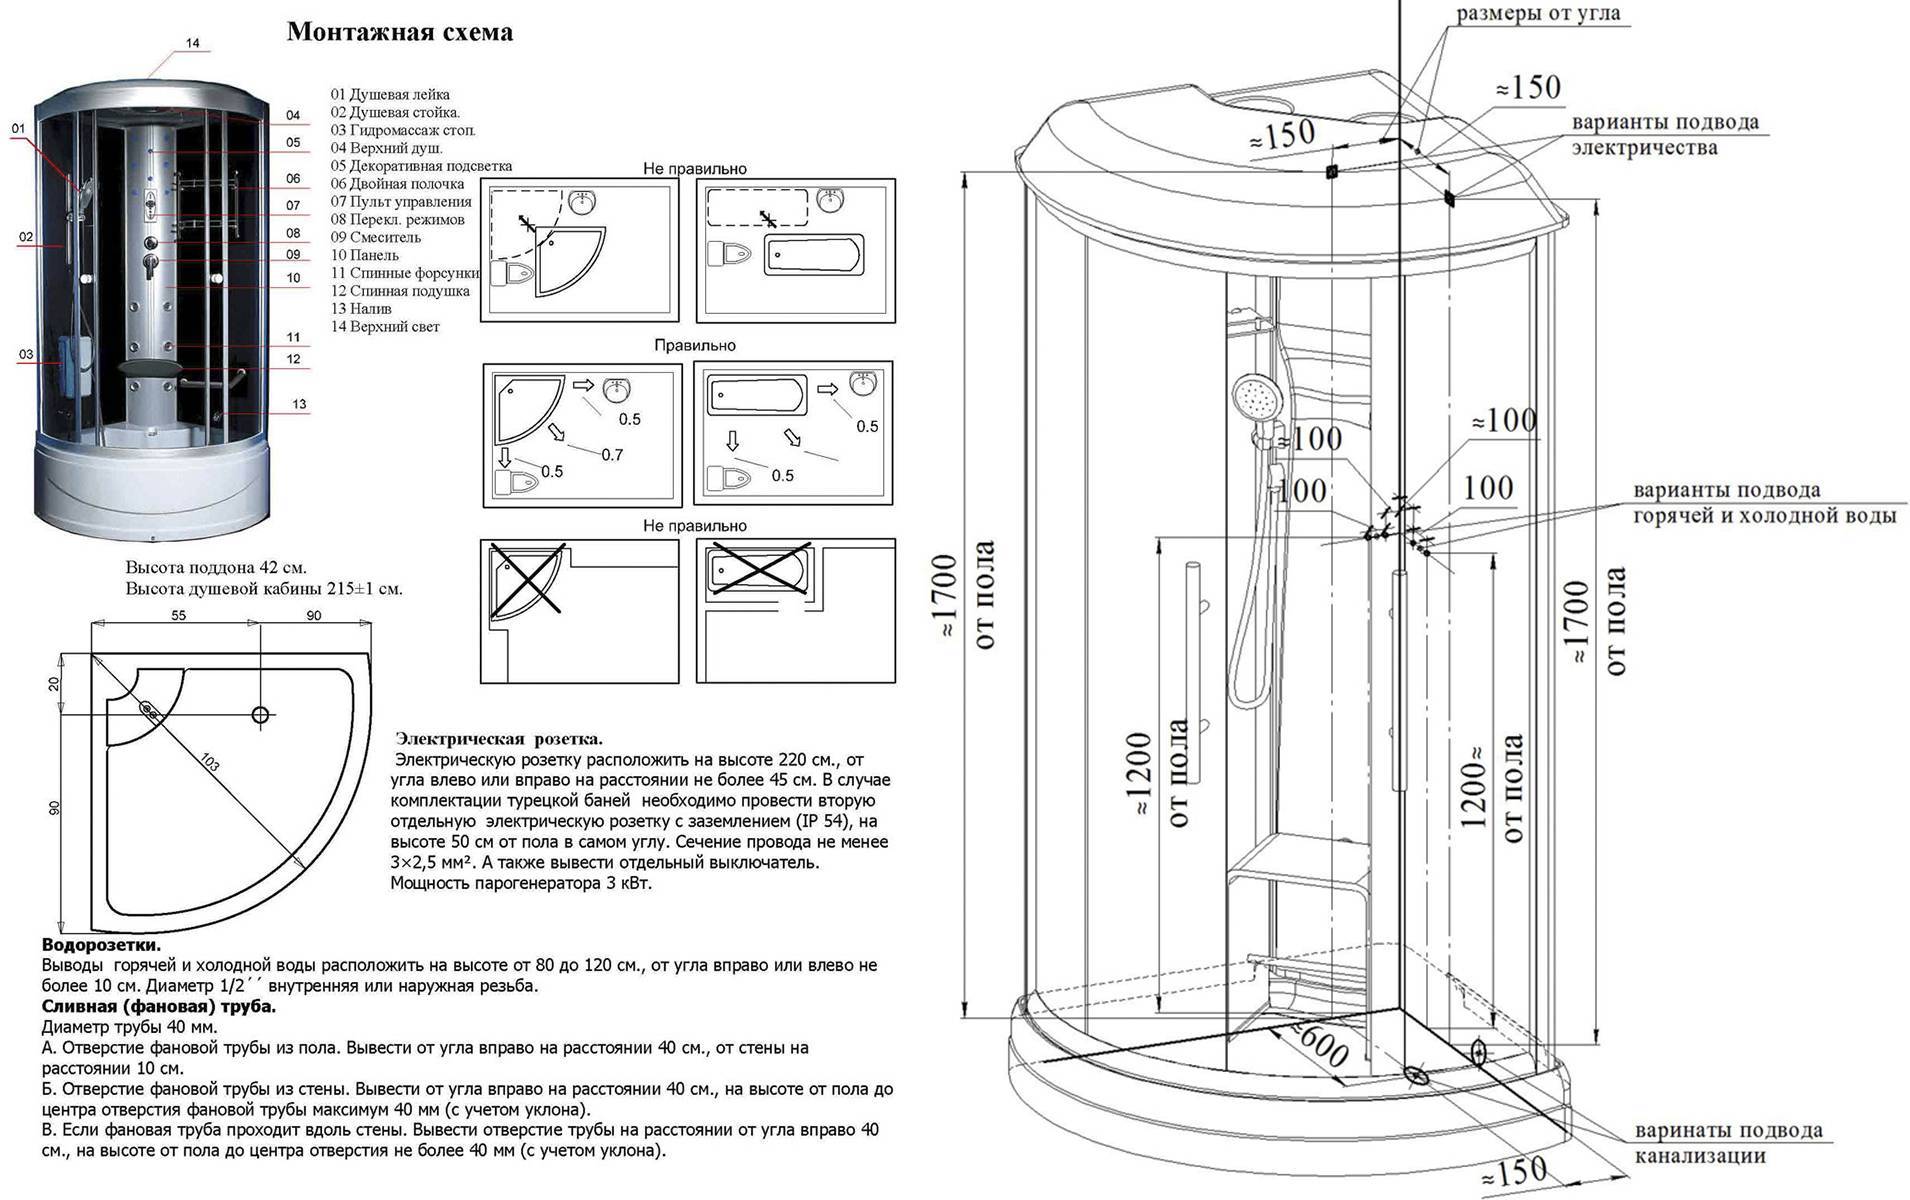
The most common type of mixer installation is wall mounting. Such installation is carried out with an acceptable distribution of pipes for water supply. It is imperative to adhere to the standards - the mixer is mounted at a height of 1.2 meters from the floor, the distance between water outlets is 15 centimeters.You must take this work very seriously, since the smooth operation of your mixer depends on the correct execution of it.
The next option is to mount on the side of the bath. The advantage here is that all spare parts will be hidden behind the body of the bath, and flexible hoses are used during installation, which gives you the opportunity to mount them in any suitable and convenient place for you. But there is also a small downside. On old-style baths, there is no place for installing a mixer, so this method is used in most cases for new generation acrylic baths.


The last type of installation is installation on the floor. This is the most expensive way, it is not suitable for small bathrooms, and it will be difficult to make it yourself if you are not a plumber.
Is it worth taking on the job yourself?
Replacing faucets is carried out at the stage of repairing a bathroom or landscaping a purchased apartment. It is not easy to do this kind of work well. Having understood the intricacies of technology, you can repeat all the steps in practice. To do this, turn off the water by turning off the hot and cold water taps.
If you do not do this, then arrange a flood in the apartment. Next, dismantle the old equipment, redecorate the premises, transfer communications if the design requires it. Then it is already possible to proceed with the installation work on the installation and connection of the bath to the water supply and sewerage systems.
Of course, you can do everything with your own hands. However, some skill in the case is likely to be required. After all, the equipment is connected in a hard-to-reach place. Remember that all pipe connections must be firmly clamped with clamps (nuts).Do a test run to rule out the possibility of leakage.
 If such a problem is identified, tighten the connections with a wrench, replace the gaskets, wind the FUM tape or use silicone sealant
If you are afraid of doing something wrong, then it is better to seek help from professionals.
In order for the new mixer to please you with its beautiful appearance for a long time, do not forget to take care of the body of each individual module. Timely wiping the shiny finish of the faucet with a soft cloth using a soapy solution or neutral detergents borrowed from the kitchen will keep the attractive appearance of the installed equipment.
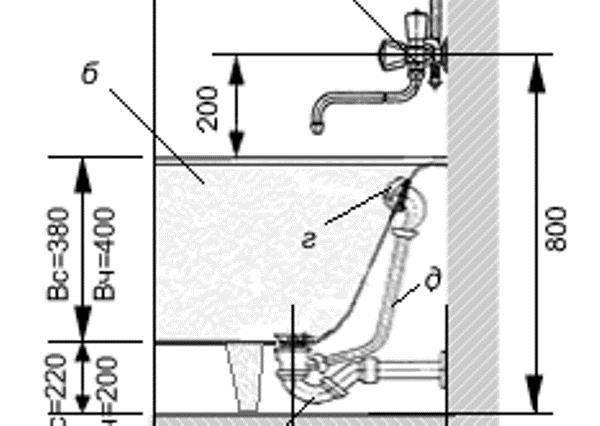
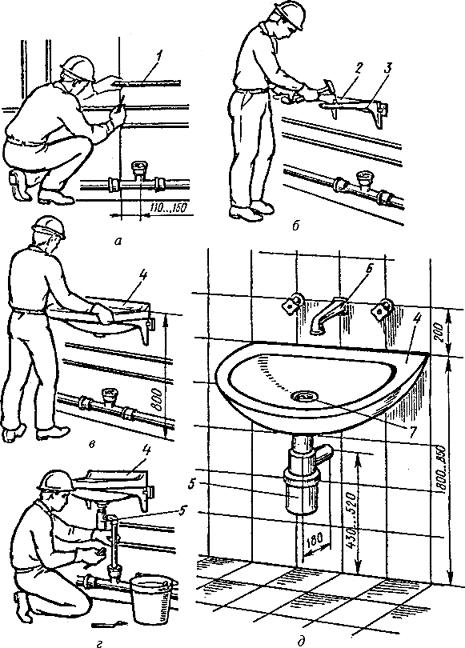
Faucet height above bath
There is a recommendation that says that the optimal height of the mixer in relation to the bath is 20 centimeters. But this is all conditional and the real height may differ slightly from this indicator, taking into account such tips for installing the mixer:
- Before installing the structure in the right place, check the ease of placement of the crane and then try on the height.
- When installing a mixer for a shower cabin, the height should be about 120 cm from the bottom of the cabin.
- Do not take the height of the bowl as a starting point, because in practice, for stability, the bath is equipped with all kinds of linings and centimeters can be lost.
- Calculate the distance from the installation to the edge of the tub, especially when you plan to turn the faucet from the tub to the sink and back.
- Also, all kinds of accessories located, such as water softeners and others, can affect the height.
- When attaching the faucet to the wall, do not practice attaching it to the tiles, but rather attach it to the curbs.The height may also depend on the height of its layout, as a rule, it is laid out about a meter from the floor level.
Faucet installation on the wall
After the pipes are checked for the possibility of their further operation, the mixer in the bathroom is installed on the wall.
- The distance between the center points of the mixer fixing nuts is measured.
- The pipeline has connectors. They are inserted into the eccentrics from the kit, wrapped with FUM tape. The eccentrics are set so that the center-to-center distance matches the size of the crane. At the same time, their upper part must be strictly horizontal, the same distance is maintained from the ends of the eccentrics to the wall surface.
- Decorative caps hide the outlet of pipes in the wall. They are installed before the valve is screwed to the eccentrics. Decor elements should fit snugly against the wall surface, they are screwed onto the threads of the eccentrics.
- The device is connected to the pipes with union nuts with gaps sealed with rubber gaskets. Twisting is carried out carefully so that there are no distortions. Otherwise, there will be depressurization of the connections.
- Using a tool with soft jaws, the union nuts are tightened so that the connection becomes tight.
Selection of a mortise mixer model
The cost of mortise models is directly proportional to the quality of their assembly. Therefore, it is difficult to expect a long service life from a cheap model.
- The choice of model is based on a harmonious combination with the design of the room.
- By weight, you can determine what material the mixer is made of.Too light will be made of a dubious alloy, which will also reduce its service life.
- For lovers of silence at home, it is recommended to opt for high-quality models. Only they are capable of making a low noise while filling the bowl with water.
- The water temperature limiter model is recommended for families with small children to avoid accidental burns.
- You can save water consumption if you install a mixer with a special device. It reduces the amount of water used. The amount of money spent is reduced.
How to install a faucet on a new wall
 Above, we considered the case of installing a mixer, subject to the dismantling of the old structure, and now let's look at the installation process in a new house or other room where such a structure is installed for the first time.
So, you need to change pipes, tile the walls, and install fittings. To do this, you need to make simple calculations:
- Measure the distance between the centers of the fittings, which is 150 mm.
- The centers must be on the same parallel.
- The end point must be flush with the wall.
- The fittings are located at the same level, and their height must be acceptable for the installation of the structure.
Fittings are installed only after plumbing pipes have been laid out and a plasterboard crate or plaster beacons have been installed.
If you will use drywall, then the soldering of the fitting must be done in such a way that it protrudes from the crate by about 25 mm, and the exit point must be firmly fixed with profiles or mounting brackets.
Given the planning of plaster on the walls, the protrusion should be calculated depending on the distance from the lighthouse to the tiled plane adjacent to the wall. As a rule, the height of the protrusion is about 17 mm.
Subsequent work on the installation of the mixer does not differ from the case with the dismantling of the old structure and the use of the old fitting.
As mentioned earlier, when doing this work, you can not rush things, otherwise you risk having serious problems using the finished design after it is launched.
Therefore, do not forget that the eccentrics are first twisted without a seal, and only then, when you have checked the correctness of your actions, are they set to working condition.
Before starting work, do not forget to cover the bath and washbasin with a sink with rags, adhesive tape, film or corrugated cardboard. This is necessary so that the plumbing is protected from chips, falling structures and heavy accessories. Don't let a faucet replacement cost you a bathtub replacement.


As you can see, installing a faucet in the bathroom on your own is not so difficult if you follow all the requirements and recommendations. If everything is done correctly, it will serve you as long as possible and you will not have problems during its operation.
Standard spacing for water outlets
Water sockets are modern fittings installed on pipe and water outlets. When using them, the installation and replacement of mixers is greatly simplified. The most common are threaded water sockets, but compression or self-locking type fittings can be used.
By design, single (for installing taps) and double water outlets are distinguished. For mixers, a double version is used. After their installation, a stationary unit for installation is formed at the point where the water pipe exits to the bathroom.
As in the previous case, the distance between the water outlets is important. It should also be 150 mm, which allows the use of standard plumbing
Thread standards
The diameters of the supply pipes and nozzles must strictly correspond, and the threads must have the same parameters. According to the norms, they must correspond to a ¾ inch pipe thread. Mixer nozzles can be of two types:
- With union nut with ¾" internal thread. This design is needed when cutting external threads on outlet pipes.
- With external thread. They are designed for installation in water sockets containing union nuts.
When using eccentrics, other thread parameters are sometimes applied. Outlet fittings can have a ½" female thread to screw in an eccentric with a matching male thread. Its second end has a ¾ inch external thread, and is designed to screw on the faucet union nut.
Removing the old faucet
Before installing a new faucet in the bathroom, the old model is dismantled. So that the work is not difficult, it is carried out in strict sequence:
- At the common riser, the water supply is blocked.
- The dismantling of the old model begins after unscrewing the union nuts of the fasteners.
- If there are regulating eccentrics available, they must be unscrewed.
- After that, the condition of the pipes is inspected. This is done in order to determine if the pipeline needs to be replaced. Over time, steel pipes become overgrown with rust.This leads to a decrease in their throughput. In addition, debris particles get in and clog mixers with ceramic closures. Subsequently, they quickly fail. Therefore, if the pipes are heavily clogged, it is better to replace them.
- The thread is cleaned of rust residues. A metal brush is used for this.
- It is possible to choose a new model correctly only if the center-to-center distance between pipe bends is known.
When these steps are completed, you can proceed to install the device.
The range allows you to choose the crane that is needed in a particular situation. Foreign and domestic manufacturers produce models for mounting on a vertical or horizontal plane, of various configurations.
Installing the faucet in the bathroom on a vertical plane is carried out without altering existing attachment points. This installation method is used if an urgent replacement of broken equipment is carried out or for minor cosmetic repairs in the room.
For horizontal installation, the surface is prepared in advance, existing pipes are transferred. This is done during a major renovation when the equipment in the room is changed.


