- Siphon selection
- Operating tips
- Design
- corrugated model
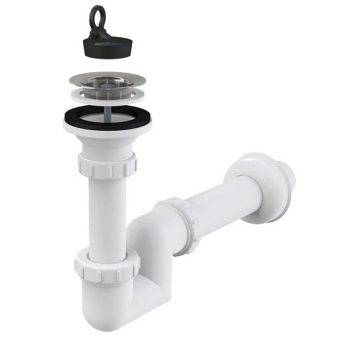
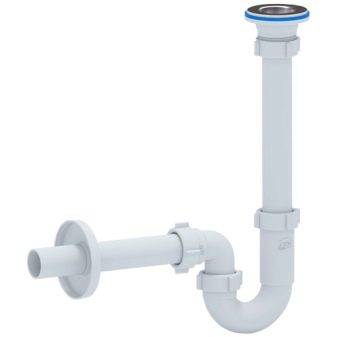
- Pipe siphons
- bottle siphon
- Other models
- Automatic or semi-automatic siphons
- How to install a bathroom siphon: installation instructions
- Installation - preparatory stage
- Detailed installation instructions for the siphon
- Drain installation
- Mounting
- We carry out the installation of a drain in the bath
- First stage of installation
- Second stage of installation
- The third stage of installation
- Fourth stage of installation
- Purpose and design features
- Sewer connection
- The choice of material for the manufacture of the siphon
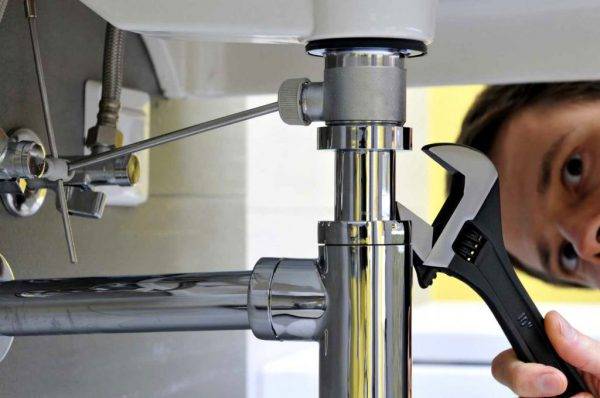
- Do-it-yourself siphon installation tools
- Dismantling
- How to assemble a manual siphon
- Conclusions and useful video on the topic
- conclusions
- Summarize
Siphon selection
Convenient bathtub siphon
After reviewing the installation process, you can proceed to the tips for choosing this device. At the same time, you need to understand that you can replace the siphon in the bathroom with your own hands in accordance with the instructions, but no one writes anything about its acquisition
So, when buying, pay attention to the material from which the siphon is made. If you purchase a device made of plastic, then its surface must be uniform, smooth, without flaws.
Do not purchase a siphon made of nickel-plated metal or steel. It will quickly rust, and after a few years it will completely fail.If you already take metal, then only made of stainless steel or brass.
Also, when buying, try to choose the simplest possible design. It will cost less, and installation is much easier. But do not purchase siphons at greatly reduced prices. As a rule, they are made of PVC, and it tends to disintegrate when exposed to high temperatures (hot water with various chemicals greatly speeds up this process). It is better to give preference to siphons that are in the middle and high price range. Here is a device that will definitely serve you for several decades.
In almost all configurations, there is a lack of pipes, and they have to be purchased separately. Experts recommend choosing corrugated pipes, as they are flexible, reliable and inexpensive. Also, when using them, you don’t have to think much about the exact distances between the centers. More problems may arise when using a rigid pipe. Here everything needs to be measured exactly to the millimeter, which can cause a lot of trouble.
Another recommendation of experts is the correct selection of sealant
It is worth paying attention to the base. If it's acid, then it won't suit us
It is better to take more expensive, but one that does not contain acid.
Operating tips
In the kitchen, it is recommended to install a filter mesh on the siphon grate. It will retain small debris and thereby prevent clogging of the product.
The product is washed:
- Hot water (if there is no thin corrugation in the design).
- A solution of soda and vinegar.
- Warm soapy water. A few liters are poured out and after half an hour the system is washed with clean water.
- A warm solution of soda and salt.
- Special formulations.Such products are sold in household chemical stores. Some are not allowed to be used if the design has a thin corrugation, so you should carefully study the instructions before buying.
The bottle siphon is regularly cleaned of sediment, for which it is necessary to unscrew the bottom cover of the glass.
A situation is undesirable when, due to a leaky gasket, water constantly flows from the tap in a thin stream. This leads to lime deposits on the siphon.
Design
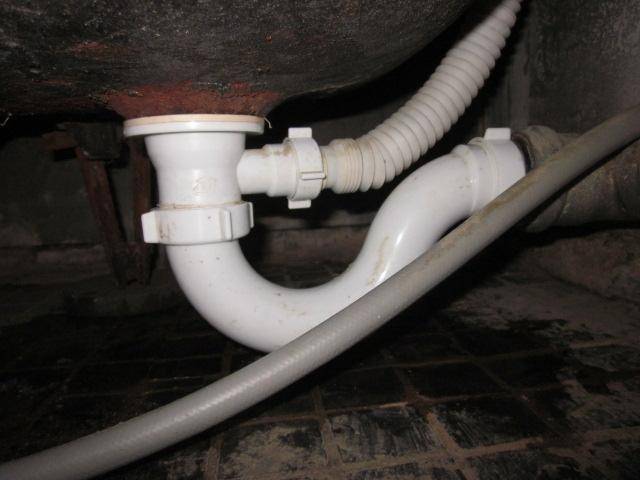
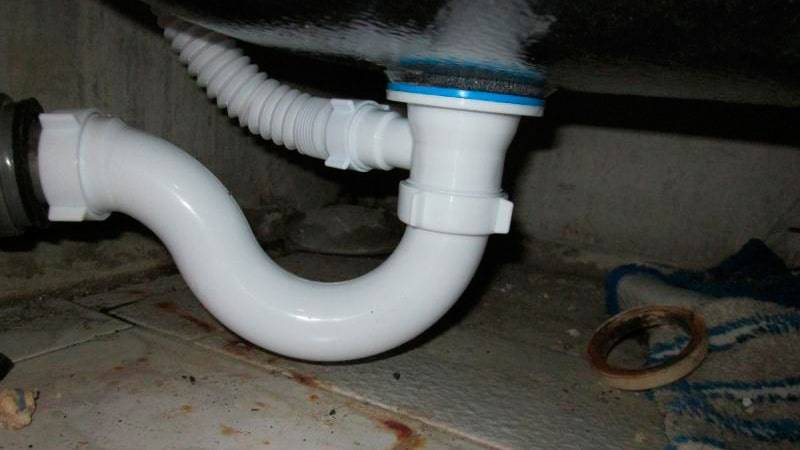
According to their design, siphons are divided into corrugated, pipe and bottle.
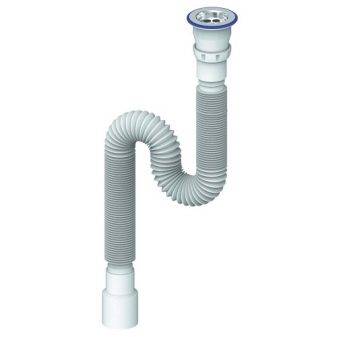
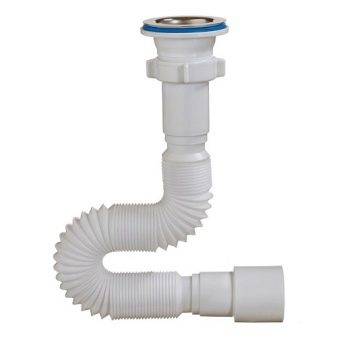
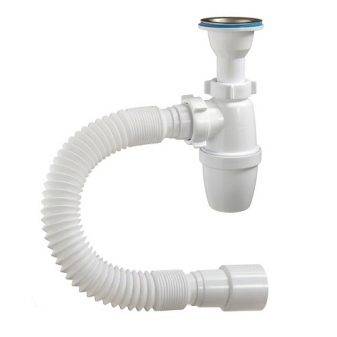
corrugated model
It is one of the most popular and easy to assemble. Such siphons are a hose that easily bends and takes the required shape. With the help of special clamps, the pipe is fixed in one position. These models can be easily removed and cleaned if necessary.
Pros:
- compactness: the corrugated model takes up little space under the sink;
- ease of assembly and operation;
- the hose can be bent as you like, as well as make it longer or shorter.
Minuses:
- from constant exposure to high temperatures, the corrugated hose can be deformed and lose the necessary shape;
- grease and dirt can accumulate in the folds of the pipe, which can lead to blockages.
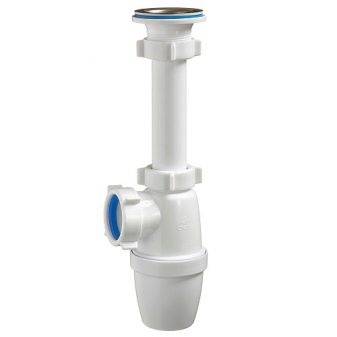
Pipe siphons
They are a pipe of various sections, which, when assembled, have an S-shape. Previously, such models were in great demand, but with the advent of corrugated models, they faded into the background. Nevertheless, tubular models are still popular.
Pros:
- have a clear fixation;
- have high strength;
- clogging resistance.
Minuses:
- if it became necessary to clean this version of the siphon, then the pipe has to be partially disassembled;
- takes up a lot of space under the sink.
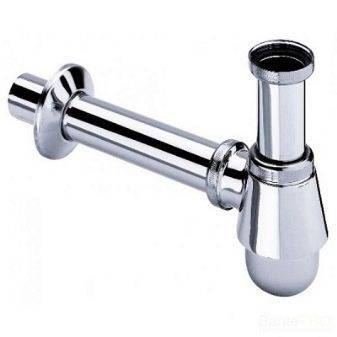
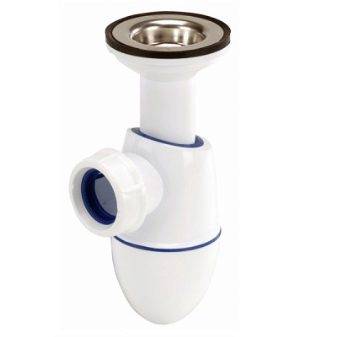
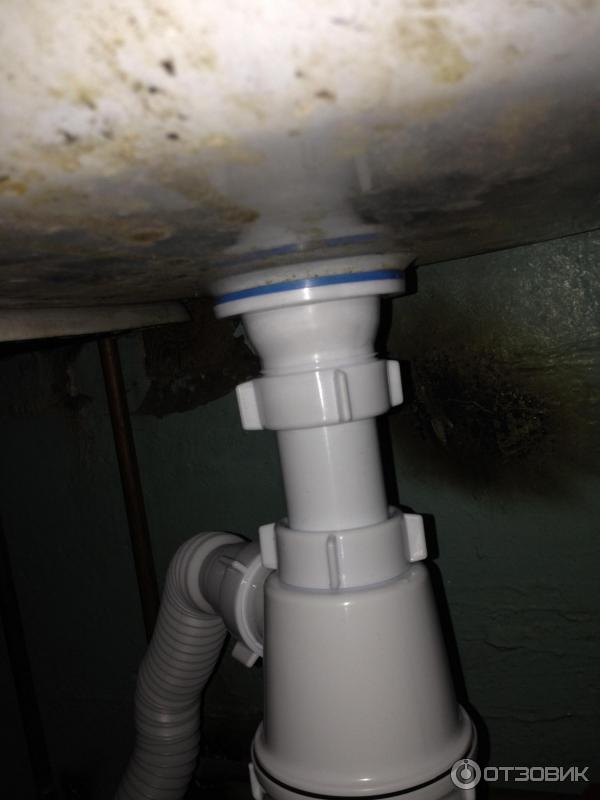
bottle siphon
It differs from the previous options in that it has a special sump. If necessary, the sump can be easily twisted. It is this model that is ideal for the sink in the kitchen. In the modern plumbing market, you can pick up a metal or plastic bottle siphon.


Pros:
- usually such models have two outlets - if necessary, you can connect, for example, a washing machine to the siphon;
- if any object accidentally falls into the sink, it will fall into the bottle part of the device, where it can be easily reached;
- prevents blockages.
Other models
In addition to the above design options, flat and double siphons can be noted. The first ones are usually installed to drain the water from the shower, and the double ones are designed for double sinks.
Siphons with overflow are usually used for kitchen sinks. An overflow is a device by which water does not reach the edges of the sink.
In addition, siphons may differ in the material used to make them.
One of the highest quality siphon options are brass models. Their price is yours, but the service life and reliability exceed other models. Such siphons are coated with a special coating that prevents the metal from oxidizing.
It is worth noting products made of non-ferrous metals or steel. A copper plumbing siphon is usually used exclusively as a design move. Caring for him is quite painstaking.This also includes bronze models, which give an aesthetic appearance, but require maintenance and are not so easy to install.
Steel products have long service life and high price. Also, to install such a model, you need to know the exact dimensions of the future pipe, because steel, unlike the corrugation, does not bend.
Cast iron products have been used in the past. The reliability of such siphons is very high, but the assembly is extremely difficult. Many seek to change cast-iron products for plastic ones. With the dismantling of cast iron parts, problems can also arise. For their fastening, a cement mortar was previously used, which must be broken when replacing.
Automatic or semi-automatic siphons
They are a fairly new product on the plumbing market. Such devices are installed in the bathroom or in the shower. On the top of the siphon there is a special cover, which, when pressed, falls and water is collected. In automatic siphons, the lid rises on its own with a large amount of water to prevent flooding. In semi-automatic, this happens when you press it again.
How to install a bathroom siphon: installation instructions
A sanitary siphon is a water seal aimed at preventing sewer gases from entering the room.
To avoid trouble during the installation and operation of the siphon, it is necessary to choose a high-quality plumbing siphon and assemble it correctly according to the attached instructions.
Proper installation of the siphon between the sewer drain and the bathroom is ensured by proper assembly and the availability of high-quality plumbing.
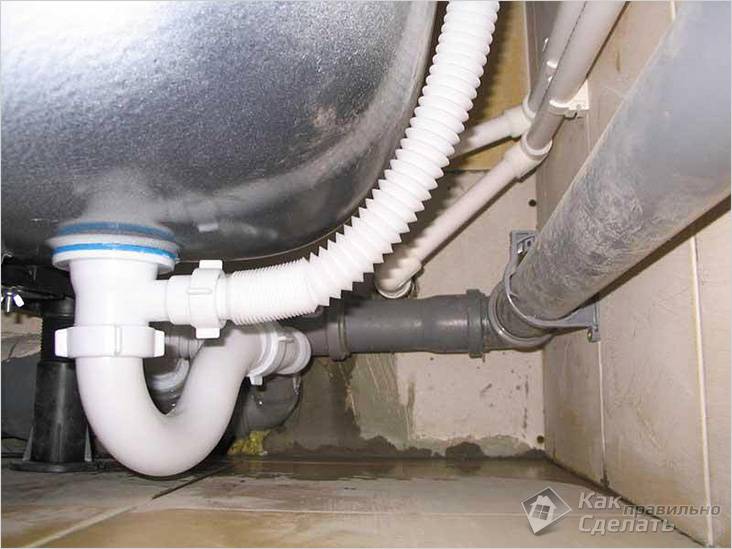
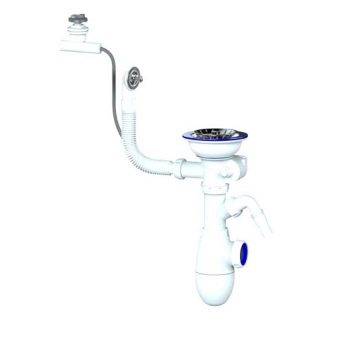
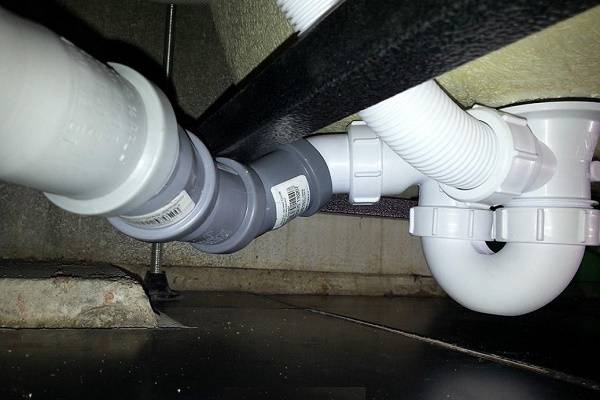
The siphon for the bathroom includes a drain pipe and an overflow pipe, which are connected in front of the gate, behind which water goes into the sewer through one pipe. All bathtubs, regardless of configuration, are equipped with siphons. Siphons can be located in different places and are made of a wide variety of materials: polypropylene, steel, brass, PVC and others. For the correct fit of the siphons in their intended places, their shape should not be monolithic or rigid. The siphons contain flexible plastic pipes that can be easily adjusted in length when connecting the siphon to the sewer.
Installation - preparatory stage
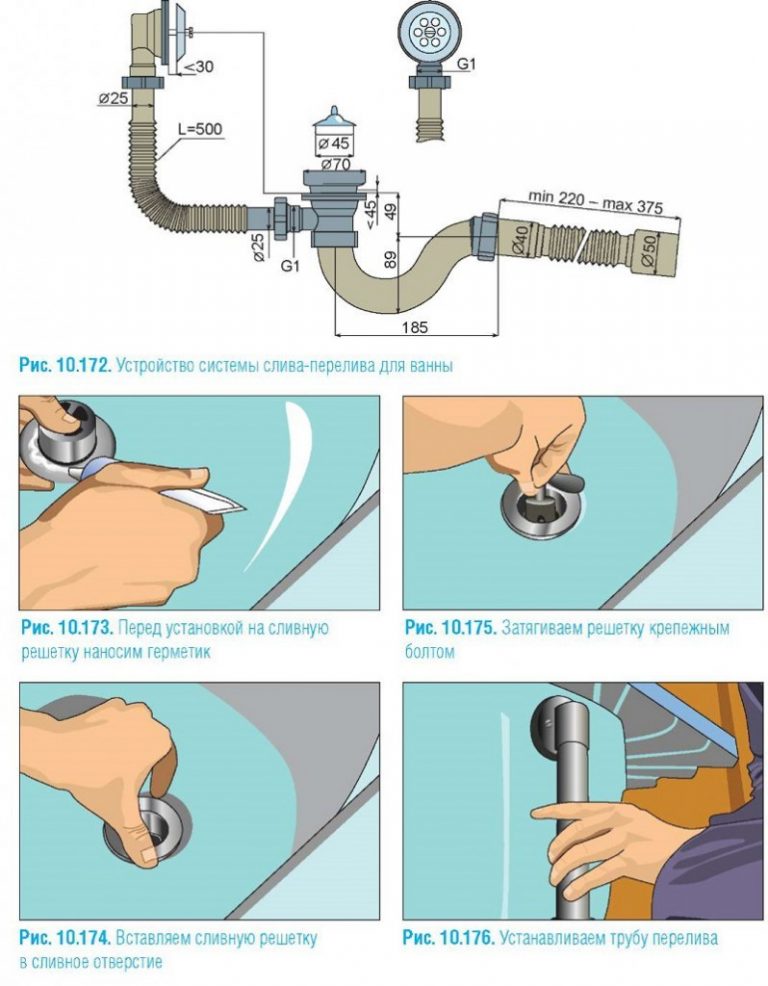
Bath siphons.
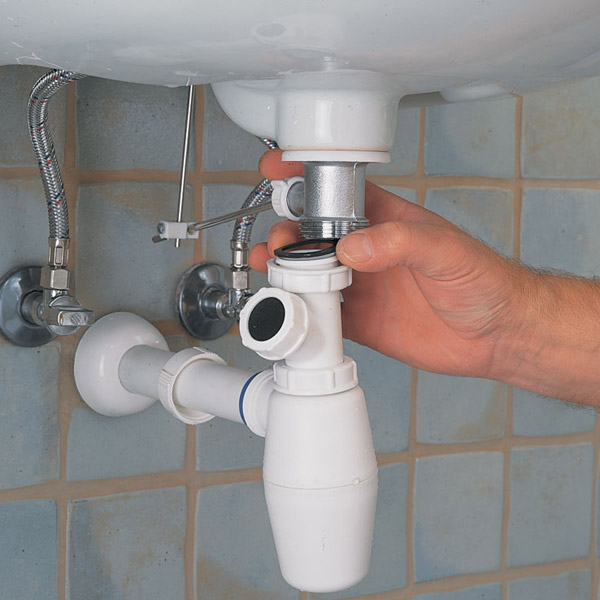
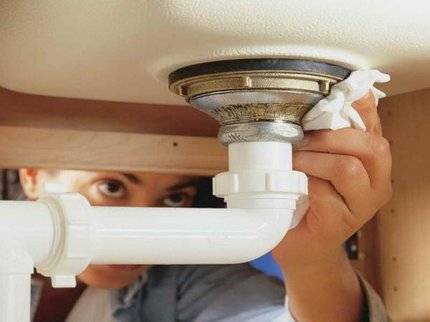
Initially, all parts of the siphon must be checked for damage and defects, because sometimes there are scratches on polished elements and deformation of rubber parts, also pay attention to the quality of the threads. Installation begins with the exact layout of all elements of the siphon, in the order and position in which it will be connected
This is how it should be installed. The adapter sleeve is not a superfluous part, it should be remembered that only one sleeve is installed, according to the pipe diameter.
When dismantling the old system, the siphon and the sewer connection are removed, the coupling is carefully inspected and replaced with a new one, in case of wear. The socket and drain are thoroughly cleaned of dirt and remnants of the old sealant and temporarily closed with a rag. A metal rim is installed in the upper opening of the bath, to which a pipe is attached.A drain cup is attached to the drain hole located in the bottom of the bath with a bolt. To connect the siphon to the drain holes, you first need to unscrew the metal bolt that is located in the round plate of the tub. Then, with the help of a bolt, the siphon pipe connecting the bottle and the bath is screwed to the hole. With the help of a drum on the pipe, the bottle is screwed to the pipe connecting the bottle and the tub. Upon completion of the assembly, the end of the corrugation is attached to the sewer sewer pipe


In the process of assembling the siphon, it is very important not to lose the sealing gum and other small parts. After the joints are checked for leaks, you can use the bathroom
Detailed installation instructions for the siphon
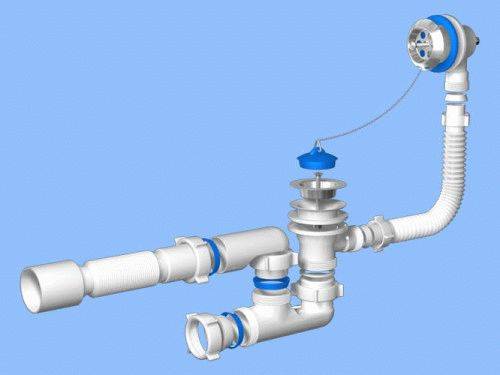
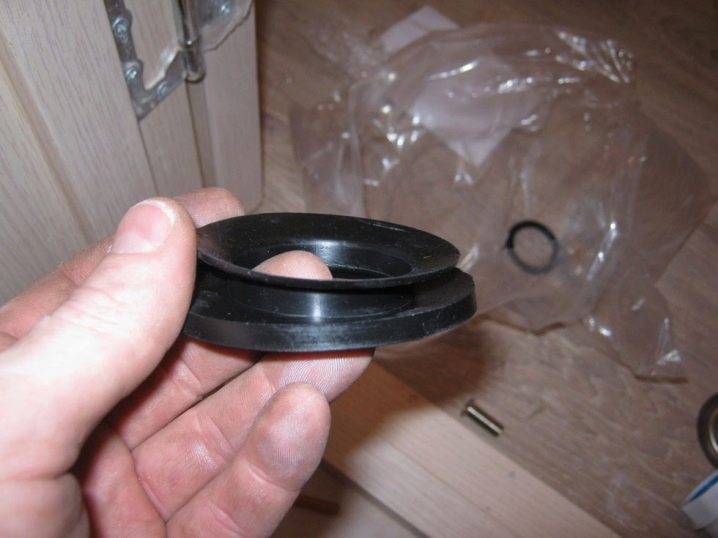
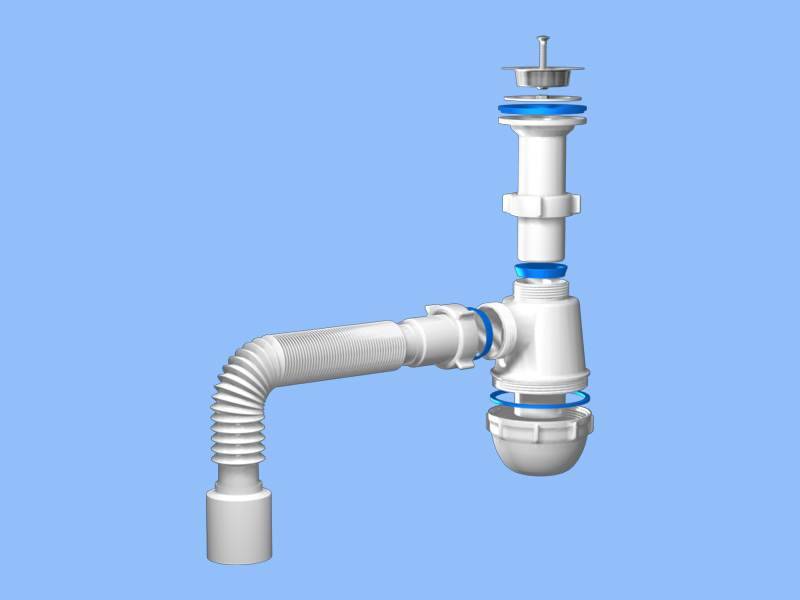
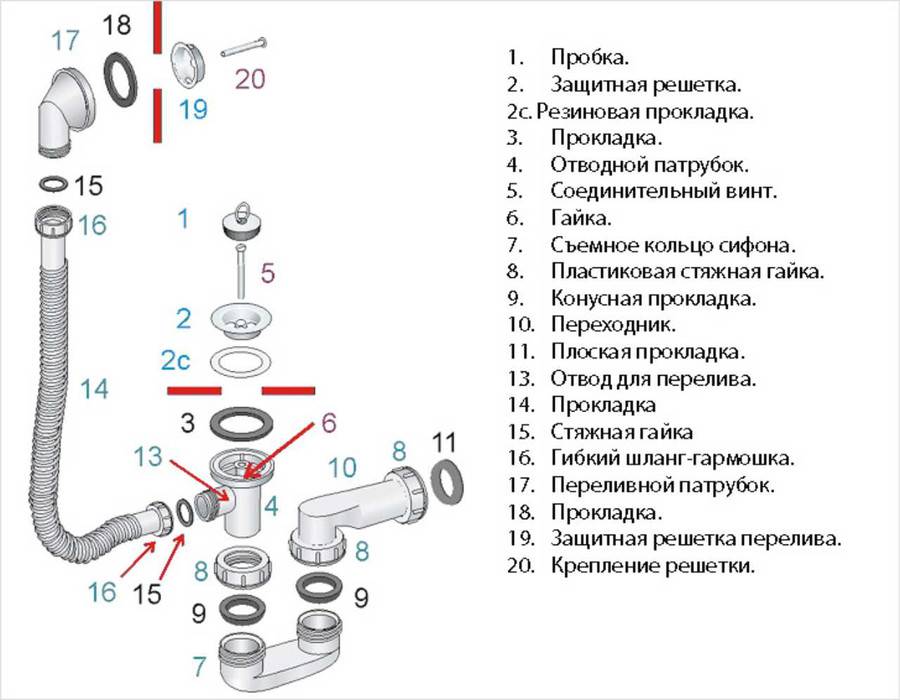
The installation of rubber conical cuffs is carried out in this way: before installing them on the overflow pipe, you need to install plastic nuts on the nozzles, and close to the restrictive belts, above the nuts, you need to put on the cuff, with the wide side to the nut. Next, you need to assemble two pipes into one structure: an F-shaped, forming a water lock, and an L-shaped, outlet. If a narrow section of the cuff around the entire perimeter has entered the socket of this part, then you can tighten the nut. When installing the siphon on the bathtub, it will be useful to use plastic tape and additionally lubricate the threads with gaskets with sealant. One ring of the chain is inserted into the downward eye of the overflow lining, while it is not clamped between the lining and the enamel. The second ring is threaded into the eye of the rubber plug, then it is necessary to stretch the corrugation to the desired length and install the outlet and overflow pipes on it.
The standard installation of a bathroom siphon involves the use of plastic nuts, which must be firmly tightened by hand. Before installing all rubber gaskets, it will not be superfluous to coat them with silicone sealant
Particular attention should be paid to the angular groove between the top edge and the horizontal plane, and in places where the gaskets are joined to the bath. The double rubber gasket must be more securely installed and fixed at the top of the outlet collar, and the flat gasket should be placed on the overflow pipe around the retainer tabs
The use of a retainer is relevant if the bath has thick walls, for example, cast iron. If the bathtub has thin walls, then the half-ring of the retainer needs to be slightly trimmed with legs, just above the installation line. The final step in installing the siphon is to connect the outlet pipe to the water seal pipe.
Drain installation
 Siphon installation
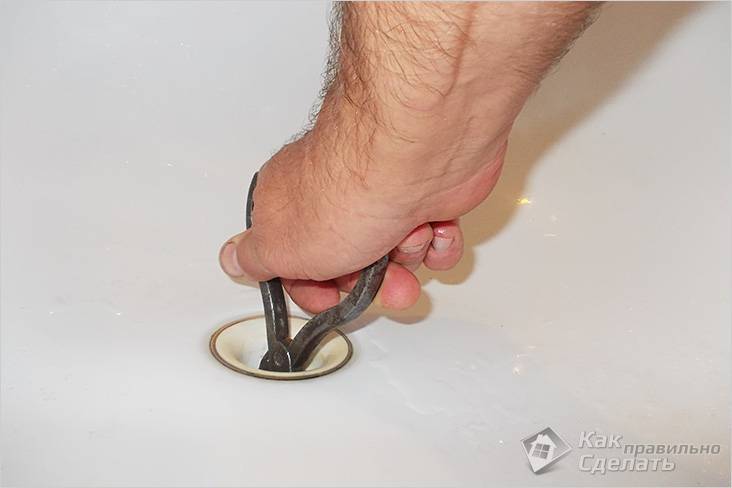
Having collected the drain, you need to install it in the bath.
- First of all, you need to check if there are any pieces of the old gasket or some kind of stuck debris. The landing area must be clean and smooth (both inside and outside the tub). If this is not the case, then the installation cannot be performed until the problem is corrected.
- The lower part of the siphon has a wide neck with a lowering from the inside - this is a seat for a gasket (shown by a blue arrow). If the length of the arms allows, then further installation can be performed without an assistant. The siphon with a gasket laid on it is brought under the lower opening of the bath and held in this position.
- From inside the tub, check that the bottom gasket has not moved to the side.
- A gasket is placed on the drain hole (the green arrow points to it), the top cover with a grill is installed and screwed. In modern models, fixation is carried out with a copper screw; in older models, the cover is threaded and screwed directly into the siphon.
 We clamp the siphon
- In the same way, the overflow hole is tied and connected to the siphon using a flexible hose with nuts and cone washers pre-fitted.
- The next step is to connect to the sewer. As a rule, when connecting to PVC sewer pipes, there are no problems, but in order to make a connection with a cast-iron pipe, you will have to purchase a rubber coupling of a suitable size.
- After crimping all connections, you need to check if there are any leaks. This is done simply - water is drawn into the bath, and you need to look under the bath. Then you need to close the cork and check if drops of water appear from below when the bath is filled a little. The final step will be to check the tightness of the overflow installation. To do this, you need to collect water until it flows into the siphon through the overflow.
Is it dry under the bath? Then the installation of the siphon is successful.
Mounting
Each owner can screw the siphon with his own hands without involving a plumber. Installation should be carried out very responsibly, paying attention to every detail. Negligent attitude will cause constant leaks or the formation of unpleasant odors in the room due to gaps between the components of the device.
The main requirement during installation work of this type is the tightness of the fasteners.
Therefore, much attention is paid to the quality fastening of components.The gaskets that come with the kit are often either too thin or made of poor quality rubber.
Therefore, it is advisable to purchase third-party gaskets.
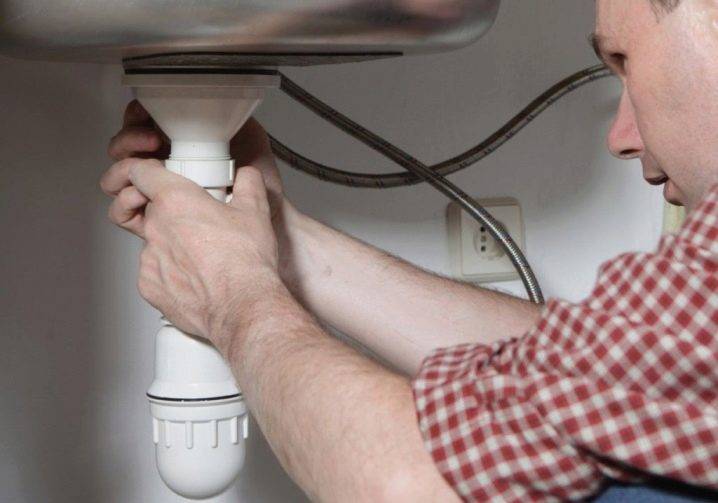
We carry out the installation of a drain in the bath
The kit for the bathtub siphon necessarily includes instructions that indicate how to properly install the siphon in the bathroom or, at least, how the siphon assembly you bought looks like. This manual is courtesy of the manufacturer. The assembly of classic and semi-automatic siphons is not much different from each other, but some nuances still exist, and they cannot be neglected.
If the device you bought is intended to replace an existing one, then make sure that the attachment points of the old siphon are cleaned of sealant residues and the contact surfaces are cleaned. Such measures are necessary to prevent the flow of new gaskets at their installation sites.

Assembling a modern plastic siphon with your own hands is not at all as difficult as it might seem at first glance. Having opened the box with the siphon, do not rush to get scared and call a specialist. You'll be great at doing it all on your own.
First stage of installation
Our first task is to attach the bottom drain to the tub. Take this pipe, put a gasket in it, and then put it from the bottom side to the drain hole. On the opposite side of the hole in the bowl itself, install a protective grill and screw on the connection with a screw.
Now you need to check the holes for matches and make sure that the gasket is not warped. If this is not done, then after tightening the screw, a leak may occur. After making sure that everything is in order, tighten the screw while holding the lower pipe with your hand.
Second stage of installation
Now install the top overflow pipe. In this case, it is necessary to act in the same way as when installing the lower drain pipe. The top pipe is also tightened with a screw. The only difference is that it is better to turn this branch pipe a little in the direction from the wall to the door in order to facilitate the manipulation of its connection with the corrugated drain pipe.
The branch pipes of both drain holes are connected by a corrugated tube. If it is too long, it should be bent instead of cut. If a nut is involved in the process of connecting two pipes, then it is it that must be put on the corrugation in the first place. Then it is the laying turn, after which the connection is made.


The third stage of installation
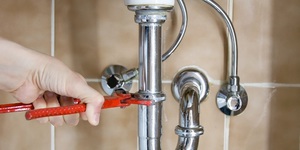
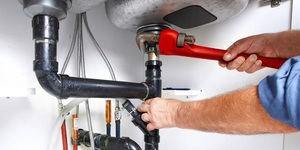
Now you need to check the "knee" of the drain siphon, in which a water seal will form. It should not have any defects in the place where the gaskets are attached. The water seal must be absolutely tight, otherwise it will not perform its main functions.
The knee mounts are the same for almost all siphon models. it union nut with cone or flat rubber. The “elbow” is connected to the corrugated tube using a union nut and a gasket.
Fourth stage of installation
At the fourth, final stage, the system should be connected to the sewer. There are only two mounting options. If old cast iron pipes are installed in your bathroom, the connection should be made using a sealing cuff.
If the bathroom is equipped with new plastic pipes, then it is enough to make a direct connection to the pipe.You don't need any additional equipment for this.
To visualize how the elements should look siphon and how to assemble plastic bathtub siphon, watch this video:
So, when the installation of the siphon is already completed, you can start testing. To do this, you need to draw water into the bath and check for leaks when the drain hole is closed with a stopper. If it is dry under the bath, then we can assume that the lower pipe is correctly connected to the drain hole. It remains only to pull out the plug and make sure that the water leaves the bowl without leaks throughout the drain.
 Checking the quality of the installation of the drain device and searching for possible leaks is a mandatory event that will allow you to be sure that you will not flood yourself and your neighbors from below
If you find a leak, disassemble the problem area and determine the cause of the malfunction. This could be a skewed gasket, a loose nut, or an obstruction at the joints. After correcting the problem, check again.
Purpose and design features
Bathroom sink drain or in a kitchen with an overflow, it is a curved design, the key purpose of which is to redirect excess water into the sewer, thereby preventing the sink bowl from overflowing.
The device of the drain system of the bath is almost identical to the design intended for the sink.
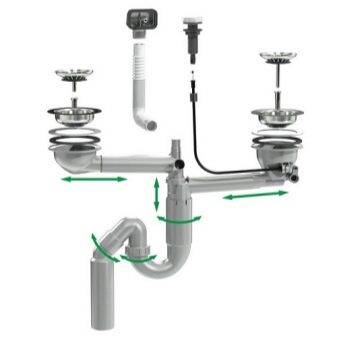
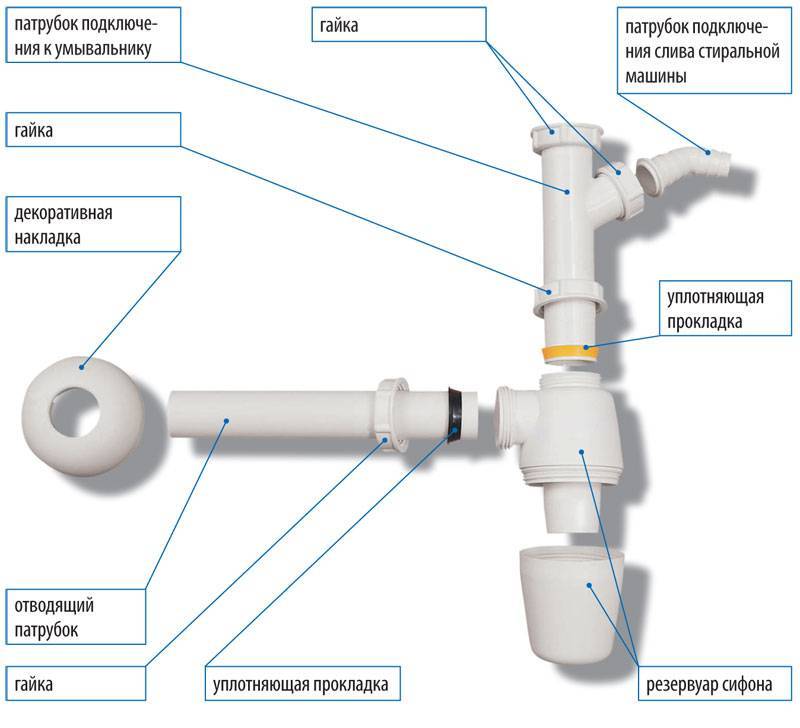
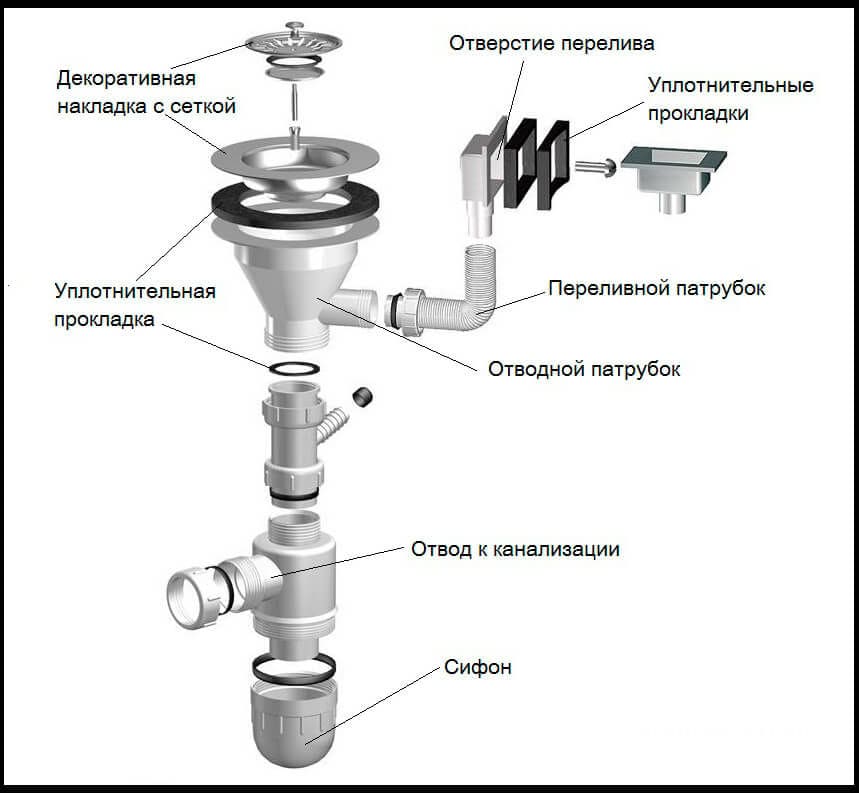
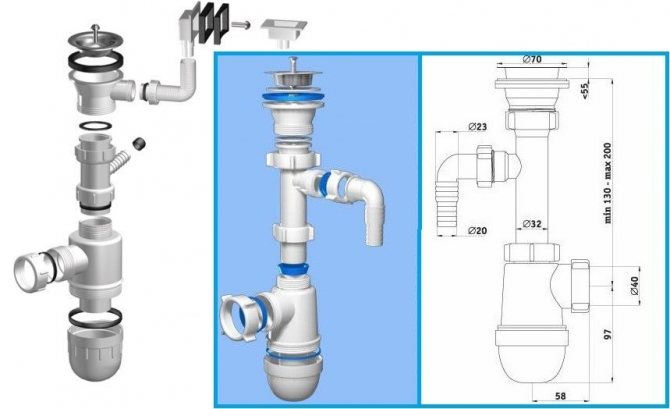
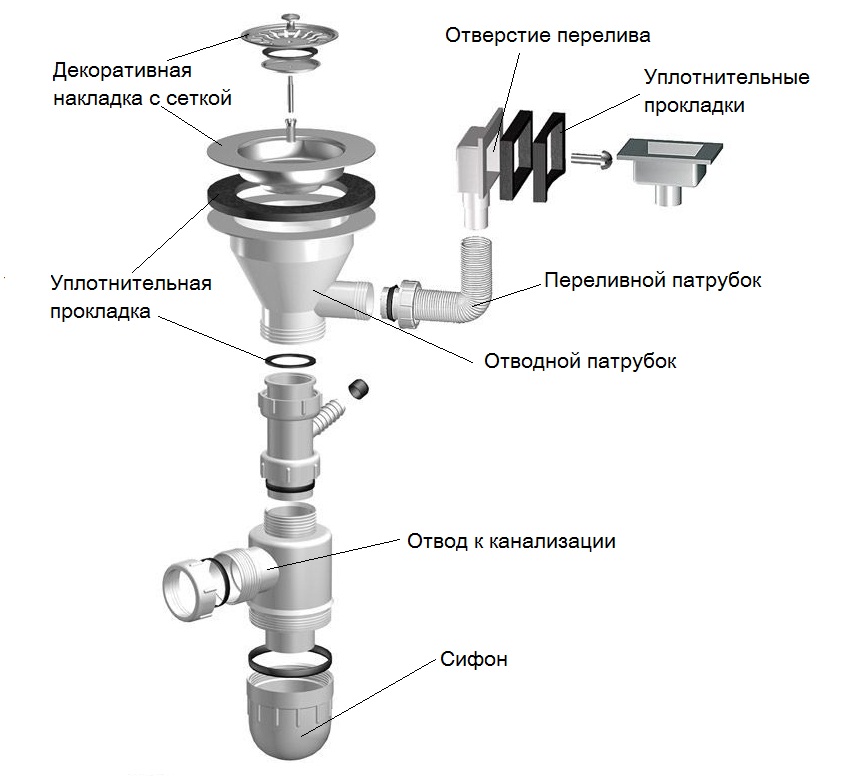
Structurally, the overflow drain for a sink or sink consists of the following elements:
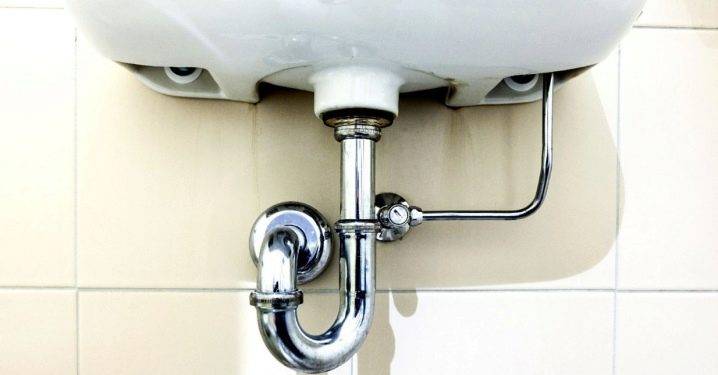
- siphon with water trap - is a "U"-shaped element that performs a dual task: it prevents the exhalation of a fetid odor from the sewer and protects the drain pipe located below from clogging.
- drain pipe - made of corrugated or rigid plastic pipe and is designed to redirect wastewater to the sewer system.
The main secret of the functionality of the siphon is in its design. Due to the bend, the water does not completely leave the pipe. The formed water seal acts as an obstacle to the penetration of sewer "ambre" into the drain hole.
Such designs are convenient in that in case of clogging, it will not be difficult to remove and clean them mechanically or chemically.
Do you want to install a more durable device that is not so afraid of clogging? In this case, it is better to purchase a design in the form of an overflow drain for the sink. It differs from traditional models in that it is equipped with an additional tube.
This device connects the hole made in the upper side of the rim of the bowl with the elements of the drain system located in front of the siphon. This allows the overflow to divert liquid from the sink, thus preventing the bowl from overflowing.
From the outside, the drain hole is covered with a grill. It performs a protective function, retaining small debris and hair, thereby protecting the system from clogging.
Sewer connection
In any bathroom, there is already a drain for sewerage, but in private self-builds this may not be the case. If this is your case, then before installing the bath, you need to drill three holes in the floor - for sewerage, hot and cold water. Further, the corresponding pipes are connected to them. Only after this is the plumbing fixture installed.
Step-by-step instructions on how to connect the bath to the sewer:
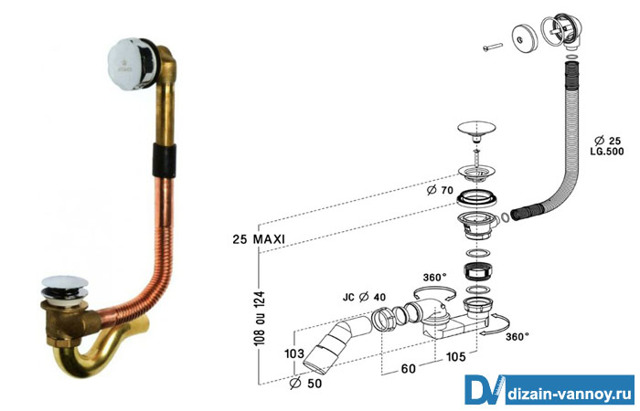
A corrugation and a siphon are used to connect the sewer outlet and the bath
Before installing them, it is important to check the level of the bath, the location of the drain pipe and its diameter. Only after that the necessary plumbing details are selected;
Overflows are installed first
There are two of them - through passage (through, central) and shut-off. Through is mounted in the drain of the bath, and locking in the side end. Before installing a through overflow, you need to assemble the siphon;
Assembling a siphon with your own hands is very simple. A black rubber gasket is inserted into the structure itself. A nut is installed in the central overflow, it must be pushed into the hole by 3–4 mm. After you need to press the gasket in the siphon. For this, an overflow is screwed into it.
Please note that plastic threads do not need to be sealed, so FUM tape is not used. Next, the output to the corrugation is set
It is mounted in the upper part of the siphon, above the water lock, a cone gasket must be installed on this pipe. It is pressed with a plastic nut;
There are two corrugations in the bath: drain and sewer. The drain has a small diameter, it is installed on the side overflow. This corrugation is also connected to the siphon with a gasket and a nut. The sewer corrugation is also connected by a threaded method with a nut, and the overflow is similarly fastened;
Each siphon has a cleaning hole, which is closed with a solid nut. The connection must be sealed with a rubber gasket (white or yellowish). This is necessary for urgent repairs when the drain is clogged;
If you have a plastic pipe to exit the sewer, then most likely it already has a gasket. If not, you need to additionally seal the mount.To connect a plastic sewer corrugation from a bathtub to a cast-iron or other pipe, you will need a special adapter;
After completing the collection of the siphon constructor, you need to check how it will be installed. Overflows are installed in the intended places. To do this, a double elastic band is placed in the central hole of the bath, and a single thin one in the side hole. Next, a siphon is installed and tins are attached to the holes. With the help of a bolt, the mesh takes root. A transitional overflow is also attached;
To connect the sewer and corrugations, the side surfaces are lubricated with silicone sealant or soap. This will make it easier to connect the pipes. After they are additionally treated with a sealant. It is desirable to stretch the corrugations without kinks, otherwise water will not pass through them well.
This completes the process of connecting the bath to the sewer. Check the connection points of the siphon and overflows - water should not drip from them. The described method is the simplest and most affordable. Connecting brass structures is done in a similar way, but such siphons are 3 times more expensive than plastic ones.
Video: How to connect a bath to a sewer
The choice of material for the manufacture of the siphon
 Most of the models offered in stores today are made of metal and plastic. These models differ from each other in their features, advantages and disadvantages.


Plastic structures are valued by consumers because of the affordable price, especially when it comes to models made of polyethylene. Most often they have a simple device and a minimum number of connections. Polypropylene structures are considered more expensive in this category, however, this is not surprising, given their increased strength and long service life.
Another positive quality of polypropylene should be called increased resistance to high temperatures. Because of it, experts advise owners who plan to connect a washing machine with a boiling function to choose these products.
During the operation of a plastic product, such a nuisance as a leak may occur. However, this problem is quite easy to solve by tightening the threaded connections.
Metal siphons for the kitchen sink are a more expensive proposition, unlike polymer models. Such a difference in price is due to the increased service life. Most often, metal products are made of bronze or brass. Their advantage is not susceptibility to oxidation processes, as well as corrosion.
An alternative to the listed devices are stainless steel models, however, they are much more expensive than their main competitors, so they have not received proper distribution.
If you want even such a detail of your sink as a siphon to look attractive, then you should pay attention to models with a chrome finish. But keep in mind that for such a sanitary ware you will have to pay the maximum price.
Do-it-yourself siphon installation tools
 In principle, each owner can cope with the task of installing a siphon for a sink in a kitchen with an overflow or other functions on their own. Although it does not interfere with the presence of minimal skills in the field of working with plumbing and a minimal set of tools.
However, all this can be found in any household, so you can dismantle the old device and install a new one without big problems. Of the tools that will be required to perform this work, we can name the following:
- screwdriver;
- hacksaw;
- roulette;
- sandpaper.
In some cases, pipe cutting may be required, so you will need to prepare construction scissors as well.
Dismantling
 Before you start assembling a new kitchen sink siphon, you will need to remove the old one. With this, you will have no problems: you need to take a screwdriver and unscrew the screw that holds the drain hole in the center of the grate.
Having coped with this task, it will be very easy for you to pull out the siphon. If your siphon was installed a long time ago, then the nut and screw may stick to each other. Because of this, you may have great difficulty unscrewing the siphon.
In this case, proceed as follows: you need to disconnect the lower part of the siphon and twist the pipe. If this does not help, experts advise using special solvents.
How to assemble a manual siphon
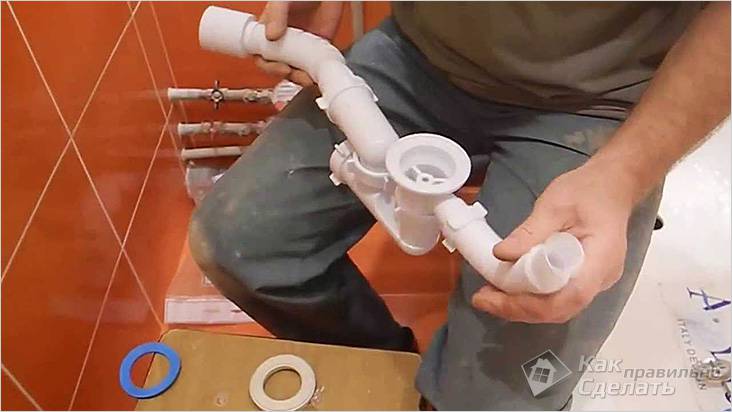
Despite the difference in the designs of these elements, the assembly of all siphons is carried out in a similar way.
The design of the manual siphon for the bath
Step-by-step instructions on how to assemble a bath siphon:
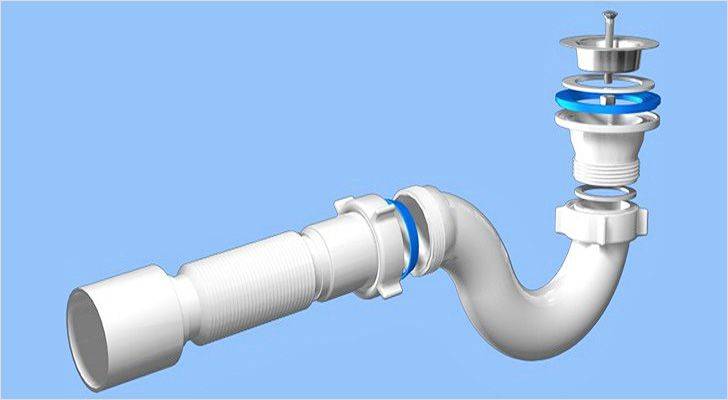
The set of devices includes the sump itself, pipes of different diameters, sealing elements. The sump is taken first, the largest flat gasket is put on its lower part (most often it is blue). When installing it, distortions or other distortions are not allowed;
The overflow and sump pipes are interconnected.If a plastic siphon is assembled, then the FUM tape is not needed - the gasket is enough, but to connect brass or steel to the thread, it is additionally sealed;
On the top and side of such a siphon there are two holes of different diameters. One is designed to connect the side drain, and the other to connect the system to the sewer outlet. In accordance with the dimensions of these holes, a conical gasket (wide) and a union nut are selected;
The first pipe is taken, which will be connected to the central drain. A cap nut is put on it. Then the gasket is put on.
Pay attention to its design. One end of the gasket is blunt and the other is sharp
Here, with a sharp end, the sealant is put on to the nozzle, the blunt one subsequently “sits” on the sump. The gasket is inserted to the maximum position, but be careful not to tear it;
The pipe is inserted into the corresponding hole in the siphon, after which the union nut is tightened. In the same way, a pipe is connected that will lead to the sewer;
If everything is done correctly, then there remains a wide gasket under the sink and a thin rubber ring for sealing the pipe, nuts for connecting the sewer, and a sink drain filter. A wide gasket is installed on the upper pipe. After the outlet is connected to the sink;
Connection to the sink is made using a bolted connection. It is also recommended not to use FUM tape here (if the siphon is plastic). To connect all parts of the structure, you need to install a sealing ring on the upper section of the drain, after a metal mesh filter. The siphon pipe is attached from below, the whole structure is screwed with a bolt;
The output is connected to the sewerage using silicone sealant (for connecting two plastic elements) or a special adapter (for connecting metal and plastic pipes). In the first case, the end parts of the siphon and sewer pipes are lubricated with silicone and connected to each other. In the second, the ends of the adapter are lubricated.
After the installation is completed, you need to wait for the sealant to dry completely (on average, from 4 to 6 hours), only then you can use the system.
Video: bath siphon assembly
Corrugated models do not require complex assembly work - often, they are simply connected to the drain outlet system. At the same time, flat ones are more complex in design. The main problem is the large number of pipes of different diameters.
Tips for properly assembling the siphon:
- All metal threads must be sealed with FUM tape;
-
Not a single gasket or ring should be left "idle". If after the end of the assembly you still have extra parts, this means that a seal is missing somewhere and it will leak there;
- When connecting pipes, only one gasket can be used. Some home craftsmen install two gaskets at the junction of pipes or during repairs to prevent leaks. This contributes to the violation of the tightness of the system;
- When tightening the union nuts, you need to be very careful (especially if you work with plastic). It is impossible for the connection to be “stretched”, but with a strong impact, there is a chance of damaging the fastener;
- The same goes for installing gaskets. They need to be tightened to the nozzles to the maximum, but if the seals are tightened, they will break;
- Sealing elements must be replaced regularly.Drain gaskets - 1 time in 6 months (on average), thin seals between nozzles - 1 time in 3 months. These times may vary, but timely warning of worn rubber bands will help to avoid flooding and leakage.
Conclusions and useful video on the topic
Videos are a great opportunity to consolidate knowledge about the assembly and installation of siphons, as well as learn how to practice the installation of plumbing equipment on your own, avoiding common mistakes.
Video guide for replacing an old, failed kitchen sink siphon:


Non-standard installation of a siphon connected to a drain hole with a corrugated pipe:
Assembly and tips for proper installation of an inexpensive siphon with overflow:
As you can see, assembling simple models does not take much time and does not require special knowledge. When replacing an old siphon, it takes more effort to dismantle worn-out equipment.
If a drain installation questions for the kitchen sink did not arise, you can do all the work yourself. To solve more complex problems of connecting the device, it is better to contact a plumber.
Want to talk about your personal experience in installing a siphon under a kitchen sink? Do you have useful information that you would like to share with site visitors? Please write comments in the block form below, express your opinion and post a photo on the topic of the article.
conclusions
As a conclusion, we can say that the siphon is a very important part of plumbing. Breaking it can cause a lot of inconvenience.
This is high humidity, which entails the appearance of mold on the walls and floor, a wet ceiling from neighbors, an unpleasant smell throughout the room.Incorrect installation of the siphon entails the same consequences, only more precious time and finances will be lost.
The above inconveniences can be easily avoided when deciding to install a siphon for a bathtub or washbasin yourself. You just need to take the choice of device and replacement as seriously as possible. It is also worthwhile to understand that the drain at the bath is in a very inconvenient place for installation. For this reason, try to do the job as well as possible, repeated replacement will bring you very little pleasure.
Summarize
Assembling a siphon for a sink, washbasin, shower or bath does not take much time and does not require special skills. However, there are a number of nuances that you should be aware of and take into account so that you do not have to do double work when redoing something. Everything must be taken into account so that in the near future it will not be necessary to change a completely new device to a more functional model, because you forgot to take into account that you will put a washing machine nearby and it will also need to be connected to the sewer through a siphon.
If you are new to plumbing and are installing a siphon for the first time, the manufacturer's instructions for the product may be somewhat incomprehensible
Having only a schematic description of the assembly and installation sequence of the device, it does not carry important information and tips that will help you avoid mistakes and protect your kitchen from leaking sewer unit


