- How to choose a new siphon
- Siphon device
- Types and types
- How to choose the right product?
- Siphon installation
- Assembling a siphon for a kitchen sink
- overflow connection
- General kitchen sink siphon
- Basic assembly guidelines
- Choosing a siphon for a kitchen sink
- Mounting
- Installation rules
- The choice of material for the manufacture of the siphon
- Do-it-yourself siphon installation tools
- Dismantling
- How to assemble a manual siphon
How to choose a new siphon
When choosing a siphon model, it is worth considering several factors. These are:
- The price that determines the quality of the material, the manufacture of the siphon and its durability.
- Appearance. A siphon installed in an open place should look aesthetically pleasing and fit into the design of the room.
- The diameter of the sink drain must match the size of the seat on the inlet pipe.
- It is desirable to have an overflow system.
- The presence of additional outlets for connecting a washing machine and dishwasher.
- The dimensions of the siphon depend on the horizontal and vertical distance from the neck of the sink to the sewer pipe.
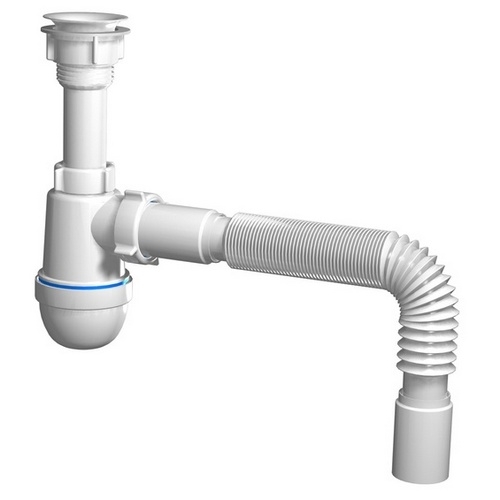
- When the neck of the sink and the sewer pipe are located in different planes, a siphon with a corrugated drain pipe is purchased.
- The diameter of the drain pipe must be the same or smaller than the diameter of the sewer pipe. A branch pipe of a smaller diameter is mounted with an adapter.
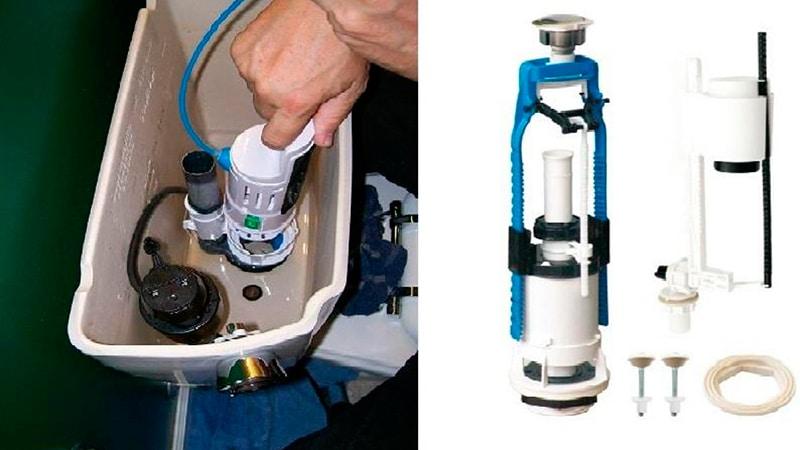
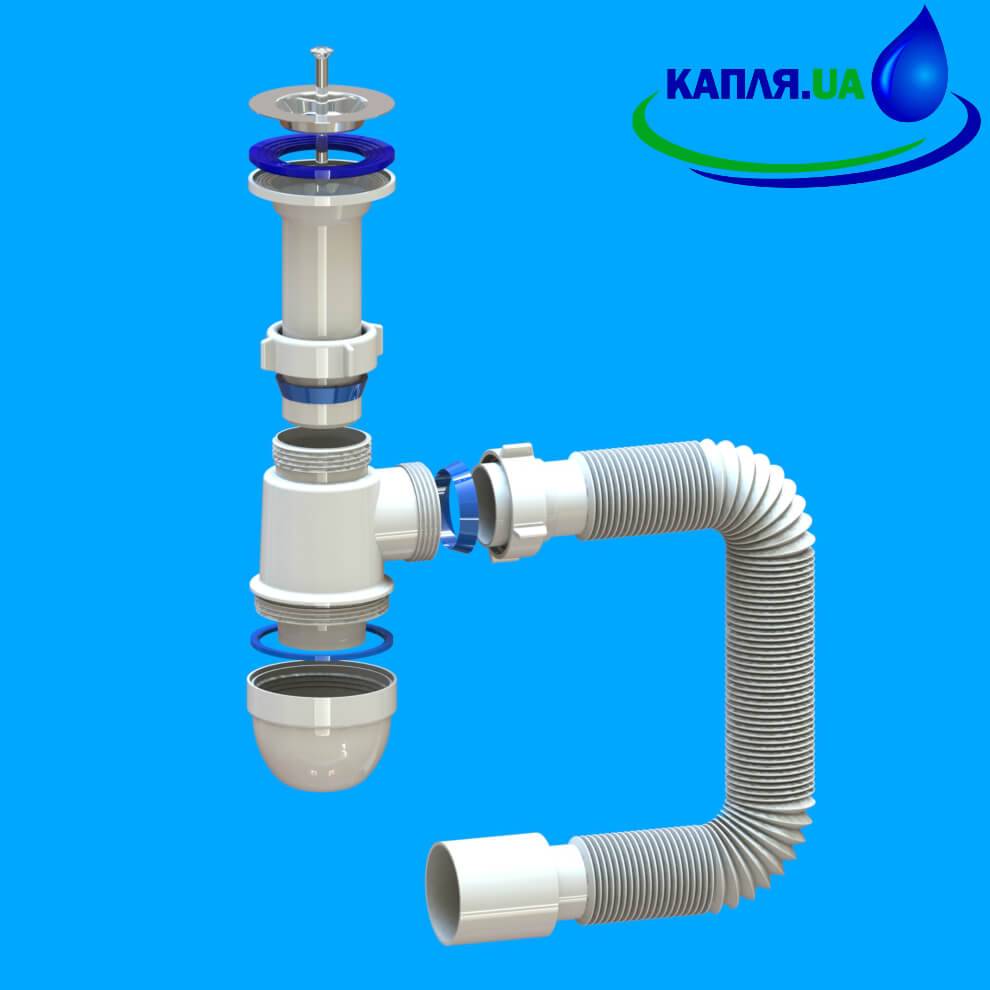
Siphon device
Siphons for drains are most often made of chrome-plated brass or plastic (propylene, polyethylene, PVC). Brass products oxidize over time and accumulate dirt. It is better to give preference to a plastic siphon. Such a product does not corrode, does not rot, it is wear-resistant and durable.
Types of siphons for the kitchen
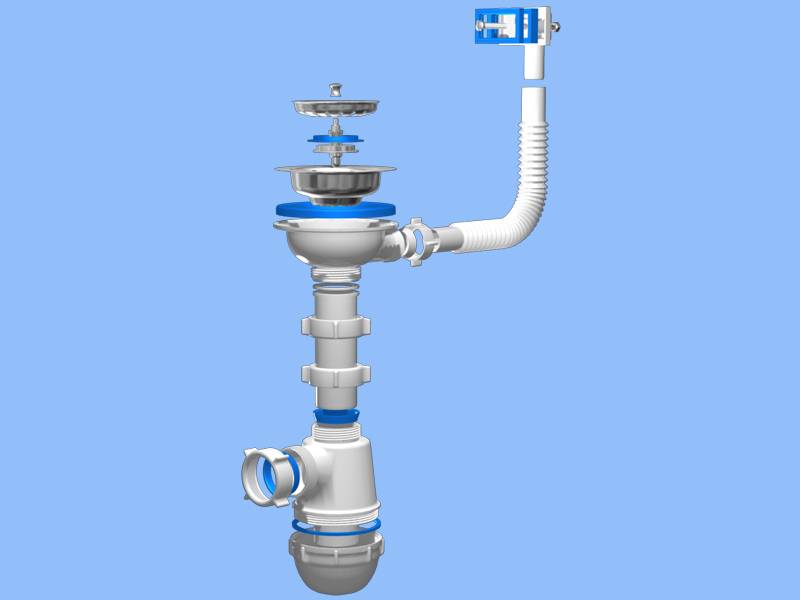
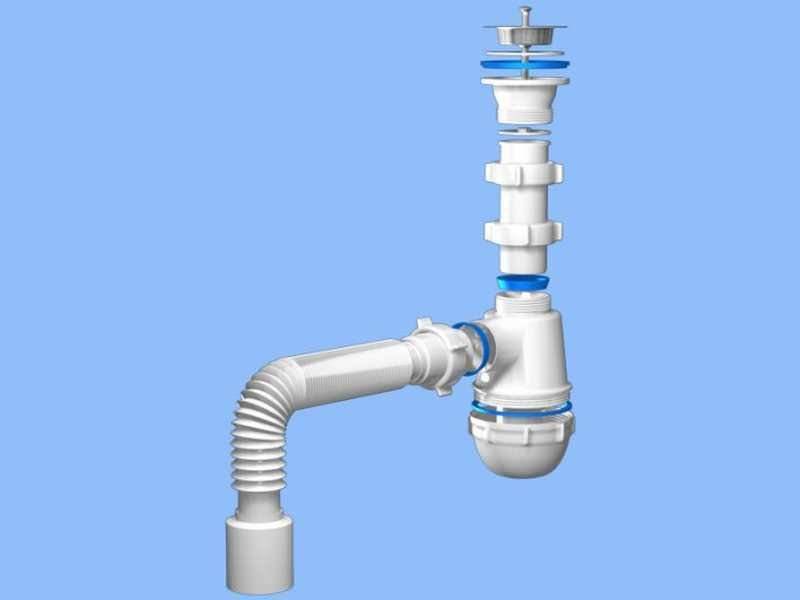
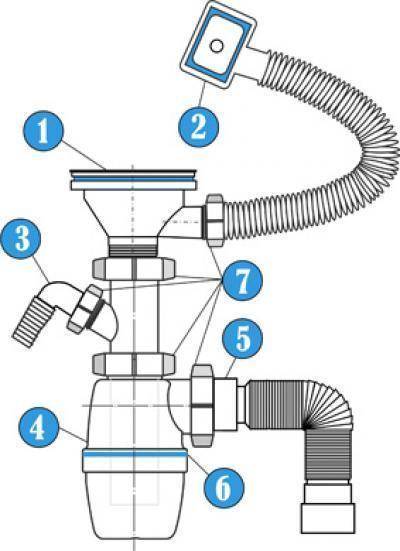
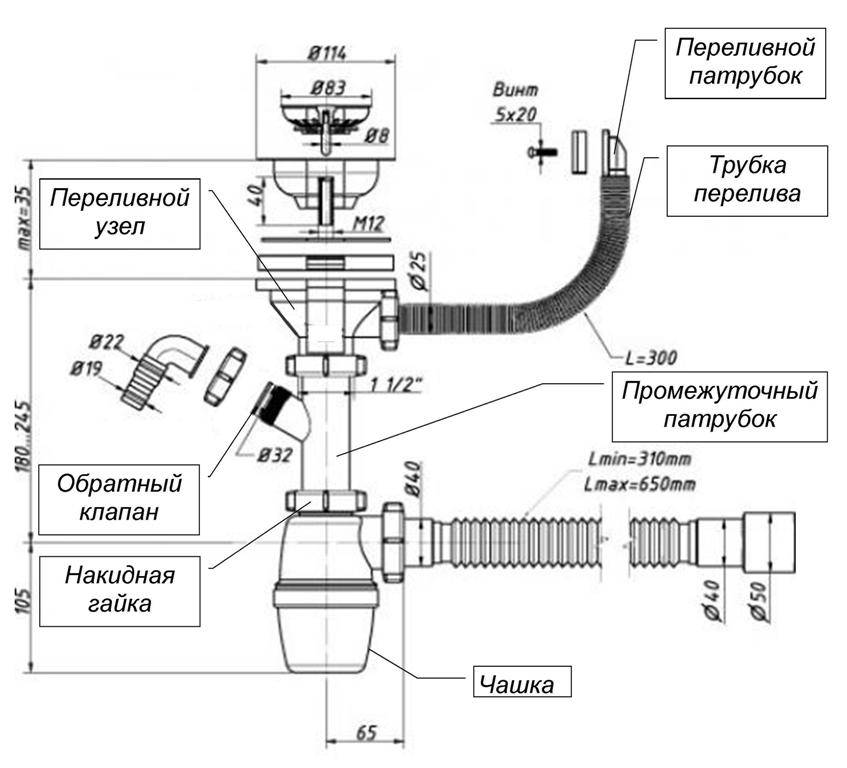
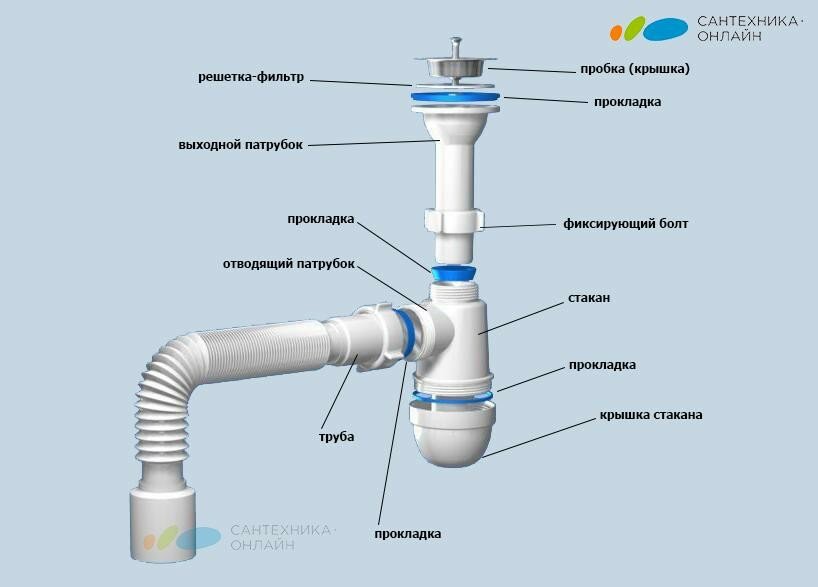
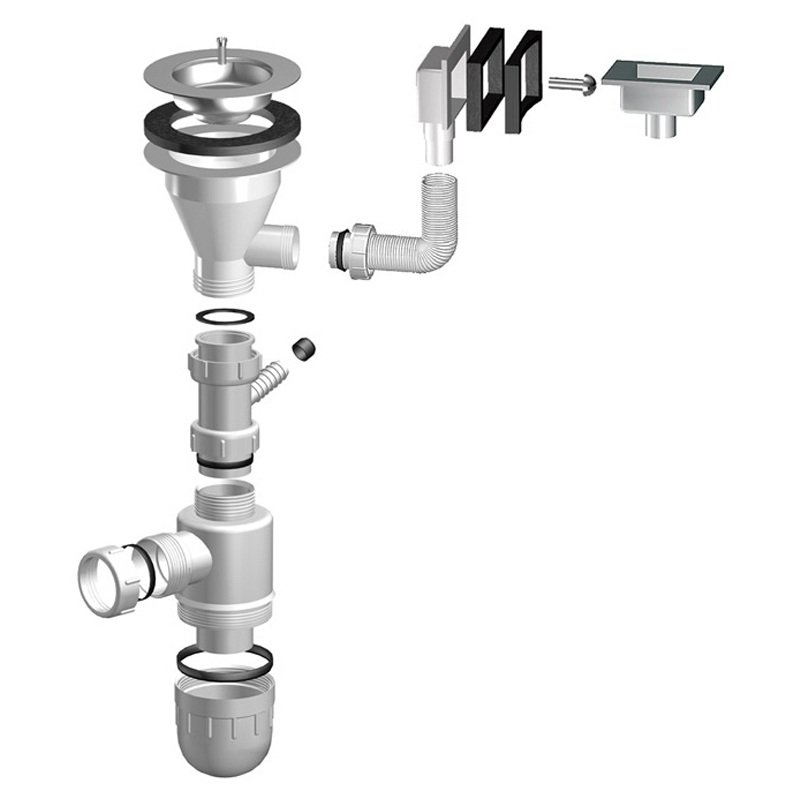
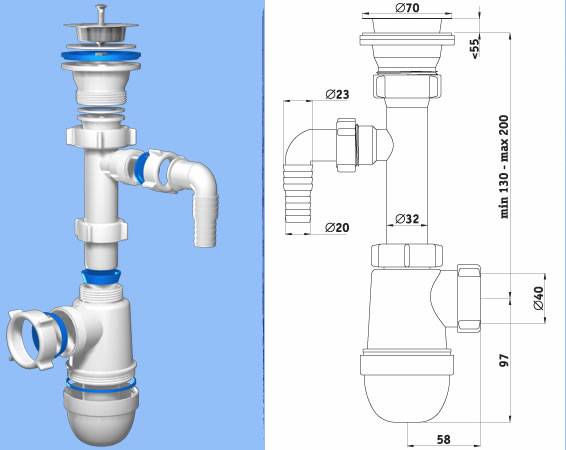
Consider the siphon device using the example of a plastic product. The standard set of the siphon includes:
- protective grid. It is installed directly in the drain hole of the sink and prevents large pieces of waste from entering the sewer.
- rubber stopper. Designed to block the drain hole of the sink (usually there are no siphons in cheap models).
- rubber gasket 3-5 mm thick. It is located between the sink body and the outlet pipe.
- outlet pipe. Some models of nozzles have an additional outlet to which the washer/dishwasher drain or outlet for faucets with a waste valve is connected.
- exhaust pipe rubber gasket
- outlet plastic nut
- connecting screw Ø 6-8 mm made of stainless steel. In cheap models of siphons, these screws are made of simple iron with a thin coating of chromium or nickel. Such a screw is unreliable, quickly begins to rust and collapse. To buy a siphon with a quality screw, it is recommended to take a small magnet with you to check the metal (stainless steel is not magnetized).
metal nut. It can be brass, copper or stainless steel. Do not take a siphon with an iron nut.It will also quickly rust and will last no more than a year.
siphon body in the form of a bottle or knee.
clamping plastic nut.
2 cone gaskets made of rubber or plastic.
sewer outlet. It is located on the side of the siphon body.
a nut of the appropriate diameter for attaching a plastic adapter.
lid or glass of the siphon. This part more often than others has to be unscrewed to clean the siphon.
large flat rubber gasket. It serves to tightly adjoin the lid (glass) of the siphon to the body.
sewer outlet. It can be a flexible hose, a standard plastic pipe, a corrugated pipe, or a plastic spigot. It all depends on the model of the acquired siphon and the diameter of its outlet.
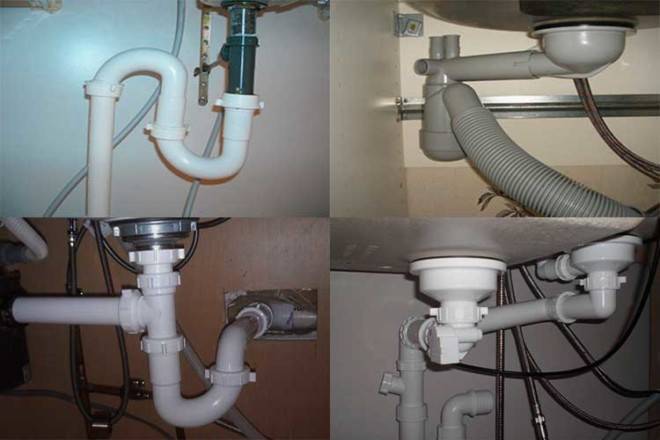
Types and types
Before assembling the siphon, consider the classification of products. The industry produces three types. Please refer to the product specifications for understanding.
Pipe. So named because it looks like a pipe. The steel model stands out for its compactness and stylish design. According to consumer reviews, pipe is not suitable for installation in the kitchen. The pipe under the sink clogs more often and faster. And in this case, it is more difficult to clean it. Dismantling takes a long time.
Another disadvantage of the pipe is the rapid evaporation of moisture. If the pipe under the bathroom sink is not used often enough, a stagnant smell of rot will appear in the bathroom.
The product is available in two versions:
- hard,
- corrugated.
Any person can assemble or disassemble, clean the glass with their own hands, even without plumbing skills. Unscrew the lower part and wash the parts with detergents.In addition, the water seal is filled with water, which guarantees the protection of the drain in the sink from drying out. Experts consider the bottle type durable.
Connecting the siphon to the outflows is similar to all types of device.
The only drawback of the product is the tendency to leak due to the large number of joints and connections.
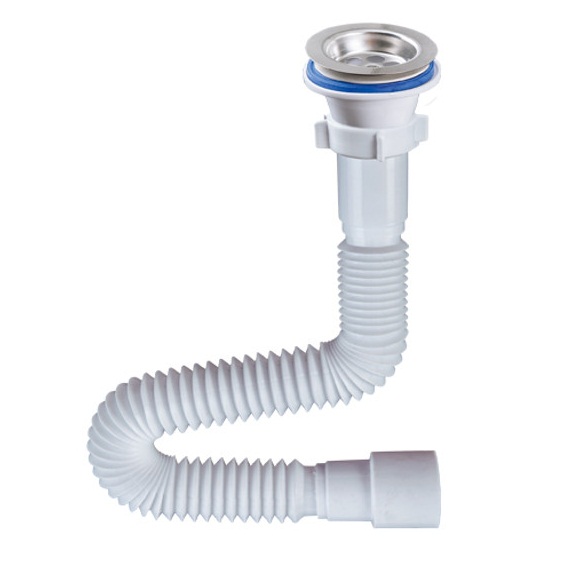
Corrugated. Another simple design. It consists of a branch connected to a corrugated pipe. Corrugated is more often used in non-standard layouts of engineering units. A flexible corrugated pipe under the sink in combination with special clamps in the kit will allow you to independently form the necessary bend. At the same time, the quality of water disposal will not suffer at all.
The only thing to consider is the material. The corrugated pipe under the sink under the influence of hot water quickly loses its strength.


Flat is a great option for solving the question of how to install a siphon on a bathroom sink. A new kind of bottle type is installed in non-standard situations. If the washing machine is located under the sink, then only a flat flask can be mounted.
Compact size is the main advantage that helps to equip hard-to-reach places under the kitchen sink. A flat siphon in a small area will allow you to rationally manage the free space under the kitchen or bathroom sink. Installing a siphon of this type, replacing the gasket or cleaning it is easy.
How to choose the right product?
in the drain system, each device is connected independently. Therefore, when choosing a weir, it is important to consider which plumbing unit it will dock to. As mentioned above, each device has its own siphon;
you will have to connect the drain with a sewer of a certain size, so you need to know the diameter of the hole
In addition, there are differences between domestic and foreign plumbing. When buying, it is better to immediately check this information with the seller;
free space plays an important role in the choice of design. With a lack of space, you can use a corrugation that bends at any angle. And if there are empty squares under the sink, it is better to install a knee or a flask;
the connection of the drain to the pipe must be made of plastic. This material is not subject to corrosion, is easy to install and has a long service life.
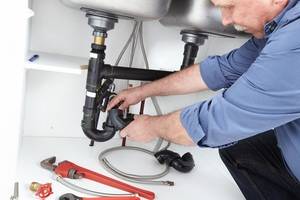
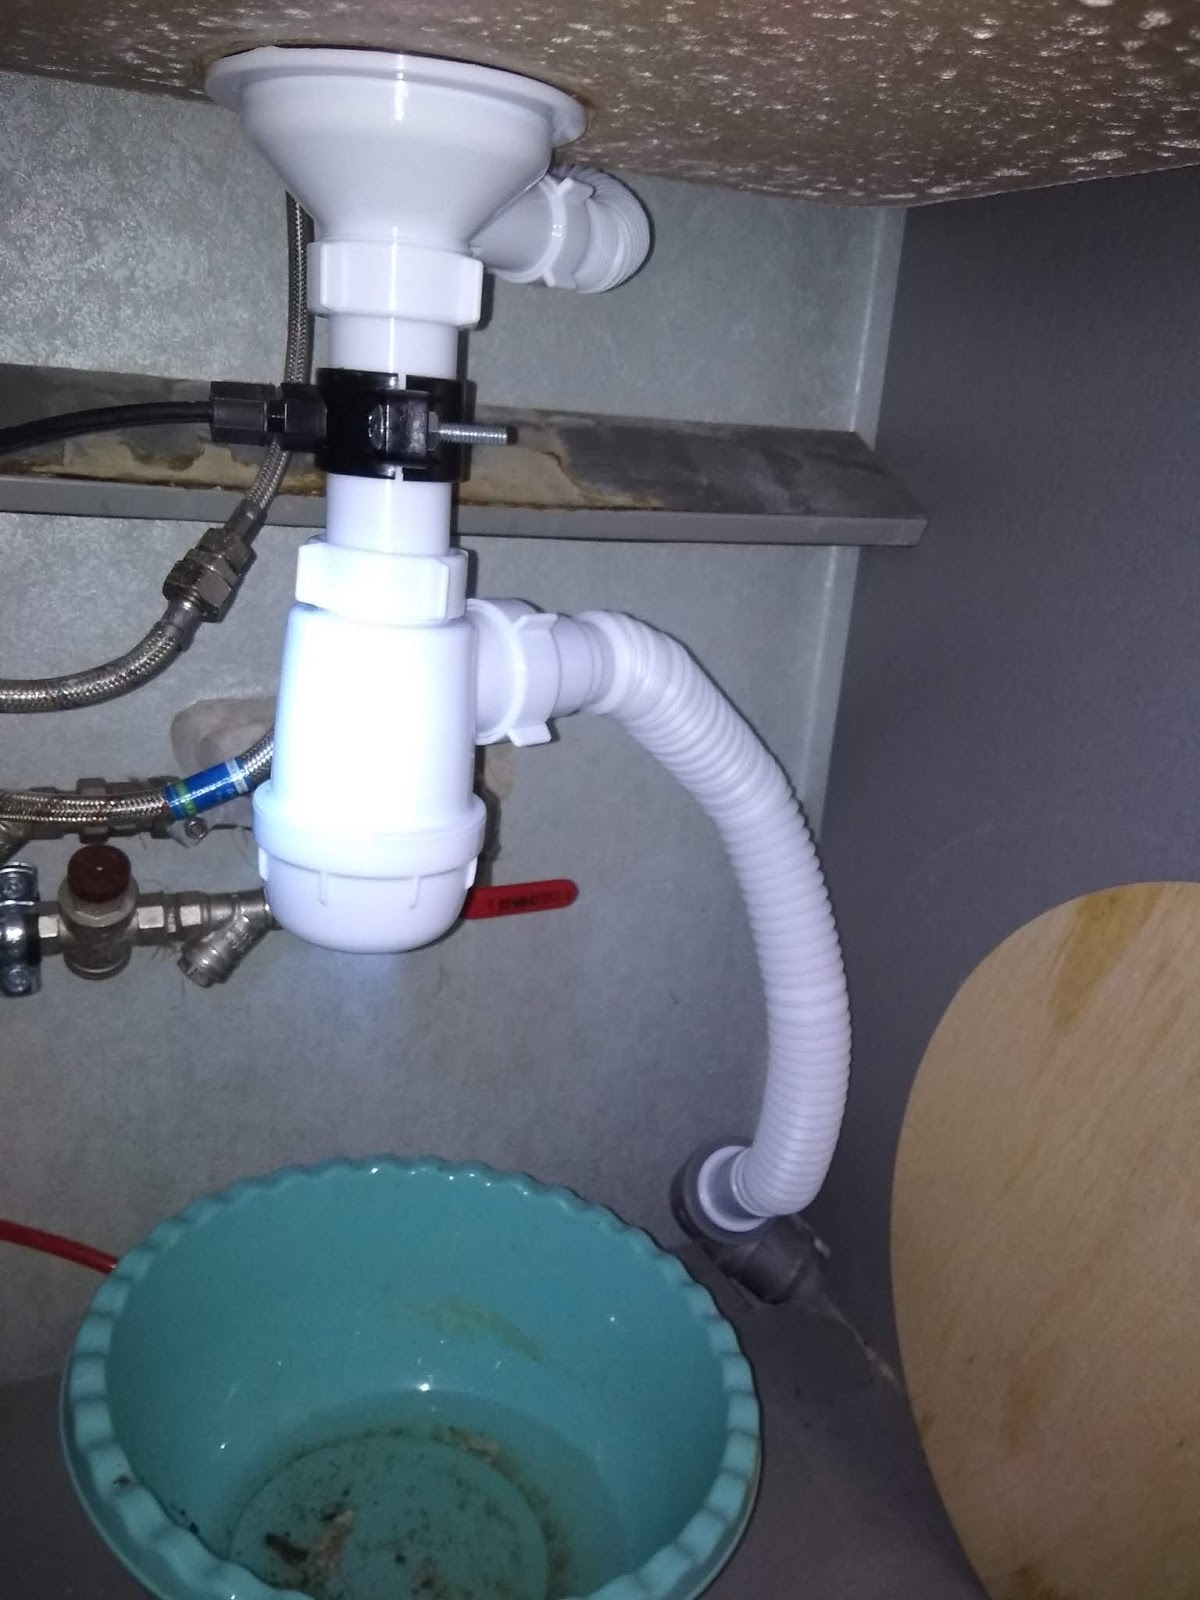
Siphon installation
If you know how to assemble a sink siphon, you can get the job done quickly. Before installing a new siphon, it is necessary to dismantle the old device.
Siphon complete set
The dismantling process is carried out in the following sequence:
- Water is shut off in the room.
- A bowl is placed under the sink to collect the flowing water.
- The screw located in the center of the sink inlet is unscrewed.
- The siphon is removed, and the sewer pipe is plugged with something to prevent the passage of foreign odors into the room.
- The inside of the sink, to which the siphon was attached, is cleaned.
How to assemble a standard bottle siphon for a plastic sink is shown in the video.
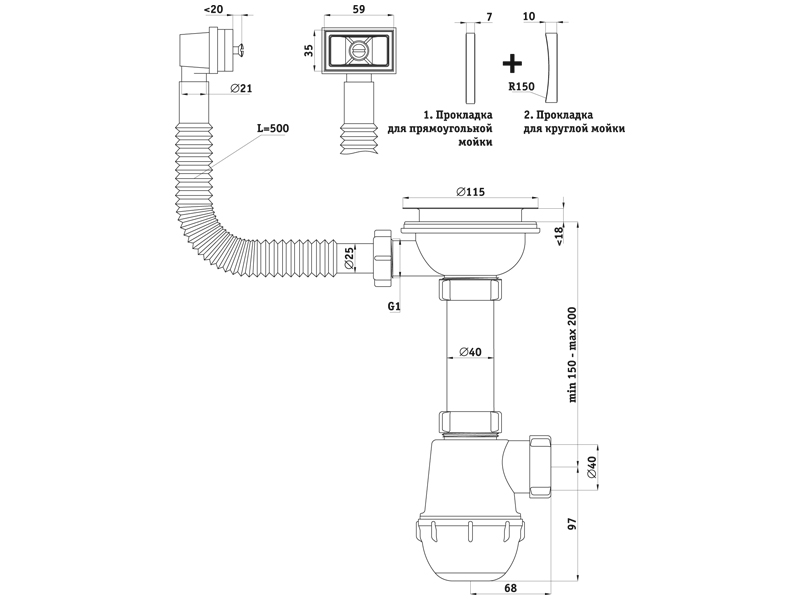
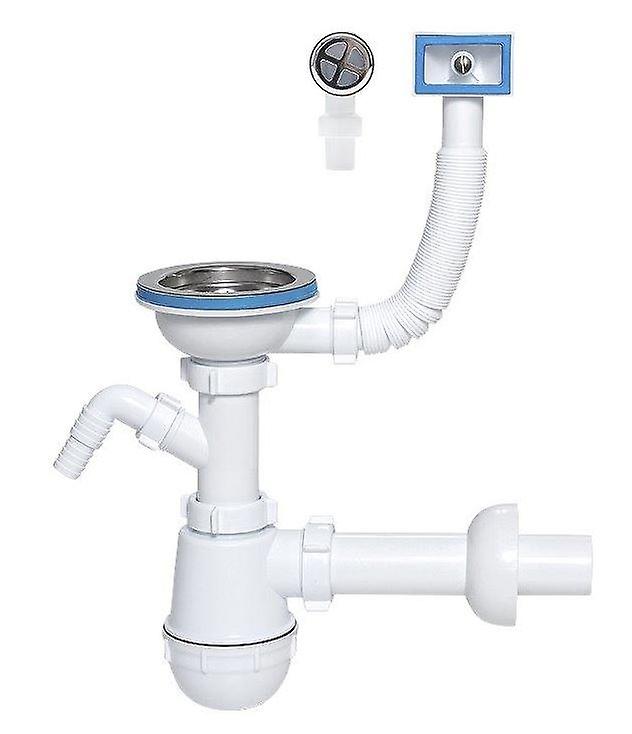
Now let's figure out how to install a siphon for a sink with an overflow:
- Install the protective grill in the drain hole on the gasket or sealant.
- From below, a docking pipe is attached to the sink along with a gasket, which is screwed to the grate with a long screw.
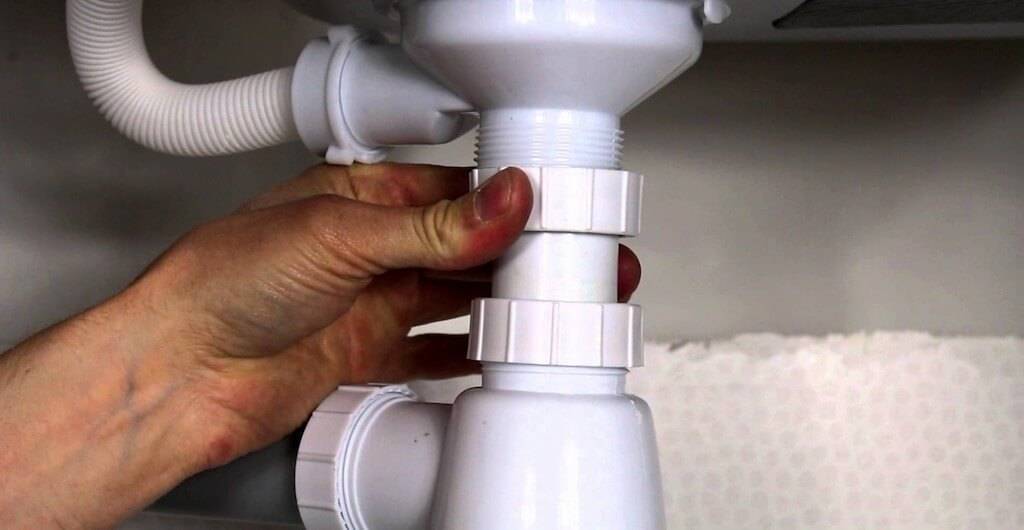
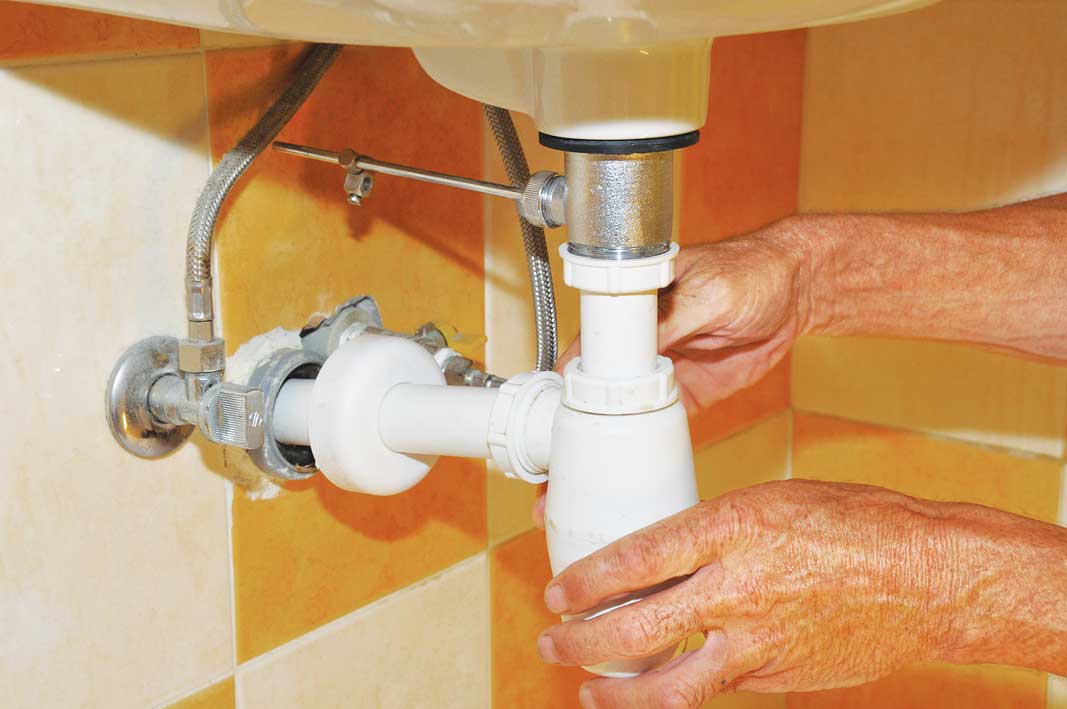
- A union nut is put on the branch pipe, and after it - a conical gasket.
- The body of the siphon is put on the pipe, after which it is joined to it with a union nut. At this stage, the height of the siphon is adjusted.
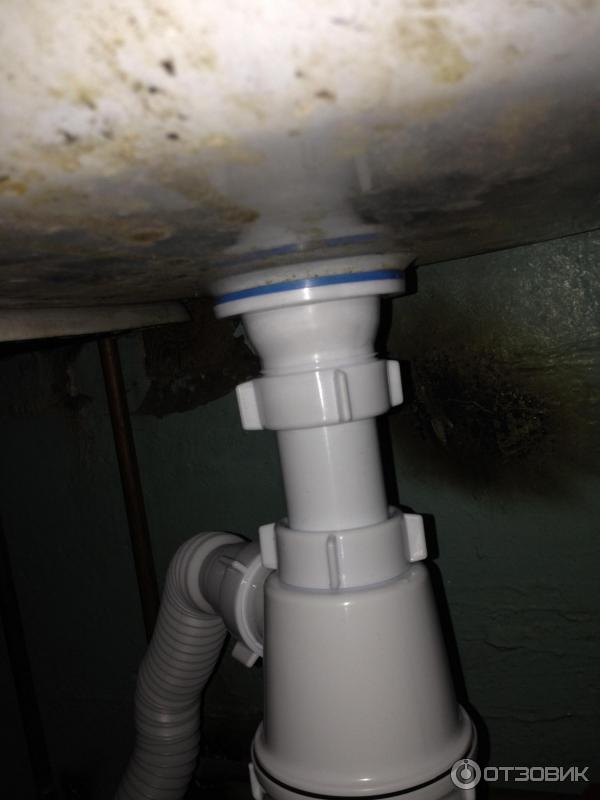
- The outlet pipeline is inserted into the sewer hole, and then fastened with a union nut to the housing outlet through a cone gasket. Siphon connection to the sewer
- The overflow pipe is installed. One end of the tube goes into the sink, where it is fastened in its special hole with a screw. The other end of the tube is connected to the docking pipe.
- The tightness of all connections is checked by running water into the sink.
If a washing machine will be connected to the siphon, then you first need to prepare a hose that goes from the washer to the siphon body. It should be long enough, because you need to place it not on the aisle, but somewhere under the bathroom or along the wall. Accordingly, the hose is connected to the fitting on the siphon body.
Assembling a siphon for a kitchen sink
Each siphon purchased in a store or warehouse must be accompanied by an instruction with a product assembly diagram. The assembly will not cause difficulties even for the one who first picked up the siphon. But in order to avoid leakage in the future, the following points must be taken into account when assembling the product:
The most important thing that must be observed when assembling the product is the tightness of all connections. The tightness test should be carried out from the bottom plug, because it is under constant drain pressure
Even in the store, when purchasing a siphon, you should carefully check the product for defects (chips, burrs, etc.), as they can damage the gasket.
If the siphon was sold assembled, it must be disassembled and checked for the presence of all gaskets, and also to make sure that all parts of the product are well tightened and secured.


it is under constant drain pressure. Even in the store, when purchasing a siphon, you should carefully check the product for defects (chips, burrs, etc.), as they can damage the gasket.
If the siphon was sold assembled, it must be disassembled and checked for the presence of all gaskets, and also to make sure that all parts of the product are well tightened and secured.
Siphons for the kitchen should be assembled by hand so that you can control the clamping force and not damage the device.
When installing the bottom plug and other connections, the gaskets must be fixed. For this purpose, a sealant is used. The twisting of the siphon parts should be carried out until it stops, but without strong pressure.
After installing the outlet pipe, it is necessary to tighten the fixing screw and remove excess sealant. Due to the release of the pipe, the installation height of the siphon is adjusted.
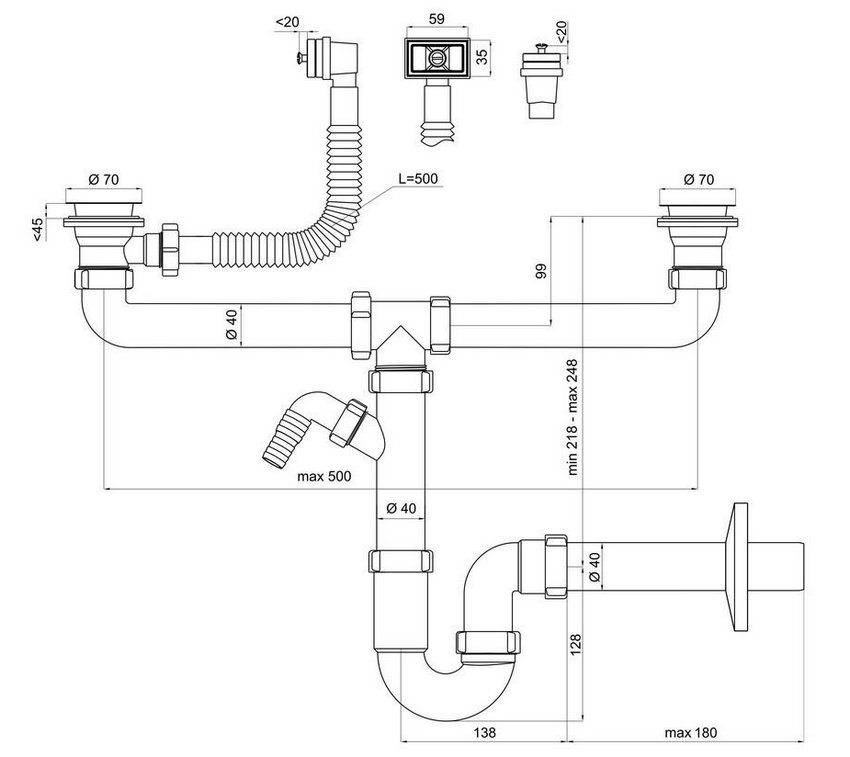
overflow connection
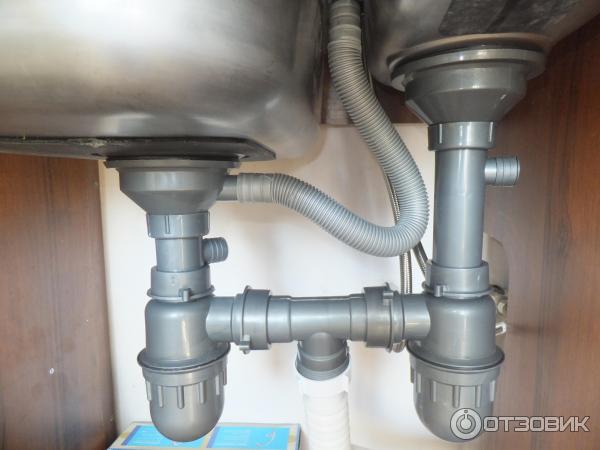
The overflow is a special hole on the wall of the sink, to which a corrugated pipe is brought from the side of the wall. This design allows you to protect the kitchen from flooding if the drain hole is clogged. Outside, it can be covered with a decorative grille. In cheaper models of sinks, it looks like several small holes; in a double sink, it is located on the partition between the parts of the sink.
To install the overflow, they take an additional, usually thinner, corrugated tube and fix it on the sink, opposite the overflow hole. The second end is inserted into the siphon pipe.The corrugation is attached to the sink with a bolt, to the branch pipe - with a union nut. During installation, a seal is used, which is fixed under the socket attached to the back of the sink.
After installing the system, it is necessary to check its tightness. To do this, close the drain hole with a plug and draw water into the sink. The liquid should all flow out through the overflow hole. There should be no leaks if the system is installed correctly.
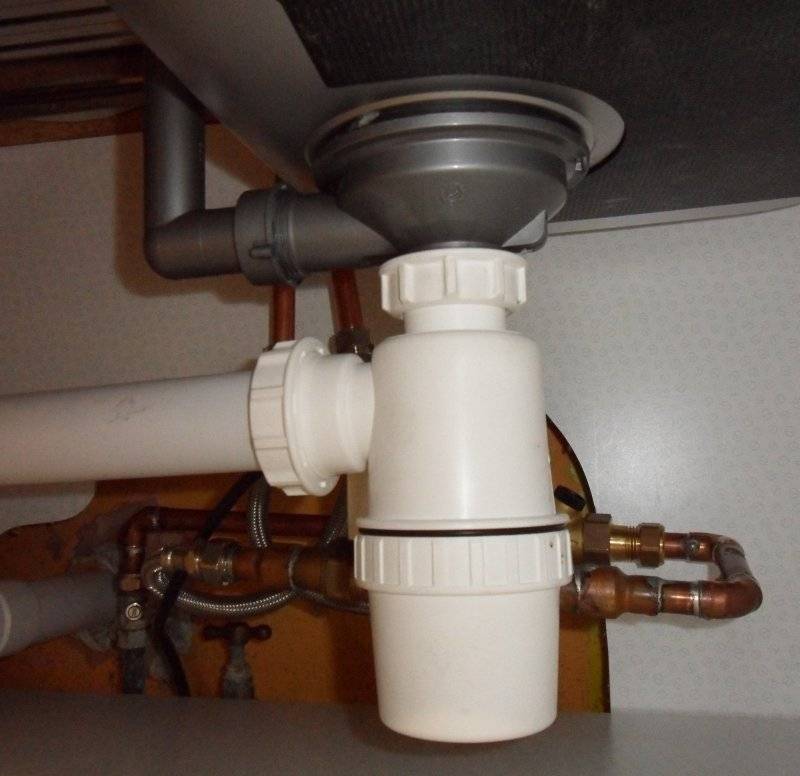
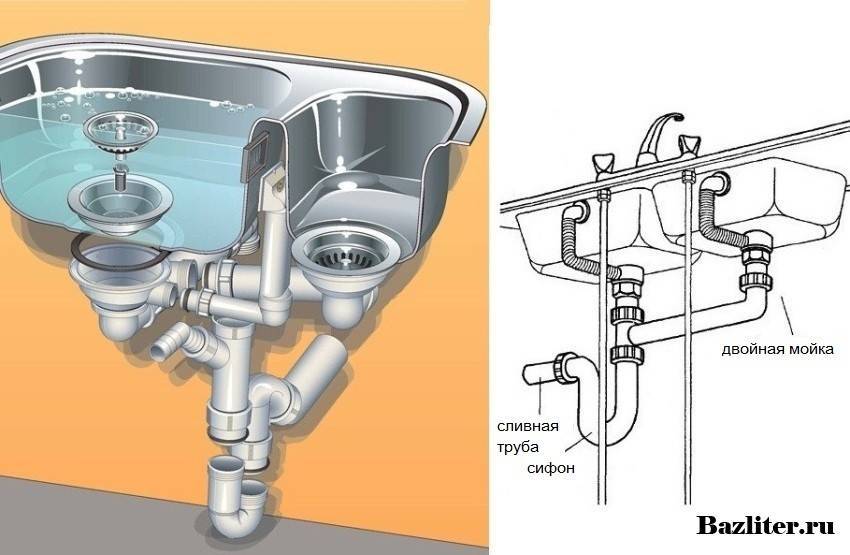
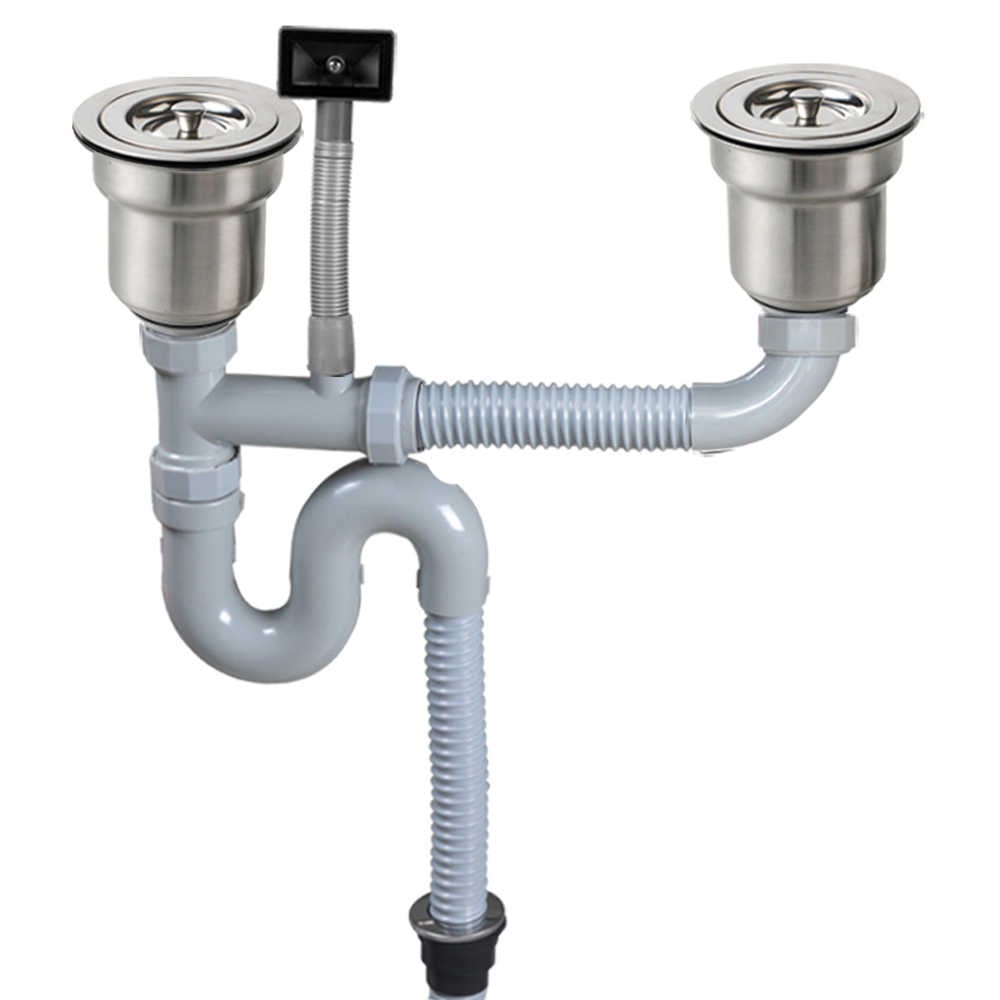
General kitchen sink siphon
A siphon is a curved pipe that holds a certain volume of liquid.
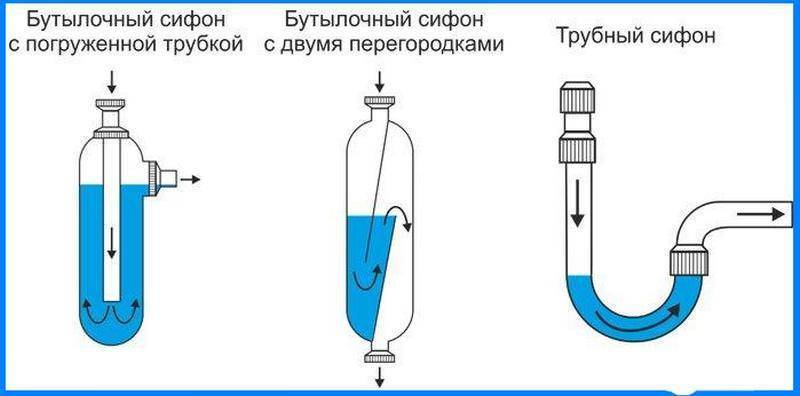
Despite the simplicity of the fundamental idea, siphons can be built according to the following schemes:
Most often, we are faced with the tubular form of the siphon. A bottle siphon is an expanded container into which a certain amount of water enters, then overflows into the sewer. The container is reliably insulated with a layer of water from the outlet pipe of the sink, and thus, the bad smell does not penetrate into the sink and further into the kitchen. The glass of the bottle siphon is unscrewed for maintenance work.
They have a number of useful properties:
- Chemical inertness, impossibility of corrosion;
- Cheapness;
- small mass;
- Smooth, hydrophobic surface that does not retain fat.
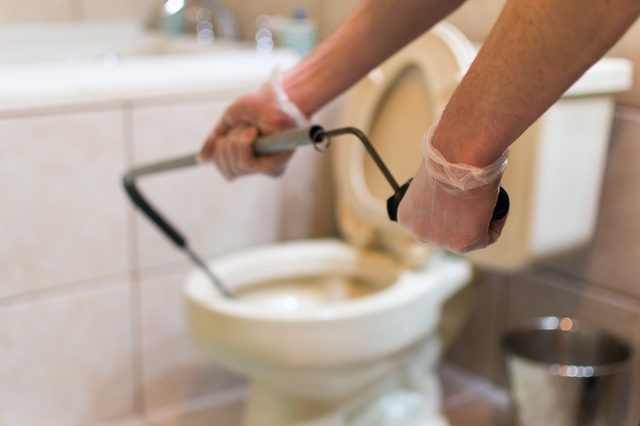
The siphon device has a collapsible design in order to periodically unscrew it, pouring water into the toilet with large residues of vegetables and hair accumulated in it, which do not collapse for a long time and rot in the water. Thus, the siphon performs another useful function - it protects narrow sewer pipes from clogging. The mucilaginous surface of the siphon in this case must be treated with antibacterial gels.
Often the kitchen outlet is formed using a corrugated pipe.In this case, you can even do without a siphon, giving the pipe an S-shaped bend. However, in this case, the pipe often silts up, and with an incorrectly formed bend, it begins to let the stench through.


As a rule, the siphon device is sold complete with a sink. The joints of the siphon are sealed with rubber gaskets and connected with plastic winglets. The pressure of the water flowing out of the sink is low, so the siphon should not be particularly strong.
Basic assembly guidelines
As a rule, instructions for assembling the product are included with the device. But even if it is missing, you can mount it yourself without much difficulty. The following tips will help with this:
- It is best to assemble the kitchen sink siphon by hand, without using a screwdriver (instead of a screwdriver). This will allow you to control the clamping force so that the integrity of the threaded connections is not violated.
- Before the parts are tightened, rubber gaskets are installed in place. For reliable sealing, you can use plumbing sealant.
- The height of the pipe connecting the sink and the glass can be adjusted. When changing the position of the gasket-seal, the optimal height of the device is set.
- The nuts must be tightened, but not overtightened, otherwise the threads may be stripped.
- When all parts are connected, remove excess sealant (if used). A visual inspection of the build quality is a must.
Choosing a siphon for a kitchen sink
 Sooner or later, you have to decide whether to buy a siphon or replace it. An old model may break, or a sink needs to be replaced with a more modern one.A new sink by design may require a different drain configuration. Modern manufacturers offer various types of siphons.
There are a large number of different plums on the market, but they can be classified into three fundamentally different categories:
- Bottle. A certain amount of water is collected in a special glass, forming a water seal.
- Knees. Water is collected in a pipe that is shaped like a knee.
- Pipe. Without hydraulic plug.
Knee plums are also divided into types:
- Rigid.
- Corrugated.
 In some cases, hybrid options are used.
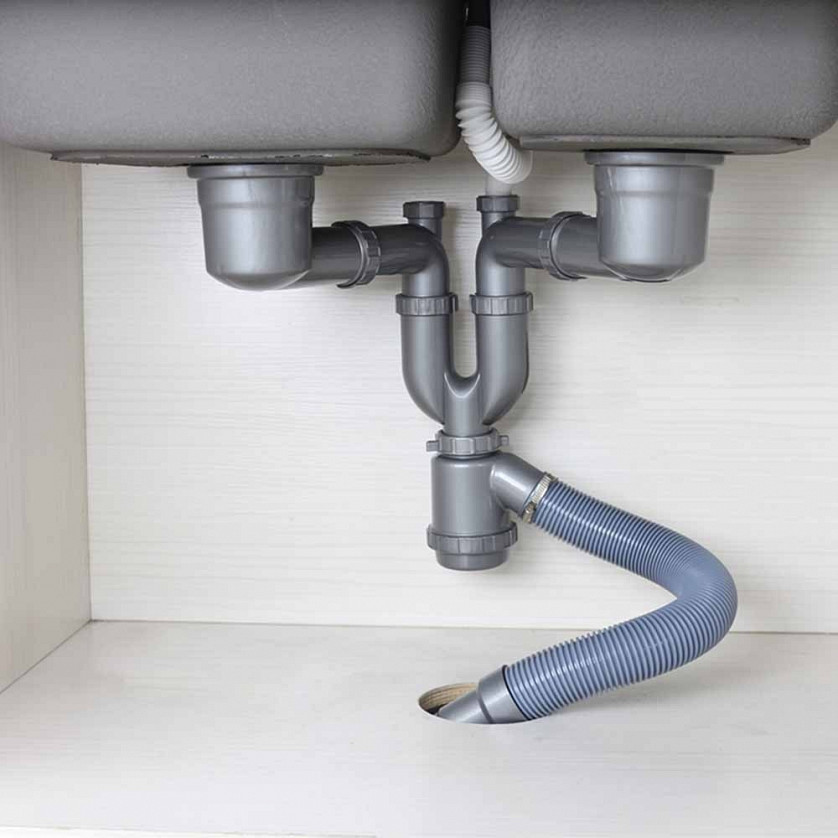
The classes of flat siphons and double ones stand apart. Flat ones are installed under low-sitting bathtubs or showers. Flat structures are used when installing double sinks. A bottle-type model is usually installed in the kitchen. When free space is limited, it is rational to use knee types. For example, U-shaped or S-shaped.
Thus, before installing a drain system, you need to find out which model is best suited for specific conditions.
The list of points that you should pay attention to when installing a siphon in the kitchen:
The diameters of the hole in the sink and the protective grid of the drain must be equal.
If you need to connect an additional device, a washing machine or a dishwasher to the drain, then you need to take care in advance of purchasing an additional unit to connect another drain hose.
The height of the sink or bathtub must match the height of the siphon.
You should pay attention to the sewer hole. Its diameter must match the diameter of the outlet pipe.
If the diameter of the drain pipe is smaller than the sewer opening, then you need to purchase a special adapter. Its cross section should not exceed the sewer.
If the drain filter is open and clearly visible, then it makes sense to take care of the chrome node. For aesthetics. If the node is closed, located in the kitchen cabinet, then the material is not important. The plastic filter is easier to wash and clean than the metal one.
Product cost. In this case, the price depends on the appearance. Functionally, drain systems do not differ much from each other. Service life does not depend on the price. Plastic plums can also serve for a long time.
Mounting
Each owner can screw the siphon with his own hands without involving a plumber. Installation should be carried out very responsibly, paying attention to every detail. Negligent attitude will cause constant leaks or the formation of unpleasant odors in the room due to gaps between the components of the device.
The main requirement during installation work of this type is the tightness of the fasteners.
Therefore, much attention is paid to the quality fastening of components. The gaskets that come with the kit are often either too thin or made of poor quality rubber.
Therefore, it is advisable to purchase third-party gaskets.
Installation rules
A detailed diagram of the siphon is shown in the instructions. The assembly diagram will clearly show how to assemble a sink siphon. It should not be difficult, but some points you need to know:


When assembling a siphon for a kitchen sink, it is important to achieve complete tightness of all parts of the drain. Start checking the tightness from the bottom plug
It is she who is under constant load.When buying a kit in a store, you need to visually assess the presence of defects on the case. These can be burrs, sharp chips and even cracks. Protruding sharp edges can damage gaskets.
Before connecting, make sure that all parts are present. If the assembly has already been assembled, then it is better to disassemble it, check whether the gaskets are in their places and whether the remaining elements are well tightened.
Kitchen siphons must be assembled by hand. This makes it easier to control efforts so as not to damage fragile parts. The details of the siphon must be screwed up to the stop, but without the last strong pressure.
Sealant must be smeared onto the threads of the joints. Then good fixation and tightness of parts, especially the bottom plug, will be guaranteed.
After fixing the outlet hose, the fixing screw is tightened. Excess sealant is removed. Using the length of the pipe, it is selected at what height the siphon will be installed.
The choice of material for the manufacture of the siphon
Most of the models offered in stores today are made of metal and plastic. These models differ from each other in their features, advantages and disadvantages.
Plastic structures are valued by consumers because of the affordable price, especially when it comes to models made of polyethylene. Most often they have a simple device and a minimum number of connections. Polypropylene structures are considered more expensive in this category, however, this is not surprising, given their increased strength and long service life.
Another positive quality of polypropylene should be called increased resistance to high temperatures.Because of it, experts advise owners who plan to connect a washing machine with a boiling function to choose these products.
During the operation of a plastic product, such a nuisance as a leak may occur. However, this problem is quite easy to solve by tightening the threaded connections.
Metal siphons for the kitchen sink are a more expensive proposition, unlike polymer models. Such a difference in price is due to the increased service life. Most often, metal products are made of bronze or brass. Their advantage is not susceptibility to oxidation processes, as well as corrosion.
An alternative to the listed devices are stainless steel models, however, they are much more expensive than their main competitors, so they have not received proper distribution.
If you want even such a detail of your sink as a siphon to look attractive, then you should pay attention to models with a chrome finish. But keep in mind that for such a sanitary ware you will have to pay the maximum price.
Do-it-yourself siphon installation tools
In principle, each owner can cope with the task of installing a siphon for a sink in a kitchen with an overflow or other functions on their own. Although it does not interfere with the presence of minimal skills in the field of working with plumbing and a minimal set of tools.
However, all this can be found in any household, so you can dismantle the old device and install a new one without big problems. Of the tools that will be required to perform this work, we can name the following:
- screwdriver;
- hacksaw;
- roulette;
- sandpaper.
In some cases, pipe cutting may be required, so you will need to prepare construction scissors as well.
Dismantling
Before you start assembling a new kitchen sink siphon, you will need to remove the old one. With this, you will have no problems: you need to take a screwdriver and unscrew the screw that holds the drain hole in the center of the grate.
Having coped with this task, it will be very easy for you to pull out the siphon. If your siphon was installed a long time ago, then the nut and screw may stick to each other. Because of this, you may have great difficulty unscrewing the siphon.
In this case, proceed as follows: you need to disconnect the lower part of the siphon and twist the pipe. If this does not help, experts advise using special solvents.


How to assemble a manual siphon
Despite the difference in the designs of these elements, the assembly of all siphons is carried out in a similar way.
The design of the manual siphon for the bath
Step-by-step instructions on how to assemble a bath siphon:
The set of devices includes the sump itself, pipes of different diameters, sealing elements. The sump is taken first, the largest flat gasket is put on its lower part (most often it is blue). When installing it, distortions or other distortions are not allowed;
The overflow and sump pipes are interconnected. If a plastic siphon is assembled, then the FUM tape is not needed - the gasket is enough, but to connect brass or steel to the thread, it is additionally sealed;
On the top and side of such a siphon there are two holes of different diameters. One is designed to connect the side drain, and the other to connect the system to the sewer outlet.In accordance with the dimensions of these holes, a conical gasket (wide) and a union nut are selected;
The first pipe is taken, which will be connected to the central drain. A cap nut is put on it. Then the gasket is put on.
Pay attention to its design. One end of the gasket is blunt and the other is sharp
Here, with a sharp end, the sealant is put on to the nozzle, the blunt one subsequently “sits” on the sump. The gasket is inserted to the maximum position, but be careful not to tear it;
The pipe is inserted into the corresponding hole in the siphon, after which the union nut is tightened. In the same way, a pipe is connected that will lead to the sewer;
If everything is done correctly, then there remains a wide gasket under the sink and a thin rubber ring for sealing the pipe, nuts for connecting the sewer, and a sink drain filter. A wide gasket is installed on the upper pipe. After the outlet is connected to the sink;
Connection to the sink is made using a bolted connection. It is also recommended not to use FUM tape here (if the siphon is plastic). To connect all parts of the structure, you need to install a sealing ring on the upper section of the drain, after a metal mesh filter. The siphon pipe is attached from below, the whole structure is screwed with a bolt;
The output is connected to the sewerage using silicone sealant (for connecting two plastic elements) or a special adapter (for connecting metal and plastic pipes). In the first case, the end parts of the siphon and sewer pipes are lubricated with silicone and connected to each other. In the second, the ends of the adapter are lubricated.
After the installation is completed, you need to wait for the sealant to dry completely (on average, from 4 to 6 hours), only then you can use the system.
Video: bath siphon assembly
Corrugated models do not require complex assembly work - often, they are simply connected to the drain outlet system. At the same time, flat ones are more complex in design. The main problem is the large number of pipes of different diameters.
Tips for properly assembling the siphon:
- All metal threads must be sealed with FUM tape;
-
Not a single gasket or ring should be left "idle". If after the end of the assembly you still have extra parts, this means that a seal is missing somewhere and it will leak there;
- When connecting pipes, only one gasket can be used. Some home craftsmen install two gaskets at the junction of pipes or during repairs to prevent leaks. This contributes to the violation of the tightness of the system;
- When tightening the union nuts, you need to be very careful (especially if you work with plastic). It is impossible for the connection to be “stretched”, but with a strong impact, there is a chance of damaging the fastener;
- The same goes for installing gaskets. They need to be tightened to the nozzles to the maximum, but if the seals are tightened, they will break;
- Sealing elements must be replaced regularly. Drain gaskets - 1 time in 6 months (on average), thin seals between nozzles - 1 time in 3 months. These times may vary, but timely warning of worn rubber bands will help to avoid flooding and leakage.