- Siphon installation: step by step instructions
- General concepts
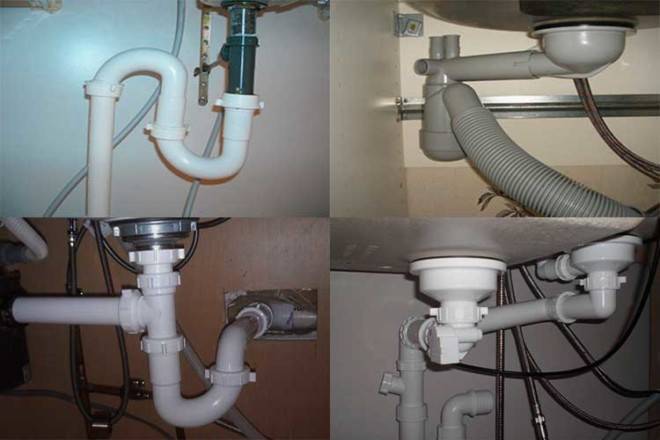
- Main varieties
- Step-by-step instructions for replacing the drain device
- Assembly steps
- How to choose a sink siphon
- How to choose a new siphon
- Preparing for installation
- How to assemble a manual siphon
- How to assemble a siphon for a sink in a kitchen with an overflow
- Siphon Assembly Expert Tips
- Maintenance and operation of the siphon
- Siphon device
- Assembly
- Which siphon is better to install on the sink in the bathroom
Siphon installation: step by step instructions
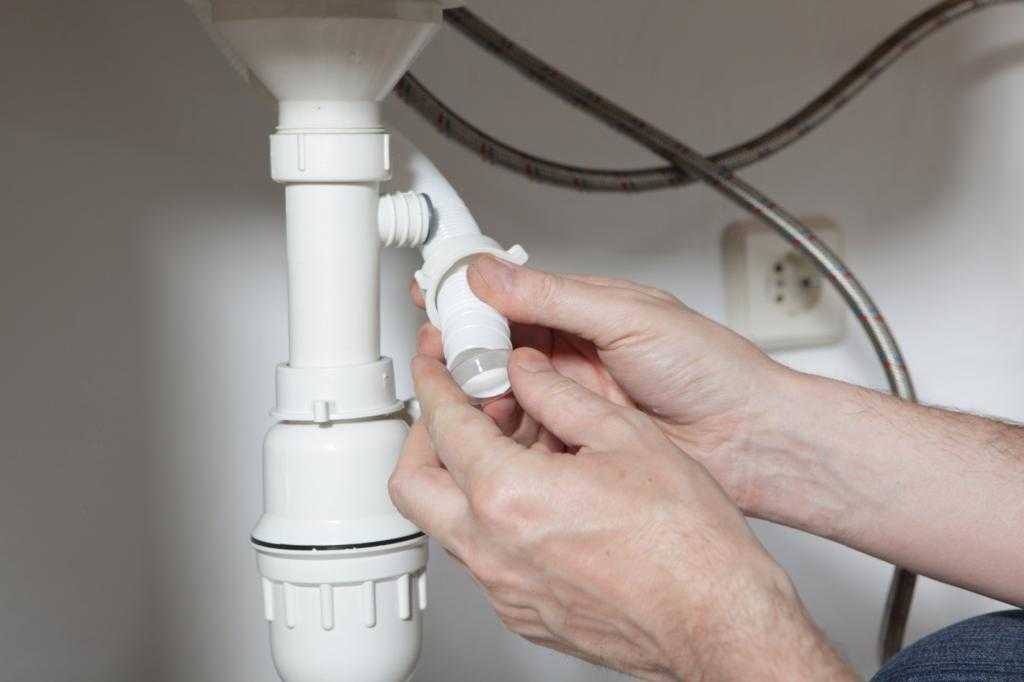
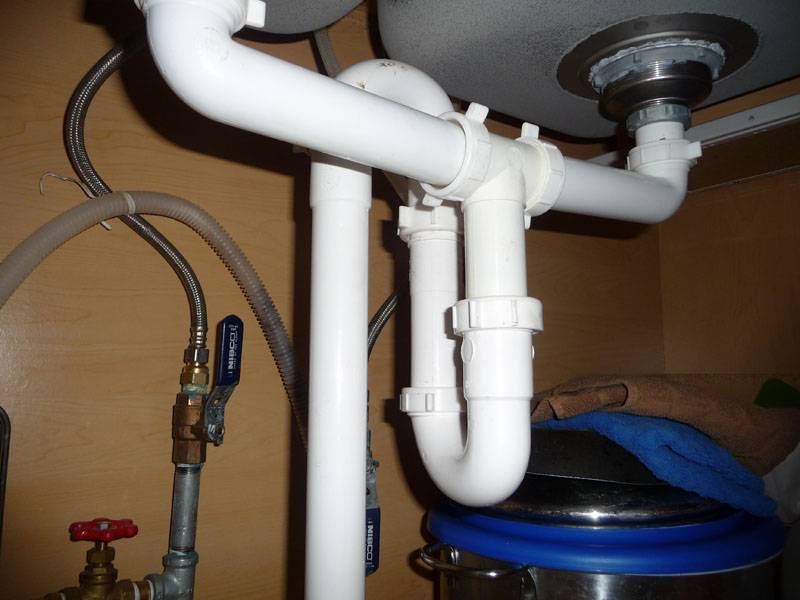
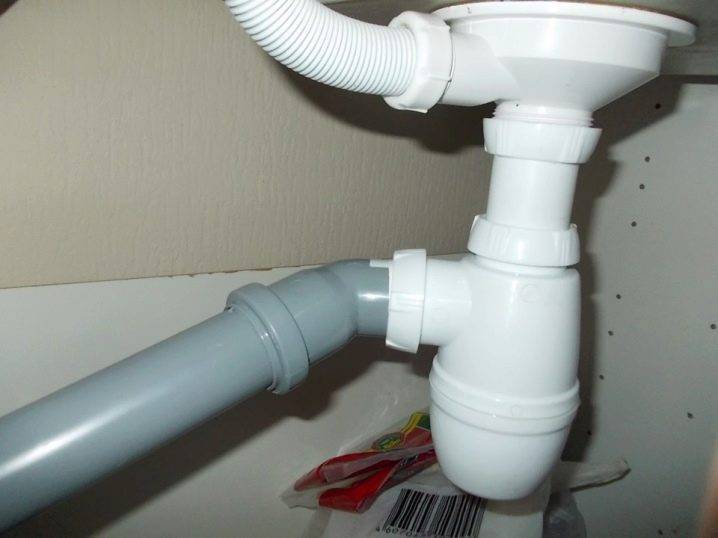
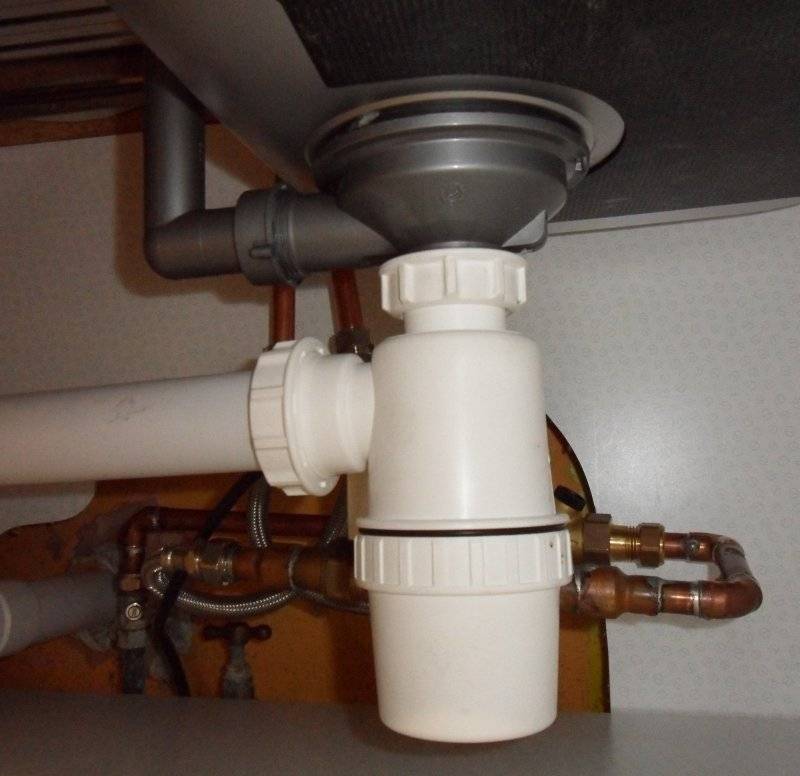
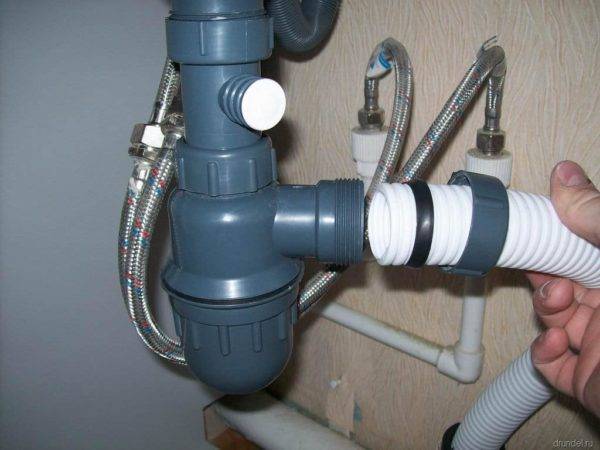
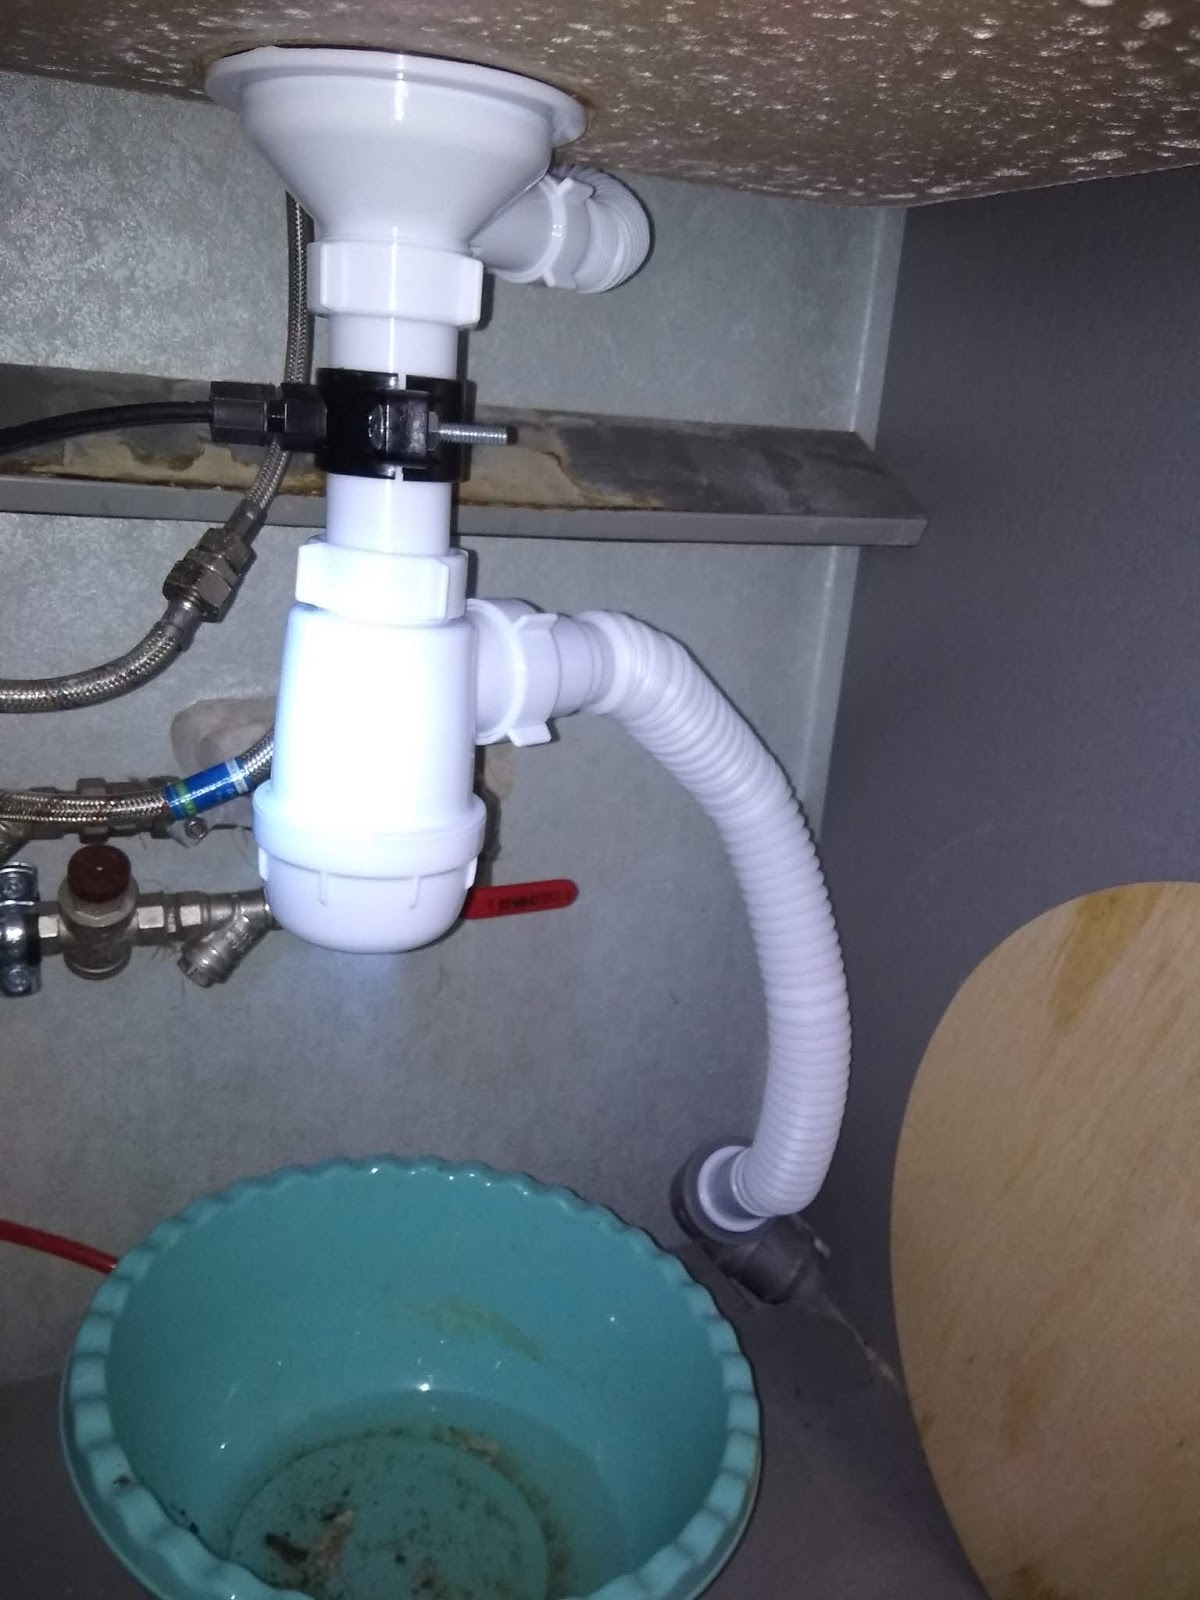
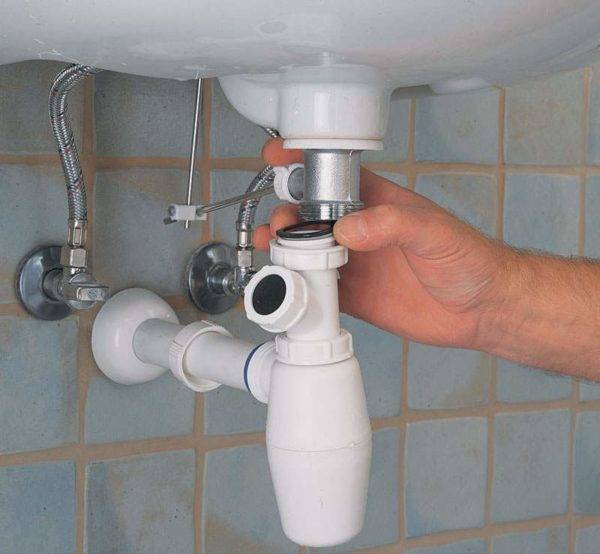
Installation of plumbing in general and drain fittings in particular is best left to professionals. But no one will judge you if you decide to do it yourself. Plastic systems do not need additional tools, only a screwdriver is needed to install the outlet. All components are screwed by hand. Arm yourself with a photo instruction, a good mood and you can proceed.
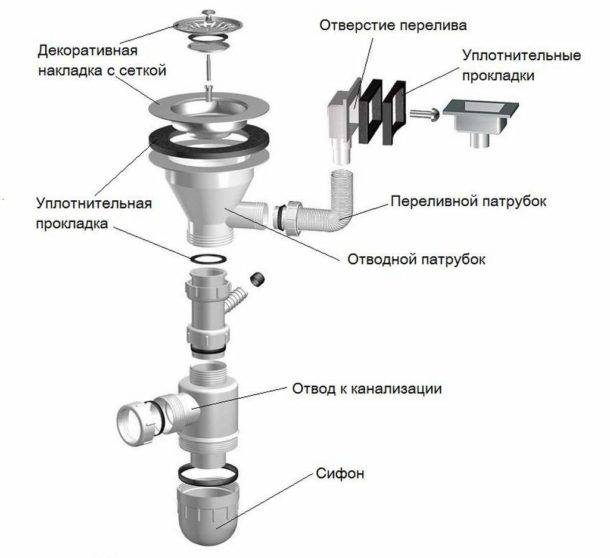
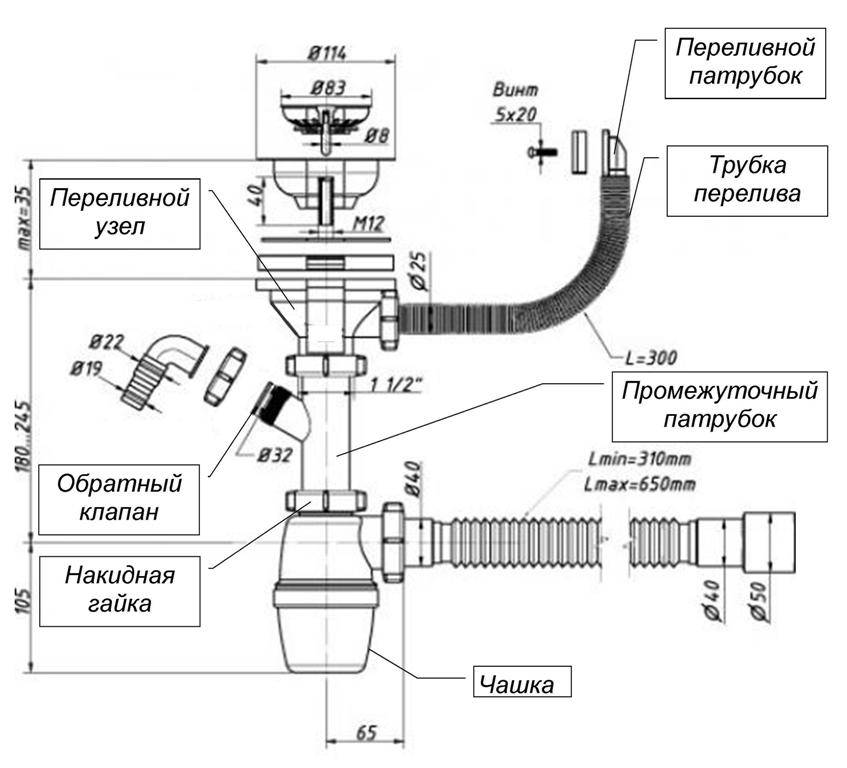
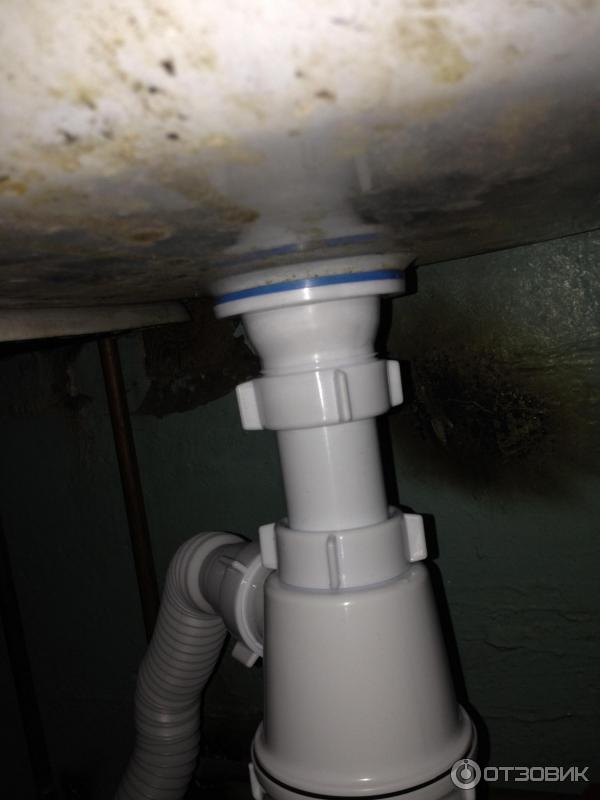
First of all, the upper part of the release is screwed on. Often it is made of stainless steel. The drain system kit includes a sealing ring for a decorative mesh. Place it on the drain hole of the sink, press down on the rubber seal and the rest of the outlet. Tighten the two pieces tightly with a screw. Check if the seals have moved.
 Scheme: siphon installation
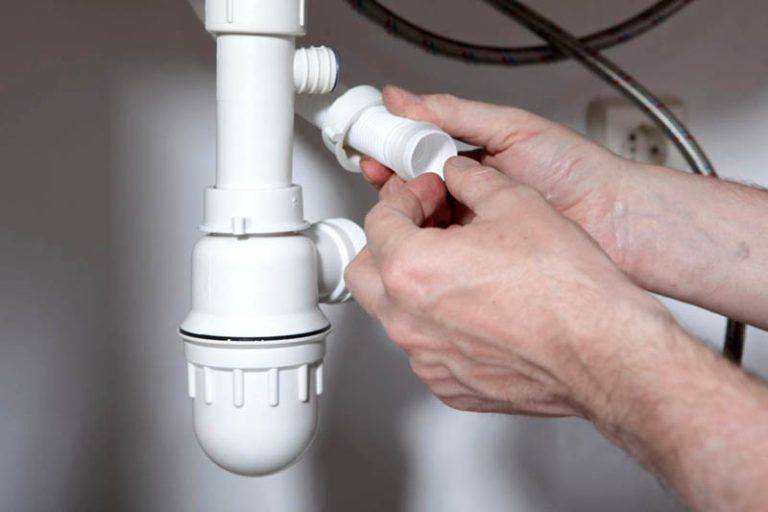
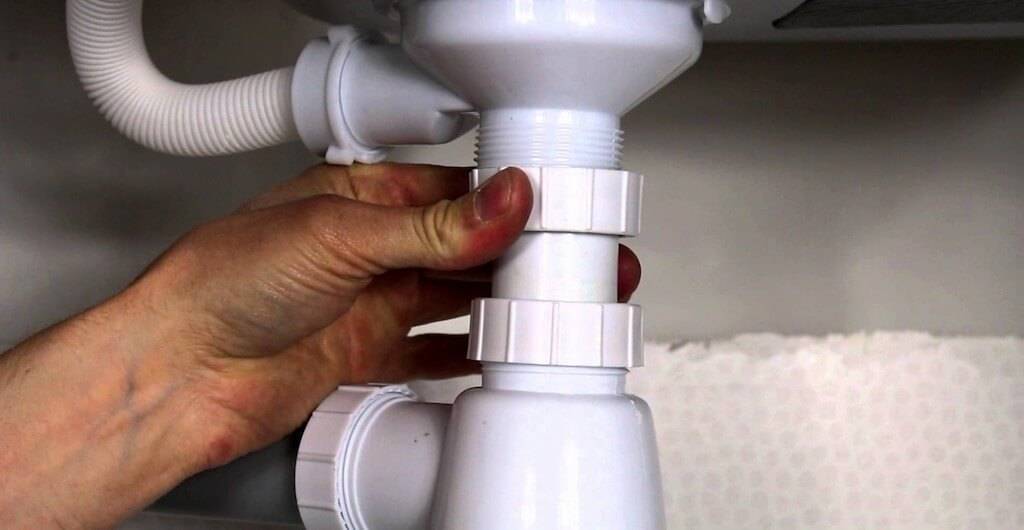
Attach the overflow hose to the outlet, and the mesh to the sink, by tightening the stainless bolt in the same way as the outlet system. Screw the assembled siphon to the outlet using a plastic nut located on the neck. Be sure to check for a flat gasket. Tighten the nut until it stops by hand. Don't put too much pressure on her. Plastic can not withstand pressure and burst.
In the same way, screw the outlet pipe to the body of the siphon. Be sure to check the seal. Then connect the outlet pipe to the sewer system using a cone seal. It is installed, as well as on the neck of the siphon, with a narrowed part towards the hole into which the pipe is inserted.
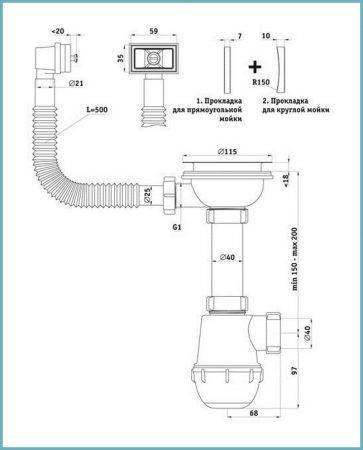
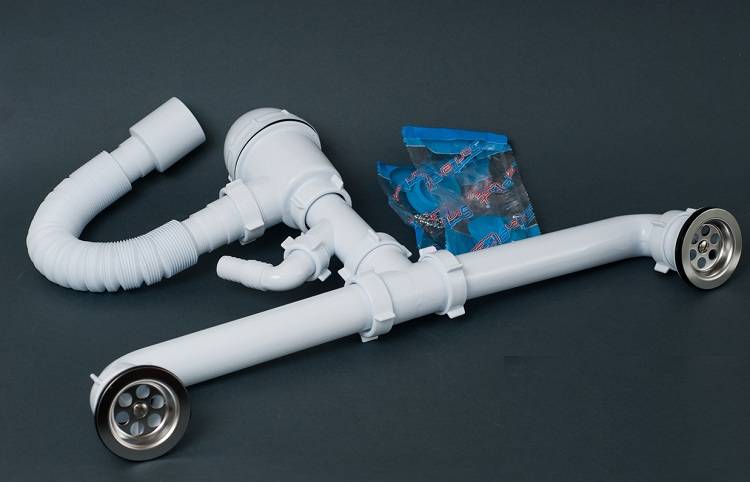
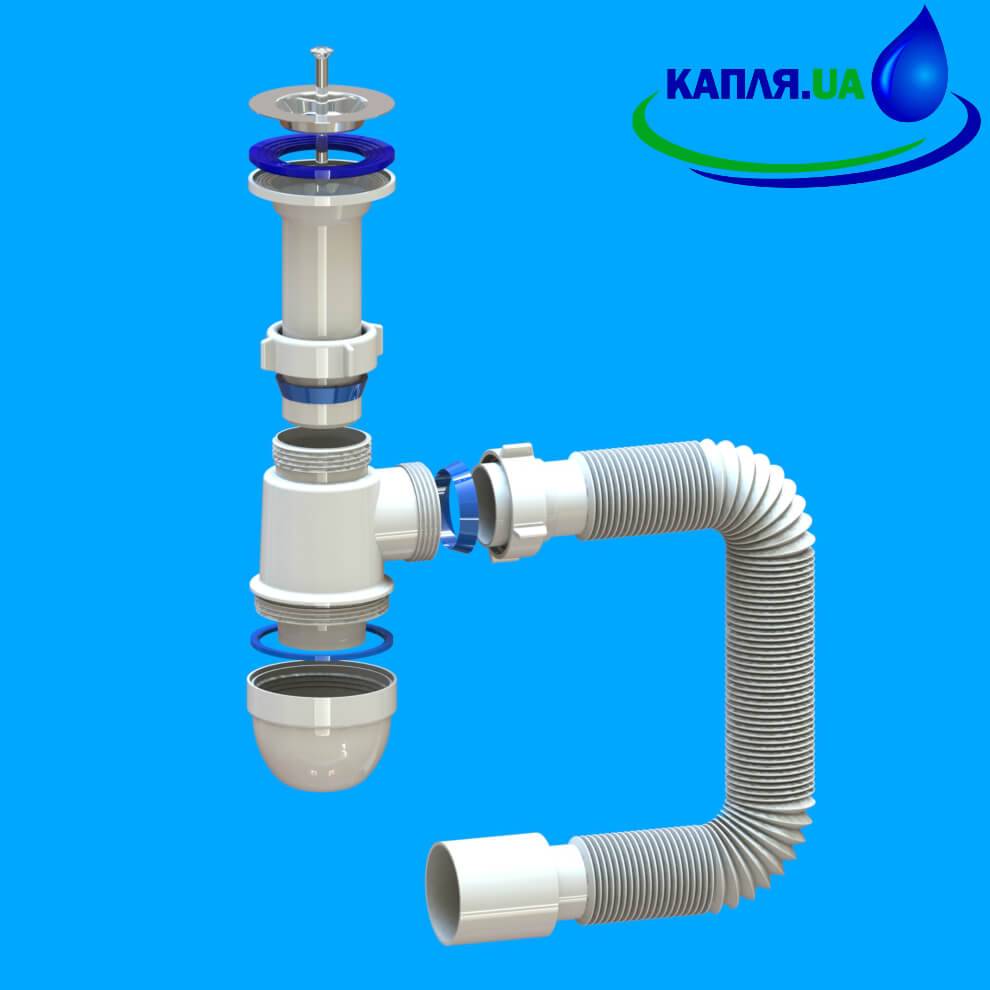
 Siphon complete set
With a difference in the diameters of the pipe and the outlet of the sewer system, reducing plastic or rubber adapters can be used.
After installing the system, a test run must be performed. To do this, fill the sink with water up to the overflow hole. Check it out first. Then open the drain, the water will rapidly go into the sewer. Carefully inspect each siphon connection. If not a single drop formed on it, then the installation was carried out successfully.
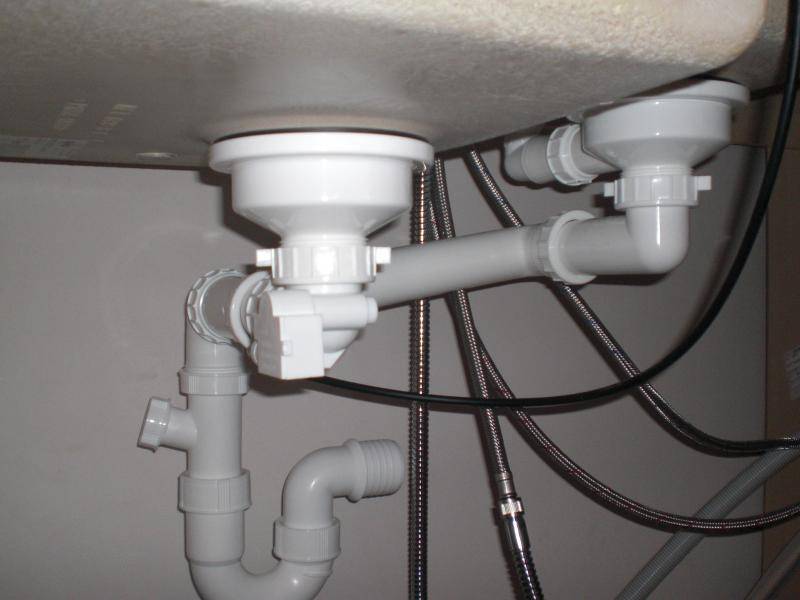
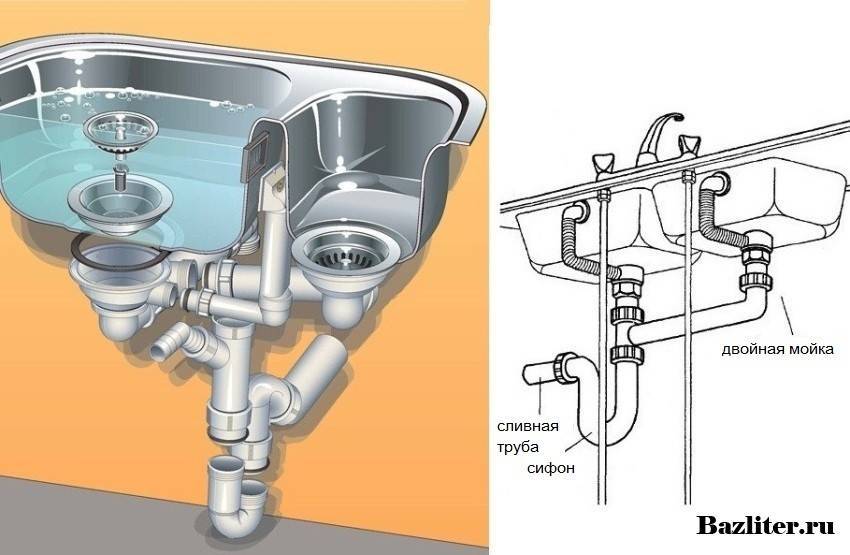
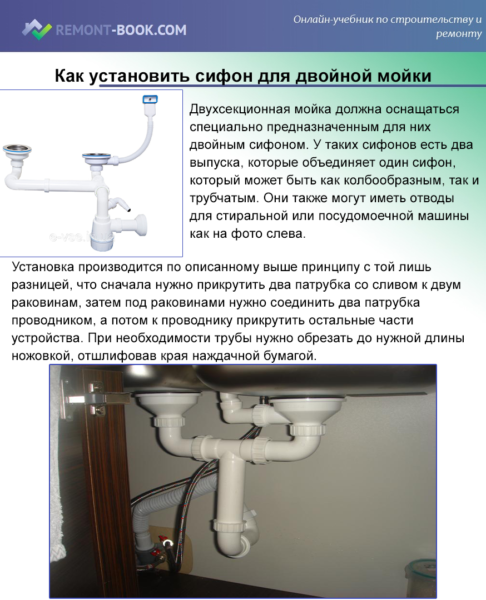
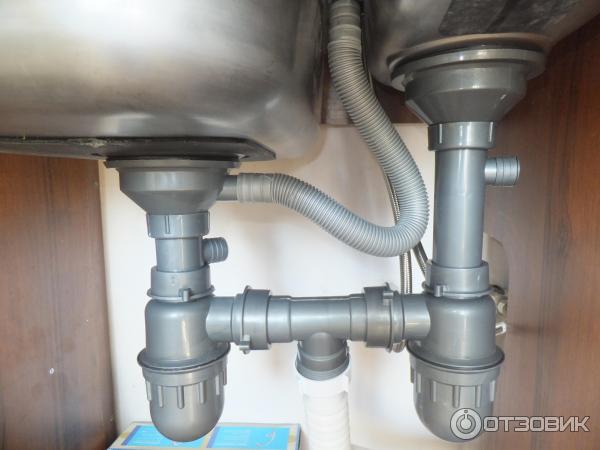
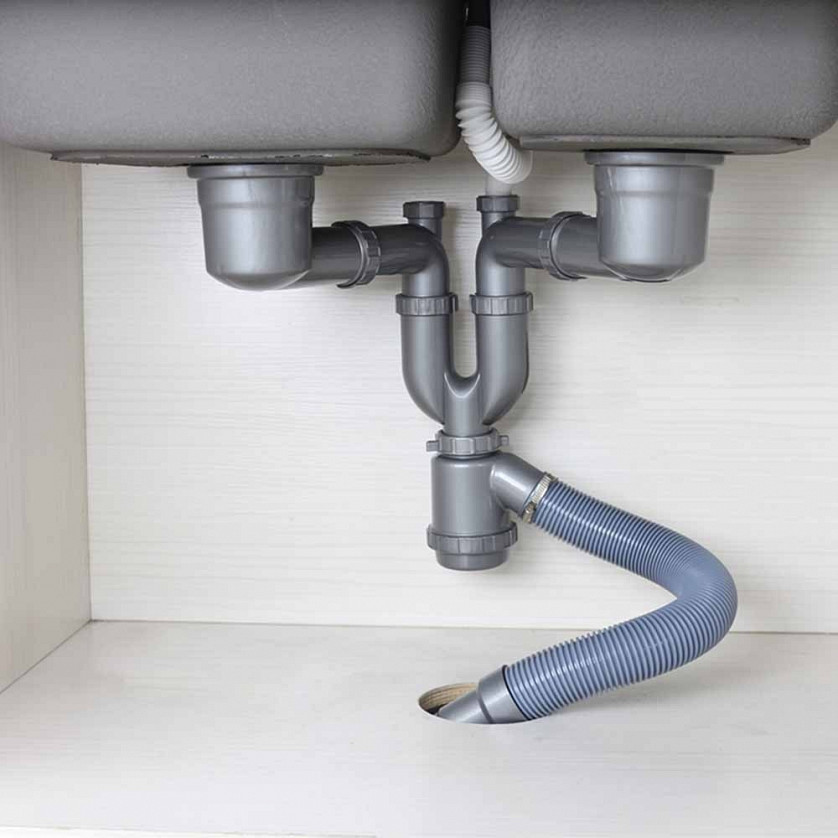
 Connecting a siphon to a double sink
General concepts
This device is able to perform additional functions: it protects the drainage system from clogging.
This task is carried out due to the presence of a protective grid, the location of which is the neck of the device. The grid is located on the sink, which makes it possible to clean it without disassembling the structure.
Siphon for kitchen washing performs another rather important task.Thanks to this device, wastewater enters the sewer system. This task is performed using plastic or metal anti-corrosion pipes. Due to their universal structure, grease and dirt are removed into the sewer, which eliminates the possibility of their deposits.


Main varieties
According to their design, all siphons used for kitchen sinks can be divided into several types:
- Bottle. This is a rigid structure that can be unscrewed from below. Thanks to this, the device can be cleaned quickly and easily. In the lower removable part, not only garbage is retained, but also decorations or some solid objects that have accidentally fallen into the sink. A corrugated or rigid drain pipe can be connected to the "bottle". There is always water inside the case, which provides a water seal.
- Corrugated. In fact, this is a flexible pipe, bent in a certain place and fixed with a clamp. The bend is designed to create a water seal. The rest of the siphon can be freely bent in the desired direction. The corrugated siphon for washing has a significant drawback, expressed in the roughness of its inner surface, on which debris lingers. Because of this, the structure often has to be removed and cleaned.
- Pipe. This is a rigid, curved "S" pipe that takes up little space.
- Flat. This is an ordinary siphon, all elements of which are located in a horizontal plane. It is used in cases where there is a shortage of free space under the sink.
- Hidden. It can be a device of any design, which is hidden in a wall or in a box.
- With overflow.An additional element in the design is a rigid overflow pipe connecting the top of the sink with a drain hose.
- Siphon for a sink with a rupture of a stream. It differs from the usual siphon by the presence of a small gap (2-3 cm) between the outlet and inlet water holes. Thus, the path of penetration of microbes in the direction from the sewer pipe to the sink is stopped. Such products can often be found in catering establishments.
Step-by-step instructions for replacing the drain device
To change the siphon in the kitchen, you need to prepare everything you need, and then proceed to the assembly steps.
When the water supply to the sink is turned off, the old siphon is dismantled. In this case, it should be borne in mind that there is still liquid left in it. In order not to spill the remnants, a spacious container is placed below. An old cast iron product planted on cement will have to be removed with a hammer and chisel
It is important to ensure that cement residues or cast iron fragments do not enter the sewer
- The sewer pipe is plugged with a damp cloth to eliminate unpleasant odors.
- The hole in the sink is thoroughly cleaned of dirt.
Assembly steps
Let's start installing a new device:
The protective grille, together with a gasket lubricated with sealant, is installed in the sink hole and centered.
- The docking pipe with a sealing gasket is inserted from below and fastened to the sink and grate with a screw with a wide screwdriver. In this case, it is necessary to ensure that the mesh from above does not move during installation. If the sink is double, both outlet pipes are attached.
- A gasket is put on the flask, then the lid is screwed on.
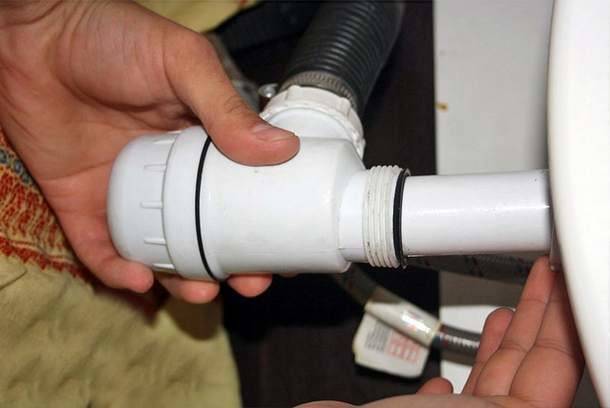
- Now you can collect the flask.A docking pipe and a corrugation are connected to it by installing conical rubber bands and plastic nuts.
- If the sink has an overflow hole and a suitable siphon is selected, an overflow hose is screwed to the outlet pipe. The top is inserted into the overflow hole of the sink and sealed with gaskets, as shown in the diagram.
- A rag is removed from the sewer pipe and the corrugation exit is installed there. The flask is inserted with a docking pipe into the drain and fastened with a union nut. Here you can adjust its height. If the device is joined to an old cast-iron pipe, it must be cleaned of dirt, and a rubber gasket should be installed at the junction.
- Water is supplied to the sink, and the tightness of the assembled structure is checked. At first, it is better to leave the container under the siphon in case it still leaks.
- Lastly, additional equipment is connected to the fitting of the product. The drain hose must lie freely, without strong bends or twists. It is attached to the fitting using a clamp.
If you understand the design of the siphon, you can independently connect a device of any complexity: for a double sink, with an overflow, side fittings for a washing machine and dishwasher.
How to choose a sink siphon
When deciding which model of sink siphon to choose, it is necessary to take into account a combination of several factors.
Be sure to take into account:
- price. It does not determine the quality of the device, although it reflects the duration of the service life;
- aesthetics. In a washbasin without a pedestal, chrome details will be visible and create a certain impression.In the presence of a pedestal, they will be hidden, their aesthetic perfection will be inaccessible to contemplation;
- neck diameter;
- the presence of overflow;
- whether a washing machine or dishwasher will be connected, which will require an additional drain;
- what is the horizontal distance separating the neck from the outlet of the sewer;
- Is the release included?
- location relative to the sewer outlet. If the displacement exceeds 2-4 cm, it is advisable to install a corrugated siphon or a bottle siphon with a flexible pipe;
- the inlet pipe of the siphon should not have a diameter larger than that of the inlet to the sewer. It's better that they match. With a smaller value of the diameter of the inlet tube, an adapter will be required.
The choice of siphon depends on the design features of the sink or sink and the need to connect household appliances to the drain system
How to choose a new siphon
When choosing a siphon model, it is worth considering several factors. These are:
- The price that determines the quality of the material, the manufacture of the siphon and its durability.
- Appearance. A siphon installed in an open place should look aesthetically pleasing and fit into the design of the room.
- The diameter of the sink drain must match the size of the seat on the inlet pipe.
- It is desirable to have an overflow system.
- The presence of additional outlets for connecting a washing machine and dishwasher.
- The dimensions of the siphon depend on the horizontal and vertical distance from the neck of the sink to the sewer pipe.
- When the neck of the sink and the sewer pipe are located in different planes, a siphon with a corrugated drain pipe is purchased.
- The diameter of the drain pipe must be the same or smaller than the diameter of the sewer pipe.A branch pipe of a smaller diameter is mounted with an adapter.
Preparing for installation
Having figured out how to assemble a siphon in the kitchen, you can proceed to dismantle the old structure and clean the surfaces of the sewer pipe. When implementing the task, one should not attach too much importance to the presence of residual contaminants on the surface of the drain, since the special sealing cuff is designed to fit on a rough base.


Certain difficulties may arise when replacing a Soviet cast-iron siphon embedded in a pipe with a cement fit. In this case, you will have to work hard to depressurize the connection using a hammer, chisel or chisel. This is required to remove old cement from the pipe and dismantle the old siphon.
When preparing a siphon for a double sink in the kitchen or a single tank, you need to make sure that fragments of brittle cast iron and particles of cement do not remain in the sewer pipe. During the operation of the new system, such debris can turn into a source of regular blockages. It is convenient to remove all kinds of debris from the sewer branch with pliers and tweezers.
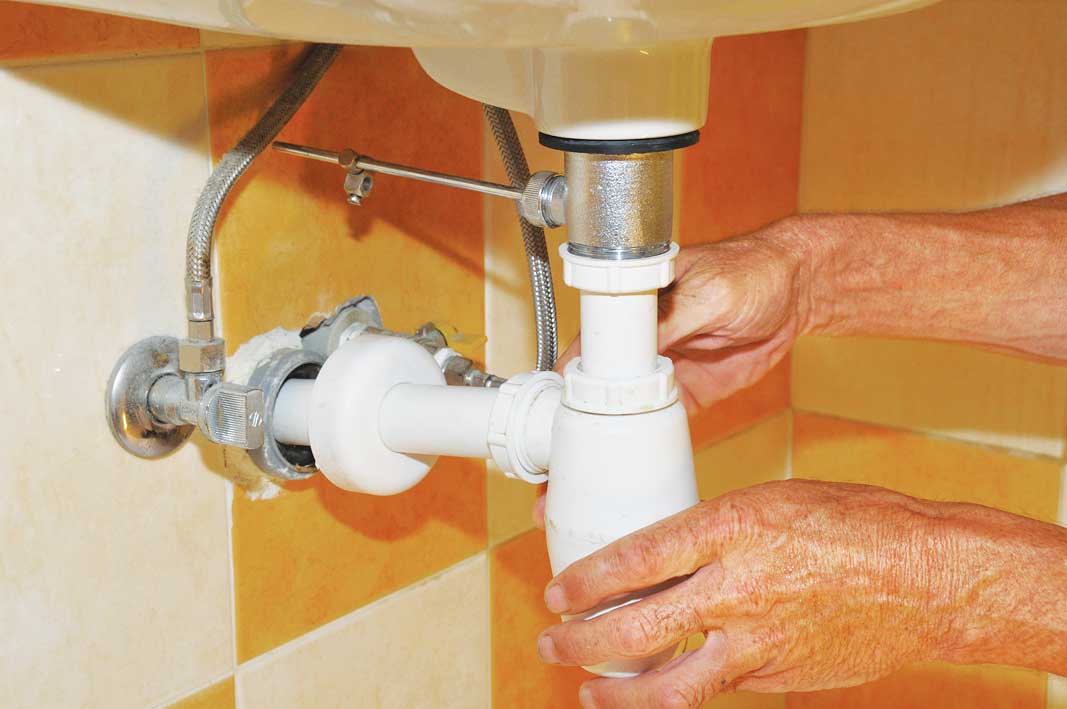
How to install a siphon in the kitchen? For reliable installation, work must be carried out in strict sequence:
- The mounting cuff pre-lubricated with sealant is placed in the sewer pipe. In this case, all surfaces must be dry.
- The mating (end) surfaces of body threaded connections are checked. If necessary, burrs should be carefully cut off with a sharp blade, as their presence can damage the gaskets.
- The end of the drain pipe is inserted into the cuff and securely fastened.If you have to work with a clamp-like mount, you will have to use a screwdriver to tighten the latter.
- A drain grate is mounted in the sink. The black bottom gasket is not installed yet.
- A thin ring gasket is placed in the groove of the plug, which is abundantly lubricated with sealant. Next, the cork is wrapped. It is enough to capture the thread at a distance of about 2-3 of its turns.
- If the siphon body is represented by a nozzle in the form of a bottle, a special valve is placed in it with an outward-opening damper. The structure is attached to the exhaust pipe.
- The lower drain gasket is placed in the groove of the upper pipe, the siphon housing nut is screwed.
- Slightly rocking the knee of the structure, you must carefully alternately tighten the side and top nuts of the bottle.
How to assemble a manual siphon
Despite the difference in the designs of these elements, the assembly of all siphons is carried out in a similar way.
The design of the manual siphon for the bath
Step by step instructions how to assemble a siphon baths:
The set of devices includes the sump itself, pipes of different diameters, sealing elements. The sump is taken first, the largest flat gasket is put on its lower part (most often it is blue). When installing it, distortions or other distortions are not allowed;
The overflow and sump pipes are interconnected. If a plastic siphon is assembled, then the FUM tape is not needed - the gasket is enough, but to connect brass or steel to the thread, it is additionally sealed;
On the top and side of such a siphon there are two holes of different diameters. One is designed to connect the side drain, and the other to connect the system to the sewer outlet.In accordance with the dimensions of these holes, a conical gasket (wide) and a union nut are selected;
The first pipe is taken, which will be connected to the central drain. A cap nut is put on it. Then the gasket is put on.
Pay attention to its design. One end of the gasket is blunt and the other is sharp
Here, with a sharp end, the sealant is put on to the nozzle, the blunt one subsequently “sits” on the sump. The gasket is inserted to the maximum position, but be careful not to tear it;
The pipe is inserted into the corresponding hole in the siphon, after which the union nut is tightened. In the same way, a pipe is connected that will lead to the sewer;
If everything is done correctly, then there remains a wide gasket under the sink and a thin rubber ring for sealing the pipe, nuts for connecting the sewer, and a sink drain filter. A wide gasket is installed on the upper pipe. After the outlet is connected to the sink;
Connection to the sink is made using a bolted connection. It is also recommended not to use FUM tape here (if the siphon is plastic). To connect all parts of the structure, you need to install a sealing ring on the upper section of the drain, after a metal mesh filter. The siphon pipe is attached from below, the whole structure is screwed with a bolt;
The output is connected to the sewerage using silicone sealant (for connecting two plastic elements) or a special adapter (for connecting metal and plastic pipes). In the first case, the end parts of the siphon and sewer pipes are lubricated with silicone and connected to each other. In the second, the ends of the adapter are lubricated.
After the installation is completed, you need to wait for the sealant to dry completely (on average, from 4 to 6 hours), only then you can use the system.
Video: bath siphon assembly
Corrugated models do not require complex assembly work - often, they are simply connected to the drain outlet system. At the same time, flat ones are more complex in design. The main problem is the large number of pipes of different diameters.


Tips for properly assembling the siphon:
- All metal threads must be sealed with FUM tape;
-
Not a single gasket or ring should be left "idle". If after the end of the assembly you still have extra parts, this means that a seal is missing somewhere and it will leak there;
- When connecting pipes, only one gasket can be used. Some home craftsmen install two gaskets at the junction of pipes or during repairs to prevent leaks. This contributes to the violation of the tightness of the system;
- When tightening the union nuts, you need to be very careful (especially if you work with plastic). It is impossible for the connection to be “stretched”, but with a strong impact, there is a chance of damaging the fastener;
- The same goes for installing gaskets. They need to be tightened to the nozzles to the maximum, but if the seals are tightened, they will break;
- Sealing elements must be replaced regularly. Drain gaskets - 1 time in 6 months (on average), thin seals between nozzles - 1 time in 3 months. These times may vary, but timely warning of worn rubber bands will help to avoid flooding and leakage.
How to assemble a siphon for a sink in a kitchen with an overflow
First you need to prepare a place for installing a plumbing fixture.To do this, the old siphon is dismantled and the surface of the sewer pipe outlet is cleaned. If this is a Soviet-era cast iron product, you will have to beat off the cement, which was then used as a waterproofing agent, with a hammer and chisel.
At the same time, debris should not be allowed to enter the sewer pipe, as in the future they will cause blockages. after completion of work, the mouth of the pipe is carefully inspected and solid fragments of construction debris are removed with tweezers or pliers. Then a rubber plug is installed.
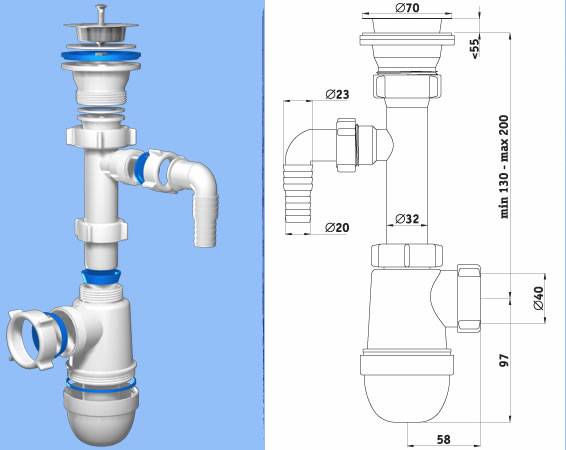
 An example of a siphon with overflow
In the design of the sink with overflow, an additional hole is provided in the upper part of the side wall. Its functional purpose is to prevent liquid from splashing over the edge of the container when it is overfilled. To install under such a sink, a siphon is needed, which has an additional pipe for receiving liquid coming from the overflow hole.
 Siphon design with overflow
To assemble a siphon for a kitchen with an overflow, in addition to the actions according to the standard scheme, some additional manipulations are required. The lower part of the overflow pipe is attached to the inlet pipe of the plumbing fixture using a union nut and a gasket.
The overflow pipe is brought from the outer part of the sink to the hole made in the upper part of its side surface. On the inside of the sink, the pipeline is strengthened by tightening the screw connection. After performing these steps, the water will flow into the siphon, and not pour out when the tank overflows.
At the final stage, the system performance is checked.To do this, a jet of water is directed into the sink under strong pressure, and all connections are carefully inspected. In the absence of a leak, the work is considered completed. Liquid leakage in a certain place is eliminated by tightening fasteners or replacing defective parts.
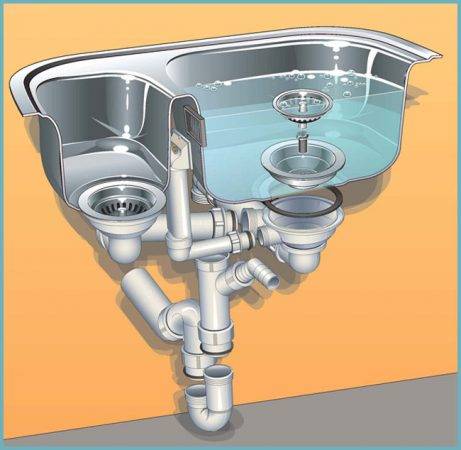
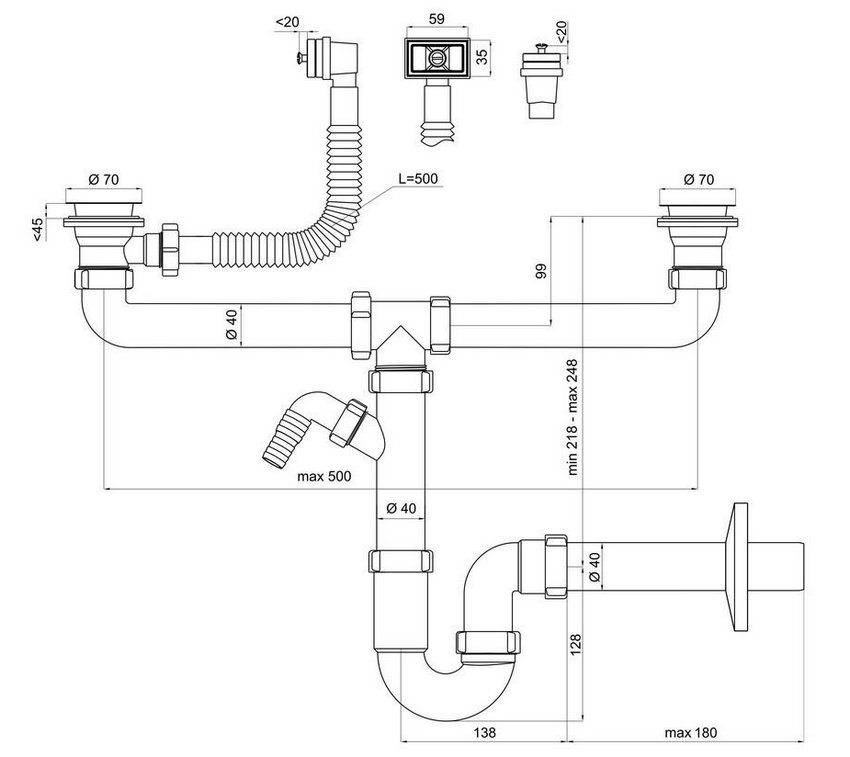
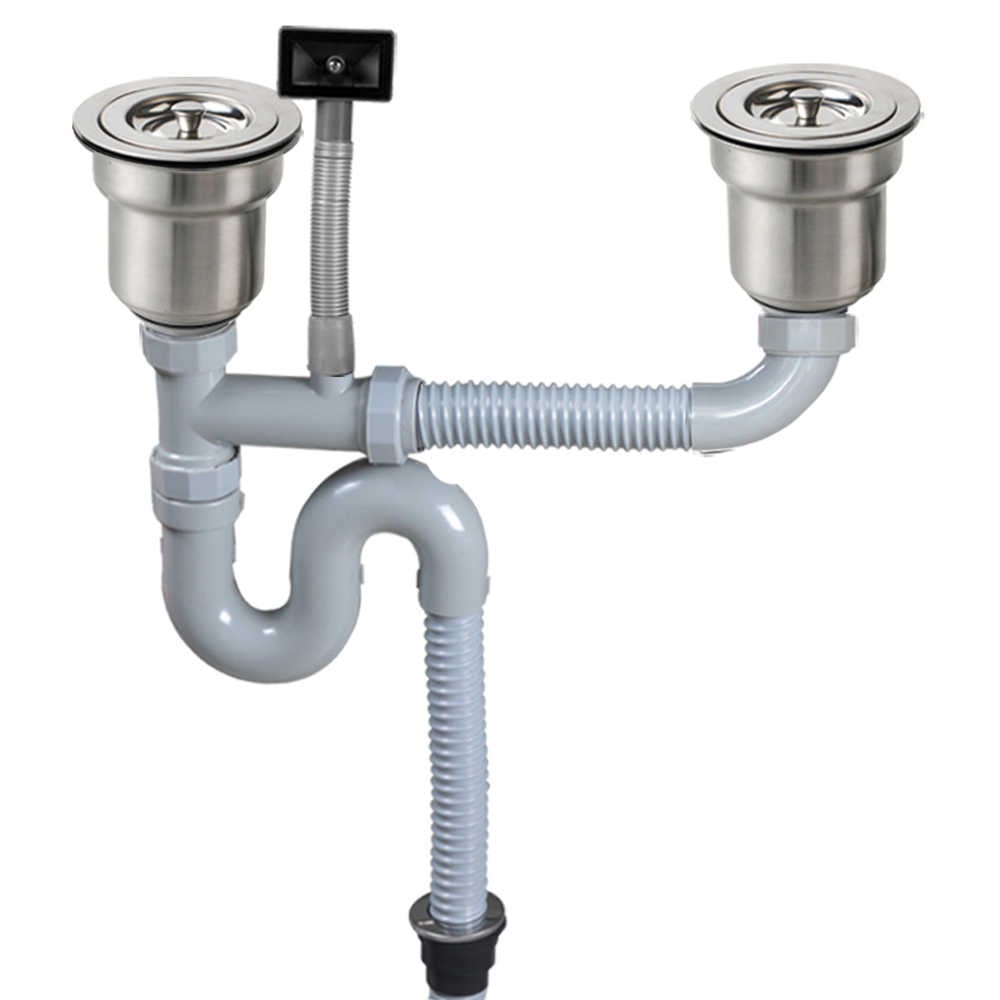
 Siphon for double sink
Siphon Assembly Expert Tips
When assembling a siphon, you should adhere to the following recommendations:
Thicken thread cut into metal special tape or linen tow.
All gaskets included in the kit must be installed in their place. If after completion of work at least one ring remains in the missed seal, a leak will soon form.
Pipe connections are sealed with only one gasket. Inexperienced craftsmen install two gaskets at pipeline connections to prevent leaks
Such actions lead to depressurization of the system.
Tighten the fixing plastic nuts carefully and carefully. Weakness in the connection should not be allowed, but if excessive force is applied, there is a risk of damage to parts.
Gaskets are installed in the same way
They tighten well on the nozzle, but if you overdo it, the sealant material will break.
To prevent the occurrence of leaks on a regular basis, it is necessary to carry out preventive replacement of worn seals. Otherwise, you can flood the neighbors.


 Do not neglect the advice of experts
Compliance with the rules of operation is no less important for increasing the life of the plumbing fixture
Maintenance and operation of the siphon
A well-installed siphon will work flawlessly for many years with timely maintenance of the drain system. The piping system must be periodically cleaned from contaminants arising during operation. Sticky lumps of fat are dissolved with caustic soda.
Good results are obtained by prolonged flushing of the plumbing fixture with a pressure of high temperature water. Cleaning the pipeline network in the event of blockages is carried out using special chemicals. Plumbers often use a flexible metal wire with a thickened end for this purpose.
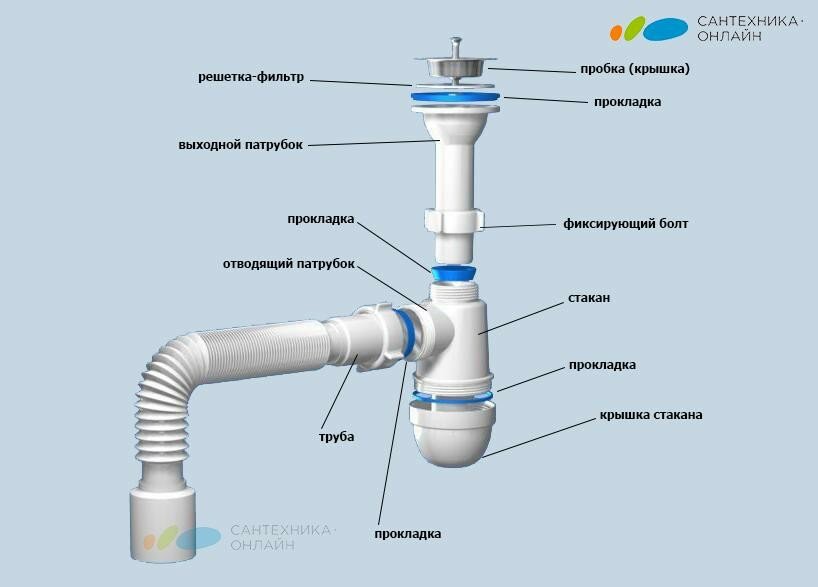
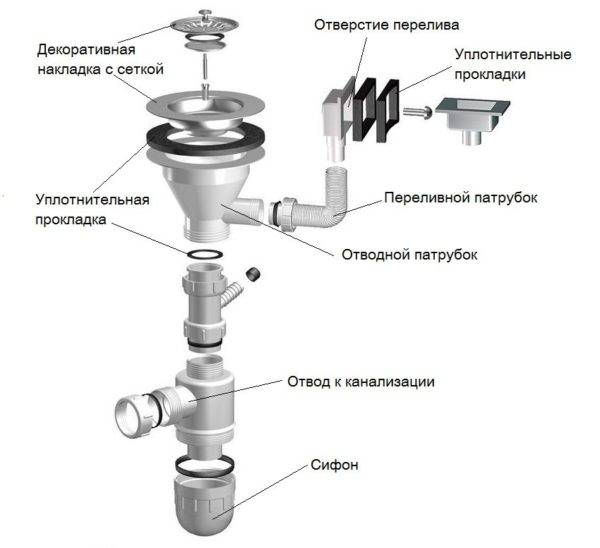
Siphon device
Siphons for drains are most often made of chrome-plated brass or plastic (propylene, polyethylene, PVC). Brass products oxidize over time and accumulate dirt. It is better to give preference to a plastic siphon. Such a product does not corrode, does not rot, it is wear-resistant and durable.
Types of siphons for the kitchen
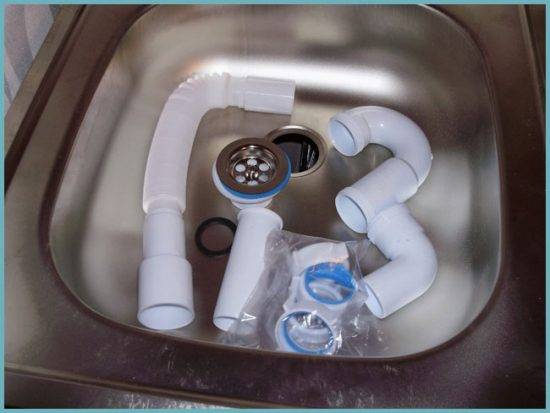
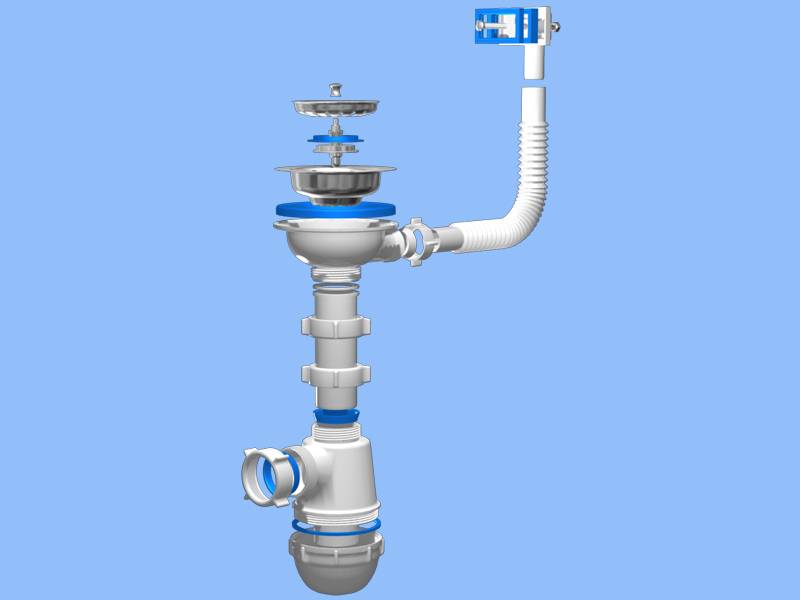
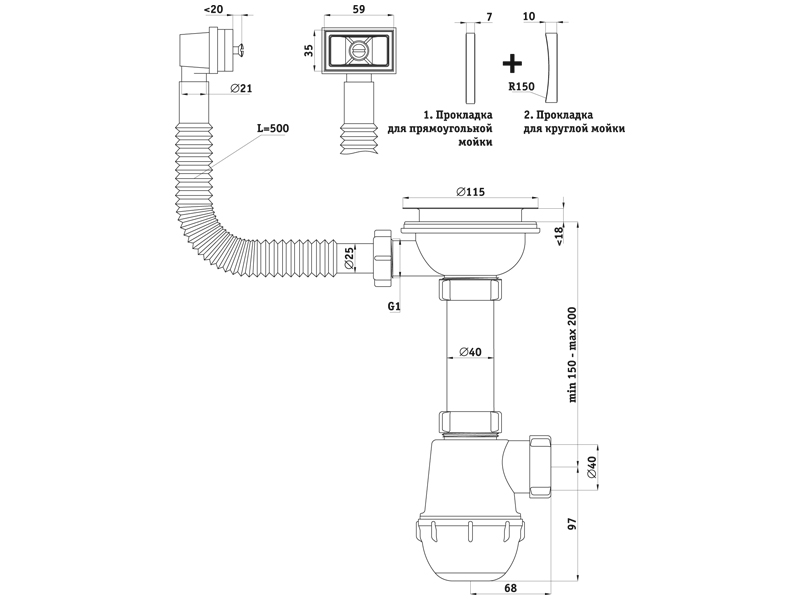
Consider the siphon device using the example of a plastic product. The standard set of the siphon includes:
- protective grid. It is installed directly in the drain hole of the sink and prevents large pieces of waste from entering the sewer.
- rubber stopper. Designed to block the drain hole of the sink (usually there are no siphons in cheap models).
- rubber gasket 3-5 mm thick. It is located between the sink body and the outlet pipe.
- outlet pipe. Some models of nozzles have an additional outlet to which the washer/dishwasher drain or outlet for faucets with a waste valve is connected.
- exhaust pipe rubber gasket
- outlet plastic nut
- connecting screw Ø 6-8 mm made of stainless steel. In cheap models of siphons, these screws are made of simple iron with a thin coating of chromium or nickel. Such a screw is unreliable, quickly begins to rust and collapse. To buy a siphon with a quality screw, it is recommended to take a small magnet with you to check the metal (stainless steel is not magnetized).
metal nut. It can be brass, copper or stainless steel. Do not take a siphon with an iron nut. It will also quickly rust and will last no more than a year.
siphon body in the form of a bottle or knee.
clamping plastic nut.
2 cone gaskets made of rubber or plastic.
sewer outlet. It is located on the side of the siphon body.
a nut of the appropriate diameter for attaching a plastic adapter.
lid or glass of the siphon. This part more often than others has to be unscrewed to clean the siphon.
large flat rubber gasket. It serves to tightly adjoin the lid (glass) of the siphon to the body.
sewer outlet. It can be a flexible hose, a standard plastic pipe, a corrugated pipe, or a plastic spigot. It all depends on the model of the acquired siphon and the diameter of its outlet.
Assembly
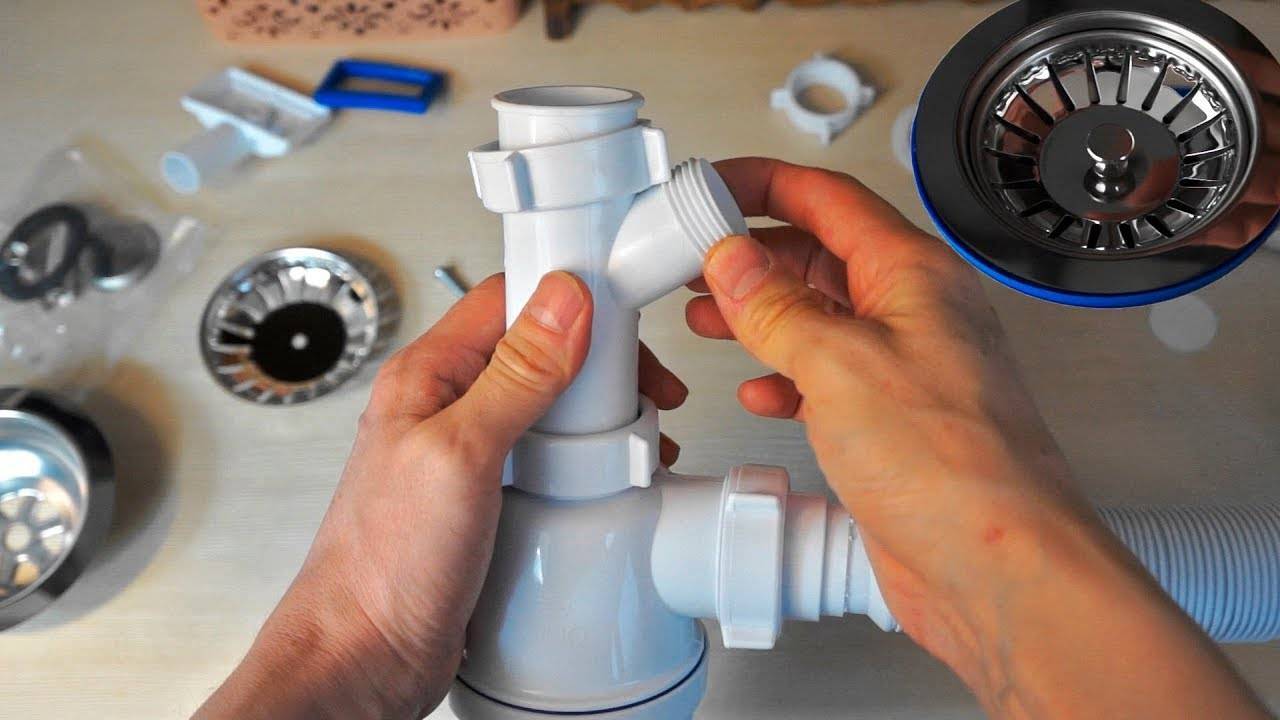
If you purchased a sink for the kitchen, then assemble sink drain needed in the following order:
- Take the bottom of the bottle seal and install the large flat gasket so that it fits snugly and without distortion to the plastic part.
- Then screw on the screw cap and tighten it tightly. Do not pinch, otherwise the gasket may be damaged.
- There are holes of different diameters on the top and side of the siphon.It is necessary to select the appropriate union nuts and cone gaskets for them.
- On the pipe, which will be attached to the sink, we put on the union nut and the cone gasket. It should be borne in mind that the seal must be put on with the blunt side to the nut, and the sharp side must go into the hydraulic seal. The distance from the sharp edge of the gasket to the end of the pipe should be 4-6 cm.
- We assemble the pipe and siphon together. The tube should go into the top hole. Then tighten the nut and tighten tightly.
- A union nut and a conical gasket are put on the corrugated tube with a blunt end to the tube. After that, insert the tube into the middle hole of the siphon, tighten the nut and tighten tightly.
Which siphon is better to install on the sink in the bathroom
The product is selected based on several criteria:
- Prices. Expensive models are made with exact dimensions and are equipped with high-quality gaskets. When installing cheap analogues, difficulties may arise.
- aesthetic qualities. If the product is in plain sight, it should look attractive and match the style of the sink. For example, a stone or copper washbasin should be equipped with a steel siphon, a plastic one will not work here.
- The diameter of the drain hole of the plumbing fixture. It must match the dimensions of the grid.
- Free space under the plumbing fixture. The dimensions of the siphon depend on this parameter.
- Orientation of the plumbing fixture relative to the inlet of the sewer pipe. If the product is installed to the side or rotated, a corrugated water seal or flexible adapter will be required.
- plumbing thicknesses. A siphon designed for a steel bath may not have enough thread when trying to fix it, for example, on a granite washbasin.
Semi-automatic models are more difficult to install than automatic ones, but they have 2 advantages over them:
- To open the bottom valve, you do not need to dip your hand into the water.
- The cork can be easily removed so that it does not interfere with, for example, taking a shower. The part is simply removed from the seat. In automatic models, it must be unscrewed.
Plastic bottle siphons are most in demand.
plastic siphon.


