
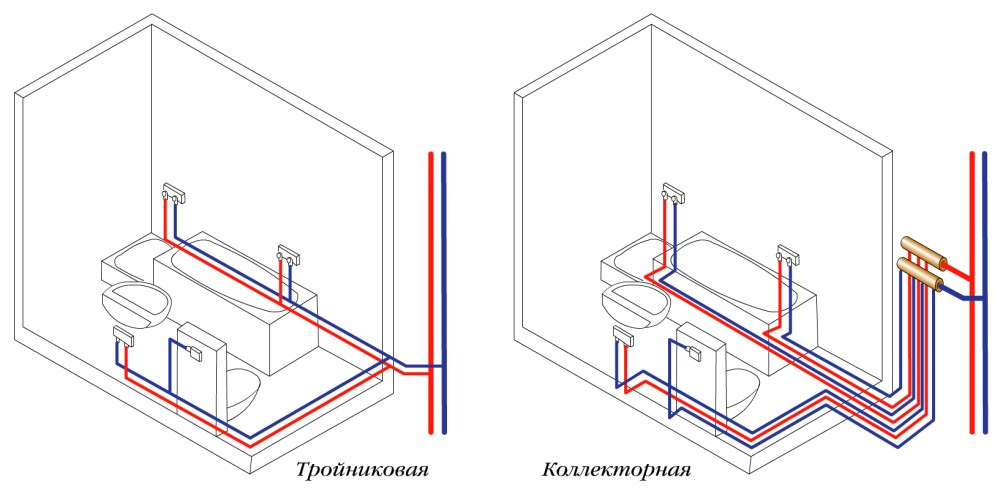
- Pipe laying methods
- Do-it-yourself plumbing in a private house
- Choosing the right mounting method
- Choosing the location of the bathroom in a village house
- Choosing the best type of bathroom
- Determining the size of the bathroom
- Features of arranging a hygienic room in a wooden building
- Accounting and control
- HMS, aquastop, filter
- Do-it-yourself sink installation
- Plumbing work: prices
- Methods for installing water pipes
- open laying
- Hidden laying of utilities
- Peculiarities
- Laying methods - hidden and open system
Pipe laying methods
There are two laying methods:
- open. Pipes are attached to the wall using special support elements (clamps);
- hidden. In the walls (sometimes in the floor) recesses are made into which pipes are laid.
The first option is found in houses with relatively thin walls that do not allow making recesses. This method is simpler, but, during finishing, you will have to hide the wiring behind special designs. Most often, boxes are made of drywall or other sheet material, on which a finish is installed. Boxes take up the space of the room, spoil the even shape of the walls. When assembling, it is necessary to think in advance about the possibility of quick dismantling for urgent repair work.Many apartment owners do not take into account the risk of leaks or other problems when making repairs. In emergency situations, they have to break the finish and subsequently restore it, spending money and time.
With hidden installation, the plane of the walls and the space of the room are kept intact. However, laying the wall finish (usually tiles) makes it impossible to access the pipes. It is impossible to provide the possibility of temporary dismantling of the tile. This puts forward special requirements for the assembly and quality of connections. If there are leaks, they will not be noticed immediately. Sometimes neighbors from the lower floor, who have seriously damaged expensive repairs, inform about this. Therefore, it is necessary to perform all connections very carefully, without the slightest error.
The choice of one method or another is the prerogative of the owner of the apartment. It is necessary to carefully weigh the pros and cons of each option, taking into account the configuration of the apartment, the type and composition of the wiring. Usually, the thickness of the walls becomes the main criterion - if they allow, they do concealed installation.
Do-it-yourself plumbing in a private house
Start with plumbing since the presence of water is necessary already at the stage of building a private house. In this case, you need to think first of all about ensuring the supply of cold water. You can also install a heating boiler, the installation of which is a simple procedure.
To equip the water supply of a private house, plumbing, materials and tools are needed:
-
shut-off plumbing;
-
PVC pipes;
-
pump equipment;
-
a set of keys;
-
pliers;
-
shovel;
-
Bulgarian.
Before you make plumbing in a private house, you need to determine what types of plumbing equipment will be installed.Consider the general rules and sequence of installation.
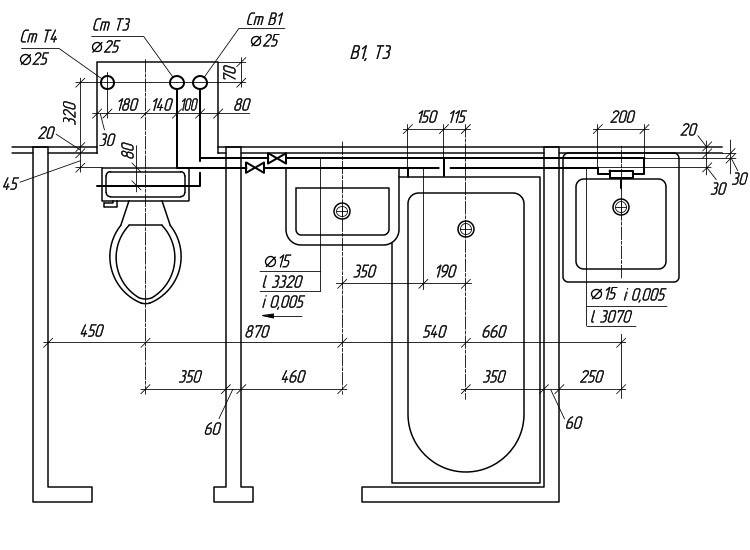
As mentioned above, at the initial stage, a plan should be developed for the placement of plumbing and plumbing elements. The scheme should include information about all the nodes of the external and internal wiring of the water supply system of a private house. Based on the parameters of the water supply, you need to select the optimal equipment for arranging a pumping station. Manufacturers of such equipment attach a wiring diagram to it, indicating the main features of connecting a private house to the water supply system. It is necessary to place the pump plumbing unit in such a way as to minimize the noise from its operation. To do this, select the most convenient place in the house (in the basement or basement). In the documentation for the pumping station, you can find information about the noise level that is created during its operation.
After the location of the pumping equipment has been chosen, it is possible to start arranging trenches for laying external pipes through which water from the source will be supplied to the house. Their depth should exceed the level of soil freezing. If there is no technical possibility of laying a pipeline at such a distance, it is necessary to insulate the line using special fiberglass materials.
After arranging the outer part of the water supply of a private house and installing pump plumbing, the installation of internal pipes is carried out. This is a very important stage that must be carried out with strict adherence to the technology of work. When the distribution of water pipes is completed, the specialists proceed to the installation of plumbing and installation of the sewer system.
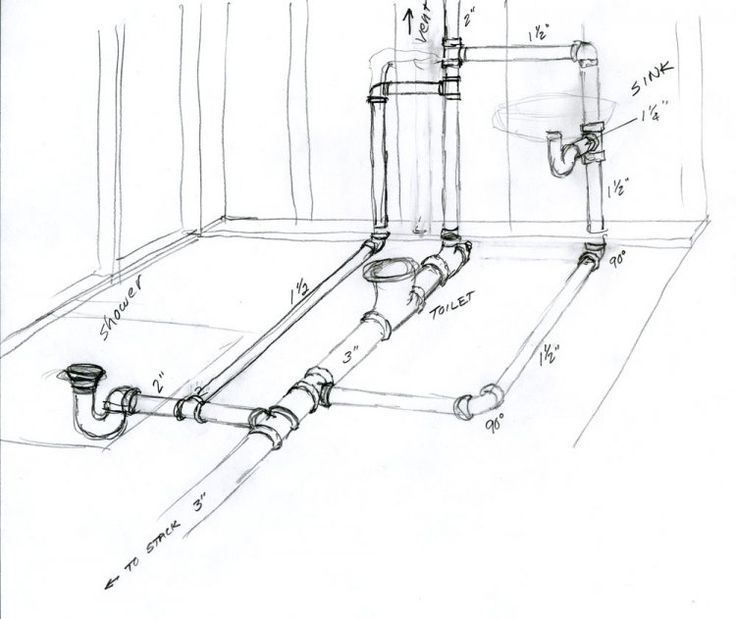
Let's consider installation of the sewerage for the private house. Here, even before the installation work, an engineering diagram of the system is drawn up, indicating the points of placement of plumbing. A professionally drawn up sewerage plan will eliminate the difficulties during installation and problems during operation.
Sewerage of a private house includes external and internal systems. The elements of outdoor installation include sewer pipes and cleaning systems. The internal part also consists of piping and plumbing of a private house.
Rules for installing sewerage in a private house:
-
when choosing the location of the cesspool, it is necessary to provide for the possibility of unhindered access to it by sewage vehicles;
-
the lowest line of the cesspool is placed one meter deeper than the freezing level of the soil. The sewage collector is equipped with a slope and must have a depth of more than 70 cm.
-


In situations where it is not possible to lay sewer pipes below the freezing level, the collector is insulated.
For the installation of the sewer system of a private house, plastic pipes are currently used. Unlike metal products, such a pipe will not experience corrosion problems. The installation of these elements of a private house is carried out by inserting one pipe into another, followed by sealing the seams. Laying of sewer pipes is carried out in strict accordance with the preliminary calculations of the depth. This will allow the line to be laid on undisturbed solid ground, which will prevent the elements from bending. Pipes for risers and collectors must be of a larger diameter than sewer pipes coming from private home plumbing.
To carry out work on the arrangement of sewage systems in a private house, experienced and highly qualified specialists should be involved. The works on the installation and connection of plumbing are carried out in strict accordance with the requirements of building codes according to the drawn up scheme. Only experienced specialists who perform work under engineering supervision can satisfy such parameters.
Read the material on the topic: How to choose accessories for pipes
Choosing the right mounting method
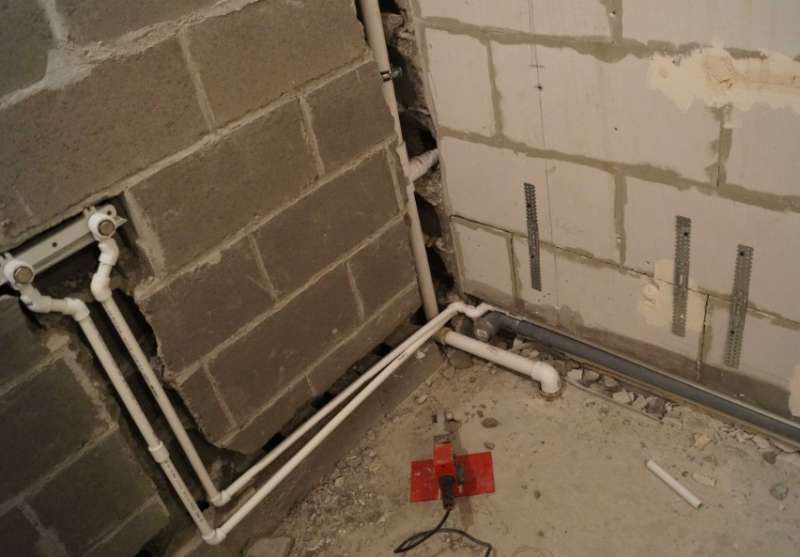
In modern bathrooms, all engineering communications are hidden. To implement this, you can use false panels or make strobes in the walls. An alternative is open laying when piping in the bathroom. It is less aesthetic, but it will require less effort and time. This can be done independently, without the help of a plumber.
To choose a method, you need to analyze the pros and cons of each.
- Open gasket. All engineering communications are mounted to the wall or floor. This makes it possible to make the installation even after the final repair. Advantages - constant monitoring of the condition, minimum cost, the possibility of prompt repair. Disadvantages - the likelihood of mechanical damage, pipelines spoil the appearance of the room.
- Hidden wiring diagram. For laying in walls or floors, strobes are made. However, there are limitations - they cannot be done in load-bearing walls. An alternative is mounting on top of the wall, followed by the installation of a false panel. Advantages - only the connection points to the devices remain outside, it is impossible to damage the pipes. The disadvantage is the complexity of installation.
In some cases, the two methods can be combined. Part of the communications remains open, the rest are covered with decorative materials. This is true if one of the bathroom walls is load-bearing.
Important: the width and depth of the strobe should be 2-3 cm larger than the diameter of the pipes. This is necessary to compensate for thermal expansion.
Choosing the location of the bathroom in a village house
In order for a bathroom in a wooden house to be beautiful and functional, it is important to choose its location correctly. Since the supply and discharge of water is necessary for the normal functioning of the bathroom and toilet, the bathroom in a wooden house should be located close to the water source, and also have access to the sewer system.
Important: according to SNIP, the minimum distance from the house and cellar to the outdoor restroom should be at least 12 m, from the well to the sewer, or composting device - at least 8 m.
Approximate layout of a mansion on a suburban area
Choosing the best type of bathroom
The method of arranging the sewerage and toilet is determined by how much time per year it is planned to live in the cottage (permanently or seasonally). There are several types of toilets for country houses, or cottages:
dry closet - a compact portable device consisting of a toilet seat and a reservoir under it. The tank contains a special liquid that exposes human waste products to chemical or organic attack, turning them into water, powder, or compost.
Tip: the main disadvantage of dry closets is quick filling and the need to dispose of the contents of the tank.
Compact dry closet - a bathroom in the country, photo
backlash closet - a waste disposal system, which is an insulated restroom at the house, when the toilet is connected to a cesspool using a pipe system;
Note: an important design feature of the backlash closet is a ventilation system that prevents the accumulation of unpleasant odors in the room.
The design of the backlash closet - a bathroom in the country, photo
powder closet - a dry method of waste disposal, in which the toilet in the house is directly connected to a box-type cesspool. A periodic layer of waste is covered with peat to neutralize them. In this case, the tank box should be cleaned regularly.


The device powder-closet in a country house
Tip: with permanent residence in a country house, the backlash closet will be the most convenient and practical way to equip the toilet. The rest of the options are more suitable for occasional or seasonal use.
Determining the size of the bathroom
A bathroom in a private house can be organized in several ways:
- as a full-fledged bathroom (with a shower, a tank-bath and a toilet);
- like a toilet (only a toilet and a sink).
Recommendation: for the convenience of all the inhabitants of the house, there should be one bathroom per floor.
The dimensions of the bathroom in a private house directly depend on what kind of plumbing and household appliances it is planned to install there. If the hygienic room will include only a toilet bowl and a washbasin, then its area may be 2-3 square meters.
The layout of a small toilet in a private house
If it is planned to install a shower cabin in the bathroom, its optimal area should be 3-4 square meters.Corner plumbing will save space, but all appliances must be placed at a certain distance from each other so that they are convenient to use.
Planning options for a combined bathroom in a wooden house
If a bath, a washing machine, cabinets for storing various bath accessories are installed in the room, then the dimensions of the bathroom should be from 5 sq. m.
Options for how to rationally plan a bathroom in a private house, photo
Features of arranging a hygienic room in a wooden building
The device of a bathroom in a wooden house has some features. The linear dimensions of a wooden structure during shrinkage are constantly changing, this should be taken into account when building a bathroom and toilet. How to make a bathroom in a house from a bar?
For this, a sliding frame is used. The technology of erecting the base of a bathroom in a log house consists in installing metal or wooden profiles in vertical grooves of the logs, which will make it possible to rigidly fix the base of the bathroom structure. Overlappings are strengthened with the help of wide logs located at a minimum distance from each other. Then flexible water and sewer pipes are laid, electrical cables are routed, and at the end all communications are sewn up with plasterboard sheets, or clapboard.
Note: the use of a sliding frame in the construction of a bathroom allows the room to resist the shrinkage of the house without damaging the plumbing.
Arrangement of a bathroom on a sliding frame - a bathroom in a log house
This is interesting: Smart home will follow the garden
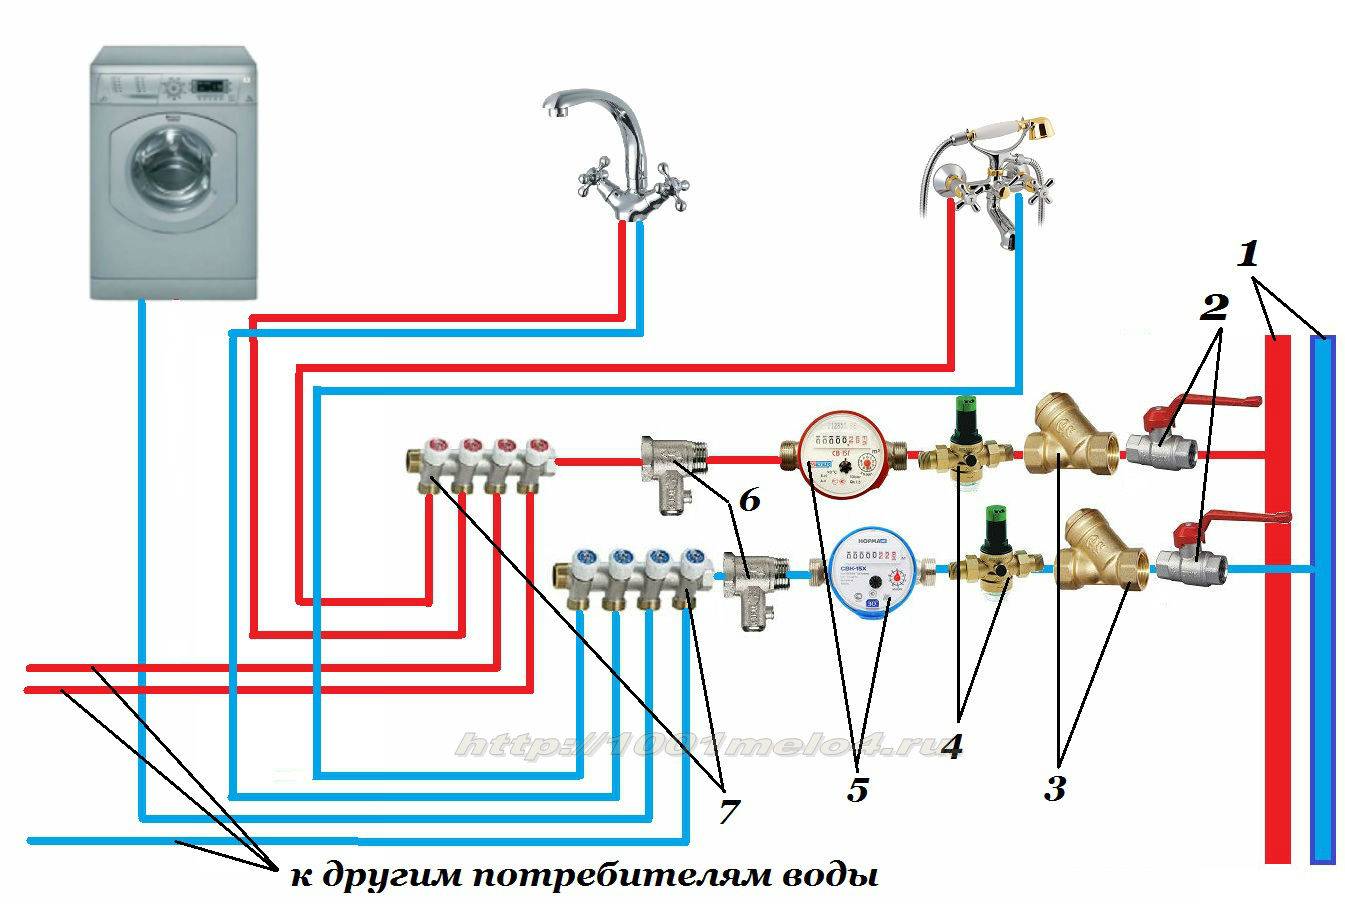
Accounting and control
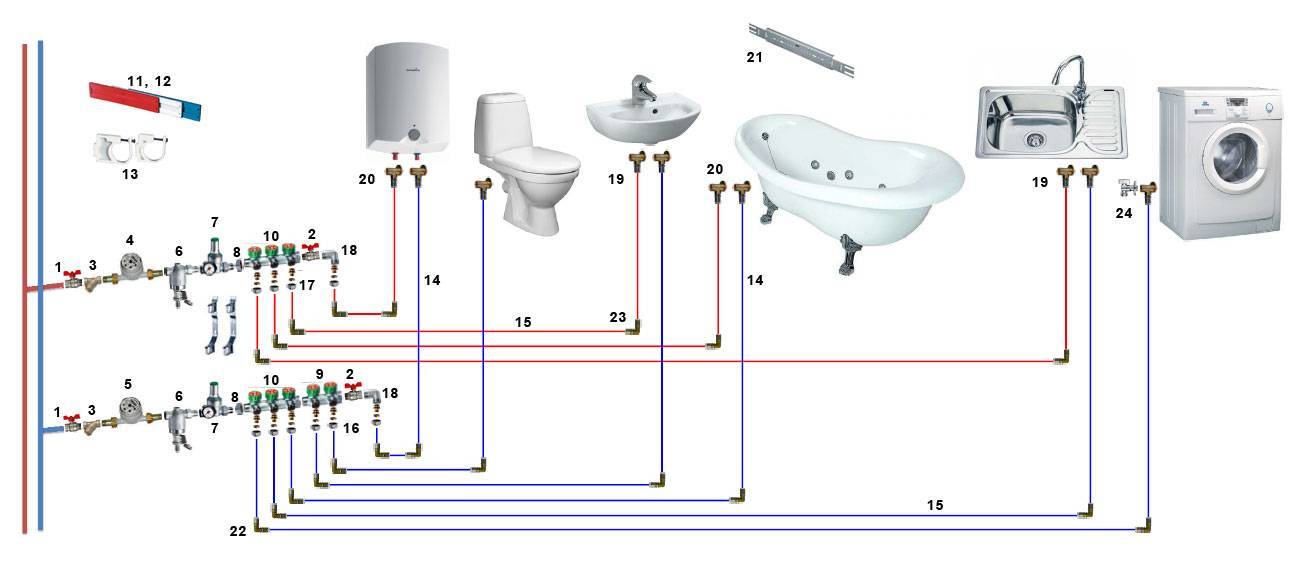
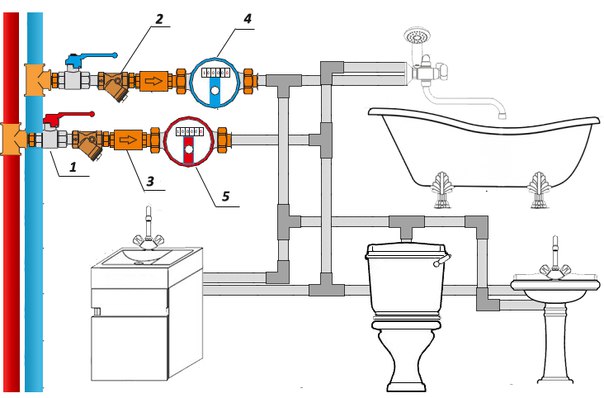
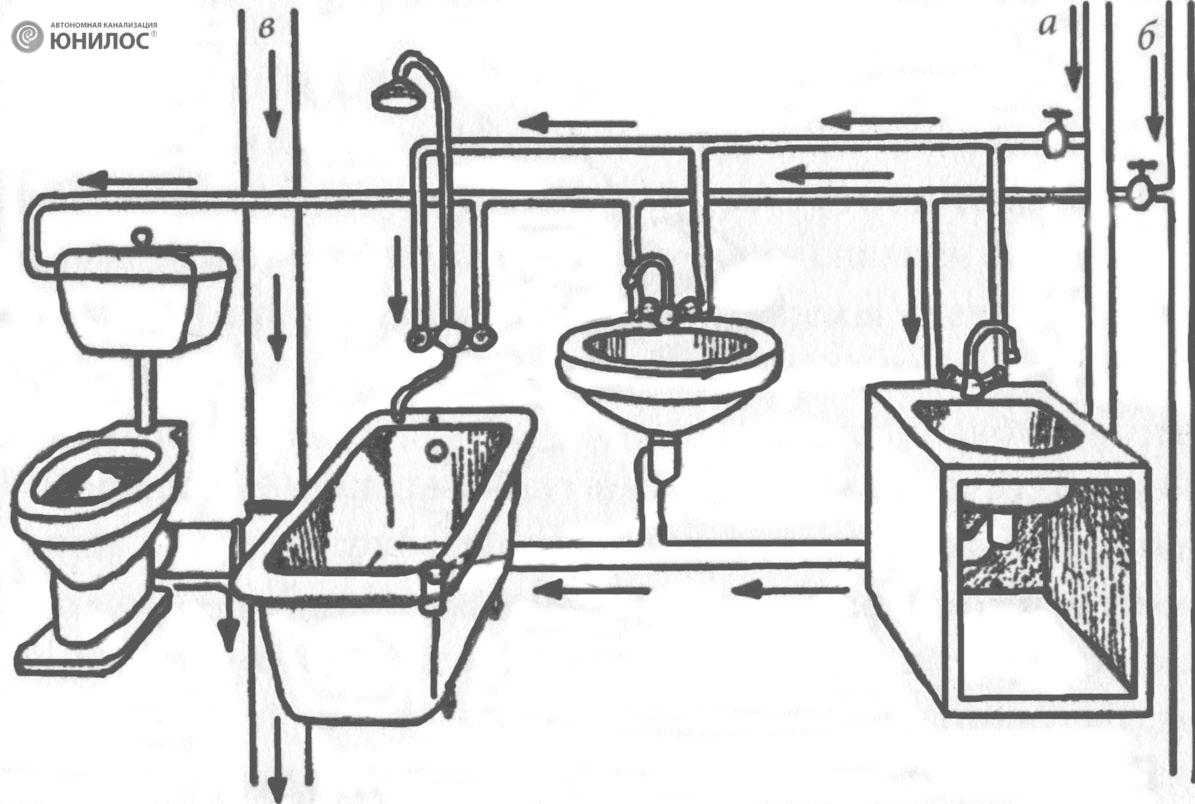
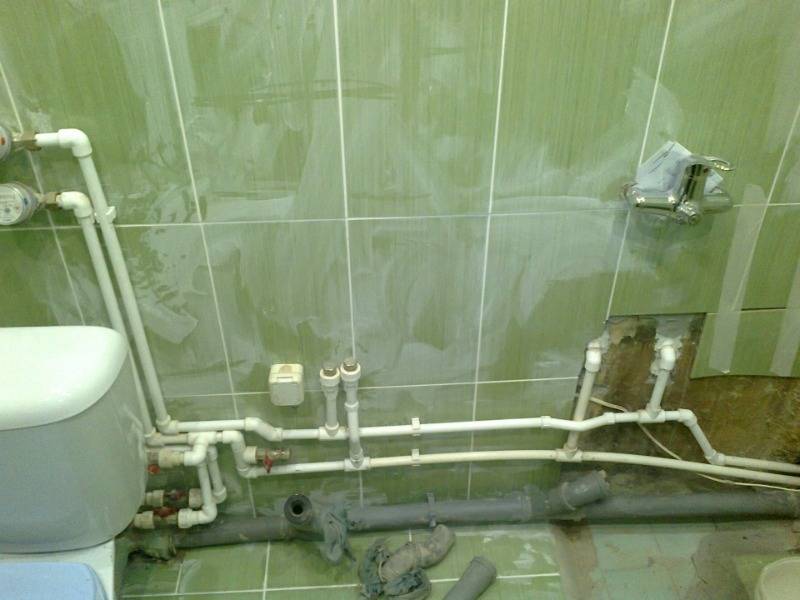
The selection and accounting unit consists of a shut-off valve, a coarse filter, a water meter and a check valve.Assembled as shown in the picture. Each of the devices indicates the direction of the water flow for it, it must be observed during assembly.
Selective-accounting water supply unit, assembly
The assembly is assembled with waterproofing of the joints with FUM tape and is also connected to the riser, having previously blocked the water; Remember to close the shut-off valve before supplying water. This is the only operation, and a short one, that requires turning off the water supply to the neighbors in the riser.
Separate meter units are needed for cold and hot water. It is highly desirable that the counters and valve handles be highlighted in color. The meter readings should be clearly readable without any additional operations (hatch removal, etc.), so it is often necessary to pre-assemble a part of an integral pipeline, sometimes of a rather bizarre configuration, to connect metering devices to the riser. In addition to pipes and a soldering iron, for this you will need transitional couplings from plastic to metal MPV - a threaded inner coupling. Plastic is connected to metering units using MRN - external threaded couplings.
The meters are sold sealed, but this does not mean that you can immediately call the water utility and pay for water according to consumption. The factory seal is for this (the Russian land is rich in craftsmen) so that no one gets into the meter and twists or files anything there. The factory seal must be protected; without it, the meter is considered unusable, as well as without a certificate for it.
When installing water meters, you need to declare to the water utility and call its inspector.You can use water before he arrives, the inspector does not need zero readings, he will write down the initial ones, seal the meter and drain the filter with his seal. Payment for water consumption will go after registration of metering devices.
HMS, aquastop, filter
Although the design of the HMS is non-separable and does not allow stealing water with its help, and this device is not subject to sealing, connecting the HMS to the meter is unacceptable: the meter impeller can become clogged with sludge. HMS with a flask filter is connected after metering devices; filter - immediately after HMS. An aquastop can be connected immediately after the filter, but if it is electrodynamic, the magnetic field of the HMS can cause its false operation, but it makes no sense to attribute the aquastop far from the riser: it does not react to a breakthrough before it.


Do-it-yourself sink installation
So, before starting all installation work, it is necessary first of all to turn off the water supply in the room, while being careful and attentive, as this can lead to flooding of the room or neighbors on the floor below.

At the same time, the leg can hide the summed communications and mixers, it is very convenient and practical. In fact, work with the sink is divided into two stages: fastening and installation of the sink itself, and the second stage is the wiring of the mixers.

Therefore, this material can be considered as a step-by-step instruction for beginners, in which we will analyze in detail the various nuances.

So, first you need to make the necessary markings on the wall for an even wall mount sink, Using the building level, we make markings on the wall, then mark the points for the holes that will hold the bracket.The holes are drilled with an electric drill or a puncher, plastic dowels are hammered into the finished holes, and then the brackets are screwed in.

Further, it is possible to bring drain pipes and flexible wiring under cold and hot water
It is very important that all connections be lubricated with silicone sealant in order to avoid water leakage, and everything was securely sealed.

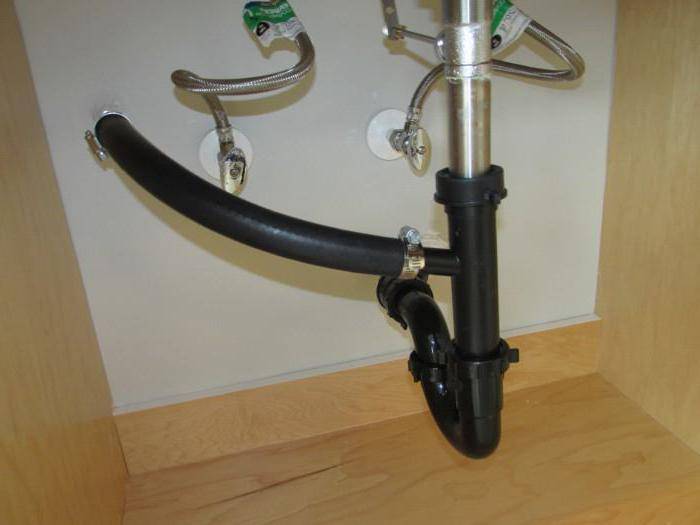
This is especially true when installing a faucet with water outlets, while silicone sealant must be applied to its threads. At the final stage, you should start laying the sewer pipe and connecting the siphon.

It is very important that all elements of the connections are tightened and tightened, all nuts and pipe bends. After installing the sink, be sure to turn on the water supply and make sure that there is no water leakage.

Plumbing work: prices
With a complete replacement of all devices and pipes, it may take several days to complete. Many are interested in the cost of this service, it depends on several factors:
- the complexity of the work and the time allotted for its implementation;
- the number of installed devices, nodes and other basic elements;
- type of plumbing.
For example, a shower complex with extensive functionality is more difficult to install than a standard cast-iron bath. Also, the cost increases with the use of additional services.
For plumbing work, prices may vary from different specialists and firms. On average, installing a sink will cost 1,700 rubles, and installing a standard faucet will cost 800 rubles. When choosing a company, it is worth focusing not only on the prices of the services provided, but also on the professionalism of the employees; it will also not be superfluous to study the reviews on specialized resources.


Methods for installing water pipes
The pipes in the bathroom that are in plain sight can make an unpleasant impression and spoil the external impression. To solve this problem, various technologies are used to mask the water supply.
Before choosing one of the methods, you should familiarize yourself with the advantages and disadvantages of each.
open laying
Open pipes are mounted along the walls or above the floor, attaching them with special holders. This will not improve the design of the bathroom, but will provide a number of other benefits. Installation does not require complex work, and the ability to inspect the water supply system will help to detect and eliminate leaks in time. The cost of open laying is low.
Plastic pipes can be damaged. This is one of the reasons why laying is carried out in places where the likelihood of mechanical impact on pipes is minimized. Protective boxes will help reduce the possibility of damage and improve the design.
These designs in the bathroom are easy to assemble with your own hands from plastic panels or waterproof drywall. Also, plumbing communications are hidden behind false walls or roller shutters. The choice of disguise is influenced by the design features of the bathroom and the wishes of the owners.
High humidity is constantly kept in the bathrooms, which contributes to the appearance of rust on steel elements. The process of corrosion does not slow down even the painting of metal components and parts. If metal products are closed with a box or something else, the moisture concentration around them will increase several times. Therefore, it is not recommended to close steel pipes.
Hidden laying of utilities
To hide the wiring pipes, cutting special grooves is required. First, they mark the route on the wall of the bathroom, then drill niches with a perforator, the width and depth of which should be greater than the diameter of the sewer or water pipes laid in them. The main advantage of hidden wiring is aesthetics. Hidden pipes cannot be damaged mechanically. The water supply outlets are neatly arranged in the form of sockets or sockets.
This is a laborious and dirty work that takes a lot of time. Finishing materials are required for sealing pipes, which increases costs. Immured pipes cannot be inspected and preventive repairs can be carried out.
In the case of a decision to hide the water supply in the wall, it is necessary to correctly design the route. It is not allowed to cut strobes in load-bearing walls and in thin partitions. The depth of the niche will be at least 6-7 cm, which significantly weakens even capital partitions.
Therefore, hidden installation is only permissible in brick buildings or those made of solid blocks. It is allowed to cut channels for water supply in apartments with a free layout. The device of strobes in floor slabs is prohibited in buildings of any type.
To hide the pipeline in the bathroom of the building, the walls of which are not suitable for ducting, you can put a screed over the wiring, run pipes behind the wall sheathing or under the ceiling.
The best solution would be to arrange a podium of the appropriate height. Any pipes can pass under it in different directions.
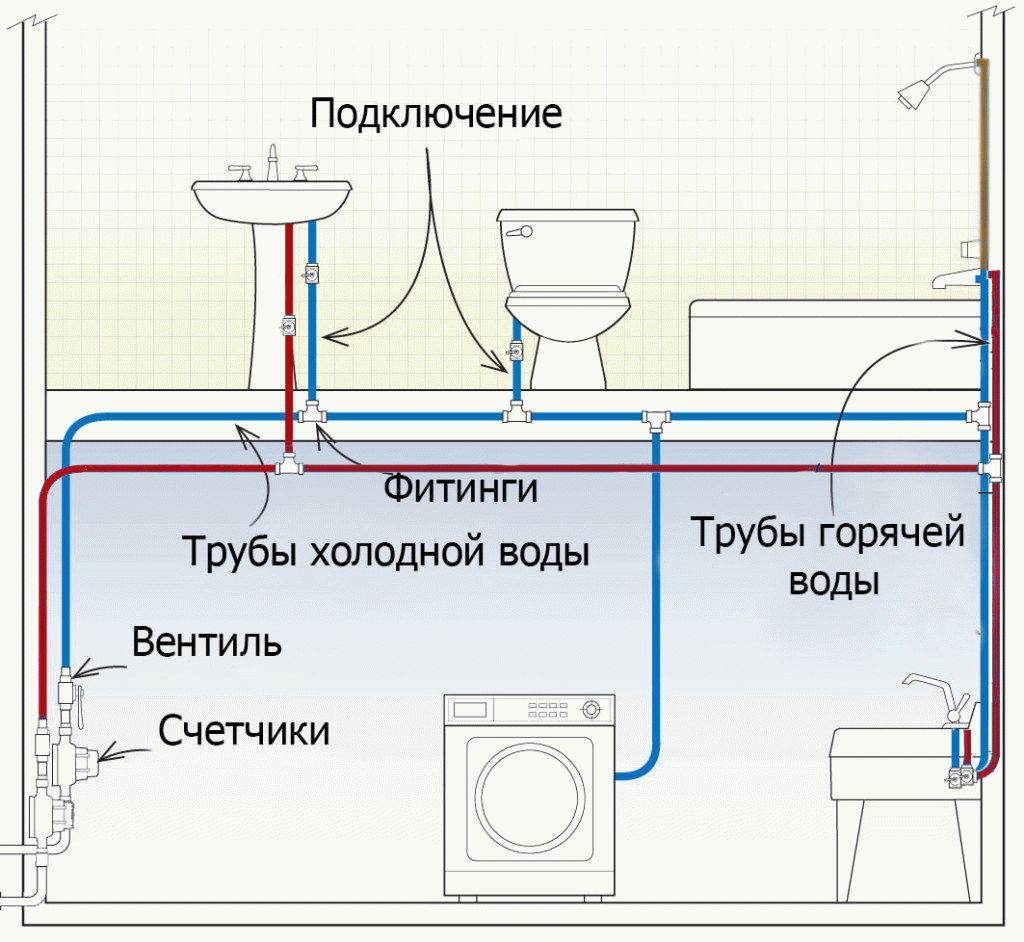
It is important to install DHW branches above the cold water supply and wrap both pipelines with insulating material - merylon or the like. Otherwise, condensation will appear on the cold water lines, which will lead to the destruction of the structure.
Mounted and protected pipes should be laid in channels, and then sealed with mortar flush with the wall. It will be impossible to inspect the structure in order to detect leaks. Therefore, the resistance of elements to corrosion should be maximum, and the quality of the joints should be high. For flush mounting, copper, plastic and metal-plastic pipes are suitable.


I like it I don't like it
Peculiarities
When using a soldering iron, the resulting joints become one-piece, and if there are any defects, a part of the pipeline must be cut off to eliminate them. Couplings are used to build up a pipe that has insufficient length.
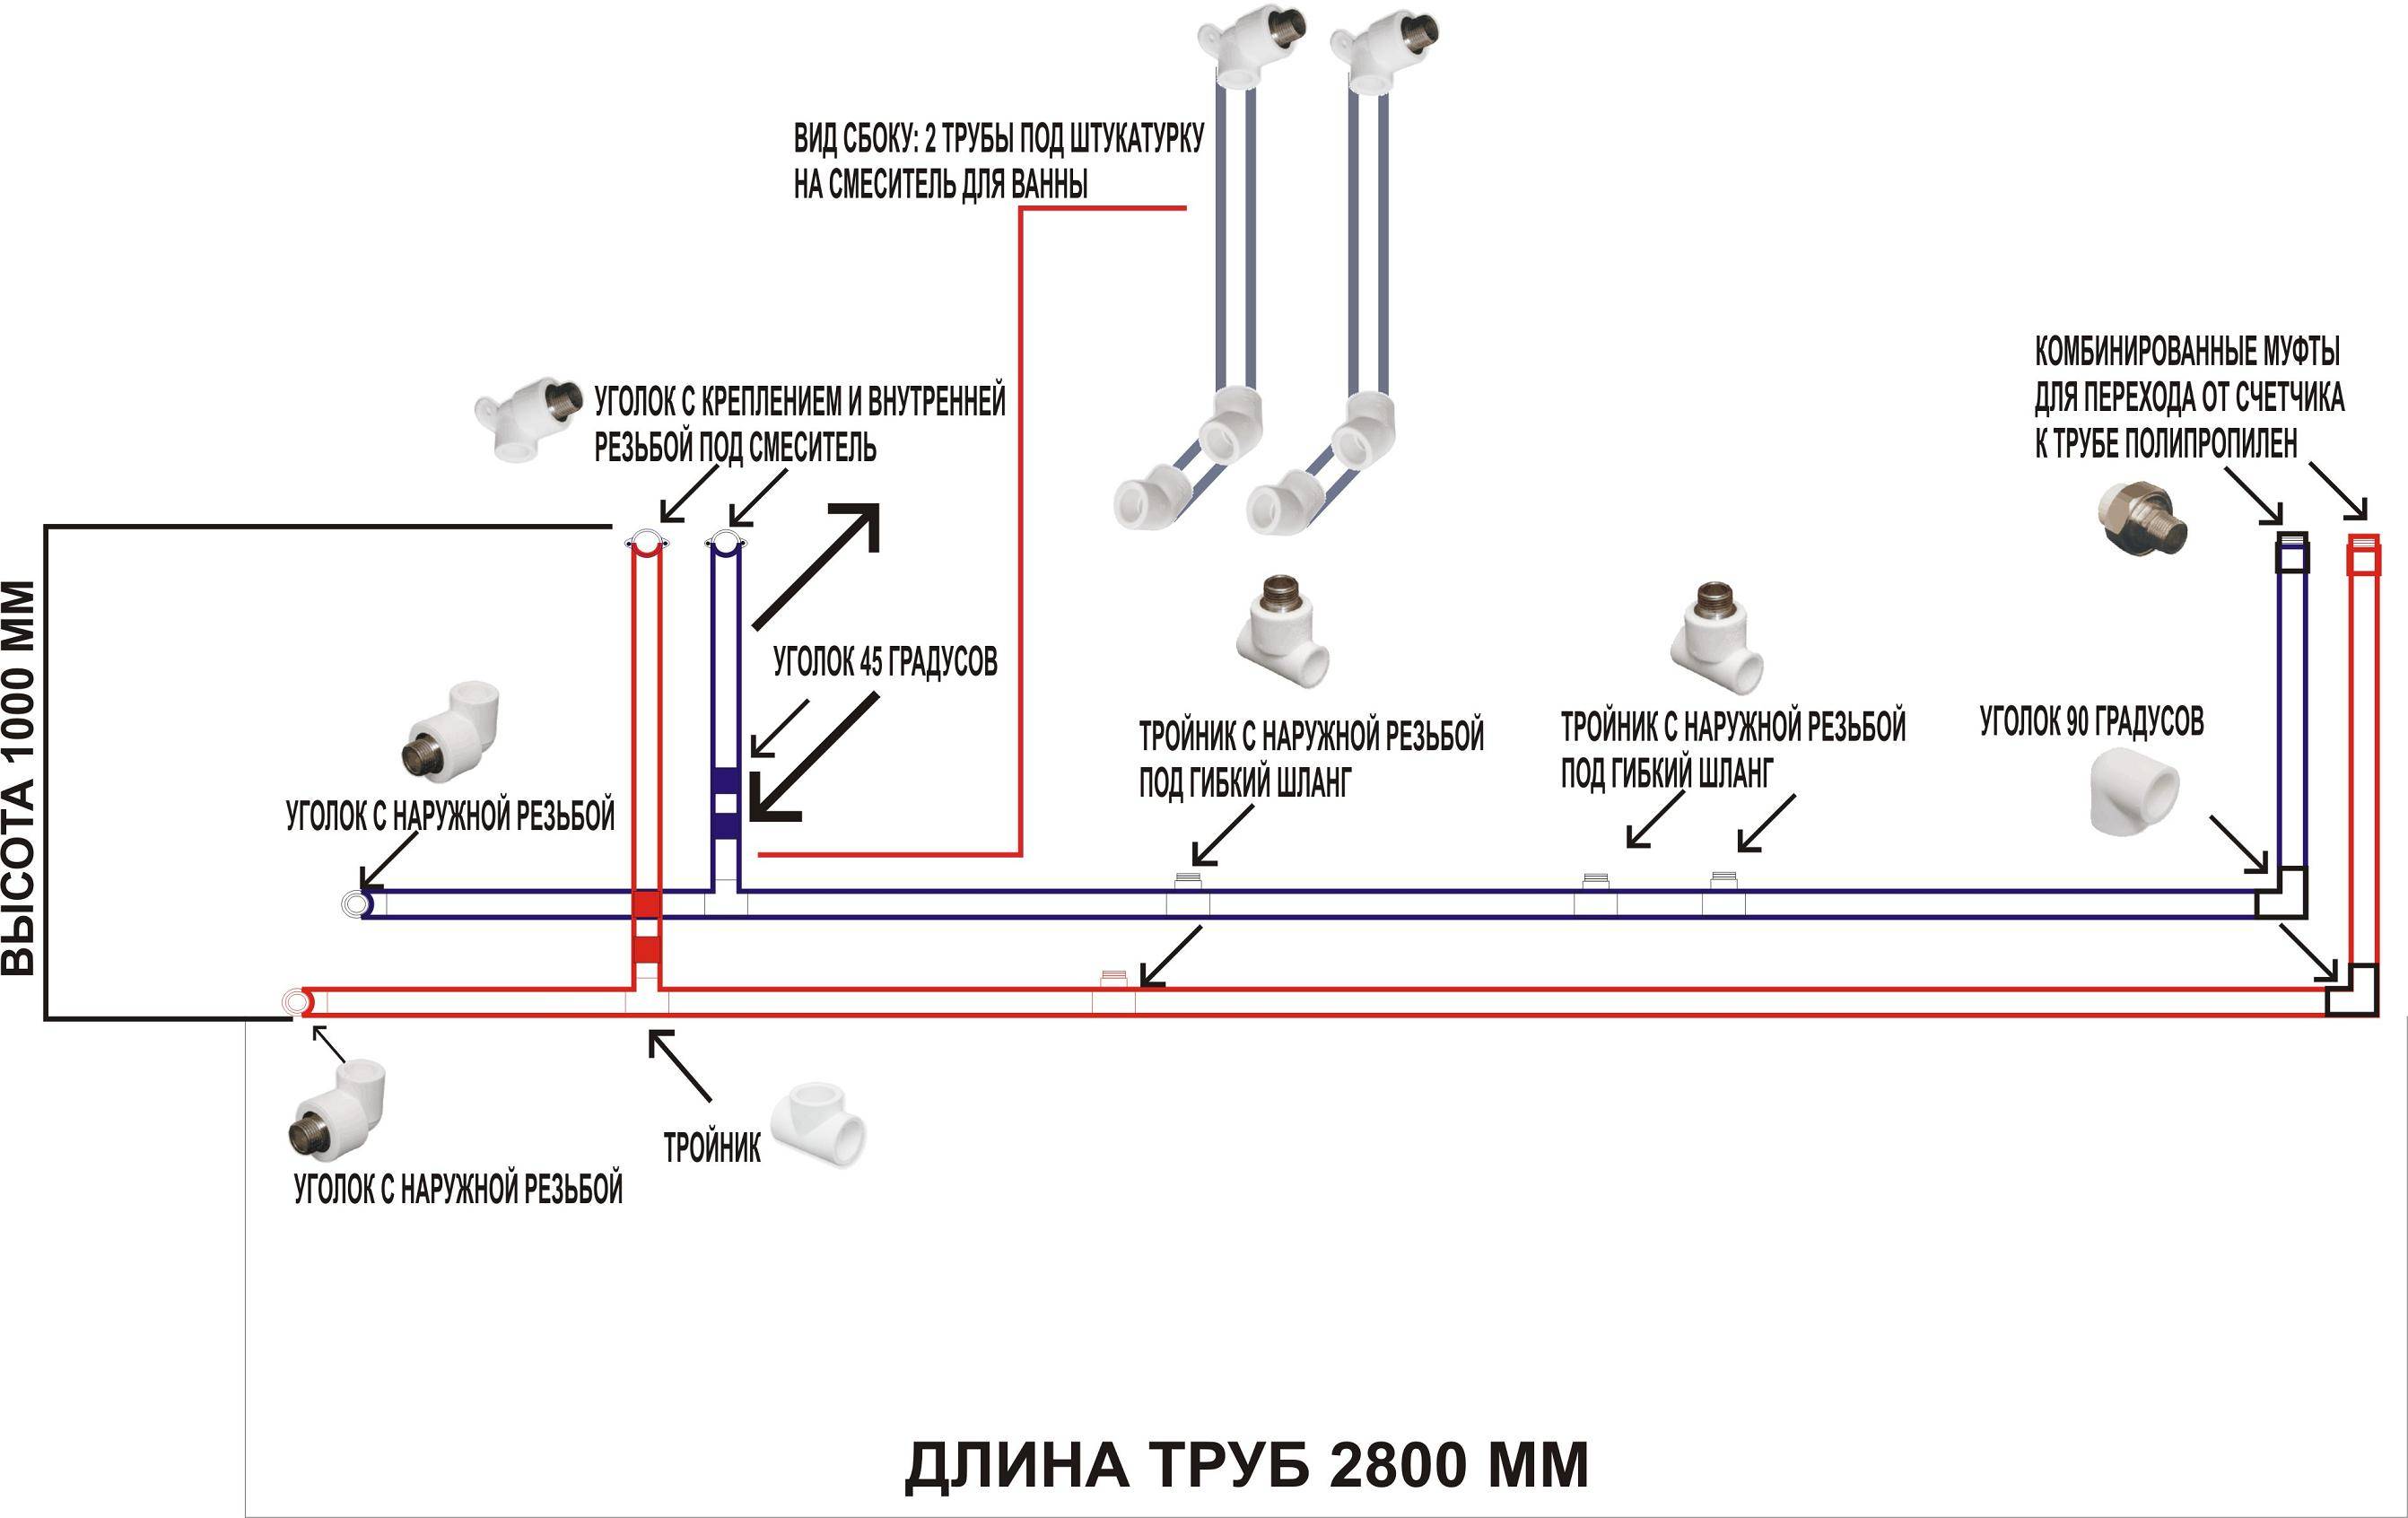
One of the stages of work is the connection of special fittings to the end outlets, on the one hand, a flexible hose is connected to them, and on the other, a pipe is fixed.
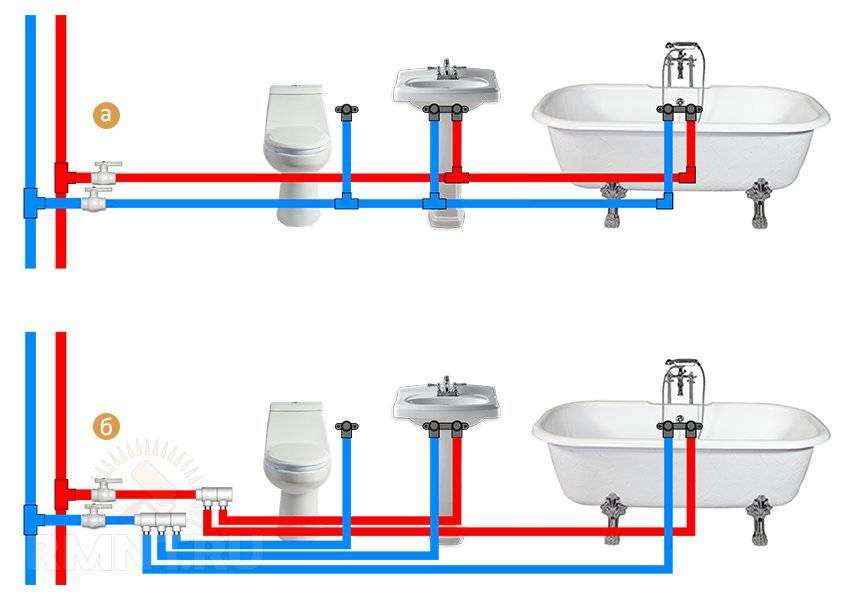
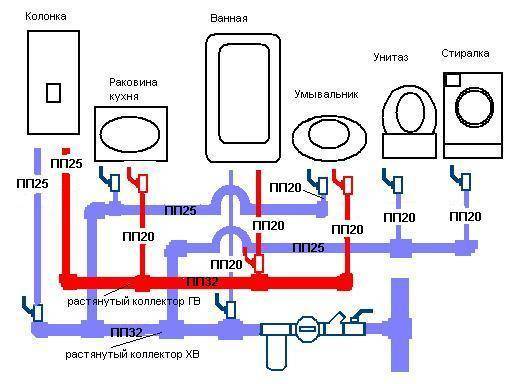
Plumbing in a new building is done in two main ways:
- Soldering pipes starts from the riser towards plumbing fixtures.
- First, the plumbing element farthest from the riser is connected.
Laying methods - hidden and open system
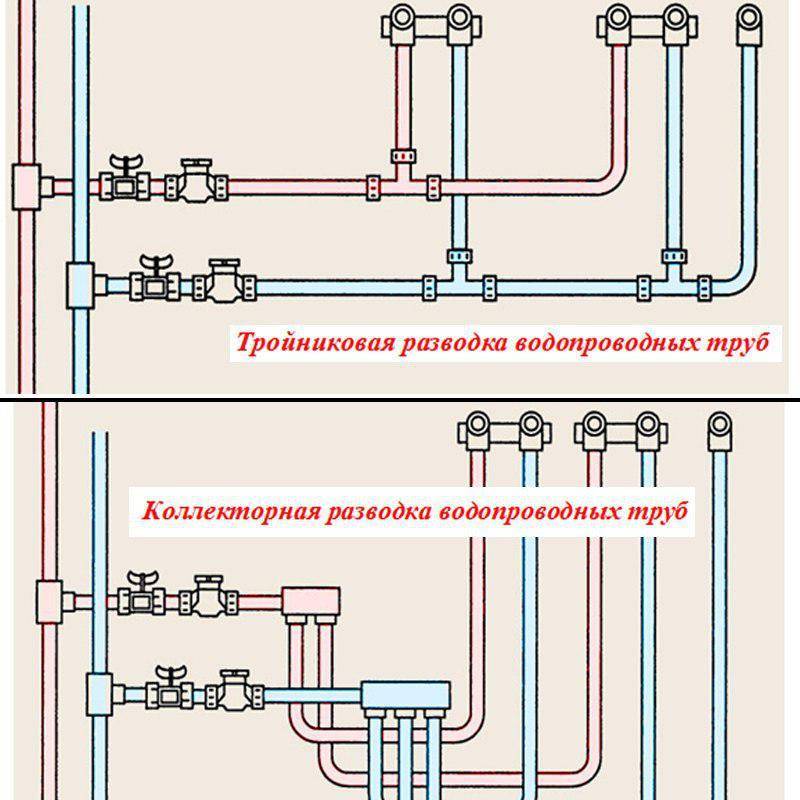
Pipes in the water supply system can be laid in a closed and open way. The choice of one of the methods does not affect either the quality of the connections or the functionality of the entire system and depends only on personal preferences.
It would seem that it is not difficult to decide and the closed method is preferable as more aesthetic and allows you to save up to 10 cm of usable space. Why is an open pipeline still used in the installation of a water supply system? Let's try to give an answer.
Hidden wiring allows you to hide pipes and not spoil the aesthetic perception of the interior of a house or apartment.The hidden method is used when assembling a water pipe from PP pipes. They hide the contour behind a decorative wall, for example, made of drywall, or ditch the walls and lead the pipes into the formed niches, sealing them with facing material or plaster along the grid.
The pipeline should not be tightly adjacent to the surfaces - always leave a small gap for possible repairs. When installing a pipeline in a monolith, it is recommended to place them in a casing, inserting a pipe into a pipe.
The disadvantage of the method manifests itself when it becomes necessary to repair or replace the hidden elements of the system - the plaster or tiling has to be opened and then re-decorated.
In addition, in the event of damage and leaks, the problem may not be detected immediately and lead first to the loss of operational technical characteristics of structures, then to flooding of the premises.
It is better to proceed with the installation of the water supply system with a pre-drawn scheme - otherwise, errors in calculations or assembly will lead to the fact that you will have to ditch new grooves and re-mount the pipes
To avoid such difficulties, when installing the wiring, only whole sections of the pipe are hidden, placing the docking fittings in open areas. In places of installation of shutoff valves, invisible doors are made. This gives access for maintenance to pipe connections, which are the weakest links in the system.
It should also be noted that pipes made of not all materials can be hidden under a layer of plaster - only products made of polypropylene, metal-plastic or copper are suitable for this.
Pipe laying in an open way is carried out after finishing is completed. The method involves the uncovered laying of pipes and water supply elements.It looks ugly, reduces the usable area of the room, but at the same time this method is very convenient for maintenance, repair and dismantling of elements.
Redevelopment and rearrangement of plumbing in the house with such a plumbing device will also not cause difficulties.
Open wiring makes it possible to quickly detect a leak and eliminate the cause of breakage or damage to system elements


