- Useful tips for electrical installation in the bathroom
- PUE requirements and other standards
- Useful tips for electrical installation in the bathroom
- Material selection
- Hidden installation
- Gating
- Drywall installation
- How to choose a socket for a bathroom
- Determination of the type of bathroom devices
- Installation in a protective casing
- How to choose a socket for a bathroom
- Layout of the electrical network in different rooms
- Wiring in kitchens
- The nuances of the location in the bathroom
- How to conduct current in the bedroom or living room
- Common sense when installing outlets in wet areas
- Installation
- Safety and grounding
- RCD application
- Circuit breakers
- Let's deal with the main ground bus
- Safety sockets
- Is it worth using junction boxes
- Conclusions and useful video on the topic
Useful tips for electrical installation in the bathroom
In old buildings, sockets in bathrooms are extremely rare. The reason for this is the compact footage of the room, the elementary lack of free space on the walls and the weak general electrical network of the apartment.
In addition, until recently it was believed that electric points in bathrooms and toilets could not be installed, so they were taken out and mounted near the doors to the bathroom.
In modern housing, the situation is different: combined with a toilet and separate bathrooms have a large area, which allows you to freely place a washing machine, water heater, dryer, additional electric heater-towel dryer, and a “warm floor” system in the interior space.
The daily use of a hair dryer, electric shaver, hair curler, etc. remains relevant.

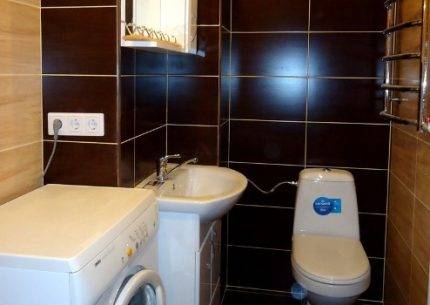
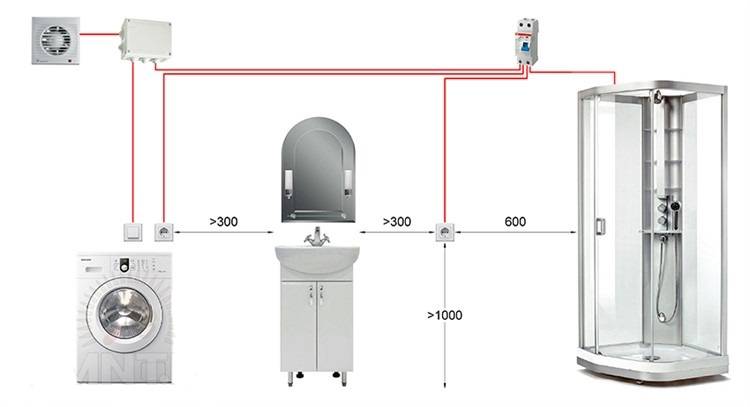
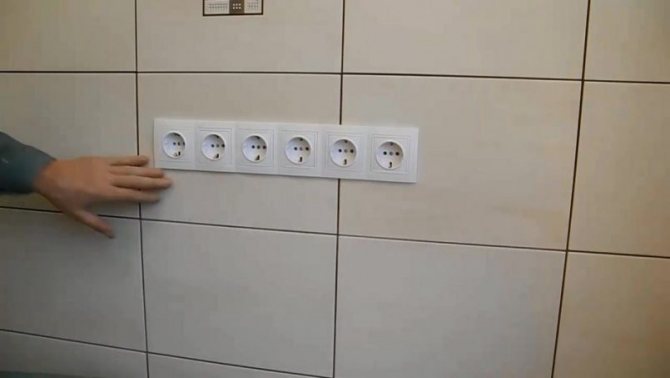
Given the number of devices that require electricity to operate, a block of sockets or 2-3 separate points are mounted in the bathroom
Suppose a washing machine is often installed in a large bathroom. Under it, they usually allocate a separate electric point or mount the cable connection directly, using a terminal block.
According to the rules, the electric point must be located on the left, right or above the device; it is prohibited to install it behind the volumetric unit. Easy access must be provided so that in the event of a product failure, it can be quickly and easily replaced or repaired.
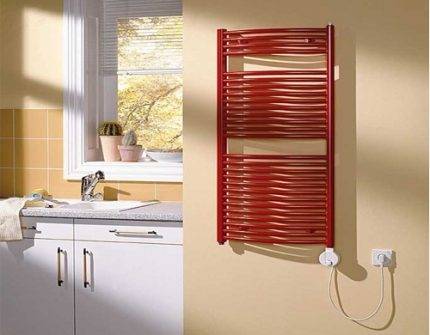
It is also recommended to allocate separately located sockets for connecting a water heater, a storage boiler or a heated towel rail - that is, devices that usually operate in constant mode
Before installing large and powerful equipment, you need to think about whether you need an outlet to connect. Suppose, for the operation of a boiler with a power of 3.5-5.5 kW, operating in constant mode, it is better to use not a conventional power outlet, but a direct connection with a separate machine.
To protect electric points from water ingress when bathing, they can be placed in niches, behind partitions and even in cabinets.
If the bathroom has a sink with a countertop, then you can consider an interesting and convenient solution with a hidden module. The socket block is hidden in the table, and only an element comes out, for which it can be easily reached outside.

The main advantage of the retractable module is 100% protection against water, but subject to timely masking.
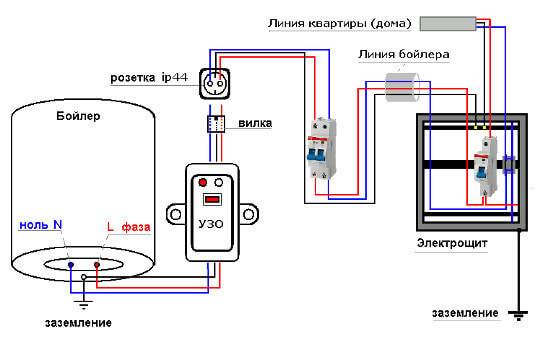
The line going to the bathroom must be equipped with an RCD, and each powerful device with a separate circuit breaker. So, if one device breaks down, the rest of the lines will work as usual.
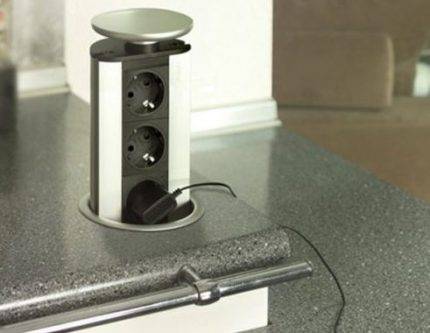
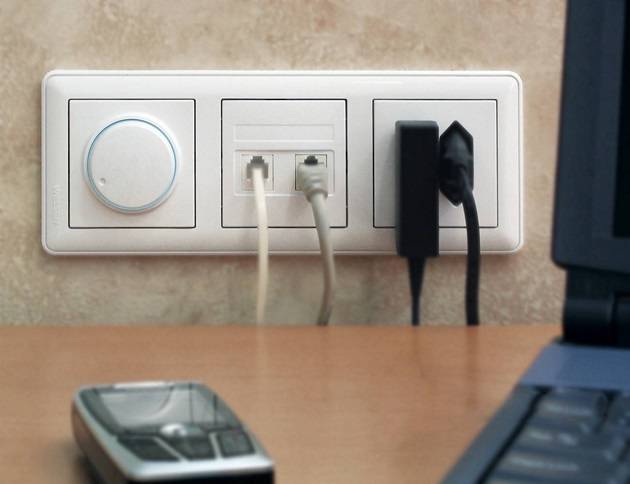
Portable and retractable "columns" and "books" are actively used in offices and kitchens, but they are also suitable for equipping a bathroom
What difficulties can collide during installation electric outlets in the bathroom and how to deal with them, you will learn from the videos presented.
If you still have difficulties or require work of increased complexity, it is better to contact professional electricians.
PUE requirements and other standards
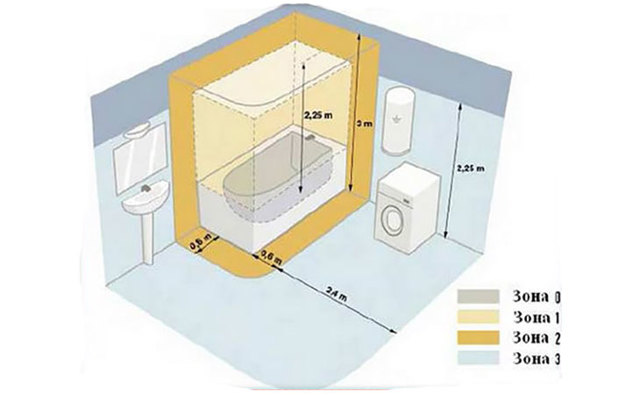
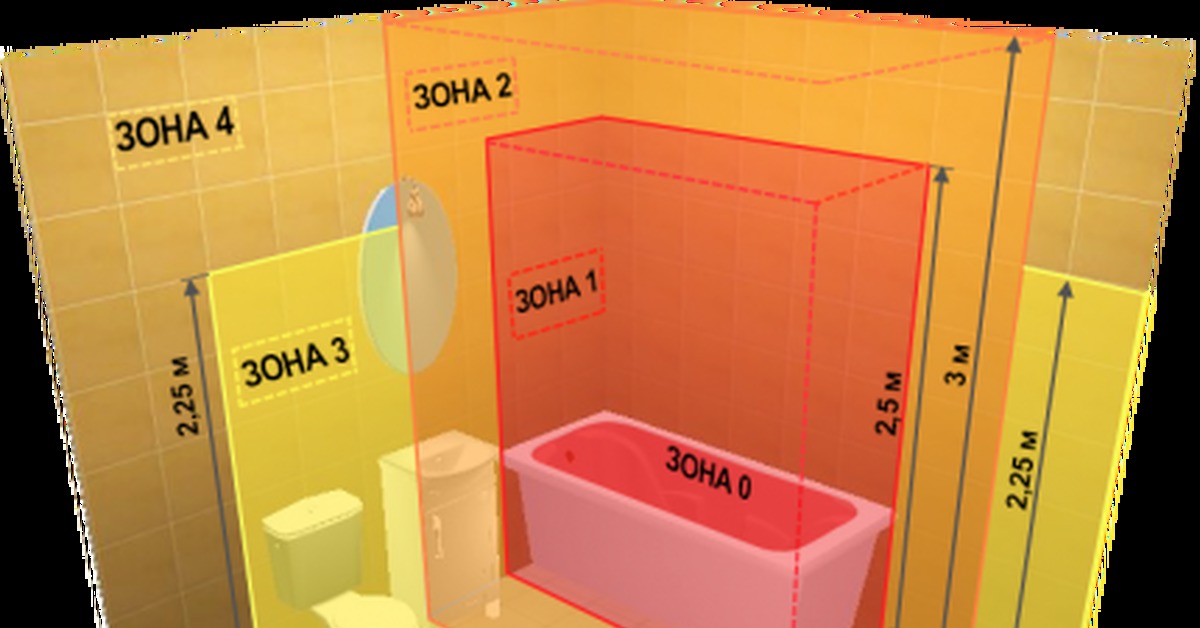
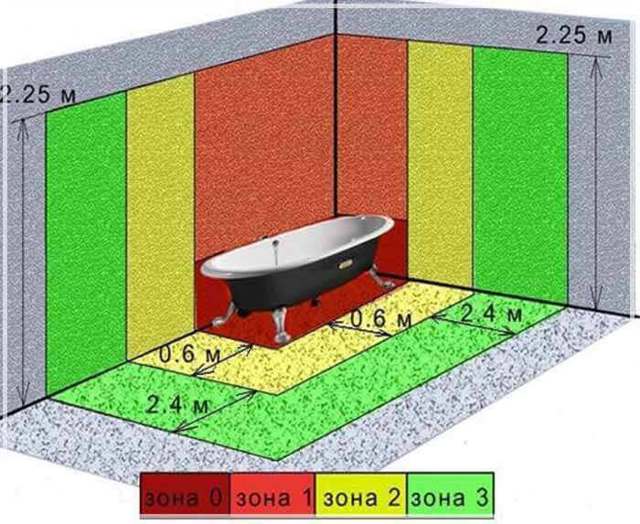
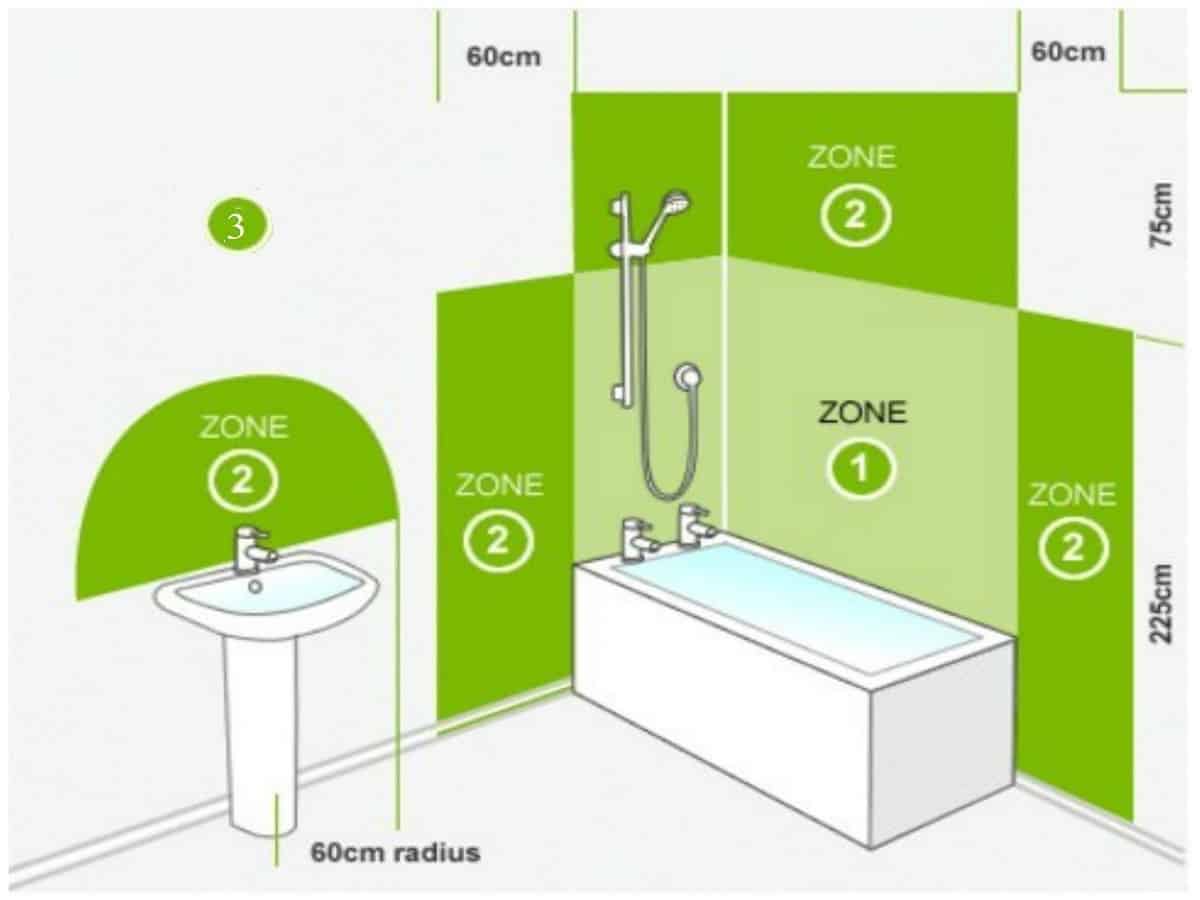
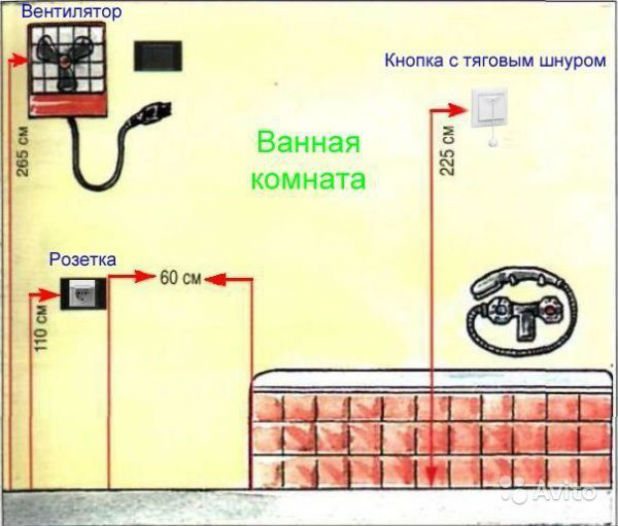
The bathroom is divided into zones, which indicate the admissibility or inadmissibility of installing electrical equipment in them. The figure below shows briefly schematically these zones and the distances to the elements of the bathroom - a bathtub, sinks, etc. Read more about them in GOST R 50571.11-96 (IEC 364-7-701-84) Electrical installations of buildings. Part 7. Requirements for special electrical installations. Section 701 Baths and showers.
Bathroom zones for electrical safety:
- 0 - this is directly where there is water (sink, shower tray, etc.).
- 1 - surrounds the previous area, usually adjacent walls.
- 2 - located at a distance of 60 cm, and for a shower cabin and similar non-rectangular containers within a radius of 60 cm from the edges of zone 0.
- 3 - conditionally safe. It is located outside the second, that is, more than 60 cm from washbasins and other things.
You can find a more detailed description in the above mentioned GOST. And what do the requirements of the PUE tell us? To do this, let's move on to paragraph PUE 7.1, and consider some excerpts from the text:


7.1.40 describes the wiring requirements. It states that both open cabling and hidden wiring are acceptable. The permissible temperature of their insulation must be at least 170 °C.
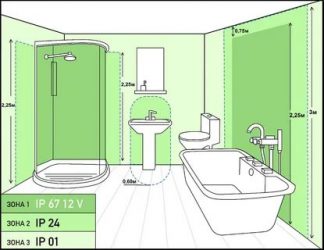
7.1.47 describes the permissibility of installing certain products in the bathroom, in the relevant areas (the table is compiled according to the text from the original):
| Zone | Security class | What can be used |
| IPX7 | electrical appliances with voltage up to 12 V, and the power source must be located outside this zone; | |
| 1 | IPX5 | only water heaters |
| 2 | IPX4 (IPX5 for public areas) | water heaters and lighting fixtures protection class 2 |
| 3 | IPX1 (IPX5 for public areas) | All the rest |
*in zones 0, 1 and 2 installation of junction boxes, switchgears and control devices is not allowed.
7.1.48 is considering installing electrical outlets in the bathroom in general. It refers to the fact that sockets cannot be installed in public showers, but in bathrooms of apartments or hotel rooms it can only be installed in zone 3, according to GOST R 50571.11-96. At the same time, they must be connected through isolating transformers (which is not convenient and expensive in most cases), or through RCDs and difautomats with a trip current of not more than 30 mA.Also, electrical installation products are installed at a distance of not less than 0.6 meters from the doors of the shower cabin.
So, to summarize, where to install sockets in the bathroom and how to connect according to GOST?
According to the PUE and GOST standards, they must be connected through an RCD with a trip current of not more than 30 mA, located no closer than 60 cm from the doors of the shower cabin and located in zone 3. In this case, the wiring can be hidden and open. Place junction boxes at the same distance, and even better outside the bathroom.
It also follows from this that the location of the electrical points is selected only according to the zones. At the same time, it is not regulated at what height from the floor or what distance from the ceiling is permissible. Install them so that it is convenient to connect and disconnect electrical appliances. Also consider the possibility of splashes or streams of water on electrical appliances and their connectors for connection - it should be excluded.
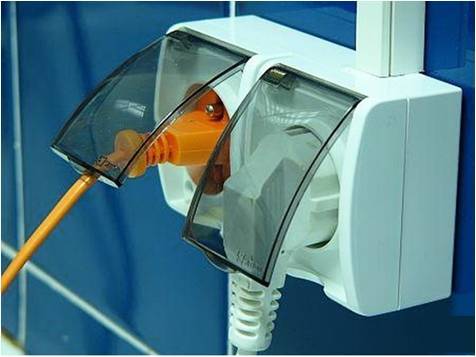
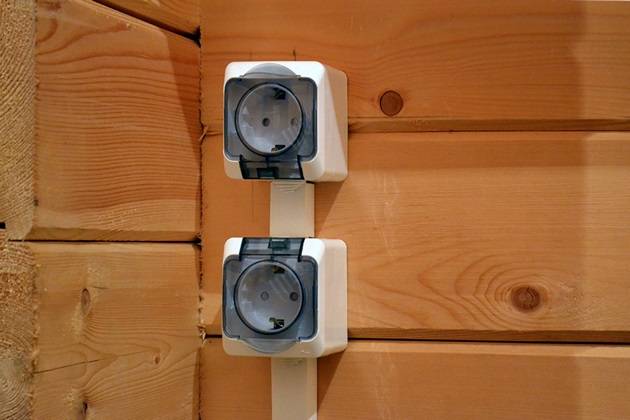
This means that the installation of sockets at the washbasin in the bathroom is also prohibited. It is necessary to take them out to zone 3, i.e. 60 cm from it, and if closer, then in this case it is necessary to use the product with IPx4 protection, that is, with a protective curtain. An excellent example is the Legrand Plexo series of high-quality overhead electrical installation products:
Even such protected products should not be installed either above or under the sink, since you cannot foresee where the water will flow if the plumbing elements are damaged somewhere. Compliance with the requirements of the PUE is your safety.
More about the degree of protection You can find out the IP by going to the article we linked to.
Useful tips for electrical installation in the bathroom
Before installing large and powerful equipment, you need to think about whether you need an outlet to connect. Suppose, for the operation of a boiler with a power of 3.5-5.5 kW, operating in constant mode, it is better to use not a conventional power outlet, but a direct connection with a separate machine.
To protect electric points from water ingress when bathing, they can be placed in niches, behind partitions and even in cabinets.
If the bathroom has a sink with a countertop, then you can consider an interesting and convenient solution with a hidden module. The socket block is hidden in the table, and only an element comes out, for which it can be easily reached outside.
The main advantage of the retractable module is 100% protection against water, but subject to timely masking.
The line going to the bathroom must be equipped with an RCD, and each powerful device with a separate circuit breaker. So, if one device breaks down, the rest of the lines will work as usual.
Portable and retractable "columns" and "books" are actively used in offices and kitchens, but they are also suitable for equipping a bathroom
Material selection
The laying of the power line in the bathroom is carried out with a cable with three cores, with two insulations.

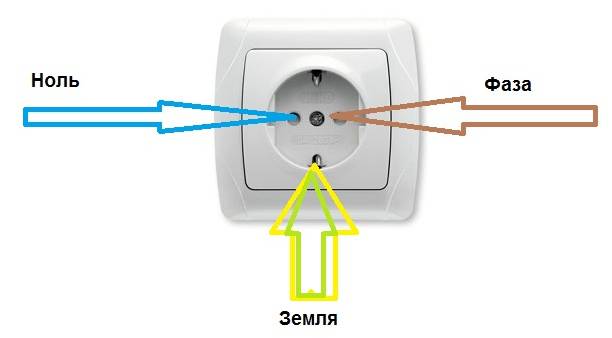
Connecting the cable to the points is facilitated by the color marking of its cores:
- "0" - blue core;
- "phase" - brown vein;
- "earth" - a shade of yellow-green.
Masters advise to purchase a cable made of copper.
- The flexibility of the material allows quick and reliable connections to socket contacts.
- Practically does not oxidize in connecting places.
- When compared with an aluminum cable with the same cross-sections, a large load of copper wire can withstand.
- As for the contact resistance, its indicator is less when it is connected to sockets and the machine.
One core of a copper cable is in the form of a bundle of thin, twisted as one. There is a core from one thick wire. Both options differ little in terms of their technical characteristics.
In order for the connection of the twisted core of the bath socket to be of high quality, you need to solder the ends. Lived with one wire is not soldered. She doesn't bend well.
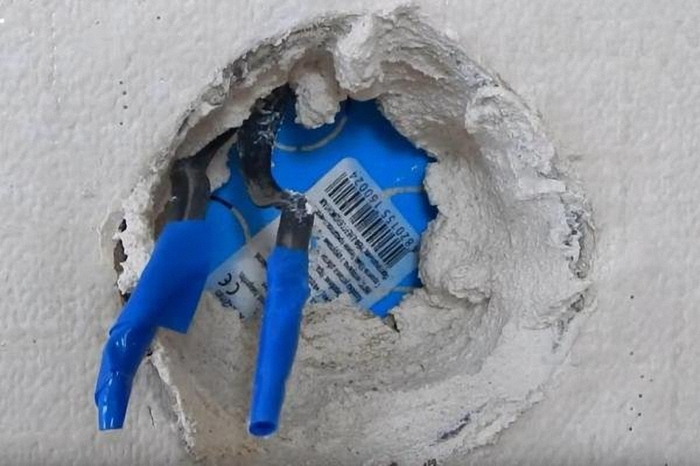
Hidden installation
In this option, the main difficulty lies in the preparation of the landing nest. It is necessary to drill or gouge a recess into which the socket block will be installed. A brick wall lends itself easily to a diamond-coated crown. Reinforced concrete panels are of great complexity, in addition it is necessary to use a perforator drill.
The socket box is installed in the resulting blind hole. For reliability, fixation is carried out with a solution of alabaster or a dowel of nails. The further installation process is quite simple and does not present any difficulties:


- The decorative upper part of the case is removed from the built-in socket;
- The mounting end of the cable is connected to the contacts;
- The socket is installed in its seat;
- By rotating the mounting screw, the contact block is fixed due to the wedging of the mounting tabs;
- The top cover of the case is installed and fixed with screws.
We install a hidden outlet.
Gating
It is used for mounting hidden wiring, allowing you to hide it in the wall. First you need to determine and mark the route on the walls of the bathroom, where the cables are supposed to be laid. They should be placed vertically on a plumb line or under the ceiling, horizontally.Additionally, it should be noted the location of the sockets.
Then you need to go to the direct procedure of gating. It can be carried out by means of a strobe or a puncher with a special nozzle. For large volumes, a disc cutting tool (grinder with a segmented diamond disc) is suitable. Then attach the cables using an aluminum mounting strip or a perforated one. In their absence, alabaster is perfect. You can also use a dowel-clamp. Then it remains only to close the channel with the laid cables.
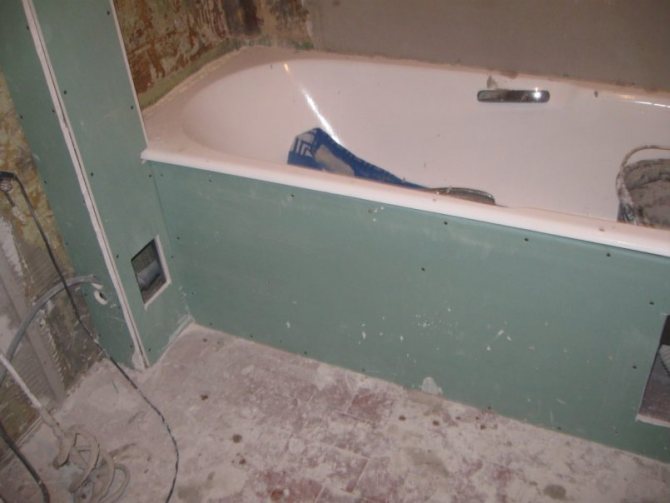
Drywall installation
Drywall partitions do not lose popularity so far, because it is of high quality, convenient and fast. And it is also convenient to lay the wiring under it. The main thing is to avoid "meetings" with self-tapping screws or screws on which drywall is attached. Usually, wiring laid 20 cm from the floor helps with this.
But for reliability, the cables should be carried out in a corrugated pipe that has the appropriate fire safety certificate. This must be done before sheathing the second side of the partition. It should be pulled through the holes located in the vertical racks of the frame. If the corrugated pipe will pass close to the self-tapping screw, you should move it or bite off the self-tapping screw. Next, you should fill the voids of the partition with soundproofing and sheathe the second side so that the cables are tightly clamped between the partitions.
If the above methods are not suitable, there is another option - wiring the box. Modern boxes are made of durable plastic, characterized by inability to ignite. The box consists of two parts: one must be fixed to the wall with simple nails or screws.The second part is easily snapped onto the finished base, only before that a wire should be pulled through it. This installation option provides additional safety from damage and fire.
Mounting wires through a box is a very simple task. It is enough to make markings in accordance with the project, cut the necessary sections of the box and install it along with the wiring. Another advantage of using the box is the ability to open it at any time and replace the wires if necessary. The aesthetic side of the issue also plays an important role. Experienced manufacturers produce boxes of various colors and imitations for cornices or skirting boards, so they do not spoil the interior at all.
How to choose a socket for a bathroom
Some devices for bathrooms, kitchens and combined bathrooms are indistinguishable from ordinary ones - outwardly they look exactly the same. Others have a slightly modified design. However, the main difference lies in the protection, which can be determined by marking - the letter IP and two numbers.
Both digital values are relevant for the bathroom. The first indicates the degree of protection against solid particles and dust, the second - from moisture. Experts recommend devices labeled for both parameters at least 4, but better than 5 or 6.
A table with which you can choose an outlet according to suitable parameters. Successful Choice Examples - IP55 or IP65 Labeled Devices
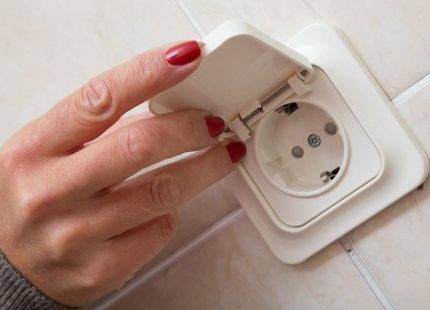
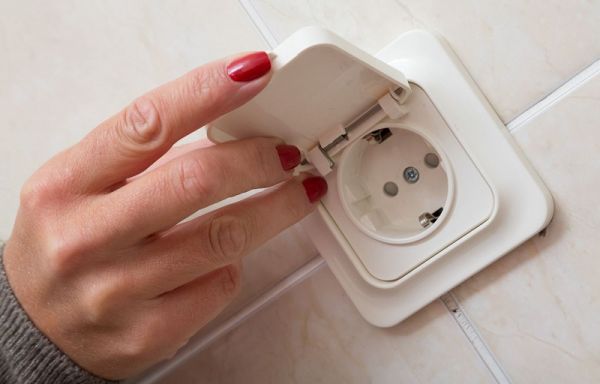
The socket housing, in the marking of which there are numbers 6-8, is sealed and protected even from direct jets of water, however, many devices are additionally equipped with covers. Built-in spring prevents accidental opening.
To use the socket, you need to carefully, with some effort, lift the cover up so that the plug contacts can be freely inserted into the holes.
During the selection and purchase process, as well as after installing the device, it is better to once again make sure that it is intact: there should be no cracks on the case, and the lid should fit snugly and open with force
Professional electricians recommend not to save on the purchase of products of famous brands that serve for years without repair. For example, products from Schneider Electric, GIRA, Legrand, BERKER, ABB, Wessen, Bticino, Makel, Viko receive a lot of good reviews from specialists.
Determination of the type of bathroom devices
According to the rules, the placement of sockets in the bathroom is not prohibited, although due to the possibility of condensation, water drops, there is a risk of electric shock. This also applies to toilets. Therefore, the issue of placement and installation of sockets must be approached with skill and all seriousness. Ordinary outlets for damp or water-exposed areas are suitable, but only when located within 2.5 meters of water. Waterproof outlets work best.
Their choice is not very diverse, it is based on a classification according to two criteria - the number of connected devices and power. The last indicator is important, it depends on which sockets and for which devices you should purchase.
For example, you need a socket for a washing machine with a capacity of at least 16 A, and 8 A is enough for an electric shaver.They will definitely require grounding, and you must choose devices that have an additional contact.
Regarding the design of outlets, everything is individual. Manufacturers produce a sufficient variety of devices with moisture protection that can fit into any interior.
But the most important rule in choosing such devices is to pay attention to the markings. It will allow you to decide which socket is suitable for a particular place in the bathroom.
Housing protection is one of the main features designed in accordance with international standards.

There is a standardized code of four characters - IPXX. The first two symbols refer directly to the very concept of protection, and the next two - protection against the ingress of dust with particles and moisture with water.
For example, the IP 44 marking means that the socket is protected from foreign particles larger than 1 mm, as well as all-round splashes. And the IP 68 marking indicates that the socket is able to withstand complete immersion in water. The final choice depends on in which zones you need to place the sockets.
Installation in a protective casing
If a socket with a protection class lower than IP4 is used, it should be mounted in a protective casing (shield). The protection class of the latter must also be at least IP4.


-
Instructions on how to move the outlet to another place: detailed step-by-step instructions on how to transfer and mask the outlet (135 photos and videos)
-
How to choose a circuit breaker for a house and an apartment: tips for choosing and calculating the parameters of the circuit breaker for current. Which machine is better - an overview of the leading manufacturers (175 photos + video)
-
How to check the voltage in the outlet with a multimeter: a step-by-step description of how to measure the main parameters of the current in the network (120 photos + video)

In general, installing sockets in the bathroom is not difficult.
But, it is important to comply with all the above requirements in order to ensure the necessary level of electrical safety. Therefore, first of all, you need to correctly design the wiring diagram and select the appropriate sockets.
How to choose a socket for a bathroom
Some devices for bathrooms, kitchens and combined bathrooms are indistinguishable from ordinary ones - outwardly they look exactly the same. Others have a slightly modified design. However, the main difference lies in the protection, which can be determined by marking - the letter IP and two numbers.
Both digital values are relevant for the bathroom. The first indicates the degree of protection against solid particles and dust, the second - from moisture. Experts recommend devices labeled for both parameters at least 4, but better than 5 or 6.
The socket housing, in the marking of which there are numbers 6-8, is sealed and protected even from direct jets of water, however, many devices are additionally equipped with covers. Built-in spring prevents accidental opening.
To use the socket, you need to carefully, with some effort, lift the cover up so that the plug contacts can be freely inserted into the holes.
Professional electricians recommend not to save on the purchase of products of famous brands that serve for years without repair. For example, products from Schneider Electric, GIRA, Legrand, BERKER, ABB, Wessen, Bticino, Makel, Viko receive a lot of good reviews from specialists.
Layout of the electrical network in different rooms
Recommendations for installing sockets in rooms (kitchen, bedroom, bathroom) may differ from each other.This is due to the level of humidity, the number of household appliances connected to the power grid, and fire safety standards.
Wiring in kitchens
There are no exact instructions for the location of the electrical connection points and sockets in the kitchen, but the recommendations are collected based on the characteristics of the operation of this room and the possible number of connection of household appliances. So, in the requirements of the PES it is stated:
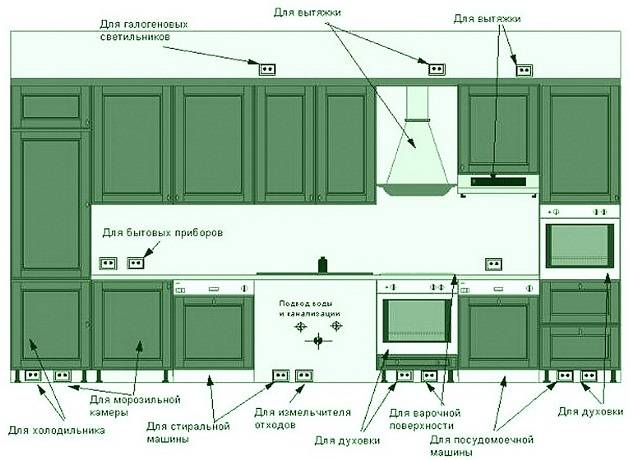
- Switches and plug sockets are located at a distance of 60 cm from the door, the same requirements are put forward for the sink in the kitchen;
- Distance to the gas pipeline from 50 cm.
They also highlight a number of tips on the location of connection points to the power grid for various kitchen appliances and household appliances:
- To connect a dishwasher or refrigerator, choose a height of 10–20 cm from the floor. There are models of equipment where manufacturers have installed a short wire for connection, for them they make separate “power points” at a height of 0.5 m.
- Small electrical appliances: microwave, toaster, multicooker, blender and others are connected to sockets installed 20 cm up from the countertop or 110 cm from the floor.
- For the hood, it is recommended to make a separate connection point to the mains, retreating 2 m from the floor. At the same time, there must be at least 20 cm from the middle of the device to the outlet, which is necessary for ventilation.
- If built-in household appliances are involved in the layout of the kitchen, then separate sockets behind cabinets are made for its “power supply” for convenient and permanent connection of appliances. It is recommended to mount them from 30 to 60 cm from the floor and make sure that the connected cable is not pinched by furniture.
- To connect the lighting under the shelves and cabinets in the kitchen, sockets are used, mounted above the furniture at a distance of 5–10 cm. The switches are brought to a height convenient for users.
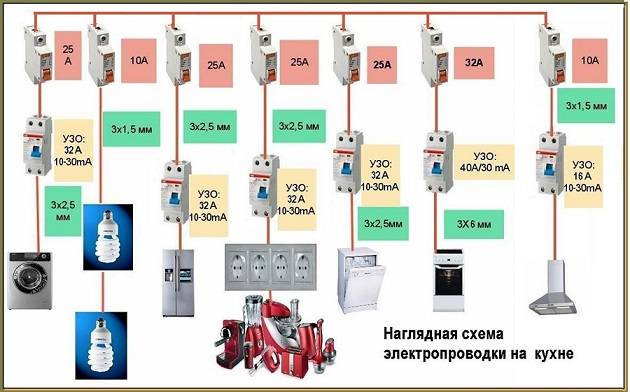
To calculate the power, indicators are taken from the data sheet of household appliances or average indicators:
- oven, hob have their own sockets with a current strength of 32 to 40 A;
- a separate line is needed for a heating element with a power of 3.5 W or more;
- for a refrigerator, microwave or toaster, a regular 16 A socket is suitable.
Such recommendations will help to correctly draw up a project and distribute sockets. The switch for general light in the kitchen is located on the wall at a user-friendly distance from the floor (from 60 to 90 cm).
The nuances of the location in the bathroom
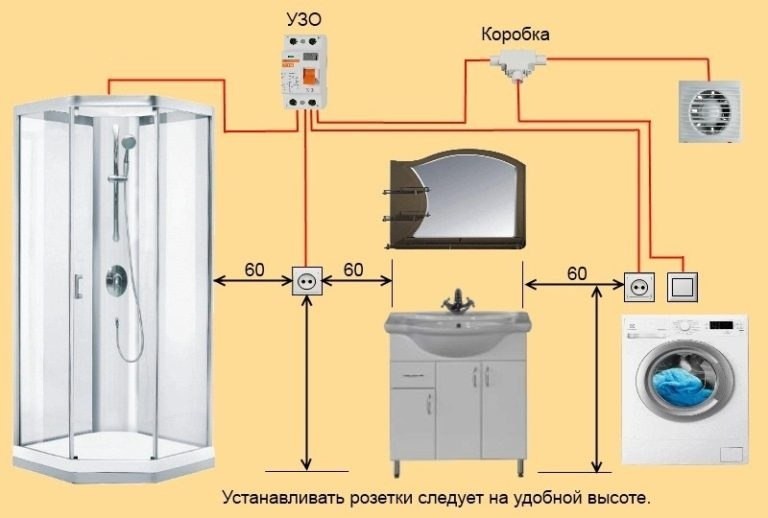
The main requirement when choosing the height of the sockets in the bathroom is protection against water penetration. To do this, you need to choose a model with an RCD - a special mudguard cover. There are several recommendations for connecting electrical appliances:
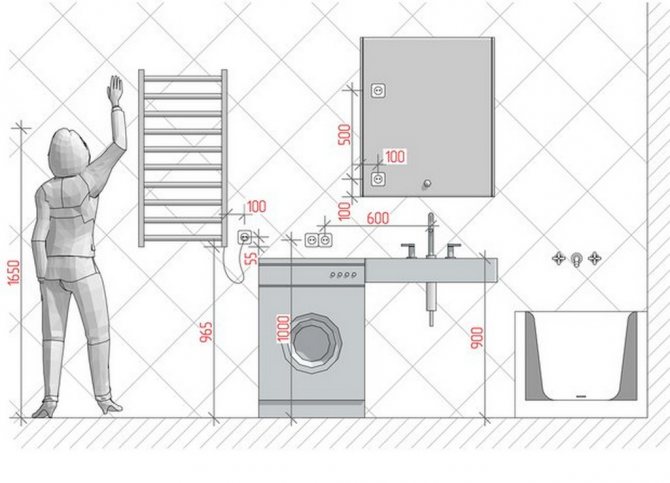
- for a washing machine, a height of 1 m is observed;
- for water heaters - at least 180 cm;
- if it is necessary to turn on additional devices, another socket is mounted near the sink at a height of 110 cm.
The general light switch for the entire room is displayed outside the bathroom and installed at a convenient height for operation.
How to conduct current in the bedroom or living room
The height of installation of electrical connection points in bedrooms and living rooms is not regulated. These rooms do not have points of contact with the gas pipeline or high humidity, but there are several general recommendations for the location of entry points to the power line:
- the average height of the sockets from the floor is 70 cm;
- auxiliary sockets near the table are mounted at a level of 0.3 m from the floor covering, where a block of 2-3 sockets is made;
- behind TVs or other household appliances, “power points” are installed at a height of 1.3 m from the floor surface, and additional Internet sockets are made there.
The switch is made alone at the entrance to the room at a height of 90 cm from the side of the door handle.
Installation of sockets in the corridor of apartments and private houses is optional. At the discretion of the owners of the premises, they mount one or two entry points to the power lines to connect a vacuum cleaner or telephones.


Common sense when installing outlets in wet areas
Yes, we understand that this is unlikely, no one will check where you install sockets in the bathroom, the choice is yours, but there are sad statistics. The decision is yours alone. It is logical that sockets are not located near the floor, even in zone 3. What if a flood happens? Sockets should not be in the water. It is logical not to place sockets opposite valves or flange connections.
Even if the valve bursts, the water jet should not be directed to the outlet, because at this time your loved ones may be in the bathroom. There are recommendations to use RCDs with a leakage current of 10 mA in bathrooms, see SP, Appendix A.
Installation
Installation of sockets in the bathroom from scratch should be carried out based on the recommendations:
- before installation, the line is equipped with a separate machine for emergency shutdown;
- each socket has a separate connection with a separate wire;
- the socket is completed with a grounding cable and equipped with a cover;
- the device should be located no closer than 60 cm from water sources;
- installation is carried out without repair, so the socket must be equipped with a separate cable, which is connected to the switchboard through the machine.
You will need the following tools for installation:
- indicator for measuring voltage;
- Phillips screwdriver;
- a knife or a special tool for removing insulation;
- level;
- drill;
- pliers.
Then the installation process begins. Conventionally, it is divided into 4 main stages:
- Drilling holes into which dowels are installed. They are needed to secure the device.
- Then prepare the wiring. The tips are cleaned of the insulating layer with a knife or a special cleaning tool.
- After that, the bolts are installed in the prepared holes. Then they are connected to the outlet and attached to the wall in a box with dowels. Moisture-resistant devices are equipped with ready-made holes, which are equipped with rubber plugs. They are connected to the wiring before connecting to the mains.
- The final step is to install the case in the allotted place and supply electricity.
If a built-in socket is to be installed, then at the first stage you need to make a hole in the wall according to the diameter of the box. After that, it must be installed on a plasterboard wall with special screws and wires connected.
Installation of an additional outlet is carried out according to a similar algorithm, but with a slight difference. There are 2 ways of cable entry:
- laying a new line of electrical cable from the shield, installing a separate circuit breaker;
- installation of a transformer, in this case, grounding is carried out from the nearest electrical point.
The rest of the steps are the same as for the initial installation.When installing additional equipment, it is necessary to make additional holes in the facing coating; for this, specially designed drills and crowns are used.
When installing, follow the safety instructions:
- installation is carried out in a de-energized apartment;
- check the wires with an indicator before connecting;
- do not allow contact with bare wires.
By following the simple installation rules, you can independently connect the outlet in the bathroom without much effort.
Sockets in bathrooms can and should be installed.
To comply with safety requirements, electrical sockets are installed only in the third zone of the room at a certain height and distance from water sources, with a degree of protection of IPx4 and higher, they must be equipped with grounding, an automatic device or RCD is installed to turn off the electricity in case of a current leakage
The choice of outlet is made taking into account the devices connected to it and their total power. For small household appliances: a curling iron, a razor, you can use 8 A sockets. For powerful devices, such as a washing machine and water heaters, you will need 16 A sockets. By observing the above installation and installation requirements, anyone without special knowledge and skills can independently connect the device.
Safety and grounding
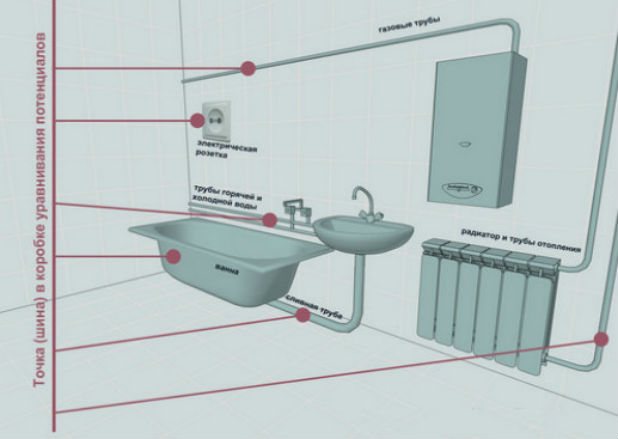
Safety and functionality are requirements for any wiring. Grounding is mandatory on all sockets, stationary electrical equipment. In addition, potential equalization is connected. Previously, when two-wire wiring was used, it was required to bring a separate ground wire to the shield. Now the cables are three-core, all devices are immediately connected to ground.
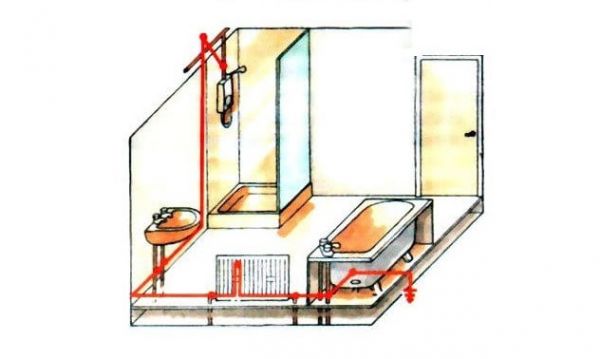
In a private house, you should take care of grounding yourself. 3 metal corners or pieces of reinforcement are deeply driven into the ground. The elements are connected to each other by welding. The circuit is connected to the switchboard with a steel wire on bolts with washers.
RCD application
Residual current devices are mandatory for wiring in the bathroom. They break the power circuit if there are insulation breakdowns. Installed at the entrance to the shield. The nominal value of the common RCD for the group line is 30 mA.
Security is enhanced by personal devices installed for each power line leading to sockets and electrical equipment. They must respond to a current of 10 mA.
Circuit breakers
Circuit breakers protect the circuit and devices from overload or short circuit. In order for them to fulfill their purpose, you should choose the right power. It is calculated by the formula I \u003d P / U, where I is the rated current, P is the power of all devices, U is the mains voltage.
In the shield there can be a general automatic switch for the bathroom. It is better to mount devices for each consumer group: separately for lighting, sockets, a boiler, a heated towel rail, a washing machine.
Recommended rating of the machine under load:
- up to 0.2 kW - 1 A;
- 1.3 kW - 6 A;
- 2.2 kW - 10 A;
- 3.5 kW - 16 A;
- 5.5 kW - 25 A.
Connection is carried out only after checking the correct installation.
Let's deal with the main ground bus
According to the new rules, a main earth bus is installed in the switchboard. This is a group of contacts made of copper or steel, from which ground wires diverge. One is screwed to the body of the shield, the rest come from the instruments. In older houses, there may be no bus, the wiring is made with a two-core cable.It is changed to a three-core one, a bus is installed in the shield. A working zero and a ground wire are connected to it. A separate contact is selected for each conductor.


If you ignore this rule, you can get an electric shock by touching several objects at the same time at the time of the current leakage.
Safety sockets
Sockets must have protective automation separate from lighting: an isolating transformer or RCD. The rated current of the RCD is the same or a little more than that of the circuit breaker, otherwise it will not work. Power consumers (boiler, washing machine) are connected to separate sockets. Located only in zone 3, protection class IP44, splash-proof cover and grounding are required. Distance from the floor 90 cm.
Is it worth using junction boxes
Modern wiring technology involves a complete rejection of junction boxes. Separate cables run from the inlet panel to each consumer. The old way has flaws. Connected by twisting, terminal blocks, the wires in the junction box are heated, the insulation is destroyed. If you use this option for the bathroom, then only outside, inside installation is prohibited.
Conclusions and useful video on the topic
What difficulties you may encounter when installing electrical outlets in the bathroom and how to deal with them, you will learn from the videos presented.
Video with comments on the installation of outlets:
About the nuances of working with tiles:
Professional installation of the socket block on the tile:
Installation of a surface socket:
Electrical work requires a certain skill and safety precautions. However, home craftsmen can easily cope with activities such as replacing and installing sockets and switches.If you still have difficulties or require work of increased complexity, it is better to contact professional electricians.


