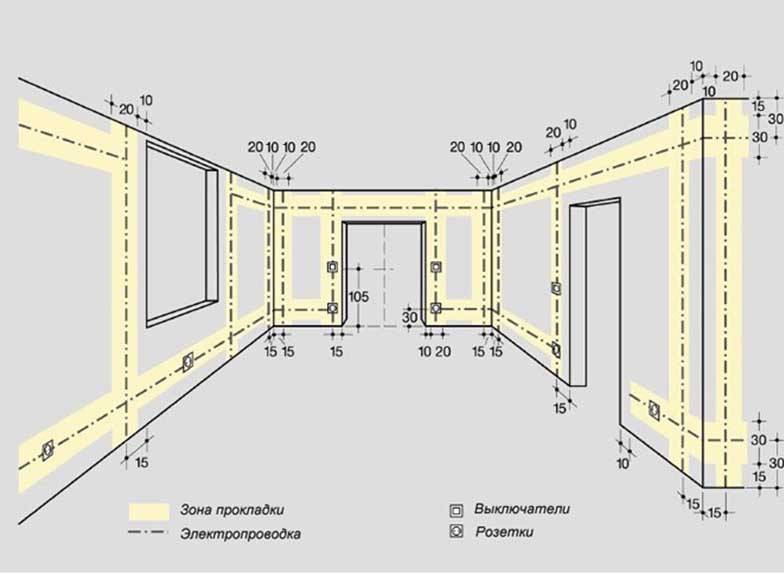
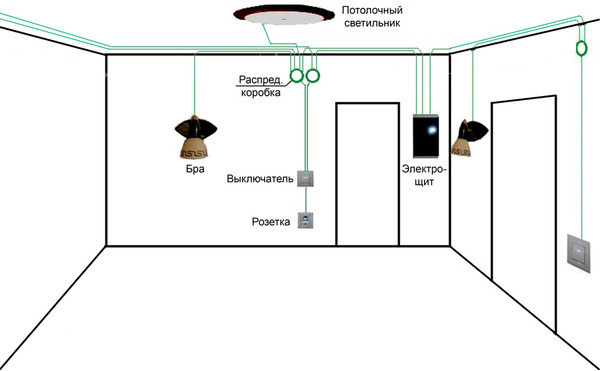
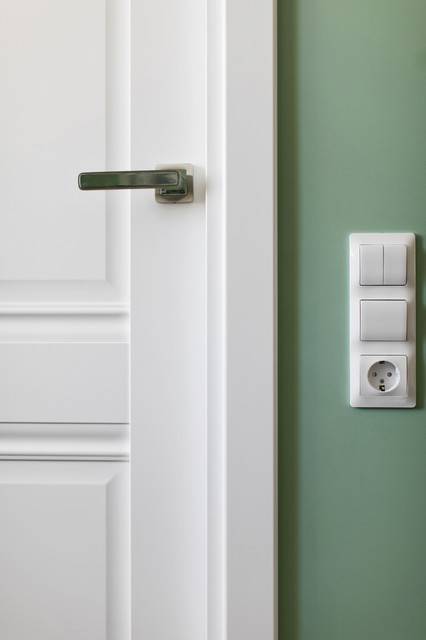
- Children's room
- 1. At the door
- 2. By the bed
- 3. At the desktop
- Installation and connection of an external socket without grounding
- Schematic diagram of a switch and power outlet through one junction box.
- Nuances of installation in brick and concrete walls
- Installing a socket in a plasterboard wall
- Connecting sockets (general scheme)
- Bedroom
- 1. Next to the bed
- 2. Near functional areas
- 3. At the door
- Kitchen
- 1. For household appliances and indoor lighting
- 2. For additional equipment
- Do-it-yourself connection diagrams
- electrical outlet
- Multiple appliances
- important to important
- Design features of the device
- Safety rules and connection of conductors, selection of cable section
- Replacement and installation process
- Briefly about the types of recessed sockets
- Prices for waterproof sockets
- Types of sockets
- Types of outlet malfunctions
- Installation and connection of an external socket with grounding
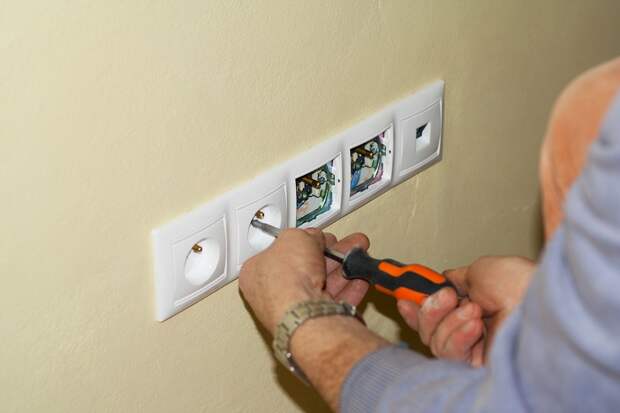
- Installing the socket block
- Important nuances
- The nuances of installing a multibox on a plinth
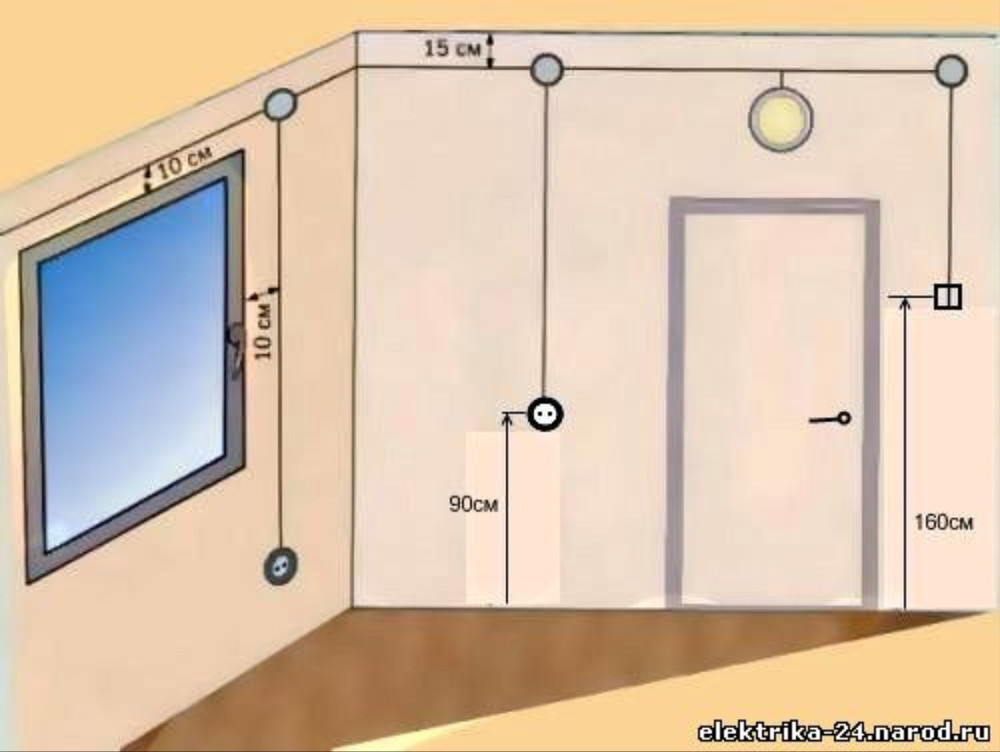
Children's room
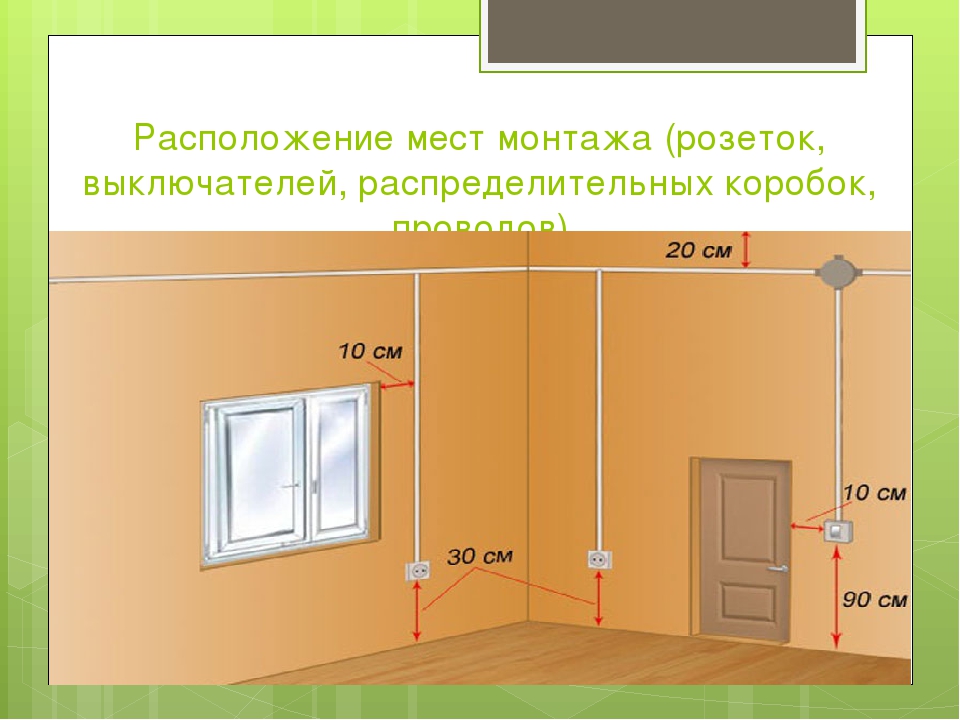
1. At the door
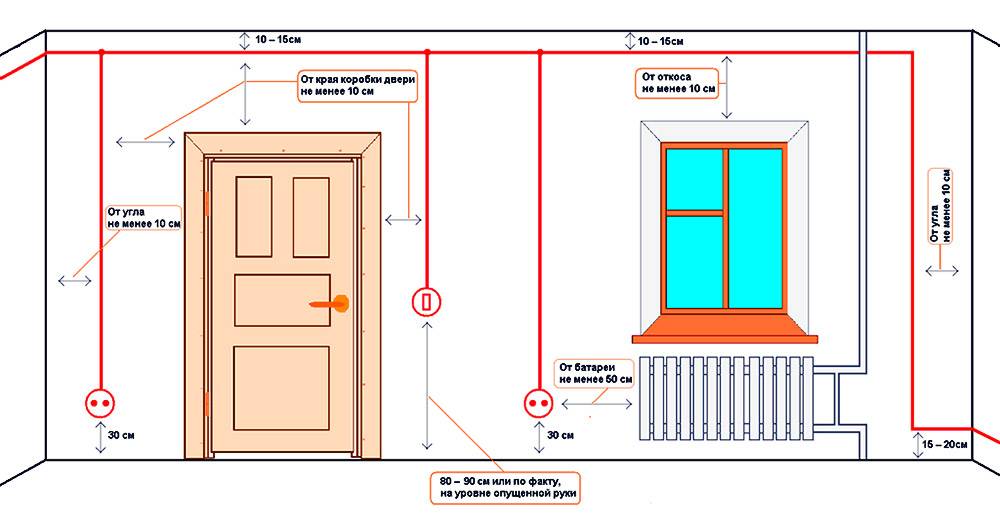
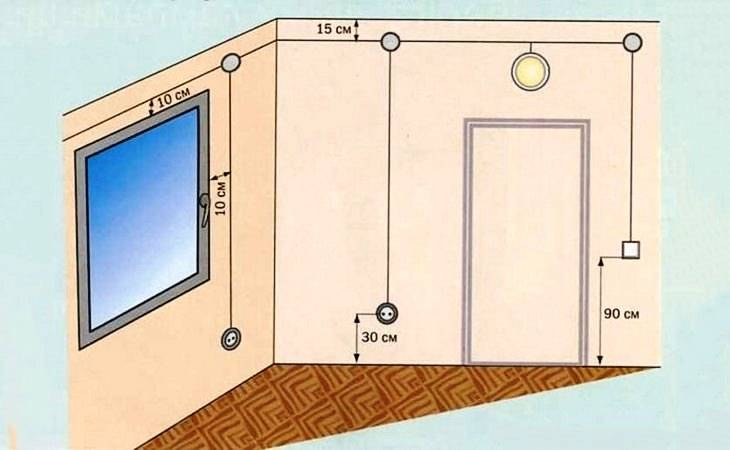
At the entrance to the room, a switch is traditionally placed. Usually the toggle switch is installed at a height of 75-90 cm from the floor, so that each family member is comfortable
It is also important to see if the switch closes the cabinet or open door - place it on the same side as the handle.

An outlet should also be placed next to the switch.It will be needed for a vacuum cleaner, heater or humidifier. Recommended placement parameters: height about 30 cm and distance from doors 10 cm. If the child is small and begins to walk, provide plugs or covers for sockets.
2. By the bed
Near the bed, you will need an outlet for a night light, a musical pendant for a crib, or another device (the same air humidifier). Do not forget about protection, this place will become the most accessible for the child as soon as he starts to get up on his own in the crib.
For an adult child, sockets will also come in handy in front of the bed, for the TV. Sometimes they can be interesting to beat in the interior, if the TV has not yet been purchased.
3. At the desktop
The student's room should be with a desk - sockets are also needed there. At least for a lamp and a computer. Where to put - above the countertop or below - is a moot point. Some find it inconvenient to constantly crawl under the table to connect the device. Others don't like the look of the wires. Choose after weighing the pros and cons.
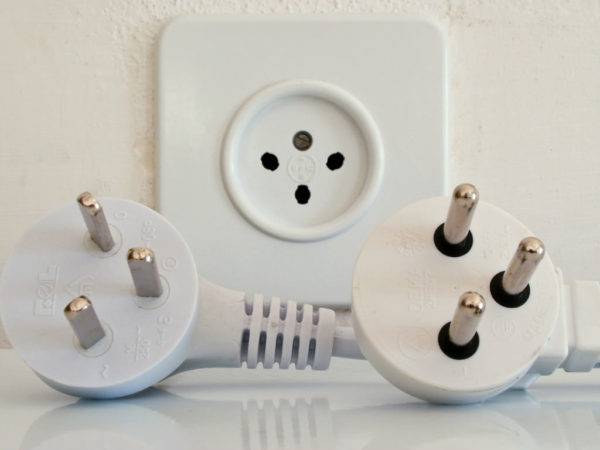
Installation and connection of an external socket without grounding
This type of socket is installed if:
- The wiring in the house is laid over the walls.
- The wiring in the house is internal, but the installation of a new outlet is required, for which there is no desire to break through and then re-align the wall. It is easier to run the wire in the cable channel from the nearest outlet or from the junction box.
- When installing sockets in utility rooms.
Operating procedure:
- To gain access to the contacts of the socket, it must be disassembled by unscrewing the bolt that secures the housing to the base.
- The socket has two contacts to which the phase and neutral wires must be connected.To do this, the stripped ends of the wires should be brought into special connectors and tightened with bolts. Polarity does not matter in this case.
- Next, attach the base of the outlet to the wall. If the wall is not concrete, then you can put it on self-tapping screws. On a concrete or brick wall, having previously marked the attachment points, drill holes and hammer in the dowels.
- Before installing the socket housing on the base, use a construction knife to cut an opening for the wire to pass through the existing markings.
- Put the prepared body on the cover, tighten the fastening bolt.
 Outdoor socket without grounding
This problem can later lead to a malfunction of the wiring, and fires due to overheated wiring are not uncommon.
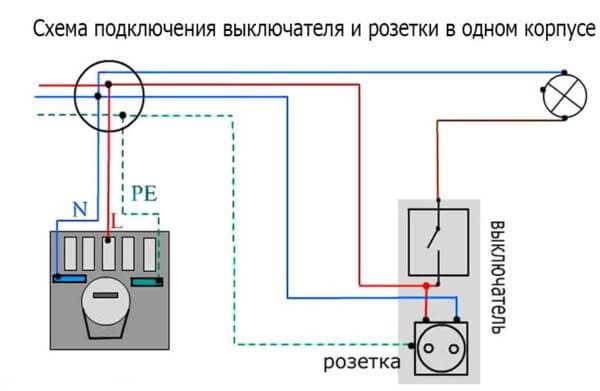
Schematic diagram of a switch and power outlet through one junction box.
Previously, the elements of the electrical network were mounted in accordance with the rules of the Soviet standard. Another two-wire wire is laid from the junction box to the outlet. In a house or apartment, usually single or double sockets are installed under hidden electrical wiring under a two-plug plug.
Scheme for connecting a socket to an electrical system Since the current standards do not regulate the relative position of the neutral and phase conductors, you can connect them in any order. The scheme for connecting such a device to a common network is extremely simple, and you can handle it yourself.
In addition, devices may have other additions. The switching device must only work on a phase break.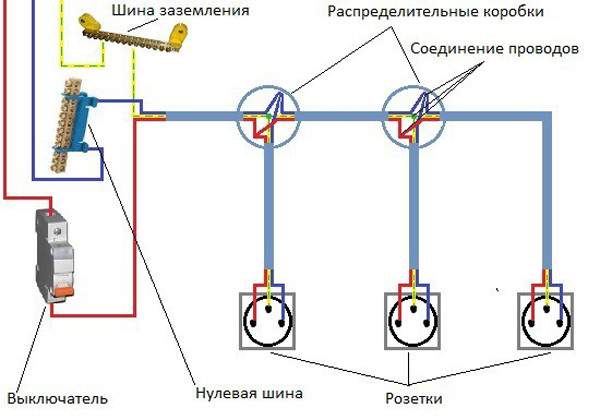
The wires to the power outlet are connected, in the same way as to the switch, through threaded contacts.We work with fittings Replacing a burnt one In this case, the best option is to install an overhead socket in an old socket box, especially since the socket blocks are not sold separately, and the old socket box may have led from time to time.
But the latter are not as popular as the first two options.
If foam plastic or other fusible combustible material is used as a soundproofing material of the partition, the thickness of the wiring section should be increased by one and a half times.
In the old ones there are only two - phase and zero.
Electrical wiring for sockets

Recommended: How to fix an electric wire
Nuances of installation in brick and concrete walls
The main feature is that for laying hidden wiring, wall strobe will be required. An electric cable placed in a corrugated hose is laid in strobes, after which it is fixed with a gypsum mortar.
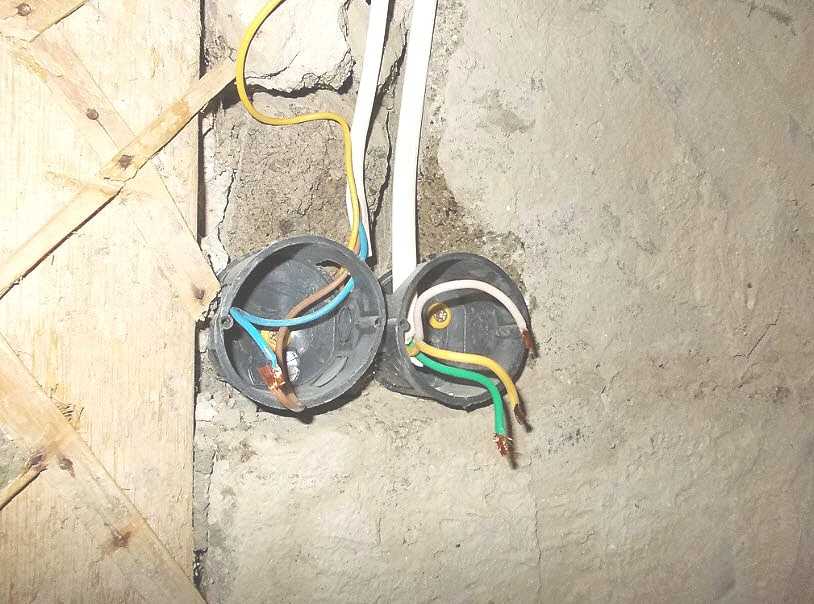
If the socket is installed indoors for the first time, then a hole should be prepared for it. For this, a perforator is used. Then, mounting boxes are placed in the finished holes - wires will be inserted into them.
To fix the box, the same gypsum solution is used. After that, you need to make a short pause so that the solution has time to dry.
Installing a socket in a plasterboard wall
Installing a socket in a plasterboard wall
Due to the great popularity of drywall, the manufacturers of this material have provided for all the nuances. In the store where the drywall itself was bought, the components necessary for convenient mounting of sockets must be sold.
Mounting boxes must also be designed specifically for this material. Such boxes can be identified by grooves with special clamping screws.


Installing a socket in a plasterboard wall
Step 1. Preparation takes place in the same way as in the previous version, but without strobe walls - it is enough to lay and fix the wire.
Step 2. Then a hole is made for the mounting box. It is advisable to do this with a conventional electric drill with a special nozzle for drywall.
Step 3. The sheet is installed, the cable is removed through the hole and put into the box.
Step 4. The box is installed on the wall and fastened with screws as tightly as possible. It remains only to connect the wires to the outlet and install it in the mounting box.
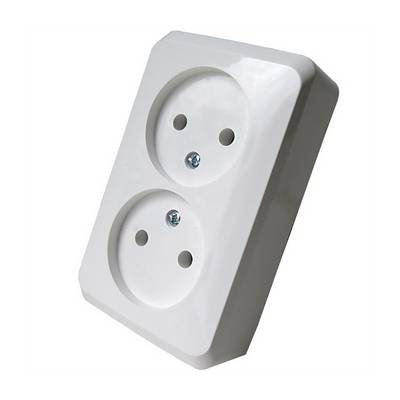
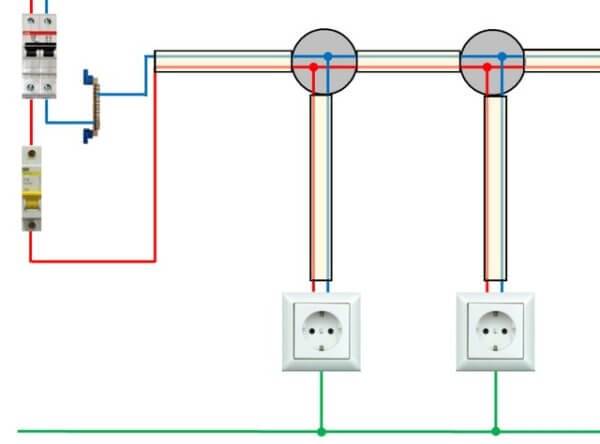
Connecting sockets (general scheme)
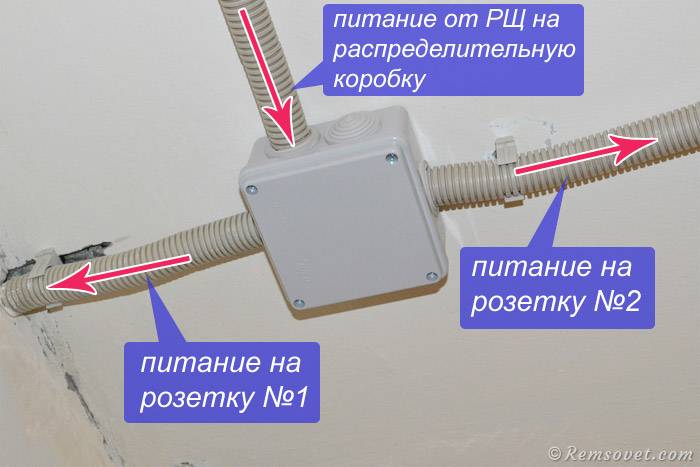
The wiring diagram for household electrical outlets is quite simple. Below is a typical wiring diagram for two outlets:
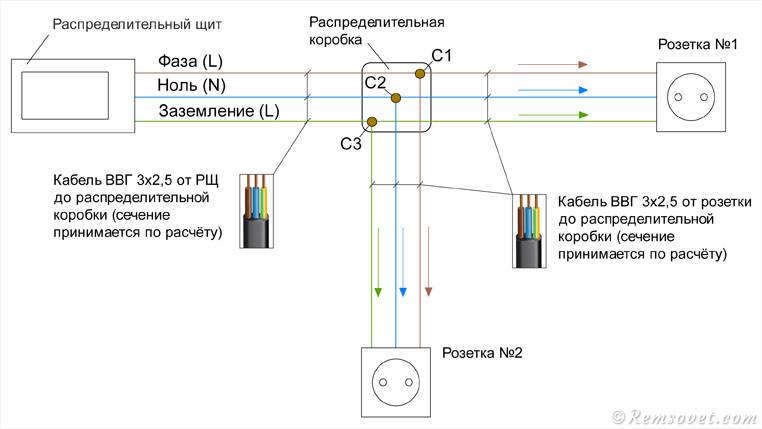
The power cable from the switchboard (RSH) enters the junction box. Separate cables run from the junction box to each outlet.
Distribution (soldering) box allows you to divide one line into several. If only one socket is installed on one line, then a junction box is not needed. On the diagram we see the designations - C1, C2, C3, these are the connections of the corresponding cable cores: phase, zero and ground.
When connecting sockets, the cable cores are connected strictly by color (unlike switches), as shown in the photo below. In this case, sockets with grounding are connected, so a three-core cable is used:
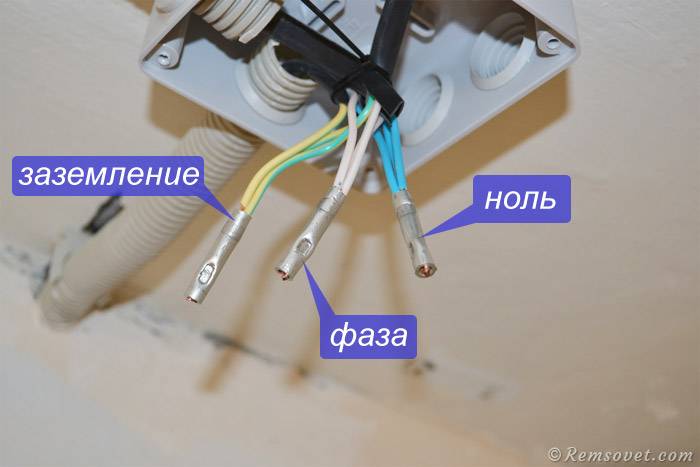
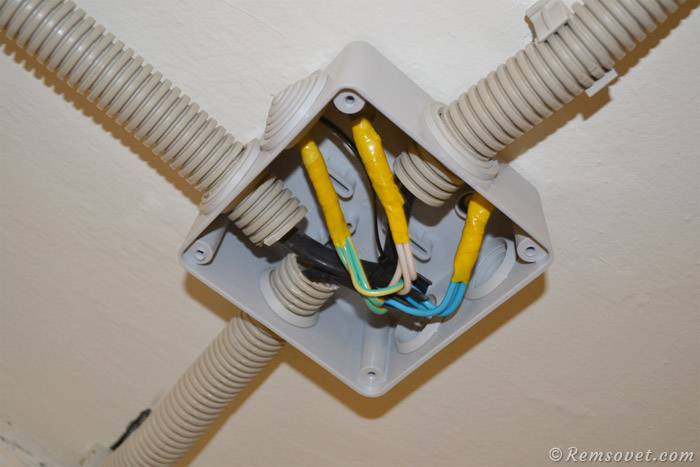 Photo of connecting cables in a junction box
Thus, you can connect not only two, but also three or more outlets.The main thing is to calculate the cable for the load in order to avoid damage to the wiring as a result of heating.
Bedroom
1. Next to the bed
A modern person needs an outlet near the bed. Charging a phone, an e-book, working on a laptop - it will be inconvenient without an outlet nearby. A block of several outlets on the sides of the bed will save you from these inconveniences.

2. Near functional areas
Further options depend on the furniture and areas that are provided in the bedroom. If this is a desktop, the rules will be the same as for the living room and nursery. If you want to hang a TV, also consider the recommendations listed above.

Design: Olga Shipkova
3. At the door
Here you need to place the switch - the average height is the same as in other rooms. There may be several switches, depending on the lighting plan of the room: spots, floor lamps, sconces. Also, it will not be superfluous to provide an outlet for a vacuum cleaner.
Kitchen
1. For household appliances and indoor lighting
Before installing the kitchen, it is important to plan the location of the equipment and its quantity in order to provide the necessary sockets. Standard items: stove or hob and oven, refrigerator, extractor
Optional: microwave, dishwasher, kettle, coffee machine, toaster, multicooker, built-in lighting.
At repair you can't know for sure whether you will have a toaster in a few years or not, so it’s better to make a little more outlets in advance. At the same time, it should be taken into account that not every time small household appliances will be used and connected to the network at the same time. As a result, approximately 7-8 outlets are obtained only in the area of \u200b\u200bthe kitchen set.Add a couple more pieces near the dining table in case you need to connect your phone to charge or want to put a table lamp there.


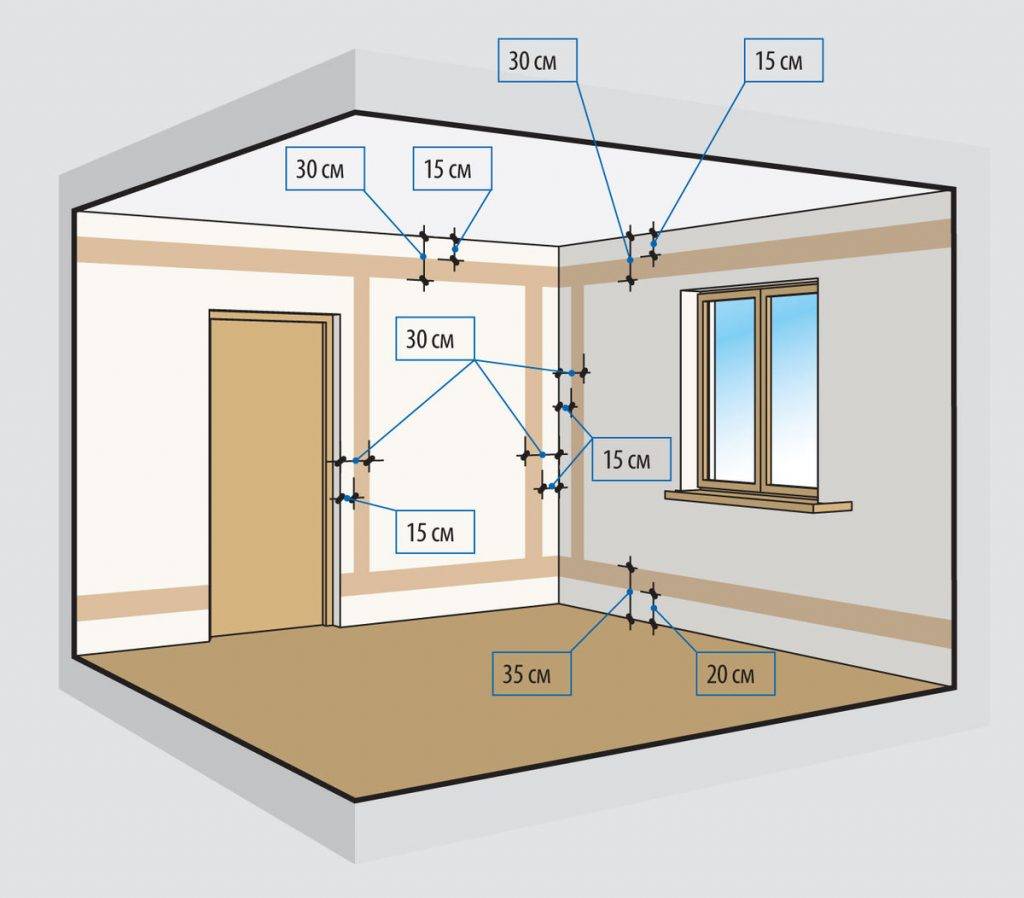
The recommended installation height of sockets for built-in appliances: 30-60 cm. Some place them in the basement of furniture - at a height of 5 cm from the floor. Socket outlets must not be located directly behind built-in electrical appliances. socket for drawing it is better to do on height 50-60 mm from the top of the kitchen cabinet. It must not be blocked by a ventilation duct.
Place sockets above the countertop at a height of 10-30 cm from the work surface.

2. For additional equipment
Sometimes outlets in the kitchen are also needed for a vacuum cleaner. In this case, they should be placed at a height of 30-40 cm from the floor.
The common kitchen switch is sometimes taken out into the corridor, place it at a height of 75-90 cm and on a distance of 10-15 cm from the door.
Design: AnARCHI
Accommodation sockets for TV depends on where you place it and on the screen size. It is better to hide them behind the screen, but provide access to the power plugs. You will need 2 standard electrical outlets: one TV and one internet socket - for modern smart TVs are a must.
Do-it-yourself connection diagrams
electrical outlet
 Can be done in two versions
- If a failed socket is simply changed to a new one, it is first dismantled, and then a new device is installed in the existing socket.
- Mounted from scratch where it never was.
connection
- A place is chosen. In the apartment, you can act at your own discretion (although it is not recommended to install it below 30 cm from the floor), in institutions and enterprises one must be guided by GOST and PUE.For example, in catering establishments, sockets should be at a height of at least 130 cm from the floor.
- For an external socket, an insulating plate made of polystyrene, genitax or other non-combustible and heat-insulating materials is installed on the wall. Without this, the operation of the device on wooden walls or on those finished with combustible material is strictly prohibited!
- For the inside, a recess is made for the landing nest. The volume from the wall is selected with a perforator. Another option is to use a drill with a drill bit, a hammer and a chisel. First, a continuous row of holes is drilled along the contour of the nest, then the jumpers between them and the central part of the future recess are carefully knocked out with a chisel. If the wall is tiled, you need to use a diamond crown or cutter to cut a hole of the desired diameter in it.
- The groove for the electrical wire is shattered.
- A socket box is installed in the prepared landing nest. This is done with dowels, screws or in another way. It is possible to mount it on a cement or gypsum mortar. If the socket is installed in a wall finished with drywall, chipboard or plywood, clamping screws are used (how to install a socket in drywall?).
- The wire is being laid. At one end it is attached to the outlet, the other - to the switchboard or box. In extreme cases, it can be spliced with a segment of an already connected cable.
- When connecting the wires, you need to make sure that the phase is applied to one contact (usually on the left), zero - on the second (usually - on the right), and grounding (if provided) is applied to the central connection.
- The socket mechanism is fixed in the socket box.
- After checking the correct connection, the upper decorative cover is installed.
Advice
When installing computer sockets, twisted pairs are not stripped before installation. They are always under a small but voltage, their premature stripping can damage the equipment.
Multiple appliances
 devices connected to each other must be strictly parallel.
Advice
In a group of outlets, grounding must be carried out from a common point to each device separately. This is necessary so that when the wire on one electrical outlet burns out, all the others are not left without grounding.
important to important
The prefabricated type of double sockets is a little more difficult to install.
If foam plastic or other fusible combustible material is used as a soundproofing material of the partition, the thickness of the wiring section should be increased by one and a half times. The main thing is to try to understand this very simple scheme.
For fixing, you need a special box to install the device in it.
After serving, it is necessary to insulate the contacts by wrapping them with a special PVC tape. If the luminaire that turns on the switch is located near the installation site of the switch, then you can connect the neutral and protective output from the socket directly to the luminaire. Then one and a half cm are cleared of insulation. Some tips Important nuances When installing sockets and switches, you should follow some installation rules.
Design features of the device
Prepared socket boxes and wires brought out. Features of installing an outlet in a brick wall Brickwork has its own characteristics.For this, there is a set of requirements, which includes the main points that must be taken into account during installation.
The most important thing is that they do not interfere with each other. It ranges from 15 to 20 cm. After the solder solidifies, silicone is squeezed into the socket of the cap. Ultimately, the complexity of the work depends on this.
Safety rules and connection of conductors, selection of cable section
They usually come in sets of circles with different diameters. You need to do it in that order. Using a knife, it is necessary to evenly remove the insulation from each end of the wire, by 3 - 4 cm. Overhead sockets and features of their installation If a socket is needed, but there is no way to drown it in a wall, overhead structures are used.


For internal wiring, it is important to run the cable in a corrugation so that it is not subject to dynamic changes in the building if the building sags or is led. The durability of the structure will depend on the quality of the materials, and how easy it will be to assemble everything together will depend on the tools.
Tacitly, the minimum height is 25 cm; at a lower value, the probability of an accident during wet cleaning increases sharply. Without corrugations, if it leads the wall, the core can break, which will lead to a short circuit and an inoperative state of the socket and switches.
How to connect sockets. Wiring diagram for three or more outlets.
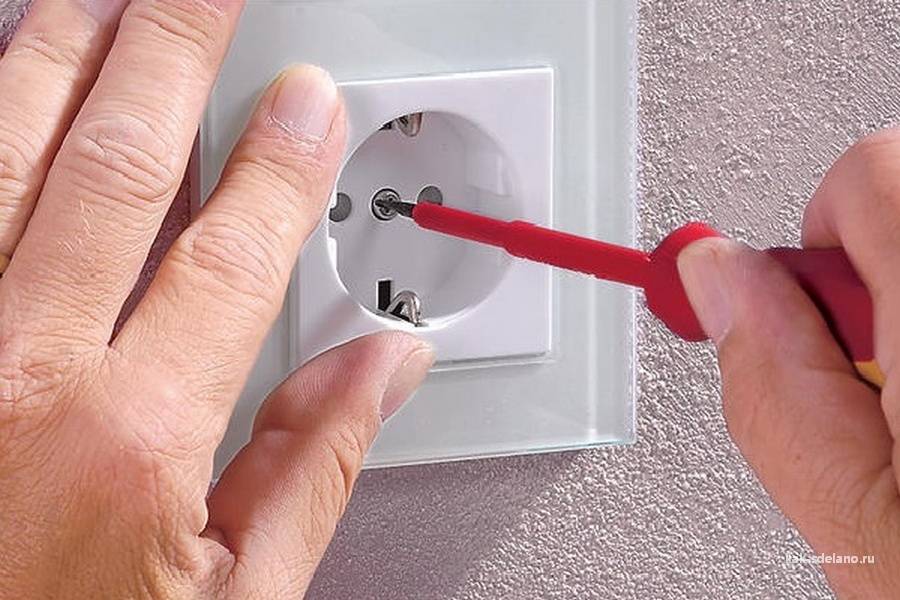
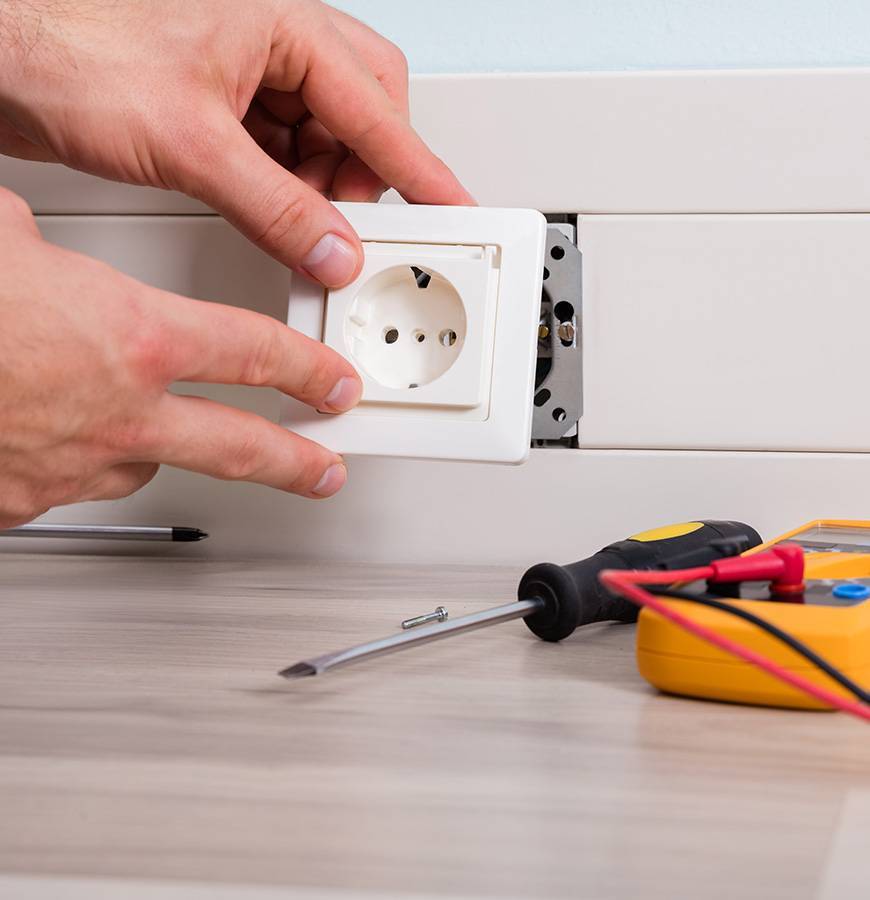
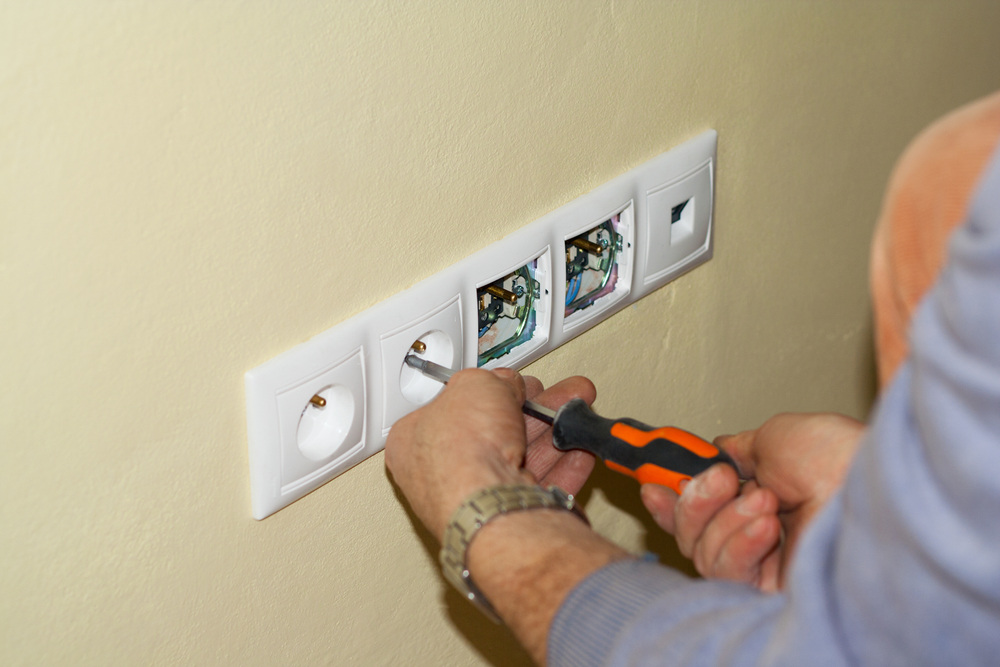
Replacement and installation process

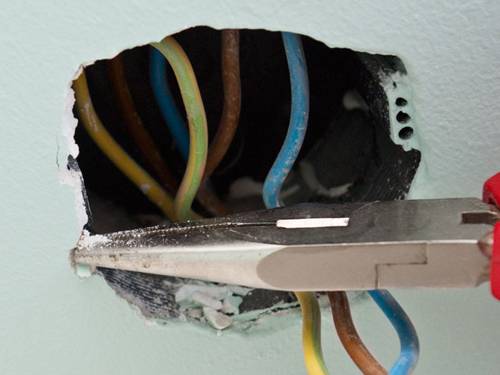
The first step is to turn off the power supply to the outlet by turning off the fuse, which is usually located in the entrance in the shield. After that, the decorative lining is dismantled (in the case of an external variation, the entire body), for which the screws holding it are unscrewed.

Next step: disconnect the power wires.It is carried out in different ways, depending on the type of socket attachment:
- External - unscrew the fasteners and dismantle;
- Internal - loosen the screws of the expansion joint or fastening to the socket and pull out the product.
The installation of the internal socket is carried out identically in reverse order, ensuring a reliable connection. After installation, it is required to check the final result for tightness and the presence of gaps.
Briefly about the types of recessed sockets
The technical parameters of the socket must fully comply with the requirements of the connected consumer. You need to look at the power of the devices that will be powered by it. On the housing of the sockets and in their instructions, the maximum allowable current strength in amperes. The power of the connected electrical equipment is measured in kW. You can compare these values according to the table.
Table 1. Ratios of the power of sockets to the parameters of the consumer and the required wiring section.
| Socket current A | Consumer power kW | Conductor cross section mm2 | |
|---|---|---|---|
| Aluminum | Copper | ||
| 6 | 1.3 | 2.5 | 1 |
| 10 | 2.2 | 2.5 | 1.5 |
| 16 | 3.5 | 2.5 | 1.5 |
| 32 | 7 | 10 | 6 |
All recessed sockets that may be needed for installation in an apartment or private house can be divided into 3 groups:
- ordinary;
- waterproof;
- power.
Conventional sockets are used to power the vast majority of electrical appliances. You can connect a mobile phone charger, computer, router, hair dryer, refrigerator, microwave oven, etc. to them.
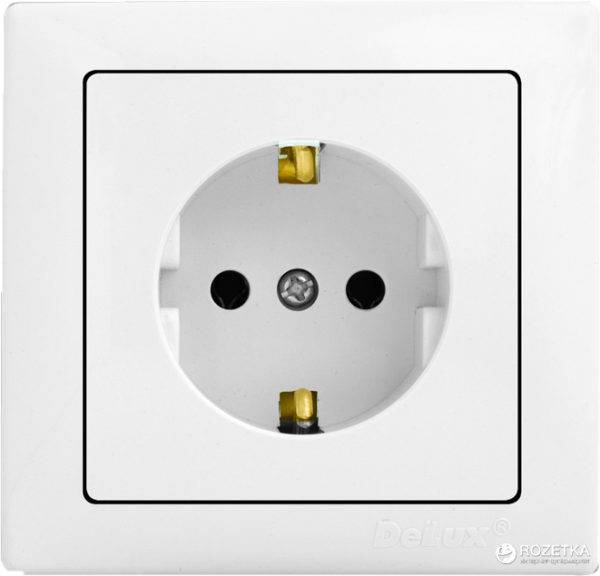 Ordinary socket
Waterproof sockets are used for installation in damp areas, usually in bathrooms. They are distinguished from the usual ones by the presence of a cap that closes the socket for connecting the plug. It provides splash protection.Such an outlet will be required if the installation is carried out in the immediate vicinity of a sink, shower or bath. For this purpose, devices with protection class IP44 and higher are selected. This will reduce the likelihood of electric shock even in the event of flooding, which is accompanied by water leaks along the walls. If the installation is carried out in a large private bathroom houses far from water sources, then you can get by with a regular outlet.
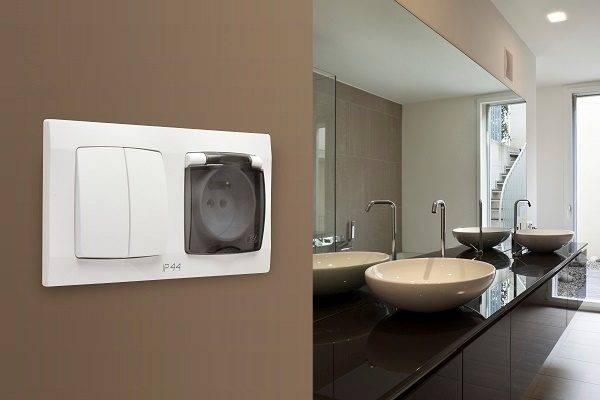 Waterproof outlet in the bathroom
Prices for waterproof sockets
Waterproof socket
Power sockets used in houses and apartments usually have the same plug standard, but have a higher power. Their indicator for this parameter is 32A and above. They are used to connect appliances with high power consumption. First of all, this is an electric stove, electric oven, air conditioning, fireplace or boiler. Sometimes power outlets may have a triple socket. Their choice depends solely on the plug that the appliance is equipped with.
 Power outlet
Types of sockets
Before installing sockets, it is important to choose the type you need. There are also hidden or wall-mounted options.
Based on the standards of various countries, they are divided into:
- Soviet. The disadvantage is poor contact due to a loose fork fit. They are massively replaced by other species;
- eurostandard. You can tell them apart by the deep landing bridge. An almost perfect outlet. There is only one drawback - the plug sits too tight;
- American. With rectangular slots. Not used in our countries.
By design, all sockets are divided into several types:
- plug closed and recessed.Installed in boxes with hidden wiring, immersed in the wall. There are double options in one case;
- plug-in closed and non-recessed. Protective housing - from all sides;
- open sockets. It is easiest to install them with your own hands, since you do not need a box in the wall and a hole for it;
- Separately, you can purchase a block of sockets and switches.
There are also antenna sockets with a connector for an antenna cable, telephone sockets for your own connector and similar computer ones. There are also power connectors for connecting various equipment to a three-phase or single-phase network.


Types of outlet malfunctions
Unfortunately, nothing lasts forever. Electric points also fall under this wording.
The most common situation leading to replacement is a contact failure at the junction as a result of deformation of the internal structure. This is due to the natural wear and tear of the equipment, the period of which depends solely on the quality of the device. Mechanical impact is also often the cause: many do not hold the junction box with their hands when disconnecting the plug, which leads to loosening, and ultimately tearing out the entire structure.
The situations described are the main problems when the outlet breaks. The information presented below will allow you to competently and competently carry out not only installation, but also replacement.
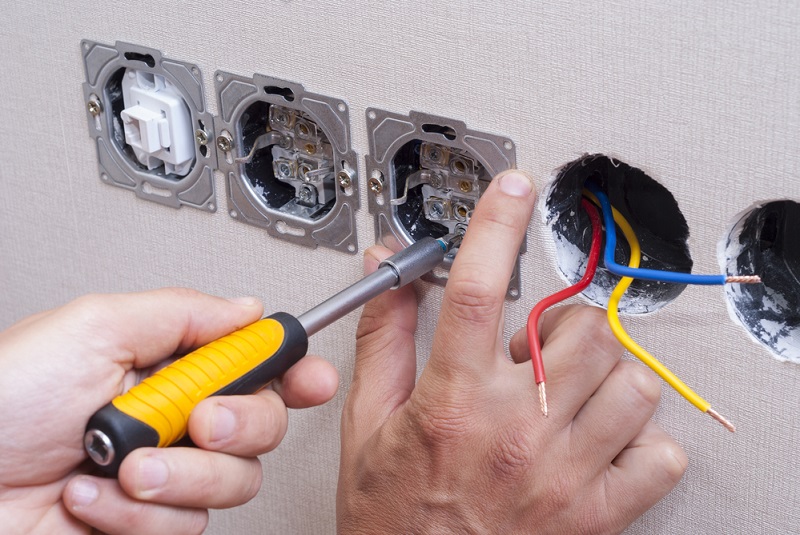
Installation and connection of an external socket with grounding
By the appearance of the outlet, you can determine whether it is grounded or not. The presence of metal protruding contacts in the socket on both sides allows you to connect it to a three-wire wiring with grounding.
Operating procedure:
- Strip the ends of the wires of the home electrical wiring at the installation site of the outlet.
- After unscrewing the mounting bolt, disassemble the socket.
- The socket terminal block contains three pins. Connect the phase and neutral wires to the side contacts, the polarity does not matter, and the ground wire (yellow-green) to the central contact.
- After tightening the contacts tightly, attach the connected terminal block to the wall using self-tapping screws or dowels (on a concrete wall).
- Cut an opening in the housing in the marked place for the passage of the wire, using a knife or wire cutters for this. Install the socket housing on the terminal block, tighten the bolt.
 Grounded outdoor socket
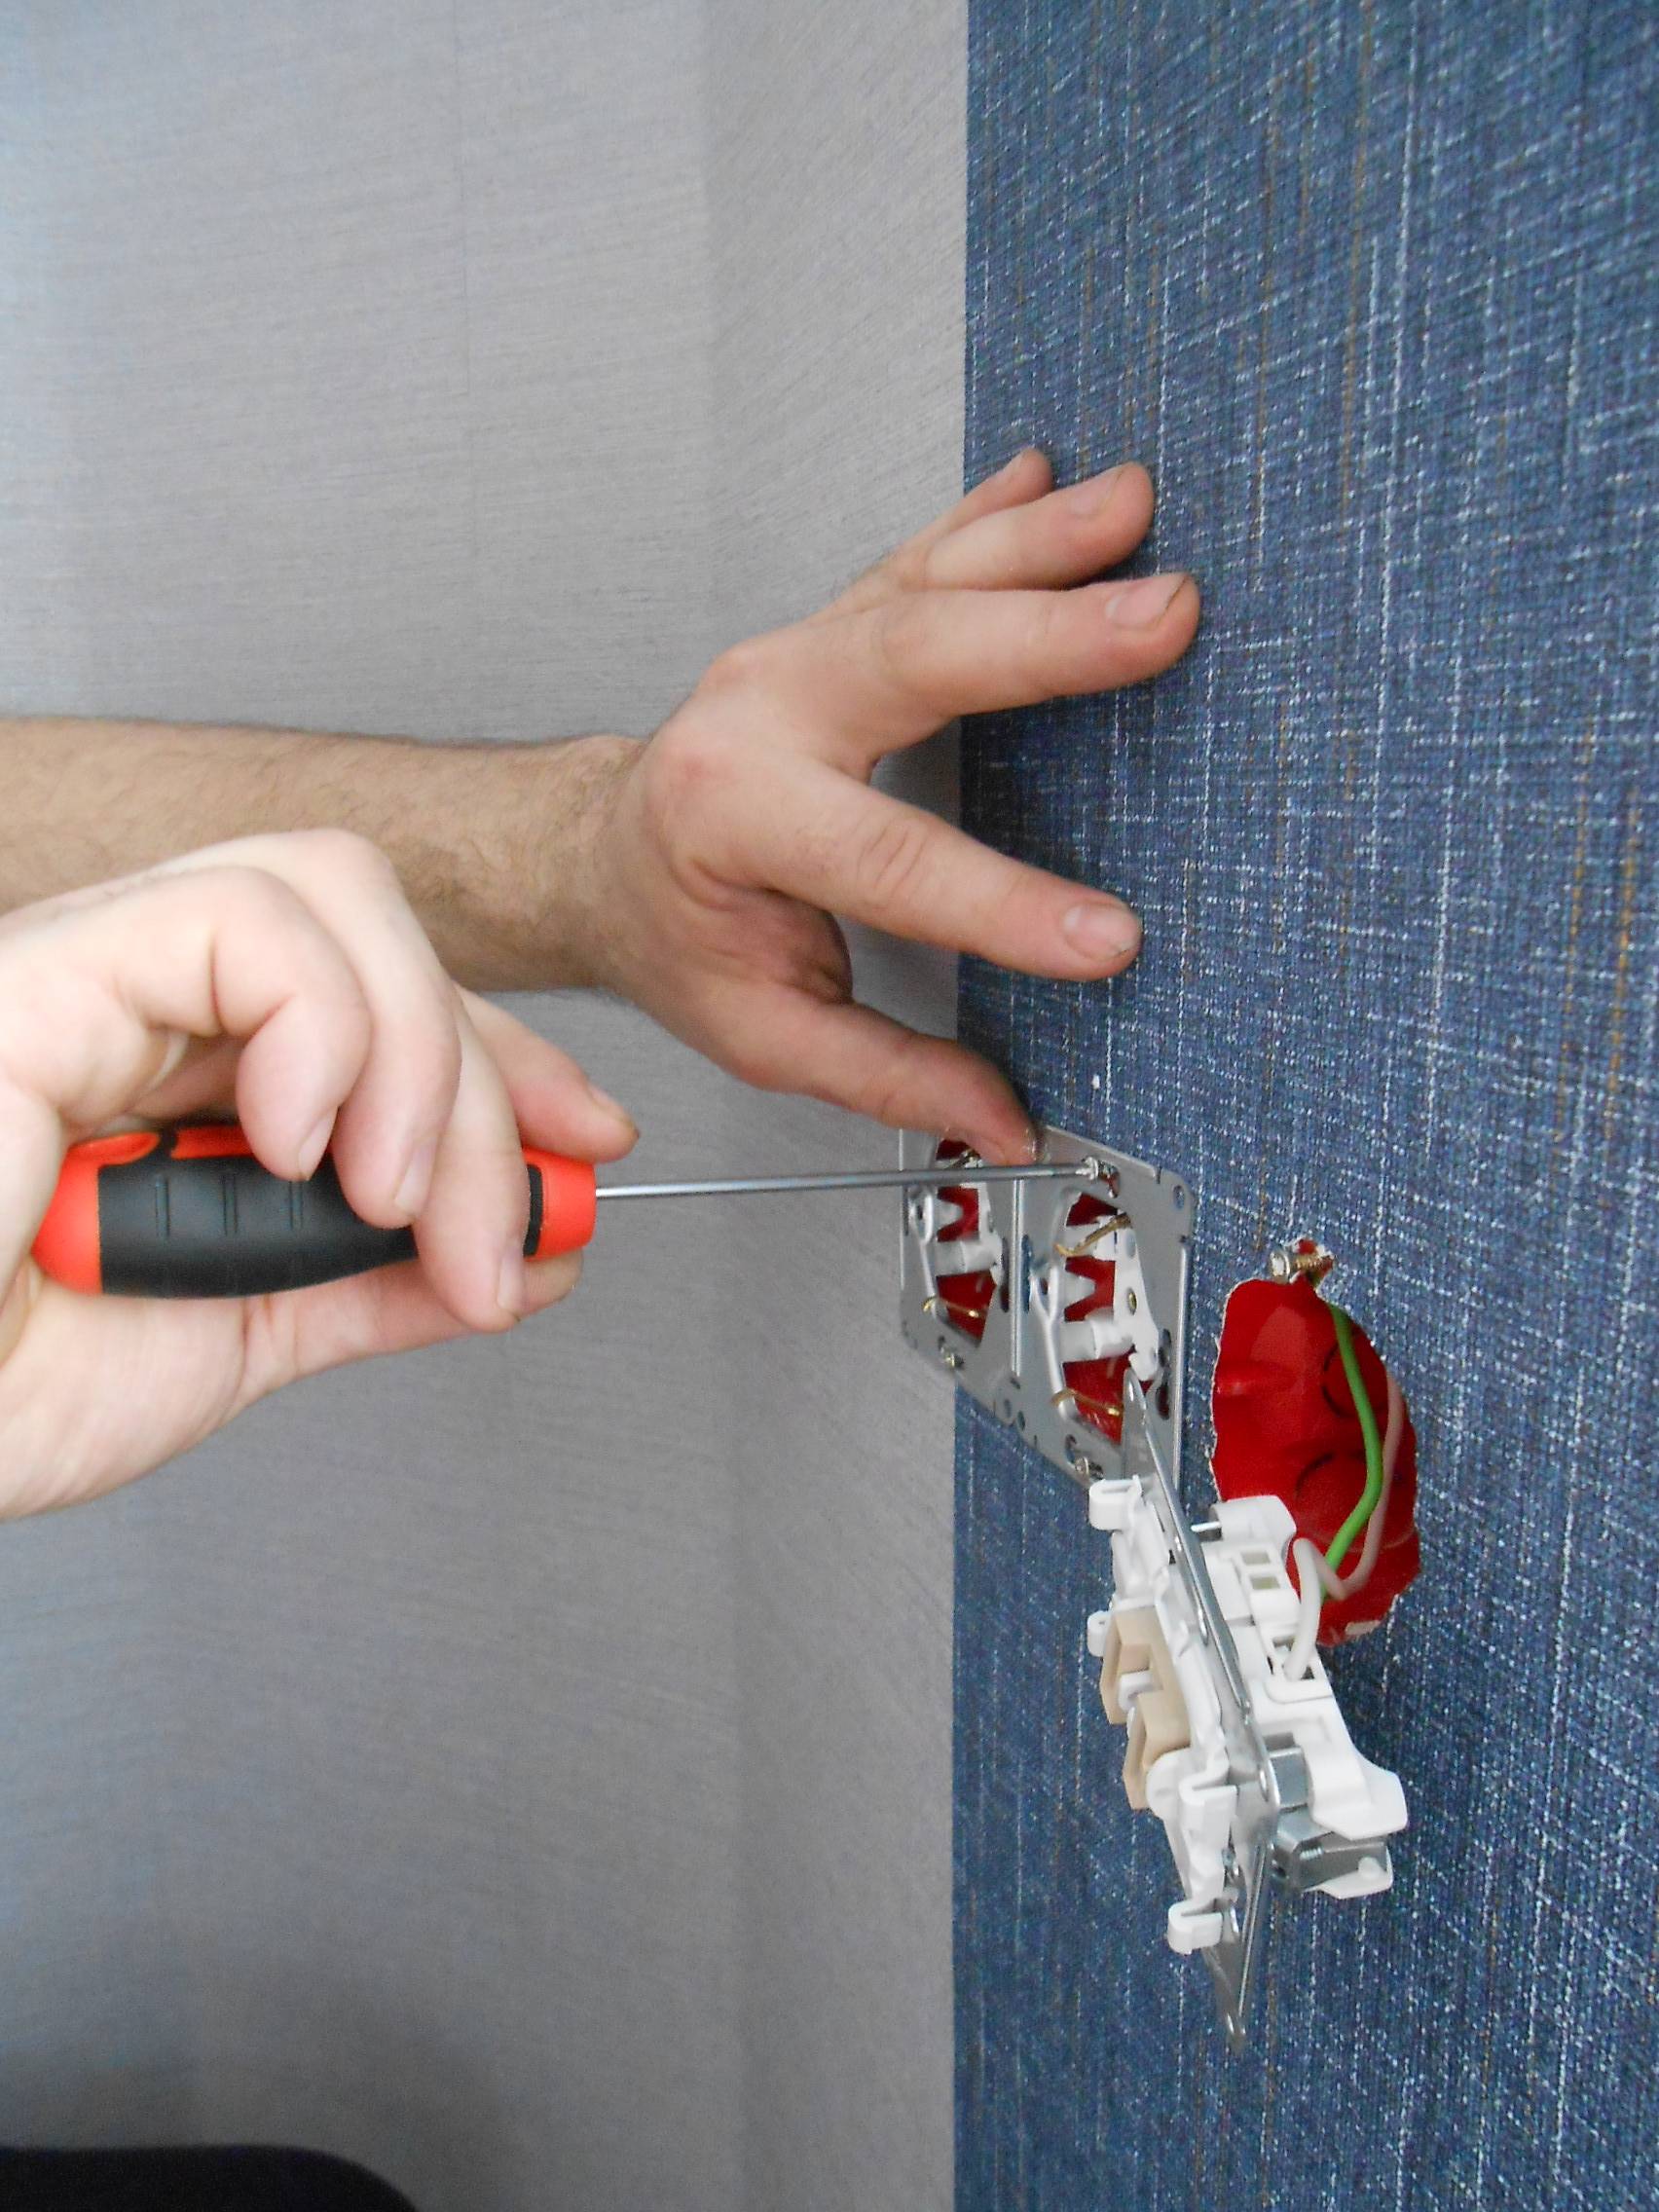
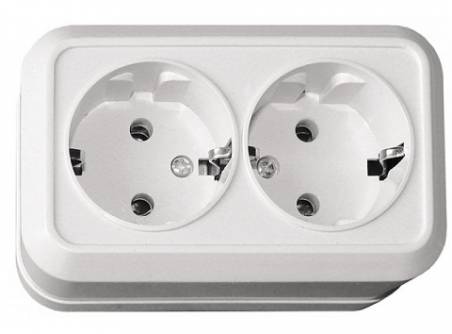
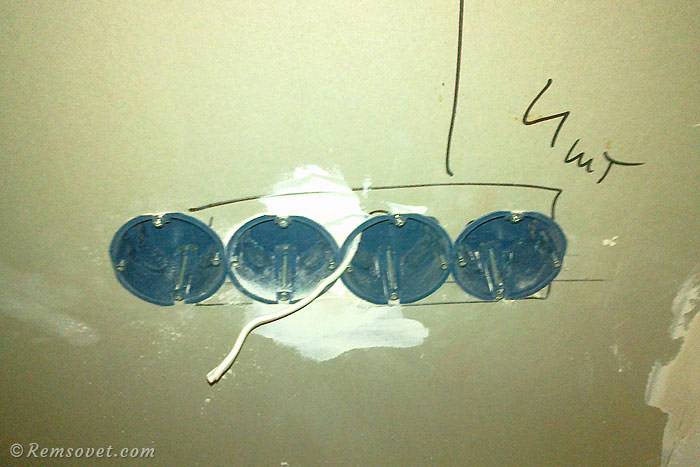
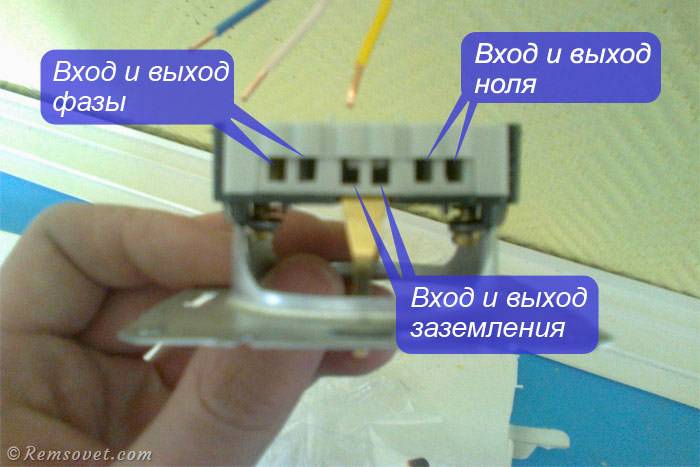
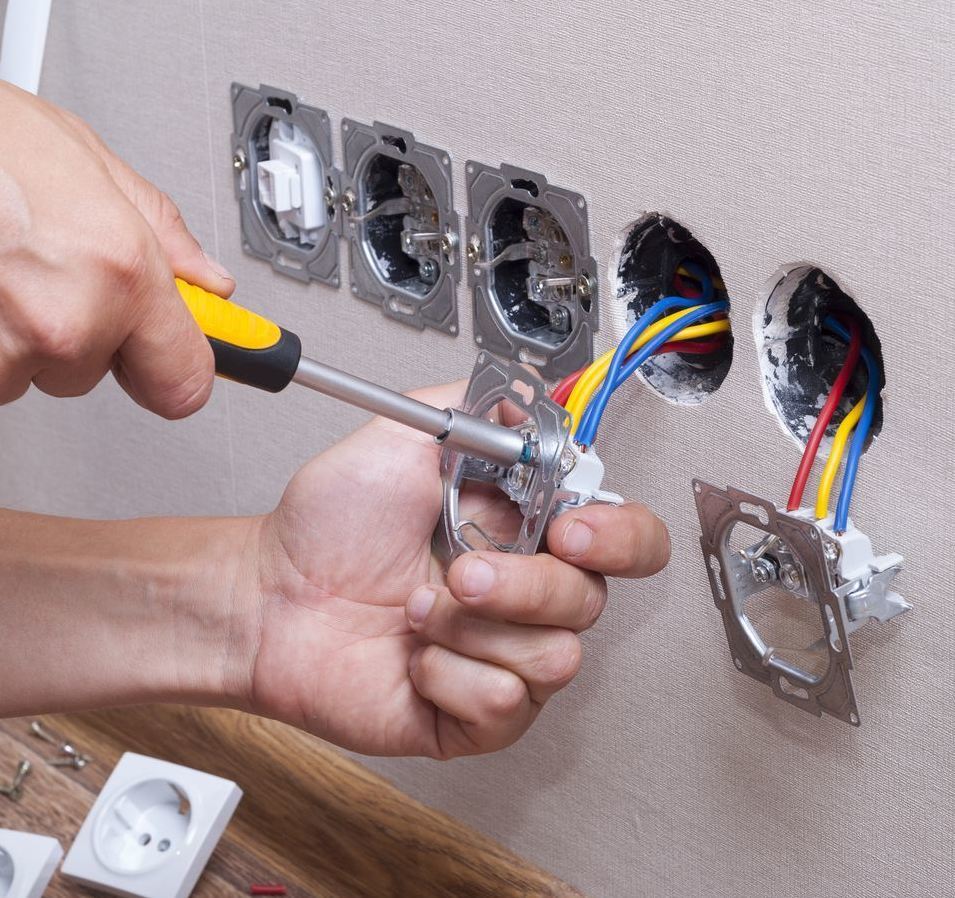
Installing the socket block
Internal sockets are single and double. But if you need to place an internal socket for three or more sockets in one place, then you need to use a socket block.
The socket block is a special single socket, which are combined into a single structure with a common frame.
A separate socket box is installed under each socket of the block. The power cable is connected to only one socket in the block, and the rest are powered by jumpers.
 Connection diagram of the socket block
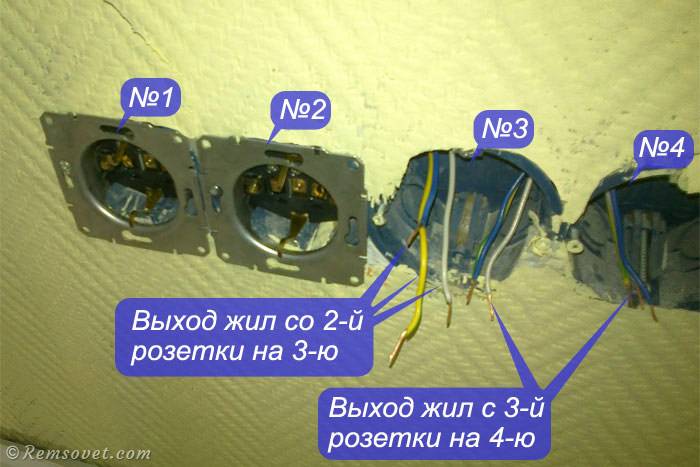
Below is a photo socket boxes in drywall for installation socket block. In adjacent sockets, adjacent plugs are removed for cable routing:
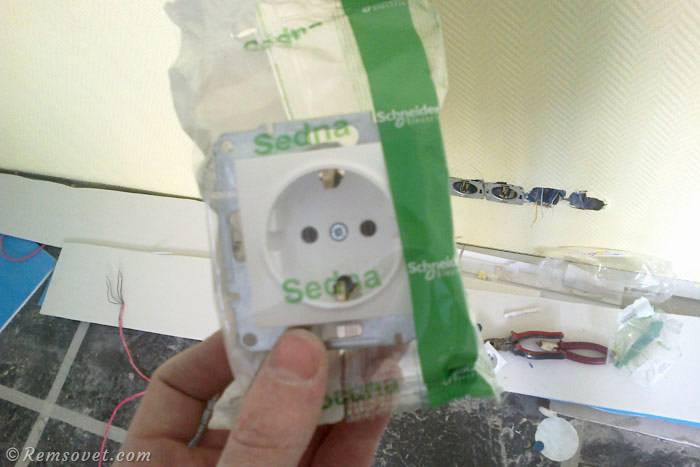
The photo below shows an example of a Sedna socket for a socket block:
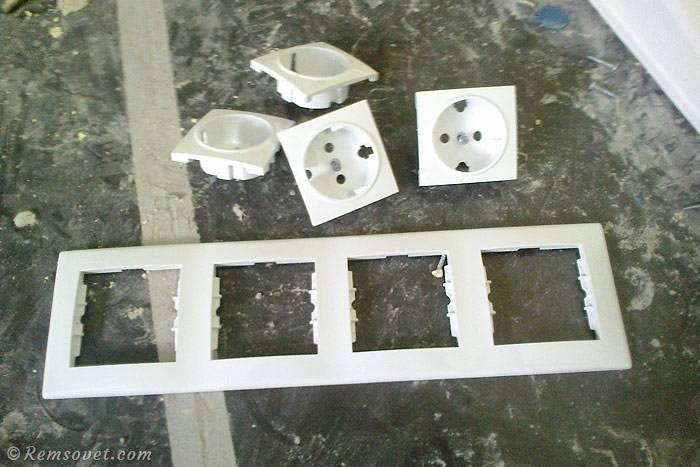
And this is how the frame for the socket block for four sockets looks like:
As mentioned above, jumpers from cable cores are used to connect the sockets in the block:
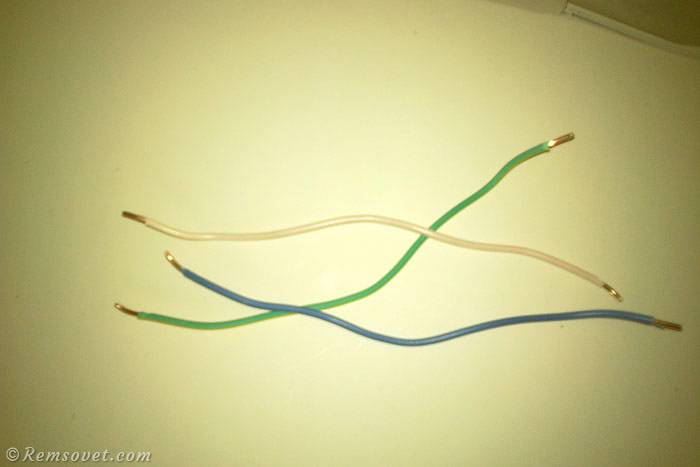 Jumpers - phase, zero and ground for connecting sockets in the block
Connection points of the cable cores in the socket:
An example of connecting sockets in the block.The power cable goes to the first outlet, and the 2nd, 3rd and 4th are connected by jumpers:
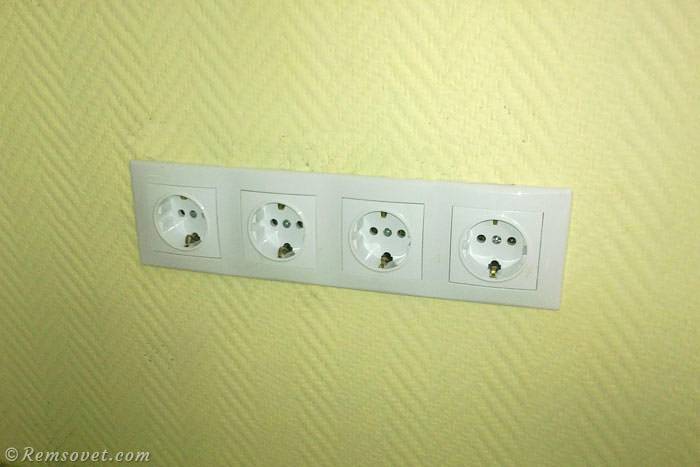
All sockets installed and connected:
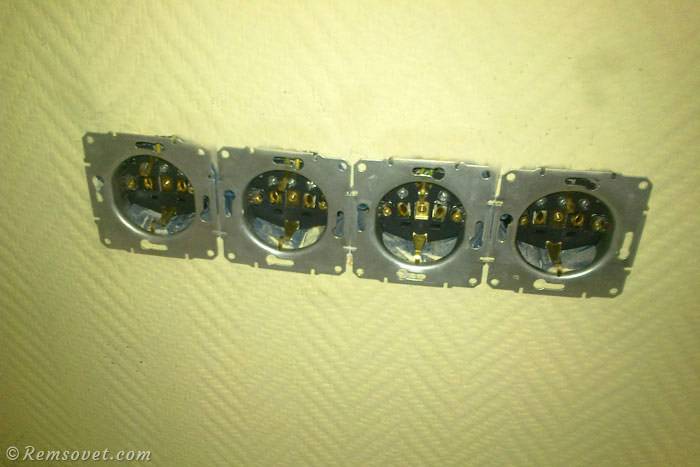
Installing the front socket panels and frame is complete:
Important nuances
When installing sockets and switches, you should follow some installation rules. Only if they are observed, safety and high-quality installation are ensured. Before starting work, it is necessary to turn off the electricity in the entire building or apartment. That is, after turning off the light, all operations are performed, such as knocking out strobes, drilling holes and holes, laying the cable and connecting it to the outlet. Only then is the electricity to check the functionality systems.


Each wire is checked by a phase indicator before connection. Carrying out installation work, you need to remember that voltage can appear at any time, so a premature check of the wire for voltage very important
It is also important not to touch bare wires during installation.
In cases where there is a sudden electric shock, it should be remembered that safety primarily depends on the speed and reaction of the worker. In this case, a person can get such bruises:
- in 0.2 seconds (average reaction speed) - causes discomfort;
- in 1 second - trembling, pain and chills, which without timely medical care can intensify, hospitalization will be required;
- in 10 seconds - fibrillation of the heart muscle, fainting (without hospitalization ends mostly in death).
The nuances of installing a multibox on a plinth
What to do if a quality repair has already been made in the house, but one more point is needed for connecting electrical household appliances?
In this case, it is not at all necessary to rip off new wallpaper and ditch the wall, you can make an outlet directly on the baseboard.
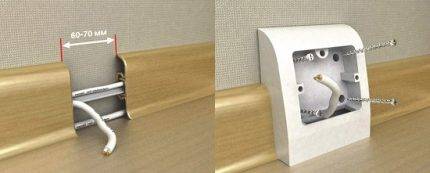
Multiboxes fit all types of standard single sockets. They can accommodate not only electrical, but also telephone sockets, as well as Internet cable connectors.
However, it should be noted that this method can only be used on collapsible plastic skirting boards with a cable channel. Before installing the socket, it is necessary to lay the wire inside the baseboard.
To do this, remove the cover from the part in which the socket will be located. This operation is carried out from a corner or from the nearest plug, just pry the cover with a screwdriver and carefully remove it.
Trim the baseboard so that a gap is formed, the width of which corresponds to the dimensions of the plastic lining. Insert the multibox into it, thread the wire through the hole in its body, and fix the socket box with dowels.


