- Device
- Automation of the gate movement control process
- Installing the receiver, programming remotes
- Connecting photocells and signal lamp
- Automatic gate closing programming
- Mounting and setting up the drive
- What you need for work: materials and tools
- Material calculation
- Tools
- Sash installation
- Homemade automation for gates
- Stages of installation of swing gates
- Installation of support poles
- Installation of hinges and hinged gate
- Features of installation and configuration of automation
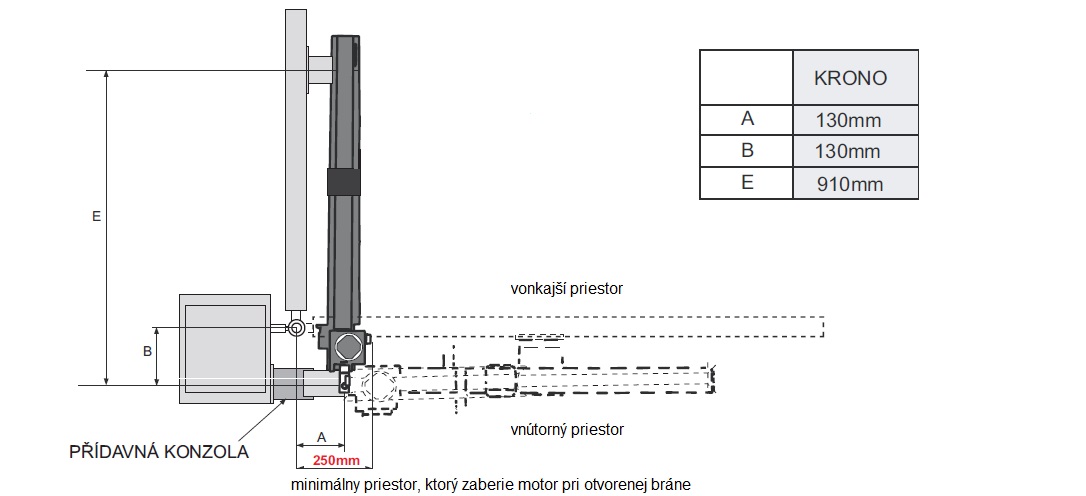
- Drive placement requirements
- Nuances of connection and settings
- Peculiarities
- Wiring of electrical wires and cables
- Kinds
- Material
- Dimensions
- Colors
- Installation of automatic gates: advantages and disadvantages
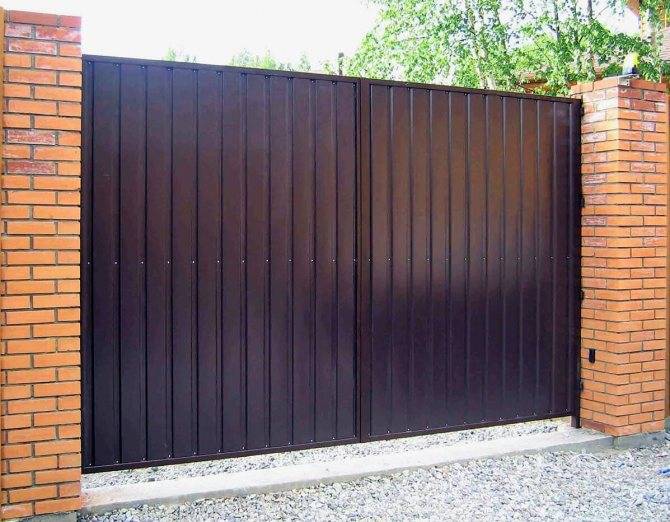
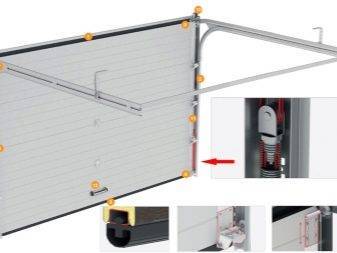
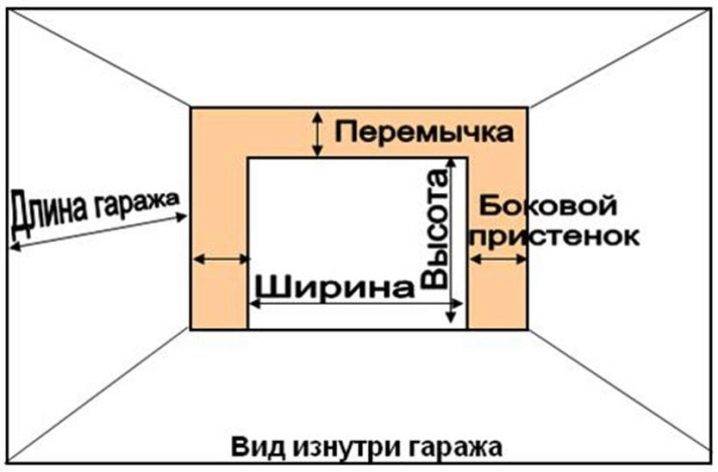
Device
Represent a street double-leaf design. Both halves open outward or into the courtyard. It all depends on where there is more space. If there is not much free space on the site and beyond, choose a double-leaf gate. If an object with unlimited space on the site and beyond, choose a single-leaf design.
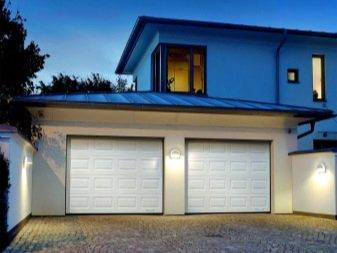
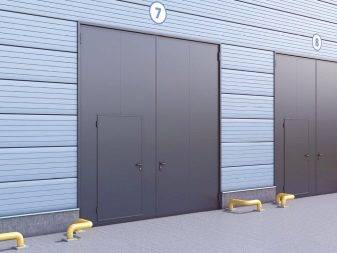
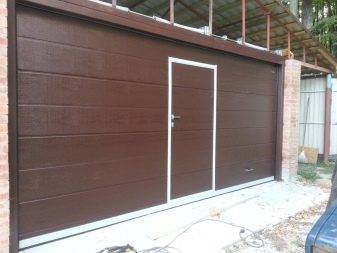
Entrance swing systems are equipped on the territory of a private house for the free movement of vehicles, both trucks and cars.A wicket is required. It can be located next to the gate. In a garage, this will be inconvenient, since the width of the building is often limited. In this case, sectional products are more suitable.
The gate is built into the frame of swing doors. Its height in this case is small. If it is planned to install swing gates with a built-in gate on the site, a frame is provided that ensures the rigidity of the entire structure. Appearance is just as important as reliability. Gates for a country house, cottages can be made from different materials:
- metal (profiling, welded mesh, steel bars, forged sashes);
- wood (edged, unedged board, carved elements);
- polycarbonate.
Usually, in the manufacture of sashes, the same material is used as that of the fence. To get a beautiful entrance to the cottage, choose fasteners that will be invisible on the canvas of the valves. It can be self-tapping screws or a welding seam. The last of the options is used only when working with metal. The screw heads may be visible after installation. They are hidden with putty and paintwork materials.
Considering that the width of the gate is 3 m, the leaf may sag over time if its weight is not compensated by means of a supporting element (pin, wheel) fixed on the side opposite to the hinges. According to regulatory documents, the height of the fence on the territory of private housing from the side of the street should be 2 m. A technical gap is left at the bottom of the gate. If the gate is on an uneven surface, the gap should be 10 cm. Above the concrete pavement, the leaves rise by 7 cm with asphalt.
Main elements:
- Pillars. Shutters are attached to them.There can be two variations when the door is built into the sash, 2 supports are enough. If you want to place the gate next to the gate, then you need 3 pillars.
- A frame that gives rigidity to the structure, as well as a facing fabric.
- Loops.
- Locking mechanism. It can be a padlock, built-in lock or a pin that is inserted into the ground (installed at the bottom of the wings).
Automation of the gate movement control process
Each package comes with instructions from the manufacturer. Any automatic drive is installed based on the nuances of the door leaf. All actions must be carried out in accordance with the manufacturer's recommendations.
When choosing an automatic movement, always consider the following nuances:
- sash sizes;
- Weight and windage of the canvas;
- The canvas is installed strictly vertically and horizontally;
- Adjustment of smoothness of movement;
- The direction of opening is outward or inward.
When installing automatic drive elements, it is important to disconnect the power supply from the mains. Disconnect all external cables and communications
The reverse connection of the power supply elements is carried out upon completion of the installation of all parts.
Installing the receiver, programming remotes
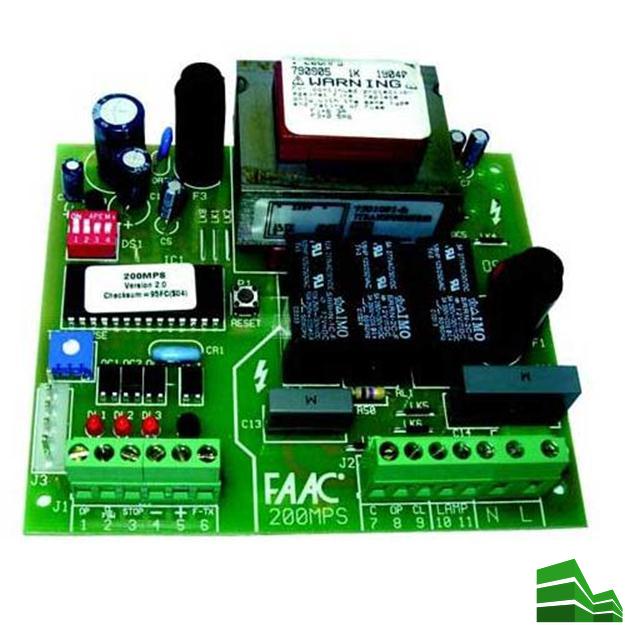
The owner controls the gate with a remote control. Commands are sent from the communicator, which the receiver catches in the form of signals. This device is placed in a prepared slot on the surface of the control board.
Not far from the receiver, several jumpers are attached. These allow the installer to test the drive unit after the installation work is completed.
There are two main jumpers. 2-1 is used when there is no need for a stop key. A 2-C1 when not using photocells.
Photocells are connected to the power last. This is due to the fact that a jumper is mounted on their wires. When the installation of the receiver is completed, proceed to configure the communicator.
We will tell the process of prescribing the control panel. There is a key on the control unit that you need to press. It's called PU Programming. After that, a similar button is pressed and held on the communicator. This starts the programming process.
In parallel, the LED light on the control board lights up evenly. This indicates the successful registration of the console.
On the control unit there is one button to control a specific design. She is responsible for managing all processes. They mean opening, closing and stopping. Other keys can be used to control other gates.
IMPORTANT! If the setting was done incorrectly, then one of the gate leaves may open in the wrong direction. The solution may be the following: just swap the wires on the control unit
If the problem is that you need another sash to open first of all, swap the fixation of the first and second gearboxes with each other.
Connecting photocells and signal lamp
Safety elements are photocells and signal light. Do not try to power up all systems at once. This way you can detect the problem if you do the setup and connection incorrectly.


When the swing gate mechanism is fully configured, you can connect the photocells. This requires PVA cables. One is for the transmitter, the other is for the receiver. They use two completely different wires so as not to confuse them.Otherwise, you may burn the lamp or photocells.
A photocell is attached to one pole, acting as a transmitter, and a receiver to the other. The location of the parts of the receiving-transmitting system does not matter. After that, you can connect the blocks and put on the housing covers.
Photocells are mounted at a height of 50-70 cm. Their main function is to ensure safety for the car. The photocell prevents the gate from closing if the car is left standing in the opening for some reason.
It is recommended to mount four photocells: one pair is active during opening, the second - during closing. This ensures 100% safety when the doors move.
To connect the antenna and create a stronger signal, you need to run a coaxial cable. It increases the range of communicators. After connecting all the details, you can safely check the functioning of the whole system.
Automatic gate closing programming
Closing the door leaf in automatic mode is the case when the product closes spontaneously without human intervention. This occurs after 20 seconds of inactivity in the open position.
By following the recommendations of the instructions, you can configure this function. It is available in semi-automatic mode.
Mounting and setting up the drive
To attach the drive to the leaves, poles, it is necessary to weld the U-shaped brackets. They will give the necessary mobility to the entire structure.
For the axis of rotation, it is better to choose hardened bolts having a diameter of 8 to 10 mm. From galvanized metal products made in China, it is better to refuse.This steel is soft, it will quickly wear out, which in no way contributes to the reliability and safety of the structure.
- the lever and the electric motor are fixed with the lever down, along the upper edge of the web;
- first, the entire mechanism is fixed to the pillars, then to the gate leaves;
- after the installation is completed, the gate is opened manually, the limit switches are adjusted;
- electricity is connected only when the drive is locked;
- in order to prevent engine breakdown during the locking of the doors, a device is introduced into the circuit that will turn off the network during an increase in current strength;
- be sure to mount a signal lamp, which will notify you of the supply of voltage.
Upon completion of the work, they check the smoothness of movement, opening and closing, the clarity of operation of the terminal elements. The reducer, the motor are protected by casings from moisture penetration.
What you need for work: materials and tools
For the construction of a double-leaf swing gate frame, you will need:
- metal profile with a section of 8x10 or 10x10 cm with a wall thickness of about 0.7 cm;
- profile pipe 6x3x0.2 cm;
- channel beam with walls 14–16 cm thick.
Decking - light metal sheets coated with special compounds that can significantly extend the life of the material and do not need additional processing and painting - is most often used for sheathing the frame of a swing gate structure. There are several brands:
- C is a strong and lightweight sheet, which is made of galvanized steel and has a small height of the ribs;
- NS - has a large corrugation height and sheet height;
- H - a heavy sheet, which has a high level of strength and reliability, is used for facing large structures.
Usually people purchase a professional sheet of the C8 or C10 brand, as it is considered the lightest and most durable. The number here indicates the depth of the wave. Masters recommend using a sheet with a thickness of 0.4 mm: this way the gate will weigh about 50 kilograms, their installation will not require large lifting devices and mechanisms.

The optimal type of profiled sheets for sheathing swing gates is material grade C8 or C10
Roofing material or other waterproofing material, concrete mortar and metal corners are also required for work.
Material calculation
To determine the total length of the frame, perform the following steps:
- multiply the width of one sash by 4;
- multiply the frame height by 6;
- find the sum of the received numbers.
The number of metal profiles is calculated as follows:
- we find the area of \u200b\u200bone sash (we multiply its width by the height);
- the resulting value is multiplied by 2.
If you choose the standard width and height of the sash (2 m), then you will need 8 m2: two sheets of 4 m2 in size for two sashes.
The height of the supporting pillars should correspond to the height of the profiled sheet, taking into account the digging into the ground, and this is another plus of 50–70 centimeters.
Tools
For the construction of swing gates you will need:
- drill, bayonet and shovel;
- drill;
- electric screwdriver;
- scissors for metal;
- square and level.


Sash installation
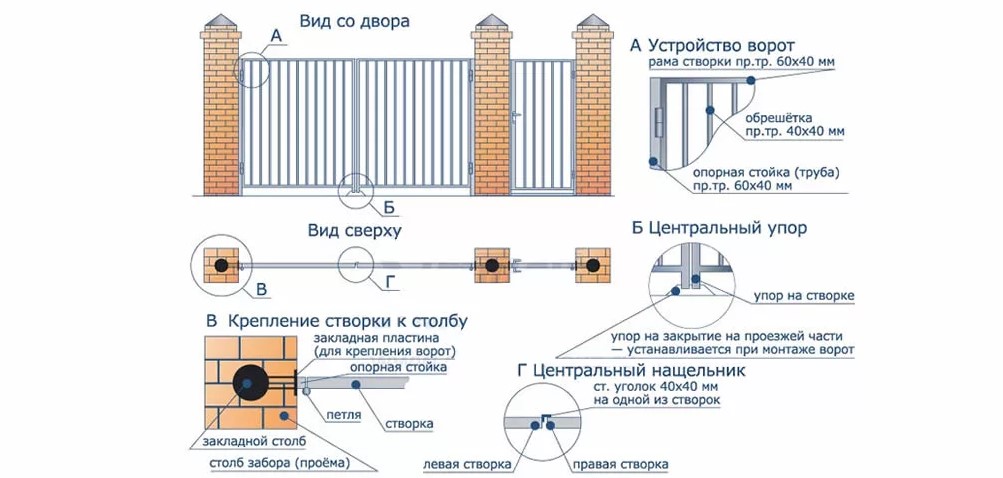
When installing swing doors, brick pillars are most often used. A pipe with a diameter of 100 mm or a channel is mounted in the center of the supporting column, to which reinforcement must be welded in order to bring out three mortgages to strengthen the profile pipe 30–60 mm to the brick pillar. Then loops are attached directly to this pipe. Inserts for the drive must be located at the height of the drive, preferably 1 meter.
A pipe with a diameter of 60 mm must be welded to the finished gate along the entire length of the bearing post. This pipe will be used to weld the swing gate hinges to it. It is worth noting that all pipes that are used to install outdoor gates that open outwards must be thoroughly cleaned of rust and primed.
The frame is made of a pipe with a diameter of 50 mm or 60 mm, smaller than the diameter of the pipe of the stiffeners, to which the corrugated board will be fixed. A pipe with a diameter of 20–40 mm is welded to a 50 mm pipe in the middle, so that it is more convenient to sew up the gate with corrugated board.
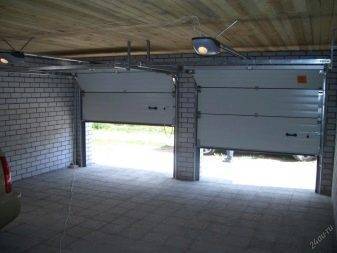
Automatic swing gates differ from conventional ones in that they are equipped with an electric drive. Automation makes the operation of the gate simple and efficient, thanks to which it has become very popular not only in industrial, but also for domestic purposes.
After the installation of swing gates is completed, automation can be installed. This process is not as complicated as it might seem at first glance. However, it requires accuracy and strict adherence to the attached instructions. In order for automation to work flawlessly and for a long time, all factors must be taken into account.
Homemade automation for gates
The phrase "do it yourself" should not be taken literally. Those who still think about the design of the entire control system from scratch should look at the design features of typical drive models.

It turns out that it will have to be selected, since independent production is a hopeless business. Assembling the hull, arranging the "stuffing" is possible only if there is a certain material and technical base. The purchase of a ready-made drive for the gate will greatly simplify the work.If you plan to mount gate automation from individual prefabricated components (prefabricated structure), you need to take into account a number of points.

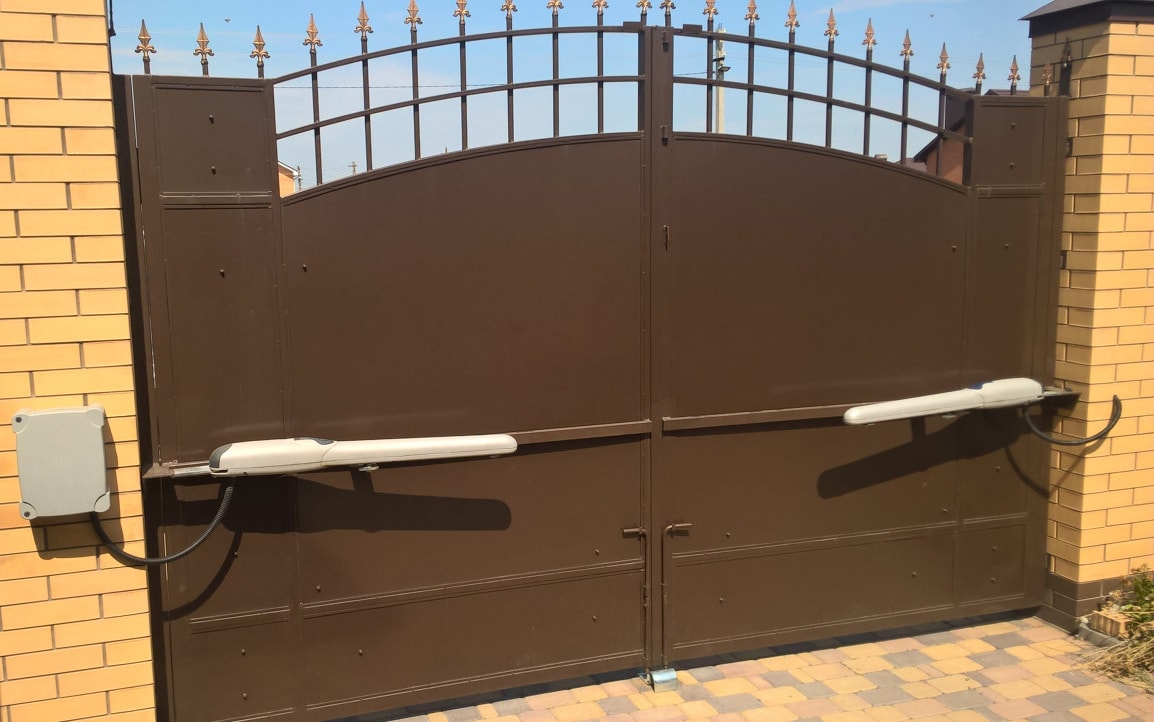
Which option do you prefer? There are several types of drives - linear, lever, even underground. When planning to do everything with your own hands, it is more expedient to choose the first modification. For sashes opening outward - the optimal engineering solution.
Stages of installation of swing gates
The main stage is the installation of support pillars. To which the gate leaves are subsequently attached.
The material for the manufacture of support pillars can be:
- steel pipes - commonly used products whose cross section is 60X60 mm or 80X80 mm;
- concrete;
- brick;
- stone.
To ensure sufficient strength characteristics of the structure, all types of poles, except for those made of steel pipes, are equipped with a metal base - a core.
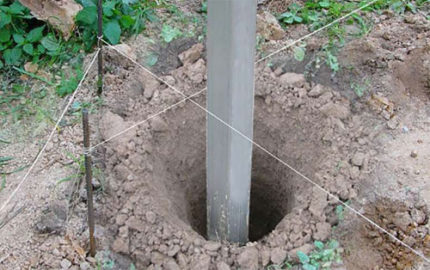 To install a support column, you need to drill a well (you can dig it manually). Then a sand cushion is created at the bottom, which prevents the column from moving during operation. Next, the lower part of the column is poured with concrete mortar. If there is a desire to reduce the cost of the procedure, then the clogging method can be used, but in this case, the reliability of the design will be lower
Installation of support poles
The material of manufacture affects the amount of work during installation. So it is enough to drive steel pipes or concrete. If necessary, they can be installed in a combined way.
Pipes are driven in to a depth of 1.5 m. For which it is necessary to first prepare the well.The driving procedure can be carried out using a sledgehammer and a wooden gasket. But this is the most laborious way. Therefore, most often use special devices, for example, pile drivers.
The leveling is then carried out using a hydraulic level. Further, the supporting pillars are connected to the fence and to each other. What are special removable strips used for?
 The design of swing gates must have sufficient rigidity, which will exclude the possibility of twisting of their wings, the occurrence of other defects that lead to additional expenses (repair, replacement of individual elements)
Pillar concreting is a more reliable way, because the entire structure of the entrance group will be more stable. It's no more difficult than punching.
So concreting consists of several stages:
- well drilling;
- installation and alignment;
- pouring concrete.
In this case, the depth of the well is usually no more than 1.5 m. The installation of support pipes is carried out in a reinforced glass or without it. A hydraulic level is used for leveling.


The solution is not filled with the entire well, but only part of it. For example, if the depth is 1.5 m, then only the lower 50 cm are concreted. The rest of the space is covered with rubble and soil.
Installation of hinges and hinged gate
Regardless of the method of installation of the support poles, hinged hinges should be welded next. After that, the swing gate leaves are hung.
Support poles with a steel core, until they are laid with bricks or other demanded material, are installed in the same way as steel counterparts.
But it should be remembered that hinged hinges and an overlay plate should be welded to each core.This is necessary for fastening the sash and the electric drive.
 More and more demands are placed on the decorative qualities of swing gates. Therefore, the list of installation works includes decoration operations. But to make the gate original today is not difficult. For example, the photo shows sashes with an inexpensive sticker
When the gate is not planned to be automated, then the need for overhead plates is eliminated. If circumstances change, they can be attached to support posts using chemical anchors or welding. The latter method is more reliable.
We recommend that you familiarize yourself with the manual on electric welding for beginners.
In any case, the plate should not be mounted below 50 cm from ground level - the lower, the more moisture affects it. So, in winter, the electric drive will be covered with snow, which can result in an early breakdown.
The opening of the gate leaves can be carried out in any direction, but it is more practical if outward. This will save space on your territory.
Features of installation and configuration of automation
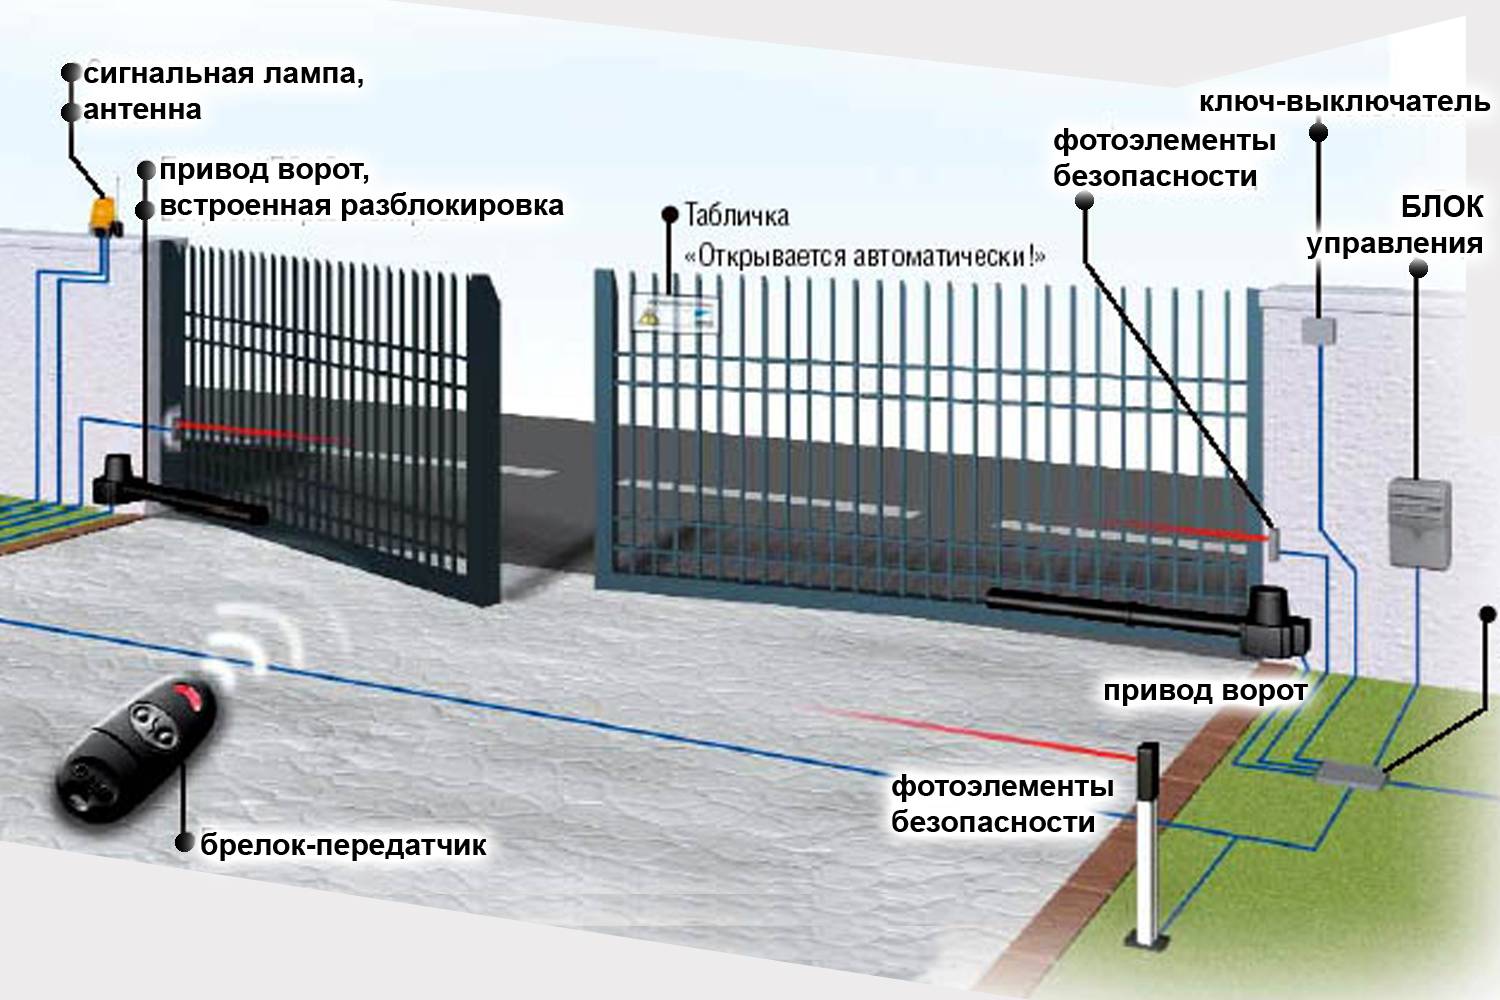
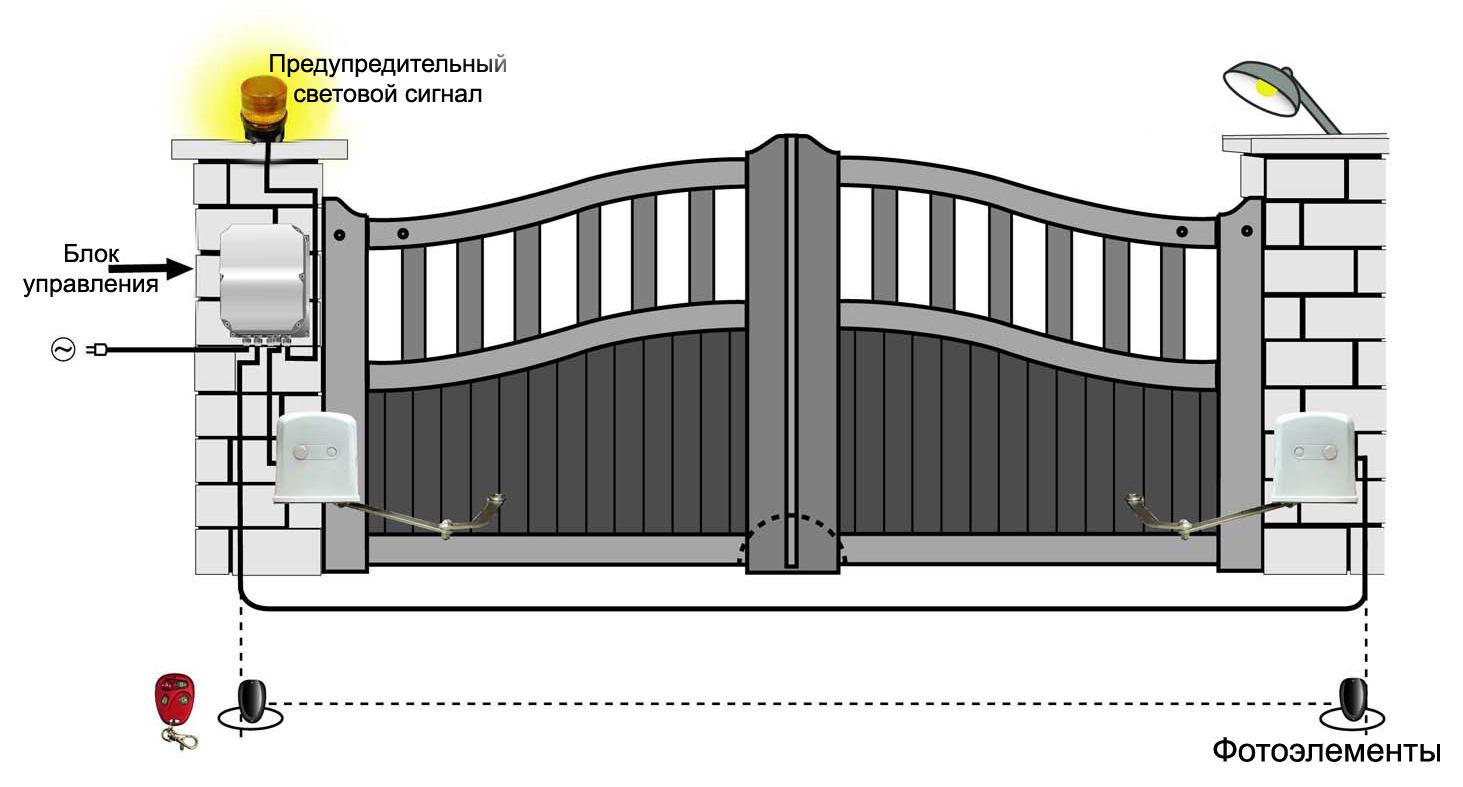
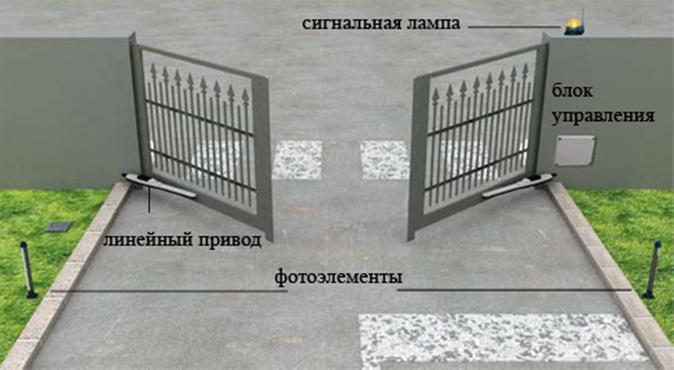
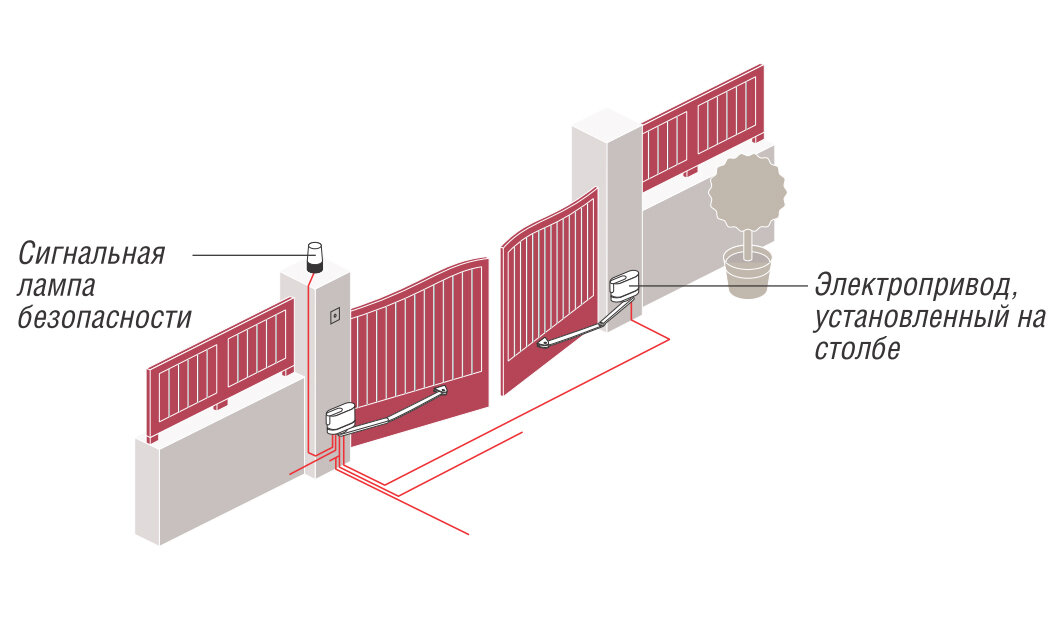
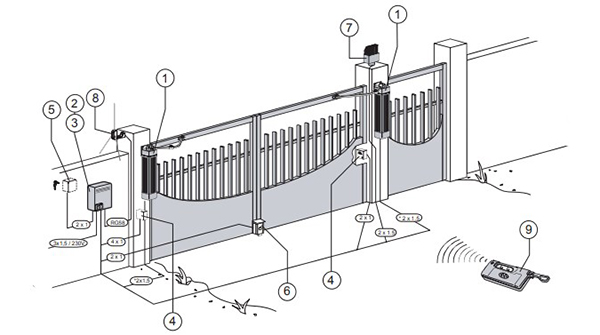
The set of gate control systems includes a significant number of elements that ensure their efficient and safe operation:
- Electric drives of various types (lever, linear). Each sash is equipped with one such device.
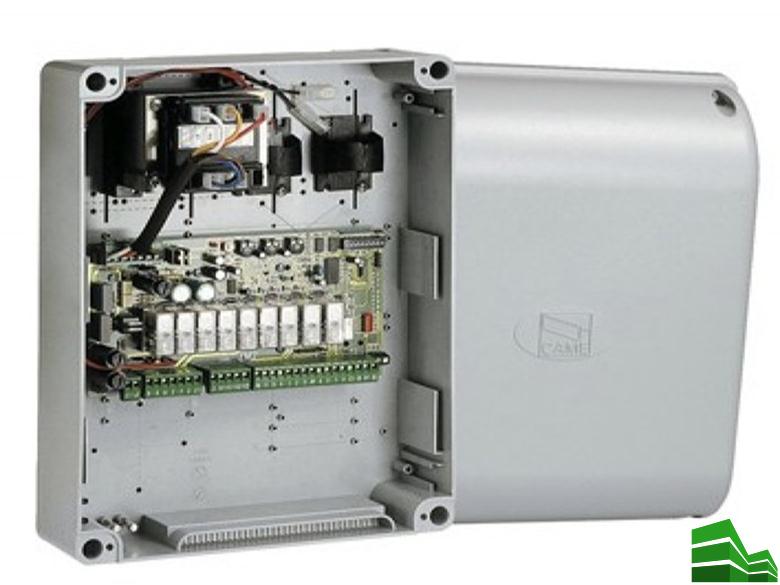
- Control block.
- Photocells. They are not a mandatory element of the design, that is, automation can easily cope with closing / opening the gate without them. Photocells allow you to instantly identify an obstacle - a child, an animal, an unsuccessfully approached car. Then give a command to stop the movement of the valves.
- Wires.
- Control panels.
- distribution boxes.
Gate automation operates on 220 V voltage.
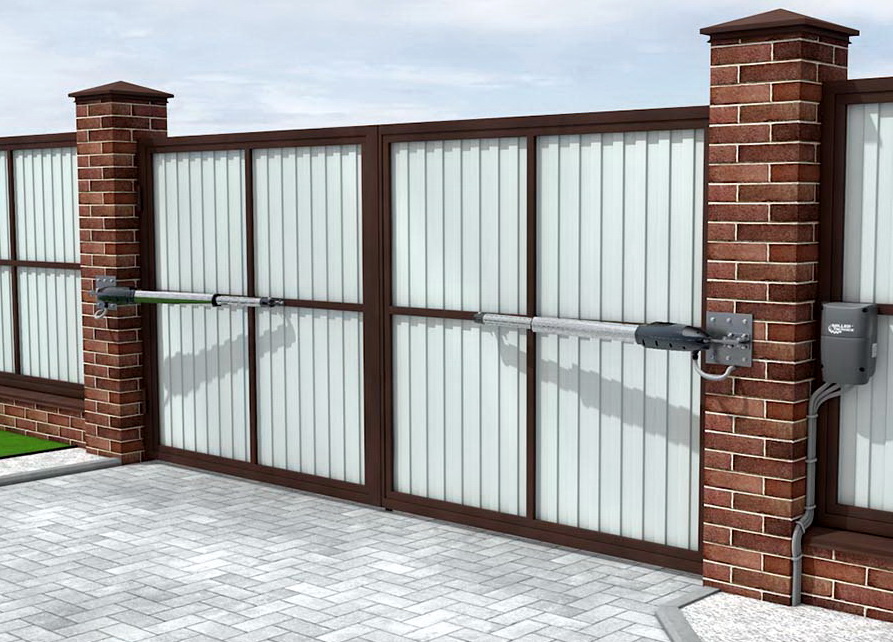
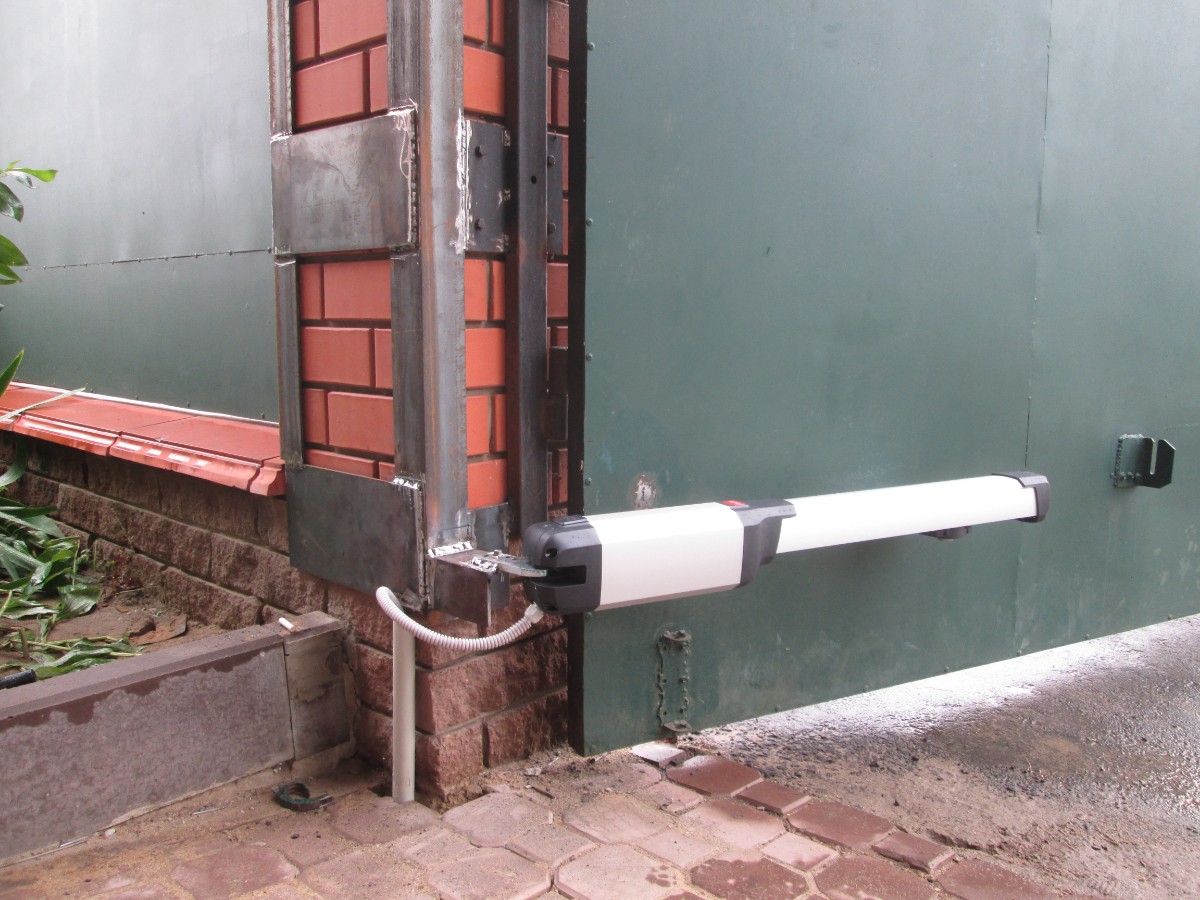
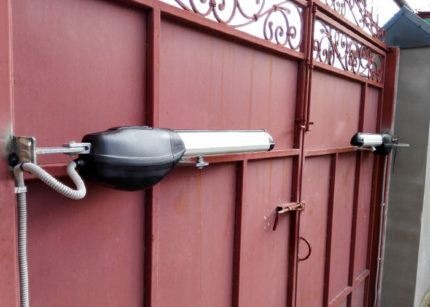
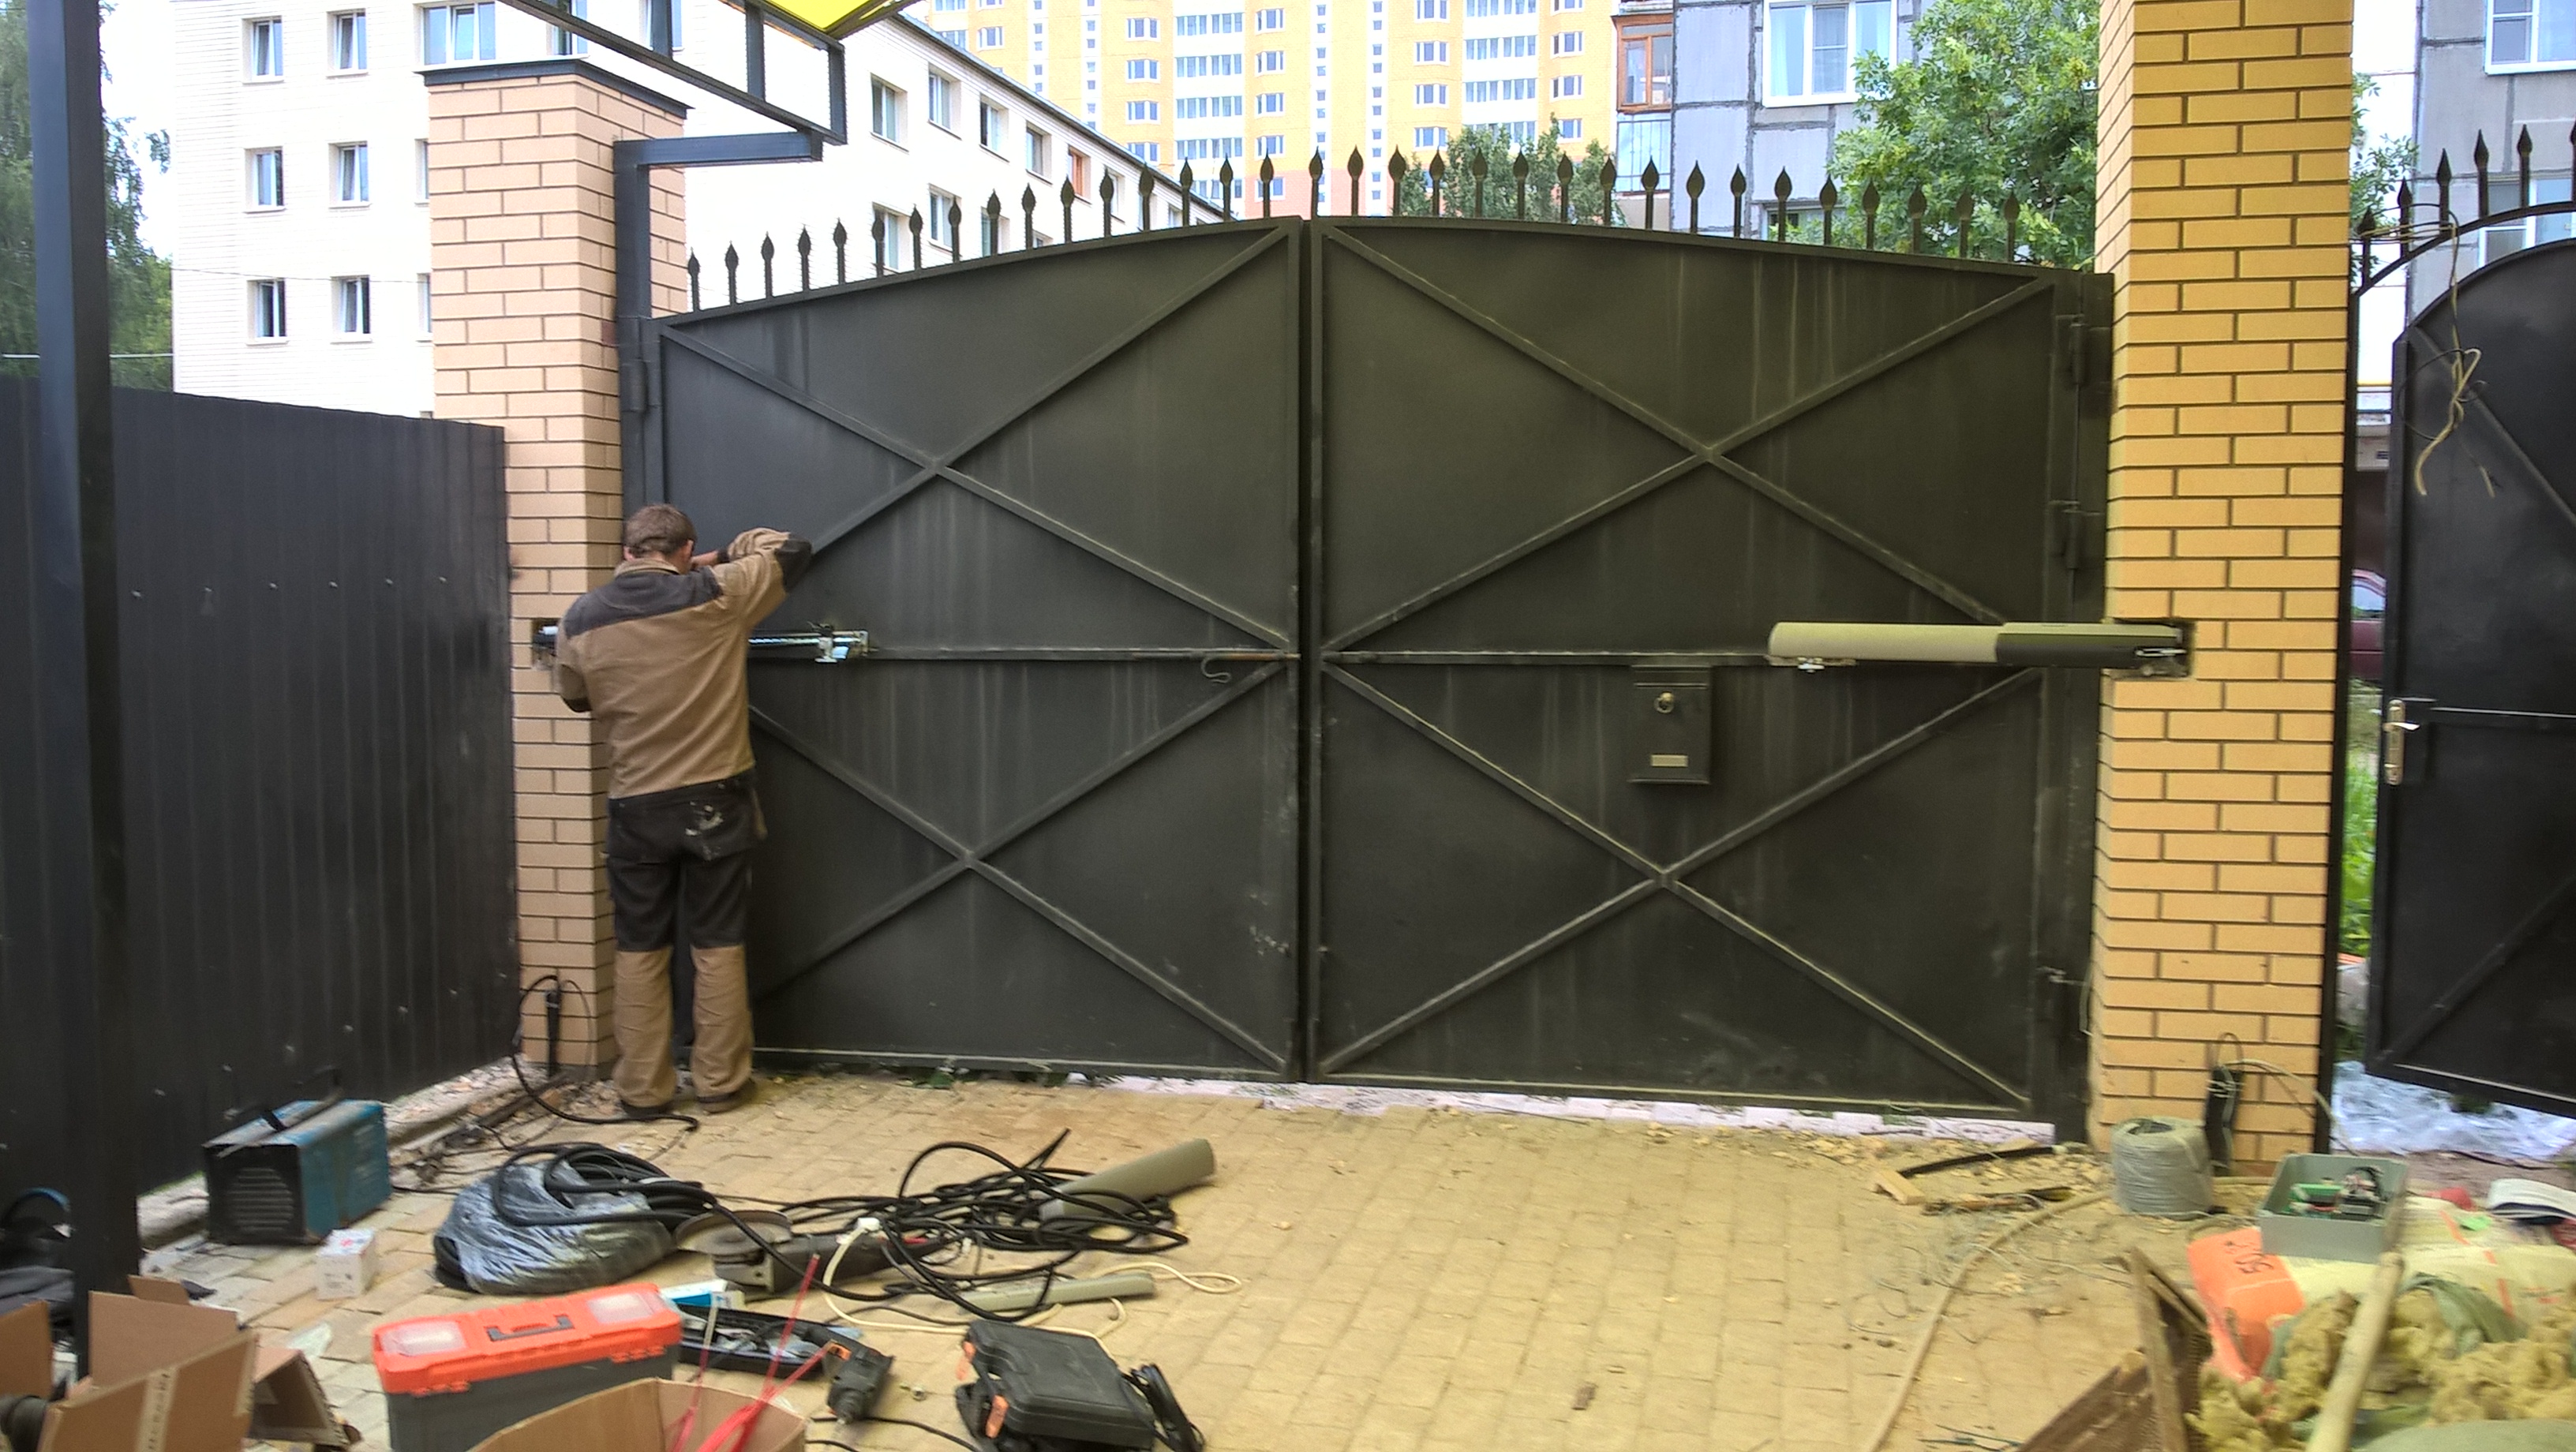
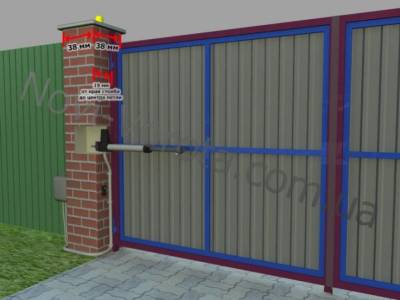
 The photo shows a linear electric drive. In its upper part, a key is visible with which the doors are unlocked in the absence of electricity. In this case, the drive bracket is welded to the overlay plate, and it is also attached to the steel core of the pole in the same way.
If the owner plans to independently install the automation, then you should choose an electric drive model for which the warranty will not be lost after do-it-yourself installation.
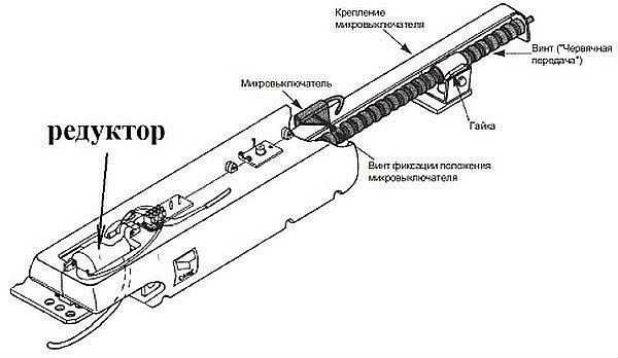
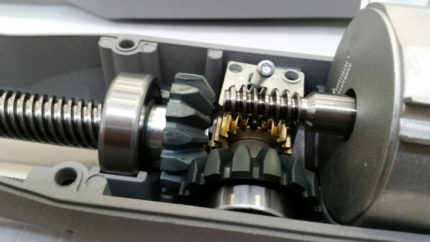 Swing gate automation should not be cheap, as little-known manufacturers often save on quality. For example, the steel gears of the electric drive (shown in the photo) are often replaced with plastic ones.
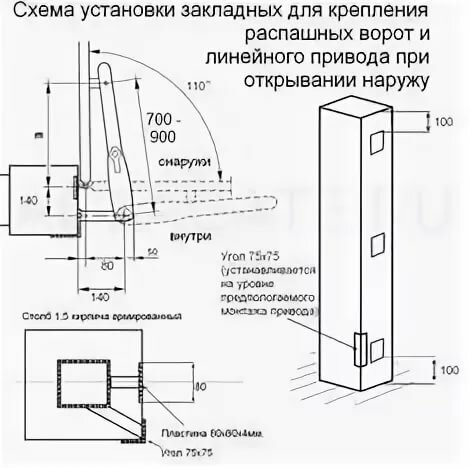
Drive placement requirements
An important point when setting up the structural elements of the gate leaf control system is their correct placement:
Photocells must be located strictly opposite each other. This is necessary so that nothing prevents the receiver from receiving a command signal from the transmitter.
During the installation of electric drives, the requirements and recommendations of the manufacturer should be taken into account. Almost always, the requirements regarding the distance between the loops and the angle of the supporting post should be strictly observed.
It is critical that the motor drive bracket is at the correct distance (the value is indicated in the instructions) from the corner of the pole.
If these requirements are ignored, then the gate simply will not open.
When fixing the bracket of the electric drive to the embedded plate by welding, tacking is initially performed. After that, measurements are made, as well as a trial opening / closing of the sash, and only then scalding is carried out.In this case, if any shortcomings are identified, then the bracket can be moved to a new location without much difficulty and loss.
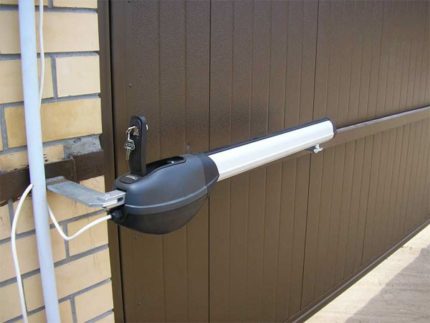
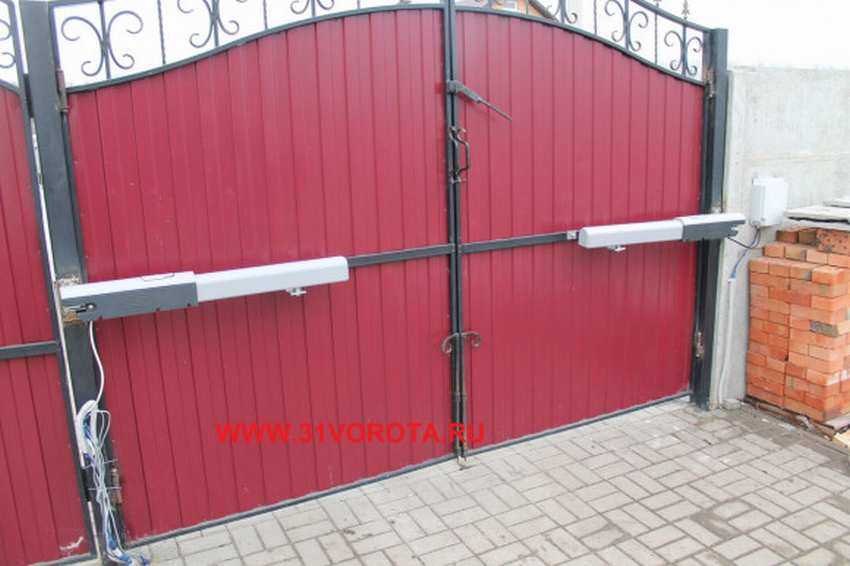
 The photo shows an electric drive located at the top of the sash, and this can lead to its premature failure. Reason: when the sash is already resting on the latch, the motor will still try to move it. As a result, with insufficient rigidity, twisting will occur.
The rod of the electric drive must be attached to the sash frame, and not to the leaf, even if it is rigid. The control unit is placed on a vertical surface, and not lower than half a meter from the ground, but preferably higher. This element of the system is sealed, but it is correct if the rubber gasket is periodically replaced. This will reduce the likelihood of damage to an expensive board, batteries, transformer inside.
Nuances of connection and settings
Connection of automation to the power supply is carried out after all elements of the system are installed. Initially, the wires are connected to the control unit. And then to the drive motor and other devices.
To connect automation, it is desirable to use copper PVA wires. They should be protected with corrugated pipes. If the cable will pass under the roadway, then it is better to take plastic water pipes, which will prevent damage even with a significant load.


The laying of wires should be hidden, that is, they should be hidden inside the support pipes, in the fence, etc. If this is not possible, then UV-resistant materials should be used for insulation.
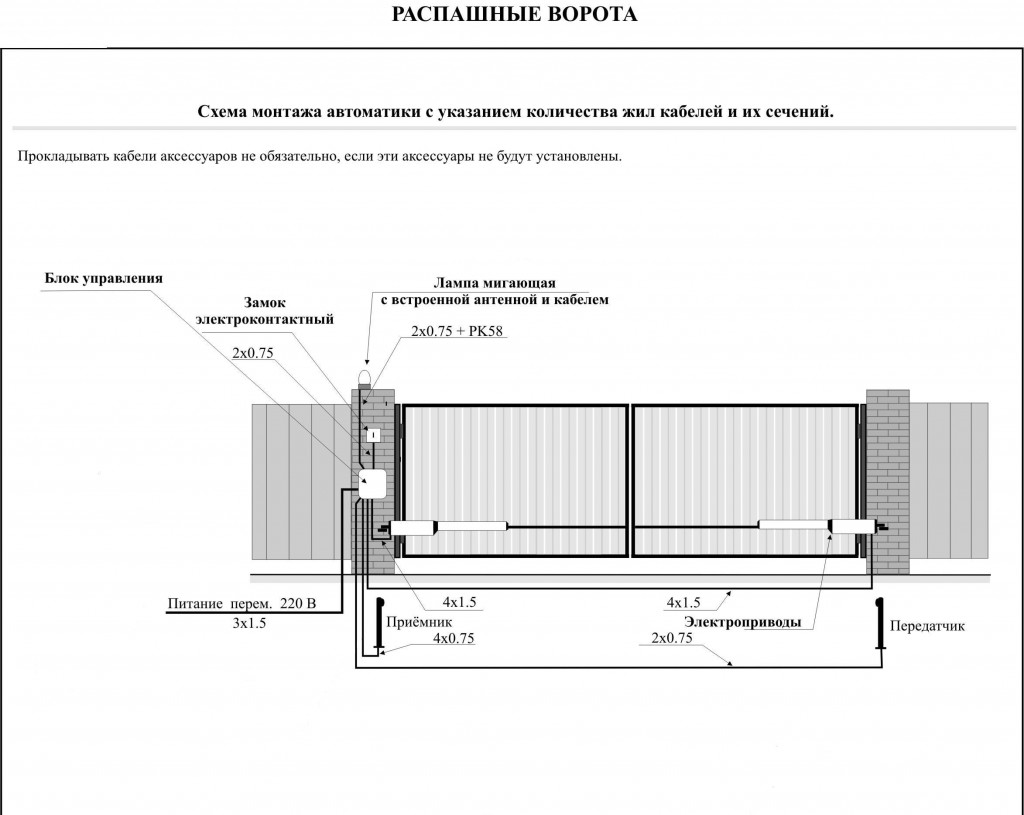
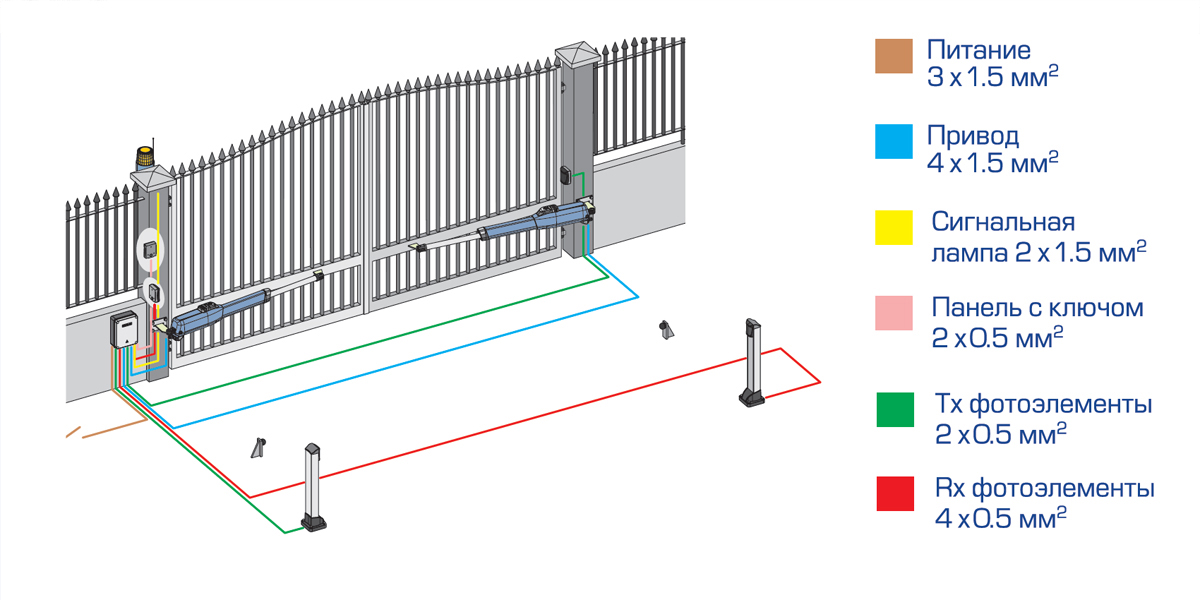
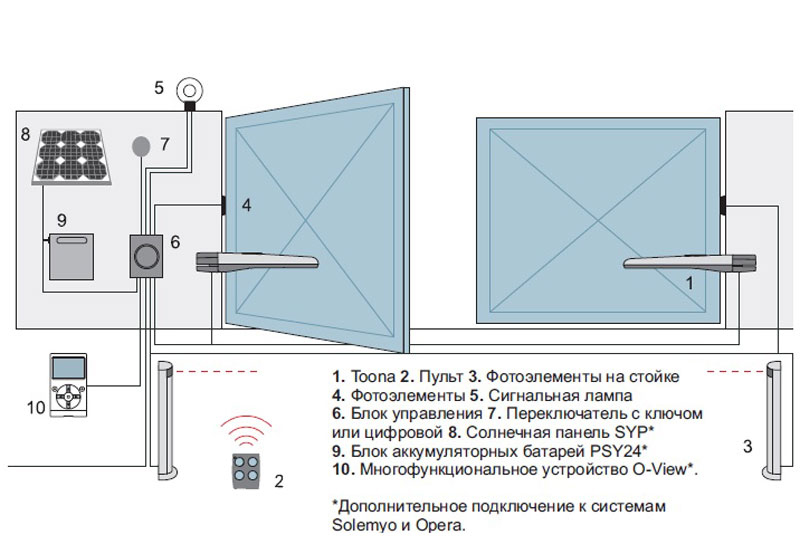
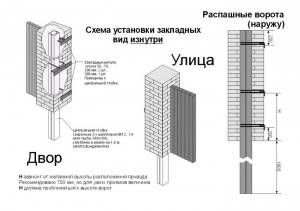
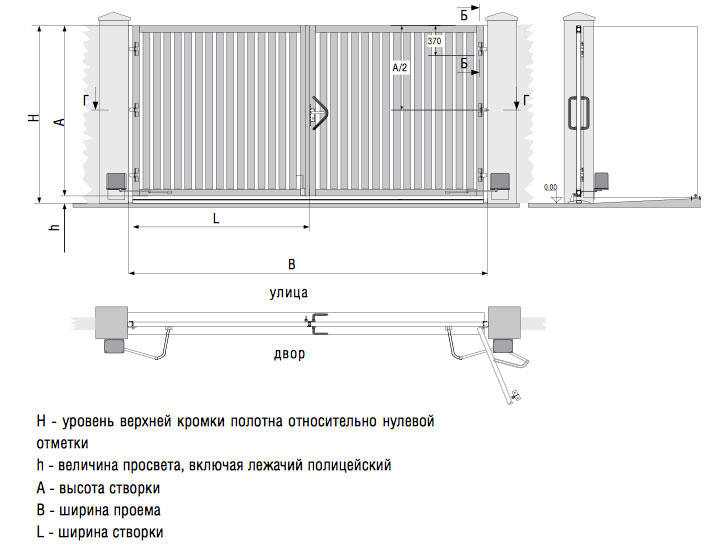
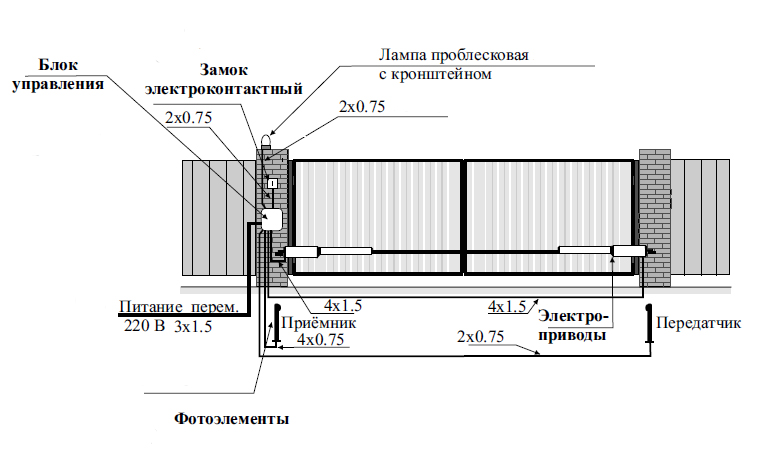
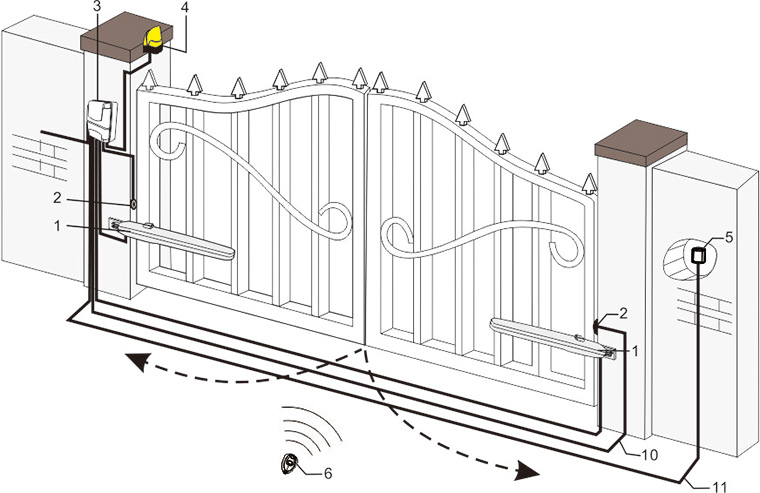
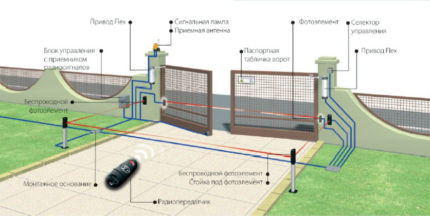 The diagram shows how the automation that controls the swing gate leaves should be placed. To ensure a sufficient level of safety, 2 sets of photocells must be used
To reduce the load on the electric drive, you should use the locks for the extreme positions of the leaves. They reduce the negative impact on the gear motor during wind, swinging of the wings by people. This greatly increases their service life.
You can unlock the gate in the absence of electricity using a special key. It is included with every drive.
Peculiarities
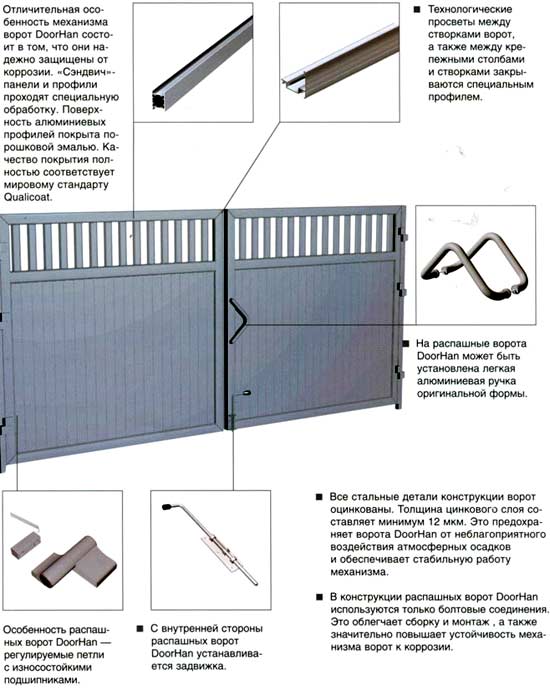
The products presented by Doorhan are in great demand. This company is engaged in the production and production of a wide range of gates. It is noteworthy that panels for such structures are produced directly in Russia, and are not imported from abroad.
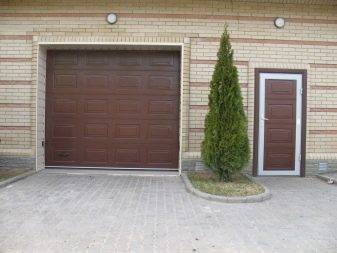
Gates are installed by many car owners in their garages. Automatic adjustment, as well as setting and programming the key fob, allows you to freely enter the place of its storage without leaving the car.

A distinctive feature of the products of this company is reliability and a long period of operation. The degree of its protection against the penetration of strangers into the garage is very high. The purchase price is quite affordable.
Having the skills of installation and welding, you can install the gate yourself, without resorting to the help of specialists. It is necessary to follow the instructions step by step (it is necessarily included in the package of purchased products), tune in to scrupulous preparatory work.
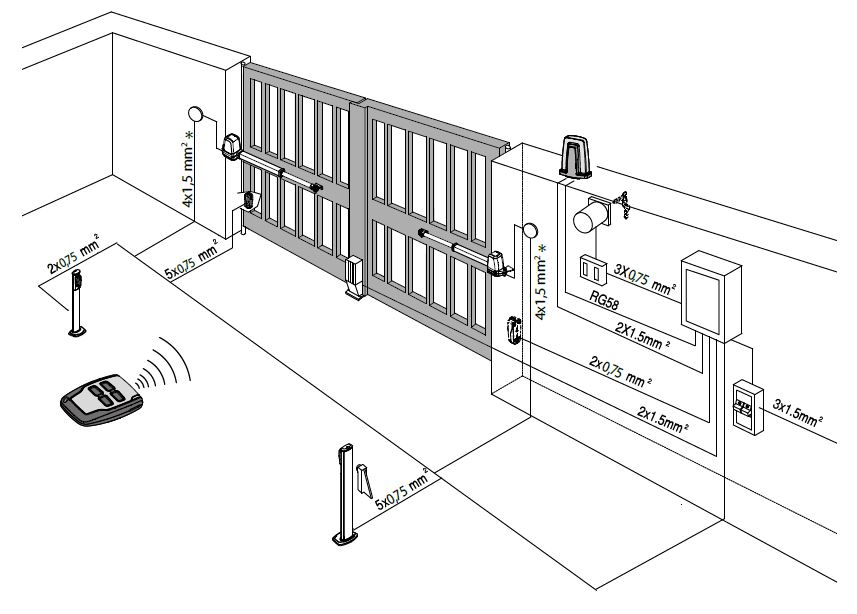
Wiring of electrical wires and cables
In practice, the installation of automation begins even when installing or laying the side support pillars. It is more practical to lay wires for power supply and control of the drive system of movement inside the poles, and have leads to the outside in the places necessary for installation.
In addition, a pipe should be laid under the road, in which all wires and cables should be laid for the operation of the gate panel located on the opposite side of the control unit. It is recommended to do this before asphalt is laid or paving slabs are laid, so that later, during installation, the integrity of the road surface is not violated.
It is advisable to take the wires of the indicated markings and observe all dimensions for the gasket that are required by the instructions. For automation, assembled according to your own scheme and with your own hands, you should also specifically prescribe the materials and dimensions used.
Kinds
DoorHan produces a range of household garage structures that have their own unique characteristics and functionality.
The four main types of these products are:
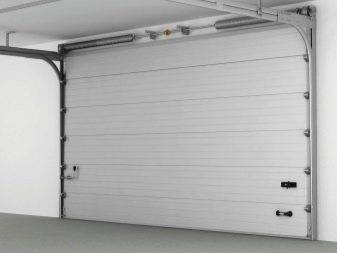
- sectional;
- retractable;
- swing;
- rolled.
All types are divided into certain models, each of which is completely individual.
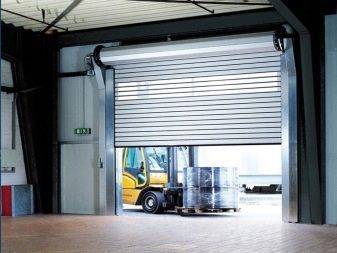
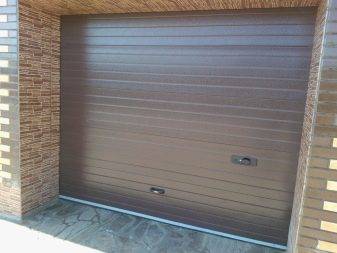
One of the most popular in Russia is the first option - automatic sectional garage doors.
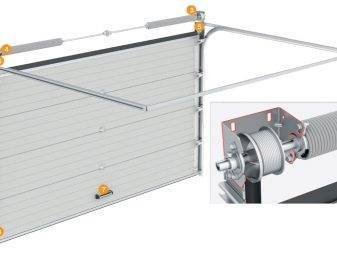
They have two main categories depending on the method of lifting:
- structures with tension springs;
- with torsion mechanism.
The main difference between these two varieties is that the first ones raise and lower the door leaf using the “spring in spring” system. This method has long established itself as the most effective and safe. In case of stretching or rupture of one section of the spring, another one takes its place.This prevents the door leaf from falling.
The second option is based on the installation of a mechanism with a rear torsion spring. This allows you to install garage sectional doors even in rooms where the lintel is no more than 150 mm. The torsion mechanism is designed for 25,000 ups and downs. It has a very robust design that provides efficient and comfortable long-term operation.
In addition to the basic equipment, it is possible to purchase mechanical means of opening the gate in case the electricity is turned off or there are malfunctions in the automatic system.
Material
DoorHan products please with an abundance of materials from which the gates are made. The standard for the Russian manufacturing plant is the creation of structures from sandwich panels. Sliding and swing gates are characterized by materials such as corrugated sheet, "steel sandwich" and wrought iron.


Dimensions
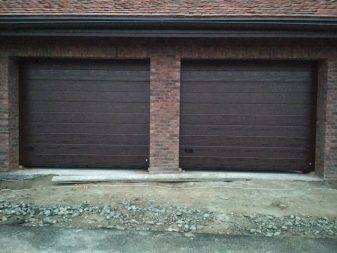
Unlike other modern manufacturers of garage structures, DoorHan allows you to select the required gate size according to the available table. Thus, the width range of the structure ranges from 2 to 6 thousand mm. And the height is: minimum - 1,800 mm, maximum - 3,500 mm. However, the manufacturer reserves the right for the buyer to make changes to the standard dimensions, providing the opportunity to make garage doors for an individual order.
Colors
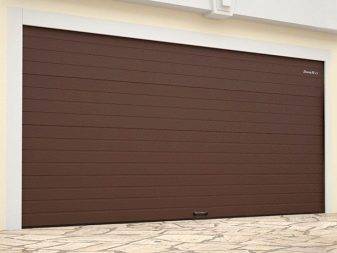
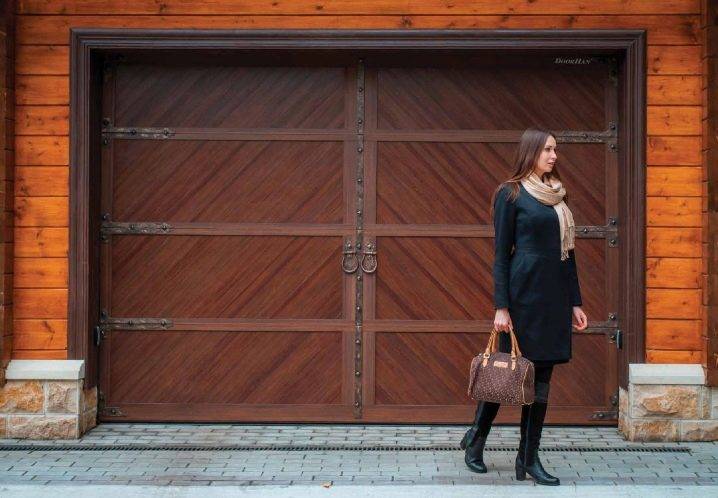
The color scheme of structures for the garage mainly depends on the material from which they are made. There is a small variety of standard colors: white, grey, beige, green, red and so on. As well as imitation of a wooden surface: golden oak and wenge.
There is an interesting addition to the standard metal gate textures - decorating the garage door leaf with aluminum moldings. The sequence and location of these additional decors creates a kind of ornament or pattern.
So, having decided on the type, color, size and texture of the future garage doors, you can start installing the DoorHan structure with your own hands.
Installation of automatic gates: advantages and disadvantages
Modern electric gates have a number of undeniable advantages, the main of which are:
- Saving time and effort. Automatic gate leaves open in a few seconds without any effort on the part of the user.
- Comfort. Remote opening of automated systems will not allow you to get wet in the pouring rain or shudder from gusts of frosty wind. After all, there is no need to leave the car: to open the gate, just press the button on the control panel.
- Safety of use. Sensors are installed in the design, which do not allow the doors to suddenly slam shut from a gust of wind, protect parts of the body and objects from possible pinching, and prevent the spread of fire in case of ignition. Additional devices for automated door models guarantee safe operation.
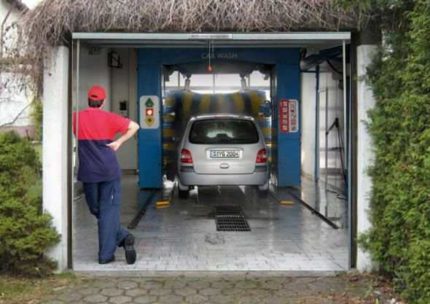
- Wide scope. Automatic gates can be installed not only in the yard or garage for personal use. They are often equipped with the entrances of industrial buildings, car dealerships and car washes.

Among the disadvantages of installing and using automatic gates in Moscow, one can single out the expensive cost and complexity of installation.Installing automatic garage doors and programming control mechanisms are quite complex processes. In addition, automation elements require periodic maintenance. For the selection of the optimal version of the gate model and their installation, they resort to the help of specialists. Car owners are not afraid of installing automatic garage doors - although the price is relatively high, their cost is justified and pays off already at the beginning of operation due to obvious advantages.


