- Possible errors and methods for their elimination
- Video: sealing the seam between the wall and the sink
- Material
- Ceramic
- Made of artificial stone
- From natural stone
- glass
- metal
- Siphon installation
- Overhead and built-in washbasins
- Features of installing a mortise washbasin
- Stage 1
- Stage 2
- Stage 3
- Stage 4
- Stage 5
- do-it-yourself installation of a sink in a bathroom: sinks with a pedestal
- Ergonomics of the bathroom and toilet rooms
- How to install the faucet
- Types of shells
- Types of bathroom sinks by installation method
- Shape and size
- Production material
- Tips from professional designers
- Practice
- Installing a bathroom sink on a countertop
- Siphon connection diagrams
Possible errors and methods for their elimination
Although installing a sink is not a difficult task, certain mistakes can be made when doing it yourself. Incorrect installation leads not only to leakage, but a loosely fixed sink can fall and cause injury to household members.
Main errors and how to fix them:
- installing a new sink on the mounts from the old one. Often people don't want to make new holes and put the new bowl in the old holes. In this case, the sink is not fixed very securely and may fall;
- strong tightening of fasteners.If you do not calculate the force when twisting the sink fasteners, you can split the bowl. Strong tightening of the nuts of the water hoses and the siphon will damage the rubber gaskets, which will lead to leaks;
- thread break. Applying a lot of force, you can break the threads on the fasteners and they will have to be changed;
- selection errors. It is necessary to choose the right size of the sink, otherwise it will interfere with free movement around the room;
-
gap between bowl and wall. Its presence leads to smudges on the wall, so it is necessary to lubricate the joint with sealant;
- uneven installation. During installation, it is not necessary to focus on the joints of the tiles. The levelness of the installation should be checked using a spirit level. To install the pedestal, the floor must be flat, otherwise you will have to use plastic gaskets.
Video: sealing the seam between the wall and the sink
Modern bathroom sinks can have a variety of shapes, differ in the type of installation and the material from which they are made. When choosing, it is necessary to take into account not only the shape and size of the bowl, but also the fact that the washbasin is convenient to use. The most affordable and popular are ceramic sinks. Modern technologies make it possible to create coatings that repel dirt, limescale is not deposited on them, so they have a long service life and retain an attractive appearance throughout the entire period of operation. If you adhere to the sink installation technology and follow the recommendations of specialists, you will be able to cope with its installation without the involvement of craftsmen, whose services are not cheap.
Material
When choosing a washbasin, attention should be paid to the material of construction.The market includes ceramic, glass, metal models, as well as sinks made of natural or artificial stone.
Ceramic
Ceramic sinks are environmentally friendly, resistant to scratches, chemicals, temperature changes, they are easy to care for, they are pleasant to the touch. The disadvantages of porcelain stoneware sinks are their considerable weight, which creates inconvenience during installation, fragility of the structure and relatively high prices.
Made of artificial stone
Sinks made of artificial stone have moisture resistance, resistance to chemicals, high temperatures, environmental safety, a wide range of different colors and shapes, long-term preservation of the original appearance with proper operation. The disadvantages can be considered high cost, high weight and fragility of budget models.
From natural stone
Products made of natural stone are carved from large pieces or interconnected from several parts. Sinks are made of granite, marble, onyx, basalt, travertine. Stone products are durable, strong, functional. The disadvantages are the high price and large weight, which complicates installation and transportation.
glass
Glass sinks may seem fragile at first glance, but in fact, thick tempered glass can easily withstand temperature fluctuations and mechanical damage. They are easy to care for and retain their integrity for many years.

metal
Metal sinks are made of cast iron, steel, copper, bronze. They are popular due to low prices, ease of installation, functionality, practicality. The metal has high strength and resistance to temperature extremes.The disadvantages are susceptibility to the formation of limescale and the need to ground the sink in the presence of electrical appliances and sockets nearby.
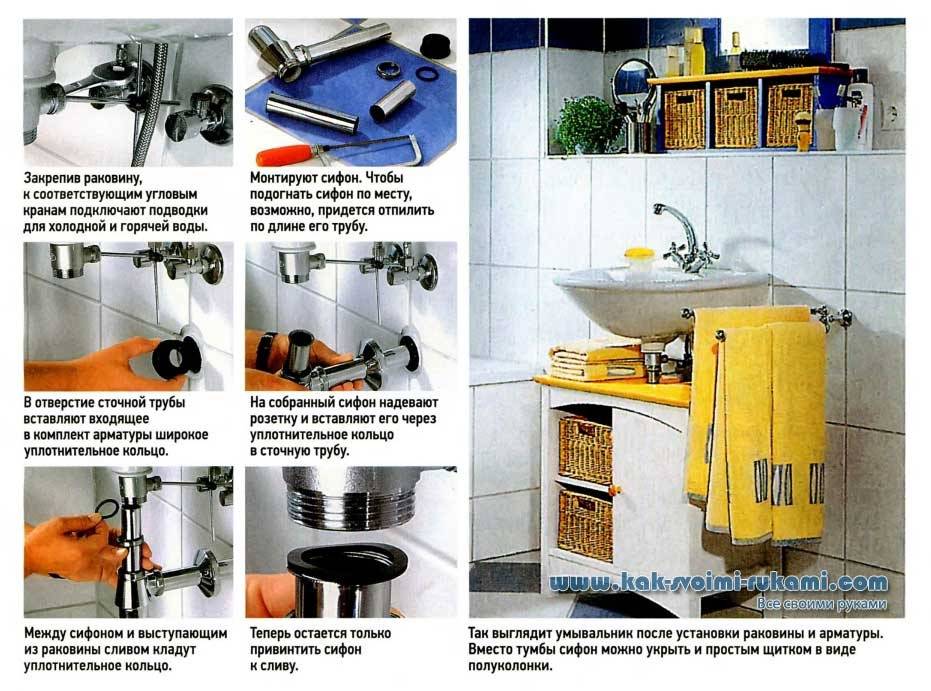
Siphon installation
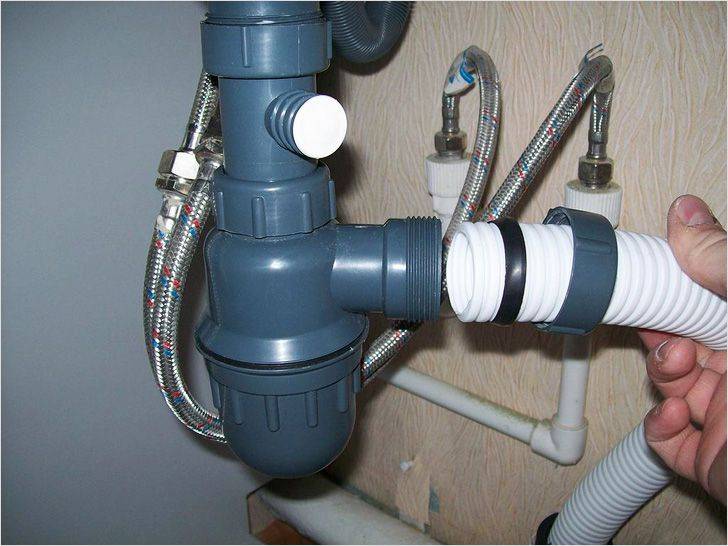 Siphon device
When the washbasin is fully installed, you should proceed with the installation of the siphon. Although in some cases its installation is carried out before the installation of the washbasin. If the siphon is not installed correctly or the seal is broken, this can lead to unpleasant odors that will come from the sewer. So, to install a siphon needed:
- wrench,
- screwdriver,
- siphon kit with all nuts.
 Metal siphon
Depending on the manufacturer, the assembly of the siphon may vary slightly, but the principle is the same. All parts are twisted together with plastic nuts or flange connections. Each connection must have a sealing gum. The siphon is attached to the washbasin itself with a long bolt, which is twisted from the washbasin bowl itself.
In this case, it is important not to strip the thread. After, when the siphon is fixed, a hose or corrugation is attached to drain water into the sewer
When the siphon is assembled, it is recommended to check it for leaks. To do this, pour a small amount of water into the sink. If at least one connection leaks, the work of installing the siphon needs to be redone.


Overhead and built-in washbasins
The overhead sink is a sink that is installed on a flat and even base - cabinet or tabletop with legs. The bowl is made of various materials - white and colored faience, natural and artificial stone, glass, metal. The shape can also be different: round, oval, rectangular.The advantages of overhead bowls include an interesting and original appearance, as well as the ability to install almost anywhere in the bathroom where it is possible to bring communications.
Overhead bowls can be installed on any surface.
Built-in sinks cut into the countertop and are considered the most practical and ergonomic. Mortise washbasins are divided into 3 types according to the installation method:
- The bowl is located under the countertop.
- The sides of the sink are above the countertop and rest on it.
- Semi-recessed model: the bowl cuts into the countertop partially and protrudes beyond it.
Such sinks most often crash into the countertop, which acts as a dressing table. In addition, it is convenient to keep frequently used hygiene products on it. Another advantage of mortise sinks is that they are the least susceptible to cracks, chips and other mechanical damage, as they are almost completely closed.
Read more: Installing a sink with a cabinet.
Features of installing a mortise washbasin
The installation of the sink is started after the supply of water pipes and sewerage to the location of the bowl is completed. Consider the installation procedure using the example of inserting a sink with protruding sides into a wooden countertop.
Stage 1
First of all, you need to mark the countertop for cutting the hole. Some manufacturers attach a template to the bowl, according to which it is convenient to transfer markup. If there is no such template, you can do the following:
- The bowl is turned upside down and traced around the edge with a pencil.
- While the bowl is upside down, measure the width of the rim on all sides.
- Remove the sink from the table.
- Inside the drawn contour, another one is drawn, taking into account the width of the side.
The markup is ready!
Stage 2
Next, along the inner contour, you need to cut a hole. It is most convenient to do this with an electric jigsaw, but first you need to drill a hole in the countertop so that the jigsaw blade can enter there.
To start cutting a hole for the washbasin, you first need to drill a hole for the jigsaw blade.
Then, carefully, trying not to go beyond the line, cut a hole with a jigsaw.
Cutting a hole for a wash basin.
Stage 3
The cut end is treated with sandpaper and 2-3 layers of sealant are applied to fill all the pores and make the surface waterproof.
Cut ends must be treated with sealant
Stage 4
A faucet and a siphon are installed on the sink. After that, a tape of waterproof material is carefully glued along the side, which acts as a sealant. Also, fasteners are installed on the side at an equal distance from each other, which are attached by the manufacturer.
Stage 5
A layer of sealant is applied to the edge of the inverted sink, after which the sink is installed in the hole and the fasteners are tightened. The protruding sealant is carefully removed with a damp cloth, but in such a way that a thin strip remains for reliable protection against leakage. water for washing. After that, the siphon is connected to the sewer, and the flexible hoses of the mixer are connected to the water intake points. Do-it-yourself mortise sink installed!
We examined the main types of bathroom sinks, which differ in the installation method. Almost all types can be installed with your own hands, without resorting to the help of specialists.To do this, you need to be able to use a simple set of plumbing tools and follow the installation instructions supplied by manufacturers with their products.
do-it-yourself installation of a sink in a bathroom: sinks with a pedestal
Installing a bathroom sink with a pedestal depends on the specific model:
- the sink can be mounted on the wall;
- the sink can rest on a pedestal.
Please note that in this case the sink may be located at a distance from the wall. Fasten to the wall:
Fasten to the wall:
- put the sink in the planned place and mark the attachment points on the wall;
- drill holes, drive in plugs or dowels;
- fix the sink with bolts;
Advice!
Do not overtighten the bolts. It is enough that the product does not stagger.


- connect the siphon and install the mixer.
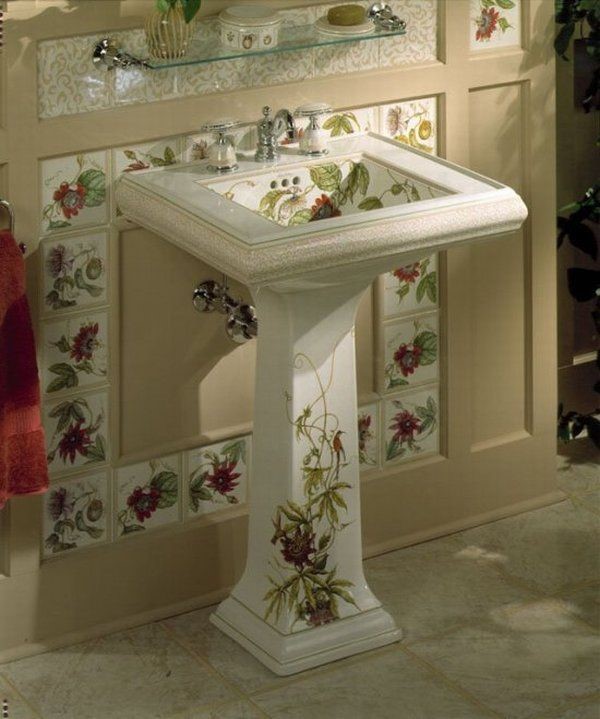 Photo 6. A washbasin on a pedestal will organically fit into a variety of interior styles.
Sink on a pedestal, mounted to the wall
Putting it on a pedestal:
- connect the sink to the sewer with long pipes;
- connect the sink to the siphon.
Please note that the outlet is inserted into the hole of the bowl
- fasten the sink to the brackets and seal the joints.
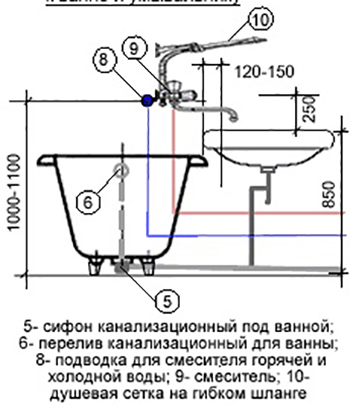
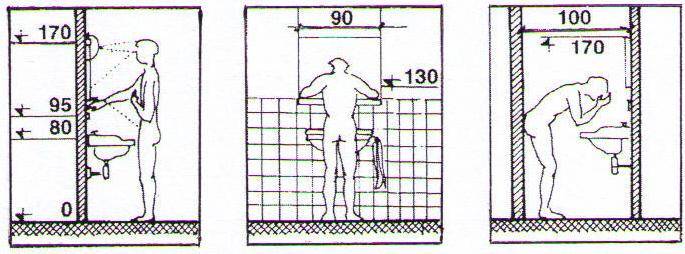
Ergonomics of the bathroom and toilet rooms
13.03.2009 17:54
Views: 128932
(60 ratings, average: 4.17 out of 5)
To My World
Every time a renovation is planned, it is necessary to start it from the so-called wet areas - these are the bathroom, toilet and kitchen. These rooms are the most difficult when planning and calculating an ergonomic space.
When reconstructing (repairing) the bathroom, the necessary conditions are taken into account, namely:
- The toilet bowl must be located near the sewer riser, if this is not taken into account, then the toilet bowl is placed above the floor level.
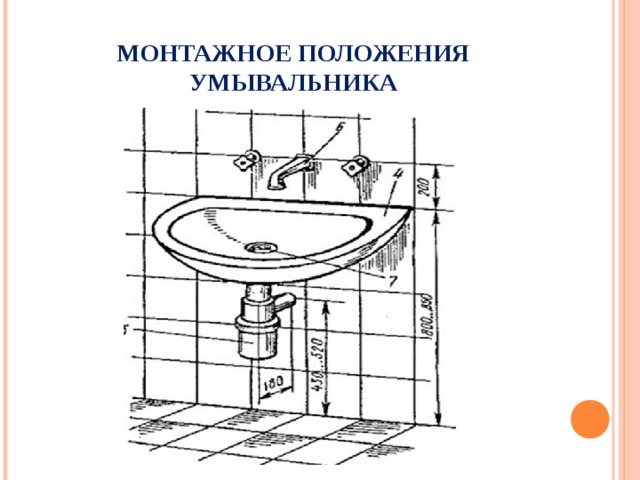
- The sink must be placed at a height of 85-90 cm from the floor level.
- In small bathrooms (less than 15 m2), for safety reasons, it is forbidden to install sockets and switches, they are located in front of the entrance to the room.
- In cases where the bathroom is larger than 15 m2, you can install sockets for various appliances: heated towel rails, hair dryers, saunas, TVs and even electric fireplaces.
- Towel dryers are located next to the riser for connecting to hot water. Electric heated towel rails are installed at any height from the floor and next to the outlet.
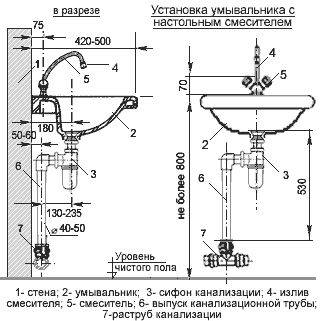
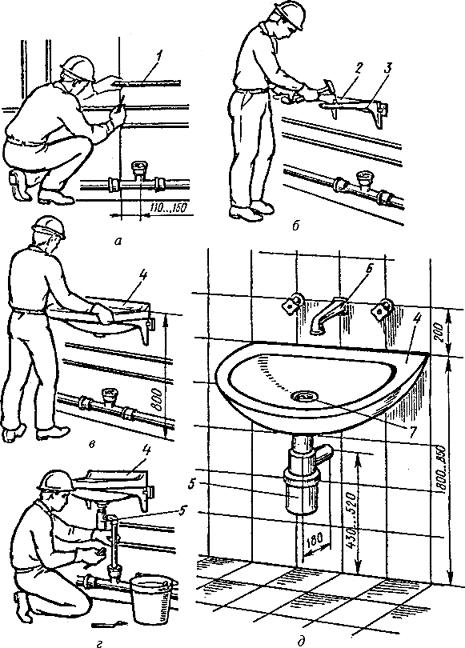
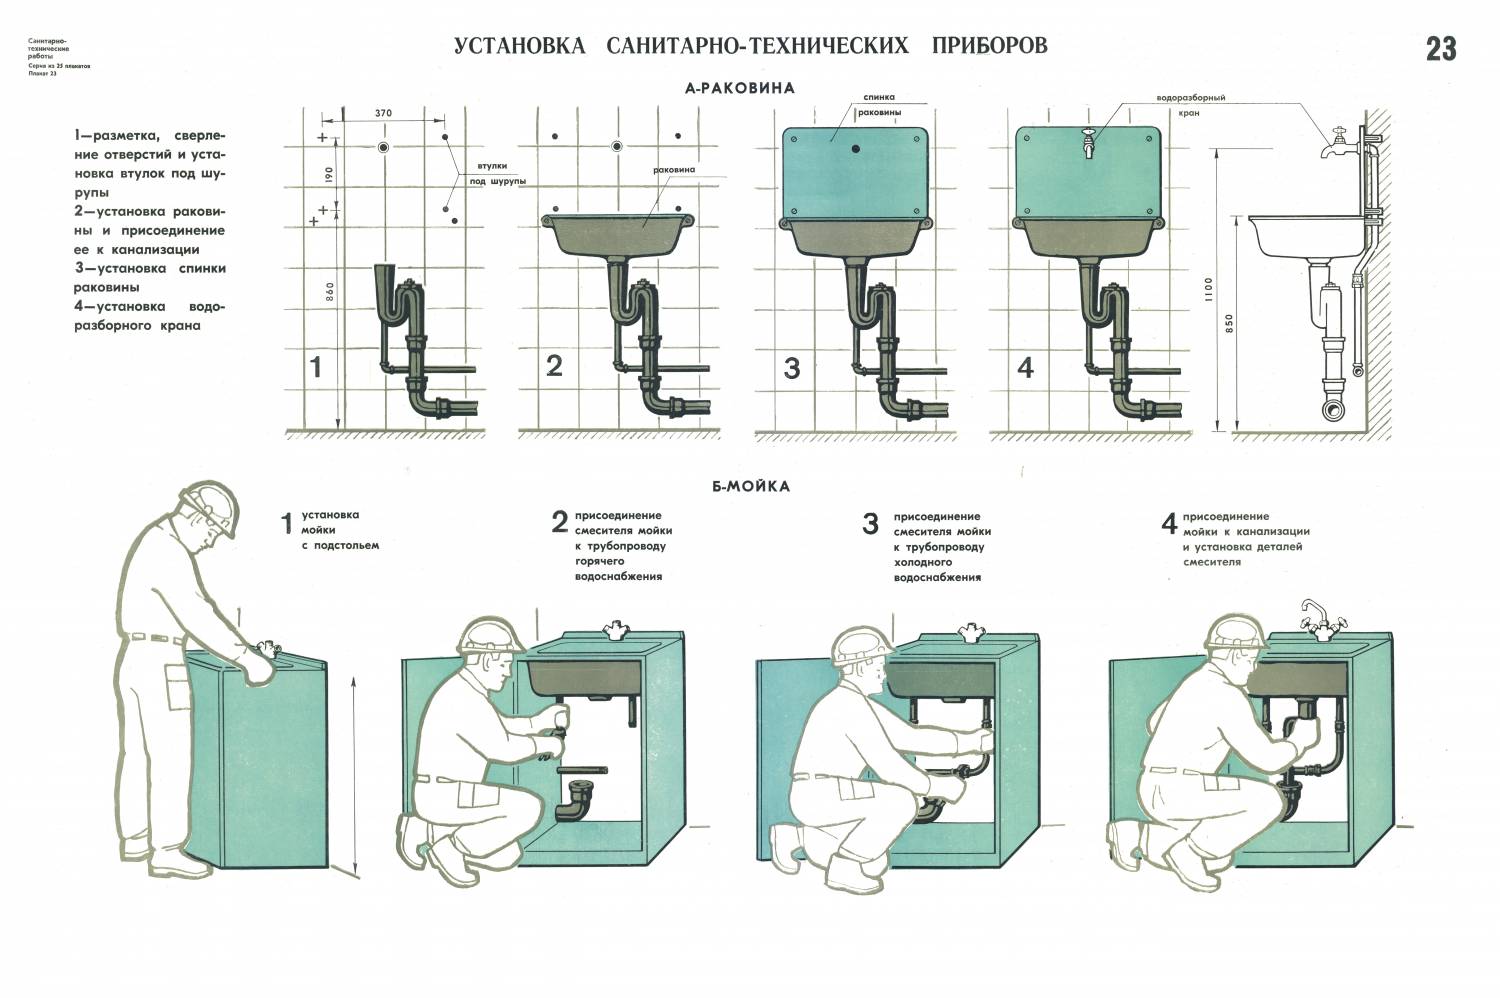
How to install the faucet
Mixer installation steps:
- 1. One or two studs are inserted into the mixer device for fastening.
- 2. Bring the hoses for hot and cold water supply, moderately tighten the attachment points with an open-end wrench. It should be noted that after mounting the faucet to the sink, it will not be possible to tighten the fasteners more strongly.
- 3. Next, the drainage hoses are passed into the holes of the washbasin.
- 4. Mounting studs on the other side of the bowl are provided with gaskets, a pressure washer and put on nuts for fastening.
- 5. Using a wrench, tighten the elements.
Types of shells
Unlike kitchen sinks, bathroom sinks come in a much wider range.
In order to choose the right accessory, you need to pay attention to the following characteristics:
- type of instalation;
- shape and size;
- manufacturing material.
Types of bathroom sinks by installation method
According to the installation method, sinks are divided into the following types:
-
With a pedestal In the people, this design is also called a tulip. Its main feature is the presence of a leg or pedestal.This solution allows you to hide the siphon and water pipes, and also provides a reliable support for the bowl. These structures have a predetermined height, usually 70-80 cm, and in the case when it is not enough, you will have to additionally make a stand or pedestal. It is not possible to reduce the height of the pedestal.
-
Overhead. Such models are installed on the countertop and protrude above it at a distance not exceeding 10 cm. After installing the overhead sink, it seems that it is a separate object. Such designs do not have holes for installing a mixer, so the faucet is mounted on a countertop. For ease of use, the height of the countertop should be no more than 85 cm.
-
Mortise. Such a sink crashes into the countertop, this can be done both from below and from above. When inserting from below, plumbing is flush with the countertop, which greatly simplifies the removal of water that has fallen on it. When installing the sink on top of the countertop, it protrudes a few centimeters above it. The faucet can be installed both in the hole on the sink and on the countertop.
-
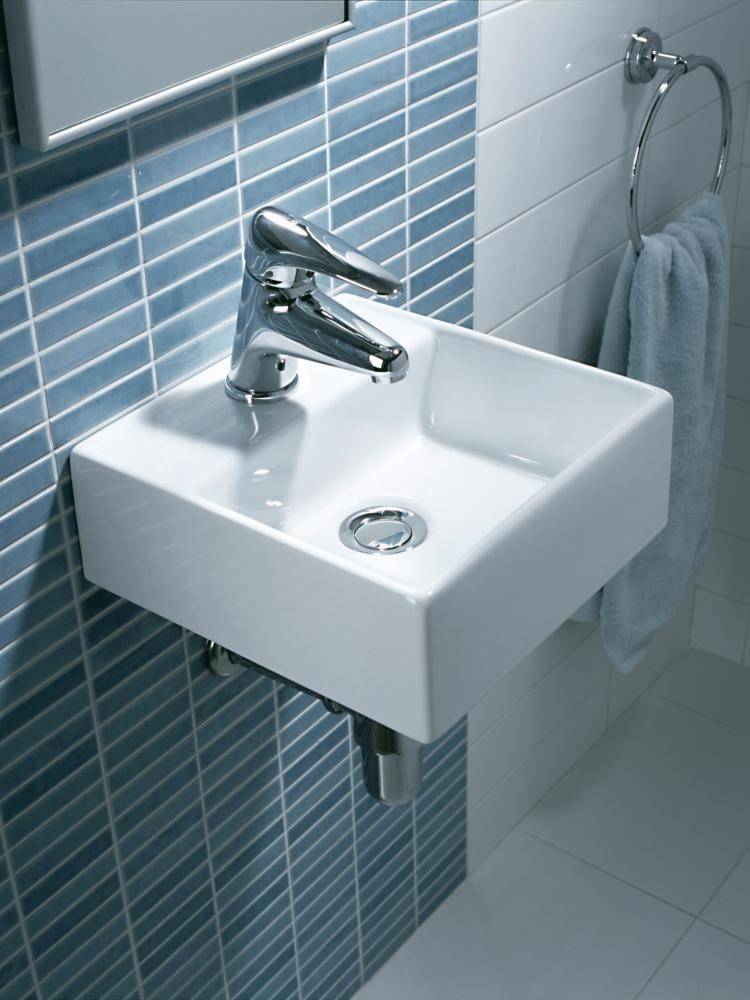
With wall mount. This design is also called console. There is no need to install a cabinet or countertop, as the sink is fixed directly on the wall using special fasteners. There are models of sinks with wide wings that allow you to imitate a countertop. The faucet can be installed both on the sink itself and on the wall. The main disadvantage of such models is that the connection to the plumbing and sewer system remains in sight. The advantage is the release of free space, and this is an important point for small spaces.Under flat models, you can install a washing machine.
-
Furniture. Typically, these models come with bathroom furniture. They can be mounted on a separate countertop, but most often furniture sinks are installed on a stand or bedside table that matches their size.
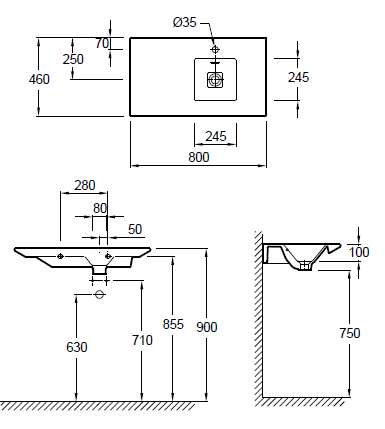
Shape and size
One of the main parameters that you need to pay attention to when choosing a bathroom sink is its size. Only a properly sized washbasin will ensure its comfortable use and will not take up a lot of free space.
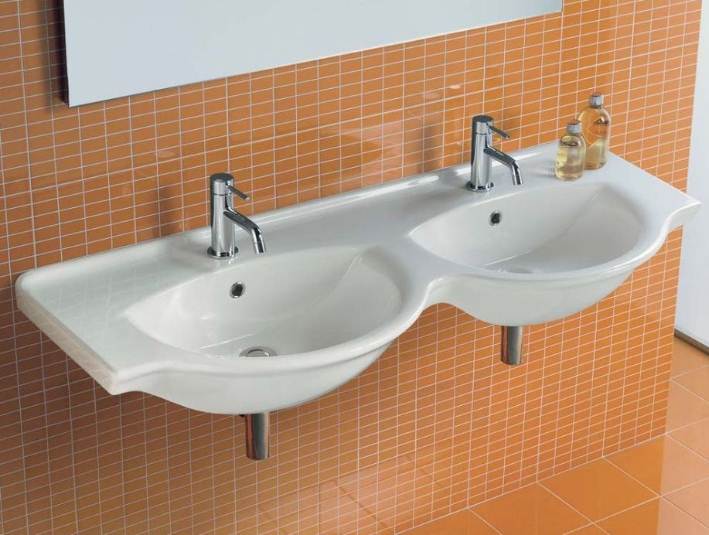
For small rooms, sinks 50–65 cm long and 40 cm wide are usually chosen. If you have a large room, you can install models up to 75 cm long or a double sink, in which case two people can wash at the same time.


Having decided on the size of the sink, you can proceed to the choice of its shape. Sinks are:
- round;
- oval;
- rectangular or square;
- complex shape.
Production material
In the manufacture of bathroom sinks, a variety of materials are used:
-
ceramics are the most common products. Porcelain is more expensive and of high quality, sanitary faience is simpler and cheaper;
-
natural or artificial marble. Although natural marble is a more expensive material, the presence of pores in it requires more careful maintenance. Sinks made of artificial marble outwardly practically do not differ from those made of natural stone, but they are cheaper. In addition, they have a smoother surface, which greatly facilitates maintenance;
-
Corian is a composite material, which includes acrylic resins and mineral filler, and with the help of a pigment, any color can be applied.Since this material is easy to process, shells of any shape can be made from it. Such models have a smooth surface, so they are easy to care for;
-
glass. Glass sinks, although they are expensive, look very beautiful. For their manufacture, special glass is used, so their strength is high. The disadvantage of such models is that traces of water are visible on them, so you need to take care of them more carefully;
-
Stainless steel. Such sinks have a long service life, high strength and hygiene. The disadvantage is that when hit by a jet of water, a lot of noise is created. Care must be taken of metal models carefully so as not to scratch their surface.
Tips from professional designers
Many experts recommend such types of sinks that would meet hygiene standards. In this case, a great solution would be to buy porcelain products. They fully meet quality standards, have high wear resistance. In addition, porcelain is a material of the middle price segment, which means it is available to everyone.
Use the advice of qualified personnel in the selection of a wall-hung sink and other plumbing fixtures, then you do not have to change or repair plumbing fixtures often
Pay attention to the style of the bathroom. If you are dominated by delicate pastel colors, then the best option would be a model, made of glass or white faience/porcelain
Instead of a shiny gloss, you can choose frosted glass, which is not so easily soiled and partially masks splashes flying in all directions.
Additionally, pay attention to the manufacturer. For example, Italian models of the Kerasan brand are of high quality.
The company has long been engaged in the manufacture of stylish accessories and furniture for bathrooms.
When buying a hanging sink, do not forget about the material of manufacture and size. For spacious bathrooms - large models, for small bathrooms - compact.
If you are at a loss, choose standard-sized products. These are suitable for installation in any bathroom, and you do not have to spend effort and money to connect them.
But do not forget that the most important thing in choosing a hanging sink is to make it as convenient as possible to use, durable, reliable and safe for all family members. Having chosen the model you like, get acquainted with installation and installation rules at home.
Practice
As practice shows, for all people the optimal height at which the washbasin bowl should be located is different. So, according to studies that take into account the average height depending on gender, it is:
- For men: 950-1020 mm.
- For women: 810-930 mm.
- For teenagers: 650–800 mm.
- For children: 400–600 mm.

Not only the mounting height of the bowl affects the ease of use of the sink. Also, when choosing a sink installation location, the location of other plumbing fixtures should be taken into account:
- To the edge of the bathtub or shower cabin must be at least 300 mm.
- To the toilet or bidet - 250 mm.
- To the heated towel rail - at least 600 mm.
In this case, do not forget about the free distance to the walls. To the side partitions should be at least 200 mm, and to the rear wall - from 700 to 1000 mm.
In addition to the design and overall appearance, when choosing a sink, it is also necessary to take into account its dimensions. Depending on the dimensions, all washbasins can be divided into 4
- Compact washbasins designed for installation in small bathrooms.
- Sinks are standard sizes.
- For spacious rooms, full-sized washbasins, as well as devices with two bowls, are best suited.
- Wash basins made to order. Such products differ not only in size and design, but also in the forms of execution, which are quite bizarre.
Two parameters affect the ease of use of the sink: the width and depth of the bowl.
For a small bathroom, a sink with a width of 300–450 mm is suitable. But using such a miniature sink is not very convenient, as a lot of water is sprayed.


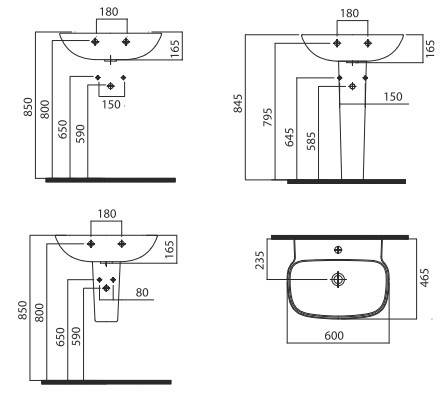

The optimal washbasin width for a medium-sized bathroom is between 500 and 650 mm.
 A standard 50–60 cm wide washbasin will fit perfectly into almost any bathroom.
Products of greater width are recommended to be installed in large rooms where they will not clutter up the space. When installing double bowls, the distance between their centers must be at least 900 mm, otherwise it will be inconvenient to use them at the same time.
 Installing two washbasins in the bathroom is a great solution for a large family.
The depth of the bowl affects the splash radius: the deeper the bowl, the less the mirror and the walls around are splashed. The optimal depth for the sink is 450-600 mm, it is with these values that most products are produced.

Changing the height, as well as the installation location of the washbasin (within the bathroom) is not considered a redevelopment, therefore, it does not require approval. But depending on the peculiarities of regional legislation, after the installation of plumbing with the transfer of wiring (points of water intake and sewage discharge), an inspection of the master of the company serving the apartment building may be required. Such a check is often necessary for the master to make sure that the changes made do not affect the performance of the overall in-house system.
Based on this, you can choose a new sink without taking into account how the old appliance is installed, and start solely from your preferences and needs. Consider which models of sinks allow you to adjust the height during installation, and which ones do not.
Installing a bathroom sink on a countertop
Plumbing products with mounting on the countertop can be of various types. The built-in sink is a high-tech device. In the neighborhood on the same plane there can be several bowls for various purposes at once. Mortise models have an aesthetic appearance, especially if they are made of materials such as porcelain stoneware, artificial stone, polymer concrete. During installation, the edges of the sink go under the material of the countertop. Screw clamps are used for fixation. The size and number of fasteners depends on the shape, weight of the product. A simple overhead sink is held on the surface due to the protruding sides.
Countertop sinks differ in the type of material and shape. These factors affect the performance and appearance of products.When choosing a bowl, it should be borne in mind that its outer and inner surfaces will always be in sight. They are made of ceramics, glass stone. For exquisite semi-antique interiors, you can find copper, brass products. Installation consists in installing the sink on a horizontal surface, in which holes for the drain and mixer are cut.
 Sink in the bathroom on the countertop.
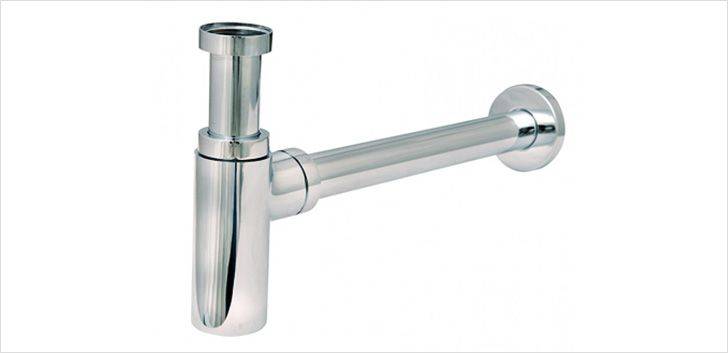
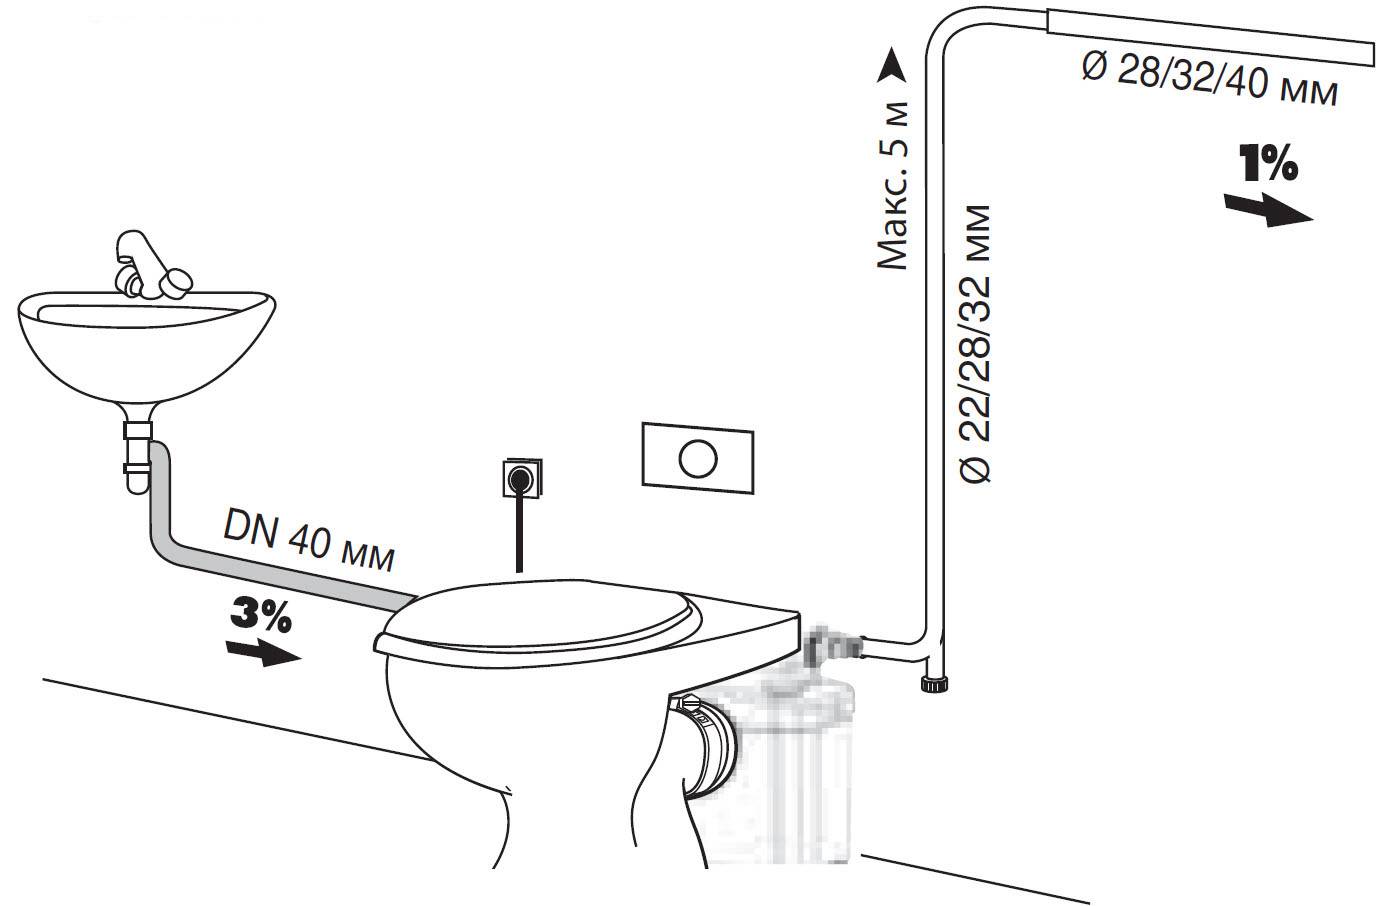
Siphon connection diagrams
Regardless of the design of the washbasins, the methods of their installation and the decision made at what height to hang the sink in the bathroom, the following types of siphons are used:
- single-turn;
- double-turn;
- bottle.
One-double-turn siphons, which received this name due to the presence of one or two pipe bends in the circuit, are used for “water lilies” when it is necessary to free up space under the appliance for a washing unit or other household items to the maximum.
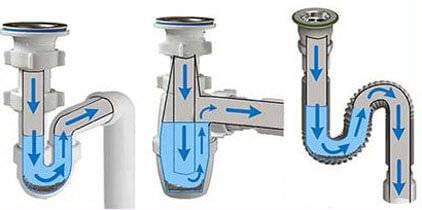
Another option - "bottle" is considered the most common. Differs in absence of bends. Instead, there is a special element in the form of a bottle with a drain pipe from the top of the structure. This scheme is more convenient than the first one regarding maintenance, which involves cleaning the sewer due to a blockage. At the bottom of the "bottle" there is an easily unscrewed cap.
The recommendations of experts regarding the installation of the washbasin will help the home master decide on the solution to the problem, at what height to hang the sink. The process of installing this indoor sanitary ware for the bathroom is based on generally accepted standards and schemes, the implementation of which is the key to a successful completion of the work.
The standard height of the sink, its length and width, and other existing parameters, were calculated based on the practical results of operation. If you adhere to them, the convenience and comfort of hygiene procedures will be provided.