- We carry out preparatory work
- How to dismantle old equipment
- Bathroom sink installation
- Installation of a suspended sink in the bathroom
- How to install a sink on a pedestal?
- Faucet installation process
- Frame construction for mounting the washbasin
- Sink installation: photo
- Preparatory work
- Possible errors and methods for their elimination
- Video: sealing the seam between the wall and the sink
- Fixing the bowl
- Washbasin installation height
- Key Points
- Types of country washbasins
- Country washbasins on a rack
- Washbasins without cabinets for summer cottages
- Outdoor washbasins with cabinet
- Consequences of improper installation of the washbasin
- Sink Installation Procedure
- Conclusion
We carry out preparatory work
Before starting the installation of the sink, it is necessary to determine exactly the place where it will be located, and the procedure for connecting the equipment to utilities. Once again, carefully measure the height of the device and its width. When choosing an installation site, we must take into account that the approach to the sink must be free. In addition, it should be easy to use.
If the plumbing fixture is to be installed in place of an obsolete device, the latter will need to be dismantled
This must be done very carefully and carefully so as not to damage the old sewer and water pipes.
After dismantling, we thoroughly clean the place of future installation, prepare the areas for connecting engineering communications. Experts recommend avoiding the use of all kinds of adapters whenever possible. They worsen the sealing of joints and spoil the appearance of the structure.
The sink is fixed to the wall using special fasteners. If they are not sold with the equipment, please purchase them separately.
In some cases, adapters cannot be dispensed with. For example, if you have to equip a connection with very old pipes. Then it is desirable to purchase high-quality parts that are most suitable for the pipeline.
One more moment
It is important to properly complete the sink if it is sold without a siphon and other elements. It must be understood that the siphon does not apply to universal elements. Different siphons are designed for different models of equipment
For example, one that is suitable for a steel product is not suitable for sanitary ware
Different siphons are designed for different models of equipment. For example, one that is suitable for a steel product is not suitable for sanitary ware.
Usually a conscientious manufacturer completes the sink with everything you need. If so, you should make sure that all the details are in place. It is advisable to immediately purchase a suitable mixer.
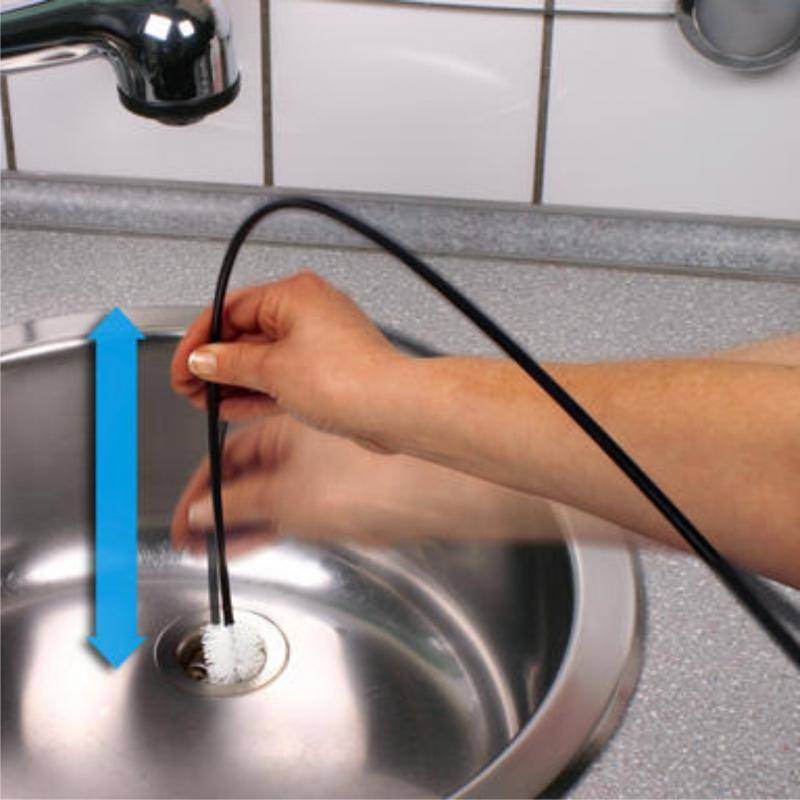
How to dismantle old equipment
How to install the sink correctly? You should start by dismantling the device that has served its purpose. To do this, first unscrew the nut that secures the mixer. After that, the device is disconnected from the eyeliner, carefully removed and removed. Then the drain elements are dismantled. The nuts are unscrewed from the bottom of the sink.A siphon is disconnected from the drain outlet, the water from which is immediately removed. If it is necessary to replace the siphon, it is separated from the drain pipe. At the end of the work, it is recommended to tightly close the opening of the sewer pipe with a rag, cork or other suitable object in order to prevent the appearance of an unpleasant odor. The sink is removed from the support.
Bathroom sink installation
As well as the installation of any plumbing equipment, installing a sink with your own hands requires certain knowledge and a special approach in terms of connecting utilities. Due to the fact that today there is a large assortment of different models of sanitary ware, the installation of a sink in a bathroom will primarily be determined by the type of its attachment.
More specifically, all sinks can be divided into several categories according to the method of attachment:
- Hanging sinks - fastened to the wall with brackets or special studs;
- Built-in sinks - with their entire surface they are installed on a cabinet or countertop;
- Semi-recessed sinks - are installed on a similar support, but protrude slightly beyond its edge;
- Overhead sinks are similar to the previous types, but, unlike them, they do not crash into the countertop, but are installed on top of it;
- Pedestal sinks, or tulip sinks - in most cases they are attached to the wall with partial support on the leg, in rare cases the leg acts as an independent support.
For each category of products there is a specific step-by-step instruction for installing the sink.And if there are no particular difficulties with the installation of built-in, semi-embedded and surface-mounted models - they are simply mounted in a finished base, then the installation of hanging sinks and tulip-type models involves its own nuances.
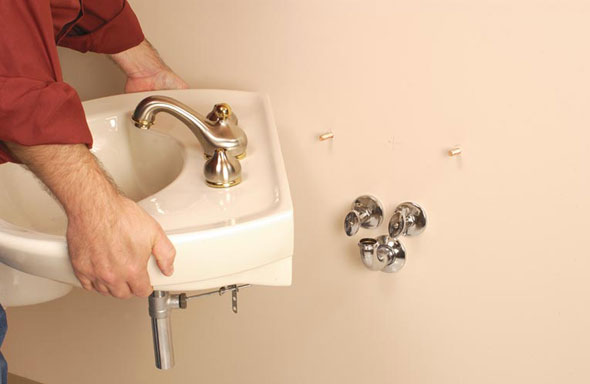
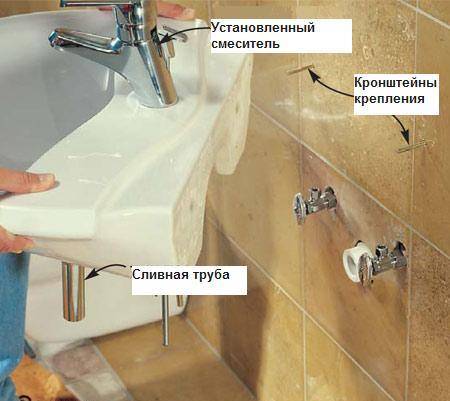
Installation of a suspended sink in the bathroom
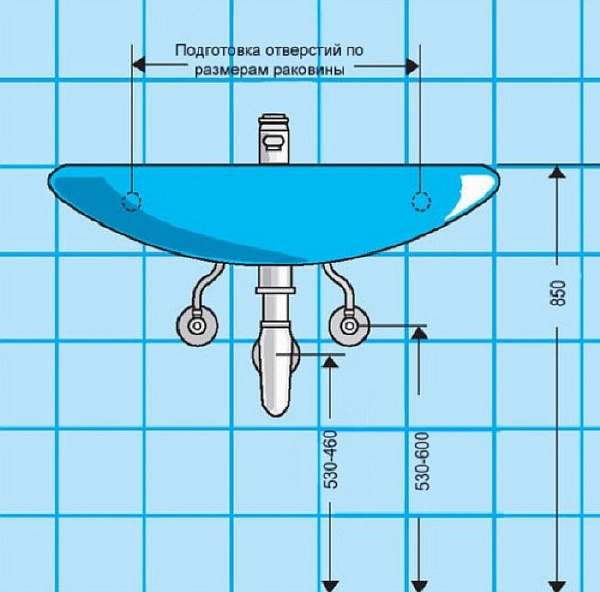
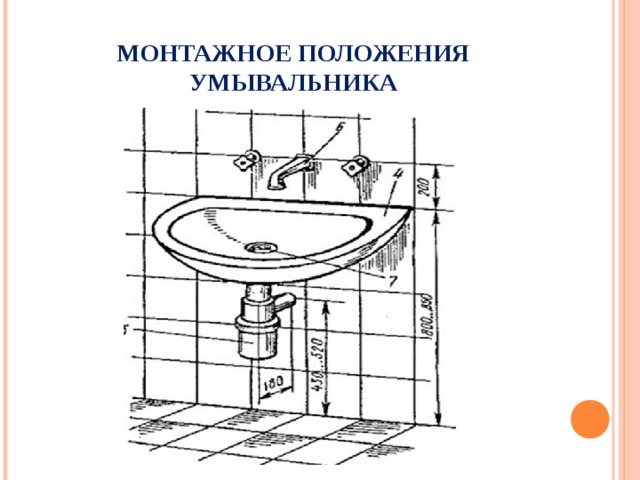
Before proceeding directly to the installation work, you should determine the installation height of the sink in the bathroom. The generally accepted optimal height is a distance of 85 cm from the floor, but deviations up or down are acceptable, based on the convenience of residents.
Having measured the required height, we draw a straight line on the wall parallel to the floor. This line will correspond to the top edge of the sink.
We apply the sink to the wall along the marked line and mark the locations of the fastener holes.
According to the marks, we drill holes in the wall, hammer dowels into them and screw in the mounting studs. If the sink has a solid weight, then it is better to play it safe and create a stronger support for it by installing it on brackets - strong fastening elements that are attached to the wall on one side and directly to the sink on the other.


Before you finally fix the sink on the wall, you should install the faucet - this will be discussed in more detail below.
Finally, the last step in installing the sink with your own hands will be its installation on prepared fasteners, followed by fixing the fasteners. The photos with the installation of the sink given in the article will help to more specifically understand the essence of each stage.
How to install a sink on a pedestal?
If you plan to independently install the sink on a tulip-type leg, the design of which involves fastening to the wall, then the installation of the sink in the bathroom will proceed in the same way.
The only difference is that you do not have to measure the installation height of the sink, since this value already depends in advance on the height of the support leg. We simply install the leg in the intended place and, placing the sink on it, proceed according to the previous scheme, starting with marking the fastener holes.
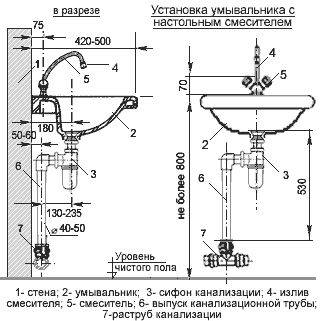
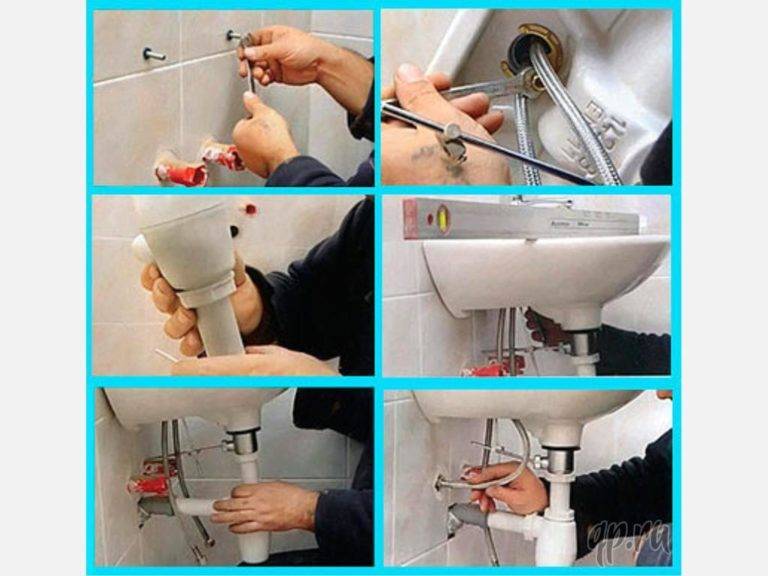
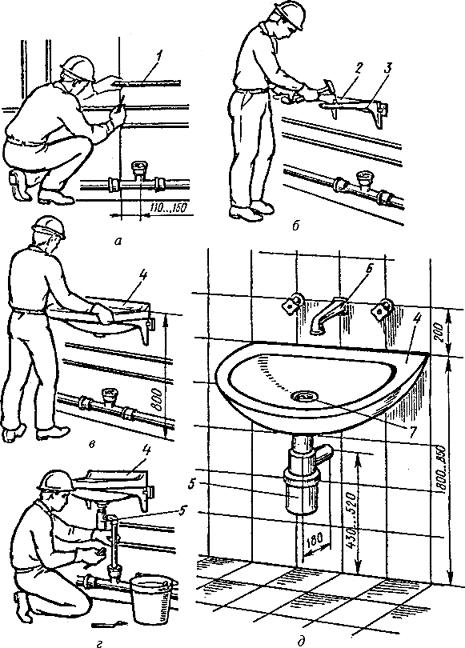
Faucet installation process
After the installation of the sink with your own hands, you will need to install the faucet (if the faucet is built into the sink). The scheme of its installation will consist of the following sequence of actions:
- Mounting studs are screwed into the mixer, then hoses for cold and hot water;
- The hoses are passed into the hole in the sink and are fixed on its reverse side with a pressure washer with a sealing ring;
- To connect the mixer to cold and hot water, the hoses are simply twisted into the appropriate pipes and the tightness of the connections is checked.
For more information, see the article on installing a faucet.
To connect the sink to the sewer, a grate is attached to the drain hole on the upper side, a drain pipe on the lower side, and this whole structure is connected by means of a bolt. Next, the corrugation or hose from the siphon is connected to the sewerage system with a mandatory leak test. This completes the sink installation process.
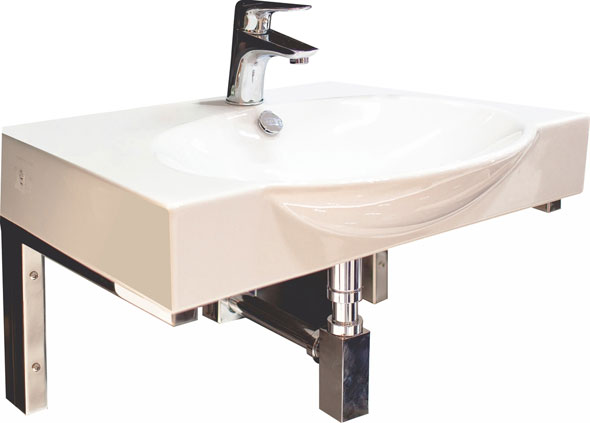
Frame construction for mounting the washbasin
If the walls in your bathroom are not strong enough to install a sink, but you really want just such a model, then you can solve this issue by installing a frame structure. It is attached to the floor and walls and consists of profiles. Height-adjustable with legs, so that the sink can be set at the desired height from the floor. All communications are hidden inside the structure.
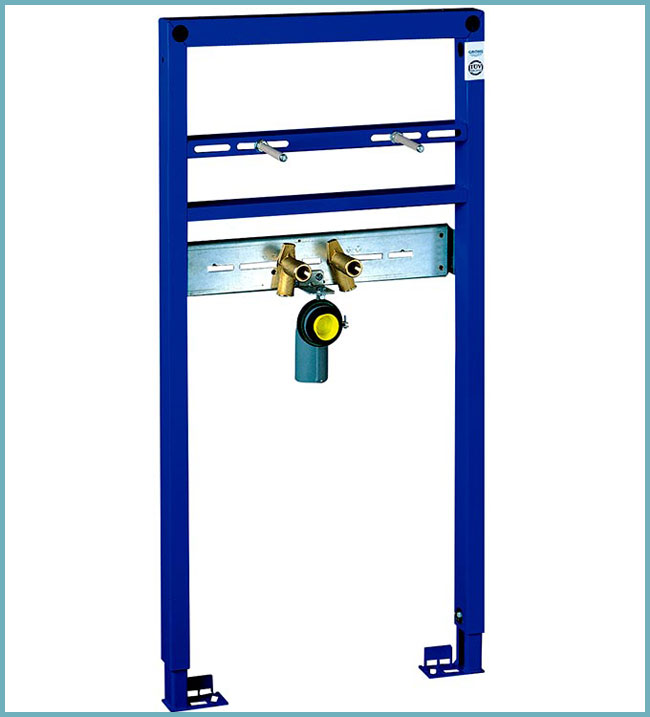
Frame construction for fixing the sink
The procedure is as follows:
- the frame is leveled and fixed to the floor and wall;
- at the desired height, the studs are screwed in to fix the sink;
- sheathe the frame with moisture-resistant drywall and or any other finishing material;
- between the wall and the sink, a rubber washer is thrown onto the stud to reduce noise during operation;
- attach the hinged sink to the studs on top of the cladding.
A properly assembled installation can withstand a load of up to 400 kg, and this is not only a sink, but also other plumbing. In addition, you can make a niche in the design and use it as a shelf.
Sink installation: photo

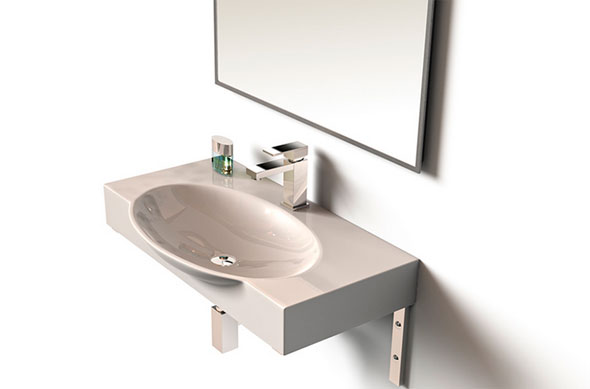
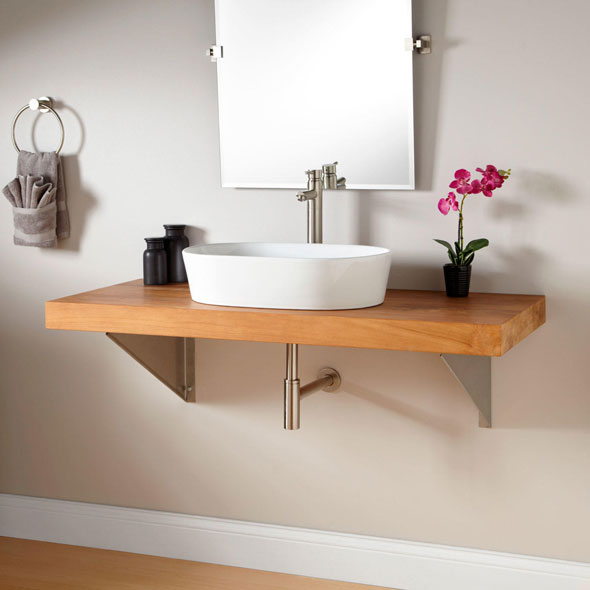


Modern wall-mounted sinks are one of the main elements of combined bathrooms and bathrooms. They differ from models built into the countertop by the method of attachment.
We will tell you how to fix the bathroom sink to the wall in order to maintain the integrity of the bowl. We will also show you how to ensure the reliability of fixation and comfort during the operation of plumbing. Based on our recommendations, you can easily do all the work with your own hands.
Back in the middle of the last century, almost all modifications of wall models were reduced to one type - a bowl mounted on two cast-iron brackets. Metal supports remained in sight and did not look very aesthetically pleasing.


With the development of the plumbing industry, many new models have appeared that have a hidden fastener method, are distinguished by their elegant design and durability. There are several classifications of wall-mounted washbasins, depending on the fasteners used, the shape or material of the bowl.
The so-called "tulips" or also refer to wall models, but have additional supports that simultaneously mask the siphon and pipes. Furniture sets with a sink in the countertop are popular, and both the bowl itself and the hanging pedestal can be attached to the wall.
Models with cabinets and cabinets are practical. Detergents, household chemicals or hygiene items can be stored in drawers or on shelves
Convenient for use bowls built into the countertop. The tabletop, in turn, is also fixed to the wall, and not installed on the floor.
Thus, the area under the sink remains completely free, which is convenient for cleaning and just for washing. However, more practical residents install under the sink-top or, or a small shelf for sanitary accessories.
Image gallery
How to install a washbasin on washbasin brackets? What other ways can a faience washbasin or a metal sink be fixed? In the article we will try to recall some installation methods and give the reader a number of practical tips for their implementation.
Using cast iron brackets is just one of many ways to install a sink.
Preparatory work
If you have already chosen an acceptable type of sink and want to install it, then in no case do not rush.
First you need to do some preliminary work:
- Shut off all water.
- Think about what corner of the room is best for the bowl, taking into account the piping under the faucet.
- Compare the parameters of the sink and the place prepared for it. Try to imagine her position and final appearance.
The size of the bowl is of paramount importance. You should choose the most compact and at the same time attractive design from the aesthetic side.
The sink should not take up much space, but it must have such overall parameters that are enough with a margin to cover the spectrum of water spraying. The optimal size of the structure will be 65 centimeters. And the most convenient mounting height is 80 centimeters.
As you can see, like every suspended plumbing fixture, sinks are mounted on the wall without touching the floor. For fastening, reliable brackets are used, which are available in a decorative design.
Step-by-step instructions for installing the sink:
- Using a ruler, spirit level and marker, mark the central horizontal. It is along this line that the installation takes place. This is sort of the upper limit of the bowl.
- Consider the thickness of the side walls of the new sink. They must be strong enough to withstand the pressure of the brackets. Measure the thickness and record the parameters on both sides of the bowl for future installation.
- Horizontally connect all available marks that indicate the installation height of the brackets.
- Turn the bowl over and fix it on the walls of the hole for the brackets.
This installation is best done with two people. This is required only for convenience: one makes marks with a marker, and the second holds the sink.
Now you can start working with the sink itself:
- Lean the sink firmly against the horizontal and make marks with a marker for installing fasteners. This must be done from the outside through the recesses. Constantly measure the coincidence of all lines and brackets.
- Use a drill to make holes that are slightly smaller in diameter compared to the size of the dowel screws and fasteners.
- Bushings or plugs made of nylon or durable plastic are driven into the drilled places, screws are screwed into them.
- Support brackets are installed on this mount.
- Mark the places for the future fixing of the sink to the wall, drill holes and hoist the sink.
- Attach the end of the siphon pipe to the socket of the sewer system. Install the faucet, connect the water supply.
- Make a light bait of the fasteners, set the bowl on a horizontal level. Check all fasteners again and fix them.
Possible errors and methods for their elimination
Although installing a sink is not a difficult task, certain mistakes can be made when doing it yourself. Incorrect installation leads not only to leakage, but a loosely fixed sink can fall and cause injury to household members.
The main errors and how to fix them:
- installing a new sink on the mounts from the old one. Often people don't want to make new holes and put the new bowl in the old holes. In this case, the sink is not fixed very securely and may fall;
- strong tightening of fasteners. If you do not calculate the force when twisting the sink fasteners, you can split the bowl. Strong tightening of the nuts of the water hoses and the siphon will damage the rubber gaskets, which will lead to leaks;
- thread break.Applying a lot of force, you can break the threads on the fasteners and they will have to be changed;
- selection errors. It is necessary to choose the right size of the sink, otherwise it will interfere with free movement around the room;
-
gap between bowl and wall. Its presence leads to smudges on the wall, so it is necessary to lubricate the joint with sealant;
- uneven installation. During installation, it is not necessary to focus on the joints of the tiles. The levelness of the installation should be checked using a spirit level. To install the pedestal, the floor must be flat, otherwise you will have to use plastic gaskets.
Video: sealing the seam between the wall and the sink


Modern bathroom sinks can have a variety of shapes, differ in the type of installation and the material from which they are made. When choosing, it is necessary to take into account not only the shape and size of the bowl, but also the fact that the washbasin is convenient to use. The most affordable and popular are ceramic sinks. Modern technologies make it possible to create coatings that repel dirt, limescale is not deposited on them, so they have a long service life and retain an attractive appearance throughout the entire period of operation. If you adhere to the sink installation technology and follow the recommendations of specialists, you will be able to cope with its installation without the involvement of craftsmen, whose services are not cheap.
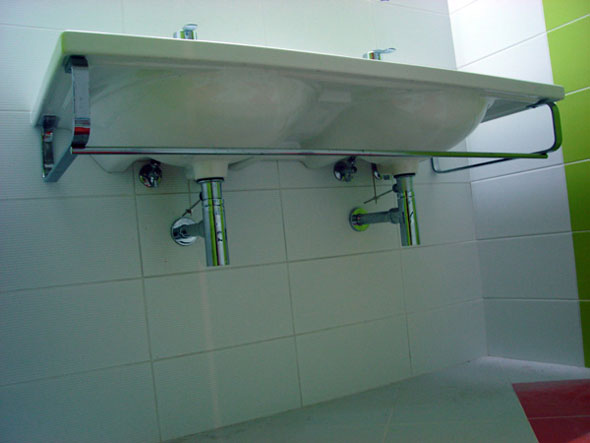
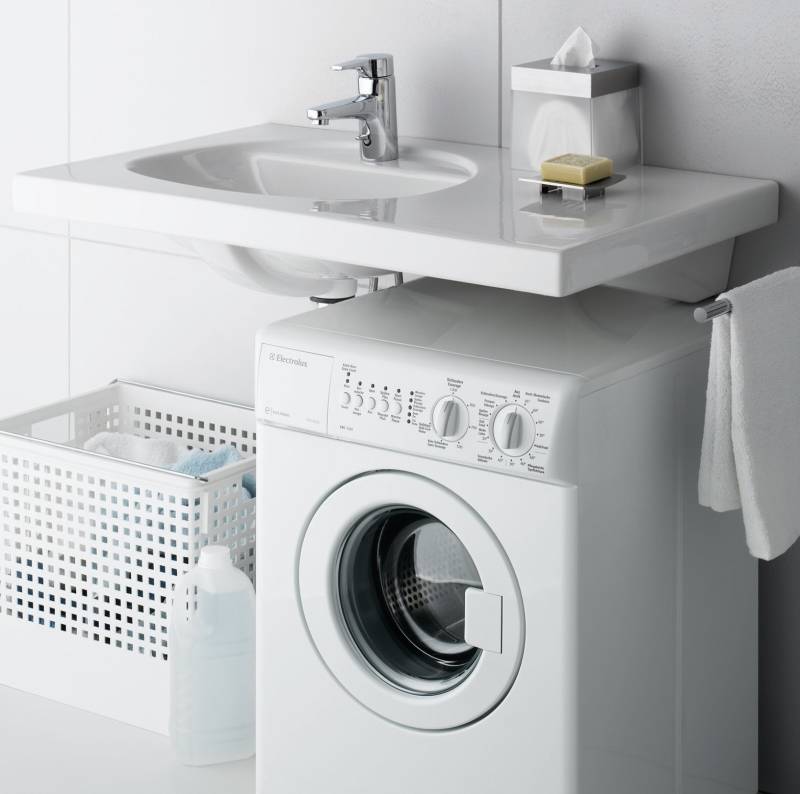
Fixing the bowl
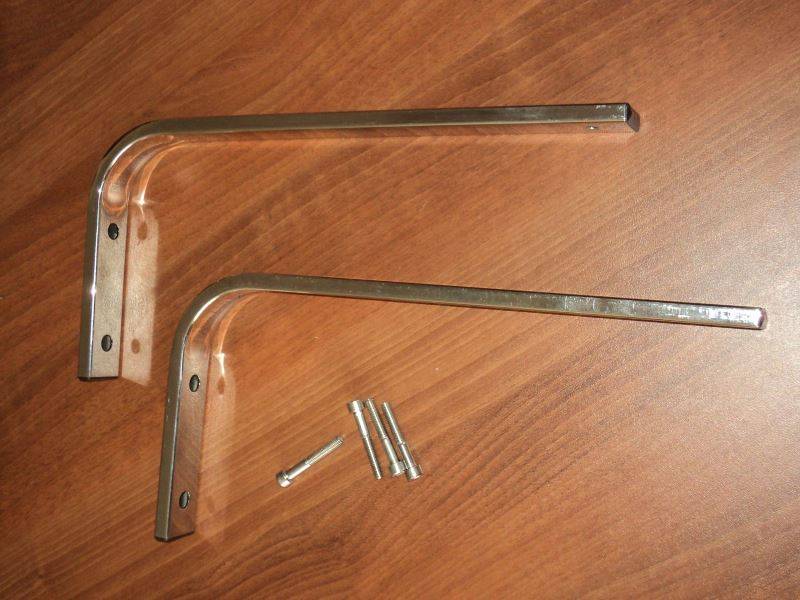
The brackets supplied with the main product are used as fasteners for the sink above the machine. The work of the master plumber consists in fixing the brackets and hanging the bowl.
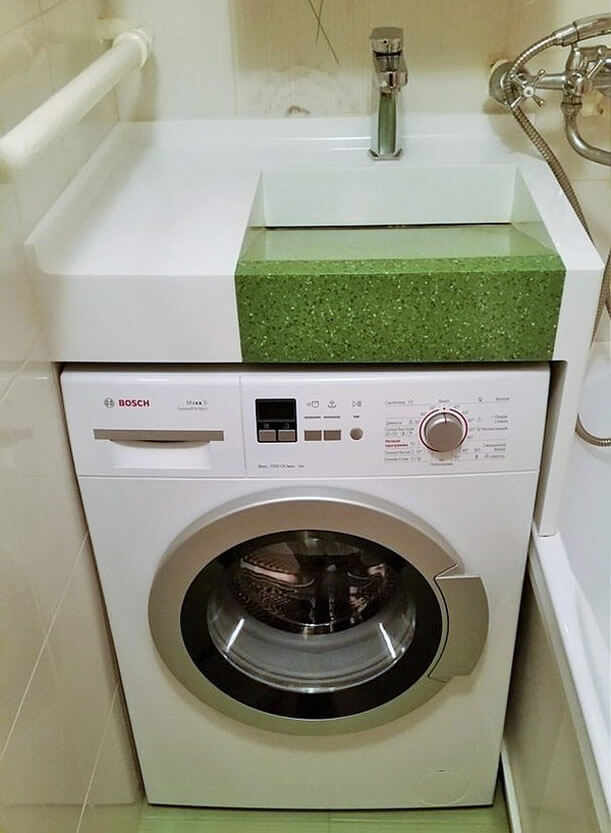
The process looks like this:
- First, the wall is marked. A line is drawn at the level of the top panel of the machine; it will serve as a guide when drawing other marks. Next, you should try on the bowl, controlling the distance to the washing machine. It should be noted that a siphon should fit in this gap. Then you need to make marks where you plan to make holes for fasteners. When placing a sink next to the bathroom, a common siphon is most often installed, so you should check the length of the spout.
- Next comes the holes. They should be made in accordance with the dimensions of the fasteners, these can be anchor bolts or dowels.
- Installation of brackets. At this stage, do not tighten the bolts too much, it is recommended to leave a gap of about 5 mm.
- The back of the sink is covered with a layer of sealant or other sealing material. The composition is applied in a strip at a small distance from the edge, about 1 cm. The protrusions of the brackets at the point of contact with the sink surface are also coated with sealant.
- Now you can install the sink above the washing machine with your own hands on the brackets. The shell eyes are put on the brackets and pressed with previously installed fixing bolts or dowels.
- Finally, you can fully tighten the bolts that secure the brackets.
Washbasin installation height
The installation height of the sink is not strictly regulated by any regulatory documents. SNiP give recommendations of 80-85 cm, but this is based on average growth data. Scandinavian construction sites recommend 85-90 cm, and in Trondheim, the home of the Viking giants, even 90-95 cm.In Ecuador and Colombia, where most of the population are short Indians and mestizos, on the contrary, they recommend 75-80 cm.
So do what is more convenient - in a small family you can hang lower; in the heroic - higher. True, if you plan to install a washbasin with a pedestal, you will have to become attached to its height.
Key Points
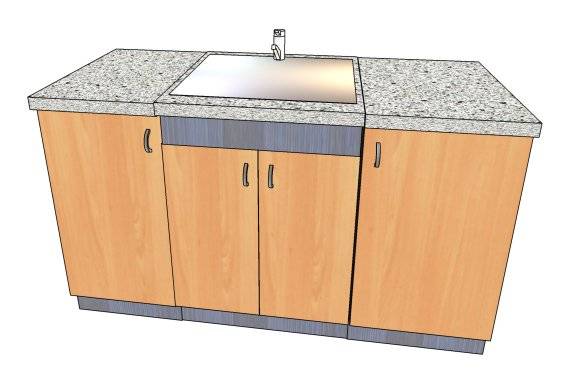
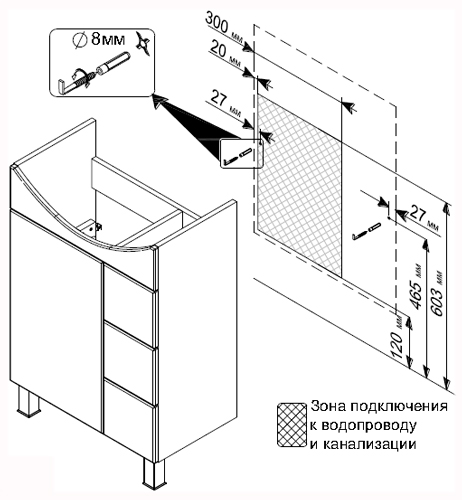
The cabinet under the sink is a convenient and practical piece of furniture for the bathroom or kitchen. You can install it with your own hands. First you need to decide on its location. If the cabinet is placed in the bathroom, it should not interfere with the exit from the room and the opening of the shower door. In the kitchen, furniture should not be placed under windows or near walls with low pipes.
If you want a cabinet for a sink, you should decide on the place and material. The curbstone must be covered with a waterproof varnish.
When choosing wooden furniture for the bathroom or kitchen, you need to choose models covered with waterproof varnishes or veneer.
Pay attention to the material of the sink stand. A great option for the kitchen is a marble countertop, but for the bathroom it is better to choose a stand made of acrylic or tempered glass.
Diagram of a corner pedestal: 1 Sidewall. 1a Sidewall. 2 bottom. 3 Rear panel. 4 Facial communication. 5 Communication. 6 shelf. 7 Rear wall, fiberboard.
Check the completeness of the product, the kit should include: 2 side walls, bottom, 2 lintels, 2 doors, fittings, legs, facade. In addition, it is necessary to prepare additional materials, as well as tools for assembly:
- dowels;
- drill;
- jigsaw;
- spatulas;
- building level;
- silicone, masking tape.
Purchased furniture usually comes with an assembly manual.In the walls and bottom, if necessary, you can cut holes for water supply and sewage pipes. Then the frame is assembled according to the scheme. Doors are installed last. Handles are placed on them and set aside.
The height can be adjusted with the legs.
The height of the pedestal is adjusted with twist-off legs. The building level checks the accuracy of the assembly. Then holes for fasteners are drilled through the upper and lower strips, and the parts are fastened with dowels.
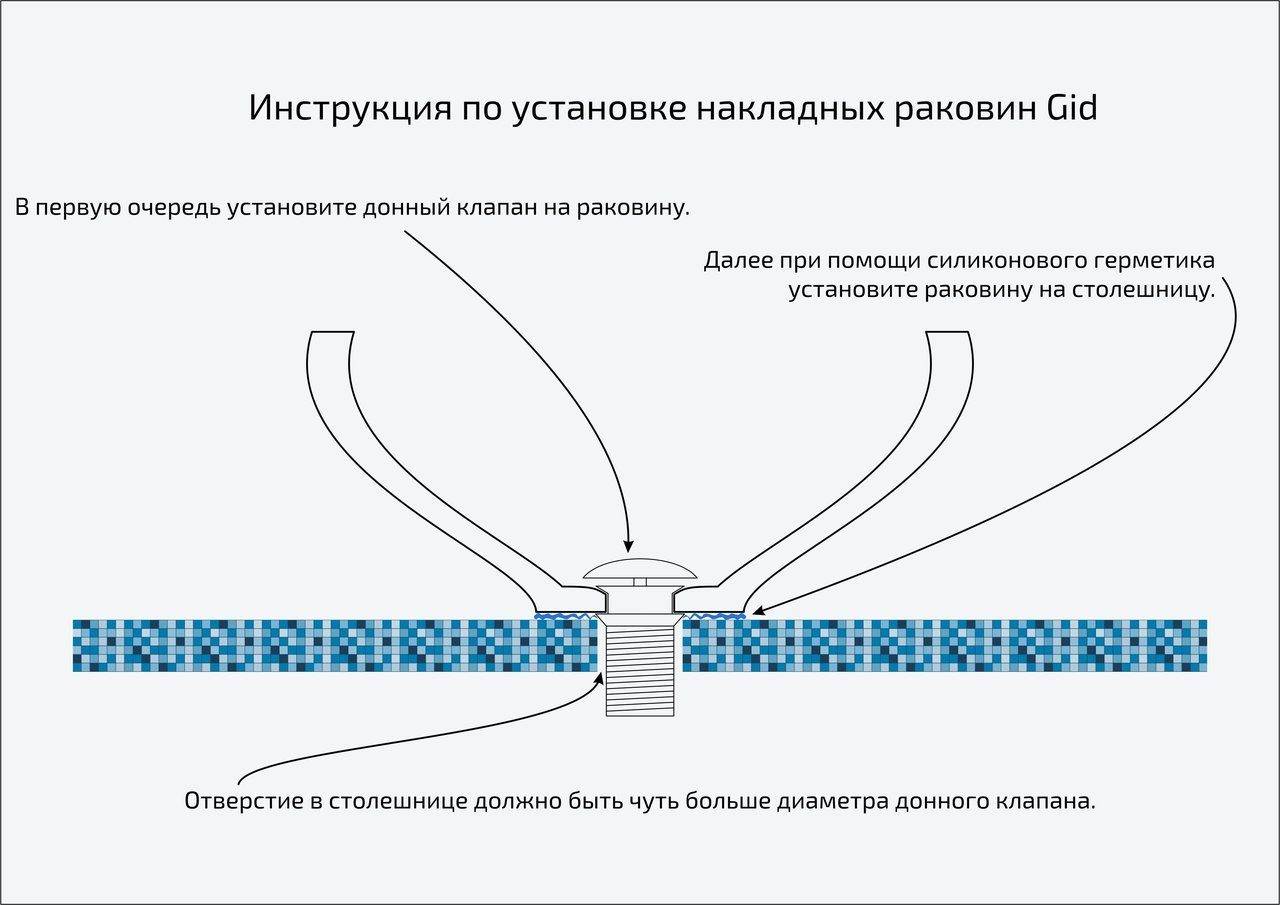
A sink is installed in the cutout of the countertop and fixed to the wall with anchor bolts or glued with silicone. If the wall is thin, the second option is preferable. Before pouring silicone, the sink is glued along the contour with masking tape so that it goes not only to the sink, but also to the wall. Then, slightly pulling the sink towards you, silicone is poured. The sink is pressed tightly against the wall, the adhesive tape is removed, and the silicone is leveled with a spatula. Silicone should dry for a day, after which, according to the assembly instructions, a mixer and a siphon, doors and shelves are installed, and a decorative facade is also glued.
Types of country washbasins
First of all, it should be noted that washbasins for summer cottages can be either with or without a cabinet. Unlike models with a pedestal, hanging tanks are mobile and can be installed in any place of the summer cottage - at least on garden, even near the house or at the exit at the gate. The main thing is to find any vertical surface (wall, log, tree) on which such a tank could be fixed.
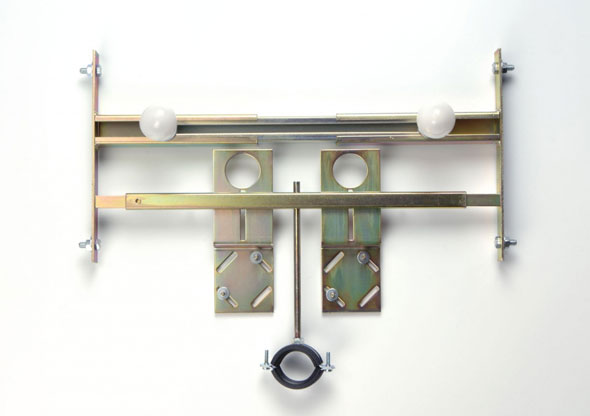
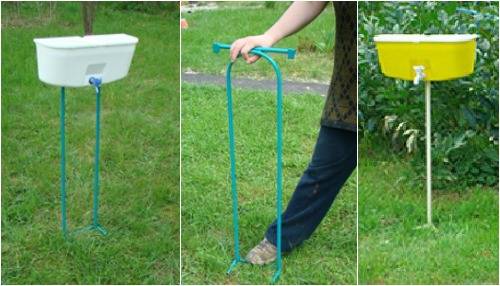
Country washbasins on a rack
Among the whole variety of outdoor washbasins for summer cottages (and such hanging types are installed mainly on the street), there are cisterns on a steel rack.They are convenient because by pressing the foot on the metal crossbar at the bottom of the rack, the horns are driven into the ground, allowing the washbasin to be installed on any territory of the site, regardless of the presence of a support nearby. The washstand on the counter can be installed even in the middle of the garden among raspberry or strawberry bushes.
Outdoor washbasin on a metal stand
Washbasins without cabinets for summer cottages
The simplest type of washbasin for a summer residence is a barrel-shaped plastic container for 3-5 liters with a pressure spout. It can be hung on a wall or on a board hammered into the ground, and it is better to put it under it. collection bucket dirty water. As in all types of country washstands, water is supplied to it manually: pour water - and you can use it. After 3.4.5 liters of water are exhausted, it must be filled again.


Suspended plastic washbasins for summer cottages
A more advanced design of a wall-hung washbasin for a summer residence has an ergonomic design and a larger volume - rectangular shapes with two covers for collecting water (on the right and on the left) and with a pressure or valve tap. Moreover, the clamping crane, unlike its plastic counterpart, has a magnet in its device, which allows you to fix it in a raised state. Thus, a more convenient use of the device is achieved: they pressed the rod up, it became magnetized and the water flowed freely. After washing the hands, the spout was slightly pulled, and it lowered, stopping the water supply. Such models are made mainly of durable plastic, and the tank is designed for a liquid volume of 10-15 liters. They can also be installed on a cabinet with a sink.
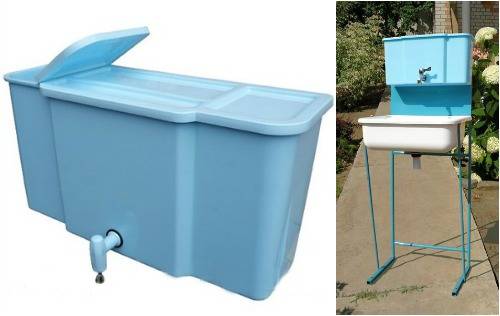
Suspended plastic washbasin for a summer residence
Another type of hanging washbasin is an oval galvanized steel washstand with a faucet. It does not differ in special functionality, and the service life of the steel is not very long, even though it is galvanized. So plastic models are more durable in this regard.
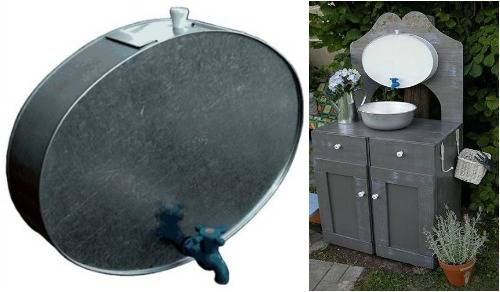
Hanging washbasins for summer cottages
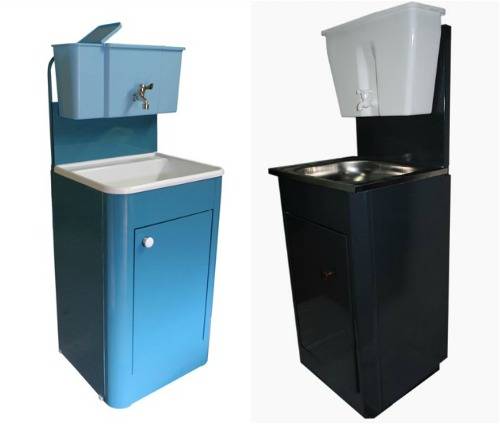
Outdoor washbasins with cabinet
More serious designs with a cabinet cannot be easily rearranged from place to place; these washbasins are more stationary than mobile. Although, if desired, they can be dragged to any place in the suburban area.
The country washbasin moidodyr consists of a cabinet-rack, a sink and a bulk tank. The principle of operation is the same as that of hanging washstands, only the comfort of using it in the form of a plastic or metal sink is added, in which you can put, for example, a bowl of apples and wash them slowly and without fear of dropping them on the floor. More interesting models are equipped with a mirror, a shelf for soap accessories and a towel hook.
The country wash basin with a curbstone can be used both on the street, and in the house. But before you buy such a model, think about where you put it. If it is outside, then it is better not to take a washbasin with a wooden or metal cabinet for a summer residence, since wood and metal will quickly become unusable under the influence of temperature changes and precipitation. But for the home, a wooden cabinet is perfect. It is also more rational to choose a model with heating for the house, and on the street in favorable weather, the water will heat up itself under the influence of sunlight.
Country washbasin moidodyr photo
Consequences of improper installation of the washbasin
Incorrect installation of the sink causes a feeling of discomfort and creates conditions for injuries when performing daily household activities.
The low position of the washbasin is fraught with back pain or hygiene problems, since the inconvenience of a bent position pushes for a reduction in procedures. On the other hand, the agonizing wait to straighten up, combined with the traditional shelf above the sink, increases the likelihood of a head injury, followed by a collection of scattered items that were previously stored on the shelf all over the floor, and as a result of a nervous breakdown.
Too high a location creates other problems. Stretching, clinging to the sink, will have to be older and, accordingly, heavy children. A falling washbasin is likely to result in injury, not to mention the need for urgent, costly repairs.
The optimal installation height of the washbasin is important. Despite the playful tone of the final section, the consequences described are quite real.
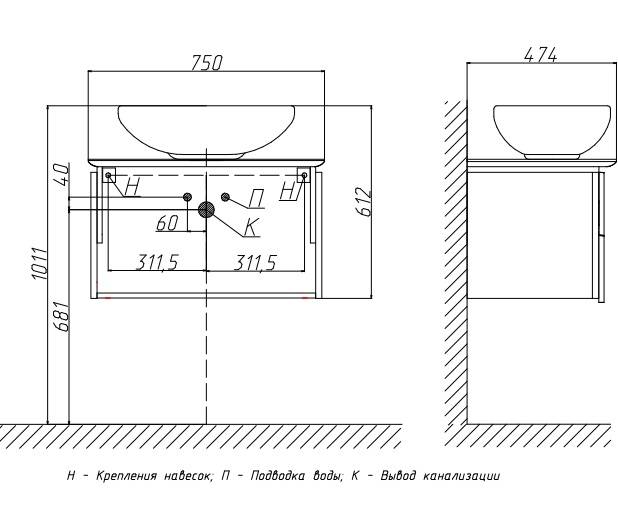
Sink Installation Procedure
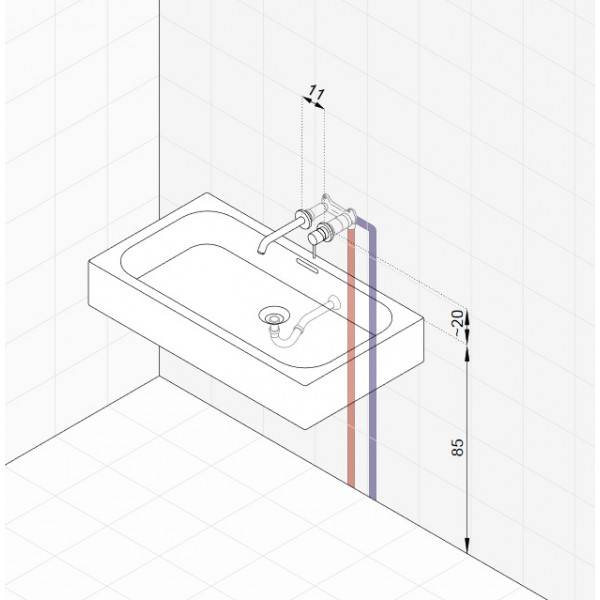
Now that we have considered the features of the assemblies of various products, we will analyze how to install the sink in the bathroom with your own hands for a widespread model with anchoring to the wall.
1. Markup. Having decided on the height of the bowl, we draw a horizontal line on the wall along its upper edge. From this line, mark the locations of the holes for the dowels. This can be done by appropriate measurements and calculations, or simply by placing the bowl horizontally with the projection of the eyes on the wall.
2. Fixture for sink
According to the marking, we carefully drill holes, since usually such operations are already performed on a fine finish and, as a rule, on ceramic tiles.The hard coating is first drilled through without impact with a drill with a well-pointed carbide nozzle, and we drill directly into the wall itself in perforation mode
Depth of dowels in a solid base is recommended not less than 70 mm.
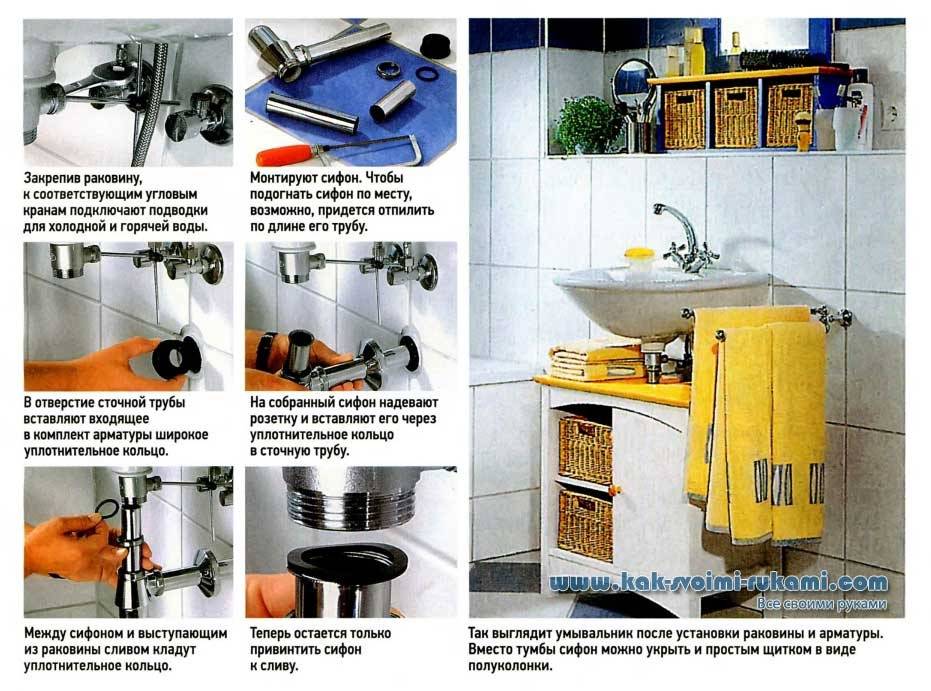
3. How to install the faucet on the sink? The most convenient way is to use flexible hoses to connect it. Their fittings are screwed into the mixer body either immediately, or, if the union nuts of the hoses do not go into the corresponding mounting hole of the washstand, the hoses are passed into this hole, and then they are screwed into the body.


Next to the fittings, it is necessary to screw in one or two studs from the mounting kit, then, putting an elastic figured gasket on them, attach the mixer to the mounting hole on the washstand. Now it remains to put the clamping flange on the studs on the back of the sink and tighten it with nuts. Unforgettable in the process of tightening, fix the tap so that its spout in its middle position is directed to the center of the bowl.
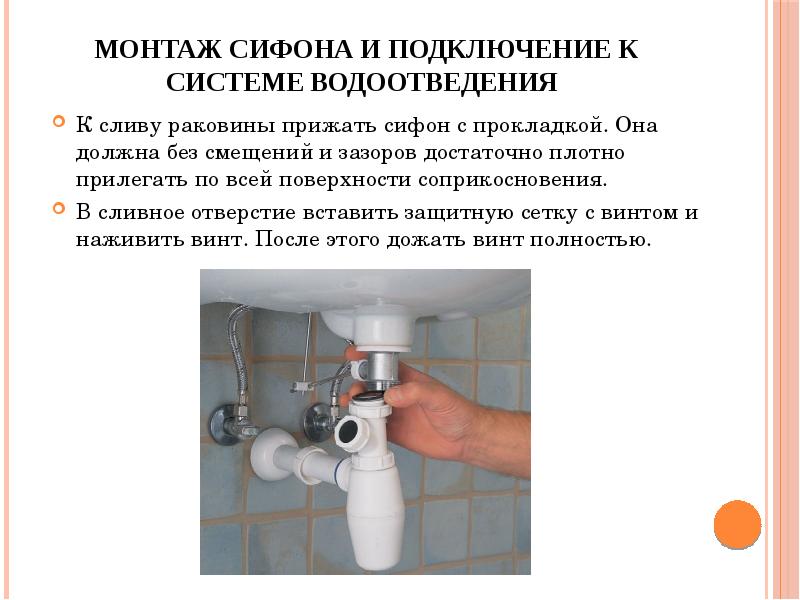
4. Siphon. Almost all models of pipe, bottle or corrugated water seals have one mounting standard: the drain is attracted to the sink body (from below) with a screw, the head of which rests on a stainless grate (from above). Be sure to remember to lay the O-ring on the bottom of the product before tightening.
Assembling the rest of the siphon is not difficult and can be easily done according to the supplied instructions. In this case, the easiest way is to assemble a corrugated water seal, which is enough to pull the clamp into an S-shape in a convenient place.
5. The assembled sanitary design of the washbasin is applied to the wall
The threaded ends of the anchor studs are passed into the eyelets of the product, on which plastic eccentric inserts, washers are put on and everything is carefully fixed with nuts. The skew of the shell is leveled by turning the eccentrics
Connecting the sink to the sewer and water supply is also not difficult. The drain end of the siphon is inserted into the sewer inlet, where it will be held by friction forces with a rubber o-ring.
Hose union nuts mixers are screwed onto the corresponding fittings plumbing. And it’s not bad if a separate shut-off valve is installed on each supply pipeline.
It remains to check the operation of the mixer, drain, and connections for leaks.
Conclusion
Installing a sink in a bathroom with your own hands, its typical model, in principle, is not overly complicated. However, due to the fact that recently there has been too much variety of sanitary products, in order to avoid damage to expensive products, it is better to seek help from specialized plumbing specialists.