- Form and drain
- Sink selection
- Choice of sink material
- Advantages of ceramics over cast marble
- Faience or porcelain - which is better
- Advantages and disadvantages of water lily shells
- Types and features of the choice of shells
- materials
- Shape and size
- Drain
- Installation
- Stage 1 - preparation
- Stage 2 - installation
- Stage 3 - connection to the water supply and sewerage
- How to install the mixer?
- Video
- Washer under the sink: the pros and cons of the solution
- Installing a sink above an electrical appliance
- Fixing the bowl
- We mount the siphon
- Installing the mixer
- Installation sequence
- Preparatory activities
- Faucet installation
- Assembly and installation of the siphon
- Instructions for installation and connection of the sink
- Video: How to install a sink over a washing machine
- How to choose a washing machine
- Rules for installing a sink above a washing machine
Form and drain
Since the interior of the bathroom is as important as any other room, the shape of the sink will play an important role in decorating the space. So, in addition to the standard rectangular shape with even corners, there may be varieties with rounded edges. If oval products fit well into the room and completely protect the machine, then it will be correct to use them.This is especially true if there is a small child in the house. Streamlined shapes without sharp corners will make the room safer.
As for the drain, it is located closer to the back wall, and sometimes right on the wall itself.
In the sink, two options for the shape of the drain can be distinguished.
- Round. In the sink, the hole for draining water has the shape of a circle, and in this case a flat siphon is used, placed immediately below the hole. The negative feature of this type is the location of the drain directly above the household appliance, which can be dangerous in case of a leak. Of the positive aspects, one can single out a quick runoff of water and minimal clogging.
- Slit-like. Assumes the location of the siphon closer to the back wall of the sink. The siphon in this case is outside the washing machine and does not threaten it in any way, even if it starts to leak. Among the shortcomings, one can note the small width of the hole and its frequent clogging, which forces it to be cleaned from time to time.


Some models have a drain-overflow system that controls the amount of water in the sink and prevents it from overflowing while flooding the machine. Also, plugs or automatic systems can be additionally installed in the drain.
If there is a desire to do something special in the bathroom, then you can resort to another type of sinks:
- built-in sink, which is placed in a table with a curbstone or in a countertop;
- countertop sink, which can also be installed in a chair or countertop.
The choice of option depends on the dimensions of the room and financial capabilities, because built-in and overhead structures will cost an order of magnitude more expensive.Sinks with a side drain will be more convenient than those in the middle, and the rear position is considered the safest and most correct for the bathroom.
Sink selection
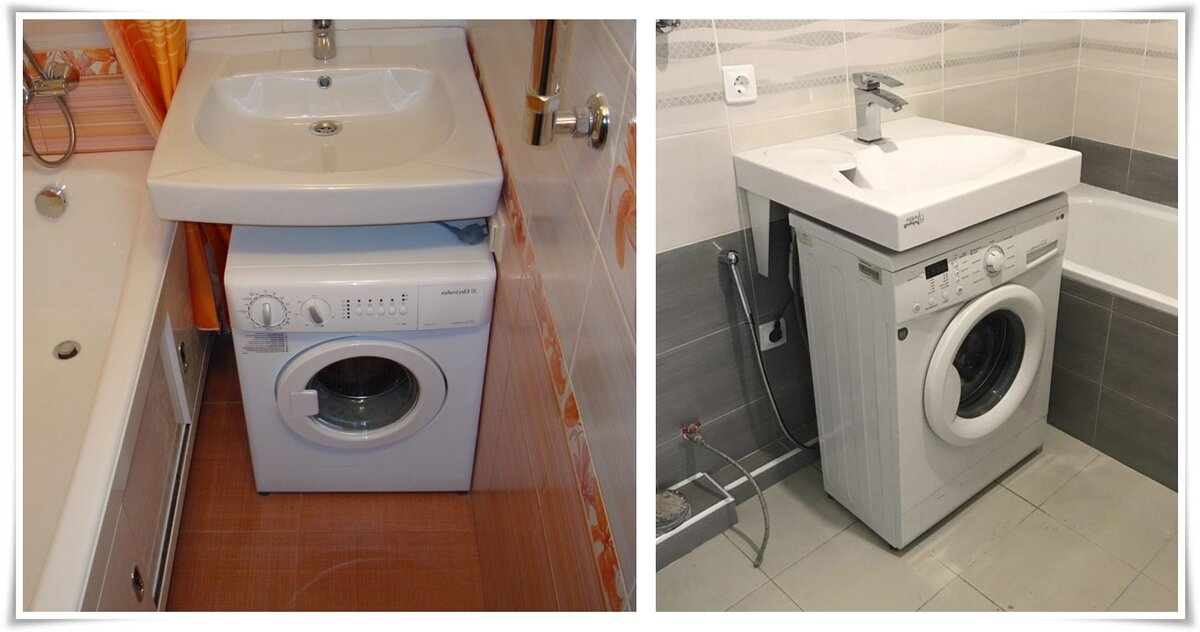
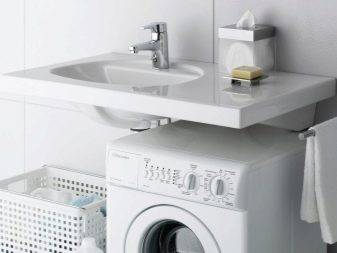
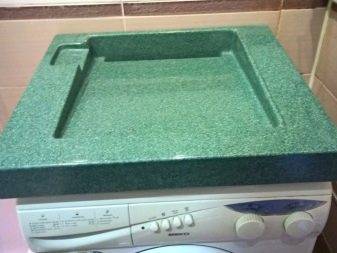
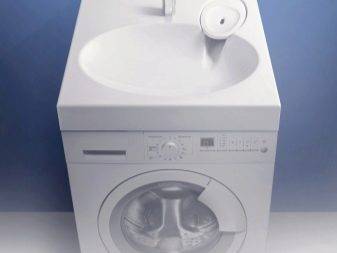
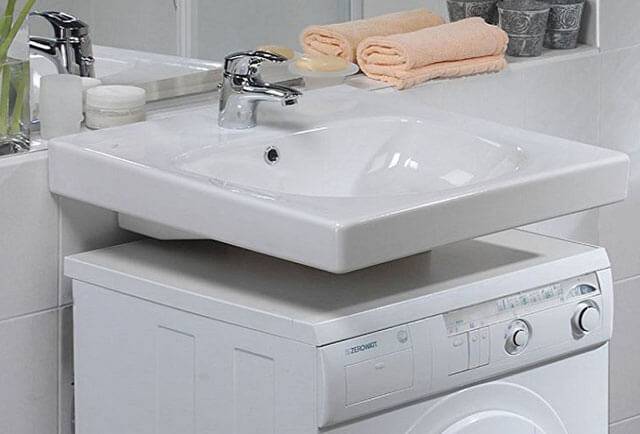
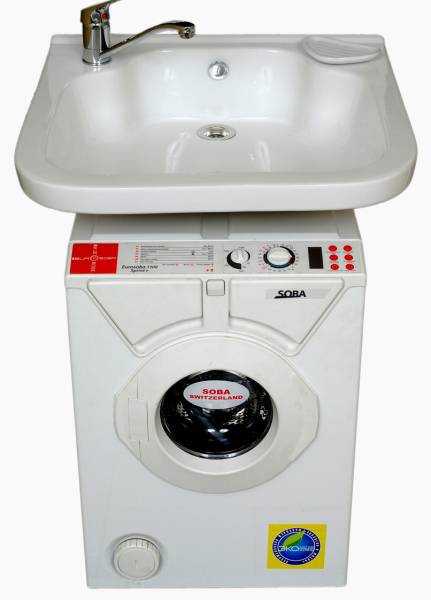
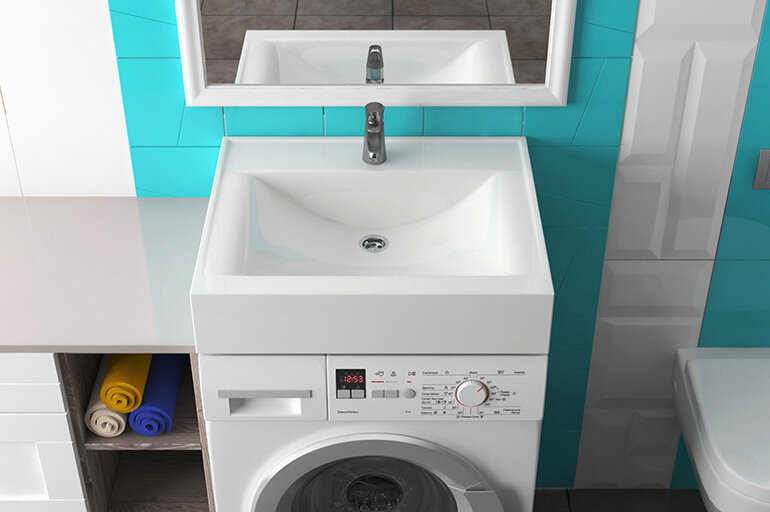
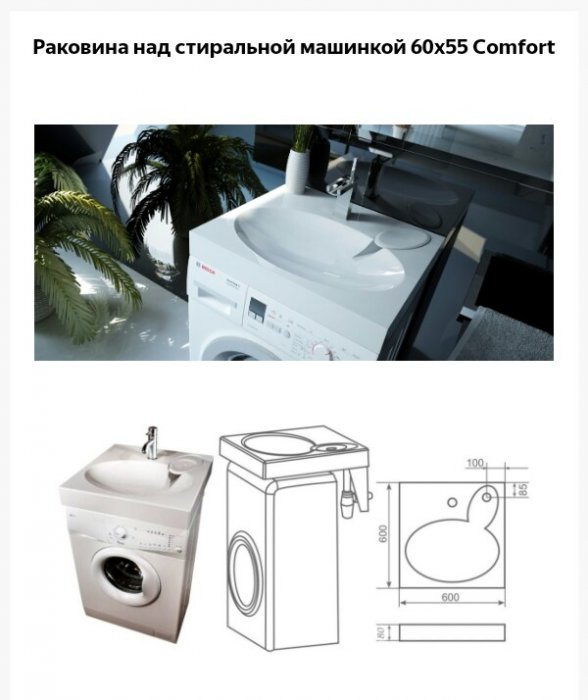
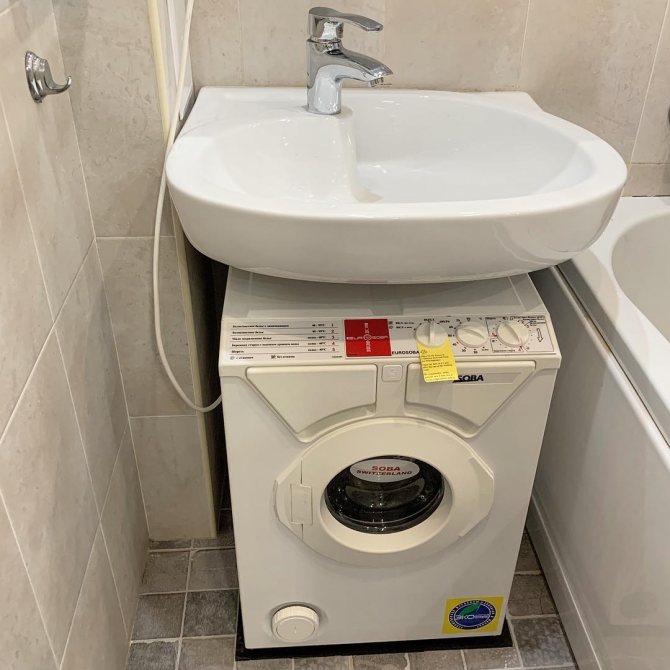
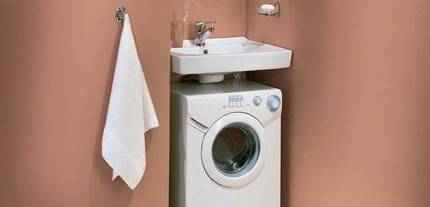
A sink that can be installed above a washing machine is called a water lily. The reason for this was the small height of the bowl and the characteristic flat shape in the form of water lily leaves.
There are also other design features that should be considered before placing the washing machine under the sink. In particular, we are talking about the location of the drain, in a water lily it is located in the back, and not in the middle, like a standard sink. The hole for installing the mixer can be located anywhere.
Various materials can be used to make water lily shells. Recently, a new material has become popular - polymer concrete, which is characterized by high resistance to aggressive environments and mechanical stress. Polymer concrete can be called a high-quality imitation of natural stone; during visual inspection, it is difficult to find differences between natural and artificial stone. Glass, ceramic, acrylic and metal sinks are also in demand.
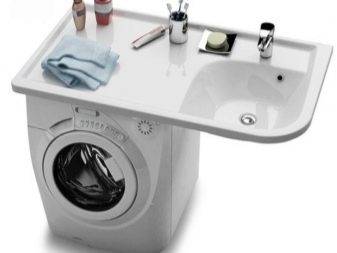
The shape and design of the sink above the washing machine may vary. On sale you can find rectangular, square and oval bowls with straight or rounded corners. Much less often, but still there are bowls of non-standard configuration.
The color scheme of the sink with an offset drain is easy to choose, thanks to a wide range. But when choosing a product, the appearance does not matter much; linear characteristics are considered more important.
Also, when deciding how to embed a washing machine under the sink, one should take into account the size of the technological gap between the household appliance and the wall, which is mandatory for the location of the tubes and wires of the corresponding communications.
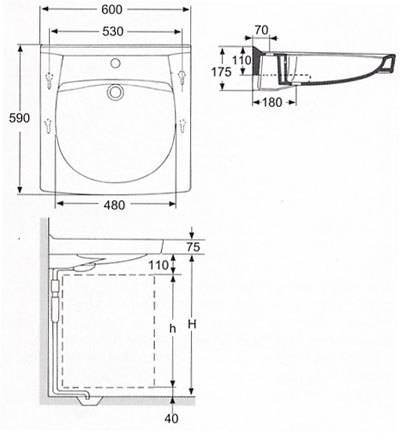
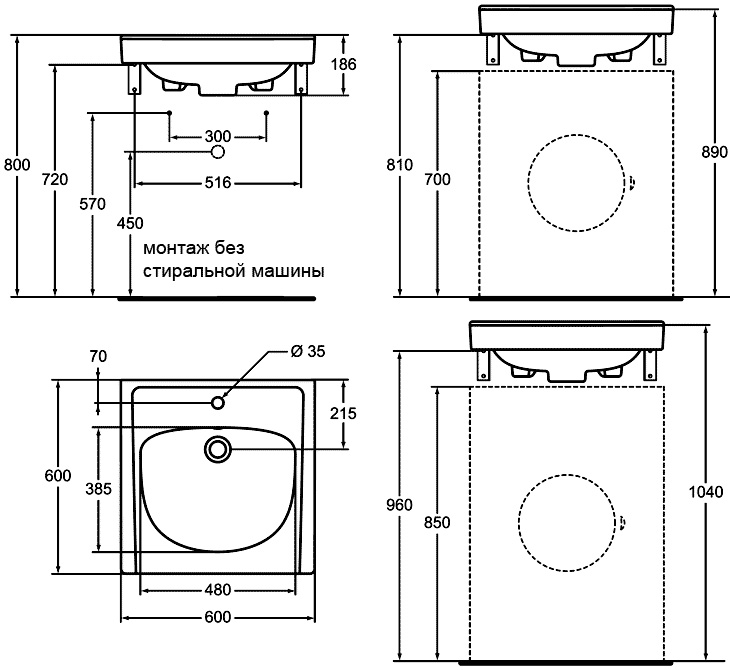
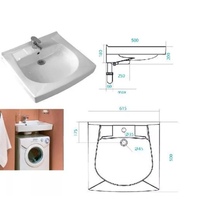
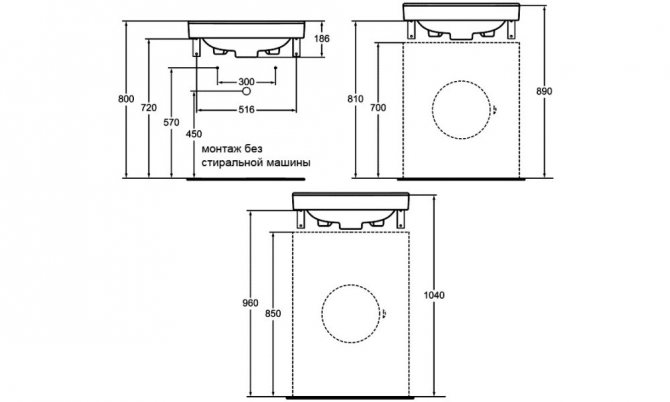
According to experienced professionals, above the washing machine, the depth of which is 36-39 cm, you should install a sink 50 50 under the washing machine. If the household appliance has a depth of 50-51 cm, then the length of the bowl must be at least 60 cm.
The shape distinguish between round and slit-like plums. In the first case, the design provides for the installation of a flat siphon directly under the drain hole. Since the siphon is located above the washing machine, there is a possibility of a short circuit in case of leaks. This can be called the main drawback of the model. However, round drains have an advantage - water practically does not stagnate, therefore, blockages occur less frequently.
The advantage of a slot-drain sink over a washing machine is that the siphon is placed behind the appliance. This prevents water from entering the washing machine panel. The disadvantage of a model with such a drain is a narrow hole, which, due to frequent blockages, requires regular cleaning.
Some models of water lily shells have a drain-overflow system. In this case, the bowl does not overflow and water does not get on the household appliance, thanks to the presence of drain holes on the side and bottom of the sink. Stoppers or an automatic system can be used as a supplement.
You can also install washing machine in the bathroom under a different type of sink.
The most common options are:
- A bowl built into a table, cabinet or countertop.
- Surface-mounted sink for a bathroom washing machine, installed on any horizontal surface.
Choice of sink material
For the manufacture of sinks, traditional ceramic technology or a new one - cast marble is used. In the first case, materials of natural origin are used, in the second - artificial ones. Products made of cast marble are distinguished by a more regular shape, bright color. Comparison 2 materials reveals the advantages and disadvantages everyone.


Advantages of ceramics over cast marble
Ceramic products are made from clay. Prepared raw materials are poured into molds. The hardened product is taken out, dried under natural conditions or in a special device. Liquid enamel is applied to the workpiece, fired in a kiln. The process takes a long time.
Ceramic products are safe for health, easy to maintain and operate.
Cast marble is produced from loose filler mixed with resins, which play the role of a binder. The hardener gives the product rigidity. Manufacturing is faster and cheaper.
Comparison of ceramics and cast marble shows the following results:
The processing of ceramics goes through several stages, each of which accumulates errors in the form of sags and deformations. According to the correctness of the forms, ceramics loses to cast marble.
The clay used in ceramic products is a completely environmentally friendly raw material. The composition of shells made of artificial material contains toxic phenol, formaldehyde, which are part of the resins. To prevent vapors from escaping, the product is covered with a film. After a few years, it collapses, harmful substances enter the lungs.
In terms of coating durability, ceramics wins. Enamel retains properties under mechanical and chemical influences. The surface of cast marble fades after a year, traces of scratches appear, chips appear.
A ceramic sink dropped on a tiled floor will break. The product made of artificial material will remain intact
Such situations are extremely rare to pay attention to this property.
Faience or porcelain - which is better
It is difficult for the user to distinguish faience from porcelain, which are similar in appearance. For production, similar raw materials are used, but the technology is different. Properties differ: when tapped, porcelain makes a higher sound, the bottom of the product is rough. It surpasses faience in resistance to aggressive substances, strength.
faience the sink is suitable for any bathroom rooms.
Faience has a more porous structure, absorbs moisture well. To get rid of the flaw, the product is covered with glaze. It does not absorb moisture and odors. Porcelain is waterproof, most suitable for the production of sanitary ware.
The wide distribution of porcelain is stopped by the high cost. Most buyers prefer faience. Quality products serve no less than porcelain sanitary ware, if properly cared for.
Advantages and disadvantages of water lily shells
All types of washbasins have certain advantages and disadvantages. Among the advantages of water lily shells are the following:
- Compactness. Such designs are compact, thanks to which it is possible to save free space in the bathroom.
- Variety of forms.Water lily shells differ in their shape. Therefore, each person will be able to purchase a suitable type of sinks for their bathroom.
- Ease of care. Caring for water lily shells is very simple, as dirt does not accumulate on them.
The disadvantages of water lilies include:
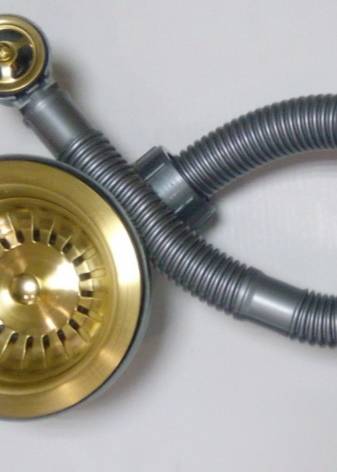
- Non-standard siphon shape. It should be included in the sink kit, since it is not easy to purchase it separately.
- Fast clogging. At the water lily, the water drains back, and therefore the drain is often clogged.
- Water splashing. When using such a washbasin, water splashes quickly, and because of this, drops can fall on the surface of the washing machine.
Types and features of the choice of shells
As mentioned above, only water lily sinks are suitable for combination with a washing machine. This type of washbasin is classified into different types depending on the shape, size and materials of manufacture. There are models with a hole for the mixer and without it. In the latter case, the plumbing fixture can be mounted on the wall, thereby freeing the washbasin for cups with toothbrushes and a soap dish.

materials
Water lily sinks are made from the same materials as other washbasin models:
- Ceramics. Two types of material are used for the manufacture of sinks: porcelain and faience. Compared to metal, they both carry a lot of weight. Unlike earthenware, porcelain is more expensive, has a noble whiteness, is less porous and rarely becomes covered with small cracks on the top layer of glaze after long-term use.
- Glass. A stylish, modern solution that is suitable for bathrooms decorated in high-tech, techno, futurism, avant-garde styles. Glass is perfectly combined with chrome surfaces.Unlike ceramics, the material weighs less. Manufacturers offer a variety of color solutions: from plain shells to original models with an ombre effect and streaks. Glass is a durable, strong material. However, it is afraid of detergents with an abrasive effect and requires daily cleaning, as smudges and traces of dried water droplets are visible on the surface. A glass sink will cost many times more than a ceramic washbasin.
- Metal. Compared to stone and ceramics, the material is light. It is durable, and with careful use (regular cleaning with non-abrasive compounds) it will retain its original appearance even after years of operation. The material cannot be damaged and split during the drilling of technical holes. The disadvantages of metal sinks include only an increase in the noise of flowing water, which does not occur when the flow collides with ceramics or stone.
- Stone. Natural stone for the manufacture of water lilies is rarely used. Among all types of materials, it has the most impressive weight, which creates difficulties when installing the washbasin (very reliable fasteners are needed). However, the stone is an ecological material, it is not afraid of absolutely anything and blends perfectly with the popular eco style. An artificial analogue is cheaper, visually practically does not differ from the original, but it can break if the washbasin is dropped during installation.
Very rarely in the domestic market there are shells made of plastic and wood. The first ones have not yet reached our country and have not taken root in local plumbing stores, but are gaining popularity abroad.Wooden sinks are considered exclusive, which is not durable, but will certainly impress guests with its colorfulness and eccentricity.
Shape and size
Water lily sinks are available in five variations of shapes:
- Semicircular and round;
- Square;
- Rectangular;
- corner;
- non-standard forms.

The latter option can be found in designer collections of expensive plumbing. Such an exclusive is not suitable for budget options. As for sizes, water lilies are available in many variations, among the variety of which the following models are in the lead:
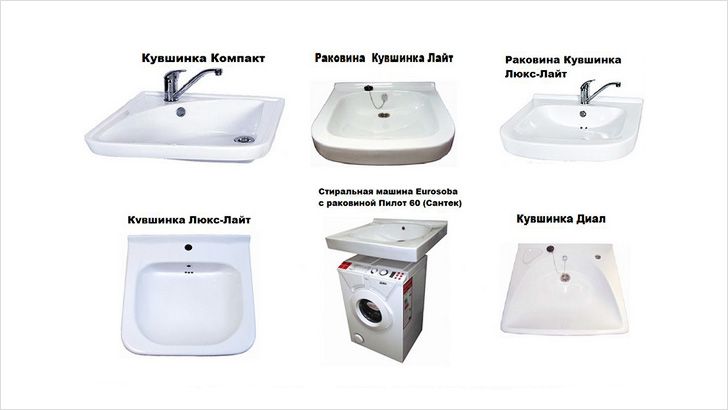
- Mini or Compact. Its dimensions are only 50x64 cm. The rectangular washbasin is compactly placed in any corner of the bathroom.
- light. Dimensions 60x61cm. The model is notable for the presence of an offset drain and the absence of a hole for the mixer.
- Lux Light. It differs from the “simple” Light version by only 1 cm, the dimensions of the model are 60x62 cm.
- Bolero. The dimensions of this round corner model are 60x64 cm.
There are also models with the euphonious names "Deal", "Uni", "Victoria", "Elegant". They differ not only in size, but also in shape. Most models are produced in only one variation (according to the material of manufacture).
Drain
Water lily sinks can have a horizontal and vertical drain system. The latter is considered more convenient, since water under pressure goes down faster, which reduces the risk of blockages. A "water lily" together with a washer can only have a horizontal drain. This feature is due to the increased risk of contact with electric current. The water will leave slowly, periodically stagnate in the sink and wash your hands for a long time without turning off the tap, unfortunately, it will not work.There are non-standard models (usually corner ones), in which the drain is placed on the side.


Installation
 Installing a water lily shell
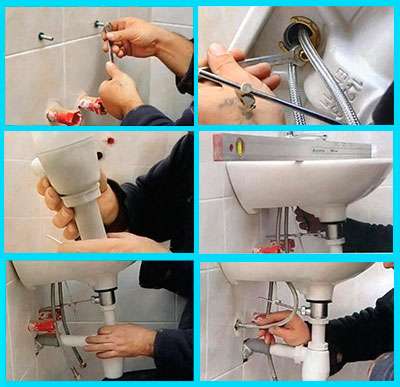
If there are no problems with installing the washing machine - you need to set it up and connect it, then the sink must be fixed. Consider the progress of work in stages.
Stage 1 - preparation
- To install the sink in the bathroom, there must be enough free space, so do not be too lazy to take out all the excess.
- Now you need to dismantle the old sink and take it out. If a domestic water lily is purchased, you can check if it can be fixed on the fixtures remaining in the wall.
- The washing machine is installed in its place, and a mark is made along its upper edge on the wall. Now it can be pushed aside or removed from the bathroom altogether.
- Let's try on a sink - the distance between its lowest point and the lid of the washing machine should be at least 3 cm. Having exposed it, marks are made through the holes for mounting on the wall. If the structure is mounted on brackets, then marking is done under them.
- After marking, the device is removed to the side, away from the installation site.
Stage 2 - installation
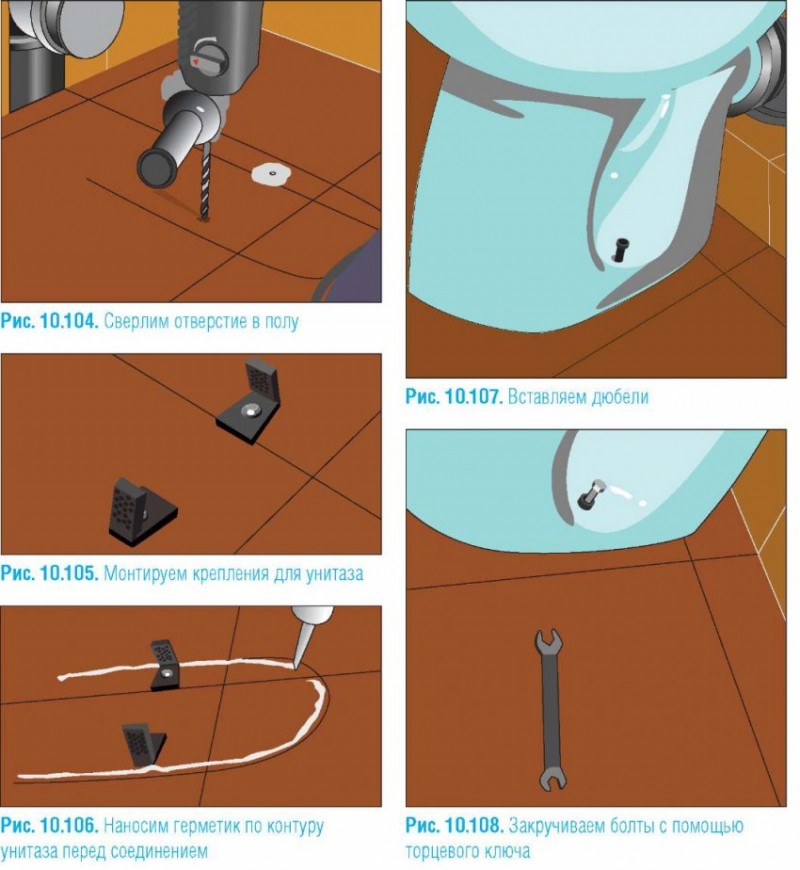
- So, there is a clearly visible markup on the wall. Check its horizontalness with a building level, and, if necessary, correct it.
- According to the marks, you need to drill holes for the anchor bolts, and insert the anchors into them, after which it will be possible to mount the product.
- If the sink comes with a bracket, then it is attached to the wall, but when additional fastening is not provided, it will need to be attached directly to the wall. To do this, you can use the fasteners provided by the manufacturer.
- To prevent water from getting behind the sink, silicone or sealant is applied to its end part.
- We press against the wall and fix in this position with fasteners. Regardless of what material this sanitary ware is made of, in order not to damage it, the fasteners should not be strongly clamped.
Stage 3 - connection to the water supply and sewerage
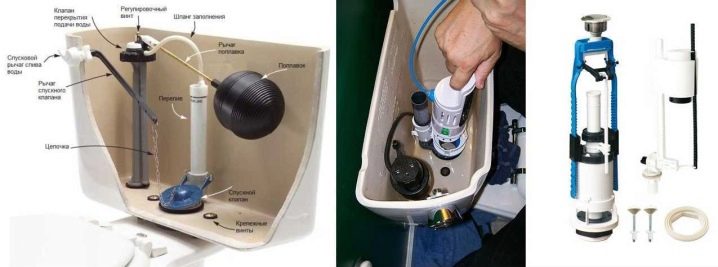
Assembling a siphon is usually not difficult, since there are few parts in it, and instructions are included.
It is important not to forget to put the rubber gaskets in their places.
The assembled siphon is fixed on the sink. It is not necessary to apply great efforts, as plastic parts can be damaged.
Using a corrugated hose, the siphon is connected to the sewer pipe.
If the faucet is installed on the sink, then its connection is made with flexible water hoses.
After running the water, you need to check that there are no leaks anywhere.
If there is a suspicion that some connection is poorly connected, try to lightly compress it or sort it out, lubricating the rubber gaskets with plumbing sealant.
The turn of the washing machine has come - it must be installed in its place, connected to the sewer and connected to the water supply. Now we level the machine, and it can be used.
After connecting to the mains, start the machine in the spin mode and check that it does not touch the sink itself or any pipeline anywhere.
It remains to put things in order and enjoy the work done.
How to install the mixer?
The mixer is on sale with some models in a set.There are sinks for which you need to buy this part yourself. Plumbing experts advise taking a mixer that can be fixed on the wall. It has a special long spout. The faucet is shared between the bathroom and the sink. Please read the instructions carefully before installation.
An important point in this work is the observance of tightness. At the joints, it is better to use tow or a modern fum tape. If rubber seals are present in the design, it is better to treat them with a special lubricant. Nuts must not be overtightened.
Video
We bring to your attention a video that shows main stages of installation shells.
About the author:
She graduated from the Institute of Tourism of the FPU with a degree in Manager, she loves to travel and communicate with people. Interested in psychology, enjoys dancing, studying English. For five years of maternity leave, she thoroughly mastered housekeeping, not forgetting about her own development. Skillfully wields a word, can support a conversation on any topic due to interest in different areas of life.
Found an error? Select it and press the buttons:
Ctrl+Enter
Interesting!
There is a washing machine "for bachelors". Linen washed in such a unit does not need to be ironed at all! The thing is that the device does not have a drum: some things can be placed inside the container directly on hangers (for example, jackets and shirts), and smaller things (for example, underwear and socks) can be placed on special shelves.
Washer under the sink: the pros and cons of the solution
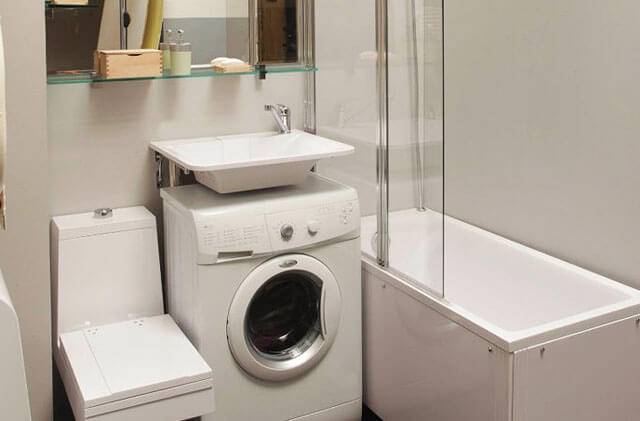
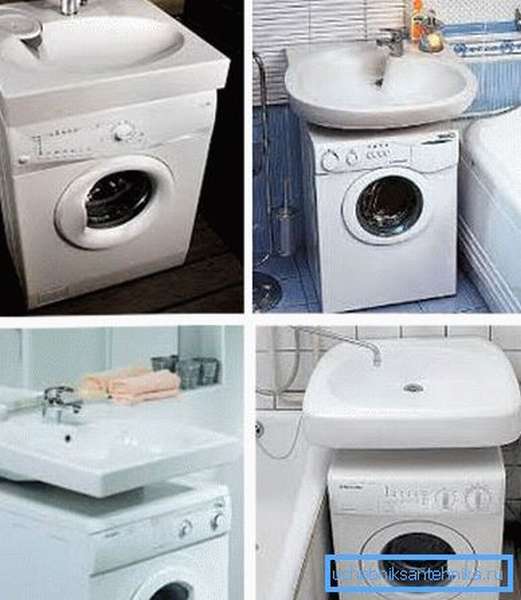
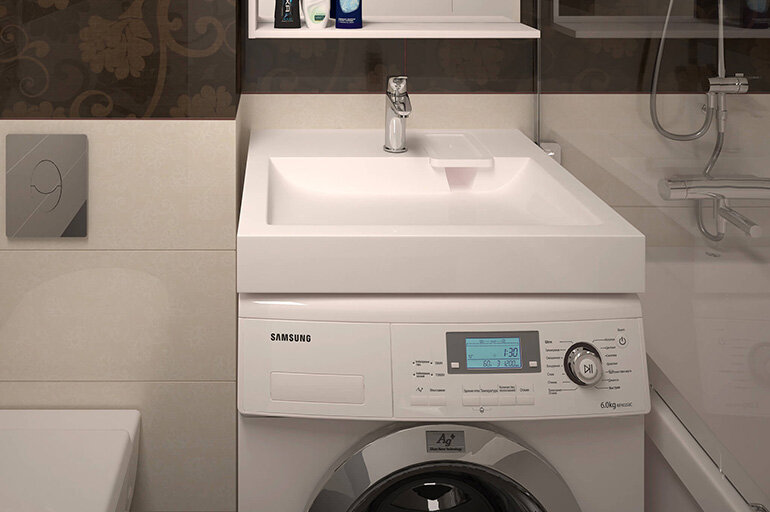
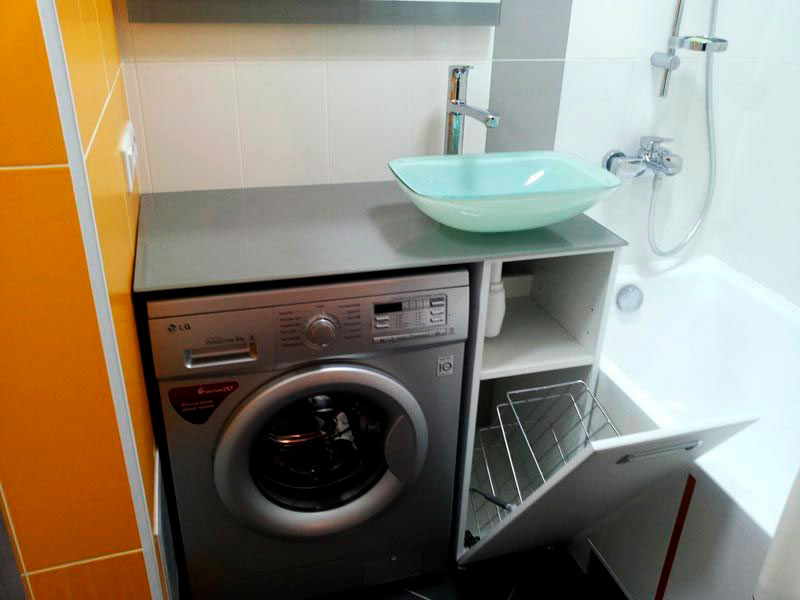
Owners of small bathrooms may think that installing a sink over a washer is an absolutely win-win solution.Indeed, this option has a lot of advantages. First of all, it is an opportunity to organize the space as efficiently as possible by combining the layout of the upper and lower tiers of the room.
If you place a few more shelves or a cabinet above the sink, the space will be fully utilized. Thus, even in a small room it will be possible to place the necessary household appliances.
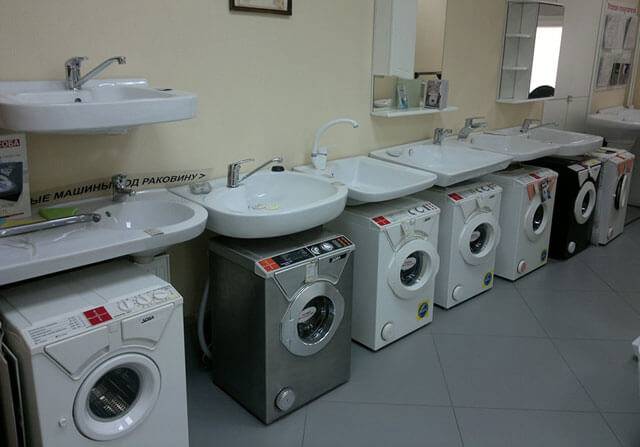
In addition, on sale you can find a variety of washing machines and sinks in style, which will decorate the interior of the bathroom.
However, along with the advantages, this solution also has disadvantages. And quite significant. First of all, it is insufficient electrical safety.
The washing machine is one of the electrical appliances for which contact with water is unacceptable. The sink located above the equipment is connected to the water supply, which is a potential electrical safety hazard.
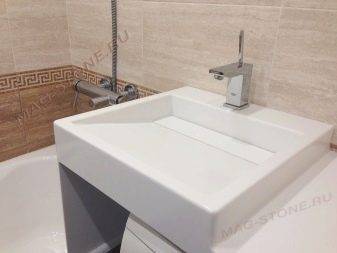
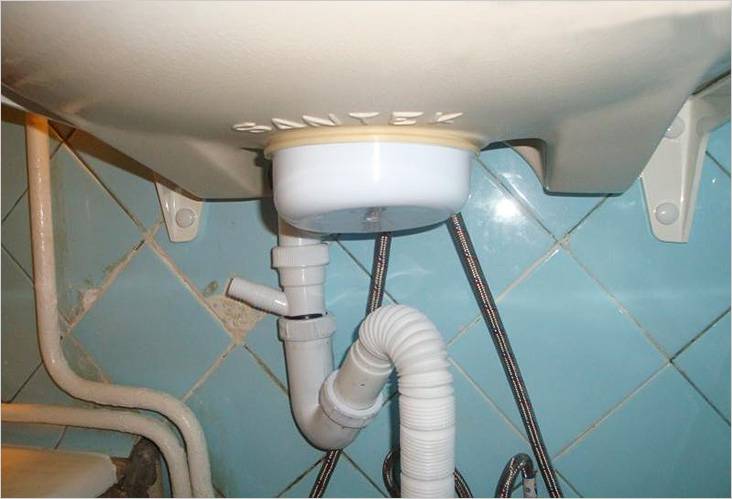
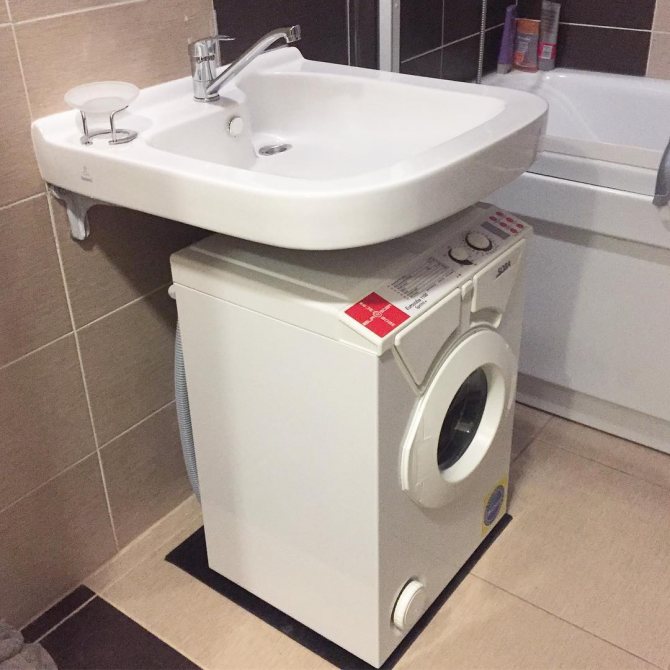
Even a slight leak can cause moisture to enter the machine and damage it. Therefore, for installation above the washing machine, you should choose special sinks with a siphon located at the back of the bowl.
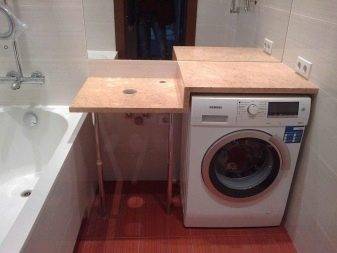
Installing the washing machine under the countertop, in which the sink is built-in, saves space in the bathroom
Their design is made in such a way that even in the event of a leak, water from the bowl does not fall on electrical equipment. Such shells are called "water lilies", they are sold in hardware stores.


Using water lilies is safe, but may not be entirely convenient. This is due to a non-standard siphon. Its design is such that the likelihood of blockages increases, since the water does not drain vertically, but horizontally.In addition, spare parts for siphons of this type are not always available for sale.
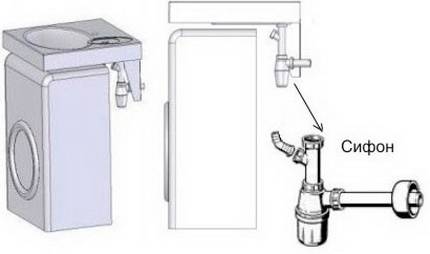
A distinctive feature of water lily shells is the location of the siphon. It's in the back of the bowl
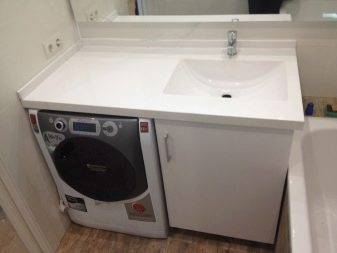
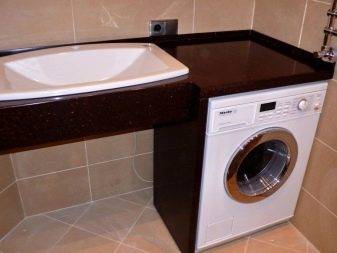
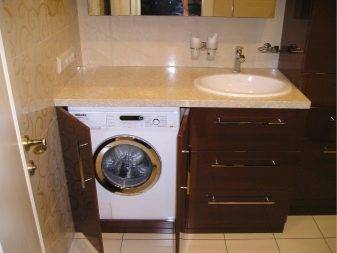
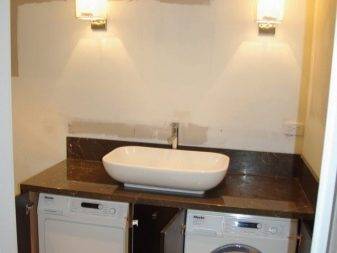
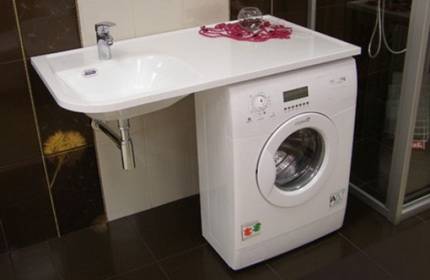
If it was not possible to purchase a special sink or for some reason it cannot be used, there is another solution. The washing machine is installed under a countertop common with the sink.
It looks like this: a worktop of sufficient length is installed, on one side of it under the base there is an electrical appliance, on the other - a built-in sink. This solution is safer in terms of the use of electricity, but requires a sufficient amount of free space. Another unpleasant moment is associated with the height of the washer.
Standard models have a height of about 85 cm, if you install a sink above such a device, it will be extremely inconvenient to use the latter. You can, of course, build a semblance of a podium, but for small bathrooms this is not always possible.
Practice shows that the height of the equipment located under the sink should not exceed 60 cm. Thus, you will have to buy a special model.
They can be found in the lines of well-known manufacturers. Very often, sinks are also included with such devices, which are ideally suited to all parameters of the machine. Such a purchase will be the best option for installation.
These are all the main disadvantages of installing a washing machine under the sink. Apart from some inconvenience from the fact that when washing you can not come close to the bowl, because the place under it is already taken. But they get used to it pretty quickly.It must be admitted that all these disadvantages usually do not outweigh the advantages of such an installation, therefore such solutions are quite viable and in demand.
Installing a sink above an electrical appliance
The equipment installation technology is quite simple and includes three main stages. Let's take a closer look at each of them.
Fixing the bowl
To attach the water lily sink to the wall, use the brackets that come with it. The master only needs to fix them at the right height and hang the bowl.
Let's get to work:
- We mark the wall. We draw a line corresponding to the top panel of the washing machine. We will make the rest of the marks relative to this feature. We try on the bowl, not forgetting to leave a gap between the sink and the washing machine. Its value depends on the type of siphon. We outline the holes for the fasteners. If the bowl is located close to the bath and it is planned to install a common mixer, we check whether the length of its spout is sufficient.
- We drill holes. We use anchor bolts or dowel fasteners as fasteners.
- Install brackets. We do not completely tighten the bolts yet, leaving small gaps of 5 mm.
- Apply silicone sealant to the back of the sink. The composition is applied in a strip at a distance of 5-10 mm from the edge of the bowl. We carry out a similar procedure with the protrusions of the brackets, where they come into contact with the surface of the sink.
- We install the bowl on the brackets. To do this, we put the shell eyes on the metal hooks and fix it to the wall with dowels or anchor fasteners.
- Fully tighten the bolts securing the brackets.
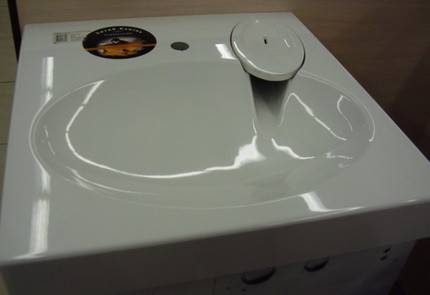 The drain of the “water lily” sink is located as close as possible to the back wall of the bowl
We mount the siphon
It is recommended to attach the siphon to the sink before the brackets are tightened. Install the device in this order:
- We assemble the assembly, guided by the scheme, which the manufacturer must include in the packaging with the product. Do not forget to thoroughly coat all sealing elements and threaded connections with silicone grease. We tighten the thread very carefully, otherwise the plastic parts may not withstand the force and break.
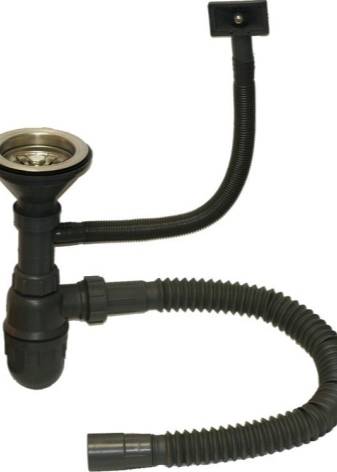
- We find a pipe for connecting a washing machine at the siphon and put a drain hose on it. The resulting connection must be fixed with a clamp with a screw tightening. So we can be sure that the pressure of the water drained from the tank of the washing machine will not break the hose.
- We connect the outlet of the siphon to the sewer. Masters advise to additionally bend the corrugated pipe outlet in the form of a knee and secure it with insulating tape or soft wire. This is necessary to prevent the possible appearance of an unpleasant odor from the sewer, since in the flat siphons that the water lilies are equipped with, due to their design features, the water seal is very often broken.
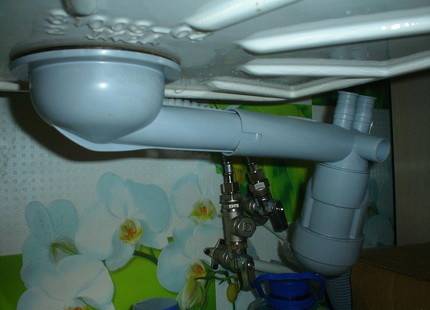 Flat siphon for sinks are equipped with a special nozzle for connecting the drain hose from the washing machine cars
Installing the mixer
The design features of a flat sink suggest the absence of a faucet. The best option for such devices is a mixer mounted on the wall.
The most commonly used model is with a long spout, common for a bathtub and a washbasin. In some cases, a hole is provided in the water lily body for installing a mixer.
It is installed in strict accordance with the manufacturer's instructions after the installation of the siphon is completed and the bowl is finally fixed to the brackets.
In the process of installing the mixer, do not forget about careful sealing. All seals must be lubricated with silicone grease.
Threaded connections are sealed with sanitary tow with paste or fum tape. We tighten the nuts on the mixer hoses very carefully. They are made of rather brittle zinc alloys, excessive force can simply destroy them.
After the installation is completed, we carry out a trial run and carefully inspect all connections for possible leaks.
 If the “water lily” is equipped with a hole for the mixer, it is installed in strict observance of all instructions from the manufacturer
A bathroom sink mounted above a washing machine is a practical solution that helps to save and efficiently organize free space.
It is very easy to implement it in your home. You need to choose the right electrical appliance and plumbing equipment, it will be easiest to purchase a special kit. They are offered by many manufacturers. You can install such a tandem yourself.
During installation, it is important to remember the need to ensure electrical safety and perform all work carefully, observing all the requirements of the instructions.
Installation sequence
Preparatory activities
At the first stage, a washing machine is installed in the place freed from unnecessary items and the sink is fitted to the wall. If it is not possible to install the bowl on the old brackets, then they are dismantled and the places for new mounts are marked.We remind you that in doing so, a distance of 2–3 cm must be maintained between the lid of the washing unit and the bottom surface of the sink. If a vertical drain is used, then this gap is measured from the siphon.


In addition, if necessary, a hidden location of the wiring of engineering communications, mark the places of their laying. After that, the washing machine is moved aside, a hole is prepared in the wall for dowel fasteners, if necessary, the channels are gated and the pipelines are installed.
Faucet installation
The installation of the mixer is carried out using copper fasteners from the kit. Subsequently, this will allow you to easily dismantle the device for repair or replacement.
If the design of the sink provides for a mixer, then it is mounted before the product is installed in place. Connected to the valve first flexible hosesmaking sure that their rubber o-rings are intact. After that, the device is installed in a special hole in the bowl, after placing a fluoroplastic gasket from the delivery set under it. Thanks to it, a snug fit of the bottom of the faucet to the sink is ensured, as well as protecting the smooth surface from scratches. On the reverse side, a segment washer is installed on the fixing screw and, with the help of copper nuts from the set, the tap is securely fixed to the bowl.
Assembly and installation of the siphon
When assembling the siphon, follow the manufacturer's instructions.
It is important to ensure a secure fit of all parts of the part and good tightness. It will not be superfluous to lubricate all sealing gaskets with silicone sealant before installation.After assembly, the siphon is installed on the sink, after which the overflow system is mounted, if it is provided for by the design
The last step is to connect the corrugated hose to the drain system. It is best to fix it using a threaded type clamp.
After assembly, the siphon is installed on the sink, after which the overflow system is mounted, if it is provided for by the design. The last step is to connect the corrugated hose to the drain system. It is best to secure it using a threaded type clamp.
Instructions for installation and connection of the sink
Dowels are driven into the prepared holes and the brackets from the delivery set are mounted.
It is important not to tighten the fasteners while the washbasin will not be properly adjusted.
Having installed the sink in place, control and, if necessary, correct its horizontal level. If the longitudinal displacement of the structure is prevented by a special hook, then a corresponding mark is made on the wall.
The washbasin is removed and the nuts securing the brackets to the wall are tightened.
A layer of sealant is applied to the metal surfaces of the parts to protect the sanitary ware from damage.
According to the mark on the wall, a hole is drilled into which an anchor or dowel is installed and a mounting hook is mounted.
A layer of silicone sealant is applied at the place where the back surface of the bowl is attached to the wall.
A sink is installed on the prepared brackets. At the same time, it is important to monitor its fixation on the hook.
The sink drain is connected to the sewer pipe, and the flexible connection is connected to pipelines with hot and cold water.
At the same time, it is important to monitor its fixation on the hook.
The sink drain is connected to the sewer pipe, and the flexible connection is connected to pipelines with hot and cold water.
After checking the performance of the mixer and the absence of leaks in the drain system, the washing machine is moved closer to the sink and connected to the water supply and sewer pipe. After that, the equipment is installed in place, not forgetting to adjust the horizontal position.
Video: How to install a sink over a washing machine
For practical and safe operation, it is important to ensure that the parameters of plumbing and electrical equipment are correctly matched. Do not lose sight of the factor of aesthetic perception of the design. A wide range of models allows you to provide a holistic, harmonious picture
That is why the design is easy to fit into the interior, getting a bathroom that will delight with convenience and appearance.
A wide range of models allows you to provide a holistic, harmonious picture. That is why the design is easy to fit into the interior, getting a bathroom that will delight with convenience and appearance.
(0 votes, average: 0 out of 5)
How to choose a washing machine
 For such placement, the main criterion is the external dimensions of the unit.
Regular narrow models are ideal for installation under the washbasin. For a tall person, this arrangement will be convenient. But in order not to get into a mess, you need to take into account your own preferences and the comfort of family members.


For a child, it is recommended to purchase special coasters covered with a material that does not slip. If space permits, you can make a separate installation of the children's washbasin and raise it as it grows.
A compact washing machine is a good choice for an under-sink installation.
The only thing that is important is that you need to carefully choose the manufacturer and brand of such equipment. Such machines are not repaired on their own, and if they break down, there will be a lot of trouble.
Built-in models of washing appliances are designed to be located in kitchen niches under the countertop, they look good if there are several cabinets. If possible, they put in the bathroom not a single frame, but several adjacent cabinets.
Washing machines with vertical stacking of clothes are not suitable for creating a tandem with an overhanging sink, since their functional use is not possible.
The equipment is selected taking into account the parameters of the space under the sink. Many washing units today are produced up to 70 cm high, and their depth does not exceed 35 and 45 cm.
Using a simple calculation, the height of the future washbasin is determined. To do this, add the thickness of the sink to the height of the machine and add another 20 cm. This will determine the height position of the edge of the washbasin.
Household standards define a sink height of 0.8 m. Upon receipt of calculated data of a different order for your specific case, a review of the model of the machine is required for ease of use.
Built-in mini-machines can wash no more than 3 kg of clothes at a time, which is not always acceptable for families with a large number of members. In this case, you need to install a standard narrow washing unit, which will fill the space under the machine and will not protrude much forward.
Rules for installing a sink above a washing machine
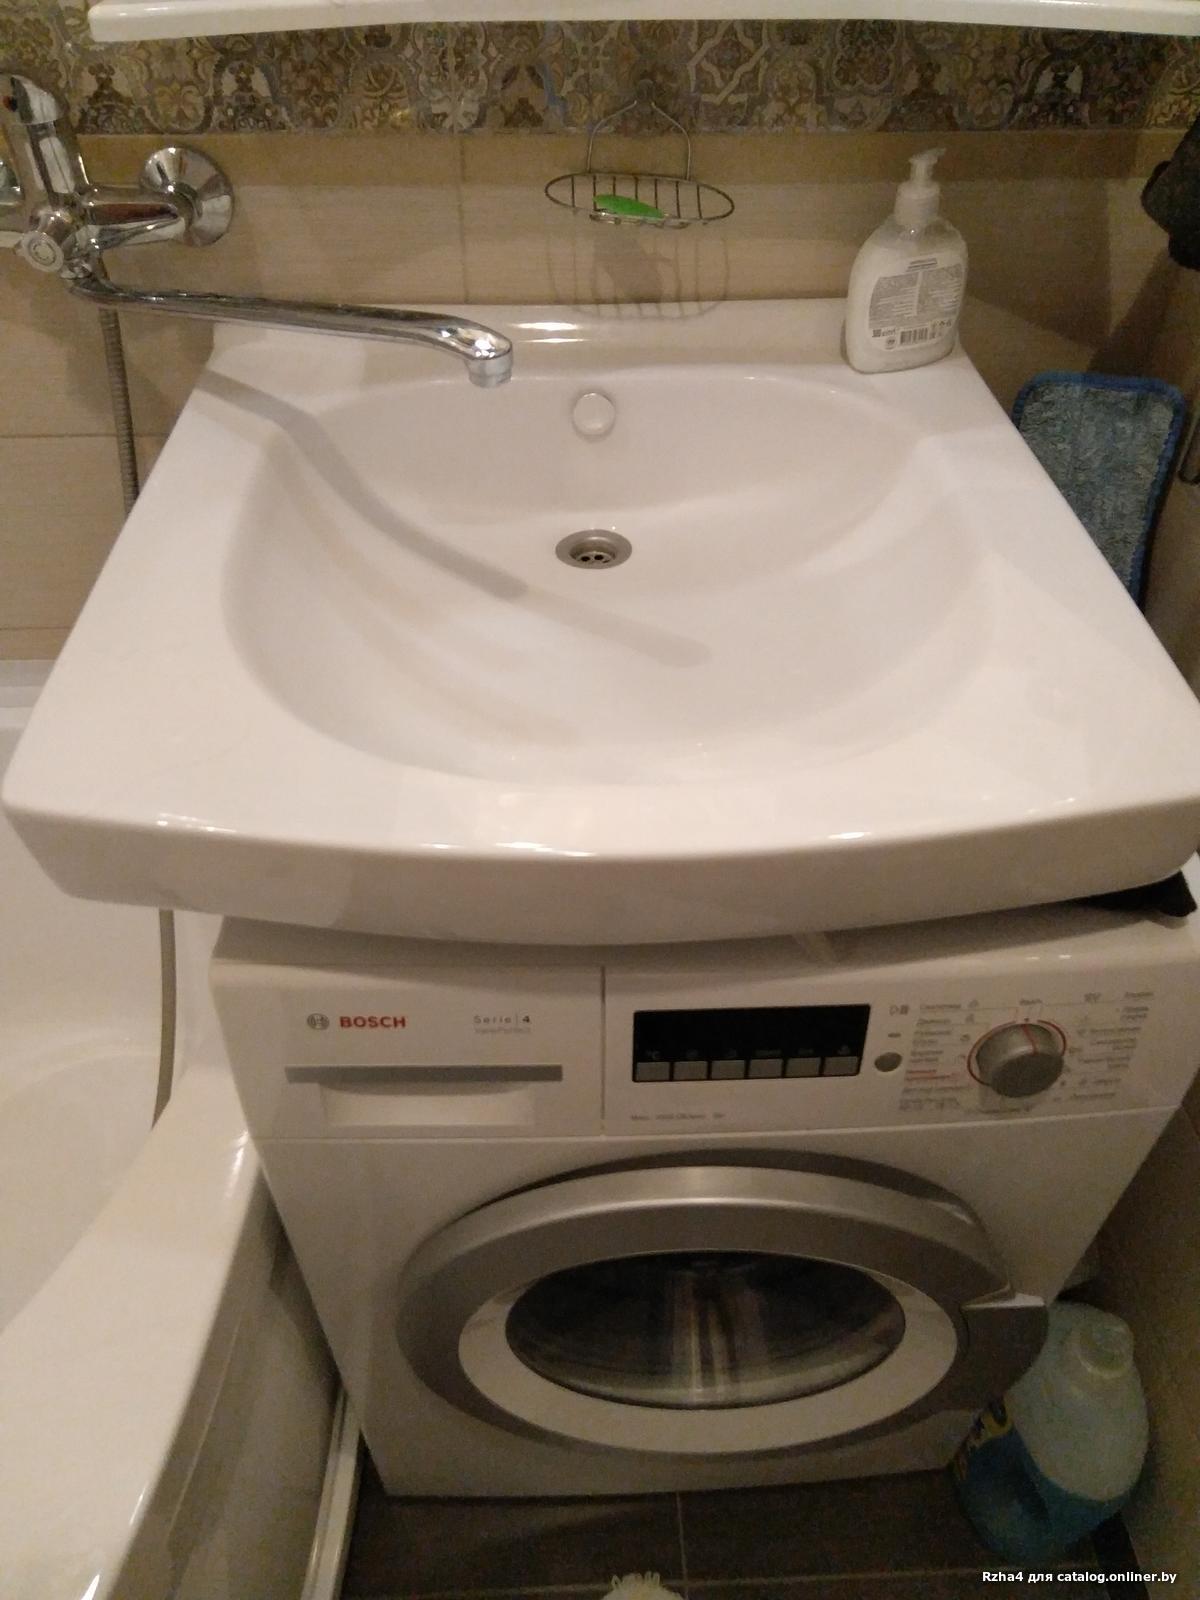
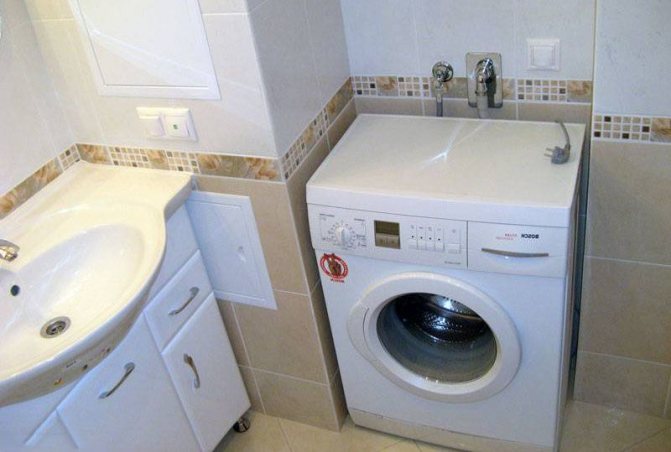
 It is recommended to completely cover the surface of the washing unit with a sink, otherwise water may enter, which is not entirely good for safety in terms of electricity. Drain pipes must not be placed directly above the electrical connection of the machine.
The pipeline is not located above the washing machine because the unit vibrates strongly during the spin cycle, this can lead to a gradual violation of the integrity of the drain pipes. The width of the sink is set based on convenience. It is desirable that its edge protrude from the typewriter by 4-5 cm, but the width is not recommended more than 60 cm.
The floor at the installation site of the washing machine must not have a slope or unevenness. Leveling is carried out at the stage of floor screeding or with special rubber mats after laying the floor covering.