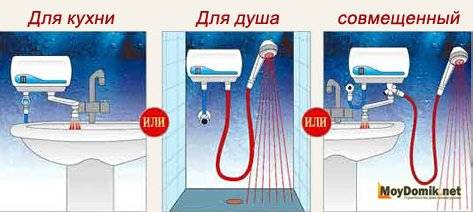
- Types of household boilers
- Preparatory work
- Walkthrough
- Boiler Advantages
- Types of household water heaters
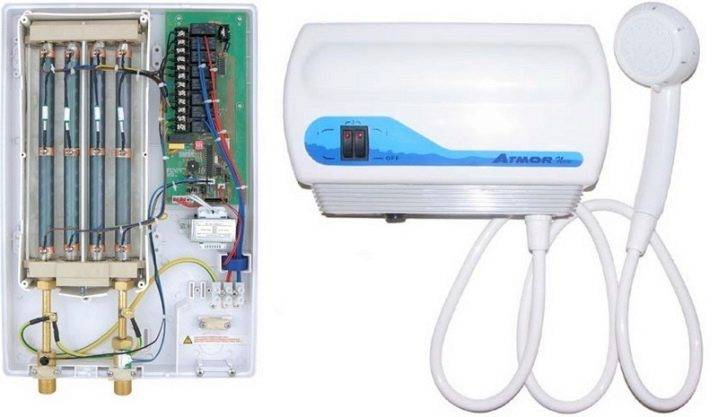
- Technical device of the storage boiler
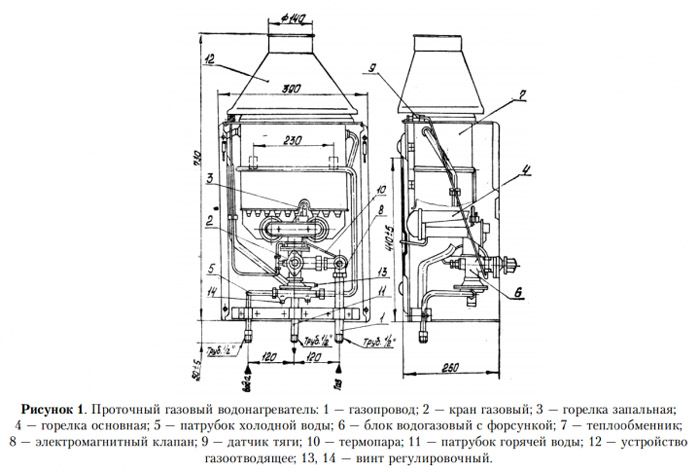
- Structural design of heating devices
- Tools and materials
- Material
- How to install a water heater: step by step instructions
- 3 We mount the storage heater - warm water is provided
- Necessary parts, materials and tools
Types of household boilers
The characteristics of connecting household heaters are directly related to the types of devices, their technical parameters, and overall dimensions.
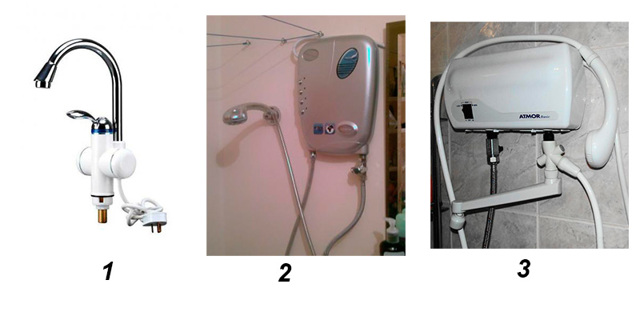
Classically in household practice, two types of heaters are used:
Two types of boiler systems differ from one another by heating technology.
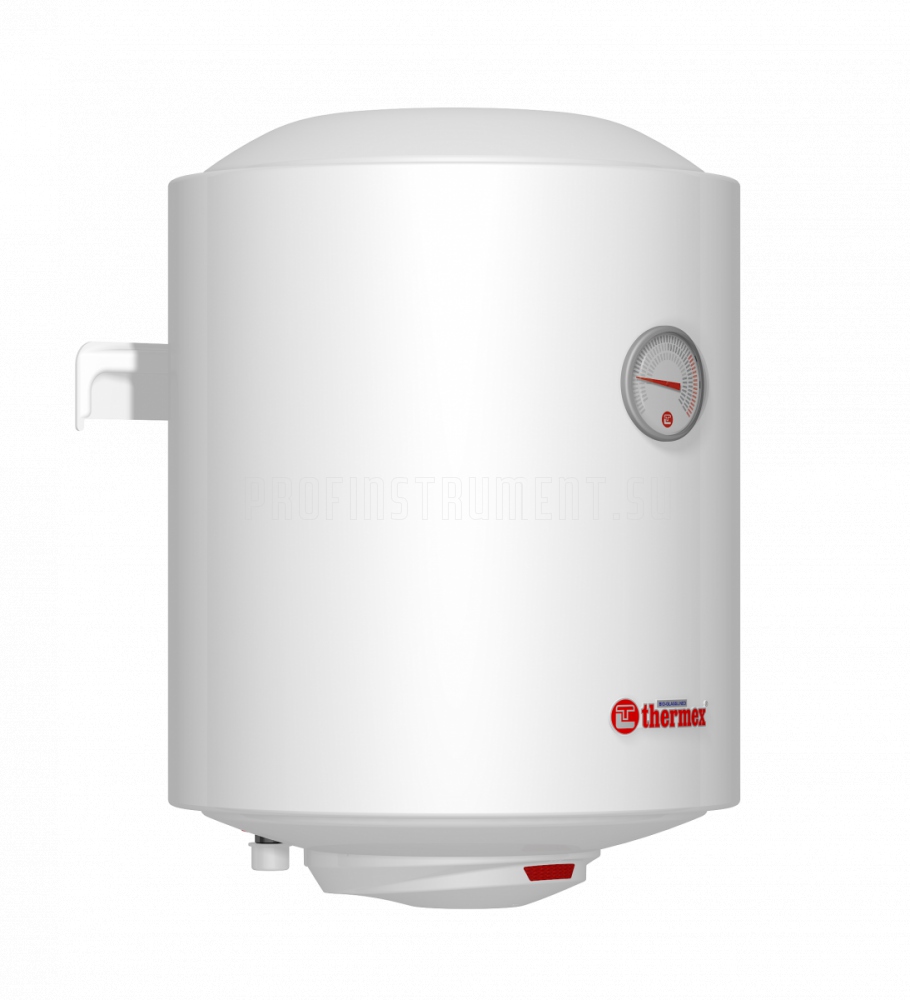
Accumulative type apparatus equipped with an electric heater (Tubular type heating element). Similar equipment is very often used in the domestic area. It can be mounted specifically in the bathroom, if the dimensions and dimensions allow
With accumulative heaters, cold water accumulates in a container, heats up and then is displayed for water intake.
With flow-through units, heating is carried out specifically in the process of cold water flow in contact with the heater, without collecting liquid in a storage tank.
Consumers of the domestic sphere, as a rule, use accumulative boiler systems. Comparative review of two types boilers is given in this publication.
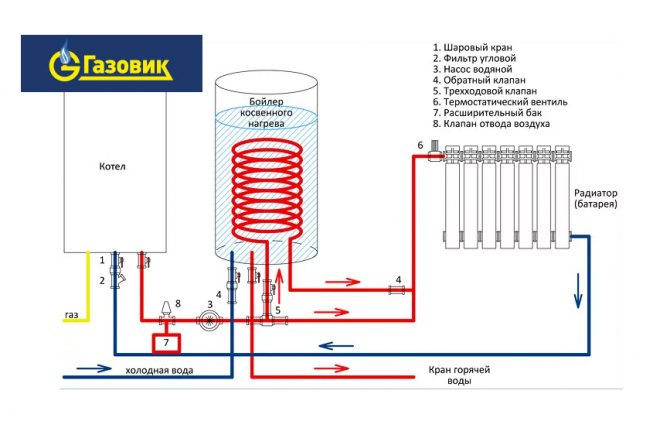
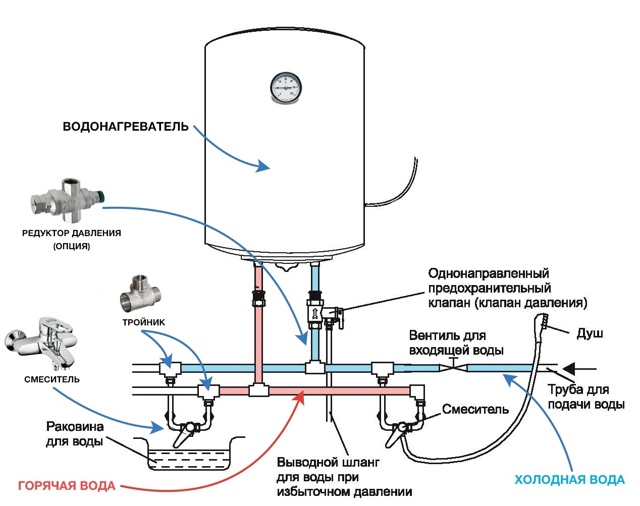
A storage-type water heating system, indirect heating water heaters, in a simplified schematic form, is a tank equipped with electricity-powered tubular-type heating element or liquid heat exchangers. The storage vessel has pipe lines for cold water supply and hot water outlet.
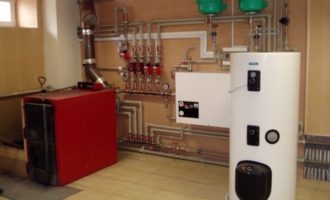
A more powerful and voluminous design is an indirect heating installation. It is clear that the source of heating energy in this case is the water that comes from the heating system. However, if there is a desire, it is possible to connect electric heating
Indirect structures are additionally equipped with a zone for the operation of a heat carrier and lines for connecting to heating.
Any modern system, regardless of the design properties, is equipped with automation, thanks to which the temperature adjustment of the water heating and the operation of the system in general are carried out. Of course, in all individual cases of using certain water heaters, there are their own installation features.
So, if wall mounting of a water heating device is planned, a preparatory calculation of the load and a comparison of the results obtained with the design parameters of the wall of the room on which the device is to be mounted are needed.
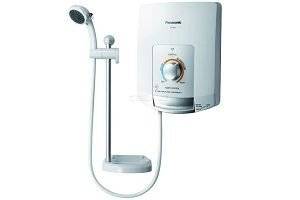
Flow type water heaters are quickly becoming very popular.Users are attracted by their small size, the possibility of simplified, simple installation. For small water consumption needs, they are actually good devices.
Installation of equipment without load calculations threatens to turn into a fatal installation error, when a filled water heater can simply collapse at the same time as the flimsy partition on which it was mounted.
According to the manuals for the equipment, the load must be calculated taking into account four times the weight of the boiler system.
Therefore, if the structure of the supporting wall is frankly weak, the water heater circuit must be supplemented not only with lines for connecting to the water wire and the heat carrier, but also with reinforced racks - through fasteners.
Horizontal boiler plant used for local hot water production. Electric heating is also provided here, and an expansion tank is installed in this installation option, which is considered the right decision.
Preparatory work
Let's make a reservation right away, only an experienced and technically savvy person can make a home-made electric instantaneous water heater with their own hands. Setting up a complex circuit diagram requires special knowledge. Mistakes will lead to accidents.
To assemble a water heater with your own hands, you will need the following tools and materials.
- For marking core and tape measure.
- Bulgarian and drill with nozzles.
- Welding transformer or inverter, electrodes.
- TEN for 6 kW.
- Sheet steel (2 - 3 mm thick).
- Grounding bolts, nuts.
- Threaded pipes.
- Anti-corrosion composition.
Walkthrough
All metal elements should be prepared. Internal and external surfaces are thoroughly cleaned and polished.
- From a metal sheet, cut out a rectangle with a height exceeding the diameter of the tube by 2-3 mm.
- Attach the ends of the contacts to the cut out plate and make marks at the points of contact. In the marked places, drill holes 1 mm larger than the diameter of the legs of the heating element.
- Align the end of the pipe with the plate prepared in this way and outline along the contour.
- Cut the metal according to the markup with a grinder.
- Install the heating element and fix it in the prepared holes.
- Next, the pipe is welded with the end part to the circle with the heating element.
- Now we need to cut another metal circle. The tube is cut in such a way that a distance of 1 - 2 cm remains between the circles.
- Stepping back from the edge of the pipe by 1 cm, drill holes equal to the diameter of the pipe threads.
- Pipes with threaded ends are inserted into the holes obtained and welded from the outside.
- Next, a circle for the heating element is welded.
- A heating element is installed on the welded circle and another circle is welded.
- Welding work is completed by fixing a bolt or nut that serves as a ground electrode.
The design is connected to the water supply to detect leaks. If everything is in order and no leaks are found, an anti-corrosion compound can be applied.
Boiler Advantages
- Temperature sensor that works automatically. In the event of a malfunction, it simply turns off. If you look from the point of view of fire safety, then of course, the production boiler wins, as it is equipped with several types of interlocks.But if we consider the situation with a homemade one, then everything is at your discretion.
- Water flow sensor and pressure sensor. Of course, the boiler levels out pressure drops, endures water hammer, and also easily copes with high water pressure. Saving water with a boiler is beneficial only if it is small. For example, a 50-liter boiler consumes enough electricity, so that saving on water is practically not noticeable. As soon as insufficient pressure appears in the water supply system (less than 0.6 bar), the boiler automatically turns off. As for the instantaneous water heater, even with a minimum water flow, the number of liters of water flowing out per minute is about 1.5 liters.

They are fixed in place of the crane and have a presentable appearance. For added safety, the chassis must be grounded as the equipment is powered.
In more expensive models, a shower head is included in the kit, which is very convenient for summer residents. But, unfortunately, the price of such a device is very impressive.
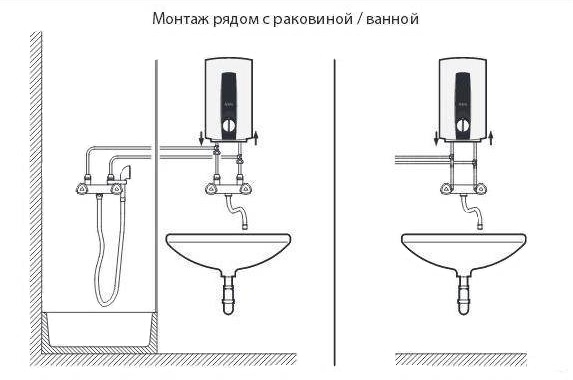
Please note: It is not recommended to install an in-line heater in a bathtub, as this may cause a fire. Best of all, run plastic or metal pipes along the wall and install them in the shower.


Installing a metal swivel crane will greatly simplify the operation of the drive. Without a tap, it will look more like a washstand, which is very impractical
Pay attention to the tightness of the drive (the cover must be welded with argon welding) and the entire structure as a whole. Insulate the body and make it more secure.When using a storage flow heater, pay attention to the meter readings: in rural areas, the maximum power is about 4 kW
If an ordinary electric kettle draws 1.5 -2 kW, and a TV 1 kW, then you can already calculate which electrical appliances can be turned on at the same time and which cannot.
When using a storage flow heater, pay attention to the meter readings: in rural areas, the maximum power is about 4 kW. If an ordinary electric kettle draws 1.5 -2 kW, and a TV 1 kW, then you can already calculate which electrical appliances can be turned on at the same time and which cannot. If the meter is automatic, then it will simply knock out the plugs, as the fuses will work, which can be replaced
But if your meter does not have fuses, then turning on the water pump, electric stove and TV at the same time can cause a fire in the wiring
If the meter is automatic, then it will simply knock out the plugs, as fuses that can be replaced will work. But if your meter does not have fuses, then turning on the water pump, electric stove and TV at the same time can cause a fire in the wiring
If an ordinary electric kettle draws 1.5 -2 kW, and a TV 1 kW, then you can already calculate which electrical appliances can be turned on at the same time and which cannot. If the meter is automatic, then it will simply knock out the plugs, as fuses that can be replaced will work. But if your meter does not have fuses, then turning on the water pump, electric stove and TV at the same time can cause a fire in the wiring.
Types of household water heaters
Features of connecting household heaters are directly related to the types of devices, their technical parameters, overall dimensions.
Traditionally, two types of heaters are used in household practice:
- Cumulative.
- Flowing.
Both types of boiler systems differ from each other in heating technology.
Accumulative type apparatus equipped with an electric heater (TEH). Such equipment is most often used in the domestic sphere. Can be mounted directly in the bathroom, if the overall dimensions allow
With accumulative heaters, cold water is collected in a tank, heated and then displayed for water intake.
With flow-through units, heating is carried out directly in the process of cold water flow in contact with the heater, without collecting liquid in a storage tank.
Technical device of the storage boiler
A storage-type water heating system, boilers, in a simplified schematic form, is a container equipped with electric heating elements or liquid heat exchangers. The storage vessel has pipe lines for cold water supply and hot water outlet.


A more powerful and voluminous design is an indirect heating installation. It is clear that the source of heating energy in this case is the water coming from the heating system. However, if desired, it is possible to connect electric heating
The designs of indirect heating boilers are additionally equipped with a working area of the coolant and lines for connecting to heating.
Any modern system, regardless of design features, is equipped with automation, thanks to which the water heating temperature is adjusted and the system as a whole operates.
Structural design of heating devices
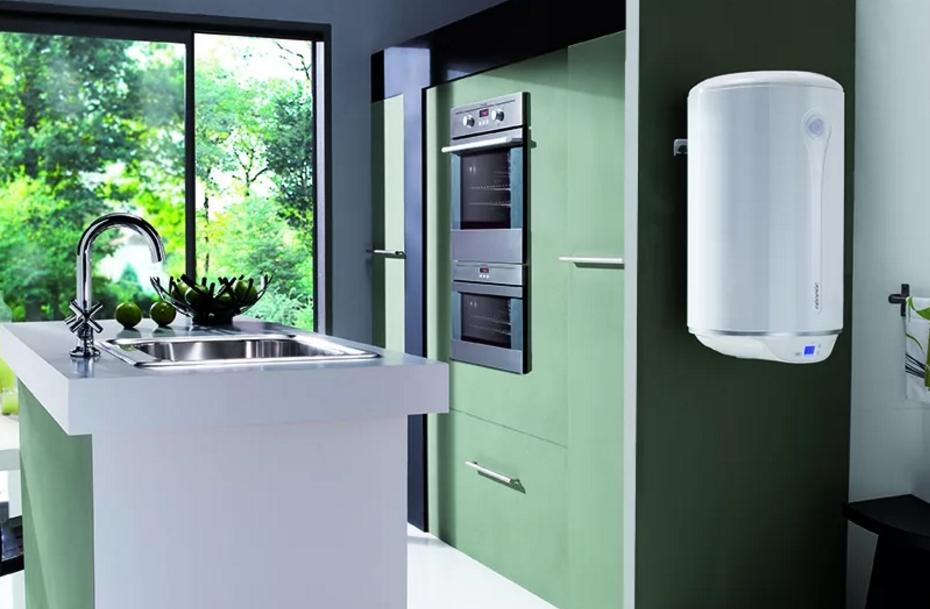
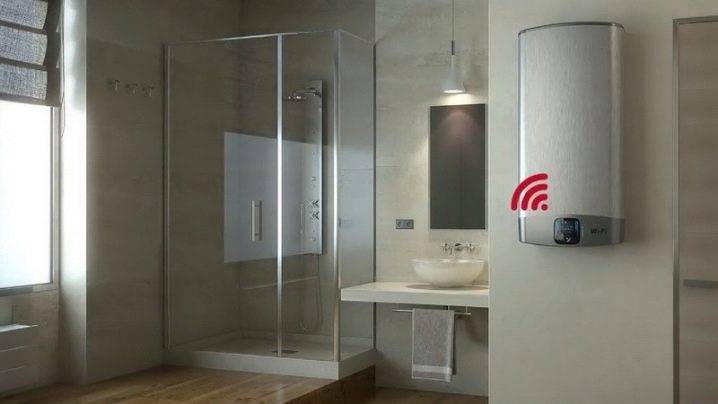
There are designs of storage boilers designed for installation vertically (wall-mounted) and horizontally (floor-mounted). Of course, in each individual case of the use of certain boilers, there are installation features.
So, if wall mounting of a water heating device is planned, a preliminary calculation of the load and comparison of the results obtained with the design parameters of the wall of the room on which the device is to be mounted is necessary.
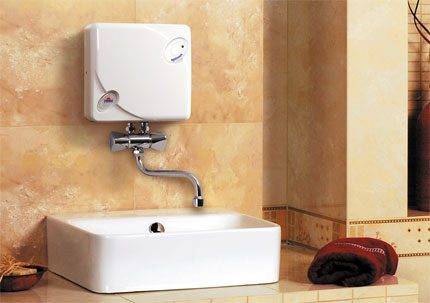
Instantaneous water heaters are rapidly gaining popularity in recent years. Users are attracted by their small dimensions, the possibility of simplified easy installation. Really convenient devices for small water consumption needs
Installation of equipment without load calculations threatens to turn into a fatal installation error, when a filled boiler can simply collapse along with the flimsy partition on which it was mounted.
According to the instructions for the equipment, it is necessary to calculate the load taking into account four times the weight of the boiler system.
Therefore, if the structure of the supporting wall is frankly weak, the water heater circuit must be supplemented not only with connection lines to the water supply and coolant, but also with reinforced racks - through fasteners.
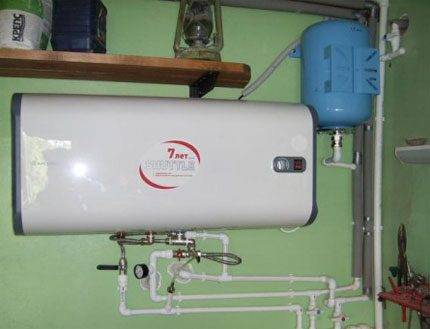
Horizontal boiler plant used for local hot water supply. Here, too, electric heating is provided and in this installation option an expansion tank is installed, which is the right solution.
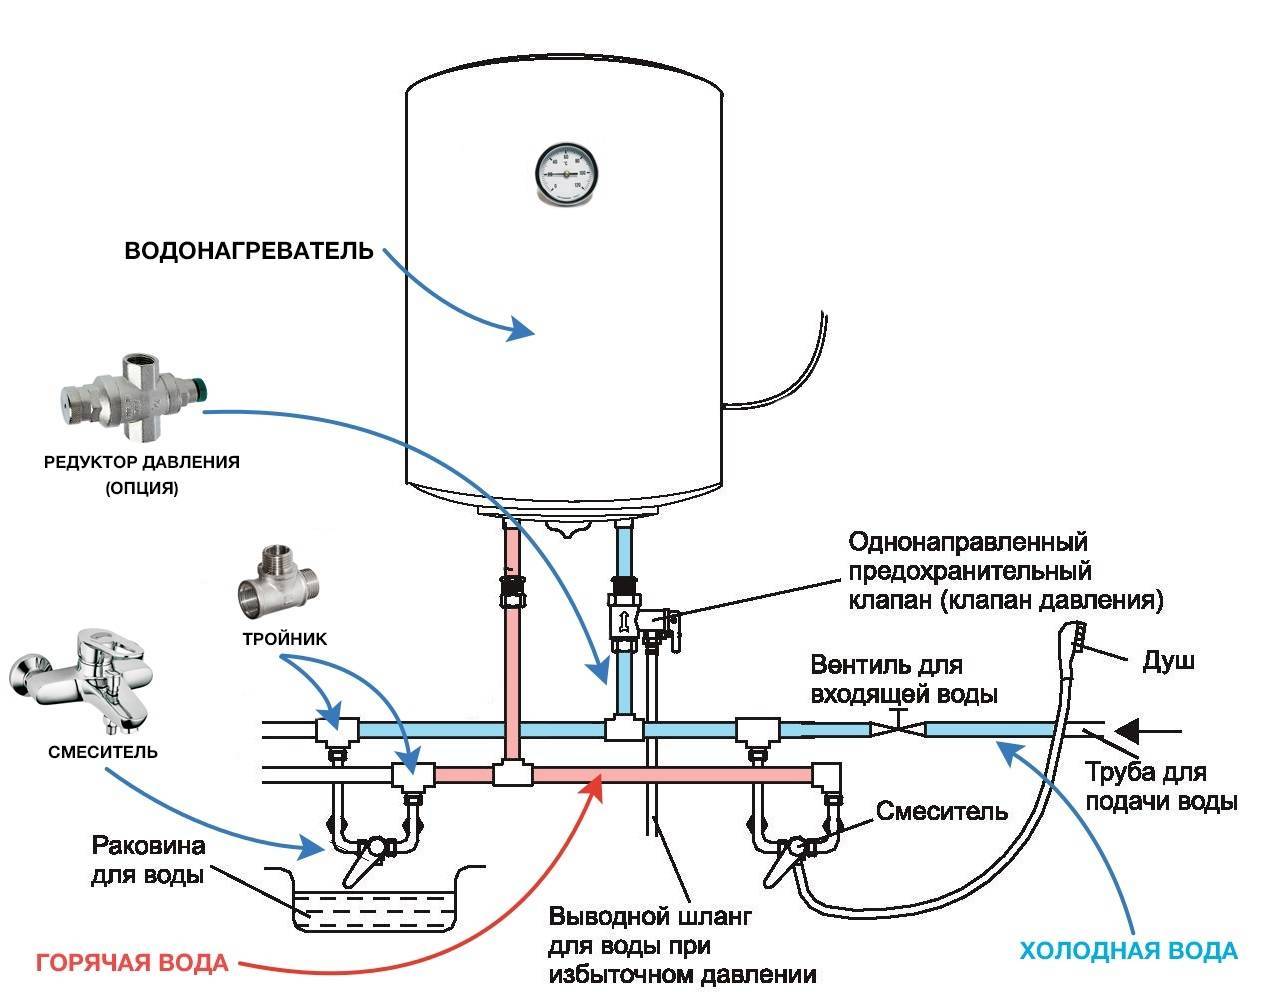
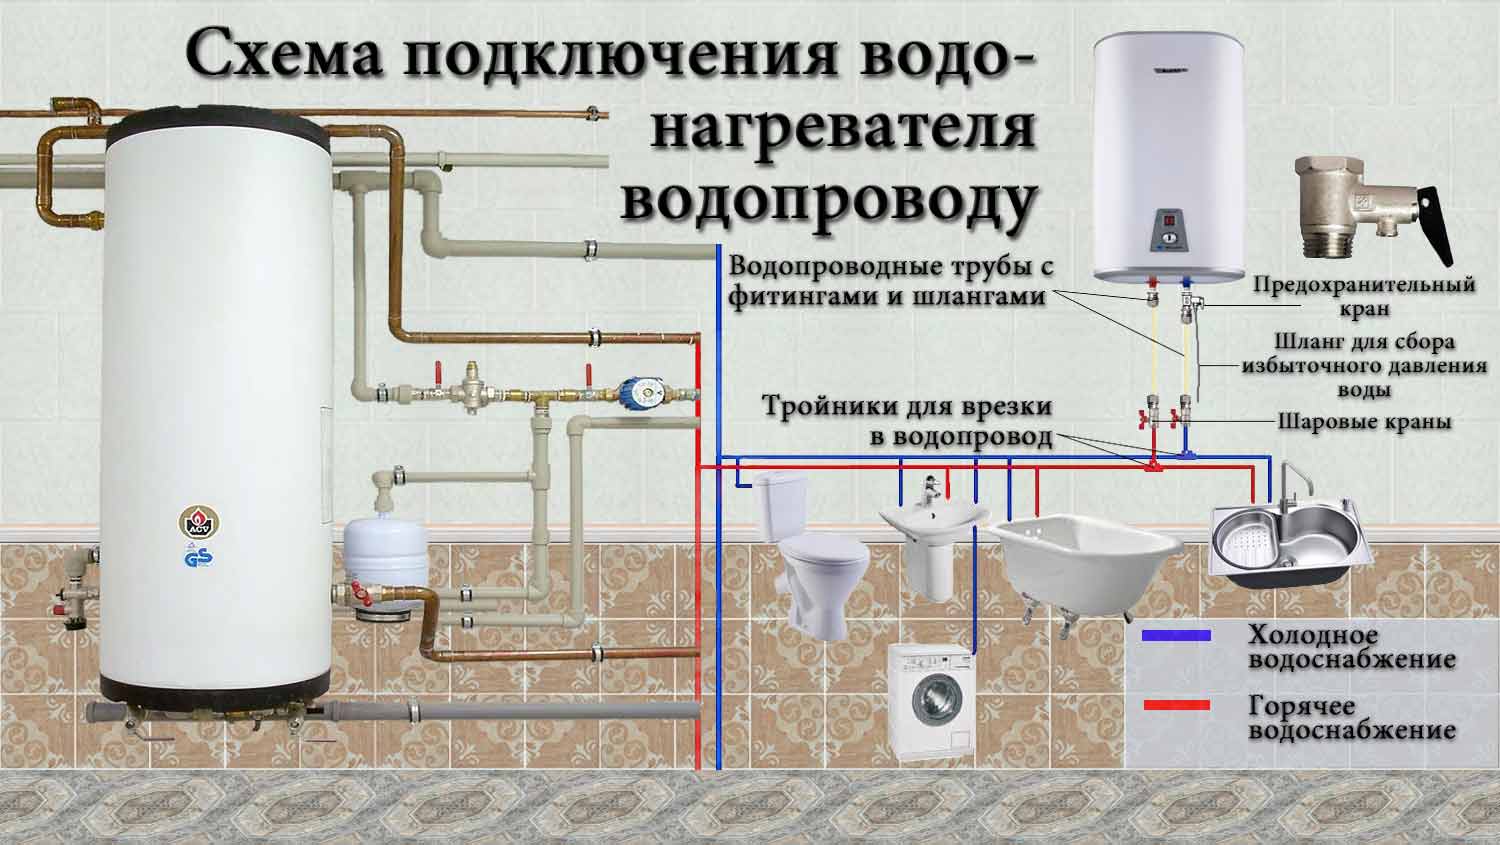
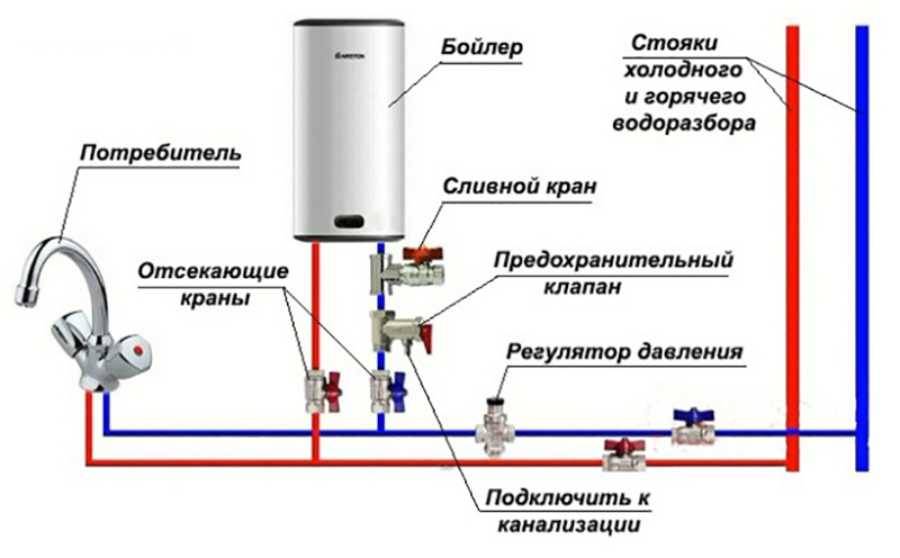
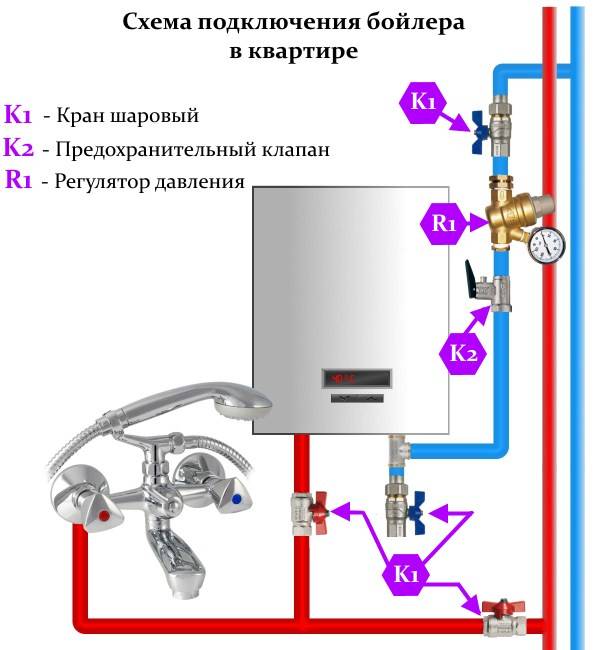
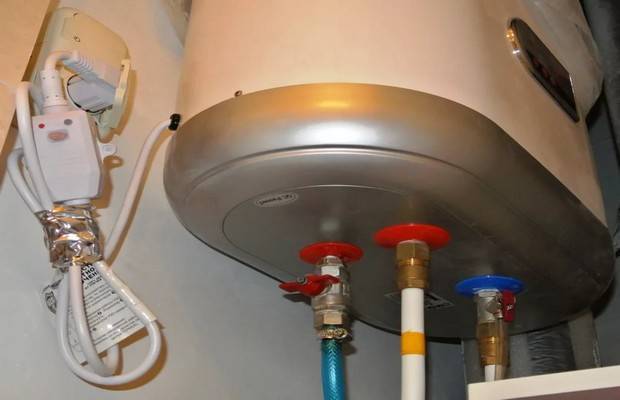
On the classic schemes for connecting wall-mounted boilers, the water inlet / outlet pipes of the heating devices are marked with the appropriate color - blue / red.
Tools and materials
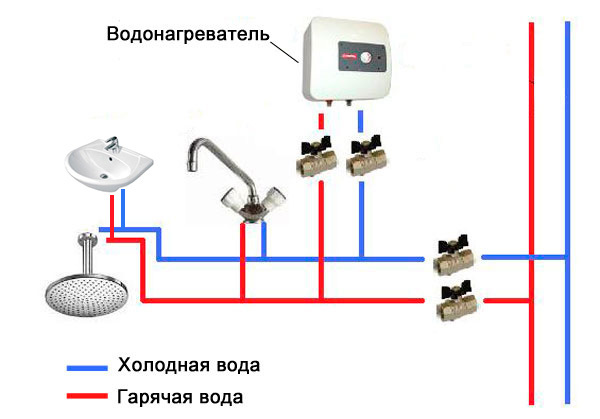
Do-it-yourself heater installation begins with a suitable model. It is necessary to take into account how many points of water intake will be connected to the device - the power of the heater depends on this
You should also pay attention to the condition of the electrical wiring in the apartment. Remember that it is not intended for connecting electrical appliances with a power higher than 2 kW.
If you plan to use a powerful water heater, you should run a separate wire to it with an RCD.
The next step is to choose the installation location. The following conditions are required here:
- The place must be dry - make sure that the device will not get water. Otherwise, it may fail or cause electric shock;
- Availability of access for maintenance and adjustment - do not hide the device in hard-to-reach places. Remember that it must be periodically inspected for leaks. It should also be possible to freely adjust the temperature - some models are equipped with smooth or step regulators.
You also need to remember about possible heat losses - make sure that the water heater is located as close as possible to the points of water intake.
Tools and Materials Needed to Install a Water Heater
Now let's talk about materials and tools. We will need:
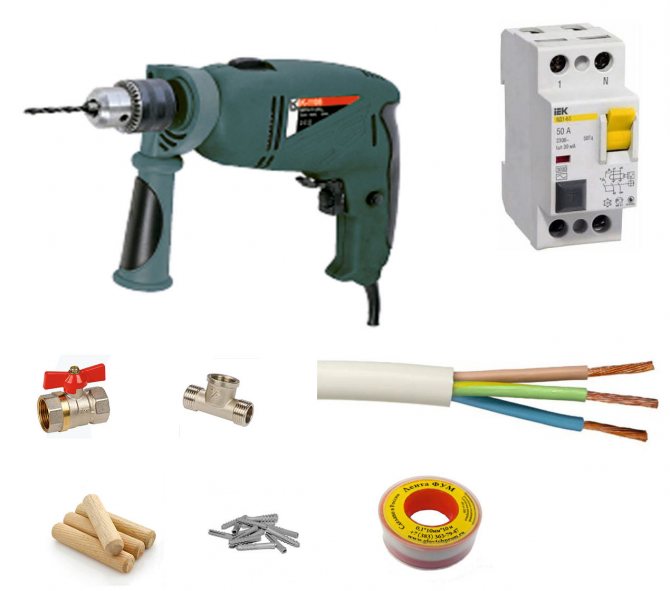
- Drill with drills - you need to drill holes in the walls for fastening;
- Plastic dowels or wooden chopsticks - fixing screws will be screwed into them;
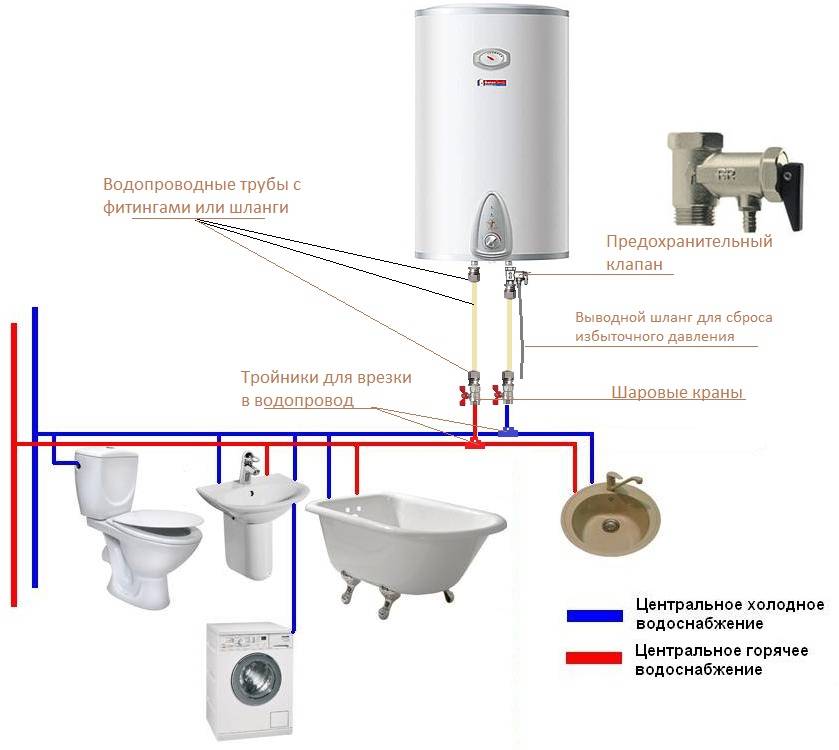
- Plastic or metal pipes - water will flow through them. We recommend choosing plastic pipes, as they are much easier to work with;
- Tees and taps - they will ensure the “correct” connection of equipment;
- Fum tape - with its help we will seal the connections;
- Wires and automatic RCD - with their help, powerful water heaters are connected.
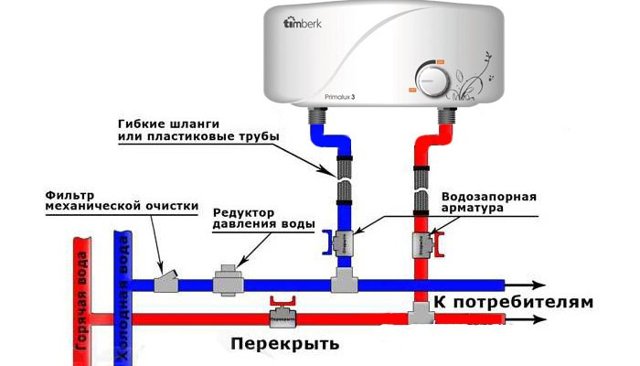
If possible, you can use flexible hoses of various lengths to connect the instantaneous water heater with your own hands. Thanks to this, you will get rid of the fuss with metal and plastic pipes.


In some cases, you can do without certain tools and materials, since there are quite a few connection diagrams
The location of pipes and points of water analysis is also taken into account.
Material
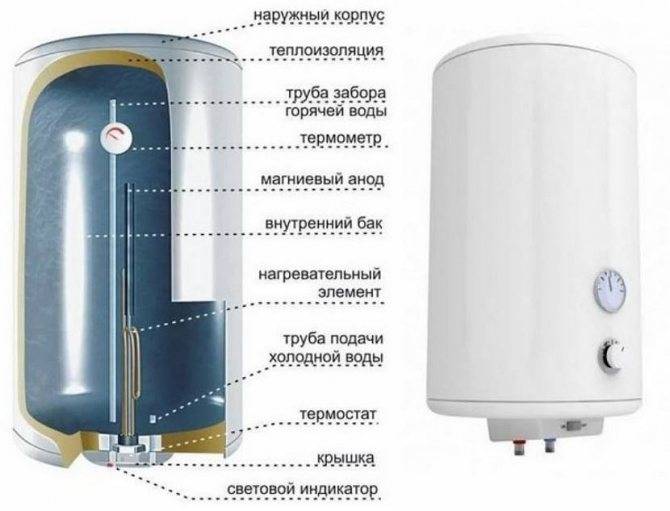
In storage water heaters, the material of manufacture of the tank is the most important. They can be either plain steel or stainless steel. The usual one is additionally covered with enamel. Naturally, stainless steel tanks are more reliable and durable. Enameled ones quickly become unusable. But, accordingly, stainless ones are an order of magnitude more expensive than ordinary ones. To prolong the life of the enamel, magnesium anodes are additionally installed, which must be changed periodically. Their status is monitored by a sensor.
As for instantaneous water heaters, they can be made from:
- copper - it quickly heats water, as it has excellent heat-conducting properties;
- stainless steel - such products are durable, but keep in mind that the water should not be very hard;
- plastic - they are not very durable, but they are low cost.
The most reliable devices are copper. But their price is quite high.
How to install a water heater: step by step instructions
If the boiler is wall-mounted, then the height of its location depends only on the convenience of using the device.The user should easily set the temperature modes on the control panel.
First of all, the heater is installed at the place of operation:
- Mark with a line the area on the wall where the underside of the appliance will be located.
- Measure and mark on the wall the distance between the outlined axis and the location of the fixing bar. It is welded on the back side of the device. There are no holes on the fixing bar; it is picked up by hook anchors.
- Drill two holes on the top line.
- Hammer the plastic dowels into the holes with a hammer. Then screw steel anchors with hooks into them until they stop.
- After that, hang the boiler on the mounts, hooking them with a fixing bar.

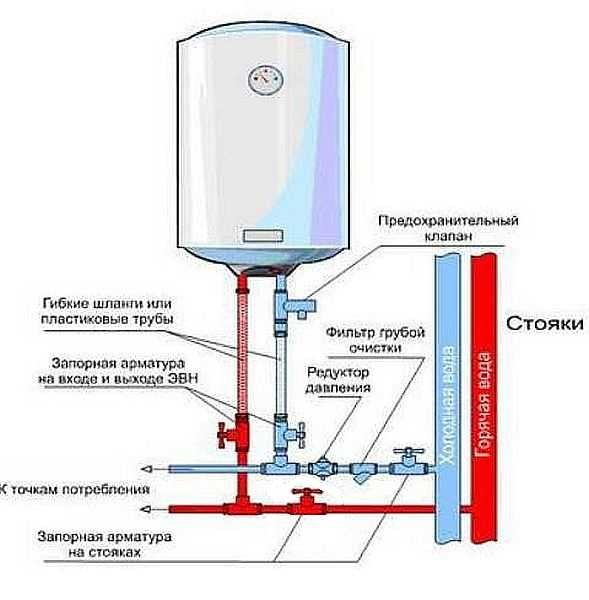
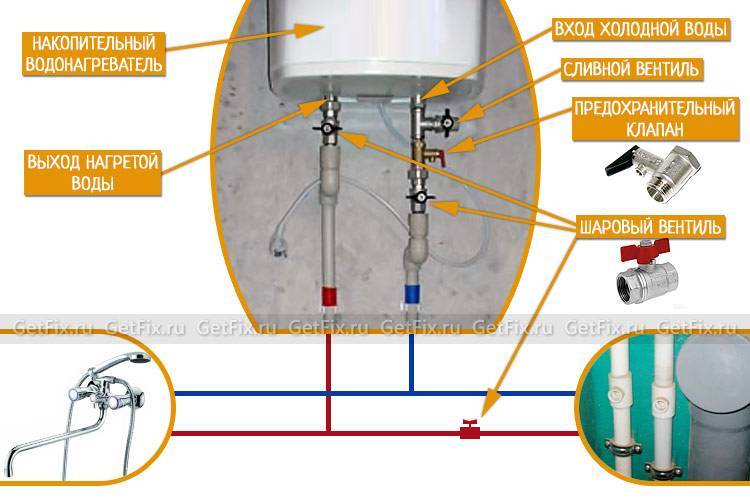
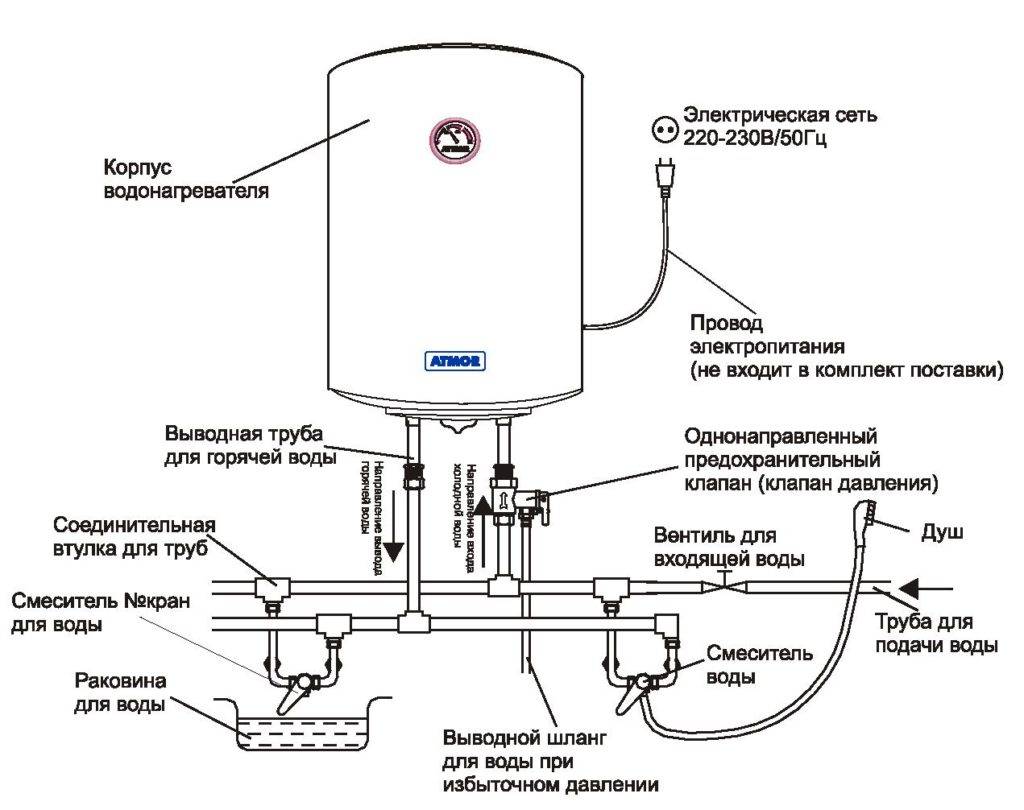
After the device is installed, it should be connected to the water supply. The easiest way to do this is to use reinforced hoses. The boiler has two marked pipes:
- blue (input) is used to connect cold water;
- red is the output for the heated resource.
The device is equipped with a safety valve. It should be screwed onto the cold water inlet:
- First, the pairing is sealed with a fum tape.
- Then the valve is screwed on.
- Then a hose is screwed onto the fuse located at its bottom. This conjugation does not need to be compacted, because The cap nut has a rubber gasket.
Then, in the same way, the second hose is connected to the pipe for heated water.
After that, it remains to screw the flexible connecting elements to the pipeline outlets for the cold and heated resources.

Next, you need to turn on the device in the mains. Most boilers are equipped with a wire with a plug and a safety relay.In advance, you will need to install a grounded electrical outlet near the water heater. The device can also be equipped with a circuit breaker.


All terminals of the device are marked according to the corresponding color of the cable cores:
- a wire for a phase of the same color is connected to the brown connector;
- a core for zero is mated with a blue terminal;
- a yellow or green wire is connected to the ground terminal.
After pairing the cores with all terminals, voltage can be applied. If everything is connected correctly, the indicator on the device should light up.
Next, you should set the desired water heating temperature and carry out a test run of the boiler. To do this, fill the tank and open the hot resource valve to remove air from the pipeline. Then connect the plug to an electrical outlet. If the indicator lights up, and a resource begins to flow into the branch for heated water, then the device can be used.
3 We mount the storage heater - warm water is provided
After we have studied the basic rules for installing boilers, you can get down to business. Let's start with the installation of the storage unit. Installation of a water heater with a tank begins with determining the place of its attachment to the wall. Then we take a tape measure and measure the distance between the holes in the anchors of the boiler. We transfer the obtained measurements to the wall. We drill holes in it in the designated places with a puncher with an appropriate nozzle for fasteners. As such, we will use dowels. Some boilers have four mounting holes, while others have only two. The number of dowels used must be the same (4 or 2).
Water heater ready for use
Next, we insert the dowels, carefully twist (in some cases we hammer in) the hooks. There may be a small problem here. It is associated with inaccurate markup. We definitely need to measure the height from the top of the water heater to the holes and maintain exactly the same (slight deviation is allowed) distance between the ceiling and the dowels. If everything is done correctly, the hooks will spin without problems. Otherwise, dressing them will be very problematic.
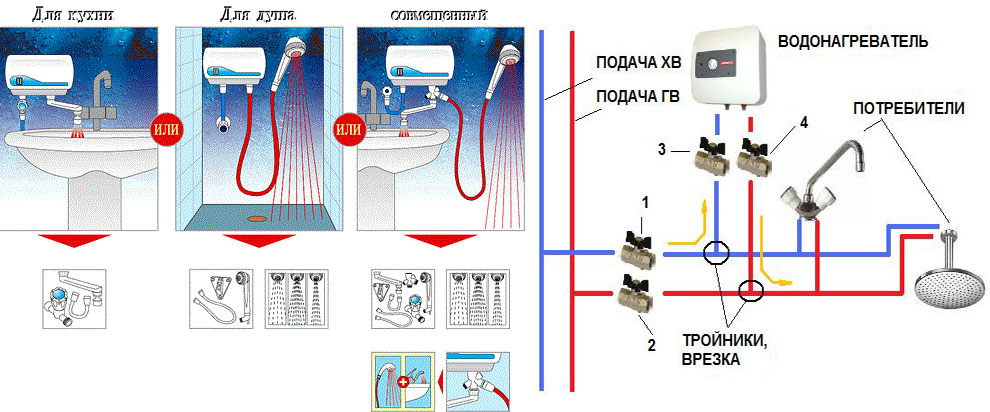
After fixing the boiler on the wall surface, we proceed to connect it to the water supply system. Well, when the conclusions for this are already available. But usually they don't. The workflow for arranging the conclusions will be as follows:
- 1. Turn off the water supply.
- 2. We cut the pipe with a grinder in the area where we will mount the tee.
- 3. We cut the thread with a die (we use a tool whose cross section is equal to the diameter of the pipes) and seal it with fluoroplastic tape (FUM) or linen tow.
- 4. Install the tee, attach a tap to it, seal the resulting assembly in the manner indicated above.
We connect the outputs of the boiler to the conclusions drawn. This can be done using metal-plastic pipes or flexible hoses. In the first case, the resulting connection must be sealed with FUM tape. When using flexible products, additional sealing of the assembly is not required.
The next step is to install a special valve for the cold water inlet on the heater. This element is of great importance for the normal operation of the boiler.The valve automatically relieves excess pressure in the system, saving equipment from failure. Such a device may not be included in sets of inexpensive water heaters. But this does not mean that it can not be installed. Buy the valve separately and mount it if you want to use the boiler without any problems.
It is also recommended to put an additional tee in front of the shut-off valve and connect another faucet to it. In principle, this element can not be installed. But then it will be quite difficult for you to drain the water from the boiler during regular maintenance of the heating equipment. It is better to make your life easier in advance by mounting an inexpensive crane in a couple of minutes. Areas for connecting additional parts also need to be sealed.
Next, we connect the outlet of the boiler to the hot water supply tap. We connect the water supply to the dwelling. We open the taps and wait for hot water to flow. Nuance. First, air will come out of the hot water faucet. Do not worry. This is normal. Then we inspect all existing connections for leaks. If everything is fine, proceed to connect the unit to the mains. More on this later.
Necessary parts, materials and tools
For self-assembly you will need:
- pipes - metal or PVC (the second option is preferable due to greater simplicity and ease of use). The length of the pipe sections depends on the location of the tank and the configuration of the bathroom (technical room), as well as the distance of the water intake points from the device. The type of pipe and its characteristics depend on the volume of water supply (capacity) and the pressure in the system;
- plumbing fittings.You will definitely need ball valves - from two pieces, a safety valve (often included in the boiler delivery set), tees and adapters (depending on the configuration of the water supply). If there is a risk of an increase in pressure in the water supply system, it is recommended to supplement the connection diagram with a reducer. If there is a pressure gauge on the reducer, it becomes possible to visually control the level of pressure in the water supply;
- three-core electric cable, the cross section is determined in accordance with the rated power consumption;
- automatic machine for connecting the device to the house electrical network. The machine is selected depending on the current strength required by the device, with a margin of at least 10 ... 15%;
- an optional, but desirable and very useful addition to the electrical circuit would be an RCD (residual current device). These devices monitor the voltage in the network and turn off the electrical equipment when the controlled parameter increases / decreases outside the specified range
An example of connecting a heating storage tank - the machine for it is highlighted in red, the RCD is located on the left. So that the electrical equipment does not turn off constantly, the permissible voltage range of 215 ... 230 V is set on the RCD
You may also have to think about gaskets, tow or plumbing tape (fum tape).
To quickly complete the installation, you will need:
- hammer drill or impact drill with a drill for concrete / brick (depending on the type of wall). If the strength of the walls does not allow a large load from attachments, you will have to make or buy a ready-made installation for the tank.Accordingly, when choosing a metal supporting structure, a drill for metal will be needed to make holes for fastening;
- hacksaw, grinder with a suitable disc for cutting metal pipes or special scissors for PVC pipes;
- a screwdriver, pliers and side cutters, a knife or a special device for stripping wires - a standard set of an electrician;
- multimeter to detect zero and phase on the counter. You can read more about how to use a multimeter here.