- Pumping station
- Advantages and disadvantages
- One- and two-pipe pumps - which ones to choose?
- Pump connection
- Video - Installing a pumping station at home
- How to equip
- 3
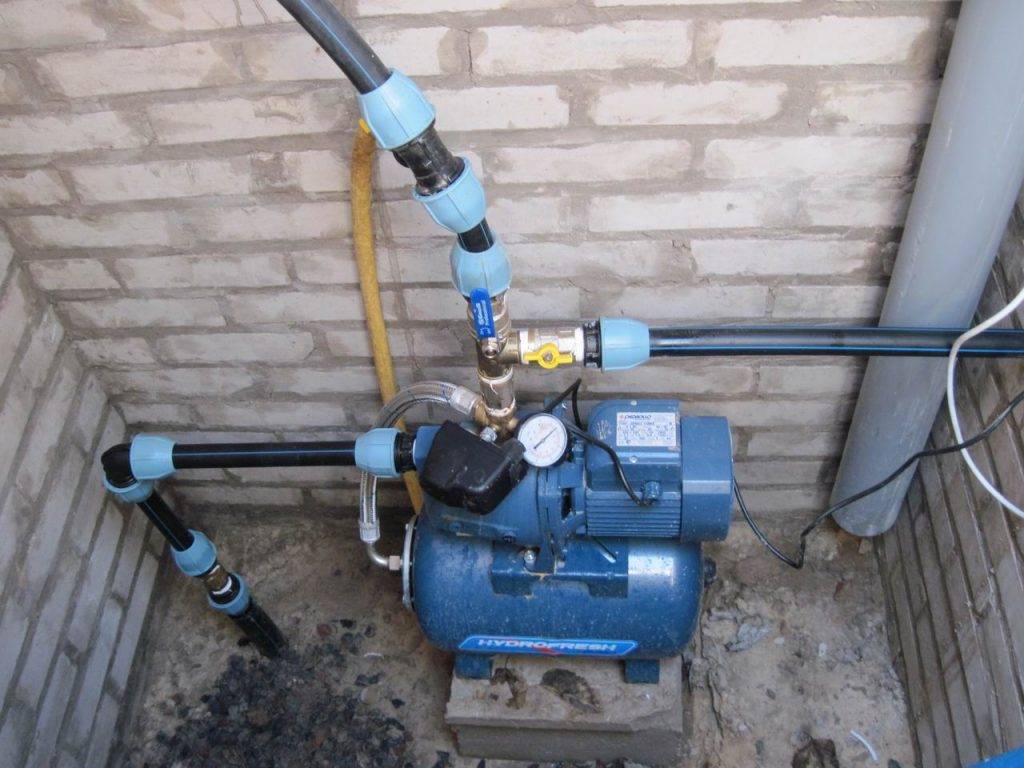
- Connecting a hydraulic accumulator with a surface pump
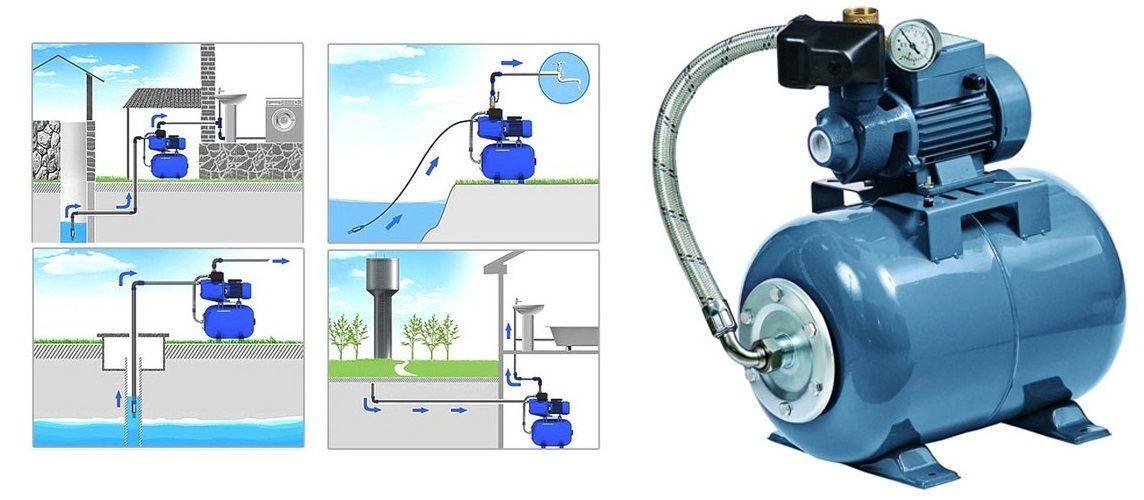
- Options for the installation site of the pumping station
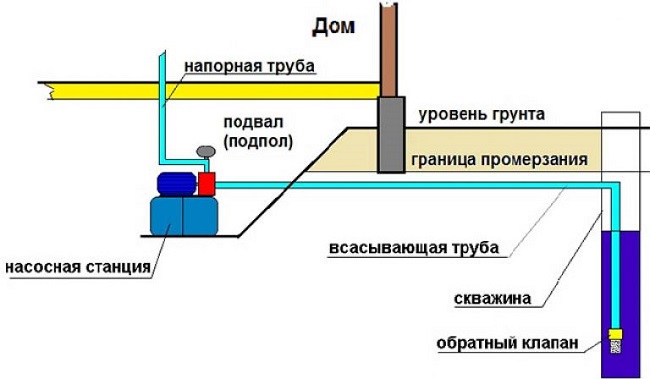
- In the house
- In the basement
- in the well
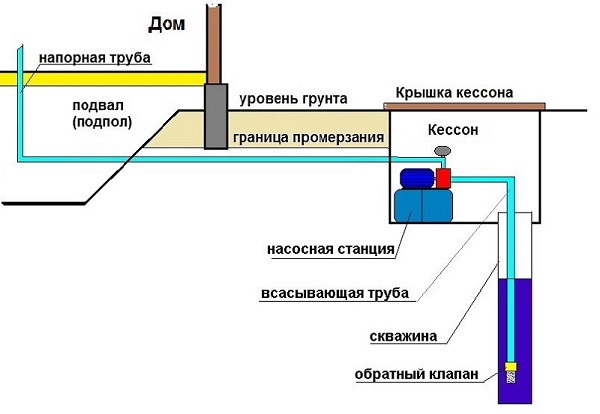
- In a caisson
- Where to put
- forced circulation
- natural circulation
- Mounting Features
- Installation and operation instructions
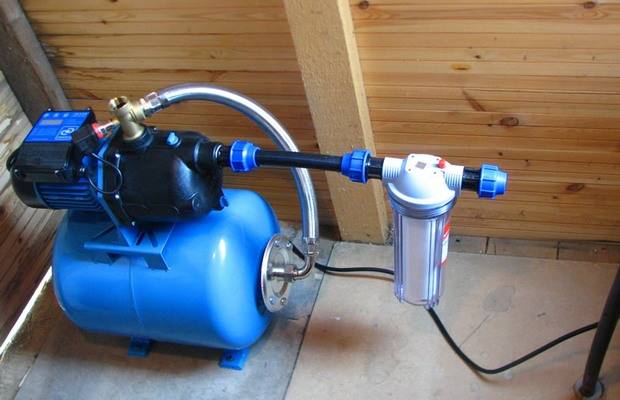
Pumping station
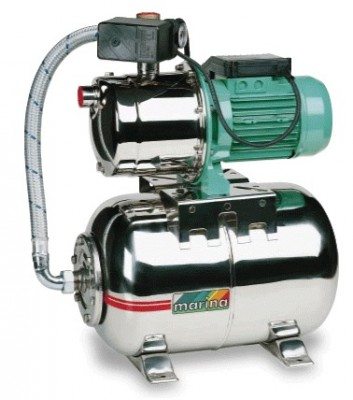
Complete pumping station.
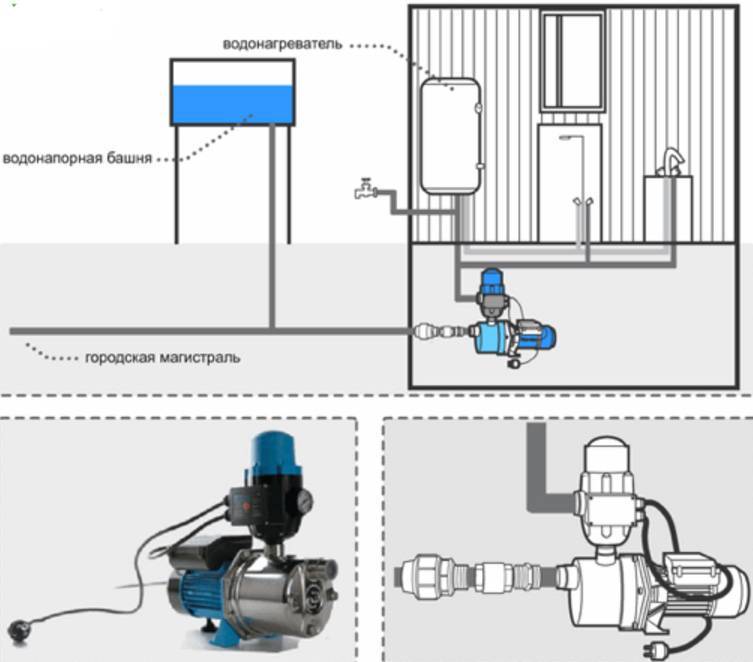
For normal operation of the surface pump as part of the water supply system of a residential building, it is connected to a storage tank and an automatic control system for switching on. This is necessary in order to reduce the number of unit starts per unit of time.
The fact is that when the power is turned on, peak current values \u200b\u200bappear on the motor winding, which are called starting currents. These currents cause a destructive effect on the device, therefore, from the point of view of the operating life of the electric motor, it is much better for it to work with the least number of start-up cycles.
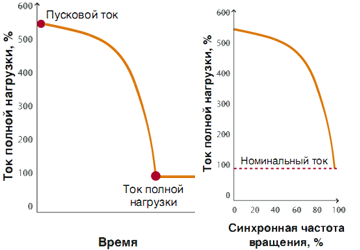
Graphs of values of starting currents in the electric motor show a fivefold increase in load current at start.
On the other hand, the constant operation of the pump is not necessary and economically unprofitable, since it consumes a considerable amount of energy and devastates the well. Obviously, it is necessary to create a certain supply of water and pressure in the system, which will cover the constant switching on and off of plumbing fixtures and taps, and only when this pressure drops below certain values, the pump will turn on and restore the supply.
Hydraulic accumulator storage tank.
Accordingly, when a certain peak pressure in the storage tank is reached, the pump will automatically turn off.
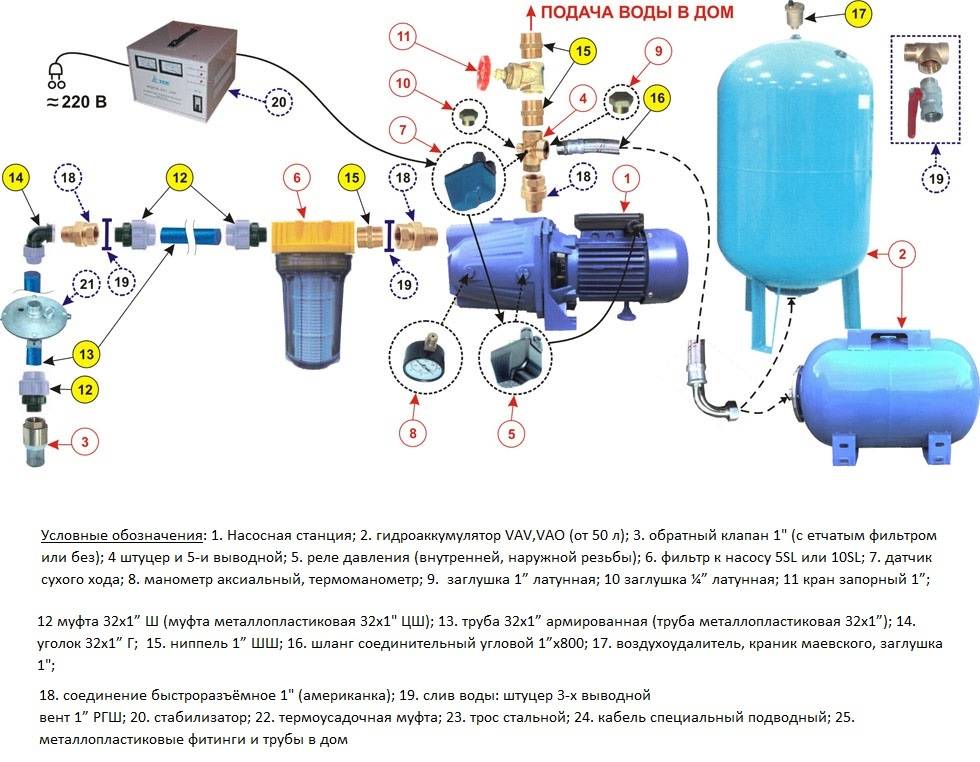
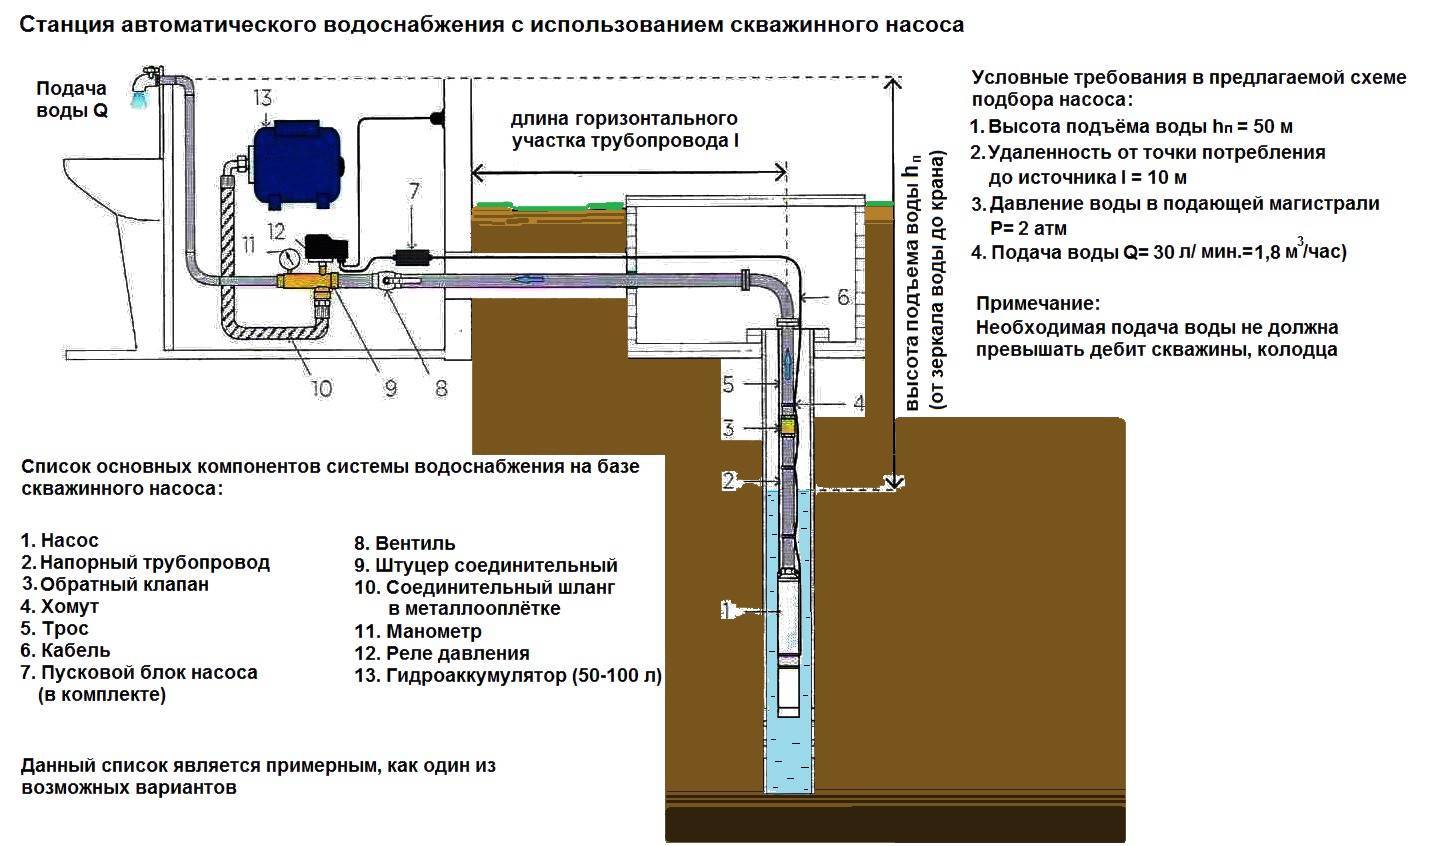
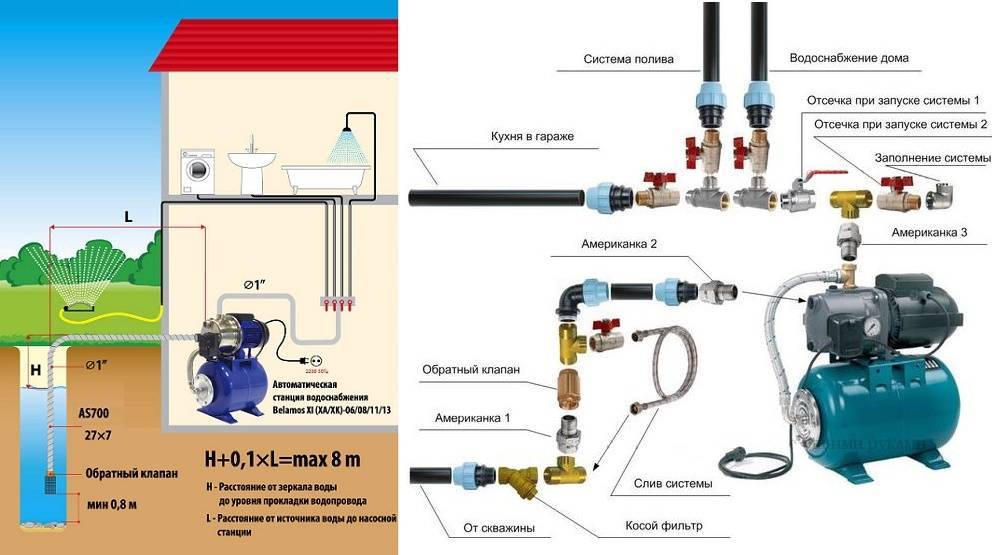
So we approached the device of the pumping station, and its main parts are:
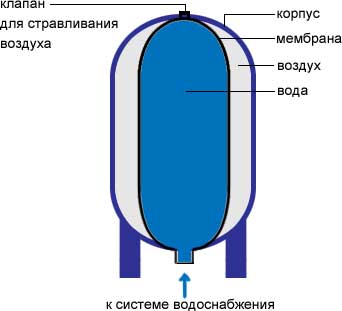
- Hydraulic accumulator or receiver. It is a metal or plastic tank, inside of which there is a rubber pear (membrane). Around the pear is compressed to 3.5 atm. air, and the water supplied to the pear is under constant pressure;
- Pressure switch. It is set to the lower and upper trip values, and when the lower limit is reached, the terminals close the circuit, and when the upper limit is reached, they open the circuit. As a result, the pump power is turned on when the pressure in the tank drops critically, and when the maximum value is restored, it turns off;
- Pressure gauge. Device for pressure measurement and control of relay and automation settings;
- Centrifugal pump;
- Suction hose with non-return valve and filter at the end;
- Supply (injection) hose;
-
Five pin fitting. It is necessary for switching all the listed parts into one system.
Advantages and disadvantages
What else are surface pumps good for? The advantages of these devices are as follows.
- Small dimensions - such a pump can be installed almost anywhere, it will not interfere with anyone, it does not require the creation of a massive foundation.
- Cheapness - you can buy such a pump for little money.
- The period of uninterrupted operation is about 5 years - this is a decent operating time for such a device. If you handle the unit with care, it will last longer.
- Payback of the equipment is fast - a maximum of two years.
- Installation of such a pump is simple and quick. The only difficulty is the need to securely attach cables and hoses to it.
- The device is economical - does not spend a lot of electricity.
- Switching off, if necessary, occurs automatically - there is no need to guard the working device.
- In repair, as well as in operation, the surface pump is very simple and cheap. And it’s convenient - you don’t even need to get the hose out of the water.
- Safety is another advantage of the installation. The electrical cable in the device does not come into contact with water.
But the surface-mounted pump also has its drawbacks, which you should be aware of in order to assess the need to purchase this equipment and justify the cash costs.
- Low power - such a device can only lift water from a depth of no more than 8-10 m.
- Filters must be installed.
- Before turning on the pump, it must first be filled with water.
- The equipment creates a lot of noise, so it is not recommended to install it in the residential area of \u200b\u200bthe house.
- The surface pump can only be used in a warm room.
As you can see, the equipment has more advantages than disadvantages. The main thing is that the cons should not be the determining factors, and then you can safely buy this equipment.

Centrifugal surface pump "Aquarius BTs-1.2-1.8U1.1"
One- and two-pipe pumps - which ones to choose?
Installation and connection of a household pumping station is carried out only in cases when a well is drilled in a country house with a depth of no more than 20 m. If the aquifers lie in the ground below, there will be no sense from a compact pump. In such situations, a special submersible pump should be installed.
When selecting the equipment of interest to us, one should pay attention to its technical parameters and modes of operation, and not only to the cost of the pumping station. First of all, it is necessary to determine the type of suction pipeline. Pumping station
Pumping station
It happens:
- ejector (in other words - two-pipe);
- single-pipe.
Single tube stations are very simple in design. In them, the liquid from the well enters the body of the pumping equipment used through the only available line. Do-it-yourself installation of such a unit is done without problems, and quickly enough. Pumps with two pipes are structurally more complex device. But the efficiency of its functioning is many times higher and more reliable than single-pipe equipment.
In the ejector pumping station, the rise of water is provided by a vacuum, which is formed due to a special wheel. It was originally installed in the unit. The increase in rarefaction is due to the inertia of the fluid, which makes a circular motion when the equipment is turned on. Due to this scheme, pumps with two pipes are always characterized by low power, while having a high efficiency. They are able to lift liquid from great depths. Therefore, the installation of a two-pipe pumping station is recommended for depths of 10–20 m.If the depth of the well is less than 10 m, feel free to install equipment with one line. It will do its job one hundred percent.
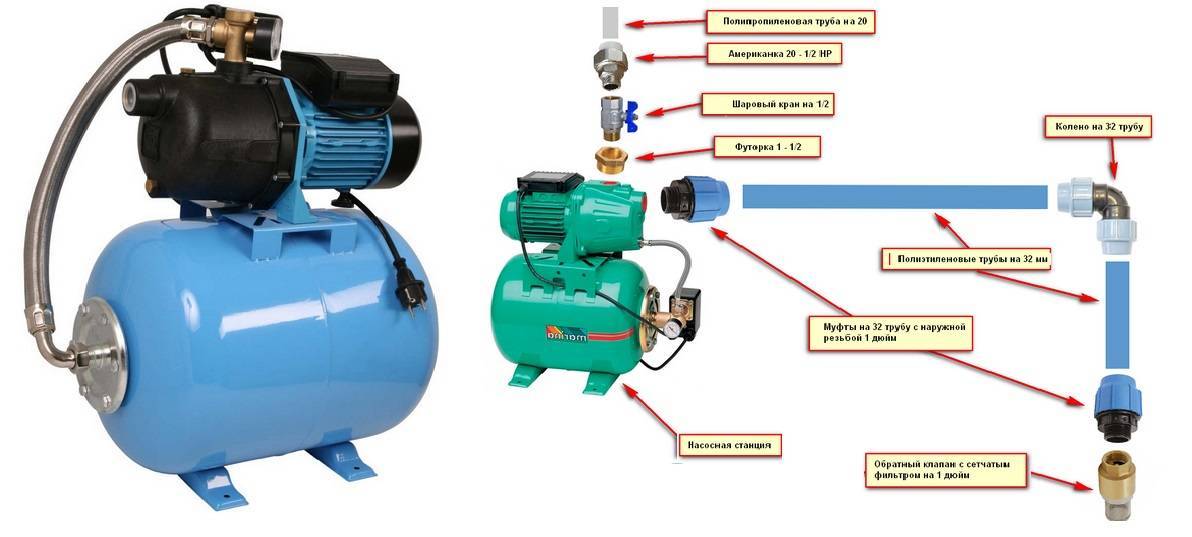
Pump connection
To connect the pump to the water supply system in the house, it is necessary to purchase not only the equipment itself, but also such additional materials:
- filter for water purification;
- corrugated hose, through which water will be taken;
- check valve with filter;
- water supply hose;
- connectors;
- FUM tape;
- screwdriver and fasteners;
- wrenches;
- some water.
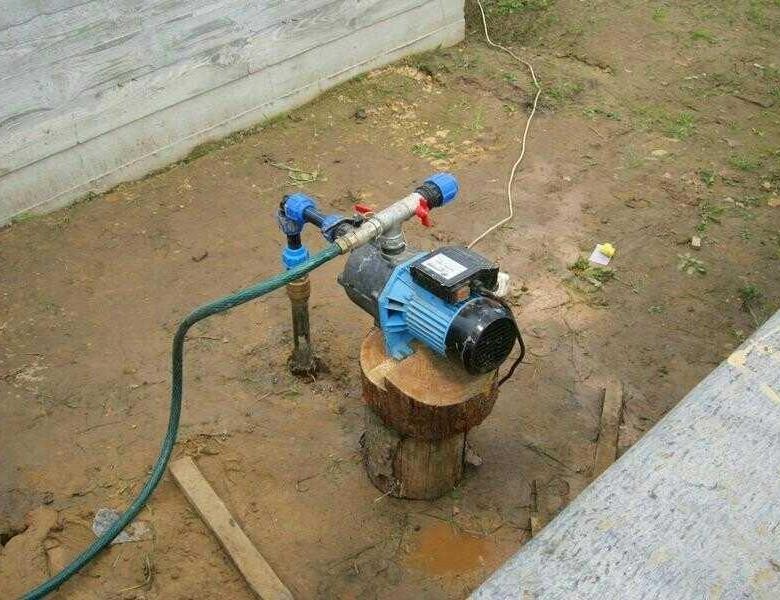
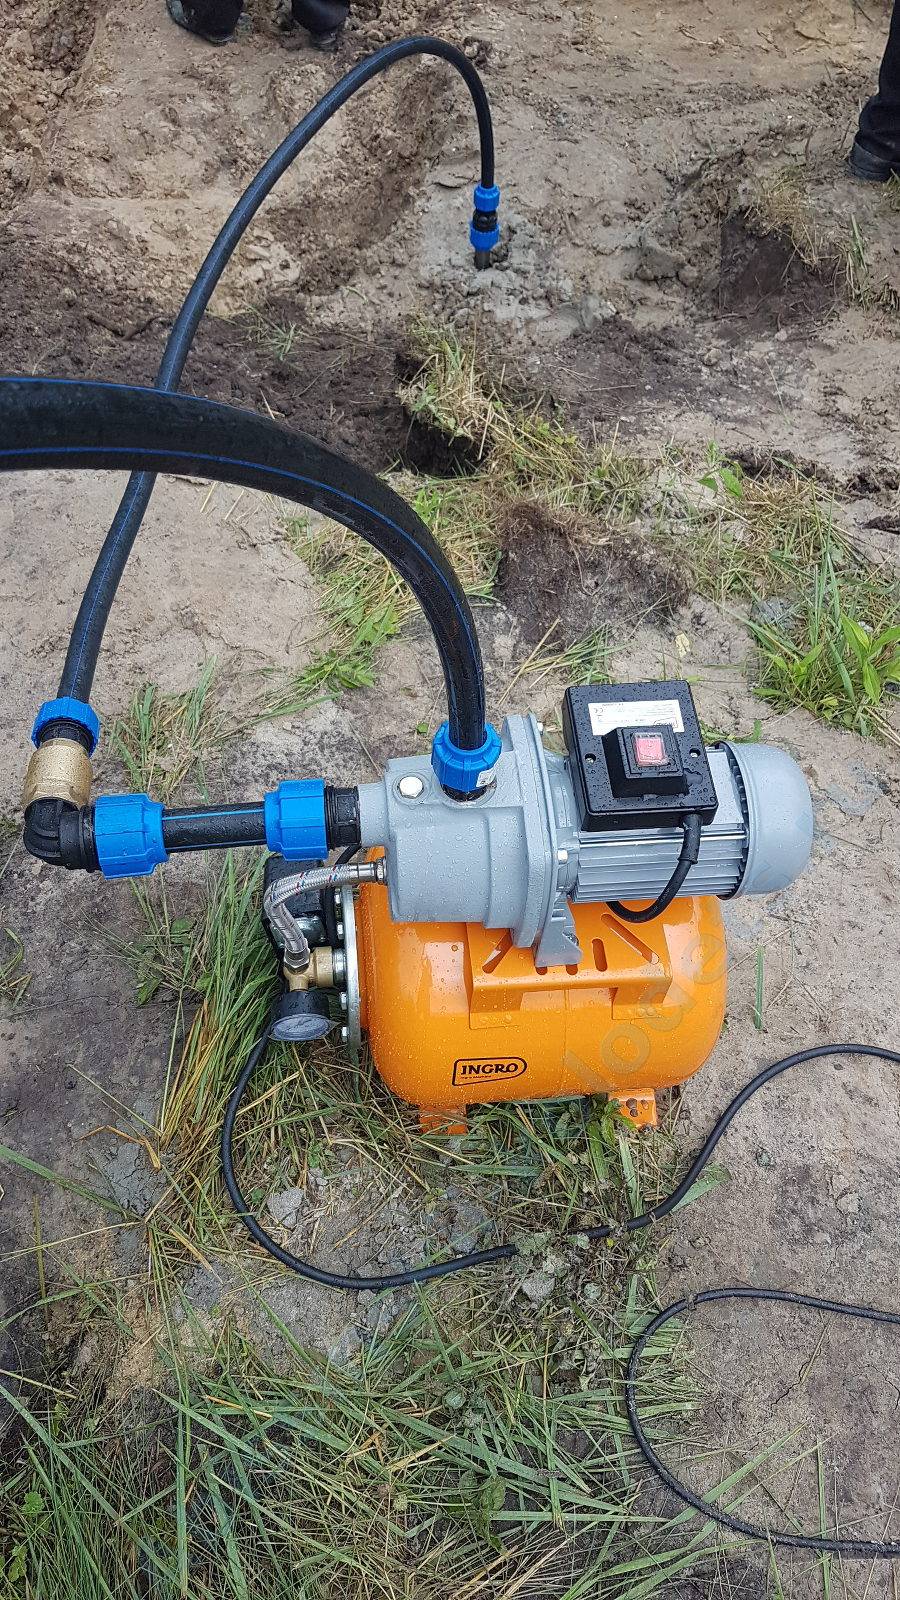
Step 1. First you need to choose the place where the pump will be installed. It should be a warm room, preferably an outbuilding or a basement. It can also be a specially equipped small room built near the well. It should have a dense floor (preferably concrete). The pump is screwed to the floor so that it is securely fixed.
The pump is screwed on
Step 2. An FUM tape is wound on the inlet pipe to seal the joints.
Inlet seal
Step 3. A corrugated hose of suitable diameter is connected to the inlet.


Corrugated hose connection
Built-in filter
Step 4. A valve with a strainer is screwed onto the other end of the conduit.
Strainer valve
Step 5. The hose is lowered into the well.
The hose is lowered into the well
Step 6. The pump is connected to the water supply system using special connectors.
The pump is connected to the water supply system
Step 7. The pump is filled with water through the supply hole, filter cap, filler neck. The water intake hose and pump housing must be filled with liquid.
Filling the pump with water
Step 8. The exhaust connection is twisted.
The outlet connection is twisted
Step 9 Connect the power cable to the device.
Electrical connection
Step 10. Before starting the pump, you must open all the taps in the water supply system to release air. When the pump starts and water flows through it, the taps can be closed.
The faucet opens
Video - Installing a pumping station at home
A surface pump is a good solution for organizing an autonomous water supply to the house. It is easy to use such a pump, and you can handle the installation yourself if you follow the instructions. With careful operation, the pump will last a long time.
Selection, installation and connection of a surface pump
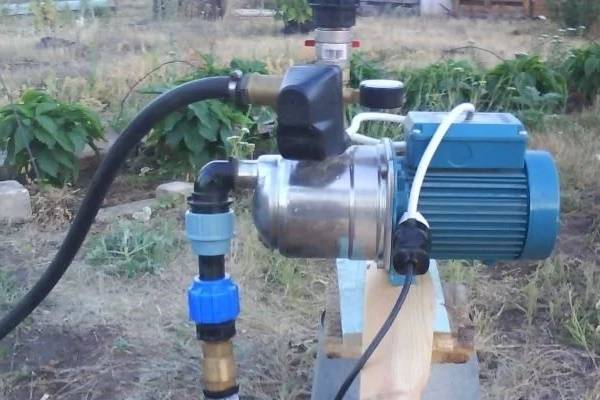
Using a Surface Pump to Water Your Garden
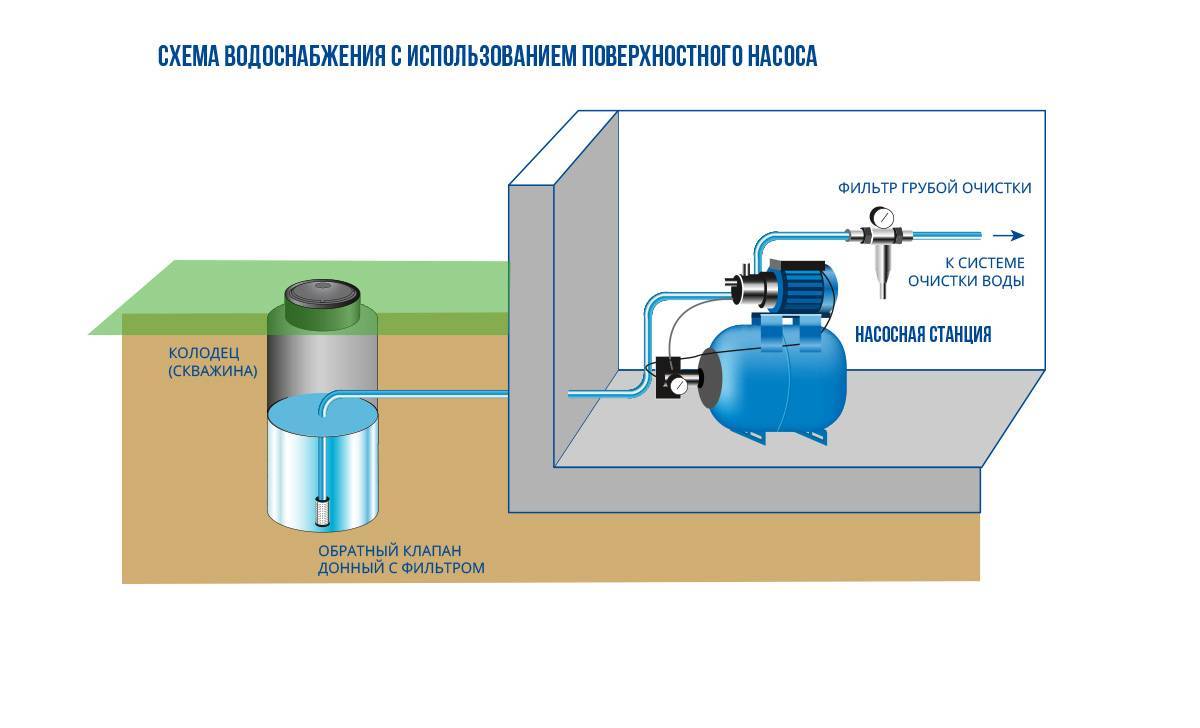
Surface pump
An example of a surface pump
Surface pump diagram
Working surface pump
Surface pumps have many advantages
Centrifugal surface pump Aquarius BTs-1.2-1.8U1.1
Vortex
Centrifugal
ejector
The principle of operation of self-priming pumps
Horizontal surface centrifugal pump
The electric pump will automatically supply water to the house, which is very convenient and practical.
Pumping station with built-in ejector
Pumping station
The pump is screwed on
Inlet seal
Corrugated hose connection
Built-in filter
Strainer valve
The hose is lowered into the well
The pump is connected to the water supply system
Filling the pump with water
The outlet connection is twisted
Electrical connection
The faucet opens
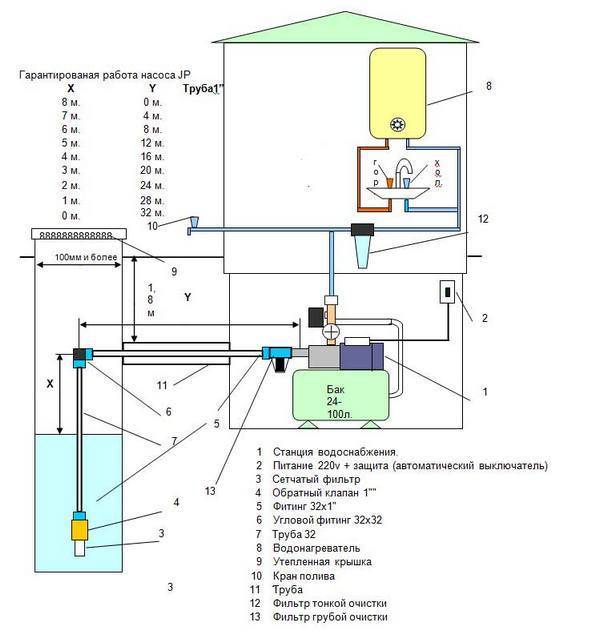
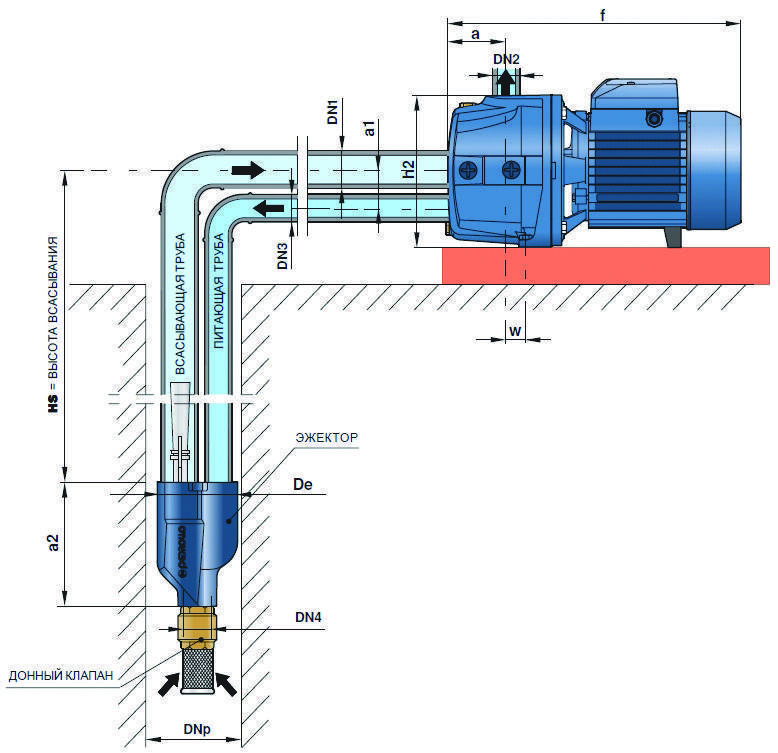
Water supply pumping station
The diagram shows the ratio of suction height (X) to the length of the horizontal part of the pipeline from the well
Surface pump Patriot PTQB70
How to equip
The first thing that is required is to decide on the location of the well device.
- The distance from the well to the nearest sewage discharge point (street restroom, compost heap), according to SNiP 30-02-97, should be at least 8 meters (the more, the better). If you are planning to install a septic tank in the future, or your neighbors have it, then the distance to its “aeration field” (a special area for draining processed effluents) should be at least 15 meters.
- The distance from the well shaft to the foundation of the house is not regulated, but, given the load of the building on the ground, it should be at least 4 meters (a lot depends on the type of soil and type of foundation, so specialist advice is desirable).
- The closer the well is to the installation site of the system in the house, the cheaper and more reliable it will be.
Having limited the search field based on the above conditions, the place under the well in most cases is determined using the ancient, but reliable, dowsing method. Sometimes an exploratory well of small diameter is pierced.


Digging wells is an extremely dangerous occupation, so it is better if you entrust it to specialists.
If you decide to dig a well yourself, then for this you will need equipment:
- shovels,
- containers for excavation of soil,
- strong rope,
- scrap,
- also requires a device (usually a gate) for lifting the earth and a ladder, as well as,
- water pump.
Most often, a well is arranged using well rings, so we will consider just such an option.
Having marked a circle on the ground with a diameter of ten centimeters larger than the ring, we take out the soil to a depth of 80 centimeters and level the bottom.We place the first ring in the center and check it for the horizon. It is on this that the verticality of the mine depends in the future.
In a circle, we select the ground inside the ring, which will fall under its own weight, then in the center. If the soil is soft, then the sequence of actions is reversed: first the middle is removed, then the edges.
As we deepen, we install the next ring on top, seal the joint with a special solution, fasten the rings with brackets and continue to dig further. We bring the depth of the mine until water appears and leave the well for a day, giving it the opportunity to fill up. Then we fix the water level and pump it out.
If the level is insufficient (usually three or four rings are considered to be filled), then we continue to lower the rings, reaching the desired depth. If the water level is sufficient, then we select the sand to the end of the lower ring and fill the bottom with a layer of washed rubble ten to fifteen centimeters thick, then we lay large stones on top to a thickness of twenty to thirty centimeters.
Silicon, basalt or granite are best suited for this purpose. Limestone must not be used! It spoils the quality of the water.
After that, you should take care of the "pressure seal" of the pipeline from the mine.
We dig to a depth of at least one and a half meters (the lower the “pressure seal”, the less likely the pipeline will freeze in winter) to the outside wall of the well and punch a hole for future communication. The “house” should be installed from above after the installation of the pipeline, as well as making a clay or concrete hydraulic lock around the perimeter of the well.
3
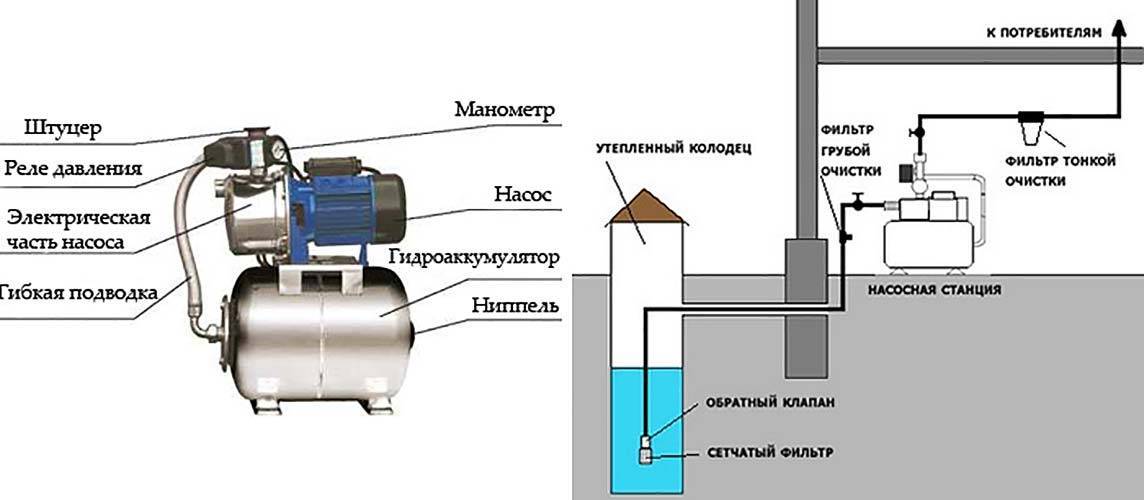
So that connecting pumping equipment with your own hands does not cause you serious difficulties, it is advisable to know its design in advance and understand the principle of its operation.
Connected pumping station
Everything is not so complicated here. The main elements of the pumping station are given below:
- Centrifugal pump. The basis of the whole structure. He is directly responsible for lifting fluid from the well, as well as for its supply to the residential building.
- Electric motor. It is connected to the pump and to a special pressure switch. The latter is of great importance for the normal operation of all equipment. The relay starts the engine when the pressure in the system decreases and turns off the engine when an excess load is detected.
- Hydraulic accumulator. This assembly is assembled from two separate parts. They are separated from each other by a special membrane. The only task of the battery is to smooth out the water hammer that occurs during the operation of the pumping station.
- Water intake element. This piece of equipment must be equipped with a check valve. It is located directly in the well.
- Pressure gauge. It monitors the pressure in the system and transmits data to the relay, which turns the pump on / off.
Also, the described equipment for taking water from a well is equipped with a line. It combines a pump and a water intake into one system. The cost of the stations we are considering for installation on a well depends on the quality of all the nodes described above, on the capacity of the equipment (it can be 1.5 cubic meters of water per hour and 5), on the maximum head and power of the unit. Also, the price of the pump is affected by the promotion of the company that produces it.
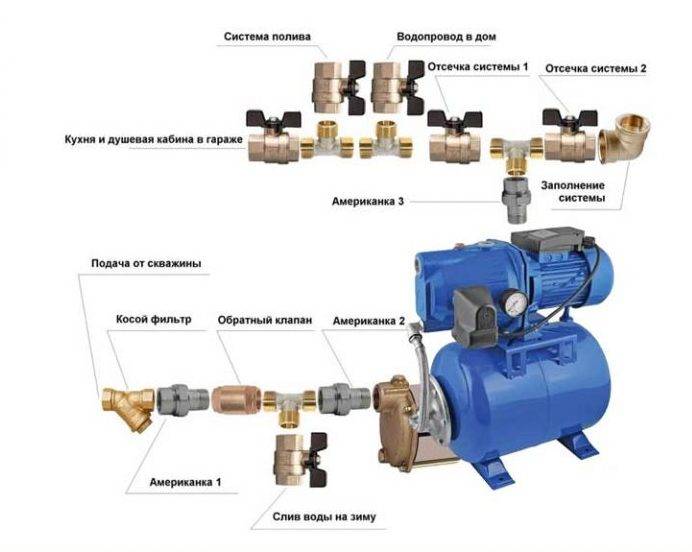
Connecting a hydraulic accumulator with a surface pump

First of all, the pressure level in the tank is checked. As a rule, it should be less than that of the pump, which is set on the relay up to 1 bar. To connect, you need a special fitting, which has 5 different outlets. Each output is intended for a specific purpose. Plus, you should buy a pressure switch.
As for the special fitting for five outlets, the following elements are connected through it:
- To connect the pump.
- Pressure switch.
- Pressure gauge.
- For plumbing connection.
To begin with, the connection can be made through a rigid hose. After that, a pressure switch and a pressure gauge indicating the pressure level are screwed to the fitting. You should also connect the pipe that will be directed to the pump.

When connecting a pressure switch, it is extremely important to consider the following points. The device itself has a top cover. It should be carefully removed
Below it you will find four contacts. Each contact will be labeled pump and network. This greatly simplifies when connecting the device to the network of wires coming from the pump. Connection is carried out strictly according to the specified labels
It should be carefully removed. Below it you will find four contacts. Each contact will be labeled pump and network. This greatly simplifies when connecting the device to the network of wires coming from the pump. The connection is made strictly according to the specified labels.
However, not all manufacturers sign such a plan on the relay. This is done on the assumption that the installer is fully versed in this. If you are new to this business, then be sure to consider this factor. For example, when buying, make sure that there are inscriptions.In this case, you will not need to call a specialist in this profile.
Important! Absolutely every connection on the device should be made with a sealant. Every joint must be sealed. Usually, FUM tape or tow is used for this purpose.
Usually, FUM tape or tow is used for this purpose.
Upon completion of these manipulations, you just have to turn on the pump in the network and adjust the pressure level in the accumulator. Plus, you should make sure that there are no leaks at all joints.
Options for the installation site of the pumping station
When planning to assemble and connect the pumping station to the water supply in the house, the following points should be considered.
- The unit must be located near a water source. This will ensure stable suction of liquid from the source and smooth operation of the station. If the equipment is placed far from the well (well), then it will not be able to pump water and will fail.
- To install the equipment, you need to choose a dry, well-ventilated and warm place.
- The device must not touch any objects or walls.
- Access to the equipment for routine inspection and repair work should be free.
Based on the foregoing, there may be several options for installing the unit.
In the house
For the correct operation of the station, the most ideal option is a heated room. It is good if a private house has a boiler room with good sound insulation.


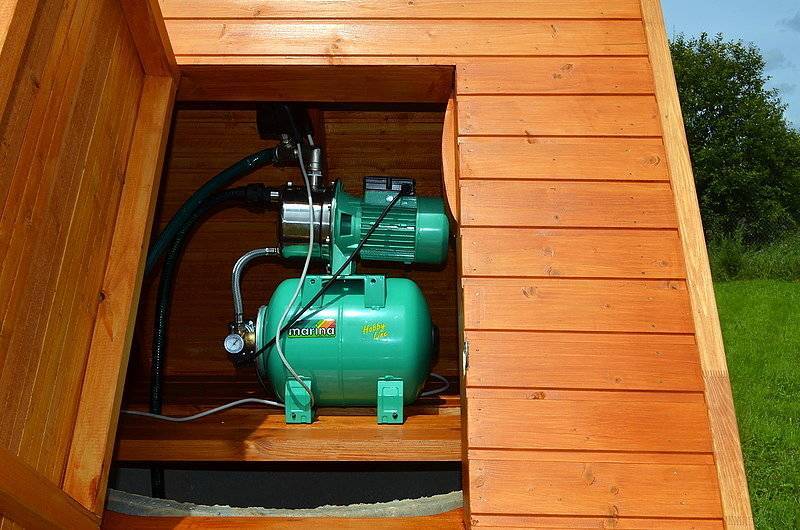

As a last resort, water supply equipment can be installed in the hallway, bathroom, hallway or closet. But these rooms should be located as far as possible from the rest rooms (bedroom, living room).The device is placed in a cabinet or covered with a special casing that provides sound insulation.
In the basement
Most often, pumping equipment is installed in the basement of the house or in the basement. Sometimes the unit is installed under the floor, providing access to it through the hatch. In any case, the place where the device is installed must be with good sound and waterproofing. Also, it should be warm enough so that the temperature in it does not fall below 0 ° C in winter.
in the well
To place the station in the well, a small platform is installed in it. It is fixed below the freezing line of the soil.
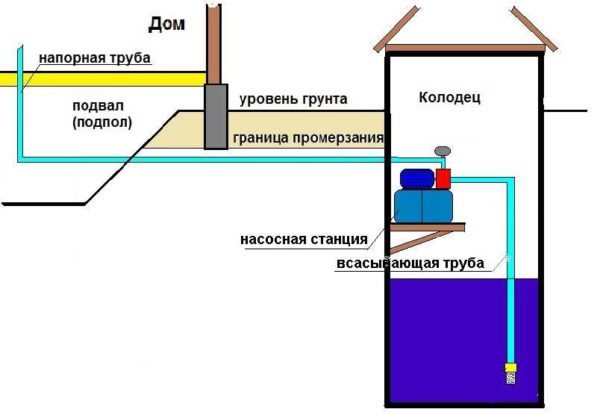
Advice! The well is recommended to be well insulated from above. But with such an installation of equipment, access to it for maintenance and repair will be difficult.
In a caisson
In this case, in order to properly install the pump, a small room (caisson) is arranged around the water source, of sufficient width and depth (below the freezing line).
From above, the caisson is covered with a lid with a hatch through which the unit is serviced. The cover is well insulated for the winter.
In the case of assembling a station with a submersible pump, you should not worry about sound insulation, since the unit is located deep underground, and its operation is almost inaudible. All elements of the station are installed in any heated room, and the pump itself is installed in a well or well. This option for assembling a pumping station is well suited for a summer residence.
Where to put
It is recommended to install a circulation pump after the boiler, before the first branch, but it does not matter on the supply or return pipeline.Modern units are made from materials that normally tolerate temperatures up to 100-115 ° C. There are few heating systems that work with a hotter coolant, therefore considerations of a more “comfortable” temperature are untenable, but if you are so calmer, put it in the return line.
Can be installed in the return or direct pipeline after/before the boiler up to the first branch
There is no difference in hydraulics - the boiler, and the rest of the system, it does not matter whether there is a pump in the supply or return branch. What matters is the correct installation, in the sense of tying, and the correct orientation of the rotor in space
Nothing else matters
There is one important point at the installation site. If there are two separate branches in the heating system - on the right and left wings of the house or on the first and second floors - it makes sense to put a separate unit on each, and not one common one - directly after the boiler. Moreover, the same rule is preserved on these branches: immediately after the boiler, before the first branch in this heating circuit. This will make it possible to set the required thermal regime in each of the parts of the house independently of the other, as well as save on heating in two-story houses. How? Due to the fact that the second floor is usually much warmer than the first floor and much less heat is required there. If there are two pumps in the branch that goes up, the speed of the coolant is set much less, and this allows you to burn less fuel, and without compromising the comfort of living.
There are two types of heating systems - with forced and natural circulation. Systems with forced circulation cannot work without a pump, with natural circulation they work, but in this mode they have a lower heat transfer.However, less heat is still much better than no heat at all, so in areas where electricity is often cut off, the system is designed as hydraulic (with natural circulation), and then a pump is slammed into it. This gives high efficiency and reliability of heating. It is clear that the installation of a circulation pump in these systems has differences.
All heating systems with underfloor heating are forced - without a pump, the coolant will not pass through such large circuits
forced circulation
Since a forced circulation heating system is inoperative without a pump, it is installed directly into the gap in the supply or return pipe (of your choice).
Most problems with the circulation pump arise due to the presence of mechanical impurities (sand, other abrasive particles) in the coolant. They are able to jam the impeller and stop the motor. Therefore, a strainer must be placed in front of the unit.
Installing a circulation pump in a forced circulation system
It is also desirable to install ball valves on both sides. They will make it possible to replace or repair the device without draining the coolant from the system. Turn off the taps, remove the unit. Only that part of the water that was directly in this piece of the system is drained.
natural circulation
The piping of the circulation pump in gravity systems has one significant difference - a bypass is required. This is a jumper that makes the system operational when the pump is not running. One ball shut-off valve is installed on the bypass, which is closed all the time while pumping is in operation. In this mode, the system works as a forced one.
Scheme of installation of a circulation pump in a system with natural circulation
When electricity fails or the unit fails, the faucet on the jumper is opened, the faucet leading to the pump is closed, the system works like a gravitational one.
Mounting Features
There is one important point, without which the installation of the circulation pump will require alteration: it is required to turn the rotor so that it is directed horizontally. The second point is the direction of the flow. There is an arrow on the body indicating in which direction the coolant should flow. So turn the unit around so that the direction of movement of the coolant is “in the direction of the arrow”.
The pump itself can be installed both horizontally and vertically, only when choosing a model, see that it can work in both positions. And one more thing: with a vertical arrangement, the power (created pressure) drops by about 30%. This must be taken into account when choosing a model.
Installation and operation instructions
To understand how to install the pumping unit correctly, you need to study the following recommendations:
- The equipment is placed on a horizontal surface. Reliable fixation will prevent the blocks from falling.
- Before a test run, the pressure in the accumulator is measured. This value should be 1.5-2 kg/cm³. If the value deviates from the norm, air is pumped in or released.
- The hydraulic tank is placed vertically. The membrane must not touch the tank walls.
- The room with pumping equipment is equipped with a system for collecting and draining fluid.
- The relay has preset settings, if necessary, change them.
- The components are positioned so that the repair does not require disassembly of the entire plant.


