- Algorithm of work on creating an electrical model
- What are electric towel warmers
- Internal organization
- Purchasing a floor unit
- What is the value of modern heated towel rails?
- Dismantling of the old heated towel rail, installation of bypass and taps
- Recommended and unacceptable tie-in schemes
- Lateral and diagonal connection
- Possible forced tie-in options
- Wrong wiring diagrams
- Features of installing an electric heated towel rail
- Faucet installation
- Overview of types of heated towel rails for the bath
- Technology of work - step by step
- Dismantling the old towel warmer
- Installation of bypass (jumper) and ball valves
- Installation, fastening and connection of the coil
- Typical mistakes of independent masters
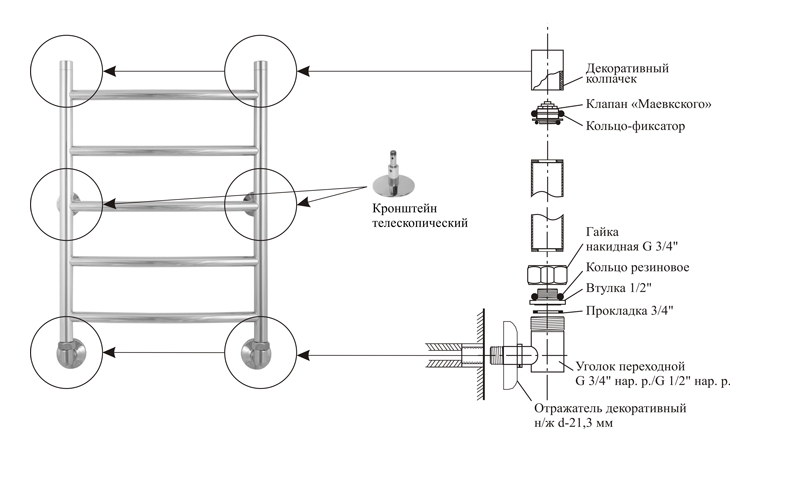
Algorithm of work on creating an electrical model
The creation of a model powered by electricity is based on the design of a water appliance. Therefore, work begins with its acquisition. In addition, you will need:
- electric heater for the device (power not less than 110 W), with an external threaded connection ½ inch, with a temperature controller;
- plugs (external thread ½ inch) - 2 pieces;
- Mayevsky crane (external thread ½ inch) - 1 piece;
- for sealing tow joints.
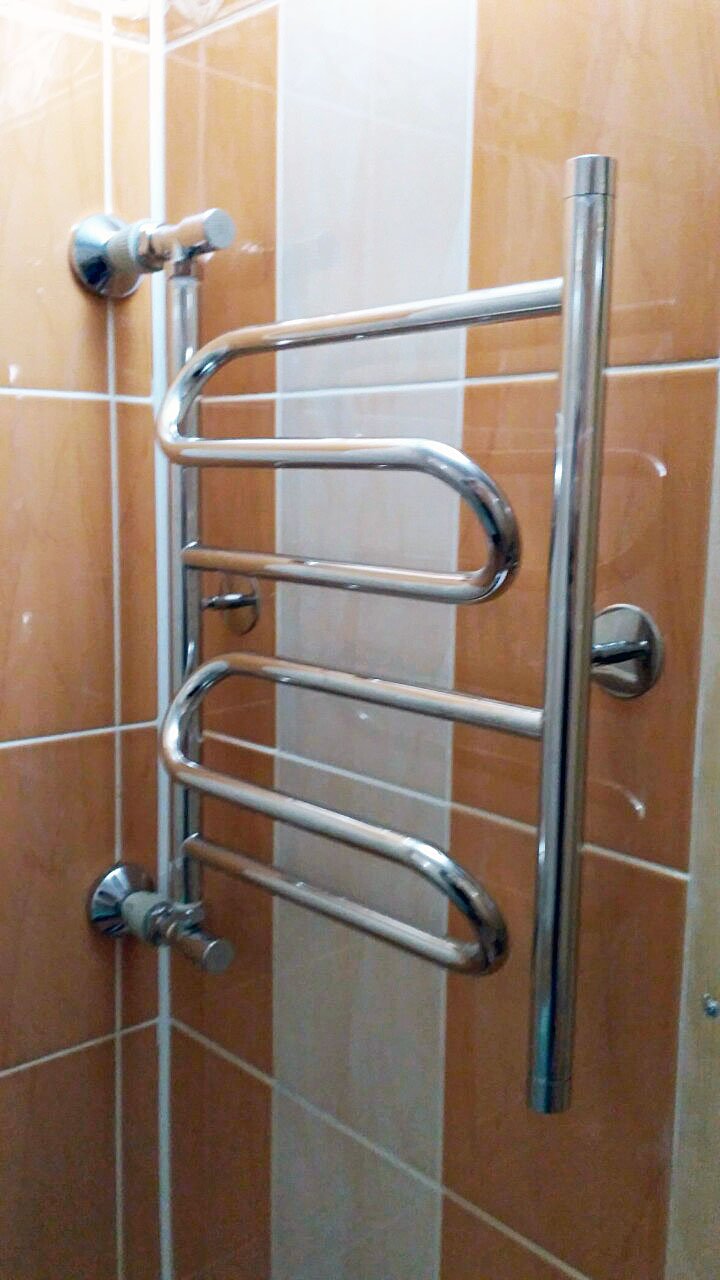
Electric heated towel rails are more often found in the form of a "ladder" model.
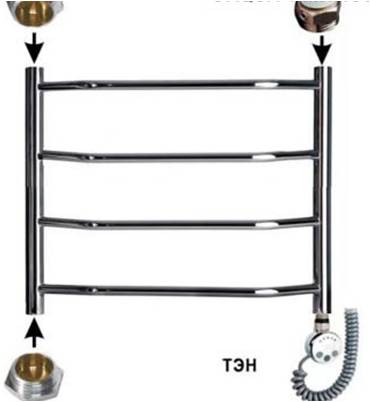
- more often, the left rack is selected, in which plugs are screwed in from above and below;
- then on the right side, below, an electric heating element is inserted into the rack;
- through the upper open hole, the structure is filled with water;
- after the water occupies all the free space inside, the hole is closed with a Mayevsky tap;
- inserting the plug into the socket, the control of the work performed is carried out.
The last step in working with an electrical appliance is to mount it on the wall.
What are electric towel warmers
There are 2 main types of electrical appliances: dry and wet. Dry are heated by a special cable used in the "warm floor" system.
And the heating of the wet occurs due to the heating element, which heats the water in the pipe. The bottom line is that a wet electrical appliance in the bathroom is a miniature heating system that can use water, oil, antifreeze and other liquids as a heat exchanger.
And also different floor and wall dryers for towels. Floor - ideal for typical high-rise buildings, as they take up little space. They can be used as a towel rack. Wall models are great for additional heating and contactless drying. The disadvantage of the device is that it is not suitable for a small bathroom and repair work will be required to install it.
Internal organization
A wet towel warmer consists of a sealed housing that is filled with oil or antifreeze. Heating occurs by means of an insulated heating cable or heating element.
In dry type models, the heater is separated from the body by a graphite gasket. The battery in this case heats up faster, but also cools down quickly.
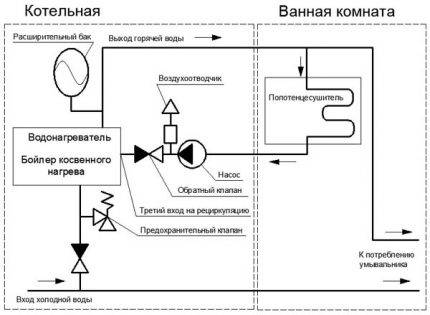
The best features are endowed with a hybrid or dual-circuit heated towel rail. The first circuit is connected to the electrical network, and the second - to the hot water supply network. It retains the advantages of wet heated towel rails and electrical appliances: the efficiency of some and the autonomy from interruptions in hot water of the second.
Purchasing a floor unit
If it is not possible to perform installation work, then in this case it is worth purchasing a floor heated towel rail. It does not require installation at all, for its operation you just need to connect the device to the network. The advantage is that during installation it is not necessary to turn off the riser, connect adapters and additional pipes. This option is suitable for bathrooms with a large area and a small area of dry floor to accommodate the device.
Photo 1. The modern design of the floor heated towel rail not only beautifully complements the room, but also has all the features of a decorative accessory in the bathroom.
What is the value of modern heated towel rails?
Towel warmers have become a great boon for high-rise residents for many reasons.
The electrical basis of this equipment avoids the complexity of installation and repair. Water heated towel rails require a separate riser in the niche of the bathroom, which in old houses has long since rusted and practically rotted in cemented interfloor ceilings. Residents save time on appeals to the housing office to stop the supply of coolant when repairing a leaking water device.
Image gallery
Photo from
Electric heated towel rail in the lobby of the apartment
Device for rapid heating of the room
The presence of a temperature control device
Easy installation of electrical equipment
The aesthetics and hygiene of EPS is obvious.There are hundreds of models of this equipment that will allow you to choose the right size, desired appearance and convenient functionality. No need to paint pipes, clean seams and be afraid to ruin the fabric. In addition, impractical piping, which often runs through two walls, is eliminated from the wiring diagram.


The possibility of using adjusting devices has lifted the functionality of electrical appliances to the skies. You can choose EPS with a timer, with temperature control, with backlight, with shelves. Although, to save money, you can also plug a simple heated towel rail into an outlet with an already built-in timer. Mounting heated towel rails on rotary axes to rotate the frame in the right direction is also a useful development of an engineering idea.
Electrical equipment allows for adjustable heating of bathrooms. In apartment buildings with individual heating, the bathroom is often a dead end in the heating distribution: pipes are allowed into the bathroom through the kitchen loaded with communications.
The use of an autonomous heated towel rail helps to remove unnecessary heating communications in the bathroom, to simplify the situation and increase ergonomics in the kitchen, improves the appearance of the room and significantly simplifies cleaning.
The regulator allows you to set the temperature required for various fabrics, and also makes it possible to save money on electricity by reducing the parameters
Electric heated towel rails with dignity perform their main job - drying towels and clothes. Chrome-plated tubes will never harm or leave marks even on delicate fabrics.
You can list further advantages of an electric heated towel rail, but it is better to install it in your bathroom and experience all the benefits yourself. The psychological effect of installing XPS is comparable to installing a modern washing machine after many years of hand washing!
Exquisite designer models of heated towel rails are not only necessary equipment, but also an elegant decorative element of a bathroom or a combined bathroom.
This is interesting: Installing an electric oven yourself
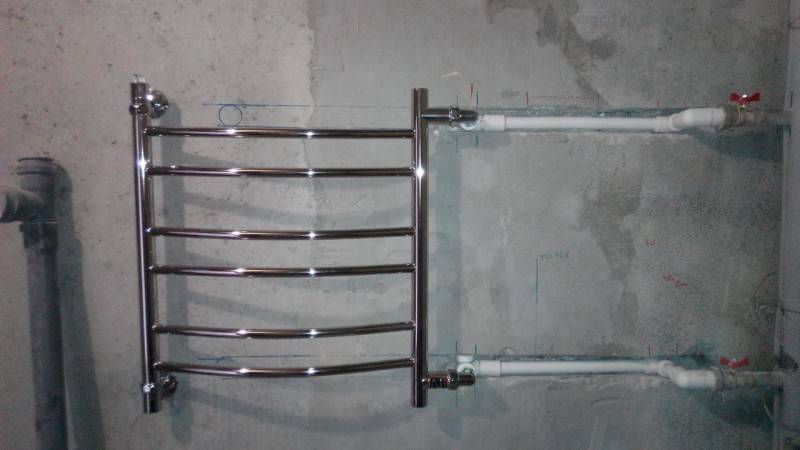
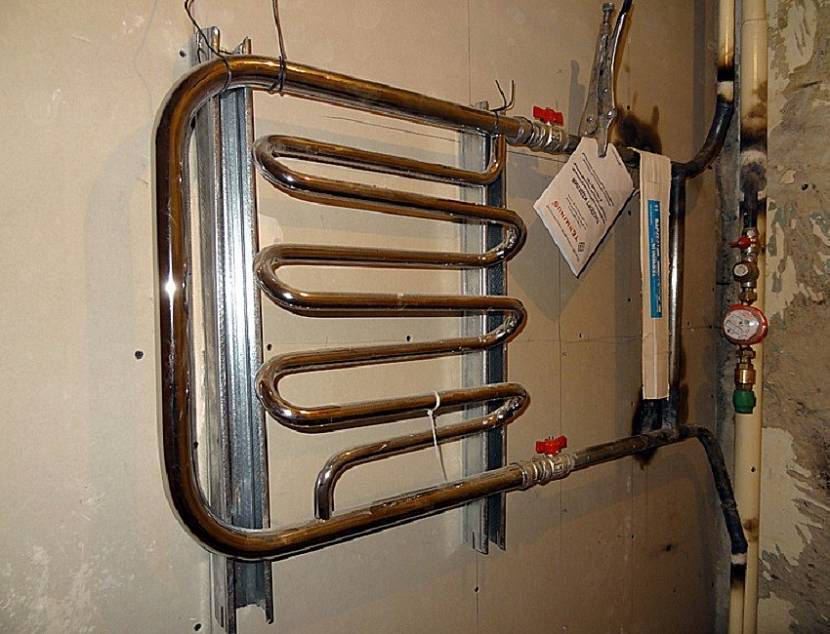
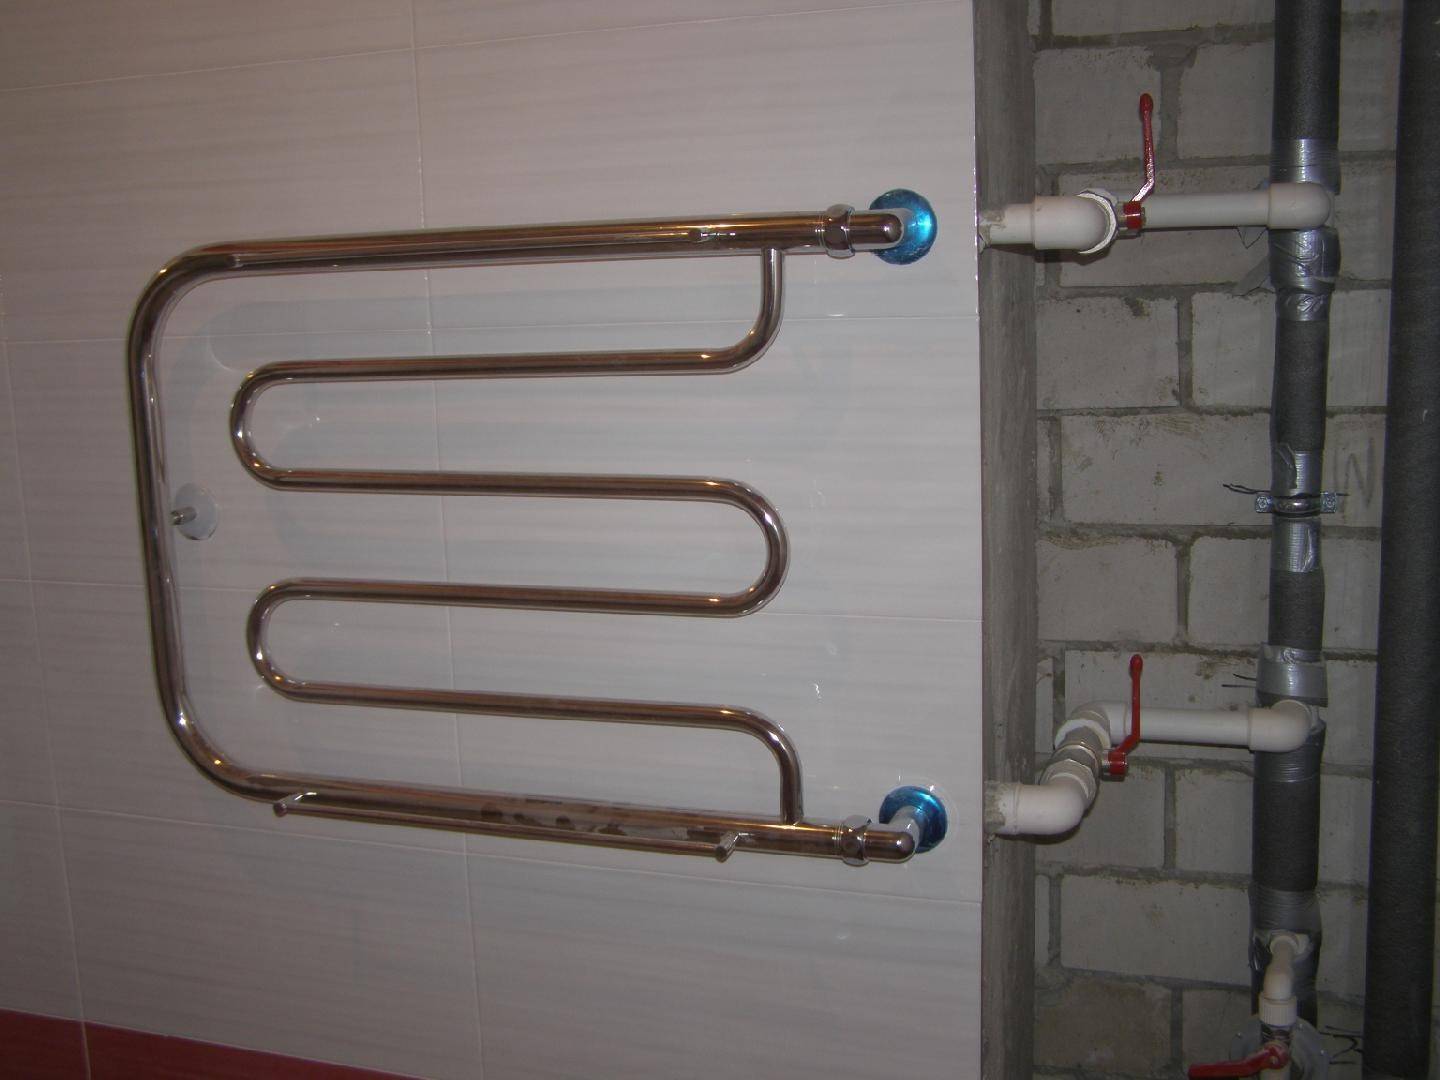
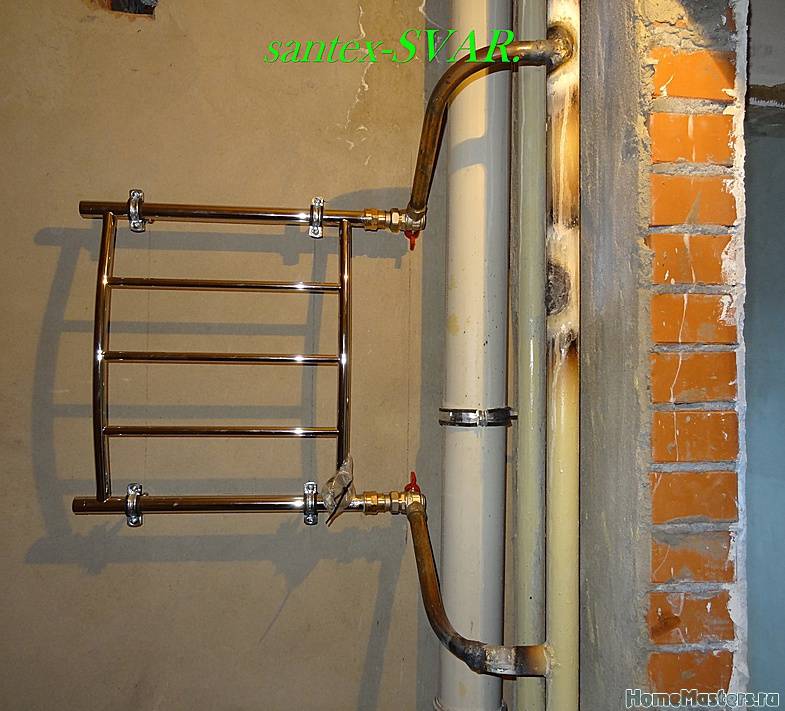
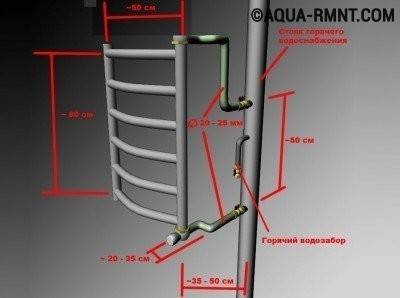
Dismantling of the old heated towel rail, installation of bypass and taps
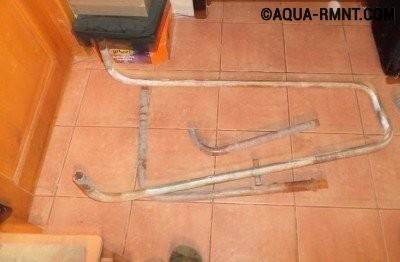
Direct plumbing work on installing a "towel" begins with the dismantling of the old structure, in most cases it is a U- or M-shaped pipe that belongs to the main riser and has a common diameter with it. With its simplicity and cheapness, such a heated towel rail does not have an attractive appearance.
An example of an old-style heated towel rail installed during the construction of a house
The dismantling process is as follows.
Step 1. First, turn off the hot water supply in the riser. To do this, contact the Housing Office or the partnership serving your home, submit an application and, if necessary, pay a fee for the provision of the service. The plumber who came on your call will make a temporary overlap of the riser.
Step 2. Check if the hot water supply is turned off. To do this, open the corresponding faucet on the sink or bathtub.
Step 3. If the old heated towel rail is connected to the riser with a threaded connection, unscrew it with a plumbing wrench.
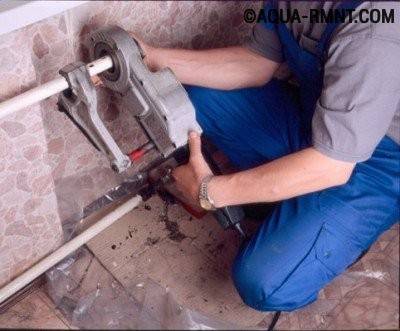
Step 4Dismantling an old heated towel rail with a plumbing wrench is a lot of luck - most often the “towel” is welded to the riser or threaded connections have “been stuck” for many years. In this case, use the grinder. In the process of working with it, do not cut off the excess - the remaining part of the pipe should be enough to cut threads for future fittings.
Step 5. After cutting or unscrewing from the riser, remove the “towel” from your fasteners to the wall and put it somewhere far away. The next stage of work is the creation of a bypass, the installation of taps and connections to the future heated towel rail.
Dismantled heated towel rail
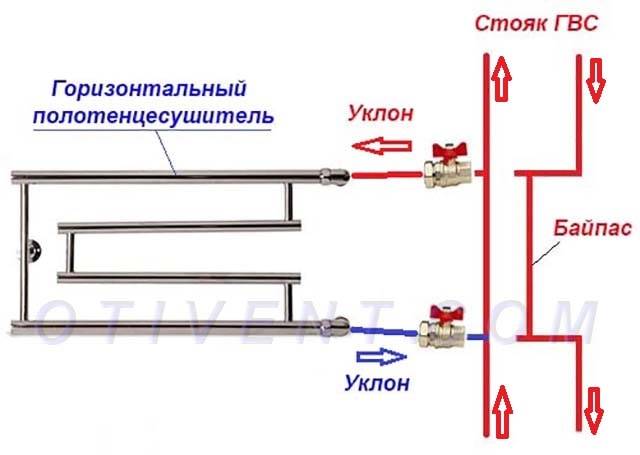
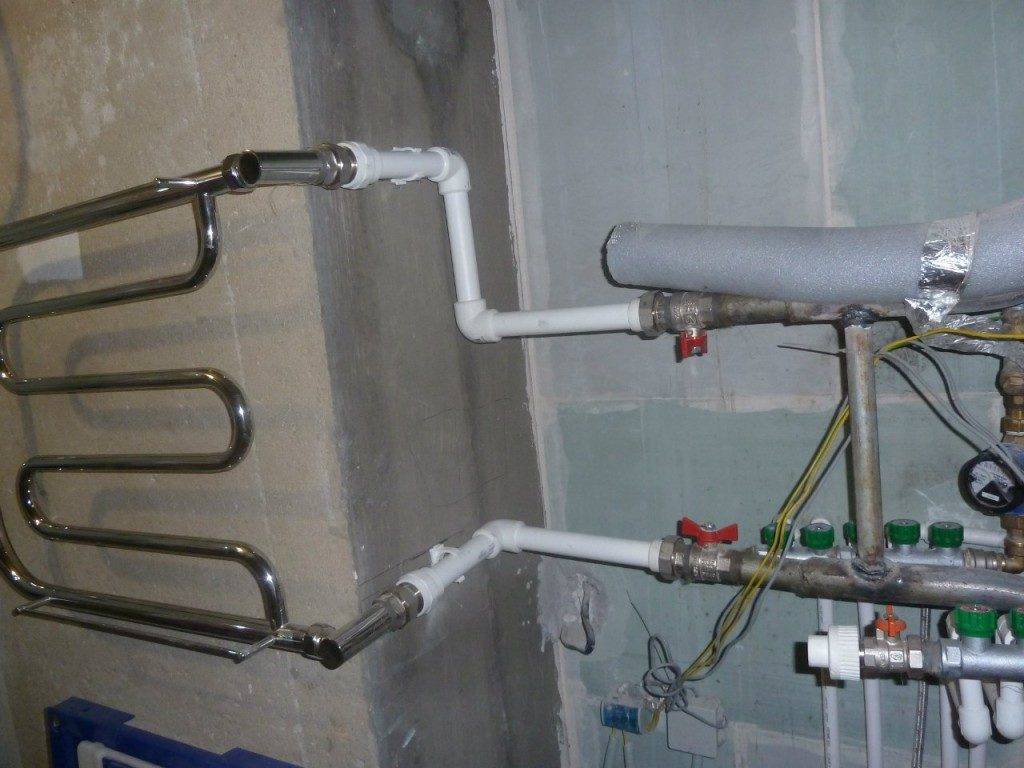
Bypass (or in translation “bypass”) is a section of the pipe between the outlets on the heated towel rail, which gives the water in the riser the opportunity to go “past” the heated towel rail in cases where it is blocked. Its presence solves several problems at once.
- The bypass allows you to mount valves at the inlet and outlet of the heated towel rail to control the temperature. In addition, it can be used to completely shut off the water supply to the "towel" without turning off the riser, which is especially convenient in case of repair or replacement of such equipment.
- The bypass separates the hot water flows in the riser - one goes to the heated towel rail, and the second goes further to the neighbors, while maintaining its temperature unchanged.
- The bypass on the heated towel rail ensures the normal circulation of hot water in the riser along its entire height.
Examples of different schemes for installing bypasses between taps are shown in the images below.
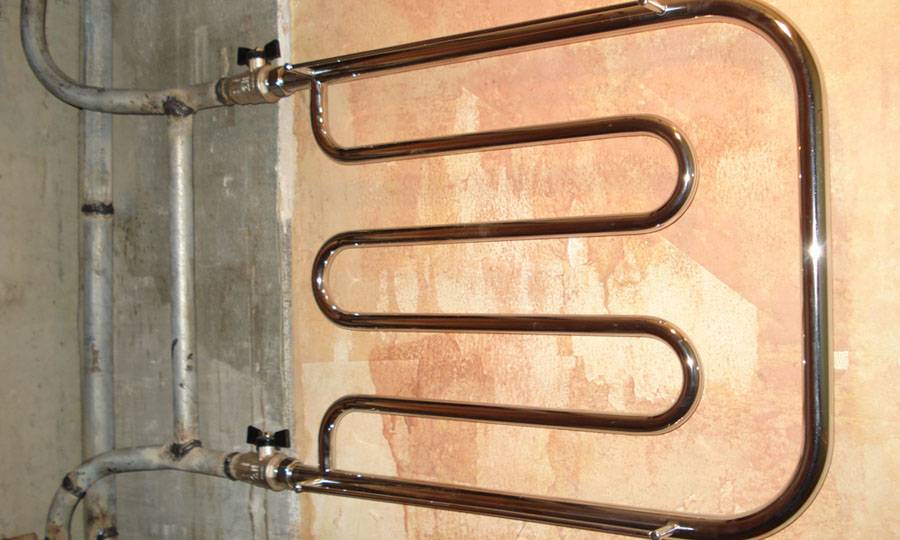
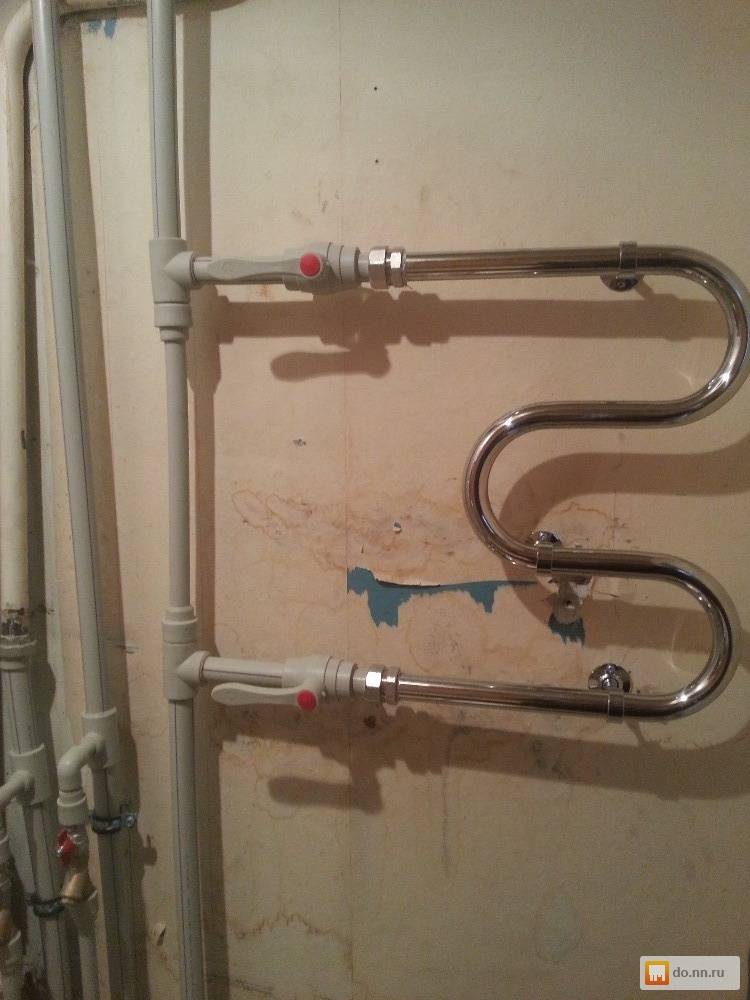
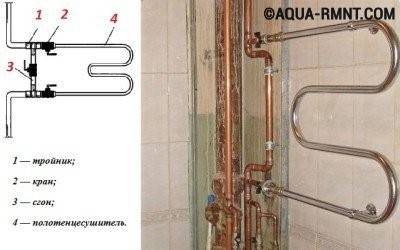
A classic example, suitable for most apartments, is that a thread is cut on the outlets of a previously dismantled heated towel rail, and two tees are installed on it, in turn.Between them is a short pipe, which is the bypass. Next - two taps to shut off the flow of water into the heated towel rail. Similar bypasses installed away from the riser are called offset.

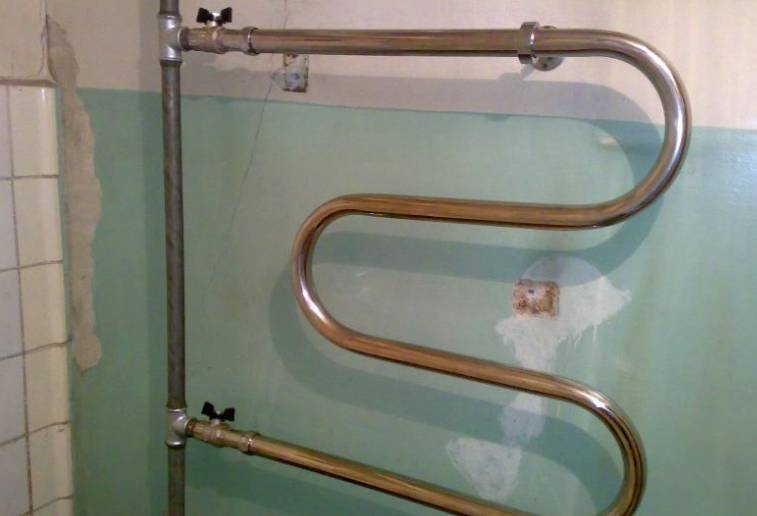


In this example, the offset bypass is connected to the towel warmer outlets by welding.
In this case, you see a direct bypass, not offset from the riser. Threads are cut in its pipes at the top and bottom and taps are mounted. Then the heated towel rail was installed.
The same as in the previous picture - a direct bypass created by tapping tees into the riser. But at the same time, the bypass itself and the bends are assembled from plastic pipes.
Thermogram illustrating the temperature of the water inside the heated towel rail with a direct bypass with a diameter equal to that of the riser
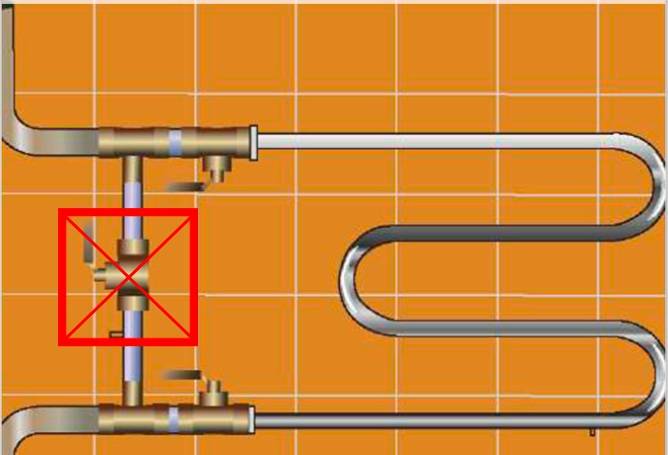
Often on the Internet you can find such diagrams and photographs, where the bypass is equipped with a valve valve. The presence of this faucet is another point of contention among plumbers. From the point of view of building codes, unauthorized installation in the riser (and in this case the bypass is formally considered to be one) of such devices that are not provided for by the project is a gross violation. In addition, installing a bypass faucet reduces the pressure and temperature of hot water in the following apartments. Therefore, its presence may be the subject of claims against you by the management company or neighbors.
The bypass is equipped with a valve valve
Recommended and unacceptable tie-in schemes
The serpentine is based on the principle of "gravity pump". A competent tie-in ensures natural circulation and the performance of the radiator.The development of a do-it-yourself water heated towel rail installation scheme is carried out in accordance with the design of a particular model and the location of the riser in the bathroom.
Lateral and diagonal connection
For most devices, a tie-in with coolant supply through the top outlet and outlet from the bottom is considered optimal. This is achieved with universal connections, the diagrams of which are given below.
Benefits of a universal tie-in:
- performance does not depend on the direction and speed of water supply in the riser;
- after turning off the circulation, air bleeding is not required;
The universal tie-in option allows you to place the heated towel rail at any distance convenient for installation from the riser.
Conditions for the operation of the scheme:
- The lower tie-in point is located below the connection to the radiator, and the upper tie-in, respectively, is above the upper outlet. The slope of the supply pipes is 2-3 cm per meter. Horizontal connection is acceptable for pipes with a cross section of 32 mm, and also if the distance to the riser is less than 2 m.
- Supply pipes - without bends and "humps". Otherwise, the system becomes airy and natural circulation stops.
- The optimal diameter of the supply pipes: ¾ inch steel, 25 mm - reinforced polypropylene.
- Pipes should be thermally insulated. This requirement is especially relevant for the hidden installation of a plastic pipeline.
Fully functional side / diagonal tie-in scheme with a narrowed bypass. Plumbers resort to this design on a previously installed heated towel rail if there is no need to completely change the design of the riser.
Bypass offset is justified if you want to keep the old riser connections. With this connection method, it is not recommended to use a narrowed jumper. The main requirement is the top coolant supply.
Some models of dryers are designed for bottom connection. The insert is performed according to three main schemes.
Requirements for the implementation of the bottom connection:
- The lower outlet must be located below the heated towel rail.
- It is desirable to insulate the supply pipes.
- The top branch of the riser, when using an offset or narrowed bypass, is located below the point of connection to the device.
The optimal slope is about 2 cm per meter of pipe. The fulfillment of this condition ensures the independence of the circuit from the direction of the water flow.
Possible forced tie-in options
With lateral connection, some deviations from the typical recommended schemes are permissible.
The basic terms of the tie-in remain unchanged. The difference is in the connection points of the heated towel rail with the riser, as well as in the presence of vertical segments at the inlet and outlet of the device.
An alternative sidebar option is shown below. The top of the heated towel rail is above the top outlet. After turning off the water, it will be necessary to bleed the air from the coil.


The lower inset may also be somewhat modified. The need to place pipes from the riser at a minimum distance to the floor forces both ascending connections to be increased. If all the requirements of the bottom connection are met, the system works without failures.
Wrong wiring diagrams
Inexperienced craftsmen sometimes do not adhere to the recommended schemes. As a result, the dryer remains cold with an uninterrupted supply of hot water. Examples of possible omissions are shown below.
In both versions, the device is located below the lower outlet from the riser. The coolant that has fallen down cools down and is trapped. Water is not pushed back, since there is pressure from the coolant flow from above.
In the resulting "hump" accumulates air. Over time, the air lock blocks the circulation in the radiator and the heated towel rail cools.
The variant presented below combines two errors at the same time. The scheme is obviously not working.
Features of installing an electric heated towel rail
As mentioned above, do-it-yourself installation of a device with electric heating is much easier, but it is necessary to remember the features related to the safety of its operation.
These tips are few, but the importance of each of them can hardly be disputed.

Installing an electrically heated fixture
If the outlet to which the device is connected is located in the bathroom, it must be waterproof and have a special cover that isolates from water.
Grounding is a prerequisite to prevent the formation of static electricity on the surface of the dryer.
Use an automatic power cut device
The condition is indisputable if you do not want to get an electric shock during water procedures!
It is advisable to use concealed wiring to prevent moisture from entering the wire.
When buying, you need to pay attention to the type of electric dryer. Oil-containing - require rigid fixing in one position, warm up for a long time and cool down slowly, but the installation of grounding is an indispensable condition. Cable - can be rotated as convenient, heat up quickly and cool down quickly, grounding is desirable, but not necessary.
Cable - can be rotated as convenient, heat up quickly and cool down quickly, grounding is desirable, but not necessary.
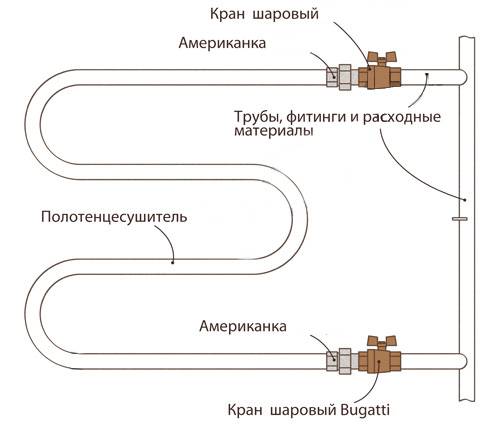
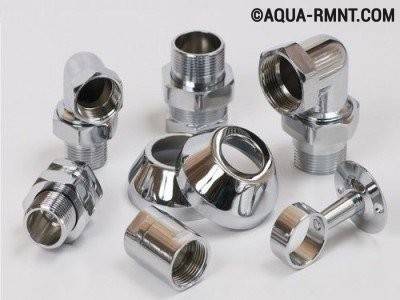
Faucet installation
After that, you can proceed to the installation of cranes. If the old device was cut off, then cut a new thread on the remaining pipe sections using a die of the required diameter for this. And if the coil was removed “civilized” and the thread remained in place, then simply “drive” it with the same die in order to improve the quality of the connection.
Once the threads are in order, install the shut-off valves (in other words, taps). This armature will perform two functions at once.
- Adjusting the intensity of the coil by closing / opening taps.
- Shutting off the water in case of need for repair or replacement of equipment in order to carry out the required actions.
Overview of types of heated towel rails for the bath
The classification of heated towel rails is carried out according to the coolant, installation method, shape, type of connection and materials of manufacture. So, the source of heat is electricity or a heating network. According to the location, wall models are distinguished, floor, stationary or rotary. Design execution is based on the following standards:
- coil;
- steps:
- bowl;
- spiral.
The heated towel rail is connected to the mains or water supply diagonally, horizontally or vertically. For the production of water equipment, metal is used:
- Seamless stainless steel with walls over 3 mm and a diameter of ¾-1 inch copes with the pressure in the city heating network.
- Black steel is only acceptable for stand-alone systems, since the inner surface does not have anti-corrosion protection.
- Copper quickly acquires the temperature of the coolant, but the inner surface of the pipe must be isolated from direct contact with water.
- Brass is protected by a chrome layer, but is sensitive to pressure drops.

Copper bathroom radiator
Electrical units are equipped with a heating element, which transfers thermal energy to a liquid heat carrier. It can be technical oil, antifreeze or water. Another option involves pulling a heating cable through the channels.


The dimensions of the water heated towel rail have a wide range of values depending on the design. So, U-shaped products are often 32 cm in height, ladders - 50-120 cm, and a coil up to 60 cm. All products are in the range of 40-80 cm in width, which is explained by the small dimensions of the bathroom and the purpose for drying small textiles.
An independent approach to the manufacture of a water heated towel rail allows the use of metal-plastic or polypropylene pipes
It is important to observe the restrictions on the bending of the channels and the diameter, which must match or exceed that of the water supply.
. Polypropylene pipe dryer

Polypropylene pipe dryer
Combined products are connected to the seasonal central heating system and the power grid. Such equipment provides heating of a wet room in the summer and in emergency situations at a heating plant.

Combination dryer for wet room
Technology of work - step by step
Replacing a heated towel rail involves the following sequence of work:
- dismantling of an outdated heated towel rail;
- installation of a bypass (jumper) and ball valves;
- towel warmer installation.
Let's take a closer look at the steps listed above.
Dismantling the old towel warmer
Replacing a heated towel rail in the bathroom begins with removing the old one:
The first step in the installation of a heated towel rail is the dismantling of the old version that you want to replace
- Turn off hot water by closing the corresponding valve. This issue needs to be coordinated with the housing office.
- When there is no more water in the riser, we remove the old heated towel rail. If it is not integral with the hot water pipe, unscrew the threaded connection and dismantle it.
- If the heated towel rail is simply welded to the pipe, it should be cut with a grinder. Trimming is carried out in such a way that the length of the pipe is sufficient for threading
- We remove the used heated towel rail from the brackets.
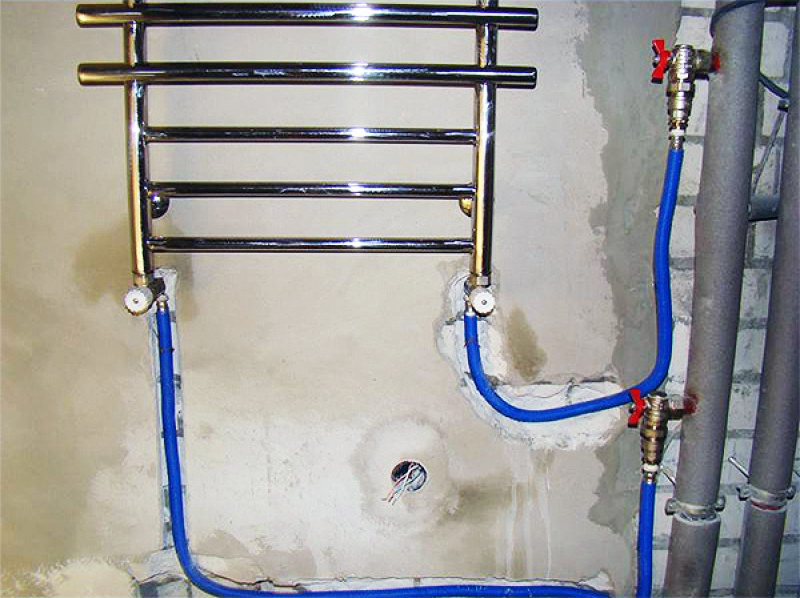
Installation of bypass (jumper) and ball valves
A jumper (bypass) is a piece of pipe equipped with connecting elements. She is a lifesaver in unforeseen situations. To install a bypass, ball valves are placed at the ends of the heated towel rail, which, if necessary, will stop the flow of water through it. At the same time, when a jumper is installed in the riser, water circulation does not stop even when the heated towel rail is turned off.
This allows you not to shut off the water to the entire house in case of repair work.
Threading a pipe using a thread cutter - more information about the technology of work can be found here
The bypass is equipped with three valves: two of them are installed at the junction of the towel rail pipe with the bypass, and the 3rd stops the water in the bypass itself
To remove air from the system, it is recommended to mount an additional ball valve in the jumper itself. This will ensure free circulation of water in the heated towel rail and in the main pipeline.
Installation, fastening and connection of the coil
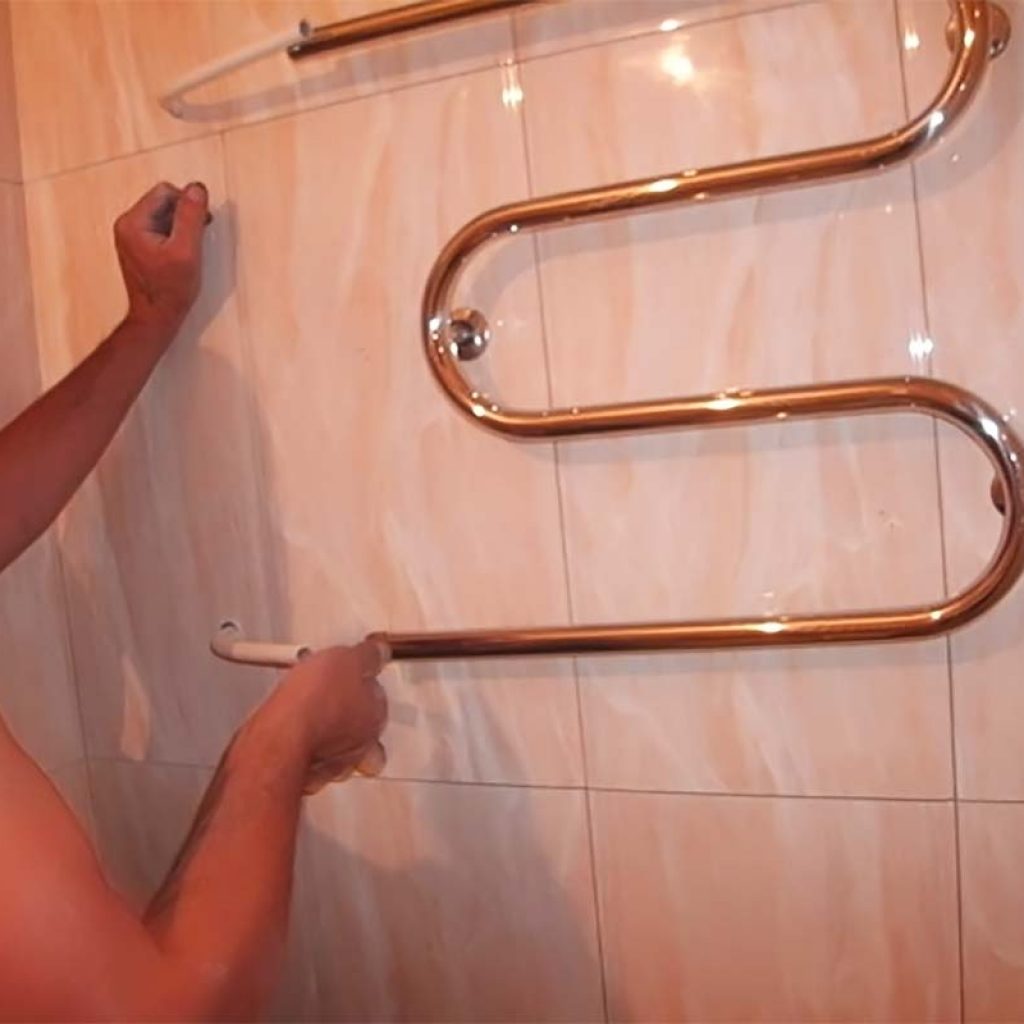
We continue the installation of a heated towel rail with our own hands. The next step is to attach the brackets and attach the heated towel rail to the wall.
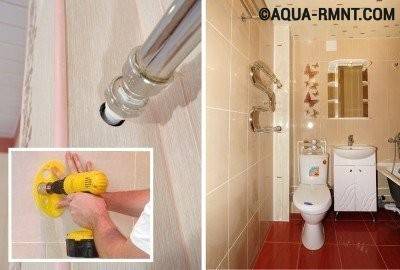
When attaching the heated towel rail to the wall, you will need to drill holes in the tile, which requires some accuracy
We fasten the brackets to the heated towel rail, which are usually included in the kit (if they are not, you need to purchase them separately). Attaching to the placement, we make marks with a pencil for the holes. To align the fixture with a building level, you need an assistant.
In a wall covered with tiles, holes are made using a drill with a special drill bit for tiles. We insert plastic dowels into the holes, then attach the heated towel rail to the wall and fasten it to it with screws using a screwdriver or a screwdriver.


The distance from the wall to the axis of the heated towel rail pipe is regulated and depends on the diameter of the pipe
Next, it remains to connect the heated towel rail to the riser. To do this, we connect it to the valves on the jumper using fittings (straight or angled, depending on the type of connection of the heated towel rail).
We tighten the fasteners carefully so as not to spoil the thread. We seal all threaded connections using linen winding
When making the connection, you may have to purchase special fittings to connect the heated towel rail to the water pipe
After completing the above work, you need to check the tightness of the joints: when probing the seams, there should be no drops or leaks. It remains to smoothly open the taps so that the device is filled with water gradually, and there is no water hammer.
That's all. Now you can safely say that you have an idea of how to connect a heated towel rail. Decide whether you can do this work qualitatively on your own, or it is better to invite a specialist.
Typical mistakes of independent masters
When the bottom outlet is above the extreme point of the SS with a side or bottom connection, a dead zone is formed between the bottom of the device and the connection point of the bottom outlet.
This is a consequence of the fact that the cooled liquid, having dropped down, cannot get back into the riser due to the pressure on it of a column of hot water with a lower specific gravity. As long as the permissible height difference between the lower outlet and the bottom of the heated towel rail is not exceeded, the device operates, and after that the circulation in it stops.
The circulation will also stop if there is an elbow formed by the upper pipe. Only the insertion of the Mayevsky crane can make such a scheme work in order to periodically bleed the accumulated air. Sometimes a loop is made in the upper pipe, laying it behind the ceiling lining, and the lower pipe is immured into the floor.
Air will accumulate at the top, and the chilled water in the unit will be blocked in the lower loop located in the floor. The movement of the coolant will completely stop.
 In order to release the air generated when the coolant boils or brought into the heating system during its filling, air vents (+)


