- The process of installing a toilet-compact how to replace it yourself
- Preparing for installation
- Tank replacement
- Step-by-step toilet installation technology
- Installation of a frame installation with a hanging toilet bowl
- Preparing for installation
- Connecting water to the cistern of a wall-hung toilet
- Installation installation
- Preparatory stage
- Mounting the device
- Installation connection
- Installing a wall hung toilet
The process of installing a toilet-compact how to replace it yourself
In order to replace an old appliance with a floor product of the "compact" type when installed on a tiled floor, you need to use the step-by-step description of how to replace the toilet yourself:
- First of all, determine the location of the new device. The bowl is placed in the bathroom without fastening. You have to try to get on it. It is advisable to try several options.
- When the exact location is known, the base of the bowl is traced with a washable marker. With it, they also mark the places for attaching plumbing.
- The product is removed to the side, and after that all the necessary marks remain on the floor. Then, with a drill with a 12 drill, holes are drilled in the tile. If the surface is concrete, then it is better to beat it with a drill at number 12. Dowels are inserted into the prepared holes.
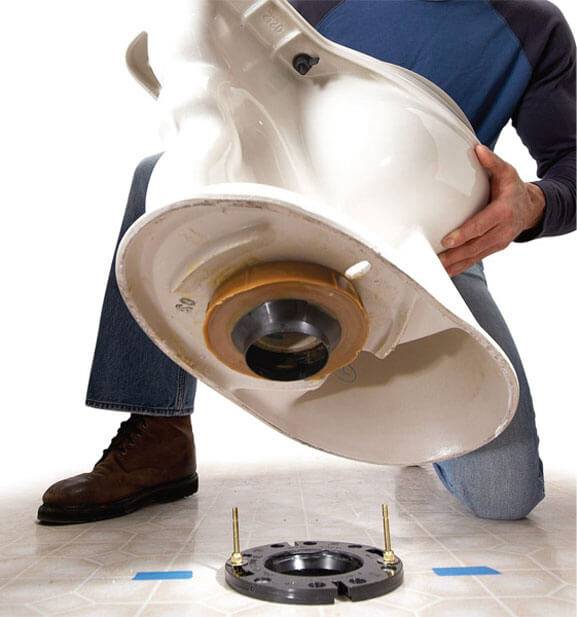
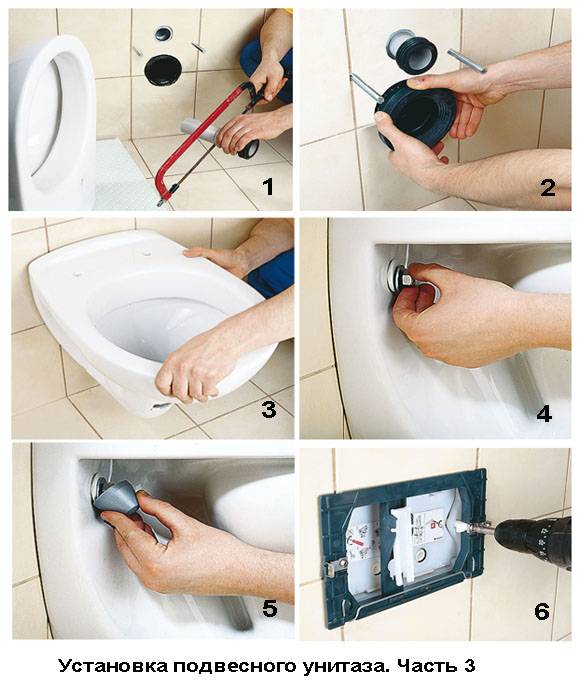
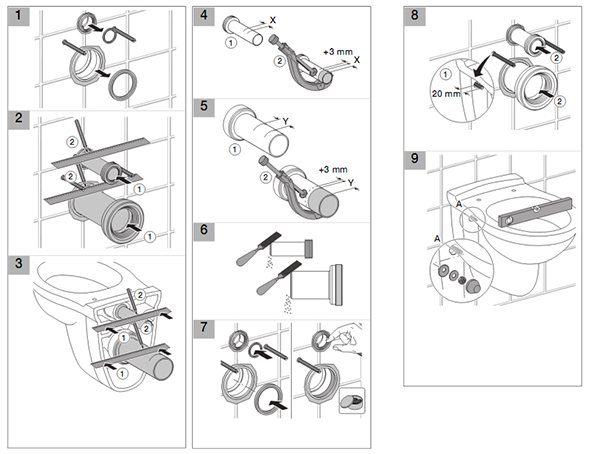
- Then they take a corrugation or cuff to connect the outlet of the device to the sewer system. The connecting element is placed in place, having previously treated the joint with a sealant.
- A new corrugated bowl is installed correctly. Bolts are threaded into the mounting ears and screwed in using an adjustable wrench. The main thing when doing this work is not to overdo it and not damage the ceramics.
- The device is connected to the sewer pipe, treating all joints with silicone.
- A tank is placed on the bowl.
- The elements are connected with bolts and the container is connected to the water pipe.
Finally, check all joints, as well as threaded connections for leaks. If no flaws and imperfections are found, you can use new plumbing equipment.
The process of how to change the toilet bowl of such a model on your own is simple, since modern products are designed so that when they are replaced, the floor covering remains intact.
Preparing for installation
The first step is to make sure the strength of the walls on which the support frame of the structure will be attached. It is impossible to fasten to partitions, plasterboard panels, bulkheads. Walls must be strong and durable.
A sewer outlet is required.
If you do not have much experience in plumbing and construction, it is better to call specialists. They will mount the wall hung toilet faster and better. Don't forget about a well-formed contract.
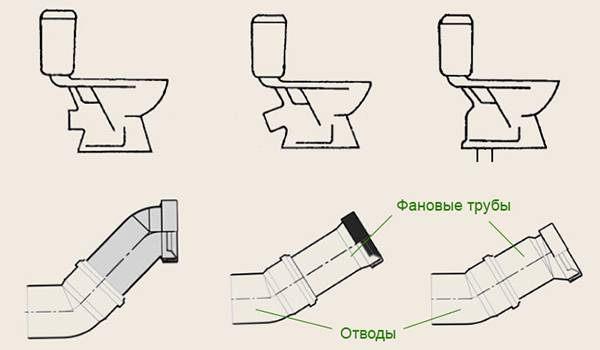
Types of toilet outlets
When calling plumbers, you should also understand that they are not going to live in this apartment and use your equipment. Their advice “it will be more convenient” is more often related to ease of installation, and not to your comfort.
But there is an important point. Plumbers will not conflict. And if you demand, for example, a long horizontal sewer outlet and insist on no slope, they will do exactly as you say. Even if it is technologically incorrect and will lead to blockages when used. Therefore, in any case, you must own the theoretical part.
Sewer pipes should not have sharp bends and must necessarily have a slope for draining sewer masses. The fewer turns and joints a sewer pipe has, the less likely it is to become clogged.
The ideal option is a direct outlet to the sewer and fan pipe. Opt for smooth plastic sewer pipes
It is very important that the pipes are of the same diameter.
Water connections for a short distance are carried out by flexible hoses. If it is planned to supply water at a distance of more than 1.5 meters, it is advisable to lay pipes and make wiring.
Why do we write about it in such detail? Because many still consider the installation of a wall-hung toilet to be exotic and an indicator of a particularly refined taste. I want to show my unusualness in all its glory, to come up with a very unusual interior. It's all interesting and can look really good if the technology isn't broken. A leaking or permanently clogged toilet is unsightly and very unhygienic.

Basic measurements before installing the hinged bowl
Therefore, pay serious attention to the competent technical preparation of space and technical support. It's better to do before installation, with a pencil and tape measure in hand, carefully measuring all centimeters and the evenness of the walls and floor
It often happens that a person does not take into account the curvature of walls, corners and considers it the way he is more comfortable. Especially the humanities, economists and major leaders. Well, just think, the discrepancy is 5 cm and the angle is 86 degrees instead of 90. Somehow it will even out!
Of course, everything can be aligned. But often it costs serious money and requires labor, the use of equipment, building mixtures, etc. etc.


By removing trim, tiles, etc. from the wall, you can save 3-10 cm of space. No, installers won't be as charmingly kind as to take care of you more than you do yourself.
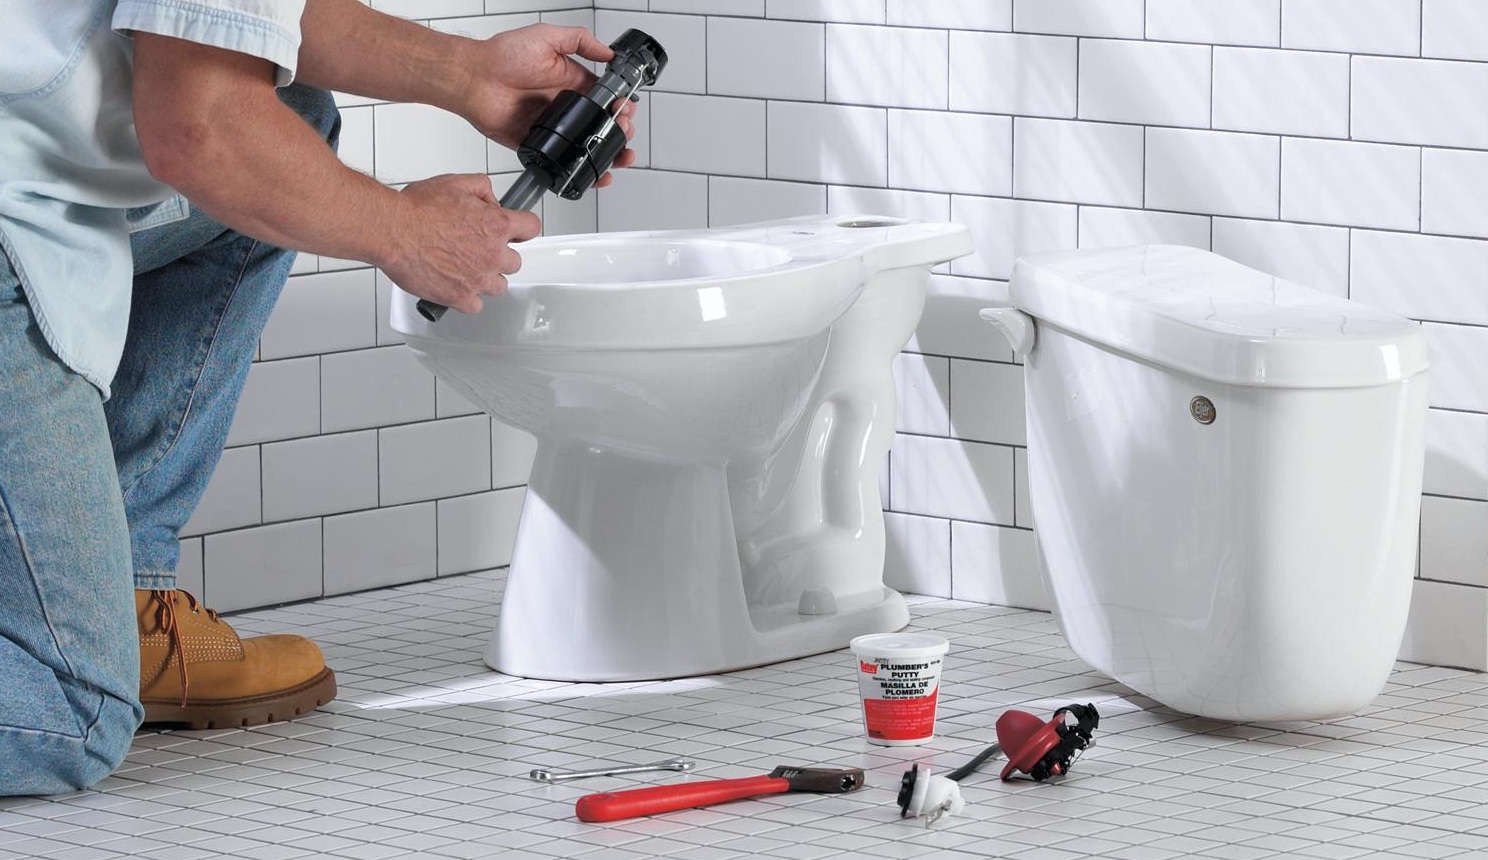
Tank replacement
toilet cistern installation
Do-it-yourself toilet cistern replacement is the last step in the process of replacing a toilet bowl. If we are talking about a barrel that is attached to the toilet shelf, then the pipe must be connected to the neck with a rubber cuff. This will be enough to ensure a strong and tight connection. At the same time, one third of the rubber cuff is put on the pipe, and the remaining two thirds are turned inside out. Then this part must be pulled over the previous one. Here it turns out that the end of the pipe is released. Then the pipe and neck are combined with each other. The inverted part of the rubber cuff is pulled over the neck. Thus, we can say that the tank is perfectly fixed. No additional action is required. A rubber cuff is enough to ensure a tight connection. At the same time, it is worth checking the density of the cuff nozzle so that unpleasant events do not occur with neighbors from below.
attaching the toilet cistern to the toilet
Sometimes a situation arises when the tank is mounted at a short distance from the toilet on the wall.In this case, one rubber cuff is not enough. It will take a little more effort and skill. In this case, a pipe is screwed to the barrel, and its opposite end is lubricated with red lead and wrapped with tow. The neck of the toilet bowl and the pipe itself are connected by means of a cuff. It is fixed on the pipe with a thin wire. Now you can power the flush tank and adjust the water level in it.
Thus, the work on replacing the toilet bowl can be considered completed. As you can see, all actions do not require any special preparation. The work may well be done by hand. Of course, if we are talking about a toilet that is installed on the floor. Otherwise, it is difficult to do without the help of a plumbing specialist. By the way, even before starting work on replacing the floor toilet, you should consult with a professional. It will help you understand all the intricacies of the work. For those who are well versed in the work associated with the installation of plumbing, this manual will definitely help. It is also suitable for those who have never tried to do such work on their own before. Here is a detailed instruction describing all the main stages of work, as well as a video showing clearly how the toilet is replaced with your own hands. Many will definitely benefit from this guide. In addition to the work related to the installation of the barrel and the toilet itself, it contains information on how to correctly dismantle the old unit so that there are no further problems in operation.The video will help even those who decide to save money and not call specialists, although they are dealing with this type of work for the first time. Everything is shown clearly and will be understandable to absolutely everyone.
Step-by-step toilet installation technology
- wrenches numbered 17 - 19, 13 and 10;
- roulette;
- drill or perforator;
- pencil and marker;
- screwdrivers;
- building level;
- dowel;
- drainage outlet;
- teflon tape;
- flexible hose equipped with an angle valve.
Stylish toilet with installation
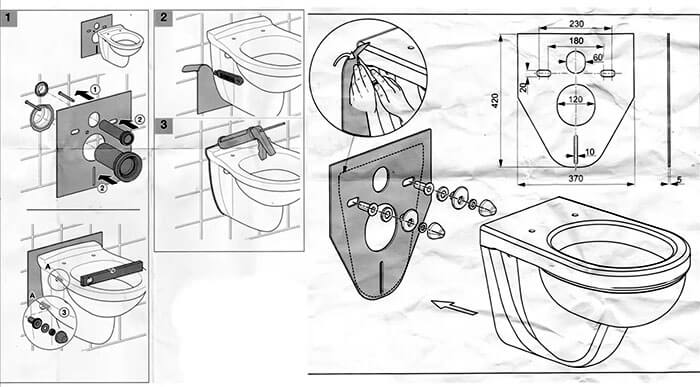
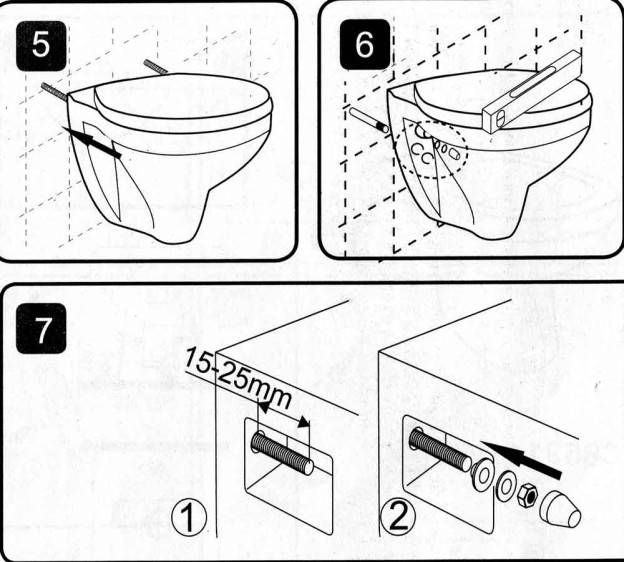
Do-it-yourself installation of a hanging toilet bowl is carried out in several stages:
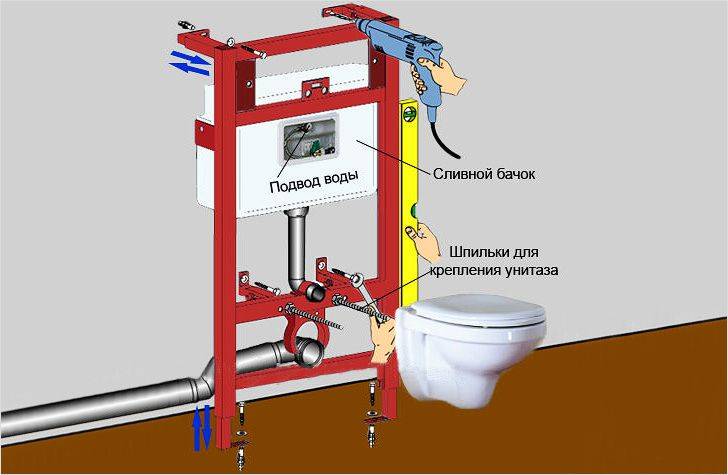
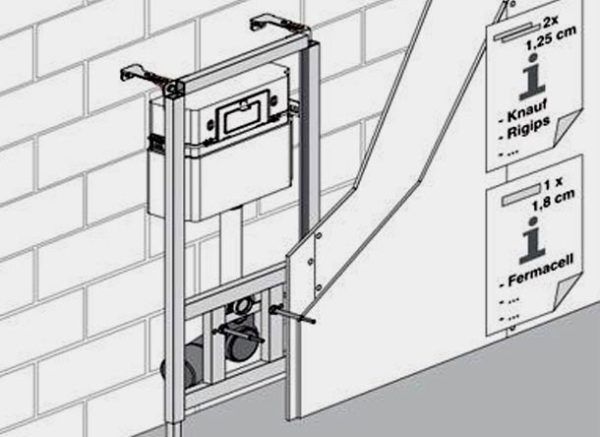
Organization of a niche in the wall. Using a perforator or drill, a niche is made in the wall, the dimensions of which must correspond to the installation.
Installation installation. The structure is attached to the wall and floor with dowels. For its installation, you can choose any place in the room, thereby improving its comfort.
The metal frame must be set exactly relative to the horizontal and vertical plane, so it is important to use a level when working. After installation of the installation, the height of the suspension studs is adjusted
As a rule, they are installed in such a way that the toilet seat is at a height of 40 - 45 cm.
Summing up water pipes. Despite the popularity of flexible piping, craftsmen recommend using rigid pipes, as they have a longer service life. When supplying water, close the tank valve.
Connection to the sewer. The corrugation is attached to the sewer outlet and the outlet of the toilet bowl.
Wall cladding. The installation site is sheathed with double waterproof drywall. Technological holes are cut out on a sheet of material for the control panel, sewer and water pipes.After sheathing, drywall is tiled.
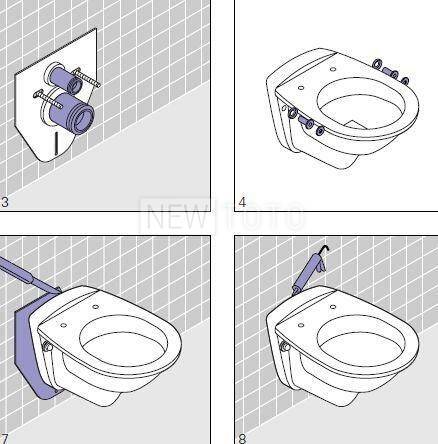
Toilet bowl attachment. When the tile adhesive is completely dry, you can hang the bowl on the installation studs and install the water drain control panel.
Installation of the installation takes place before the start of finishing work
Wall-hung toilets are best installed in small bathrooms, because flush-mounted installation saves space, so the room becomes more spacious. In addition, such plumbing looks more aesthetically pleasing, since unsightly communication elements are hidden in the wall.
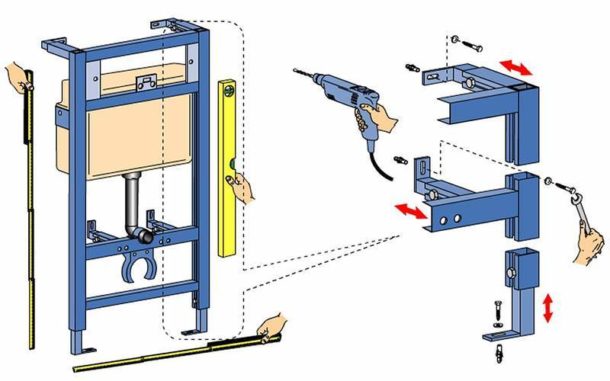
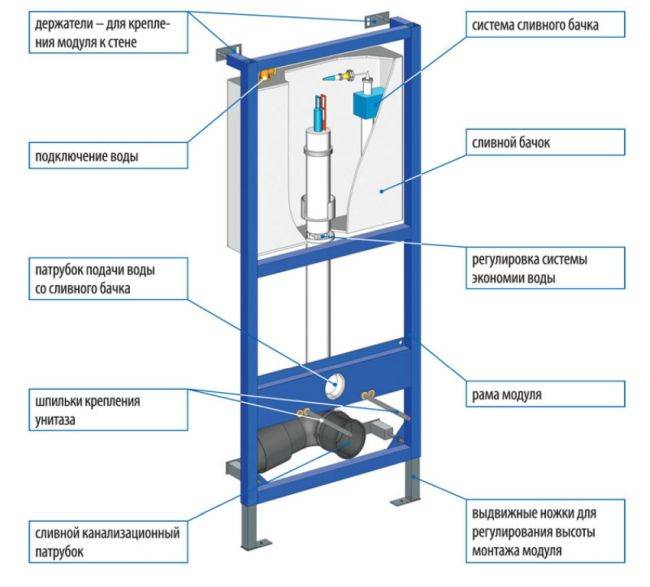
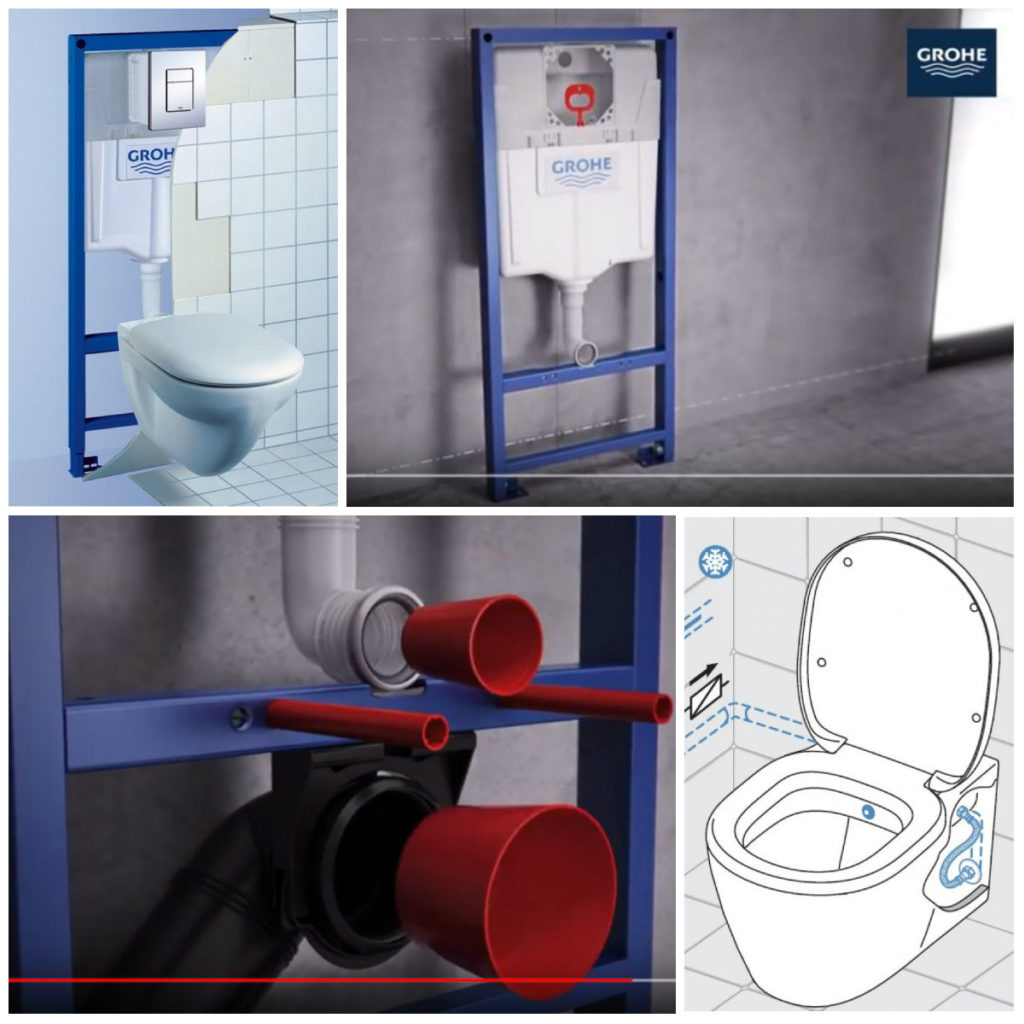
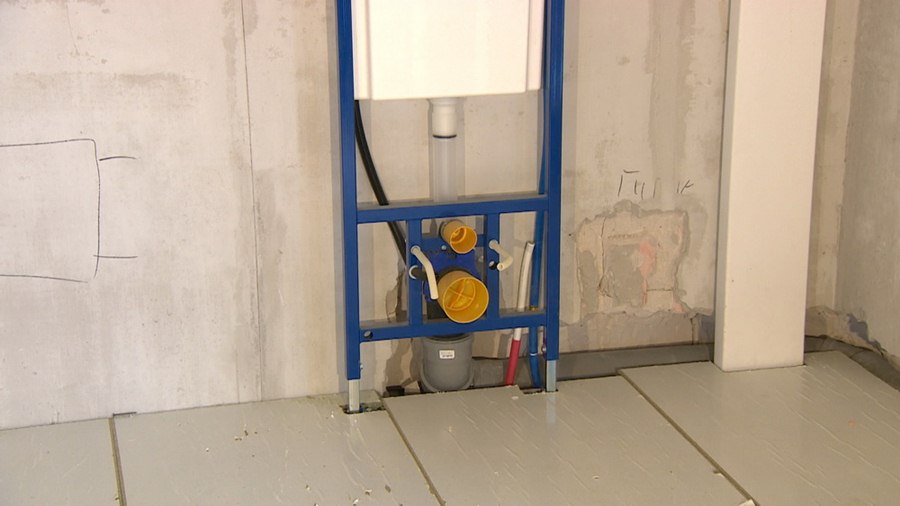
Installation of a frame installation with a hanging toilet bowl
This option is good because it allows you to put the toilet away from the walls, anywhere in the bathroom. After you choose a suitable place, you can start work.
Installing a toilet installation includes the following steps:
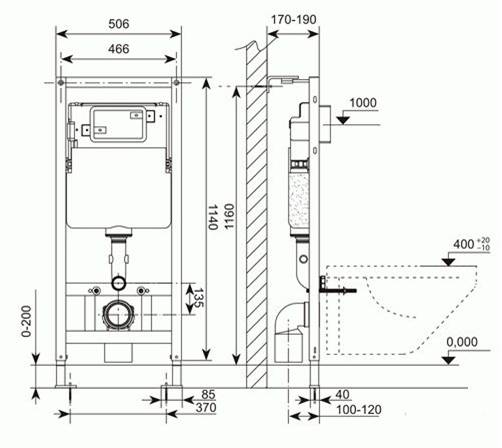
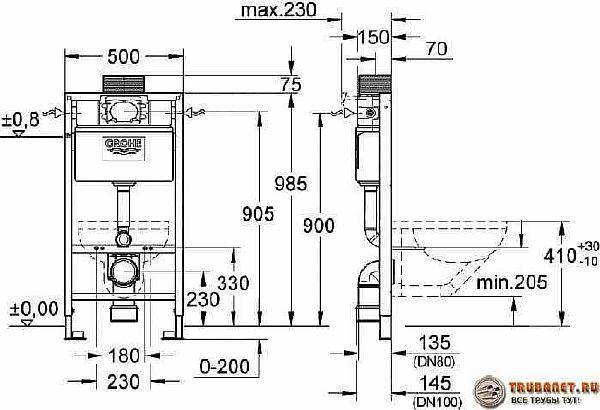
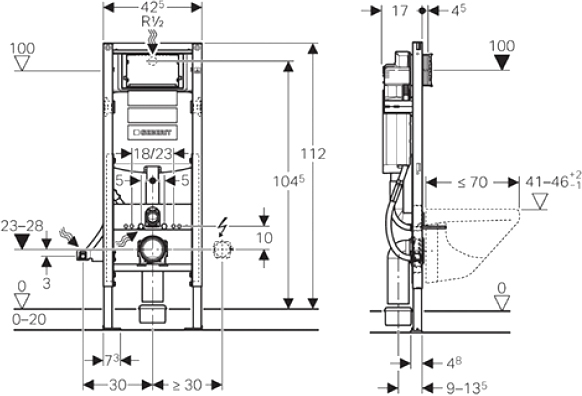
At the first stage, a metal frame with fasteners is assembled. Usually these frames are sold separately and fit different types of toilets. Next, the drain tank is installed on the frame. Its position can be adjusted with brackets. Please observe the following standard dimensions:
- The height from the floor to the drain button is 1 meter.
- The distance between the fasteners coincides with the distance between the bowl lugs.
- The height from the floor to the sewer pipe is 22 cm.
- The distance from the floor to the toilet seat is 40 cm.

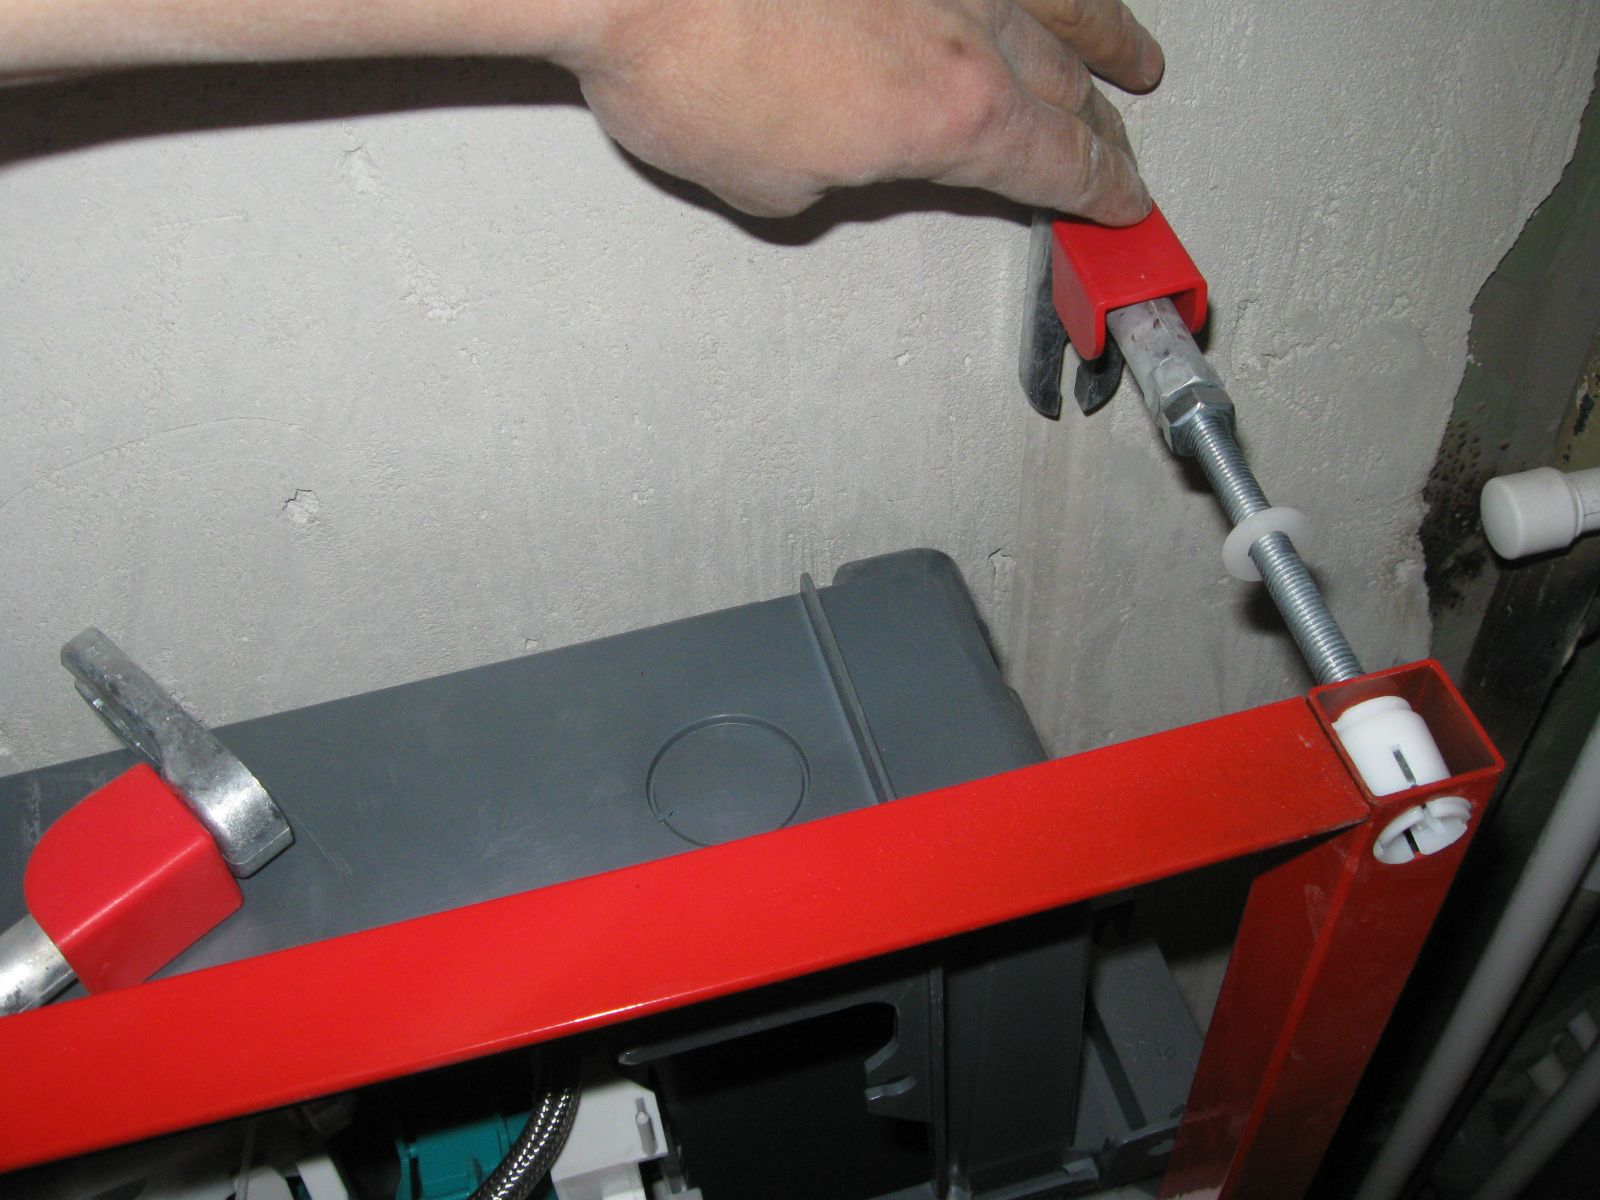
Now you need to attach the entire structure to the wall.
- Use the level to check the strict observance of verticals and horizontals. Mark holes on the wall and floor, drill them and install the fasteners. Screw the frame securely to the floor and wall.
- After installing the frame, it is necessary to connect the water pipe.It is best to opt for a plastic pipe than a flexible hose. The latter will not last as long as the toilet. And changing the hoses hidden in the wall is problematic, so plastic pipes are most often used - they can be connected to the tank from above or from the side. Connect the drain corrugation to the sewer and check the installed system for leaks.
- Install the pins on which you then need to hang the toilet. Assemble a frame of metal profiles for the wall that will close the installation.
- Take moisture-resistant drywall with a thickness of at least 1 cm, cut it to the size of the false wall. Attach to metal profiles. Don't forget to make holes for drains and buttons. From above, you can make a tiled pattern.
A frame installation for a hanging toilet is more expensive and more difficult to install than a block one, but it leaves a lot of room for creativity.
Preparing for installation
The first step is to make sure the strength of the walls on which the support frame of the structure will be attached. It is impossible to fasten to partitions, plasterboard panels, bulkheads. Walls must be strong and durable.


A sewer outlet is required.
If you do not have much experience in plumbing and construction, it is better to call specialists. They will mount the wall hung toilet faster and better. Don't forget about a well-formed contract.

Types of toilet outlets
When calling plumbers, you should also understand that they are not going to live in this apartment and use your equipment. Their advice “it will be more convenient” is more often related to ease of installation, and not to your comfort.
But there is an important point.Plumbers will not conflict. And if you demand, for example, a long horizontal sewer outlet and insist on no slope, they will do exactly as you say. Even if it is technologically incorrect and will lead to blockages when used. Therefore, in any case, you must own the theoretical part.
Sewer pipes should not have sharp bends and must necessarily have a slope for draining sewer masses. The fewer turns and joints a sewer pipe has, the less likely it is to become clogged.
The ideal option is a direct outlet to the sewer and fan pipe. Opt for smooth plastic sewer pipes
It is very important that the pipes are of the same diameter.
Water connections for a short distance are carried out by flexible hoses. If it is planned to supply water at a distance of more than 1.5 meters, it is advisable to lay pipes and make wiring.
Why do we write about it in such detail? Because many still consider the installation of a wall-hung toilet to be exotic and an indicator of a particularly refined taste. I want to show my unusualness in all its glory, to come up with a very unusual interior. It's all interesting and can look really good if the technology isn't broken. A leaking or permanently clogged toilet is unsightly and very unhygienic.
Basic measurements before installing the hinged bowl
Therefore, pay serious attention to the competent technical preparation of space and technical support. This is best done before installation, with a pencil and tape measure in hand, carefully measuring all centimeters and the evenness of the walls and floor.It often happens that a person does not take into account the curvature of walls, corners and considers it as it is more convenient for him.
Especially the humanities, economists and major leaders. Well, just think, the discrepancy is 5 cm and the angle is 86 degrees instead of 90. Somehow it will even out!
It often happens that a person does not take into account the curvature of walls, corners and considers it the way he is more comfortable. Especially the humanities, economists and major leaders. Well, just think, the discrepancy is 5 cm and the angle is 86 degrees instead of 90. Somehow it will even out!
Of course, everything can be aligned. But often it costs serious money and requires labor, the use of equipment, building mixtures, etc. etc.
By removing trim, tiles, etc. from the wall, you can save 3-10 cm of space. No, installers won't be as charmingly kind as to take care of you more than you do yourself.
Connecting water to the cistern of a wall-hung toilet
Water needs to be connected to the tank. And not hot, but cold.
I remember one incident. In one of the apartments, the plumbing pipes and the hot water riser had to be changed. Having already finished the work, we heard impatient and demanding knocks at the door. It was upstairs neighbors. Neighbors will never miss a chance to express "justified indignation" about the repair work in another apartment. They are just waiting for the slightest reason to displeasedly knock on other people's doors and insert a “hairpin”.
“What did you do there?!” - with confidence in their rightness, it was said through the threshold. "We have a hot water flushes down the toilet and everything boils!” Of course, this was an exaggeration. On the other hand, we don't know the boiling point of "this one". Then local plumbers came and carefully examined everything.Not finding anything to complain about and very puzzled, they went down to the basement and quickly fixed everything.
Just a scene for a movie. It will be necessary to offer the French filmmakers on occasion.


So, in order to exclude cases of “boiling” and excessive consumption of hot water, be careful and bring only cold water to the tank.
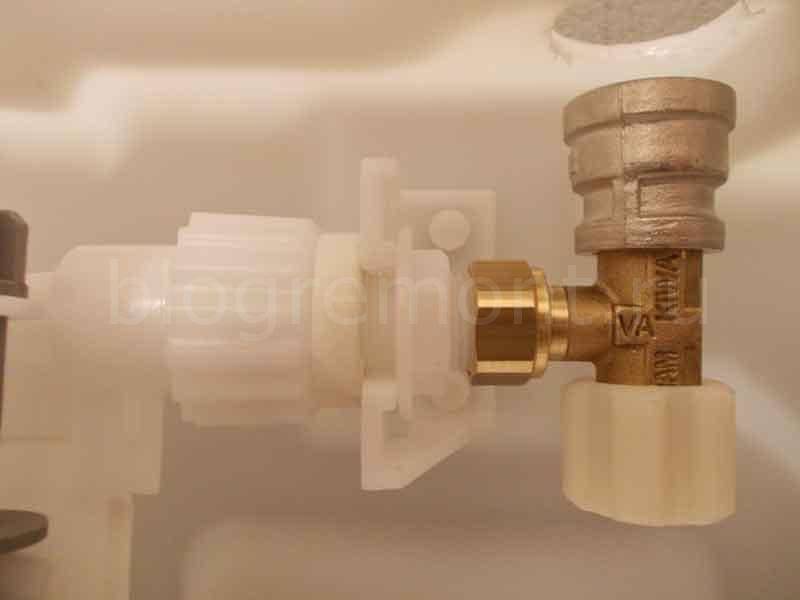
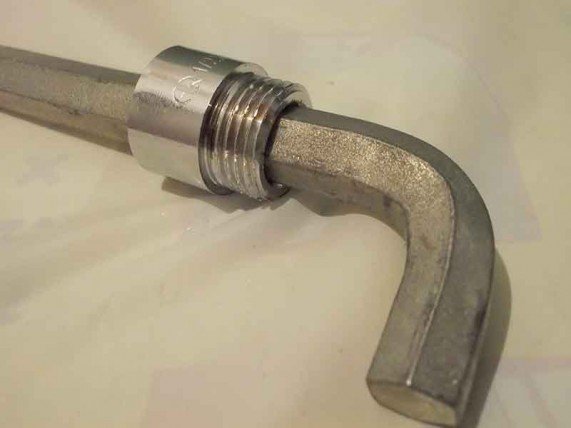
Included with the hanging toilet Cersanit there is a small corner valve that allows you to adjust the water pressure or shut it off if necessary. It has a 3/8 inch outlet thread, which is not very convenient for installation. You need to purchase a 3/8 - 1/2 inch female adapter.
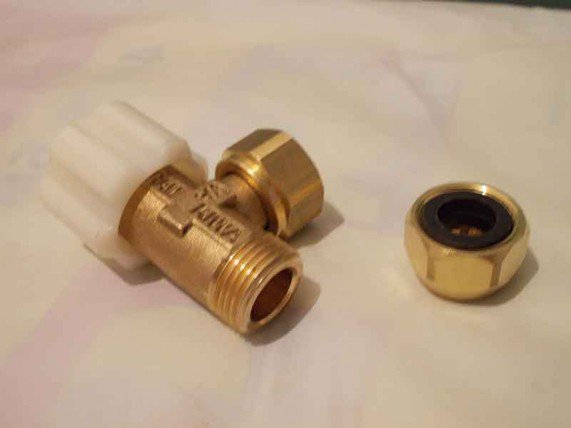
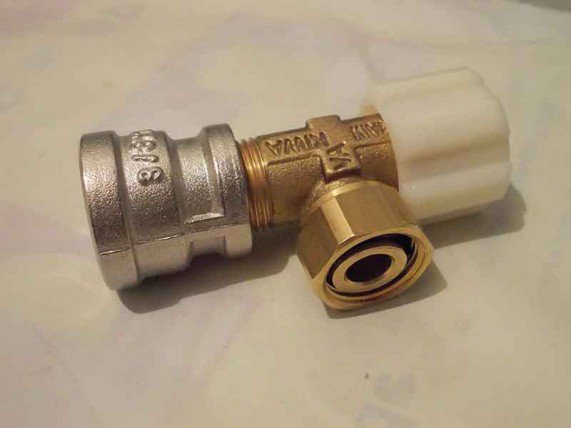
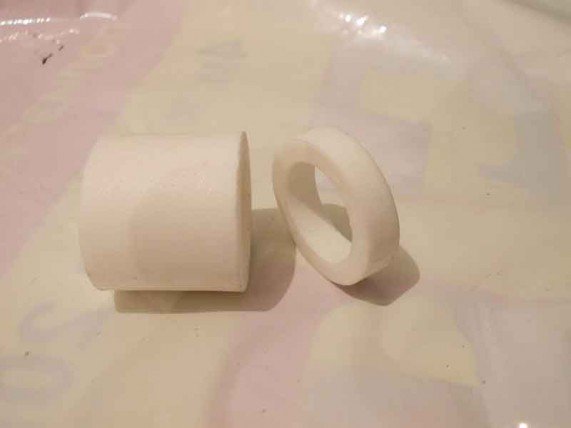
It turned out that the faucet was not centered in relation to the hole on the top panel of the tank. And the armature itself, somehow freely dangles inside, although, as you can see in the photo, there is a mounting plate for it. A sealing washer, about 5 mm thick, clearly suggests itself to it. After looking around, I decided to cut it out of the polypropylene sleeve. It turned out what you need. The armature was securely fastened, and the coupling coincided with the outlet.
While assembling the structure together, I dropped the rubber gasket to the bottom of the tank. Getting it was not easy, I assure you. The hand of an adult repairman does not fit into the hole calculated by the designers of the Cersanit company.
For example, all manufacturers of ballpoint pens have agreed to produce caps for them with a hole at the end, which will not allow a person who accidentally swallows the cap to suffocate.
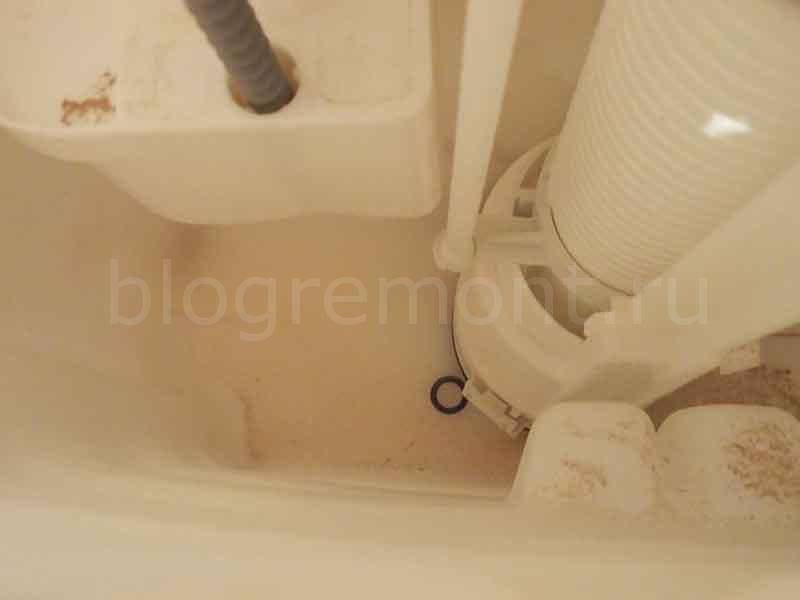
Something similar should be introduced for manufacturers of wall-mounted toilet bowls with a non-separable hidden cistern.That is, to determine the size of the window so that the average user of hanging toilet bowls, who has average human hands, can easily get everything that accidentally drops inside from the bottom of the tank. Something like this.
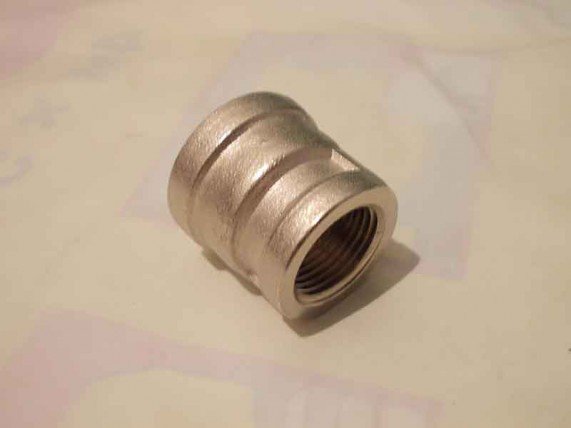
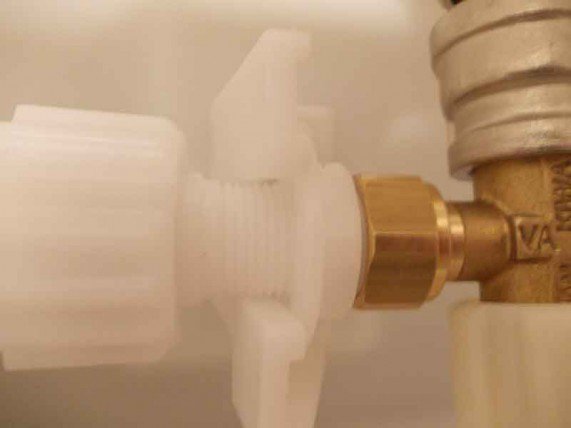
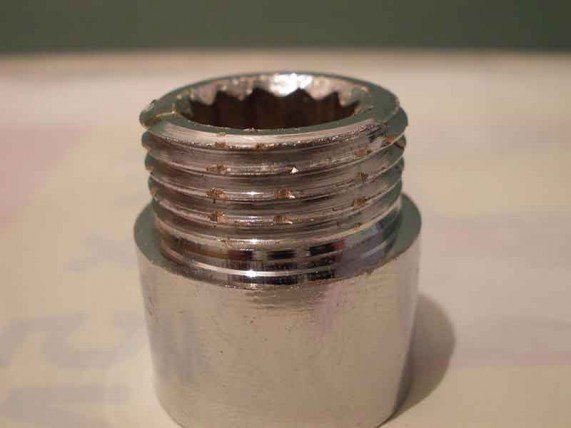
Here, Saint Cersanit, or whoever patronizes the plumbers who install the Cersanit toilets, again went to smoke and left me without attention for a while. It turned out that the thread of the polypropylene coupling does not reach a couple of centimeters to the thread of the transition coupling. I had to go to the store for an extension cord, which can also be seen in the photo.
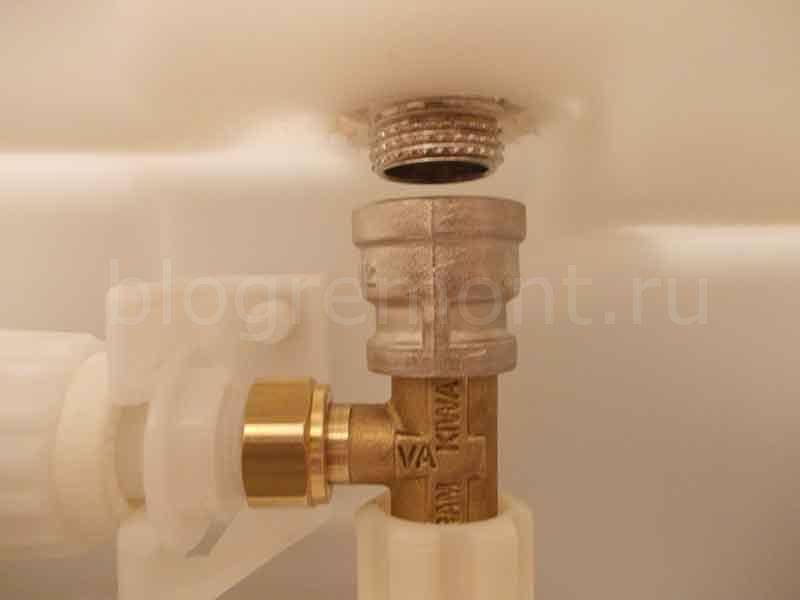
The thread surface of the chrome extension is very smooth. I made notches on it with the help of pliers, in order to thereby prevent the flax from sliding along the thread during tightening. A 16mm hex wrench is used to secure the extension. If such a key is not available, then you can use the head of an ordinary bolt of a suitable size. I keep forgetting about it. And if suddenly, I remember that I left the key at another object or at home, I begin to feel sad. But a few minutes pass, and my memory comes alive with the image of the bolt, which I used with success earlier.
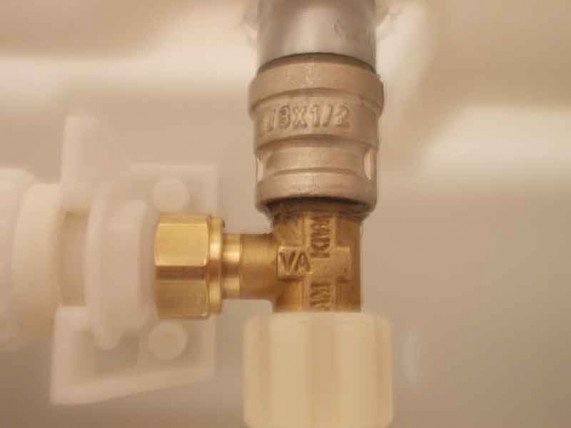
Now it remains to fasten a polypropylene coupling with an external thread to the resulting structure. It shows ready-made notches, prudently made by the manufacturer. It is commendable. In general, I recommend making such notches on all threaded connections. It will take some time, but will save you the trouble.Any sealing material, be it linen, fum tape or a special thread, will sit tightly on the thread and save you from possible leaks.
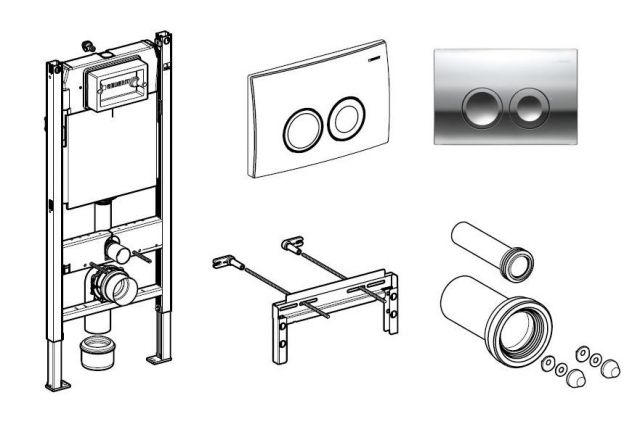
Installation installation
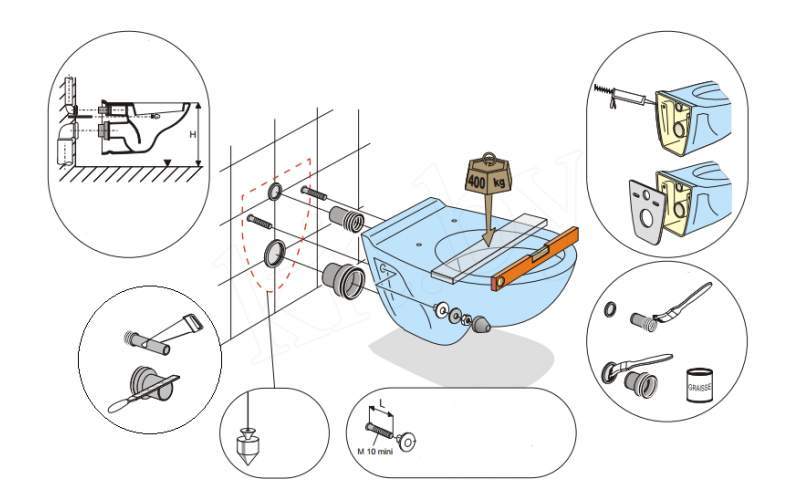
Consider how to install the installation for the toilet. The entire installation process consists in the systematic implementation of the following main stages:
- preparation for installation;
- fixing the installation;
- device connection.
Preparatory stage
The first stage of equipment installation - preparation - includes:
- preparation of tools necessary for work;
- selection of a place for installation of the structure.
It is more expedient to install a toilet bowl in a place:
- equipped with water and sewer pipes. If the installation of the toilet bowl is carried out far from communications, then it is necessary to carry out additional work to lengthen the pipelines, which will lead to an increase in time and money costs;
- where the toilet will not interfere. In apartments, special niches are most often provided, which saves a small space of the toilet room. If the toilet is located in a country house, then a place is selected that is remote from the kitchen and living quarters.
To do the job, you will need the following tools:
- tape measure, building level, marker for measuring work;
- drill, puncher and a set of drills for preparing mounting holes;
- wrenches for assembling the structure and its fastening.
Tools required for mounting the installation
At the preparation stage, it is important to check the presence of all fasteners included in the installation kit, water and sewer connections, as well as o-rings necessary for connecting communications.
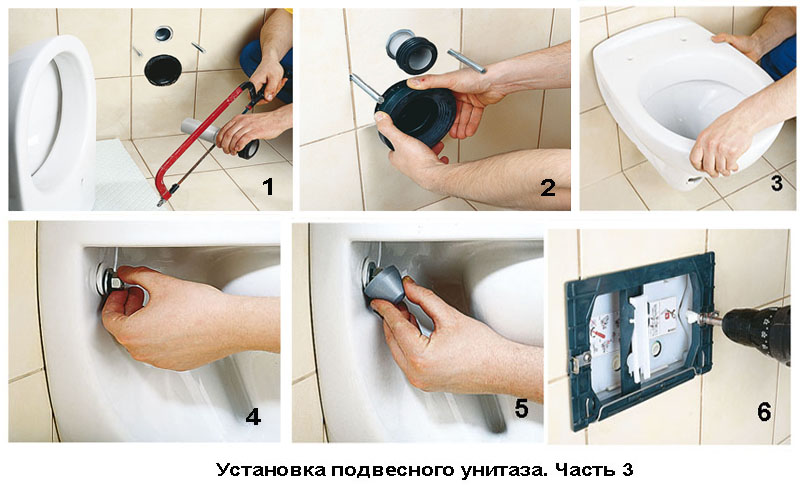
Mounting the device
Do-it-yourself installation is carried out according to the following scheme:
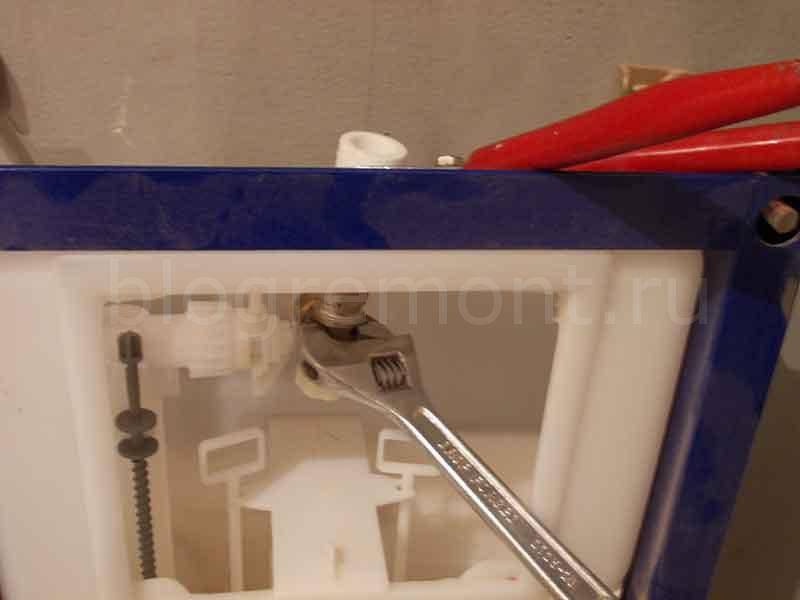
- frame assembly. If a block installation is mounted, this step is skipped. When assembling the device, it is recommended to strictly adhere to the attached diagram and securely fix all fasteners;
Instructions for assembling the device
marking places on the wall and floor for fixing bolts
When carrying out work, it is important to take into account the dimensions of the decorative finish of the room;
Determining where the frame is attached to the wall and floor
- drilling holes and inserting dowels for further fixing the installation;
Preparation of holes for fastening the structure
fixing the frame of the installation
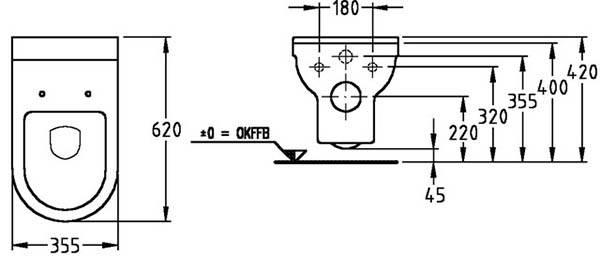
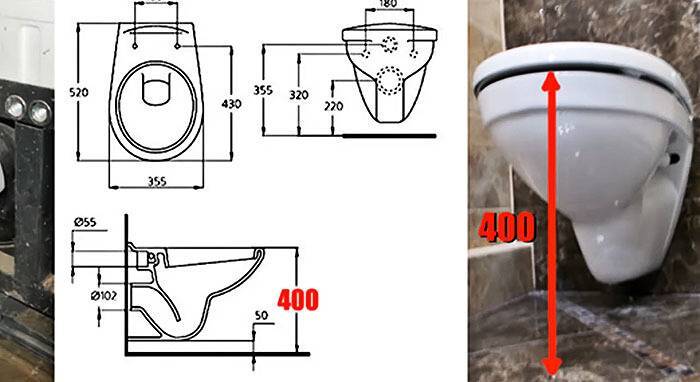
When installing equipment, it is important to observe the following parameters:
the fastening elements of the toilet bowl, located on the installation frame, must be at a distance corresponding to a similar parameter on the toilet bowl itself;
the outlet of the sewer pipe should be located at a height of 23 cm - 25 cm from the floor;
the optimal height of the hanging toilet is 40 cm - 48 cm from the floor tiles or other finish;
Recommended installation distances
The most important step in installing the frame is its alignment in the horizontal and vertical directions. The frame is adjusted with special screws provided for by the design of the equipment.


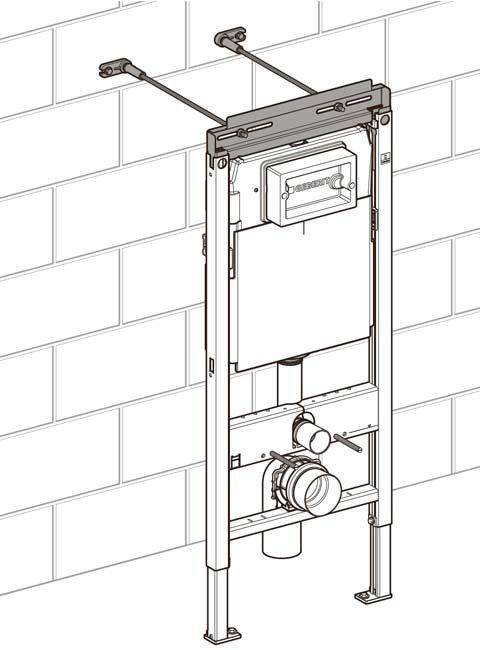

- drain tank installation. When fixing the toilet bowl, it is necessary to take into account the height of the drain button. The most universal is a distance of approximately 1 m from the floor of the toilet room. This parameter is considered optimal for using the toilet by both children and adults;
Installation of a cistern for a wall-mounted toilet bowl
- installation of fixtures for the toilet.
Installation of fasteners for the toilet
Installation connection
Water supply to the drain tank can be performed:
- side;
- above.
The choice of water connection method depends on the design of the used tank. For water supply, it is recommended to use rigid plastic pipes, and not flexible pipes, since the service life of the pipes far exceeds the life of the pipe.
For strength, the junction of the pipe and the tank is sealed with a gasket and treated with a sealant.
Connecting the drain tank to the water supply
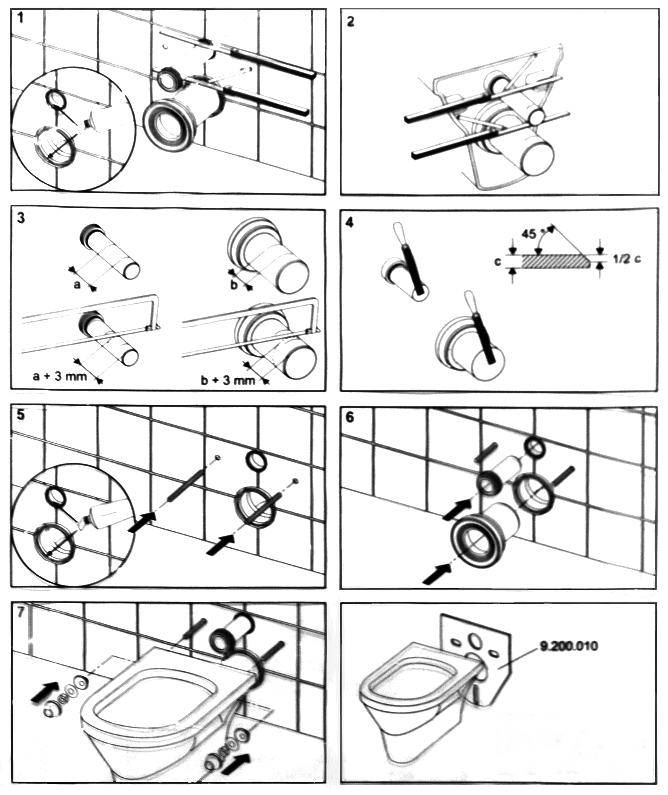
The toilet bowl and the sewer pipe can be connected:
- by cutting into the pipe. Such a connection is considered the most optimal, but it is not always possible to perform it in practice, since it is quite difficult to combine the drain from the toilet bowl and the pipe;
- using a plastic adapter;
- using a corrugated pipe.
If a direct connection is not possible, it is recommended to use plastic adapters, since the service life of the corrugated pipe is shorter.
The complete process of installation and connection of the installation can be viewed on the video.
After installation and complete connection of all devices, you can proceed to the final finishing of the niche and attaching the toilet bowl.
Installing a wall hung toilet
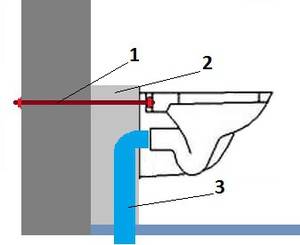
There is also a coupling that provides drainage into the sewer pipe. The toilet is mounted on rods that are inserted into the wall drilled through.
For this you will need:
- drill or perforator;
- Bulgarian;
- 2 threaded rods with a diameter of 2 cm, length 50-80 cm;
- 4 nuts and 4 washers M20;
- corrugation for draining;
- silicone sealant (styrene).
The height of the toilet bowl is determined. In this place, a through hole is made with a puncher or drill. Another hole is made 20 cm to the right / left of this hole.
Threaded rods are inserted into the holes, the length of which takes into account the distance of penetration into the wall + the distance from the wall to the toilet bowl + the thickness of the toilet bowl + the length of the free end where the nut will be screwed.
Washers are put on the rods and M20 nuts are tightened.
A corrugation with a diameter of 4 cm is inserted into the recess of the toilet bowl. The water is drained to the stop, and the gaps between the corrugation and the hole are filled with universal silicone sealant. For complete drying of the sealant, you must wait 3 days.
After the drying time of the sealant toilet bowl with corrugation is installed on rods and twist on the free ends of the washer and nut. Maintain the design during the day. If everything is in order, a toilet barrel is installed using a flexible corrugation.
If it is not possible to drill through the walls, then the rods can be attached with concrete glue. Formwork can be done independently. In addition to the following, please purchase:


- about 40 liters of concrete M200;
- 3 shields made of plywood, chipboard or board;
- drain coupling;
- a piece of plastic pipe with a diameter of 11 cm;
- adhesive for concrete ("chemical anchor").