- Self-installation of socket boxes in drywall
- Dimensions of drywall sockets
- Additional video instruction
- What to pay attention to?
- Installation of a socket in a concrete base
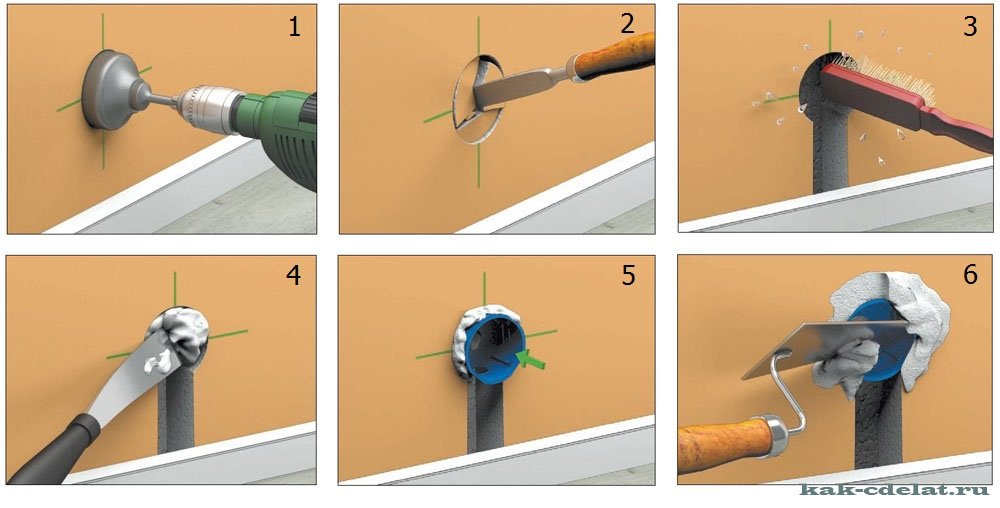
- Step 1 - markup on the wall
- Step 2 - Punching a Hole in the Concrete
- Step 3 - Installing the box into the wall
- Step 4 - combining several sockets
- Socket selection details
- Marking the walls before installing the sockets
- Tips for Installing an Outlet in a Plasterboard Wall
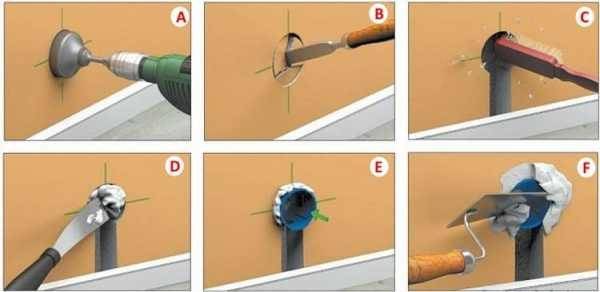
- Step 1 - Preparatory work
- Step 2 - Chasing the plaster
- Step 3 - Mounting the socket
- Step 4 - Connecting the Wires
- Installation of the socket
- Installing a socket in concrete, aerated concrete or brick
- Prices for socket drills (core drill)
- Preparing the socket for installation in drywall, selection of a crown
Self-installation of socket boxes in drywall
In modern construction, gypsum plasterboards are often used. This material is used for the installation of hollow walls and interior partitions. Accordingly, the layout of the installation of electrical equipment has also changed. In particular, additional fittings for electrical sockets and switches.
Previously, these elements were mounted into the wall; for this, the installation box was inserted into a slotted hole, where it was fixed with mortar. This option is not suitable for hollow structures, so special socket boxes designed for drywall have appeared on the market.
Note that the socket box is an indispensable element when installing electrical equipment. It is used to install sockets, switches, dimmers, thermostats. In addition, they can be soldered electrical wiring
The workflow is intuitive, however, there are certain nuances that it will be useful for the home master to know. We’ll clarify right away that expensive equipment or special skills are not required for installing socket boxes in drywall.
I am glad to welcome you friends on the blog "Electrician in the House". In today's issue, we will analyze in detail the topic of how to install a socket in drywall.
Dimensions of drywall sockets
Before proceeding with the description of the installation process, it makes sense to understand the features of the product. We note right away that a conventional socket box is not suitable for installation in plasterboard partitions; only a certain type of product intended for such cases is used here. Among the established manufacturers, the following brands can be distinguished:
These products are classified by planting depth and outer diameter. These parameters are labeled as H and d2, respectively. The standard diameter of the drywall socket is 68 mm. In addition, models with an outer diameter of 60, 64, 65, 70 and 75 millimeters are on sale.
If we talk about the depth of planting, then here you can find the following sizes: 40, 42, 45, 60 and 62 mm
Socket boxes are selected individually, depending on the installation location. If possible, and the thickness of the partition allows, we recommend choosing models with a planting depth of 60-62 mm. Such designs are much more convenient when disconnecting wiring, especially if the circuit excludes the installation of junction boxes. In this case, the wires are disconnected in the socket, so every extra millimeter will play a decisive role.
In addition, in products with a large seating depth, it is much easier to connect wires and install electrical equipment.
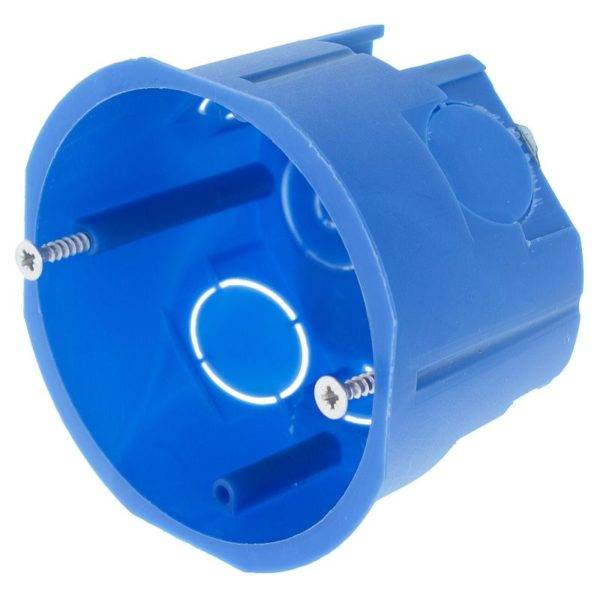
In today's article, for example, I will use the Schneider Electric drywall sockets of the IMT35150 modification. These products have a standard outer diameter (68 mm), planting depth is 45 millimeters.
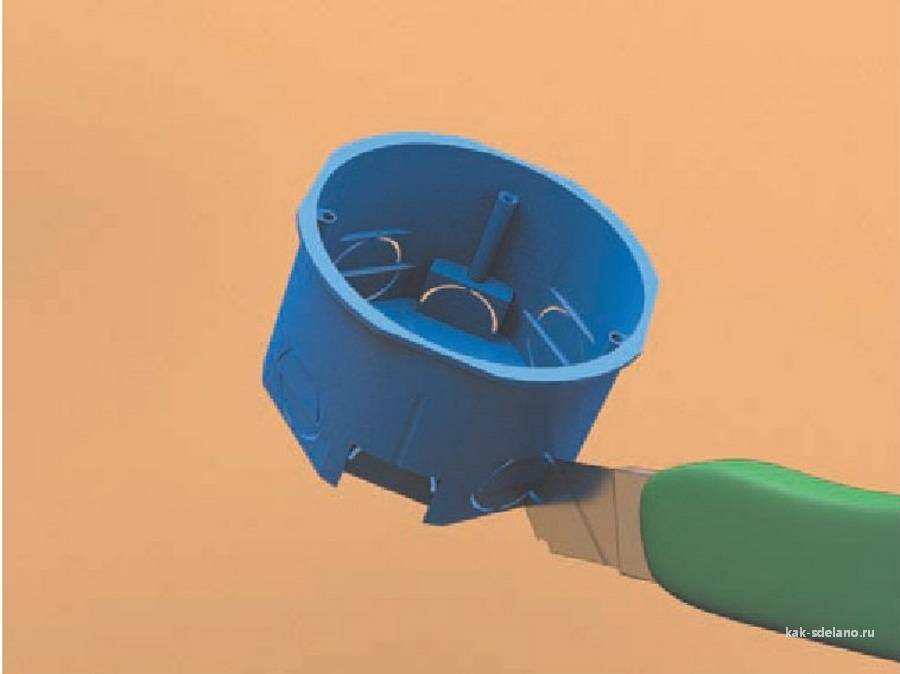
The body of the Schneider Electric IMT35150 socket box is made of non-combustible plastic. It uses a combined material polypropylene + flame retardant, which is able to withstand temperatures up to 850°C. The case is quite durable, equipped with a wide front edge. There are plugs of various diameters designed to enter wires of any section.
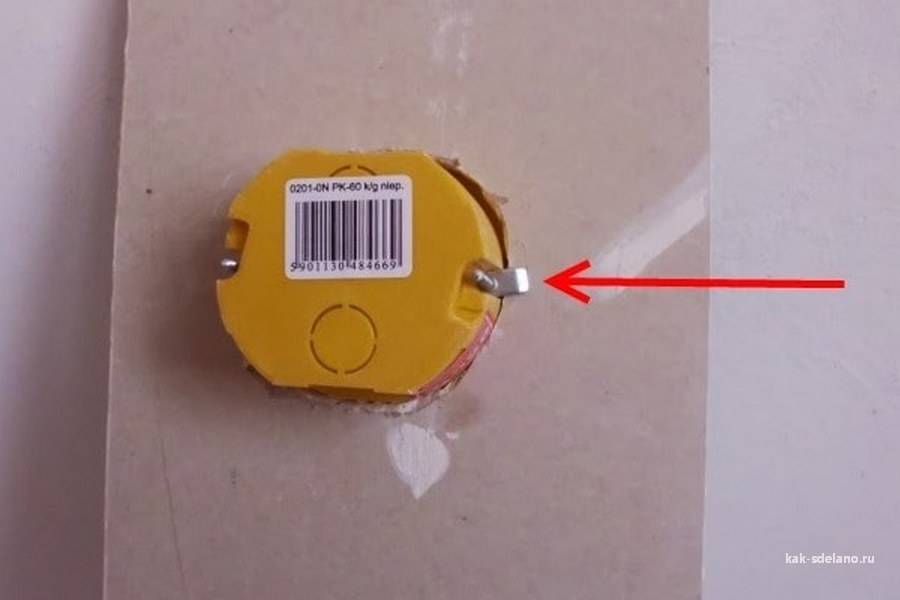
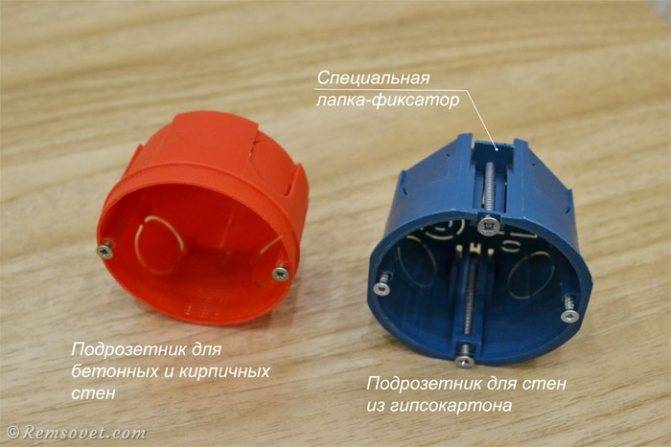
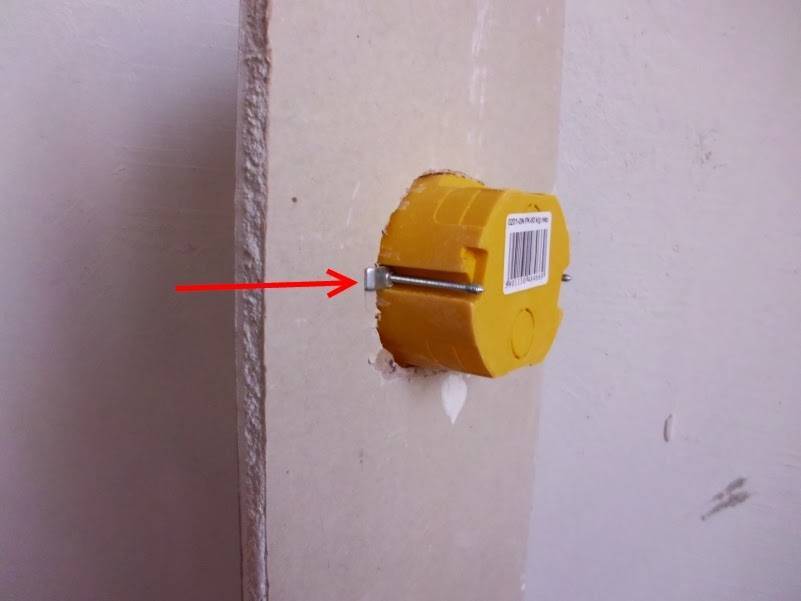
To fix the socket in the partition, two metal paws are used. The use of metal clamps provides a large area of adhesion to the surface, while the plasterboard coating is not damaged. To fix the paws, screw screws are used, which, when tightened, securely press the box to the surface.
For a change, let's take a look at the Polish drywall sockets from Pawbol Euproduct. The plastic is very hard and durable to the touch. Only thin metal paws are used here.
Additional video instruction
Having admired enough of the result of your work, you can start connecting the outlet mechanism. You can strengthen it in the socket box either by means of sliding legs, or with simple screws, for screwing which there are threaded holes on the walls of the box. For inexperienced home electricians, it is better to use screws, because. fixation with paws is not very reliable and can disappoint with azimuthal skew. So, we will attach it with screws, close it with a decorative cover on top and we will be happy to use the electric point installed on our own.
Do-it-yourself installation of plastic windows - step-by-step installation technology in photographs
Gas ovens for baths: learning to choose correctly + rules for self-assembly
Installing an electricity meter: the rules and subtleties of electrical installation
What to pay attention to?
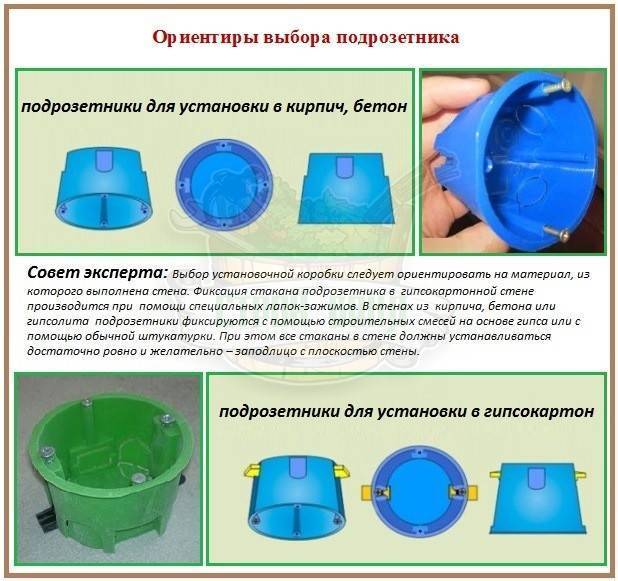
Before you complete the installation, be sure to select the type of socket that you will use. The modern market is ready to offer you the following types of glasses for sockets and switches:
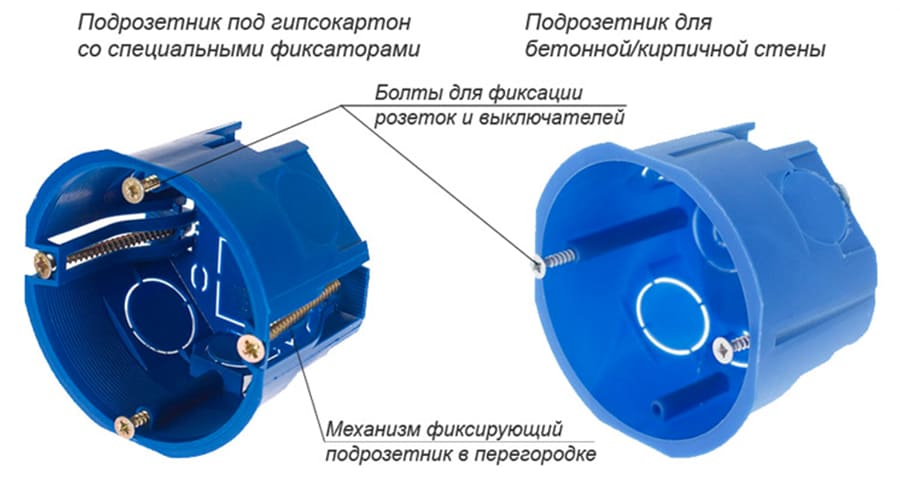
Plastic designs that do not have presser feet. This view must be used in a concrete or brick wall.
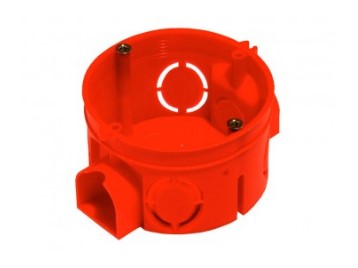
Socket holder with presser feet. This type of construction is perfect for drywall or plastic panels.


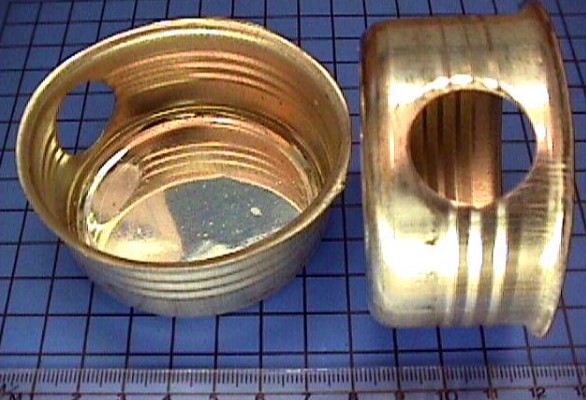
Metal structures with and without a bottom. Previously, these structures were used in old houses. Today, these structures can be used to conduct wiring in a wooden house. In the rules of the PUE, you can find information that it is possible to install sockets and switches in a tree only with the help of metal sockets.
If you have already decided on the type of structure that you plan to choose, then proceed to the preparatory work.
Installation of a socket in a concrete base
If you have already decided where you will have sockets, you can proceed with the installation work, which consists of several stages.
Before installing the socket in concrete, markings are made, then a hole is made in the wall and a gypsum mortar is prepared.
Step 1 - markup on the wall
The sequence of markup work is as follows:
- measure with a tape measure the distance from the floor to the intended installation location of the socket;
- if the flooring has not yet been laid, then you need to add another 5 cm;
- using the building level, draw two lines: horizontal and vertical with an intersection point at the place where the box will be installed;
- put the glass against the wall and circle it with a pencil.
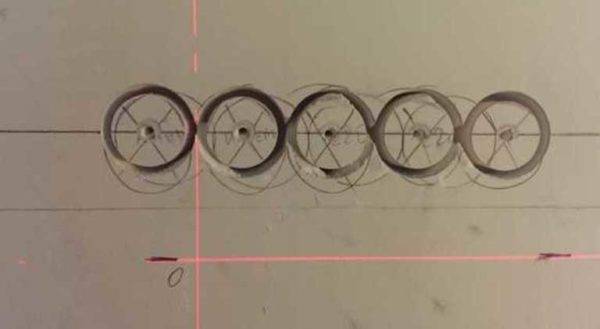
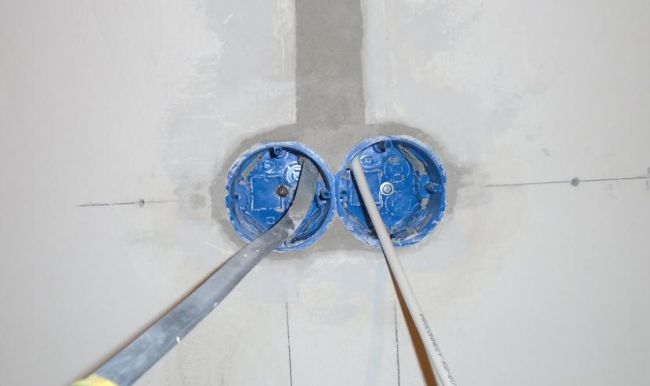
If two or more socket boxes are to be installed, then first a horizontal line is drawn using the building level. It should be located at the distance from the floor at which the sockets will be placed.
Find the center of the first box and draw a vertical line through it. Then set aside exactly 71 mm and draw a second vertical. This place will be the center of the second glass. The marking of the following socket boxes is carried out in a similar way.
Step 2 - Punching a Hole in the Concrete
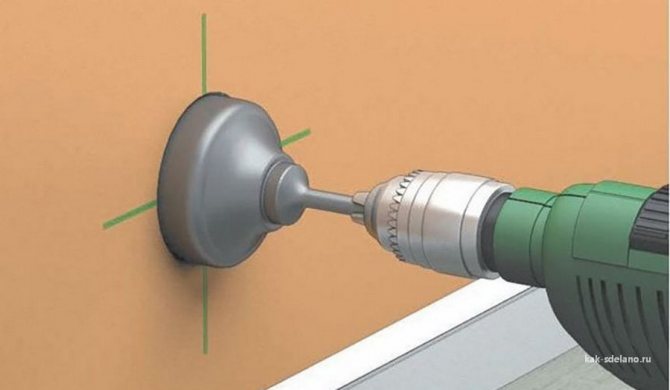
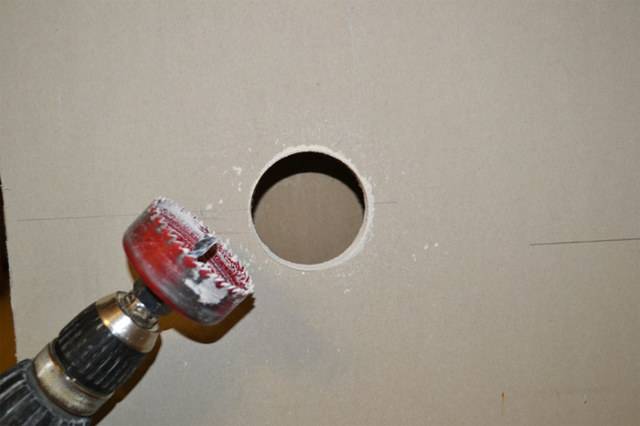
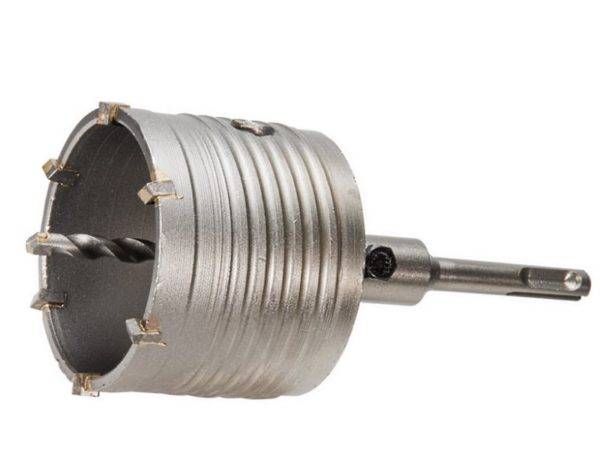
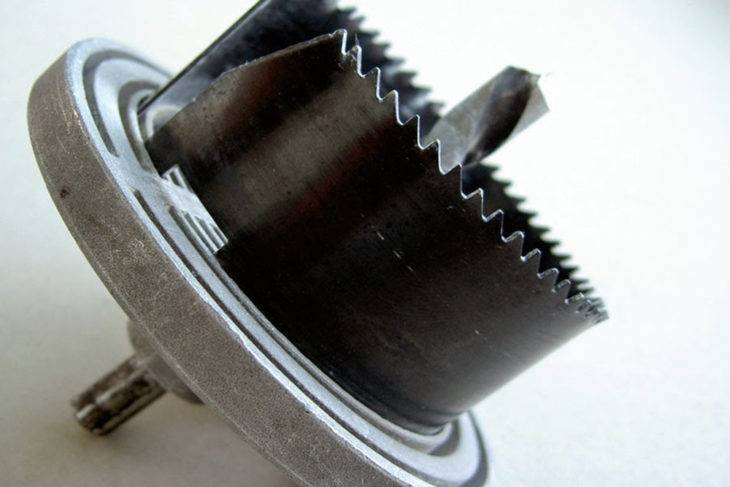
There are several ways to make holes in a brick or concrete wall.The simplest of them is with the help of a crown for concrete with victorious teeth, with which it, crashing into the wall, makes a circle of the desired size.
In the center of the crown there is a drill made of pobedit for making a central hole.
Since standard sockets have an outer diameter of 67-68 mm, a crown with a diameter of 70 mm is suitable for work. The nozzle is put on a puncher or drill, set on a marked line and a hole is made.
Then the nozzle is pulled out, and the entire remaining layer of concrete is knocked out of the hole with a chisel and hammer.
If there is no crown for concrete, then you can make a hole with a drill with a drill bit. First, a central hole is drilled to the entire depth of the nozzle, and then holes are made along the circumference line with the same drill.
The more of them, the easier it will be to gouge a hole of the desired diameter and depth with a chisel with a hammer or perforator.
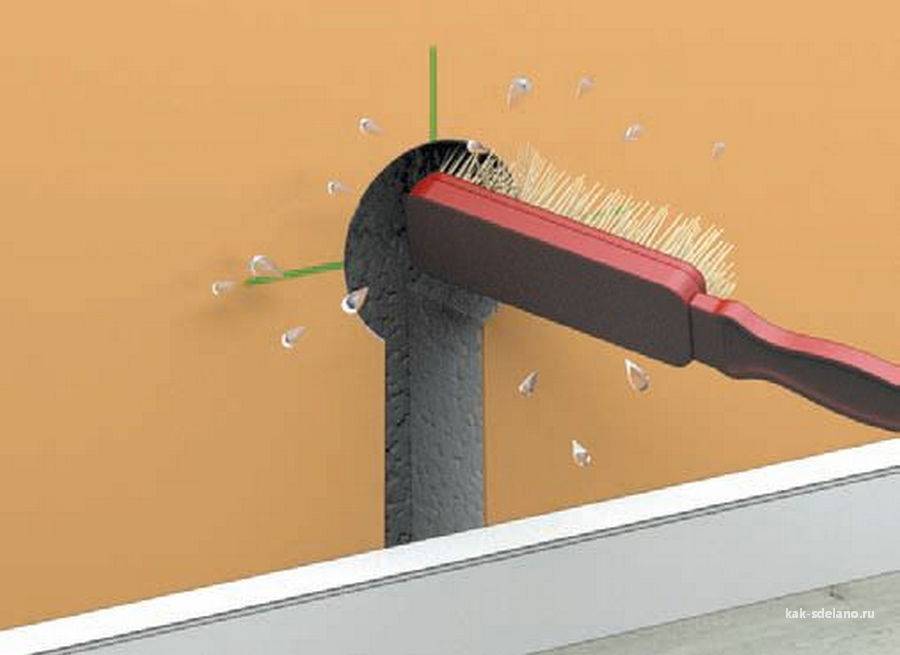
Another way is to make a square hole using a grinder with a diamond disc nozzle. First, the center lines are cut, and then along the entire perimeter of the socket. The process, as always, ends with a chisel with a hammer.
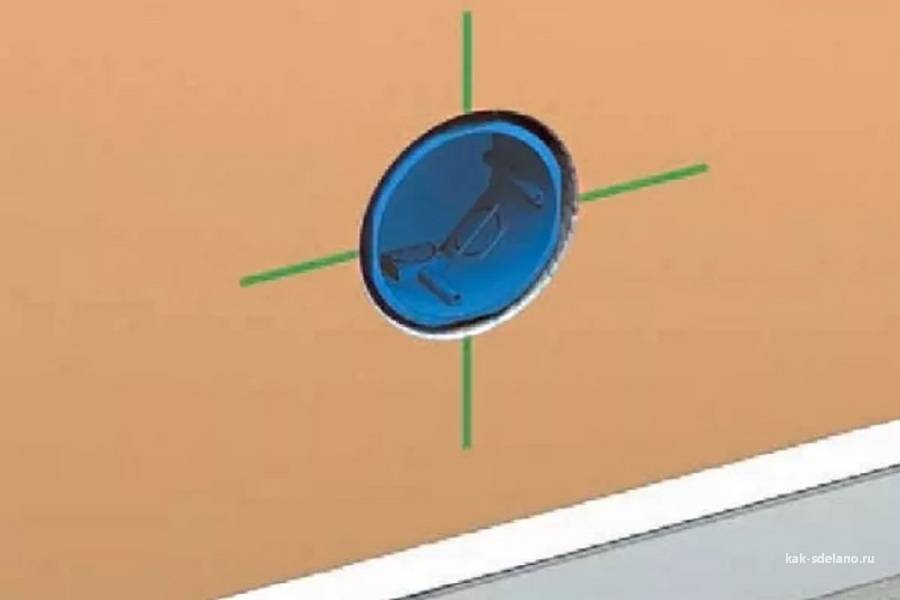
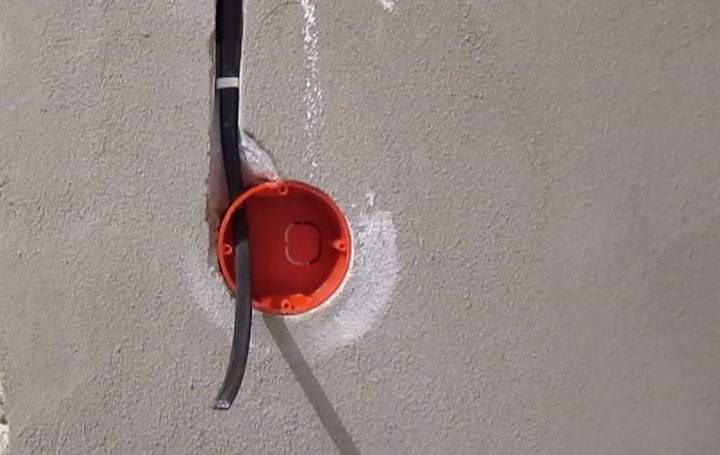
Step 3 - Installing the box into the wall
After the hole is made, it must be cleaned well and a socket box inserted into it for fitting. It should freely enter in width, and in depth there should be a margin of about 5 mm for the solution.
If everything turned out as it should, now it is necessary to make a passage for laying the wire from the upper or lower part of the hole (depending on the location of the electrical wiring in the room).
The socket also needs to be prepared. We turn it over with the bottom side, where the slots for the wires are located and cut one of them with a knife.We get the wire there and insert the box into the wall to check.


To fix the glass, we prepare a solution of gypsum or alabaster, which should have the consistency of sour cream. It is worth considering that the solution of these materials hardens very quickly, and you have no more than three to four minutes to complete the process of installing the socket. After five minutes, the mixture will no longer be suitable.
Two minutes before laying the box in the wall, the hole is wetted with water. After the liquid is absorbed, a layer of gypsum is applied to its walls with a spatula. A wire is threaded into the glass, its back part is also smeared with a solution, and the socket is inserted into the hole.
Adjust the position of the box so that its edge is flush with the wall and the screws are horizontal.
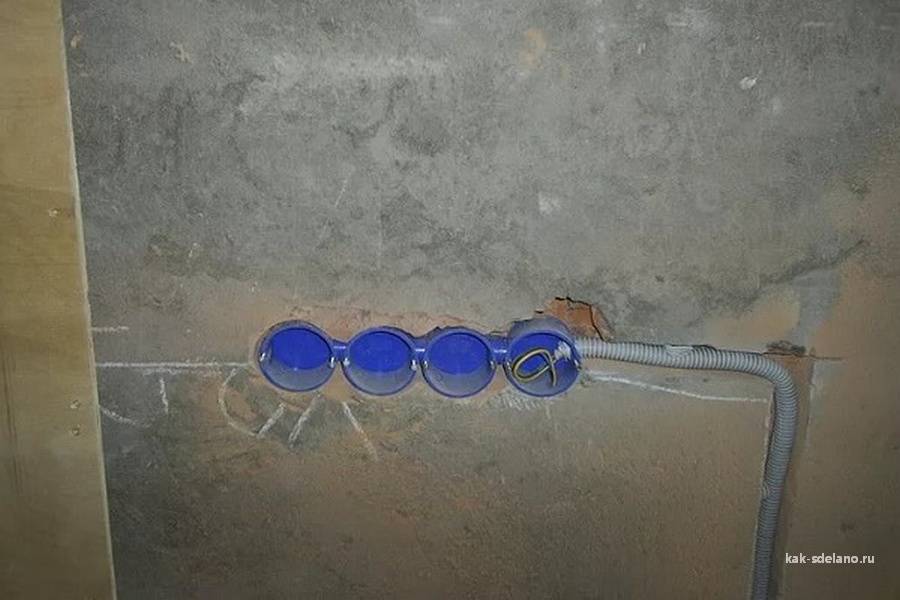
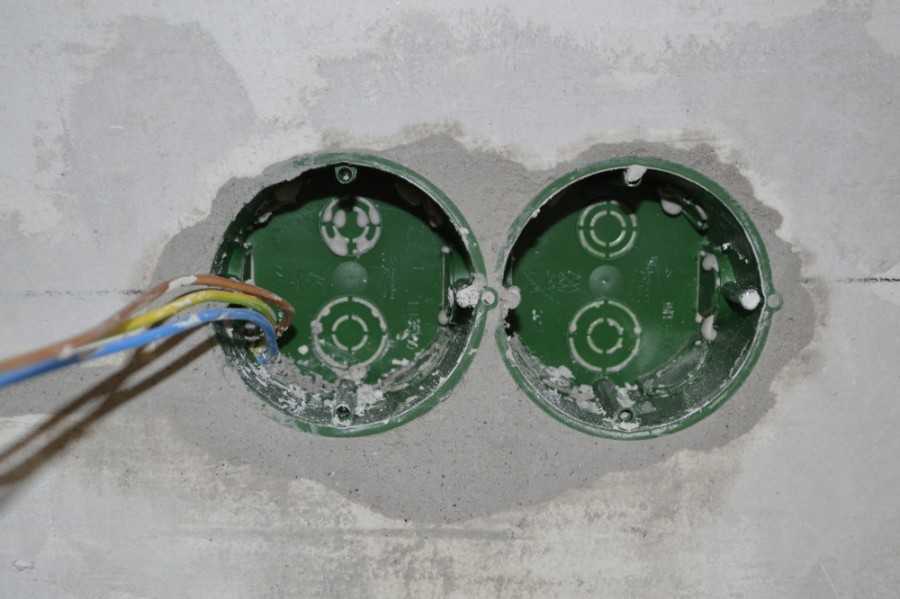
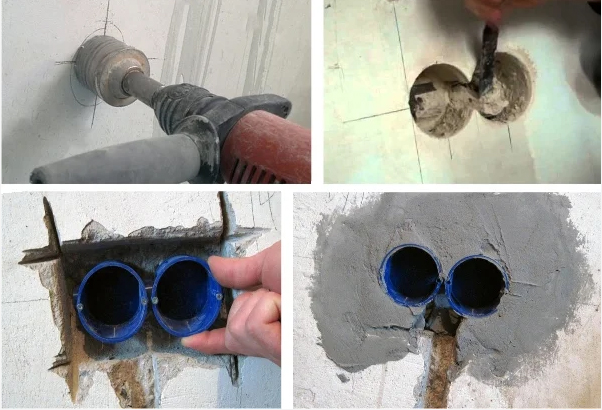
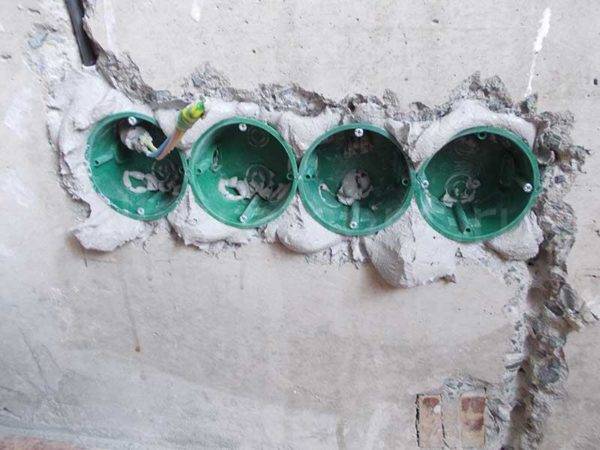
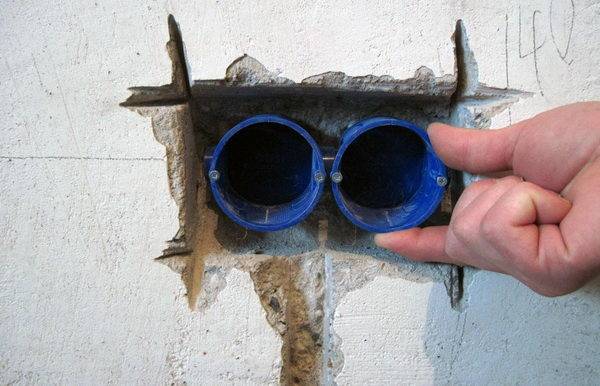
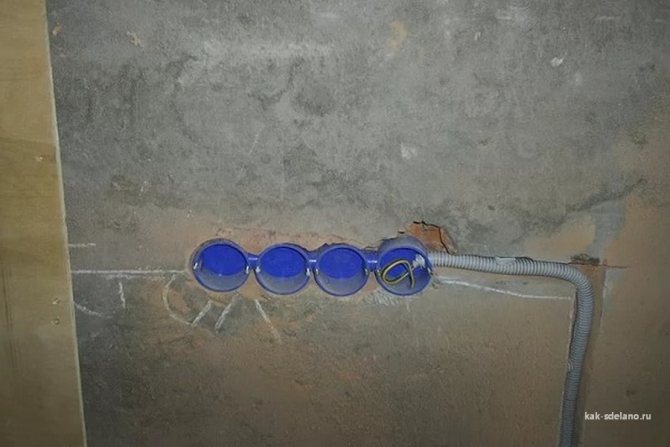
Step 4 - combining several sockets
How the marking of two or more socket boxes is performed was described above. Making holes is done in the same way as for a single box. The only difference is the need to combine the holes with each other. This can be done with a chisel or grinder.
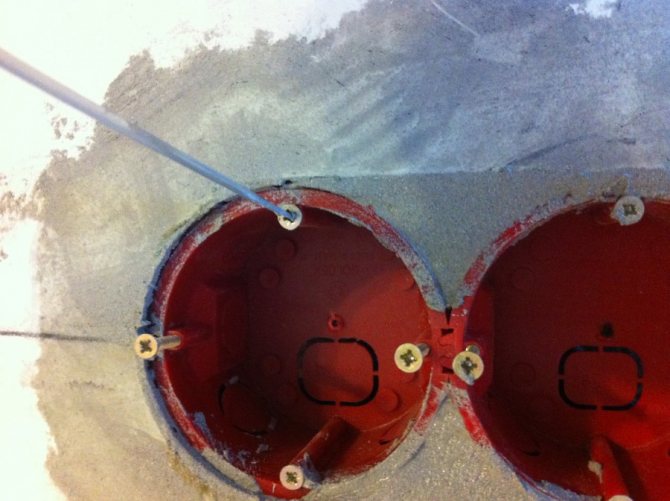
Before installation work, the socket boxes must be docked with each other using a side fastener. Installation into the wall is carried out similarly to the installation of a single glass.
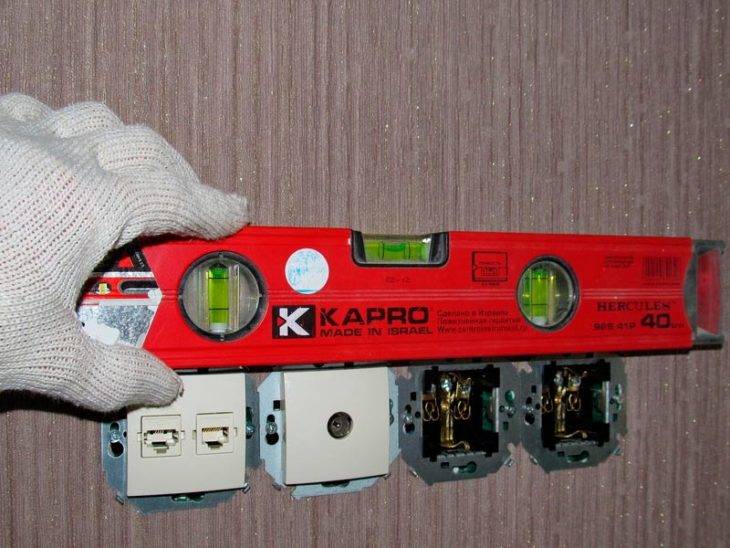
An important point that you need to pay attention to when attaching a block of boxes is the strict alignment of the socket boxes horizontally while they are fixed in the wall with a gypsum mortar. It is necessary to carry out this part of the installation only with the help of the building level.
Socket selection details

Modern technologies allow you to deal with the laying of electrical cables quickly and efficiently, clear instructions minimize possible difficulties, but it is recommended to be aware of the basic installation features.
The drywall socket is a gasket between the socket and the wall, which allows you to firmly fix the electrical connector. It is required before installing the outlet in drywall. Without it, the mount will loosen over time, the drywall will deform, which will lead to a loss of appearance and the inability to use the outlet (after a while it will simply fall out).
Modern drywall sockets, in addition to the main fasteners, have additional fasteners that “cling” to the drywall coating where they are installed, achieving a better fixation of the electrical connector.
Since GKL is considered a flammable material (with the exception of certain varieties), the choice of a socket must be made in accordance with accepted fire safety rules. According to the norms, in rooms lined with drywall, the greatest danger in terms of ignition is precisely the outlets of electricity through sockets. Choosing the right socket allows you to stop this threat.
Advice. It is recommended to purchase sockets and protective socket boxes simultaneously with the purchase of drywall: firstly, this will immediately resolve this issue; secondly, it is so realistic to choose the right materials.
- choose drywall sockets made of self-extinguishing plastic. When the outlet is heated, the heat from the outlet will not be transferred to the surrounding drywall. This is additional safety in case of a short circuit;
- focus on individual dimensions if the distance between the main wall and the drywall coating is small. If the cavity width is sufficient, you can buy a standard size model - 50 mm deep.
Marking the walls before installing the sockets
Before you make a hole in drywall and figure out where exactly it should be and outline the required area, you need to think about its intended purpose. Basically it all depends on personal convenience.
In accordance with generally accepted European standards, the distance between the socket and the floor should reach 30 cm, and the switch should be installed at a height of 90 cm, while 18 cm should be left from the middle of the device to the border of the doorway, not counting the trim and the box itself.
These standards are quite convenient not only specifically when carrying out installation work in drywall, but sometimes there are cases in everyday life that require an individual approach:
- In the kitchen, installation often occurs above the surface of the countertop. Basically, their height reaches 1.2 m.
- If an aquarium or a personal computer is located in the living room, then it is best to mount the outlet higher than 30 cm from the floor surface, which will avoid cables dangling underfoot.
- In the bathroom, double sockets are usually installed in drywall at a height of 1 m, which is convenient for a washing machine and other household appliances.
The very same markup under the socket must be done as follows:
- First of all, you need to outline a horizontal strip at the required height from the floor level.To do this, you need to use a tape measure and a simple pencil, and then you need to find out the installation location of the socket boxes, while taking into account the symmetrical placement of the structure in relation to all sections of the wall.
- If only one element should be installed, then in a suitable place at the optimal height, it is necessary to mark a point on the wall, which will become the center for the future socket or switch, where the box will be installed.
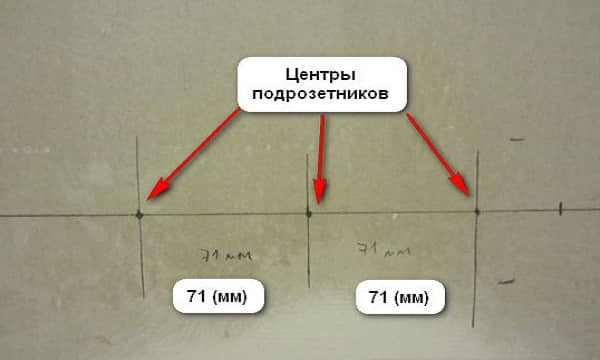
Note! If several boxes are being installed, then from the middle of the first one it is necessary to make an indent of 71 mm and mark the center of the second socket box and the subsequent ones through the same distance, which must be observed as accurately as possible. Otherwise, in the future, difficulties may arise with the installation of the overlay frame, since the structure may not fit or there will be gaps after its installation. the likelihood of their damage, as a result of which the partition will become less stable
In addition, the location of metal profiles should be taken into account, which are the support for gypsum boards, otherwise there is a possibility of damage during making holes, as a result of which the partition will become less stable. After all the actions performed, points will be marked on the wall that determine the center of the boxes
Next, you can start making holes.
After all the actions performed, points will be marked on the wall that determine the center of the boxes. Next, you can start making holes.


Tips for Installing an Outlet in a Plasterboard Wall
Step 1 - Preparatory work
To begin with, you must prepare all the tools and materials for fixing the outlet in drywall. To install the product yourself, you must have:
- Drill with a special cutter (crown) in order to make a hole in the plaster wall. The diameter of the crown should be 68 mm - the standard size of the socket for installation in plaster.
- Building level and marker for marking holes.
- Indicator screwdriver for checking the voltage in the network.
- A curly screwdriver in order to fasten a plastic cup, connect wires and actually install an outlet in a plasterboard wall.
Step 2 - Chasing the plaster
So let's move on to the main process. First, according to the wiring diagram, you must determine where you need to cut a hole for installing an outlet in a drywall partition. In the selected place, put a cross on the drywall with a marker, which will be the center of the future hole. If you decide to install a block of sockets in a plaster wall (several pieces at once), you need to make several round strobes in a row. By the way, the installation height of sockets is not standardized by GOST or PUE rules, so you can place an “electric point” anywhere you like. To do this, use the building level and one simple rule - the distance between the centers should be 72 mm, as shown in the photo below. Having made the markup, you can proceed to the gating of the GKL sheet.
Step 3 - Mounting the socket
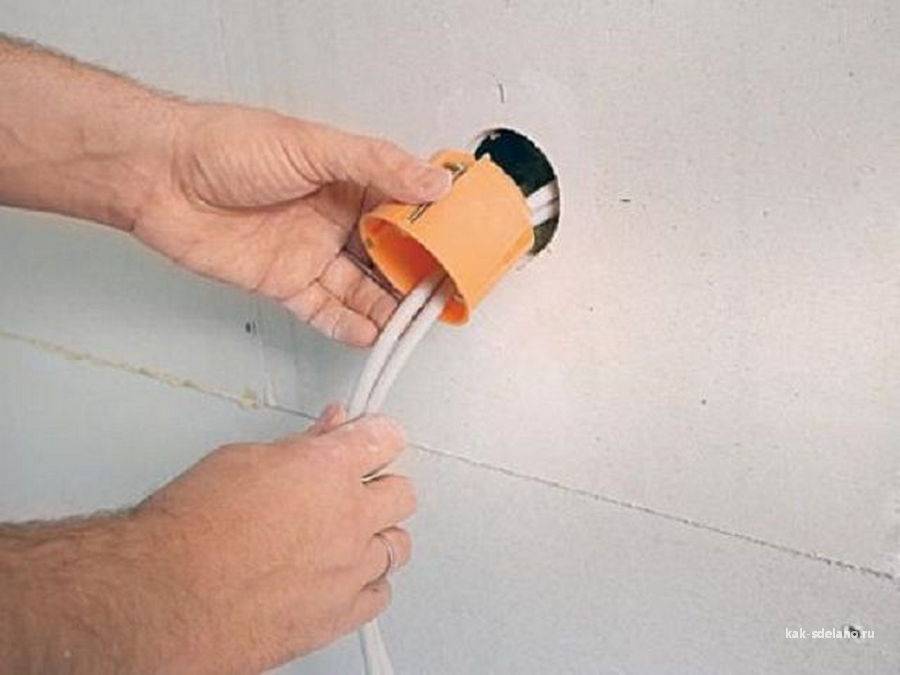
Correctly fixing the socket in drywall is not at all difficult. As you can see, there are 4 screws on the case: 2 for fixing the box itself on the wall and 2 for installing the socket.To begin, bring the wires for connection out of the strobe. After that, cut a hole in the bottom of the plastic cup for the input of the power wires. Next, carefully install the socket into the drywall and use two screws to fix the glass in the strobe. Presser feet on opposite sides will securely fix the product in the plasterboard wall.
You should also know that you will not be able to properly fix the outlet in drywall without a socket, so immediately anticipate all possible obstacles and remove them before installing the plastic cup.
Step 4 - Connecting the Wires
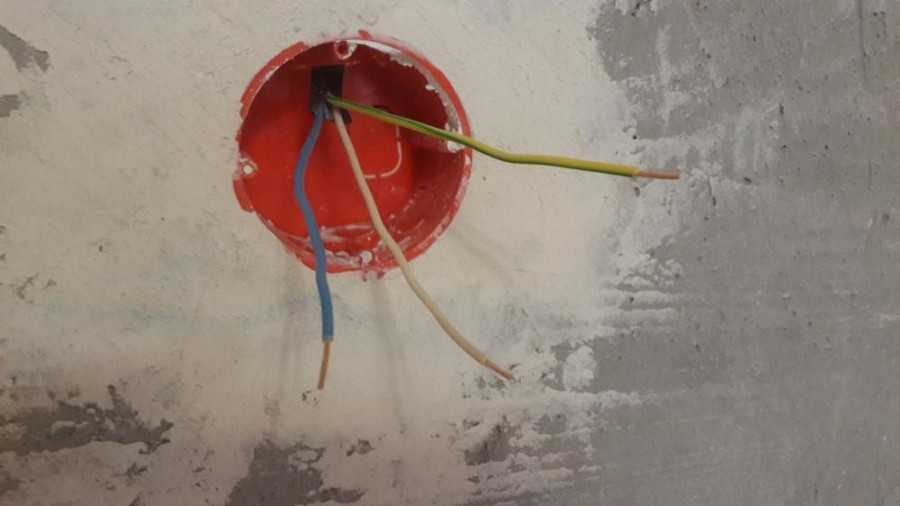
When you manage to securely install the socket in the wall, you can proceed to connecting the socket in drywall. Connecting the wires is not difficult even for a novice electrician. The main thing is to turn off the power on the input shield so that you do not get electrocuted during installation and connection. Before proceeding to electrical work, check the voltage on the wires in the socket using an indicator. If you do not know how to use an indicator screwdriver, we recommend that you read the corresponding article.
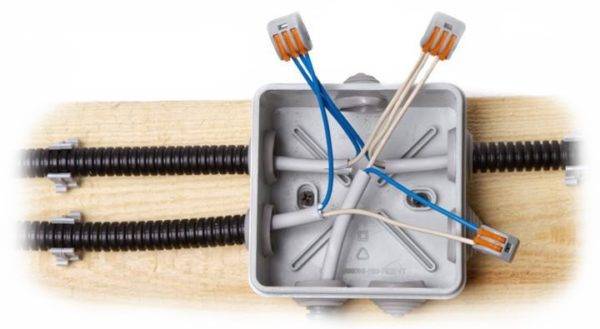
All you need to do is connect zero (N, blue), ground (PE, yellow-green) and phase (L, usually brown) to the appropriate terminals on the socket housing. Tighten the wires well so that the contact does not loosen and the plastic does not start to melt after installation and connection, because. in this case, a short circuit in the wiring may occur and, as a result, a fire in the house.
When you have connected all the wires, you can insert the socket into the socket and fix it with screws.Fastening under drywall can be done either with the help of the two remaining screws of the socket box, or you can install the case by spreading the legs of the socket itself. After installation and connection, you will only have to fix the plastic frame and decorative cover, which is obviously not difficult.
Installation of the socket
After purchasing materials, you can draw a place for installation. The technology used for installation differs depending on the type of wall. Working with concrete, aerated concrete and brick is almost identical, but with drywall it is different. Differences are also observed in the set of tools that will be required.
Installing a socket in concrete, aerated concrete or brick
Working with such wall materials requires a specialized tool. You will need to prepare:
- perforator;
- core drill 68 mm;
- chisel or pike under the puncher.
 core drill
Prices for socket drills (core drill)
core drill
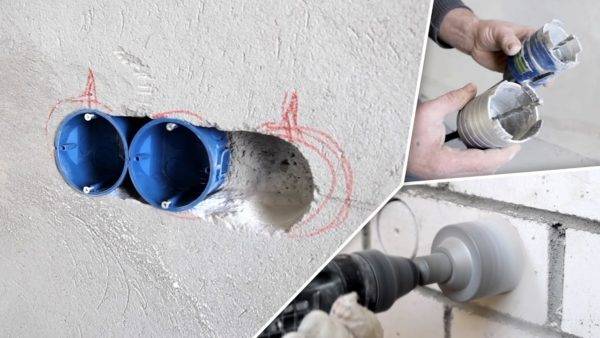
First you need to make a landing hole in the wall to install the socket using a special core drill. It is installed on a drill or puncher. Crowns come in different price segments, and differ in the material of the cutting edge. They are diamond and carbide. Also drills differ from each other in the mode of operation. Some are used only with a drill, while others are percussion, so they are suitable when drilling with chiseling turned on.
If you want to drill in reinforced concrete, then you will need to use a more expensive diamond-coated bit on the segments, since cheap equipment breaks. You also need to set the optimal number of revolutions recommended in the instructions for the drill.
There is a concrete drill in the center of the cylindrical crown. It is used for centering. The protruding drill is placed in the center of the future socket box and a deepening is carried out into the wall until the ring is drilled with a crown. After that, you need to stop drilling and remove the centering. This will prevent the protruding part of the tool from making a through hole. The center drill is removed by knocking out with a wedge or unscrewing a special clamping bolt.
 Drilling into the wall
If you need to install a block of sockets, then you need to look at their instructions, as well as at the parameters of the sockets and determine the center distance. Usually it is 71 mm. To make everything even, ideally, immediately after removing the crown to remove the center drill, it is necessary to make markings from a small hole along a horizontal line in increments of 71 mm. The resulting points will be used to center subsequent drills in the future.
 Block markup
After drilling, an annular hole will remain. It remains only to knock out its central part. It is convenient to do this with a puncher with a pike. You can get by with an ordinary hand chisel and a hammer. You need to insert the tool into a narrow strip of a drilled larger circle and hit. As a result, the central part will fall out. When working with aerated concrete or brick, this is not difficult. When knocking out concrete, it will be more difficult if it is reinforced with steel reinforcement.
 Mounting sequence
Having a ready hole, you can cut a strobe in the wall to the ceiling, where the junction box is located, in order to make a branching of the power cable.To compensate for the error, the laid cable is taken longer by 30-40 cm. In the future, the excess can be cut off. Turning to laying the cable and connecting to the junction box, you will need to de-energize the room.
 Junction box
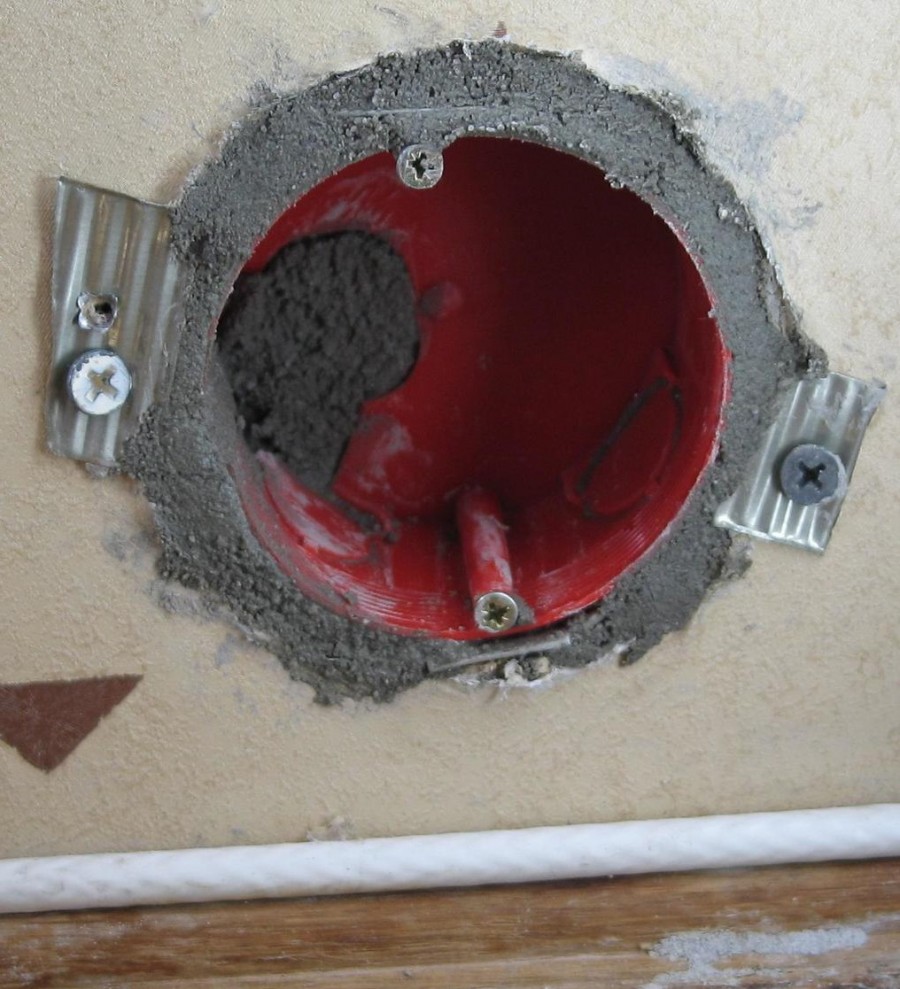
After preparing the strobe and the hole for the socket itself, you need to insert the installation box into it and check the depth so that nothing sticks out. Next, prepare a thick mortar. It is most convenient to use alabaster and gypsum plaster.


To get the power wire into the box, you need to break the window in it with pliers or cut it off with a knife. In such places, manufacturers make the plastic thinner to allow mechanical extrusion. Next, you need to lay a little solution deep into the hole, and then insert the box with the wire wound into it.
 Pasting socket boxes
The socket box should be set exactly with the help of a level. If it has only two vertical or horizontal mounts, then their orientation must be selected depending on the characteristics of the outlet purchased. In the presence of 4 mounts, this does not matter.
 Socket with two fasteners
The side cavity between the box and the wall is also filled with mortar. If alabaster was used, then after 3-4 hours the installation box will sit securely. You should wait until the solution is completely dry and stops emitting fumes. In no case should polyurethane foam be used to fix the socket boxes, since it is a combustible material.
 Work as a grinder
Preparing the socket for installation in drywall, selection of a crown
To install the installation box in a wall made of drywall, you need to carry out a number of preparatory steps.
Mark the wall and mark on it the points where the sockets and light switches will be located. To do this, you need a pencil (or marker) and a measuring tape.
There are no strict standards limiting the location, so each developer has the right to independently choose a place.
As practice has shown, placing power outlets too close to the floor can be fraught with a short circuit (for example, in the event of a water leak from the heating system). Therefore, it is customary to install them at a distance of 20-30 cm from the floor, so that you do not have to sit on the floor to turn on household electrical appliances. A convenient outlet is one that is easy to reach by bending over.
An exception to this rule can be considered sockets for connecting computer and television networks. Often they are mounted last and the cables are laid in the already assembled floor skirting boards. Inside the plinth there is a cavity designed for pulling additional network lines. Then the plinth is cut and a socket with special connectors is mounted into it. This is allowed, since this type of cable passes through itself the so-called "weak currents" and short circuits are not afraid of it.
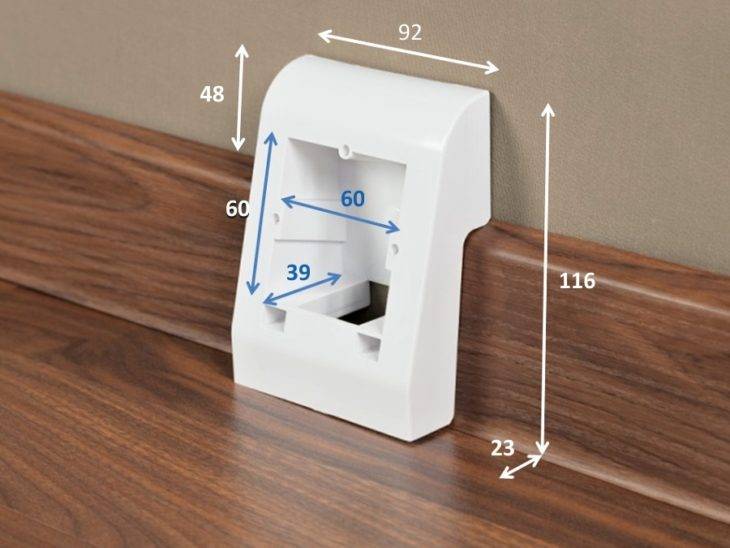 Installing a socket box on a baseboard for wiring a television and computer network
On the kitchen "apron", the sockets are raised 15–20 cm above the level of the desktop.
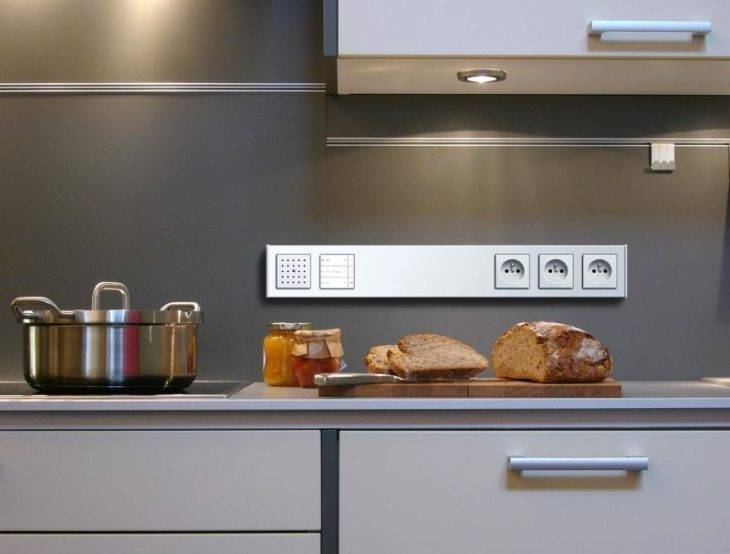 Location of sockets in the kitchen
Light switches are usually located at a height of 90 or 150 cm from the floor and 15–20 cm from the edge of the door frame.
When marking, it is recommended to use a building level or a laser, especially if several sockets are located in one row.
 Building level allows you to accurately determine the location of outlets
To install blocks from a number of switches or sockets, it is necessary to mark the centers of future circles at a distance of 71 mm.
Video: installation of a socket in a wall made of plasterboard.
The socket boxes must be brought into working condition by adjusting the location of the clamping device. If the wall consists of 2 layers of drywall, then the distance between the rim of the socket and the foot must be more than 2.5 cm. Otherwise, the box cannot be installed. The distance is easily adjusted by unscrewing the locking screw. Therefore, at the beginning of work, it is best to move the clamping legs to the maximum distance from the upper rim.
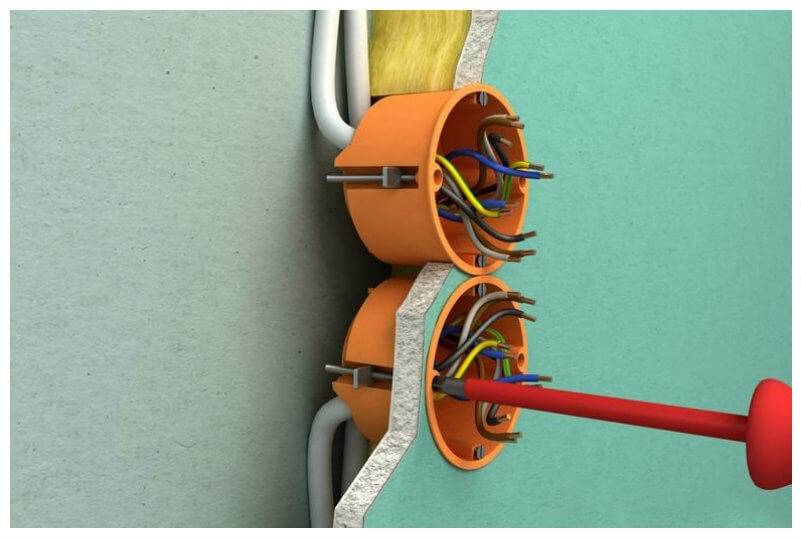


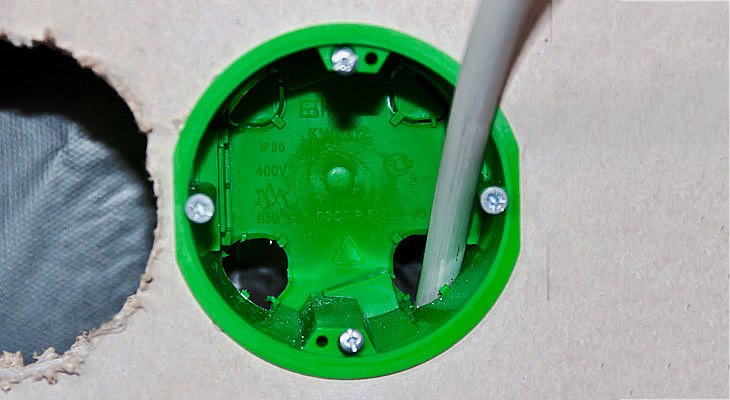
Perforated holes are located on the sides and bottom of each installation box, the plastic on which must be broken out based on the planned connection. Theoretically, one cable should be pulled into each hole, but in practice the installer decides for himself how many holes he needs for the connection.
In addition, before starting work, you need to connect the sockets into “batteries”, if any are planned. This is done using plastic connectors that are attached to the side lugs of the box (rectangular). In stores, connectors are sold separately and are not included with socket boxes, so you need to stock up on them in advance.
 Fastened with plastic clips
To drill holes for the installation box, you will need a 68 mm hole saw. and a screwdriver or drill (perforator). If there are none, the hole can be carefully cut with a construction knife, after drawing a circle in the planned place.But since the reliability of fastening depends on the shape of the hole, it is still better to use a crown for wood.
 The size of the crown for installing the socket in drywall 68 mm
It is also impossible to cut a hole with a knife if the wall is located in the bathroom or in the kitchen and is tiled. In such cases, a crown with a diamond cutting edge is used (for concrete).


