- Tray base and drain
- Waterproofing
- Water connection
- Sewer connection
- Features of the installation of a shower cabin-hydrobox
- Assembly of Erlit corner shower enclosures
- GENERAL INFORMATION
- SPECIFICATIONS
- FORBIDDEN
- TRANSPORT AND STORAGE
- Recommendations to the buyer
- Dimensions
- Width
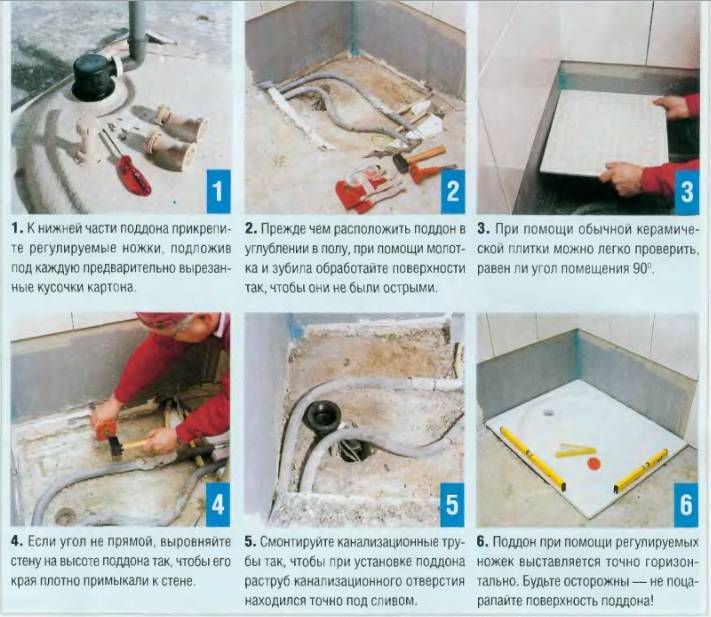
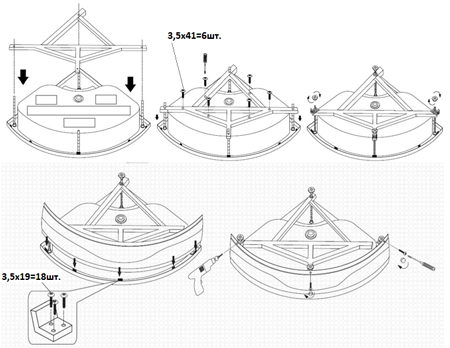
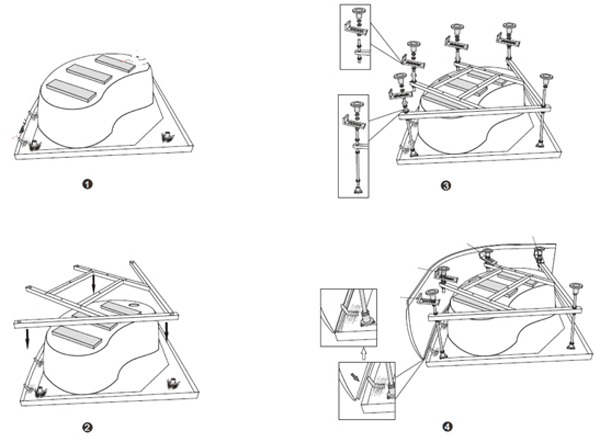
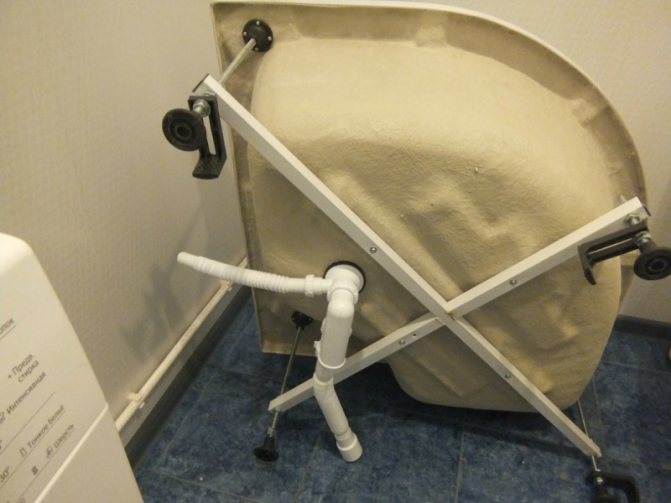
- Choosing a base for a pallet
- 4. Assembling the back wall
- General layout of the rear wall assembly
- Pallet design options
- barrier-free type
Tray base and drain
The pallet is the most important part of the structure under construction. It can be bought at any specialized plumbing store or made independently from improvised materials, namely:
- bricks;
- monolithic concrete screed;
- expanded clay concrete blocks.
A pallet made of bricks and expanded clay concrete blocks is quite simple to build, subject to the acquisition of good quality material. A monolithic screed is a more complex structure that requires knowledge of the proper arrangement of the “sex pie”.
Waterproofing
Proper waterproofing of the shower will avoid such unpleasant phenomena as leaks, dampness, the appearance of fungal infections, and the reproduction of mold colonies. A competent approach to this procedure provides for the implementation of waterproofing work not only in the booth, but in the entire area of \u200b\u200bthe bathroom.The most vulnerable areas are areas that are in direct contact with water.
They should be given the most attention
Cabin waterproofing is carried out with roll, penetrating or bituminous materials. Moreover, penetrating impregnations are used only for structures made on the basis of concrete or sand-cement materials. The booth area is completely isolated according to the scheme.
Roll insulators are applied to the floor surface with an overlap on the wall of at least 200 mm. We recommend that you familiarize yourself with the thematic video on the waterproofing of the shower stall:
Water connection
The main mistake that beginners make is immuring communications in the wall. The thing is that no material, be it metal or reinforced polypropylene, is guaranteed against leaks, especially in the places of soldering and joining of bends. A competent approach to the supply of plumbing to the shower cabin involves laying pipes in a special niche, which will be hidden by a plasterboard cover decorated with finishing material.
To reduce heat loss, the niche is insulated with mineral wool heat insulators or cellulose insulation. The ends of the pipeline are removed from the niche and cut to the desired length. They are threaded or threaded fittings are screwed for fastening with mixer flanges.


Sewer connection
The first thing they do when creating a shower cabin on their own is freeing up space. This process involves getting rid of the old bathroom. After that, the drain is installed and connected to the sewer system.The important points in this process are: the correct installation of a sewer pipeline with a slope of 3 ° to ensure the normal discharge of wastewater; the tie-in of the outlet from the drain in the horizontal plane must be made at a minimum angle to the sewer pipe.
When using corrugated pipes as bends, they can be bent up to 120°. However, in order to prevent clogging of the outlet pipeline during operation of the booth, the number of bends should be minimized and even more so, turns with negative angles should be avoided.
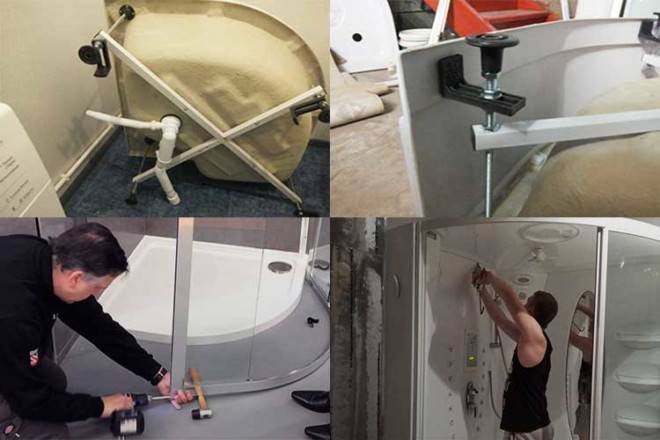
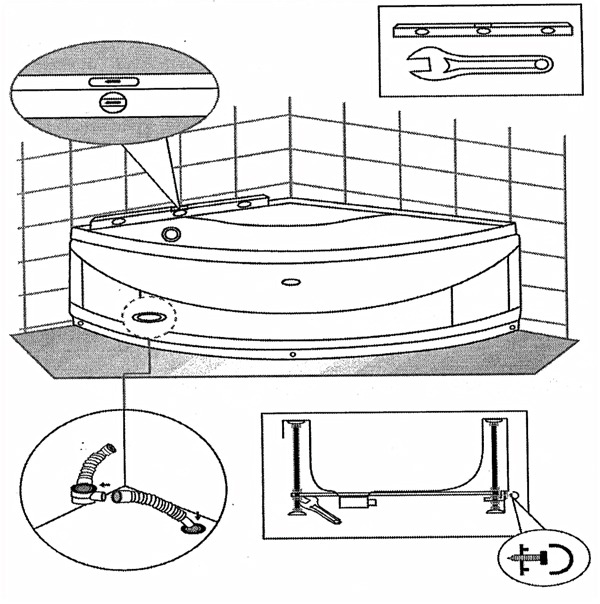
Features of the installation of a shower cabin-hydrobox
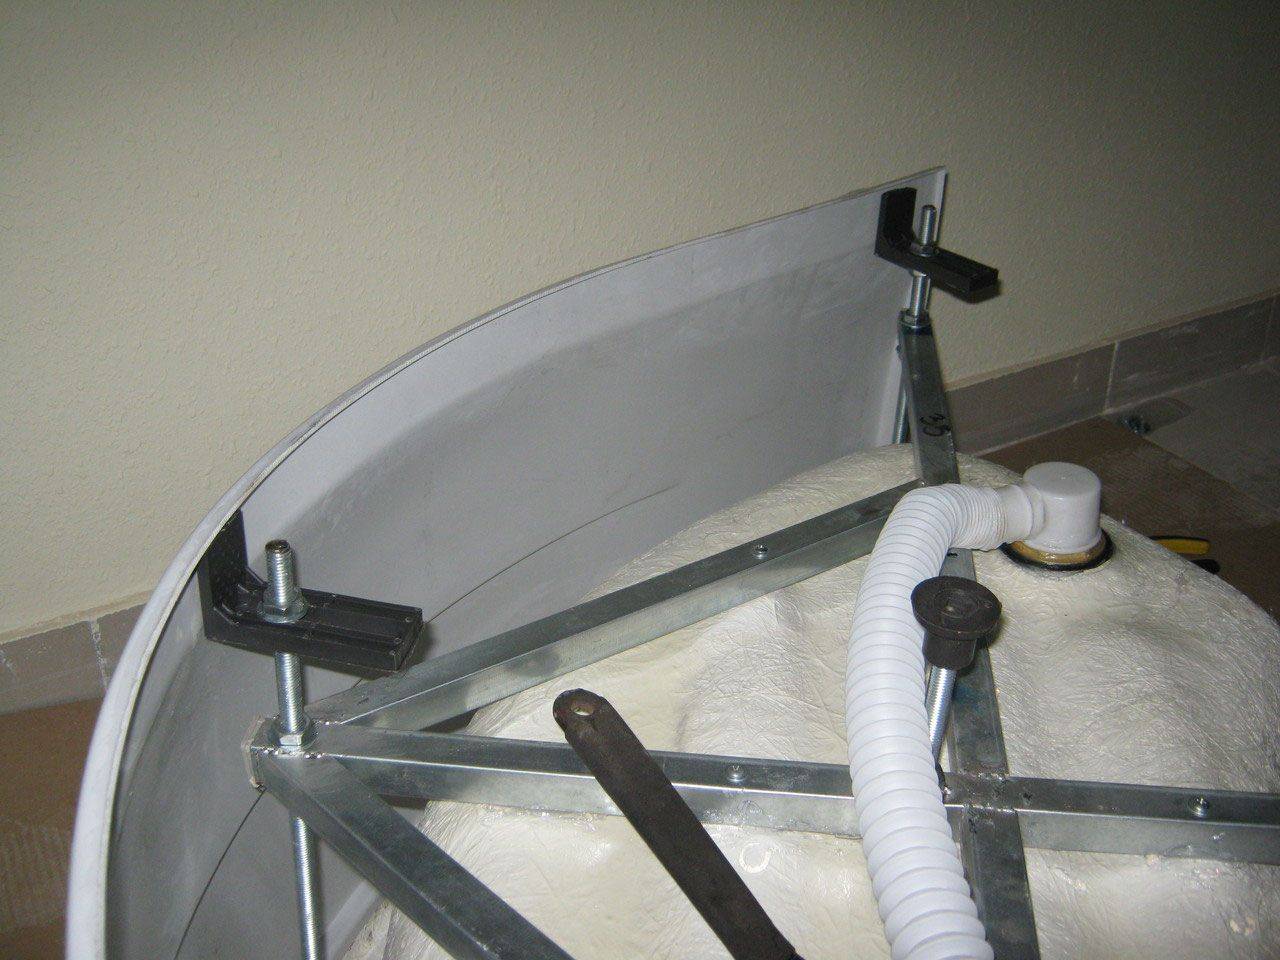
In closed showers and hydroboxes, after installing the pallet, it is necessary to assemble a panel covering the wall. It has mounting holes in which all the "gadgets" are pre-installed - nozzles, holders, soap dishes, seats, speakers, lamps, etc. the shape and size of the bottom is different for everyone, so it's hard to make a mistake. It is advisable to lubricate all the "landing holes" with sealant: there will be less dripping later.
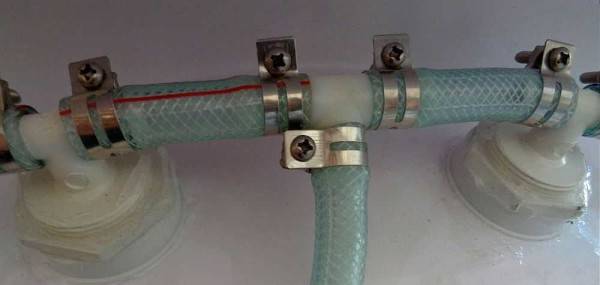
Particular attention should be paid to the installation of injectors. In addition to installing the sprayers themselves, they must be connected to each other with hose segments. It is put on the nozzle nozzles, tightened with clamps. All this is assembled according to the scheme available in the instructions.
Pay special attention to ensure that the nozzle tips are intact and the clamps are well tightened. It will not be superfluous to smear each seat with sealant (both under the nozzle and under the hoses)
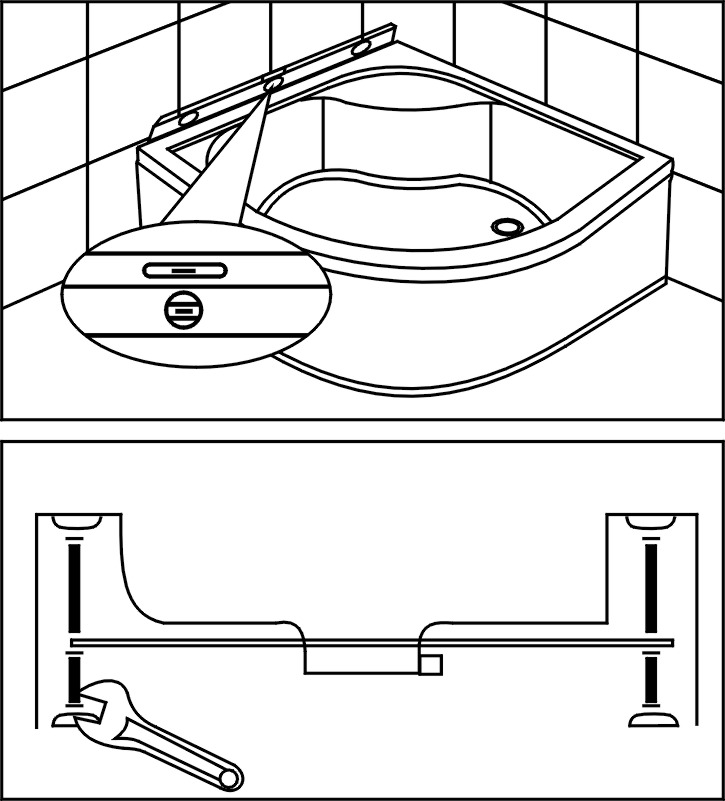
Connection of shower nozzles from the back
The wall with connected accessories is placed in a special groove. The junction is also pre-lubricated with sealant.Cold, hot water is connected, you can check the performance of the system.
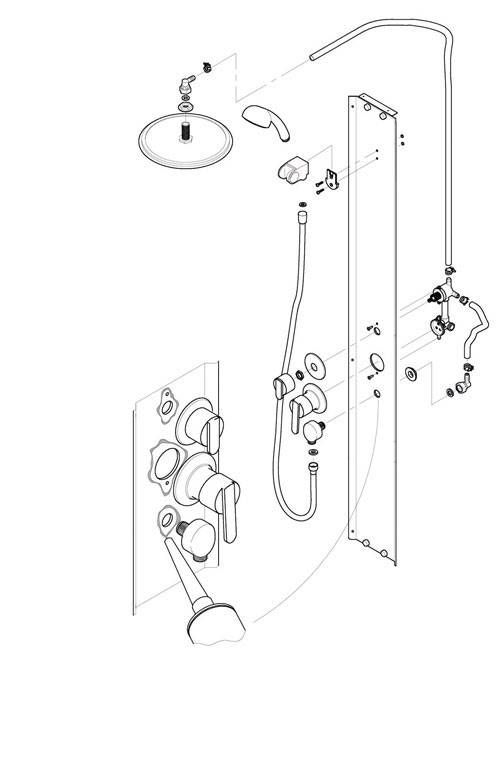
After installing the walls, the lid is assembled. There is usually a rain shower, maybe a lamp. When installing them, you can also use a sealant - you never know where water gets in ... A hose is put on the shower pipe, which is tightened with clamps. Conductors are connected to the lamp terminals, the junction is carefully insulated, several heat-shrink tubes can be put on in series.
The assembled cover is installed on the wall. The joint is again lubricated with sealant. While the sealant has not hardened, the assembled door frame is installed. When doors are installed depends on the model. In some cases, they need to be hung before installation, in some - after. All joints are sealed.
The assembly of the hydrobox shower cabin is shown in sufficient detail in this video. There are no comments, but the sequence of actions is clear.
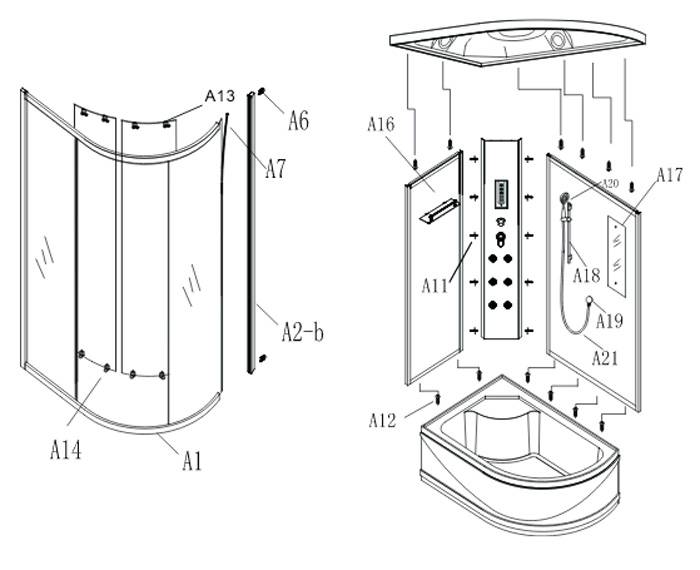
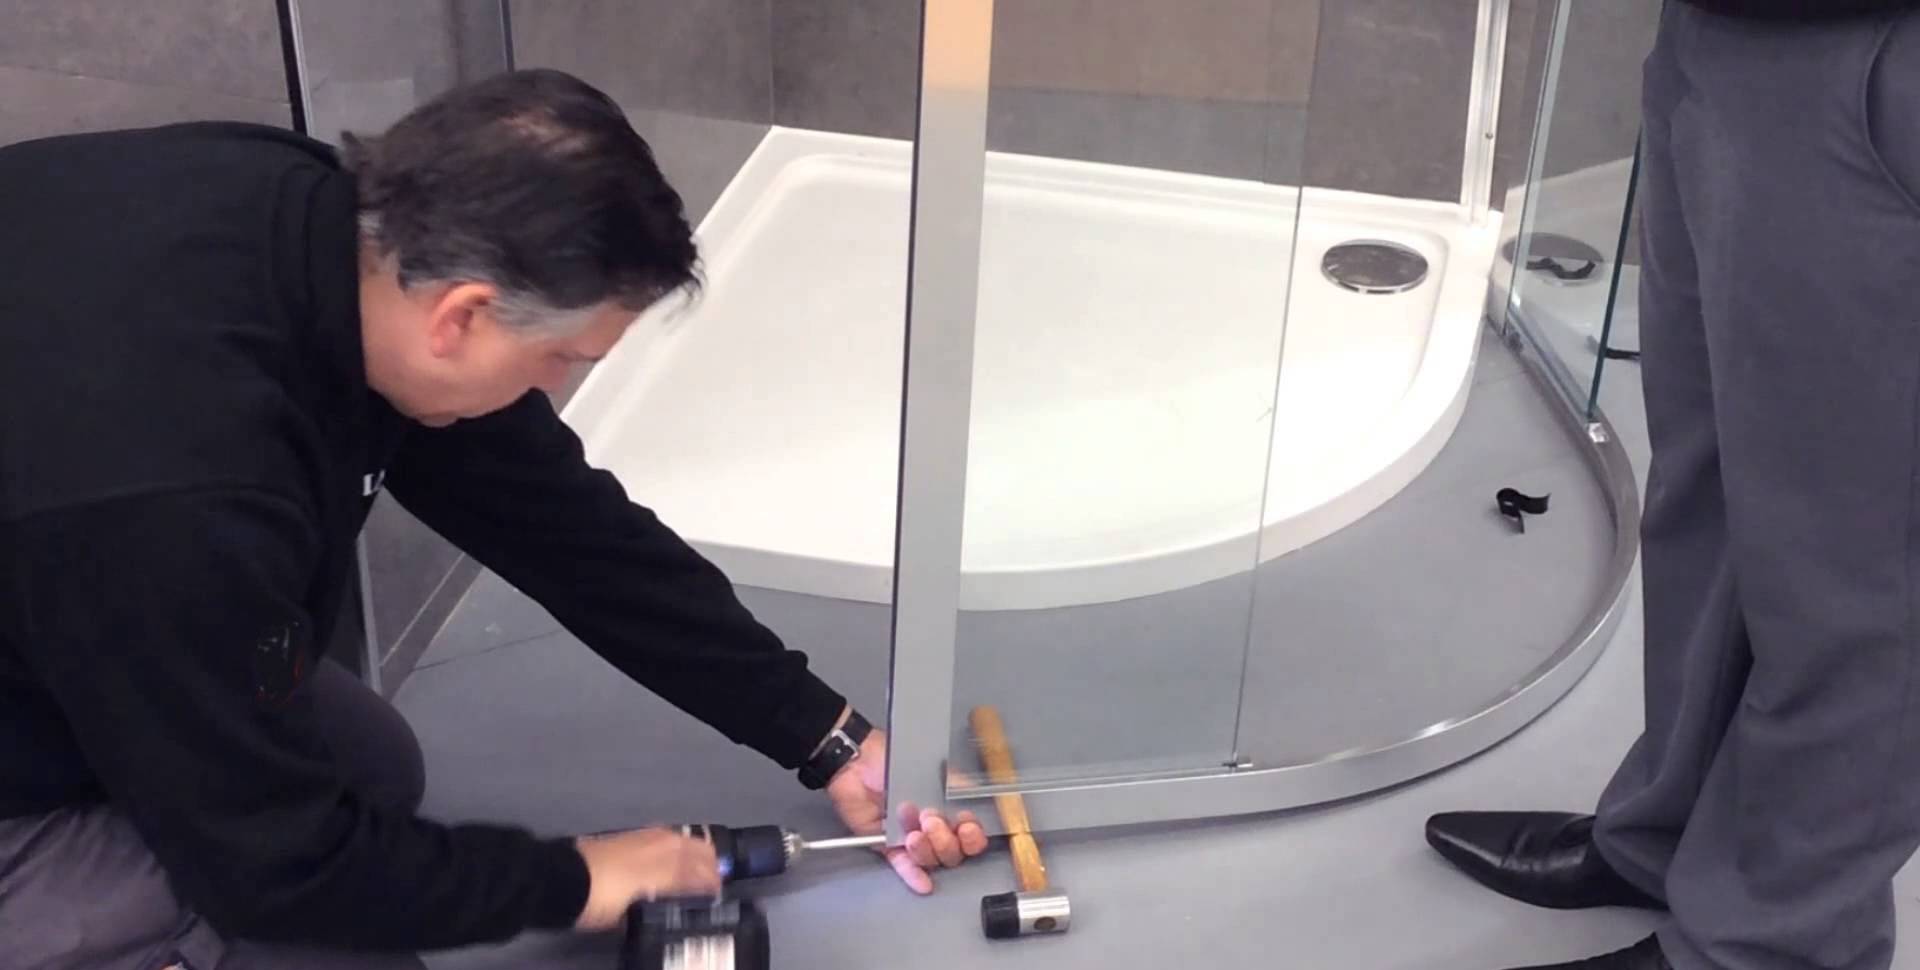
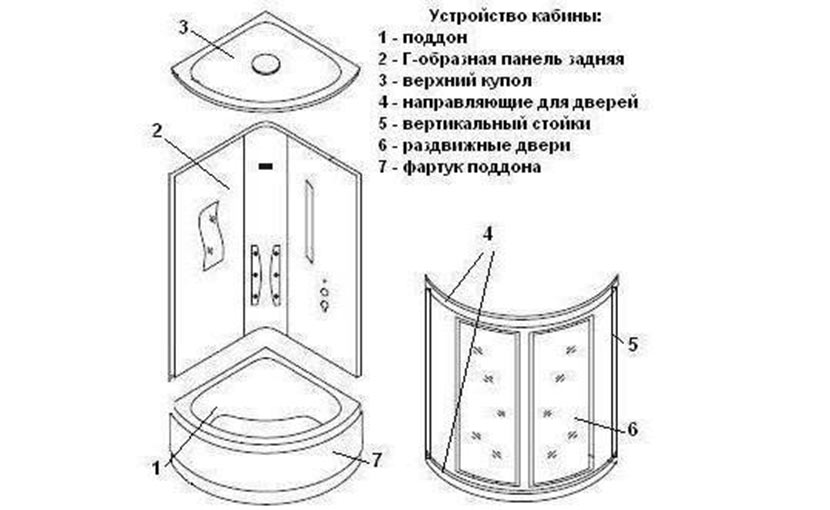
Assembly of Erlit corner shower enclosures
How to assemble an Erlit corner shower cabin with your own hands, we will tell you using the Erlit 3509 shower cabin assembly instructions as an example.
Shower cabins of the Erlit trademark are one of the highest quality and best on the Russian market. The key to the success of this brand is the highest quality and reasonable price.


Following this instruction, you will be able to assemble not only almost all Erlit shower enclosures, but also Chinese-made shower enclosures of other brands.
The shower cubicle can be used in apartments, houses or hotels - in all cases its installation will be simple and safe, and its use will bring pleasure and health benefits.
Shower cabins of the ERLIT trademark combine all the latest developments of the company, which are being introduced in order to make the product even better and more convenient to use.
The purchased product under the trademark ERLIT is manufactured in accordance with the current European directives 2006/95/EC, 2004/108/EC.
In addition, products of the ERLIT trademark meet the requirements of the Technical Regulations of the Customs Union and are adapted for operation in the Russian Federation.
Please read this installation and operating manual carefully to ensure that the product is installed, used and maintained as safely and efficiently as possible.
The manufacturing company reserves the right not to notify the end user of the differences in the instructions for the outdated model and the new, improved version of the shower cabin
GENERAL INFORMATION
The shower cabin is intended for acceptance of water procedures.
In ERLIT products, depending on the model, the following functions are used: hand shower, hydromassage jets, rain shower, electronic control panel with FM radio, fan, interior lighting.
It is necessary to install filters for mechanical water purification and a residual current device (RCD) (for cabins with electrics).
Attention! The hydromassage cabin must be installed by a qualified technician.
SPECIFICATIONS
- Used electrical voltage 220V ± 10%; The internal voltage of the cabins is 12V.
- Used water pressure 0.2-0.4 MPa, water flow 8-12 l/min.
- The temperature of hot water supplied to the cabin must not exceed 70°C.
- The sewerage entry level must be at least 70 mm lower than the shower tray drain level.
- Maximum pallet load 210 kg.
- The connecting dimensions of the hot and cold pipelines are 1/2” (15 mm), the diameter of the drain hole is 1-1/2” (40 mm).
- At the end of using the cabin, it is necessary to shut off the supply of cold and hot water in the cabin and turn off the internal consumers of electricity.
FORBIDDEN
- Use the cabin for other purposes
- Set up the cab outdoors
- Being in the shower cabin in a state of alcoholic and drug intoxication
- Being in the shower together
- Stand on the edge of the pallet
- Use the cabin for people with a fear of confined spaces
- Use the cabin for children and the elderly without the supervision of loved ones
- Clean the shower enclosure with abrasive and aggressive detergents.
TRANSPORT AND STORAGE
Cabins are transported by covered transport.
If the booth for installation is delivered from a cold room to a warm one, then the product must accept the ambient temperature.
After purchasing the product, to put it on service, it is necessary to store the product in the package until installation and acceptance for warranty.
Erlit corner shower assembly video


Recommendations to the buyer
- This product is intended for domestic indoor use.
- The packaging elements (plastic bags, metal clips) can be potentially dangerous for children, so immediately after installing the cabin, put them out of reach.
- After opening the package, it is necessary to check the completeness and integrity of the product.
- Always unplug or turn off the power to your panel before caring for the cab.
- The water supply regulator must be in the middle position when opening to avoid thermal shock.
- The shower enclosure should be cleaned with a soft cloth or sponge using special liquid detergents.
Dimensions
There are many different sizes of shower enclosures on the market.
When choosing, it is important to first decide on the size, and then look at the design and equipment. Due to the small dimensions of the apartments, many people prefer to install showers rather than bathtubs.
This saves a lot of space and is also the most convenient way to take a shower.
Width
The smallest width parameter is considered to be 0.75 m. It is possible only for asymmetric models. Good for a small bathroom. Such a small size saves a lot of space in the bathroom, which makes it possible to install it even in the smallest room. The only negative is the inability to completely relax.
In such a shower you can only be in a standing position. Sitting or lying down is out of the question. Additional features are usually not included. But it is immediately worth noting that this size is suitable only for medium-sized people. For example, tall and massive men will feel uncomfortable in it. Therefore, before buying, you need to go inside and assess the situation. Such an action will help not to make a mistake with the choice.
The minimum width dimension of standard models is 0.8 m. They are very popular among users.This is due to the fact that the largest number of rooms reserved for the bathroom are small in size. This option will save a lot of space and allow you to install additional appliances or furniture in the bathroom. The cost of such a shower cabin is low and the average person can afford it. The functions that can be in the booth will create the perfect atmosphere for taking a shower.
The maximum width of shower cabins can reach up to 1.8 m. This is the most convenient option, which makes it possible to accommodate two people inside at once. This model is usually used in large rooms connected to the toilet. Due to its large size, the shower cabin can include a number of additional functions, such as hydromassage, aromatherapy, radio, telephone, and more. The cost of this design is much higher than the previous one. But it justifies the investment.
There are also models of shower cabins, which are made together with the bathtub. They are also called combined. Along the perimeter of the bath there are walls, and the top can be either open or closed. Unlike the usual shower stalls, this design is quite large, so it is only suitable for a large room. The user is given the opportunity not only to take a shower while standing, but also to relax in a horizontal position. This design has its advantages and disadvantages.
Pros:
- You can take both a shower and a bath. Perfect for lovers of warm water.
- Spacious shower. This is due to the rather large size of the bath.
- Made in the most reliable way.High sides provide safety and also control the level of water in the pan.
Minuses:
- When leaving such a shower cabin, it is necessary to step over a large tray, which is not convenient for all people.
- Price. The price of this option is quite high compared to a conventional shower cabin, even of the largest size.
- The structure is quite high and can reach 2.5 m.
It should be understood that the wider the shower cabin, the more convenient it is to use. There should be enough space inside for movement while taking a shower.
The height of the shower enclosure is also an important factor when choosing. The smallest height is 1.98 m. It is comfortable, but not for everyone. The highest cabin is considered to be 2.3 m. The comfortable curtain height is 2 meters.
It should be noted that the height is selected individually. In this case, it is necessary to take into account the growth of each family member when buying. It is desirable that there be a "reserve". Therefore, it is recommended to immediately take the largest shower. As a rule, the ceilings in the bathroom will allow you to install such a design.
If the size of the shower cabin is chosen correctly, then its installation will not be problematic for the user. The main thing is to navigate the market of the presented models. The most popular and in demand are side models of showers. This is due to the fact that their walls fit snugly against the walls of the bathroom, which is the most comfortable and safe option. The installation of such a cabin is also quite simple.

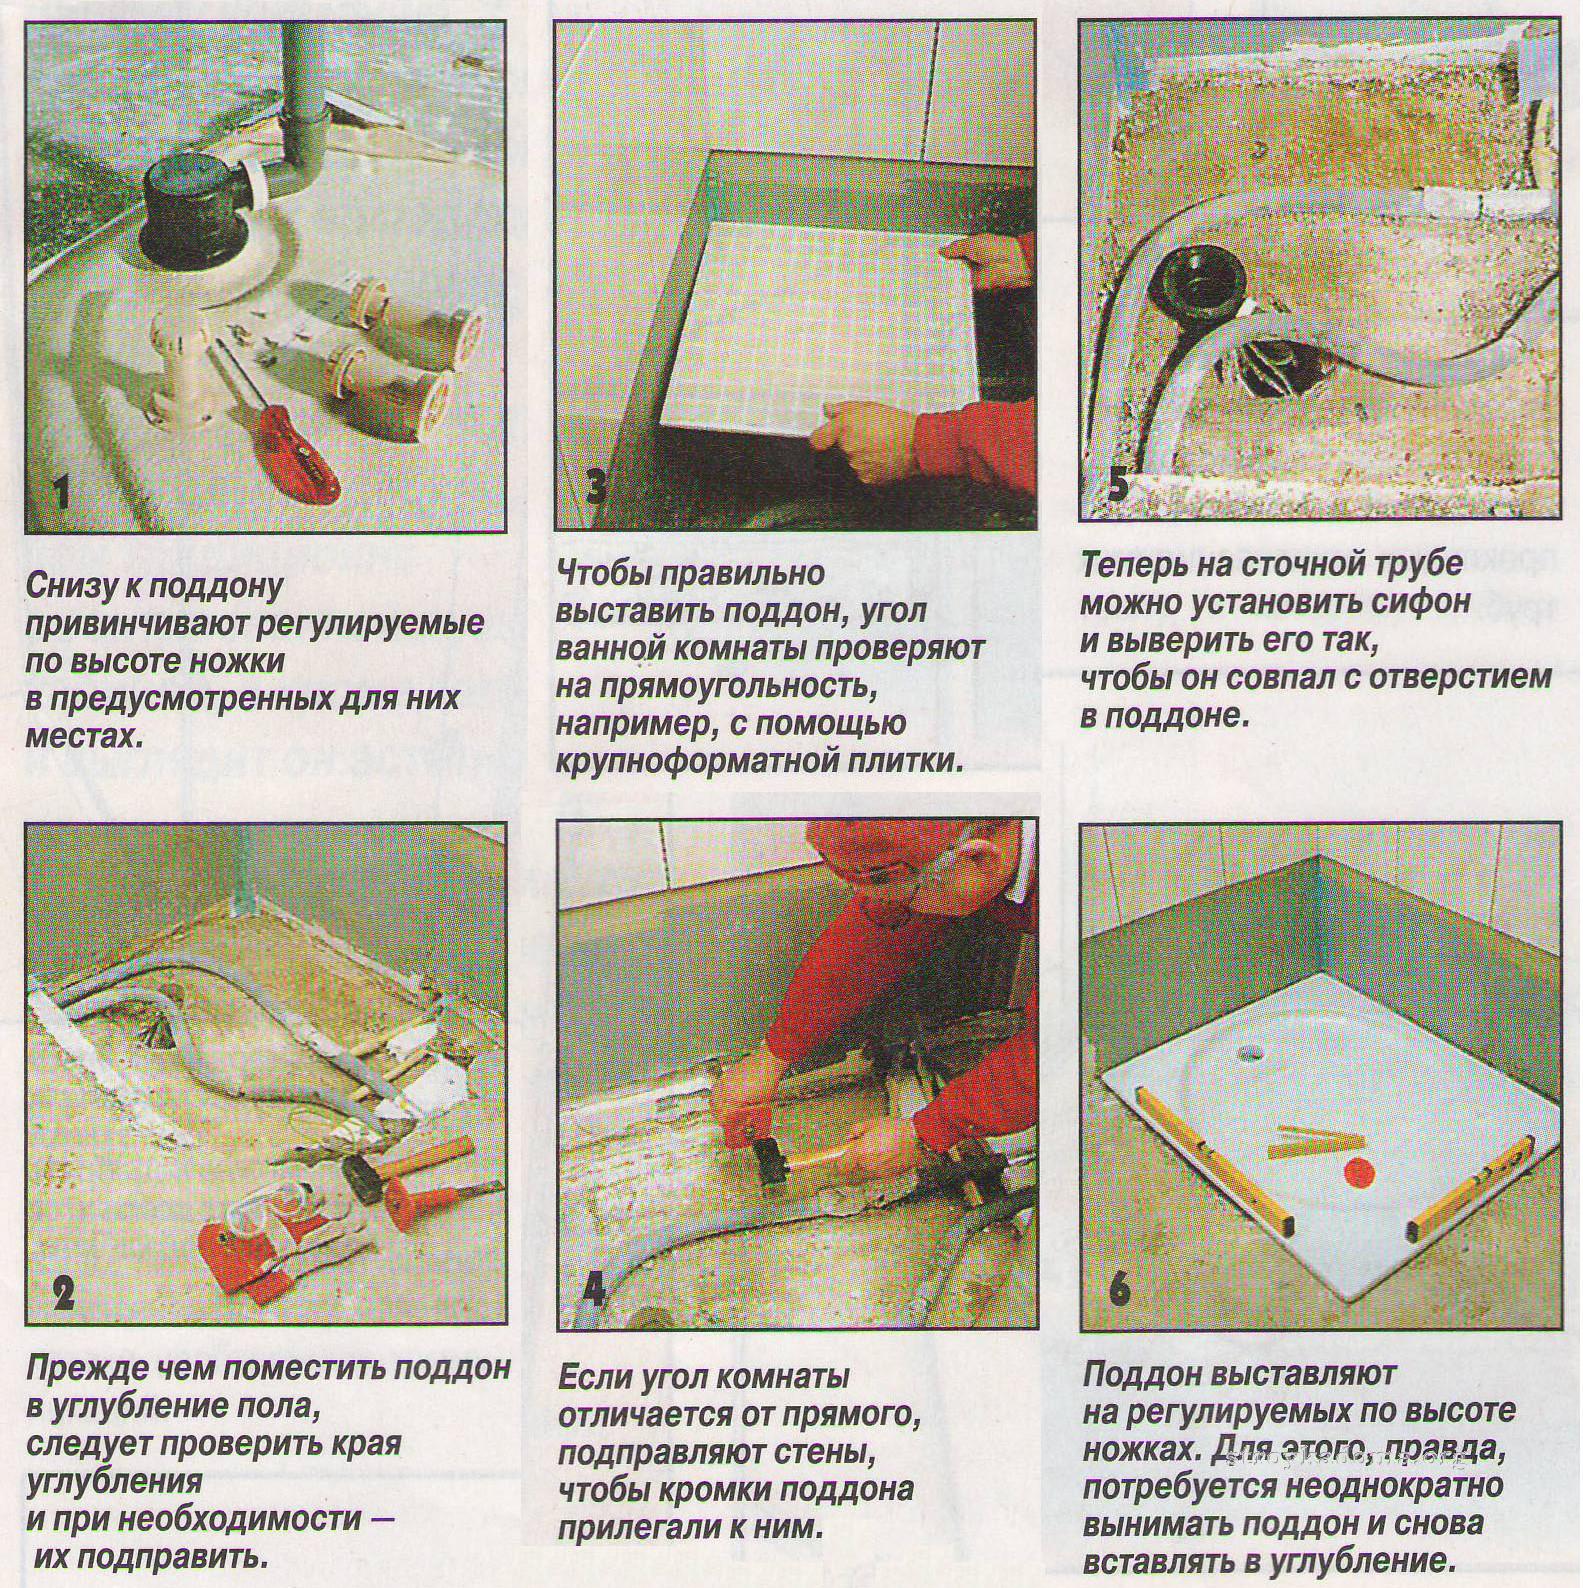


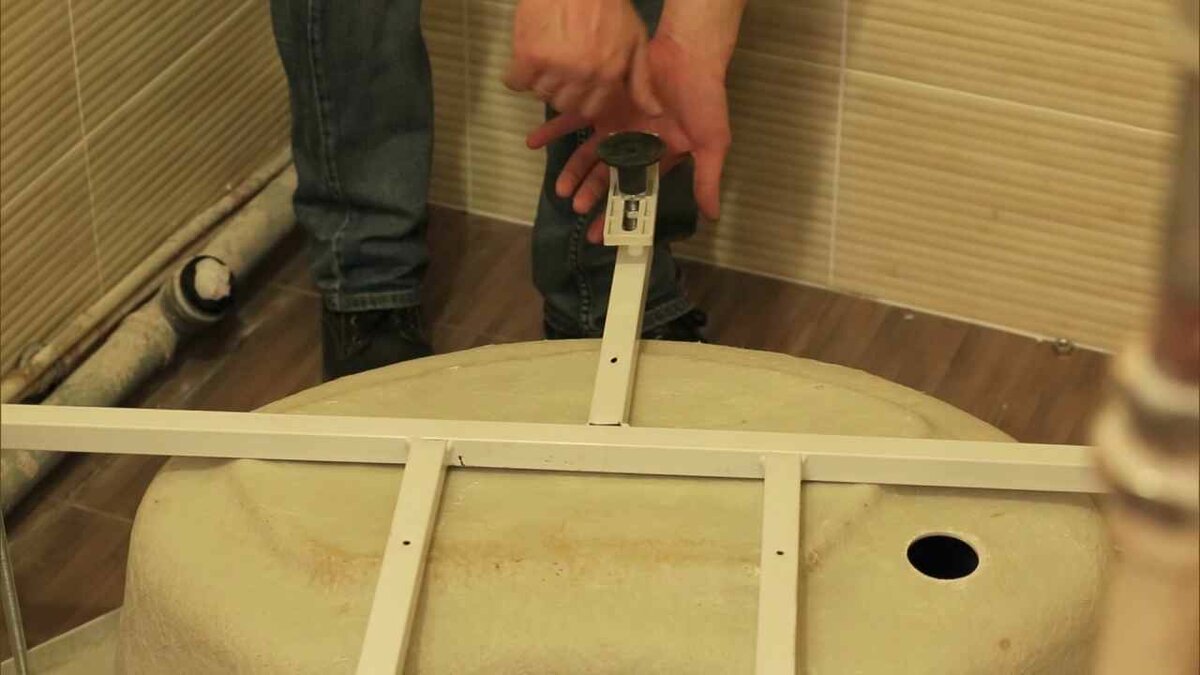
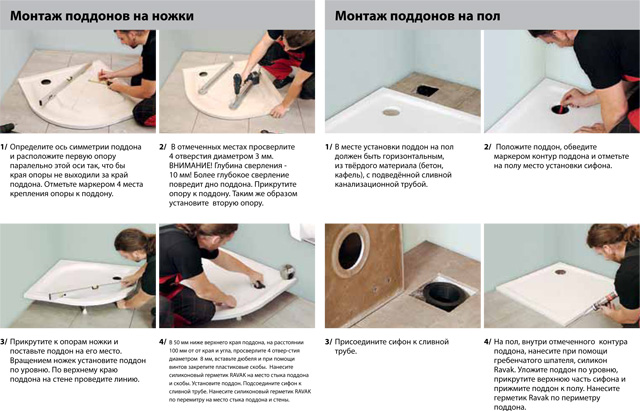
Choosing a base for a pallet
Installation of the bottom of the shower enclosure is carried out:
- on a brick base;
- on plastic supports;
- on a metal frame.
The base is selected depending on the completeness of the model itself, on its material and related technological characteristics.
Proper arrangement of the foundation is the key to the correct operation of the drain system: the drain hole must be above the level of the sewer system line. Only under this condition, the waste water leaves without delay. The angle of inclination of the bottom to the inlet to the sewer is 3 degrees. If the pallet does not rise on a pedestal, or the entrance to the sewer does not fall, then only a pump for pumping water will be able to establish the operation of the drain system.
Many deep shower trays in their kit are sold with a metal profile frame. But if the model has thin walls, then it is better to install it on a flat floor without a foundation. This is how ceramic bottoms are mounted. But the question remains the correct organization of the height of the drain hole. The hole must be higher than the outlet so that the water goes into the sewer. The bottom sits on the floor with glue or cement tile mix.
Bottoms made of cast iron and stone are mounted on the floor. Their height does not interfere with the discharge of liquid into the sewer. But there is a difficulty in arranging the siphon. It is mounted directly on the floor surface or a flexible unit is installed, which is carried out into a wall niche.
Depending on the type of foundation, the algorithm for performing work is different.
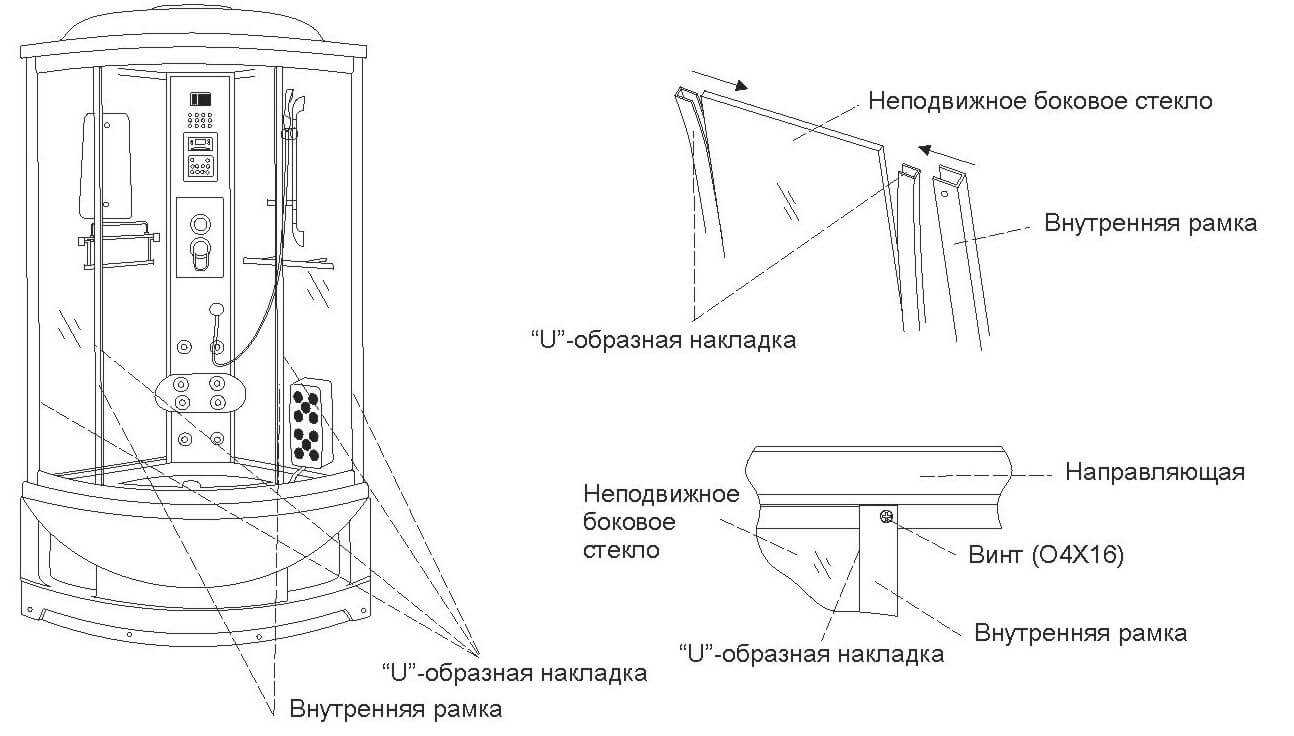
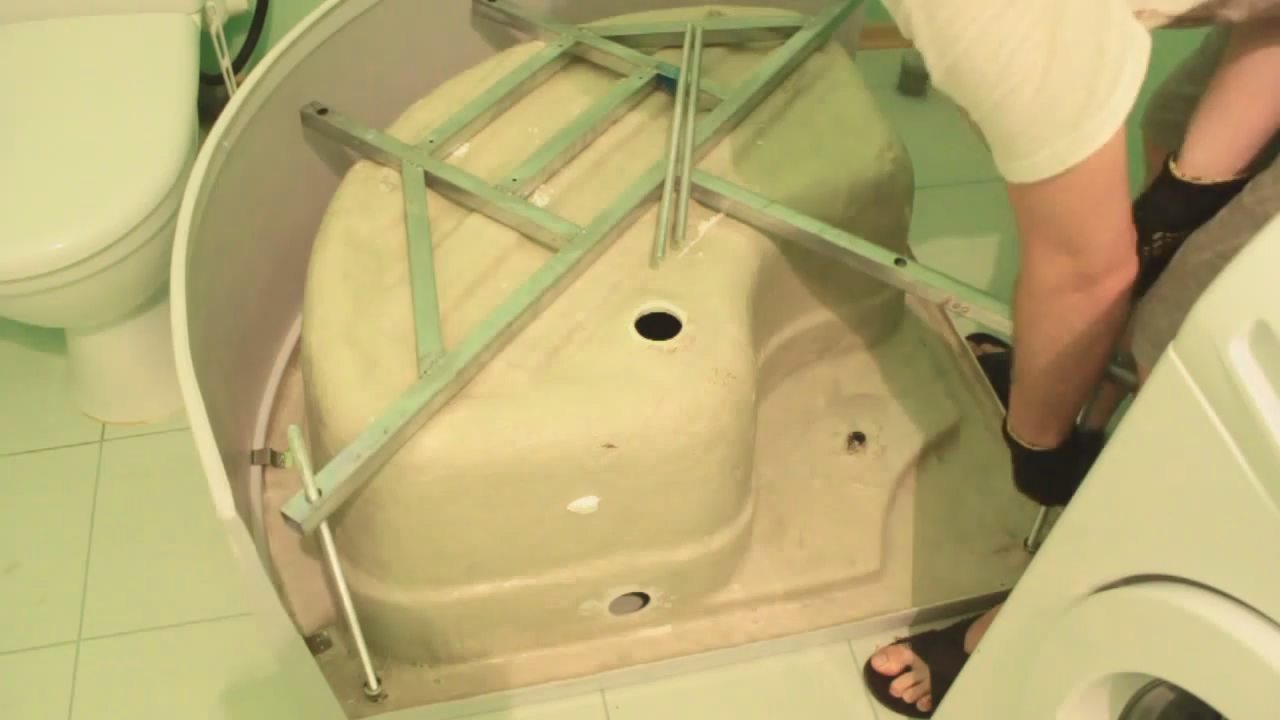
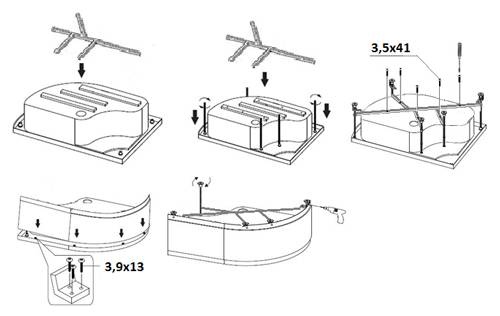
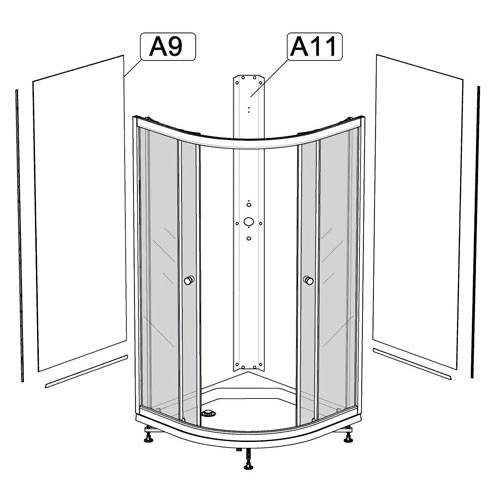
4. Assembling the back wall
General layout of the rear wall assembly
Video, assembling the rear windows and the central panel of Triton shower cabins
First
Video, installation of additional equipment on a shower cabin Triton
Second
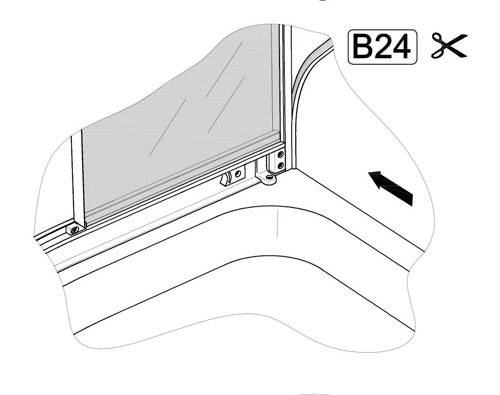
Third, screw the B-pillar to the rear windows.Also attach the mounting brackets to the back of the rack. Seal the joints with neutral silicone sealant.


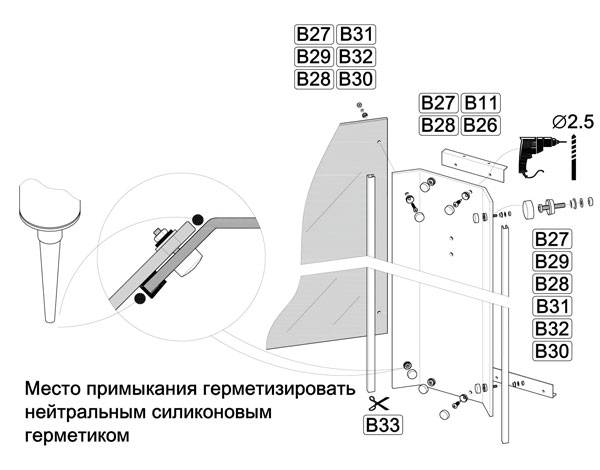
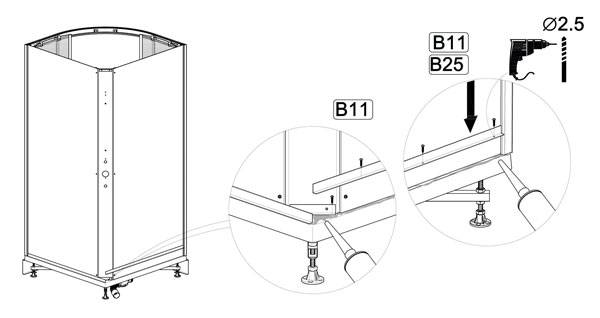
Fourth, using a corner, fix the rear windows to the pallet, having previously drilled holes with a 2.5 mm drill bit. Seal the joints with silicone sealant.
Pallet design options
There are two types - barrier-free and elevated. The first option is ideal for families with children and the elderly. Since it is completely flat, getting in and out of the shower is a breeze. In order for the floor to remain at the same level, you need to think over the connection to the sewer in advance. If this is neglected, the floor will need to be poured additionally.
barrier-free type
The base is made of concrete or brick, communications will pass through it. A monolithic model must be insulated as best as possible, and the joints should be treated with a water-repellent solution. Otherwise, there is a high risk of flooding the neighbors.


