- Types of equipment
- Regulatory documents for replacement
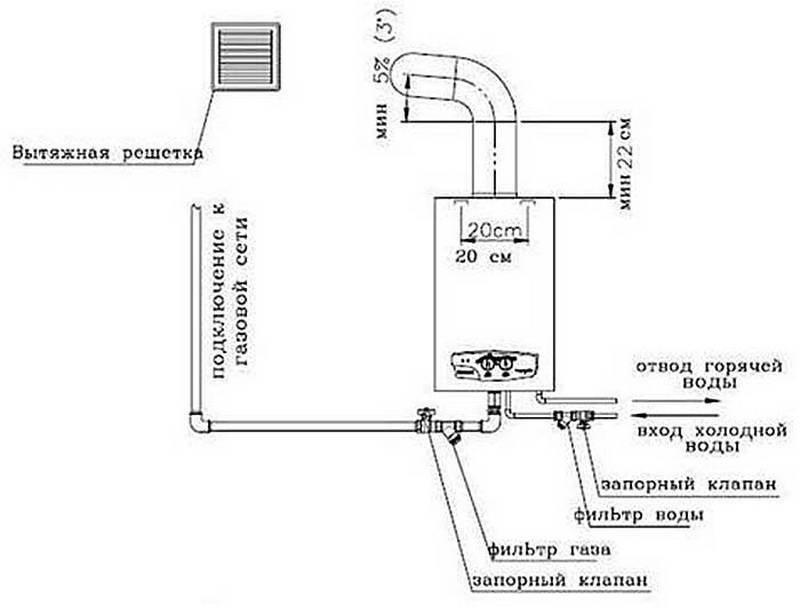
- Gas boiler installation standards
- Assembling a ceramic chimney
- Boiler power calculation
- Coordination of the installation of a gas boiler
- Rules for the installation of gas appliances in the apartment
- Strapping schemes
- Installation
- Conducting a trial run
- Rules for installing a floor-standing gas boiler
- Development and approval of the project
- Basic rules for using a gas unit
- Autonomous heating, where to start
- With bithermic heat exchanger
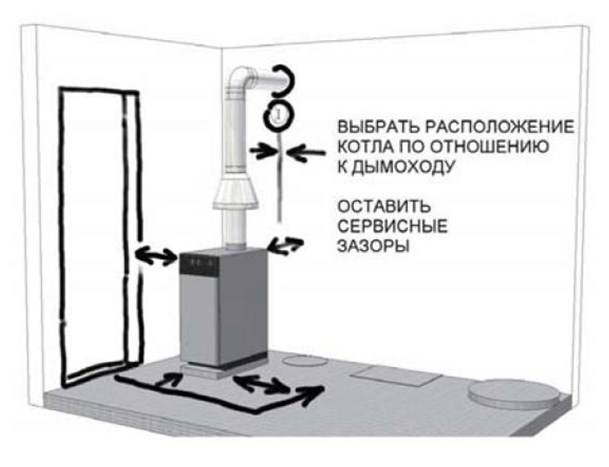
- How to install a gas boiler
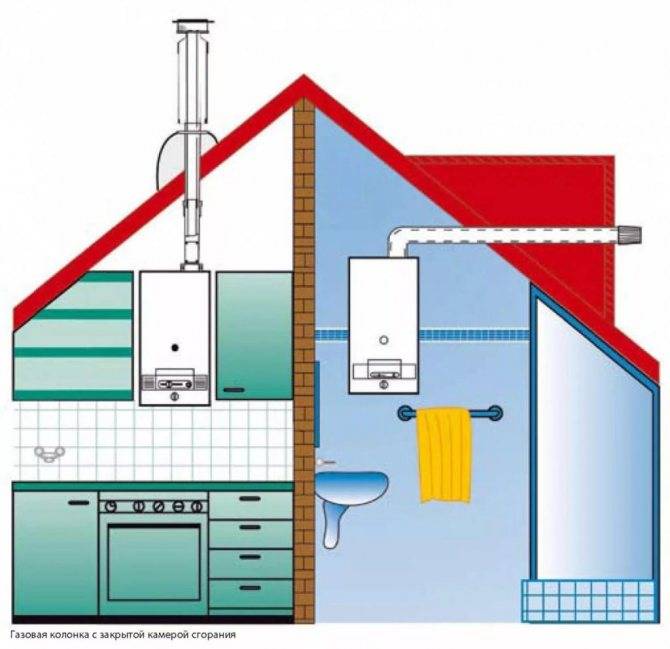
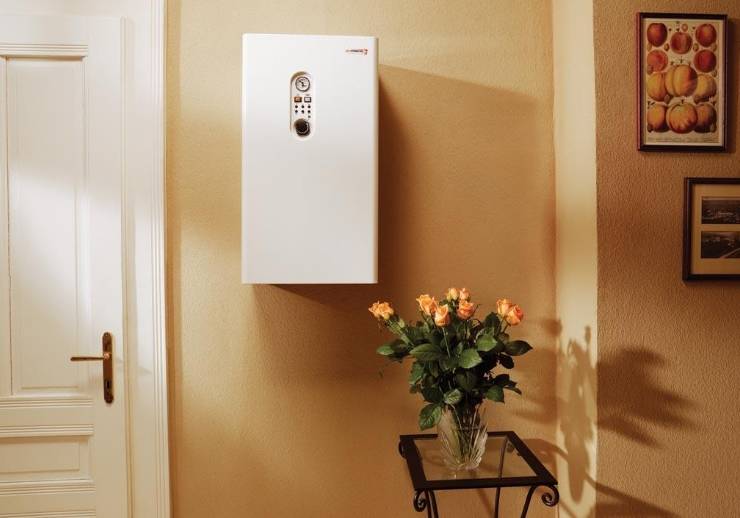
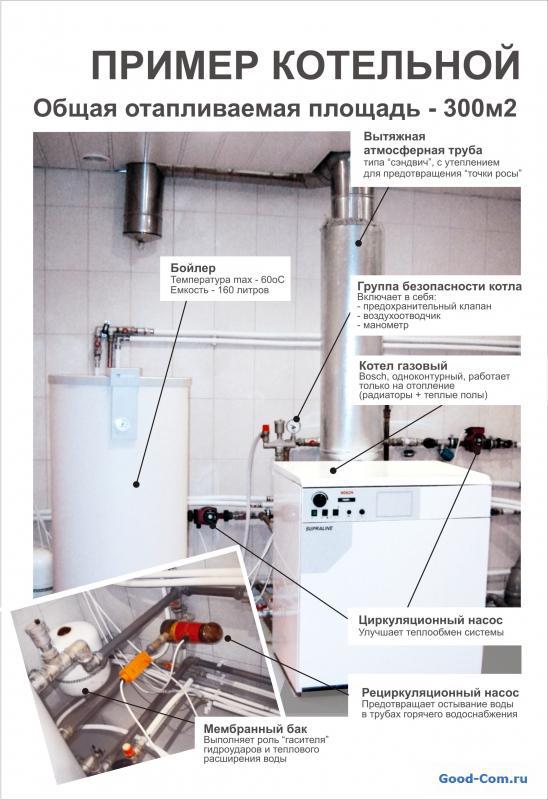
Types of equipment
The classification of gas units is quite extensive. Wall - this type has recently appeared in the trading network, but already has many supporters. The devices of this modification are so compact and functional that they are also called mini-boiler rooms. In a small case, not only an efficient heat exchanger, a burner with safety automatics, an expansion tank, but also a circulation pump are located. This became possible because the units use innovative heating technologies, in addition, their price is lower than floor options.
According to the method of removing flue gases, outdoor gas boilers are divided into devices with forced movement, when they are discharged into the environment by a smoke exhauster and with a natural one - through a chimney due to draft.
According to the ignition option, wall-mounted units differ with electric and piezo ignition, the igniter of which is constantly working, giving out a flame. According to the type of burner, they are divided into conventional and modulation, which creates a comfortable temperature regime for hot water.
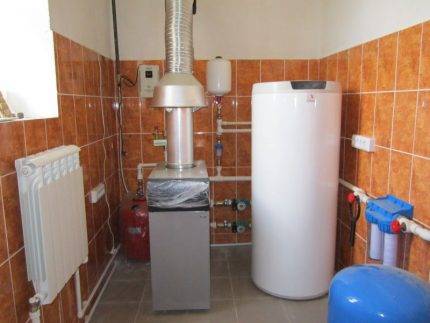
The floor boiler has been operated in its almost unchanged design for several decades. The heat exchanger is made of boiler steel or cast iron. The latter has greater anti-corrosion resistance, but is more brittle and subject to destruction in the event of water hammer. Steel suffers from sweat corrosion and scale formation, so the choice of option will largely depend on the quality of the tap water used in the boiler heating circuit. Recently, in order to improve the quality of water and increase the service life of the boiler, purification filters are installed at the inlet of tap water.
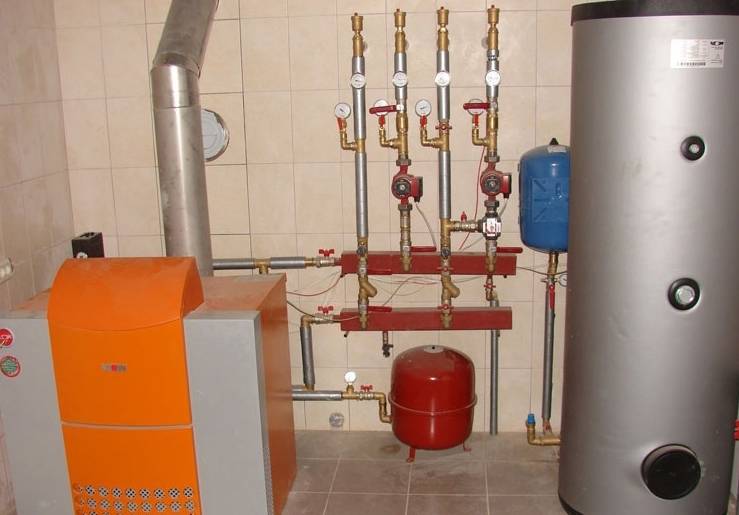
 Floor boiler in the house
The placement of gas boilers in a private house will depend on the type of installation. Floor boilers can be inflatable or with atmospheric burners. For the first burners are purchased separately, they have a high unit power up to 1000 kW, high efficiency, and a higher price. The disadvantage of the design is the dependence on electricity, which will require the presence of autonomous energy sources. The second units are distinguished by quiet operation and affordable prices.
According to their functionality, outdoor gas boilers are divided into single- and double-circuit ones.In the first, the coolant is heated only for heating needs. To provide hot water services, it will be necessary to include an indirect heating boiler in the scheme, the power of which will depend on the volume of water use.
A double-circuit boiler is a “2 in 1” device, it has two built-in heat exchangers for the heating and hot water circuit, therefore it is more functional and equipped with an additional burner for hot water. It releases heat energy both for heating needs and for hot water supply and is much cheaper than a single-circuit boiler kit with an indirect heating boiler. However, there are certain operational restrictions for placing gas boilers in a private house. They cannot simultaneously work for heating and hot water, heating occurs alternately, with hot water heating priority. Switching to the DHW circuit occurs simultaneously with the opening of a hot water tap, and cold water will immediately flow, especially if consumers have not used the service for a long time.
Regulatory documents for replacement
Gas heating equipment, in case of incorrect installation, operation or maintenance, is a source of danger. Therefore, its replacement is not just the purchase and installation of the desired unit, but a whole procedure, which is regulated by a number of documents.
But among them there are a number of documents that are more important to the consumer than all the others. Since the information contained in them will help to understand the nuances of replacing the stakes, as well as protect your interests from possible wrong actions of representatives of the city gas companies.
Replacing a gas boiler is a carefully regulated procedure that requires certain knowledge.As a result, there are many requirements, rules that must be strictly followed.
The most requested documents include:
- SNiP 2.04.08-87, which is called "Gas supply";
- SNiP 42-41-2002 under the name "Gas distribution systems".
- GSRF dated December 29, 2004 No. 190-FZ (Urban Planning Code of the Russian Federation);
- RF Government Decree No. 1314 dated December 30, 2013 (Decree of the Government of the Russian Federation “On Amendments to the Rules for Connecting ... to Gas Distribution Networks”);
- RF Government Decree No. 1203 of November 16, 2016 (Decree of the Government of the Russian Federation "On approval of the rules for connecting ... to gas distribution networks");
- SNiP II-35-76, which specifies the procedure for connecting boilers;
- Code of Administrative Offenses of the Russian Federation of December 30, 2001 N 195-FZ (Code of Laws on Administrative Offenses).
It should be remembered that, if necessary, you should use their latest versions, which contain relevant articles with the latest changes and additions.
Gas boiler installation standards
There are strict rules for replacing a gas boiler in a private house, which must be observed during work:
- more than 4 m2 of area must be allocated for installation;
- the width of the front door must exceed 80 cm;
- the premises must be chosen bright, the window area is calculated based on the standard of 0.3 m2 per 10 m3 of volume;
- ceiling height - from 2.5 m;
- the presence of a pipeline with cold liquid is mandatory;
- the cross section of the chimney must correspond to the power of the gas boiler;
- it is desirable that the wall panels are even.
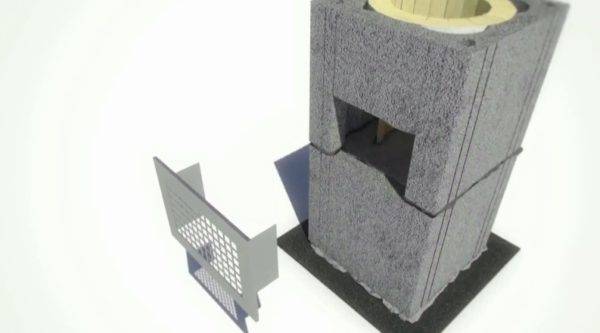
Assembling a ceramic chimney
Now let's take a step-by-step look at how a ceramic-type chimney is assembled.
Table 2. Kit of materials for assembly.
View, photo
Description
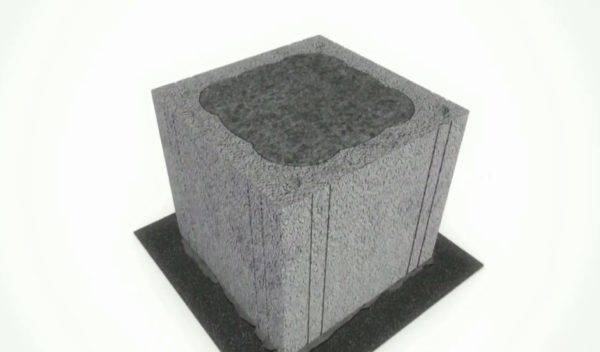
Chimney concrete blocks
Ceramic chimneys are not left in sight, but mounted inside special concrete blocks, which can be purchased at the same store. The size of the material is selected according to the diameter of the pipes used.
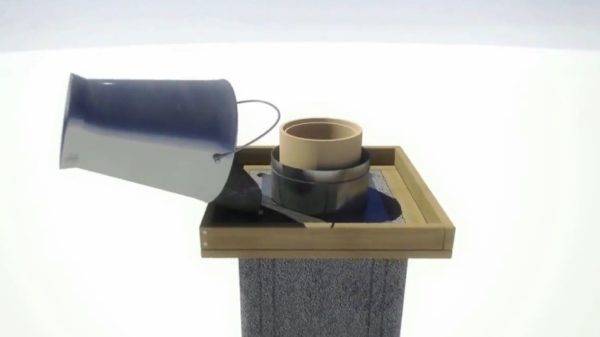
Chimney base
The condensate collector is the base of the future chimney. If this element is not provided, then the entire structure may collapse soon.
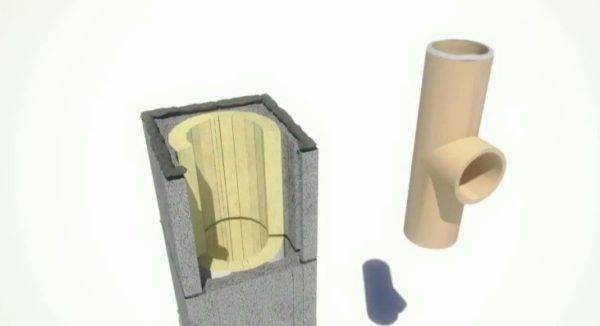
Revision tee
A revision must be bought so that we can freely clean the pipes from the inside in the future and perform inspection services. Also, the kit immediately gets a ceramic shutter for the hole in the tee.
Tee
The boiler will be connected to the chimney through such a tee. Its height is 660 mm, it has a glued pipe outlet at an angle of 90 degrees
There are models with half the angle of inclination. Attention! The metal pipe from the chimney must be smaller in diameter than the branch pipe of the tee.
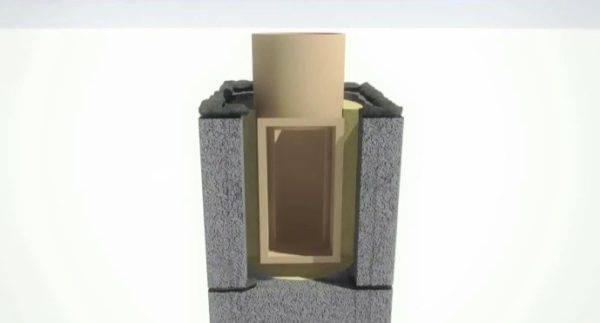
ceramic pipe
The main part of the chimney will be made up of such pipes.
Adhesive for ceramic pipes
The joints are sealed with a special heat-resistant adhesive. It can also be purchased from the store where you buy the main parts of the system.
thermal insulation
For ease of installation, we buy cylinders made of basalt wool
This material is fireproof.
Also here you can include a ventilation grill through which the chimney will take air, and a door for access to the audit. Both items are made of metal.
Step 1 - installation of the first block. We glue the first block to the base on the cement mortar. Its position must be accurately leveled in all planes. Also orient its sides.
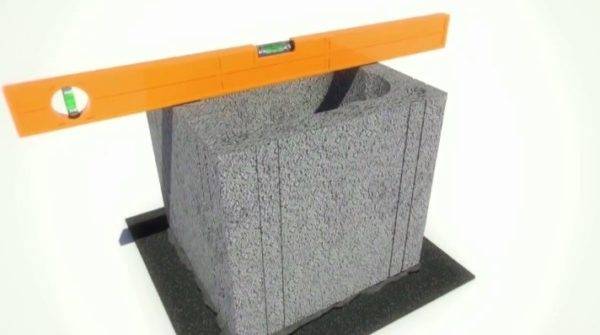 Installation of the first block
Step 2 - concreting.Then concrete is poured inside the hollow block - this is how we create the foundation for the future structure.


 concreting
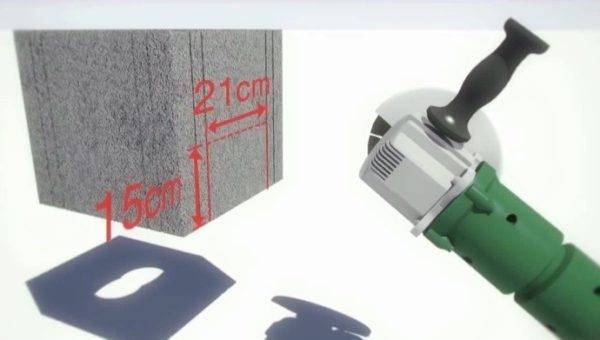
Step 3 - forming a hole in the block. In the next block, you need to cut a rectangular hole 15 cm high and 21 cm wide.
 Forming a hole in a block
Step 4 - laying the second block. As soon as the concrete in the foundation hardens, we put the second block on the mortar. At the same time, the thickness of the applied solution is clearly verified according to the stencil that comes with the kit. According to it, it is also placed in the base, under the condensate collector. We also check the position of the element with a level.
 Laying the second block
Step 5 - installation of the condensate trap. We put a condensate collector on the solution, orienting it along the hole in the block.
 Installing a condensate trap
Step 6 - insulation and protective grille. We install the insulation exactly at the height of the concrete block, making a slot in it under the hole in the block. We also install ventilation grilles. - this can be done after finishing the blocks with decorative materials.
 Insulation and protective grille
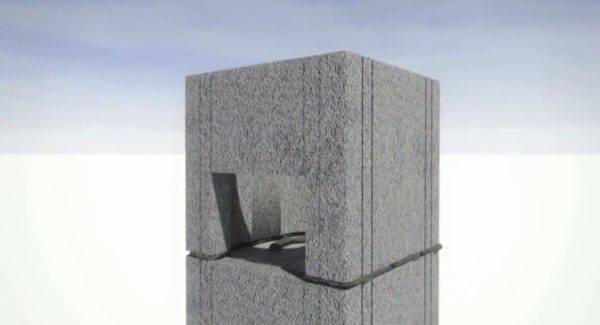
Step 7 - installation of an inspection tee. In the next block, we completely remove the front wall. We install a revision tee into it, carefully smearing its mounting edge with sealant. We also put in a heater.
 Installation of an inspection tee
Step 8 - installation of the inspection hatch. We continue laying blocks, and then we install an inspection hatch on the metal anchors, having previously installed a ceramic shutter.
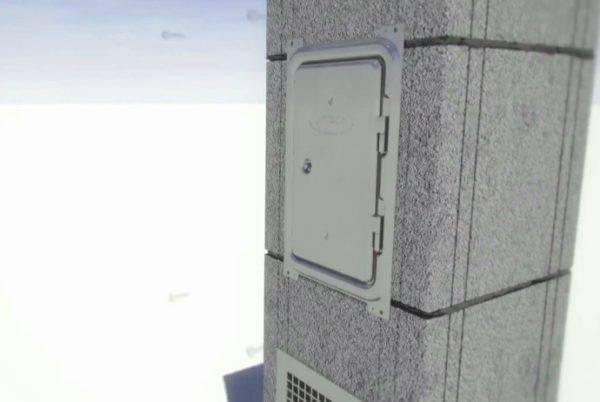 Installation of an inspection hatch
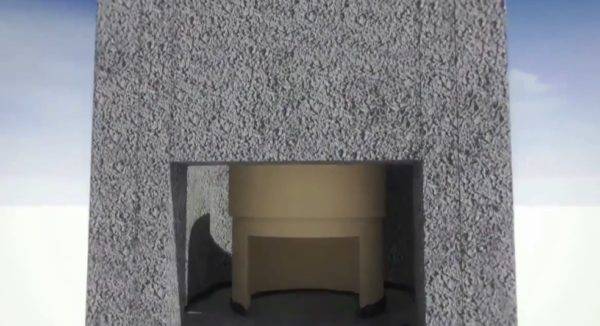
Step 9 - Install the connecting tee. We go in the same order. Through the next block, a branch pipe under the boiler will be displayed.He will look away from the inspection hatch. The area around the pipe is covered with a layer of insulation.
 Connecting tee installation
Further assembly will follow the same scheme - first a block is placed, then a heater and a pipe are put into it. When passing floors and roofs, a small layer of insulation is inserted around the blocks.
Step 10 is the end of the chimney. Our chimney is completed by the installation of a steel sleeve, the construction of the formwork and the pouring of concrete mortar into it. A deflector is put on the pipe and the chimney is ready for operation.
 chimney end
Boiler power calculation
When the type of heating unit is selected, it is necessary to determine its power. If desired, you can order a heat engineering calculation that allows you to determine the heat loss in the premises. Based on this figure, they begin to select the power of the boiler.
You can not make calculations, but use the norms obtained empirically, according to which 1 kW of boiler power is needed for 10 "squares" of area. To this result should be added the performance margin for various losses.
For example, to heat an apartment with an area of 60 "squares", you need a device with a capacity of 6 kW. If water heating is planned, add 50% and get 9 kW of power, and in case of abnormally cold weather another 20-30%. The final result is 12 kW.
But this is a calculation for central Russia. If the settlement is located to the north, the performance of the unit should be further increased. The specific value depends on the degree of insulation of the house. For a panel or brick high-rise building, this will be 50% or more.


The process of obtaining a permit related to whether it is possible to install a gas boiler in an apartment is quite complicated, costly and takes a lot of time. But all the effort is worth it, since it is much better to live at a comfortable indoor temperature. At the same time, you will have to pay less for individual heating than for centralized heating.
Coordination of the installation of a gas boiler
In order to install a gas boiler in a private house or apartment, it will not be enough to study the SNiP documents. To begin with, it is necessary to obtain technical conditions that will become the basis for organizing further work on connecting equipment to gas pipelines.
To do this, the landlord submits an application to the local gas supply service, which indicates the estimated gas consumption required for use in a particular building for heating and for other needs. This parameter is calculated approximately on the basis of SNiP 31-02, clause 9.1.3, which shows the average daily gas volume for a single-family house:
– gas stove (cooking) – 0.5 m³/day;
- hot water supply, that is, the use of a flowing gas water heater (column) - 0.5 m³ / day;
- heating using a domestic gas unit with a connected water circuit (for central Russia) - from 7 to 12 m³ / day.
In the local organization that controls the gas supply and installation of boiler equipment, the request is considered by specialists. For the applicant, a document is drawn up with technical conditions or with a reasoned refusal. The review process may take from one week to a month, depending on the efficiency of the work of this controlling service.
If the request is satisfied, then technical conditions are issued, which must be fully implemented during the installation of gas equipment. This document will simultaneously be a permission to carry out the relevant work.
Rules for the installation of gas appliances in the apartment
The least problems with the arrangement of individual heating occur among the owners of new apartments that are not connected to a centralized heating system. In this case, there is no need to visit the heating network and there is no need to deal with disconnecting from the risers, and permission to install gas heating in an apartment building may be in the package of documents for real estate.
But in this case, you need to follow certain rules. First of all, having documents in hand, you cannot install gas equipment on your own - this work should be done by specialists. These can be not only employees of a gas supply organization, but also representatives of a company that licenses this type of activity.
After the installation is completed, the engineer of the company supplying gaseous fuels will check the correctness of the connection and issue a permit to use the boiler. Only then can you open the valve leading to the apartment.
Before starting, according to the requirements for installing a boiler in an apartment building, it is imperative to check the individual heat supply system. To do this, it is launched under a pressure equal to at least 1.8 atmospheres. You can control this parameter using the pressure gauge of the heating unit.
If the pipes are built into the floor or walls, it is advisable to increase the pressure and drive the coolant through them for at least 24 hours. Only after testing the system can you be sure that there are no leaks and reliable connections.
Air must be bled from the equipment before start-up. Since when installing a gas boiler in an apartment building, the systems are made closed, you need to use the Mayevsky taps available on the radiators. Air is bled in each battery, bypassing them several times in turn until there is no air left in them. After that, the system can be launched into operating mode - turn on the heat supply.
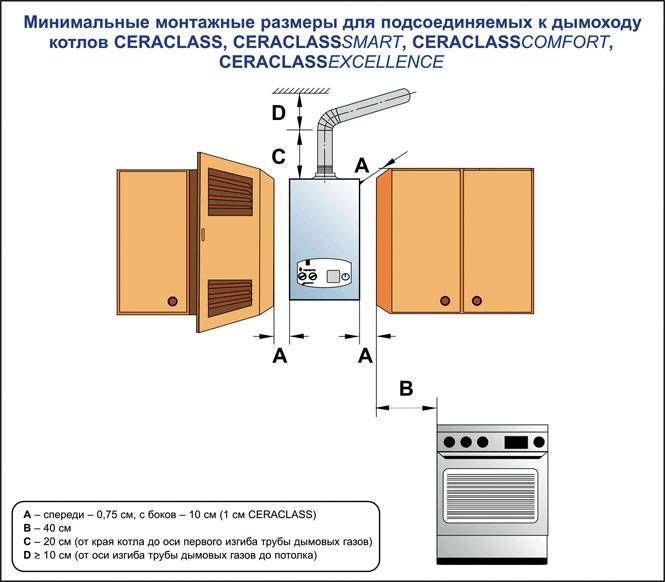
It is necessary to place an electrical outlet and another gas appliance at a distance of at least 30 centimeters from the unit.
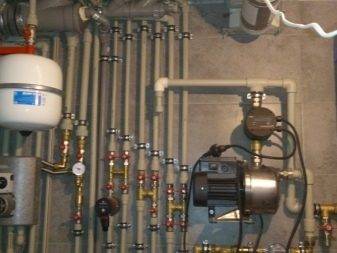
Strapping schemes
Having finished with the installation of channels for combustible gases, you need to start piping a solid fuel boiler, and there are no less subtleties in it. Very often, such heat generators are equipped with a water tank, which is used in a variety of connection schemes. The role of the device is to dampen the stresses that may arise at the maximum load on the boiler.
The choice of a heat accumulator depends on the personal tastes of the owner. Moreover, when buying, you should pay attention to the need to maintain a certain load for a specific time with a heat accumulator.
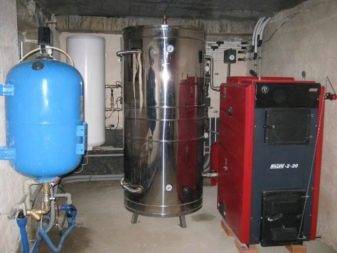
Usually they are guided by the value of the thermal energy accumulator of 30–50 liters per 1 kW of the maximum power of the boiler. If the peak heat consumption significantly exceeds the average daily level in terms of 1 hour, and especially if this consumption lasts for a long time, it is necessary to install a more capacious tank.


It must be designed for pressure greater than the planned operating maximum.Regardless of the chosen connection scheme, it is required to install safety valves and an expansion tank. All calculations should be carefully carried out, and ideally, turn to professionals both for them and for the installation itself.
This is a set of systems that will automatically relieve pressure if it exceeds the set values. This kind of manipulation is carried out by a safety valve, which is complemented by a pressure gauge and a device that just brings air out. From the safety kit to the boiler itself, it is unacceptable to use any locking fittings. When the fuel begins to ignite, the circulation pump is running, and the valve located at the inlet to the heating circuit is closed.
In this case, the movement of the fluid occurs in a reduced circle. As soon as the return pipeline warms up to 50 or 55 degrees, the thermal head, at the command of the sensor, begins to slightly open the closed circuit. This is done smoothly so that the mixing of cold water with hot water contained in the bypass occurs evenly. As a result of heating the radiators, the temperature rises, and there comes a moment when the valve closes the bypass completely. In this case, 100% of the heat carrier is directed through the boiler heat exchanger.

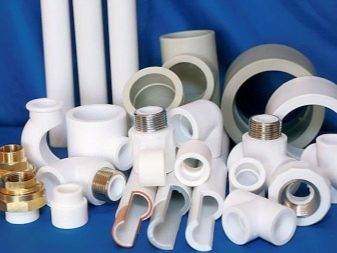
This configuration is the easiest and can be done by hand. Polypropylene pipes are completely safe to use, but you only need to check their official origin and compliance with the necessary characteristics. It is recommended to use only metal for the gap between the boiler and the safety group.
The thick walls of the polypropylene pipe are characterized by poor thermal conductivity, due to which external sensors give incorrect readings, and the three-way valve is late in responding to changing conditions.
Installation
Gas boilers exist in two versions depending on the installation method: floor and wall. Floor boilers usually have high power and a large mass.
- Such a boiler must be installed on a solid floor. The best option is a concrete screed. If there is no screed, you can put a metal sheet on the floor with your own hands.
- It is necessary to achieve an even installation of the unit relative to the horizontal axis. At the same time, it should stand straight without swaying.
- Next, you should make a connection to the chimney, while checking the draft.
- Then connect to the pipes of the heating system. Install a filter to purify the incoming water. Install taps on the pipe on both sides of the filter and on all connecting pipes.
- If the boiler is double-circuit, then you need to connect to the water supply. For water supply, it is more correct to use a pipe from above, and for return from below.
- Do-it-yourself connection to the gas pipe is prohibited; only the gas service has the right to perform such work.
- And only at the last step, you should connect to electricity.
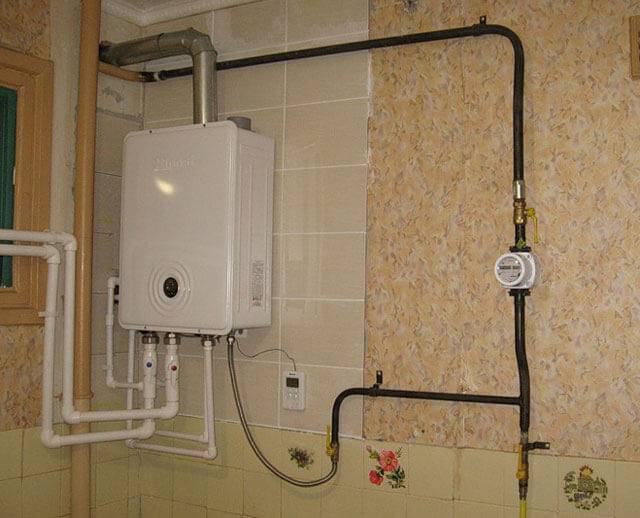
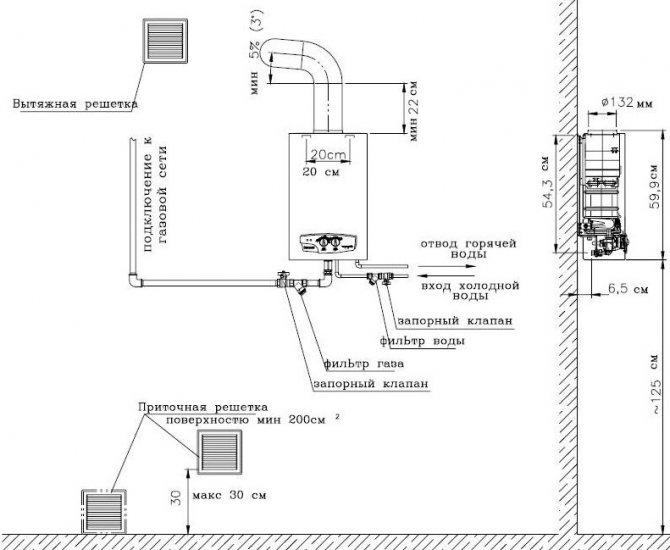
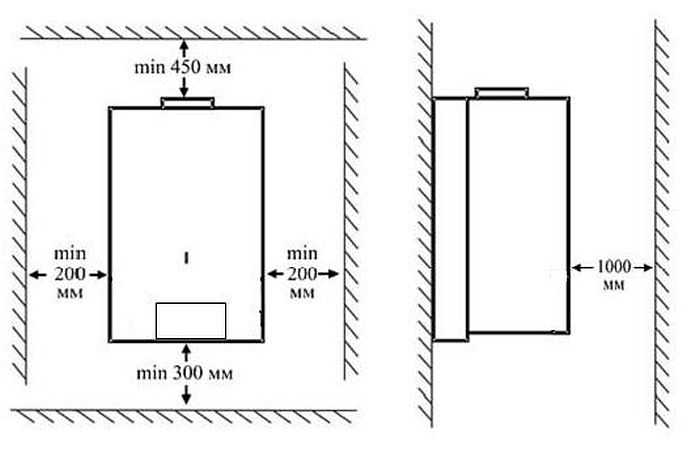
Wall-mounted boilers are usually smaller in size and inferior in power to floor-standing ones. The scheme for installing a wall-mounted gas boiler is as follows:
- The wall to which the wall-mounted boiler will be attached must be strong enough for its weight. The wall should also be protected with refractory material.
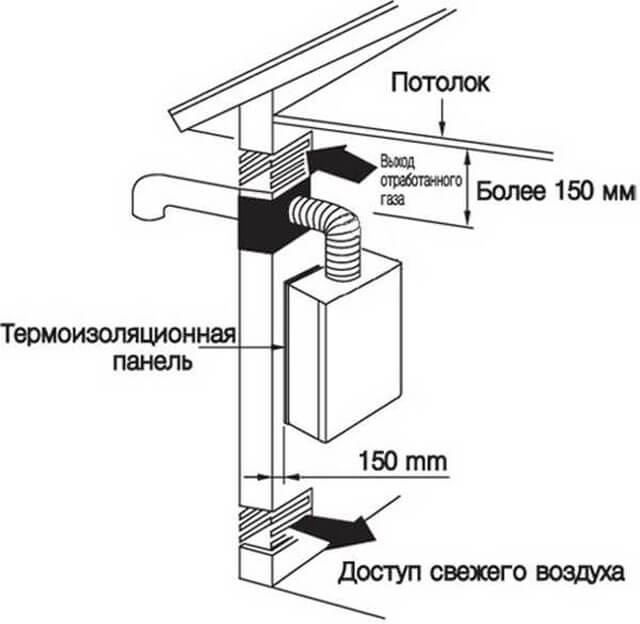
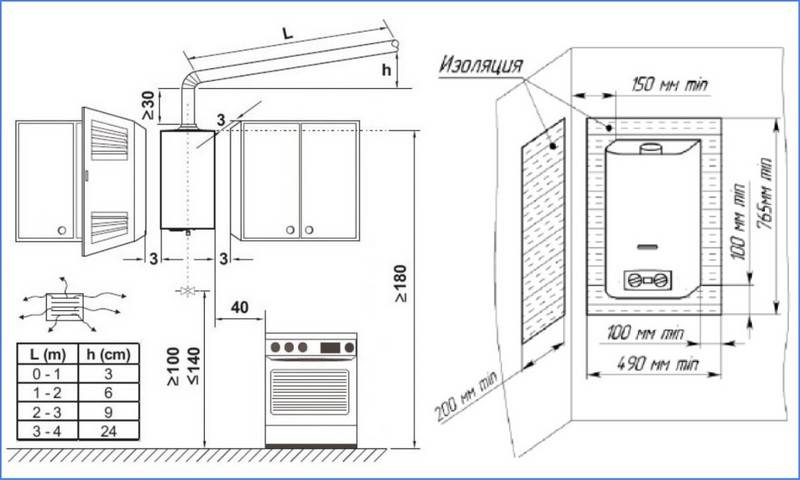
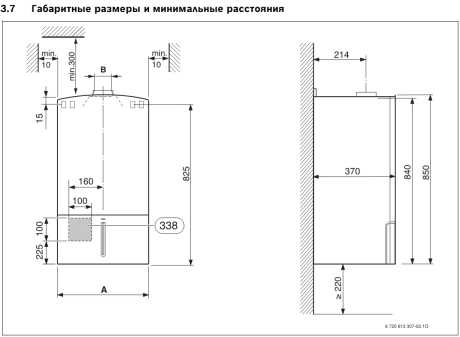
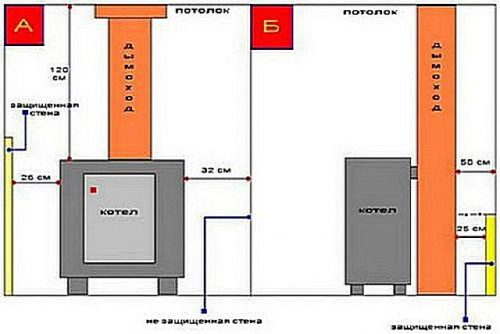
- The wall-mounted boiler is mounted at a distance of 3-5 cm from the wall and at least 50 cm from the ceiling and other walls, 80 cm from the floor.
- The wall-mounted boiler must be fixed and leveled using a building level.
- Clean the inlet holes of the pipes from debris with a pressure of water.
- Connect heating pipes with shut-off valves. Install a water filter.
- Connect the chimney and make sure there is good draft.
- Call the gas service to connect the gas.
- Connect electricity.
It is forbidden to install the equipment at low temperatures. The temperature should lie between +5 and +35 degrees.
Before the first start, water should be drawn slowly. This will get rid of air bubbles in the system, which are extremely bad for heating.
Installation and installation of equipment must be carried out by specialists with the necessary level of qualification and permission. Professionals perform the whole range of work for safe operation and compliance with all standards for connection. But sometimes you can do some work with your own hands. To do this, you must obtain permission from the supervisory organization. But still, employees of the gas service will accept and test equipment for compliance with all safety standards.
Conducting a trial run
This completes the main work on connecting the gas boiler. The exception is devices with a closed firebox. They need to be connected to the electrical network. It is better to do it through the stabilizer.
After that, the system can be filled with coolant. This is done as slowly as possible in order to displace most of the air present in it. The liquid is pumped until a pressure of 2 atm is reached.
All connections are carefully checked for possible leaks.After the representative of the gas service has inspected the connection made and allowed the gas supply, you should also carefully examine all the connections on this pipeline. They need to be coated with soapy water and make sure there are no bubbles. Now you can carry out the first start of the equipment.
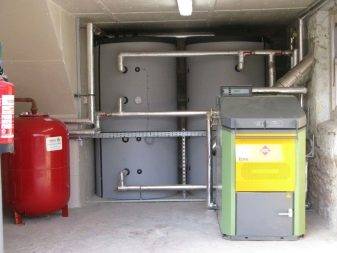
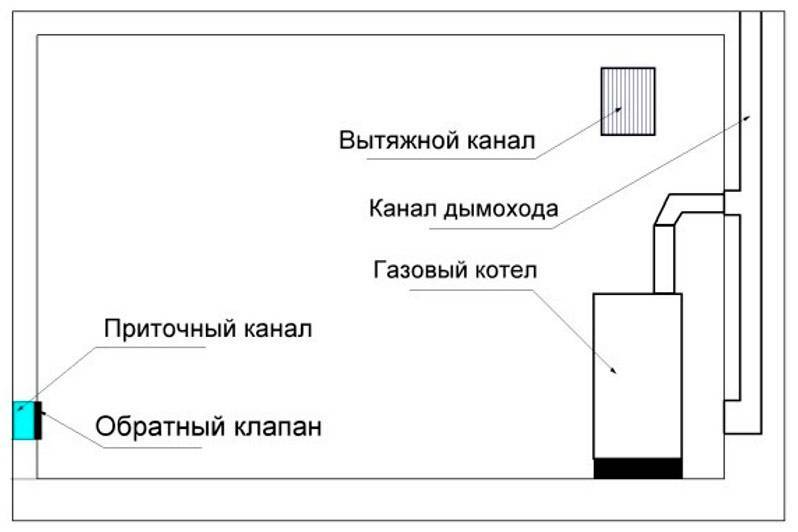
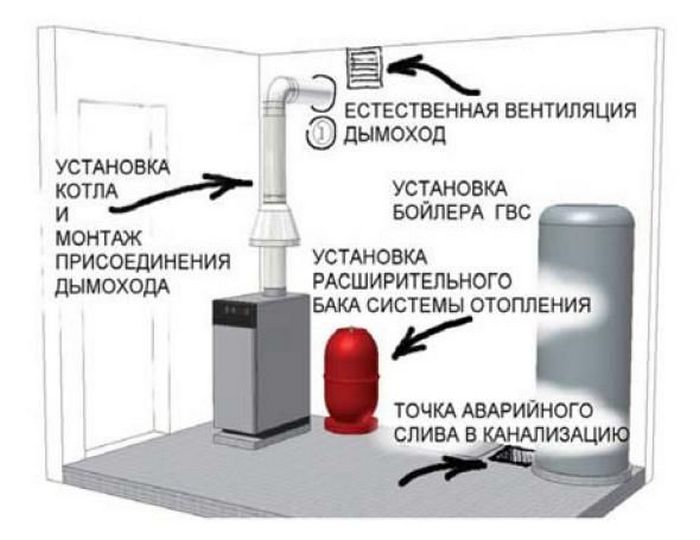
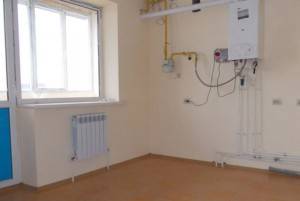
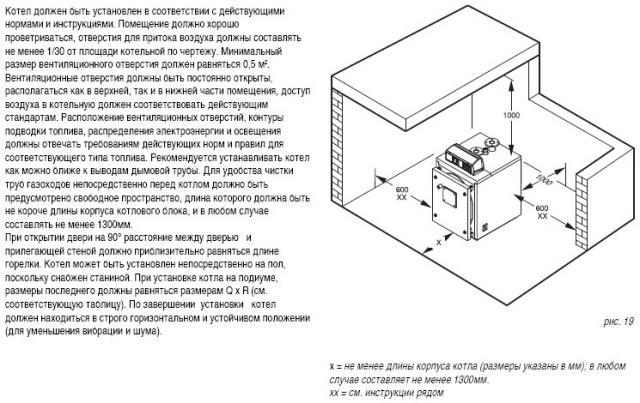
Rules for installing a floor-standing gas boiler
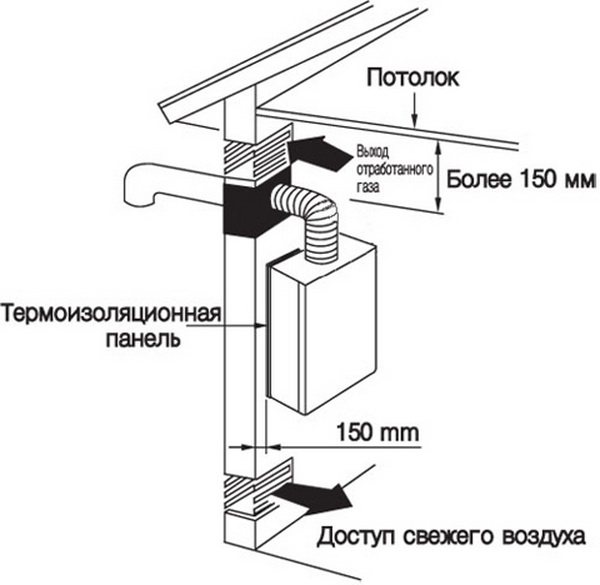
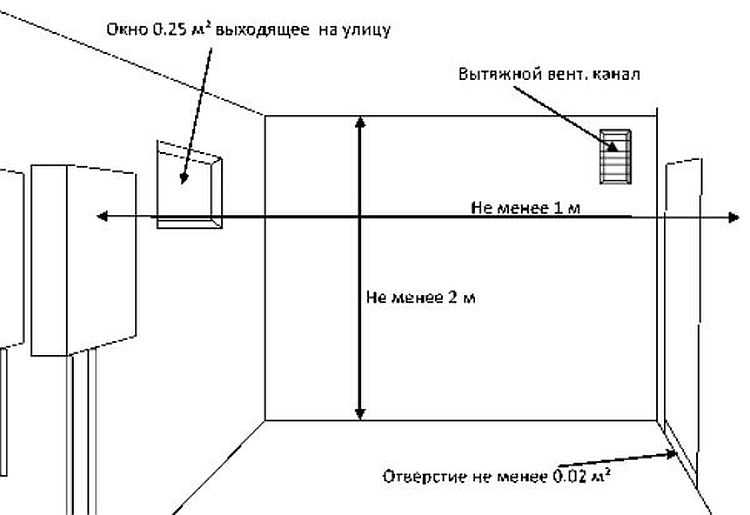
- In a house under construction, it is necessary to plan a separate room for installing a gas-fired boiler. The room should be with natural air flow through the grate in the door or through a hole in the wall.
- Be sure to make a separate hole for supply and exhaust ventilation - it must be under the ceiling.
- A hole in the wall for a chimney, a hole below the chimney for a soot duster (for cleaning the chimney), which is made 20-30 cm below the main chimney.
- The chimney is made airtight so that smoke and carbon dioxide do not get back into the room. For tightness, a smaller diameter pipe is installed inside the large chimney pipe, through which the products of gas combustion are removed.
- The room intended for the installation and operation of the gas boiler must be spacious and provide free access and operation, maintenance and repair of the boiler. The floor in the furnace must be made of non-combustible materials - concrete screed, natural stone, paving stones. The furnace must be connected to the water supply for the operation of the water heater, and equipped with a sewer.
- The area of the room for the boiler is 4 m2, the height of the ceilings in the room is at least 2.5 m2.
- The outer door should be 80 cm wide.
- The top of the chimney must be above the roof.The cross section of the chimney pipe must be larger than the diameter of the boiler outlet.
- To supply power to the boiler room, an electrical panel with grounding must be equipped.
- The gas line is brought into the room in advance. A separate valve must be installed for each gas appliance.
- The walls of the boiler room are plastered - it is strictly forbidden to finish the walls with combustible materials (MDF, fiberboard, plastic).
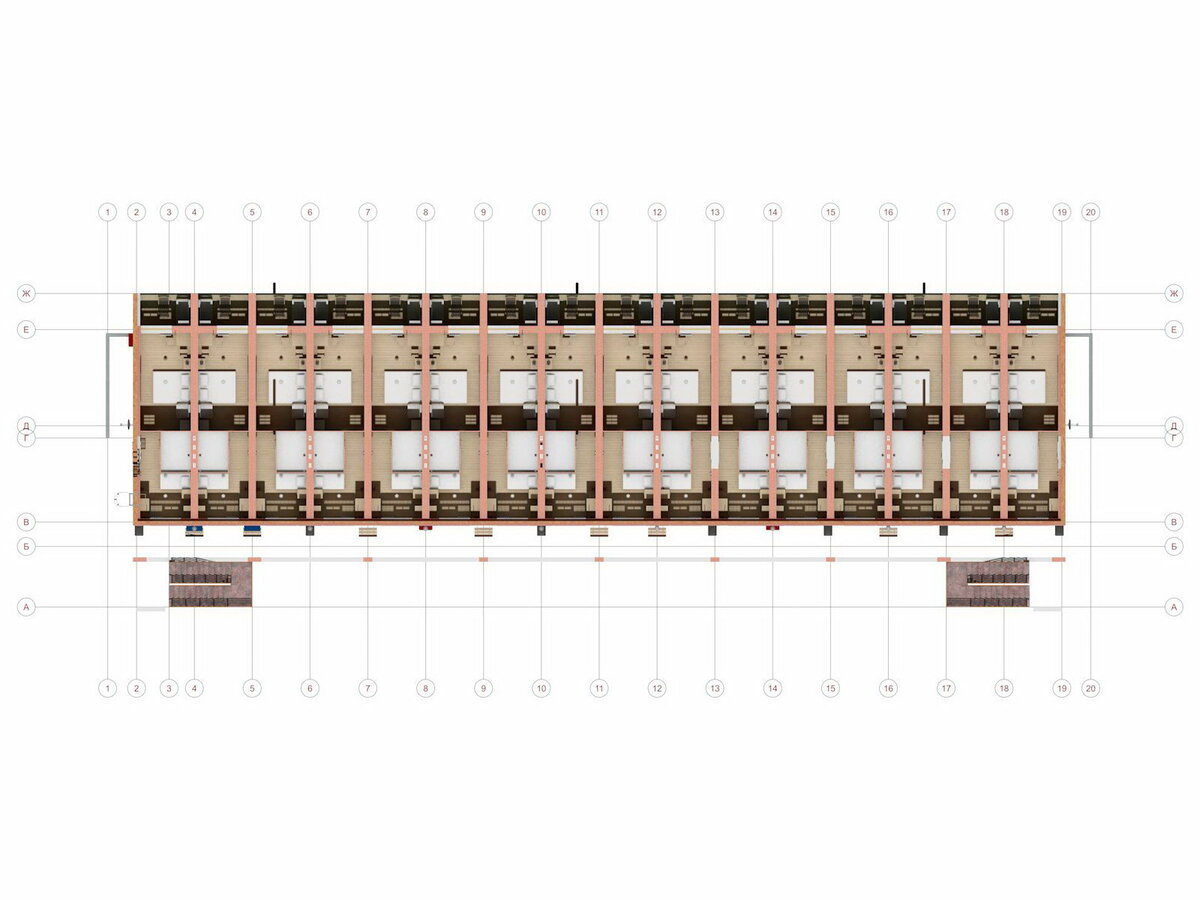
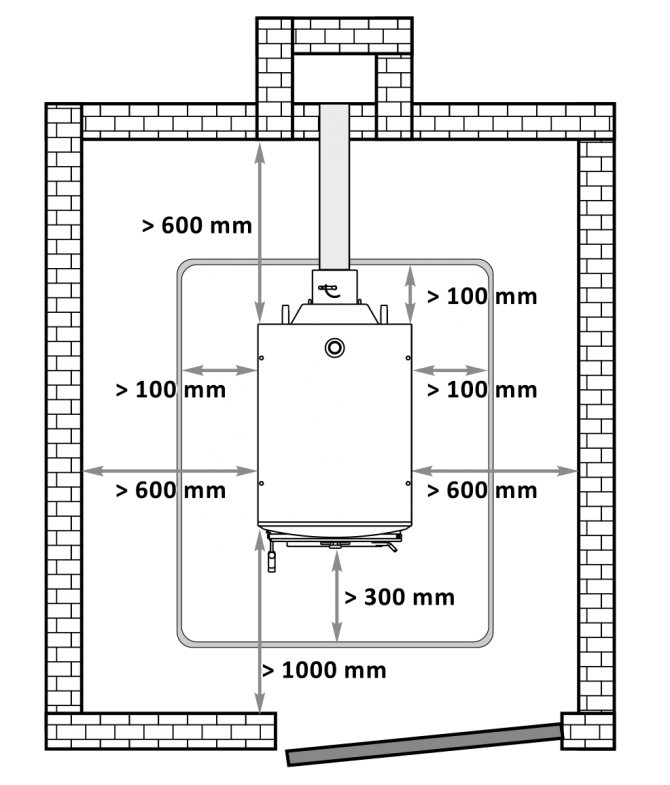
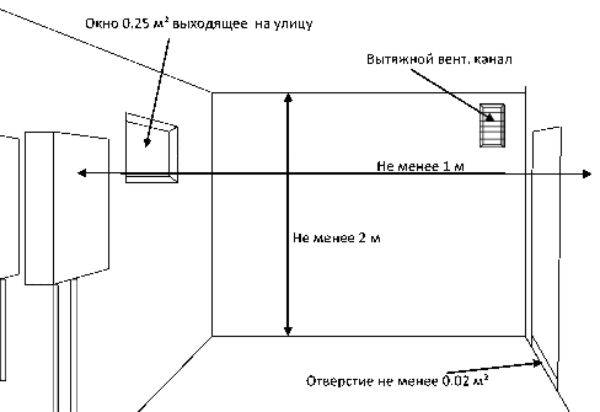 Requirements for a boiler room in a private house
It is forbidden to store flammable liquids and objects near the furnace and in the room itself. The foundation under the AOGV (gas heating unit or gas water heating unit) should not freeze in winter, so its depth should be below the freezing level of the soil in this region. The air from the vent must be clean, that is, the chimney must be located far from the vent. The room or building in which the gas boiler is installed cannot be equipped for other purposes.
Development and approval of the project
Installation work without a project permitting the installation of a heating boiler is prohibited. First of all, this is due to the high degree of danger of the work carried out and the further operation of the equipment.
When drawing up project documentation, the features of the premises are taken into account. It must meet all the requirements specified in the technical specifications. In addition, the project indicates a drawing for laying gas supply communications:
- in private houses - throughout the site to the front door in a residential building;
- in apartments - from the front door to the point of connection of the boiler to the gas network.
The preparation of such documentation can only be carried out by authorized persons who have received a license for such work and are responsible for all calculations. The owners of the premises are forbidden to edit or make adjustments at their discretion. Prepared project documents are subsequently sent for approval. This issue is dealt with by the technical department for gas supply. Consideration can take from several days to several months, depending on the complexity of the drawings and the characteristics of the premises.
Together with the project for which boiler equipment will be installed, it is necessary to provide for approval:
- technical passport of the unit;
- installation and operating instructions;
- certificates confirming the compliance of the boiler with sanitary and technical standards;
- confirmation of the examination of the boiler, which reveals its compliance with safety standards.
The buyer receives all these documents when purchasing the equipment.
If it was not possible to achieve a positive decision on the installation, it is necessary to pay attention to the reason for the refusal. Project reviewers are required to list the steps that will subsequently lead to approval. Once the documents are approved, you can proceed to the installation work
Once the documents are approved, you can proceed to the installation work.

Basic rules for using a gas unit
It is necessary to use heating gas appliances in compliance with certain rules:
- The boiler room or other room should always be dry.
- Filters for the heat carrier should be cleaned of dirt in a timely manner in order to extend the life of the heat exchanger.
- It is strictly forbidden to make independent changes to the structural device of the boiler.
- Cleaning of the flue structure pipe from the combustion products deposited on its walls should be carried out in a timely manner.
- In a private household or boiler room, it is advisable to install a gas analyzer that helps to identify malfunctions in the functioning of gas equipment.
- Timely maintenance of the heating unit should not be avoided, which experts recommend to carry out before the start of the heating season and after its completion. To do this, you need to invite a master who will comprehensively check the condition and operation of the chimney, ventilation system, filters, burner and boiler as a whole.
A qualified installation and compliance with preventive measures can ensure the long and trouble-free operation of gas equipment, and, accordingly, the entire heating system of a household.
Autonomous heating, where to start
Before starting the installation of a gas boiler, you must have the following documents:
- Specifications. This important document is issued in the gas service. It reflects the technical conditions for installation, in fact, permission to carry out all installation work on heating. The gas service, even before granting a permit, will require the amount of the estimated consumption volume.
- Installation project. Its development begins on the basis of the received specifications. The project clearly defines the scheme for the installation of gas heating, the scheme for supplying a gas pipeline.For private housing construction, a scheme is created for wiring gas communications along the site and indicating the entry point to the house. The project has the right to develop design engineers who have the appropriate design license.
- Coordination of the project in Gorgaz. The new project is coordinated either with the service that serves the site or with Gorgaz. The process is quite lengthy and sometimes takes about 3 months.
If, for example, a Thermona gas boiler is purchased, then the following documents must be included in the documentation set:
- registration certificate for a Czech-made boiler;
- technical description and operating instructions;
- certificates of conformity;
- certificates, such as a health certificate.
You should be careful when buying and carefully check the availability of relevant documents. Without them, coordination in Gorgaz can become much more complicated. You can read about how to legally connect individual heating in an apartment here.
With bithermic heat exchanger
The bithermic heat exchanger is arranged according to the "pipe in pipe" principle. The internal structure can be different - firms are trying to improve their products and try different options. One thing remains unchanged: one large pipe is divided into parts - along. They are separated by metal partitions, sealed and not connected.
One of the options for a bithermic heat exchanger for double-circuit gas heating boilers
How does a double-circuit boiler with a bithermic heat exchanger work? On one part of the pipe - the outer one - the coolant circulates, which is supplied to the heating system. In the second part - the inner one - water appears only after a hot water tap is opened somewhere.The heating circuit that was working before is closed (by a signal from the control board), all the heat goes to the preparation of hot water. All this time the circulation pump does not work.
The device of a double-circuit boiler with a bithermic heat exchanger
When the flow of hot water stops (the tap is closed), the circulation pump turns on, the coolant is heated again, which circulates through the heating pipes. As you can see, the arrangement of double-circuit boilers with bithermic heat exchangers is simpler - there are fewer parts, sensors, and, accordingly, easier control. This is reflected in the price - they are a little cheaper. At the same time, the efficiency of such boilers in the water heating mode is slightly higher (93.4% on average, versus 91.7%).
There are also disadvantages - bithermic heat exchangers are often clogged. In DHW heating mode, there is no circulation in the heating medium circuit. This is not a problem if the system is sealed (it should be) and does not require constant replenishment.
This is how a bithermic heat exchanger overgrows
But if there is a leak somewhere and in order to maintain the working pressure in the heating system, it is necessary to constantly add water, there is a gradual overgrowth of the lumen of that part of the pipe through which the coolant circulates. When this gap is clogged with salts, the part that conducts water for hot water is heated more actively. This leads to the fact that salts begin to clog and this part, the boiler, simply stops working.
Both circuits of the bithermic heat exchanger have been scaled up
How to install a gas boiler
Installation of a gas boiler is a rather painstaking and time-consuming task, during which it is important to comply with all norms and the procedure for performing all work.The use of absolutely any device on gas requires compliance with fire safety rules, gas boilers are no exception, therefore the room for installing a gas boiler must be equipped in accordance with all standards, and the installation procedure must in no case be violated. Read: How to choose a parapet gas boiler?
Read: How to choose a parapet gas boiler?
Carrying out preparatory work before installing a gas boiler
Before proceeding with the installation of gas heating boilers, it is necessary to obtain documentary permission, as well as to carry out a number of preparatory work.
- It is necessary to sign a contract for the individual supply of gas for the developer
- Before approving a project for the installation of gas equipment, all technical conditions must be agreed with the relevant gas service authorities. Often, all the development of projects for the installation of gas boilers is carried out by special services or institutions that have the appropriate license to carry out this kind of activity.
- All work on the installation of gas equipment must be carried out by specialists.
- After installing a gas boiler, it is imperative to obtain a conclusion from a representative of the gas organization that the boiler is connected in accordance with all norms and rules and is working properly. Only after receiving the conclusion, the gas boiler can be used.
- The heating system must be pressurized to P = 1.8, and all connections must be completely tight.
- Before carrying out installation work on installing a gas boiler, care must be taken to ensure that a voltage stabilizer and an uninterruptible power supply are installed.
- In no case should antifreeze get into the heating water, otherwise this will lead to gas leakage and damage to the seals.
The boiler room for a gas boiler can be located on any floor of the house, including the basement, basement and attic. The exceptions are living rooms, a toilet and a bathroom - it is not recommended to equip a place for a boiler room in them. Be sure to make sure that the room in which the boiler room will be located and the gas boiler itself comply with all fire safety standards and regulations.


To calculate the volume of the room for the installation of a gas boiler, it is necessary to take into account the total thermal power of both the unit itself and water heaters - flow and capacitive.
Please note that in the data sheet for a gas boiler, the room for installing the boiler should be referred to as a boiler room or a furnace room. To calculate the volume of the boiler room, use the data given in the table below. To calculate the volume of the boiler room, use the data given in the table below
To calculate the volume of the boiler room, use the data given in the table below.
However, there are exceptions: for boilers with a closed-type combustion chamber, the dimensions of the furnace can be of any size and are not standardized. In addition, for this type of boilers, it is not necessary to have a window opening in the room.
For other types, good ventilation is a must. Firstly, air is needed in order to burn at least 2.5 gas per hour, the boiler power depends on it.And secondly, if there is not enough air supplied, the gas does not burn out completely and a substance harmful to health is formed, which, if inhaled, causes death within 15 minutes.
Read: How to choose a floor standing gas boiler?