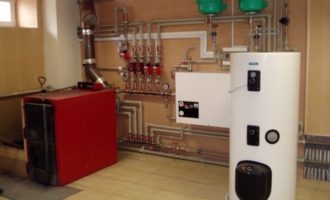
- Working with a gas appliance
- Location selection
- Features of installation in the apartment
- Preparing the device for work
- Installing an electric boiler on the wall - we do everything right
- How to connect instantaneous water heater in the apartment
- Installation of an electric water heater
- Stage number 1 - checking the electrical network
- Stage number 2 - choosing an installation site
- Stage number 3 - the installation process itself
- Stage number 4 - connecting to the mains
- Stage number 5 - connection to the water supply system
- Connecting the water heater to the mains
- How to install a flow water heater
- Organization of power supply
- Selecting an installation site
- Wall mounting
- Recommendations from the pros!
- How to connect a storage water heater in the country
- General information
- General scheme of connection to the water supply
- Cold water supply (top to bottom):
- Hot water outlet (top to bottom):
Working with a gas appliance
Gas-powered appliances can only be replaced on their own. If they weren’t there initially, you can’t just install them. To do this, it is necessary to develop an appropriate project, coordinate it in various instances, otherwise such unauthorized actions are a violation of the law and entail appropriate consequences.
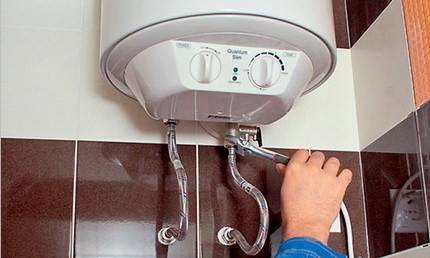
If the project is developed, the gas service has completed all the work on connecting the pipe to the column, the gas meter has been installed, then the installation of the heating element can be done by hand. Step by step process:
- At the intended installation site, mark out, drill mounting holes for the dowels and hammer in the hooks.
- Place the column on the mounts.
- Install a corrugation to exit carbon monoxide vapor into the chimney: one end should be tightly fixed in the chimney, put the other on the outlet of the device. Hole and corrugation diameters must match exactly.
- Connect the gas pipe to the column inlet using a special rubber hose. Then it is necessary to open the gas supply to the product and use a soapy solution to check the connections for leaks. If soap bubbles swell, tighten the connection nut more tightly.
- The next step is to connect the water supply. The procedure is carried out in the same way as connecting electrical appliances, only in this case auxiliary elements are not needed. To extend the life of the column, it is recommended to install an additional salt filter. Open the cold and hot water faucet, check for leaks. If everything is done without error, install the power supply.
- Open hot water, after that the column will start, and after a while warm water will flow. Adjust the temperature according to the instructions for use of the device.
2 id="vybor-place">Select a place
First of all, for the operation of a flowing water heater, sufficient power is needed. They range in power from 1 to 27 kW and usually require a new network to be installed and connected to an electrical panel.In apartments, single-phase non-pressure flow devices are most often used, the power of which is up to 4-6 kW.
If you constantly do not have warm water in your apartment, then you should choose a more powerful model, preferably a pressure type, or consider buying a storage tank.
It should be said that low-power instantaneous water heaters usually have a single phase, and devices with a power of 11 kW or more are three-phase. If your housing has only one phase, then you can only install a single-phase device.
Learn how to build a cellar with ventilation, a sheepfold, a chicken coop, a veranda, an arbor, a brazier, a fence with a foundation with your own hands.
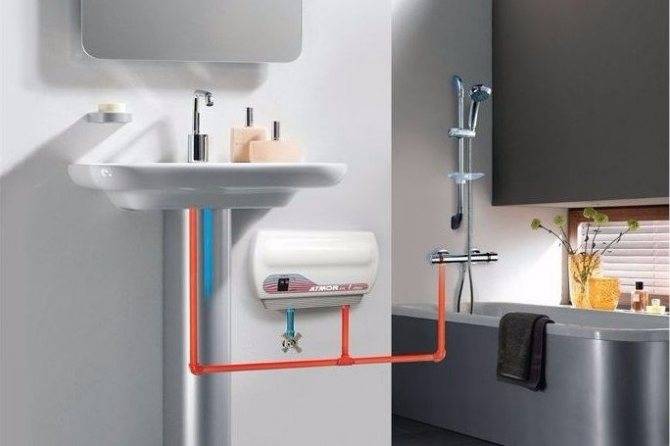
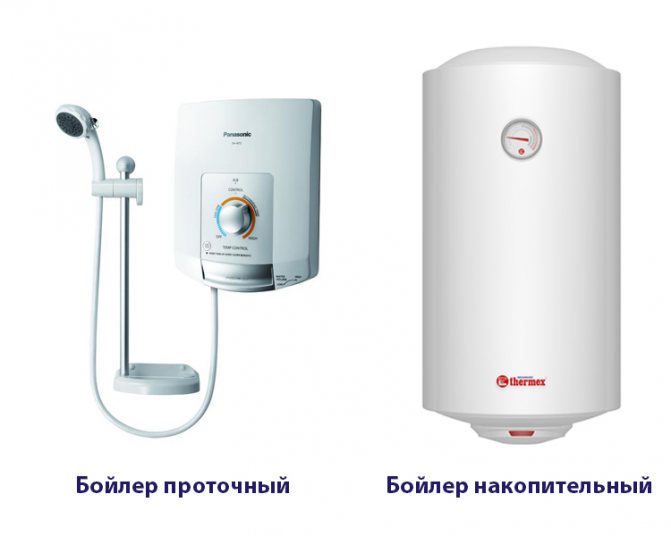
The choice of the place where the instantaneous water heater will be installed depends on its type: non-pressure or pressure. Most often, in order to ensure washing under the shower during water outages, non-pressure models are installed in the bathrooms.
Of course, they are not able to provide such a pressure of hot water, which gives a centralized supply of hot water or a pressurized water heater. But even that flow of heated water, which will provide you with a non-pressure view, is quite enough to wash.
Important! You should use exactly the shower head that comes with the non-pressure water heater - it has fewer holes. Water can barely flow from a conventional shower head. A non-pressure model is installed next to the place of consumption of the water it heats
Usually this place is above or below the washbasin, on the side. This takes into account the following aspects:
- it should not be splashed from the shower. Devices marked IP 24 and IP 25 are protected from water ingress, but it is also undesirable to place them in flood areas;
- access to management, regulation;
- ease of use of the shower (faucet) to which the connection is made;
- ease of connection to the central water supply;
- the strength of the wall to which the device will be attached. Typically, the weight of such water heaters is small, but the wall must ensure its reliable fastening. Brick, concrete, wooden walls are usually not in doubt, but drywall may not be suitable;
- evenness of the wall. On very curved surfaces, it is sometimes difficult to position the instrument correctly.
Learn how to get rid of old paint, stick wallpaper, insulate windows in an apartment. A pressure water heater is able to serve several points of water consumption at once. Its installation is carried out next to the riser or draw-off point. Such a device has more power than non-pressure. It can have both top and bottom connections, but to install and connect such a model, it is better to contact specialists. Flowing water heaters are gas and electric. Mostly electrical appliances are used, since for gas it is necessary that the project provides for a gas column and the presence of a gas pipeline, and the installation must be agreed with the gas service.
Did you know? One of the first methods of heating water was stones heated on fire, which were immersed in a container of water.
Features of installation in the apartment
The main feature of a city apartment is the lack of space. If the walls of the toilet are tiled, then it will be quite difficult to install a boiler there. The only option in this case would be to install on the back wall, where there is usually a small cabinet for masking sewer pipes or storing household chemicals.
Step 1.We note right away that a heater with a volume of no more than 10 liters can be placed in the cabinet. First, the locker is freed from all contents - cleaning products, shelves, lid and bottom.
Step 2. Then the center-to-center distance of the fasteners, the dimensions of the cabinet and the gap between it and the wall are noted. The latter is marked, fastener points are indicated. Holes are made in appropriate places, dowels are hammered into which anchors are screwed.
Step 3. The water heater is hung on anchors.
Step 4. The cabinet is assembled back (of course, the shelves and the bottom are no longer used), and the device is connected in the same way as in the previous paragraph of the article.


Preparing the device for work
To prepare the water heater for operation, it is necessary to remove the air accumulated in it from the secondary circuit, otherwise, when heated, air bubbles will move through the coolant and cause unpleasant noise.
To do this, fill the water heating circuit with water to failure. At the same time, the hot water tap remains open until the container is completely filled.
 Upon completion of installation work and connection of the device, we once again check the quality of the connections of all nodes and conduct a test run of the device
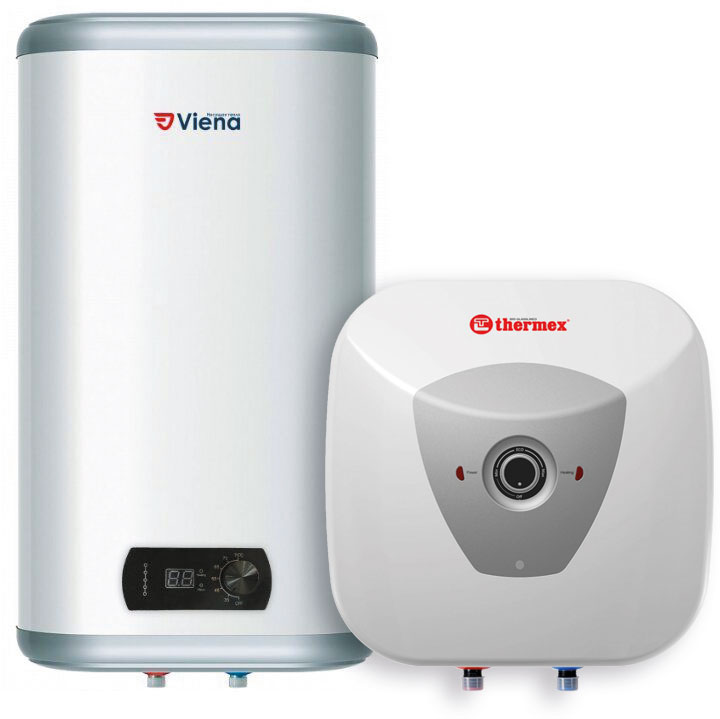
A storage electric heater is a practical solution for providing hot water to your home. Different types of devices can be connected both to the water supply and to a storage tank with water or a pump.
Installation of equipment can be carried out independently, especially if the home master has experience in plumbing
It is important to strictly follow the manufacturer's instructions and correctly install and connect the heater.
Only then the device will serve its owner for a long time and without interruption.
Installing an electric boiler on the wall - we do everything right
Be sure to take into account the strength characteristics of the surface (in our case, the wall) intended for mounting the water heater
It is also important to properly fix the boiler on the wall so that it does not break off during operation. With a low strength of the walls, it is recommended to fill it with a light metal frame or wooden slats and install the unit
With a low strength of the walls, it is recommended to fill it with a light metal frame or wooden slats and install the unit.
The mounting scheme for heating equipment depends on its type and specific model. Most often, fastening is performed using:
- dowel-screw kit;
- screws L-shaped type, designed to work with wooden surfaces;
- drop-in anchors if the wall is made of concrete.
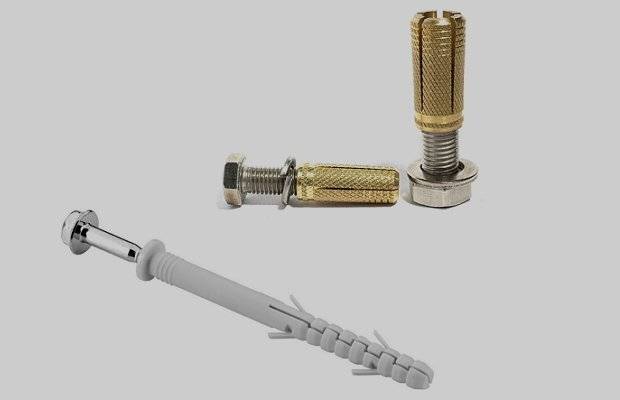
Dowel screw and drive-in anchors
A wall-mounted boiler kit usually includes a special support bar. It provides more reliable fastening of the equipment. If installing a water heater with your own hands involves the use of L-shaped screws, the length of the hardware must be more than 6 cm, and the cross section must be at least 8 mm. Dowels are taken with a diameter of 1.2 cm. If the installation scheme involves the use of anchors, the cross section of such fasteners should be 1.6 cm. Smaller diameter hardware cannot be used.
When mounting the unit in an apartment on a frame or a support bar, the fixation scheme for such structures looks like this:
- the frame is applied to the wall surface and aligned horizontally;
- a hole is drilled with an impact drill or puncher;
- in the holes obtained, the support element is mounted.
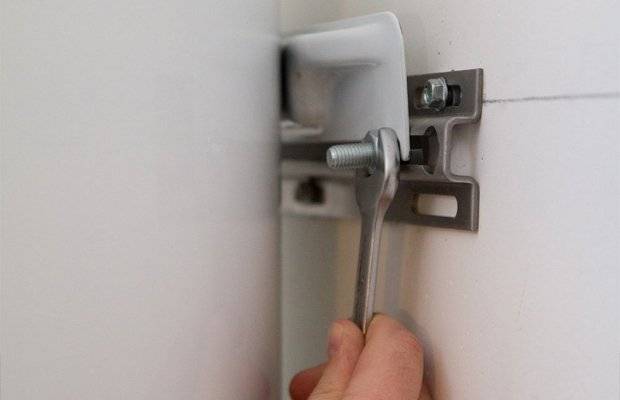
Support element mounting
In dwellings with “flimsy” walls, instead of a standard support bar, it is better to use a frame made independently from a corner or a steel three-millimeter strip. This design will completely hold the boiler. The scheme of its fastening will be similar to fixing a conventional support bar. Installation of a wall-mounted heater is carried out taking into account its design features. The equipment is accompanied by a drawing and a diagram of the location of its nozzles. Mount the boiler, focusing on the data specified by the manufacturer.


How to connect instantaneous water heater in the apartment
Installation of an electric water heater
Having dealt with the type and principle of operation of water heaters, you can proceed directly to the consideration of the installation process
And here it is important to make the connection correctly.
Stage number 1 - checking the electrical network
Before deciding how to connect an instantaneous water heater to the mains, you should make sure that the electrical wiring in the house is able to withstand such a load.
Models with power from 3 kW to 27 kW are presented on the market. If the wiring in the apartment is old and there is no way to replace it, you need to choose a device with a power of 3 kW, 5 kW or 8 kW. With a large flow of water, a pressure model is required, which must be connected through a separate line and a residual current device (RCD).
That is, powerful models require a stationary installation, which will require the following:
- AC power supply with voltage 220 V;
- copper cable (mandatory three-core) with a minimum cross section of 3 mm x 2.5 mm;
- RCD, selected according to the power of the heating appliance (in most cases, the power indicator corresponds to 30 A).
The instantaneous water heater must not be used without grounding. And if it is planned to be installed on a heated surface, the cable cross-section must be increased.
Stage number 2 - choosing an installation site
When choosing an installation site, the type of equipment is taken into account. Non-pressure devices are installed directly near the draw-off point, that is, above the sink or shower. Such models, as a rule, are already equipped with a faucet with a gander or a shower head. Therefore, they can be connected to both the faucet and the shower.
Consideration should also be given to ease of maintenance when choosing a mounting location. It should be convenient for each tenant of the apartment to turn on the device and regulate the temperature of water heating.
Heating indicators for pressure water heaters do not need to be set, since these devices have built-in programs. They also do not need to be constantly turned on and off. Therefore, such units are located near a water point or riser, for example, in a bathroom or in the kitchen.
Stage number 3 - the installation process itself
Now you need to prepare a drill and drill bits for wood or concrete. Next, you need to perform the following algorithm of actions:
- make sure that the device switch is set to the “Off” position;
- attach brackets or a mounting plate to the wall, mark the drilling locations and drill holes;
- insert dowels into the holes.
Now the water heater can be connected to the electrical network and the water supply system.
Stage number 4 - connecting to the mains
At this stage, you must be extremely careful, as you will have to work with electricity.Therefore, first you need to make sure that there is no voltage in the network.
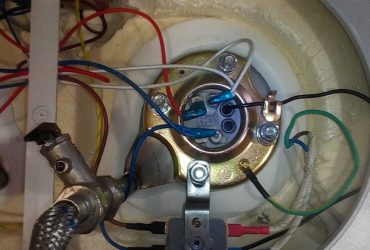
In the rear wall of the water heater there is a special hole through which the electric cable is inserted. It is closed with a rubber plug. When the cable is in place, the device is hung on the wall and screwed with screws, checking its correct location using the building level.
The ends of the wires are stripped and inserted into the terminal box according to the color code. To improve the fixation of the wires, tighten the fixing screws.
We must not forget about grounding and the need to install a circuit breaker (RCD).
It is installed in the switchboard.
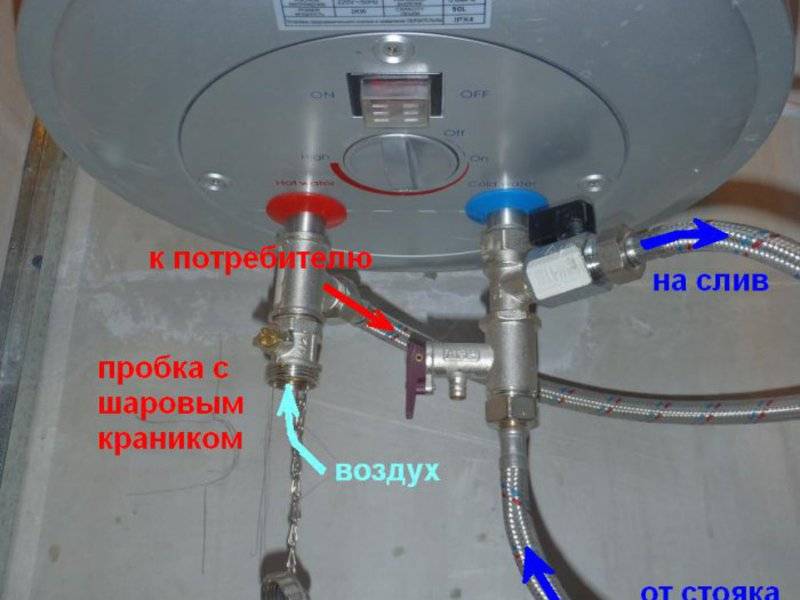
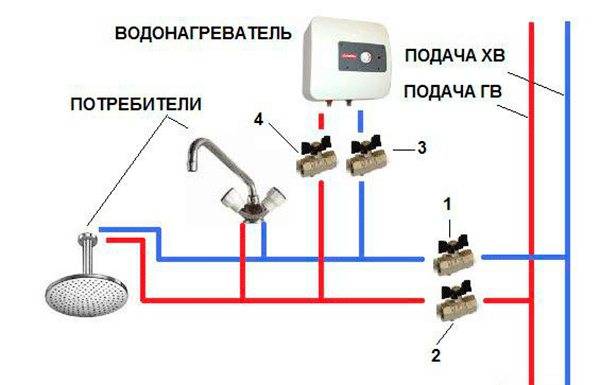
Stage number 5 - connection to the water supply system
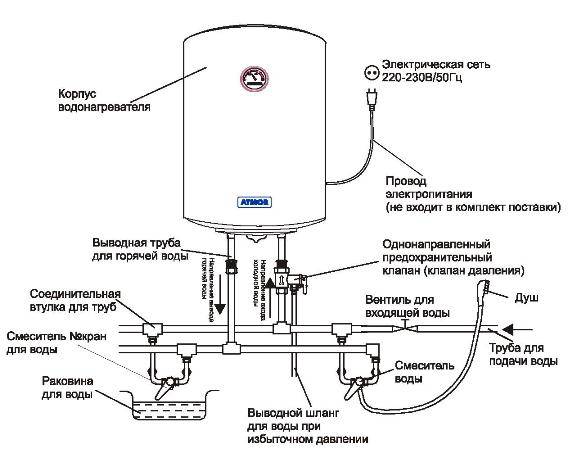
There are two holes on the bottom of the case:
- input - for connecting cold water;
- output - for hot water supply.
Non-pressure model is enough to connect to the mixer with a flexible hose through the inlet. A shower hose with a previously unscrewed watering can is connected to the outlet. You need to use the one that comes with the kit. It has smaller nozzles that do not make it difficult to heat water.


Connecting an instantaneous water heater to the water supply is a more complicated process that involves the use of pressure models, to which several water points are connected. This method involves tapping into a water pipe. When carrying out work, the following rules must be observed:
- the tie-in should be done as close to the points as possible;
- install the valve near the tie-in in such a way that access to it is always free.
After looking at the connection diagram of the instantaneous water heater, you can see two valves. One of them serves to shut off cold water, the second - only to shut off the water entering the device. Next, a tee cuts into the pipe, into which a hose is inserted.
Connecting the water heater to the mains
Since the operation of the water heater requires a connection to a 220V network and mandatory grounding, the best option would be to connect to an existing outlet for a washing machine - through a plug (of course, provided that this outlet is wired in a separate line in compliance with the rules).
If the apartment does not have such an outlet, then it would be best to turn to electricians for qualified help in laying electrical wiring. There are several reasons for this.
First, working with electrical wiring requires certain skills and knowledge, and if certain points are not observed during installation, it threatens with electric shock or failure of electrical appliances.
Second, you will have someone to ask for poor quality work. Of course, if you have concluded an agreement with a contractor.
And finally, there will be no problems with which wire to choose, which machines to install.
Perhaps this will prompt you to conduct an audit of the electrical wiring throughout the apartment.
Well, in conclusion, I would like to wish you pleasant water procedures.
How to install a flow water heater
The process of installing a instantaneous water heater with your own hands includes a preparatory period
First of all, it is important to correctly determine the model. To choose the device that is optimally suited for its characteristics, the following factors are taken into account:
- the number of people living in the house;
- maximum hot water consumption with all taps open at the same time;
- number of water points;
- desired water temperature at the outlet of the tap.
Having a clear idea of the requirements, you can proceed to the selection of a flow heater of suitable power
Separately, it is worth paying attention to other nuances: the complexity of installation, price, maintainability and the availability of spare parts for sale.
Organization of power supply
The power of household instantaneous heaters varies from 3 to 27 kW. The old electrical wiring will not withstand such a load. If a non-pressure device rated at 3 kW can still be connected to an existing electrical network, then powerful pressure models require a separate line.
A powerful water heater cannot be connected to a power outlet. From the device lay a straight line to the electrical panel. The circuit includes an RCD. The circuit breaker is selected according to the power of the flowing electrical appliance. According to the standard, the indicator is 50–60 A, but you need to look at the instructions for the device.
The cable cross section is selected in the same way, taking into account the power of the heater, but not less than 2.5 mm 2. It is better to take a copper wire and be sure to have a three-core one. The instantaneous water heater cannot be used without grounding.
Selecting an installation site
The choice of the location of the water heater is determined by the convenience and safety of using the device:
When installing a water heater in an apartment, it is important to choose a place so that there is a free approach to the device. There are control buttons on the case. All family members will set the optimum water temperature according to their preference.
The installation of the electrical appliance is carried out so that during the use of a shower or sink, splashes of water do not fall on its body.
The device is placed as close as possible to the water points and the electrical panel, taking into account the convenient connection to the water supply.
All family members will set the optimum water temperature according to their preference.
The installation of the electrical appliance is carried out so that during the use of a shower or sink, splashes of water do not fall on its body.
The device is placed as close as possible to the water points and the electrical panel, taking into account the convenient connection to the water supply.


The choice of installation location depends on the type of flow device:
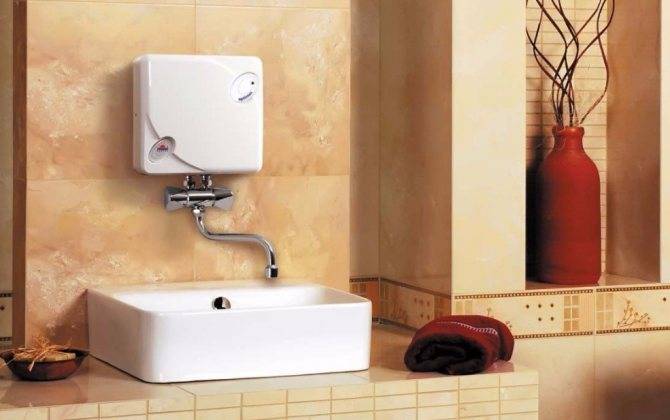
- Non-pressure low-power models are designed to connect one draw-off point. The water heater is often made in the form of a faucet mounted on the sink. Non-pressure models are mounted under the sink or on the side of the sink. The device can be equipped with a hose with a shower head. It will be optimal to install a flowing water heater in the bathroom near the shower. If the question arises, how to connect a non-pressure instantaneous water heater, there is only one answer - as close as possible to the mixer.
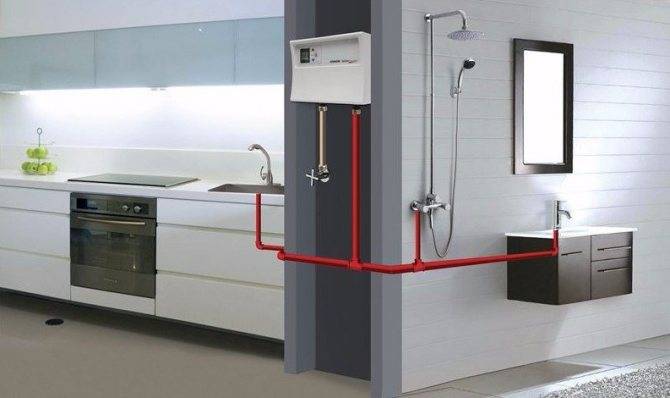
- Powerful pressure models are able to provide hot water for more than two water points. It is allowed to install an electrical appliance near the cold water riser. With this scheme, hot water will flow to all the taps of the apartment.
The presence of IP 24 and IP 25 markings on the water heater means protection against direct water jets. However, it's not worth the risk. It is better to place the appliance in a safe, dry place.
Wall mounting
The instantaneous water heater is installed on the wall by hanging. Included with the product are dowels with self-tapping screws, mounting plate, brackets. When installing an electric flow-type water heater, two important nuances are taken into account:
- Support strength. A wall made of solid materials is perfect. The device is characterized by light weight. It can be fixed even on a plasterboard wall. The main thing is that the wall does not stagger, and a mortgage was provided under the plasterboard for reliable fixation of the brackets.
- During installation, the ideal horizontal position of the body of the flow device is observed. At the slightest inclination, an air lock is formed inside the water heater chamber. A heating element not washed by water in this area will quickly burn out.
Installation work begins with the markup. The mounting plate is applied to the wall and the places for drilling holes are marked with a pencil.
It is important at this stage to set the horizontal level. Holes are drilled according to the markings, plastic dowels are driven in with a hammer, after which the mounting plate is screwed with self-tapping screws. Support base ready
Now it remains to fix the water heater body to the bar
The supporting base is ready. Now it remains to fix the body of the water heater to the bar.
Recommendations from the pros!
Bath accessories
DIY gazebo
concrete fence
Do-it-yourself potbelly stove
DIY veranda
screw foundation
Do-it-yourself country toilet
decorative brick
stone fence
Foundation pouring
How to do fence
Wicket from corrugated board
DIY fireplace
brick fence
flowerbeds do it yourself
Forged gates
Do-it-yourself porch
Hot tub
DIY chicken coop
Ladder do it yourself
metal gate
Installation of lining
Installation of polycarbonate
Garden pump
Arrangement of the garage
Fences for flower beds
Do-it-yourself blind area
Steam room in the bath
Railings for stairs
Do-it-yourself cellar
wall painting
Do-it-yourself press
Lattices on windows
roller shutters
Do-it-yourself barn
Alarm for giving
Benches for giving
fence posts
Floor screed
Solid fuel boilers
DIY greenhouse
Fence Installation
House insulation
Attic insulation
Foundation insulation
How to connect a storage water heater in the country
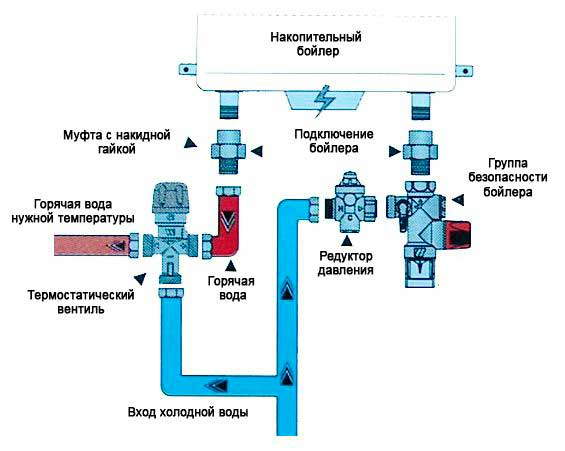
As a rule, cottages have to deal with very low pressure inside the plumbing system, which eliminates the possibility of using classic water heater installation schemes. The way out of this situation is a special container installed separately from the heater: the boiler tanks are already filled from it. A non-return valve cannot be used in this scheme.
It is important to choose the volume of additional capacity as accurately as possible: it should be several times larger than the volume of the tank (tanks) of the device. The container for creating pressure cannot be closed (vacuum), so holes must be made in it.
It is better if there is a float valve in such a tank to adjust the liquid level. A tap or valve is installed on the pipe from the tank to the water heater. Before connecting the water heater, the pressure tank is raised to the attic: it must be located above the boiler at a height of more than two meters. If the dacha or country house will not be used in the winter, the contents of the tank must be drained before the onset of frost.
General information
The topic of the note is important, because a lot of summer cottage construction projects are not connected to a centralized hot water supply.Again, independent heating designs very often do not provide for the possibility of water heating for the washbasin and kitchen sink in the bathroom.
At the same time, warm water in the tap is a mandatory requirement of life convenience. It is very easy to solve the problem of a lack of warm water, it is enough to install a water heater under the sink for 10 liters. There is a large selection of this equipment on the market, it remains to be formed with what to choose.
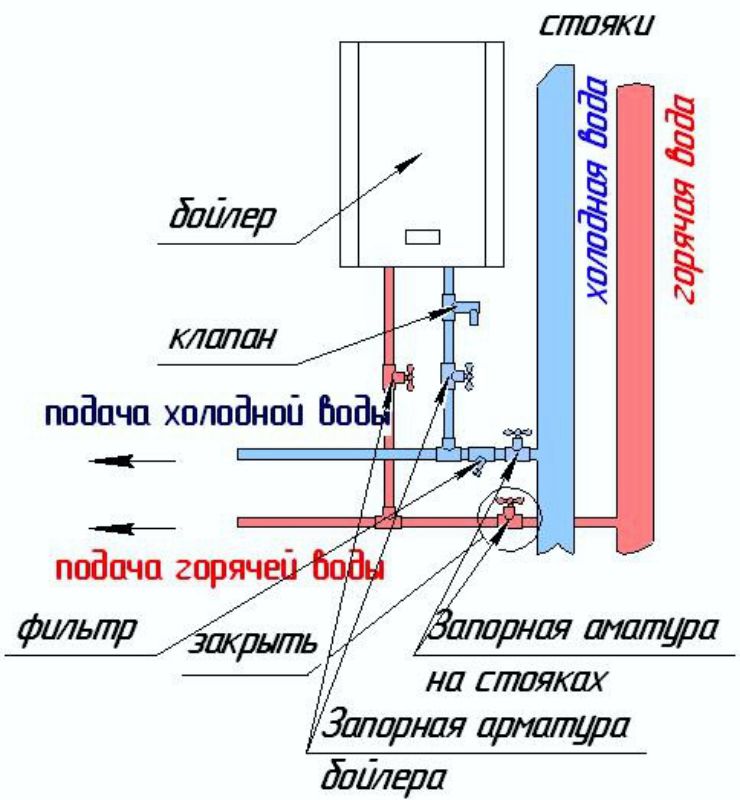
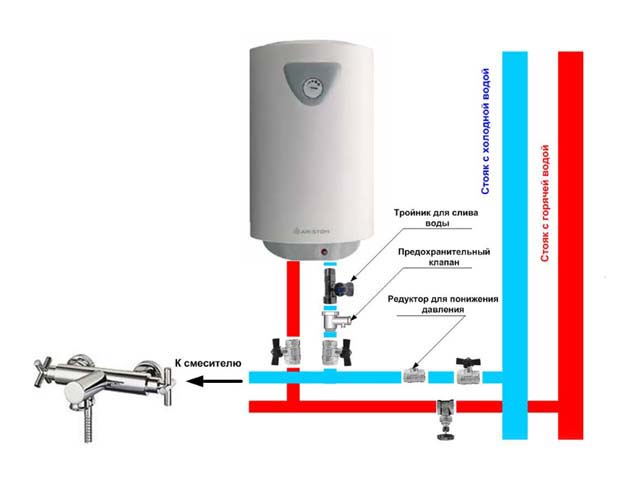
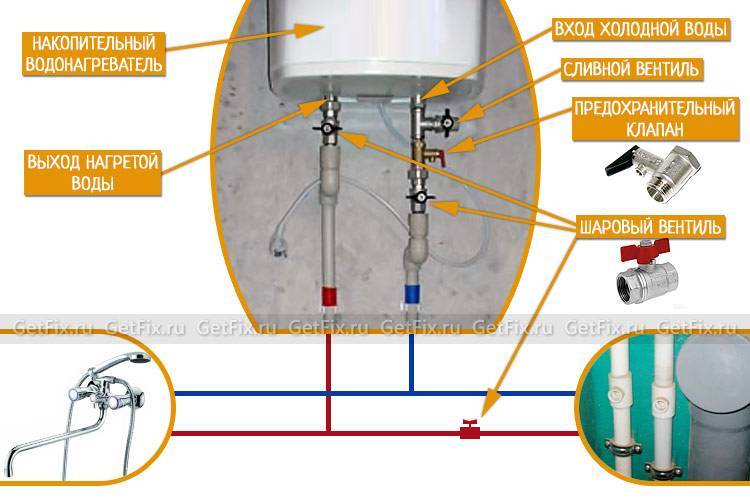
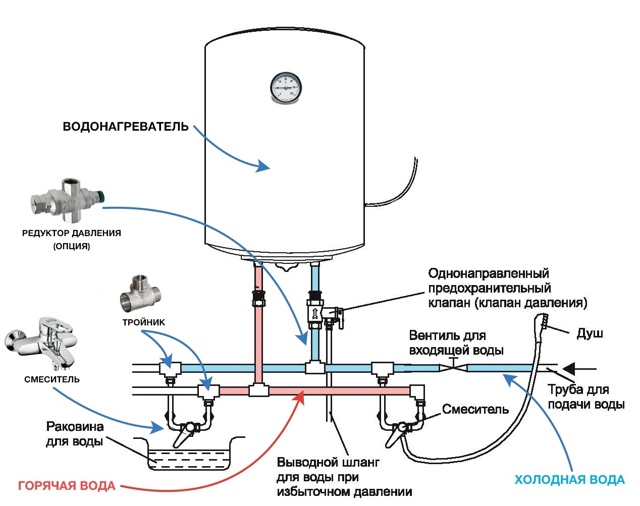
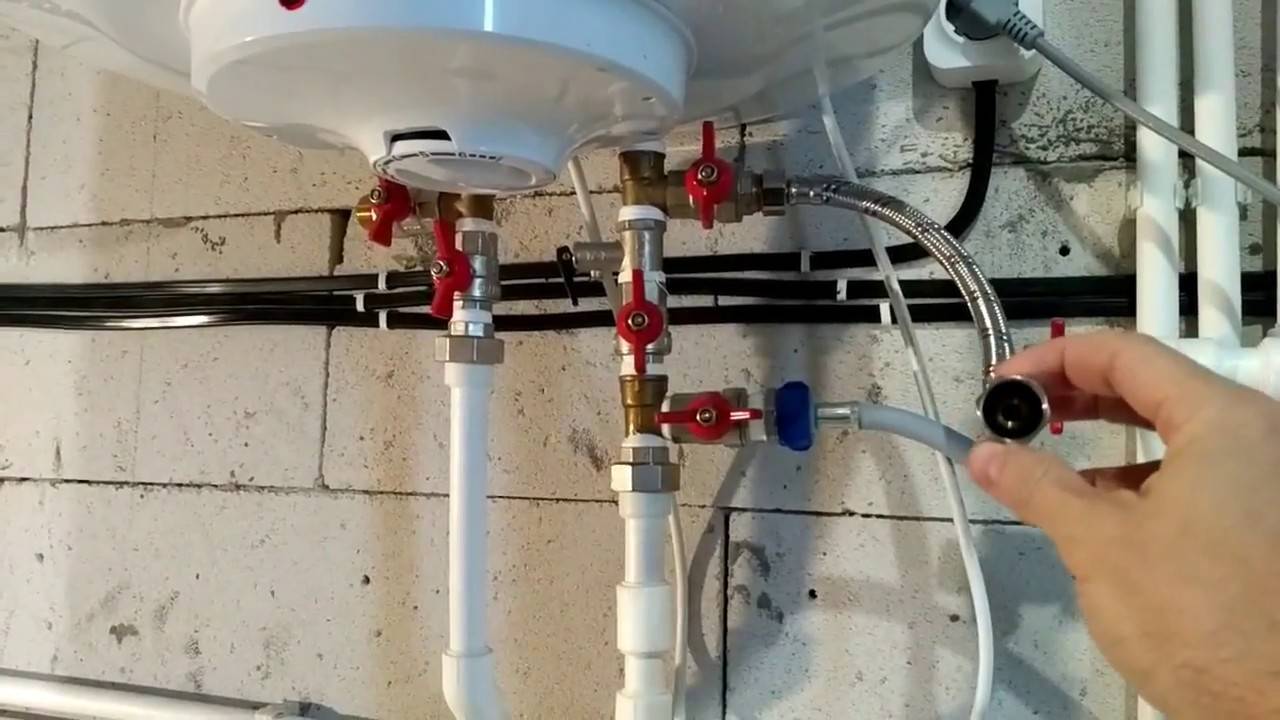
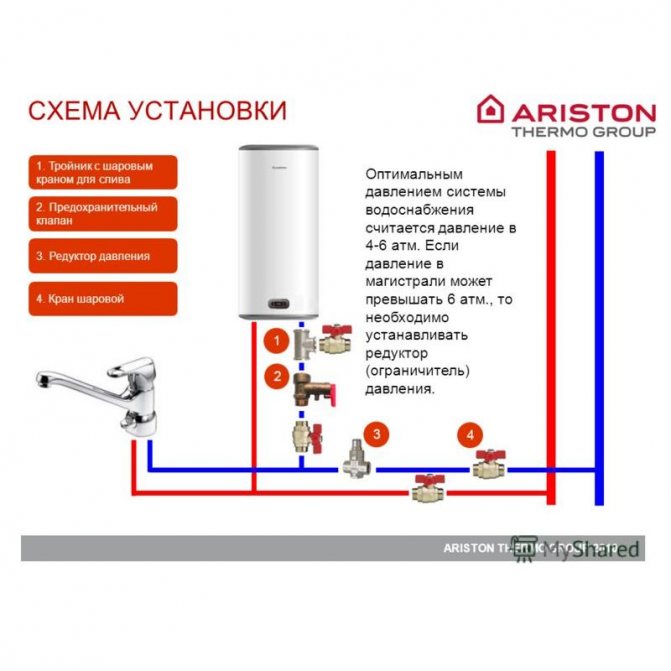
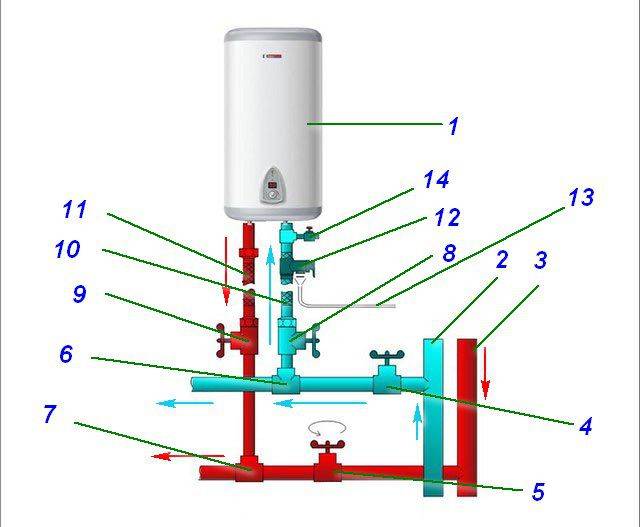
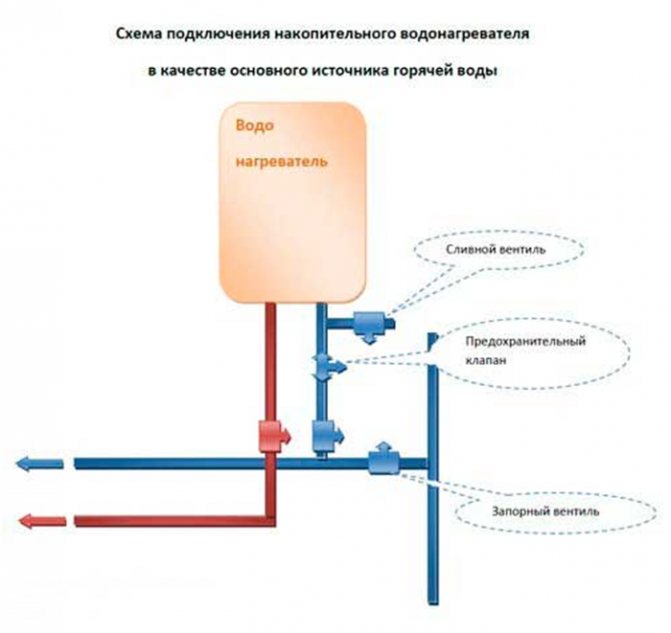
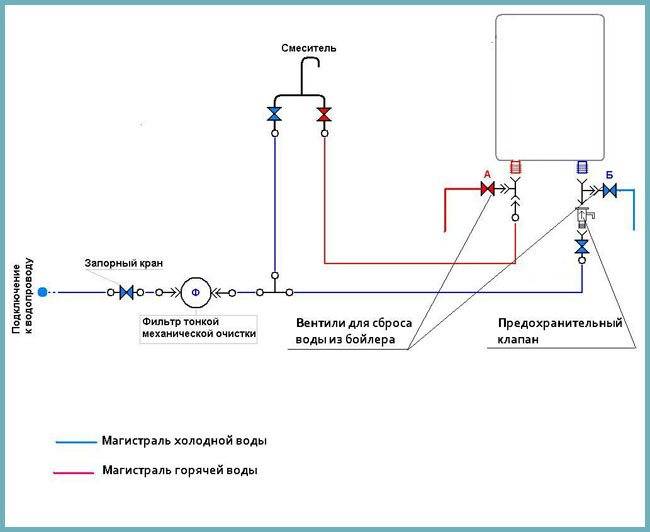
General scheme of connection to the water supply
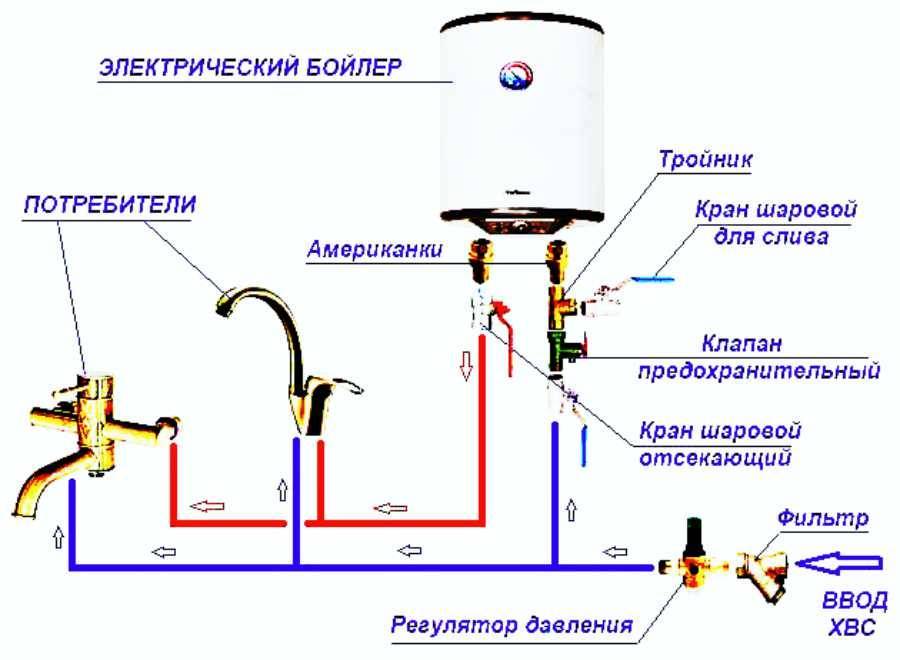
Connecting the boiler to the water supply from any type of pipes is carried out according to one general scheme.
Cold water supply (top to bottom):
- Mounting the "American" to the water supply pipe of the boiler is one of the simplest and most reliable options for connecting the boiler. If it is necessary to dismantle the water heater, it can be disconnected from the water supply in a few minutes.
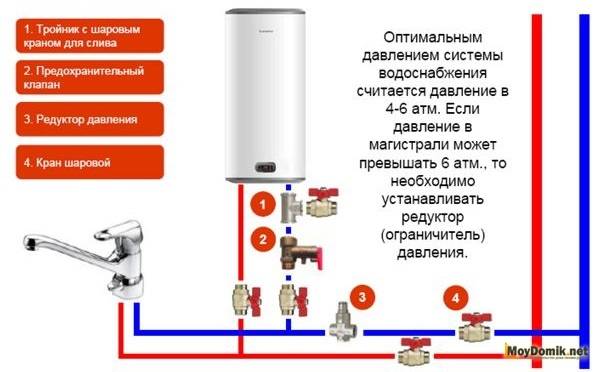
- Installation of a brass tee with a tap for draining water. This part is not a prerequisite for connecting the boiler. But for the convenience of draining water from the boiler, this is an excellent and durable option.
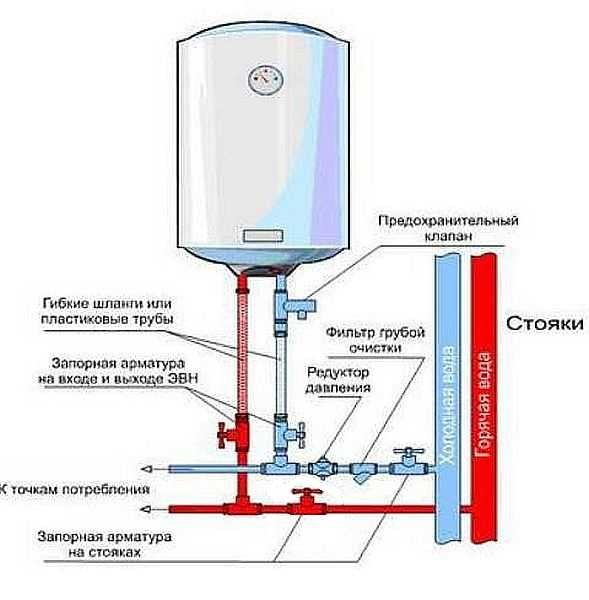
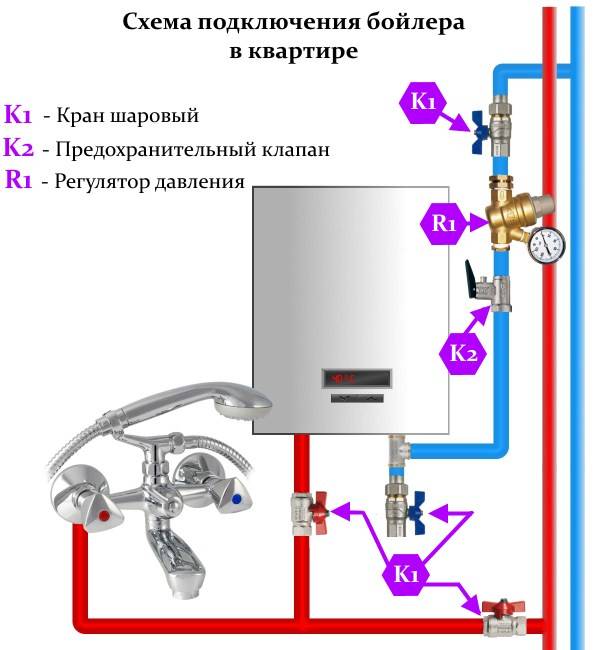
- Installation of a security system is a prerequisite for connecting the boiler to the water supply. The system includes:
Scheme of water supply to the boiler
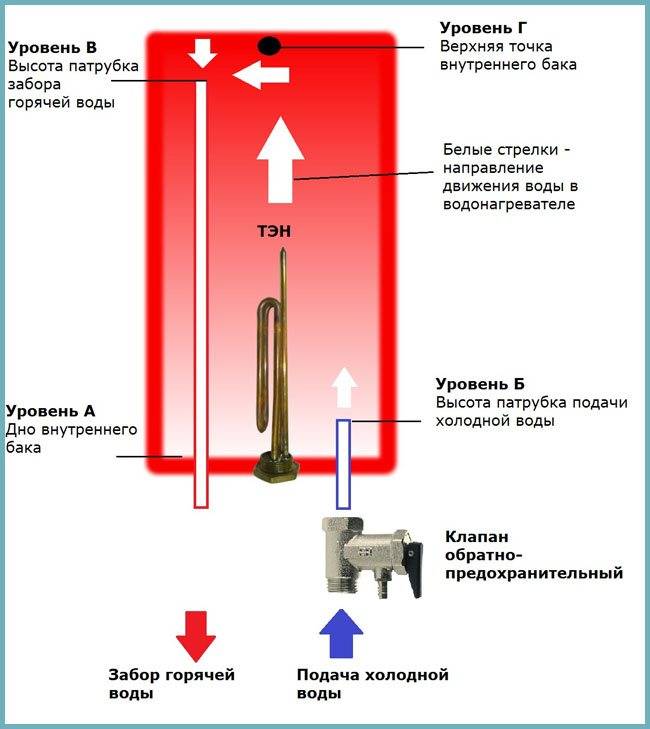
- non-return valve - will prevent the outflow of hot water from the boiler in the event of a drop in the pressure of the cold water supply or its complete absence;
- safety valve - in the event of an increase in pressure inside the boiler tank, excess water is automatically discharged through this valve to reduce internal pressure.
Attention! The security system included with the water heater is not always reliable. To protect yourself from trouble, purchase a reliable non-return and "stall" valve
The importance of a security system cannot be overestimated. So the absence of a check valve in the event of a shutdown of the water supply (for example, repair of the main line) will lead to emptying of the tank
At the same time, the heaters will still heat up, which will lead to their failure.
The safety valve is equally important in the system. Let's say the thermostat in the boiler failed. In this case, the heating elements will not automatically turn off and the temperature of the water in the tank can reach up to 100º. The pressure in the tank will rise rapidly, which will eventually lead to an explosion of the boiler.


Safety valve in the system
- In the case of supplying poor-quality, hard water to the water supply system, a cleaning filter must be installed after the stopcock. Its presence will save the boiler capacity from scale and deposits of water stone, which will significantly extend its service life.
- Stopcock installation. Its purpose is to shut off the water supply to the boiler during its maintenance or repair, while water will be supplied to other points.
- In the case when the pressure in the water supply system “jumps”, experienced craftsmen recommend installing a pressure reducer. If it is already installed at the water inlet to a house or apartment, there is no need to duplicate the installation.
- Inserting a tee into an existing cold water supply pipe.
Hot water outlet (top to bottom):
- Installation of the “American” coupling on the hot water pipe of the boiler.
- Installation of a ball valve for the possibility of draining water from the boiler (if such a valve is already installed elsewhere, there is no need to duplicate it).
- An insert into the distribution of hot water in an apartment or house.
Insertion into a metal-plastic pipe. The easiest way to cut.In the right place, the pipe is cut with a cutter and, using suitable fittings, a tee is mounted on it, from which cold water will be supplied to the boiler. Metal-plastic pipes are already losing their popularity. Outwardly, they do not look very aesthetically pleasing, and their service life is not too long.
Insert into a polypropylene pipe. Such a tie-in is more time-consuming and costly, but at the same time, the most reliable. A tee with an “American” coupling for connection is mounted using a special soldering iron. Having cut a pipe fragment in the right place with special scissors, it is necessary to maintain the alignment of its two parts. Otherwise, soldering the tee will fail.
Scheme of connecting the boiler to the water supply
Cutting into a metal pipe. Such a tie-in will require certain skills in working with spurs and couplings. If it is possible to cut a thread on a cut pipe, the tee is installed using a conventional plumbing fixture or coupling. If the metal pipes are located so that it is impossible to use a threading bowl, they resort to using a special clamp with a threaded outlet, popularly known as a “vampire”. How to work with a "vampire":
- The metal pipe must be carefully cleaned of old paint.
- Drill a hole at the tie-in point in the pipe. The diameter of the hole in the pipe must match the hole in the coupling.
- The “vampire” coupling is mounted on a metal pipe through a rubber gasket and fixed with coupling bolts. The holes in the pipe and the coupling must match.
Attention! A large hole drilled in the pipe will violate the strength characteristics of the pipe; small - after a short time it will become clogged with dirt