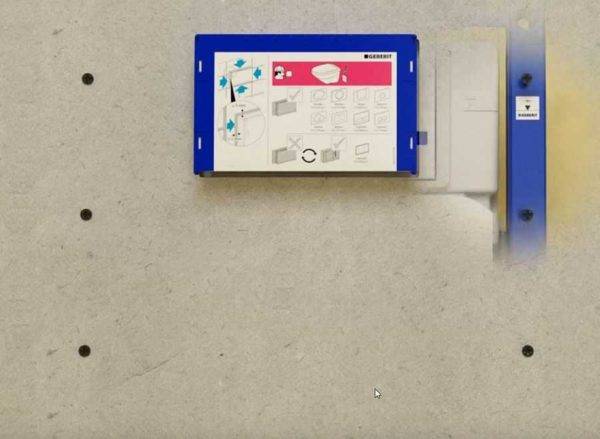
- frame construction
- Hanging bidet installation
- Installation installation
- Attaching the bidet to the installation
- Connection
- Design features
- Installation installation
- Choosing a place to install a wall hung toilet
- Bathroom preparation
- Installation of a toilet bowl without installation on a concrete base
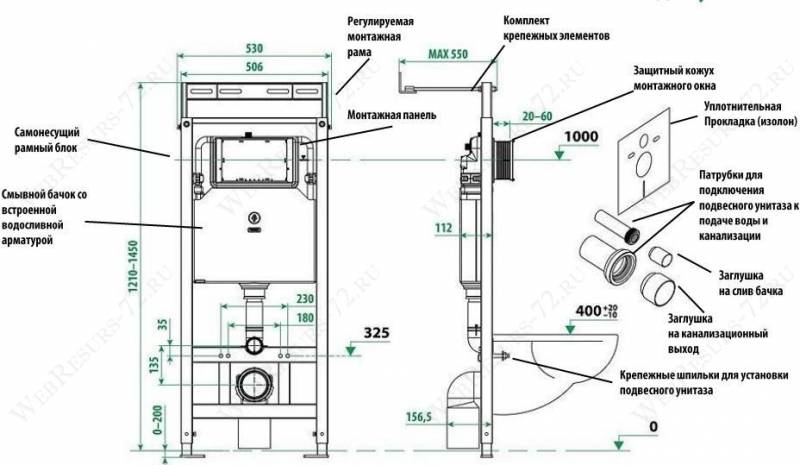
- The device and scheme of the installation
- Supporting steel frame
- Plastic waste tank
- Types of toilet bowls
- How to install a conventional toilet
- Getting ready to install
- Niche preparation
- DIY Installation Tips
- How to install a wall hung toilet with installation
- Self-installation installation of the toilet bowl
- Hanging tank design with installation
- The choice of location and installation scheme for the toilet
- Installation Tools
- Installation Installation Instructions
- Connection of water pipes and sewerage
- False panel cladding
- Fixing the wall hung toilet
- What to focus on?
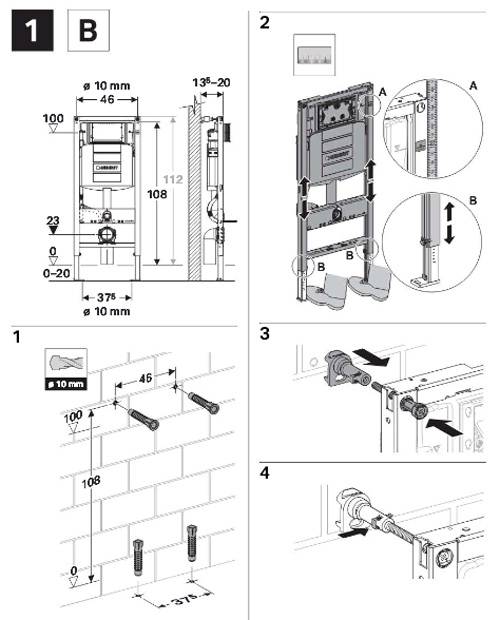
frame construction
First you need to choose a place where the structure will be installed. When choosing a suitable installation, consider the thickness of the partition or wall
It will also be necessary to pay attention to the features of the sewerage
Installation work must be carried out in a certain order.
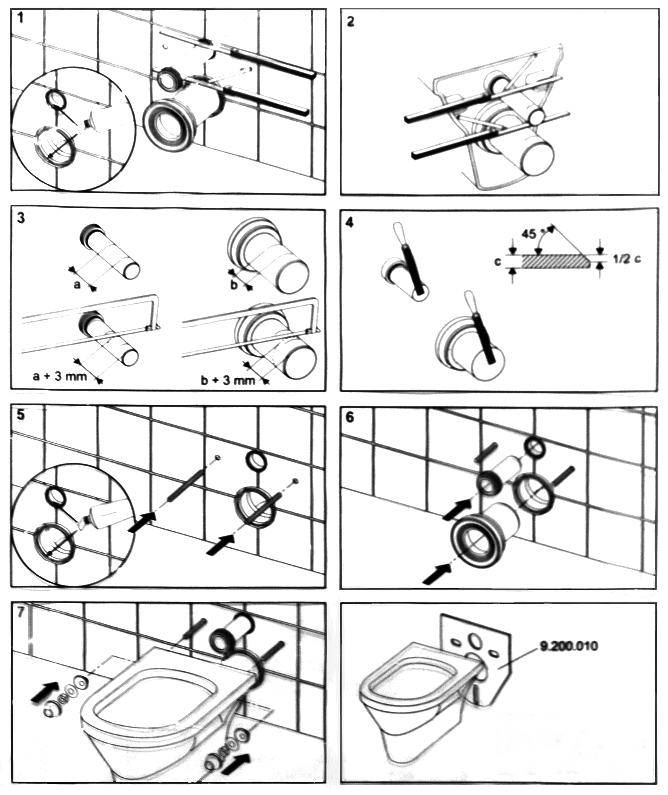
- Assemble the frame. It will be necessary to make a frame of metal, where the movable fasteners are located.The drain tank will be fixed on them. Since the fasteners are floating, you can set a suitable height at which the sanitary ware will be fixed. The frame can withstand a very significant weight (up to 500 kg).
- Then you need to install the tank. A small distance should be left between the wall and the tank (about 15 mm). Position the drain button at a distance of 100 cm from the floor.
- Attach the assembled structure to the wall. To do this, you need to use the building level. First, bring the frame to the wall and mark where you will make the mounting holes.
- Lead the pipeline to the tank. The direction is lateral or top. It is better not to choose flexible hoses for connecting the tank, otherwise it is quite possible that these elements will fail in the shortest possible time. It is recommended to opt for plastic pipes.
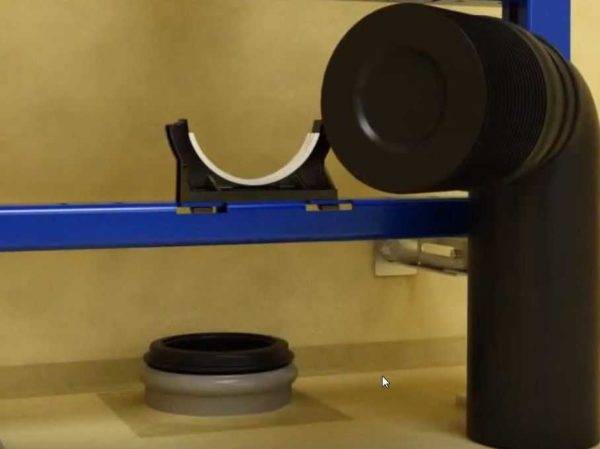
- Then the system must be connected to the sewer. For this, corrugation is used.
- Check how the installation works. Inspect all connecting elements: there should be no leaks. If everything is in order, you can close the frame.
- Carry out the installation of drywall boxes. The frame for the box must be metal profile. It is recommended to opt for drywall, which is highly resistant to moisture (especially in cases where there is both a bath and a toilet in the same room). It is better to choose sheets with a thickness of 10 mm. You can lay drywall in two layers. It is necessary to pre-cut all the necessary holes in the sheets.
- Install a toilet. Installation can be carried out approximately ten days after the installation of the box. The sanitary ware should be installed on pins. You can clad the box before or after installing the toilet.

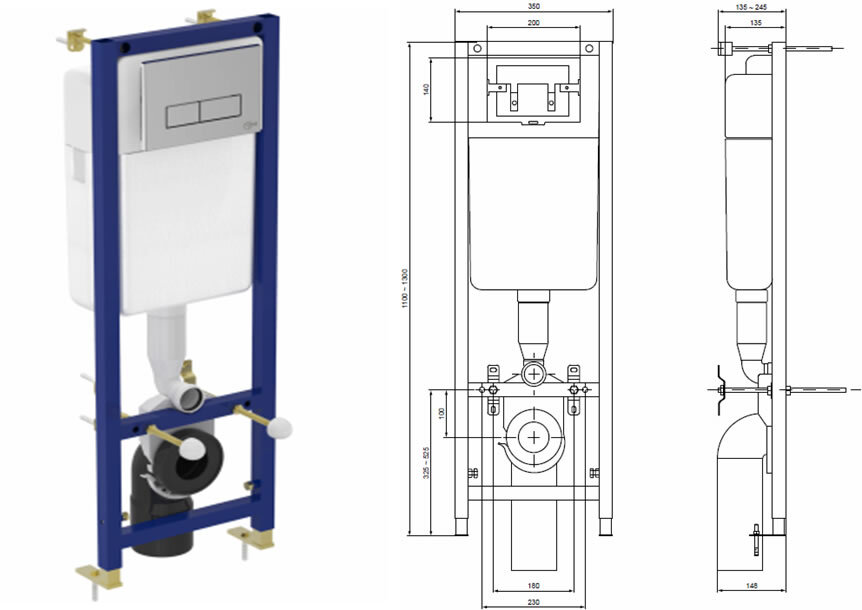
Hanging bidet installation
Installation of a hanging bidet consists in the systematic passage of the following steps:
- installation installation;
- fixing a plumbing device;
- connection to sewerage and water supply.
Installation installation
The installation of the bidet installation is carried out according to the following scheme:
- a recess is made in the wall for mounting the installation. The dimensions of the recess should be slightly larger than the overall dimensions of the device;
- water pipes and a sewer inlet are connected to the place of the proposed attachment of the bidet;
- going to be installed. Detailed assembly instructions are attached to each device, so this stage, as a rule, does not cause problems;
- markings are made on the floor and back wall for mounting the device;
- holes for mounting bolts are prepared;
- the installation is fixed;
- open space can be sewn up with drywall or other selected materials.
Assembling and fixing the installation for mounting a hanging bidet
When installing the installation, it is important to strictly observe the geometry of the device and the parallelism of the main elements of the floor surface
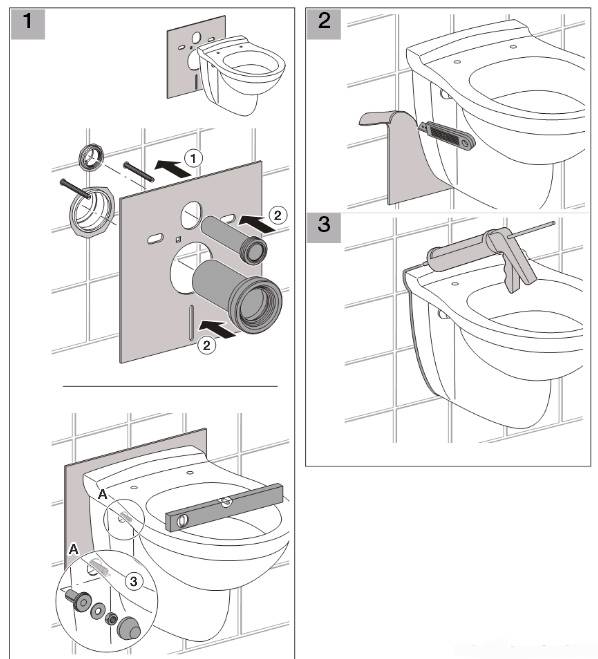
Attaching the bidet to the installation
How to install a bidet on installation? To do this, a number of steps are followed:
- studs are inserted into special holes to fix the bidet. For strength, metal studs are attached to the back wall of the bathroom;
Bolts for fixing the bidet to the installation
- a special gasket is installed on the installation to protect the sanitary ware. If the gasket is not supplied with the installation, then it can be replaced with a regular silicone sealant. The sealing composition is applied to the attachment area of the plumbing device and the time is waited until it dries completely;
Installing a gasket to protect the plumbing fixture
- the bidet is fixed on studs with bolts.
The installation of the bidet with the installation is completed. It remains to connect the plumbing device to the water supply and sewerage.
Connection
Connecting a bidet: instructions must be supplied with the plumbing fixture. In most cases, the connection is made in the following way:
- a built-in mixer is installed in the place where the water pipes are connected;
- flexible hoses connect the device to the bidet pipes of the central water supply.
When connecting flexible hoses, it is important to take care of maximum tightness. In some situations, regular gaskets installed at the ends of the eyeliner are not enough
To seal the threaded connection, it is recommended to use flax or FUM tape.
Water supply to bidet
The plumbing device is connected to the sewer through a siphon. This device is a must:
- the siphon is connected to the drain hole of the bidet. Between the plumbing fixture and the siphon, rubber rings are required to seal the drain;
- the corrugated pipe from the siphon is inserted into the sewer inlet, which was previously connected to the installation. This connection method is considered the most optimal and allows repairs to be made in a short time, even if any element needs to be replaced.
Connecting a bidet drain to a sewer pipe
Thus, knowing the simplest instructions and having the necessary set of tools, you can install and connect a bidet of any type with your own hands.
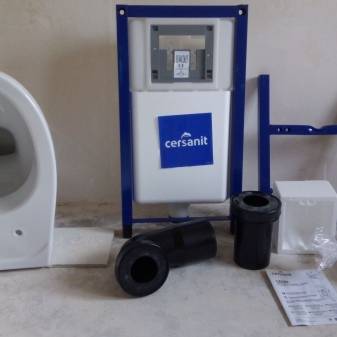
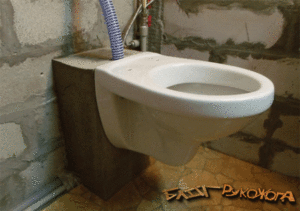
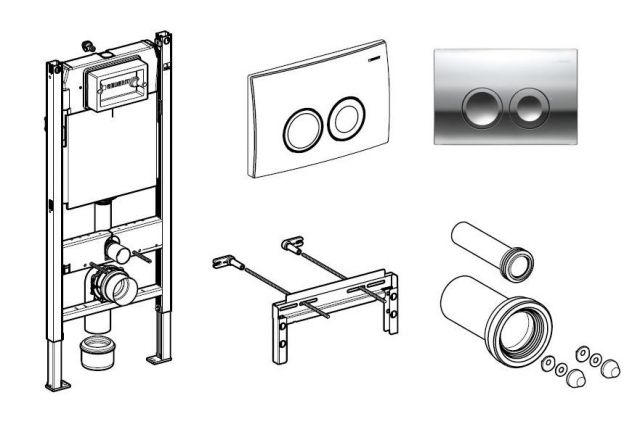
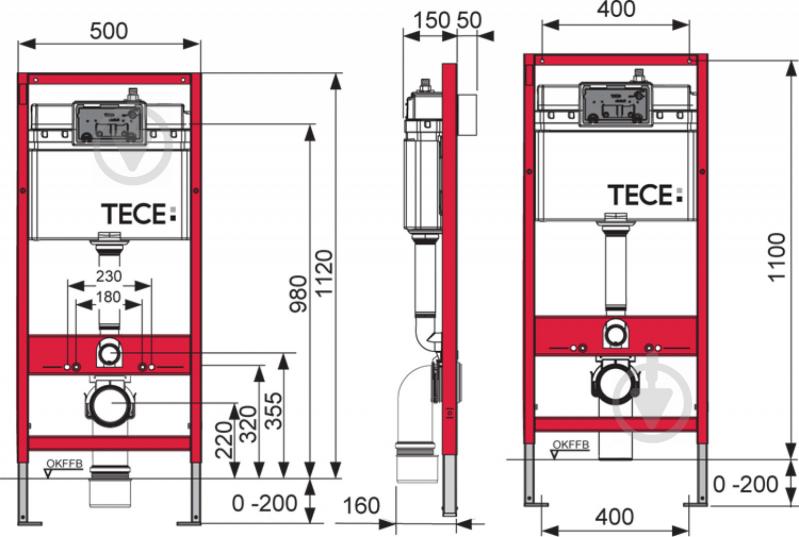
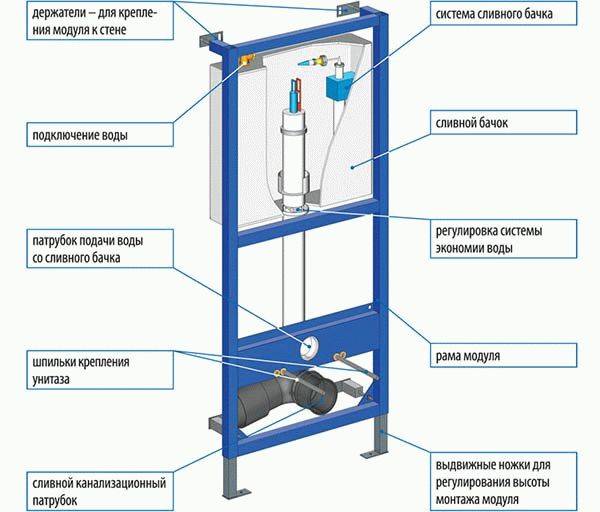
Design features
Before proceeding directly to the installation, you should understand the design.Installation of a wall-mounted toilet bowl will become much easier when its structure and principle of operation are known. It will immediately become clear how to act correctly and what is needed.
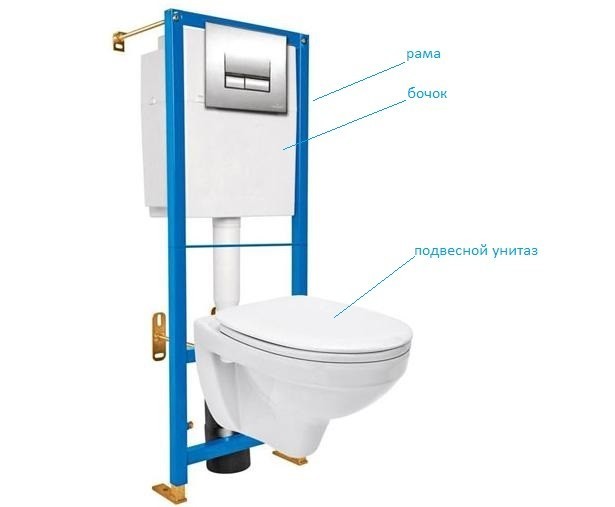
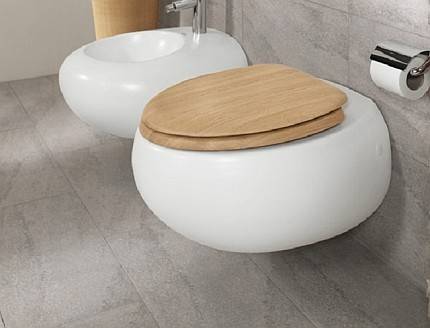
The main feature of the product is that only the bowl remains in sight.
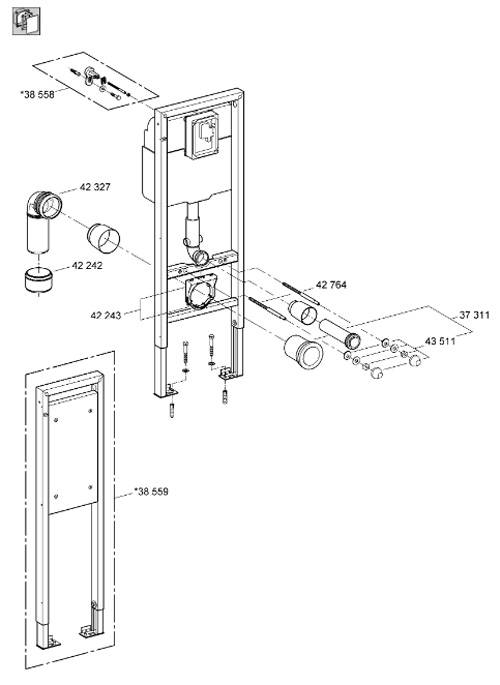
The basis of the whole structure is a solid metal frame. The visible part is directly fixed to it. It is from this element that all installation work starts. The frame must be firmly fixed to the wall and be stable on the floor. As a result, it should easily withstand an adult. Based on this, we can say that fixing the frame to a weak wall will not work.
The frame has an element that allows you to change the height of the bowl, which is attached using special pins. They are the main fasteners when installing the toilet installation.


A common option for attaching two installations at once is a toilet and a bidet.
The second element is a plastic drain tank. He also hides in the wall. It has a specific shape, because. must fit in a limited space. The tank is also installed in a metal frame and is insulated with a special material that prevents the formation of condensate. On the front wall of the tank there is a cutout for mounting a drain button. Modern models, including floor-standing ones, have a dosed discharge of water - 3 or 6 liters.
The next element is the toilet bowl. The only part that is visible and in active use. It has a traditional shape, but some designer models have original configurations.
The package contains all the necessary parts and accessories.The attached instructions are also able to show the entire installation sequence of the toilet installation.
Installation installation
Installing a do-it-yourself toilet installation on a special frame fixed to the wall is a more expensive process, but faster and more reliable. The installation will be fixed to the floor and a solid wall.
The technological sequence is as follows:
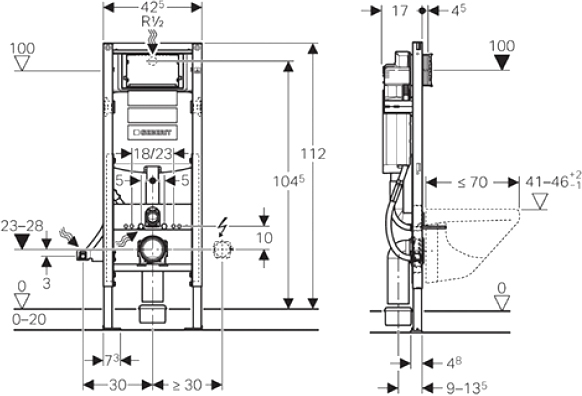
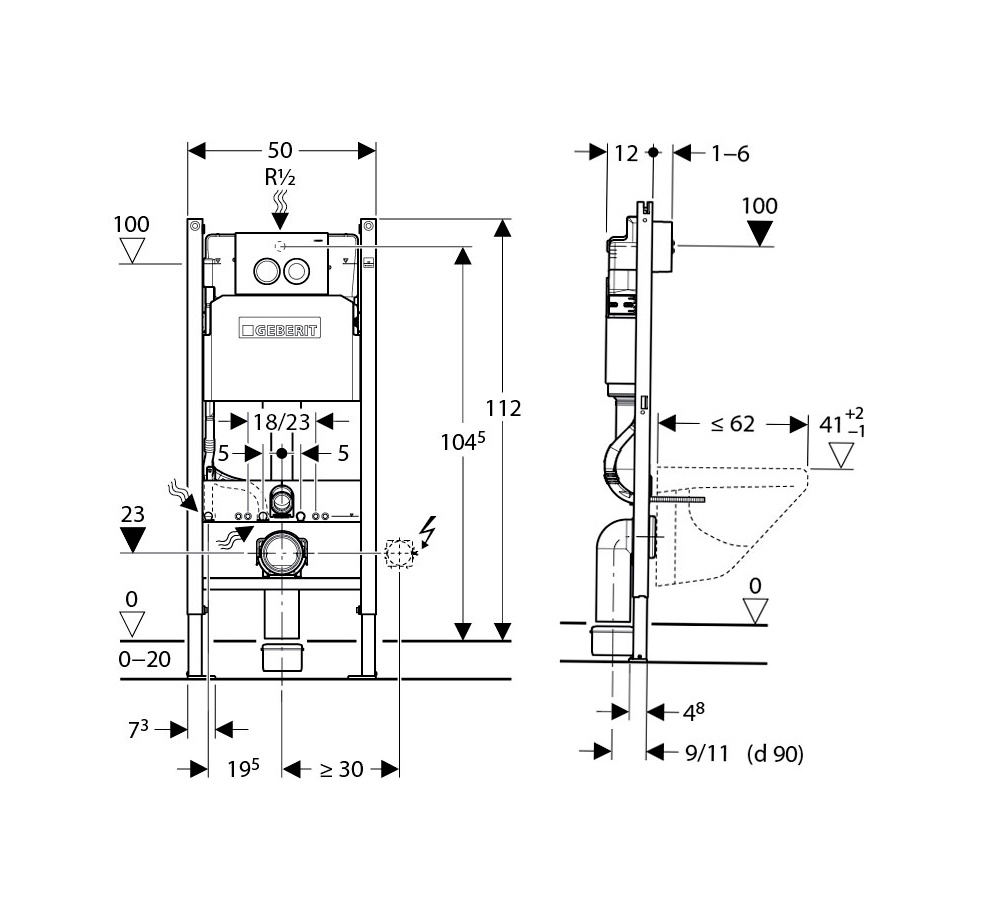
1. Fixing the metal frame. It has corresponding holes with which it is fixed to the surfaces with dowels. Two points for fixing to the floor and two to the wall. Sewer and water pipes are connected to the installation site. The installed frame must be checked for evenness using a spirit level. It is necessary to maintain exact parallelism to the wall to be installed, because even slight distortions can lead to interruptions in operation and even breakdowns. Horizontal adjustment is carried out using wall mounts that change their position.
This stage also involves setting the height of the hanging toilet. It will depend on the height of the residents, usually 0.4 m. The height of the bowl can be adjusted in the future.
2. Leading to the drain tank of water. You can use a flexible or rigid system. Professionals often use hard, because. she can last longer. Flexible hoses can also be used, but if they fail, it will not be possible to get to them and replace them quickly. During the installation of the liner, the valve valve of the tank, as well as the drain from it, must be closed.
After connecting, check the reliability of the connections. To do this, open the water supply and start filling the tank. If there are leaks, they are fixed. Water may remain in the tank.
3. Connection to the sewer. The toilet drain hole must be inserted into the outlet of the sewer pipe using the appropriate corrugation, but some models can be connected without using it. At the end of the connection, check the tightness of the system by test drains. To do this, you will need to temporarily screw the bowl to the frame. After that, remove it again, it will be installed in the final installation.
The correct connection of the sewer pipe must be performed even before the installation is started. Pipe diameter - 100 mm. It must be laid with an appropriate slope. You can read about it in the corresponding article.
4. Closing with plasterboard sheets. The installation of a wall-hung toilet must be accompanied by a decorative finish of functional elements. To finish the bathrooms, you must purchase a waterproof double drywall. It is more durable than normal. Sheets are required to be mounted to metal profiles and directly to the toilet frame. The installation instructions must contain the necessary information on the cutting method, indicating the points for cutting holes.
Sheathing can be done in two ways: over the entire wall area or only along the installation plane. The second method involves the formation of a small shelf above the bowl, which can be used to place the necessary items.
Subsequently, the installed barrier is finished with tiles or panels together with the rest of the area of \u200b\u200bthe room.
5.In conclusion, it is necessary to install the toilet on the installation, namely the bowl. It should be hung in the appropriate place using two fasteners.
6. The last, most simple step is to install the flush button. They are pneumatic and mechanical. The process is not difficult, because. everything should already be connected to the required opening in the wall. The mechanical button is installed using special pins with their subsequent adjustment. For pneumatic, you only need to connect the appropriate tubes, everything is ready.
In the process of activity, it is necessary to especially control the process of mounting the installation frame,
because the course of further installation will depend on the correctness. Figuring out how to install a toilet installation is actually not difficult. It is enough to follow the recommendations of the installation instructions, and in addition to watch the corresponding video about the process, and you will succeed.
Suspended plumbing fixtures are gradually gaining popularity, especially among owners of small bathrooms. However, not everyone likes hanging toilets - outwardly they seem unstable and unreliable. This impression is deceptive, because it is carried out using the installation system, which is hidden behind the finishing material of the wall. Let us consider in more detail the advantages of suspended plumbing objects and get acquainted with the instructions for their installation.
Choosing a place to install a wall hung toilet
Any toilet bowl, even standing on the floor, even suspended, must be installed as close as possible to the sewer riser. It would be a big mistake to install this sanitary fixture a few meters from the aforementioned pipe or even in another room.Only in the movies you can see how the sewer pipes randomly wander through all the rooms of the apartment without any system, neglecting the level of slope, which the ancient Romans, who built the aqueducts, knew about.
For example, in the French film “Not a Moment of Peace” with Christian Clavier in the title role, we see how the drain pipes were destroyed during the dismantling of the office, and the water from the bathtub flooded not only the office, but also the neighbors. I will not describe here all the plumbing blunders of the film. It's funny, but the shut-off valves that turn off the water in the risers were also in the office.
In films, they teach, having heard an alarming knock on the door at night, to get rid of drugs and money by flushing them down the toilet. If you do not exclude the possibility that you will need to flush something like this, then install the toilet closer to the riser, my advice to you.
The water in the storage tank is not enough to give the necessary energy and wash away all the “wealth” you have accumulated at a distance of a few meters from the riser, and you will be caught red-handed.
Even Aristotle argued that "a moving body stops if the force pushing it stops its action." We have no reason not to trust Aristotle in this matter, so the hanging toilet was assigned a place in a niche located next to the sewer riser, as if specially created for its installation.
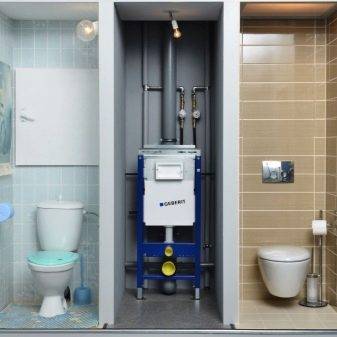
Bathroom preparation
Installation of the installation is carried out before finishing work in the bathroom. Moreover, “before” means that the tiles have not yet been laid on the floor, and in some cases there is even no screed, the walls have not been plastered.
Before you install a wall-mounted or floor-standing toilet along with the installation, choose a suitable location.The least accessible place or the one farthest from the door is optimal for installation: the plumbing fixture should not be located in the aisle. In limited conditions, it is necessary to mount the installation in a corner. In general cases, plumbers do not recommend moving the location of the node, but advise putting the toilet in the same place where the old one stood. This will greatly simplify the work. A niche with risers is suitable for installation, but the risers will have to be moved apart.
If the floor screed has not yet been filled, calculate its height. Sewer and water pipes are brought to the installation site. All pipes must be secured so that they do not move before the screed is poured.
Sometimes the design of the room requires:
- installation of a toilet bowl under the window;
- installation of a plumbing fixture on a partition separating the bathroom space.
In the first case, it is necessary to purchase a low installation (below 82 cm), in the second case, it is advisable to use a double frame structure, which is more stable.
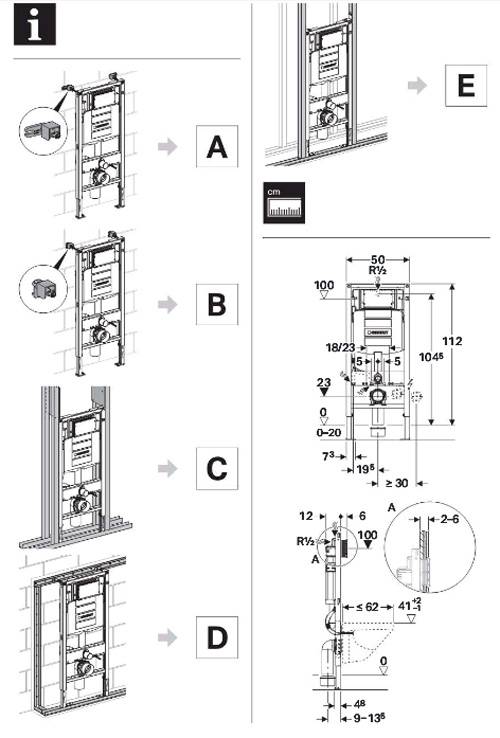
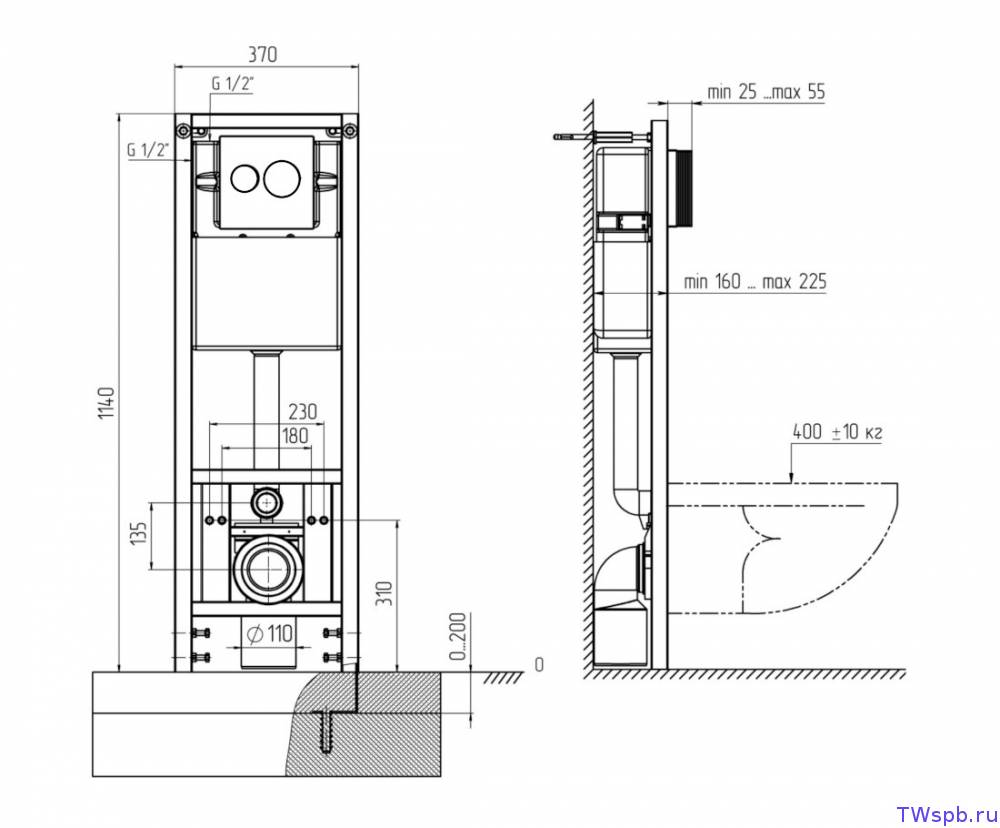
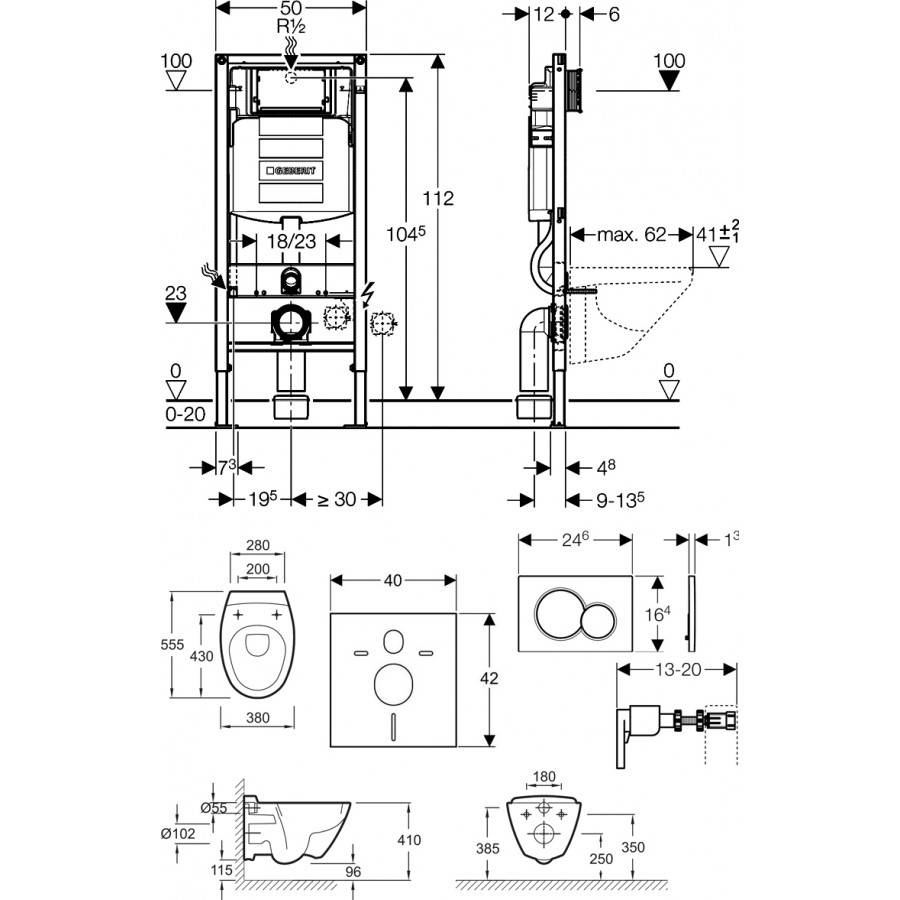
The central axis, the contours of the installation, the location of the tank, the holes for fasteners, including on the floor, are marked on the wall, setting aside the required distance from the wall (at least 13.5 cm).
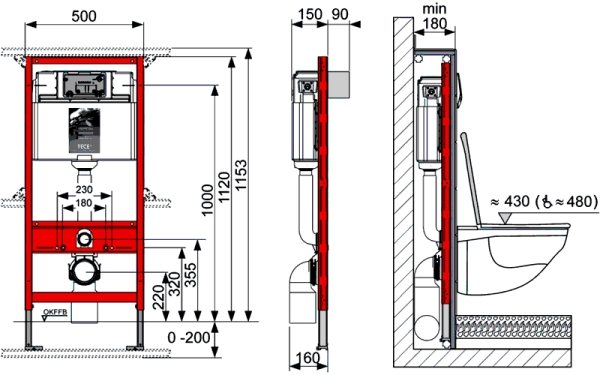
Recommended dimensions to be guided by: seat from the floor - 43 cm, button from the floor - 100 cm, frame from the wall - 15 cm, tank from the wall - 2 cm.


Installation of a toilet bowl without installation on a concrete base
There is another option for installing a hanging toilet that does not require installation. In this case, fastening is carried out on a concrete base. This method is a more budgetary option, but requires additional work to equip the necessary foundation.
Step 1

Wooden formwork is being assembled.On the front part, it is necessary to pre-mark and drill the attachment points of the bowl, through which a mark is applied to the wall through the formwork. Further, holes are drilled in the wall into which a chemical anchor is poured. This action will allow the metal pins to be fastened to concrete and brick by the force of cohesion and adhesion.
Step 2
Pins of the required length are inserted through the formwork into the wall with a chemical anchor and pressed against the wooden formwork with nuts. On the front side, it is necessary to glue a small piece of foam, which will later be removed, and the recess remaining after it will serve as a place for the coupling.
Step 3
Concrete mortar (about 40 liters) is poured into the formwork cavity and left to dry completely (about a week). After hardening, the wooden shields are removed, leaving a monolithic base with knitting needles for hanging the toilet bowl. The foam is removed, a coupling is installed in the recess, connecting the pipe and the sewer.
The drain barrel is being installed, the wall is decorated with decorative trim and the system is checked for operability.
The device and scheme of the installation
Self-installation of the toilet bowl for installation will become easier if you understand the device of its design and the principles of operation. Consider the elements of the frame bathroom in more detail.
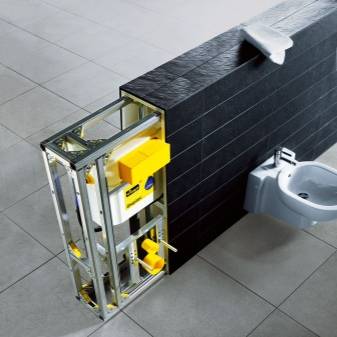
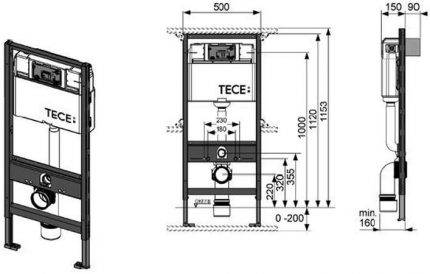
Supporting steel frame
The metal frame is the main load-bearing element of the installation, which accounts not only for the weight of the equipment, but also for the weight of the person sitting on the bowl.
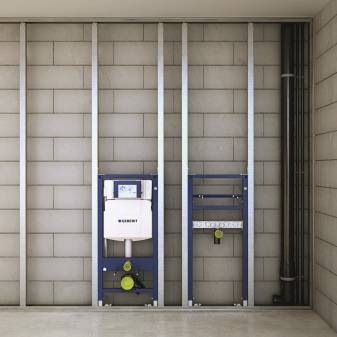
The frame is fixed to the load-bearing wall and the floor at the same time, but there are also double frame designs for installation in large bathroom partitions.
 The double frame is installed in the partition of large bathrooms and is attached only to the floor with four legs using special fasteners (+)
At the bottom, the frame is equipped with retractable legs for adjusting the height of the installation. The standard height of the upper edge of the toilet seat from the floor is 40-48 cm, it depends on the height of the owners of the apartment. Steel pins are screwed into the frame in front, on which the bowl is subsequently hung.
Plastic waste tank
The shape of the plastic tank is different for each manufacturer, because it is necessary to ensure a good water capacity in the narrow framework of the metal frame. The plastic surface is covered with a heat insulator to prevent condensation.
Choose a cistern with a special coating that prevents condensation from forming. In the presence of moisture in the closed space of the installation, metal elements can quickly rot
On the front surface of the tank there is a small area where manufacturers are trying to fit all the equipment: a pipe for connecting a water hose and a device for mounting the release button. It is this limited installation rectangle that will be accessed for repair after the final installation of the equipment.
Drainage dosing has already become standard, so each cistern has a control for the volume of drained water.
Types of toilet bowls
The bowl is the most beautiful element of the installation, on which designers work more than engineers.The traditional oval shape of the seat remains the best-selling, but rectangular, round and shaped bowls are also in demand.
When determining the required height of the toilet bowl, take into account the height of children. Reducing the level by 2-3 centimeters will help teach a child to go to the toilet on his own 1-2 years earlier
Small components of the installation (mounts, fittings, drain button, etc.) vary depending on the manufacturer, so it is better to familiarize yourself with the features of their installation in the installation instructions.
How to install a conventional toilet
Installation of a floor-standing toilet bowl Compact or Monoblock
As a rule, when selling, the toilet bowl and the tank are disconnected. The internal fittings of the barrel are most often already assembled, which greatly simplifies the installation process.
First step. We put the toilet bowl in its place and make marks at the attachment points.
MarkingMarkings on the floor for fasteners
Second step. We remove the toilet bowl and drill mounting holes in the marked places.
Drilling holes in tiles for dowels
Third step. We drive the dowels into the mounting holes.
Fourth step. Installing the bowl. We insert fasteners through special sealing gaskets. Tighten fasteners. You should not pull too hard - you can damage either the fasteners or even the toilet itself. We pull until the sanitary ware is firmly attached to the surface. From above we close the fasteners with plugs.
Tighten the nuts Close the capMake sure the toilet is level
Fifth step. We mount the cover and seat. The manual for their assembly usually comes with the toilet, so we will not dwell on this event separately.


Sixth step. We connect the toilet to the sewer.The procedure depends on how the toilet outlet is connected.
We put the corrugation. We coat the connection of the corrugation with the sewer pipe with sealant. We pull the corrugation onto the outlet of the toilet bowl without additional seals
Prices for accessories for toilets and urinals
Accessories for toilet bowls and urinals
If the release is done into the wall, we work like this:
- we check whether the outlet of the toilet bowl coincides with the sewer pipe. If everything is in order, we connect with the help of a cuff-seal. In the presence of displacements, we use corrugation;
- we process the ends of the connecting element with silicone sealant and connect the toilet bowl to the sewer;
- fasten the plumbing fixture to the floor.
If the release to the floor is being arranged, we do the following:
- we install on the floor, at the exit of the drain pipe, a screw flange with a lock;
- we see a hole in the center of the flange. The sewer pipe must go into it;
- install a toilet. The collar of the screw flange must fit into the outlet socket of the toilet bowl. We turn the cuff, ensuring complete fixation;
- seal the connection with a special silicone compound.
Seventh step. We carry out the installation of the tank. Drain mechanisms, as a rule, are sold already assembled. If the mechanism is disassembled, assemble it according to the manufacturer's instructions (the assembly order for different models may vary slightly).
Lubricate the tank ring with sealant Connecting the drain tank Fixing the tank Tighten the tank bolts Close the lid
We take the gasket from the kit and install it in the water hole in our toilet. Install the tank on the gasket and tighten the bolts.
Fasteners are most conveniently installed like this:
- we twist the first bolt so that the tank warps in its direction by about 1.5-2 cm;
- we press the raised edge of the tank with our hand and tighten the second bolt.
Eighth step. We connect the tank to the water supply using a flexible hose. We turn on the water supply and check the quality of the system. If it digs somewhere, tighten the nuts a little. The level of filling the tank with water is adjustable by moving the float lower or higher.
Connecting the water supply hose
We let the tank fill several times and drain the water. If everything is fine, we take the toilet into permanent operation.
Getting ready to install
The base for the installation of the toilet must be level. There are several options for the development of events, namely:
- if the floor is tiled and does not have level differences, we do not carry out any preliminary measures to level the base;
- if the floor is tiled and not even, install the toilet with chopsticks. To do this, holes are drilled in the floor, chopsticks are hammered into them according to the level, and after that the toilet bowl is attached to the chopsticks with screws;
- if a tile replacement is planned, we dismantle the old cladding and fill in a new screed, if the old one has level differences;
- if the toilet is installed in a new house or apartment without any finishing, we fill in the screed and lay the tiles.
We pay attention to pipes. We clean the sewer from debris and various deposits, install a tap on the water supply (if it was absent before) to shut off the water supply to the tank
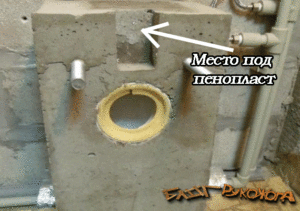
Niche preparation
Installing a wall hung toilet involves using a niche to accommodate the frame. As already mentioned, a certain strength of the walls is necessary for fastening.The design of the installation can withstand a weight of up to 400 kg, part of the load from which is transferred to the wall. This issue must be approached with particular care.
In order to place the installation, it is necessary to prepare a niche. It should be the following:
- Height - 1 m;
- Width - 0.6 m;
- Depth - up to 0.2 m.
In some cases, it is problematic to create such a depth. In such cases, it is necessary to go deep to the possible value, and hide the remaining elements with plasterboard panels.

By hiding the main part of the device, certain opportunities open up for decorating and improving the interior. It’s not worth just placing the installation near the wall and sheathing it with GKL, because. placing a conventional toilet will be cheaper and easier. In addition, it will take up less space.
DIY Installation Tips
There are a number of recommendations that will tell you how to choose the right plumbing and mount it:
the choice of toilet can be made depending on personal preferences, and you can determine their quality visually when buying;
much more attention should be paid to the quality of the installation, so here you should pay attention to the manufacturer (Western European companies are considered the best);
the creation of a technological hatch under the drain key can greatly facilitate the implementation of repair work in the future;
you need to lay the tiles symmetrically, and it is best to start from the flush button: this will allow you to position the cladding in the best possible way;
it is advisable to use a system with a metered descent of water, which will save money and be much more convenient.
Installing the installation of toilet bowls is not the most difficult process, if you follow all the recommendations described.As a last resort, you can always look at the photo, which shows in detail all the nuances associated with hanging toilets.
How to install a wall hung toilet with installation
To install hanging toilets, the outlet of the sewer pipe must be located near the wall. The specific distance from the wall is indicated by the manufacturer, but it should be small - from the far edge of the order of 13-15 cm. If the exit from the floor, there is a solution - a special overlay with which the drain is transferred closer to the wall.
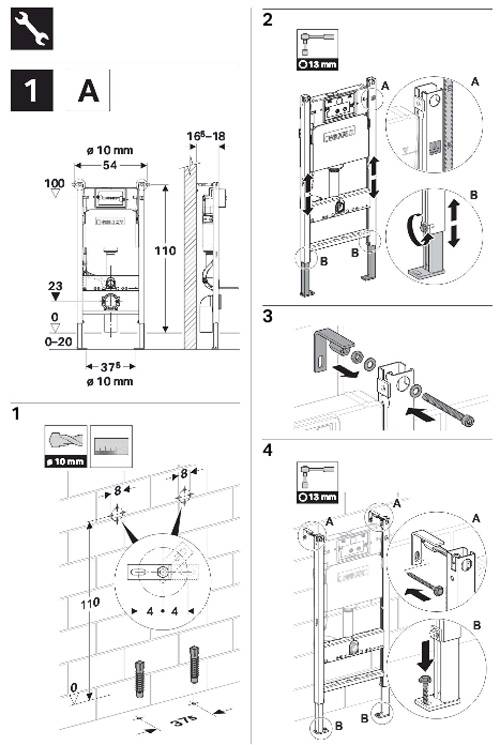
The installation of a wall-hung toilet bowl begins with fixing the stops to the wall to the installation frame. They are attached two at the top and at the bottom. With their help, the distance to the wall is adjusted, the frame rises and starts.
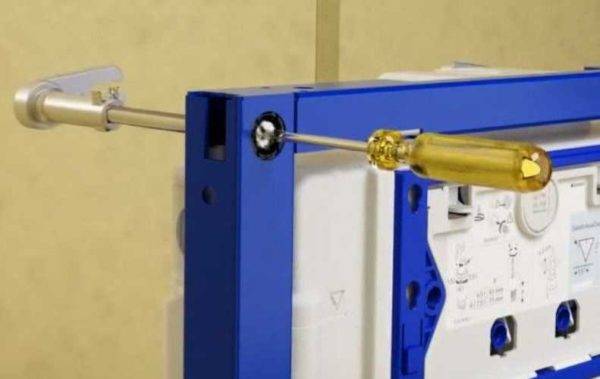
Install top stops
The upper stops are in the form of rods, adjustable with a socket wrench and a screwdriver. The bottom stops are more like plates, they are also adjusted with a socket wrench but with a side head.

Bottom stops and height adjustment
The assembled frame is attached to the wall, its center is exposed above the middle of the sewer outlet. The mark on the frame rises or falls to the height required by the manufacturer (there is a mark on the frame, also indicated in the passport, usually 1 meter).
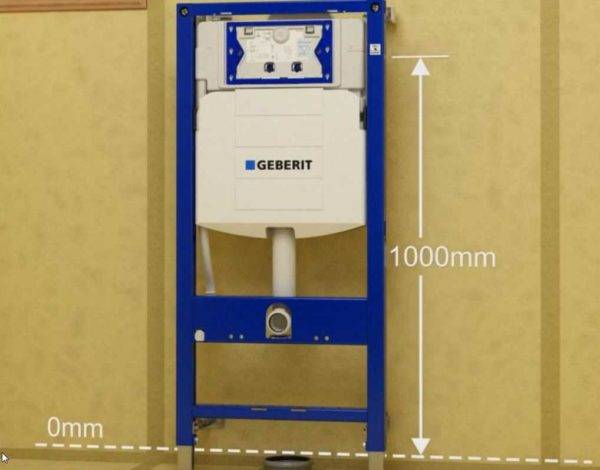
Align height and away from wall
Using a bubble level, the horizontal and vertical installation of the wall-hung toilet installation is checked.

Checking the horizontal
By adjusting the height of the stops, an equal distance from the wall, set by the manufacturer, is set. How convenient it is to do, look at the photo.


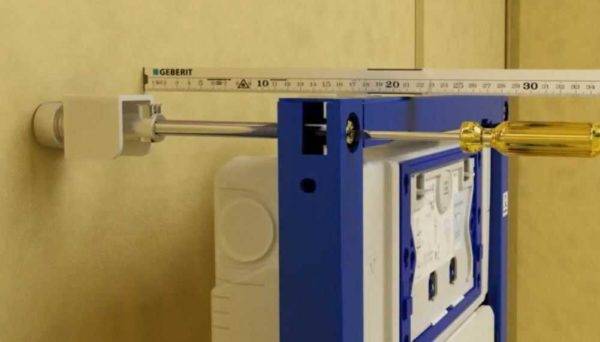
The specified distance to the wall is set
The exposed frame must be fixed to the wall.In appropriate places put marks with a pencil or marker, drill holes. They are equipped with plastic housing dowels. Most of the hanging toilets are imported, and they recommend planting the dowel bodies on the sealant. Some of the sealant is squeezed into the drilled hole, a dowel is inserted. Then, before installing the fastener itself, the sealant is applied to the plastic case.
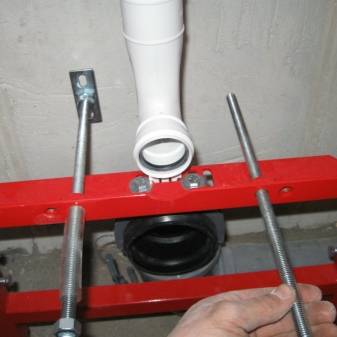
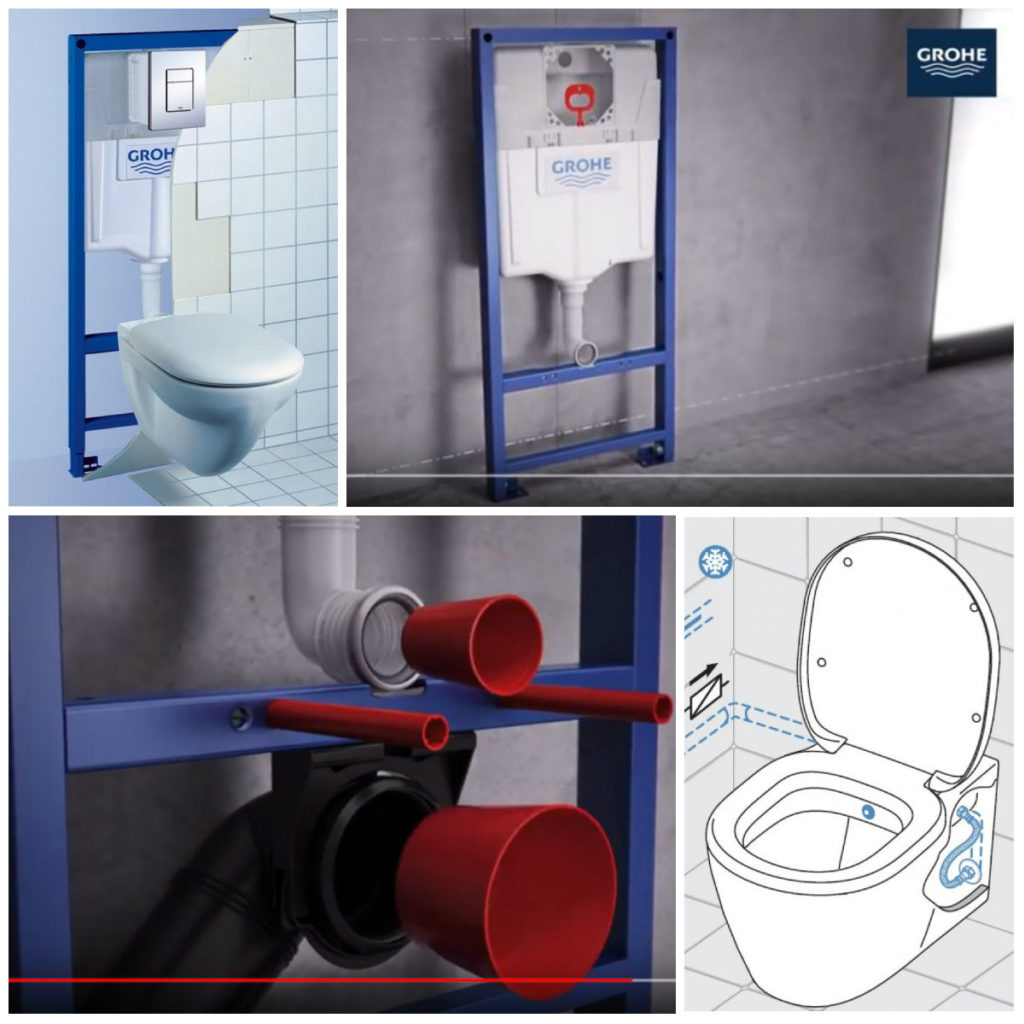
In a fixed installation, you can put connecting elements - branch pipes, couplings. They are all included and simply snap into place.
Pipes and connectors are installed

Pipes from the tank and sewerage are installed
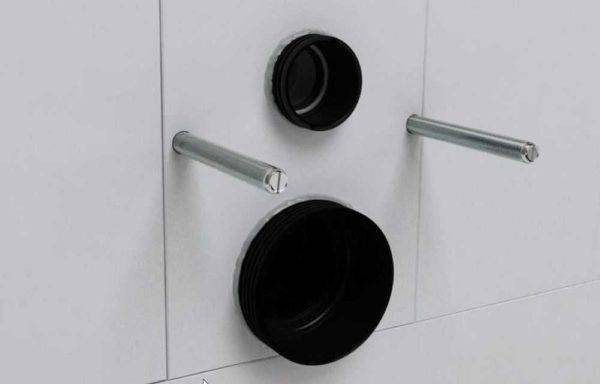
Next, metal rods are installed on which the toilet bowl will be held. They are screwed into the corresponding sockets, silicone seals are put on top (in the lower photo these are two rods above the sewer outlet).
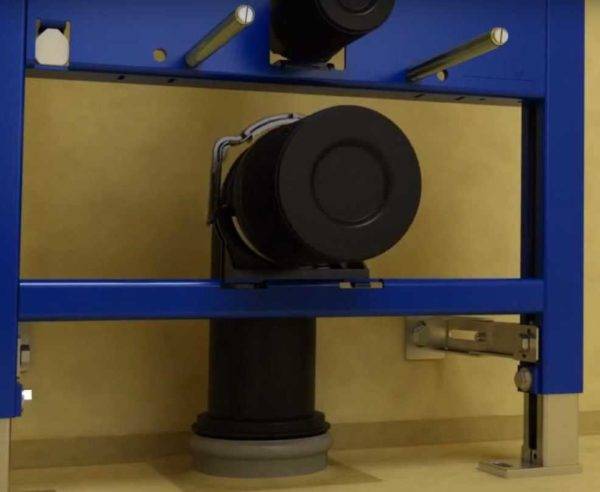
Toilet holders are installed, the sewer pipe is fixed
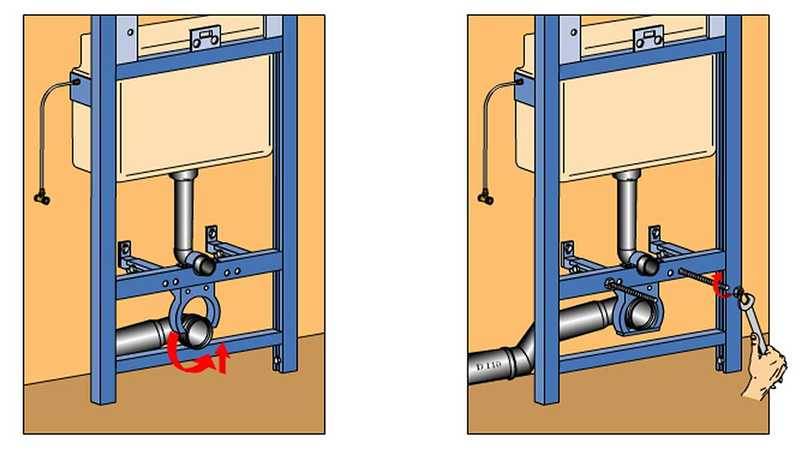
The sewer pipe extends to the desired distance, is fixed in a predetermined position with a bracket. It covers the pipe from above, is inserted into the groove until it clicks.
Next, water is connected to the tank. Open the tank lid (it is latched), the plug on the side surface is removed. Right or left - depends on where you have water. A corrugated pipe is inserted into the opened hole, the counterpart is inserted from the inside, everything is connected with a union nut. It is necessary to tighten without applying excessive force - it is plastic.

Connecting the installation to the water supply
A tee is installed inside the tank, a pipe (usually plastic) is connected to the desired outlet.They do this with the help of an adapter and an American.
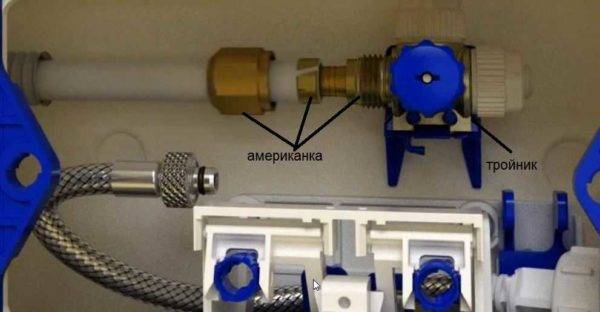
Water pipe connection
A hose from the tank is connected to a special tee inlet. It is flexible, in a metal braid. Tightened with a cap nut.
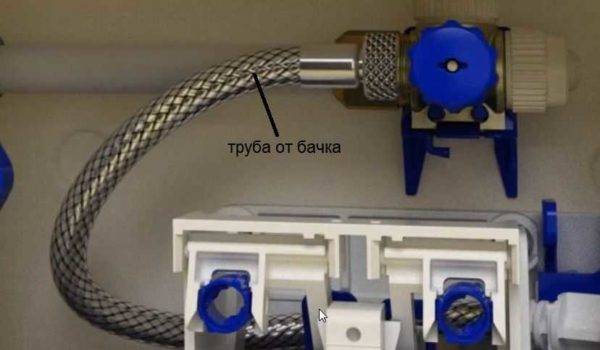
Connect the hose from the tank
Install the cover in place. In principle, the installation for the toilet is installed. Now we need to close it. To do this, make a false wall of moisture-resistant drywall. It is recommended to put two sheets, but you can use one. Drywall is attached to the installation frame and to the mounted profiles.
Fixing the false wall to the installation frame is mandatory
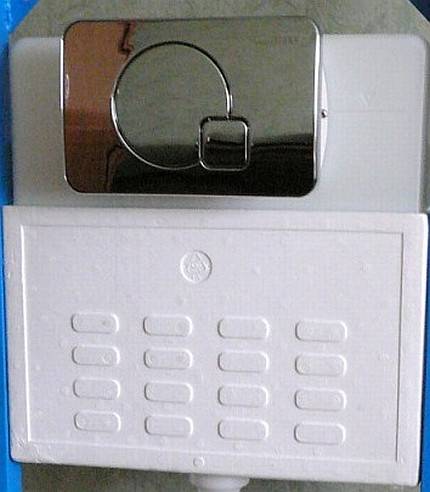
Next, the wall is finished, after which the toilet bowl is hung and a decorative panel of the drain device with buttons is installed.
Cut off plugs
The toilet bowl is put on the pins, its outlet goes into the plastic socket. The connection is tight, no additional measures are required. This completes the installation of the toilet with the installation.
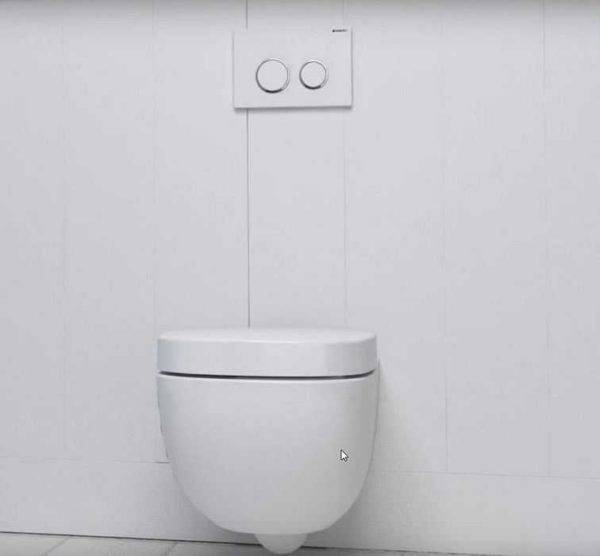
The result of the work
Self-installation installation of the toilet bowl
Hanging tank design with installation
Before considering how to install a hanging toilet with an installation, you should choose it (read about the rules here), as well as determine the main components of the attachment mechanism.
The life of the plumbing device will depend on the quality of the chosen design. In general, the hanging toilet bowl consists of the following parts:
steel frame;

The sturdy frame is attached both to the floor and to the wall with special studs. It has rods for adjusting the height of the product. The drain tank of the structure is made of plastic, coated with a coating from condensate. On the front of the tank there is a special cutout in which the drain system is installed.


The choice of location and installation scheme for the toilet
A good location for the device is considered to be an impenetrable place away from the door, so you can choose the far wall. But at the same time, it should be borne in mind that all communications should be near the toilet so that they do not have to be brought across the whole room.
The main parameters for fastening the structure are:
the height of the toilet bowl - the average size is 430 mm;
It is better to install the toilet in a niche in which all the sewerage is hidden and the drain riser is located. If not, then you can build a drywall box.
Installation Tools
To perform all the work on installing the installation for the toilet, you need to have the following tools:
laser or regular level;
Installation Installation Instructions
Before carrying out installation work, you first need to bring a sewer pipe with a diameter of 110 mm, and then - water pipes.
- Fastening preparation. Holes are made in the wall at previously marked places using a perforator. Dowels are inserted into them. In this case, fastenings can be performed both diagonally and vertically. The installation frame has 4 mandatory fixings: 2 on the wall and 2 on the floor.
After installing the frame, it is necessary to check the reliability of the structure, exclude its vibrations to the sides, otherwise it may tilt under heavy loads. After these steps, the do-it-yourself installation of the frame is completed.
How to install a toilet and bidet with your own hands: detailed instructions for beginners.
Connection of water pipes and sewerage
This is the most critical part of arranging a new toilet bowl, because if a leak appears in one of the pipes, then the entire structure and wall cladding on which the hanging toilet bowl is located will have to be dismantled.
False panel cladding
It is carried out after all plumbing work before installing the toilet. Since the structure is located in a kind of niche, it does not matter what material it will be sheathed with. Usually drywall is used for these purposes, and it is moisture resistant.
Fixing the wall hung toilet
Do-it-yourself installation of a toilet bowl should be carried out taking into account the following rule: a rubber backing must be laid between the tile and the toilet bowl, which will protect not only the facing material from cracking, but also the bidet itself. If for some reason the factory substrate is lost, it can be replaced with a thick layer of sealant. When solidified, it will play the role of a cushion cushion.
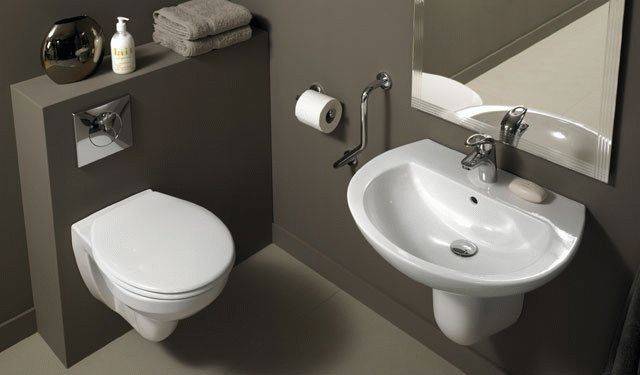
Hanging toilet - it's aesthetically pleasing, stylish and reliable
All work on its installation can be done by hand, taking into account the above tips and instructions for installation.
What to focus on?
When buying a wall hung toilet, you should first of all pay attention to its material and shape. The materials used are very different, but the vast majority of devices are traditionally made of two types of ceramics:
The materials used are very different, but the vast majority of devices are traditionally made of two types of ceramics:
- Earthenware: the material is inexpensive, but due to the porous structure, indelible yellow stains soon appear on it.
- Porcelain: there are no pores in this material, so the appearance of the product remains attractive longer. But it also costs a little more.
Other materials have the following advantages:
- stainless steel: not afraid of impacts, therefore suitable for public areas;
- acrylic and other types of plastic: a budget option;
- natural stone: elite toilet bowls, so to speak, of a representative class.
Most preferred are round or oval bowls. Rectangular ones are also made, but, as practice has shown, they are less convenient to use.
Do not forget to make sure that the chosen model fits well indoors: for convenient use, there should be at least 60 cm of free space in front of the toilet.