- Choosing a place for equipment
- How to independently lower the pump into the well: the order of work
- Preparatory work
- Lowering equipment
- Trial run
- Types and features of installation of caissons
- Which typical well pump to choose
- Power connection
- Connecting a pumping station to a well
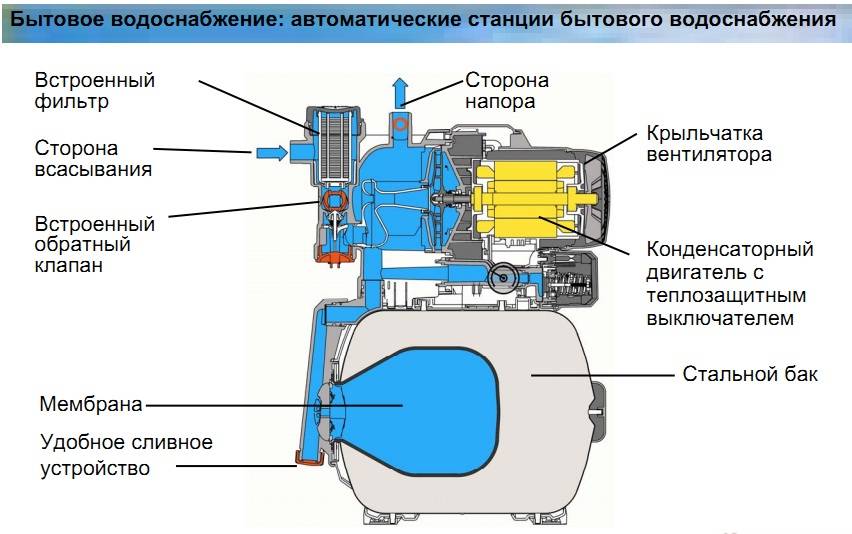
- Why is it needed?
- Preparation of related installation materials
- Structure and principle of operation
- Centrifugal
- Vortex
- Surface pumps
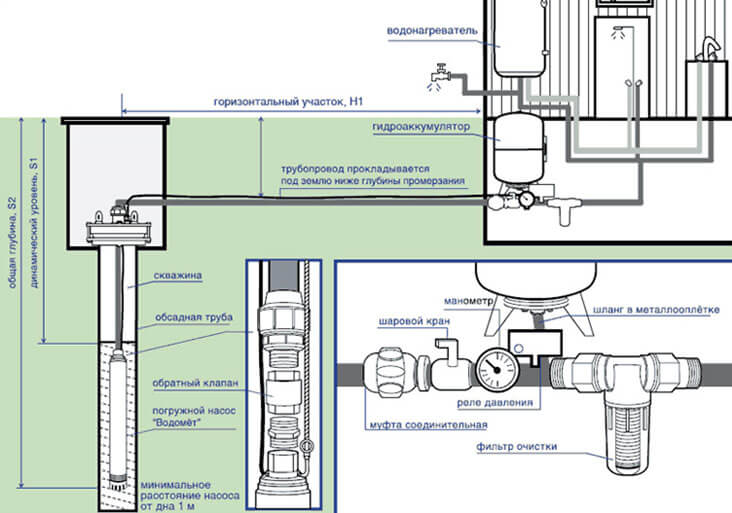
- Installation of a submersible pump to the well scheme
Choosing a place for equipment
The pump or pumping station must be located in a certain place. It can be a caisson or a basement. The second option is the most common.
In this case, special attention must be paid to installation in order to avoid damage to the equipment due to possible rising water. In other words, the unit is fixed on a special stand
away from the walls
At the same time, it is important to take care of the heating of the basement. If you have chosen a caisson, then this design must also be insulated
Moreover, you should make sure that the depth at which the caisson will be installed is at least 2 m.
If you have chosen a caisson, then this design must also be insulated. Moreover, you should make sure that the depth at which the caisson will be installed is at least 2 m.
How to independently lower the pump into the well: the order of work
To properly lower the device into the well, you must perform the following operations.
Preparatory work
We clean the well from small particles of dirt and sand, pump it. We carefully examine the pump. We need to make sure that the valve works smoothly, the shaft rotates efficiently and all fasteners are secure. Be sure to check the integrity of the cable and electrical wiring. We specify the size of the gap between the casing pipe and the working part of the pump. If it is less than 5 mm, the device cannot be installed.
We install a tripod or a truck crane, which are usually used when lowering the pump into the well. Before lowering the device, you need to prepare it. Preparation consists in fixing the cable, electric cable and water pipe connected to the pump into a single sleeve. This will prevent jamming of the equipment inside the well. The elements are fastened with plastic clamps in increments of 75-130 cm.
We make the first fastening 20-30 cm from the pump nozzle. It is best to wrap the cable sections that come into contact with the clamp with sheet rubber. In this case, make sure that the clamp securely fixes the rubber, but is not overtightened, otherwise it may damage the insulation.
It is most convenient to lower the pump with a truck crane or a tripod.
Lowering equipment
The procedure is carried out very smoothly and carefully, without sudden movements. We try not to hit the equipment against the walls of the casing
If this is not possible, then it will be necessary to additionally protect its body even before the start of the descent of the device. In the process of lowering the device, it may hit an obstacle and stop.In this case, we raise the pump a little, and then we continue to lower it, slightly turning it in the casing pipe clockwise.
Having reached the desired depth, we fix the water pipe on the adapter. We solder the end of the steel cable with a thermal coupling so that it does not fluff. One and a half hours after the equipment is lowered into the water, we carry out a control measurement of the resistance of the pump motor winding and cable insulation. If the installation is carried out correctly, the indicators will correspond to the normative ones.
Trial run
We are doing a test run. We use a special automatic station for this, which eliminates the negative impact on the motor winding of possible overloads or short circuits. After starting, we measure the applied load, which must correspond to the parameters specified in the technical documentation for the device. If the indicators are higher than the normative ones, we close the valve at the well outlet and perform an additional push back, thereby bringing the indicators to optimal values.
If the pump has run into an obstacle, it must be lifted up a little, then continue the descent by rotating the equipment clockwise
Lowering the pump into the well is a complex and responsible undertaking. It requires great precision, accuracy and skill. You can, of course, carefully read the instructions and try to do everything yourself, but the risk of running into problems is very high. If the pump gets stuck in the casing, which happens quite often, it will be extremely difficult to remove it, which will entail additional costs and loss of time. Therefore, for those who do not have experience in carrying out such work, it is better to turn to professionals who will quickly and efficiently perform all the necessary manipulations.
The question, it turns out, is relevant: attempts to install the pump as close as possible to the bottom of the well are made in cases where, after pumping out a certain volume of water, the height of the water column becomes insufficient so that the idle valve does not work. According to the recommendations of pumping equipment manufacturers for, the minimum distance from the bottom of the pump to the bottom of the casing pipe cannot be less than 80 cm. But with a small well flow rate, the water level in it can drop critically, and it becomes clear the desire to lower the pump lower.
Types and features of installation of caissons
The uninterrupted operation of the well is designed to provide a caisson, an insulated waterproof container with the necessary equipment inside.
Usually a pump, shut-off valves, measuring instruments, automation, filters, etc. are mounted in it. Buildings are made from different materials. The most common:
Plastic. They are distinguished by excellent thermal insulation, which allows even without additional insulation to maintain the temperature inside the caisson at the level of 5C. Durability, excellent waterproofing characteristics, which makes it possible to avoid additional costs for insulation work, reasonable price, especially in comparison with other options. In addition, the system is quite easy to install due to its low weight. The main disadvantage is low rigidity, which can provoke deformation of the structure and damage to equipment. However, it is easy to deal with it by filling the container around the perimeter with cement mortar with a layer of 80-100 mm.


Plastic caissons have excellent thermal insulation, which allows them to be installed without additional insulation.
Steel. Most often, the arrangement of a water well is carried out with just such a design.The material allows you to make a caisson of any desired shape, while not requiring much effort. It will be enough just to weld the parts together and treat the structure from the inside and outside with a special anti-corrosion coating. For a high-quality container, metal 4 mm thick will be quite enough. You can also find ready-made structures on sale, but their purchase will cost much more than self-production.
There are various forms of steel caissons - for various needs
Reinforced concrete. Very strong and durable installations, previously extremely common. Due to their shortcomings, today they are used much less frequently. Their cost is very high, and special equipment is required for installation, which is due to the large weight of the equipment. For the same reason, over time, the concrete caisson sags, deforming the pipelines inside it.
Concrete has insufficient thermal insulation, which can cause water in the pump to freeze in severe frosts, and poor waterproofing, since concrete is hygroscopic
Here is an approximate scheme for installing equipment in a caisson and connecting communications:
Scheme of installation of equipment in the caisson
If you are going to complete the arrangement of the well with your own hands, it is worth getting acquainted with the stages of installing the caisson. They are almost the same for any type of structure, with slight nuances depending on the material of the equipment. Let's consider the stages of installing a steel tank:
Pit preparation. We dig a hole, the diameter of which is 20-30 cm greater than the diameter of the caisson. The depth must be calculated so that the neck of the structure rises about 15 cm above ground level. This way, it will be possible to avoid flooding the tank during the flood and heavy rainfall.
Casing sleeve installation.We make a hole in the bottom of the container. It can be positioned traditionally in the center or shifted as needed for equipment installation. A sleeve 10-15 cm long must be welded to the hole. Its diameter must be greater than the diameter of the casing pipe. Be sure to check that the sleeve can be easily put on the pipe.
Installation of nipples for the withdrawal of water pipes. We weld them into the wall of the container.
Caisson installation. We cut the casing pipe at ground level. We put the container on the bars above the pit so that the sleeve on the bottom of the container “dresses” on the pipe
We check that the axes of the caisson and the casing exactly match, then carefully remove the bars and carefully lower the structure down the casing. We install the container in the pit strictly vertically and fix it with bars. We weld the pipe to the bottomwhile sealing the caisson
Through the nipples we start water pipes into the structure
We weld a pipe to the bottom, while sealing the caisson. Through the nipples we start water pipes into the structure.
Backfilling of the building.
The caisson is “put on” on the casing pipe and carefully lowered into the pit
It should be noted that, in principle, it is possible to equip a well without a caisson, but only if a heated building is located near it, in which the equipment is located.
The convenience of such a system is undeniable - all nodes are easily accessible. However, the disadvantages are also significant: it takes up a lot of space in the room and most often makes a lot of noise.


Which typical well pump to choose
If you need to arrange a home water supply from a well or a well, then you can use one of the types of equipment, among them pumps of the following type:
- deep;
- ordinary;
- surface.
The deep pump should be located behind the ten-meter mark. As for ordinary pumps, they are installed in shallow wells, their shaft should not be deeper into the soil by more than 10 m. But surface pumps serve shallow mines, but are located above the head.
The above varieties include centrifugal and vortex models, of which the assortment of submersible, deep and surface units consists. The equipment can also belong to the automatic segment or be controlled in manual mode. This suggests that the assortment of the described equipment is quite diverse, therefore, in search of the optimal solution, it is necessary to study all aspects and design solutions of the model, which may affect the belonging of the device to one or another variety.
Power connection
Circulation pumps operate from a 220 V network. The connection is standard, a separate power line with a circuit breaker is desirable. Three wires are required for connection - phase, zero and ground.
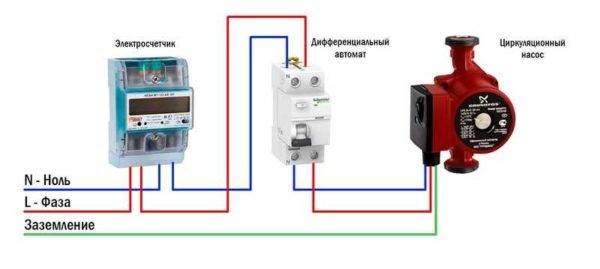
Electrical connection diagram of the circulation pump
The connection to the network itself can be organized using a three-pin socket and plug. This connection method is used if the pump comes with a connected power cable. It can also be connected via a terminal block or directly with a cable to the terminals.
The terminals are located under a plastic cover. We remove it by unscrewing a few bolts, we find three connectors.They are usually signed (pictograms are applied N - neutral wire, L - phase, and "earth" has an international designation), it is difficult to make a mistake.
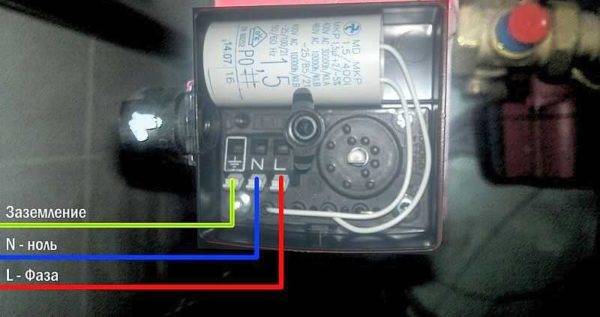
Where to connect the power cable
Since the entire system depends on the performance of the circulation pump, it makes sense to make a backup power supply - put a stabilizer with connected batteries. With such a power supply system, everything will work for several days, since the pump itself and the boiler automation “pull” electricity to a maximum of 250-300 watts. But when organizing, you need to calculate everything and select the capacity of the batteries. The disadvantage of such a system is the need to ensure that the batteries are not discharged.
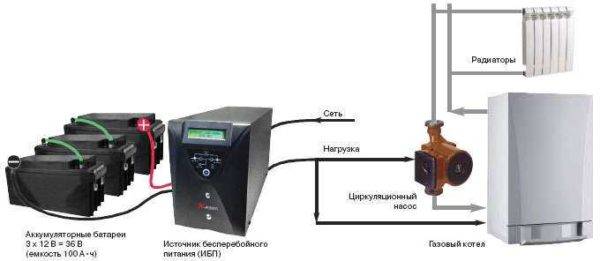
How to connect a circulator to electricity through a stabilizer
Hello. My situation is that a 25 x 60 pump stands right after the 6 kW electric boiler, then the line from the 40 mm pipe goes to the bathhouse (there are three steel radiators) and returns to the boiler; after the pump, the branch goes up, then 4 m, down, rings the house of 50 sq. m. through the kitchen, then through the bedroom, where it doubles, then the hall, where it triples and flows into the boiler return; in the bath branch 40 mm up, leaves the bath, enters the 2nd floor of the house 40 sq. m. (there are two cast-iron radiators) and returns to the bath in the return line; the heat did not go to the second floor; the idea to install a second pump in the bath for supply after a branch; the total length of the pipeline is 125 m. How correct is the solution?
The idea is correct - the route is too long for one pump.
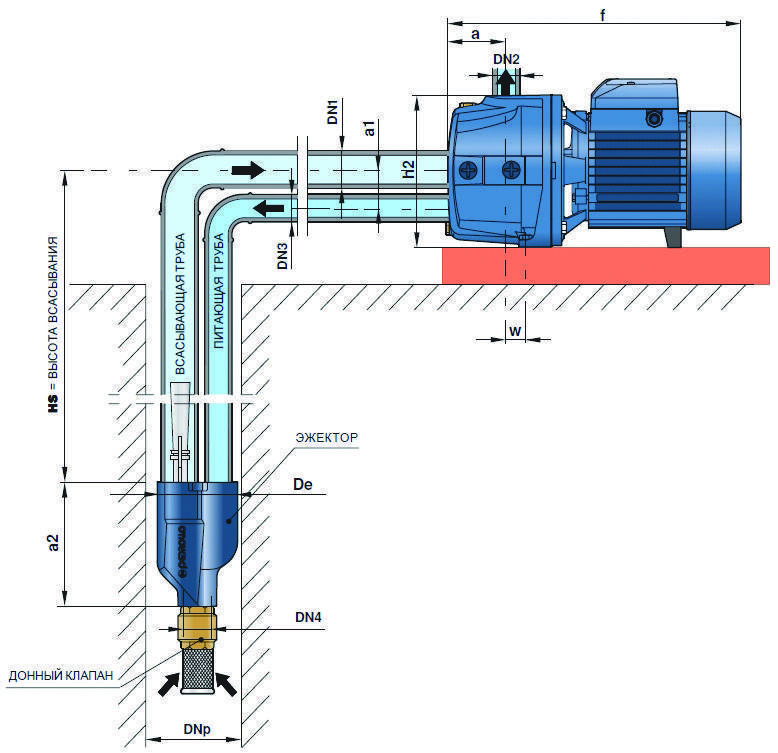
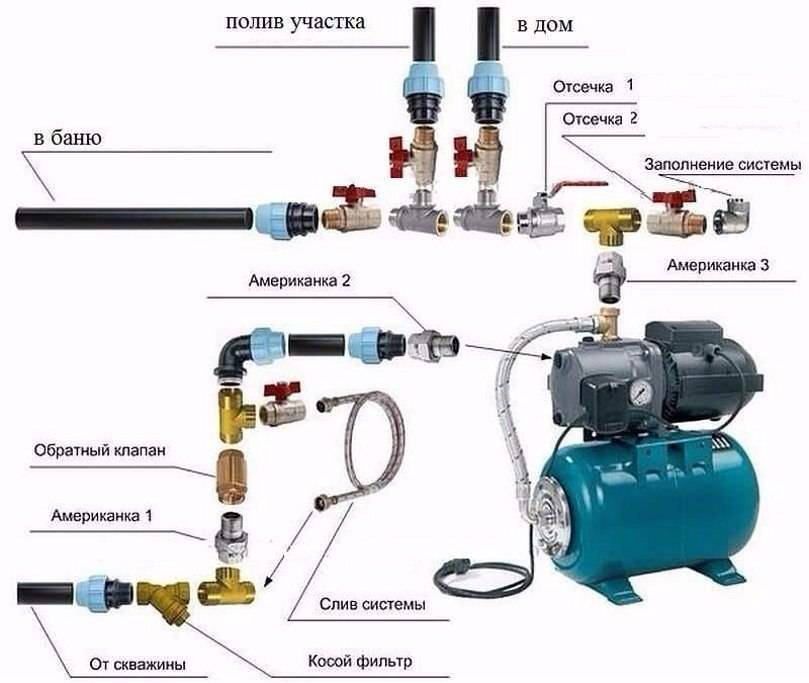
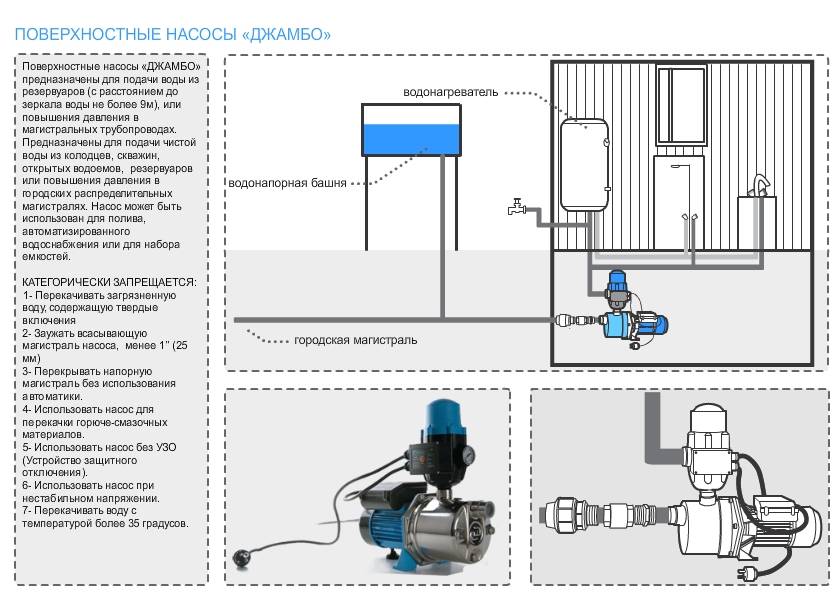
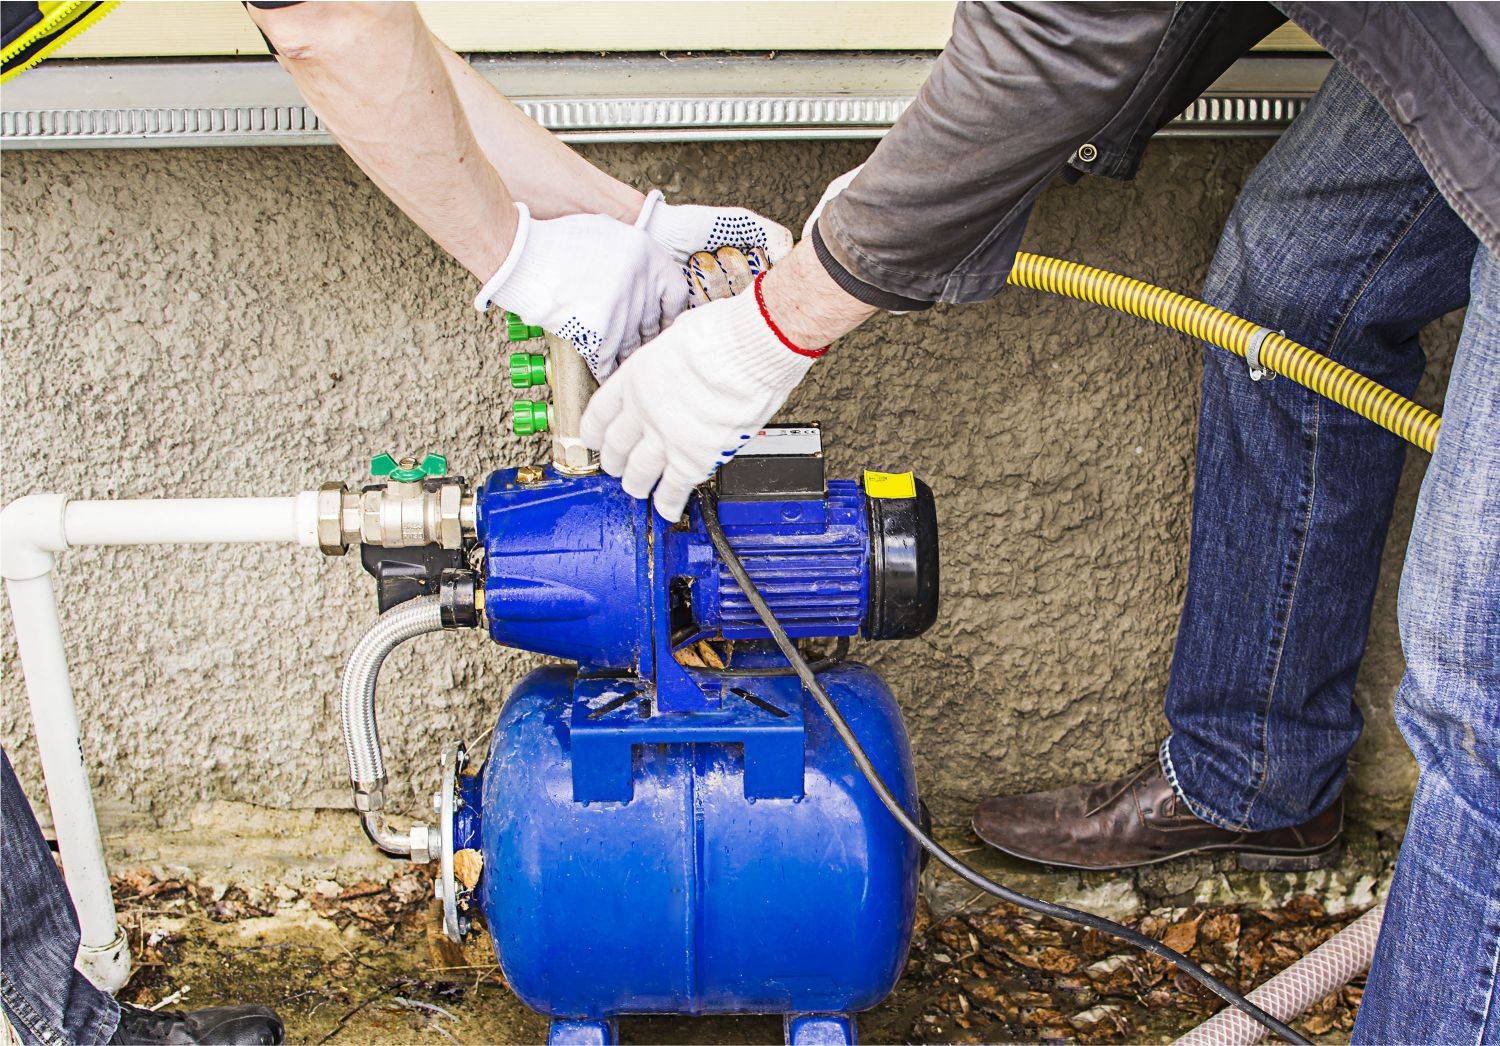
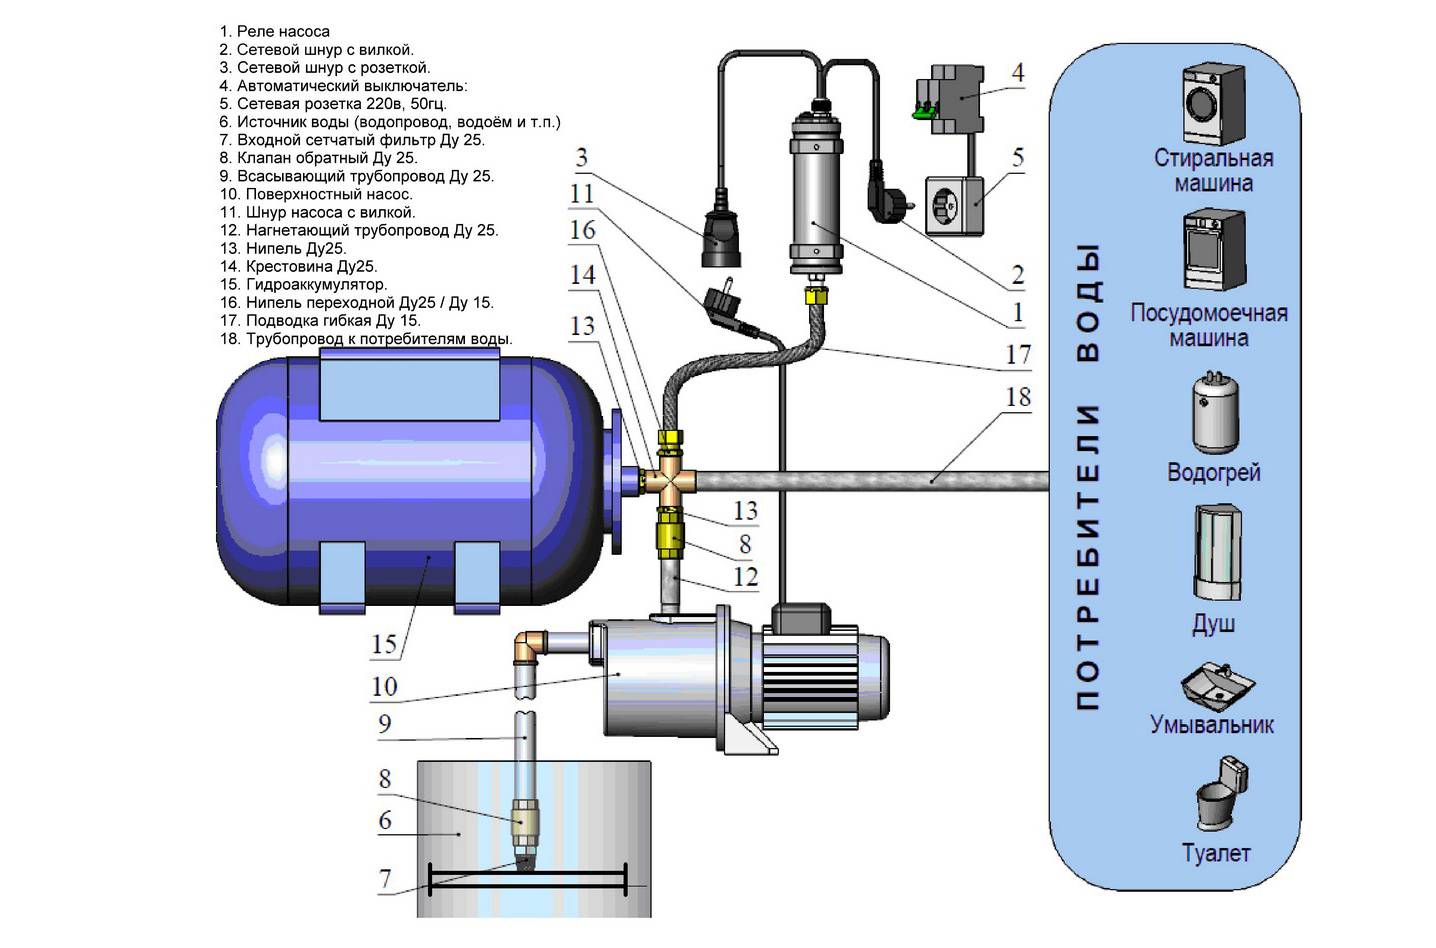
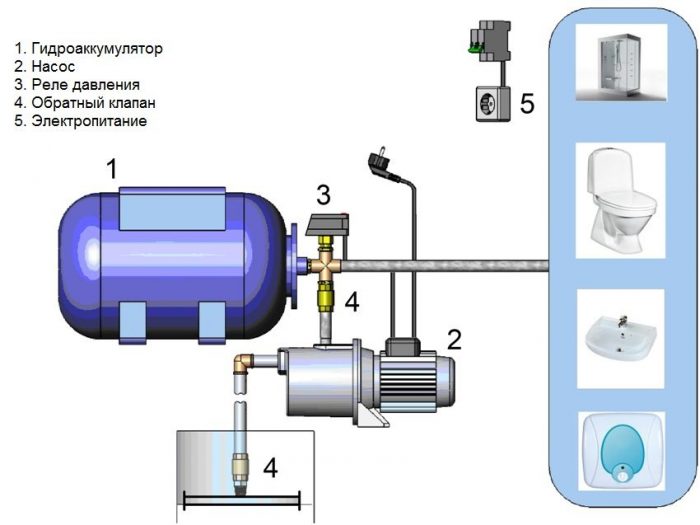
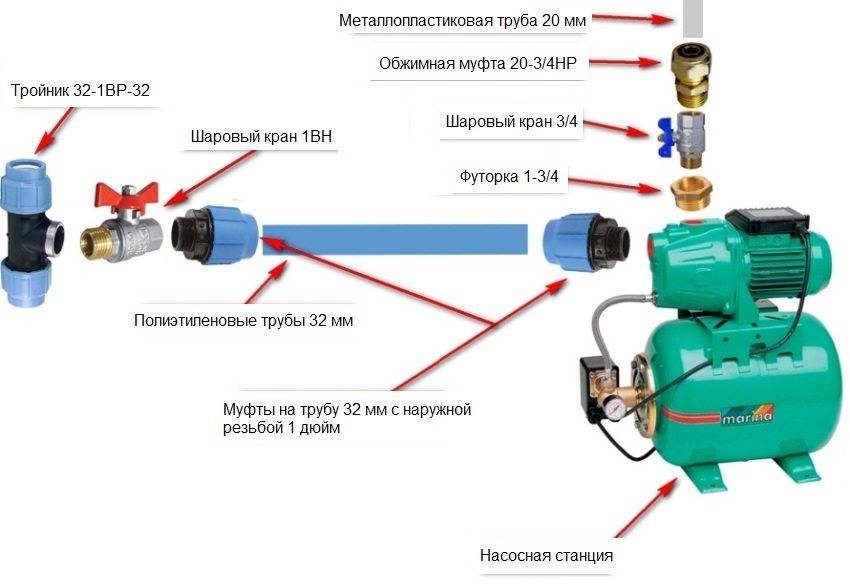
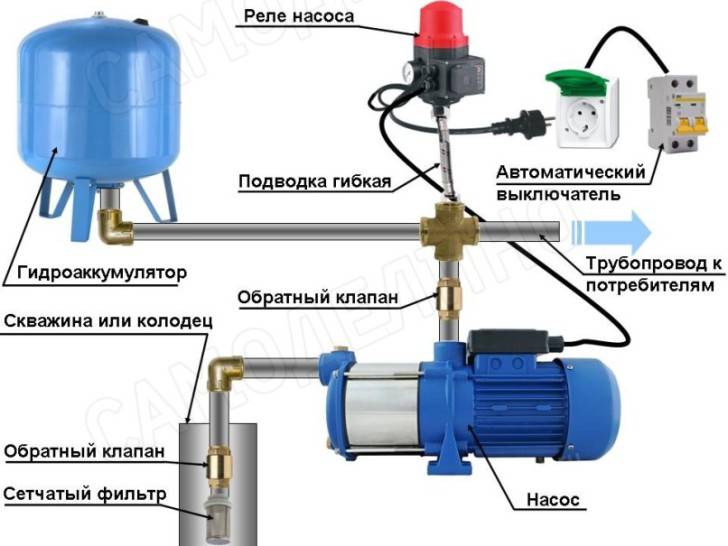
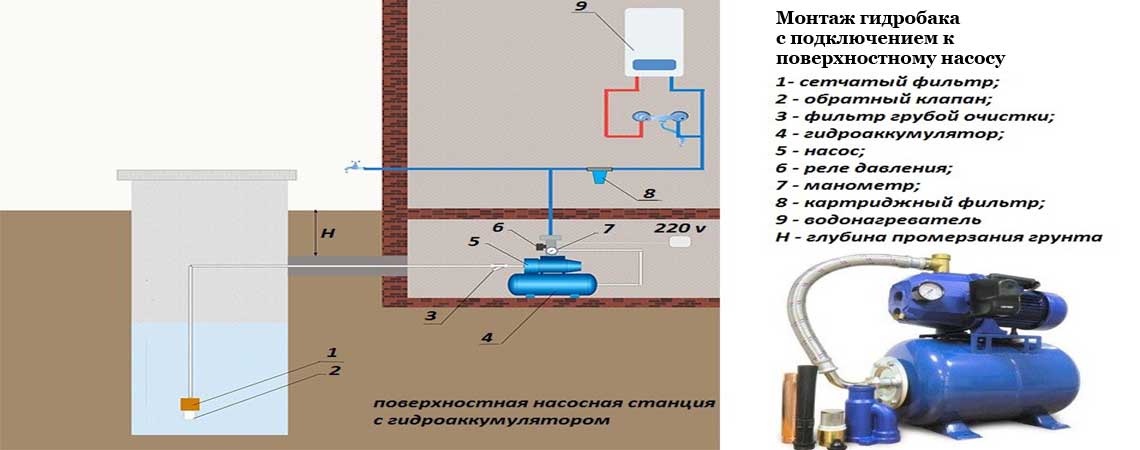
Connecting a pumping station to a well
If you are going to connect a surface pump to the well with your own hands, our step-by-step instructions will help you:
- The pumping station (or separately the pump) is installed on a solid fixed base and the legs are fixed with bolts or anchors. Under the installation, it is advised to lay a rubber mat to reduce the vibration activity of the device;
- The outlet (supply) of the pump is connected to the inch outlet of the five-outlet fitting with a hose or directly;
- The accumulator tank is also connected to the inch outlet of the fitting by means of a soft hose or directly;
- The remaining inch hole of the fitting is connected to the pipe of the internal water supply of the house;
- To the hole? inches, a pressure gauge is screwed on the fitting;
- The pressure switch is connected to the remaining unoccupied last hole of the fitting;
- The suction port of the pump is connected to the intake pipe;
- The end of the intake pipe is supplied with a filter and a non-return valve for rough water purification and lowered into the well (the distance to the bottom is at least a meter);
- The power cord of the pump is connected to the normally open terminals of the pressure switch, and the relay itself is connected to a 220 V power outlet;
- The working space of the pump is filled with water through a special hole in the housing and the start of the device is created;
- The taps in the house are closed and waiting for the tank to be filled. At the time when the tank was filled and the pump turned off, the cut-off pressure is measured on the pressure gauge;
- After that, the taps are unlocked and the water is draineduntil the pump is turned on again. The switch-on pressure is detected;
- Finally, the obtained pressure values \u200b\u200bare compared with the passport data of the receiver and, if necessary, adjust the pressure switch.
Why is it needed?
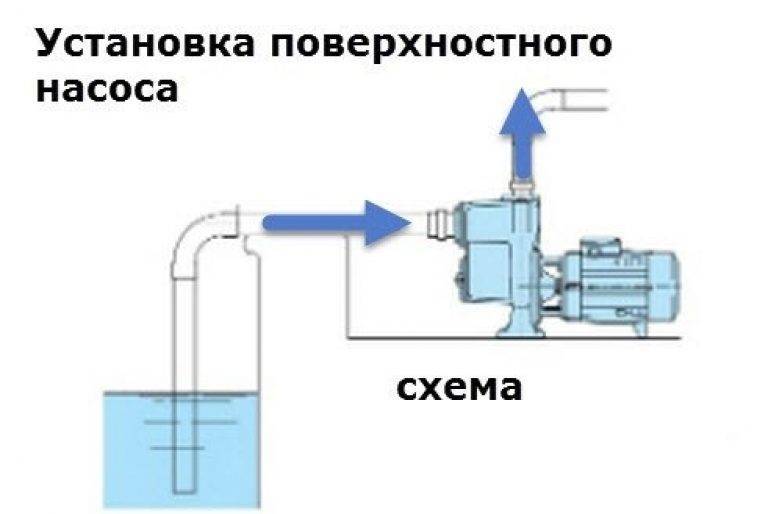
The name of the surface pump speaks for itself - this device does not require immersion in water to function properly.It is installed "on land", and the liquid is supplied to the pipes using a flexible hose that goes from the pump to the water. You should also install a downhole adapter. Thanks to easy access to the device, the surface pump is easy to maintain, which attracts the owners of private houses.
The surface pump, in addition to supplying water to the cottage, can also be used to water the garden plot or pump water out of the basement, which is important for areas with frequent flooding in the spring.
Using a Surface Pump to Water Your Garden
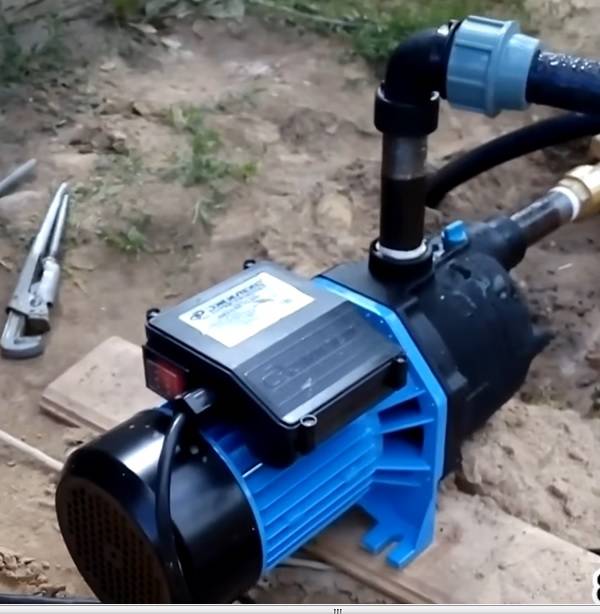
An example of a surface pump
A conventional surface pump works like this: a vacuum is created at the end of the suction conduit that is not lowered into the water, and the liquid begins to rise through the hose due to the difference in pressure at both ends. Interestingly, in the suction area, this figure is 760 mm Hg. Art. in full vacuum and, replacing mercury with water, we will get a height of 10.3 m. So it turns out that in full vacuum, the liquid can rise only by this amount. You should also take into account the presence of certain losses during friction against the walls of the conduit - thus, we get a distance of only about 9 m. As a result, the real working height of the surface pump is very small - about 8-9 m.


Working surface pump
When choosing a pump, it is also important to take into account the distance from the well to the pump itself, as well as the position of the conduit. That is, it is worth remembering that 4 m of the horizontal part of the hose will be equivalent to 1 m of water rise
Surface pump
The surface pump works as follows.
- An expansion tank or a hydraulic accumulator connected to the pump will be filled with water up to a certain level due to the design.
- The automatic pump will turn it off when the water reaches a certain level. The water supply will stop.
- When the water from the tank is used up, the pump will automatically turn on again and refill the accumulator completely, after which it will stop.
Surface pump diagram
If you need to pump water from a shallow well or a nearby reservoir, then purchasing a surface pump will be the best option for organizing an autonomous water supply to the house. Moreover, such a device is installed very simply and does not require special operating conditions.
Surface pump Patriot PTQB70
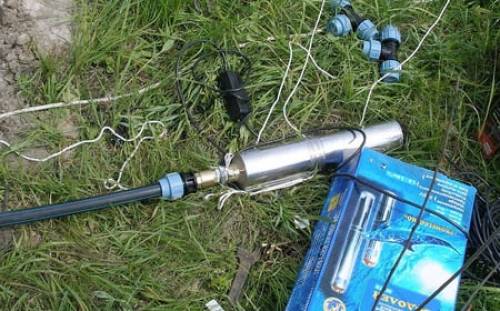
Preparation of related installation materials
A pump stuck in the casing can be a major headache. And it is necessary to pull it out (as well as lower it) with the help of a special cable. If the pump is already equipped with a polymer cord, you must make sure that it is of high quality and of sufficient length. Sometimes it makes more sense to purchase this item separately.
It is considered that a reliable cable or cord should be designed for a load that is at least five times the weight of the equipment attached to it. Of course, it must tolerate the effects of moisture well, since part of it will constantly be in the water.
If the device is suspended relatively shallow, less than ten meters from the surface, you need to take care of additional depreciation of the equipment during its operation. To do this, use a piece of flexible rubber or a medical tourniquet. A metal cable or suspension wire is not suitable as it does not dampen the vibration but may destroy the mount.
A special electrical cable is used to power the pump. Its length must be sufficient so that the cable lies freely and is not under tension.
To supply water from the pump to the house water supply, special plastic pipes are used. Designs with a diameter of 32 mm or larger are recommended. Otherwise, the water pressure in the system will be insufficient.
For installation of a submersible pump, a special cable is used, which is designed for long-term operation under water. Its cross section must comply with the technical requirements specified in the product passport.
Pipes can be used both metal and plastic. There is controversy regarding the connection of metal pipes. Some experts object to a threaded connection as less reliable. It is recommended to use flanges, and the bolt should be on top, this will prevent it from accidentally falling into the well.
But the threaded connection in wells is used quite successfully. During installation, winding is mandatory. Some experts recommend taking linen or Tangit sealing tape instead of the usual FUM tape or tow. Linen winding is additionally strengthened with silicone sealant or similar material.
The characteristics of the water supply pipe should be selected in accordance with the conditions of its operation. For depths up to 50 meters, HDPE pipes are used, designed for a pressure of 10 atm. For a depth of 50-80 m, pipes capable of operating under a pressure of 12.5 atm will be needed, and for deeper wells, pipes of 16 atm are used.


In addition to the pump, pipes and cord or cable, before installing a submersible pump in a well, it is recommended to stock up on the following materials:
- clamps for fixing the electric cable on the pipe;
- check valve;
- pressure gauge;
- shut-off valve for the water pipe;
- steel mount;
- power cable, etc.
Before connecting the pipe to the pump, a nipple adapter must be attached to its outlet. Usually, modern submersible pumps are equipped with such a device, but if it is not, this unit must be purchased separately.
It should be remembered that for pumping a well immediately after drilling, i.e. to remove a large amount of very dirty water from the well, such a pump cannot be used. It will quickly fail. Usually, the well is pumped with a separate pump, which is cheaper and works better when working with dirty water.
Structure and principle of operation
According to the mode of action, a self-priming pump can be vortex and centrifugal. In both, the key link is the impeller, only it has a different structure and is installed in a housing of a different handicap. This changes the principle of operation.
Centrifugal
Centrifugal self-priming pumps have an interesting structure of the working chamber - in the form of a snail. Impellers are fixed in the center of the body. There can be one wheel, then the pump is called single-stage, there can be several - a multi-stage design. Single-stage always operate at the same power, multi-stage can change performance depending on the conditions, respectively, they are more economical (less power consumption).
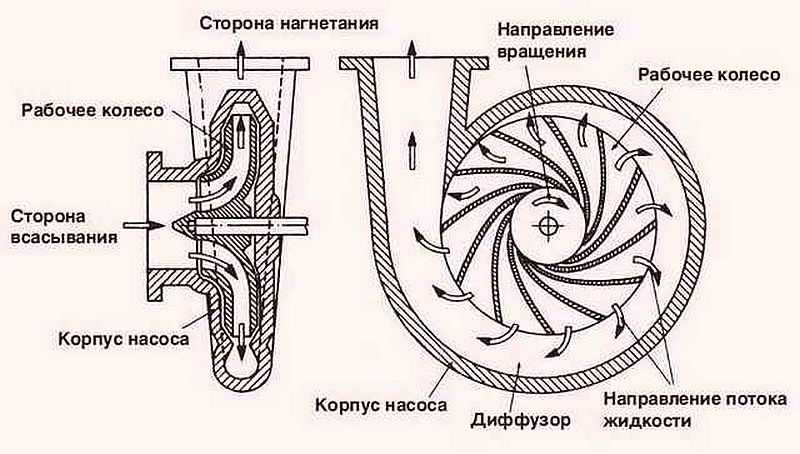
The main working element in this design is a wheel with blades. The blades are bent in the opposite direction with respect to the movement of the wheel. When moving, they seem to push the water, squeezing it to the walls of the case. This phenomenon is called centrifugal force, and the area between the blades and the wall is called the "diffuser".So, the impeller moves, creating an area of increased pressure on the periphery and pushing water towards the outlet pipe.

At the same time, a zone of reduced pressure is formed in the center of the impeller. Water is sucked into it from the supply pipeline (suction line). In the figure above, incoming water is indicated by yellow arrows. Then it is pushed by the impeller to the walls and rises up due to centrifugal force. This process is constant and endless, repeating as long as the shaft is spinning.
FROM operating principle of centrifugal pumps have a drawback: the impeller cannot create centrifugal force from the air, therefore, before operation, the housing is filled with water. Since pumps often operate in intermittent mode, so that water does not flow out of the housing when stopped, a check valve is installed on the suction pipe. These are the features of the operation of centrifugal self-priming pumps. If the check valve (it must be mandatory) is at the bottom of the supply pipeline, the entire pipeline has to be filled, and this will require more than one liter.
| Name | Power | pressure | Maximum suction depth | Performance | Housing material | Connecting dimensions | Price |
|---|---|---|---|---|---|---|---|
| Caliber NBTs-380 | 380 W | 25 m | 9 m | 28 l/min | cast iron | 1 inch | 32$ |
| Metabo P 3300 G | 900 W | 45 m | 8 m | 55 l/min | cast iron (stainless steel drive shaft) | 1 inch | 87$ |
| ZUBR ZNS-600 | 600 W | 35 m | 8 m | 50 l/min | plastic | 1 inch | 71$ |
| Elitech HC 400V | 400W | 35 m | 8 m | 40 l/min | cast iron | 25 mm | 42$ |
| PATRIOT QB70 | 750 W | 65 m | 8 m | 60 l/min | plastic | 1 inch | 58$ |
| Gilex Jumbo 70/50 H 3700 | 1100 W | 50 m | 9 m (integrated ejector) | 70 l/min | cast iron | 1 inch | 122$ |
| BELAMOSS XI 13 | 1200 W | 50 m | 8 m | 65 l/min | stainless steel | 1 inch | 125$ |
| BELAMOS XA 06 | 600 W | 33 m | 8 m | 47 l/min | cast iron | 1 inch | 75$ |
Vortex
The vortex self-priming pump differs in the structure of the casing and the impeller. The impeller is a disk with short radial baffles located at the edges. It's called an impeller.

The housing is made in such a way that it quite tightly covers the "flat" part of the impeller, and a significant lateral clearance remains in the baffle area. When the impeller rotates, the water is carried away by the bridges. Due to the action of centrifugal force, it is pressed against the walls, but after some distance it again falls into the zone of action of the partitions, receiving an additional portion of energy. Thus, in the gaps, it also twists into vortices. It turns out a double vortex flow, which gave the name to the equipment.
Due to the peculiarities of work, vortex pumps can create pressure 3-7 times more than centrifugal ones (with the same wheel sizes and rotation speed). They are ideal when low flow and high pressure are required. Another plus is that they can pump a mixture of water and air, sometimes they even create a vacuum if they are filled with only air. This makes it easier to start it up - no need to fill the chamber with water or a small amount is enough. The disadvantage of vortex pumps is low efficiency. It cannot be higher than 45-50%.
| Name | Power | Head (lifting height) | Performance | Suction depth | Housing material | Price |
|---|---|---|---|---|---|---|
| LEO XKSm 60-1 | 370 W | 40 m | 40 l/min | 9 m | cast iron | 24$ |
| LEO XKSm 80-1 | 750 W | 70 m | 60 l/min | 9 m | cast iron | 89$ |
| AKO QB 60 | 370 W | 30 m | 28 l/min | 8 m | cast iron | 47$ |
| AKO QB 70 | 550 W | 45 m | 40 l/min | 8 m | cast iron | 68 $ |
| Pedrollo RKm 60 | 370 W | 40 m | 40 l/min | 8 m | cast iron | 77$ |
| Pedrollo RK 65 | 500 W | 55 m | 50 l/min | 8 m | cast iron | 124$ |
Surface pumps
Surface pumps are installed on the ground, outside the well and connected to the water layer by pipes. This design has a number of advantages:
- Access, easy maintenance.
- Control, closed room with pump, reduces the possibility of theft.
Flaws:
- Low performance in terms of water pressure (in comparison with foreign pumps).
- Noisy, you can’t put the installation in the house.
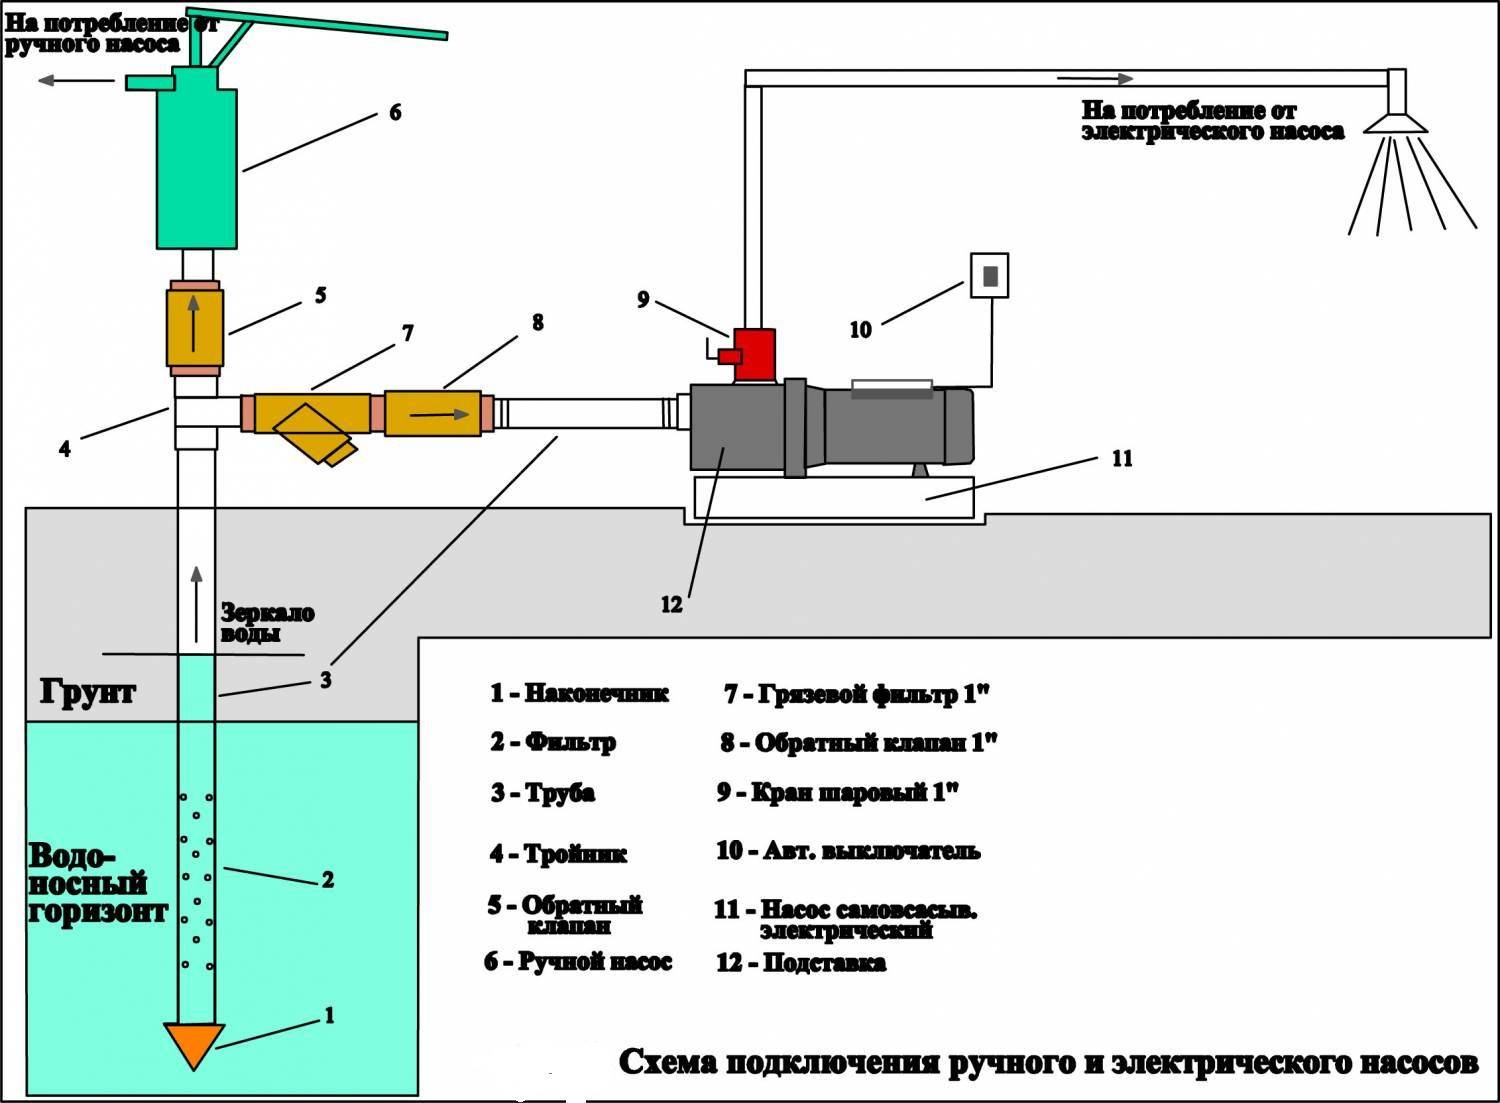
Hand pump
Familiar from childhood, a hand pump-column, the design is still in use. It is used when there is no need for an influx of water, it is enough to periodically dial the right amount. Easy to operate and very reliable. The working scheme is a piston, two valves and a cylinder, air and water. The lever transmits the muscular force required to lift the water. Complete independence from electricity, which in some cases makes the only available solution.
For functioning, it is necessary to drill an Abyssinian well, and a column is installed on top. Along with a full-fledged pump, they also mount it manually, for safety net, during a power outage.
The installation of the column is carried out directly on the well (Abyssinian well) or through a pipe lowered to the water horizon.
Self-priming pumps
Household pumps use electric drives as the main element. There are models on internal combustion engines, but they are specialized solutions.


Surface self-priming pump
The main module does not come into contact with water, so it does not need protection, which simplifies surface pump installation. They are connected to the water with pipes, with a check valve that works when “aired”. Or sleeves, with a temporary installation of a surface pump.
Cooling systems are not provided by the design, which is a common cause of breakdowns. There are no control mechanisms on the case, only an on and off button. To build an autonomous system, you will have to buy additional equipment. The level of pressure created is 10 m, which is not enough for home plumbing. But it can fill a tank located in the upper part of the building, from which water will flow by gravity to consumers.
Such a pump is well suited for temporary water supply of the site, irrigation system.
Pumping stations
This technique was specially developed for the organization of year-round water supply at home. In addition to the self-priming pump, the stations are equipped with a hydraulic accumulator of a certain capacity, which maintains the required pressure of the water supply network.
Control mechanisms allow you to turn on the station automatically when the pressure in the system drops and turn it off when the required level is reached. But the stations are not without drawbacks:
- The noise problem hasn't gone away.
- Low productivity, which does not allow water to be taken from a great depth, only up to 10 m.
Modern models of some manufacturers are enclosed in a polymer case, which partially solves the problem of noise and vibration.
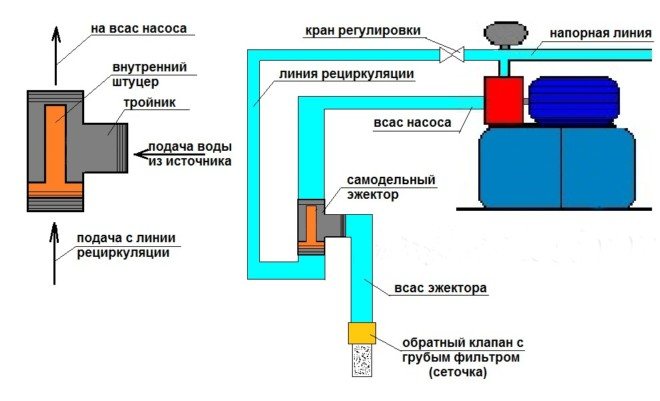
Pump stations with ejector
To work at depths up to 25 m, pumping stations with an internal (injector) or external (ejector) mechanism are used. In such a water intake system, an additional circuit is formed from a pipe of a smaller diameter through which liquid is pumped.This creates a vacuum in the ejector and increases the pressure in the pipe. Sufficient for water intake at great depths. But you have to pay for this with a decrease in pump performance and increased noise. For installation in the house you will need an isolated room.
Installation of a submersible pump to the well scheme
The principle of installing a submersible or deep-well pump is not much different from the general one with a pumping station. There is a difference in the size of the equipment. A submersible pump does not require a special caisson, however, it will still be necessary to equip the head well - a strong cable is attached to it for the subsequent extraction and prevention of the unit.
So:
The HDPE pipe is cut off. Its size depends on the depth of the well. The unit itself is installed 1.5 m above the bottom so as not to scoop up silt or other dirt from the bottom and 2–3 m below the water table so as not to remain dry if the horizon leaves. The end of the pipe is equipped with a coupling and a check valve. The design is connected to the pump by a double nipple with an external thread.
Now, along the entire length of the pipe, a power cable is attached with clamps. Electrical tape is also suitable, but metal fasteners are more reliable - the tape is capable of losing adhesive properties during condensate. Fastening frequency - 3 m. The cable cannot be twisted around the pipe - it lies parallel to it. Sufficient length for installation and connection is measured in advance.
The rope is reinforced. It can be metal or nylon, depending on the weight of the device. For this, there are special lugs on the pump housing. Loop connect sections of the cable and secure with several clamps for reliability
Now the structure can be lowered into the well, carefully, without jerking.
At the head of the well there is a hole for inserting a water pipe, where it is led out. There is also a safety wire attached. There is always a lightning rod on the head, since the installation is electric.
It remains to connect the pump to the network, check the pressure and install the plumbing from the outlet pipe.
There is always a lightning rod on the head, since the installation is electric.
It remains to connect the pump to the network, check the pressure and install the plumbing from the outlet pipe.
Thus, two types of pumps from the well are mounted. It is not difficult - with the skills of handling a metalwork tool, the work is familiar. The installation time depends on the timely acquisition of all components - this should be taken care of in advance.


