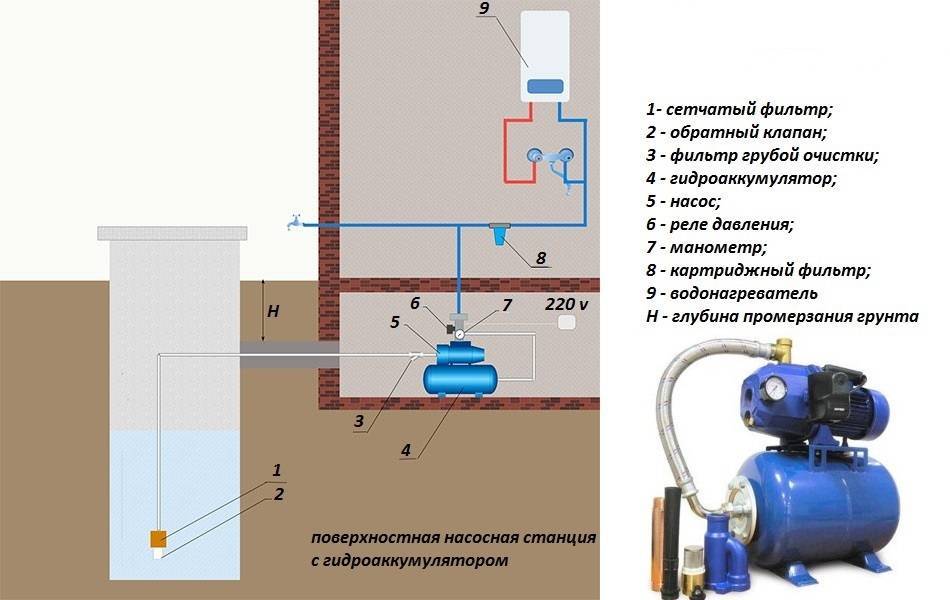
- The composition of the equipment of the pumping station
- Basic installation and connection diagrams
- Assembly and connection of a pumping station with a suction pump
- The process of installing a pumping station
- Key Recommendations
- Do-it-yourself station connection - work algorithm
- Operation features
- Do-it-yourself steps for connecting a pumping station to a well
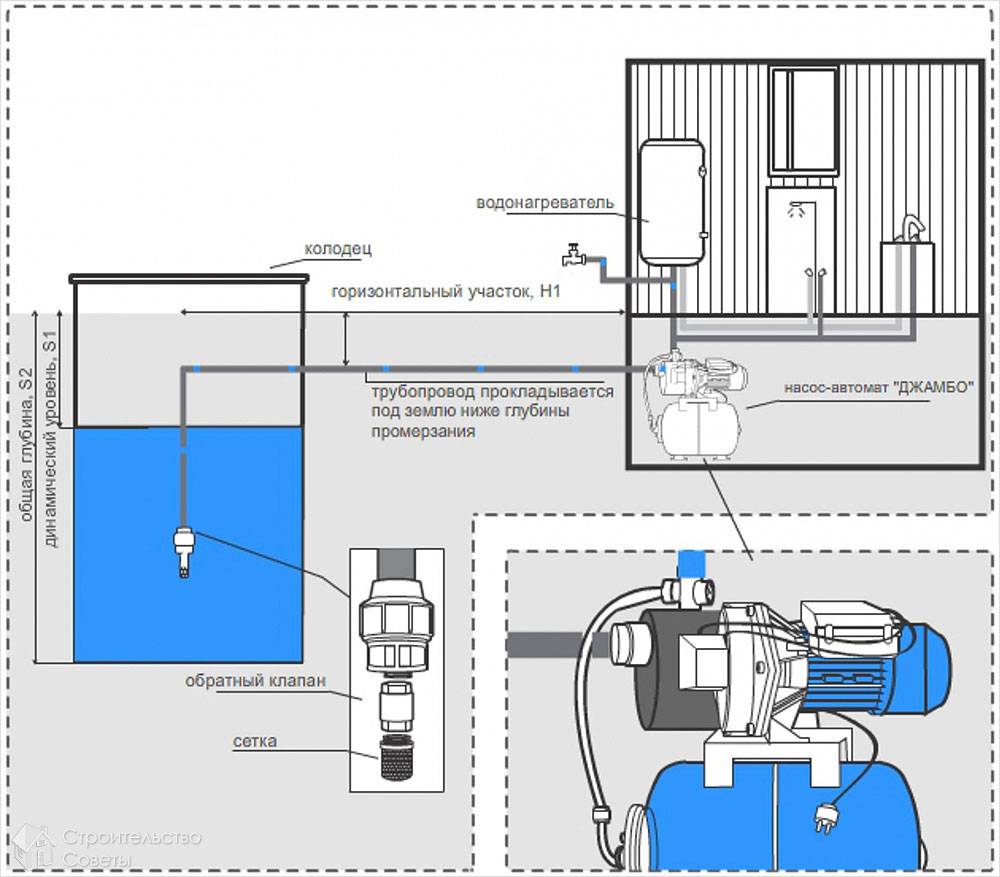
- Scheme of connecting a pumping station to a well in the country
- How to calculate the volume of a hydraulic accumulator?
- Water purification
- Models
- Features of the device of the pumping station
The composition of the equipment of the pumping station

There are 2 types of such devices:
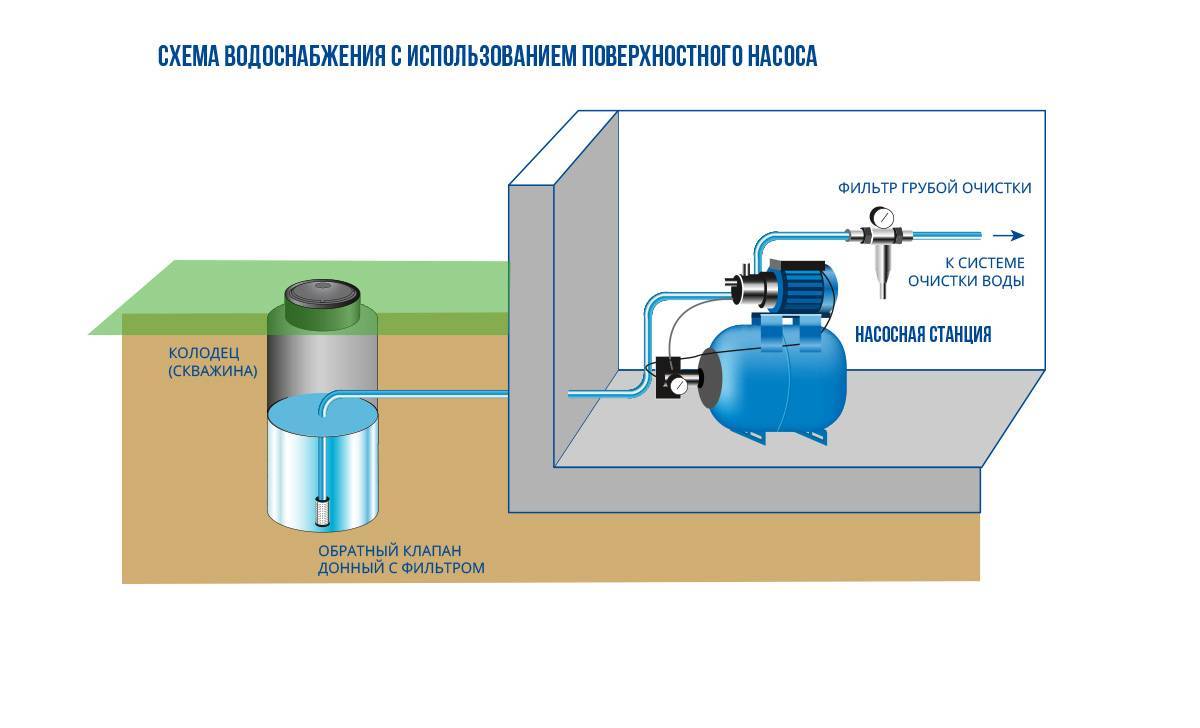
- Surface pumping station. This is a complex that includes all the necessary elements to ensure uninterrupted water supply by an autonomous water supply system.
- Submersible pump. This is a pump that descends into the water at the source, and when turned on, draws in water, raises it to the surface and transfers it through the pipeline to consumers.
Those who are thinking about how to assemble a pumping do-it-yourself station, must understand that it is not only a pump.
In addition to the liquid suction unit, the complex includes:
- manometer;
- hydraulic tank;
- Control block;
- water pressure switch;
- coarse filter.
Each element performs its function.But only being included in a single complex, they form an autonomous system for supplying water from a well or a well.
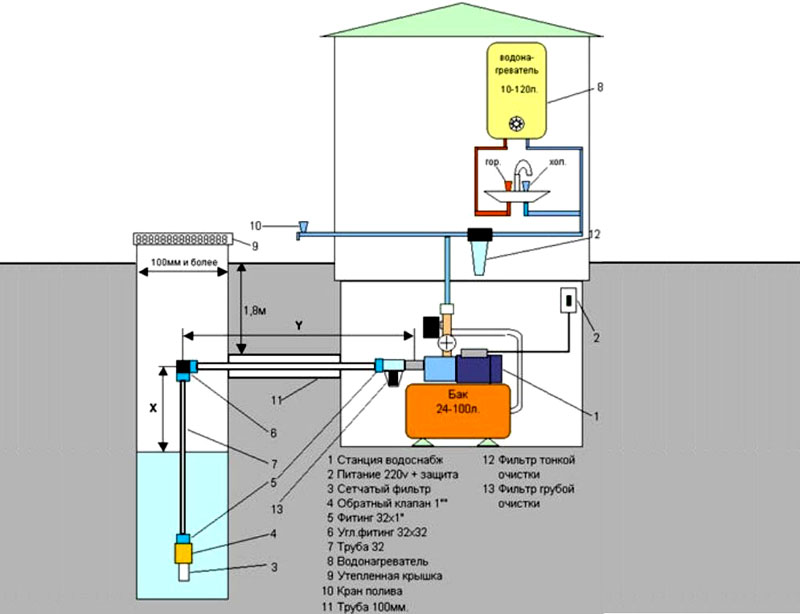
Basic installation and connection diagrams
The most common schemes are:
- Scheme of direct connection of the device to the supply pipeline.
- Scheme with a storage tank.
Direct connection involves placing the station between the water intake and the intra-house pipeline. Water is directly sucked from the well and supplied to the consumer. With this installation scheme, the equipment is located in a heated room - in the basement or basement. This is due to the fear of low temperatures. Freezing water inside the device can cause it to fail.
However, in regions with relatively mild winters, it is allowed to place a water station directly at the top of the well. To do this, a well buried in the ground is built above it, which is insulated to prevent freezing of water inside the pipeline. If necessary, an electric heating wire can be used. We will discuss in more detail all aspects of choosing an installation site below.
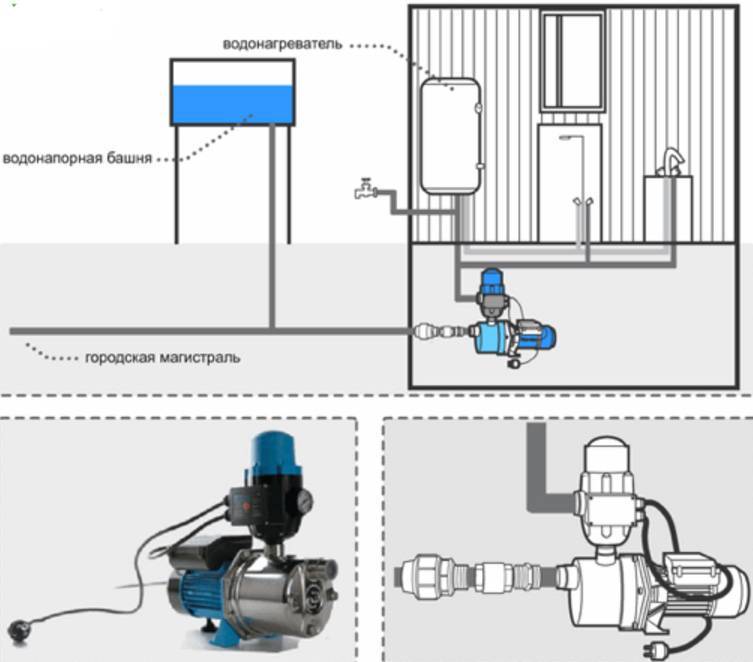
The scheme for connecting a station with a storage tank looks a little different. Water from the source is not supplied directly to the in-house system, but to a special volumetric storage tank. The pumping station itself is located between the storage tank and the internal pipeline. Water is pumped to the points of water intake by the station pump from the storage tank.
Thus, in such a scheme, two pumps are used:
- Deep well pump that pumps water into the storage tank.
- A pumping station that supplies water from a storage tank to a water supply system.
The advantage of the scheme with a storage tank is the presence of a sufficiently large amount of water in it.The volume of the tank can be several hundred liters, and even cubic meters, and the average volume of the damper tank of the station is 20-50 liters. Also, a similar version of the water supply system is suitable for artesian wells, when one way or another it is necessary to use a deep pump.
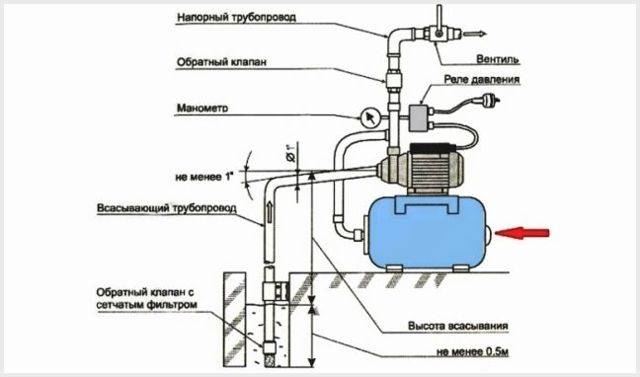
Assembly and connection of a pumping station with a suction pump
We will begin the description of the assembly and composition of the first version of our pumping station with a station with a suction pump. This solution has its pluses, which, upon closer examination, automatically become minuses.
Let's try to "dig" to those and others, having examined in more detail all the features of a station with a suction pump. The first significant plus of such pumping stations is their wide distribution and the ability to meet "ready-made solutions".
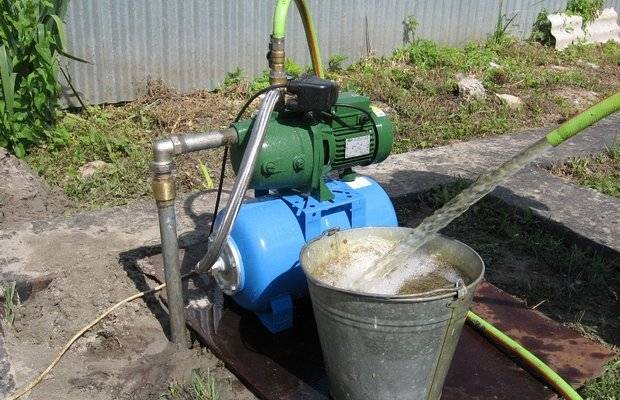
By "ready-made solutions" we mean pre-assembled kits consisting of a receiver, a pump, a piping between them, a pressure control switch, a pressure gauge. Such kits are good in that you will not need to collect an already certain part of the plumbing and elements to provide water supply. The second advantage of such a station is that the pump and all the main elements of the system are above the ground, which greatly facilitates their maintenance and replacement.
The disadvantages of a pumping station with a suction pump will be that the characteristics that are already included in the pre-assembled pumping stations may turn out to be unacceptable for you. So, for example, the receiver will be small or the pump will not provide the proper suction lift. In addition, the suction pump will require high tightness from the suction pipe, and a check valve will also be needed to keep the water column from the well to the pump.
Otherwise, you will need to constantly add water to the nozzle to prevent air build-up and keep the pump running.
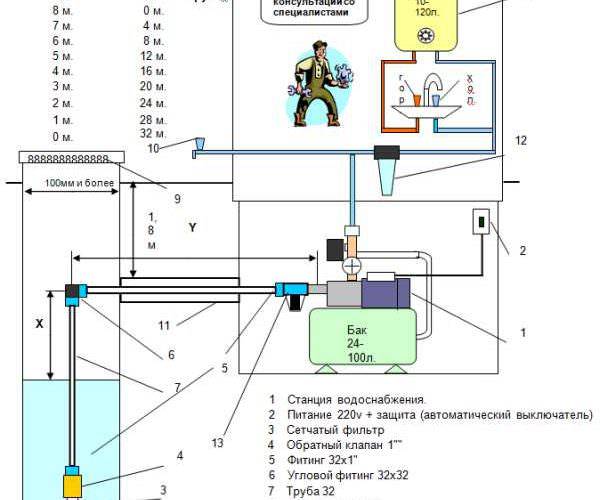
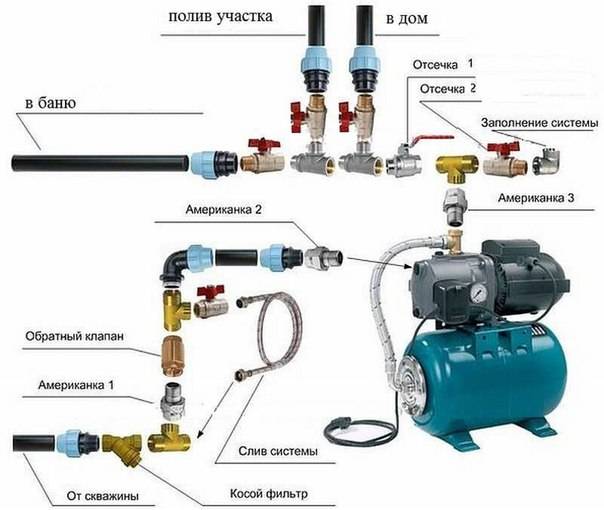
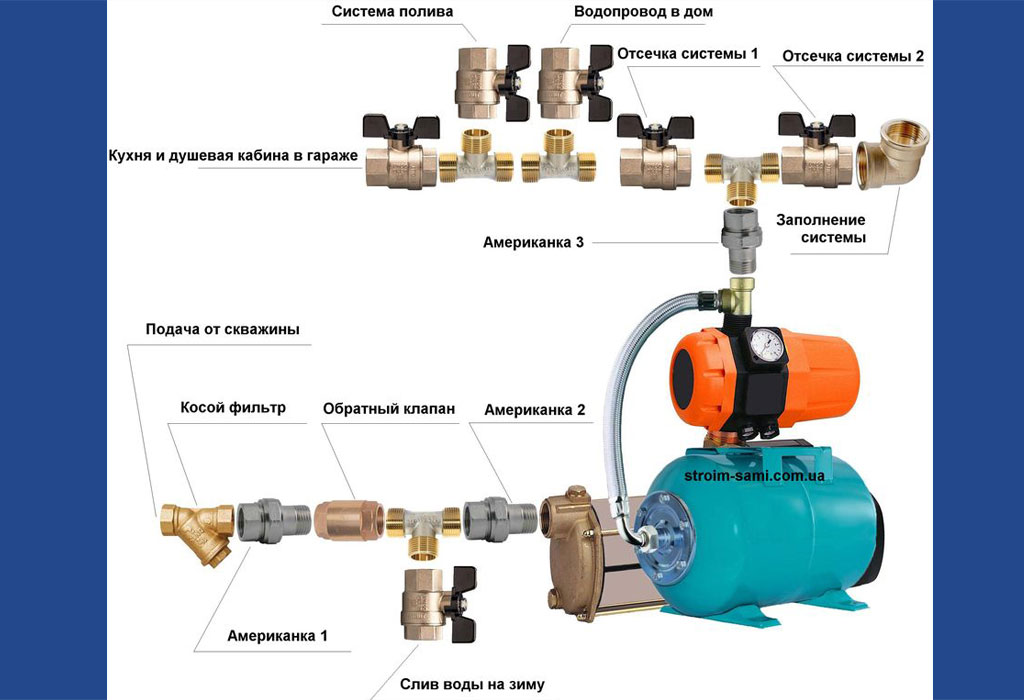
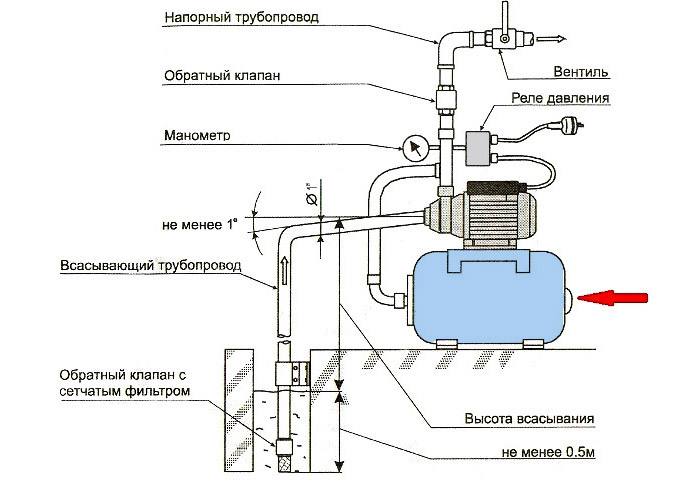
The assembly (diagram) of a pumping station with a suction pump is carried out according to the following principle
Please note that when calculating the length of the suction pipe, one vertical meter equals one horizontal meter (1:4). That is, when calculating the suction height, when choosing a pump (pumping station), it is necessary to take into account the length of the suction pipe, both vertically and horizontally. The characteristic of the ascent depth is given conditionally (8 meters), for your station this indicator may be different. See the specifications in the passport for the pumping station or pump. I would also like to additionally note the presence of a tap to fill the suction pipe with water
See the specifications in the passport for the pumping station or pump. I would also like to additionally note the presence of a tap to fill the suction pipe with water
The characteristic of the ascent depth is given conditionally (8 meters), for your station this indicator may be different. See the specifications in the passport for the pumping station or pump. Also, in addition, I would like to note the presence of a tap to fill the suction pipe with water.
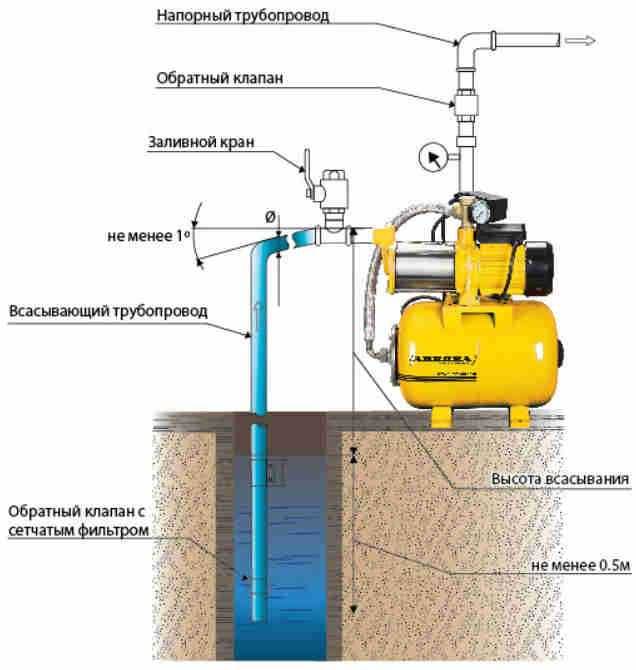


This system is not shown in the picture above, but is shown in the photo below. (yellow funnel - pipe - tap on a tee)

Naturally, all connections must guarantee maximum tightness, and all shut-off and control valves of the water supply system must be in good order.
The process of installing a pumping station
How to connect a pumping station to a well, we will now look into the details. The instructions will fit almost any model. After all, their principle of water supply is the same.
Of course, some models have their own characteristics, before installation, the instructions must be fully studied, because the manufacturer can make his own changes to the models. And the price here does not matter.

Scheme of connecting a pumping station to a well
Key Recommendations
Pumping station for the dzhileks well or any other is installed in private households, wells, wells, etc. It is a worthy replacement for conventional water supply communication
When installing it, you should pay attention to the material from which the pipes are made.
To prevent their compression, they must be made of plastic or metal. Also, it is good if the pipes are reinforced
When installing them, it is very important to prevent twisting or bending.

Determine the installation location
The pumping station can be installed:
- In a caisson;
- Indoors at home.
It is better if it is installed in the house (basement, specially designated place, etc.).
The caisson is not very suitable, primarily because of the inconvenience. Imagine: winter, snow, frost. Or: rain, mud. And you need to get dressed and go to another building to service the pumping station. It is much more convenient if it is in the house. Installation conditions for the pumping station:
- proximity to a water source;
- dry warm room for installation;
- enough space for possible repairs.
- soundproofing.
Good sound insulation is an ideal condition for placing a pumping station in the house
Constant noise and vibration can not only irritate your nervous system, but also seriously affect your health.
In this case, it is also necessary to take into account the presence of heating both walls and floors. Thus, the equipment of an unprepared area can take some time and take away considerable, at the moment, financial resources.
In addition, there are also certain pitfalls: maintaining the right pressure in the house and possible difficulties in carrying out repairs
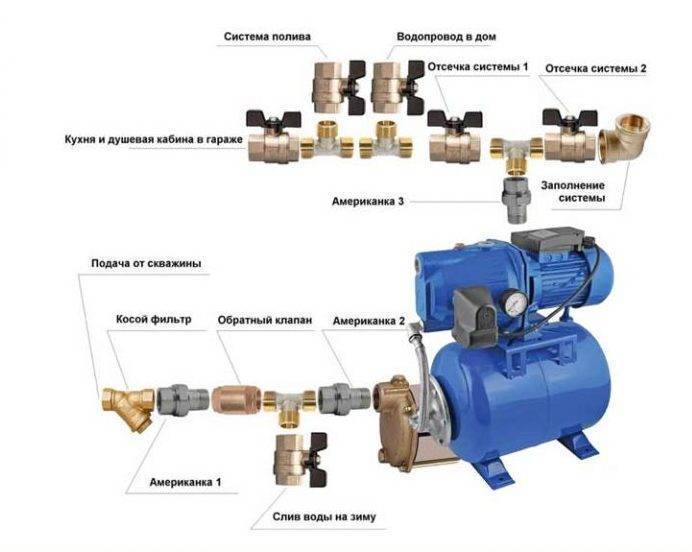
In extreme cases, you can equip a room for a pumping station in the hallway, bathroom, corridor or in the kitchen. But still, for reasons of safety and convenience, a separate room should be allocated. The main functional units of the station:
- A pump that pumps out water and delivers it to the house;
- A hydraulic accumulator, which consists of two parts separated by a membrane;
- Electric motor;
- Pressure switch;
- Manometer, with which the pressure is regulated;
- Water intake system with valve;
- A pipe connecting the water intake and the pump.
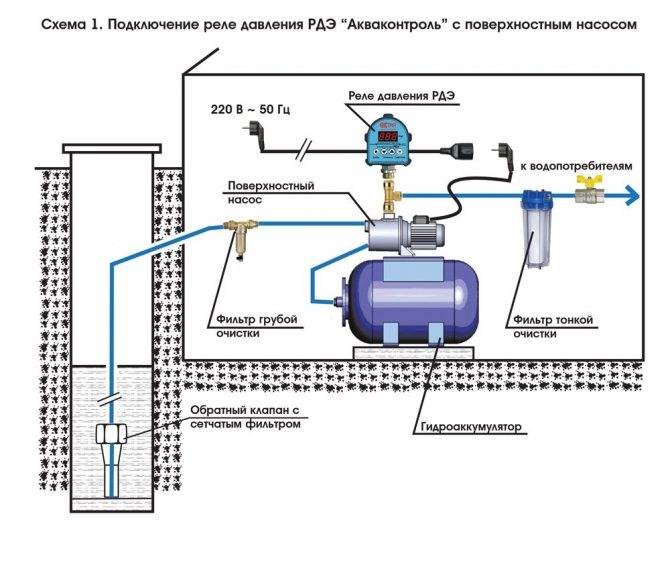
Do-it-yourself station connection - work algorithm
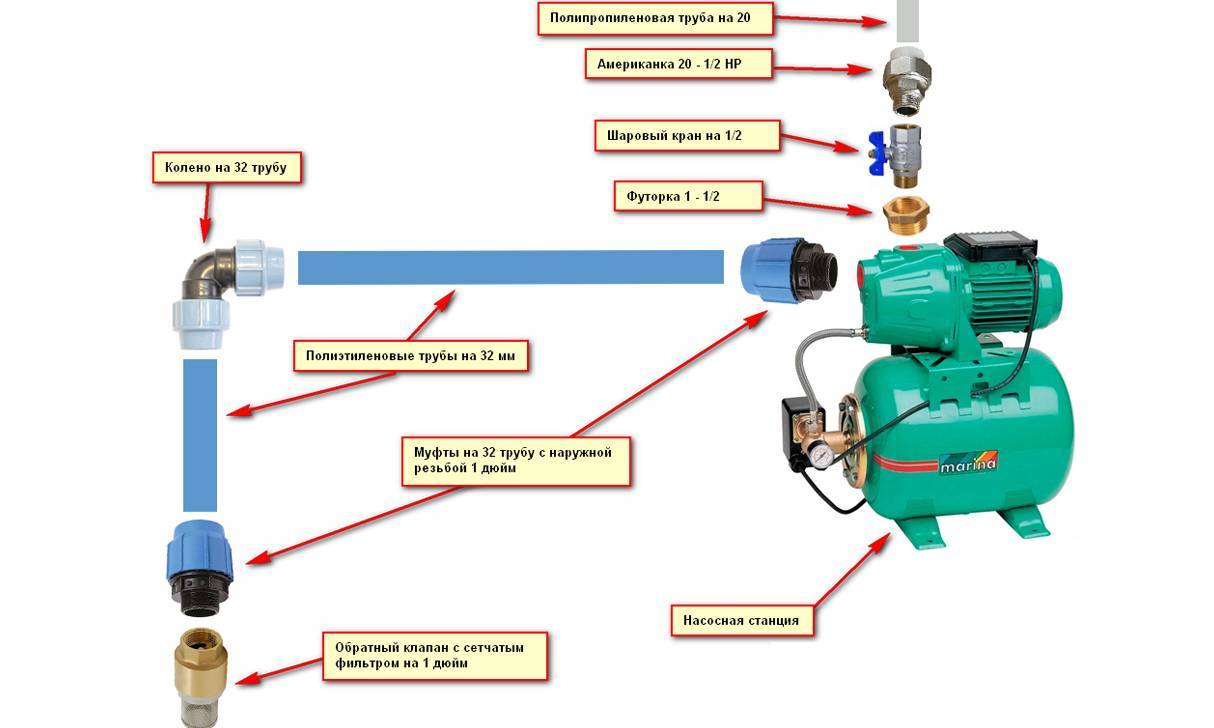
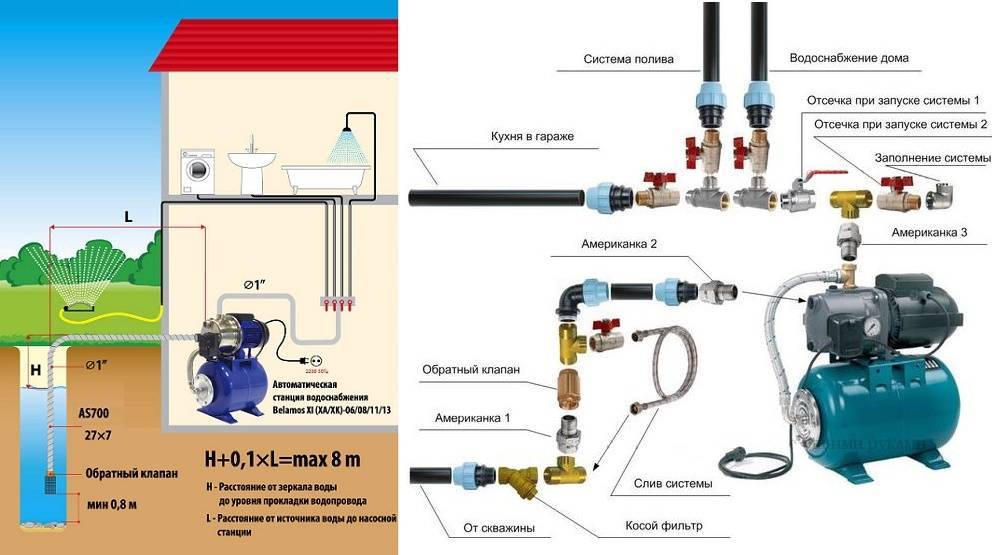
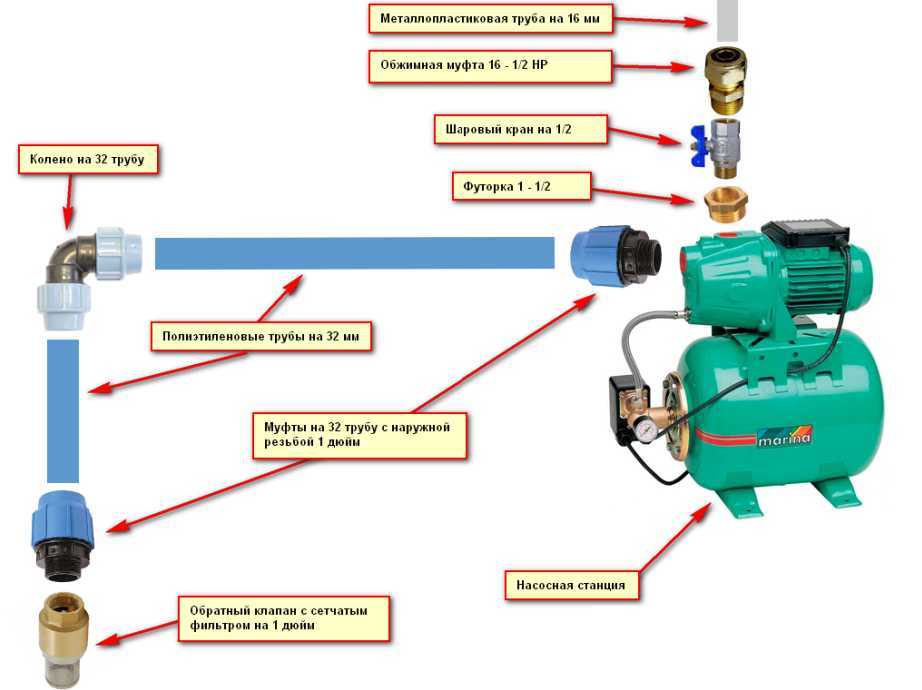
There are two outlets on the pumping equipment. They allow it to be connected to the water supply of the dwelling and directly to the water intake point (in our case, to the well). First you need to connect the station to the well. This is done using a 32 mm plastic pipe for water supply. You connect one of its ends to the pump, and the other is immersed in the well. It is desirable to insulate the pipe product using a good insulation. Products under the Termoflex brand are suitable.
Station operation after connection
At the end of the pipe, which is immersed in the source of water intake, it is necessary to mount a coarse cleaning filter. Its function is performed by a thin metal mesh. Place a non-return valve on top. It will ensure that the tubular product is constantly filled with water. If there is no liquid in the pipe, the station will not be able to pump it out of the well. Fix the metal filter and valve with a coupling having an external thread. Similar fasteners are used for mounting the second end of the pipe. The fastening scheme in this case looks like this: connect an American (faucet) to the pump outlet, then put the coupling and connect it with a collet fixture to a plastic tubular product. All work is done by hand without the slightest difficulty.
The next step is to connect the equipment to the water supply. For these purposes, the station (in its upper part) has a special entrance. An American crane is first connected (to the thread) to it, and then a 32 mm combined sleeve (usually polypropylene) is screwed in. Be sure to solder the coupling and pipe. Then their connection will be truly strong. You have connected all the elements of the pumping station. You can run it and enjoy the uninterrupted supply of water to your home from the well!
Operation features
The operation of pumping equipment should be carried out in accordance with the instructions. Subject to all the rules, the equipment will last a long time, and the number of breakdowns will be minimal. The main thing is to eliminate any malfunctions in time.
From time to time, the pumping station should be serviced
Station operation features:
- Once every 30 days or after a break in work, the pressure in the accumulator should be checked.
- The filter will need to be cleaned. If this rule is not followed, water will begin to flow jerkily, pump performance will decrease significantly, and a dirty filter will lead to dry operation of the system, which will cause breakdowns. The frequency of cleaning depends on the amount of impurities in the water that comes from the well or well.
- The installation site of the station should be dry and warm.
- The system piping must be protected from freezing during the cold season. To do this, during installation, observe the desired depth. You can also insulate the pipeline or use an electrical cable that is mounted in trenches.
- If the station is not operated in winter, then the water from the pipes should be drained.
In the presence of automation, the operation of the station will not be difficult. The main thing is to change the filters in time and monitor the pressure in the system. Other nuances are taken into account at the installation stage.
It doesn’t matter if the Gilex pumping station or any other, the instructions to start the system will be unchanged. The hydrophore has no difficulty when starting, the receiver is used to adjust the pressure
It is important to know how to operate the water station in winter and whether it is necessary to distill the liquid during work breaks.
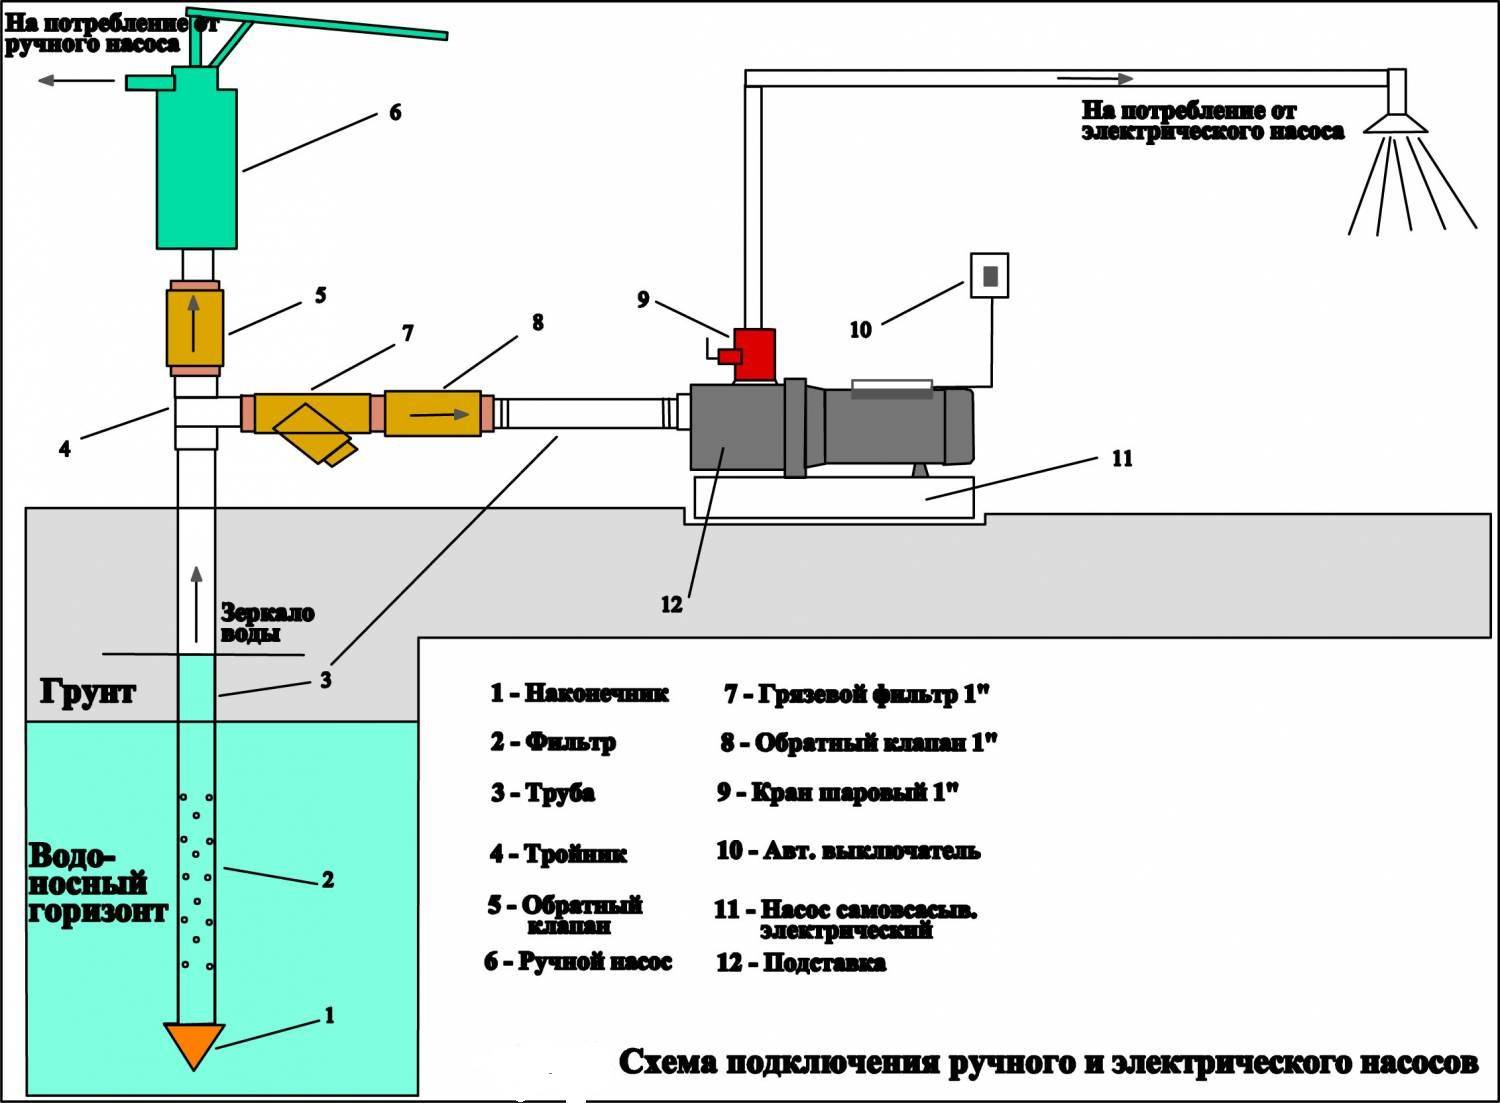
Do-it-yourself steps for connecting a pumping station to a well
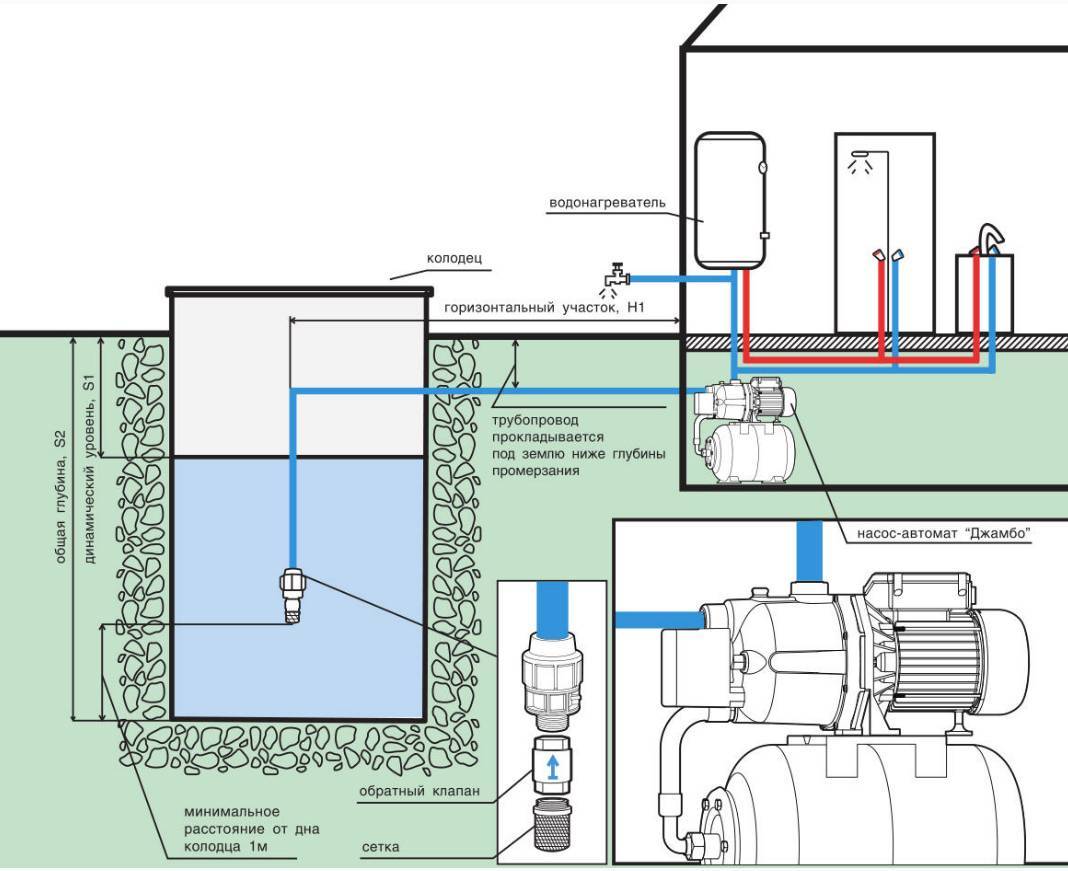
Well piping occurs after the pipeline is withdrawn. The head must be installed on the well casing. After, with the help of a long object, it is necessary to find out the depth to which the water intake pipe will go down.


Next, the polyethylene pipe is fixed on the ejector assembly. The length of this pipe is the sum of the depth of the well and the distance from its mouth to the pump. At the head of the well a knee is installed with a turn of 90ᵒ.
Initially, an ejector is assembled - a separate cast iron assembly with 3 outlets for connecting pipes:
- A filter is mounted on the lower part of the ejector, which protects against debris and dirt.
- A plastic socket is mounted on top, to which a 3.2 cm cross section is attached.
- At the end, it is necessary to connect a coupling (usually bronze), which provides a transition to plastic pipes.
All necessary components for the pumping station can be purchased separately
The pipes leading to the ejector must be pushed through the knee. Then lower the ejector to the required depth. After the head is fixed on the casing pipe. The installation scheme of the system is simple, so you can install it in a country house or a private house with your own hands. Connecting elements must be airtight, because excess air intake can lead to system failure and pressure drop in it. Next comes the introduction of pipes to the installation site of the system.
Scheme of connecting a pumping station to a well in the country
The pumping station can be placed inside the well, if there is a place for this, in addition, utility rooms are often allocated for it in the house itself or in the room
Pay attention to the depth at which the pipeline will be. The pipe must not only be insulated, but also placed below the freezing depth of the soil in order to cold season the water didn't freeze
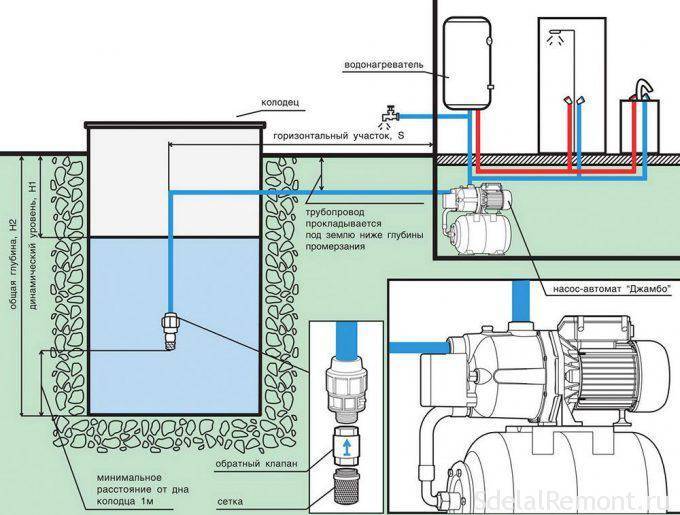
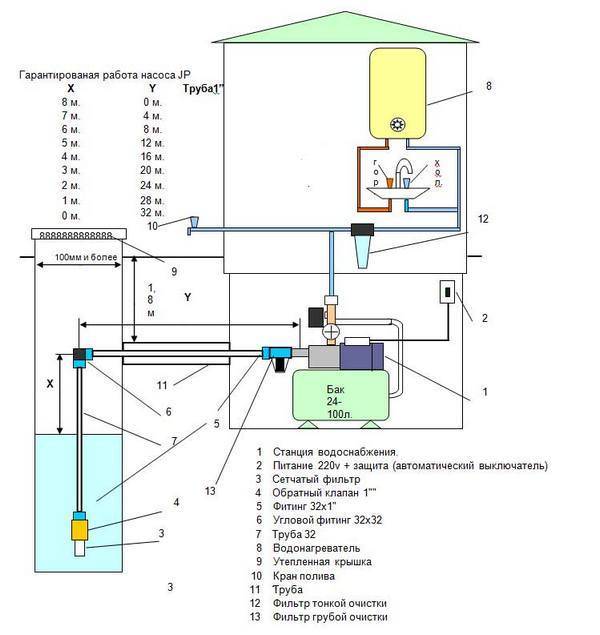
In order for the system to work correctly, you need to choose not only the type of pump, but also the depth at which it will work. The deeper the water source and the farther it is from the building, the more powerful the pump itself must be. There should be a filter at the end of the pipe, it is located between the pipe and the pump, protecting the latter from debris entering the mechanism.
Devices usually write at what depth they are designed, but it is worth taking a more powerful one, since the calculation is carried out only from the bottom of the well to its surface, not taking into account the distance to the building. It is easy to calculate: 1 meter of the vertical location of the pipe is 10 meters of its horizontal location, since it is easier to supply water in this plane.
Depending on the type and power of the pump, the pressure may be stronger or weaker. It can also be calculated. On average, the pump provides 1.5 atmospheres, but this is not enough pressure for the normal operation of the same washing machine or hydromassage, the water heater may require a higher temperature.
In order to control the pressure, the equipment is equipped with a barometer. Depending on the pressure parameter, the size of the storage tank is also calculated. Station performance also plays an important role. This parameter indicates how many cubic meters per minute the pump is capable of delivering. You need to calculate based on peak water consumption, that is, when all the taps in the house are open or several consumer electrical appliances are working. In order to calculate which pumping station is suitable for giving in a well, you need to know the performance. To do this, add up the number of water supply points.
From the point of view of power supply, it is more convenient to use those systems that are powered by a 22-volt network. Some stations operate 380 V phases, but such motors are not always convenient, because a three-phase connection is not available in every home. The power of a household station may vary, on average it is 500-2000 watts.Based on this parameter, RCDs and other devices are selected that will work in conjunction with the station. In order to prevent the design from overheating, many manufacturers install automation that will turn off the pumps in the event of an emergency load. The protection also works if there is no water in the source when power surges occur.
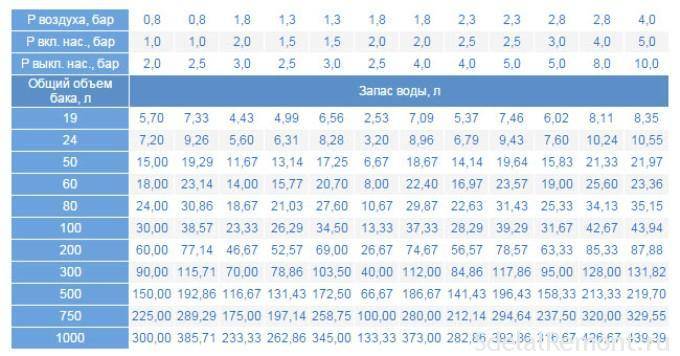
How to calculate the volume of a hydraulic accumulator?
The size of the tank determines how often the pump motor will turn on. The larger it is, the less often the installation works, which allows you to save on electricity, increase the resource of the system. Too large a hydraulic accumulator takes up a lot of space, so a medium-sized one is usually used. It holds 24 liters. This is enough for a small house in which a family of three lives.
trailer work hydraulic accumulator expansion tank
If up to 5 people live in the house, then it is better to install the tank at 50 liters, respectively, if more than 6, it should be at least 100 liters. It is worth noting that the standard tanks of many stations hold 2 liters, such a hydraulic tank can only cope with water hammer and maintain the required pressure, it is better not to save money and immediately replace it with a large one. It is the number of water users in the house that will determine which pumping station to choose for a summer residence.


Water purification
Do not forget that the water from the well, even if it is suitable for drinking, may have impurities, for example, sand, small stones, various debris can get into it, which can be disposed of using a special system for water purification. The most commonly used filters. They are placed outside so that it is convenient to change them. They can have different fractions and purify water to varying degrees.At the outlet, deep fine filters are used.
Models
- Gilex.
- Vortex.
- Ergus.
- Bison.
- gardena.
- Wilo SE.
- Karcher.
- Pedrollo.
- grundfos.
- Wilo.
- Poplar.
- Unipump.
- Aquario.
- Aquarius.
- Biral.
- S.F.A.
- Vortex.
- waterstry.
- Zota.
- Belamos.
- Pedrollo.
Before choosing a pump station for a summer residence with a well, it would not be superfluous to find out how things are with the maintenance of the products of the selected manufacturer, if there are any nearest dealers who can provide spare parts.
Features of the device of the pumping station
Autonomous water supply based on the pumping station includes a set of devices that provide automatic water supply to the house. To organize a comfortable autonomous water supply, it is necessary to choose a suitable pumping unit, properly connect it and set it up.
If the installation is done correctly and the requirements for operation are observed, it will last a very long time. The house will always have clean water under pressure, allowing the use of modern appliances: from a conventional shower and washing machine to a dishwasher and a jacuzzi.
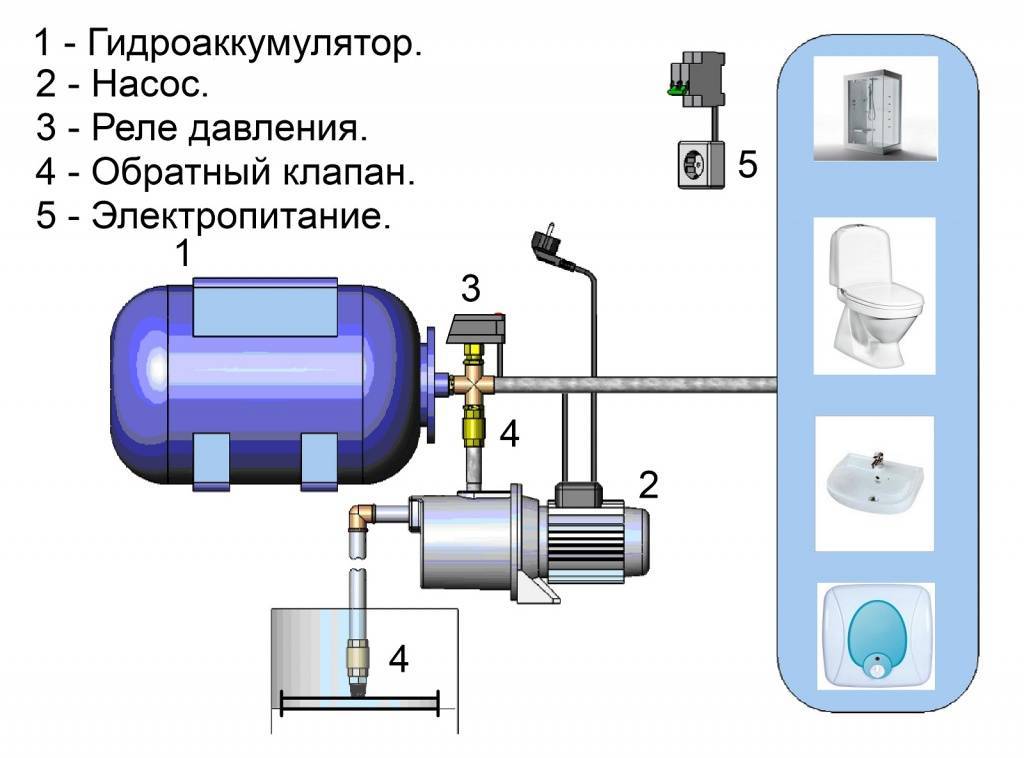
The pumping station consists of three main elements:
- a pump that supplies water;
- hydroaccumulator, where water is stored under pressure;
- control block.
The pump pumps water into a hydraulic accumulator (HA), which is a tank with an internal insert made of an elastic material, often called a membrane or pear because of its shape.
The more water in the accumulator, the stronger the membrane resists, the higher the pressure inside the tank. When the liquid flows from the HA to the water supply, the pressure decreases. The pressure switch detects these changes and then turns the pump on or off.
It works like this:
- Water fills the tank.
- The pressure rises to the upper set limit.
- The pressure switch turns off the pump, the water flow stops.
- When water is turned on, it begins to decrease from the HA.
- There is a decrease in pressure to the lower limit.
- The pressure switch turns on the pump, the tank is filled with water.
If you remove the relay and the accumulator from the circuit, the pump will need to be turned on and off every time the water is opened and closed, i.e. Often. As a result, even a very good pump will break down quickly.
The use of a hydraulic accumulator provides owners with additional bonuses. Water is supplied to the system under a certain constant pressure.
In addition, some (about 20 liters), but the necessary supply of water is stored in the tank if the equipment stops working. Sometimes this volume is enough to stretch until the problem is fixed.


