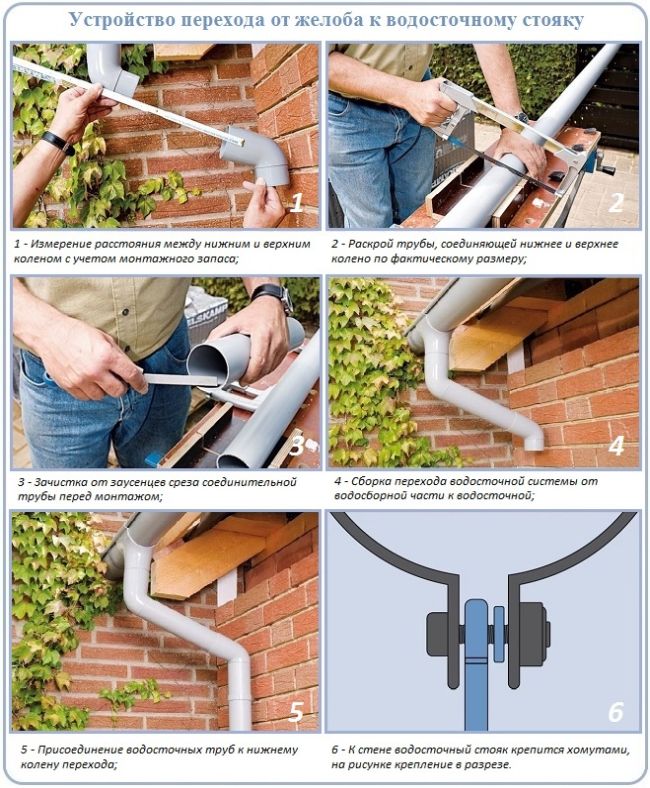
- Positive and negative points of the internal drainage system
- Installation of a drainage system from the roof
- We do the installation with our own hands
- Step 1: Calculation of materials
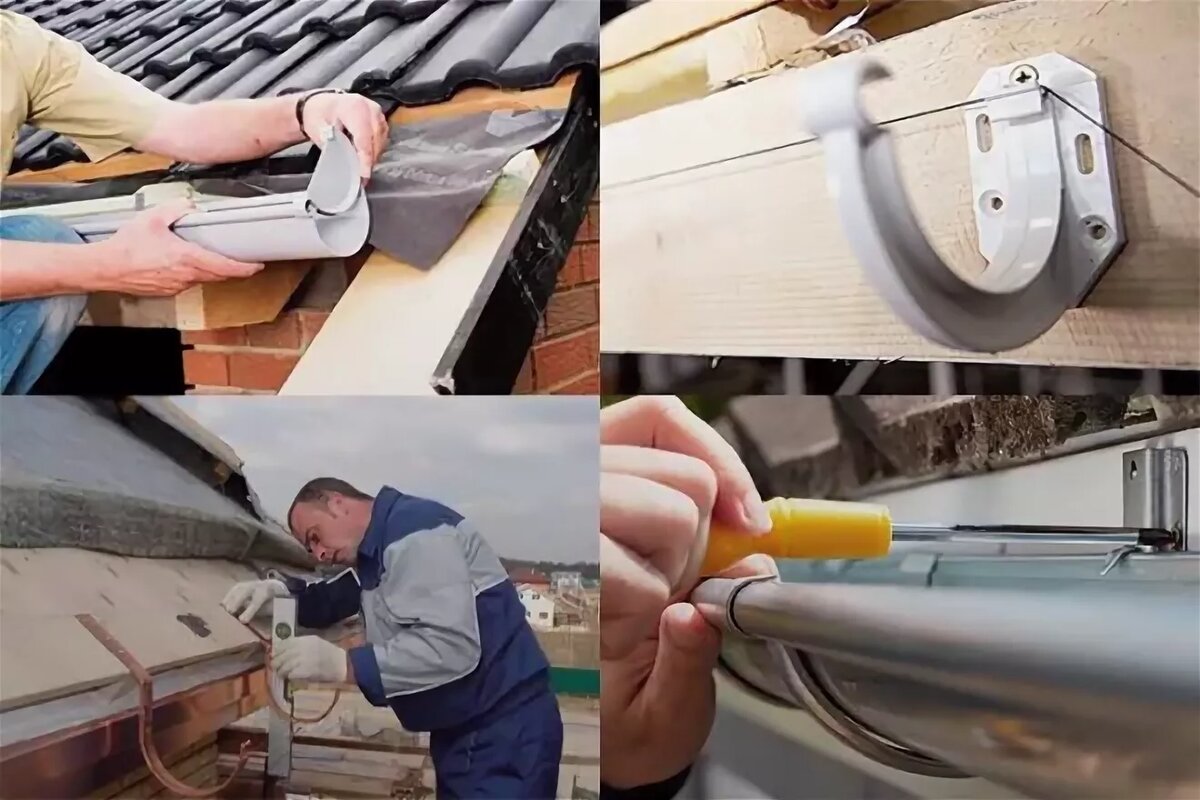
- Step 2: Mounting the brackets
- Step 3: Installing the gutter
- Step 4: Installation of gutters
- Step 5: Fixing the pipes
- Types of drains
- Installation of an external drainage system
- Video: heating gutters and drain pipes
- Homemade tin drain pipes
- Installation of internal gutters
- Installation of downpipes
- Made of plastic
- metal system
- Installation of drains Dcke installation instructions
- How to ensure the optimal position of the elements of the drain relative to the roof
- How to ensure stability against deformations under vertical load
- How to compensate for linear thermal expansions
- System sealing
- How to fix the gutter to the roof: ways
- Drainage system installation
- Gutter heating options
Positive and negative points of the internal drainage system
If you are planning to create an internal downpipe system, then you should know that it comes in two types:
- Gravity. Here, precipitation is removed by gravity and it all looks something like this. When enough moisture is collected on the roof surface, it begins to move towards the collection funnel.Once in it, it flows down the pipe and out of the building.
- Siphon-vacuum. The operation of such a system is much more complicated. Rain or melt water enters the collection funnel and moves through a horizontal pipe connected to a vertical riser.
The systems described above have their own strengths and weaknesses. First, let's take a look at gravity.
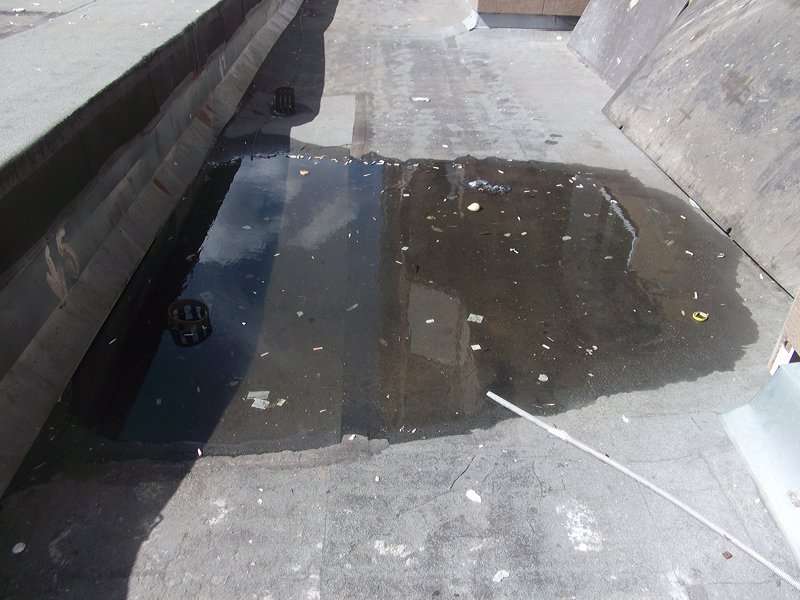
The gravity drain has a rather low throughput, so it may happen that during a heavy rain it simply cannot cope with the incoming volumes and a pool appears on the roof, which can cause the destruction of the entire structure.
When creating such a system, it is very important to study the average annual precipitation in your region. If these are large values, then do not hesitate and install the maximum possible pipes and funnels to collect water
The siphon-vacuum drain copes with the above problem very simply. The fact is that all precipitation enters the drainage system under vacuum. And as soon as the vertical elements are filled to the top, the process of the second discharge begins, and the pressurized liquid is discharged into the collector, and subsequently, into the storm drain. Thanks to this process, this drain has a high throughput.
The advantages of the siphon-gravity system include the following points:
- Water collection can be carried out not only from flat surfaces, but also from any other.
- Smaller diameter pipes handle large volumes of water without problems.
- Due to the large bandwidth, there is no need to arrange a large number of channels.
- Due to the rapid withdrawal of water from the system, its possibility of clogging is significantly reduced.
If we compare the internal and external drainage, then the advantages of the first are obvious:
- You will not see any protruding elements along the perimeter of the building.
- Work to remove moisture can be carried out at any time of the year.
- The moisture flowing down the pipes is immediately sent to the storm sewer.
The disadvantages of internal flow include the complexity of its creation, maintenance and cleaning.
As a conclusion, I would like to say a few words about the flat roof in general. Every year this design is gaining more and more popularity among private developers. Thanks to this growth, manufacturers of building materials are thinking about the production of new materials, which is moving this area forward.
Having created a flat roof, you can equip it to your taste. You can grow a garden on it, open your own workshop or equip a recreation area. By the way, if you make more complex calculations and invest a little more money in construction, then you can even place a swimming pool or a car park on the roof. However, nothing keeps you from implementing a unique idea.
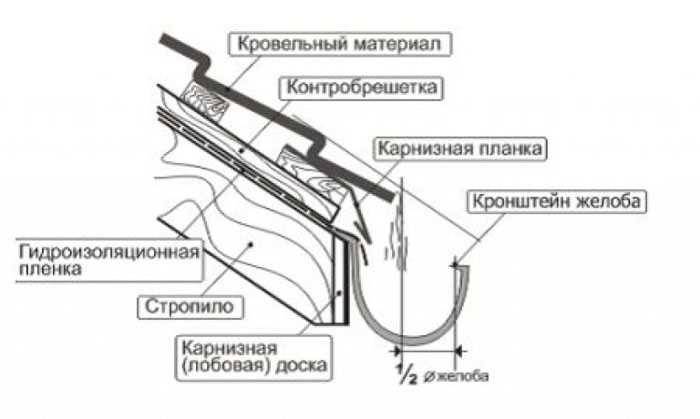
Installation of a drainage system from the roof

installation features
It should also be noted that it is best to install a drainage system in two stages, that is, before the roof is made, and after. At the first stage, the installation of gutters and gutters is underway, the second includes the installation of drainage pipes.
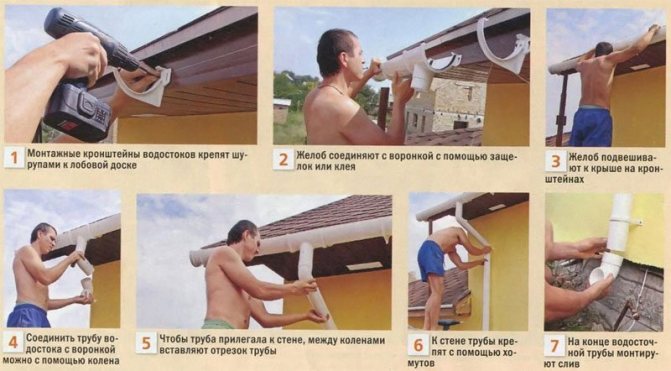
The installation process is carried out in the following order:
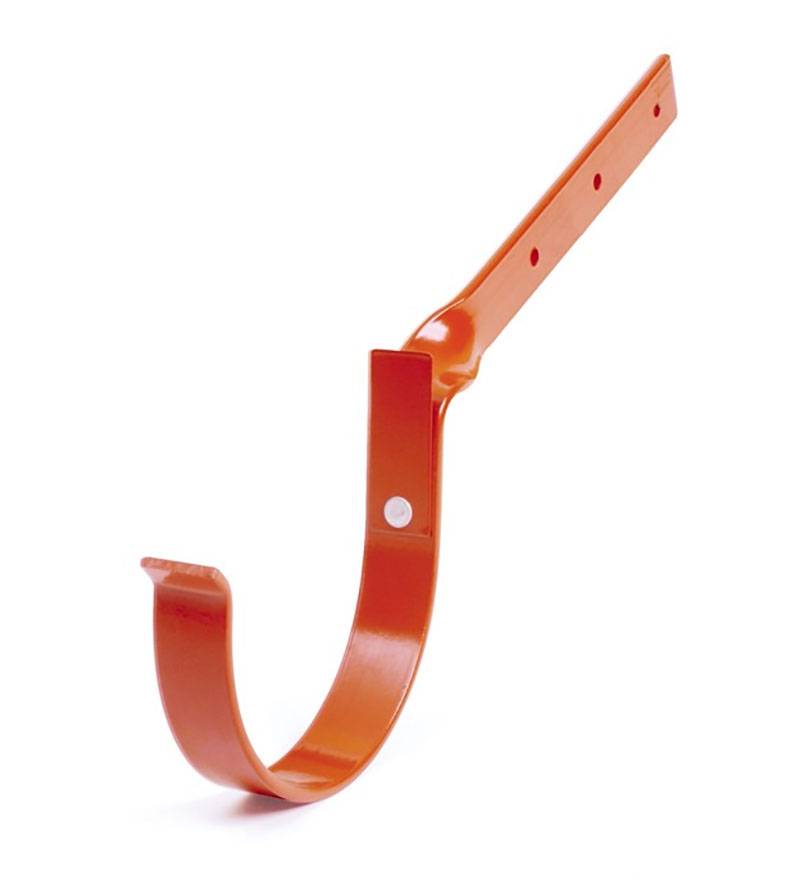
- Gutters are installed using holders, or in other words, brackets. Installation is carried out on the rafters, or frontal board. In the event that the brackets for attaching the gutter are metal, they can be fixed directly into the brick wall.Modern brackets are adjustable, so creating the necessary natural slope for water flow is not difficult.
- In order for the installation to be carried out qualitatively, it is necessary to take into account the distance between the fixed brackets - according to the rules, it should be no less and no more than 550 mm. For a metal drainage system, the pitch of the brackets should be larger - in the range from 700 to 1500 mm.
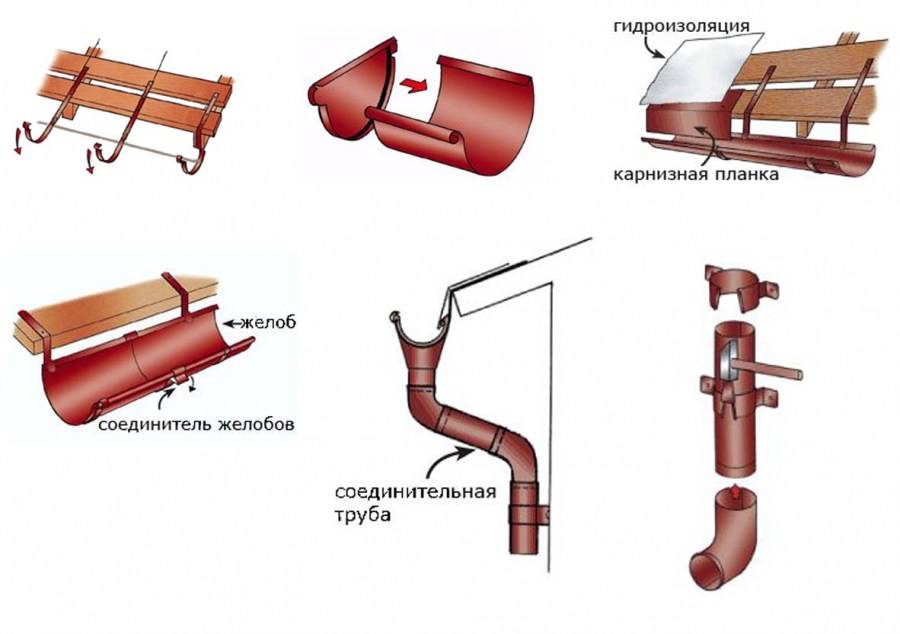
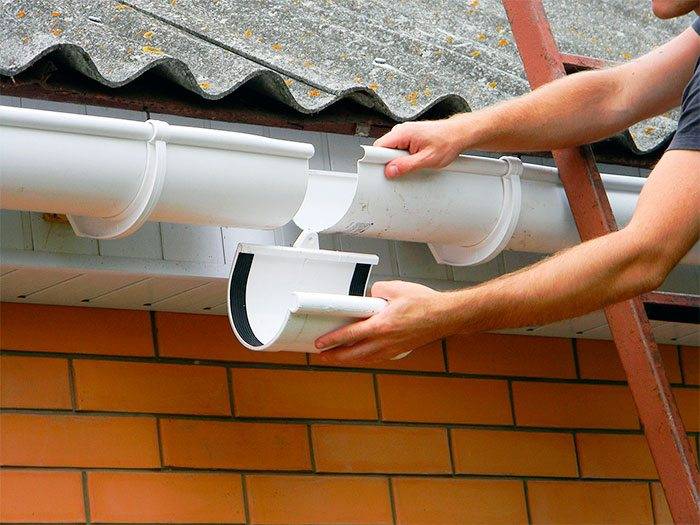
- Next, the gutter is laid, its laying should begin with a funnel. The elements of the gutter are fastened together either with special couplings or with glue. It is best to prefer the coupling joint of the gutter parts, because it makes it possible to monitor the technical condition of the system and repair as necessary.
- The installation of downpipes begins after the gutters are installed. Pipes must be fixed to the wall with special clamps. Clamps are located from each other at a distance of about one to two meters. At the same time, the clamps themselves are attached to the wall with self-tapping screws.
- To prevent dampness and mold from affecting the walls of the building, drainage pipes must be installed at a distance of at least 9 cm from the wall.
- The very last stage is the installation of the lower drain pipe. The distance from the ground should not be less than 25 - 35 cm. If the drainage system is linear, then the distance can be reduced to 15 cm.
The roof drainage system is installed and ready to go. The only thing that can be advised in the end is to install an impromptu protection of the gutters of the drain from clogging with fallen leaves and other debris. For this, a special mesh, rolled into a tube, fastened with clips, and fixed to the gutter, is perfect.
We do the installation with our own hands
If you look closely at the roof drains on any building in the city, you can see that it is not difficult to make such a system with your own hands. But there are still some nuances, let's dwell on them.
Step 1: Calculation of materials
To select the optimal size of pipes and gutters, it is necessary to calculate the area of \u200b\u200bthe roof slope, multiplying its width by length. Further, based on these values, structural elements are selected. So, for 30 squares, a pipe with a cross section of 80 mm is enough, 50 m2 - 90 mm, and pipes of 10 cm are used with a slope area of \u200b\u200bmore than 125 squares. The number of pipes is calculated relative to the perimeter of the building, the distance between adjacent elements should not exceed 24 m.
Step 2: Mounting the brackets
After the purchase, you can proceed directly to the installation work. First of all, brackets are attached at a distance of half a meter from each other (for a plastic gutter), for metal products this parameter can reach one and a half meters. They are fixed in the frontal part of the roof, and if there is none, then the rafter legs will fit. First, the extreme elements are installed, after which the twine is pulled between them and, focusing on it, intermediate


At the same time, it is very important to make the correct slope, it is 2–5 mm per linear meter.
Step 3: Installing the gutter
Further, the gutter itself is mounted on the already fixed hooks. This is done as follows: under the bent part of the bracket, the front edge of the gutter is inserted and turned 90 °, so it will fall into place. To fix this component, special plates are used. Corner joints are made using special elements, while open ends are closed with plugs.
Step 4: Installation of gutters
This step begins with the installation of outlet funnels. It is necessary to make a hole at the location of the funnel, for this a hacksaw with a small tooth is useful. Be sure to clean the edges of the cut, then apply two strips of glue, maintaining a distance of 5 cm between them. Then you need to put a funnel under the gutter and, connecting these two elements together, heat the plastic on both sides. There is another way to fix the elements of the plastic structure - through the sealing gum. Each of these options has its own advantages and disadvantages. So, when using cold welding, the fastening will turn out to be more reliable, but the thermal expansion of the material can play a cruel joke. And in the second case, linear expansions are not terrible, but rubber loses its properties over time.
Step 5: Fixing the pipes
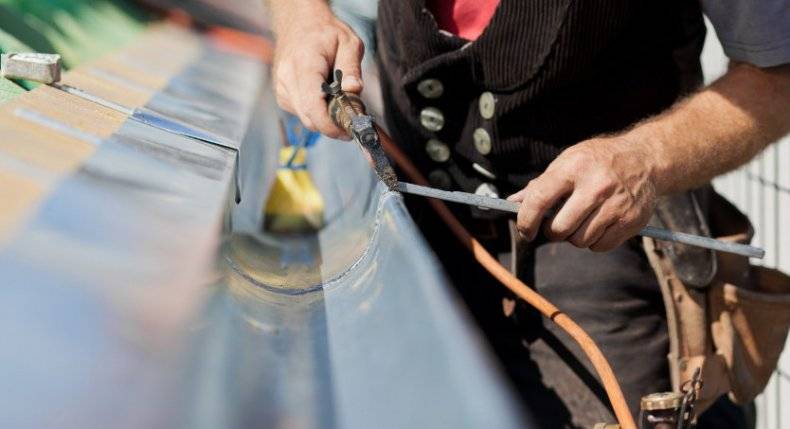
And now we have reached the last stage. These vertical elements are attached to the facade of the building from top to bottom by means of special clamps. Distance from pipe to wall must be at least 3 cm, otherwise the building will become damp. Fasteners are installed at the junction of two pipes, while maintaining a step of 1–2 m. The distance between the drain elbow and the blind area should be at least 20 centimeters. It is not difficult to do everything described with your own hands, but if you take a few minutes to watch our video on installing roof drains, you will work more confidently.
Types of drains
The most popular are systematically designed industrial metal or plastic gutters from Russian and foreign suppliers.The abundance of all kinds of solutions for mates, adapters, fasteners, ease of installation, the ability to install such a drain with your own hands ensures their stable popularity among buyers. The undoubted advantage is also the transparency of pricing, as there is an element-by-element price list for all components of the system. Estimate approximate costs to purchase all the necessary materials for installation of a drain for a roof is available to everyone.
Installation of an external drainage system
The system of external drainage of water from the roof can be:
- unorganized. In this case, the water descends arbitrarily, this method is usually used for small outbuildings;
- organized. Water is collected in gutters, after which it is discharged outside the building through drain pipes.
When creating an external drain, the gutters are attached using special brackets that you can make yourself, but it is better to purchase ready-made ones.
When creating an external drain, the gutters must be mounted at a slope, this will ensure the effective removal of water coming from the roof. It is not difficult to create an external drainage system with your own hands. Now on sale there are all necessary elements. Enough chart and calculatehow many and what elements are needed, after which you can simply and quickly install them.
It is quite possible to mount an external drainage system with your own hands, because all the necessary components are on sale to facilitate this process.
Installation of an external drainage system is carried out in the following order.
- Calculation of the required amount of materials. It is necessary to determine the number of holders, gutters, drain pipes and elbows.
- Marking places for attaching hooks. After the attachment points are marked, the hooks are bent to the required angle and fixed.
-
Preparation of sites for funnels. Holes for the funnels are prepared in the gutters, after which they are fixed.
- Gutter laying. The gutters with installed funnels are placed in holders and fixed.
- Installation of drain pipes. They are attached to the wall using special brackets.
-
Connection of drain pipes and funnels. With the help of elbows with the required angle of inclination, the drain pipe and the funnel are connected.
A properly executed external drainage system reliably protects the roof, walls and foundation of the building from water penetration into them. In the cold season, during frequent thaws, the drain pipes of the drains may freeze, so the water will not be removed effectively. To avoid such a problem, you can install the heating of these elements. For this, a self-regulating or resistive cable is used, which is attached to gutters and pipes. The electric current passing through the cable causes it to heat up, as a result of which the elements of the drainage system remain warm, so the water in them does not freeze.
Video: heating gutters and drain pipes
The main requirements for the drainage system are the removal of water from the roof of the house, as well as high strength, tightness and long service life. It is necessary to rely on such a system to be able to withstand heavy loads; in winter, a large amount of ice can accumulate on it. In order for the self-installed system to meet all the requirements, it is necessary to correctly calculate it, and then carry out the installation in compliance with the developed technologies.
Homemade tin drain pipes
To make a straight drain pipe from tin, measure a piece of galvanized steel in terms of length and width and cut it with scissors along the marked lines.
With a file, carefully clean the edges from burrs, process them to a smooth state. On the long side, both edges of the sheet are folded in one direction to a width of 10-15 mm.
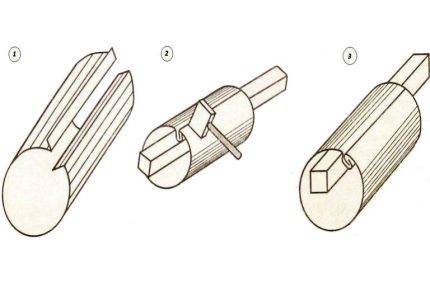
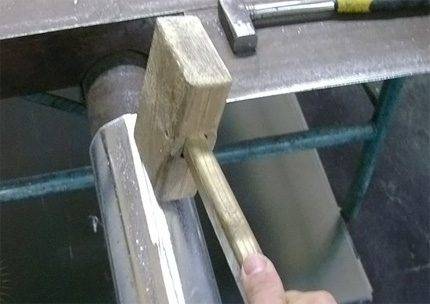
The sequence of work in the process of creating a direct branch pipe of a gutter system made of galvanized steel (copper) with your own hands. The main tool is a tinsmith's wooden mallet
On a rigidly fixed pipe of a suitable diameter, a galvanized sheet is tapped until it is rounded. Then the previously bent edges are applied one on top of the other.
Using a wooden hammer and a metal rectangular bar, “wrap” the edges into a lock. Carefully tap with a hammer along the seam until a securely pressed joint is obtained. Align the shape of the product on the blank pipe, trying to get a cylinder close to a perfect circle.


An example of the manufacture of a straight drain pipe from a galvanized metal sheet. Editing for a round shape is carried out using a conventional metal pipe of a suitable diameter
Having the skills to manufacture straight galvanized drainpipes, it is easy to master the production technology of receiving funnels and other parts of the system. With the same success, self-taught masters make brackets for metal gutters and for fastening drainpipes.
Here the production method is quite simple. For the case, you will need a bench vise, a hammer, a file, a drill, a tape measure, a pencil and a strip of mild steel with a section of 20x1.5 mm.
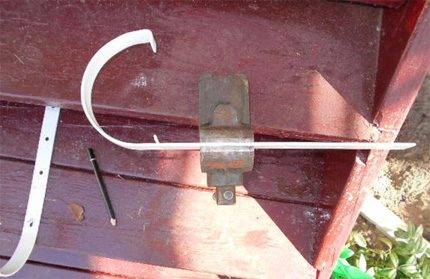
So do-it-yourself brackets for metal drainage systems are made.Under round gutters and pipes, a thickness of a metal strip of 1.5 mm is sufficient. For square gutters 3-4 mm
Manufacturing technology of steel (copper) bracket:
- Cut off a piece of steel strip 300 mm long.
- File the end pieces.
- Step back from either end 10 mm, make a 90º bend.
- Sequentially moving the strip and fixing it in a vice, bend it in an arc to fit the size of the gutter radius.
- On the remaining straight part of the strip, drill holes for the retainer and fasteners.
Brackets for downpipes are made in the same way, but already in the form of a clamp, consisting of two oval-shaped strips, the bent end edges of which are supplemented with holes for the screed with bolts.
There are several articles on our website with detailed instructions for making roof gutters, we recommend that you read:
- Do-it-yourself roof drains: instructions for self-production of a drainage system
- How to make weirs for the roof: recommendations for arranging a drainage system with your own hands
Installation of internal gutters
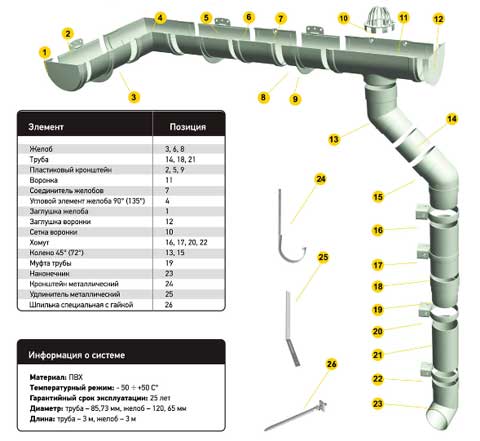
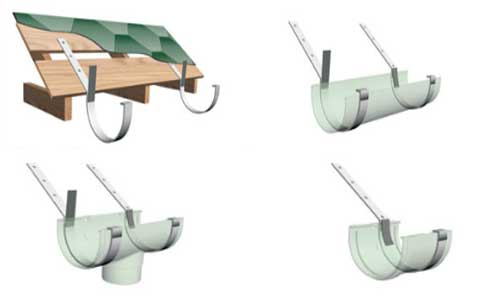
The composition of the internal drainage system includes the following main elements:
- water intake funnel;
- riser;
- outlet pipe;
- release.
In order for this system to work at any time of the year, water inlets should not be installed near the outer walls of the house, otherwise they will freeze in winter.
Installation of an internal drain is carried out in a certain sequence.
-
Funnel installation. If the floor slabs are already installed, then funnels can be mounted. If there is no overlap yet, then you need to start with the installation of risers. The funnel is connected to the riser using a compensating socket, so that the connection does not break during external deformations.
-
Installation of risers and pipes for draining water from funnels. Pipes connecting funnels and risers must be laid with a slope. The diameter of the riser must be equal to or greater than the diameter of the funnel. If the pipe diameter no more than 110 mm, then they go in bays and run from top to bottom. For larger sizes, the pipes are installed from the bottom up. Risers are fixed every 2-3 meters.
-
Laying of horizontal pipelines. Their installation is carried out in the same way as sewer pipes, but the slope is about 2–8 mm per meter. For pipes with a diameter of 50 mm, cleaning is installed after 10 m, and if their diameter is 100–150 mm, then after 15 m.
- the roof surface is divided into sections;
- no more than 150 m2 of roofing should fall on one riser;
- the roof of the building should have a slope of about 1-2%, which is directed towards the funnels;
- when choosing a pipe diameter, it should be taken into account that 1 cm2 of a pipe is able to effectively drain water from an area of 1 m2, the pipe diameter can be from 100 to 200 mm;
- for an internal drain, you will need to lay an underground drainage collector that goes into the sewer system;
- to ensure water drainage throughout the year, risers must be installed in the heated part of the building;
-
the connection of the water intake funnel and the roof of the house must be airtight so that water does not flow under the roofing material;
- funnels must be closed with grates so that debris does not fall into the drainage system and does not clog it;
- all connections must be tight; during the installation of risers, all pipes are connected by welding.
Internal drainage systems can be of the following types:
- gravity - the collection and discharge of water is carried out along the gutters located with a slope. Such a system is only partially filled with water;
- siphon - completely filled with water, which enters the funnel, and then into the riser. Due to the resulting rarefaction, the forced removal of water occurs, so this method is more effective.
Installation of downpipes
Installation of the gutter system is done before roofing - then the fasteners can be easily attached to the rafters or roof sheathing. They can also be fixed to a special fixing board. When fastening to the crate, longer hooks are used, and if the brackets are installed on the board, then you should choose fasteners of a shorter size.
We advise you to read about how to independently install a tankless water heater, a septic tank, as well as how to make water supply from a well.
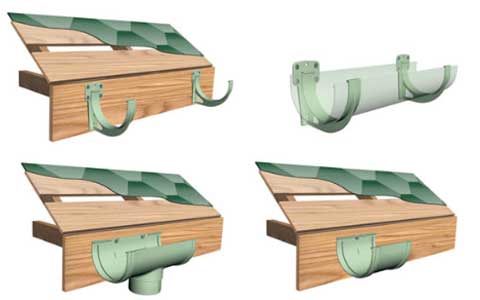
Made of plastic
Many elements and components of this lightweight design can be assembled at the bottom and then only lifted up and properly secured. Used for cutting plastic parts hacksaw or saw for metal. The edges are smoothed with a hacksaw or sandpaper. Fasteners (brackets) are installed ahead of time.
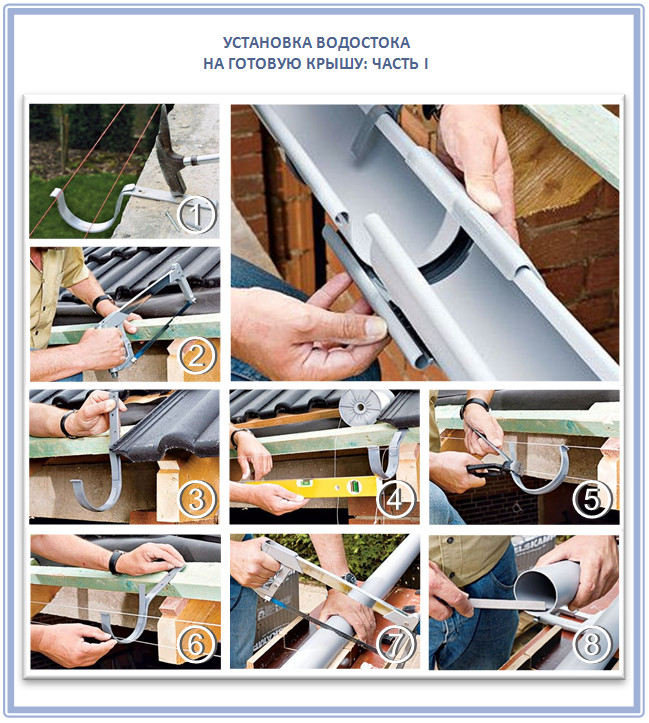
When installing plastic drainage systems, the following work is done:
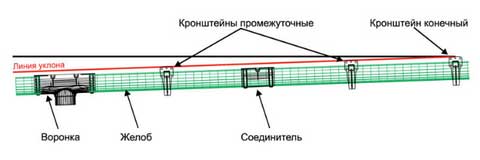
- first, mark the places for attaching the brackets, while retreating from the corner of the roof 15 cm. The distance between them is no more than 0.5 meters. The height difference should not be more than 5 mm per meter. In this case, one should also take into account the slight slope of the gutter towards the drain pipe. The optimal slope is 3-5 mm per 1 meter;
- the first to fasten the extreme elements - the uppermost bracket and the lowest;
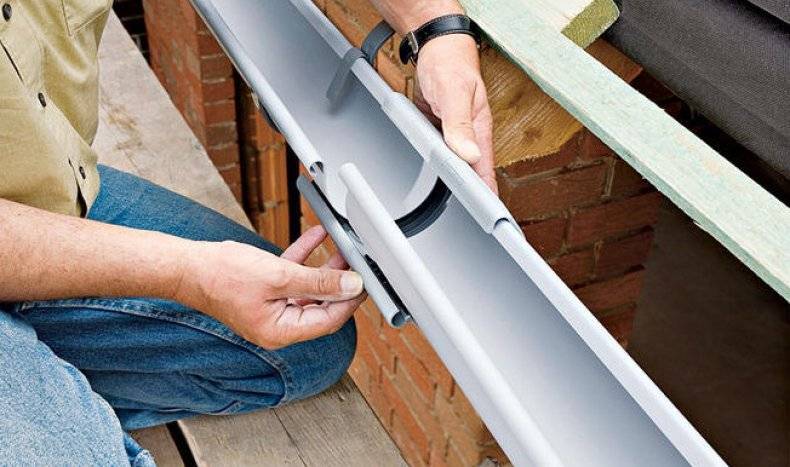
- plastic gutters are mounted on brackets and connected to each other. The joints must be completely sealed;
- cut holes for draining;
- install drain funnels;
- all joints are sealed;
- clamps are attached under the drain funnel for mounting pipes at a distance of 2 meters from each other. A plumb line is used to mark the attachment points;
- an inclined knee is first attached under the drain funnel;
- pipes are attached under the inclined elbow, connecting them to each other with the help of couplings and fixing them with clamps;
- a drain elbow is installed at the bottom of the drain pipe.
You may also find it useful to know how to build a cellar in a garage, how to get rid of groundwater in a basement, and how to country house lighting.
metal system
When installing a metal gutter system, the following steps are performed:
- brackets are fixed at a distance of no more than 0.6 meters from each other, taking into account a slight slope (2-5 mm per 1 m). A pair of brackets is installed at the drain for the funnel;
- installation of gutters. They are inserted into the grooves of the brackets and clamped with a latch. Metal gutters are cut to the desired length with a hand saw for metal and then the saw cut is processed with a small file. Two gutters are overlapped by 5 cm, and its upper part should be directed towards the slope to avoid leakage;
- on the edges of the gutters that do not lead to drains, plugs are installed and sealed with rubber gaskets or sealant;
- install drain funnels and protective nets;
- a drain elbow is attached to the drain funnels;
- mark the places of fastenings for pipes, attaching them first to the drain elbow;
- installation in the designated places on the wall of clamps;
- pipe installation.The pipes are connected to each other to the required length and fixed with clamps, fixing the removable part of the clamp with bolts and self-tapping screws;
- drain elbows are attached to the lower ends of the pipes, leading water from the roof away from the walls and foundation.
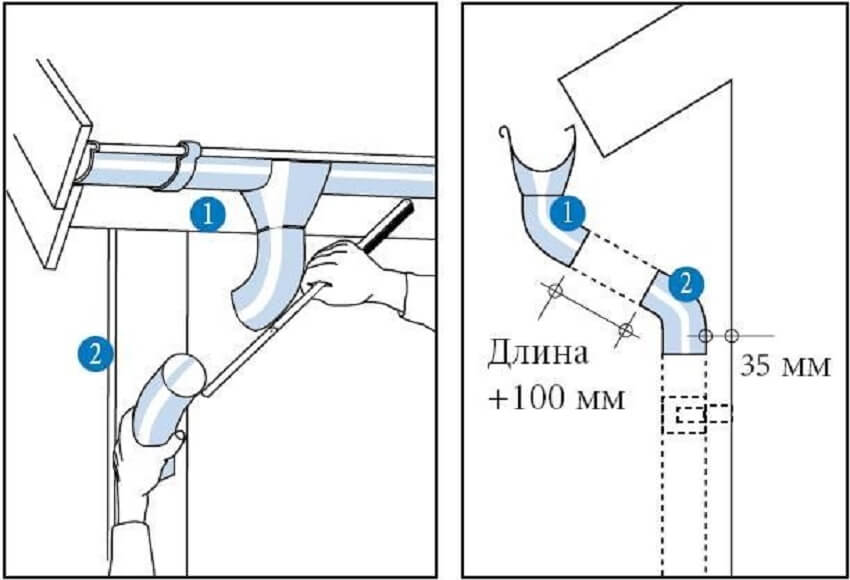
Installation of drains Dcke installation instructions
The general rules for installing Döcke gutters are quite simple.
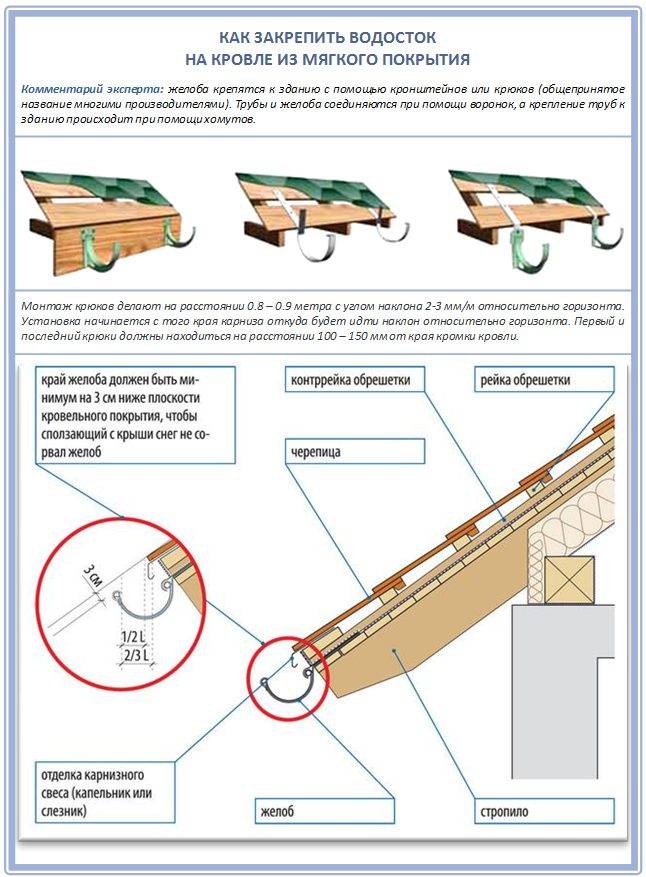
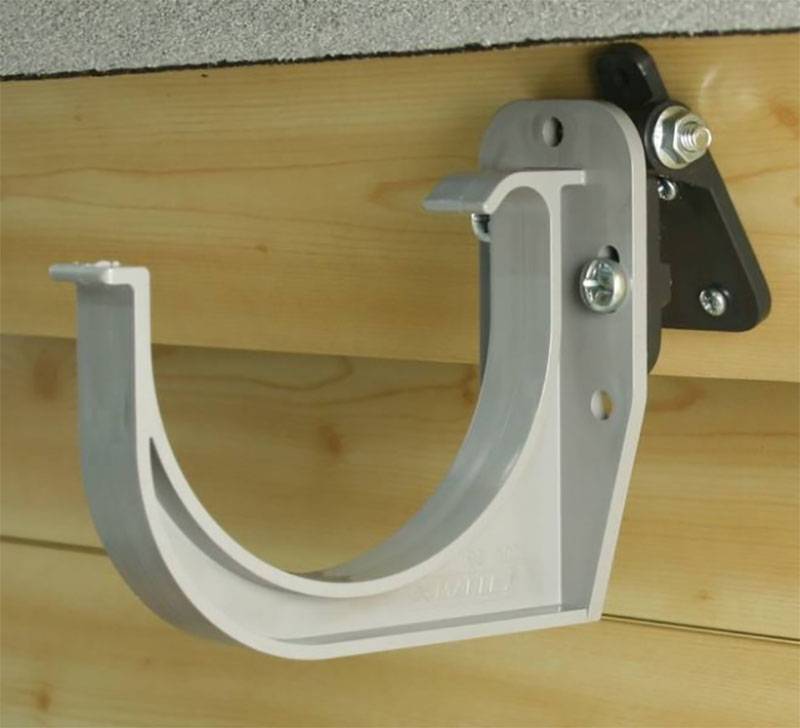
How to fix the gutters and ensure the required slope
fastening to frontal board on plastic bracket
The plastic bracket, funnel and connector are attached to the frontal board using self-tapping screws. In the bracket, the gutter is fixed as follows: first, the edge of the edge of the gutter, which is closest to the frontal board, is brought into its clamp, after which it is lowered into the bracket receiver and, pressing hard at the clamp on the opposite edge, lead the edge into the clamp until a click appears.


The brackets are placed at the level of the cord, which is pulled between the funnel and the end bracket, and the height difference between these points should provide a slope of up to 3 mm per unit length.
Fastening without a frontal board on a metal bracket
This option is used for roofs with a small batten pitch. First, the brackets are attached to the roof structure. The edge of the gutter closest to the roof is led under the hook of the bracket and lowered into its receiving socket, the clamping bar is bent and the opposite edge is fixed. The height difference is provided by bending the bracket in the calculated place. As the intermediate brackets move away from the end, the distance between the end of the supporting part and the bend should be reduced.
How to ensure the optimal position of the elements of the drain relative to the roof
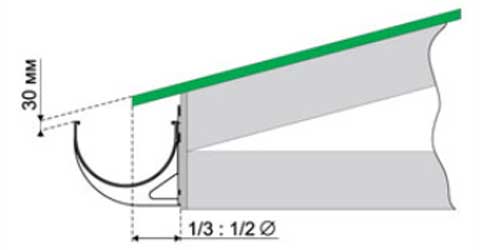
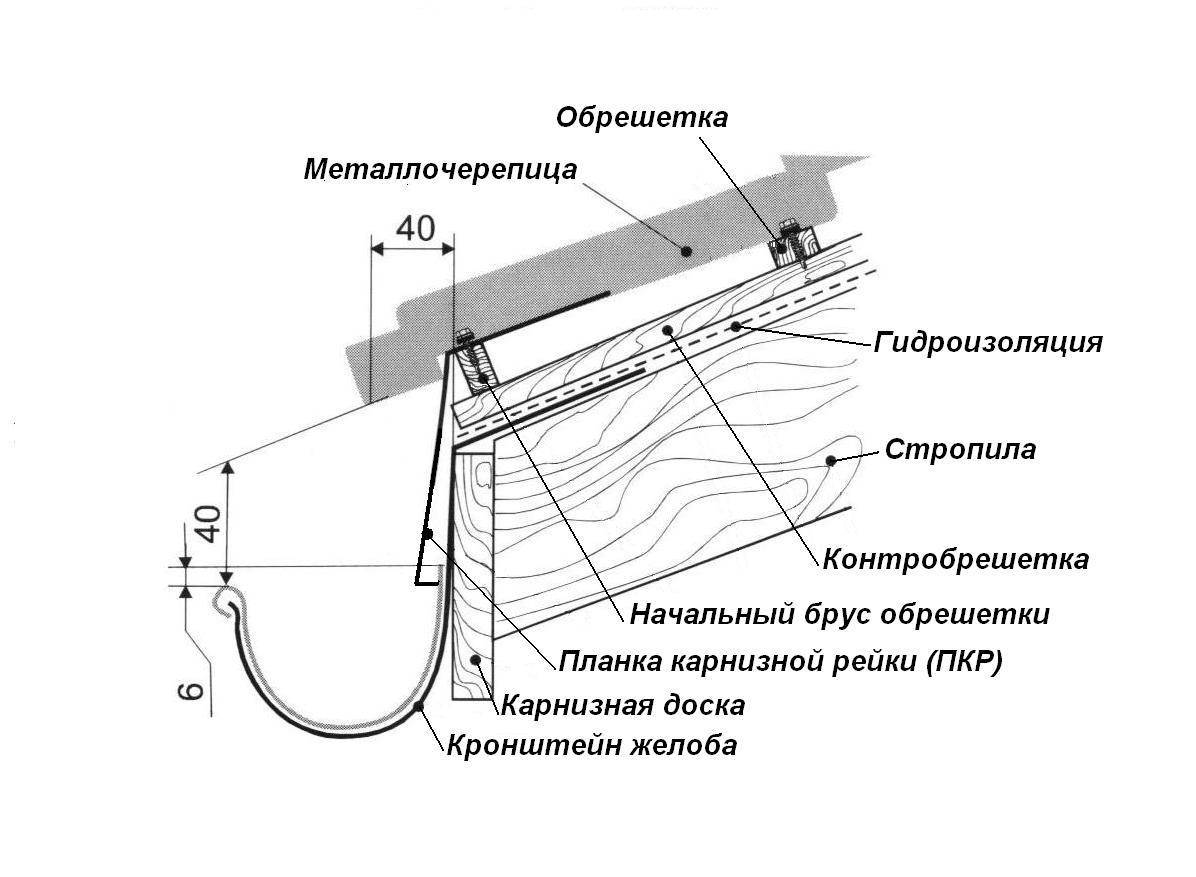
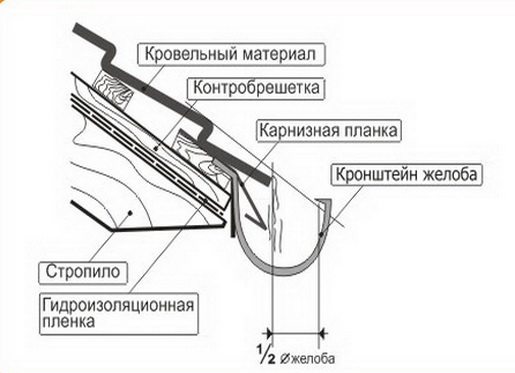
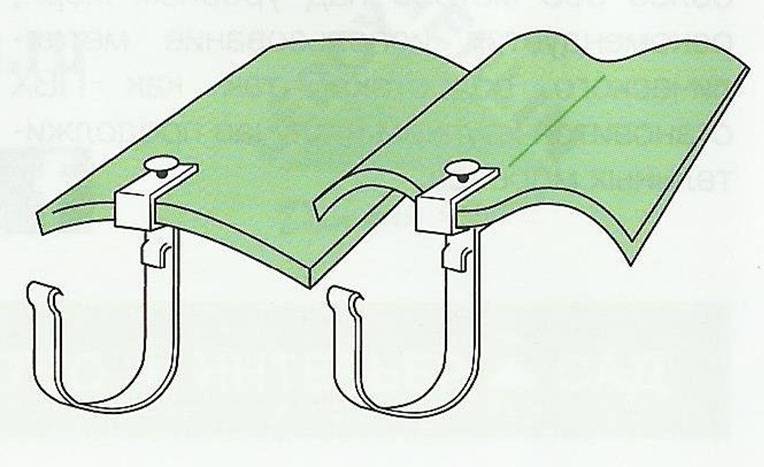
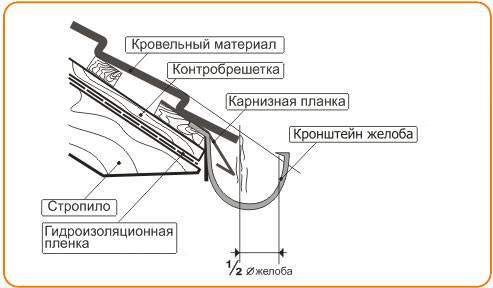
The roof overhang is placed on the gutter at a distance of 30–50% of its diameter.
The gap that needs to be kept between the bracket, its upper part and the roof extension line is 25–30 mm. It is provided by bending the final metal bracket (extension), or by moving the plastic one.
How to ensure stability against deformations under vertical load
- The spacing of the gutter brackets must not exceed 600 mm.
- The funnel must be fixed at two points (respectively, two extensions / brackets).
- The gutter connector is fixed at one point (respectively, extension / bracket).
- The distance between the end part of the corner element and the nearest bracket is up to 150 mm.
- The distance between the plug and the nearest bracket is no more than 250 mm
How to compensate for linear thermal expansions
The gutter is installed in the mating elements until the inscription “Insert until now” is reached - micro-stops are formed along the edges of the line for ease of installation.
Between the end surface of the plug and the structural elements of the house, a distance of 30 mm is maintained.
System sealing
The mating surfaces are cleaned of contamination before the start of installation work. The rubber seals must be firmly seated in the sockets and extend to their edges. It is also necessary to install plugs.
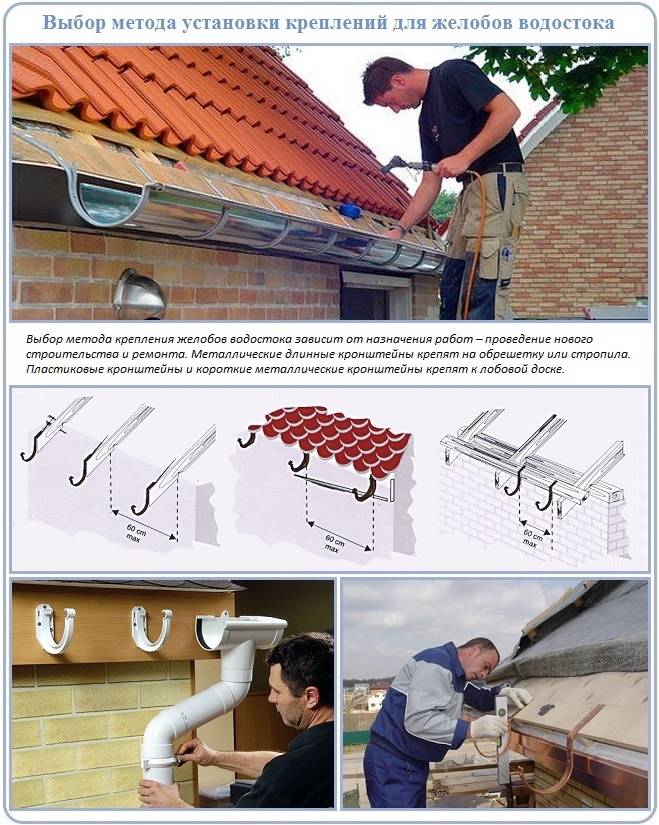
How to fix the gutter to the roof: ways
For fixing gutters to the house, several main methods have been developed:
- Fastening to the frontal (wind board);
- Fastening to the crate;
- Attachment to rafters.
The most reliable fastening option is that the gutter hooks are attached under the roof to the top of the rafters before the batten and finish are installed. The hooks are additionally pressed by the crate.This method is applicable only during the construction process and if the step between the rafters does not exceed 0.6 m.

Somewhat easier to produce do-it-yourself installation on the roof on the finished crate. The hooks are not additionally pressed, but this is the only difference from the first method (unless the batten boards are very thin). This option has the advantage that it allows you to hang a drain with a large distance between the rafters.
Holders can be attached to the frontal board only if the reliability of the board itself and its attachment to the roof elements allows.
The covered roof makes it impossible to choose among the most convenient options. How to fix the drain on a completely finished roof, under corrugated board or other coating, will be discussed below. Depending on the design, you can consider the following mounting methods:
- To the side surface of the rafters (with the same criteria for the distance between them);
- To the front board;
- To the wall of the building.
Mounting on the side surface of the rafters should be done with long hooks, since nails or screws will take the bending load and may loosen or break off over time. For mounting on the side surface of the rafters, special hooks with a mounting plane curved by 90 ° are used.
Note! To ensure the reliability of fastening and avoid damage to the rafters, they must be made of timber with a section not less than 120x50 mm. If the diameter of the rafters on the roof is smaller, then this method is not recommended. For installation of a drain on windboard, no matter if the roof is covered or not
The main requirement is the reliability of the base, that is, the wind board. Its thickness should be at least 20-25 mm
For installation of a drain on a windboard, it does not matter whether the roof is covered or not. The main requirement is the reliability of the base, that is, the wind board. Its thickness should be at least 20-25 mm.


The gutter can be fastened to the roof using several hook options:
- Ordinary hooks with a long mounting platform;
- Hooks with a supporting surface;
- Hooks with adjustable mounting surface for installation on inclined boards;
- Using a special guide profile and a specially shaped hook.
The use of a profile greatly simplifies the installation of the drain, especially in terms of maintaining the required slope and alignment of all fasteners. From cons - rather high cost.
It is possible to fasten the brackets to the crate, if it is possible to dismantle or move the lower row of the roof covering. Doing this is most simple on a tiled roof and metal tiles or profiled sheet and almost unrealistic on a covered with classic slate.
For fastening to the wall, special steel pins of the required length are used. Hooks are attached to the pins, and on them, in turn, gutters.
Reliable roofing - metal tiles, polycarbonate and other hard and durable materials allow you to fasten the elements of gutters to the roof directly to the roofing with special clamps.
Important! With all the obviousness and convenience, it is impossible to fasten the drain to the end surfaces of the rafters, since the fasteners will pass along the wood fibers, and the reliability of holding the fasteners to be fixed will be extremely low
Drainage system installation
Installing a drainage system for the roof of a private house is a simple procedure. This work can be done two people.
At the same time, it should be borne in mind that in any case related to installation or finishing, there are always subtleties and nuances that you need to know about in advance.
At the first stage, it is determined what material the structure will be assembled from, the shape and color of the gutter.
The next step is to calculate the required number of elements and fasteners.
Then the whole kit is purchased and delivered to the place where the installation will be carried out.
The view below shows how to properly install a drainage system.
Often a container is installed near the house for rain water collection. There are other solutions for this as well.
The water collected from the roof is directed through a drainpipe along a special gutter into a sewer or gutter. Installation begins with marking and securely fixing the brackets.
First, the uppermost bracket is attached, which is located at the opposite point from the downpipe.
The distance between them should be within 50 cm, with a tolerance of ten centimeters in one direction or another.
The next step is to assemble and install the gutters. The industry produces elements with a length of 1, 2 and 2.5 meters. If necessary, these segments are connected to a line of the desired length.
The joints are sealed with special gaskets. At the extreme points of the assembled gutter, the plugs are securely fixed.


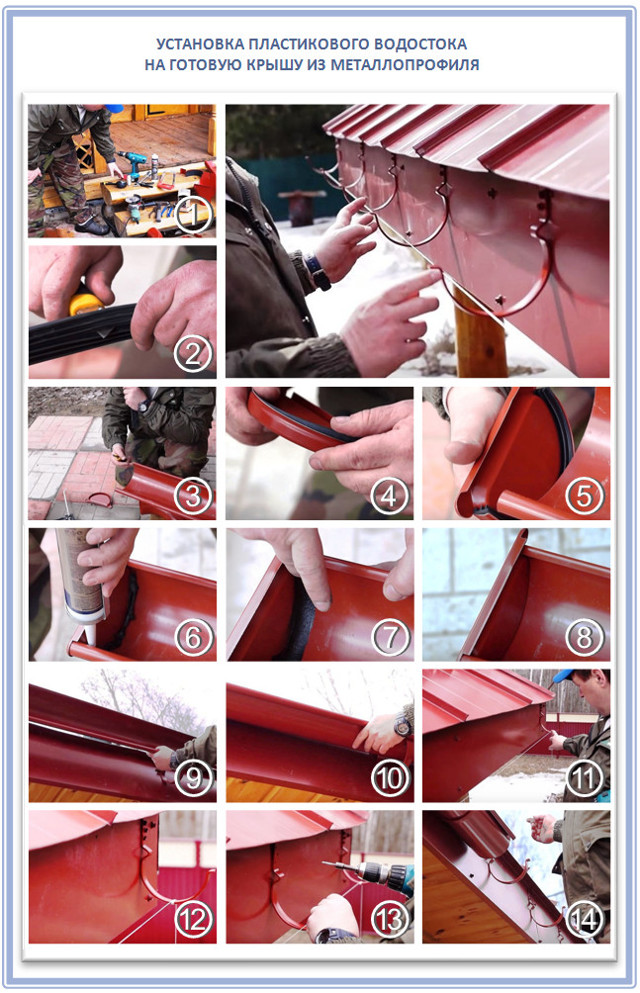


In a previously marked place under the roof, a receiving funnel is attached, which is also called a storm water inlet.
It is necessary that the axis of the funnel coincides with the hole in the gutter. And it should have a slope towards the storm water inlet and a slope away from the house.
This reduces the chance of damage to the ebb when snow falls off the roof.
During the fastening process, the verticality of the pipe should be checked after fixing each clamp. To do this, it is enough to use the usual carpentry plumb line.
The pipe is attached to the wall special clamps or holders. Fasteners are selected depending on what material the wall of the house is built from.
The most commonly used screws, screws, dowels or nails. Nails are allowed to be used only for wooden walls. The holders are placed at the joints of the pipes.
The maximum distance between them should not exceed two meters.
Gutter heating options
The absence of an anti-icing system leads to the formation of leaks in waste structures, the destruction of the facade and the foundation of the building. But the main danger lies in the hanging ice, which, when falling, can threaten the health and life of people.
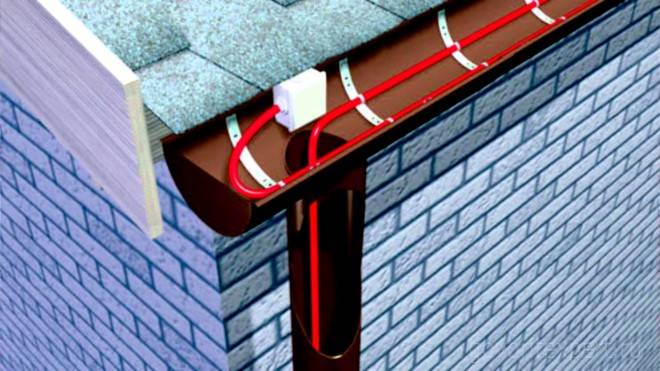
To eliminate icing and possible damage to gutters, as well as to prevent leakage of roofing material, a reliable heating system is installed.
A modern anti-icing system maintains the internal heating temperature of the structural elements of gutters and roofs above 0. It has a fairly simple and effective device, consisting of heating resistive and self-regulating cables.
- The cable is resistive. Standard heating element, which consists of a metal conductive core and thermal insulation. It has constant resistance, constant heating temperature and standard power.
- The cable is self-regulating. An element for heating roofs and drainage systems is a heating matrix for temperature control, thermal insulation (internal and external) and braid.
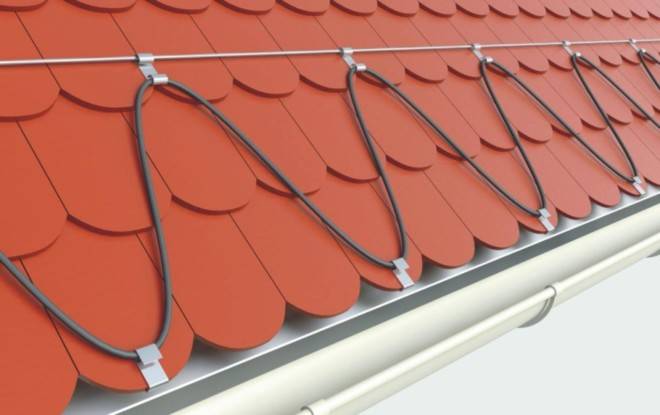
Heating of drains can be: external - the cable is installed in the lower part of the roof slope, internal - the cable is installed inside the gutter and pipe.
div class="flat_pm_end">


