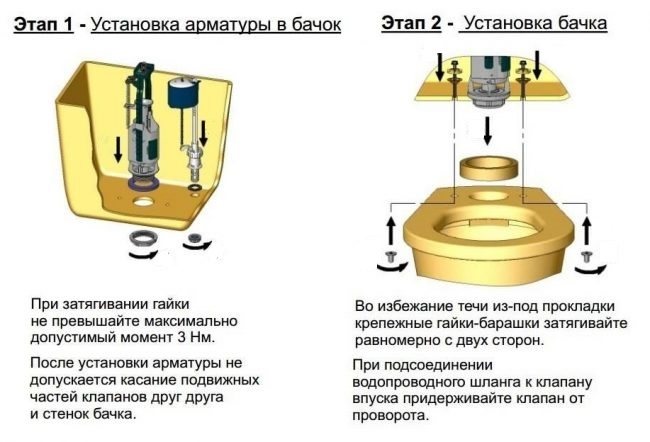
- Installation installation
- Features of choice
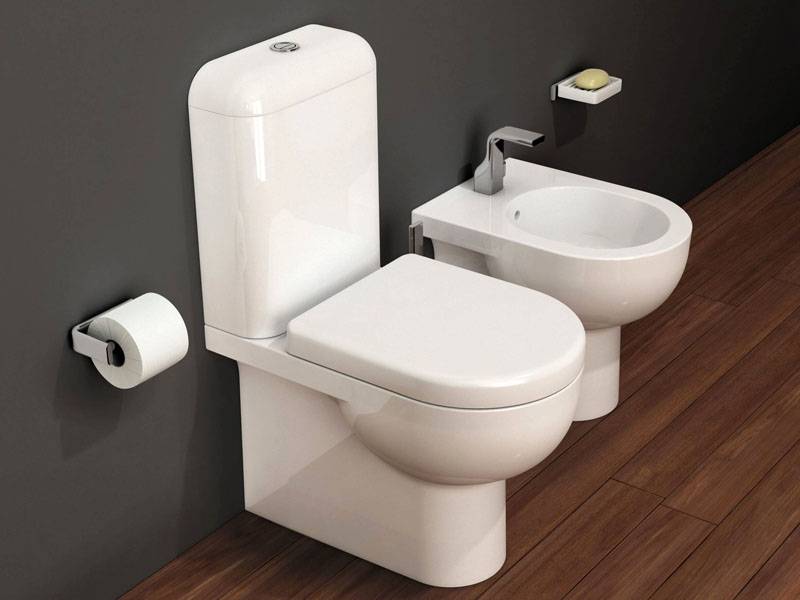
- Types of toilets
- According to the installation method
- Release to the sewer
- Preparation for installation and dismantling of the old toilet
- Myths about the wall-hung toilet
- Convenient solution for floor standing toilet
- Installation on a concrete base
- Formwork creation
- Connection
- Hanging bidet installation
- Installation installation
- Attaching the bidet to the installation
- Connection
- We study the installation of the installation on video
- Mounting without installation
- The basics of proper space planning in the toilet
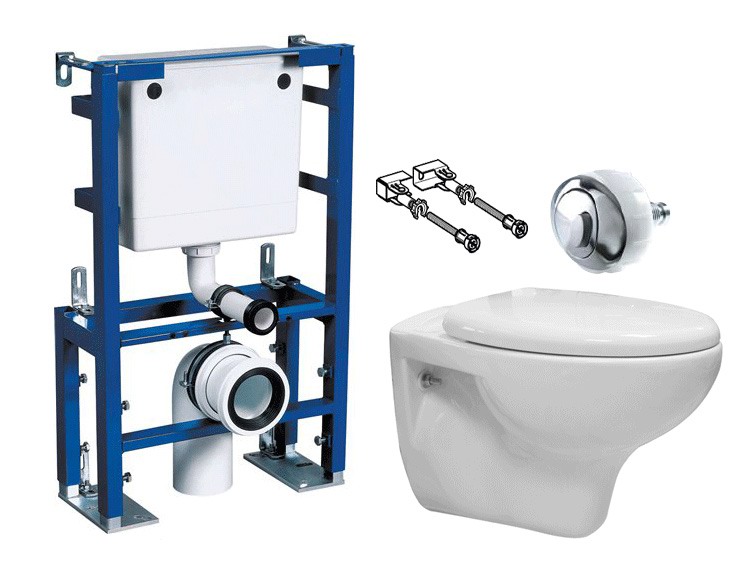
- Toilet installation
- Installing the bowl and connecting communications
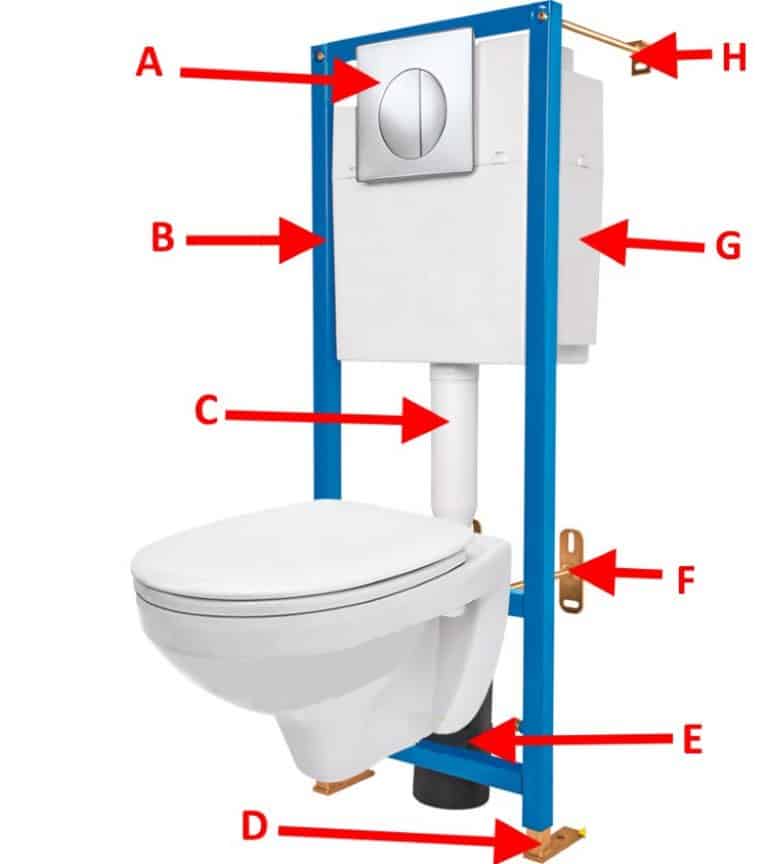
Installation installation
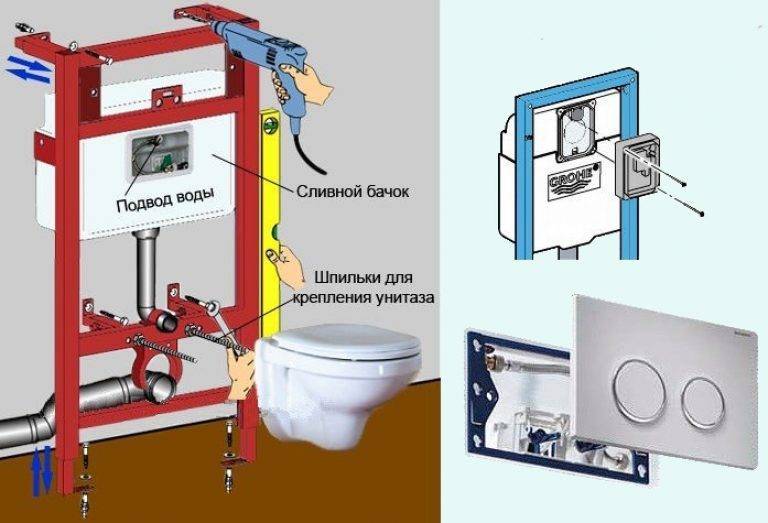
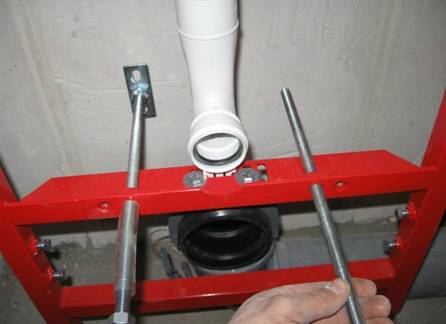
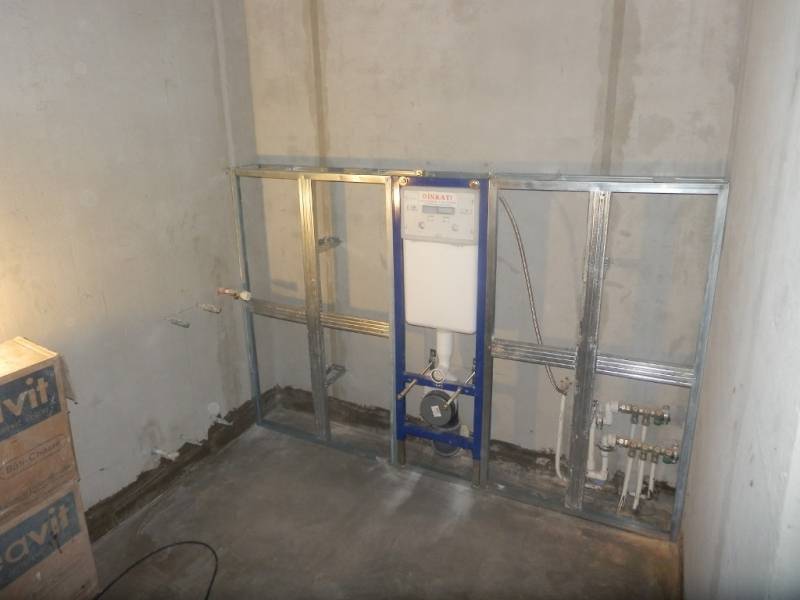
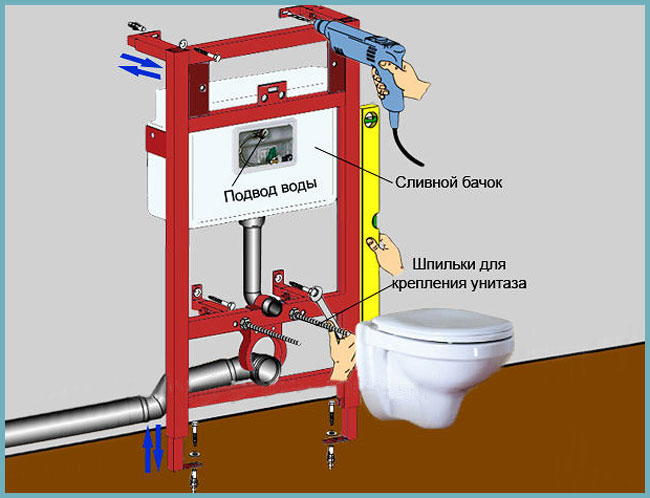
Installing a do-it-yourself toilet installation on a special frame fixed to the wall is a more expensive process, but faster and more reliable. The installation will be fixed to the floor and a solid wall.
The technological sequence is as follows:
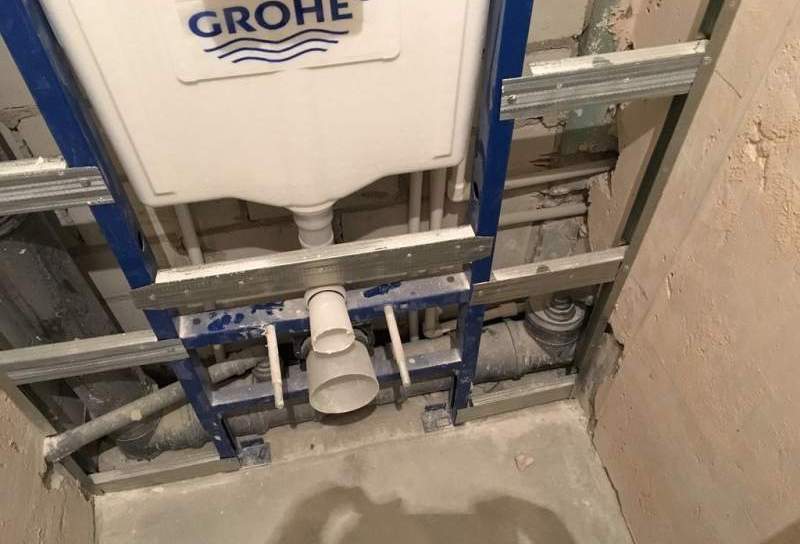
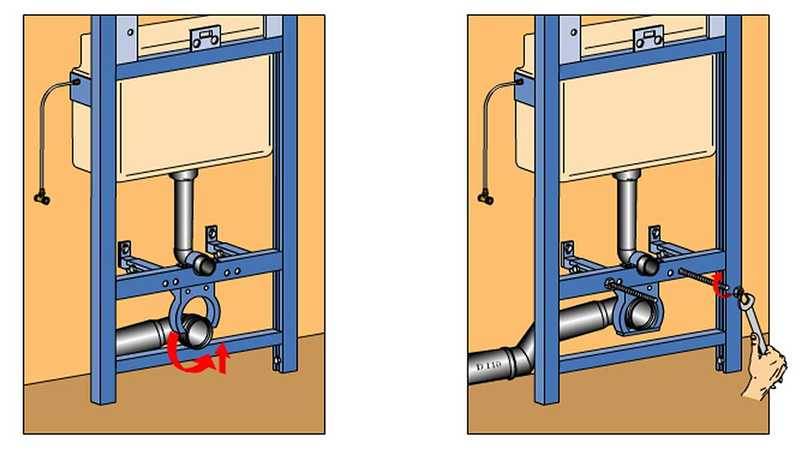
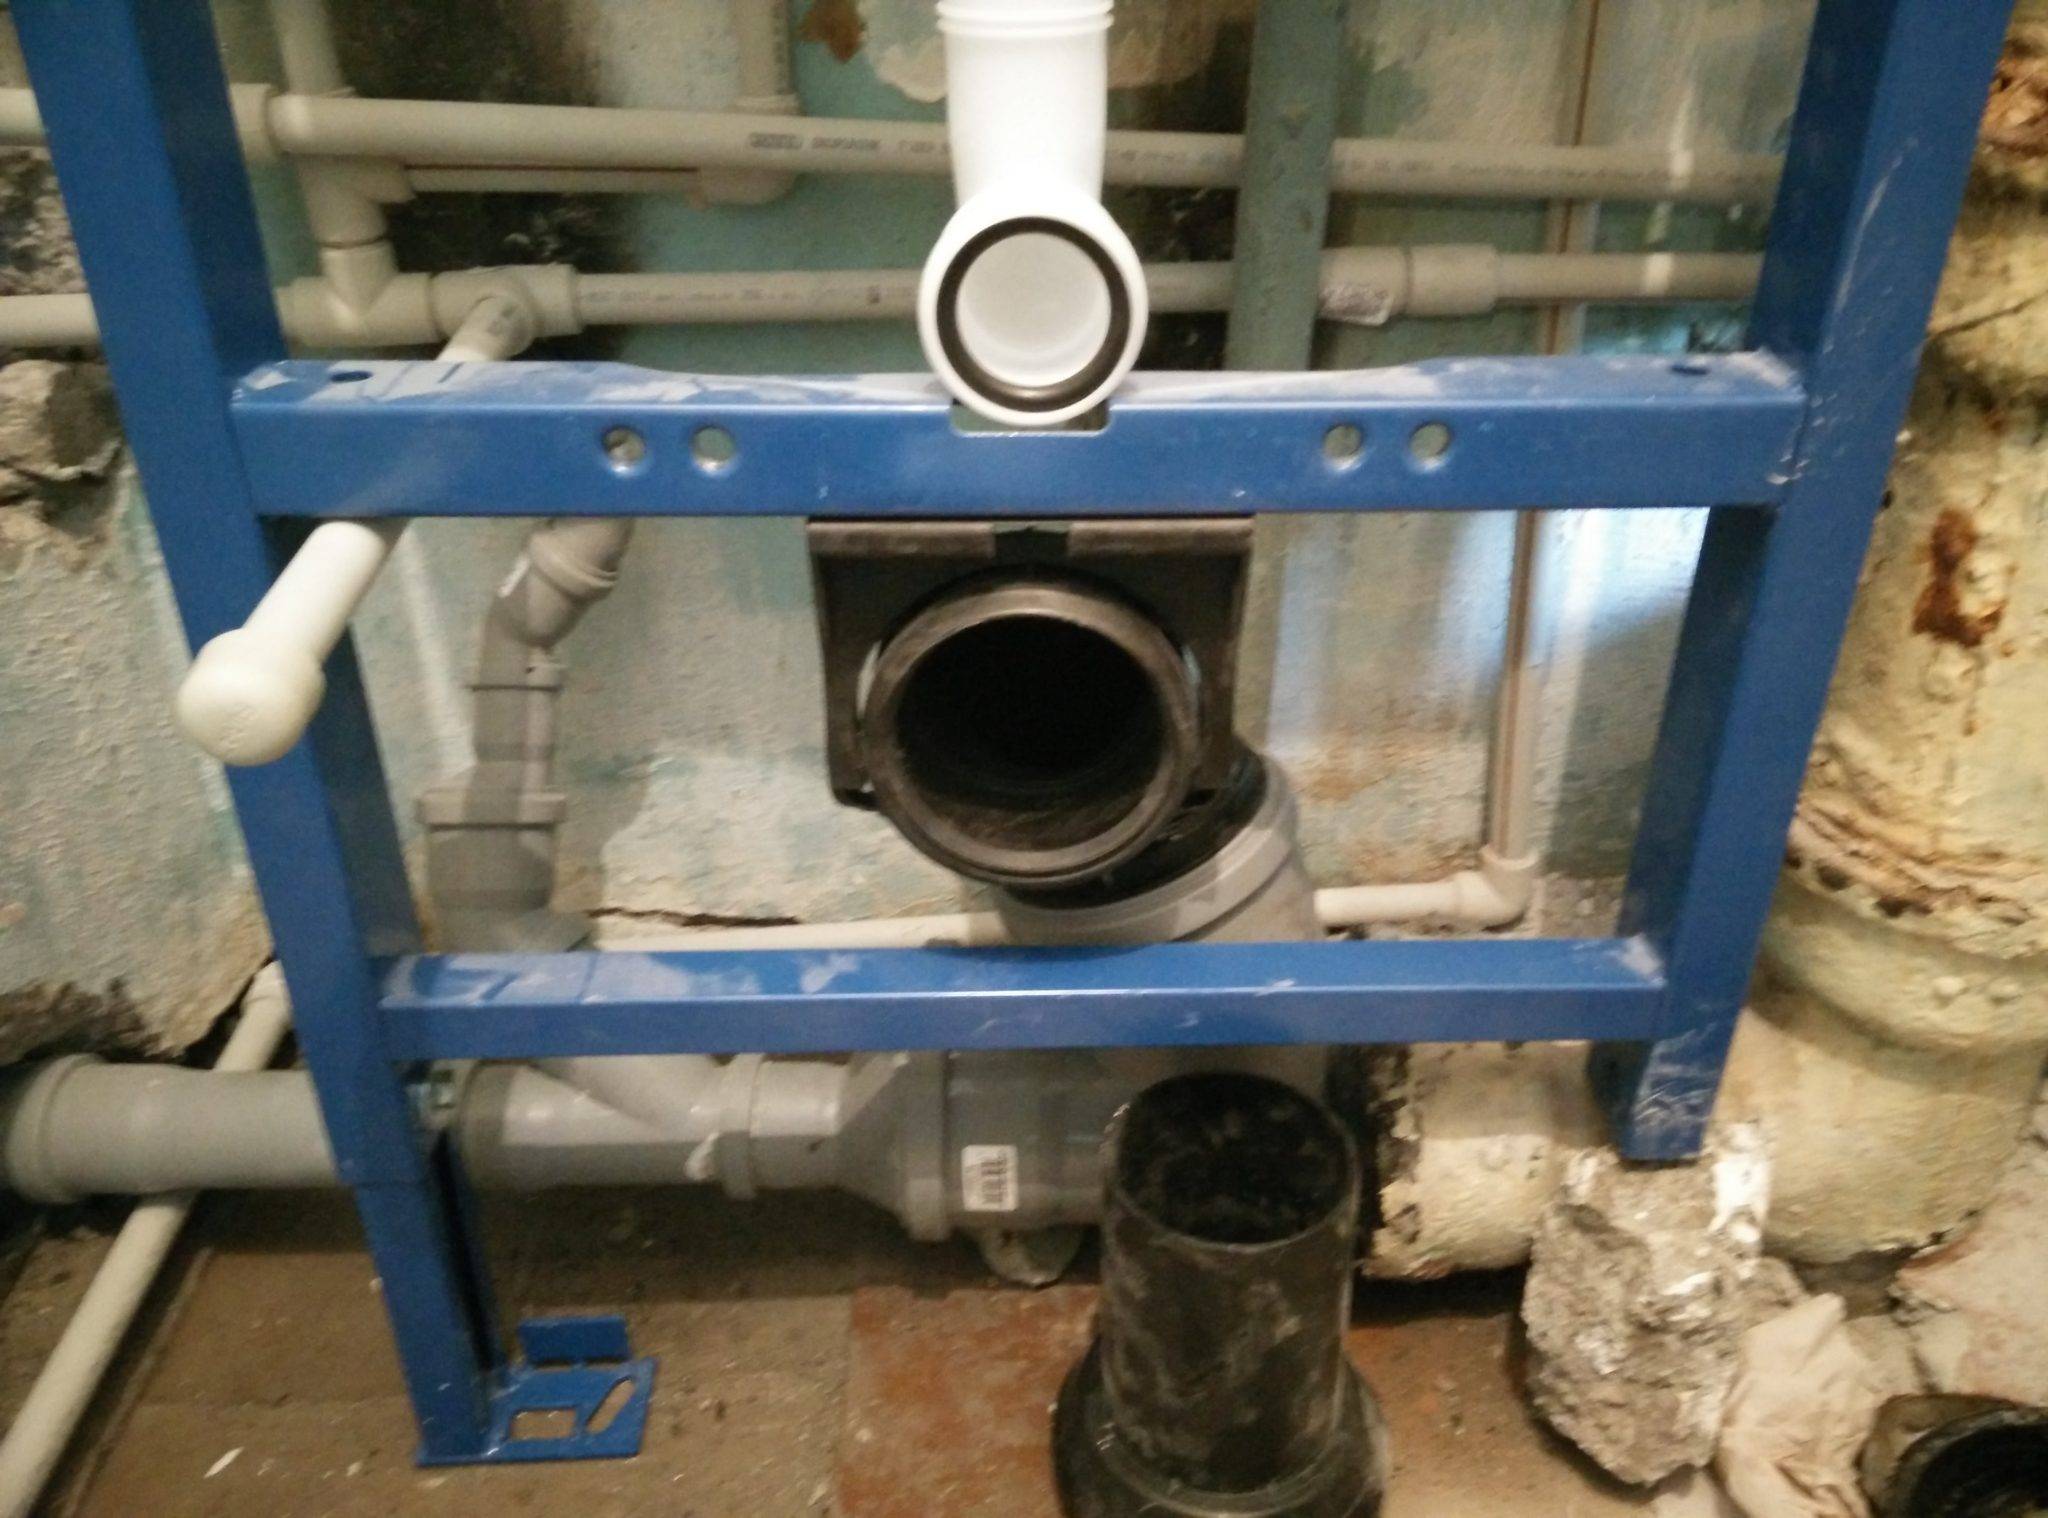
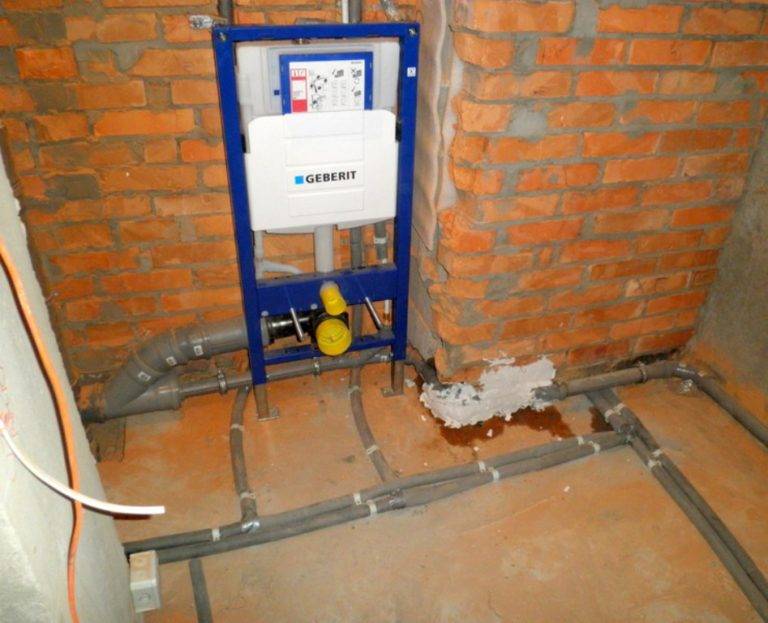
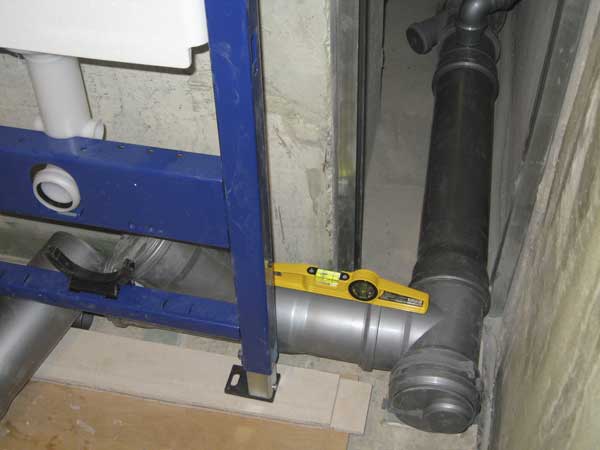
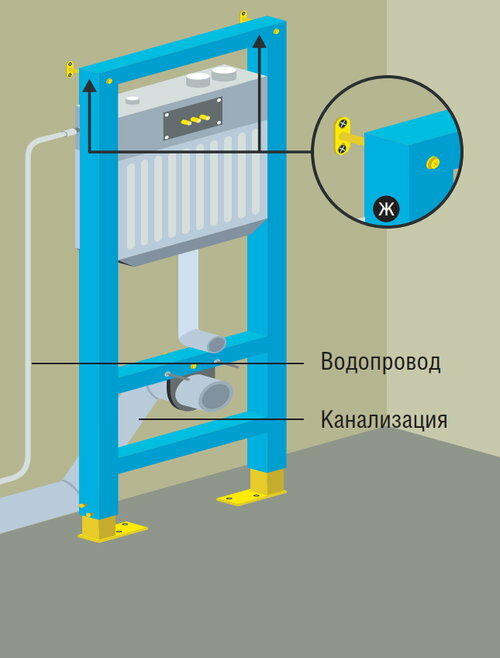
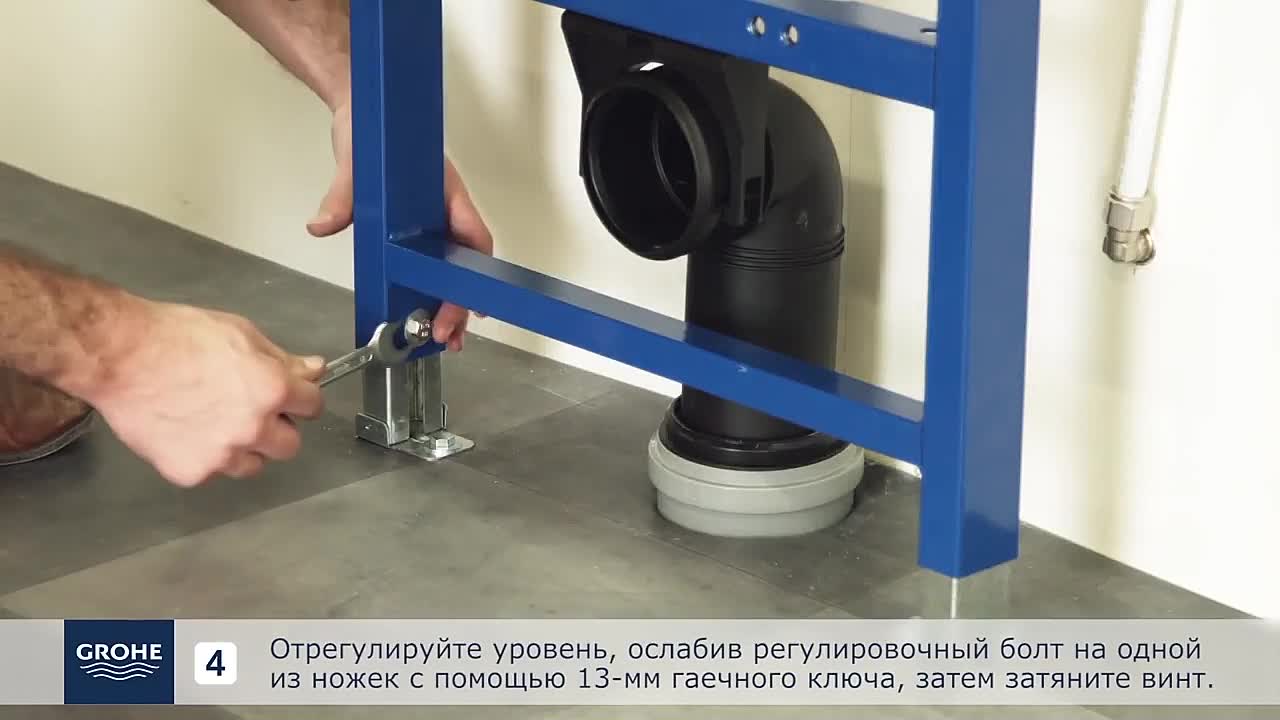
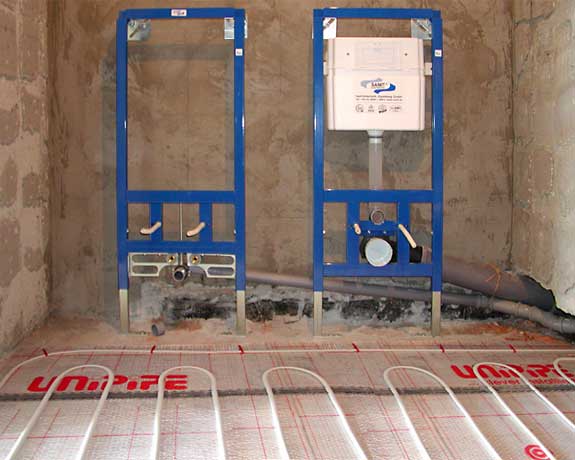
1. Fixing the metal frame. It has corresponding holes with which it is fixed to the surfaces with dowels. Two points for fixing to the floor and two to the wall. Sewer and water pipes are connected to the installation site. The installed frame must be checked for evenness using a spirit level. It is necessary to maintain exact parallelism to the wall to be installed, becauseeven slight distortions can lead to interruptions in operation and even breakdowns. Horizontal adjustment is carried out using wall mounts that change their position.
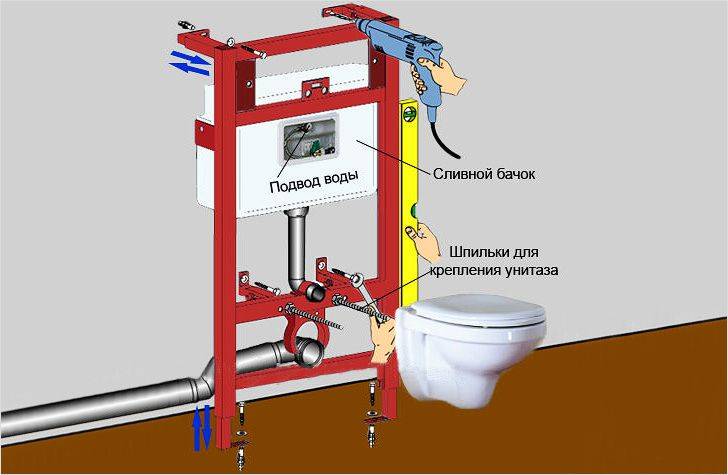
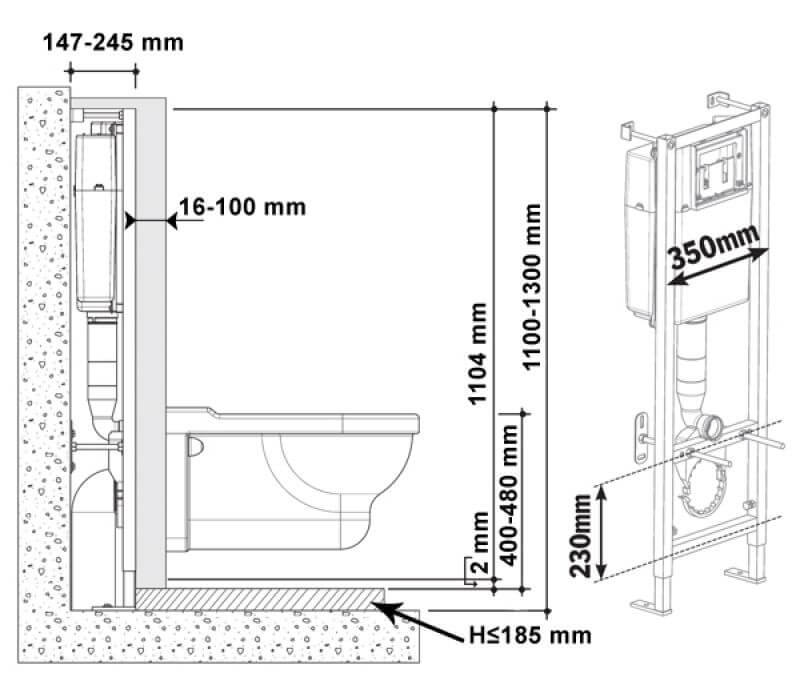
This stage also involves setting the height of the hanging toilet. It will depend on the height of the residents, usually 0.4 m. The height of the bowl can be adjusted in the future.

2. Leading to the drain tank of water. You can use a flexible or rigid system. Professionals often use hard, because. she can last longer. Flexible hoses can also be used, but if they fail, it will not be possible to get to them and replace them quickly. During the installation of the liner, the valve valve of the tank, as well as the drain from it, must be closed.
After connecting, check the reliability of the connections. To do this, open the water supply and start filling the tank. If there are leaks, they are fixed. Water may remain in the tank.
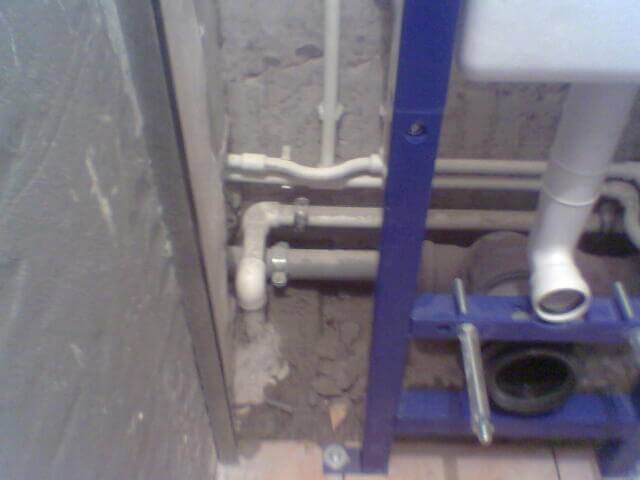
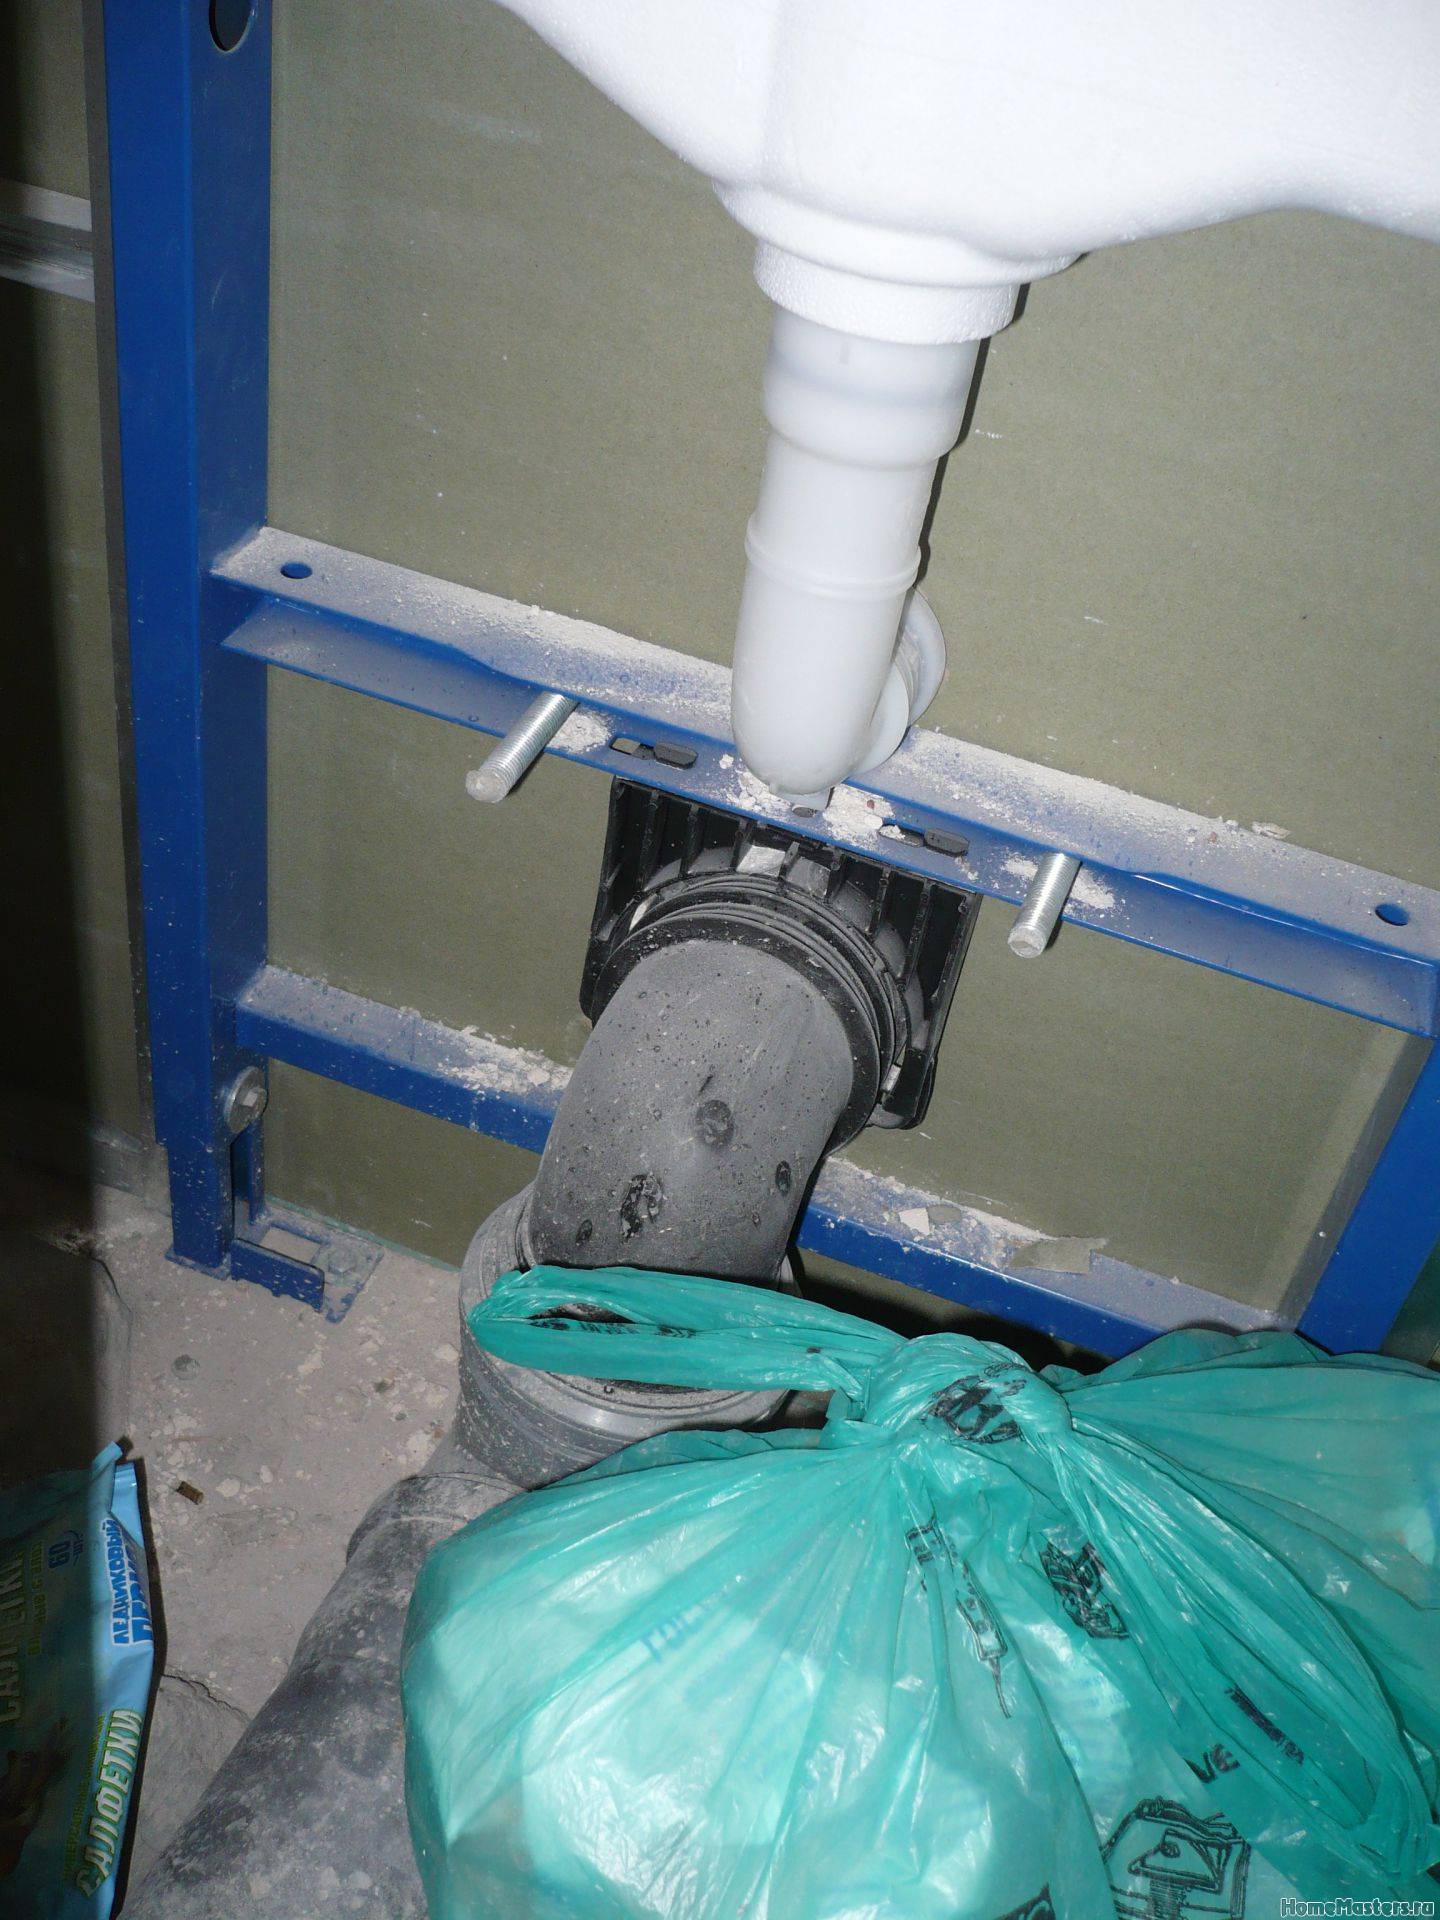
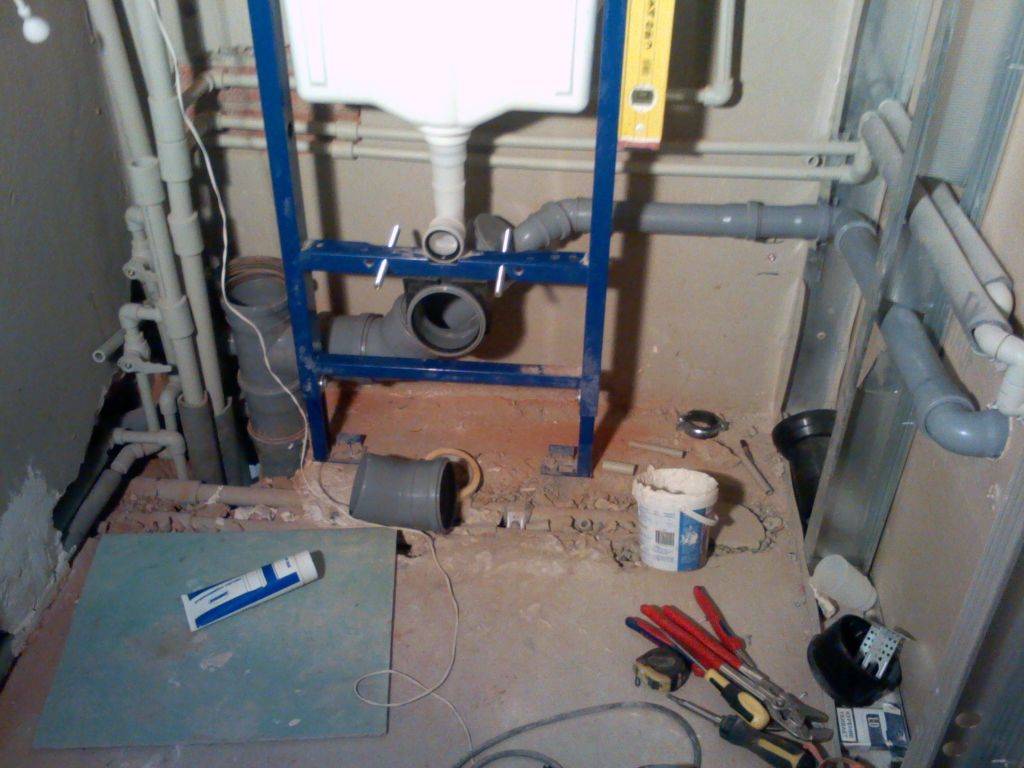
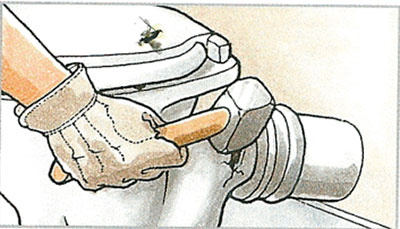
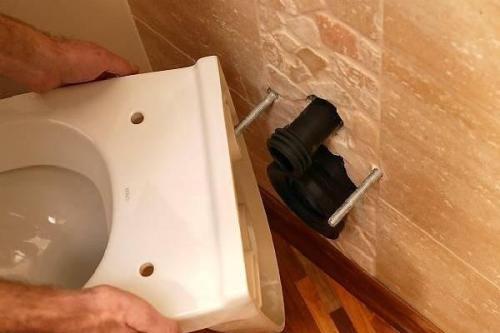
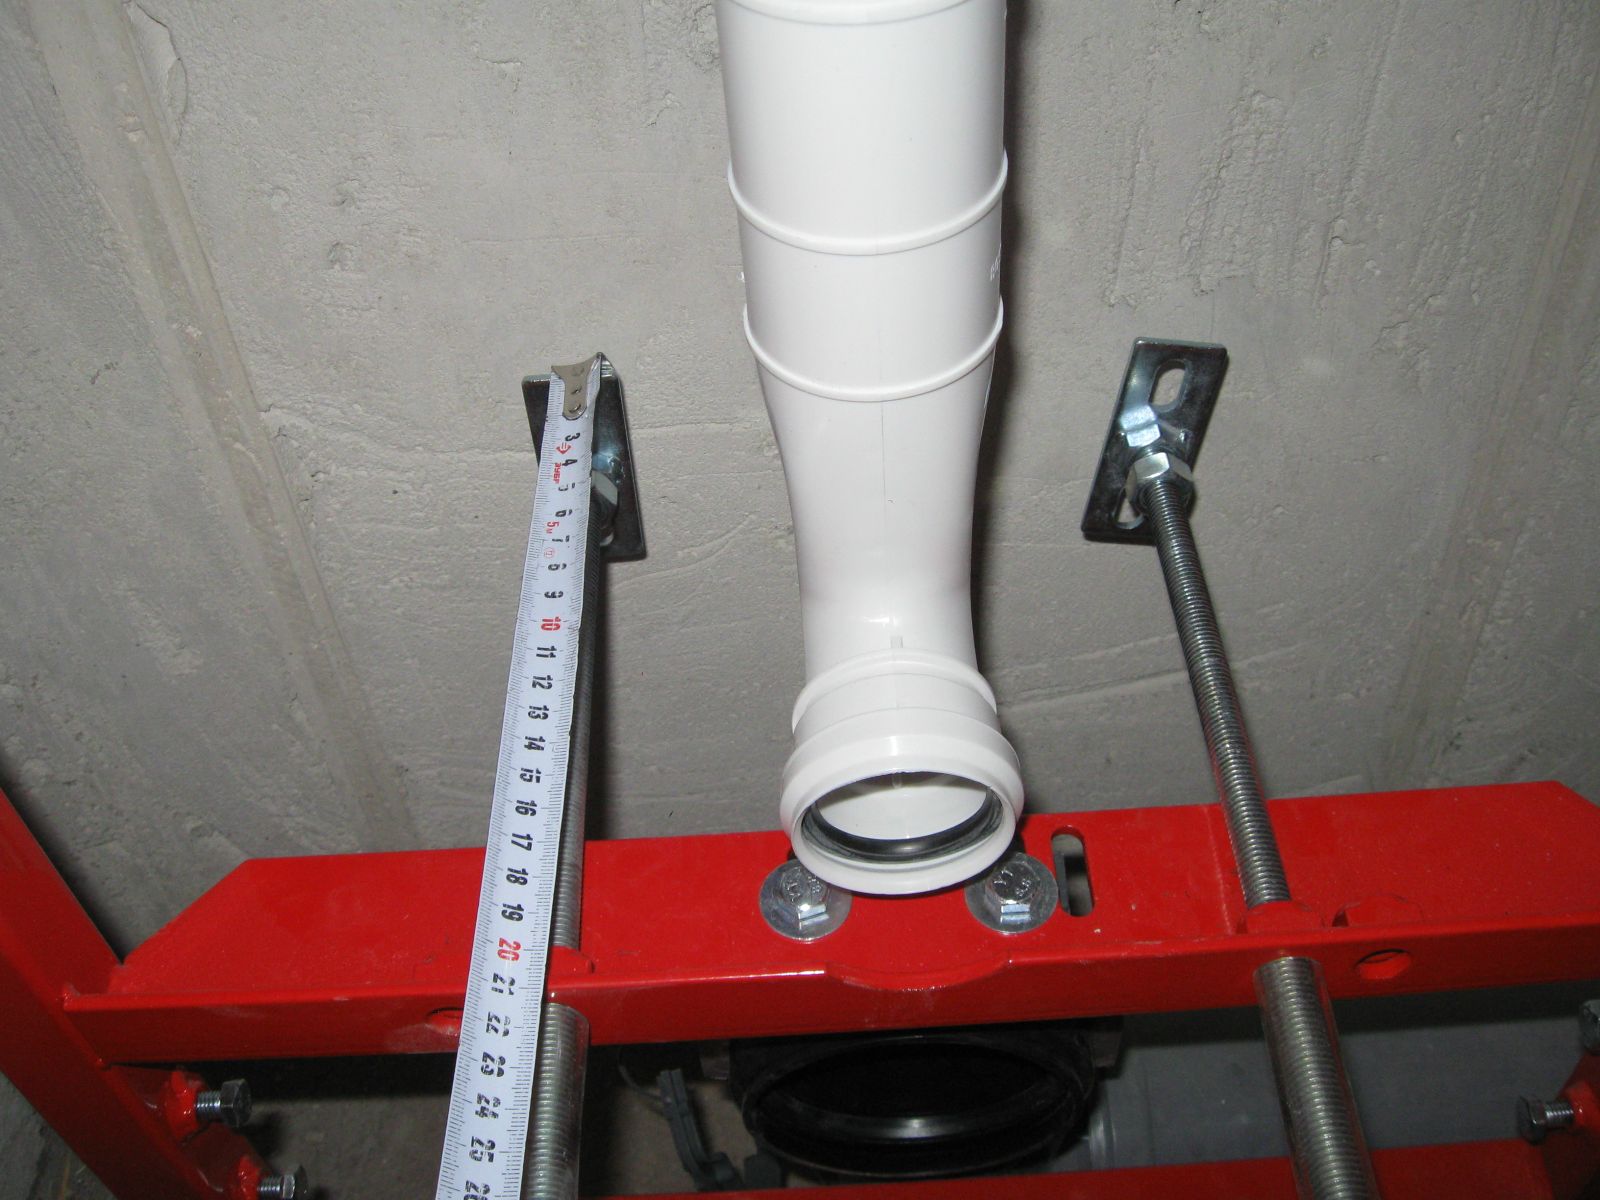
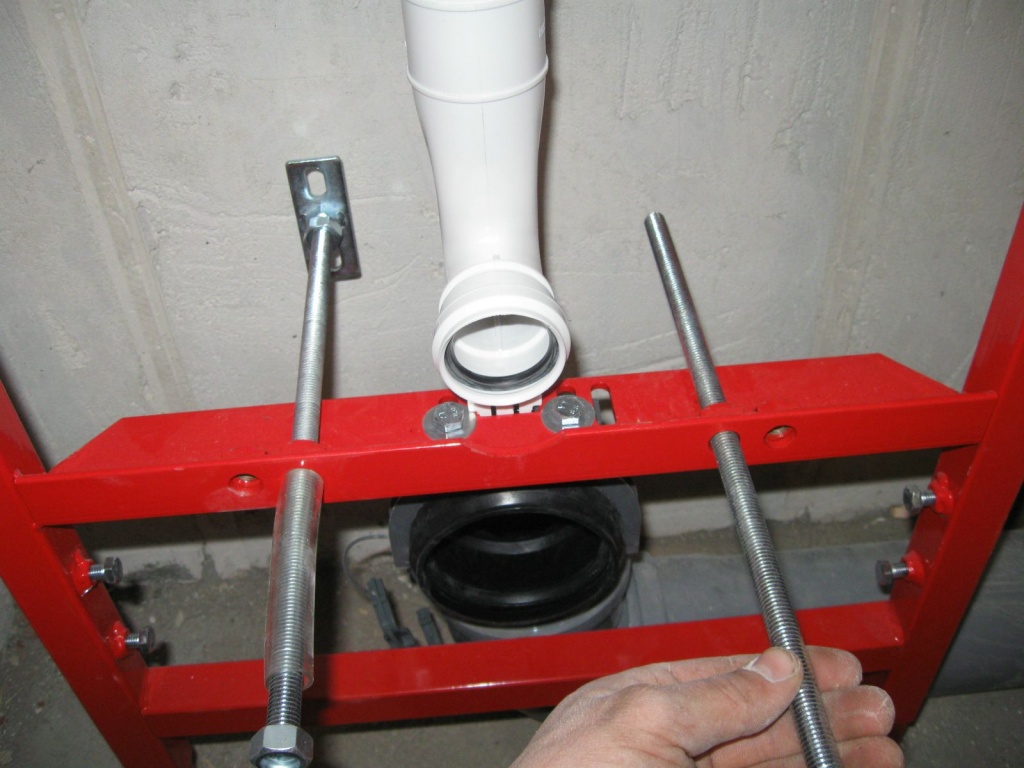
3. Connection to the sewer. The toilet drain hole must be inserted into the outlet of the sewer pipe using the appropriate corrugation, but some models can be connected without using it. At the end of the connection, check the tightness of the system by test drains. To do this, you will need to temporarily screw the bowl to the frame. After that, remove it again, it will be installed in the final installation.
The correct connection of the sewer pipe must be performed even before the installation is started. Pipe diameter - 100 mm. It must be laid with an appropriate slope. You can read about it in the corresponding article.

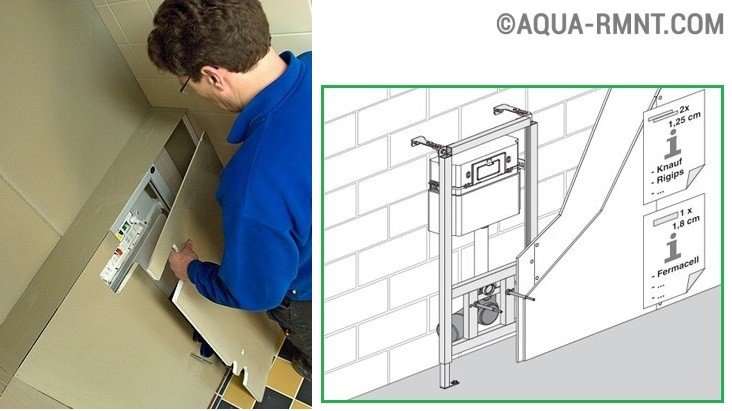
4. Closing with plasterboard sheets.The installation of a wall-hung toilet must be accompanied by a decorative finish of functional elements. To finish the bathrooms, you must purchase a waterproof double drywall. It is more durable than normal. Sheets are required to be mounted to metal profiles and directly to the toilet frame. The installation instructions must contain the necessary information on the cutting method, indicating the points for cutting holes.
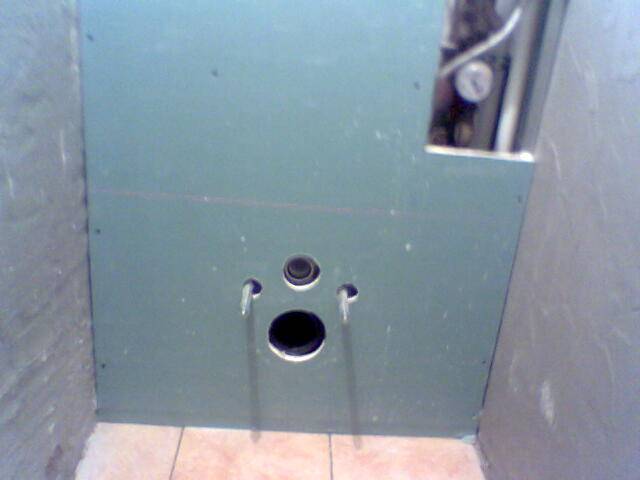
Sheathing can be done in two ways: over the entire wall area or only along the installation plane. The second method involves the formation of a small shelf above the bowl, which can be used to place the necessary items.
Subsequently, the installed barrier is finished with tiles or panels together with the rest of the area of \u200b\u200bthe room.
5. In conclusion, it is necessary to install the toilet on the installation, namely the bowl. It should be hung in the appropriate place using two fasteners.
6. The last, most simple step is to install the flush button. They are pneumatic and mechanical. The process is not difficult, because. everything should already be connected to the required opening in the wall. The mechanical button is installed using special pins with their subsequent adjustment. For pneumatic, you only need to connect the appropriate tubes, everything is ready.

In the process of activity, it is necessary to especially control the process of mounting the installation frame,
because the course of further installation will depend on the correctness. Figuring out how to install a toilet installation is actually not difficult.It is enough to follow the recommendations of the installation instructions, and in addition to watch the corresponding video about the process, and you will succeed.
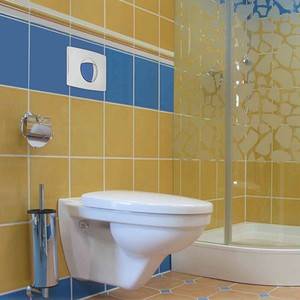
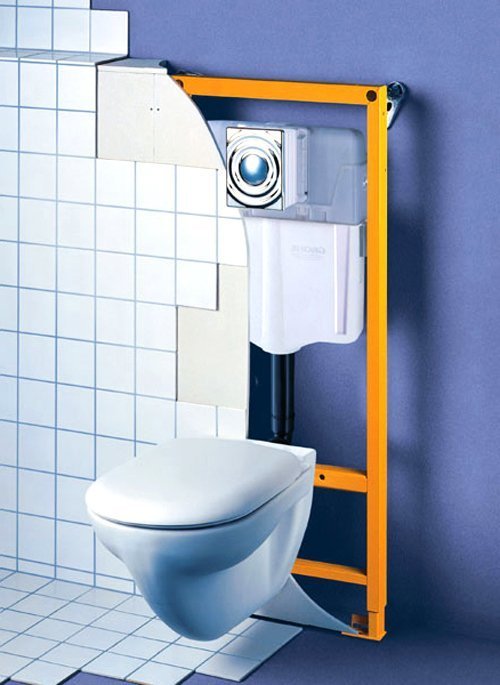
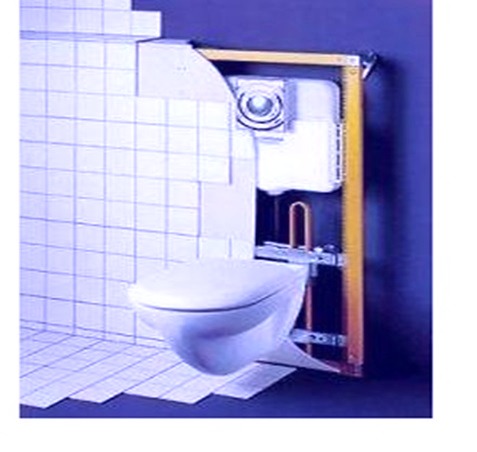
Suspended plumbing fixtures are gradually gaining popularity, especially among owners of small bathrooms. However, not everyone likes hanging toilets - outwardly they seem unstable and unreliable. This impression is deceptive, because it is carried out using the installation system, which is hidden behind the finishing material of the wall. Let us consider in more detail the advantages of suspended plumbing objects and get acquainted with the instructions for their installation.
Features of choice
While different brands of toilets may differ primarily in their bowl shape or surface, installation could be the cause of many toilet problems in the next 20 years. Indeed, after all, the tank, frame and other elements will be hidden, which will make access to them difficult.
The modern plumbing market can offer installations of two types.
-
A characteristic feature of block installations is that they can be attached exclusively to the main wall. Such installations are distinguished by a simple design, consisting only of a tank mounted on fittings and fasteners. The installation of such installations involves recessing into the wall, so they are installed mainly in pre-made niches.
-
Frame installations consist of a steel frame and a number of components - outlets for sewers, various fasteners. This design is also angular, that is, designed for installation at the junction between walls or interior partitions.Corner installations do not need to be fixed to the wall, but at the same time they cost a lot, as well as all frame structures.
-
With regards to manufacturers, Vega, Grohe and Geberit are considered the most reliable today. But here it all depends mainly on personal wishes.
It is important that the model belongs to a well-known brand that has already managed to establish itself. The installation costs will be more expensive, but in terms of operation it will quickly pay for itself

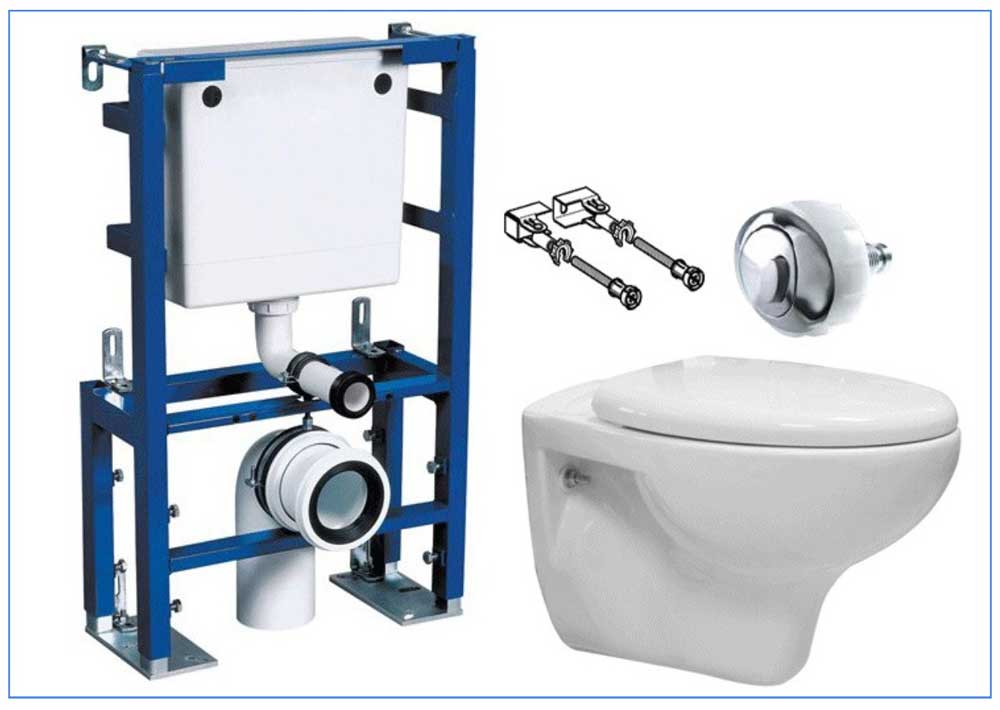
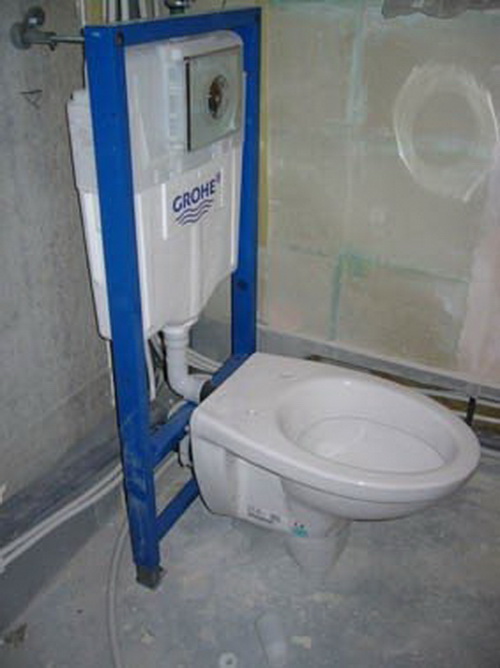
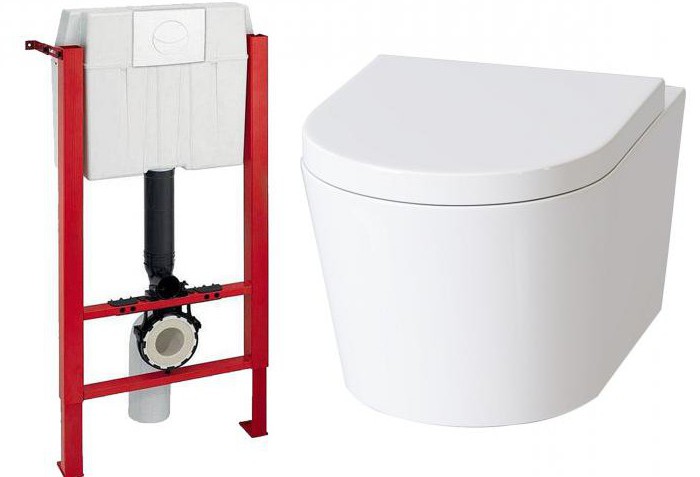
Grohe installation system
Types of toilets
In this article, we will consider not the features of the flush or the shape of the bowl, but those design features that determine the list of installation work.
According to the installation method
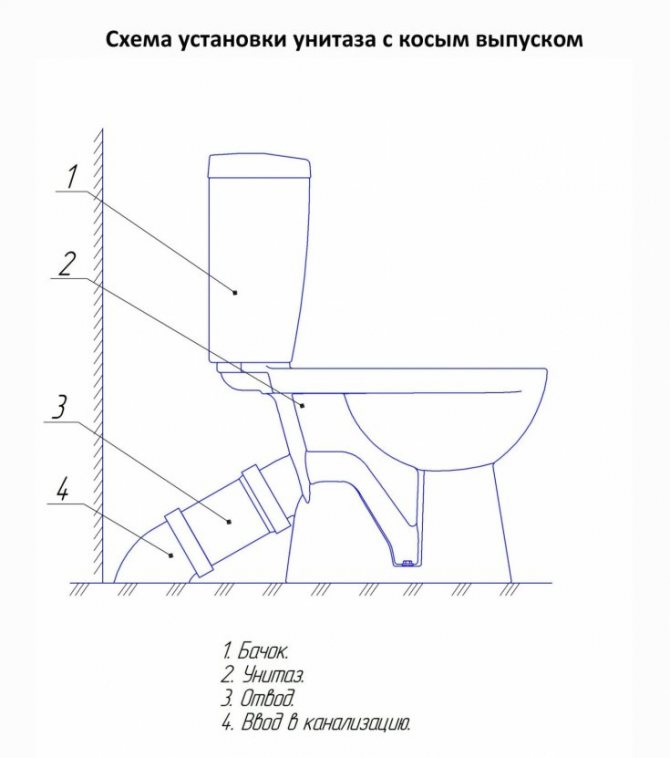
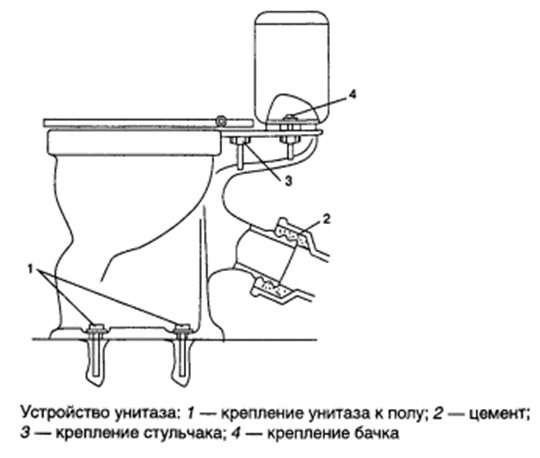
The toilet itself consists of a sanitary bowl and a drain tank. The bowl can be floor mounted or suspended. If the bowl is suspended, then the tank is flush-mounted - built into the wall. In the case of a floor bowl, there are three options for fixing the tank: on a special shelf on the bowl (compact), separate, connected with a flexible hose, in an installation (frame hidden in the wall).
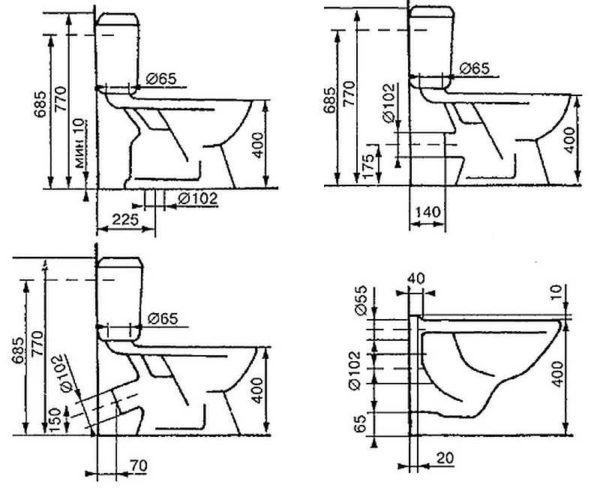
Typical sizes of toilet bowls of different designs
The advantage of a floor-standing toilet with a conventional flush cistern is ease of installation. It can be installed without starting repairs. The disadvantage is that compared to the hanging one, it takes up more space, looks more heavy. Accordingly, the installation of suspended models is complicated - it is necessary to fix the supporting structure - installation - in the wall. Perhaps it is only during the repair.
Release to the sewer
The choice of toilet for release into the sewer depends on the location of the sewer pipe. They happen:
with horizontal outlet;
oblique release;
vertical.
Types of outlets (outlets) of the toilet bowl
If the pipe is in the floor, a vertical outlet is optimal. If the exit is in the floor, but is close to the wall, the oblique toilet is most convenient. The horizontal version is universal. Using a corrugated pipe, it can be connected both to the wall and to the floor.
Preparation for installation and dismantling of the old toilet
Despite the fact that the floor-mounted type of devices is more familiar, recently in homes it is increasingly possible to find a suspended one.
Installing a hanging toilet allows you to free up additional space in the toilet room, and besides, it will be easier for housewives to clean up.
Before you install the toilet on a tile or install a wall-mounted toilet, you should acquire the appropriate tool, as well as dismantle the old device.
To do this, it is recommended to pre-disinfect the old device and all its components with a special agent, for example, bleach or whiteness.
Next, you need to completely shut off the water supply from the water supply to the apartment and drain the remaining water from the tank.
All work is best done with protective gloves and goggles to prevent the risk of injury.
Next, it will be necessary to disconnect all hoses and water supply connections, including from the drain tank. All these manipulations must be done with the release of water into the sewer system.
If the device is attached to the floor with screws, then they must be unscrewed.
After that, it is necessary to dismantle the connection of the toilet bowl to the sewer pipe. All work should be done carefully so as not to damage the joints.
When the old device is set aside, the joints should be thoroughly cleaned and treated with a sealant-type compound.
After dismantling the old device and before installing the toilet bowl on the tile, the base itself should be prepared.
Of course, the old mount can work for the new device, but you should not count on it.
In order to prevent the toilet from shaking during its operation, it is necessary to make holes in the floor for fastening.
Video:

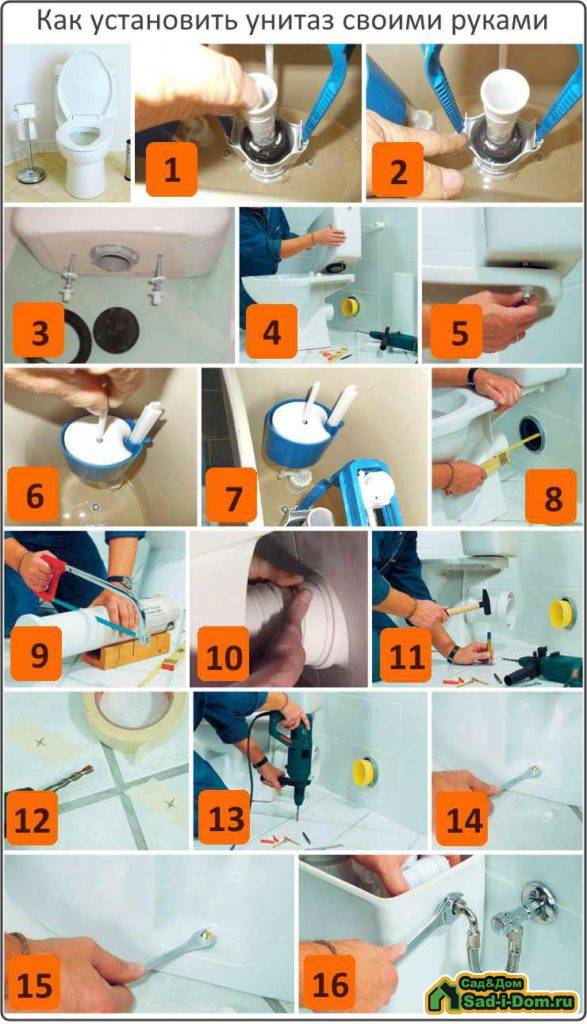
To do this, you should choose the optimal place in the toilet where the new device will fit, and its drain will reach the sewer pipe.
Also, before starting the installation of the toilet bowl, it is necessary to check it for cracks and defects, as well as completeness.
Myths about the wall-hung toilet
Myth 1. A hanging toilet, if a heavy person sits on it, will fall and break.
up to 400 kg. and installed installation
The toilet itself is hung at a height of 35-40 cm above the floor. One such bolt is able to withstand a person, and there are two such bolts, and even a couple below. If you find a 12 mm drill, then screwing in such bolts will not be a problem, and the installation will not collapse during daily use of plumbing.
Myth 2. If the drain mechanism breaks, it will be impossible to approach it.
The fact is that in a hanging toilet, the lid-button of the drain tank is fastened with latches, and if desired, it is easy to remove. The mechanism is connected to the float by a threaded connection, which is easily unscrewed by hand. The mechanism can be easily repaired, so to speak, "in the air." The tap inside the tank looks like a slot for a screwdriver to shut off the water. The tap can be easily closed with a screwdriver if you need to get the mechanism with a float.
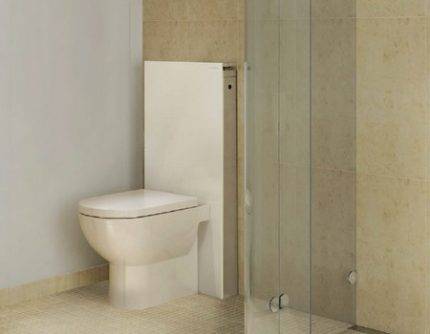
Myth 3.A wall hung toilet takes up less space than a classic toilet.
This is exactly a myth. An optical illusion is simply created thanks to hidden pipeline and sewer communications. The installation itself has a depth of 20 cm, taking into account the plasterboard sheathing and tiling. It is not always possible to install a traditional toilet close to a wall due to the cumbersome sewer pipe system. When installing a hanging toilet, this problem will not be, because the entire communications system will be hidden behind the wall. That is why the illusion of small dimensions is created.
Myth 4. It is difficult to find spare parts for wall-hung toilets.
The fact is that all manufacturers produce products similar in quality and properties. If there is no spare part of your company, then a spare part from another manufacturer will do. The main thing is to remember the numbers of internal mechanisms and water release buttons.
If you still have doubts about installing a wall-hung toilet, you can list its advantages:
- less noise from the drain tank;
- descent of a full tank or only part of it;
- ease of cleaning in the bathroom;
- The widespread use of hanging toilets in public places speaks of their high reliability.
Convenient solution for floor standing toilet
You can do a block installation for a floor toilet bowl with your own hands. This will not require too much time and specific knowledge in the field of plumbing.
After installing a block installation, the bathroom will take on a modern, attractive look, and the toilet bowl of even the simplest configuration will look more advantageous and progressive.
The finished design will reliably hide all communication nodes from the eyes, visually expand the usable space of the room and give it a more stylish, neat and modern look.
Installing a block system in stages:
- The basic position of the knee is clearly fixed with metal fasteners. Process the outlet of the toilet bowl with a technical ointment, and then move the plumbing to the future location. Carefully trace the outline with a simple pencil or marker and make marks for the mounting holes.
- Remove the toilet bowl and place the mounting brackets according to the markings. Return the plumbing fixture to its place, and press the drain outlet into the fan pipe.
- Carefully read the manufacturer's instructions for installing the toilet installation and, following its instructions, install the drain tank. Fix the outlet of the toilet bowl with a connecting cuff, tighten the bolts tightly and close the caps with decorative caps.
- Make a technological hole and bring the drain button into it. Be sure to check the complex for tightness and try to identify possible problems and leaks.
If the system passes the test normally and does not show malfunctions, firmly fix the base of the toilet bowl and cover the installation with a decorative panel.
Those who wish to get acquainted with the step-by-step instructions for attaching the wall-mounted toilet bowl to the installation, we invite you to familiarize yourself with the information of the article we have proposed.
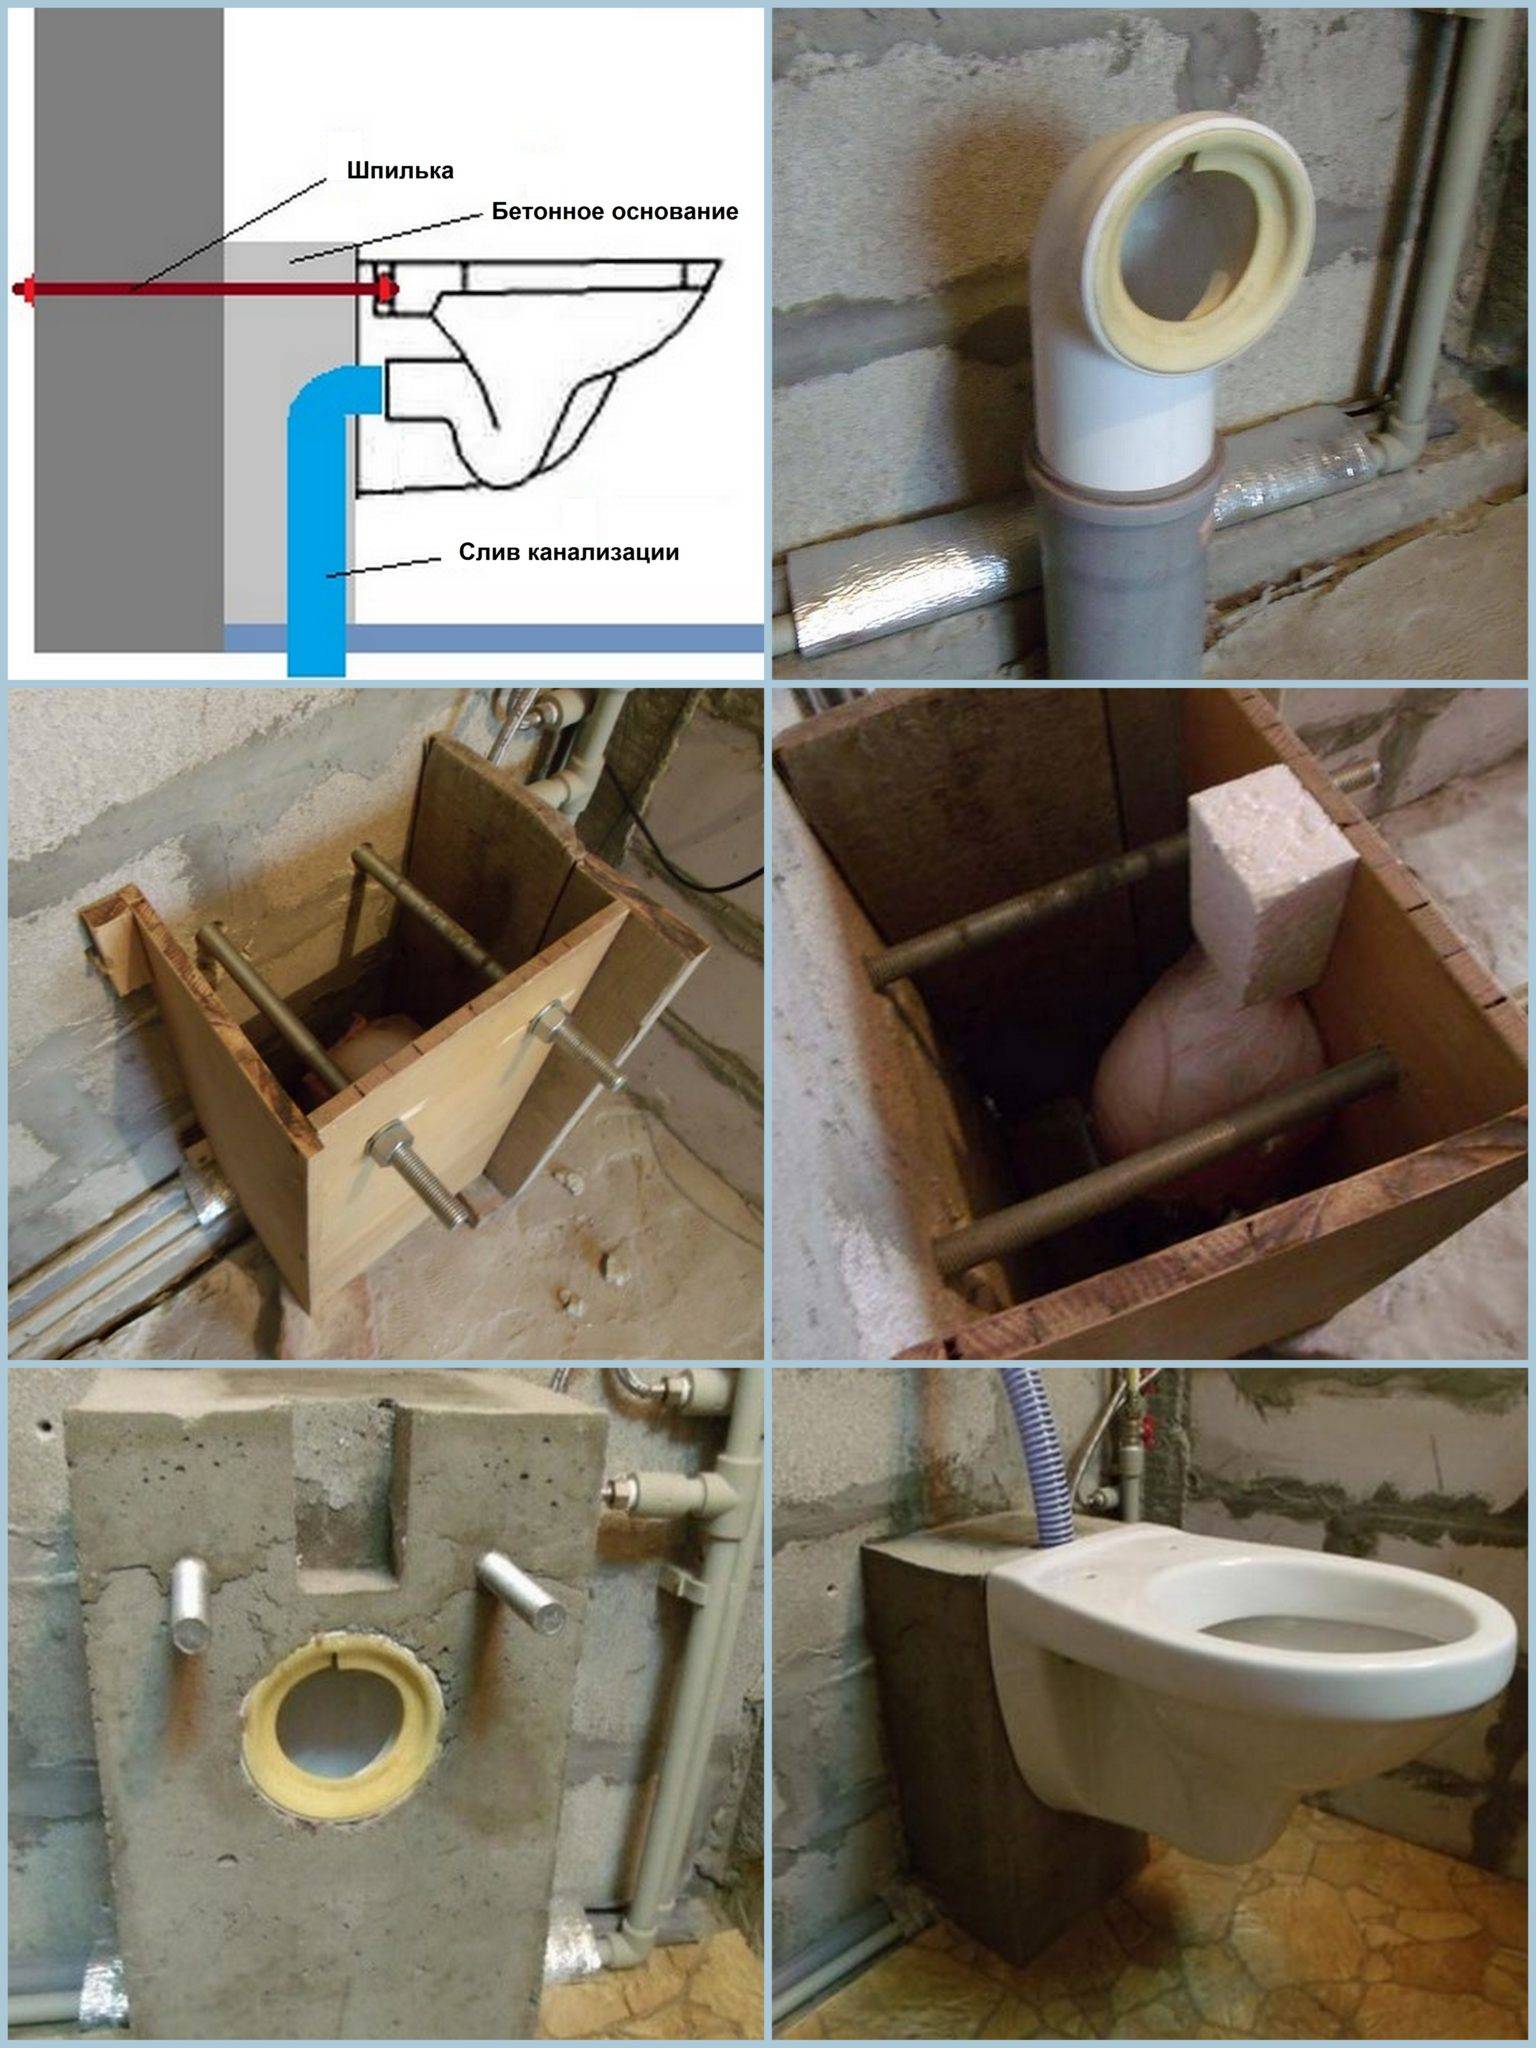
Installation on a concrete base
As for the installation of a wall-mounted toilet bowl on a concrete base, it is a little more difficult here, but on the other hand, there is an opportunity to save a lot of money. So, the first step is to install the formwork.
Formwork creation
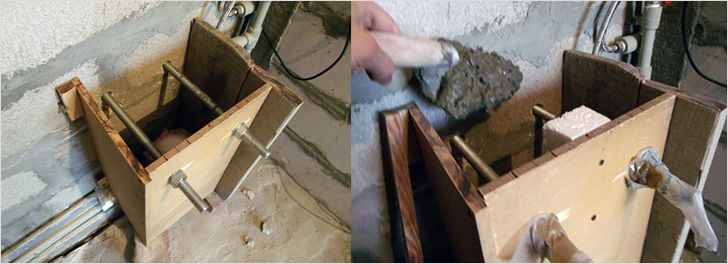
Drill holes in the wall fifteen centimeters deep. After they need to be well cleaned and filled with glue. Rods are installed in them, on which the toilet bowl will be fixed. Then three shields are sequentially mounted. Two holes are cut on the central shield. After that, it is recommended to wrap the pins with a film so that they do not get dirty during the concreting process.
At this stage of work, it is important to make sure that the formwork is vertical. This can be done using the building level.
To keep the formwork firmly, nuts can be screwed onto the rods, which are intended for mounting the toilet. So that after the concrete has hardened, you do not have to gouge holes for connecting the drain, you can fix the foam. When the formwork is ready, it remains only to perform concreting


It is extremely important here to avoid the appearance of voids. For this reason, especially in the corners, tamping is performed
Tamp until cement milk flows out of the formwork cracks.
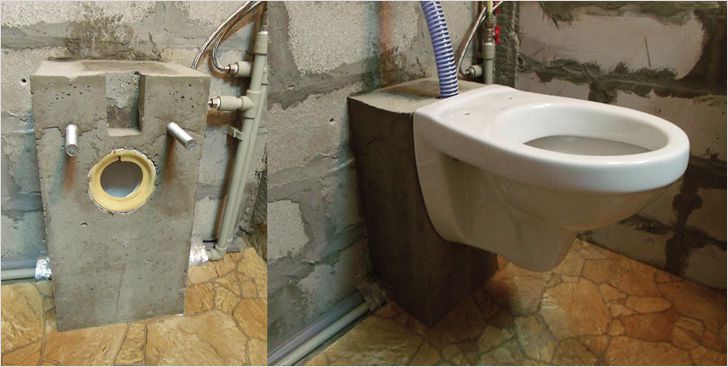
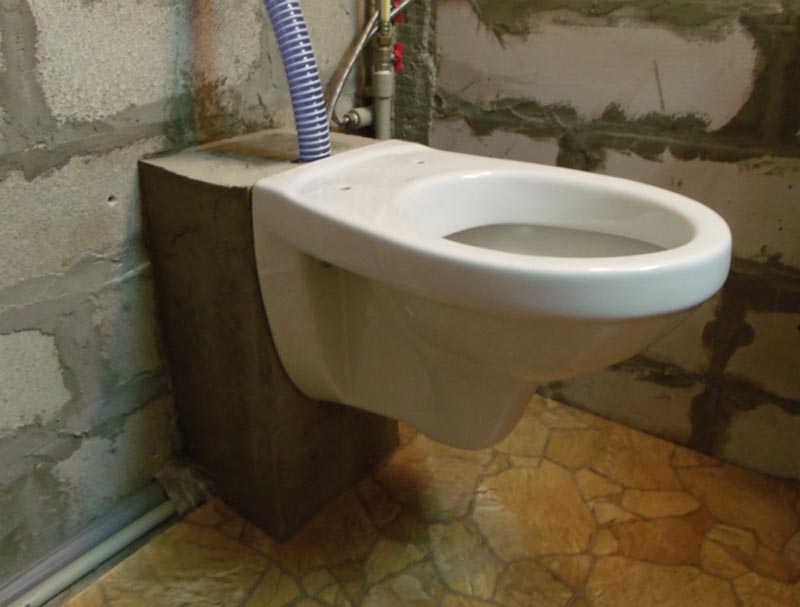
Connection
Before starting the installation of a hanging toilet bowl, the surface should be treated with any facing material of your choice.
When the concrete is completely frozen, it's time to connect the toilet to the sewer. But before that, you should connect the drain tank. For this, PVC corrugation 40Ø mm is used. It is inserted into the recess on the toilet. The resulting gap is tightly filled with sealant, preferably silicone. Only after the silicone has completely dried can the drain system be used. A toilet bowl is put on the rods that stick out of the concrete. At the same time, the corrugation is connected to the sewer. The bowl itself is tightened with nuts using washers. Now it remains to complete the final touch, namely the installation of the cover.
Hanging bidet installation
Installation of a hanging bidet consists in the systematic passage of the following steps:
- installation installation;
- fixing a plumbing device;
- connection to sewerage and water supply.
Installation installation
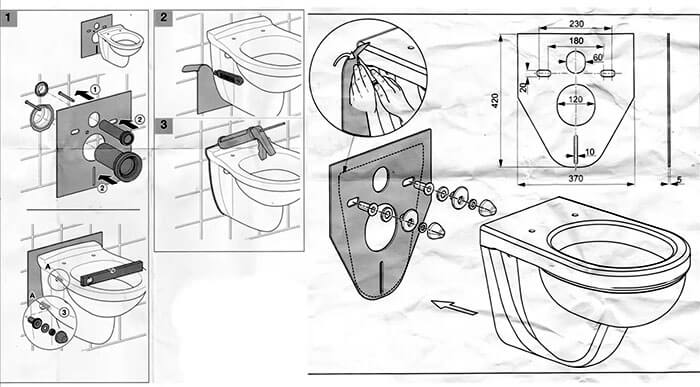
The installation of the bidet installation is carried out according to the following scheme:
- a recess is made in the wall for mounting the installation. The dimensions of the recess should be slightly larger than the overall dimensions of the device;
- water pipes and a sewer inlet are connected to the place of the proposed attachment of the bidet;
- going to be installed. Detailed assembly instructions are attached to each device, so this stage, as a rule, does not cause problems;
- markings are made on the floor and back wall for mounting the device;
- holes for mounting bolts are prepared;
- the installation is fixed;
- open space can be sewn up with drywall or other selected materials.
Assembly and fastening suspension installations bidet
When installing the installation, it is important to strictly observe the geometry of the device and the parallelism of the main elements of the floor surface
Attaching the bidet to the installation
How to install a bidet on installation? To do this, a number of steps are followed:
- studs are inserted into special holes to fix the bidet. For strength, metal studs are attached to the back wall of the bathroom;
Bolts for fixing the bidet to the installation
- a special gasket is installed on the installation to protect the sanitary ware. If the gasket is not supplied with the installation, then it can be replaced with a regular silicone sealant. The sealing composition is applied to the attachment area of the plumbing device and the time is waited until it dries completely;
Installing a gasket to protect the plumbing fixture
- the bidet is fixed on studs with bolts.
The installation of the bidet with the installation is completed. It remains to connect the plumbing device to the water supply and sewerage.
Connection
Connecting a bidet: instructions must be supplied with the plumbing fixture. In most cases, the connection is made in the following way:
- a built-in mixer is installed in the place where the water pipes are connected;
- flexible hoses connect the device to the bidet pipes of the central water supply.
When connecting flexible hoses, it is important to take care of maximum tightness. In some situations, regular gaskets installed at the ends of the eyeliner are not enough
To seal the threaded connection, it is recommended to use flax or FUM tape.
Water supply to bidet
The plumbing device is connected to the sewer through a siphon. This device is a must:
- the siphon is connected to the drain hole of the bidet. Between the plumbing fixture and the siphon, rubber rings are required to seal the drain;
- the corrugated pipe from the siphon is inserted into the sewer inlet, which was previously connected to the installation. This connection method is considered the most optimal and allows repairs to be made in a short time, even if any element needs to be replaced.

Connecting a bidet drain to a sewer pipe
Thus, knowing the simplest instructions and having the necessary set of tools, you can install and connect a bidet of any type with your own hands.
We study the installation of the installation on video
Installation installation can be done in several ways.For example, to provide structures with higher reliability, people buy special brackets. But, the suspension manufacturer does not provide for such a design, so the brackets are not included in the package, they are not mentioned in the instructions.


Therefore, in order to understand how the work will differ, you can visit the Internet pages and watch the corresponding video, which shows all the intricacies of the workflow. On the video clip, each stage will be described in as much detail as possible, so that even a person who does not have an idea about this procedure can cope with the work quickly and efficiently.
The result is a strong and reliable toilet installation fixingwhich will last for a long time.
Mounting without installation
How to fix a wall-mounted toilet if for some reason it is impossible to use the installation system for the toilet?
It is worth mentioning right away: it is still advisable to purchase a flush-mounted tank. However, there is a more compact alternative - a valve that creates a short circuit between the toilet and the cold water riser for a few seconds. Of course, such a flush system is very sensitive to cold water pressure.
What will be the fixture for the hanging toilet in this case?
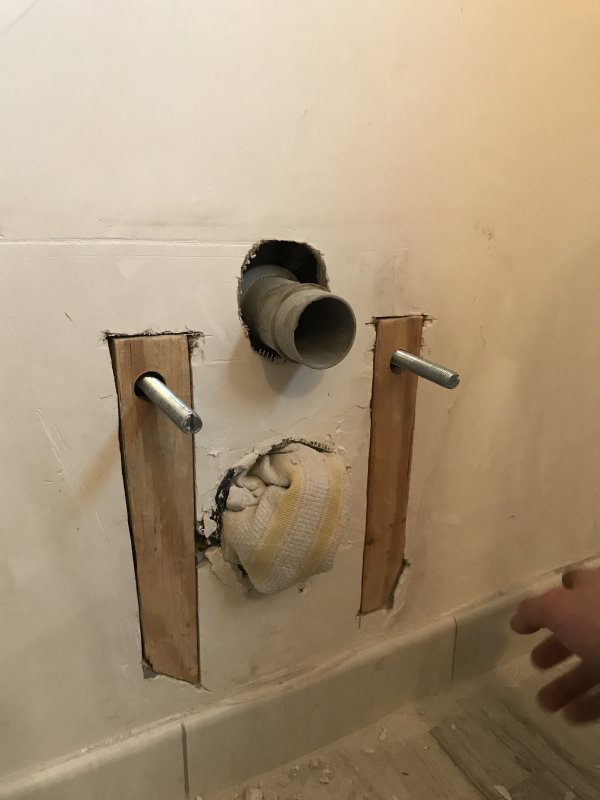
They will be two studs with an M20 thread, nuts and washers. Our task is to securely fix them in a wall or other structure, providing a maximum load of 400 kilograms, which is standard for wall-mounted toilet bowls.
 This simple set can replace an expensive frame installation.
There are several ways to do this.
- The most versatile of them is to assemble the formwork and pour a concrete rack into which the studs will be inserted at the right height. The width of the washers and nuts on the back will prevent them from being pulled out of the concrete.
- A wall made of brick or even aerated concrete can be passed through with a long drill of the appropriate diameter. Then, on the opposite side, the holes are drilled to the diameter of the washers. After the studs are inserted and the toilet is tightened, the holes are puttied flush with the wall.
- Finally, in the case of a concrete wall, a pair of long (at least 120 mm) anchors can help out, for which you will have to order very specific mushroom-shaped nuts from the turner. The anchor is first tightened without a toilet installed, and only then, when it is already spread out in the wall, a fragile faience bowl is attached.
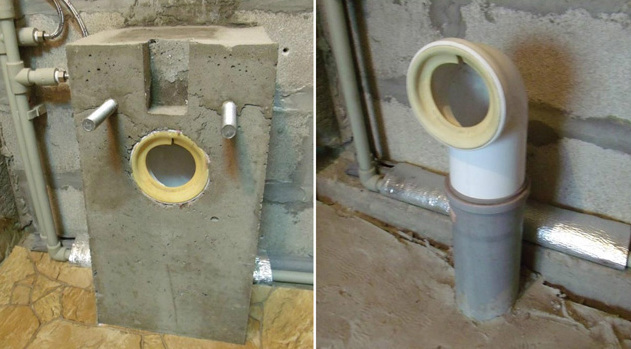
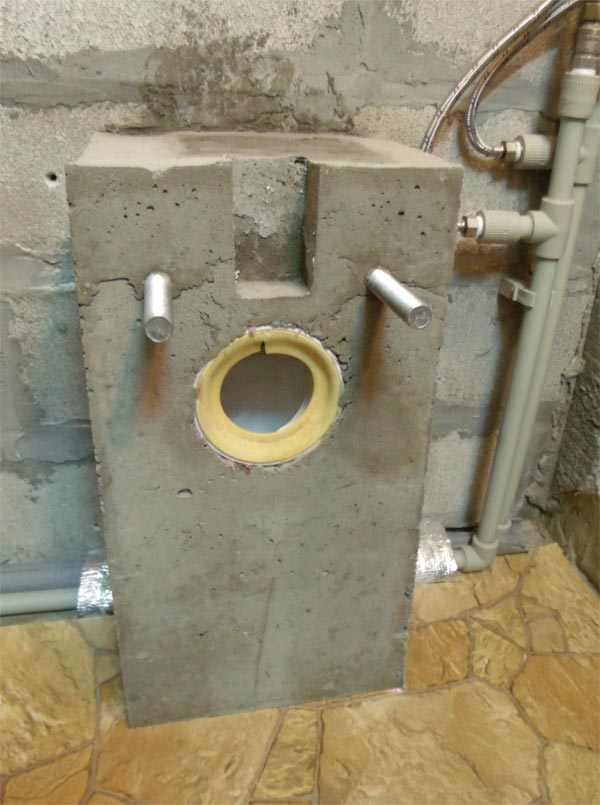
 A low concrete column with studs immured into it became a strong mount for a wall-mounted toilet bowl.
Good luck with the repair!
Previous Post How change the toilet: basic operations and helpful tips
Next Post Replacing the toilet: details that are useful to know
The basics of proper space planning in the toilet
In order to correctly arrange the key elements, you should prepare a drawing on a scale on which the plumbing will be located taking into account sanitary and hygienic standards. You can create a comfortable layout by adhering to the following recommendations:
The area in front of the toilet must be at least 60 cm long; On the sides of the toilet, a free space of at least 25 cm wide should be provided. see; in front of the sink the platform should not be narrower than 70 cm; The bidet and the toilet should be fixed at a distance of at least 35 cm; The sink should be fixed at a height of 60 ÷ 80 cm above the floor surface, and the mixer - 95 cm.
The above recommendations are relevant for private houses, for which it is enough to adhere to standard norms, principles of practicality and comfort. In apartment buildings, the arrangement of plumbing is regulated by SNiP, which are developed taking into account the safe operation of communications. When planning to do the installation yourself, you should definitely familiarize yourself with the indicated standards.
3
Preparing for installation
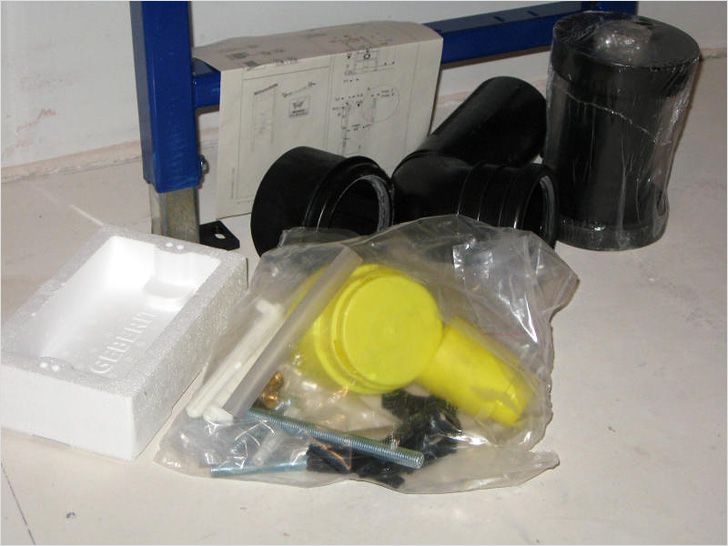
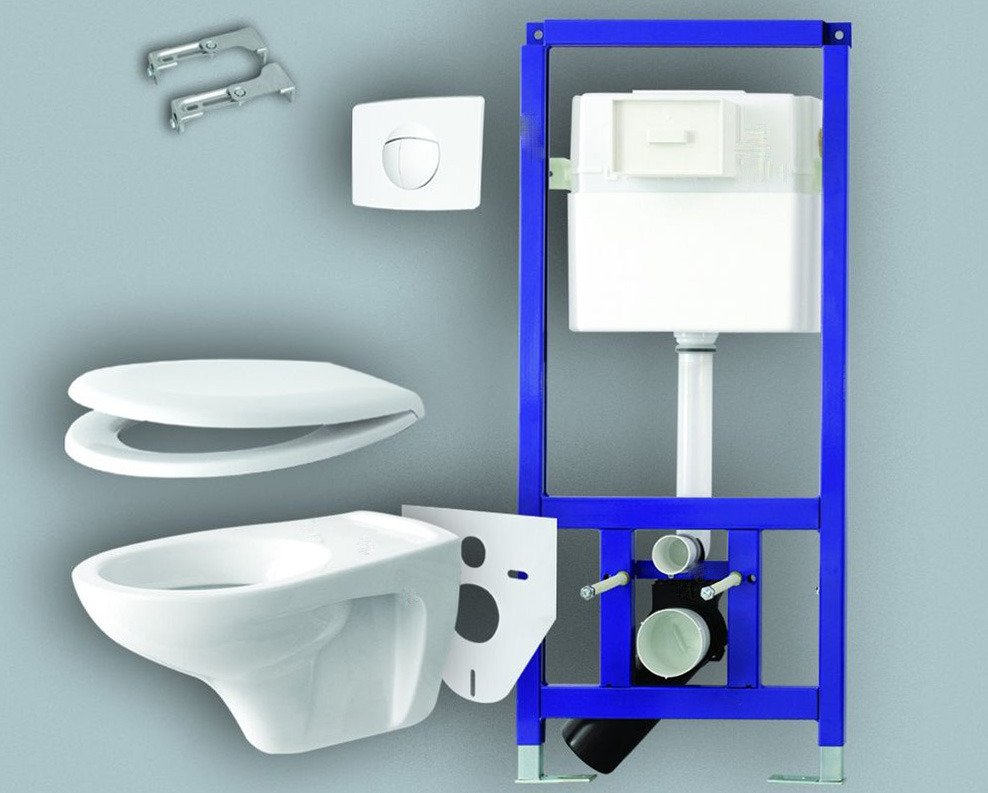
In order for the installation to be successful and quick, you need to prepare in advance everything you need to complete the work. So, in addition to the tank itself, the bowl and the steel frame of the module (included with the product), you need to buy:
steel studs; flush button; connecting pipes.
Most often, a set with a hinged product includes a special material that protects the structure from condensate. It also reduces the noise level when filling the tank with water. When purchasing plumbing, be sure to check the equipment and buy everything you need if necessary.
The bowl is usually sold separately - you just need to choose the option that fits in appearance. It is advisable to buy a double flush key, which will allow you to control the flush intensity.
The tools should be:
perforator; tape measure; pencil; building level; drywall knife.
Toilet installation
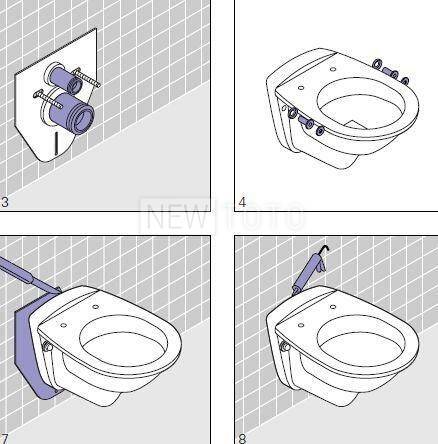
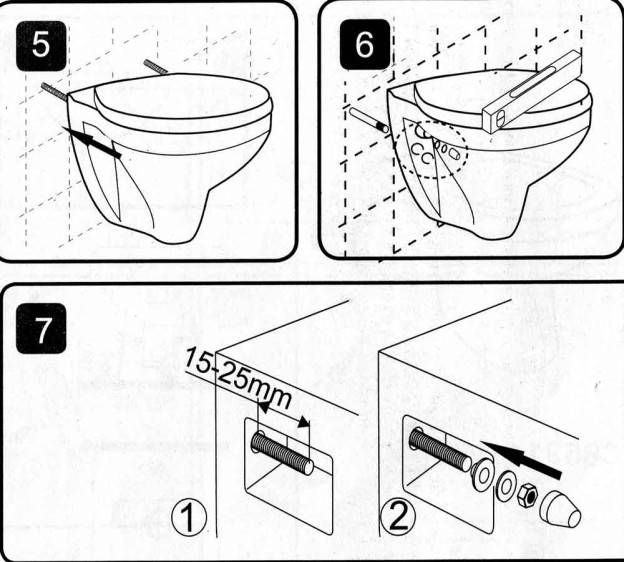
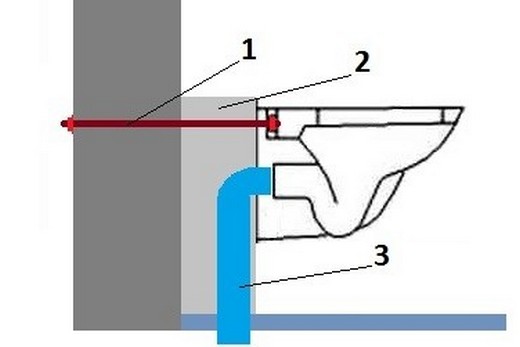
How to fix the wall-hung toilet to the installation?
It is worth considering that before fixing the toilet bowl, the decorative wall that hides the installation must already be erected, and the tiles laid on it (unless, of course, the wall will be finished with tiles).At the same time, at least one and a half weeks should pass from the moment of laying the tile.

Toilet studs, of course, are attached before the false wall is erected.
They can be mounted with different distances between the axes, so take the time to make sure that you screw them in according to the size of the toilet mounting holes.
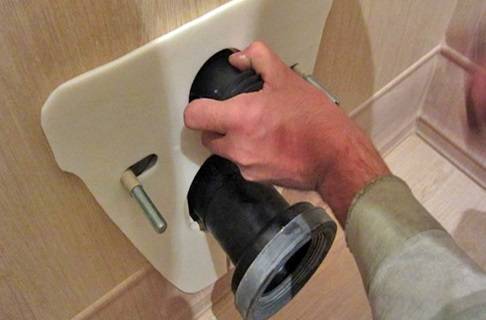
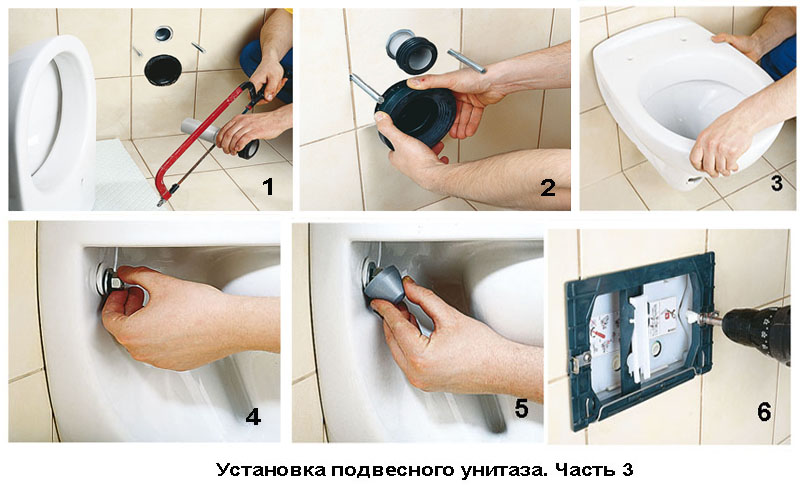
- Apply silicone sealant to the inside of the rubber collar, to the toilet outlet, and to the faucet for connecting the drain pipe.
- Lay a damping pad between the toilet and the wall. It usually comes with the installation.
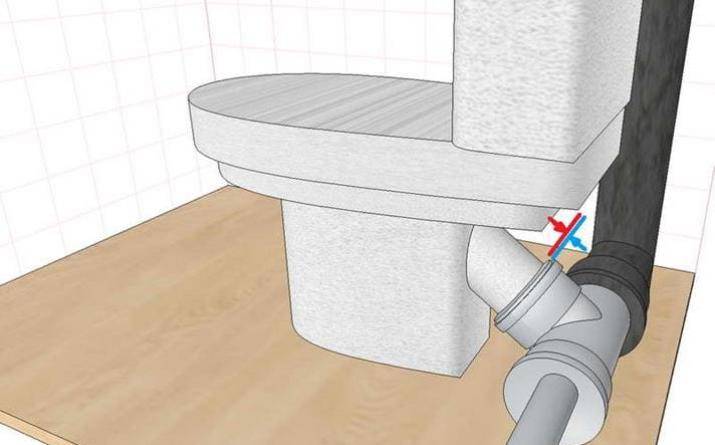
 Pipes for water supply and sewer connections are placed last.
Next, we put the toilet on the studs and check its position with a level. If necessary, we level its position with washers - eccentrics
Carefully, without distortions and extra effort, we tighten the mount for the hanging toilet bowl - nuts with gaskets
Silicone is water resistant even until completely dry; however, it is still better to let it dry for a day before the first use.
Installing the bowl and connecting communications
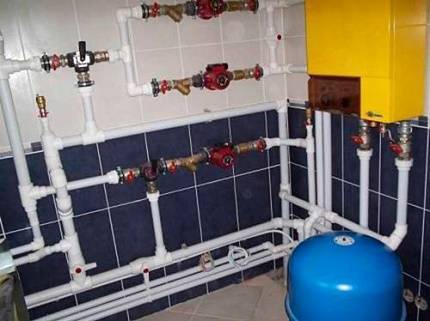
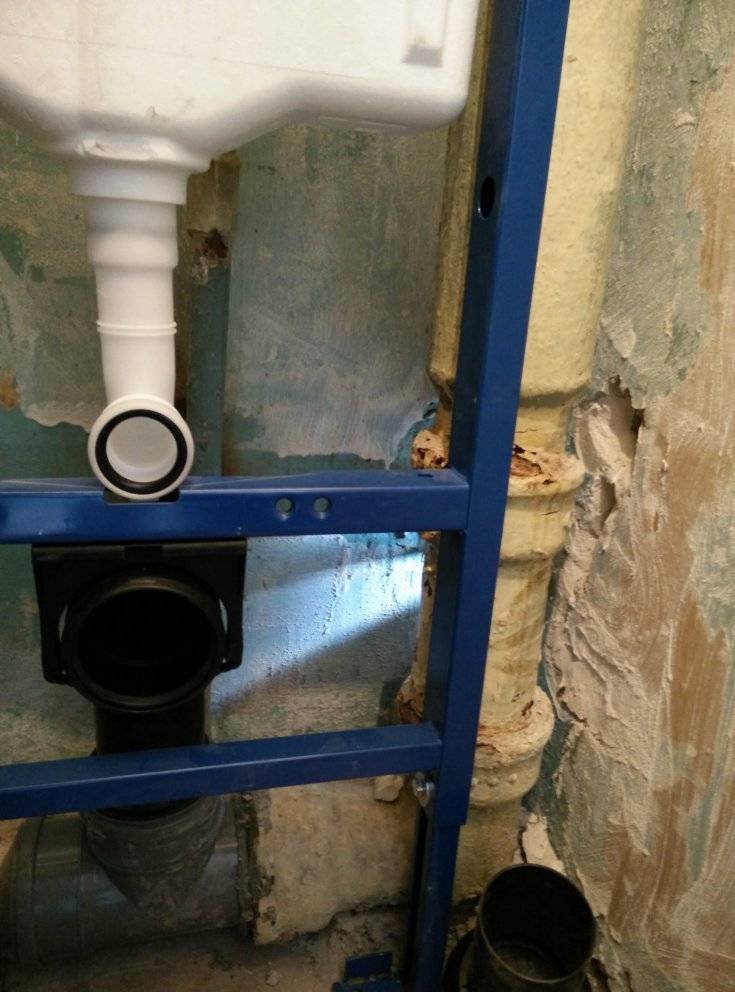
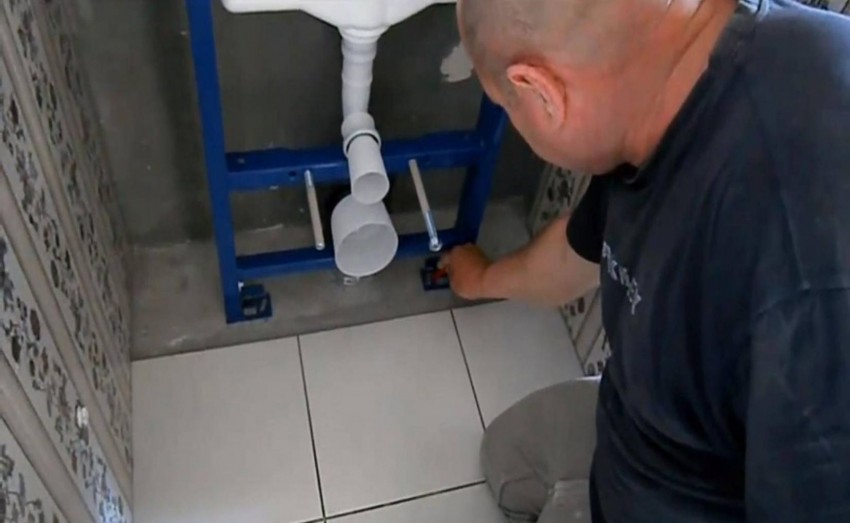
After installing the frame, the drain tank is installed in the place intended for this on special fasteners. With a home-made design, the height of its location should be at a level of 0.5 m above the toilet bowl. Then the pipes are laid. This stage should be approached responsibly, since any violation of the installation rules can cause leaks.
Flexible connections should only be used in extreme cases where there is little space for laying, as they are the most likely to leak. All connections are coated with sealant, a sewer pipe is brought in, and a bowl is installed on the pins and screwed.
Installing a flexible outlet